
1. Прежде чем начать
Этот практический урок является частью курса «Продвинутый Android на Kotlin». Наибольшую пользу от курса вы получите, если будете проходить практические уроки последовательно, но это не обязательно. Все практические уроки курса перечислены на странице «Практические уроки по продвинутому Android на Kotlin» .
MotionLayout — это библиотека, позволяющая добавлять динамичные анимации в ваши Android-приложения. Она основана на ConstraintLayout, и позволяет анимировать всё, что можно создать с помощью ConstraintLayout .
С помощью MotionLayout можно анимировать положение, размер, видимость, прозрачность, цвет, высоту, вращение и другие атрибуты нескольких элементов одновременно. Используя декларативный XML, можно создавать скоординированные анимации с участием нескольких элементов, которые сложно реализовать в коде.
Анимация — отличный способ улучшить пользовательский опыт в приложении. Вы можете использовать анимацию для:
- Отображение изменений — анимация между состояниями позволяет пользователю естественным образом отслеживать изменения в пользовательском интерфейсе.
- Привлеките внимание — используйте анимацию, чтобы привлечь внимание к важным элементам пользовательского интерфейса.
- Создавайте великолепный дизайн — эффективная анимация в дизайне придает приложениям безупречный вид.
Предварительные требования
Данный практический курс предназначен для разработчиков с некоторым опытом разработки под Android. Перед выполнением этого курса вам следует:
- Научитесь создавать приложения с Activity, базовым макетом и запускать их на устройстве или эмуляторе с помощью Android Studio. Ознакомьтесь с
ConstraintLayout. Прочитайте руководство по ConstraintLayout, чтобы узнать больше обConstraintLayout.
Что вы будете делать
- Создайте анимацию с помощью
ConstraintSetsиMotionLayout - Анимация на основе событий перетаскивания
- Изменяйте анимацию с помощью
KeyPosition - Изменяйте атрибуты с помощью
KeyAttribute - Запуск анимаций с помощью кода
- Анимируйте сворачиваемые заголовки с помощью
MotionLayout
Что вам понадобится
- Android Studio 4.0 (редактор
MotionLayoutработает только с этой версией Android Studio.)
2. Начало работы
Чтобы загрузить демонстрационную версию приложения, вы можете сделать это одним из следующих способов:
...или клонируйте репозиторий GitHub из командной строки, используя следующую команду:
$ git clone https://github.com/googlecodelabs/motionlayout.git
3. Создание анимаций с помощью MotionLayout
Сначала вам нужно будет создать анимацию, которая будет перемещать изображение из верхней части экрана в нижнюю в ответ на щелчки пользователя.
Для создания анимации из исходного кода вам понадобятся следующие основные компоненты:
-
MotionLayout,это подклассConstraintLayout. Все элементы, которые нужно анимировать, указываются внутри тегаMotionLayout. -
MotionScene,это XML-файл, описывающий анимацию дляMotionLayout. -
Transition,это частьMotionScene, определяющая продолжительность анимации, триггер и способ перемещения представлений. -
ConstraintSet, определяющий как начальные , так и конечные ограничения перехода.
Давайте рассмотрим каждый из них по очереди, начиная с MotionLayout .
Шаг 1: Изучите существующий код
MotionLayout — это подкласс ConstraintLayout , поэтому он поддерживает все те же функции, но с добавлением анимации. Чтобы использовать MotionLayout , нужно добавить представление MotionLayout там, где вы бы использовали ConstraintLayout.
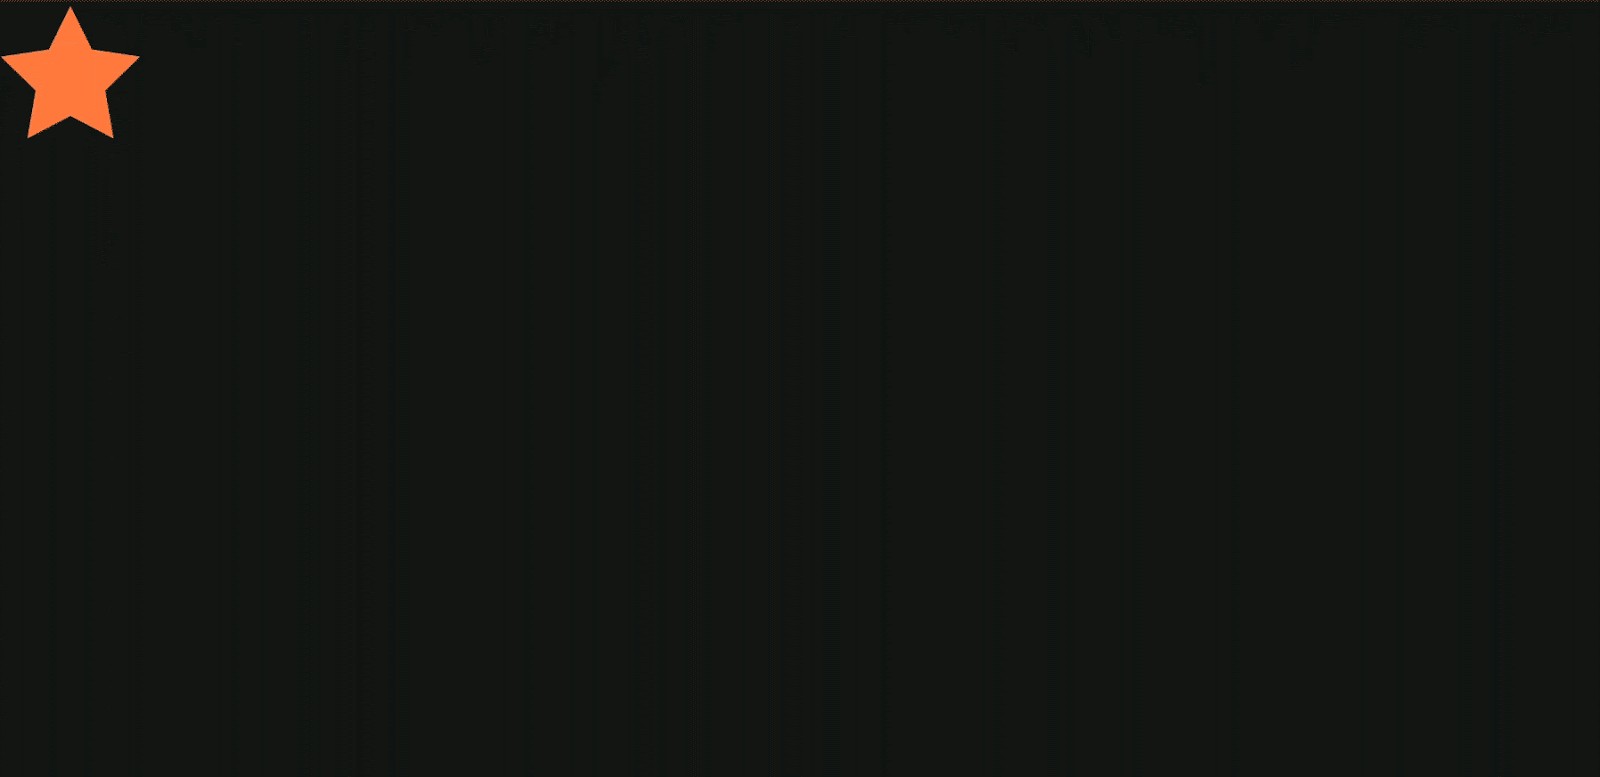
- В
res/layoutоткройте файлactivity_step1.xml.В нём находитсяConstraintLayoutс однимImageViewв виде звезды, внутри которого применено тонирование.
activity_step1.xml
<!-- initial code -->
<androidx.constraintlayout.widget.ConstraintLayout
       ...
       android:layout_width="match_parent"
       android:layout_height="match_parent"
       >

   <ImageView
           android:id="@+id/red_star"
           ...
   />

</androidx.constraintlayout.motion.widget.MotionLayout>
Этот ConstraintLayout не имеет никаких ограничений, поэтому, если вы запустите приложение сейчас, вы увидите, что отображение звезд не имеет ограничений, а это значит, что они будут расположены в неизвестном месте. Android Studio выдаст предупреждение об отсутствии ограничений.
Шаг 2: Преобразовать в макет для анимации
Для анимации с использованием MotionLayout, необходимо преобразовать ConstraintLayout в MotionLayout .
Чтобы ваш макет использовал анимированную сцену, он должен указывать на неё.
- Для этого откройте область проектирования. В Android Studio 4.0 область проектирования открывается с помощью значка разделения или дизайна в правом верхнем углу при просмотре XML-файла макета.
- После открытия рабочей области щёлкните правой кнопкой мыши по предварительному просмотру и выберите «Преобразовать в MotionLayout» .
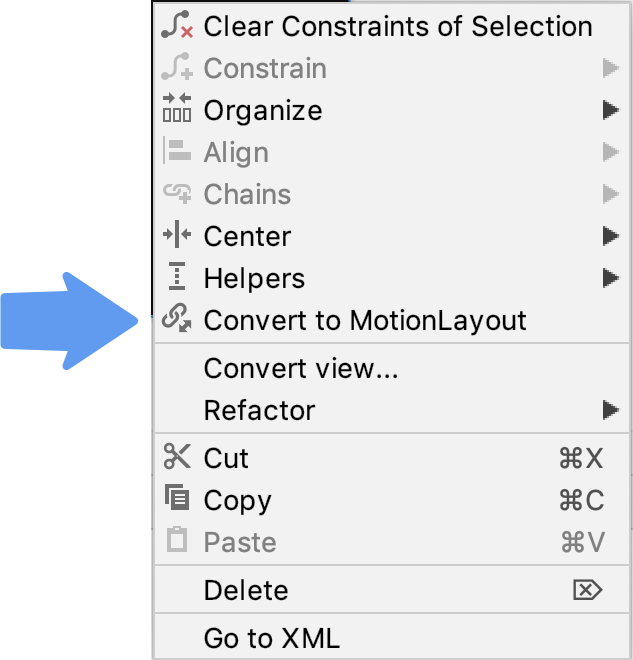
Это заменяет тег ConstraintLayout на тег MotionLayout и добавляет к тегу MotionLayout motion:layoutDescription указывающее на @xml/activity_step1_scene.
activity_step1**.xml**
<!-- explore motion:layoutDescription="@xml/activity_step1_scene" -->
<androidx.constraintlayout.motion.widget.MotionLayout
       ...
       motion:layoutDescription="@xml/activity_step1_scene">
Анимационная сцена — это отдельный XML-файл, описывающий анимацию в MotionLayout .
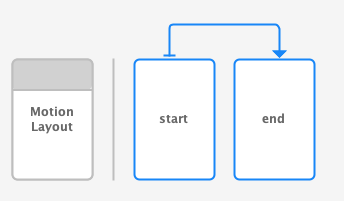
Как только вы перейдете к MotionLayout , на рабочей области отобразится редактор Motion Editor.
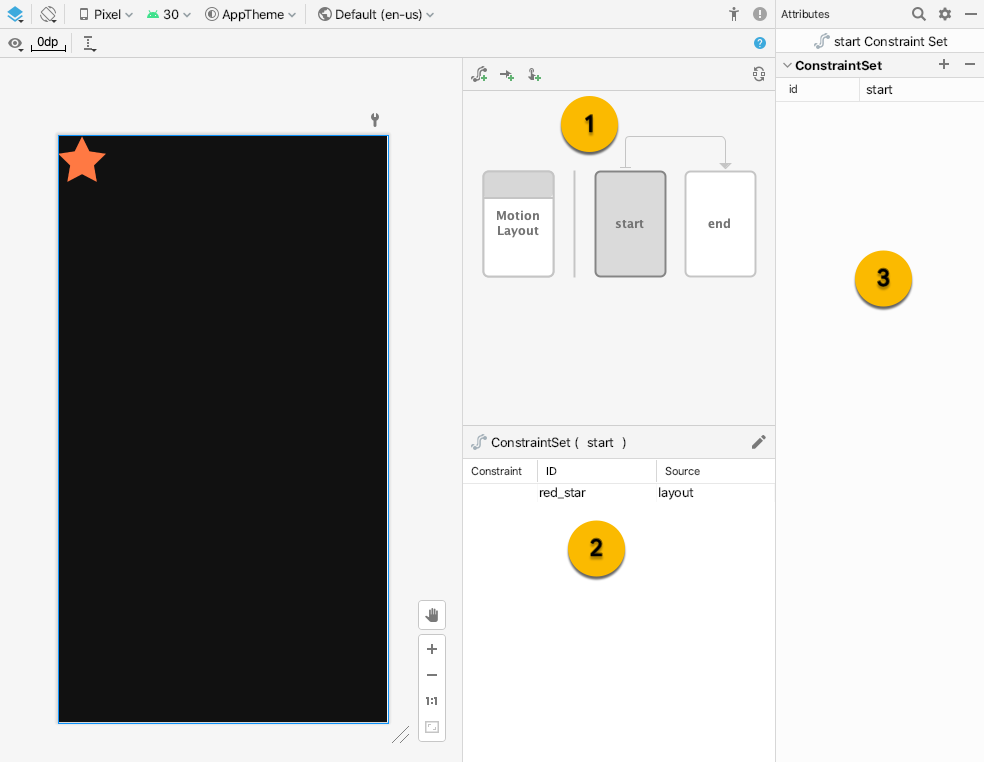
В редакторе анимации появились три новых элемента пользовательского интерфейса:
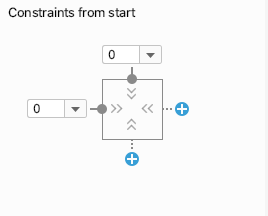
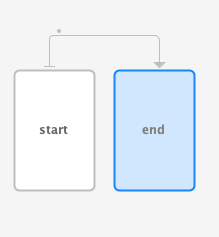
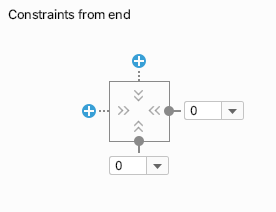
- Обзор – это модальное окно, позволяющее выбрать различные части анимации. На этом изображении выбран
startConstraintSet). Вы также можете выбрать переход междуstartиend, щелкнув стрелку между ними. - Раздел – Под обзором находится окно раздела, которое изменяется в зависимости от текущего выбранного элемента обзора. На этом изображении в окне выбора отображается информация
startConstraintSet. - Атрибуты – Панель атрибутов отображает и позволяет редактировать атрибуты текущего выбранного элемента как из окна обзора, так и из окна выбора. На этом изображении показаны атрибуты для
startConstraintSet.
Шаг 3: Определите начальные и конечные ограничения.
Все анимации можно определить по началу и концу. Начало описывает, как выглядит экран до начала анимации, а конец — как выглядит экран после её завершения. MotionLayout отвечает за определение способа анимации между начальным и конечным состояниями (с течением времени).
MotionScene использует тег ConstraintSet для определения начального и конечного состояний. ConstraintSet — это, как следует из названия, набор ограничений, которые можно применять к элементам представления. Сюда входят ограничения по ширине, высоте и ConstraintLayout . Он также включает некоторые атрибуты, такие как alpha . Он не содержит сами элементы представления, а только ограничения для этих элементов.
Любые ограничения, указанные в ConstraintSet , переопределят ограничения, указанные в файле макета. Если вы определяете ограничения как в макете, так и в MotionScene , применяются только ограничения из MotionScene .
На этом этапе вы зададите ограничение на отображение звездного неба таким образом, чтобы оно начиналось в верхней части экрана и заканчивалось в нижней его части.
Этот шаг можно выполнить либо с помощью редактора анимации, либо путем непосредственного редактирования текста файла activity_step1_scene.xml .
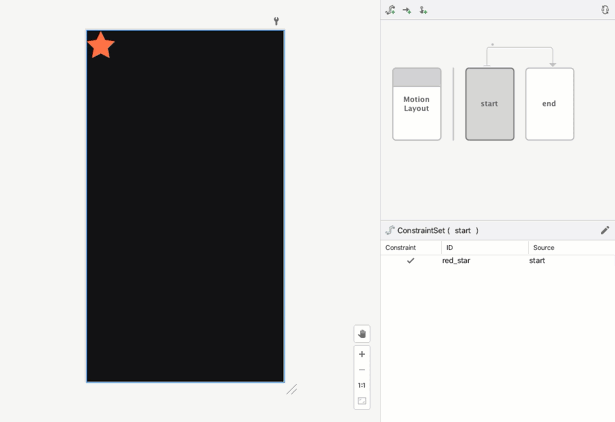
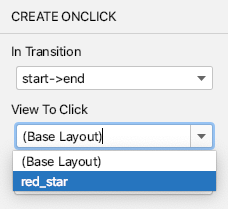
- Выберите
startнабор ограничений (ConstraintSet) на панели обзора.

- На панели выбора выберите
red_star. В данный момент отображается «Источникlayout— это означает, что он не ограничен даннымConstraintSet. Используйте значок карандаша в правом верхнем углу, чтобы создать ограничение.
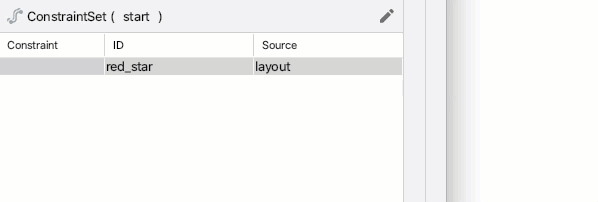
- Убедитесь, что в панели обзора параметр
red_starотображает источник «startпри выборе параметра «ConstraintSetstart. - На панели «Атрибуты», выбрав
red_starвstartConstraintSet, добавьте ограничение вверху и начните работу, нажав на синие кнопки «+» .
- Откройте
xml/activity_step1_scene.xmlчтобы увидеть код, сгенерированный редактором движения для этого ограничения.
activity_step1_scene.xml
<!-- Constraints to apply at the start of the animation -->
<ConstraintSet android:id="@+id/start">
   <Constraint
           android:id="@+id/red_star"
           android:layout_width="wrap_content"
           android:layout_height="wrap_content"
           motion:layout_constraintStart_toStartOf="parent"
           motion:layout_constraintTop_toTopOf="parent" />
</ConstraintSet>
ConstraintSet имеет id @id/start и определяет все ограничения, которые должны применяться ко всем представлениям в MotionLayout . Поскольку этот MotionLayout содержит только одно представление, ему требуется только одно Constraint .
Constraint внутри ConstraintSet указывает идентификатор представления, к которому оно применяется, @id/red_star определенный в activity_step1.xml . Важно отметить, что теги Constraint указывают только ограничения и информацию о макете. Тег Constraint не знает, что он применяется к ImageView .
Это ограничение задаёт высоту, ширину и два других ограничения, необходимых для того, чтобы привязать представление red_star к верхней начальной точке его родительского элемента.
- Выберите
endнабор ограничений (ConstraintSet) на панели обзора.
- Выполните те же действия, что и раньше, чтобы добавить
Constraintдляred_starвendConstraintSet. - Чтобы выполнить этот шаг с помощью Motion Editor, добавьте ограничение
bottomиend, нажав на синие кнопки «+» .
- Код в формате XML выглядит следующим образом:
activity_step1_scene.xml
<!-- Constraints to apply at the end of the animation -->
<ConstraintSet android:id="@+id/end">
   <Constraint
           android:id="@+id/red_star"
           android:layout_width="wrap_content"
           android:layout_height="wrap_content"
           motion:layout_constraintEnd_toEndOf="parent"
           motion:layout_constraintBottom_toBottomOf="parent" />
</ConstraintSet>
Как и в случае с @id/start , этот ConstraintSet имеет единственное Constraint для @id/red_star . На этот раз оно ограничивает его нижним краем экрана.
Называть их @id/start и @id/end необязательно, но это удобно.
Шаг 4: Определите переход.
Каждая MotionScene также должна включать как минимум один переход. Переход определяет каждую часть анимации, от начала до конца.
Для перехода необходимо указать начальный и конечный ConstraintSet . Переход также может указывать, как изменять анимацию другими способами, например, как долго она должна выполняться или как анимировать её с помощью перетаскивания элементов интерфейса.
- Редактор анимации по умолчанию создал для нас переход при создании файла MotionScene. Откройте
activity_step1_scene.xml, чтобы увидеть сгенерированный переход.
activity_step1_scene.xml
<!-- A transition describes an animation via start and end state -->
<Transition
   motion:constraintSetEnd="@+id/end"
   motion:constraintSetStart="@id/start"
   motion:duration="1000">
  <KeyFrameSet>
  </KeyFrameSet>
</Transition>
Это всё, что нужно MotionLayout для создания анимации. Рассмотрим каждый атрибут:
-
constraintSetStartбудет применен к элементам представления при запуске анимации. -
constraintSetEndбудет применен к элементам представления в конце анимации. -
durationопределяет продолжительность анимации в миллисекундах.
Затем MotionLayout определит траекторию движения между начальным и конечным ограничениями и анимирует её в течение заданного времени.
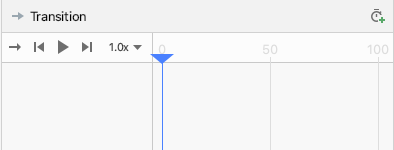
Шаг 5: Предварительный просмотр анимации в редакторе движения.
Анимация: Видеоролик, демонстрирующий воспроизведение предварительного просмотра перехода в редакторе анимации.
- Откройте редактор анимации и выберите переход, щелкнув стрелку между
startиendна панели обзора.
- На панели выбора отображаются элементы управления воспроизведением и полоса прокрутки, когда выбран переход. Нажмите кнопку воспроизведения или перетащите курсор в текущую позицию, чтобы просмотреть анимацию.
Шаг 6: Добавьте обработчик события клика.
Вам нужен способ запустить анимацию. Один из способов — заставить MotionLayout реагировать на события клика по @id/red_star .
- Откройте редактор анимации и выберите переход, щелкнув стрелку между началом и концом на панели обзора.
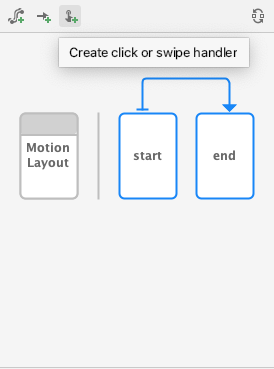
- Нажмите
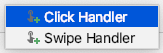
 Создайте обработчик кликов или свайпов на панели инструментов для обзорной панели. Это добавит обработчик, который запустит переход.
 - Выберите «Обработчик кликов» во всплывающем окне.
- Измените параметр "Просмотр по клику " на
red_star.
- При нажатии кнопки «Добавить » обработчик кликов отображается в виде маленькой точки в редакторе переходов в движении.
- Выбрав переход на панели обзора, добавьте атрибут
clickActionсо значениемtoggleк обработчику события OnClick, который вы только что добавили на панели атрибутов.

- Откройте файл
activity_step1_scene.xml, чтобы увидеть код, сгенерированный Motion Editor.
activity_step1_scene.xml
<!-- A transition describes an animation via start and end state -->
<Transition
    motion:constraintSetStart="@+id/start"
    motion:constraintSetEnd="@+id/end"
    motion:duration="1000">
    <!-- MotionLayout will handle clicks on @id/red_star to "toggle" the animation between the start and end -->
    <OnClick
        motion:targetId="@id/red_star"
        motion:clickAction="toggle" />
</Transition>
Атрибут Transition указывает MotionLayout запускать анимацию в ответ на события клика, используя тег <OnClick> . Рассмотрим каждый атрибут:
-
targetId— это идентификатор представления, за кликами по которому следует следить. - Параметр
clickActionдляtoggleбудет переключать состояние между начальным и конечным при нажатии. Другие параметрыclickActionможно найти в документации .
- Запустите свой код, нажмите Шаг 1 , затем нажмите на красную звездочку и посмотрите анимацию!
Шаг 5: Анимация в действии
Запустите приложение! При нажатии на звездочку вы должны увидеть, как запускается анимация.
В готовом файле сцены движения определен один Transition , который указывает на начальный и конечный ConstraintSet .
В начале анимации ( @id/start ) значок звездочки привязан к верхней части экрана. В конце анимации ( @id/end ) значок звездочки привязан к нижней части экрана.
<?xml version="1.0" encoding="utf-8"?>

<!-- Describe the animation for activity_step1.xml -->
<MotionScene xmlns:app="http://schemas.android.com/apk/res-auto"
            xmlns:android="http://schemas.android.com/apk/res/android">
   <!-- A transition describes an animation via start and end state -->
   <Transition
           motion:constraintSetStart="@+id/start"
           motion:constraintSetEnd="@+id/end"
           motion:duration="1000">
       <!-- MotionLayout will handle clicks on @id/star to "toggle" the animation between the start and end -->
       <OnClick
               motion:targetId="@id/red_star"
               motion:clickAction="toggle" />
   </Transition>

   <!-- Constraints to apply at the end of the animation -->
   <ConstraintSet android:id="@+id/start">
       <Constraint
               android:id="@+id/red_star"
               android:layout_width="wrap_content"
               android:layout_height="wrap_content"
               motion:layout_constraintStart_toStartOf="parent"
               motion:layout_constraintTop_toTopOf="parent" />
   </ConstraintSet>

   <!-- Constraints to apply at the end of the animation -->
   <ConstraintSet android:id="@+id/end">
       <Constraint
               android:id="@+id/red_star"
               android:layout_width="wrap_content"
               android:layout_height="wrap_content"
               motion:layout_constraintEnd_toEndOf="parent"
               motion:layout_constraintBottom_toBottomOf="parent" />
   </ConstraintSet>
</MotionScene>
4. Анимация на основе событий перетаскивания.
На этом этапе вы создадите анимацию, которая будет реагировать на событие перетаскивания пользователем (когда пользователь проводит пальцем по экрану), чтобы запустить анимацию. MotionLayout поддерживает отслеживание событий касания для перемещения элементов, а также жесты перемещения на основе физики для обеспечения плавного движения.
Шаг 1: Изучите исходный код
- Для начала откройте файл макета
activity_step2.xml, в котором уже естьMotionLayout. Ознакомьтесь с кодом.
activity_step2.xml
<!-- initial code -->

<androidx.constraintlayout.motion.widget.MotionLayout
       ...
       motion:layoutDescription="@xml/step2" >

   <ImageView
           android:id="@+id/left_star"
           ...
   />

   <ImageView
           android:id="@+id/right_star"
           ...
   />

   <ImageView
           android:id="@+id/red_star"
           ...
   />

   <TextView
           android:id="@+id/credits"
           ...
           motion:layout_constraintTop_toTopOf="parent"
           motion:layout_constraintEnd_toEndOf="parent"/>
</androidx.constraintlayout.motion.widget.MotionLayout>
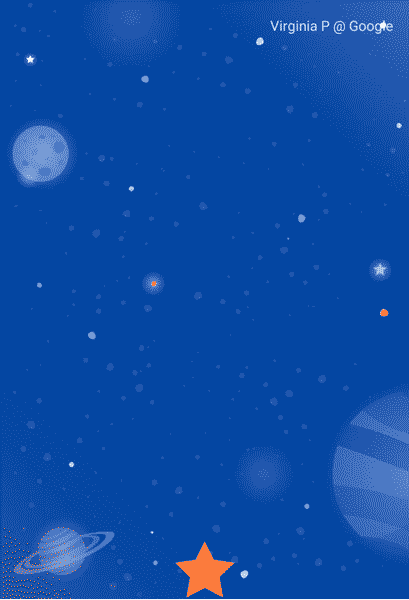
Этот макет определяет все элементы для анимации. Три значка в виде звездочек не ограничены рамками макета, поскольку они будут анимироваться в сцене движения.
К TextView отображаемому в титрах, применяются ограничения, поскольку он остается на одном и том же месте на протяжении всей анимации и не изменяет никаких атрибутов.
Шаг 2: Анимируйте сцену
Как и в предыдущей анимации, данная анимация будет определяться начальным и конечным ConstraintSet, и Transition .
Определите начальный набор ограничений (ConstraintSet) .
- Откройте файл motion scene
xml/step2.xml, чтобы определить анимацию. - Добавьте ограничения для начального ограничения
start. В начале все три звезды центрированы в нижней части экрана. Правая и левая звезды имеют значениеalpha0.0, что означает, что они полностью прозрачны и скрыты.
step2.xml
<!-- TODO apply starting constraints -->

<!-- Constraints to apply at the start of the animation -->
<ConstraintSet android:id="@+id/start">
   <Constraint
           android:id="@+id/red_star"
           android:layout_width="wrap_content"
           android:layout_height="wrap_content"
           motion:layout_constraintStart_toStartOf="parent"
           motion:layout_constraintEnd_toEndOf="parent"
           motion:layout_constraintBottom_toBottomOf="parent" />

   <Constraint
           android:id="@+id/left_star"
           android:layout_width="wrap_content"
           android:layout_height="wrap_content"
           android:alpha="0.0"
           motion:layout_constraintStart_toStartOf="parent"
           motion:layout_constraintEnd_toEndOf="parent"
           motion:layout_constraintBottom_toBottomOf="parent" />

   <Constraint
           android:id="@+id/right_star"
           android:layout_width="wrap_content"
           android:layout_height="wrap_content"
           android:alpha="0.0"
           motion:layout_constraintStart_toStartOf="parent"
           motion:layout_constraintEnd_toEndOf="parent"
           motion:layout_constraintBottom_toBottomOf="parent" />
</ConstraintSet>
В этом ConstraintSet вы указываете одно Constraint для каждой из звезд. Каждое ограничение будет применено MotionLayout в начале анимации.
Каждый звездный элемент центрируется в нижней части экрана с помощью ограничений начала, конца и низа. Две звезды с идентификаторами @id/left_star и @id/right_star имеют дополнительное значение альфа-канала, которое делает их невидимыми и будет применено в начале анимации.
Наборы ограничений start и end определяют начало и конец анимации. Ограничение на начало, например motion:layout_constraintStart_toStartOf , ограничивает начало представления началом другого представления. Поначалу это может сбивать с толку, поскольку имя start используется для обоих , и оба они используются в контексте ограничений. Чтобы помочь прояснить различие, « start » в layout_constraintStart относится к «началу» представления, которое в языке с направлением письма слева направо — это «слева», а в языке с направлением письма справа налево — «справа». Набор ограничений start относится к началу анимации.
Определите конечный набор ограничений (ConstraintSet).
- Задайте ограничение на конец, чтобы использовать цепочку для размещения всех трех звезд вместе под
@id/credits. Кроме того, это установит значениеalphaлевой и правой звезд равным1.0.
step2.xml
<!-- TODO apply ending constraints -->

<!-- Constraints to apply at the end of the animation -->
<ConstraintSet android:id="@+id/end">

   <Constraint
           android:id="@+id/left_star"
           android:layout_width="wrap_content"
           android:layout_height="wrap_content"
           android:alpha="1.0"
           motion:layout_constraintHorizontal_chainStyle="packed"
           motion:layout_constraintStart_toStartOf="parent"
           motion:layout_constraintEnd_toStartOf="@id/red_star"
           motion:layout_constraintTop_toBottomOf="@id/credits" />

   <Constraint
           android:id="@+id/red_star"
           android:layout_width="wrap_content"
           android:layout_height="wrap_content"
           motion:layout_constraintStart_toEndOf="@id/left_star"
           motion:layout_constraintEnd_toStartOf="@id/right_star"
           motion:layout_constraintTop_toBottomOf="@id/credits" />

   <Constraint
           android:id="@+id/right_star"
           android:layout_width="wrap_content"
           android:layout_height="wrap_content"
           android:alpha="1.0"
           motion:layout_constraintStart_toEndOf="@id/red_star"
           motion:layout_constraintEnd_toEndOf="parent"
           motion:layout_constraintTop_toBottomOf="@id/credits" />
</ConstraintSet>
В результате, по мере анимации, виды будут распространяться и подниматься от центра.
Кроме того, поскольку свойство alpha задано для @id/right_start и @id/left_star в обоих ConstraintSets , оба представления будут плавно появляться по мере развития анимации.
Анимация на основе свайпа пользователя
MotionLayout может отслеживать события перетаскивания или свайпа пользователя для создания анимации «броска» на основе физических принципов. Это означает, что элементы интерфейса будут продолжать движение, если пользователь их бросит, и замедляться, как физический объект при перекатывании по поверхности. Такую анимацию можно добавить с помощью тега OnSwipe в Transition .
- Замените TODO для добавления тега
OnSwipeна<OnSwipe motion:touchAnchorId="@id/red_star" />.
step2.xml
<!-- TODO add OnSwipe tag -->

<!-- A transition describes an animation via start and end state -->
<Transition
       motion:constraintSetStart="@+id/start"
       motion:constraintSetEnd="@+id/end">
   <!-- MotionLayout will track swipes relative to this view -->
   <OnSwipe motion:touchAnchorId="@id/red_star" />
</Transition>
Атрибут OnSwipe содержит несколько параметров, наиболее важным из которых является touchAnchorId .
-
touchAnchorId— это отслеживаемый элемент интерфейса, который перемещается в ответ на касание.MotionLayoutбудет поддерживать это представление на том же расстоянии от пальца, который проводит по экрану. -
touchAnchorSideопределяет, какая сторона представления должна отслеживаться. Это важно для представлений, которые изменяют размер, следуют сложным траекториям или имеют одну сторону, которая движется быстрее другой. -
dragDirectionопределяет, какое направление имеет значение для этой анимации (вверх, вниз, влево или вправо).
Когда MotionLayout отслеживает события перетаскивания, обработчик событий регистрируется на представлении MotionLayout , а не на представлении, указанном в touchAnchorId . Когда пользователь начинает жест в любом месте экрана, MotionLayout будет поддерживать постоянное расстояние между его пальцем и touchAnchorSide представления touchAnchorId . Например, если он коснется на расстоянии 100dp от стороны привязки, MotionLayout будет поддерживать это расстояние на протяжении всей анимации.
Попробуйте!
- Запустите приложение еще раз и откройте экран Шага 2. Вы увидите анимацию.
- Попробуйте «взмахнуть» или отпустить палец в середине анимации, чтобы изучить, как
MotionLayoutотображает анимации, основанные на физике жидкостей!
MotionLayout позволяет анимировать переходы между совершенно разными дизайнами, используя возможности ConstraintLayout для создания разнообразных эффектов.
В этой анимации все три элемента изначально располагаются относительно своего родительского элемента в нижней части экрана. В конце все три элемента располагаются относительно @id/credits образуя цепочку.
Несмотря на столь разные варианты компоновки, MotionLayout создаст плавную анимацию от начала до конца.
5. Изменение пути
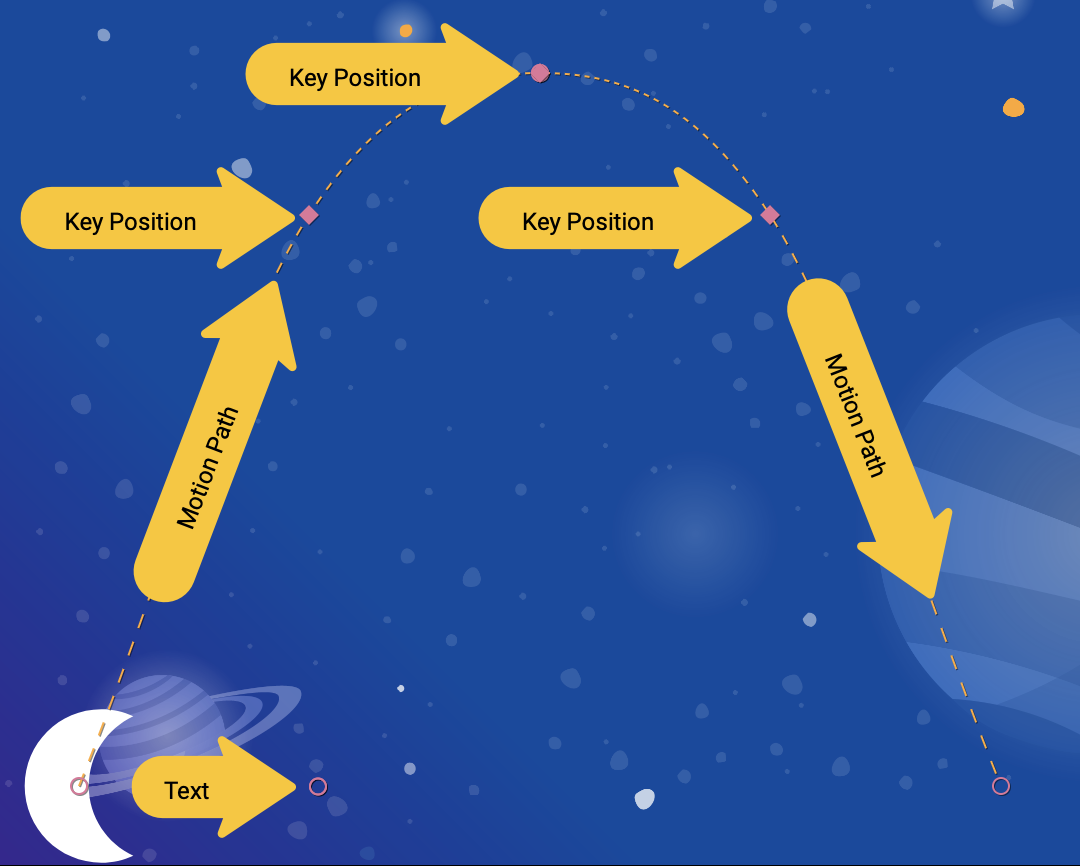
На этом шаге вы создадите анимацию, которая будет следовать сложной траектории во время анимации и анимировать титры в процессе движения. MotionLayout может изменять траекторию движения представления между началом и концом с помощью KeyPosition .
Шаг 1: Изучите существующий код
- Откройте
layout/activity_step3.xmlиxml/step3.xml, чтобы увидеть существующий макет и анимационную сцену.ImageViewиTextViewотображают луну и текст с титрами. - Откройте файл сцены анимации (
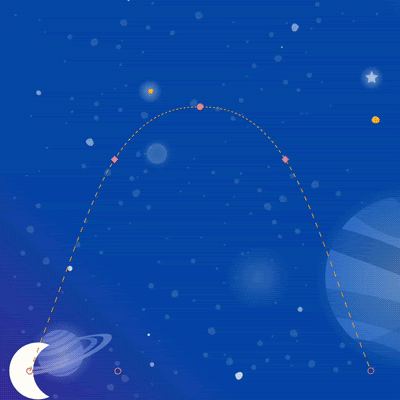
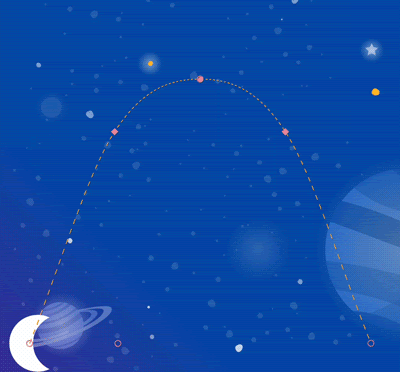
xml/step3.xml). Вы увидите, что определенTransitionот@id/startк@id/end. Анимация перемещает изображение луны из нижнего левого угла экрана в нижний правый угол экрана с помощью двухConstraintSets. Текст титров плавно появляется сalpha="0.0"доalpha="1.0"по мере движения луны. - Запустите приложение и выберите Шаг 3. Вы увидите, что при нажатии на луну она движется по линейной траектории (или прямой линии) от начала до конца.
Шаг 2: Включите отладку пути.
Прежде чем добавлять дугу к движению Луны, полезно включить отладку траектории в MotionLayout .
Для создания сложных анимаций с помощью MotionLayout можно нарисовать траекторию анимации для каждого элемента интерфейса. Это полезно при визуализации анимации и для точной настройки мелких деталей движения.
- Чтобы включить пути отладки, откройте
layout/activity_step3.xmlи добавьтеmotion:motionDebug="SHOW_PATH"к тегуMotionLayout.
activity_step3.xml
<!-- Add motion:motionDebug="SHOW_PATH" -->

<androidx.constraintlayout.motion.widget.MotionLayout
       ...
       motion:motionDebug="SHOW_PATH" >
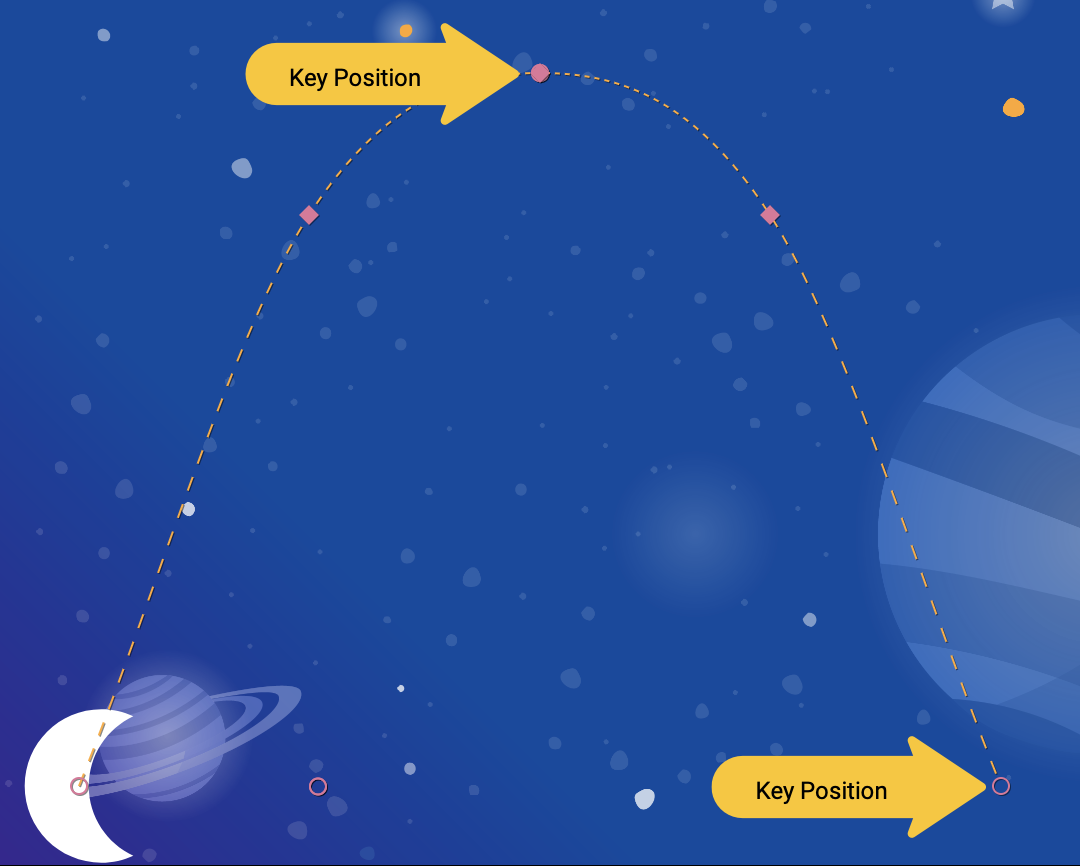
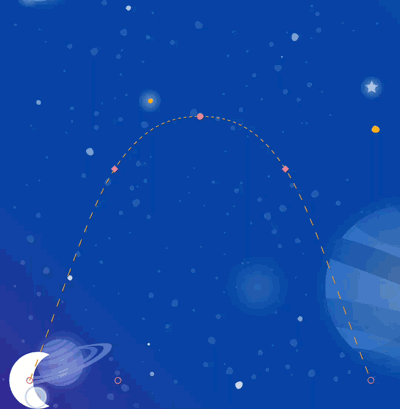
После включения отладки путей при повторном запуске приложения вы увидите пути ко всем представлениям, отображенные пунктирной линией.
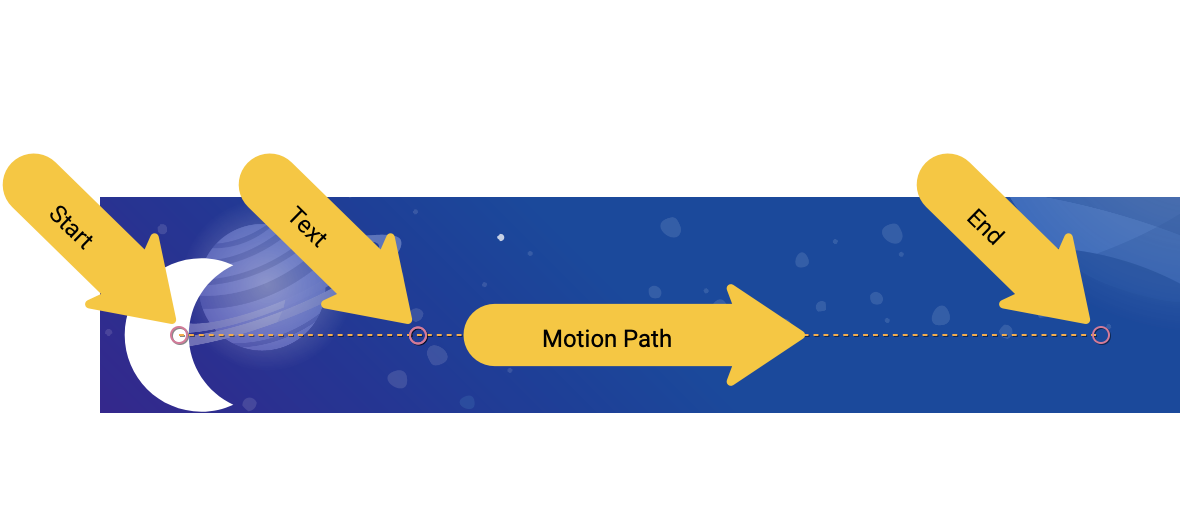
- Круги обозначают начальное или конечное положение одного из видов.
- Линии обозначают траекторию одного из видов.
- Ромбы обозначают позицию
KeyPosition, которая изменяет путь.
Например, в этой анимации средний круг обозначает положение текста титров.
Шаг 3: Измените путь
Все анимации в MotionLayout определяются начальным и конечным ConstraintSet , которые определяют внешний вид экрана до начала анимации и после её завершения. По умолчанию MotionLayout строит линейный путь (прямую линию) между начальной и конечной позициями каждого изменяющегося элемента.
Для построения сложных траекторий, таких как дуга Луны в этом примере, MotionLayout использует KeyPosition для изменения пути, который проходит представление между началом и концом.
- Откройте
xml/step3.xmlи добавьте в сценуKeyPosition. ТегKeyPositionразмещается внутри тегаTransition.
step3.xml
<!-- TODO: Add KeyFrameSet and KeyPosition -->
<KeyFrameSet>
   <KeyPosition
           motion:framePosition="50"
           motion:motionTarget="@id/moon"
           motion:keyPositionType="parentRelative"
           motion:percentY="0.5"
   />
</KeyFrameSet>
KeyFrameSet является дочерним элементом Transition и представляет собой набор всех KeyFrames , таких как KeyPosition , которые должны быть применены во время перехода.
При вычислении траектории движения Луны между началом и концом, MotionLayout изменяет эту траекторию в зависимости от KeyPosition указанного в KeyFrameSet . Вы можете увидеть, как это изменяет траекторию, запустив приложение еще раз.
KeyPosition имеет несколько атрибутов, описывающих способ его изменения пути. Наиболее важные из них:
-
framePosition— это число от 0 до 100. Оно определяет, когда именно в анимации следует применять этотKeyPosition, при этом 1 соответствует 1% анимации, а 99 — 99% анимации. Таким образом, если значение равно 50, то применение происходит ровно посередине. -
motionTarget— это представление, для которого даннаяKeyPositionизменяет путь. -
keyPositionTypeопределяет, какKeyPositionизменяет путь. Это может быть либоparentRelative,pathRelative, либоdeltaRelative(как объяснено на следующем шаге). -
percentX | percentY— это величина изменения пути вframePosition(значения от 0,0 до 1,0, допускаются отрицательные значения и значения >1).
Можно представить это так: «В framePosition измените траекторию motionTarget , переместив его на percentX или percentY в соответствии с координатами, определяемыми keyPositionType ».
По умолчанию MotionLayout скругляет все углы, возникающие при изменении пути. Если вы посмотрите на только что созданную анимацию, вы увидите, что луна движется по изогнутой траектории в месте поворота. Для большинства анимаций это именно то, что нужно, а если нет, вы можете указать атрибут curveFit для настройки.
Попробуйте!
Если вы запустите приложение снова, вы увидите анимацию для этого шага.
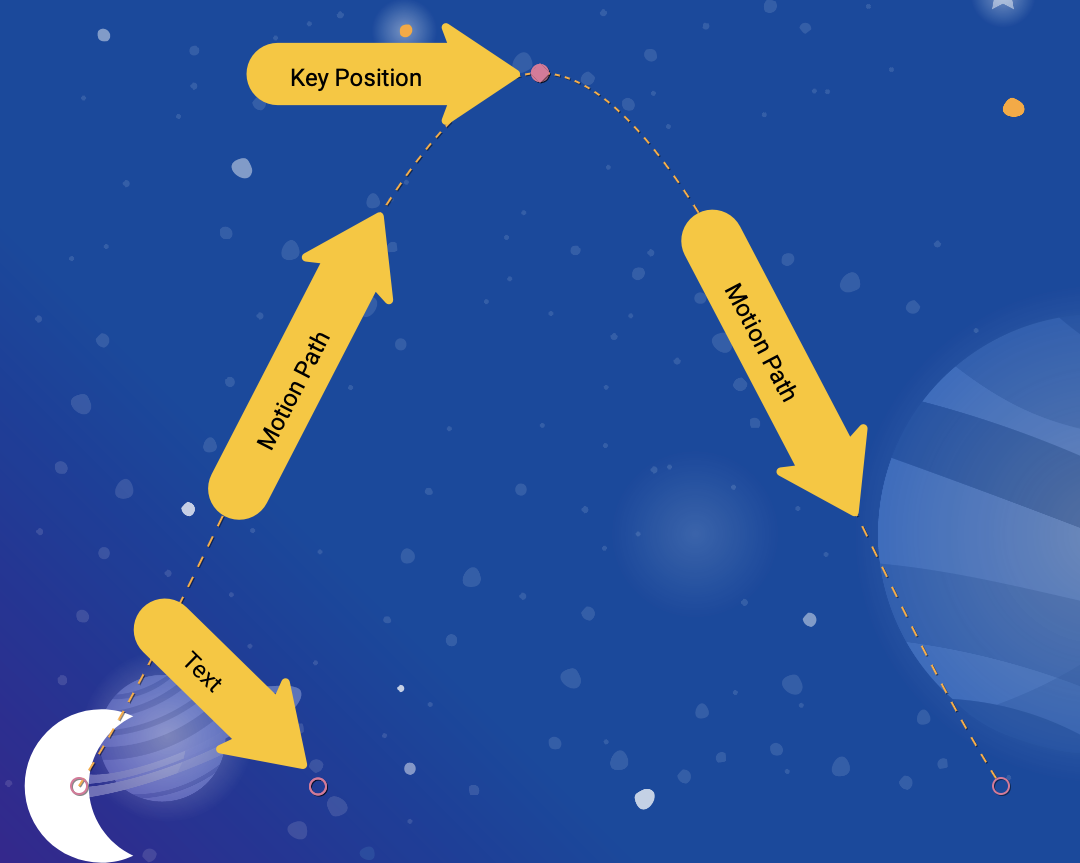
Луна движется по дуге, поскольку проходит через KeyPosition указанный в Transition .
<KeyPosition
       motion:framePosition="50"
       motion:motionTarget="@id/moon"
       motion:keyPositionType="parentRelative"
       motion:percentY="0.5"
/>
KeyPosition можно интерпретировать следующим образом: "В framePosition 50 (в середине анимации) измените траекторию motionTarget @id/moon , переместив его на 50% Y (в середине экрана) в соответствии с координатами, определенными parentRelative (всей MotionLayout )."
Таким образом, в середине анимации луна должна пройти через KeyPosition , которая находится на 50% ниже по экрану. Эта KeyPosition никак не изменяет движение по оси X, поэтому луна по-прежнему будет двигаться от начала до конца горизонтально. MotionLayout определит плавный путь, проходящий через эту KeyPosition при перемещении между началом и концом.
Если присмотреться, то видно, что текст титров ограничен положением Луны. Почему же он не движется вертикально?

<Constraint
       android:id="@id/credits"
       ...
       motion:layout_constraintBottom_toBottomOf="@id/moon"
       motion:layout_constraintTop_toTopOf="@id/moon"
/>
Оказывается, даже если вы изменяете траекторию движения Луны, её начальное и конечное положения никак не влияют на вертикальное перемещение. KeyPosition не изменяет ни начальное, ни конечное положение, поэтому текст титров ограничивается конечным положением Луны.
Если вы хотите, чтобы титры перемещались вместе с луной, вы можете добавить KeyPosition к титрам или изменить начальные ограничения для @id/credits .
В следующем разделе вы подробно рассмотрите различные типы keyPositionType в MotionLayout .
6. Понимание keyPositionType
На последнем шаге вы использовали keyPosition типа parentRelative , чтобы сместить путь на 50% экрана. Атрибут keyPositionType определяет, как MotionLayout будет изменять путь в соответствии с percentX или percentY .
<KeyFrameSet>
   <KeyPosition
           motion:framePosition="50"
           motion:motionTarget="@id/moon"
           motion:keyPositionType="parentRelative"
           motion:percentY="0.5"
   />
</KeyFrameSet>
Возможны три различных типа keyPosition : parentRelative , pathRelative и deltaRelative . Указание типа изменит систему координат, по которой вычисляются percentX и percentY .
Что такое система координат?
Система координат позволяет задать точку в пространстве. Она также полезна для описания положения на экране.
Системы координат MotionLayout — это декартова система координат . Это означает, что у них есть оси X и Y, определяемые двумя перпендикулярными линиями. Ключевое различие между ними заключается в том, где на экране проходит ось X (ось Y всегда перпендикулярна оси X).
В MotionLayout все системы координат используют значения от 0.0 до 1.0 как по оси X, так и по оси Y. Допускаются отрицательные значения, а также значения больше 1.0 . Например, значение percentX , равное -2.0 , будет означать движение в противоположном направлении от оси X дважды.
Если всё это слишком напоминает уроки алгебры, посмотрите картинки ниже!
родительские относительные координаты
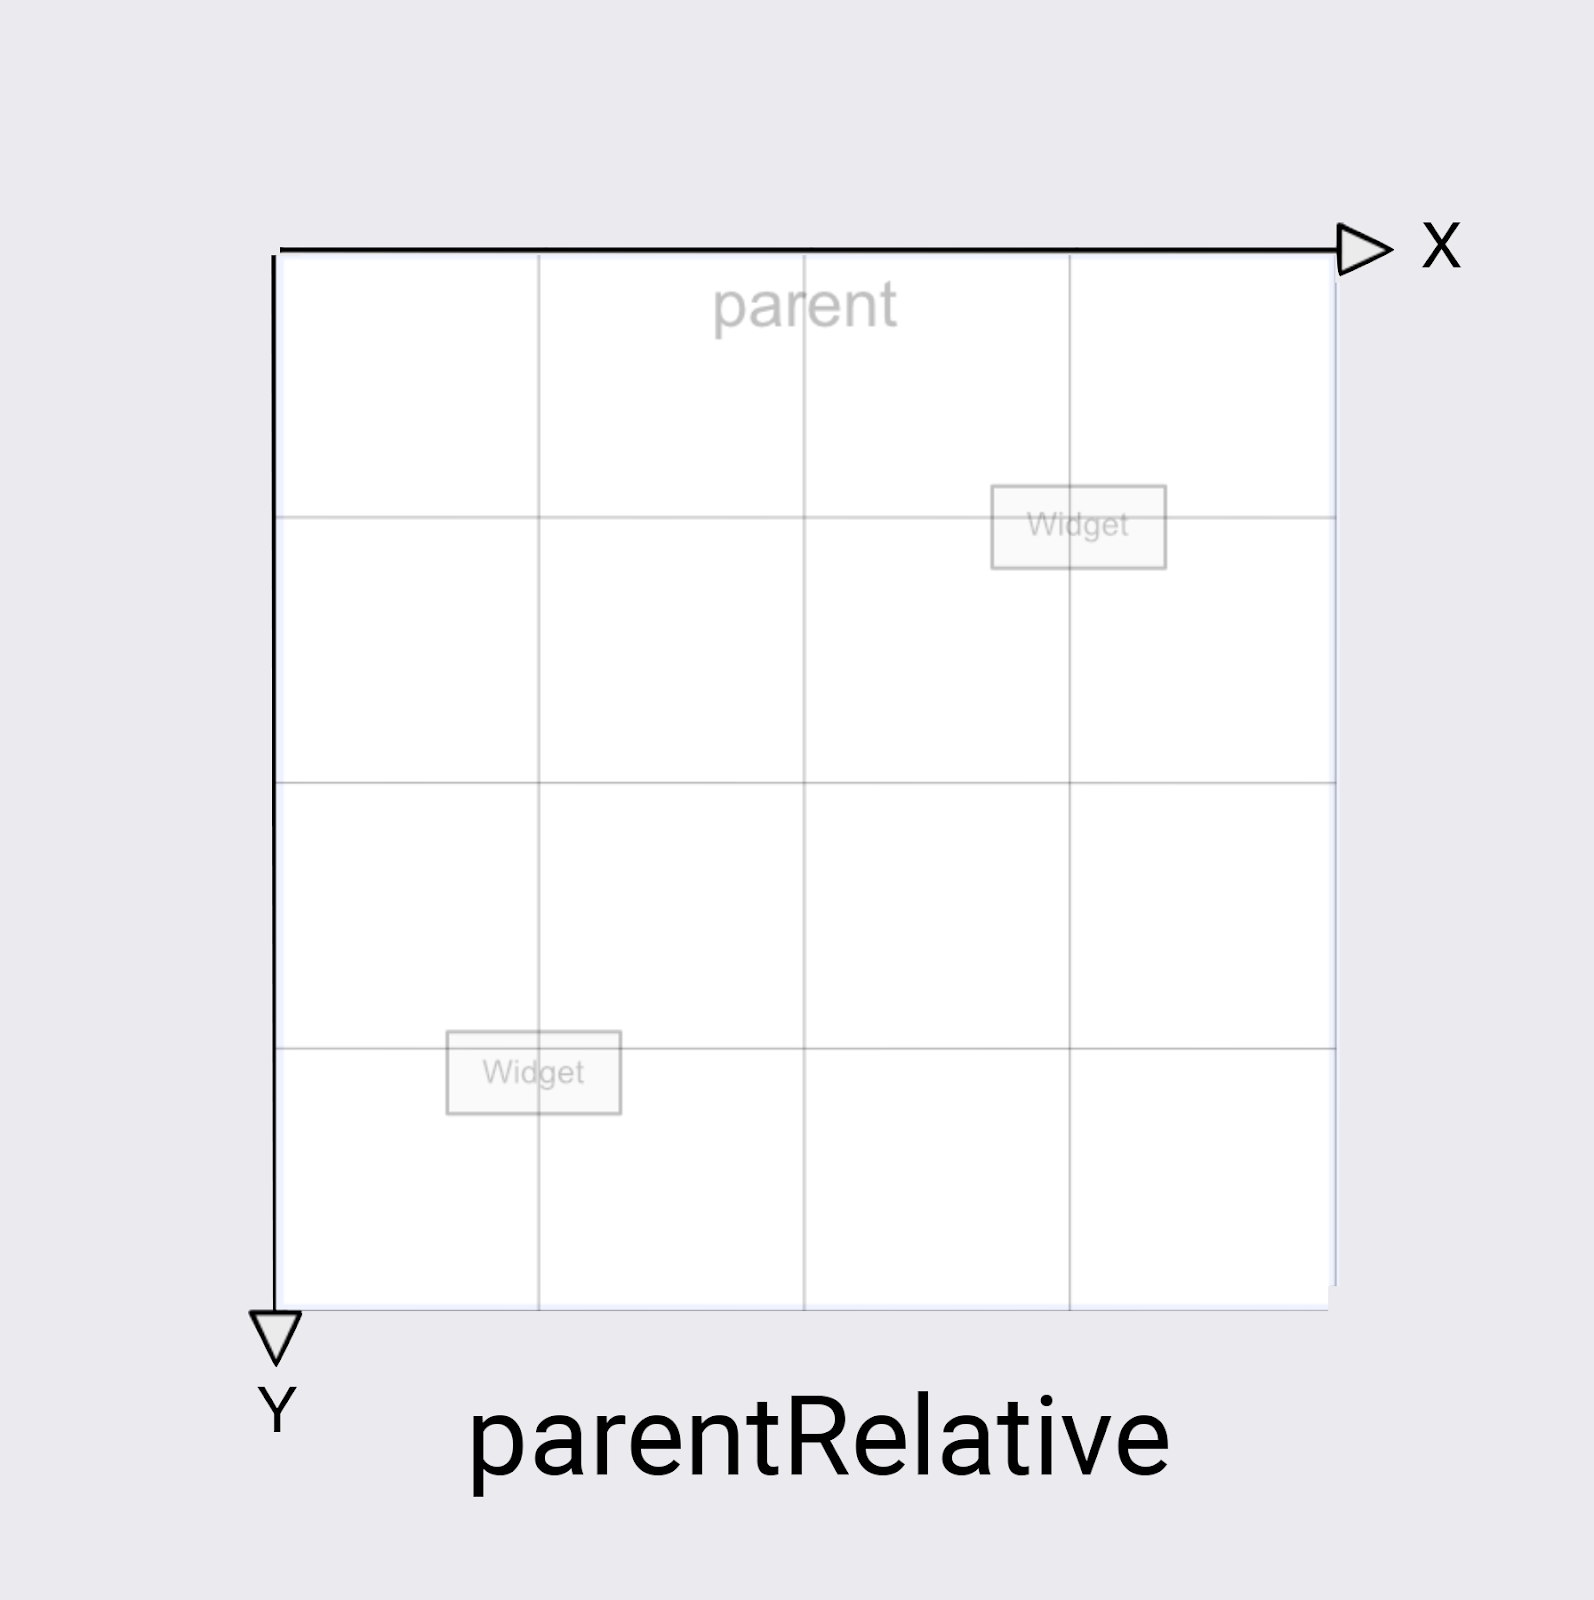
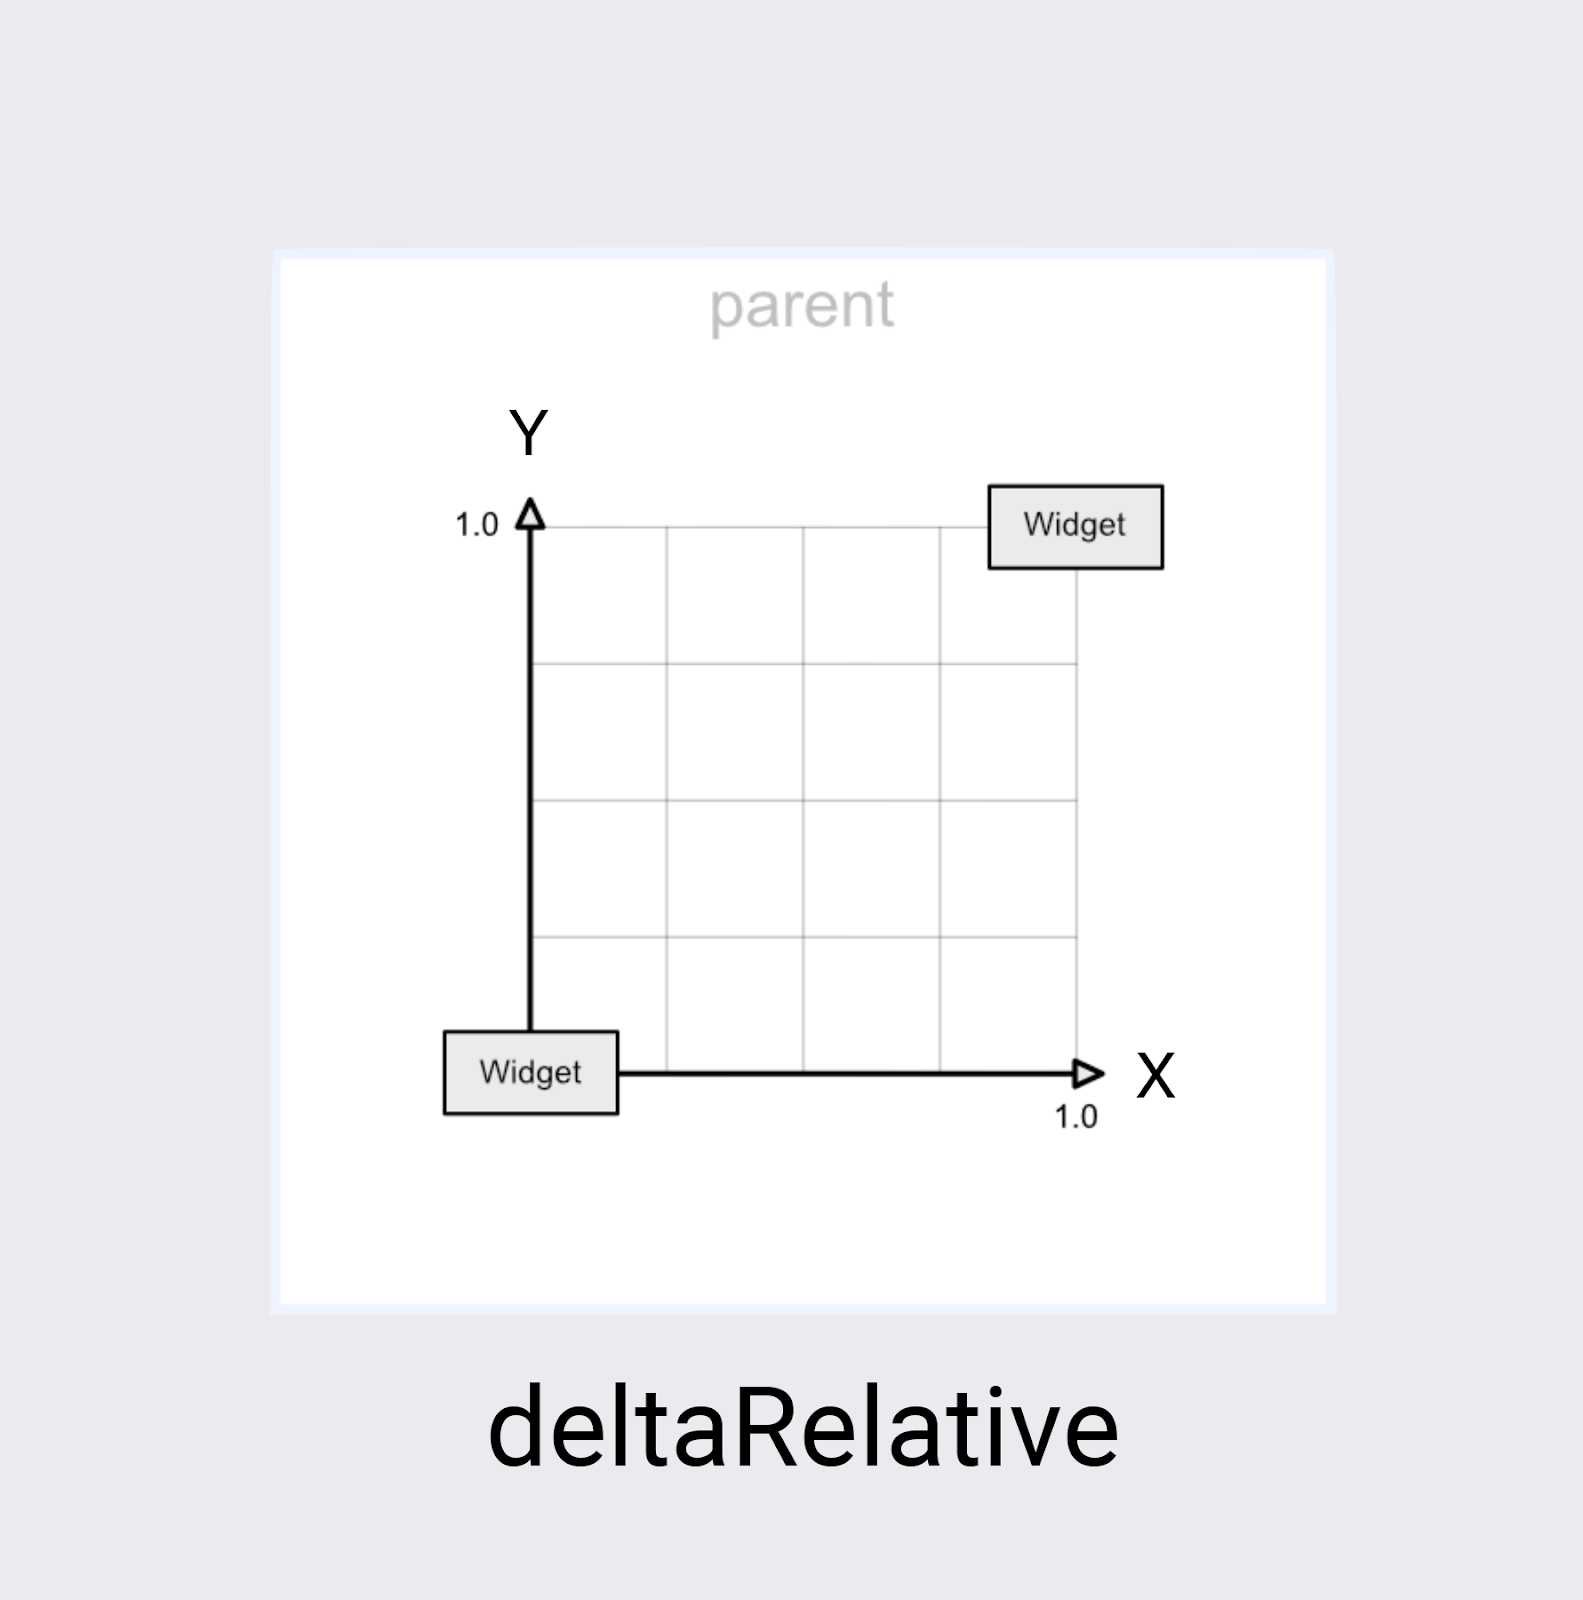
keyPositionType объекта parentRelative использует ту же систему координат, что и экран. Он определяет точку (0, 0) в верхнем левом углу всего MotionLayout и (1, 1) в нижнем правом углу.
Вы можете использовать parentRelative всякий раз, когда хотите создать анимацию, которая перемещается по всему MotionLayout — как, например, дуга луны в этом примере.
Однако, если вам нужно изменить траекторию относительно движения, например, сделать её немного изогнутой, то две другие системы координат будут лучшим выбором.
дельтаОтносительные координаты
Дельта — это математический термин, обозначающий изменение, поэтому deltaRelative — это способ сказать «изменение относительно». В deltaRelative координаты (0,0) — это начальная позиция обзора, а (1,1) — конечная позиция. Оси X и Y выровнены по экрану.
Ось X всегда горизонтальна на экране, а ось Y всегда вертикальна. По сравнению с parentRelative , главное отличие заключается в том, что координаты описывают только ту часть экрана, по которой будет перемещаться представление.
deltaRelative — это отличная система координат для управления горизонтальным или вертикальным движением по отдельности. Например, вы можете создать анимацию, которая завершает только вертикальное (Y) движение на 50%, а затем продолжает анимацию по горизонтали (X).
ПутьОтносительные координаты
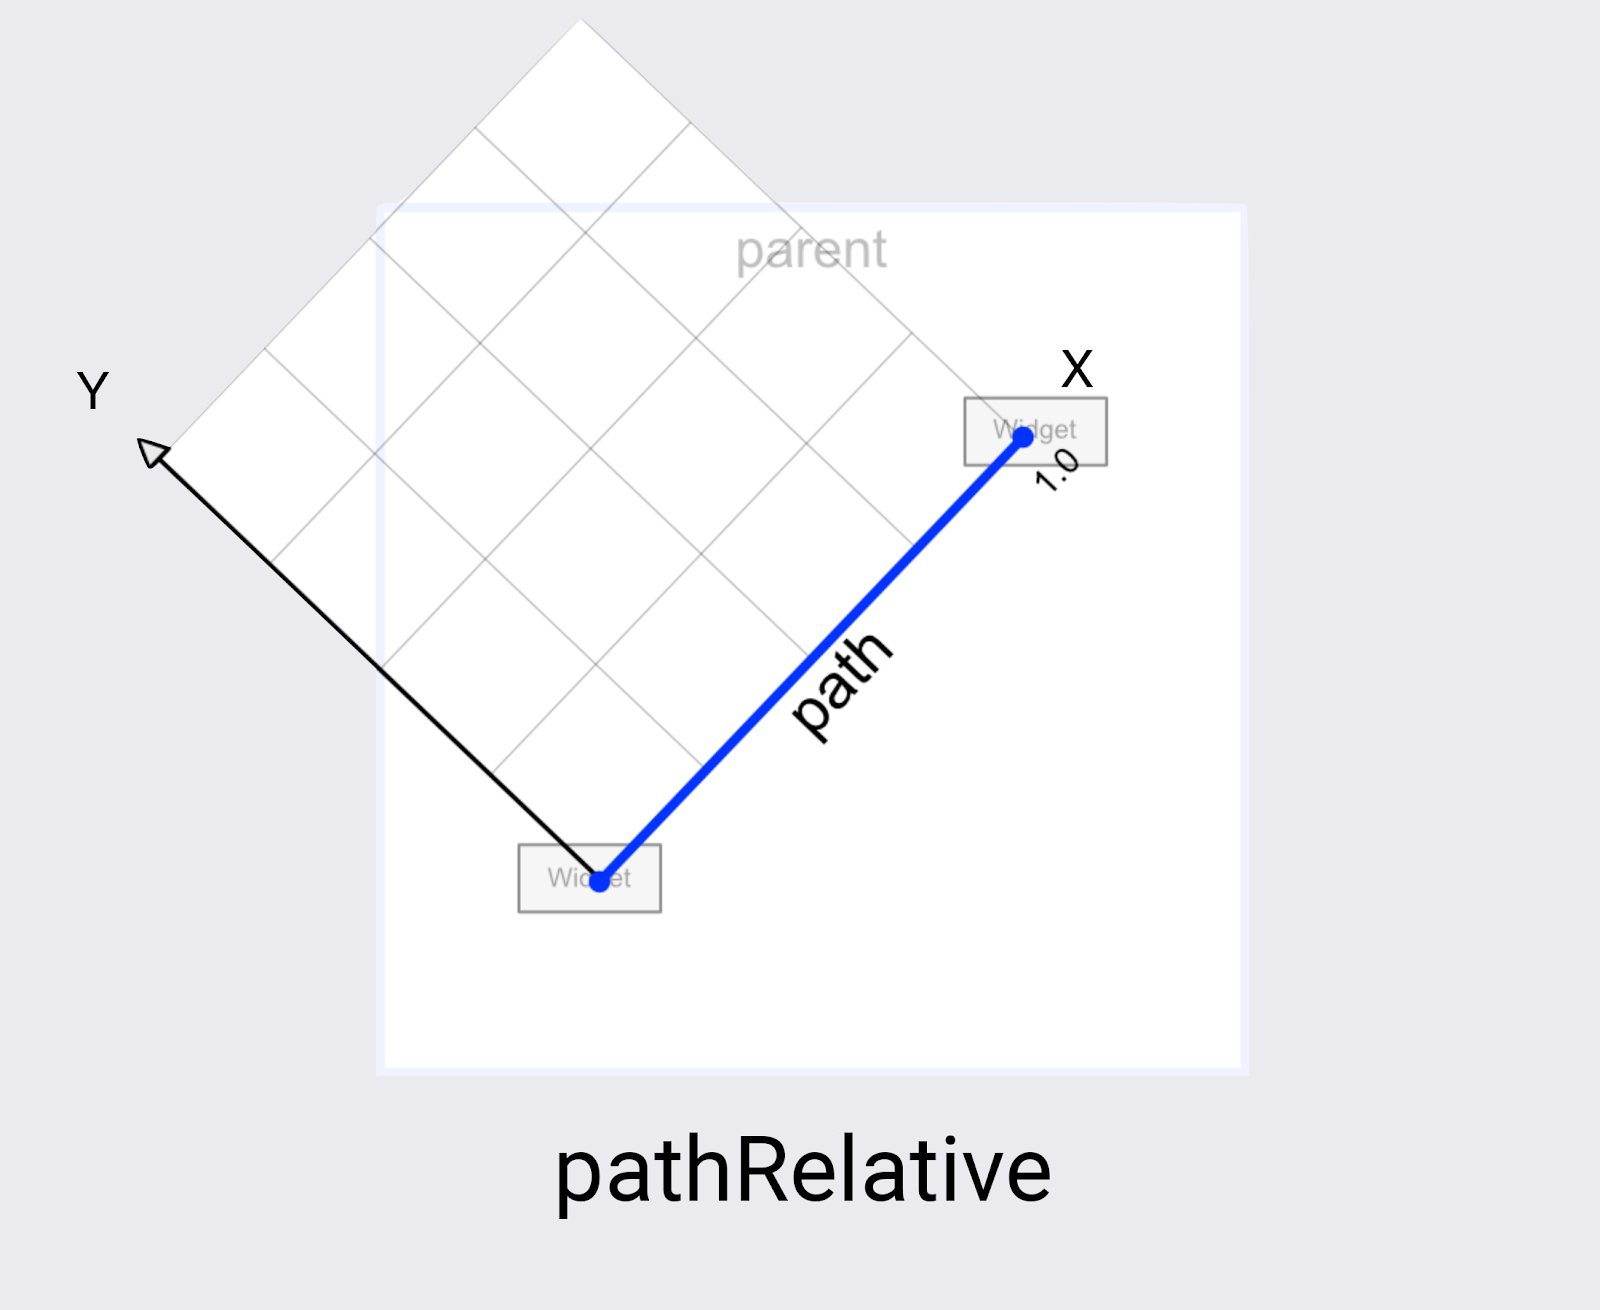
Последняя система координат в MotionLayout — pathRelative . Она существенно отличается от двух других, поскольку ось X следует за траекторией движения от начала до конца. Таким образом (0,0) — это начальная позиция, а (1,0) — конечная позиция.
Зачем это нужно? На первый взгляд это довольно удивительно, особенно учитывая, что эта система координат даже не выровнена по системе координат экрана.
Оказывается, pathRelative действительно полезен для нескольких целей.
- Ускорение, замедление или остановка отображения на определенном этапе анимации. Поскольку размер по оси X всегда точно соответствует пути, по которому движется отображение, вы можете использовать ключевую позицию
pathRelativeKeyPosition, чтобы изменитьframePositionв какой точке этого пути достигается конкретная точка. Таким образом,KeyPositionвframePosition="50"сpercentX="0.1"приведет к тому, что анимация будет занимать 50% времени на прохождение первых 10% движения. - Добавление едва заметной дуги к траектории. Поскольку ось Y всегда перпендикулярна движению, изменение оси Y изменит траекторию, сделав её кривой относительно общего движения.
- Добавление второго измерения, когда
deltaRelativeне работает. Для полностью горизонтального и вертикального движенияdeltaRelativeсоздаст только одно полезное измерение. ОднакоpathRelativeвсегда создаст пригодные для использования координаты X и Y.
In the next step you'll learn how to build even more complex paths using more than one KeyPosition .
7. Building complex paths
Looking at the animation you built in the last step, it does create a smooth curve, but the shape could be more "moon like."
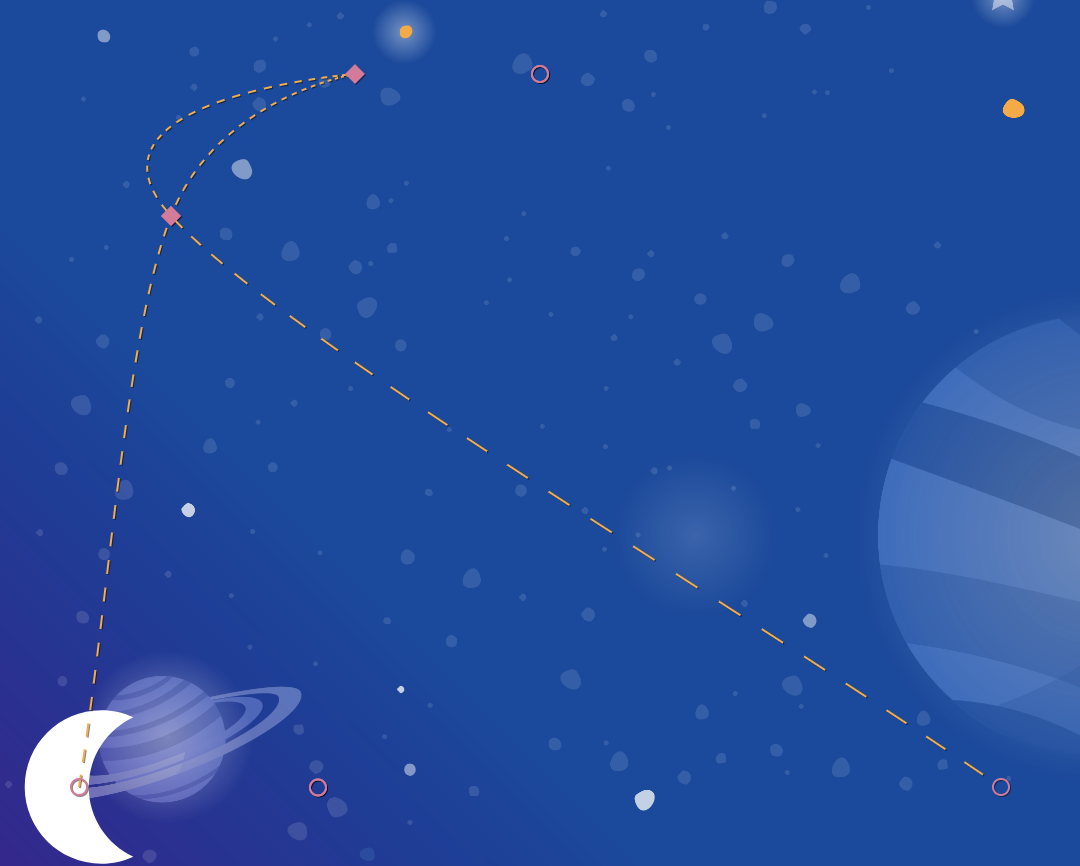
Modify a path with multiple KeyPosition elements
MotionLayout can modify a path further by defining as many KeyPosition as needed to get any motion. For this animation you will build an arc, but you could make the moon jump up and down in the middle of the screen, if you wanted.
- Open
xml/step4.xml. You see it has the same views and theKeyFrameyou added in the last step. - To round out the top of the curve, add two more
KeyPositionsto the path of@id/moon, one just before it reaches the top, and one after.
step4.xml
<!-- TODO: Add two more KeyPositions to the KeyFrameSet here -->
<KeyPosition
       motion:framePosition="25"
       motion:motionTarget="@id/moon"
       motion:keyPositionType="parentRelative"
       motion:percentY="0.6"
/>
<KeyPosition
       motion:framePosition="75"
       motion:motionTarget="@id/moon"
       motion:keyPositionType="parentRelative"
       motion:percentY="0.6"
/>
These KeyPositions will be applied 25% and 75% of the way through the animation, and cause @id/moon to move through a path that is 60% from the top of the screen. Combined with the existing KeyPosition at 50%, this creates a smooth arc for the moon to follow.
In MotionLayout , you can add as many KeyPositions as you would need to get the motion path you want. MotionLayout will apply each KeyPosition at the specified framePosition , and figure out how to create a smooth motion that goes through all of the KeyPositions .
Попробуйте!
- Run the app again. Go to Step 4 to see the animation in action. When you click on the moon, it follows the path from start to end, going through each
KeyPositionthat was specified in theKeyFrameSet.
Explore on your own
Before you move on to other types of KeyFrame , try adding some more KeyPositions to the KeyFrameSet to see what kind of effects you can create just using KeyPosition .
Here's one example showing how to build a complex path that moves back and forth during the animation.
step4.xml
<!-- Complex paths example: Dancing moon -->
<KeyFrameSet>
   <KeyPosition
           motion:framePosition="25"
           motion:motionTarget="@id/moon"
           motion:keyPositionType="parentRelative"
           motion:percentY="0.6"
           motion:percentX="0.1"
   />
   <KeyPosition
           motion:framePosition="50"
           motion:motionTarget="@id/moon"
           motion:keyPositionType="parentRelative"
           motion:percentY="0.5"
           motion:percentX="0.3"
   />
   <KeyPosition
           motion:framePosition="75"
           motion:motionTarget="@id/moon"
           motion:keyPositionType="parentRelative"
           motion:percentY="0.6"
           motion:percentX="0.1"
   />
</KeyFrameSet>
Once you're done exploring KeyPosition , in the next step you'll move on to other types of KeyFrames .
8. Changing attributes during motion
Building dynamic animations often means changing the size , rotation , or alpha of views as the animation progresses. MotionLayout supports animating many attributes on any view using a KeyAttribute .
In this step, you will use KeyAttribute to make the moon scale and rotate. You will also use a KeyAttribute to delay the appearance of the text until the moon has almost completed its journey.
Step 1: Resize and rotate with KeyAttribute
- Open
xml/step5.xmlwhich contains the same animation you built in the last step. For variety, this screen uses a different space picture as the background. - To make the moon expand in size and rotate, add two
KeyAttributetags in theKeyFrameSetatkeyFrame="50"andkeyFrame="100"
step5.xml
<!-- TODO: Add KeyAttributes to rotate and resize @id/moon -->

<KeyAttribute
       motion:framePosition="50"
       motion:motionTarget="@id/moon"
       android:scaleY="2.0"
       android:scaleX="2.0"
       android:rotation="-360"
/>
<KeyAttribute
       motion:framePosition="100"
       motion:motionTarget="@id/moon"
       android:rotation="-720"
/>
These KeyAttributes are applied at 50% and 100% of the animation. The first KeyAttribute at 50% will happen at the top of the arc, and causes the view to be doubled in size as well as rotate -360 degrees (or one full circle). The second KeyAttribute will finish the second rotation to -720 degrees (two full circles) and shrink the size back to regular since the scaleX and scaleY values default to 1.0.
Just like a KeyPosition , a KeyAttribute uses the framePosition and motionTarget to specify when to apply the KeyFrame , and which view to modify. MotionLayout will interpolate between KeyPositions to create fluid animations.
KeyAttributes support attributes that can be applied to all views. They support changing basic attributes such as the visibility , alpha , or elevation . You can also change the rotation like you're doing here, rotate in three dimensions with rotateX and rotateY , scale the size with scaleX and scaleY , or translate the view's position in X, Y, or Z.
Step 2: Delay the appearance of credits
One of the goals of this step is to update the animation so that the credits text doesn't appear until the animation is mostly complete.
- To delay the appearance of credits, define one more
KeyAttributethat ensures thatalphawill remain 0 untilkeyPosition="85".MotionLayoutwill still smoothly transition from 0 to 100 alpha, but it will do it over the last 15% of the animation.
step5.xml
<!-- TODO: Add KeyAttribute to delay the appearance of @id/credits -->

<KeyAttribute
       motion:framePosition="85"
       motion:motionTarget="@id/credits"
       android:alpha="0.0"
/>
This KeyAttribute keeps the alpha of @id/credits at 0.0 for the first 85% of the animation. Since it starts at an alpha of 0, this means it will be invisible for the first 85% of the animation.
The end effect of this KeyAttribute is that the credits appear towards the end of the animation. This gives the appearance of them being coordinated with the moon settling down in the right corner of the screen.
By delaying animations on one view while another view moves like this, you can build impressive animations that feel dynamic to the user.
Попробуйте!
- Run the app again and go to Step 5 to see the animation in action. When you click on the moon, it'll follow the path from start to end, going through each
KeyAttributethat was specified in theKeyFrameSet.
Because you rotate the moon two full circles, it will now do a double back flip, and the credits will delay their appearance until the animation is almost done.
Explore on your own
Before you move on to the final type of KeyFrame , try modifying other standard attributes in the KeyAttributes . For example, try changing rotation to rotationX to see what animation it produces.
Here's a list of the standard attributes that you can try:
-
android:visibility -
android:alpha -
android:elevation -
android:rotation -
android:rotationX -
android:rotationY -
android:scaleX -
android:scaleY -
android:translationX -
android:translationY -
android:translationZ
9. Changing custom attributes
Rich animations involve changing the color or other attributes of a view. While MotionLayout can use a KeyAttribute to change any of the standard attributes listed in the previous task, you use a CustomAttribute to specify any other attribute.
A CustomAttribute can be used to set any value that has a setter. For example, you can set the backgroundColor on a View using a CustomAttribute . MotionLayout will use reflection to find the setter, then call it repeatedly to animate the view.
In this step, you will use a CustomAttribute to set the colorFilter attribute on the moon to build the animation shown below.
Define custom attributes
- To get started open
xml/step6.xmlwhich contains the same animation you built in the last step. - To make the moon change colors, add two
KeyAttributewith aCustomAttributein theKeyFrameSetatkeyFrame="0",keyFrame="50"andkeyFrame="100".
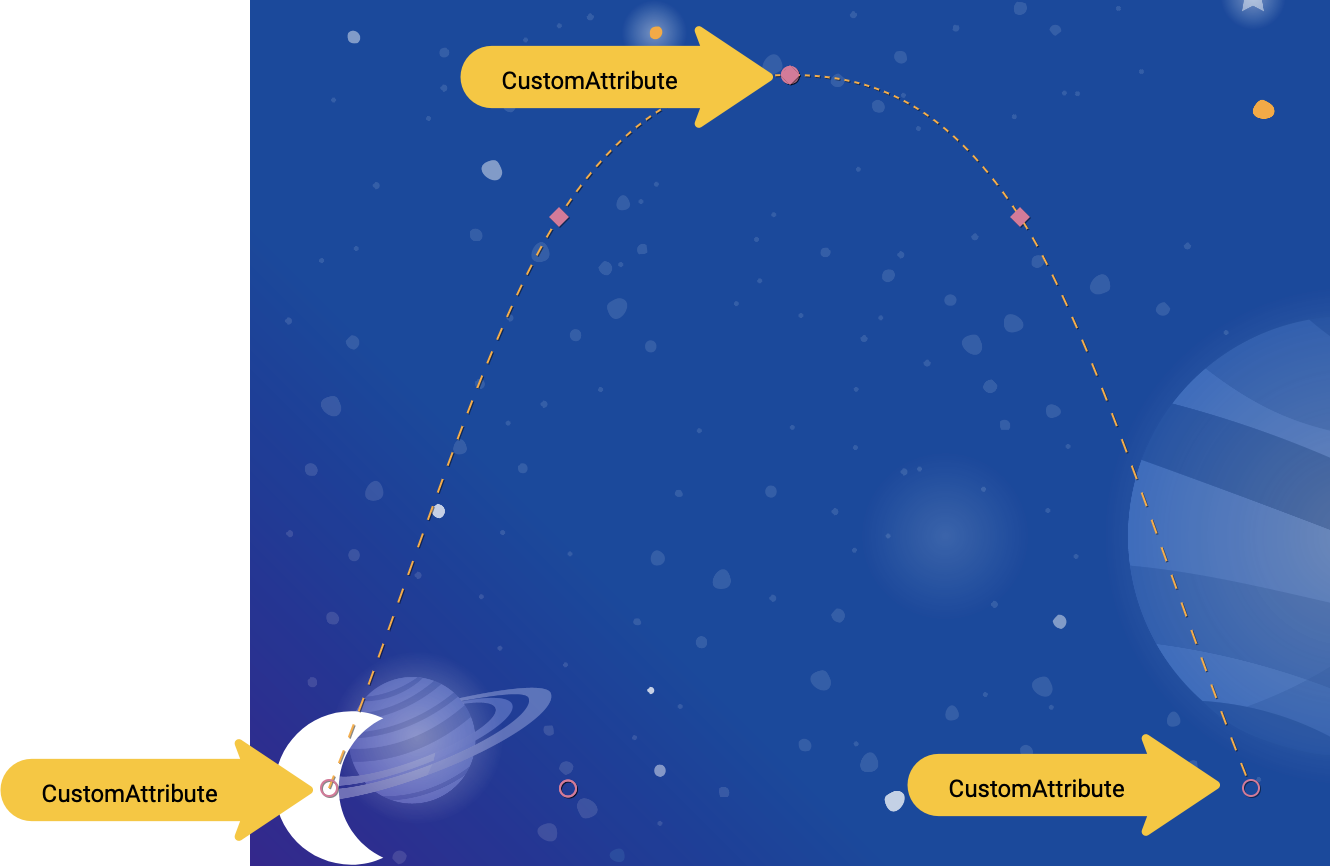
step6.xml
<!-- TODO: Add Custom attributes here -->
<KeyAttribute
       motion:framePosition="0"
       motion:motionTarget="@id/moon">
   <CustomAttribute
           motion:attributeName="colorFilter"
           motion:customColorValue="#FFFFFF"
   />
</KeyAttribute>
<KeyAttribute
       motion:framePosition="50"
       motion:motionTarget="@id/moon">
   <CustomAttribute
           motion:attributeName="colorFilter"
           motion:customColorValue="#FFB612"
   />
</KeyAttribute>
<KeyAttribute
       motion:framePosition="100"
       motion:motionTarget="@id/moon">
   <CustomAttribute
           motion:attributeName="colorFilter"
           motion:customColorValue="#FFFFFF"
   />
</KeyAttribute>
You add a CustomAttribute inside a KeyAttribute . The CustomAttribute will be applied at the framePosition specified by the KeyAttribute .
Inside the CustomAttribute you must specify an attributeName and one value to set.
-
motion:attributeNameis the name of the setter that will be called by this custom attribute. In this examplesetColorFilteronDrawablewill be called. -
motion:custom*Valueis a custom value of the type noted in the name, in this example the custom value is a color specified.
Custom values can have any of the following types:
- Цвет
- Целое число
- Плавать
- Нить
- Измерение
- Логический
Using this API, MotionLayout can animate anything that provides a setter on any view.
Попробуйте!
- Run the app again and go to Step 6 to see the animation in action. When you click on the moon, it'll follow the path from start to end, going through each
KeyAttributethat was specified in theKeyFrameSet.
When you add more KeyFrames , MotionLayout changes the path of the moon from a straight line to a complex curve, adding a double backflip, resize, and a color change midway through the animation.
In real animations, you'll often animate several views at the same time controlling their motion along different paths and speeds. By specifying a different KeyFrame for each view, it's possible to choreograph rich animations that animate multiple views with MotionLayout .
10. Drag events and complex paths
In this step you'll explore using OnSwipe with complex paths. So far, the animation of the moon has been triggered by an OnClick listener and runs for a fixed duration.
Controlling animations that have complex paths using OnSwipe , like the moon animation you've built in the last few steps, requires understanding how OnSwipe works.
Step 1: Explore OnSwipe behavior
- Open
xml/step7.xmland find the existingOnSwipedeclaration.
step7.xml
<!-- Fix OnSwipe by changing touchAnchorSide →

<OnSwipe
       motion:touchAnchorId="@id/moon"
       motion:touchAnchorSide="bottom"
/>
- Run the app on your device and go to Step 7 . See if you can produce a smooth animation by dragging the moon along the path of the arc.
When you run this animation, it doesn't look very good. After the moon reaches the top of the arc, it starts jumping around.
To understand the bug, consider what happens when the user is touching just below the top of the arc. Because the OnSwipe tag has an motion:touchAnchorSide="bottom" MotionLayout will try to make the distance between the finger and the bottom of the view constant throughout the animation.
But, since the bottom of the moon doesn't always go in the same direction, it goes up then comes back down, MotionLayout doesn't know what to do when the user has just passed the top of the arc. To consider this, since you're tracking the bottom of the moon, where should it be placed when the user is touching here?
Step 2: Use the right side
To avoid bugs like this, it is important to always choose a touchAnchorId and touchAnchorSide that always progresses in one direction throughout the duration of the entire animation.
In this animation, both the right side and the left side of the moon will progress across the screen in one direction.
However, both the bottom and the top will reverse direction. When OnSwipe attempts to track them, it will get confused when their direction changes.
- To make this animation follow touch events, change the
touchAnchorSidetoright.
step7.xml
<!-- Fix OnSwipe by changing touchAnchorSide →

<OnSwipe
       motion:touchAnchorId="@id/moon"
       motion:touchAnchorSide="right"
/>
Step 3: Use dragDirection
You can also combine dragDirection with touchAnchorSide to make a side track a different direction than it normally would. It's still important that the touchAnchorSide only progresses in one direction, but you can tell MotionLayout which direction to track. For example, you can keep the touchAnchorSide="bottom" , but add dragDirection="dragRight" . This will cause MotionLayout to track the position of the bottom of the view, but only consider its location when moving right (it ignores vertical motion). So, even though the bottom goes up and down, it will still animate correctly with OnSwipe .
- Update
OnSwipeto track the moon's motion correctly.
step7.xml
<!-- Using dragDirection to control the direction of drag tracking →

<OnSwipe
       motion:touchAnchorId="@id/moon"
       motion:touchAnchorSide="bottom"
       motion:dragDirection="dragRight"
/>
Попробуйте!
- Run the app again and try dragging the moon through the entire path. Even though it follows a complex arc,
MotionLayoutwill be able to progress the animation in response to swipe events.
11. Running motion with code
MotionLayout can be used to build rich animations when used with CoordinatorLayout . In this step, you'll build a collapsible header using MotionLayout .
Step 1: Explore the existing code
- To get started, open
layout/activity_step8.xml. - In
layout/activity_step8.xml, you see that a workingCoordinatorLayoutandAppBarLayoutis already built.
activity_step8.xml
<androidx.coordinatorlayout.widget.CoordinatorLayout
       ...>
   <com.google.android.material.appbar.AppBarLayout
           android:id="@+id/appbar_layout"
           android:layout_width="match_parent"
           android:layout_height="180dp">
       <androidx.constraintlayout.motion.widget.MotionLayout
               android:id="@+id/motion_layout"
               ... >
           ...
       </androidx.constraintlayout.motion.widget.MotionLayout>
   </com.google.android.material.appbar.AppBarLayout>

   <androidx.core.widget.NestedScrollView
           ...
           motion:layout_behavior="@string/appbar_scrolling_view_behavior" >
           ...
   </androidx.core.widget.NestedScrollView>
</androidx.coordinatorlayout.widget.CoordinatorLayout>
This layout uses a CoordinatorLayout to share scrolling information between the NestedScrollView and the AppBarLayout . So, when the NestedScrollView scrolls up, it will tell the AppBarLayout about the change. That's how you implement a collapsing toolbar like this on Android—the scrolling of the text will be "coordinated" with the collapsing header.
The motion scene that @id/motion_layout points to is similar to the motion scene in the last step. However, the OnSwipe declaration was removed to enable it to work with CoordinatorLayout .
- Run the app and go to Step 8 . You see that when you scroll the text, the moon does not move.
Step 2: Make the MotionLayout scroll
- To make the
MotionLayoutview scroll as soon as theNestedScrollViewscrolls, addmotion:minHeightandmotion:layout_scrollFlagsto theMotionLayout.
activity_step8.xml
<!-- Add minHeight and layout_scrollFlags to the MotionLayout -->

<androidx.constraintlayout.motion.widget.MotionLayout
       android:id="@+id/motion_layout"
       android:layout_width="match_parent"
       android:layout_height="match_parent"
       motion:layoutDescription="@xml/step8"
       motion:motionDebug="SHOW_PATH"
       android:minHeight="80dp"
       motion:layout_scrollFlags="scroll|enterAlways|snap|exitUntilCollapsed"  >
- Run the app again and go to Step 8 . You see that the
MotionLayoutcollapses as you scroll up. However, the animation does not progress based on the scroll behavior yet.
Step 3: Move the motion with code
- Open
Step8Activity.kt. Edit thecoordinateMotion()function to tellMotionLayoutabout the changes in scroll position.
Step8Activity.kt
// TODO: set progress of MotionLayout based on an AppBarLayout.OnOffsetChangedListener

private fun coordinateMotion() {
    val appBarLayout: AppBarLayout = findViewById(R.id.appbar_layout)
    val motionLayout: MotionLayout = findViewById(R.id.motion_layout)

    val listener = AppBarLayout.OnOffsetChangedListener { unused, verticalOffset ->
        val seekPosition = -verticalOffset / appBarLayout.totalScrollRange.toFloat()
        motionLayout.progress = seekPosition
    }

    appBarLayout.addOnOffsetChangedListener(listener)
}
This code will register a OnOffsetChangedListener that will be called every time the user scrolls with the current scroll offset.
MotionLayout supports seeking its transition by setting the progress property. To convert between a verticalOffset and a percentage progress, divide by the total scroll range.
Попробуйте!
- Deploy the app again and run the Step 8 animation. You see that
MotionLayoutwill progress the animation based on the scroll position.
It's possible to build custom dynamic collapsing toolbar animations using MotionLayout . By using a sequence of KeyFrames you can achieve very bold effects.
12. Поздравляем!
This codelab covered the basic API of MotionLayout .
To see more examples of MotionLayout in practice, check out the official sample . And be sure to check out the documentation !
Узнать больше
MotionLayout supports even more features not covered in this codelab, like KeyCycle, which lets you control paths or attributes with repeating cycles, and KeyTimeCycle, which lets you animate based on clock time. Check out the samples for examples of each.
For links to other codelabs in this course, see the Advanced Android in Kotlin codelabs landing page .