
1. Introduction
A Private Service Connect interface is a resource that lets a producer Virtual Private Cloud (VPC) network initiate connections to various destinations in a consumer VPC network. Producer and consumer networks can be in different projects and organizations.
If a network attachment accepts a connection from a Private Service Connect interface, Google Cloud allocates the interface an IP address from a consumer subnet that's specified by the network attachment. The consumer and producer networks are connected and can communicate by using internal IP addresses.
A connection between a network attachment and a Private Service Connect interface is similar to the connection between a Private Service Connect endpoint and a service attachment, but it has two key differences:
- A network attachment lets a producer network initiate connections to a consumer network (managed service egress), while an endpoint lets a consumer network initiate connections to a producer network (managed service ingress).
- A Private Service Connect interface connection is transitive. This means that a producer network can communicate with other networks that are connected to the consumer network.
What you'll build
In this tutorial, you're going to build a comprehensive Private Service Connect (PSC) Interface architecture that utilizes Cloud Firewall rules to allow and deny connectivity from the producer to the consumer's compute as illustrated in Figure 1.
Figure 1
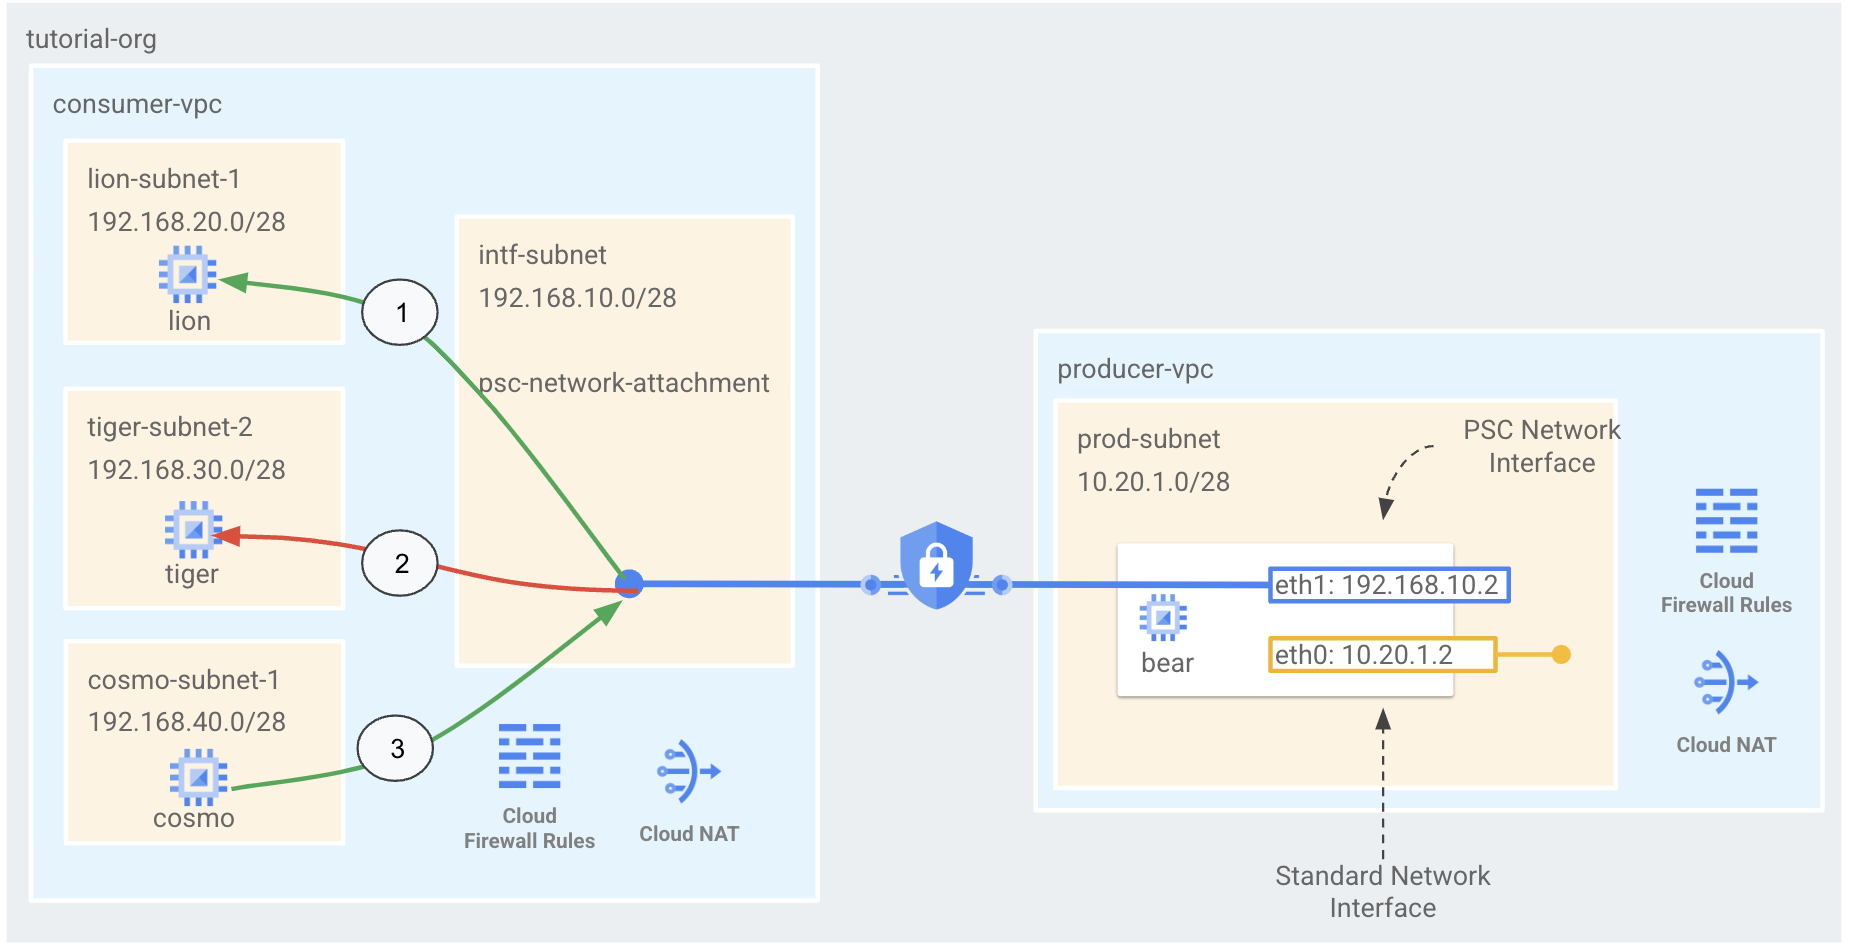
You'll create a single psc-network-attachment in the consumer VPC resulting in the following use cases:
- Create a Cloud Firewall rule to allow access from bear to lion
- Create a Cloud Firewall rule deny access from bear to tiger
- Create a Cloud Firewall rule to allow access from cosmo to bear
What you'll learn
- How to create a network attachment
- How a producer can use a network attachment to create a PSC interface
- How to establish communication from the producer to the consumer
- How to allow access from the producer VM (bear) to the consumer VM (lion)
- How to block access from the producer VM (bear) to the consumer VM (tiger)
- How to allow access from the consumer VM (cosmo) to the producer VM (bear)
What you'll need
- Google Cloud Project
- IAM Permissions
- Compute Network Admin (roles/compute.networkAdmin)
- Compute Instance Admin (roles/compute.instanceAdmin)
- Compute Security Admin (roles/compute.securityAdmin)
2. Before you begin
Update the project to support the tutorial
This tutorial makes use of $variables to aid gcloud configuration implementation in Cloud Shell.
Inside Cloud Shell, perform the following:
gcloud config list project
gcloud config set project [YOUR-PROJECT-NAME]
projectid=YOUR-PROJECT-NAME
echo $projectid
3. Consumer Setup
Create the Consumer VPC
Inside Cloud Shell, perform the following:
gcloud compute networks create consumer-vpc --project=$projectid --subnet-mode=custom
Create the consumer subnets
Inside Cloud Shell, perform the following:
gcloud compute networks subnets create lion-subnet-1 --project=$projectid --range=192.168.20.0/28 --network=consumer-vpc --region=us-central1
Inside Cloud Shell, perform the following:
gcloud compute networks subnets create tiger-subnet-1 --project=$projectid --range=192.168.30.0/28 --network=consumer-vpc --region=us-central1
Inside Cloud Shell, perform the following:
gcloud compute networks subnets create cosmo-subnet-1 --project=$projectid --range=192.168.40.0/28 --network=consumer-vpc --region=us-central1
Create the Private Service Connect Network Attachment subnet
Inside Cloud Shell, perform the following:
gcloud compute networks subnets create intf-subnet --project=$projectid --range=192.168.10.0/28 --network=consumer-vpc --region=us-central1
Cloud Router and NAT configuration
Cloud NAT is used in the tutorial for software package installation because the VM instance does not have a public IP address. Cloud NAT enables VMs with private IP addresses to access the internet.
Inside Cloud Shell, create the cloud router.
gcloud compute routers create cloud-router-for-nat --network consumer-vpc --region us-central1
Inside Cloud Shell, create the NAT gateway.
gcloud compute routers nats create cloud-nat-us-central1 --router=cloud-router-for-nat --auto-allocate-nat-external-ips --nat-all-subnet-ip-ranges --region us-central1
4. Enable IAP
To allow IAP to connect to your VM instances, create a firewall rule that:
- Applies to all VM instances that you want to be accessible by using IAP.
- Allows ingress traffic from the IP range 35.235.240.0/20. This range contains all IP addresses that IAP uses for TCP forwarding.
Inside Cloud Shell, create the IAP firewall rule.
gcloud compute firewall-rules create ssh-iap-consumer \
    --network consumer-vpc \
    --allow tcp:22 \
    --source-ranges=35.235.240.0/20
5. Create consumer VM instances
Inside Cloud Shell, create the consumer vm instance, lion.
gcloud compute instances create lion \
    --project=$projectid \
    --machine-type=e2-micro \
    --image-family debian-11 \
    --no-address \
    --image-project debian-cloud \
    --zone us-central1-a \
    --subnet=lion-subnet-1 \
    --metadata startup-script="#! /bin/bash
      sudo apt-get update
      sudo apt-get install tcpdump
      sudo apt-get install apache2 -y
      sudo service apache2 restart
      echo 'Welcome to the lion app server !!' | tee /var/www/html/index.html
      EOF"
Inside Cloud Shell, create the consumer vm instance, tiger.
gcloud compute instances create tiger \
    --project=$projectid \
    --machine-type=e2-micro \
    --image-family debian-11 \
    --no-address \
    --image-project debian-cloud \
    --zone us-central1-a \
    --subnet=tiger-subnet-1 \
    --metadata startup-script="#! /bin/bash
      sudo apt-get update
      sudo apt-get install tcpdump
      sudo apt-get install apache2 -y
      sudo service apache2 restart
      echo 'Welcome to the tiger app server !!' | tee /var/www/html/index.html
      EOF"
Inside Cloud Shell, create the consumer vm instance, cosmo.
gcloud compute instances create cosmo \
    --project=$projectid \
    --machine-type=e2-micro \
    --image-family debian-11 \
    --no-address \
    --image-project debian-cloud \
    --zone us-central1-a \
    --subnet=cosmo-subnet-1 \
    --metadata startup-script="#! /bin/bash
      sudo apt-get update
      sudo apt-get install tcpdump
      sudo apt-get install apache2 -y
      sudo service apache2 restart
      echo 'Welcome to the cosmo app server !!' | tee /var/www/html/index.html
      EOF"
Obtain and store the IP Addresses of the instances:
Inside Cloud Shell, perform a describe against the lion and tiger VM instances.
gcloud compute instances describe lion --zone=us-central1-a | grep  networkIP:

gcloud compute instances describe tiger --zone=us-central1-a | grep  networkIP:

gcloud compute instances describe cosmo --zone=us-central1-a | grep  networkIP:
6. Private Service Connect network attachment
Network attachments are regional resources that represent the consumer side of a Private Service Connect interface. You associate a single subnet with a network attachment, and the producer assigns IPs to the Private Service Connect interface from that subnet. The subnet must be in the same region as the network attachment. A network attachment must be in the same region as the producer service.
Create the network attachment
Inside Cloud Shell, create the network attachment.
gcloud compute network-attachments create psc-network-attachment \
    --region=us-central1 \
    --connection-preference=ACCEPT_MANUAL \
    --producer-accept-list=$projectid \
    --subnets=intf-subnet
List the network attachments
Inside Cloud Shell, list the network attachment.
gcloud compute network-attachments list
Describe the network attachments
Inside Cloud Shell, describe the network attachment.
gcloud compute network-attachments describe psc-network-attachment --region=us-central1
Make note of the psc-network-attachment URI that will be used by the producer when creating the Private Service Connect Interface. Example below:
user@cloudshell$ gcloud compute network-attachments describe psc-network-attachment --region=us-central1
connectionPreference: ACCEPT_MANUAL
creationTimestamp: '2023-06-06T20:57:12.623-07:00'
fingerprint: 4Yq6xAfaRO0=
id: '3235195049527328503'
kind: compute#networkAttachment
name: psc-network-attachment
network: https://www.googleapis.com/compute/v1/projects/$projectid/global/networks/consumer-vpc
producerAcceptLists:
- $projectid
region: https://www.googleapis.com/compute/v1/projects/$projectid/regions/us-central1
selfLink: https://www.googleapis.com/compute/v1/projects/$projectid/regions/us-central1/networkAttachments/psc-network-attachment
subnetworks:
- https://www.googleapis.com/compute/v1/projects/$projectid/regions/us-central1/subnetworks/intf-subnet
7. Producer Setup
Create the producer VPC network
Inside Cloud Shell, perform the following:
gcloud compute networks create producer-vpc --project=$projectid --subnet-mode=custom
Create the producer subnets
Inside Cloud Shell, create the subnet used for the vNIC0 of the psc interface.
gcloud compute networks subnets create prod-subnet --project=$projectid --range=10.20.1.0/28 --network=producer-vpc --region=us-central1
8. Enable IAP
To allow IAP to connect to your VM instances, create a firewall rule that:
- Applies to all VM instances that you want to be accessible by using IAP.
- Allows ingress traffic from the IP range 35.235.240.0/20. This range contains all IP addresses that IAP uses for TCP forwarding.
Inside Cloud Shell, create the IAP firewall rule.
gcloud compute firewall-rules create ssh-iap-producer \
    --network producer-vpc \
    --allow tcp:22 \
    --source-ranges=35.235.240.0/20
9. Create the Private Service Connect Interface
A Private Service Connect interface is a resource that lets a producer Virtual Private Cloud (VPC) network initiate connections to various destinations in a consumer VPC network. Producer and consumer networks can be in different projects and organizations.
If a network attachment accepts a connection from a Private Service Connect interface, Google Cloud allocates the interface an IP address from a consumer subnet that's specified by the network attachment. The consumer and producer networks are connected and can communicate by using internal IP addresses.
Inside Cloud Shell, create the Private Service Connect interface (bear) and insert the previously identified psc-network-attachment URI from the network attachment describe output.
gcloud compute instances create bear --zone us-central1-a --machine-type=f1-micro --can-ip-forward --network-interface subnet=prod-subnet,network=producer-vpc,no-address --network-interface network-attachment=https://www.googleapis.com/compute/v1/projects/$projectid/regions/us-central1/networkAttachments/psc-network-attachment
Multi-nic validation
Validate the PSC interface is configured with the appropriate IP Address. vNIC0 will use the producer prod-subnet (10.20.1.0/28) and vNIC1 will use the consumer intf-subnet (192.168.10.0/28).
gcloud compute instances describe bear --zone=us-central1-a | grep networkIP:
Example:
user$ gcloud compute instances describe bear --zone=us-central1-a | grep networkIP:
  networkIP: 10.20.1.2
  networkIP: 192.168.10.2
10. Update consumer firewall rules
Create a Cloud Firewall rule to allow access from bear to lion
In cloud Shell, create a higher priority rule that allows egress from the IP address range of attachment-subnet (intf-subnet) to destinations in the address range of lion-subnet-1.
gcloud compute firewall-rules create allow-limited-egress-to-lion \
    --network=consumer-vpc \
    --action=ALLOW \
    --rules=ALL \
    --direction=EGRESS \
    --priority=1000 \
    --source-ranges="192.168.10.0/28" \
    --destination-ranges="192.168.20.0/28" \
    --enable-logging
In cloud Shell, create an ingress allow rule that overrides the implied deny ingress rule for traffic from psc-network-attachment subnet.
gcloud compute firewall-rules create allow-ingress \
--network=consumer-vpc \
--action=ALLOW \
--rules=ALL \
--direction=INGRESS \
--priority=1000 \
--source-ranges="192.168.10.0/28" \
--enable-logging
Create a Cloud Firewall rule deny access from bear to all ranges (tiger included)
In cloud Shell, create a low-priority rule that denies all egress traffic from the IP address range of the network attachment's subnet, intf-subnet.
gcloud compute firewall-rules create deny-all-egress \
    --network=consumer-vpc \
    --action=DENY \
    --rules=ALL \
    --direction=EGRESS \
    --priority=65534 \
    --source-ranges="192.168.10.0/28" \
    --destination-ranges="0.0.0.0/0" \
    --enable-logging
Create a Cloud Firewall rule to allow access from cosmo to bear
In cloud Shell, create an ingress allow rule that overrides the implied deny ingress rule for traffic from psc-network-attachment subnet.
gcloud compute firewall-rules create vm-subnet-allow-ingress \
    --network=consumer-vpc \
    --action=ALLOW \
    --rules=ALL \
    --direction=INGRESS \
    --priority=1000 \
    --source-ranges="192.168.40.0/28" \
    --destination-ranges="192.168.10.0/28" \
    --enable-logging
11. Create linux routes for the PSC interface
From the PSC interface instance, configure linux routes to allow producer communication to the consumer subnets.
Find the guest OS name of your Private Service Connect interface
To configure routing, you need to know the guest OS name of your Private Service Connect interface, which is different than the interface's name in Google Cloud.
Inside Cloud Shell open a new tab and perform the following:
gcloud config list project
gcloud config set project [YOUR-PROJECT-NAME]
projectid=YOUR-PROJECT-NAME
echo $projectid
Log into the psc-interface vm, bear, using IAP in Cloud Shell.
gcloud compute ssh bear --project=$projectid --zone=us-central1-a --tunnel-through-iap
In cloud Shell obtain the IP address of the psc-interface instance
ip a
Example:
user@bear:~$ ip a
1: lo: <LOOPBACK,UP,LOWER_UP> mtu 65536 qdisc noqueue state UNKNOWN group default qlen 1000
    link/loopback 00:00:00:00:00:00 brd 00:00:00:00:00:00
    inet 127.0.0.1/8 scope host lo
       valid_lft forever preferred_lft forever
    inet6 ::1/128 scope host
       valid_lft forever preferred_lft forever
2: ens4: <BROADCAST,MULTICAST,UP,LOWER_UP> mtu 1460 qdisc pfifo_fast state UP group default qlen 1000
    link/ether 42:01:0a:14:01:02 brd ff:ff:ff:ff:ff:ff
    altname enp0s4
    inet 10.20.1.2/32 brd 10.20.1.2 scope global dynamic ens4
       valid_lft 85991sec preferred_lft 85991sec
    inet6 fe80::4001:aff:fe14:102/64 scope link
       valid_lft forever preferred_lft forever
3: ens5: <BROADCAST,MULTICAST,UP,LOWER_UP> mtu 1460 qdisc pfifo_fast state UP group default qlen 1000
    link/ether 42:01:c0:a8:0a:02 brd ff:ff:ff:ff:ff:ff
    altname enp0s5
    inet 192.168.10.2/32 brd 192.168.10.2 scope global dynamic ens5
       valid_lft 85991sec preferred_lft 85991sec
    inet6 fe80::4001:c0ff:fea8:a02/64 scope link
       valid_lft forever preferred_lft forever
Find the gateway IP of your PSC interface
In the list of network interfaces, find and store the interface name that is associated with your Private Service Connect interface's IP address—for example, ens5 (vNIC1)
To configure routing, you need to know the IP address of your Private Service Connect interface's default gateway
In cloud Shell we will use 1 since the PSC interface is associated with vNIC1.
curl http://metadata.google.internal/computeMetadata/v1/instance/network-interfaces/1/gateway -H "Metadata-Flavor: Google" && echo
Example produces the default gw 192.168.10.1
user@bear:~$ curl http://metadata.google.internal/computeMetadata/v1/instance/network-interfaces/1/gateway -H "Metadata-Flavor: Google" && echo
192.168.10.1
Add routes for consumer subnets
You must add a route to your Private Service Connect interface's default gateway for each consumer subnet that connects to your Private Service Connect interface. This ensures that traffic that is bound for the consumer network egresses from the Private Service Connect interface.
In the bear instance add the routes to the consumer subnets.
sudo ip route add 192.168.20.0/28 via 192.168.10.1 dev ens5
sudo ip route add 192.168.30.0/28 via 192.168.10.1 dev ens5
sudo ip route add 192.168.40.0/28 via 192.168.10.1 dev ens5
Validate route table
In Cloud Shell validate the newly added routes.
ip route show
Example.
user@bear:~$ ip route show
default via 10.20.1.1 dev ens4
10.20.1.0/28 via 10.20.1.1 dev ens4
10.20.1.1 dev ens4 scope link
192.168.10.0/28 via 192.168.10.1 dev ens5
192.168.10.1 dev ens5 scope link
192.168.20.0/28 via 192.168.10.1 dev ens5
192.168.30.0/28 via 192.168.10.1 dev ens5
192.168.40.0/28 via 192.168.10.1 dev ens5
12. Validate successful bear to lion connectivity
Let's confirm that the producer VM instance, bear, can communicate with the consumer instance, lion by performing a curl.
From the bear instance, perform a curl against lion's IP Address identified earlier in the tutorial from the bear instance.
curl -v <lions IP Address>
Example:
user@bear:~$ curl -v 192.168.20.2
*   Trying 192.168.20.2:80...
* Connected to 192.168.20.2 (192.168.20.2) port 80 (#0)
> GET / HTTP/1.1
> Host: 192.168.20.2
> User-Agent: curl/7.74.0
> Accept: */*
>
* Mark bundle as not supporting multiuse
< HTTP/1.1 200 OK
< Date: Tue, 06 Jun 2023 03:53:08 GMT
< Server: Apache/2.4.56 (Debian)
< Last-Modified: Mon, 05 Jun 2023 19:41:26 GMT
< ETag: "1e-5fd6716a1e11b"
< Accept-Ranges: bytes
< Content-Length: 30
< Content-Type: text/html
<
Welcome to lion app server !!
* Connection #0 to host 192.168.20.2 left intact
13. Validate bear to tiger connectivity is blocked
Let's confirm the egress firewall rule is blocking access from bear to tiger by viewing firewall logs.
From a new Cloud Console session and Navigate to Logging → Logs Explorer → Select Show query

Paste the query string below into the search field then select stream
jsonPayload.rule_details.reference="network:consumer-vpc/firewall:deny-all-egress"

From the bear instance, perform a curl against tiger's IP Address identified earlier in the tutorial from the bear instance. The curl will eventually time out.
curl -v <tiger's IP Address>
Example:
user@bear:~$ curl -v 192.168.30.2
*   Trying 192.168.30.2:80...
* connect to 192.168.30.2 port 80 failed: Connection timed out
* Failed to connect to 192.168.30.2 port 80: Connection timed out
* Closing connection 0
curl: (28) Failed to connect to 192.168.30.2 port 80: Connection timed out
Validate that Log Explorer has captured denied firewall logs. Select a log entry and expand nested fields to view metadata.

14. Validate cosmo to bear connectivity is successful
Open a new Cloud Shell tab and update your project settings.
Inside Cloud Shell, perform the following:
gcloud config list project
gcloud config set project [YOUR-PROJECT-NAME]
projectid=YOUR-PROJECT-NAME
echo $projectid
Log into the cosmo instance using IAP in Cloud Shell.
gcloud compute ssh cosmo --project=$projectid --zone=us-central1-a --tunnel-through-iap
In Cloud Shell perform a ping against bear's IP vNIV1 IP Address identified earlier in the tutorial
ping <bears vNIC1 IP Address>
Example:
user@cosmo:~$ ping 192.168.10.2 -c 5
PING 192.168.10.2 (192.168.10.2) 56(84) bytes of data.
64 bytes from 192.168.10.2: icmp_seq=1 ttl=64 time=0.277 ms
64 bytes from 192.168.10.2: icmp_seq=2 ttl=64 time=0.288 ms
64 bytes from 192.168.10.2: icmp_seq=3 ttl=64 time=0.265 ms
64 bytes from 192.168.10.2: icmp_seq=4 ttl=64 time=0.264 ms
64 bytes from 192.168.10.2: icmp_seq=5 ttl=64 time=0.366 ms
15. Clean up
From Cloud Shell, delete tutorial components.
gcloud compute instances delete bear --zone=us-central1-a --quiet

gcloud compute instances delete lion --zone=us-central1-a --quiet

gcloud compute instances delete tiger --zone=us-central1-a --quiet

gcloud compute instances delete cosmo --zone=us-central1-a --quiet

gcloud compute network-attachments delete psc-network-attachment --region=us-central1 --quiet

gcloud compute firewall-rules delete allow-ingress allow-limited-egress-to-lion deny-all-egress ssh-iap-consumer ssh-iap-producer vm-subnet-allow-ingress --quiet

gcloud compute networks subnets delete cosmo-subnet-1 intf-subnet lion-subnet-1 prod-subnet tiger-subnet-1 --region=us-central1 --quiet

gcloud compute routers delete cloud-router-for-nat --region=us-central1 --quiet

gcloud compute networks delete consumer-vpc --quiet

gcloud compute networks delete producer-vpc --quiet
16. Congratulations
Congratulations, you've successfully configured and validated a Private Service Connect Interface and consumer and producer connectivity by implementing firewall rules.
You created the consumer infrastructure, and you added a network attachment that allowed the producer to create a multi nic vm to bridge consumer and producer communication. You learned how to create firewall rules in the consumer VPC network that allowed connectivity to the instances in the consumer and producer VPC.
Cosmopup thinks tutorials are awesome!!

What's next?
Check out some of these tutorials...
- Using Private Service Connect to publish and consume services with GKE
- Using Private Service Connect to publish and consume services
- Connect to on-prem services over Hybrid Networking using Private Service Connect and an internal TCP Proxy load balancer