
1. 概要
自然言語処理(NLP)は、テキストデータから分析情報を導き出し、分析を行う研究分野です。インターネット上で生成されるテキストの量がますます増える中、企業はビジネスに関連する情報を得るために、テキストを活用しようとしています。
NLP は、言語の翻訳から感情分析、文章の生成まで、あらゆることに使用できます。NLP は活発な研究分野であり、テキストの扱い方を変革しています。
ここでは、大量のテキストデータに対して NLP を大規模に適用する方法について説明します。これは難しい作業に思えるかもしれませんが、Spark MLlib や spark-nlp などのライブラリを利用することで、簡単に実現できます。
2. ユースケース
架空の組織「FoodCorp」のチーフ データ サイエンティストは、食品業界のトレンドについて詳しく知りたいと考えています。Reddit のサブレディット r/food の投稿という形式のテキストデータのコーパスにアクセスできるため、これを使用して人々の話題を調査します。
この方法の 1 つに、「トピック モデリング」と呼ばれる NLP 手法があります。トピック モデリングは、ドキュメント グループの意味的意味のトレンドを特定できる統計的手法です。つまり、Reddit の「投稿」のコーパスにトピック モデルを構築すると、トレンドを表す「トピック」または単語のグループのリストが生成されます。
モデルの構築には、テキストのクラスタリングによく使用される Latent Dirichlet Allocation(LDA)というアルゴリズムを使用します。LDA の概要については、こちらをご覧ください。
3. プロジェクトを作成する
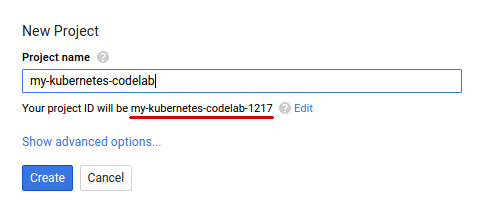
Google アカウント(Gmail または Google Apps)をお持ちでない場合は、1 つ作成する必要があります。Google Cloud Platform のコンソール(console.cloud.google.com)にログインし、新しいプロジェクトを作成します。


次に、Google Cloud リソースを使用するために、Cloud Console で 課金を有効にする必要があります。
この Codelab の操作をすべて行って、費用が生じたとしても、少額です。その他のリソースを使いたい場合や、実行したままにしておきたいステップがある場合は、追加コストがかかる可能性があります。PySpark-BigQuery Codelab と Spark-NLP Codelab のそれぞれで、最後に「クリーンアップ」について説明しています。
Google Cloud Platform の新規ユーザーは、 300 ドル分の無料トライアルの特典があります。
4. 環境を設定する
まず、Dataproc API と Compute Engine API を有効にする必要があります。
画面の左上にあるメニュー アイコンをクリックします。

プルダウンから [API マネージャー] を選択します。
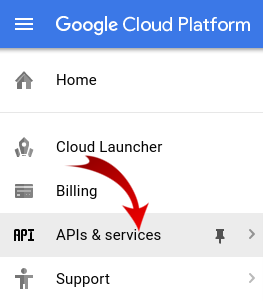
[API とサービスの有効化] をクリックします。

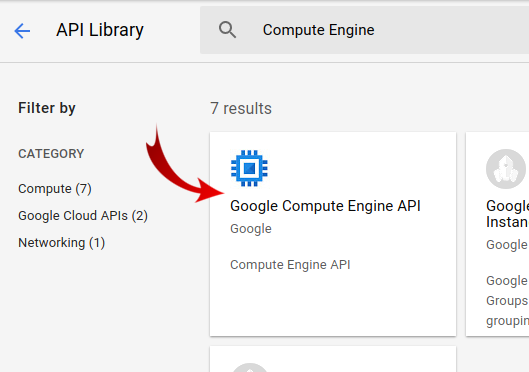
検索ボックスに「Compute Engine」と入力します。表示された結果リストで [Google Compute Engine API] をクリックします。
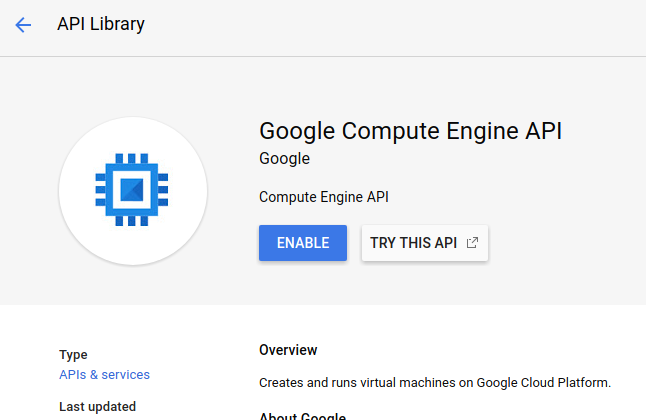
[Google Compute Engine] ページで [有効にする] をクリックします。
有効になったら、左向き矢印をクリックして戻ります。
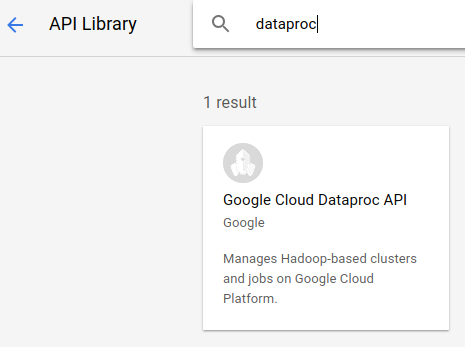
次に、「Google Dataproc API」を検索して有効にします。
次に Cloud コンソールの右上にあるボタンをクリックして Cloud Shell を開きます。

Codelab を進める際に参照できる環境変数を設定します。まず、作成する Dataproc クラスタの名前(「my-cluster」など)を選択し、環境に設定します。任意の名前を使用できます。
CLUSTER_NAME=my-cluster
次に、こちらで利用可能なゾーンのいずれかを選択します。たとえば、us-east1-b. などです。
REGION=us-east1
最後に、ジョブがデータを読み取るソースバケットを設定する必要があります。バケット bm_reddit にサンプルデータがありますが、このチュートリアルより前に PySpark を使用して BigQuery データを前処理するを完了した場合は、そのデータを使用してもかまいません。
BUCKET_NAME=bm_reddit
環境変数を構成したら、次のコマンドを実行して Dataproc クラスタを作成します。
 gcloud beta dataproc clusters create ${CLUSTER_NAME} \
     --region ${REGION} \
     --metadata 'PIP_PACKAGES=google-cloud-storage spark-nlp==2.7.2' \
     --worker-machine-type n1-standard-8 \
     --num-workers 4 \
     --image-version 1.4-debian10 \
     --initialization-actions gs://dataproc-initialization-actions/python/pip-install.sh \
     --optional-components=JUPYTER,ANACONDA \
     --enable-component-gateway
各コマンドについて説明します。
gcloud beta dataproc clusters create ${CLUSTER_NAME}: 先ほど指定した名前で Dataproc クラスタの作成を開始します。ここでは beta を含めて、後述するコンポーネント ゲートウェイなどの Dataproc のベータ版機能を有効にします。
--zone=${ZONE}: クラスタのロケーションを設定します。
--worker-machine-type n1-standard-8: ワーカーに使用するマシンのタイプです。
--num-workers 4: クラスタに 4 つのワーカーを配置します。
--image-version 1.4-debian9: 使用する Dataproc のイメージ バージョンを示します。
--initialization-actions ...: 初期化アクションは、クラスタとワーカーの作成時に実行されるカスタム スクリプトです。ユーザーが作成して GCS バケットに保存するか、一般公開バケット dataproc-initialization-actions から参照できます。ここに記載されている初期化アクションでは、--metadata フラグで指定されているように、Pip を使用して Python パッケージをインストールできます。
--metadata 'PIP_PACKAGES=google-cloud-storage spark-nlp': Dataproc にインストールするパッケージのスペース区切りリストです。この例では、google-cloud-storage Python クライアント ライブラリと spark-nlp をインストールします。
--optional-components=ANACONDA: オプション コンポーネントは、Dataproc で使用される一般的なパッケージで、作成時に Dataproc クラスタに自動的にインストールされます。初期化アクションよりもオプション コンポーネントを使用するメリットとしては、起動時間が短く、特定の Dataproc バージョンでテストされていることが挙げられます。全体的に信頼性が高くなります。
--enable-component-gateway: このフラグを使用すると、Dataproc のコンポーネント ゲートウェイを利用して、Zeppelin、Jupyter、Spark History などの一般的な UI を表示できます。注: 一部の UI では、関連するオプション コンポーネントが必要です。
Dataproc の詳細については、こちらの Codelab をご覧ください。
次に、Cloud Shell で次のコマンドを実行して、サンプルコードを含むリポジトリのクローンを作成し、正しいディレクトリに移動します。
cd
git clone https://github.com/GoogleCloudPlatform/cloud-dataproc
cd cloud-dataproc/codelabs/spark-nlp
5. Spark MLlib
Spark MLlib は、Apache Spark で記述されたスケーラブルな ML ライブラリです。MLlib は、一連の微調整された ML アルゴリズムで Spark の効率性を活用することで、大量のデータを分析できます。Java、Scala、Python、R の API が用意されています。この Codelab では、特に Python に焦点を当てます。
MLlib には、多数のトランスフォーマーとエスティメータが含まれています。トランスフォーマーは、通常は transform() 関数を使用してデータを変更または変更できるツールです。エスティメータは、通常は fit() 関数を使用してデータをトレーニングできる事前構築済みのアルゴリズムです。
トランスフォーマーの例を次に示します。
- トークン化(単語の文字列から数値のベクトルを作成)
- ワンホット エンコーディング(文字列内の単語を表す数値のスパース ベクトルを作成)
- ストップワード リムーバー(文字列に意味的な価値を追加しない単語を削除)
エスティメータの例を次に示します。
- 分類(これはリンゴですか、オレンジですか?)
- 回帰(このリンゴの価格はいくらですか?)
- クラスタリング(すべてのリンゴはどの程度似ていますか?)
- 決定木(色 == オレンジの場合はオレンジです。それ以外の場合はリンゴです)
- 次元削減(データセットから特徴を削除しても、リンゴとオレンジを区別できますか?)
MLlib には、ハイパーパラメータの調整と選択、交差検証など、ML の他の一般的な手法のツールも含まれています。
また、MLlib には Pipelines API が含まれています。この API を使用すると、 で再実行できるさまざまなトランスフォーマーを使用して、データ変換パイプラインを構築できます。
6. Spark-NLP
Spark-nlp は、John Snow Labs が作成したライブラリで、Spark を使用して効率的な自然言語処理タスクを実行します。これには、次のような一般的なタスク用のアノテーターと呼ばれる組み込みツールが含まれています。
- トークン化(単語の文字列から数値のベクトルを作成)
- 単語埋め込みの作成(ベクトルを介して単語間の関係を定義)
- 品詞タグ(どの単語が名詞ですか?どの単語が動詞ですか?)
この Codelab の範囲外ですが、spark-nlp は TensorFlow とも統合されています。
おそらく最も重要なのは、Spark-NLP が MLlib パイプラインに簡単に組み込めるコンポーネントを提供することで、Spark MLlib の機能を拡張することです。
7. 自然言語処理のベスト プラクティス
データから有用な情報を抽出する前に、いくつかの準備を行う必要があります。前処理の手順は次のとおりです。
トークン化
通常、最初に行うことはデータの「トークン化」です。これには、データを受け取り、「トークン」または単語に基づいて分割することが含まれます。通常、このステップでは句読点を削除し、すべての単語を小文字に設定します。たとえば、次の文字列があるとします。What time is it? トークン化後、この文は 4 つのトークン("what" , "time", "is", "it".)で構成されます。モデルで what という単語を、大文字と小文字が異なる 2 つの異なる単語として扱うことは望ましくありません。また、句読点は通常、単語からの推論をより適切に学習するのに役立たないため、句読点も削除します。
正規化
多くの場合、データを「正規化」する必要があります。これにより、意味が似ている単語が同じものに置き換えられます。たとえば、テキストで「fought」、「battled」、「dueled」という単語が識別された場合、正規化により「battled」と「dueled」が「fought」という単語に置き換えられることがあります。
ステミング
ステミングでは、単語が語幹の意味に置き換えられます。たとえば、「car」、「cars'」、「car's」という単語はすべて「car」という単語に置き換えられます。これらの単語はすべて、語幹で同じ意味を表しているためです。
ストップワードの削除
ストップワードは、「and」や「the」などの単語で、通常は文の意味的な価値を高めません。通常、テキスト データセットのノイズを減らすために、これらの単語を削除します。
8. ジョブを実行する
実行するジョブを見てみましょう。コードは cloud-dataproc/codelabs/spark-nlp/topic_model.py にあります。数分かけてコードと関連するコメントを読み、何が行われているかを理解してください。以下のセクションでも説明します。
# Python imports
import sys

# spark-nlp components. Each one is incorporated into our pipeline.
from sparknlp.annotator import Lemmatizer, Stemmer, Tokenizer, Normalizer
from sparknlp.base import DocumentAssembler, Finisher

# A Spark Session is how we interact with Spark SQL to create Dataframes
from pyspark.sql import SparkSession

# These allow us to create a schema for our data
from pyspark.sql.types import StructField, StructType, StringType, LongType

# Spark Pipelines allow us to sequentially add components such as transformers
from pyspark.ml import Pipeline

# These are components we will incorporate into our pipeline.
from pyspark.ml.feature import StopWordsRemover, CountVectorizer, IDF

# LDA is our model of choice for topic modeling
from pyspark.ml.clustering import LDA

# Some transformers require the usage of other Spark ML functions. We import them here
from pyspark.sql.functions import col, lit, concat

# This will help catch some PySpark errors
from pyspark.sql.utils import AnalysisException

# Assign bucket where the data lives
try:
    bucket = sys.argv[1]
except IndexError:
    print("Please provide a bucket name")
    sys.exit(1)

# Create a SparkSession under the name "reddit". Viewable via the Spark UI
spark = SparkSession.builder.appName("reddit topic model").getOrCreate()

# Create a three column schema consisting of two strings and a long integer
fields = [StructField("title", StringType(), True),
          StructField("body", StringType(), True),
          StructField("created_at", LongType(), True)]
schema = StructType(fields)

# We'll attempt to process every year / month combination below.
years = ['2016', '2017', '2018', '2019']
months = ['01', '02', '03', '04', '05', '06',
          '07', '08', '09', '10', '11', '12']

# This is the subreddit we're working with.
subreddit = "food"

# Create a base dataframe.
reddit_data = spark.createDataFrame([], schema)

# Keep a running list of all files that will be processed
files_read = []

for year in years:
    for month in months:

        # In the form of <project-id>.<dataset>.<table>
        gs_uri = f"gs://{bucket}/reddit_posts/{year}/{month}/{subreddit}.csv.gz"

        # If the table doesn't exist we will simply continue and not
        # log it into our "tables_read" list
        try:
            reddit_data = (
                spark.read.format('csv')
                .options(codec="org.apache.hadoop.io.compress.GzipCodec")
                .load(gs_uri, schema=schema)
                .union(reddit_data)
            )

            files_read.append(gs_uri)

        except AnalysisException:
            continue

if len(files_read) == 0:
    print('No files read')
    sys.exit(1)

# Replacing null values with their respective typed-equivalent is usually
# easier to work with. In this case, we'll replace nulls with empty strings.
# Since some of our data doesn't have a body, we can combine all of the text
# for the titles and bodies so that every row has useful data.

df_train = (
    reddit_data
    # Replace null values with an empty string
    .fillna("")
    .select(
         # Combine columns
        concat(
            # First column to concatenate. col() is used to specify that we're referencing a column
            col("title"),
            # Literal character that will be between the concatenated columns.
            lit(" "),
            # Second column to concatenate.
            col("body")
        # Change the name of the new column
        ).alias("text")
    )
)

# Now, we begin assembling our pipeline. Each component here is used to some transformation to the data.
# The Document Assembler takes the raw text data and convert it into a format that can
# be tokenized. It becomes one of spark-nlp native object types, the "Document".
document_assembler = DocumentAssembler().setInputCol("text").setOutputCol("document")

# The Tokenizer takes data that is of the "Document" type and tokenizes it.
# While slightly more involved than this, this is effectively taking a string and splitting
# it along ths spaces, so each word is its own string. The data then becomes the
# spark-nlp native type "Token".
tokenizer = Tokenizer().setInputCols(["document"]).setOutputCol("token")

# The Normalizer will group words together based on similar semantic meaning.
normalizer = Normalizer().setInputCols(["token"]).setOutputCol("normalizer")

# The Stemmer takes objects of class "Token" and converts the words into their
# root meaning. For instance, the words "cars", "cars'" and "car's" would all be replaced
# with the word "car".
stemmer = Stemmer().setInputCols(["normalizer"]).setOutputCol("stem")

# The Finisher signals to spark-nlp allows us to access the data outside of spark-nlp
# components. For instance, we can now feed the data into components from Spark MLlib.
finisher = Finisher().setInputCols(["stem"]).setOutputCols(["to_spark"]).setValueSplitSymbol(" ")

# Stopwords are common words that generally don't add much detail to the meaning
# of a body of text. In English, these are mostly "articles" such as the words "the"
# and "of".
stopword_remover = StopWordsRemover(inputCol="to_spark", outputCol="filtered")

# Here we implement TF-IDF as an input to our LDA model. CountVectorizer (TF) keeps track
# of the vocabulary that's being created so we can map our topics back to their
# corresponding words.
# TF (term frequency) creates a matrix that counts how many times each word in the
# vocabulary appears in each body of text. This then gives each word a weight based
# on its frequency.
tf = CountVectorizer(inputCol="filtered", outputCol="raw_features")

# Here we implement the IDF portion. IDF (Inverse document frequency) reduces
# the weights of commonly-appearing words.
idf = IDF(inputCol="raw_features", outputCol="features")

# LDA creates a statistical representation of how frequently words appear
# together in order to create "topics" or groups of commonly appearing words.
lda = LDA(k=10, maxIter=10)

# We add all of the transformers into a Pipeline object. Each transformer
# will execute in the ordered provided to the "stages" parameter
pipeline = Pipeline(
    stages = [
        document_assembler,
        tokenizer,
        normalizer,
        stemmer,
        finisher,
        stopword_remover,
        tf,
        idf,
        lda
    ]
)

# We fit the data to the model.
model = pipeline.fit(df_train)

# Now that we have completed a pipeline, we want to output the topics as human-readable.
# To do this, we need to grab the vocabulary generated from our pipeline, grab the topic
# model and do the appropriate mapping.  The output from each individual component lives
# in the model object. We can access them by referring to them by their position in
# the pipeline via model.stages[<ind>]

# Let's create a reference our vocabulary.
vocab = model.stages[-3].vocabulary

# Next, let's grab the topics generated by our LDA model via describeTopics(). Using collect(),
# we load the output into a Python array.
raw_topics = model.stages[-1].describeTopics().collect()

# Lastly, let's get the indices of the vocabulary terms from our topics
topic_inds = [ind.termIndices for ind in raw_topics]

# The indices we just grab directly map to the term at position <ind> from our vocabulary.
# Using the below code, we can generate the mappings from our topic indices to our vocabulary.
topics = []
for topic in topic_inds:
    _topic = []
    for ind in topic:
        _topic.append(vocab[ind])
    topics.append(_topic)

# Let's see our topics!
for i, topic in enumerate(topics, start=1):
    print(f"topic {i}: {topic}")
ジョブを実行する
ジョブを実行しましょう。次のコマンドを実行します。
gcloud dataproc jobs submit pyspark --cluster ${CLUSTER_NAME}\
    --region ${REGION}\
    --properties=spark.jars.packages=com.johnsnowlabs.nlp:spark-nlp_2.11:2.7.2\
    --driver-log-levels root=FATAL \
    topic_model.py \
    -- ${BUCKET_NAME}
このコマンドを使用すると、Dataproc Jobs API を利用できます。コマンド pyspark を含めることで、これが PySpark ジョブであることをクラスタに示します。クラスタ名、こちらで利用可能なオプション パラメータ こちら、ジョブを含むファイルの名前を指定します。この例では、--properties パラメータを指定します。これにより、Spark、Yarn、Dataproc のさまざまなプロパティを変更できます。Spark プロパティ packages を変更して、ジョブにパッケージ化されている spark-nlp を含めることを Spark に通知します。また、--driver-log-levels root=FATAL パラメータを指定します。これにより、エラーを除く PySpark からのログ出力のほとんどが抑制されます。一般的に、Spark ログはノイズが多くなります。
最後に、-- ${BUCKET} は、バケット名を指定する Python スクリプト自体のコマンドライン引数です。-- と ${BUCKET} の間にスペースがあることに注意してください。
ジョブの実行後、数分でモデルを含む出力が表示されます。
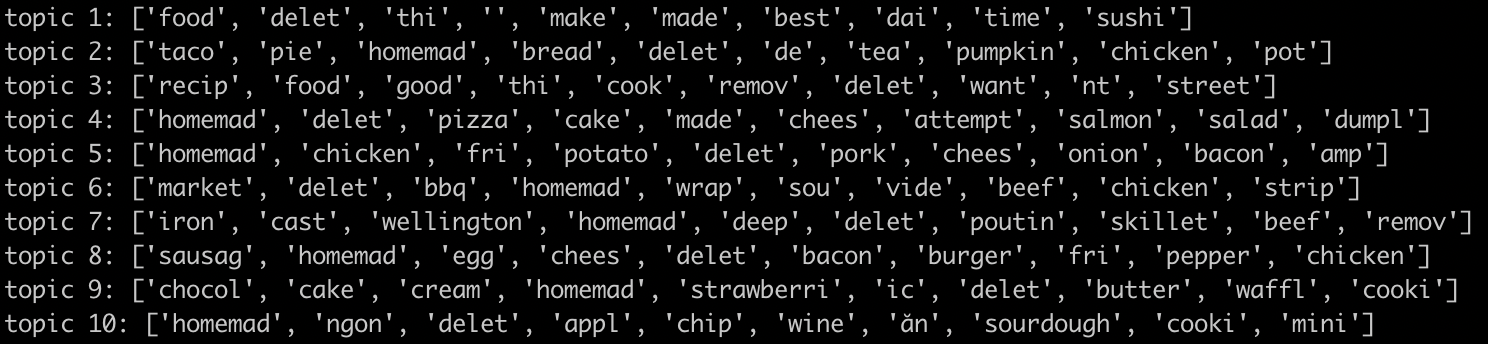
すばらしい。モデルの出力からトレンドを推測できますか?私たちの場合はどうでしょうか?
上記の出力から、朝食に関するトピック 8 とデザートに関するトピック 9 からトレンドを推測できます。
9. クリーンアップ
このクイックスタートの完了後に GCP アカウントに不要な料金が発生しないようにするには:
この Codelab 用にプロジェクトを作成した場合は、必要に応じてプロジェクトを削除することもできます。
- GCP Console で [Projects] ページに移動します。
- プロジェクト リストで、削除するプロジェクトを選択し、[削除] をクリックします。
- ボックスにプロジェクト ID を入力し、[シャットダウン] をクリックしてプロジェクトを削除します。
ライセンス
この作業は、クリエイティブ・コモンズ 表示 3.0 汎用ライセンスと Apache 2.0 ライセンスの下でライセンスされています。