
1. 概览
自然语言处理 (NLP) 是研究如何从文本数据中获取洞见并进行分析。随着互联网上生成的文字内容不断增多,组织比以往任何时候都更希望利用其文本来获取与其业务相关的信息。
NLP 的用途非常广泛,从翻译语言到分析情绪,再到从头开始生成句子等等。这是一个活跃的研究领域,正在改变我们处理文本的方式。
我们将探讨如何在规模上对大量文本数据使用 NLP。这当然是一项艰巨的任务!幸运的是,我们将利用 Spark MLlib 和 spark-nlp 等库来简化此过程。
2. 我们的用例
我们(虚构)组织“FoodCorp”的首席数据科学家对了解食品行业的趋势很感兴趣。我们可以访问 Reddit 子版块 r/food 中的信息帖形式的文本数据语料库,我们将使用该语料库来探索人们在谈论什么。
一种方法是使用一种称为“主题建模”的 NLP 方法。主题建模是一种统计方法,可以识别一组文档的语义含义趋势。换句话说,我们可以针对 Reddit“帖子”语料库构建主题模型,该模型将生成一个“主题”列表,或描述趋势的字词组。
为了构建模型,我们将使用一种称为潜在 Dirichlet 分配 (LDA) 的算法,该算法通常用于对文本进行聚类。如需了解 LDA 的精彩介绍,请点击 此处。
3. 创建项目
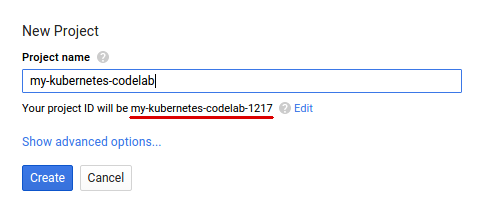
如果您还没有 Google 账号(Gmail 或 Google Apps),则必须 创建一个。登录 Google Cloud Platform Console ( console.cloud.google.com) 并创建一个新项目:


接下来,您需要在 Cloud Console 中 启用结算功能,才能使用 Google Cloud 资源。
在此 Codelab 中运行仅花费几美元,但是如果您决定使用更多资源或继续让它们运行,费用可能更高。 PySpark-BigQuery 和 Spark-NLP Codelab 都在末尾介绍了“清理”步骤。
Google Cloud Platform 的新用户有资格获享 $300 免费试用。
4. 设置环境
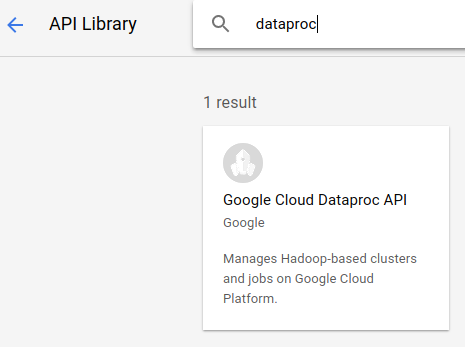
首先,我们需要启用 Dataproc 和 Compute Engine API。
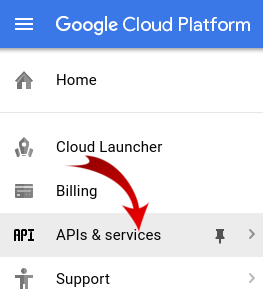
点击屏幕左上角的菜单图标。

从下拉列表中选择“API 管理器”。
点击启用 API 和服务 。

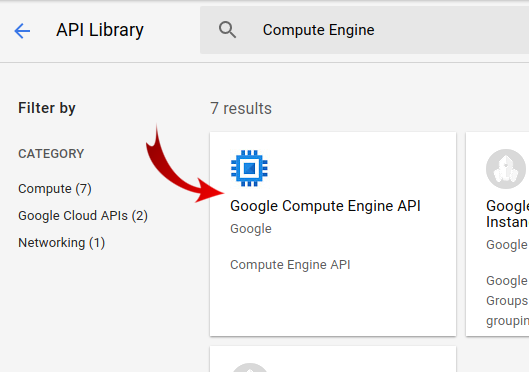
在搜索框中搜索“Compute Engine”。在显示的搜索结果列表中,点击“Google Compute Engine API”。
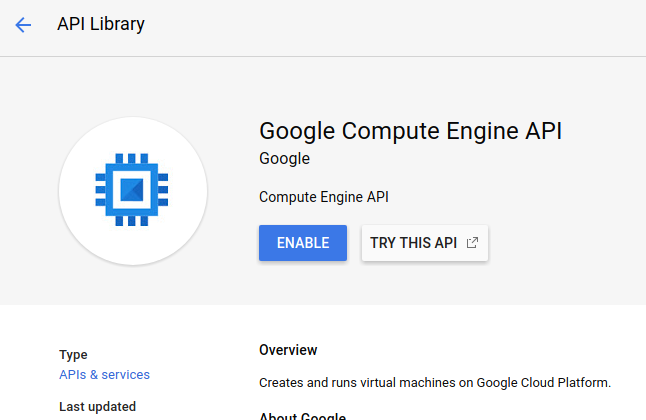
在 Google Compute Engine 页面上,点击启用
启用后,点击向左的箭头返回。
现在搜索“Google Dataproc API”并启用它。
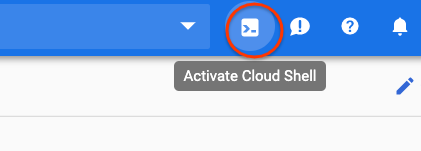
接下来,点击云控制台右上角的按钮,打开 Cloud Shell:
我们将设置一些环境变量,以便在继续学习 Codelab 时引用。首先,为我们将要创建的 Dataproc 集群选择一个名称,例如“my-cluster”,并在您的环境中进行设置。您可以随意使用任何名称。
CLUSTER_NAME=my-cluster
接下来,从此处提供的可用区域中选择一个区域 此处。例如,us-east1-b.
REGION=us-east1
最后,我们需要设置作业将从中读取数据的源存储分区。我们提供了存储分区 bm_reddit 中的示例数据,但如果您在此 Codelab 之前完成了 PySpark for Preprocessing BigQuery Data,则可以随意使用您生成的数据。
BUCKET_NAME=bm_reddit
配置好环境变量后,我们来运行以下命令以创建 Dataproc 集群:
 gcloud beta dataproc clusters create ${CLUSTER_NAME} \
     --region ${REGION} \
     --metadata 'PIP_PACKAGES=google-cloud-storage spark-nlp==2.7.2' \
     --worker-machine-type n1-standard-8 \
     --num-workers 4 \
     --image-version 1.4-debian10 \
     --initialization-actions gs://dataproc-initialization-actions/python/pip-install.sh \
     --optional-components=JUPYTER,ANACONDA \
     --enable-component-gateway
我们来逐步了解这些命令:
gcloud beta dataproc clusters create ${CLUSTER_NAME}:将使用您之前提供的名称启动 Dataproc 集群的创建。我们在此处添加了 beta,以启用 Dataproc 的 Beta 版功能,例如组件网关(我们将在下文中讨论)。
--zone=${ZONE}:用于设置集群的位置。
--worker-machine-type n1-standard-8:这是用于工作器的 类型 的机器。
--num-workers 4:我们的集群将有 4 个工作器。
--image-version 1.4-debian9:表示我们将使用的 Dataproc 的映像版本。
--initialization-actions ...:初始化操作是在创建集群和工作器时执行的自定义脚本。它们可以由用户创建并存储在 GCS 存储分区中,也可以从公共存储分区 dataproc-initialization-actions 中引用。此处包含的初始化操作将允许使用 Pip 安装 Python 软件包,如 --metadata 标志所示。
--metadata 'PIP_PACKAGES=google-cloud-storage spark-nlp':这是要安装到 Dataproc 中的软件包的列表,以空格分隔。在本例中,我们将安装 google-cloud-storage Python 客户端库和 spark-nlp。
--optional-components=ANACONDA:可选组件是与 Dataproc 搭配使用的常见软件包,在创建期间会自动安装在 Dataproc 集群上。与初始化操作相比,使用可选组件的优势包括启动速度更快,并且经过了特定 Dataproc 版本的测试。总体而言,它们更可靠。
--enable-component-gateway:借助此标志,我们可以利用 Dataproc 的组件网关 来查看常见的界面,例如 Zeppelin、Jupyter 或 Spark 历史记录。注意:其中一些需要关联的可选组件。
如需详细了解 Dataproc,请查看此 Codelab。
接下来,在 Cloud Shell 中运行以下命令,以克隆包含示例代码的仓库并进入正确的目录:
cd
git clone https://github.com/GoogleCloudPlatform/cloud-dataproc
cd cloud-dataproc/codelabs/spark-nlp
5. Spark MLlib
Spark MLlib 是一个用 Apache Spark 编写的可扩缩机器学习库。通过利用 Spark 的效率和一套经过微调的机器学习算法,MLlib 可以分析大量数据。它具有 Java、Scala、Python 和 R API。在此 Codelab 中,我们将特别关注 Python。
MLlib 包含大量转换器和估算器。转换器是一种可以更改或修改数据的工具,通常使用 transform() 函数;而估算器是一种预构建的算法,您可以使用该算法训练数据,通常使用 fit() 函数。
转换器的示例包括:
- 标记化(从字词字符串创建数字向量)
- 独热编码(创建表示字符串中存在的字词的稀疏向量)
- 停用词移除器(移除不会向字符串添加语义值的字词)
估算器的示例包括:
- 分类(这是苹果还是橙子?)
- 回归(这个苹果应该卖多少钱?)
- 聚类(所有苹果彼此之间的相似度如何?)
- 决策树(如果颜色 == 橙色,则为橙子。否则为苹果)
- 降维(我们可以从数据集中移除特征,但仍能区分苹果和橙子吗?)。
MLlib 还包含用于机器学习中其他常见方法(例如超参数调节和选择以及交叉验证)的工具。
此外,MLlib 还包含 Pipelines API,该 API 允许您使用不同的转换器构建数据转换流水线,这些转换器可以重新执行。
6. Spark-NLP
Spark-nlp 是 John Snow Labs 创建的一个库,用于使用 Spark 执行高效的自然语言处理任务。它包含内置工具(称为注释器),用于执行常见任务,例如:
- 标记化(从字词字符串创建数字向量)
- 创建字词嵌入(通过向量定义字词之间的关系)
- 词性标记(哪些字词是名词?哪些是动词?)
虽然不在本 Codelab 的讨论范围之内,但 spark-nlp 也与 TensorFlow 很好地集成。
也许最重要的是,Spark-NLP 通过提供可以轻松插入 MLlib 流水线的组件来扩展 Spark MLlib 的功能。
7. 自然语言处理的最佳实践
在从数据中提取有用信息之前,我们需要进行一些整理工作。我们将采取的预处理步骤如下:
标记化
我们通常要做的第一件事是“标记化”数据。这涉及获取数据并根据“标记”或字词将其拆分。通常,我们会在这一步中移除标点符号并将所有字词设置为小写。例如,假设我们有以下字符串:What time is it? 词元化后,此句子将包含四个 token:“what" , "time", "is", "it". 我们不希望模型将 what 一词视为两个不同的大小写不同的字词。此外,标点符号通常无助于我们更好地从字词中学习推断,因此我们也会将其剥离。
规范化
我们通常希望“规范化”数据。这会将含义相似的字词替换为相同的字词。例如,如果在文本中识别出“fought”“battled”和“dueled”这三个字词,则归一化可能会将“battled”和“dueled”替换为“fought”一词。
词干提取
词干提取会将字词替换为其词根含义。例如,“car”“cars'”和“car's”这三个字词都将被替换为“car”一词,因为所有这些字词的词根含义都相同。
移除停用词
停用词是指“and”和“the”等字词,它们通常不会向句子的语义含义添加值。我们通常希望移除这些字词,以减少文本数据集中的噪声。
8. 运行作业
我们来看看将要运行的作业。您可以在 cloud-dataproc/codelabs/spark-nlp/topic_model.py 中找到该代码。请花至少几分钟时间仔细阅读该代码及其相关注释,以了解其执行的操作。我们还将在下面重点介绍一些部分:
# Python imports
import sys

# spark-nlp components. Each one is incorporated into our pipeline.
from sparknlp.annotator import Lemmatizer, Stemmer, Tokenizer, Normalizer
from sparknlp.base import DocumentAssembler, Finisher

# A Spark Session is how we interact with Spark SQL to create Dataframes
from pyspark.sql import SparkSession

# These allow us to create a schema for our data
from pyspark.sql.types import StructField, StructType, StringType, LongType

# Spark Pipelines allow us to sequentially add components such as transformers
from pyspark.ml import Pipeline

# These are components we will incorporate into our pipeline.
from pyspark.ml.feature import StopWordsRemover, CountVectorizer, IDF

# LDA is our model of choice for topic modeling
from pyspark.ml.clustering import LDA

# Some transformers require the usage of other Spark ML functions. We import them here
from pyspark.sql.functions import col, lit, concat

# This will help catch some PySpark errors
from pyspark.sql.utils import AnalysisException

# Assign bucket where the data lives
try:
    bucket = sys.argv[1]
except IndexError:
    print("Please provide a bucket name")
    sys.exit(1)

# Create a SparkSession under the name "reddit". Viewable via the Spark UI
spark = SparkSession.builder.appName("reddit topic model").getOrCreate()

# Create a three column schema consisting of two strings and a long integer
fields = [StructField("title", StringType(), True),
          StructField("body", StringType(), True),
          StructField("created_at", LongType(), True)]
schema = StructType(fields)

# We'll attempt to process every year / month combination below.
years = ['2016', '2017', '2018', '2019']
months = ['01', '02', '03', '04', '05', '06',
          '07', '08', '09', '10', '11', '12']

# This is the subreddit we're working with.
subreddit = "food"

# Create a base dataframe.
reddit_data = spark.createDataFrame([], schema)

# Keep a running list of all files that will be processed
files_read = []

for year in years:
    for month in months:

        # In the form of <project-id>.<dataset>.<table>
        gs_uri = f"gs://{bucket}/reddit_posts/{year}/{month}/{subreddit}.csv.gz"

        # If the table doesn't exist we will simply continue and not
        # log it into our "tables_read" list
        try:
            reddit_data = (
                spark.read.format('csv')
                .options(codec="org.apache.hadoop.io.compress.GzipCodec")
                .load(gs_uri, schema=schema)
                .union(reddit_data)
            )

            files_read.append(gs_uri)

        except AnalysisException:
            continue

if len(files_read) == 0:
    print('No files read')
    sys.exit(1)

# Replacing null values with their respective typed-equivalent is usually
# easier to work with. In this case, we'll replace nulls with empty strings.
# Since some of our data doesn't have a body, we can combine all of the text
# for the titles and bodies so that every row has useful data.

df_train = (
    reddit_data
    # Replace null values with an empty string
    .fillna("")
    .select(
         # Combine columns
        concat(
            # First column to concatenate. col() is used to specify that we're referencing a column
            col("title"),
            # Literal character that will be between the concatenated columns.
            lit(" "),
            # Second column to concatenate.
            col("body")
        # Change the name of the new column
        ).alias("text")
    )
)

# Now, we begin assembling our pipeline. Each component here is used to some transformation to the data.
# The Document Assembler takes the raw text data and convert it into a format that can
# be tokenized. It becomes one of spark-nlp native object types, the "Document".
document_assembler = DocumentAssembler().setInputCol("text").setOutputCol("document")

# The Tokenizer takes data that is of the "Document" type and tokenizes it.
# While slightly more involved than this, this is effectively taking a string and splitting
# it along ths spaces, so each word is its own string. The data then becomes the
# spark-nlp native type "Token".
tokenizer = Tokenizer().setInputCols(["document"]).setOutputCol("token")

# The Normalizer will group words together based on similar semantic meaning.
normalizer = Normalizer().setInputCols(["token"]).setOutputCol("normalizer")

# The Stemmer takes objects of class "Token" and converts the words into their
# root meaning. For instance, the words "cars", "cars'" and "car's" would all be replaced
# with the word "car".
stemmer = Stemmer().setInputCols(["normalizer"]).setOutputCol("stem")

# The Finisher signals to spark-nlp allows us to access the data outside of spark-nlp
# components. For instance, we can now feed the data into components from Spark MLlib.
finisher = Finisher().setInputCols(["stem"]).setOutputCols(["to_spark"]).setValueSplitSymbol(" ")

# Stopwords are common words that generally don't add much detail to the meaning
# of a body of text. In English, these are mostly "articles" such as the words "the"
# and "of".
stopword_remover = StopWordsRemover(inputCol="to_spark", outputCol="filtered")

# Here we implement TF-IDF as an input to our LDA model. CountVectorizer (TF) keeps track
# of the vocabulary that's being created so we can map our topics back to their
# corresponding words.
# TF (term frequency) creates a matrix that counts how many times each word in the
# vocabulary appears in each body of text. This then gives each word a weight based
# on its frequency.
tf = CountVectorizer(inputCol="filtered", outputCol="raw_features")

# Here we implement the IDF portion. IDF (Inverse document frequency) reduces
# the weights of commonly-appearing words.
idf = IDF(inputCol="raw_features", outputCol="features")

# LDA creates a statistical representation of how frequently words appear
# together in order to create "topics" or groups of commonly appearing words.
lda = LDA(k=10, maxIter=10)

# We add all of the transformers into a Pipeline object. Each transformer
# will execute in the ordered provided to the "stages" parameter
pipeline = Pipeline(
    stages = [
        document_assembler,
        tokenizer,
        normalizer,
        stemmer,
        finisher,
        stopword_remover,
        tf,
        idf,
        lda
    ]
)

# We fit the data to the model.
model = pipeline.fit(df_train)

# Now that we have completed a pipeline, we want to output the topics as human-readable.
# To do this, we need to grab the vocabulary generated from our pipeline, grab the topic
# model and do the appropriate mapping.  The output from each individual component lives
# in the model object. We can access them by referring to them by their position in
# the pipeline via model.stages[<ind>]

# Let's create a reference our vocabulary.
vocab = model.stages[-3].vocabulary

# Next, let's grab the topics generated by our LDA model via describeTopics(). Using collect(),
# we load the output into a Python array.
raw_topics = model.stages[-1].describeTopics().collect()

# Lastly, let's get the indices of the vocabulary terms from our topics
topic_inds = [ind.termIndices for ind in raw_topics]

# The indices we just grab directly map to the term at position <ind> from our vocabulary.
# Using the below code, we can generate the mappings from our topic indices to our vocabulary.
topics = []
for topic in topic_inds:
    _topic = []
    for ind in topic:
        _topic.append(vocab[ind])
    topics.append(_topic)

# Let's see our topics!
for i, topic in enumerate(topics, start=1):
    print(f"topic {i}: {topic}")
运行作业
现在,我们来运行作业。请运行以下命令:
gcloud dataproc jobs submit pyspark --cluster ${CLUSTER_NAME}\
    --region ${REGION}\
    --properties=spark.jars.packages=com.johnsnowlabs.nlp:spark-nlp_2.11:2.7.2\
    --driver-log-levels root=FATAL \
    topic_model.py \
    -- ${BUCKET_NAME}
借助此命令,我们可以利用 Dataproc Jobs API。通过添加命令 pyspark,我们向集群表明这是一个 PySpark 作业。我们提供了集群名称、可选参数(来自此处提供的参数 here)以及包含作业的文件名称。在本例中,我们提供了参数 --properties,该参数允许我们更改 Spark、Yarn 或 Dataproc 的各种属性。我们更改了 Spark 属性 packages,该属性允许我们告知 Spark 我们希望将 spark-nlp 作为软件包包含在作业中。我们还提供了参数 --driver-log-levels root=FATAL,该参数将禁止显示 PySpark 的大部分日志输出,但错误除外。一般来说,Spark 日志往往很嘈杂。
最后,-- ${BUCKET} 是 Python 脚本本身的命令行实参,用于提供存储分区名称。请注意 -- 和 ${BUCKET} 之间的空格。
运行作业几分钟后,我们应该会看到包含模型的输出:
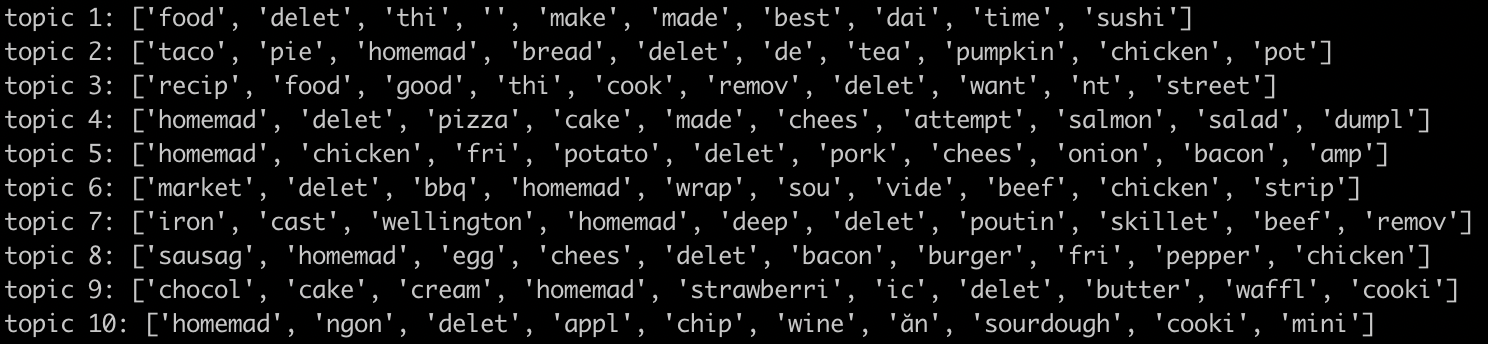
太棒啦!!您能通过查看模型的输出来推断趋势吗?我们的呢?
从上面的输出中,我们可以从主题 8(与早餐食品相关)和主题 9(与甜点相关)中推断出趋势。
9. 清理
为避免在此快速入门完成后向您的 GCP 账号收取不必要的费用,请执行以下操作:
如果您专门为此 Codelab 创建了一个项目,您还可以选择删除该项目:
- 在 GCP Console 中,转到 项目 页面。
- 在项目列表中,选择要删除的项目,然后点击删除 。
- 在框中输入项目 ID,然后点击关停 以删除项目。
许可
此作品已获得知识共享署名 3.0 通用许可和 Apache 2.0 许可授权。