1. Overview
In this lab, you will integrate serverless databases(Spanner and Firestore) with applications(Go and Node.js) running in Cloud Run. The Cymbal Eats application includes multiple services which run on Cloud Run. In the following steps, you will configure services to use the Cloud Spanner relational database and Cloud Firestore, a NoSQL document database. Utilizing serverless products for the data tier and the application runtime allows you to abstract away all infrastructure management, focusing on building your application instead of worrying about overhead.
2. What you will learn
In this lab, you will learn how to do the following:
- Integrate Spanner
- Enable Spanner Managed Services
- Integrate into code
- Deploy code connecting to Spanner
- Integrate Firestore
- Enable Firestore Managed Services
- Integrate into code
- Deploy code connecting to Firestore
3. Setup and Requirements
Self-paced environment setup
- Sign-in to the Google Cloud Console and create a new project or reuse an existing one. If you don't already have a Gmail or Google Workspace account, you must create one.


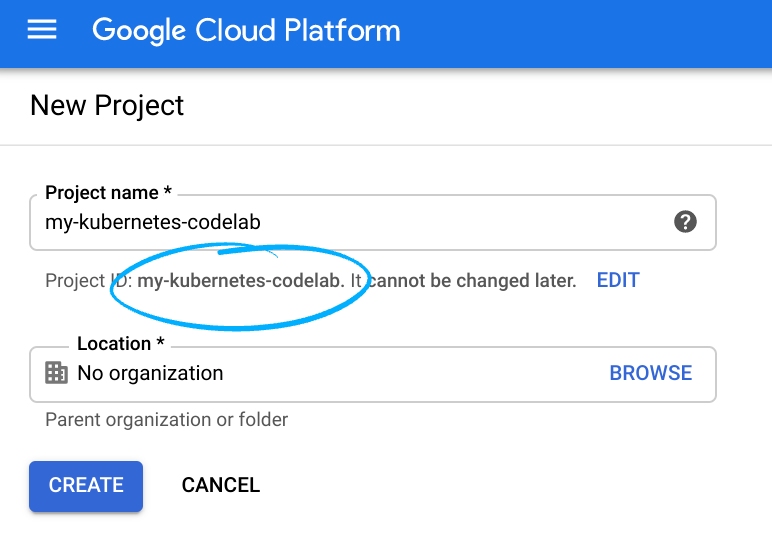
- The Project name is the display name for this project's participants. It is a character string not used by Google APIs. You can always update it.
- The Project ID is unique across all Google Cloud projects and is immutable (cannot be changed after it has been set). The Cloud Console auto-generates a unique string; usually you don't care what it is. In most codelabs, you'll need to reference your Project ID (typically identified as
PROJECT_ID). If you don't like the generated ID, you might generate another random one. Alternatively, you can try your own, and see if it's available. It can't be changed after this step and remains for the duration of the project. - For your information, there is a third value, a Project Number, which some APIs use. Learn more about all three of these values in the documentation.
- Next, you'll need to enable billing in the Cloud Console to use Cloud resources/APIs. Running through this codelab won't cost much, if anything at all. To shut down resources to avoid incurring billing beyond this tutorial, you can delete the resources you created or delete the project. New Google Cloud users are eligible for the $300 USD Free Trial program.
Setup Environment
- Create a project ID variable
export PROJECT_ID=$(gcloud config get-value project)
export PROJECT_NUMBER=$(gcloud projects describe $PROJECT_ID --format='value(projectNumber)')
export SPANNER_INSTANCE=inventory-instance
export SPANNER_DB=inventory-db
export REGION=us-east1
export SPANNER_CONNECTION_STRING=projects/$PROJECT_ID/instances/$SPANNER_INSTANCE/databases/$SPANNER_DB
- Enable Spanner, Cloud Run, Cloud Build, and Artifact Registry APIs
gcloud services enable \
     compute.googleapis.com \
     spanner.googleapis.com \
     run.googleapis.com \
     cloudbuild.googleapis.com \
     artifactregistry.googleapis.com \
     firestore.googleapis.com \
     appengine.googleapis.com \
     artifactregistry.googleapis.com
- Clone the repository
git clone https://github.com/GoogleCloudPlatform/cymbal-eats.git
- Navigate into the directory
cd cymbal-eats/inventory-service/spanner
4. Create and Configure a Spanner instance
Spanner is the inventory services backend relational database. You will create a Spanner instance, database, and schema in the following steps.
Create an instance
- Create a Cloud Spanner instance
gcloud spanner instances create $SPANNER_INSTANCE --config=regional-${REGION} \
--description="Cymbal Menu Inventory" --nodes=1
Example Output
Creating instance...done.
- Verify if the Spanner instance is correctly configured
gcloud spanner instances list
Example output
NAME: inventory-instance
DISPLAY_NAME: Cymbal Menu Inventory
CONFIG: regional-us-east1
NODE_COUNT: 1
PROCESSING_UNITS: 100
STATE: READY
Create a database and schema
Create a new database and use Google standard SQL's data definition language (DDL) to create the database schema.
- Create a DDL file
echo "CREATE TABLE InventoryHistory (ItemRowID STRING (36) NOT NULL, ItemID INT64 NOT NULL, InventoryChange INT64, Timestamp TIMESTAMP) PRIMARY KEY(ItemRowID)" >> table.ddl
- Create the Spanner database
gcloud spanner databases create $SPANNER_DB \
--instance=$SPANNER_INSTANCE \
--ddl-file=table.ddl
Example output
Creating database...done.
Verify Database state and schema
- View the state of the database
gcloud spanner databases describe $SPANNER_DB \
--instance=$SPANNER_INSTANCE
Example output
createTime: '2022-04-22T15:11:33.559300Z'
databaseDialect: GOOGLE_STANDARD_SQL
earliestVersionTime: '2022-04-22T15:11:33.559300Z'
encryptionInfo:
- encryptionType: GOOGLE_DEFAULT_ENCRYPTION
name: projects/cymbal-eats-7-348013/instances/menu-inventory/databases/menu-inventory
state: READY
versionRetentionPeriod: 1h
- View the schema of the database
gcloud spanner databases ddl describe $SPANNER_DB \
--instance=$SPANNER_INSTANCE
Example output
CREATE TABLE InventoryHistory (
  ItemRowID STRING(36) NOT NULL,
  ItemID INT64 NOT NULL,
  InventoryChange INT64,
  TimeStamp TIMESTAMP,
) PRIMARY KEY(ItemRowID);
5. Integrating Spanner
In this section, you will learn how to integrate Spanner into your application. In addition, SQL Spanner provides Client libraries, JDBC drivers, R2DBC drivers, REST APIs and RPC APIs, which allow you to integrate Spanner into any application.
In the next section, you will use the Go client library to install, authenticate and modify data in Spanner.
Installing the client library
The Cloud Spanner client library makes it easier to integrate with Cloud Spanner by automatically using Application Default Credentials (ADC) to find your service account credentials
Set up authentication
The Google Cloud CLI and Google Cloud client libraries automatically detect when they are running on Google Cloud and use the runtime service account of the current Cloud Run revision. This strategy is called Application Default Credentials and enables code portability across multiple environments.
However, it's best to create a dedicated identity by assigning it a user-managed service account instead of the default service account.
- Grant the Spanner Database Admin role to the service account
gcloud projects add-iam-policy-binding $PROJECT_ID \
--member="serviceAccount:$PROJECT_NUMBER-compute@developer.gserviceaccount.com" \
--role="roles/spanner.databaseAdmin"
Example output
Updated IAM policy for project [cymbal-eats-6422-3462].
[...]
Using client libraries
The Spanner client libraries abstract the complexities of integrating with Spanner and are available in many popular programming languages.
Create a Spanner client
The Spanner client is a client for reading and writing data to a Cloud Spanner database. A client is safe to use concurrently, except for its Close method.
The snippet below creates a spanner client
main.go
var dataClient *spanner.Client
...
dataClient, err = spanner.NewClient(ctx, databaseName)
You can think of a Client as a database connection: all your interactions with Cloud Spanner must go through a Client. Typically you create a Client when your application starts up, and then you re-use that client to read, write, and execute transactions. Each client uses resources in Cloud Spanner.
Modify data
There are multiple ways to insert, update and delete data from a Spanner database. Listed below are the available methods.
In this lab, you will use mutations to modify data in Spanner.
Mutations in Spanner
A Mutation is a container for mutation operations. A Mutation represents a sequence of inserts, updates, and deletes that Cloud Spanner applies atomically to different rows and tables in a Cloud Spanner database.
main.go
m := []*spanner.Mutation{}

m = append(m, spanner.Insert(
        "inventoryHistory",
         inventoryHistoryColumns,
        []interface{}{uuid.New().String(), element.ItemID, element.InventoryChange, time.Now()}))
The snippet of code inserts a new row into the inventory history table.
Deploying and Testing
Now that Spanner is configured and you've reviewed the key code elements deploy the application to Cloud Run.
Deploy the application to Cloud Run
Cloud Run can automatically build, push and deploy your code with a single command. In the following command, you'll call the deploy command on the run service, passing in variables used by the running application such as SPANNER_CONNECTION_STRING that you created earlier.
- Click Open Terminal
- Deploy the inventory service to Cloud Run
gcloud run deploy inventory-service \
    --source . \
    --region $REGION \
    --update-env-vars SPANNER_CONNECTION_STRING=$SPANNER_CONNECTION_STRING \
    --allow-unauthenticated \
    --project=$PROJECT_ID \
    --quiet
Example output
Service [inventory-service] revision [inventory-service-00001-sug] has been deployed and is serving 100 percent of traffic.
Service URL: https://inventory-service-ilwytgcbca-uk.a.run.app
- Store the service URL
INVENTORY_SERVICE_URL=$(gcloud run services describe inventory-service \
  --platform managed \
  --region $REGION \
  --format=json | jq \
  --raw-output ".status.url")
Test the Cloud Run application
Insert an item
- In cloudshell, enter the following command.
POST_URL=$INVENTORY_SERVICE_URL/updateInventoryItem
curl -i -X POST ${POST_URL} \
--header 'Content-Type: application/json' \
--data-raw '[
    {
        "itemID": 1,
        "inventoryChange": 5
    }
]'
Example output
HTTP/2 200
access-control-allow-origin: *
content-type: application/json
x-cloud-trace-context: 10c32f0863d26521497dc26e86419f13;o=1
date: Fri, 22 Apr 2022 21:41:38 GMT
server: Google Frontend
content-length: 2

OK
Query an item
- Query the inventory service
GET_URL=$INVENTORY_SERVICE_URL/getAvailableInventory
curl -i ${GET_URL}
Example response
HTTP/2 200
access-control-allow-origin: *
content-type: text/plain; charset=utf-8
x-cloud-trace-context: b94f921e4c2ae90210472c88eb05ace8;o=1
date: Fri, 22 Apr 2022 21:45:50 GMT
server: Google Frontend
content-length: 166

[{"ItemID":1,"Inventory":5}]
6. Spanner Concepts
Cloud Spanner queries its databases using declarative SQL statements. SQL statements indicate what the user wants without describing how the results will be obtained.
- In the terminal, enter this command to query the table for the record previously created.
gcloud spanner databases execute-sql $SPANNER_DB \
--instance=$SPANNER_INSTANCE \
--sql='SELECT * FROM InventoryHistory WHERE ItemID=1'
Example output
ItemRowID: 1
ItemID: 1
InventoryChange: 3
Timestamp:
Query execution plans
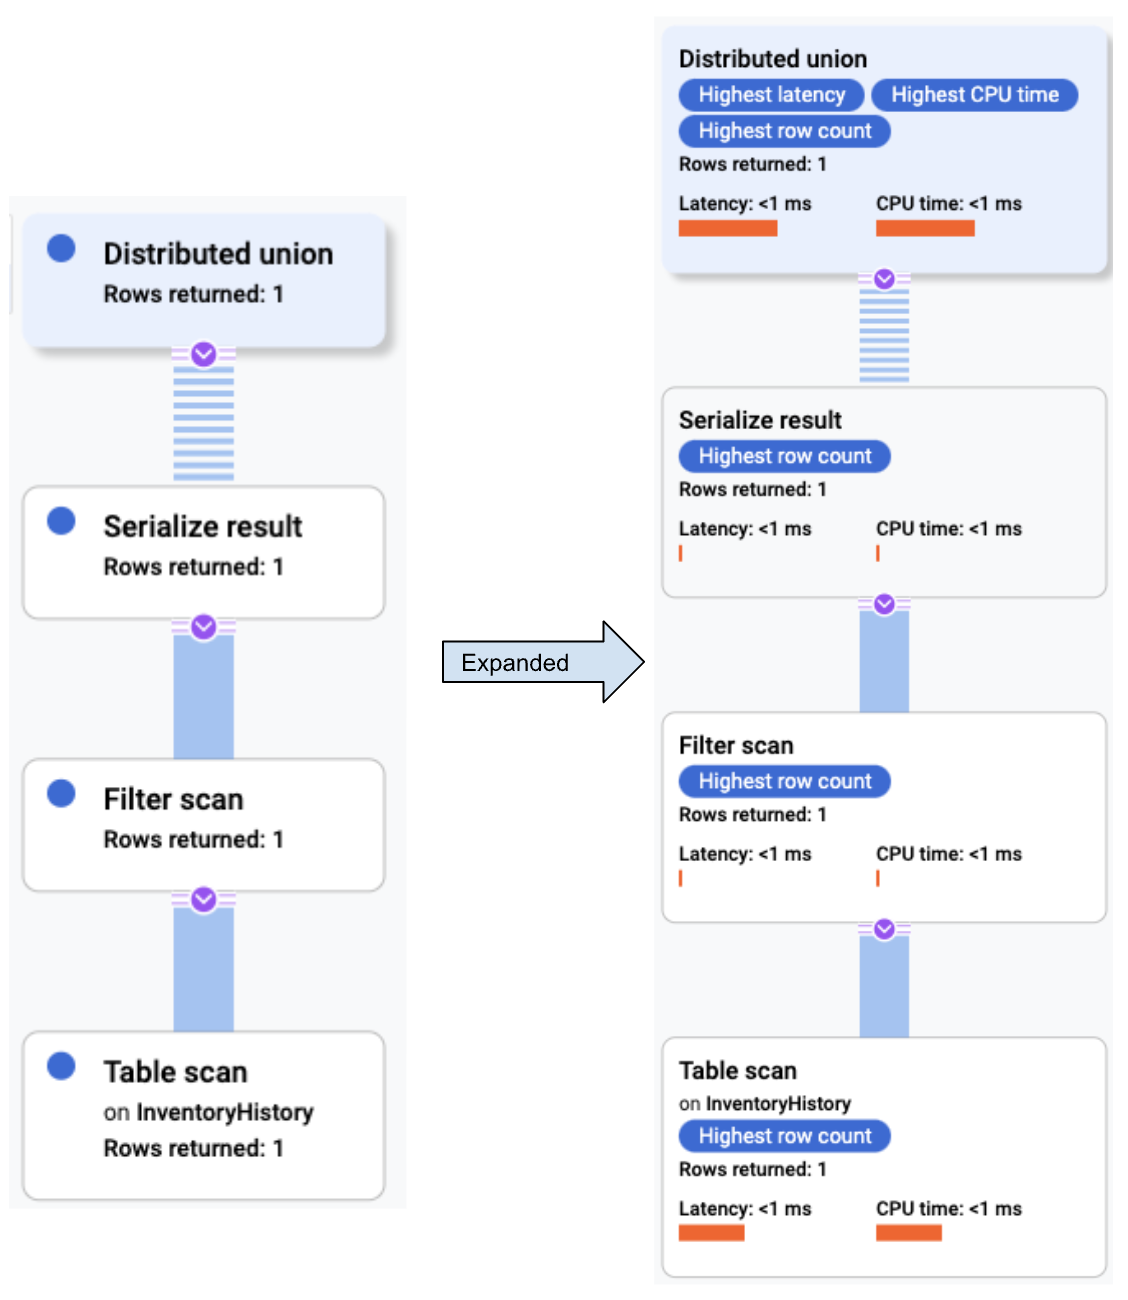
A query execution plan is a series of steps Spanner uses to obtain results. There may be several ways to acquire the results of a particular SQL statement. Query execution plans are accessible in the console and the client libraries. To see how Spanner handles SQL queries:
- In the console, open the Cloud Spanner instances page.
- Go to Cloud Spanner instances
- Click the name of the Cloud Spanner instance. From the databases section, select the database you want to query.
- Click Query.
- Enter the following query in the query editor
SELECT * FROM InventoryHistory WHERE ItemID=1
- Click RUN
- Click EXPLANATION
The Cloud Console displays a visual execution plan for your query.
Query optimizer
The Cloud Spanner query optimizer compares alternative execution plans and selects the most efficient one. Over time, the query optimizer will evolve, broadening the choices in the query execution plan and improving the accuracy of the estimates that inform those choices, leading to more efficient query execution plans.
Cloud Spanner rolls out optimizer updates as new query optimizer versions. By default, each database starts using the latest version of the optimizer no sooner than 30 days after that version has been released.
To see the version used when running a query in gcloud spanner, set the –query-mode flag to PROFILE
- Enter the following command to view the optimizer version
gcloud spanner databases execute-sql $SPANNER_DB --instance=$SPANNER_INSTANCE \
--query-mode=PROFILE --sql='SELECT * FROM InventoryHistory'
Example output
TOTAL_ELAPSED_TIME: 6.18 msecs
CPU_TIME: 5.17 msecs
ROWS_RETURNED: 1
ROWS_SCANNED: 1
OPTIMIZER_VERSION: 3
 RELATIONAL Distributed Union
 (1 execution, 0.11 msecs total latency)
 subquery_cluster_node: 1
    |
    +- RELATIONAL Distributed Union
    |  (1 execution, 0.09 msecs total latency)
    |  call_type: Local, subquery_cluster_node: 2
    |   |
    |   \- RELATIONAL Serialize Result
    |      (1 execution, 0.08 msecs total latency)
    |       |
    |       +- RELATIONAL Scan
    |       |  (1 execution, 0.08 msecs total latency)
    |       |  Full scan: true, scan_target: InventoryHistory, scan_type: TableScan
    |       |   |
    |       |   +- SCALAR Reference
    |       |   |  ItemRowID
    |       |   |
    |       |   +- SCALAR Reference
    |       |   |  ItemID
    |       |   |
    |       |   +- SCALAR Reference
    |       |   |  InventoryChange
    |       |   |
    |       |   \- SCALAR Reference
    |       |      Timestamp
    |       |
    |       +- SCALAR Reference
    |       |  $ItemRowID
    |       |
    |       +- SCALAR Reference
    |       |  $ItemID
    |       |
    |       +- SCALAR Reference
    |       |  $InventoryChange
    |       |
    |       \- SCALAR Reference
    |          $Timestamp
    |
    \- SCALAR Constant
       true

ItemRowID: 1
ItemID: 1
InventoryChange: 3
Timestamp:
Update the optimizer version
The newest version at the time of this lab is version 4. Next, you will update the Spanner Table to use version 4 for the query optimizer.
- Update the optimizer
gcloud spanner databases ddl update $SPANNER_DB \
--instance=$SPANNER_INSTANCE \
--ddl='ALTER DATABASE InventoryHistory
SET OPTIONS (optimizer_version = 4)'
Example output
Schema updating...done.
- Enter the following command to view the optimizer version update
gcloud spanner databases execute-sql $SPANNER_DB --instance=$SPANNER_INSTANCE \
--query-mode=PROFILE --sql='SELECT * FROM InventoryHistory'
Example output
TOTAL_ELAPSED_TIME: 8.57 msecs
CPU_TIME: 8.54 msecs
ROWS_RETURNED: 1
ROWS_SCANNED: 1
OPTIMIZER_VERSION: 4
[...]
Visualize query optimizer version in Metrics Explorer
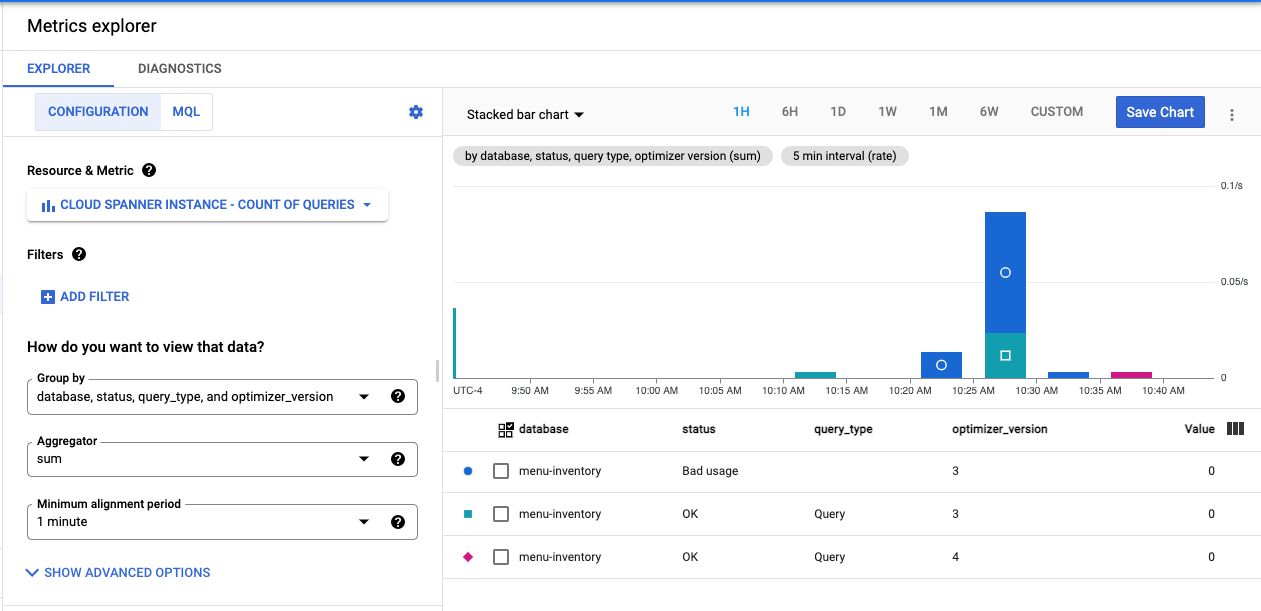
You can use Metrics Explorer in Cloud Console to visualize the Count of queries for your database instance. You can see which optimizer version is being used in each database.
- Navigate to the Monitoring in the Cloud Console and select Metrics Explorer in the left menu.
- In the Resource type field, select Cloud Spanner Instance.
- In the Metric field, select Count of queries and Apply.
- In the Group By field, select database, optimizer_version, and status.
7. Create and Configure a Firestore Database
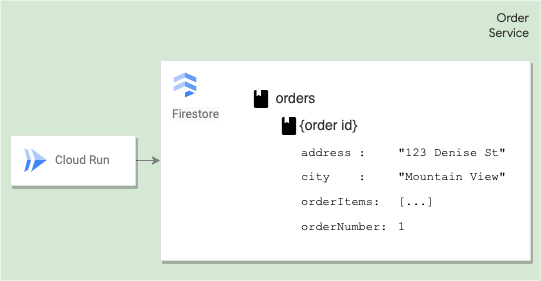
Firestore is a NoSQL document database built for automatic scaling, high performance, and ease of application development. While the Firestore interface has many of the same features as traditional databases, a NoSQL database differs from them in describing relationships between data objects.
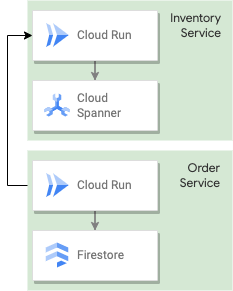
The following task will guide you through creating an ordering service Cloud Run application backed by Firestore. The ordering service will call the inventory service created in the previous section to query the Spanner database before starting the order. This service will ensure sufficient inventory exists and the order can be filled.
8. Firestore Concepts
Data model
A Firestore database is made up of collections and documents.
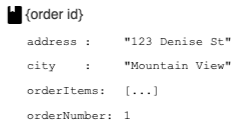
Documents
Each document contains a set of key-value pairs. Firestore is optimized for storing large collections of small documents.
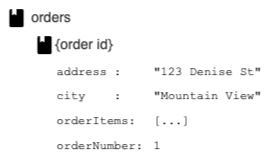
Collections
You must store all documents in collections. Documents can contain subcollections and nested objects, including primitive fields like strings or complex objects like lists.
Create a Firestore database
- Create the Firestore database
gcloud firestore databases create --location=$REGION
Example output
Success! Selected Google Cloud Firestore Native database for cymbal-eats-6422-3462
9. Integrating Firestore into your application
In this section, you will update the service account, add Firestore access service accounts, review and deploy the Firestore security rules and review how data is modified in Firestore.
Set up authentication
- Grant the Datastore user role to the service account
gcloud projects add-iam-policy-binding $PROJECT_ID \
  --member="serviceAccount:$PROJECT_NUMBER-compute@developer.gserviceaccount.com" \
  --role="roles/datastore.user"
Example output
Updated IAM policy for project [cymbal-eats-6422-3462].
Firestore Security Rules
Security rules provide access control and data validation expressive yet straightforward format.
- Navigate to the order-service/starter-code directory
cd ~/cymbal-eats/order-service
- Open the firestore.rules file in cloud editor
cat firestore.rules
firestore.rules
rules_version = '2';
service cloud.firestore {
  match /databases/{database}/documents { ⇐ All database
    match /{document=**} { ⇐ All documents
      allow read: if true; ⇐ Allow reads
    }
    match /{document=**} {
      allow write: if false; ⇐ Deny writes
    }
  }
}
Warning: It is best practice to limit access to Firestore storage. For the purpose of this lab, all reads are allowed. This is not an advised production configuration.
Enable Firestore Managed Services
- Click Open Terminal
- Create .firebaserc file with the current Project ID. The settings for deploy targets are stored in the .firebaserc file in your project directory.
firebaserc.tmpl
sed "s/PROJECT_ID/$PROJECT_ID/g" firebaserc.tmpl > .firebaserc
- Download firebase binary
curl -sL https://firebase.tools | upgrade=true bash
Example output
-- Checking for existing firebase-tools on PATH...
Your machine already has firebase-tools@10.7.0 installed. Nothing to do.
-- All done!
- Deploy Firestore rules.
firebase deploy
Example Output
=== Deploying to 'cymbal-eats-6422-3462'...

i  deploying firestore
i  cloud.firestore: checking firestore.rules for compilation errors...
✔  cloud.firestore: rules file firestore.rules compiled successfully
i  firestore: uploading rules firestore.rules...
✔  firestore: released rules firestore.rules to cloud.firestore

✔  Deploy complete!

Project Console: https://console.firebase.google.com/project/cymbal-eats-6422-3462/overview
Modify data
Collections and documents are created implicitly in Firestore. Simply assign data to a document within a collection. If either the collection or document does not exist, Firestore creates it.
Add data to firestore
There are several ways to write data to Cloud Firestore:
- Set the data of a document within a collection, explicitly specifying a document identifier.
- Add a new document to a collection. In this case, Cloud Firestore automatically generates the document identifier.
- Create an empty document with an automatically generated identifier, and assign data to it later.
The next section will guide you through creating a document using the set method.
Set a document
Use the set()method to create a document. With the set() method, you must specify an ID for the document to create.
Take a look at the code snippet below.
index.js
const orderDoc = db.doc(`orders/123`);
await orderDoc.set({
    orderNumber: 123,
    name: Anne,
    address: 555 Bright Street,
    city: Mountain View,
    state: CA,
    zip: 94043,
    orderItems: [id: 1],
    status: 'New'
  });
This code will create a document specifying a user-generated document id 123. To have Firestore generate an ID on your behalf, use the add() or create()method.
Update a documents
The update method update()allows you to update some document fields without overwriting the entire document.
In the snippet below, the code updates order 123
index.js
const orderDoc = db.doc(`orders/123`);
await orderDoc.update(name: "Anna");
Delete a documents
In Firestore, you can delete collections, documents or specific fields from a document. To delete a document, use the delete() method.
The snippet below deletes order 123.
index.js
const orderDoc = db.doc(`orders/123`);
await orderDoc.delete();
10. Deploying and Testing
In this section, you will deploy the application to Cloud Run and test the create, update and delete methods.
Deploy the application to Cloud Run
- Store the URL in the variable INVENTORY_SERVICE_URL to integrate with Inventory Service
INVENTORY_SERVICE_URL=$(gcloud run services describe inventory-service \
 --region=$REGION \
 --format=json | jq \
 --raw-output ".status.url")
- Deploy the order service
gcloud run deploy order-service \
  --source . \
  --platform managed \
  --region $REGION \
  --allow-unauthenticated \
  --project=$PROJECT_ID \
  --set-env-vars=INVENTORY_SERVICE_URL=$INVENTORY_SERVICE_URL \
  --quiet
Example output
[...]
Done.
Service [order-service] revision [order-service-00001-qot] has been deployed and is serving 100 percent of traffic.
Service URL: https://order-service-3jbm3exegq-uk.a.run.app
Test the Cloud Run application
Create a document
- Store the order service application's URL into a variable for testing
ORDER_SERVICE_URL=$(gcloud run services describe order-service \
  --platform managed \
  --region $REGION \
  --format=json | jq \
  --raw-output ".status.url")
- Build an order request and post a new order to the Firestore database
curl --request POST $ORDER_SERVICE_URL/order \
--header 'Content-Type: application/json' \
--data-raw '{
    "name": "Jane Doe",
         "email": "Jane.Doe-cymbaleats@gmail.com",
    "address": "123 Maple",
    "city": "Buffalo",
    "state": "NY",
    "zip": "12346",
    "orderItems": [
        {
            "id": 1
        }
    ]
}'
Example output
{"orderNumber":46429}
Save the Order Number for later use
export ORDER_NUMBER=<value_from_output>
View results
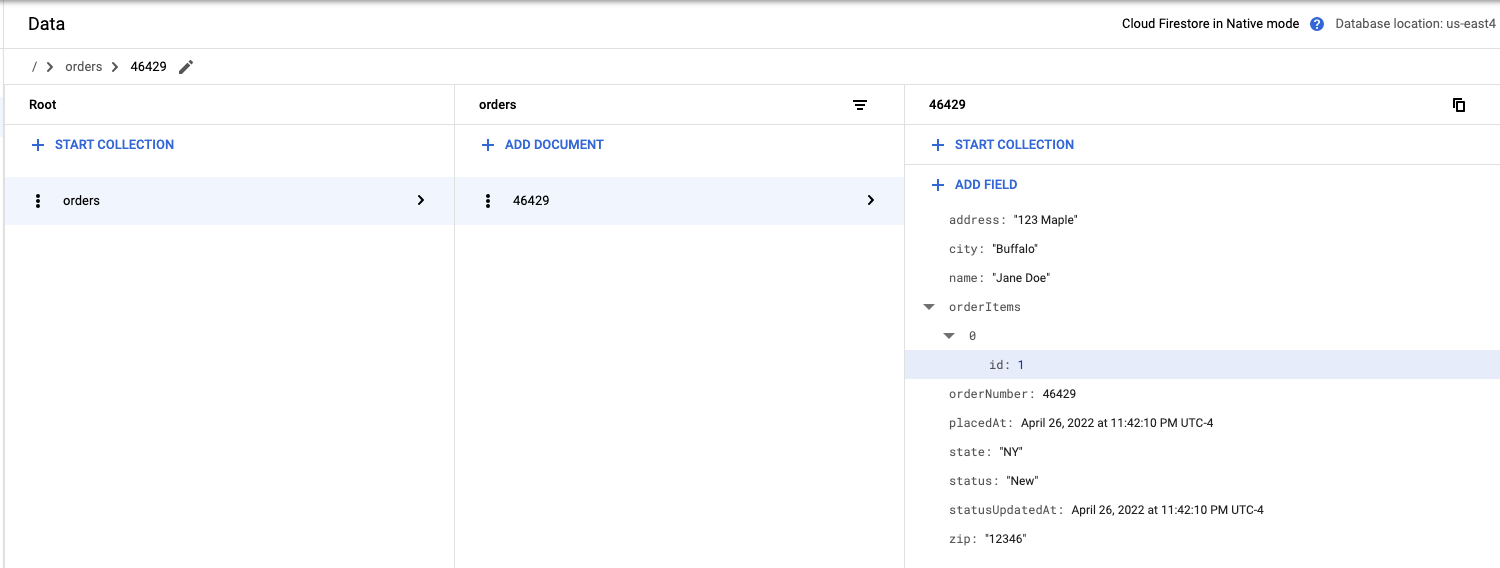
View the results in Firestore
- Navigate to the Firestore console
- Click on Data
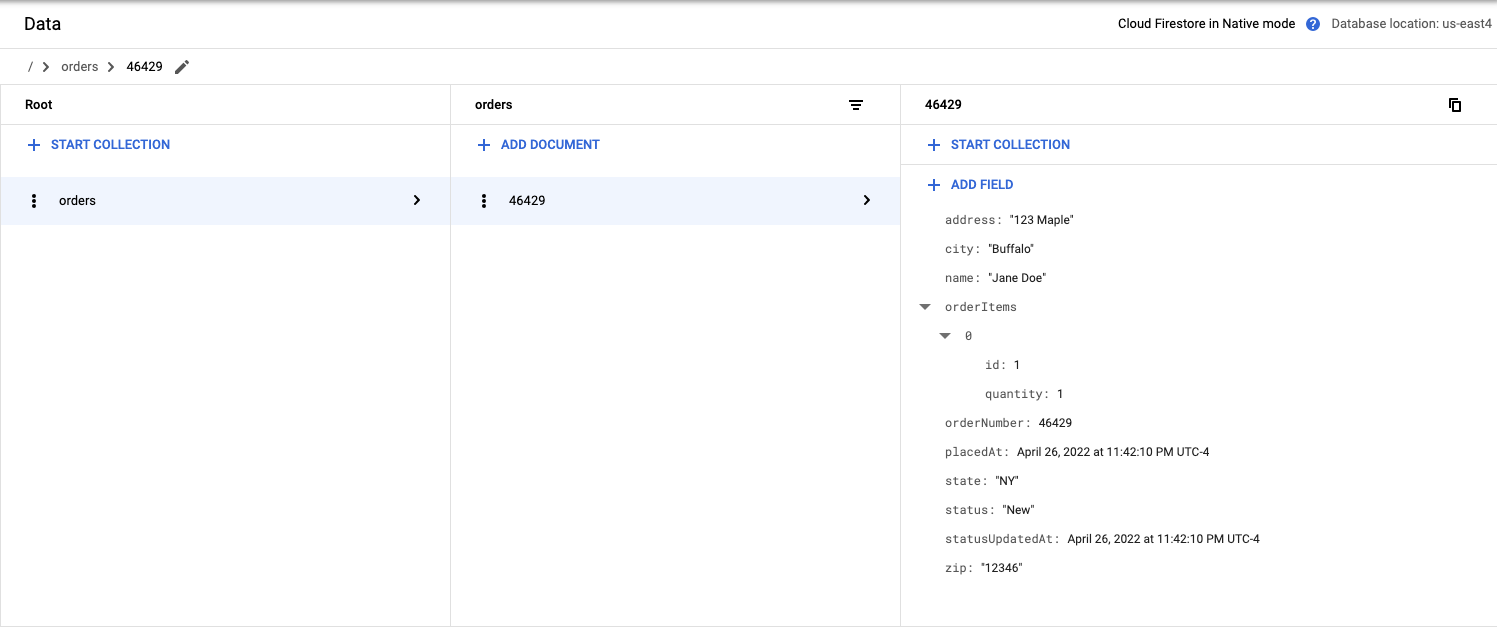
Update a document
The order submitted didn't include the quantity.
- Update the record and add a quantity key-value pair
curl --location -g --request PATCH $ORDER_SERVICE_URL/order/${ORDER_NUMBER} \
--header 'Content-Type: application/json' \
--data-raw '{
"orderItems": [
        {
            "id": 1,
            "quantity": 1
        }
    ]
}'
Example output
{"status":"success"}
View results
View the results in Firestore
- Navigate to the Firestore console
- Click on Data
Delete a document
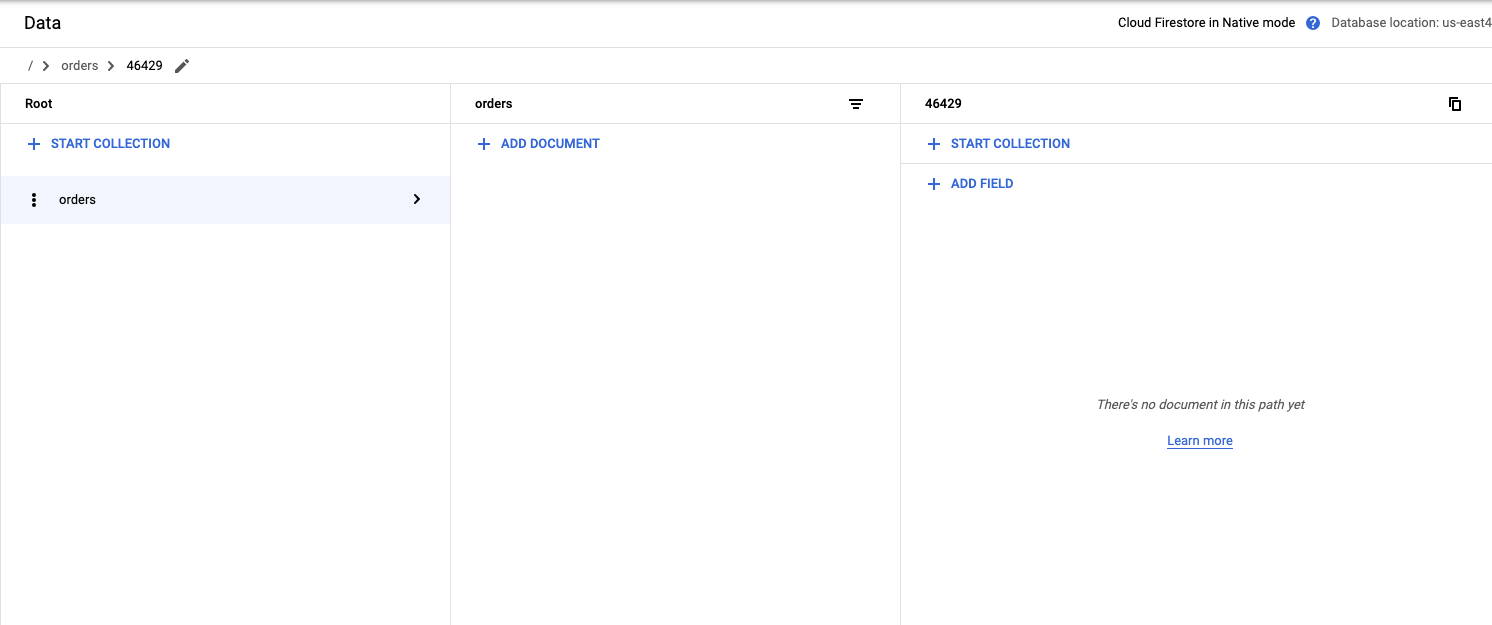
- Delete item 46429 from the Firestore orders collection
curl --location -g --request DELETE $ORDER_SERVICE_URL/order/${ORDER_NUMBER}
View results
- Navigate to the Firestore console
- Click on Data
11. Congratulations!
Congratulations, you finished the lab!
What's next:
Explore other Cymbal Eats codelabs:
- Triggering Cloud Workflows with Eventarc
- Triggering Event Processing from Cloud Storage
- Connecting to Private CloudSQL from Cloud Run
- Secure Serverless Application with Identity Aware Proxy (IAP)
- Triggering Cloud Run Jobs with Cloud Scheduler
- Securely Deploying to Cloud Run
- Securing Cloud Run Ingress Traffic
- Connecting to private AlloyDB from GKE Autopilot
Clean up
To avoid incurring charges to your Google Cloud account for the resources used in this tutorial, either delete the project that contains the resources, or keep the project and delete the individual resources.
Deleting the project
The easiest way to eliminate billing is to delete the project that you created for the tutorial.
