
1. Overview
We all know the pain of "dark data." It's the PDFs, images, and text files sitting in cloud storage buckets, completely invisible to your SQL queries and BI dashboards. Traditionally, unlocking this data required complex OCR pipelines, manual data entry, or fragile custom scripts.
Not anymore.
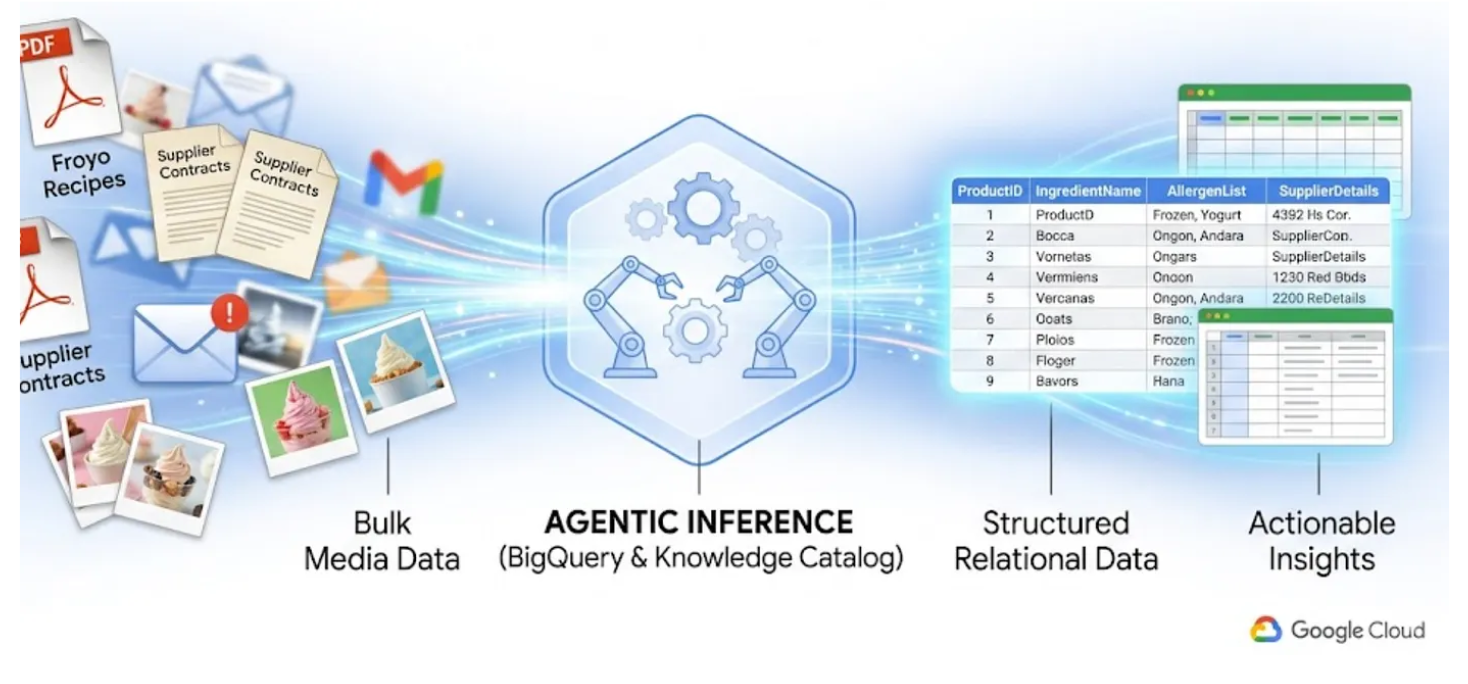
In this lab, I am going to show you how to convert 400 unstructured PDF files — spanning text, tables, and images — into cleanly structured BigQuery tables with relationships automatically inferred between them. And we are going to do it in minutes using BigQuery Knowledge Catalog and Dataplex.
What you'll build
To make this real, let's look at a fictional business: a fast-growing Frozen Yogurt franchise.
Imagine you manage the data for this Froyo business. You have hundreds of recipes and supplier spec sheets, all saved as PDFs. The business leaders want to launch an AI agent to help store managers and customers query product details.
Here is the nightmare scenario: A customer asks, "I'm really interested in your Midnight Swirl froyo. Are there any allergens in it?"
To answer this, your system would normally have to:
- Find the "Midnight Swirl" recipe PDF.
- Read the ingredients (e.g., "Cocoa Powder", "Dairy Base", "Emulsifier X").
- Search through dozens of Supplier PDFs to find the spec sheets for those specific ingredients.
- Check the supplier sheets for hidden allergens tied to those ingredients.
Trying to build an AI agent that does this on the fly by reading 400 raw PDFs at runtime is slow, expensive, and prone to hallucination. Instead, we are going to use semantic inference to extract all of this into a relational database first, making our future AI agent lightning-fast and 100% grounded in factual SQL data.
Let's start building!
What you'll learn
- How to set up Cloud Storage bucket for the source files (PDFs)
- How to set up and run Datascan job and semantic inference in Knowledge Catalog to extract data from source pdfs and semantically infer the connections and context and store it in BigQuery
- How to use BigQuery Agents to chat with the newly created dataset
Requirements
2. Before you begin
Create a project
- In the Google Cloud Console, on the project selector page, select or create a Google Cloud project.
- Make sure that billing is enabled for your Cloud project. Learn how to check if billing is enabled on a project.
- You'll use Cloud Shell, a command-line environment running in Google Cloud. Click Activate Cloud Shell at the top of the Google Cloud console.

- Once connected to Cloud Shell, you check that you're already authenticated and that the project is set to your project ID using the following command:
gcloud auth list
- Run the following command in Cloud Shell to confirm that the gcloud command knows about your project.
gcloud config list project
- If you want to authenticate
gcloud auth login
- If your project is not set, use the following command to set it:
export PROJECT_ID=<YOUR_PROJECT_ID>
gcloud config set project <YOUR_PROJECT_ID>
- Enable the required APIs: Run this command to enable all the required APIs:
gcloud services enable \
    dataplex.googleapis.com \
    datacatalog.googleapis.com \
    discoveryengine.googleapis.com \
    bigqueryconnection.googleapis.com \
    bigquery.googleapis.com \
    aiplatform.googleapis.com \
    cloudresourcemanager.googleapis.com \
    serviceusage.googleapis.com \
    storage.googleapis.com
Gotchas & Troubleshooting
The "Ghost Project" Syndrome | You ran |
The Billing Barricade | You enabled the project, but forgot the billing account. AlloyDB is a high-performance engine; it won't start if the "gas tank" (billing) is empty. |
API Propagation Lag | You clicked "Enable APIs," but the command line still says |
Quota Quags | If you're using a brand-new trial account, you might hit a regional quota for AlloyDB instances. If |
"Hidden" Service Agent | Sometimes the AlloyDB Service Agent isn't automatically granted the |
3. Google Cloud Storage Bucket Setup
In this section, you create an organizational structure within BigQuery to store Froyo recipe and supplier data, specifically for Froyo product details. It also establishes a Cloud Resource Connection, which acts as a secure "bridge" allowing BigQuery to read files from external sources like Cloud Storage.
Before you begin:
This repository contains recipes, suppliers PDF files we'll use in this project. Make sure you download these files. To download the files, do the following.
In the Cloud Shell, run the following command:
git clone --depth 1 --filter=blob:none --sparse https://github.com/GoogleCloudPlatform/next-26-keynotes.git
Navigate into the newly created folder:
cd next-26-keynotes
Pull the data-cloud-demo folder
git sparse-checkout set genkey/data-cloud-demo
After the checkout is complete, navigate to the data-cloud-demo folder and extract the ZIP files to access the codelab assets.
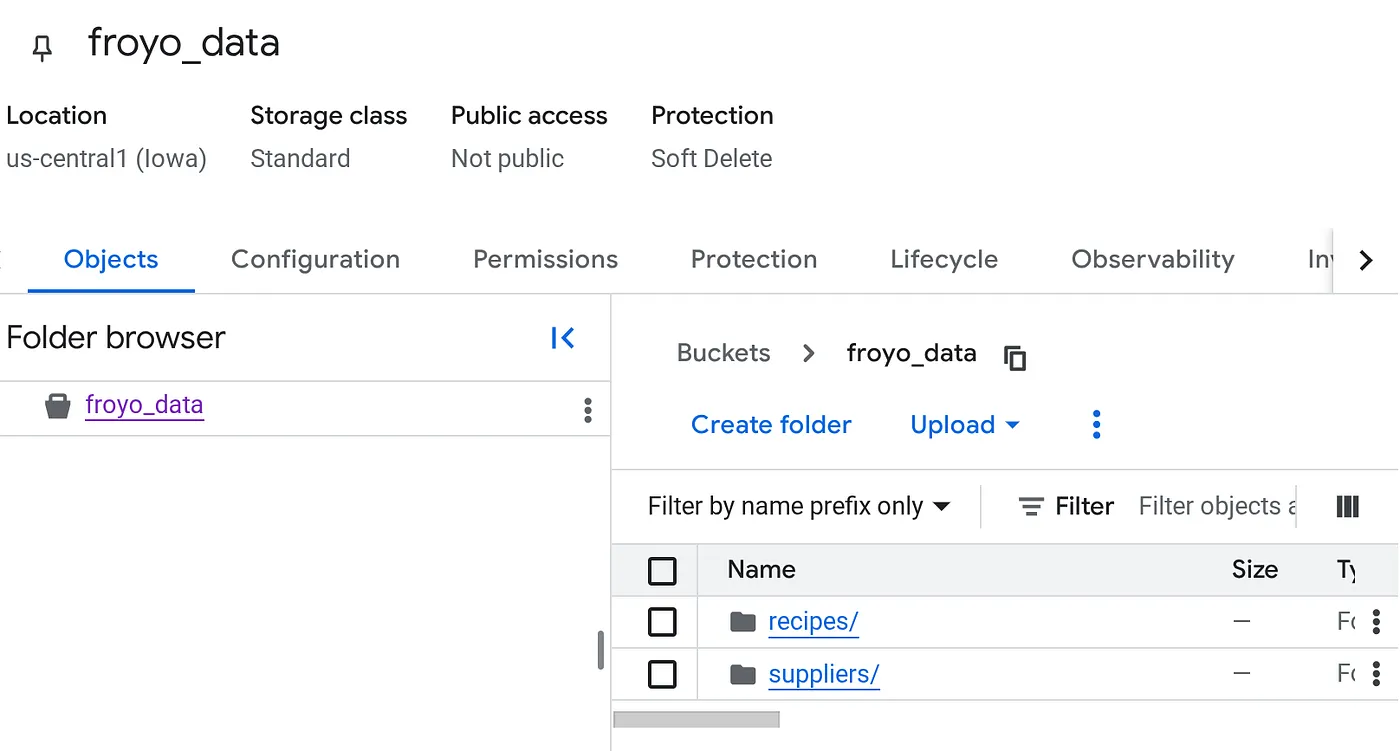
Create bucket and upload the Froyo (recipes & suppliers) pdf files
- In the Google Cloud console, go to the Cloud Storage Buckets page.
- Click Create.
- On the Create a bucket page, enter your bucket information. After each of the following steps, click Continue to proceed to the next step:
- In the Get started section, enter the bucket name. Eg.: froyo_data
- In the Choose where to store your data section, select Region and then enter your region. us-central1
- In the Choose how to control access to objects section, clear the Enforce public access prevention on this bucket checkbox.
- Click Create.
- In the list of buckets, click the bucket you created.
- In the Objects tab for the bucket, click Upload and then Upload folders.
- Select the recipes folder that you extracted in the Before you begin section of this codelab.
- Click Upload.
- Repeat the upload process for the suppliers folder.
Once uploaded, your bucket structure should look like (whatever the bucket name is):
4. BigQuery Connection Setup
Create a Cloud Resource Connection. This generates a unique Service Account that acts as BigQuery's "ID card" to access external files.
- Go to the BigQuery page.
- In the left pane, click Explorer. If you don't see the left pane, click Expand left pane to open the pane.
- In the Explorer pane, expand your project name, and then click Connections.
- On the Connections page, click Create connection.
- For Connection type, choose Vertex AI remote models, remote functions, BigLake and Spanner (Cloud Resource).
- In the Connection ID field, enter the connection ID name:
- bq-connection. Make sure to note this ID as you'll need it when you set up the data scan later in this codelab.
- Set Location type to Region and then select a region. For example, us-central1. The connection should be located in the same region as your other resources such as datasets.
- Click Create connection.
- Click Go to connection.
- In the Connection info pane, copy the service account ID for use in a later step. The service account looks similar to bqcx-**********-qn3a@gcp-sa-bigquery-condel.iam.gserviceaccount.com.
5. Permissions Setup
- Grant the necessary permissions to the BigQuery connection for accessing Cloud Storage objects and the Knowledge Catalog
Go to the IAM & Admin page and in the View by Principals section, click the Grant access button, add a principal by pasting the service account you copied in the last step. In the roles section, add the names of the following roles one by one and save:
- roles/storage.objectUser
- roles/storage.objectViewer
- roles/bigquery.user
- roles/bigquery.dataEditor
- roles/aiplatform.viewer
- roles/agentplatform.user
- roles/storage.admin
- roles/dataproc.serviceAgent
- roles/dataplex.discoveryPublishingServiceAgent
- roles/dataplex.serviceAgent
- roles/dataplex.securityAdmin
- Grant Dataplex Service Account permissions to access the Cloud Storage Bucket
Go to IAM & Admin page and in the View by Principals section, click the Grant access button and add a principal by typing the word dataplex into the New principal text bar. From the list that auto completes, select the Dataplex Service Account principal that looks similar to this: (use project number and not project id in the service account email id below)
service-<<YOUR_PROJECT_NUMBER>>@ gcp-sa-dataplex.iam.gserviceaccount.com
If for any reason if the above service account for your project number is not getting recognized, it might just be that the project has not yet initialized the dataplex service. Go to Cloud Shell Terminal and try enabling the API (if not already done in the before you begin stage) by running the following command: gcloud services enable dataplex.googleapis.com
Even after that if the service account for Dataplex is not getting recognized, force a test Dataplex scan job creation in the Metadata Curation page and enter the details in the Discover Job creation page:
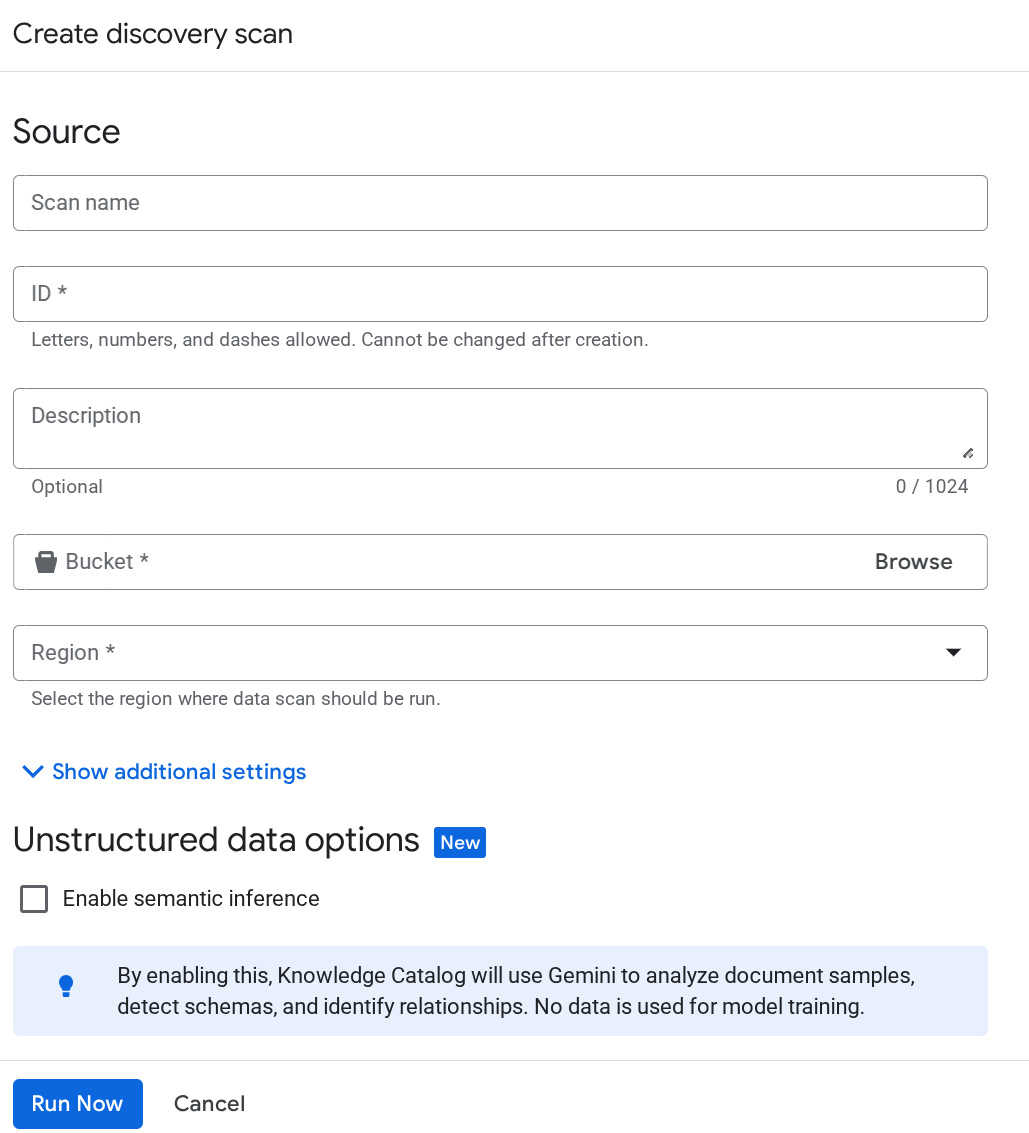
Click Run Now. The job will fail, but this will ensure the service account id will be initialized for your Dataplex service now.
Go back to the IAM & Admin page and in the View by Principals section, click the Grant access button and click add a principal. Paste the service account:
service-<<YOUR_PROJECT_NUMBER>>@ gcp-sa-dataplex.iam.gserviceaccount.com
Then grant the following roles to this Service Account:
- roles/storage.objectUser
- roles/storage.objectViewer
- roles/storage.viewer
- roles/dataplex.discoveryBigLakePublishingServiceAgent
6. Knowledge Catalog Setup
Build a Knowledge Catalog to unify the unstructured data and automate the discovery of unstructured files (such as PDF recipes and PDF suppliers).
Create the DataScan job from the console:
- Go to the Metadata curation page.
- Click Create and enter the details corresponding to your setup:
Important Note: Don't forget to check Enable Semantic Inference.
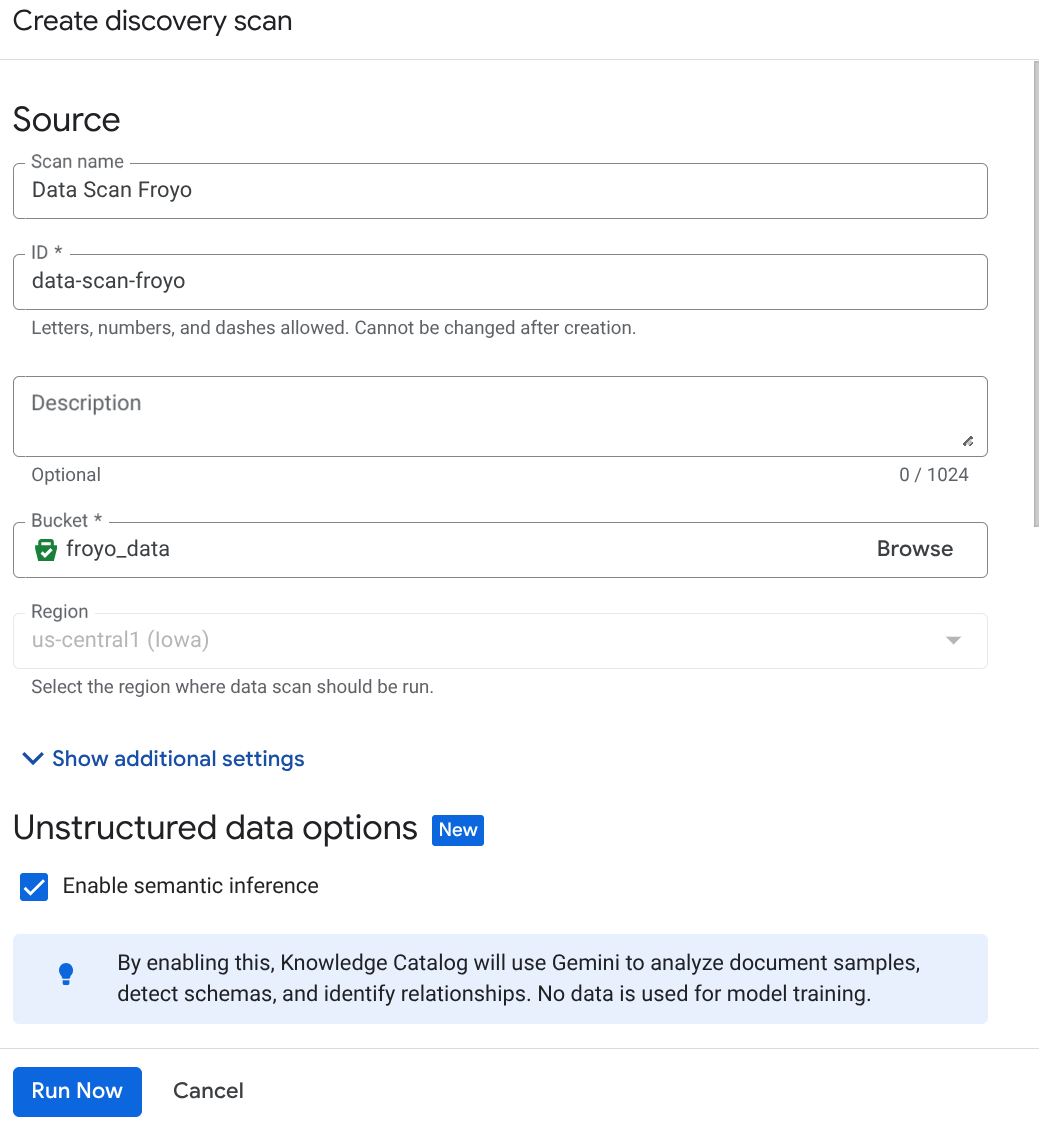
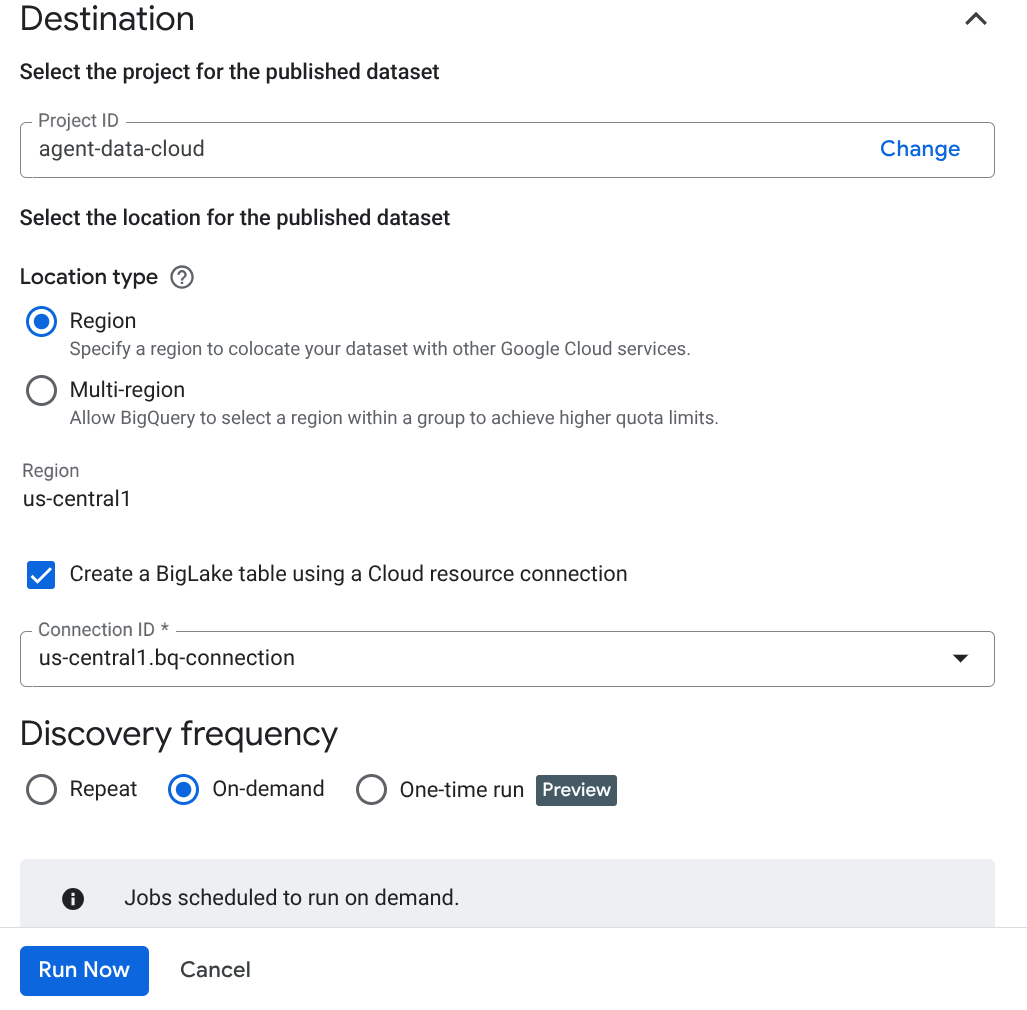
- Click "Run Now".
- It will take some time to complete the scan job. Once the job finishes, check if the Published dataset is present. To check the job status, you can check in the Metadata curation page, in the Cloud Storage discovery tab, click the name of the discovery scans of the recent run. you should see the published dataset as seen below:
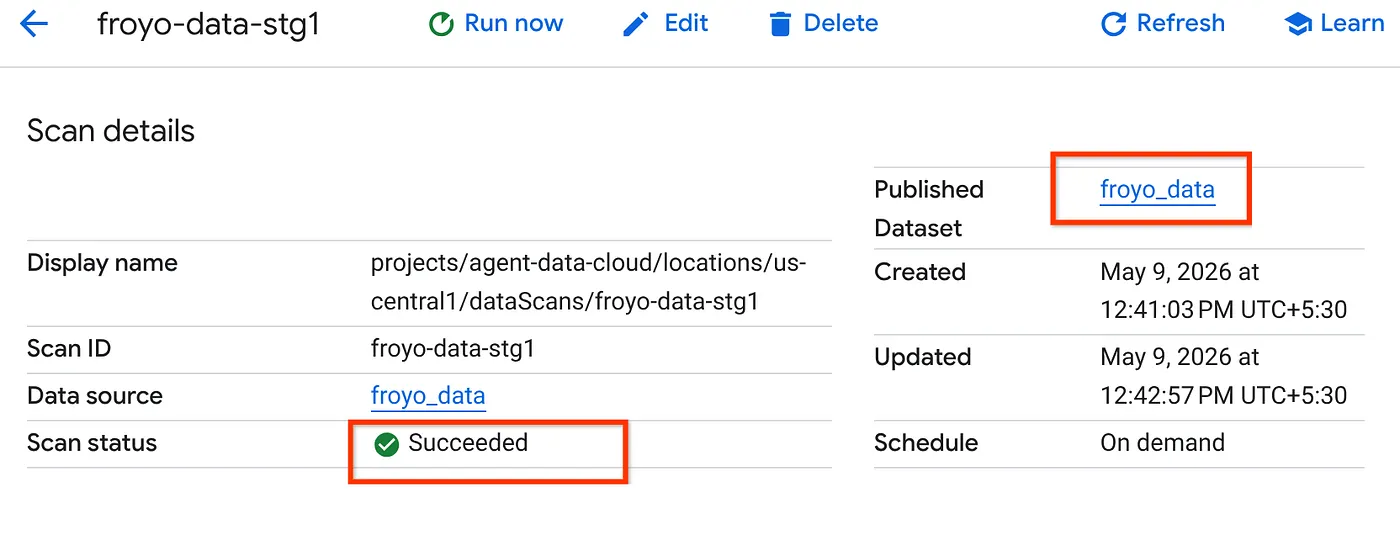
Note: If you run into errors in the scan step, just give it some time and then retry (it takes a few minutes to get the job created and complete execution).
- You can view the table in BigQuery by clicking and navigating to the froyo_data dataset. Click the table id in BigQuery and run the below query in the Query Editor tab:
SELECT count(*) FROM `froyo_data.froyo_data` LIMIT 1000;
This results in 400 (if not you can go back and run the Datascan job again).
7. Semantic Data Extraction
Great!! Now lets extract the inference for these unstructured objects using Knowledge Catalog.
We will use the Insights feature to generate SQL statements to extract structured data from the unstructured table
- In the Google Cloud console, go to the Knowledge Catalog Search page.
- Search for the dataset table that you want to view insights for. In the search bar, enter the dataset / table name from previous step: "froyo_data" and hit enter
- From the result list, click the TABLE entry (not the dataset one)
- You should see the INSIGHTS tab. Click that (if it requires you to enable any API, follow along and just enable APIs).
If you ended up enabling APIs at this point, you have to re-run the scan job again.
- In the INSIGHTS tab, you will see the EXTRACT button drop-down. Click that and select "Extract with SQL" option.
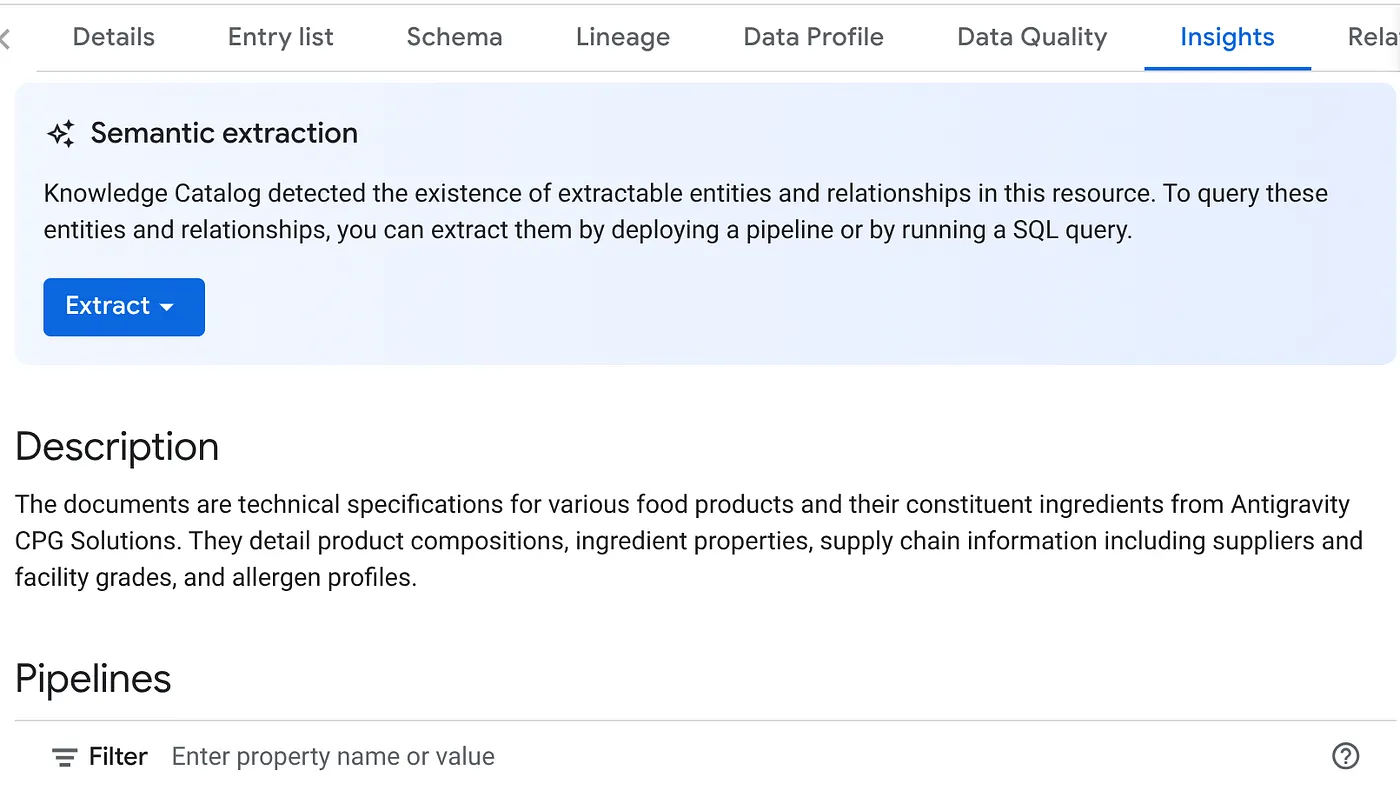
In the "Extract with SQL" dialog pop up, set the DESTINATION dataset as the one that you saw in the result of the Datascan job. Start typing its name and it should show up in autocomplete. Click the "Extract" button. Alternatively you can create a new dataset at this point and extract.
This should open BigQuery Query Editor with a tab open populated with extracted SQL from the data scan inference.
8. SQL Validation & Schema Creation
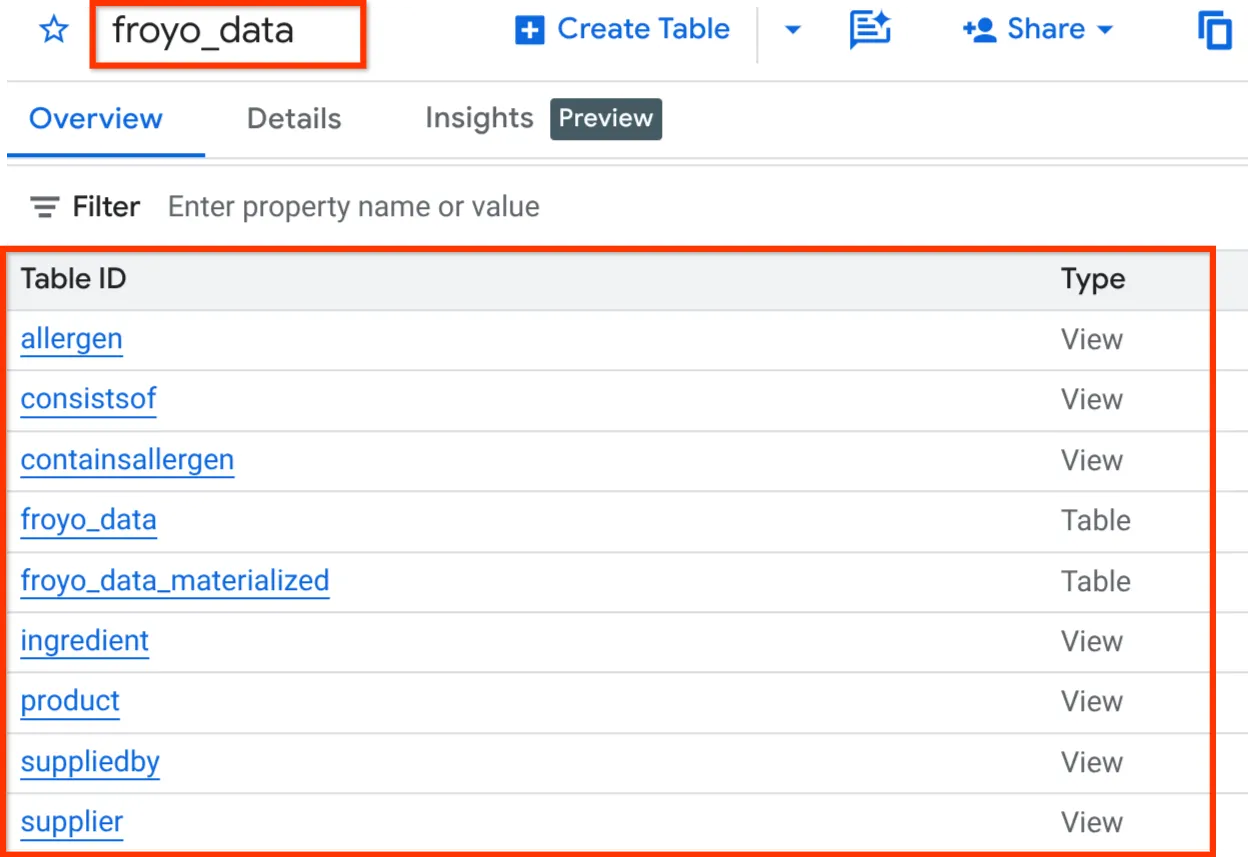
If the generated query seems all good, and semantically relevant to your unstructured data, go ahead and run it by clicking the Run button on the query editor. It will take a few minutes to create the schema required for the structured storage of your unstructured media.
Once done, you should be able to verify the schema by expanding the dataset in the explorer pane of the BigQuery Studio as seen below:
Alright!!! It was so sweet that we did all those database things really fast. Now it's time for the ultimate test!
Steps to continue to experience the data without the billing account:
- You can get the data csv files (BigQuery Data) from the github repo link above.
- First, create the BigQuery Dataset by running the below command from Cloud Shell Terminal:
bq mk --location us-central1 --dataset froyo_data
- Next, download the 8 data files (csv files) from the github repo into your working directory by running the following commands one by one:
wget https://raw.githubusercontent.com/AbiramiSukumaran/raw-data-to-gold/refs/heads/main/data/froyo_data.allergen.csv
wget https://raw.githubusercontent.com/AbiramiSukumaran/raw-data-to-gold/refs/heads/main/data/froyo_data.consistsof.csv
wget https://raw.githubusercontent.com/AbiramiSukumaran/raw-data-to-gold/refs/heads/main/data/froyo_data.containsallergen.csv
wget https://raw.githubusercontent.com/AbiramiSukumaran/raw-data-to-gold/refs/heads/main/data/froyo_data.froyo_data_materialized.csv
wget https://raw.githubusercontent.com/AbiramiSukumaran/raw-data-to-gold/refs/heads/main/data/froyo_data.ingredient.csv
wget https://raw.githubusercontent.com/AbiramiSukumaran/raw-data-to-gold/refs/heads/main/data/froyo_data.product.csv
wget https://raw.githubusercontent.com/AbiramiSukumaran/raw-data-to-gold/refs/heads/main/data/froyo_data.suppliedby.csv
wget https://raw.githubusercontent.com/AbiramiSukumaran/raw-data-to-gold/refs/heads/main/data/froyo_data.supplier.csv
- Run the following commands one by one to create these tables with the data in your newly created dataset
bq load --autodetect --source_format=CSV --skip_leading_rows=1 --allow_quoted_newlines --quote="" froyo_data.allergen ./froyo_data.allergen.csv allergen_name:STRING
bq load --autodetect --source_format=CSV --skip_leading_rows=1 --allow_quoted_newlines --quote="" froyo_data.consistsof ./froyo_data.consistsof.csv product_id:STRING,ingredient_id:STRING
bq load --autodetect --source_format=CSV --skip_leading_rows=1 --allow_quoted_newlines --quote="" froyo_data.containsallergen ./froyo_data.containsallergen.csv ingredient_id:STRING,allergen_name:STRING
bq load --autodetect --source_format=CSV --skip_leading_rows=1 --allow_quoted_newlines --quote="" froyo_data.froyo_data_materialized ./froyo_data.froyo_data_materialized.csv allergen:STRING,containsallergen:STRING,ingredient:STRING,product:STRING,suppliedby:STRING,supplier:STRING,ref:STRING,md5_hash:STRING
bq load --autodetect --source_format=CSV --skip_leading_rows=1 --allow_quoted_newlines --quote="" froyo_data.ingredient ./froyo_data.ingredient.csv ingredient_id:STRING,ingredient_name:STRING,purity:STRING,moisture_content:STRING,ph_range:STRING,specific_gravity_range:STRING
bq load --autodetect --source_format=CSV --skip_leading_rows=1 --allow_quoted_newlines --quote="" froyo_data.product ./froyo_data.product.csv product_id:STRING,product_name:STRING,category:STRING,stability:STRING
bq load --autodetect --source_format=CSV --skip_leading_rows=1 --allow_quoted_newlines --quote="" froyo_data.suppliedby ./froyo_data.suppliedby.csv ingredient_id:STRING,supplier_id:STRING
bq load --autodetect --source_format=CSV --skip_leading_rows=1 --allow_quoted_newlines --quote="" froyo_data.supplier ./froyo_data.supplier.csv supplier_id:STRING,supplier_name:STRING,production_site_id:STRING,facility_grade:STRING
Once the dataset, tables and data are created, you can proceed to test and experience the data we just discussed.
9. The Ultimate Test!!!
Let's say I want my agent to respond to the user's questions with real, complete and well orchestrated information grounded in facts. I am going to ask a question that the agent would only be able to answer by referring to multiple media files and references from my source.
Here is my user question:
I'm really interested in your Midnight Swirl froyo. Are there any allergens in it?
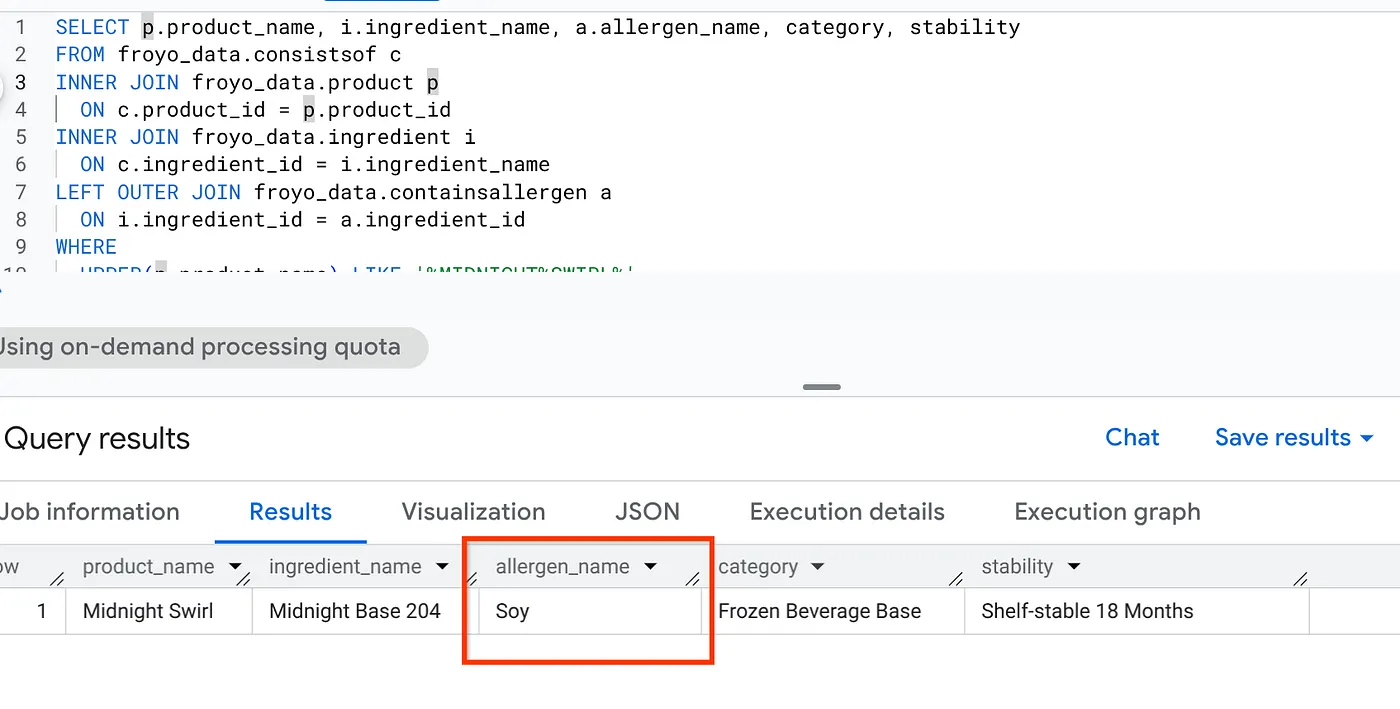
Now a generic search or an LLM search will say "Zero ingredients". But we built a full semantic inference converting all our unstructured media into structured data. So here it goes, with a simple SQL that will fetch this information:
SELECT p.product_name, i.ingredient_name, a.allergen_name, category, stability
FROM froyo_data.consistsof c
INNER JOIN froyo_data.product p
  ON c.product_id = p.product_id
INNER JOIN froyo_data.ingredient i
  ON c.ingredient_id = i.ingredient_name
LEFT OUTER JOIN froyo_data.containsallergen a
  ON i.ingredient_id = a.ingredient_id
WHERE
  UPPER(p.product_name) LIKE '%MIDNIGHT%SWIRL%'
  AND allergen_name IS NOT NULL;
Woohoo! Look at the result:
10. Clean up
Once this lab is done, do not forget to delete the scan job and the BigQuery tables the job ended up creating.
Go to https://console.cloud.google.com/bigquery/governance/metadata-curation/cloud-storage-discovery. Select the job you want to delete by clicking on the vertical ellipsis next to it and click DELETE.
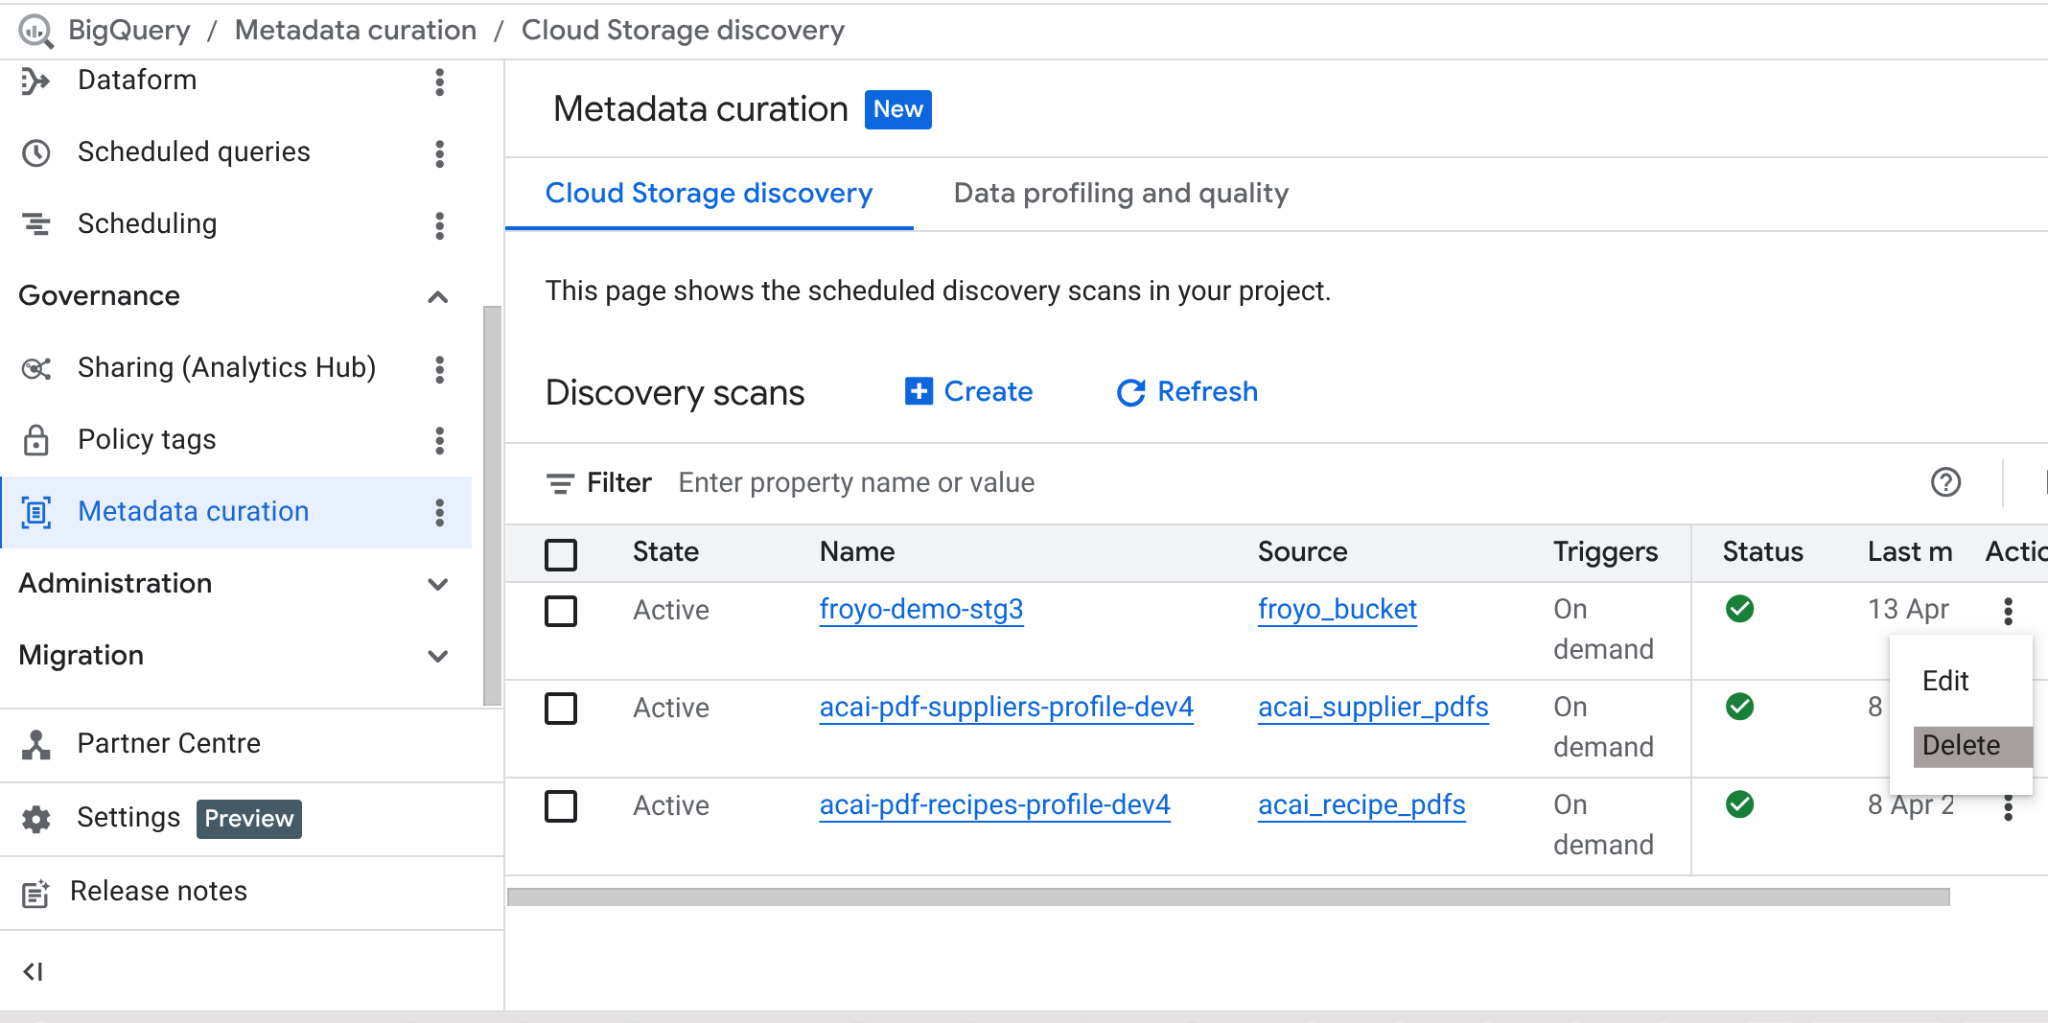
It should clean up the job.
11. Congratulations
Our implementation was successfully able to identify the hidden allergen. No more dark data, people!!! In part 2, we will federate this BigQuery data in a transactional system with AlloyDB to unify the data needs for our agentic application.