
1. Before you begin
Welcome to the second part of the "Building AI Agents with ADK" series! In this hands-on codelab, you'll empower a basic AI agent with a variety of tools.
To get started, this guide provides two paths: one for those continuing from the Building AI Agents with ADK: The Foundation codelab, and another for those starting fresh. Both paths will ensure you have the necessary base agent code to begin.
By the end of this codelab, you'll have empowered your personal assistant agent with tools for various purposes, one step closer to be expanded upon in subsequent parts of this series as we transform it into a sophisticated Multi-Agent System (MAS).
You can also access this codelab via this shortened URL: goo.gle/adk-using-tools.
Prerequisites
- An understanding of the Generative AI concepts
- A basic proficiency in Python programming
- Completed the Building AI Agents with ADK: The Foundation codelab or similar
What you'll learn
- Give your agent new skills by building custom Python functions as tools.
- Connect your agent to real-time information using built-in tools like Google Search.
- Structure a multi-tool agent by creating specialized sub-agents for complex tasks.
- Integrate tools from popular AI frameworks like LangChain to rapidly expand capabilities.
What you'll need
- A working computer and reliable WiFi
- A browser, such as Chrome, to access Google Cloud Console
- A curious mind and eagerness to learn
2. Introduction
A basic agent built with the ADK has a powerful LLM brain, but it also has limitations: it can't access information created after its training date, and it can't interact with external services. It's like a brilliant, book-smart assistant locked in a library with no phone or internet. To make an agent truly useful, we need to give it tools.
Think of tools as giving that AI assistant access to the outside world: a calculator, a web browser, or access to a specific company database. In ADK, a tool is a modular piece of code that allows the agent to perform specific actions like looking up real-time data or calling an external API. Using tools extends its capabilities far beyond simple conversation.
ADK offers three categories of tools:
- Function Tools: Custom tools you develop to meet your application's unique requirements, such as predefined functions and agents.
- Built-in Tools: Ready-to-use tools provided by the framework for common operations, like Google Search and Code Execution.
- Third-party Tools: Popular external libraries such as Serper and tools from LangChain and CrewAI.
To learn more about using Tools with ADK Agents, have a look at the official documentation. In this codelab, we will add tools to transform our simple agent into a capable personal travel assistant. Let's begin!
3. Getting Started: Your Base Agent
Before you can empower an agent with tools, you need a basic agent to work with. Choose the path that best suits your progress.
Path A: Continuing from the Foundation Codelab
If you have just completed the Building AI Agents with ADK: The Foundation codelab, you are all set. You can continue working in your existing ai-agents-adk project directory.
If you don't see (ai-agents-adk) in your Cloud Shell prompt, run these commands to activate the Python virtual environment:
cd ~/ai-agents-adk
source .venv/bin/activate
Path B: Starting Fresh
If you are starting this codelab directly, complete these 4 steps to set up your environment and create the necessary starter agent.
- Configure Google Cloud Services
- Create a Python virtual environment
- Create an agent
- Run the agent on the Development UI
Once you have completed the steps, you are ready to embark on your learning journey.
4. Build a Custom Tool for Currency Exchange
At this stage, you should already know how to build a simple AI agent using ADK and get it running on the Development UI.
Imagine you're preparing for a trip to Japan next month and need to check the current currency exchange rate. Ask the agent "What is the exchange rate from Singapore dollars to Japanese yen?"
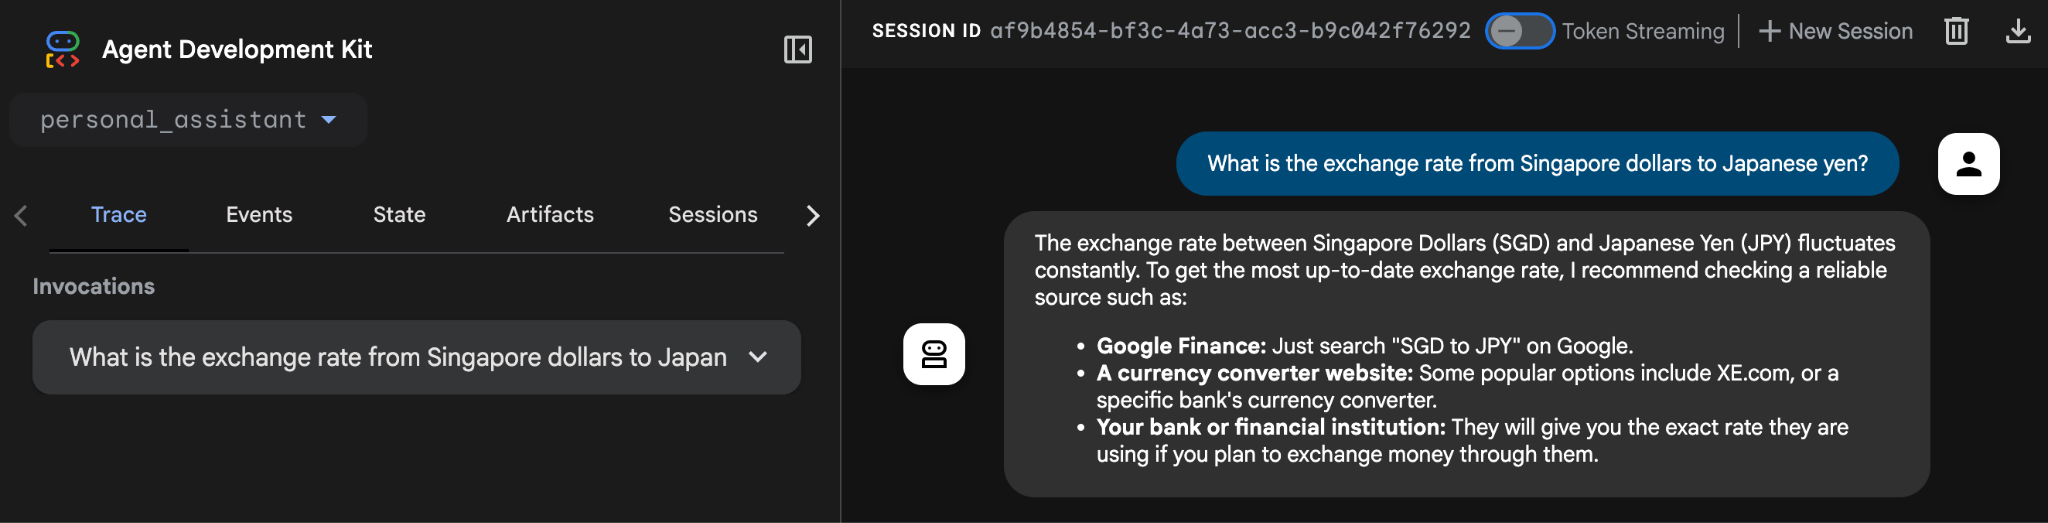
You'll see that the agent can't retrieve real-time exchange rates. This is because the agent currently lacks internet access and external system connectivity. Even if the agent replies with a value, it's hard to trust that value as it's likely going to be a hallucination.
To address this, we will implement a Python function to retrieve exchange rates via a REST API and integrate it as a Function Tool for the agent.
Terminate the running agent process by using the keyboard shortcut Ctrl + C in the terminal window.
Create custom_functions.py file
Execute this command in ther terminal to create a Python file named custom_functions.py in the personal_assistant folder and also open it on the Code Editor.
cloudshell edit personal_assistant/custom_functions.py
This is how your folder structure should look like now:
ai-agents-adk/
└── personal_assistant/
    ├── .env
    ├── __init__.py
    ├── agent.py
    └── custom_functions.py
This custom_functions.py file will contain the Python function responsible for retrieving exchange rate data from an external API. Copy and paste the following code into the file:
import requests

# define a function to get exchange rate
def get_fx_rate(base: str, target: str):
        """
        Fetches the current exchange rate between two currencies.

        Args:
                base: The base currency (e.g., "SGD").
                target: The target currency (e.g., "JPY").

        Returns:
                The exchange rate information as a json response,
                or None if the rate could not be fetched.
        """
        base_url = "https://hexarate.paikama.co/api/rates/latest"
        api_url = f"{base_url}/{base}?target={target}"

        response = requests.get(api_url)
        if response.status_code == 200:
                return response.json()
Now, edit the agent.py file: import get_fx_rate function and assign it as a FunctionTool.
Update agent.py file
Copy this codeblock and replace the existing content of agent.py file:
from google.adk.agents import Agent
from google.adk.tools import FunctionTool

from .custom_functions import get_fx_rate

root_agent = Agent(
    model='gemini-3.5-flash',
    name='root_agent',
    description='A helpful assistant for user questions.',
    instruction='Answer user questions to the best of your knowledge',
    tools=[FunctionTool(get_fx_rate)]
)
After the changes, start the agent again by typing:
adk web --allow_origins "regex:https://.*\.cloudshell\.dev"
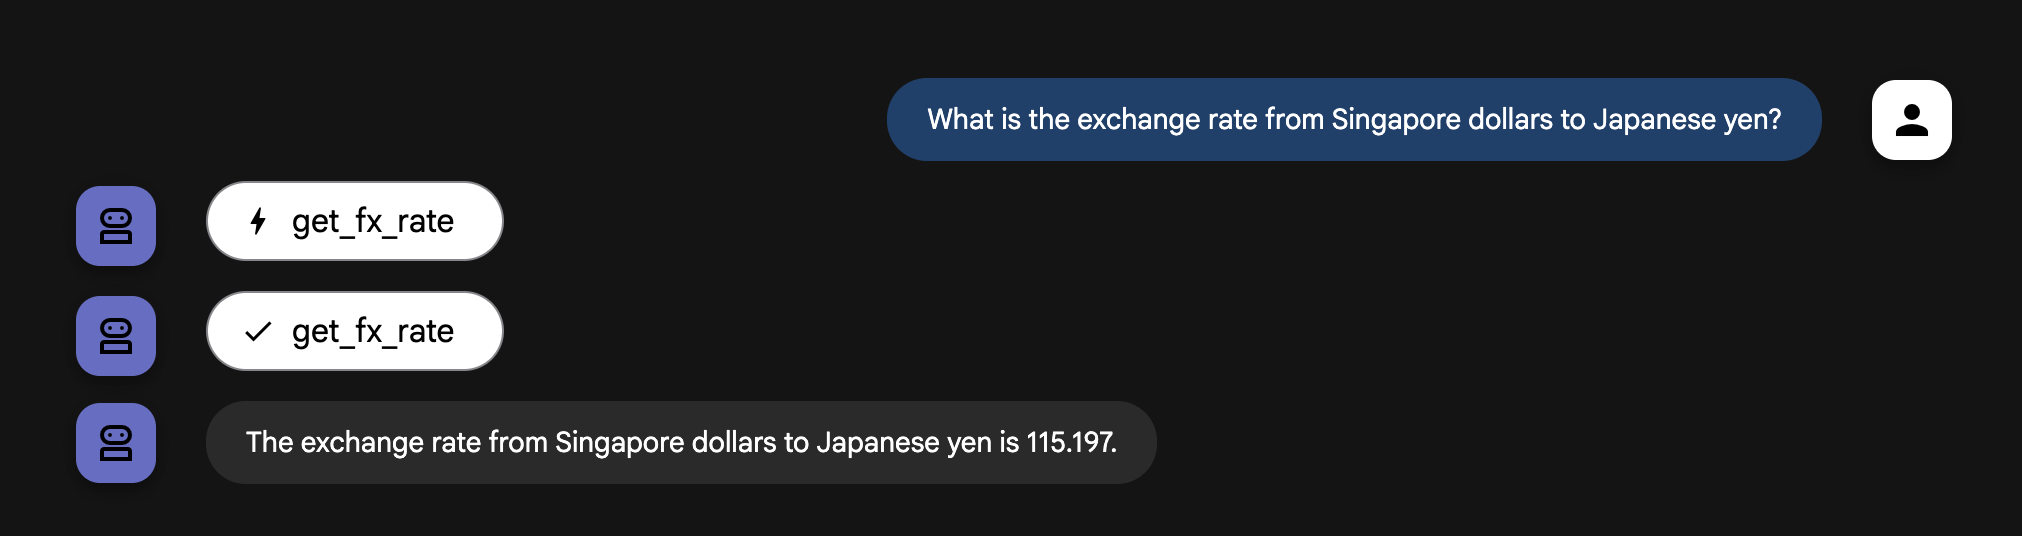
When the agent is up, ask the same question again, "What is the exchange rate from Singapore dollars to Japanese yen?"
This time around you should see the actual exchange rate given by the get_fx_rate tool.
Feel free to ask any currency exchange related questions as you wish.
5. Integrate with Built-in Google Search Tool
With the agent now capable of providing exchange rates, the next task is to obtain next month's weather forecast. Ask this question to the agent, "What is the weather forecast in Tokyo, Japan for next month?"

As you might expect, the weather forecast requires real-time information which our agent doesn't have. While we could code new Python functions for each use case that requires real-time data, adding more and more custom tools quickly makes the agent too complicated and difficult to manage.
Fortunately, the Agent Development Kit (ADK) provides a suite of Built-in Tools, including Google Search that are ready to use, simplifying how our agent interacts with the outside world.
To equip the agent with Google Search tool, you need to implement a multi-agent pattern. First, you create a specialized agent whose sole job is to perform Google searches. Then, you assign this new Google Search Agent to our main personal_assistant as a tool. Here are the steps:
Create custom_agents.py file
Run this command in the terminal to create a Python file named custom_agents.py in the personal_assistant folder and open it on the Code Editor:
cloudshell edit personal_assistant/custom_agents.py
This is how your folder structure should look like now:
ai-agents-adk/
└── personal_assistant/
    ├── .env
    ├── __init__.py
    ├── agent.py
    ├── custom_functions.py
    └── custom_agents.py
This custom_agents.py file will contain the code for the specialized google_search_agent. Copy the following code to the custom_agents.py file:
from google.adk.agents import Agent
from google.adk.tools import google_search


# Create an agent with google search tool as a search specialist
google_search_agent = Agent(
    model='gemini-3.5-flash',
    name='google_search_agent',
    description='A search agent that uses google search to get latest information about current events, weather, or business hours.',
    instruction='Use google search to answer user questions about real-time, logistical information.',
    tools=[google_search],
)
Once the file is created, update the agent.py file as shown below.
Update agent.py file
Copy this codeblock and replace the existing content of agent.py file:
from google.adk.agents import Agent
from google.adk.tools import FunctionTool
from google.adk.tools.agent_tool import AgentTool

from .custom_functions import get_fx_rate
from .custom_agents import google_search_agent


root_agent = Agent(
    model='gemini-3.5-flash',
    name='root_agent',
    description='A helpful assistant for user questions.',
    tools=[
        FunctionTool(get_fx_rate),
        AgentTool(agent=google_search_agent),
    ]
)
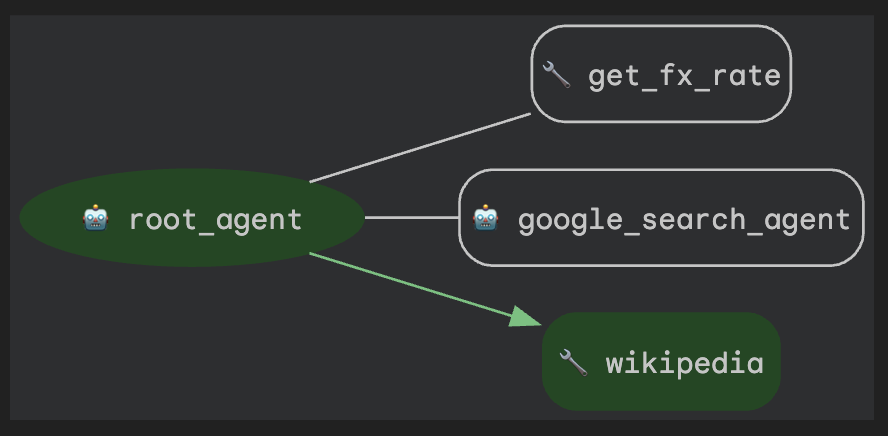
Let's break down the powerful new pattern in the code:
- A New Specialist Agent: We've defined a completely new agent,
google_search_agent. Note its specific description and that its only tool isgoogle_search. It's a search specialist. agent_tool.AgentTool: This is a special wrapper from the ADK. It takes an entire agent (our google_search_agent) and packages it to look and act like a standard tool.- A Smarter
root_agent: Ourroot_agentnow has a new tool:AgentTool(agent=google_search_agent). It doesn't know how to search the web, but it knows it has a tool it can delegate search tasks to.
Notice the instruction field is gone from root_agent. Its instructions are now implicitly defined by the tools it has available.
The root_agent has become an orchestrator or a router, whose main job is to understand a user's request and pass it to the correct tool, either the get_fx_rate function or the google_search_agent. This decentralized design is key to building complex, maintainable agent systems.
Now, type this command in the terminal to start the instance:
adk web --allow_origins "regex:https://.*\.cloudshell\.dev"
Once the agent is running, ask this question to the agent again, "What is the weather forecast in Tokyo, Japan for next month?"
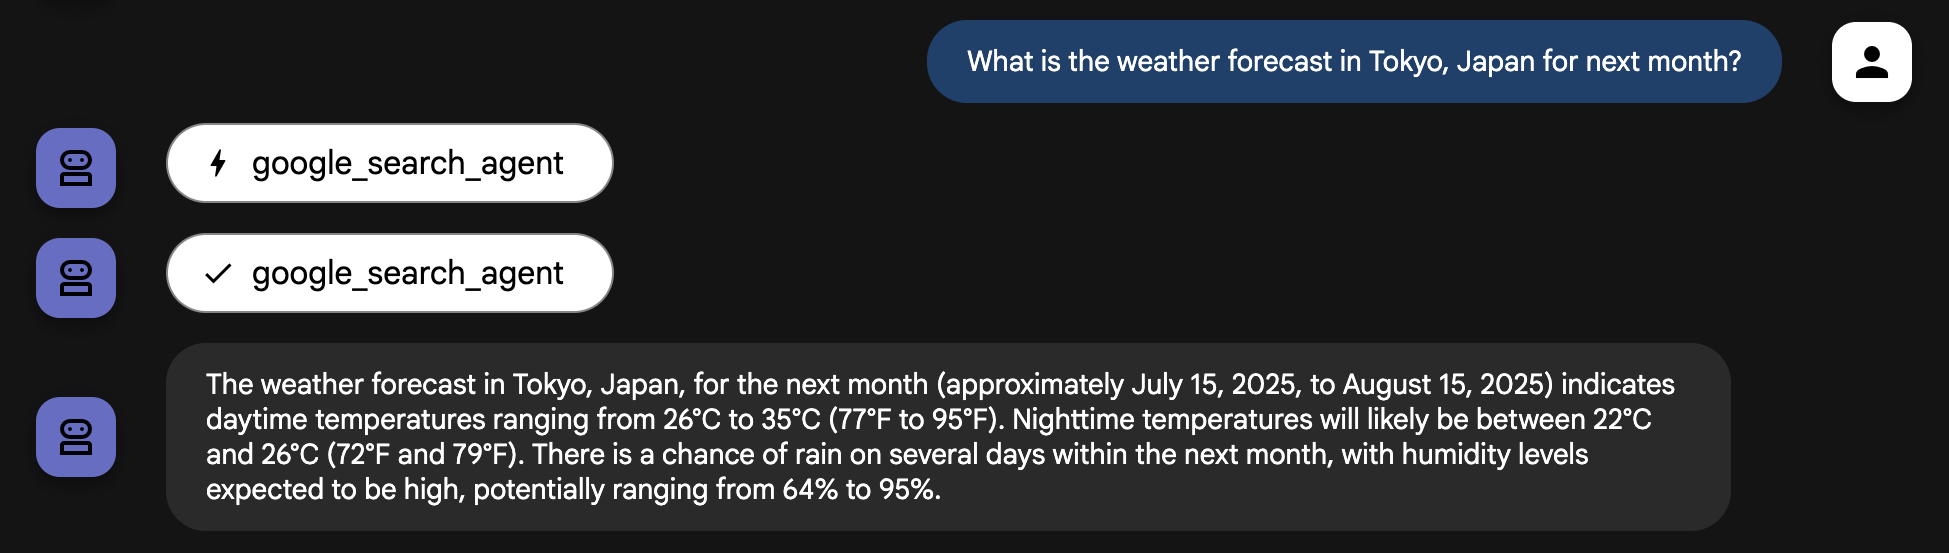
The agent is now using google_search_agent to get latest information
You can try asking a current exchange question too. The agent should now be able to use the right tool for the respective question.

Feel free to ask other questions that require real-time information to the agent and observe how it handles the queries using the tools at its disposal.
6. Leverage LangChain's Wikipedia Tool
Our agent is shaping up to be a great travel assistant. It can handle currency exchange with its get_fx_rate tool and manage logistics with its google_search_agent tool. But a great trip isn't just about logistics; it's about understanding the culture and history of your destination.
While the google_search_agent can find cultural and historical facts, information from a dedicated source like Wikipedia is often more structured and reliable.
Fortunately, ADK is designed to be highly extensible, allowing you to seamlessly integrate tools from other AI Agent frameworks like CrewAI and LangChain. This interoperability is crucial because it allows for faster development time and allows you to reuse existing tools. For this use case, we will leverage the Wikipedia tools from LangChain.
First, stop the running agent process (Ctrl + C) and install additional libraries to the current Python virtual environment by typing the following commands in the Terminal.
uv pip install langchain-community wikipedia
Create third_party_tools.py file
The following command creates a Python file named third_party_tools.py in the personal_assistant folder and open it on the Cloud Editor:
cloudshell edit personal_assistant/third_party_tools.py
This is how your folder structure should look like now:
ai-agents-adk/
└── personal_assistant/
    ├── .env
    ├── __init__.py
    ├── agent.py
    ├── custom_functions.py
    ├── custom_agents.py
    └── third_party_tools.py
This file will contain the implementation for LangChain Wikipedia tool. Copy the following code into the third_party_tools.py file:
from langchain_community.tools import WikipediaQueryRun
from langchain_community.utilities import WikipediaAPIWrapper

# Configure the Wikipedia LangChain tool to act as our cultural guide
langchain_wikipedia_tool = WikipediaQueryRun(
    api_wrapper=WikipediaAPIWrapper(top_k_results=1, doc_content_chars_max=3000)
)

# Give the tool a more specific description for our agent
langchain_wikipedia_tool.description = (
    "Provides deep historical and cultural information on landmarks, concepts, and places."
    "Use this for 'tell me about' or 'what is the history of' type questions."
)
Update agent.py file
Now. update the agent.py file with the content below:
from google.adk.agents import Agent
from google.adk.tools import FunctionTool
from google.adk.tools.agent_tool import AgentTool
from google.adk.tools.langchain_tool import LangchainTool

from .custom_functions import get_fx_rate
from .custom_agents import google_search_agent
from .third_party_tools import langchain_wikipedia_tool


root_agent = Agent(
    model='gemini-3.5-flash',
    name='root_agent',
    description='A helpful assistant for user questions.',
    tools=[
        FunctionTool(get_fx_rate),
        AgentTool(agent=google_search_agent),
        LangchainTool(langchain_wikipedia_tool),
    ]
)
Now, type this command in the terminal to start the instance:
adk web --allow_origins "regex:https://.*\.cloudshell\.dev"
When the agent is ready, ask this question to the agent, "Tell me about the history of Kyoto".
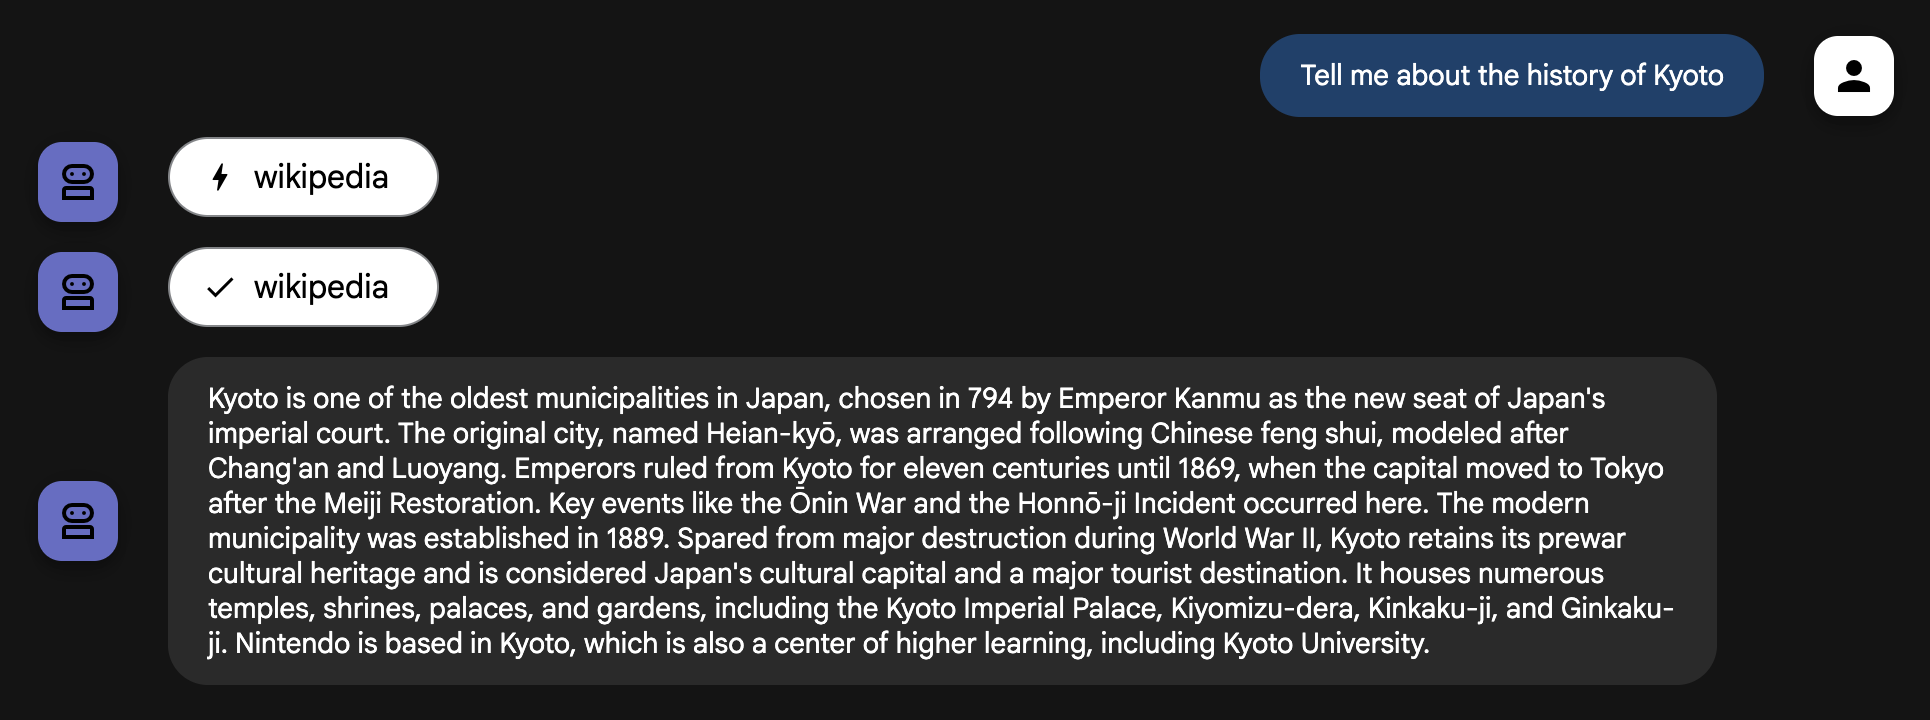
The agent correctly identifies this as a historical query and uses its new Wikipedia tool. By integrating a third-party tool and giving it a specific role, you've made your agent significantly more intelligent and useful for its travel-planning purpose.
To see exactly how the agent made this choice, you can use the event inspector in the adk web UI. Click on the Events tab and then on the most recent functionCall event.
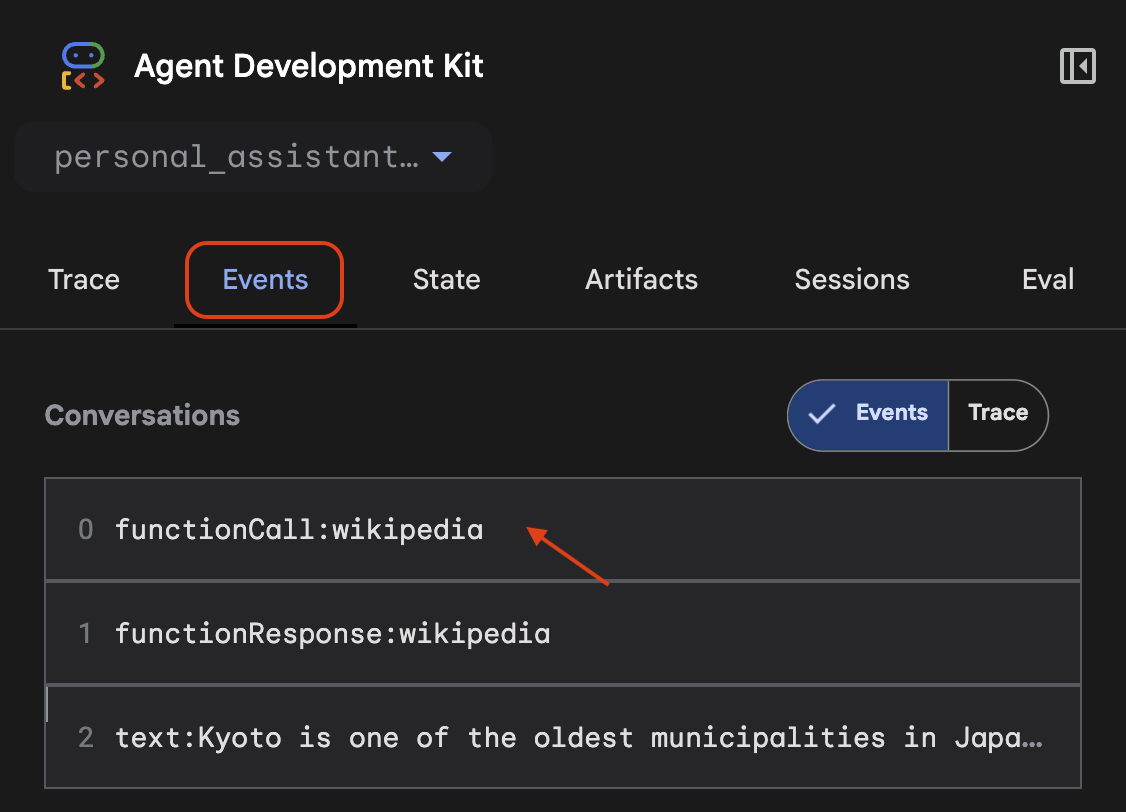
The inspector shows a list of all available tools and highlights the tool_code for the one that was executed by the agent.
7. Clean Up (Optional)
Since this codelab doesn't involve any long-running products, simply stopping your active agent sessions (e.g., the adk web instance in your terminal) by pressing Ctrl + C in the terminal is sufficient.
Delete Agent Project Folders and Files
If you only want to remove the code from your Cloud Shell environment, use the following commands:
cd ~
rm -rf ai-agents-adk
Disable Vertex AI API
To disable the Vertex AI API that was enabled earlier, run this command:
gcloud services disable aiplatform.googleapis.com
Shut Down the Entire Google Cloud Project
If you wish to fully shut down your Google Cloud project, refer to the official guide for detailed instructions.
8. Conclusion
Congratulations! You've successfully empowered the personal assistant agent with custom functions and real-time Google Search access. Read this official documentation on using tools with Google ADK.
More importantly, you have learned the fundamental architectural pattern for building capable agents: using specialized agents as tools. By creating a dedicated google_search_agent and giving it to your root_agent, you've taken your first step from building a single agent to orchestrating a simple, yet powerful, multi-agent system.
You are now perfectly prepared for the next codelab (coming soon) in the series, where we will dive deeper into orchestrating multiple agents and workflows. See you there!