

1. 概要
複数の制約がある旅行リクエスト(たとえば、歴史的な寺院、地元のラーメン、現代美術館なしで、京都での 100 ドルの日帰り旅行を計画するなど)を処理するには、構造化された好みを抽出し、同時に場所を調査し、項目別のドラフトを合成し、合計費用を監査してから回答する必要があります。ADK 1.x では、これらのステージをオーケストレートするために、SequentialAgent、ParallelAgent、LoopAgent ラッパーをネストし、すべての中間出力をセッション状態に保存し、リファインメント ループを終了するためだけに、追加の LLM ツール呼び出しを呼び出す必要がありました。
この Codelab では、Agent Development Kit(ADK)2 グラフ ワークフロー(Workflow)を使用して、Agent Platform 上にマルチエージェント旅行プランナーを構築します。3 つの段階を経て、専門の Agent ノード(gemini-3.8-flash を搭載)をシーケンシャル エッジチェーン(node_input)で接続し、JoinNode と同期した同時実行 google_search リサーチャーをファンアウトします。また、決定論的な Python ルーター(Event(route=...))を使用して予算と除外ルールを適用し、最初のドラフトが監査に合格した場合は、改善をスキップします。
前提条件
- Python プログラミングの基本的なスキル
- 生成 AI のコンセプトと AI エージェントの基礎を理解していること
学習内容
Workflowエッジタプルを使用して ADK 2 でマルチエージェント パイプラインを宣言する方法- ADK 2 が出力を
node_inputとしてエッジに直接渡し、セッション状態キーを関数パラメータとしてバインドする仕組み - 同時実行リサーチ ブランチをファンアウトし、
JoinNodeを使用して出力をマージする方法 Event(route=...)を使用して Python で制限付きのメーカーチェッカー サイクルを決定論的にルーティングする方法- ADK Web UI でコンパイル済みワークフロー グラフ、並列実行タイムライン、状態デルタを検査する方法
必要なもの
- Google アカウント(ワークショップのクレジットを申請する場合は、個人の
@gmail.comアカウントを使用してください) - インストラクターから提供されたワークショップ クレジット リンク(および QR コードをスキャンするためのスマートフォンのカメラ)または有効な Cloud 請求先アカウント
- Google Chrome(個人アカウントと仕事用アカウントが混在しないように、シークレット ウィンドウを使用することをおすすめします)
2. Google Cloud クレジットを申請する(省略可)
イベント クレジット リンクのあるワークショップに参加している場合は、Google Developer Program クレジットを申請して、クレジット カードなしで請求先アカウントをプロビジョニングします。
イベントのクレジットを取得する
- シークレット ウィンドウでワークショップのクレジット リンクを開き、
@gmail.comアカウントでログインします。 - [特典を申請] で、[クレジットを申請] をクリックします。
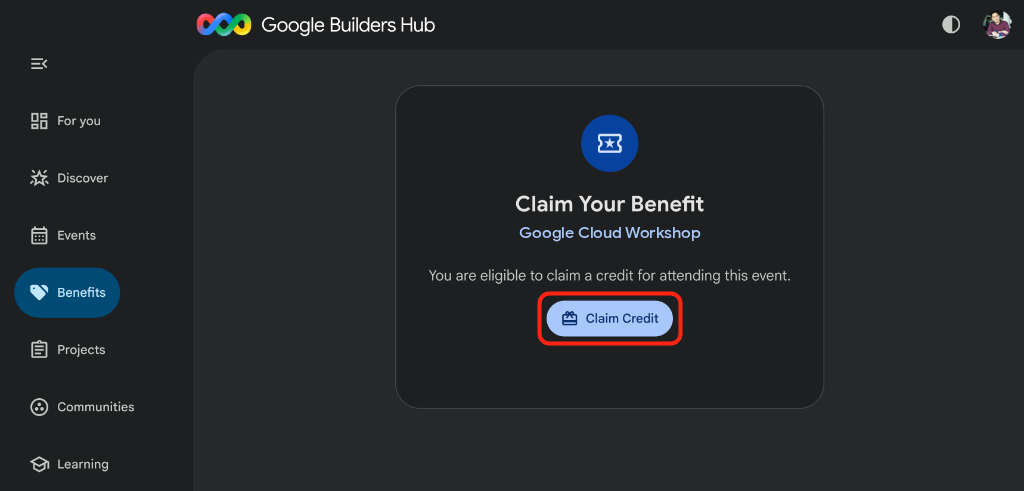
- Google Developer Program プロフィールの作成を求められた場合は、フォームに記入します。
- [Scan to Verify You're Human] が表示されたら、スマートフォンで QR コードをスキャンして確認を完了します(QR コードが表示されない場合は、更新して [Claim Credit] をもう一度クリックします)。
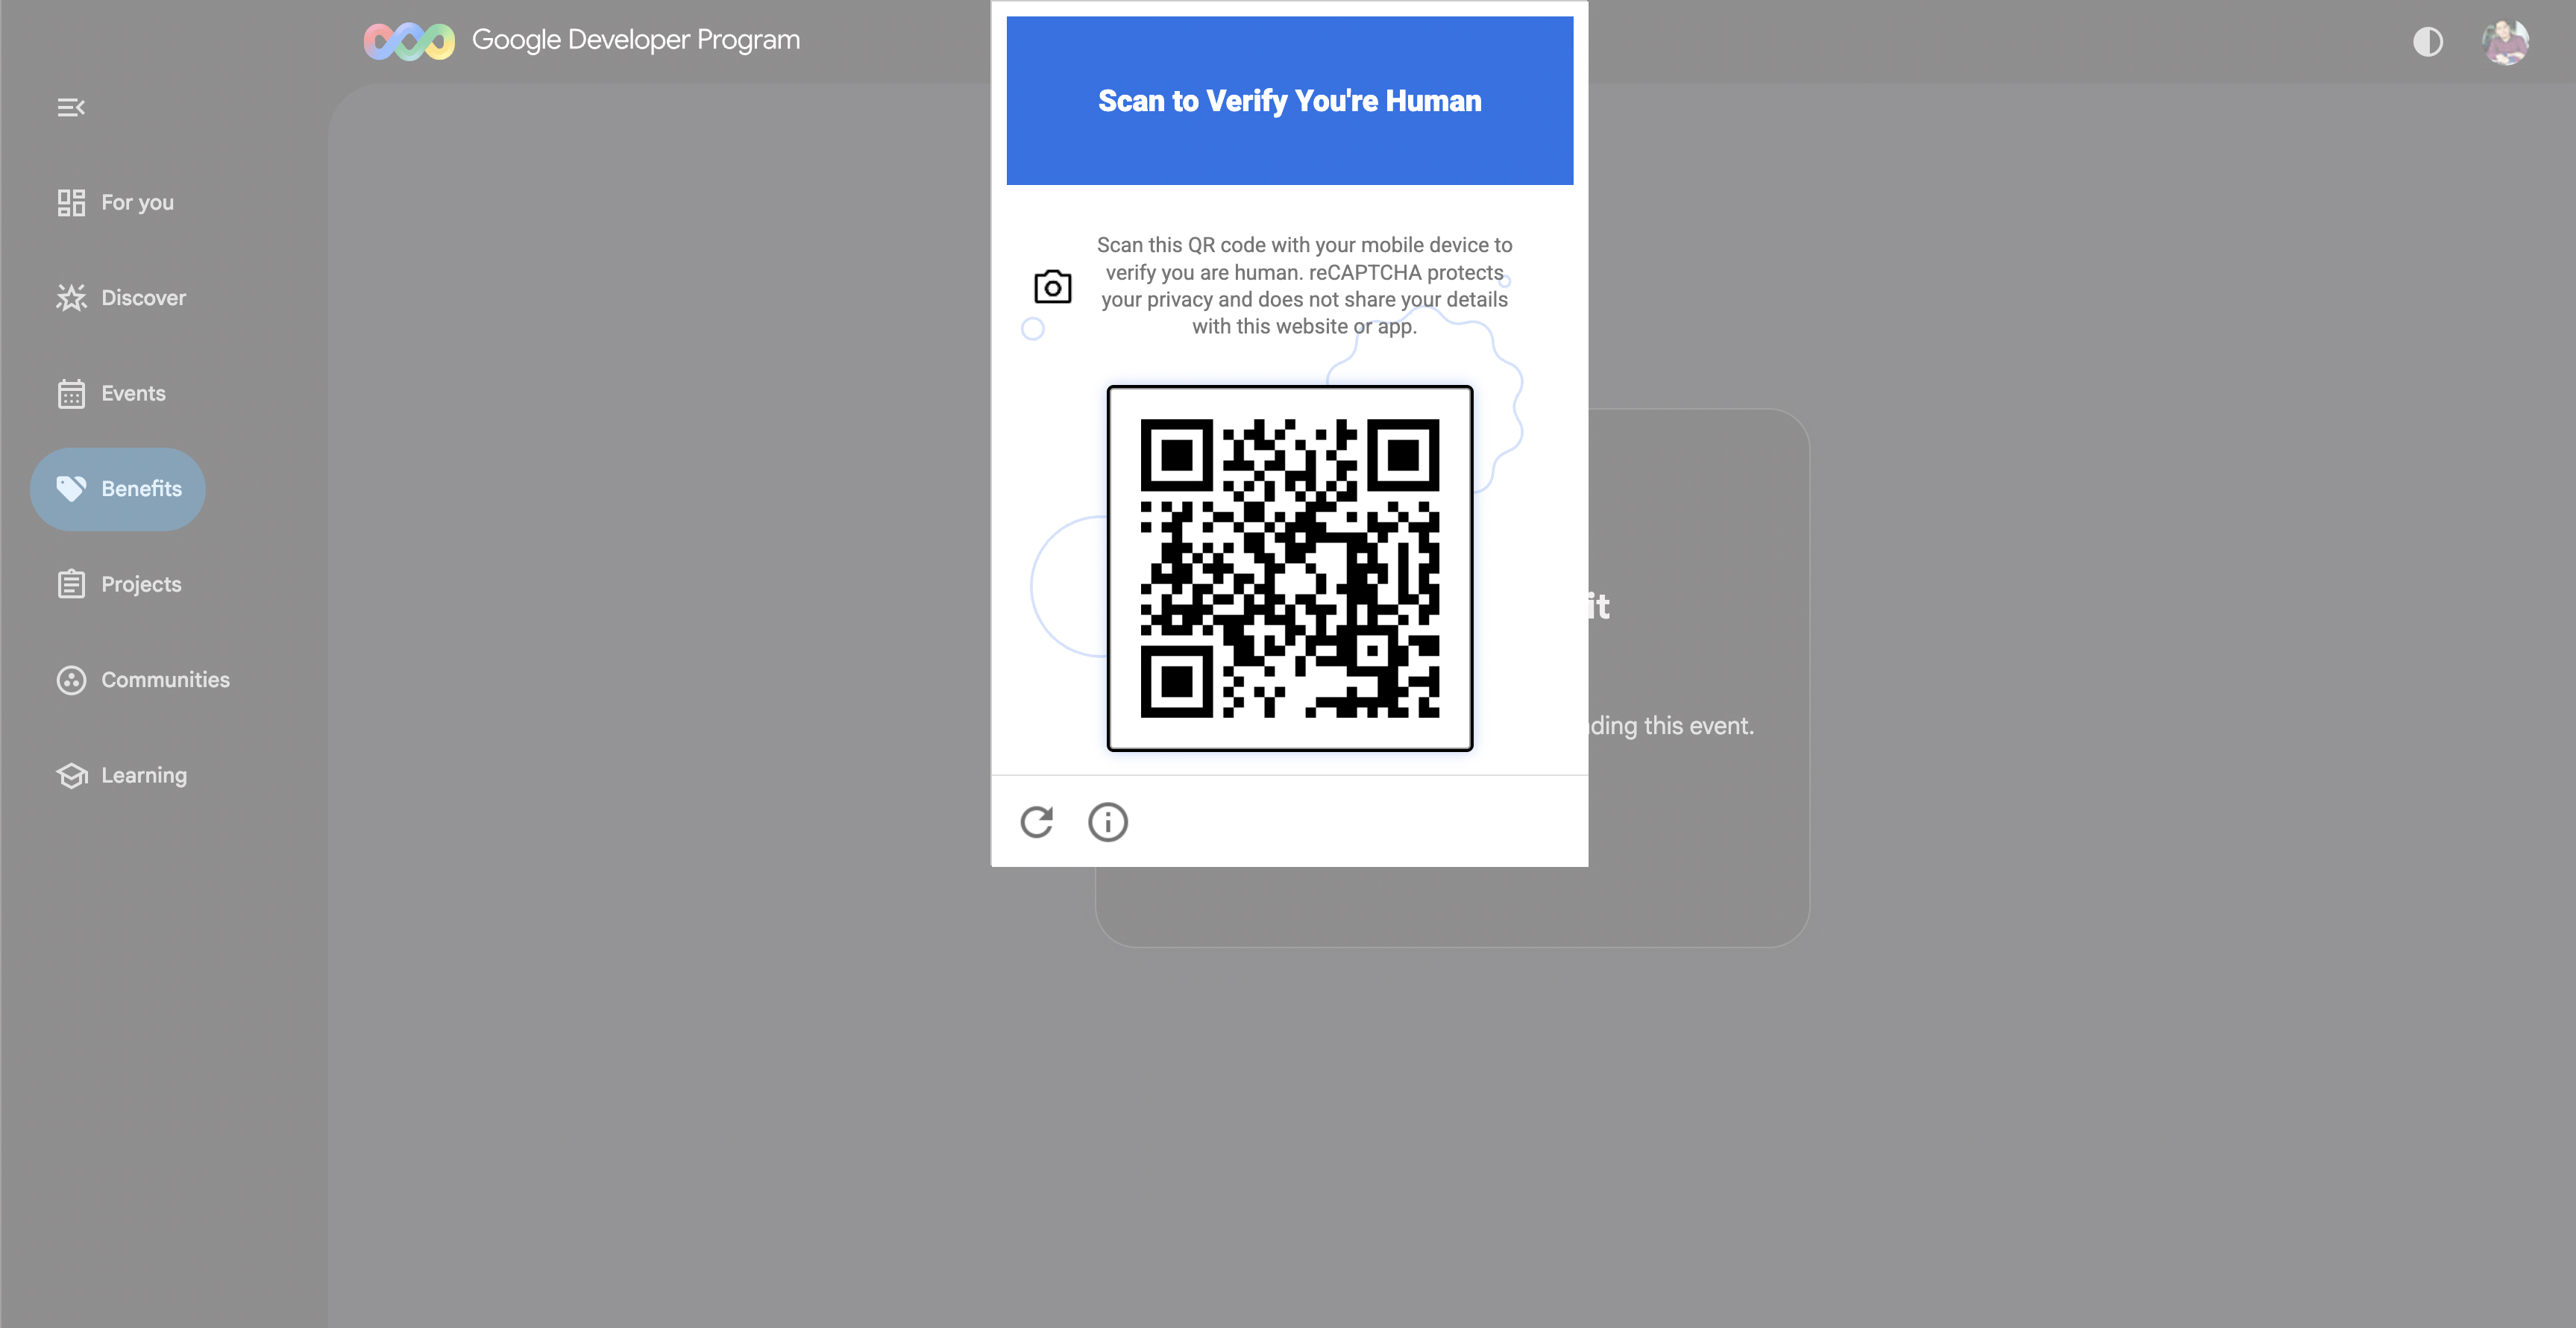
- 「イベントのクレジットを取得しました」と表示されたことを確認し、[請求先アカウントを開く] をクリックします。
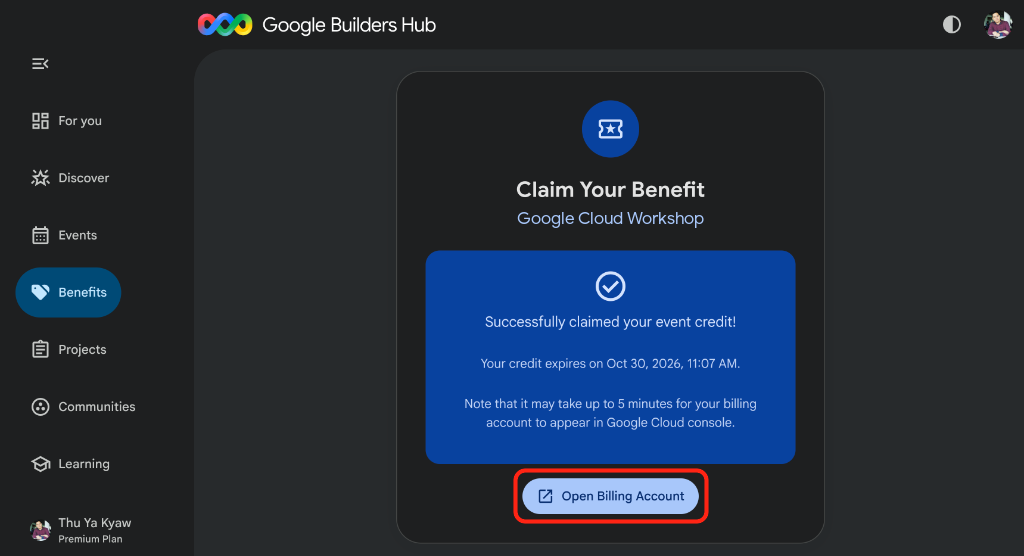
🔍 実施したタスクを確認する
請求先アカウントの設定には最大 3 分かかります。
- Google Cloud Billing を開くか、URL をコピーしてシークレット ウィンドウに貼り付け、[請求先アカウント] を選択します。
https://console.cloud.google.com/billing
GDP Creditアカウントのステータスが [有効] になるまで更新します。
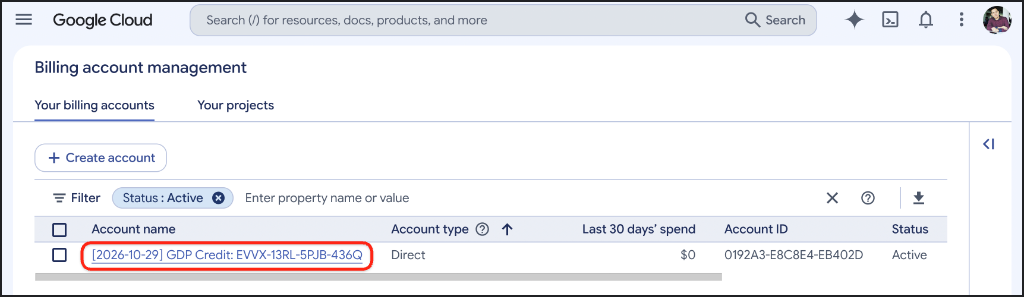
3. Google Cloud プロジェクトを作成する(省略可)
この Codelab のすべてのリソースが分離され、クリーンアップが容易になるように、専用の Google Cloud プロジェクトを作成します。
- [プロジェクトを作成] を開きます(または、URL をコピーしてシークレット ウィンドウに貼り付けます)。
https://console.cloud.google.com/projectcreate
- プロジェクトの詳細を入力します。
- プロジェクト名:
google-cloud-workshopなど - 請求先アカウント(表示されている場合):
GDP Credit(または有効な請求先アカウント)を選択します。 - 親リソース: 組織なし(必要に応じて組織を選択)
- プロジェクト名:
- プロジェクト名の下に生成されたプロジェクト ID をメモし、[作成] をクリックします。
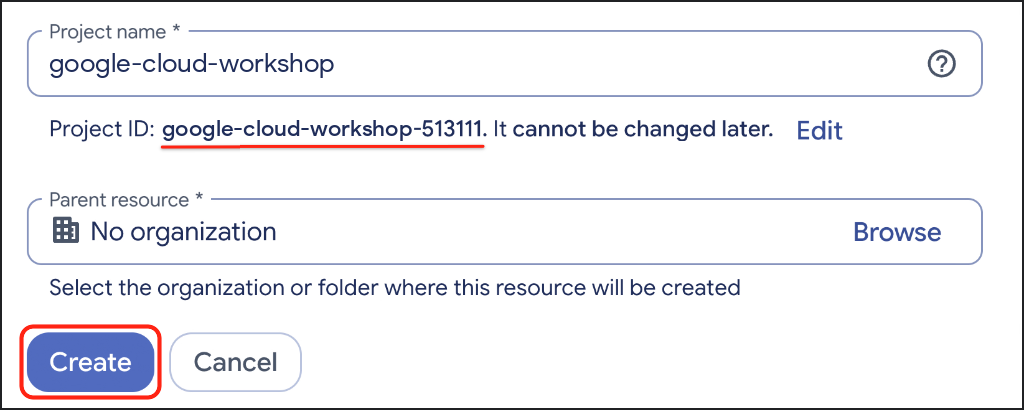
🔍 実施したタスクを確認する
右上のツールバーにある [通知] をクリックし、プロジェクトの作成が完了したら [プロジェクトを選択] をクリックします。
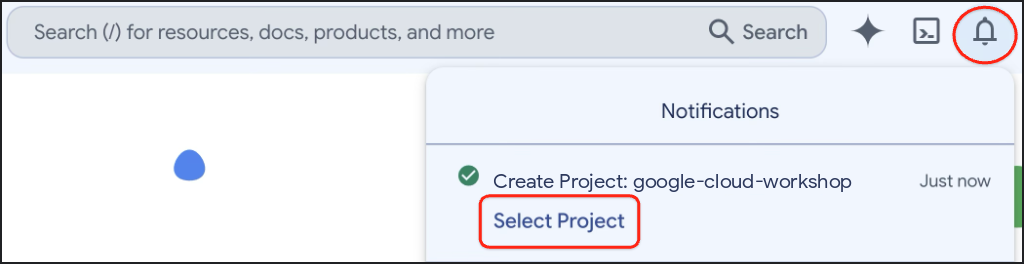
4. 環境を設定する
Google Cloud Shell を構成し、Agent Platform API を有効にして、uv を使用して隔離された Python 3.12 仮想環境を作成します。
Cloud Shell を構成する
- Google Cloud コンソールのツールバーで [Cloud Shell をアクティブにする](
>_)をクリックするか、Google Cloud Shell を直接開きます(または、URL をシークレット ウィンドウにコピーします)。
https://shell.cloud.google.com/?show=ide,terminal

- [承認] をクリックします(求められた場合)。
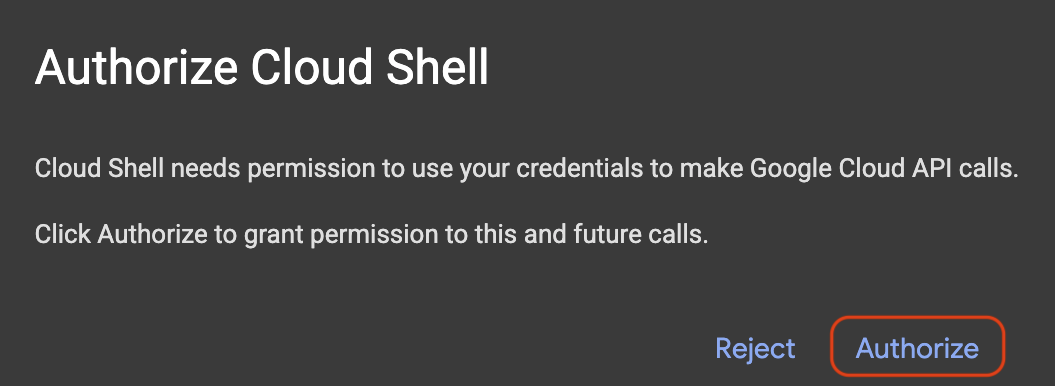
- ターミナルの番号付きメニューから、アクティブな Google Cloud プロジェクト ID を選択します。
unset CLOUDSDK_CORE_PROJECT
PS3="Select your project (e.g. 1): "
select PROJECT_ID in $(gcloud projects list --format="value(projectId)"); do
  [ -n "$PROJECT_ID" ] && gcloud config set project "$PROJECT_ID" && break
done
次のような出力が表示されます(タグ付けされていないプロジェクトでは、情報を示す [environment: untagged] 行も出力されます)。
1) google-cloud-workshop-4210
2) my-cloud-project-8812
Select your project (e.g. 1): 1
Updated property [core/project].
選択したプロジェクト ID が Cloud Shell プロンプトで黄色でハイライト表示されていることを確認します。
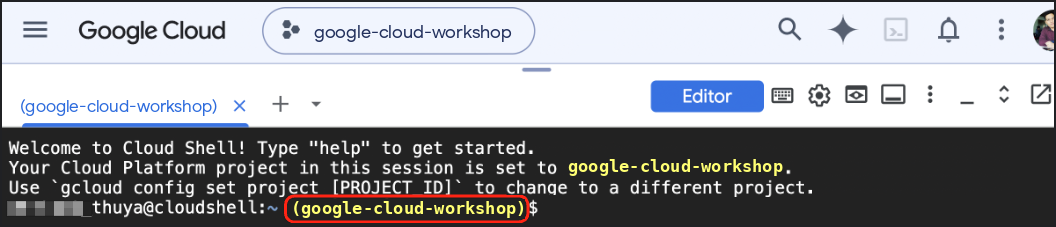
必要な API の有効化
ADK エージェントが Gemini モデルを呼び出せるように、Agent Platform API を有効にします。
gcloud services enable aiplatform.googleapis.com
次のような出力が表示されます。
Operation "operations/acat.p2-..." finished successfully.
Python 仮想環境を作成して ADK をインストールする
~/adk-graph-agents ワークスペースを作成し、Python 3.12 仮想環境を有効にします。
cd ~
mkdir -p adk-graph-agents && cd ~/adk-graph-agents

which uv >/dev/null 2>&1 || curl -LsSf https://astral.sh/uv/install.sh | sh
export PATH="$HOME/.local/bin:$PATH"

uv venv .venv --python 3.12
source .venv/bin/activate
ターミナル プロンプトの先頭に (.venv) 接頭辞が表示されていることを確認します。

アクティブな仮想環境に ADK 2 をインストールします。
uv pip install --no-cache "google-adk==2.14.0"
🔍 実施したタスクを確認する
インストールされている adk CLI のバージョンを確認します。
adk --version
次のような出力が表示されます。
adk, version 2.14.0
5. 旅行プランナーをスキャフォールディングする
adk create を使用してスターター travel_planner パッケージを生成し、adk web でデフォルトの単一エージェント ベースラインをテストします。
スターター パッケージを生成する
~/adk-graph-agents から adk create を実行します。
cd ~/adk-graph-agents
adk create travel_planner
プロンプトが表示されたら、次のオプションを選択します(初回実行時に Enable telemetry? [Y/n]: のプロンプトが表示された場合は、Enter キーを押すか、n と入力して Enter キーを押します)。
- ルート エージェントのモデルを選択する: 「
2」と入力してgemini-3.8-flashを選択し(オプション1はgemini-3.5-flashを選択)、Enter キーを押します。 - バックエンドを選択する: 「
2」と入力して Google Cloud Agent Platform バックエンド(以下の CLI メニューのオプション2)を選択し、Enter キーを押します。 - Google Cloud プロジェクト ID を入力: Enter キーを押して、検出されたプロジェクト ID(角かっこ内)をそのまま使用します。
- Enter Google Cloud region: 「
global」と入力して(グローバル Gemini エンドポイントを使用するため)、Enter キーを押します。
adk create は GOOGLE_GENAI_USE_ENTERPRISE=1、プロジェクト ID、GOOGLE_CLOUD_LOCATION=global を travel_planner/.env に書き込みます。これにより、後で agent.py を置き換えても認証情報はそのまま残ります。
次のような出力が表示されます。
Choose a model for the root agent:
1. gemini-3.5-flash
2. gemini-3.8-flash
3. Other models (fill later)
Choose model (1, 2, 3): 2
1. Google AI
2. Vertex AI
3. Login with Google
Choose a backend (1, 2, 3): 2

You need an existing Google Cloud account and project, check out this link for details:
https://google.github.io/adk-docs/get-started/quickstart/#gemini---google-cloud-vertex-ai

Enter Google Cloud project ID [google-cloud-workshop-4210]:
Enter Google Cloud region [us-central1]: global

Agent created in /home/your_username/adk-graph-agents/travel_planner:
- .env
- .gitignore
- __init__.py
- agent.py

⚠️  WARNING: Secrets (like GOOGLE_API_KEY) are stored in .env.

Next steps:
- Chat with your agent in the terminal: adk run travel_planner
- Or in the browser: adk web .
- Have your coding agent evaluate and deploy it: uvx google-agents-cli setup
  (other install options: https://adk.dev/get-started/agents-cli/)
Cloud Shell コードエディタで ~/adk-graph-agents を開きます。
which cloudshell >/dev/null 2>&1 && cloudshell workspace ~/adk-graph-agents || true
再読み込みされたターミナルで仮想環境を再度有効にします。
cd ~/adk-graph-agents
source .venv/bin/activate
スターター単一エージェントをテストする
ADK ウェブ UI を起動して、オーケストレーションされていない単一のスターター エージェントが旅行プロンプトにどのように回答するかを確認します。
cd ~/adk-graph-agents
adk web --allow_origins "*"
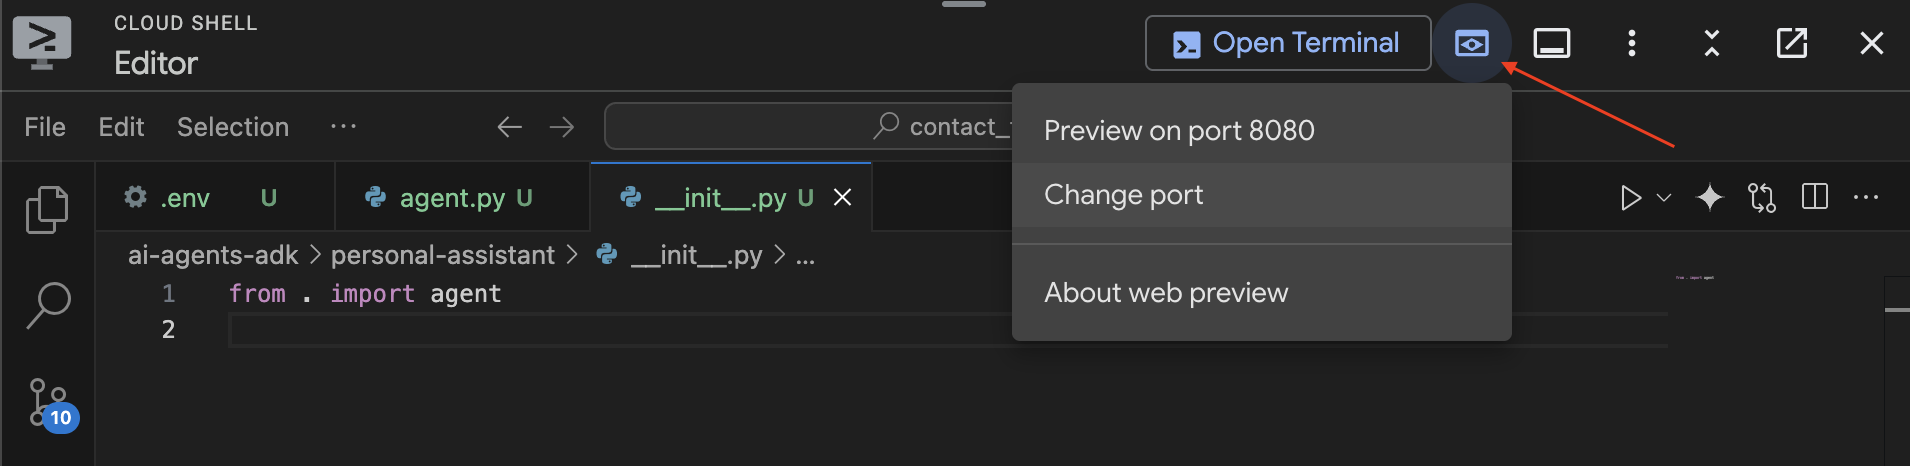
Cloud Shell の右上にあるツールバーの [ウェブでプレビュー] アイコンをクリックし、[ポートを変更] を選択して「8000」と入力し、[変更してプレビュー] をクリックします。
🔍 実施したタスクを確認する
adk web の左上のプルダウンで [travel_planner] を選択し、"Help me plan a trip to Japan" を送信します。
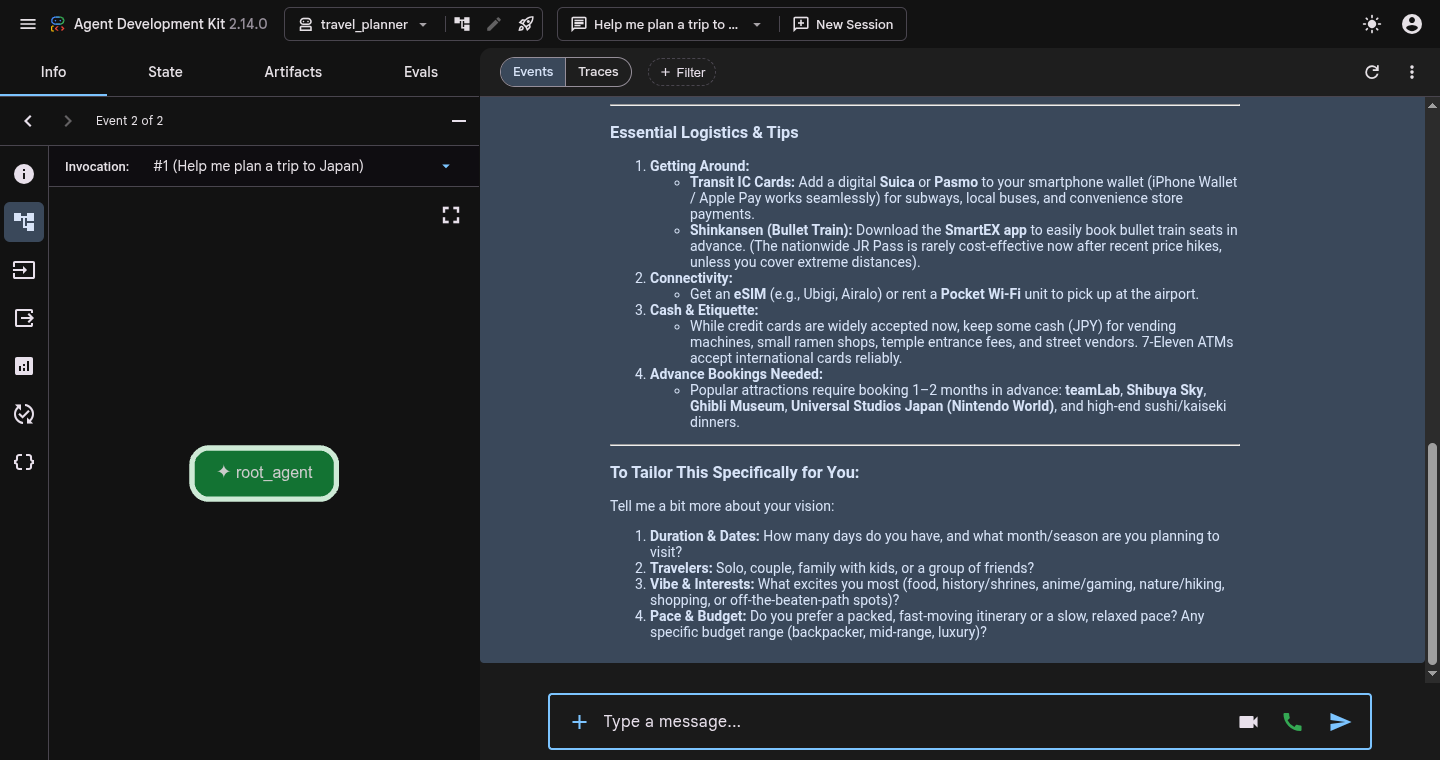
チャットペインに、1 回の会話の返信が表示されます([イベント] に 1 回の root_agent 呼び出しが表示されます)。
root_agent -> responds in one pass without structured preference extraction, live search, or budget verification
次のステップでファイルを編集する前に、Cloud Shell ターミナルで Ctrl + C を押して adk web を停止します。
6. 線形グラフ ワークフローを構築する
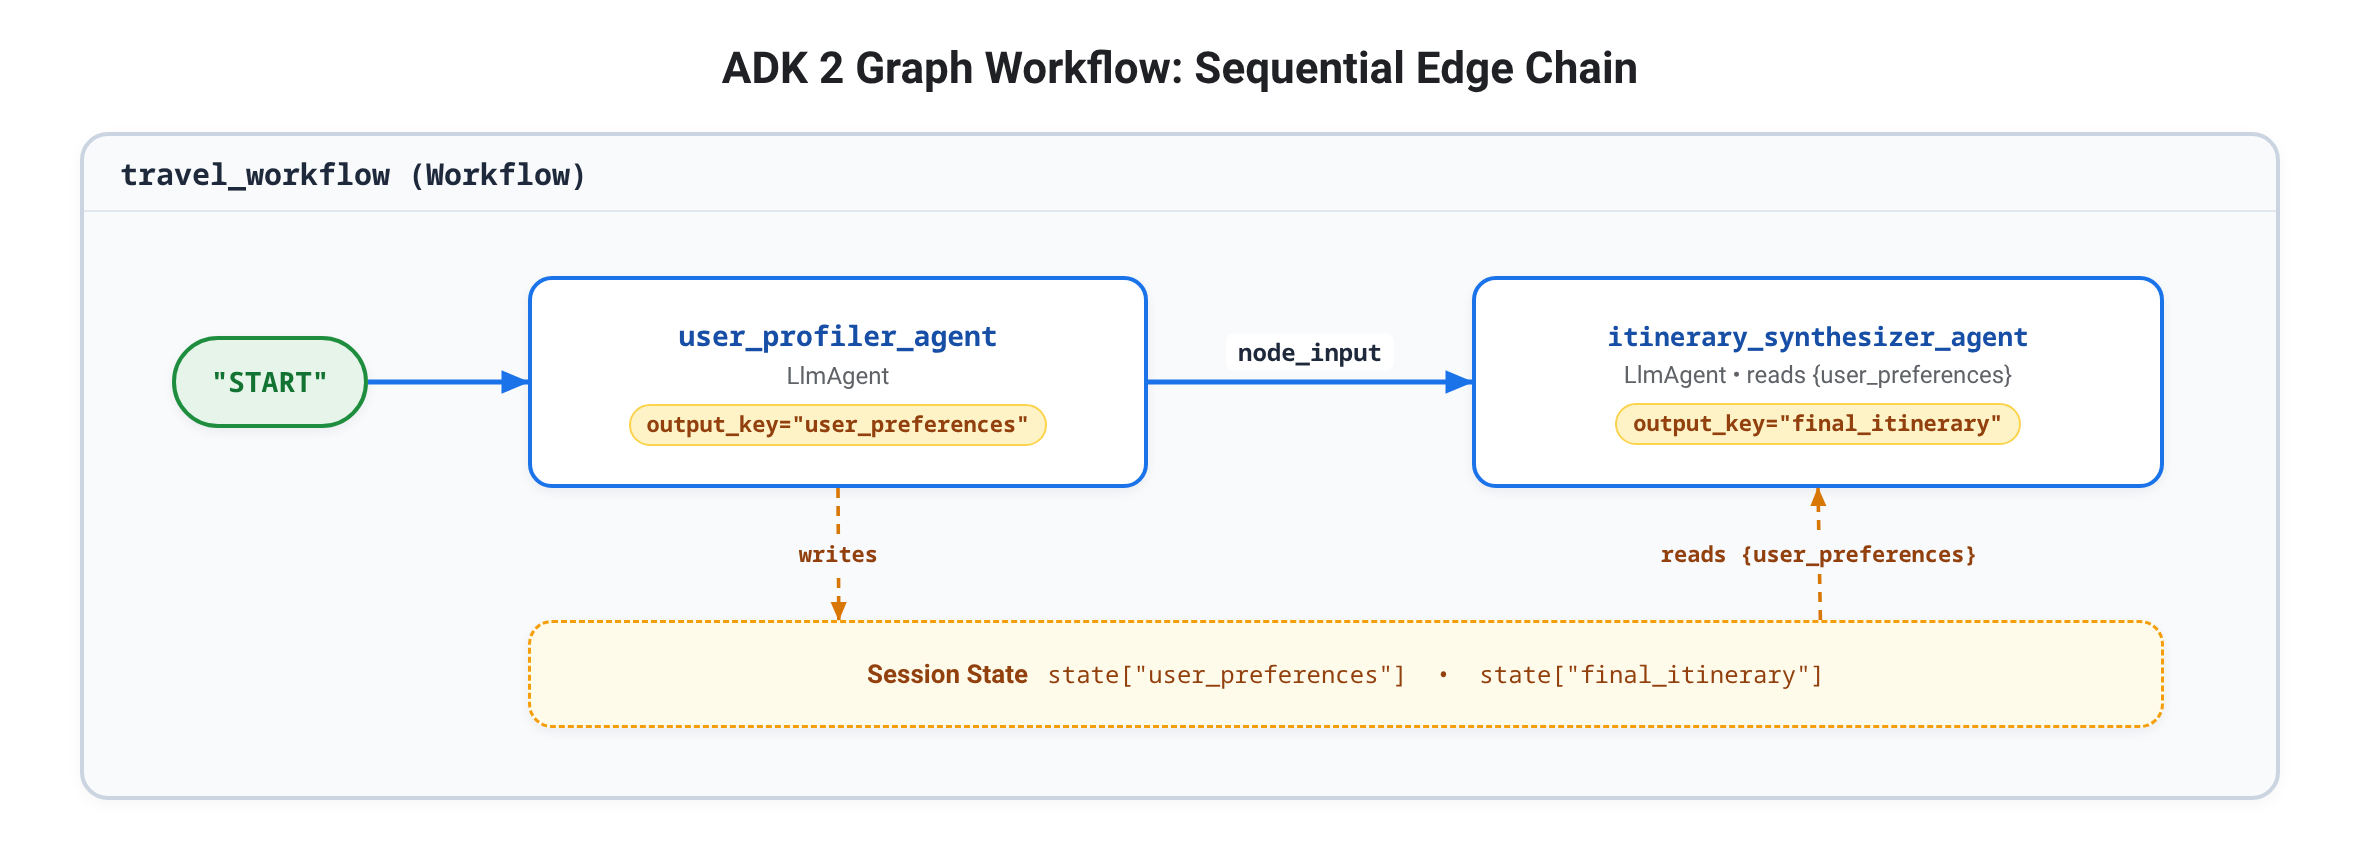
最初の ADK 2 Workflow を構築します。これは、予約済みの "START" エントリ ポイントを user_profiler_agent と itinerary_synthesizer_agent に接続するシーケンシャル チェーンです(出力エッジのないノードはターミナル ノードとして機能します)。すべてのエッジ (a, b) は、分離された single_turn モードで Agent(LlmAgent のエイリアス)ノードを自動的に実行し、ノード a の出力を node_input(受信ユーザー メッセージ)としてノード b に配信します。一方、指示文字列内の {user_preferences} は、output_key を介して保存された一致するセッション状態キーを補間します。
最初のスペシャリストを作成する
adk web が停止していることを確認し(Ctrl + C)、travel_planner/specialists.py という名前の新しいファイルを開きます。
cloudshell edit ~/adk-graph-agents/travel_planner/specialists.py
次のコードを travel_planner/specialists.py に貼り付けて、user_profiler_agent と itinerary_synthesizer_agent を定義します(次のステップのために google_search を事前にインポートします)。
from google.adk import Agent
from google.adk.tools import google_search

MODEL = "gemini-3.8-flash"

# --- Specialist 1: The User Profiler ---
user_profiler_agent = Agent(
    model=MODEL,
    name="user_profiler_agent",
    description="Extracts travel preferences and constraints from user input.",
    instruction="""
        Extract destination, duration (default 1 day), budget, interests, and exclusions.
        Return a single JSON object with keys: "destination", "duration", "budget", "interests", "exclusions".
    """,
    output_key="user_preferences",  # Saved for multi-hop constraints downstream
)

# --- Specialist 2: The Synthesizer ---
itinerary_synthesizer_agent = Agent(
    model=MODEL,
    name="itinerary_synthesizer_agent",
    description="Compiles preferences and research into a final Markdown itinerary.",
    instruction="""
        You are an elite Travel Concierge. Using the incoming input and
        User Preferences ({user_preferences}), write a Markdown itinerary
        with an itemized USD and local currency cost breakdown.
    """,
    output_key="final_itinerary",
)
シーケンシャル エッジチェーンを定義する
travel_planner/workflows.py という名前の新しいファイルを開きます。
cloudshell edit ~/adk-graph-agents/travel_planner/workflows.py
次の Workflow 定義を貼り付けます(3 つ以上のノードのタプルが "START" からのシーケンシャル チェーンにコンパイルされます)。
from google.adk import Workflow
from .specialists import (
    itinerary_synthesizer_agent,
    user_profiler_agent,
)

# 1. SEQUENTIAL GRAPH: START -> user_profiler_agent -> itinerary_synthesizer_agent
travel_workflow = Workflow(
    name="travel_workflow",
    description="Orchestrates the end-to-end travel planning process as a graph workflow.",
    edges=[
        ("START", user_profiler_agent, itinerary_synthesizer_agent),
    ],
)
ワークフローを root_agent として公開する
travel_planner/agent.py を開きます。
cloudshell edit ~/adk-graph-agents/travel_planner/agent.py
travel_planner/agent.py の内容全体を次の 2 行に置き換えます。
from .workflows import travel_workflow

root_agent = travel_workflow
🔍 実施したタスクを確認する
~/adk-graph-agents から adk web を起動します。
cd ~/adk-graph-agents
adk web --allow_origins "*"
ポート 8000 でウェブ プレビューを開き、[+ 新しいセッション] をクリックして、以下を送信します。
Help me plan a trip to Kyoto
[イベント] ビューに、次のようなイベント シーケンスが表示されます。
1. user_profiler_agent -> outputs JSON {"destination": "Kyoto", "duration": "1 day", ...} and writes state["user_preferences"]
2. itinerary_synthesizer_agent -> receives preferences via node_input and outputs the Markdown itinerary
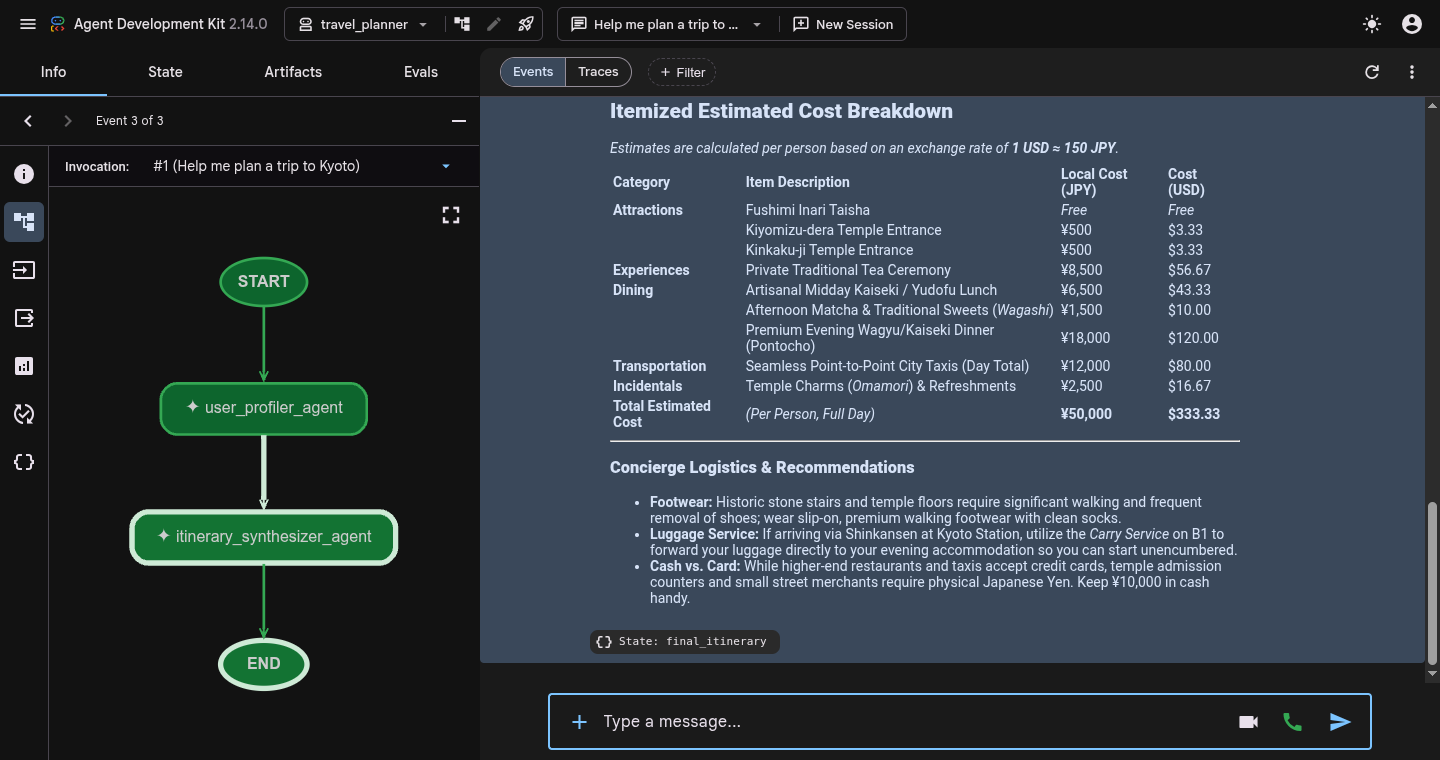
[Events] で任意のイベントをクリックし、グラフアイコン(イベント詳細ツールバーの account_tree)をクリックして、コンパイルされた START -> user_profiler_agent -> itinerary_synthesizer_agent トポロジを検査します。次に、[State] タブで user_preferences と final_itinerary が入力されていることを確認します。
ターミナルで Ctrl + C を押して adk web を停止してから、続行します。
7. ファンアウトして JoinNode で結合する
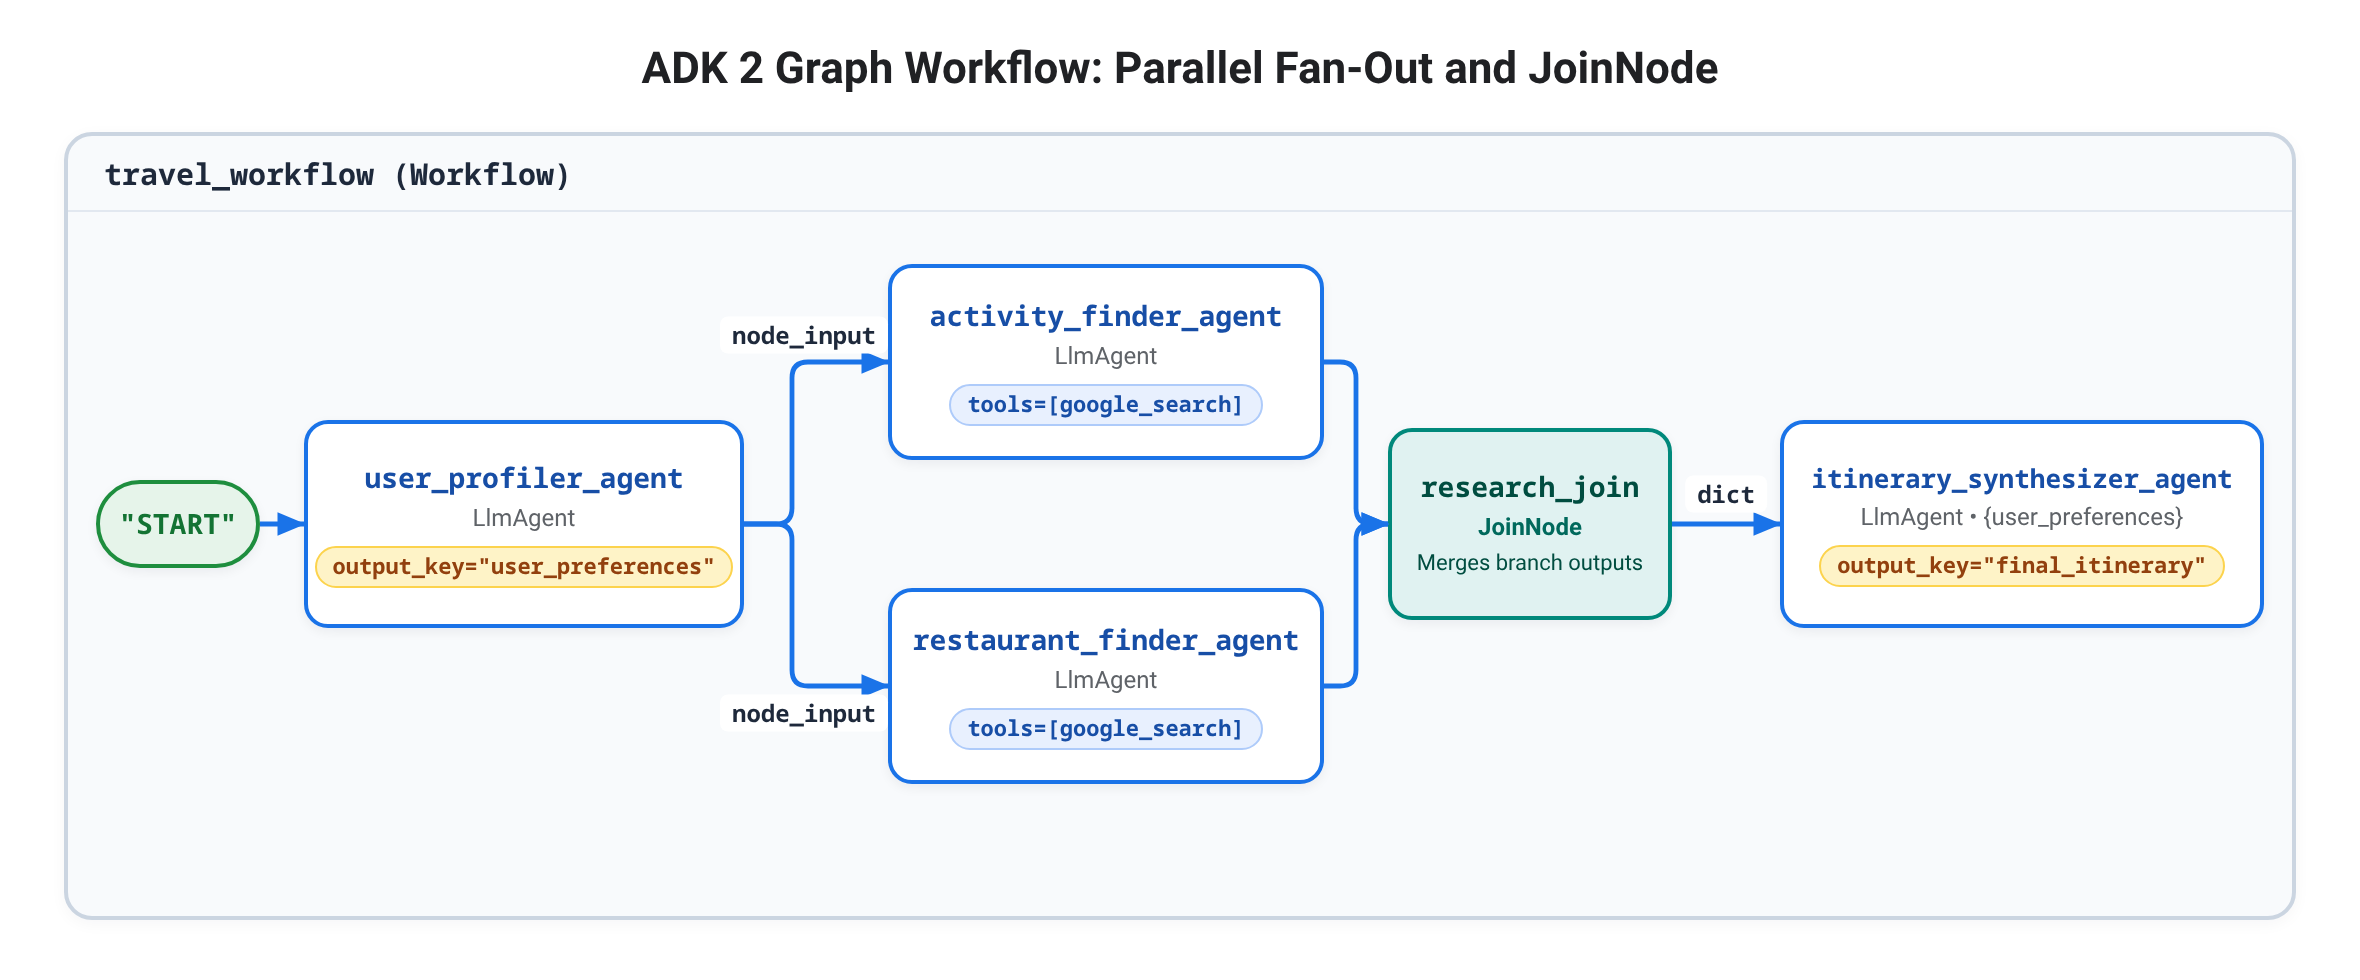
2 つの同時 google_search スペシャリスト(activity_finder_agent と restaurant_finder_agent)を追加し、JoinNode と同期することで、ライブウェブデータに旅程をグラウンディングします。
- ファンアウト タプル:
(activity_finder_agent, restaurant_finder_agent)をエッジタプル内に配置すると、user_profiler_agentの出力がnode_inputとして両方の研究者に同時に配信されます。 - ファンイン バリア(
JoinNode): タプルの直後にJoinNode(name="research_join")を配置すると、すべての受信ブランチが完了するまで待機し、合成を 2 回トリガーする代わりに、1 つにマージされたdict({"activity_finder_agent": ..., "restaurant_finder_agent": ...})をnode_inputとしてitinerary_synthesizer_agentに渡します。
リサーチ スペシャリストを追加する
adk web が停止していることを確認し(Ctrl + C)、travel_planner/specialists.py を開きます。
cloudshell edit ~/adk-graph-agents/travel_planner/specialists.py
activity_finder_agent と restaurant_finder_agent を travel_planner/specialists.py の下部に追加します(research_join は node_input を介して両方の出力を直接転送するため、どちらも output_key は必要ありません)。
# --- Specialist 3: The Activity Finder ---
activity_finder_agent = Agent(
    model=MODEL,
    name="activity_finder_agent",
    description="Finds 3 attractions matching the user's destination and interests.",
    instruction="""
        Using the travel preferences in the input, call google_search to find 3 specific attractions
        (including budget-friendly options).
        Return a JSON list with keys: "attraction_name", "estimated_cost_local", "estimated_cost_usd", "notes".
    """,
    tools=[google_search],
)

# --- Specialist 4: The Restaurant Finder ---
restaurant_finder_agent = Agent(
    model=MODEL,
    name="restaurant_finder_agent",
    description="Finds 3 restaurants matching the destination and budget.",
    instruction="""
        Using the travel preferences in the input, call google_search to find 3 highly-rated restaurants
        across price points.
        Return a JSON list with keys: "restaurant_name", "cuisine", "estimated_cost_local", "estimated_cost_usd".
    """,
    tools=[google_search],
)
workflows.py にファンアウトと JoinNode を追加する
travel_planner/workflows.py を開きます。
cloudshell edit ~/adk-graph-agents/travel_planner/workflows.py
travel_planner/workflows.py の内容全体を、ファンアウトと JoinNode グラフに置き換えます。
from google.adk import Workflow
from google.adk.workflow import JoinNode
from .specialists import (
    activity_finder_agent,
    itinerary_synthesizer_agent,
    restaurant_finder_agent,
    user_profiler_agent,
)

research_join = JoinNode(name="research_join")

# 2. FAN-OUT / FAN-IN GRAPH: Profile -> (Activities || Restaurants) -> Join -> Synthesize
travel_workflow = Workflow(
    name="travel_workflow",
    description="Orchestrates the end-to-end travel planning process as a graph workflow.",
    edges=[
        (
            "START",
            user_profiler_agent,
            (activity_finder_agent, restaurant_finder_agent),
            research_join,
            itinerary_synthesizer_agent,
        ),
    ],
)
🔍 実施したタスクを確認する
adk web を起動して、同時検索と JoinNode 同期をテストします。
cd ~/adk-graph-agents
adk web --allow_origins "*"
ポート 8000 でウェブ プレビューを開き、[+ 新しいセッション] をクリックして、以下を送信します。
Help me plan a trip to Kyoto focused on historic temples and ramen
[イベント] ビューに、次のようなイベント シーケンスが表示されます。
1. user_profiler_agent -> emits JSON preferences via node_input
2. activity_finder_agent & restaurant_finder_agent -> invoke google_search concurrently
3. research_join -> merges both researcher outputs into one dict node_input
4. itinerary_synthesizer_agent -> drafts final_itinerary from the merged dict + {user_preferences}
ターミナルで Ctrl + C を押して adk web を停止してから、続行します。
8. ルートの修正サイクル
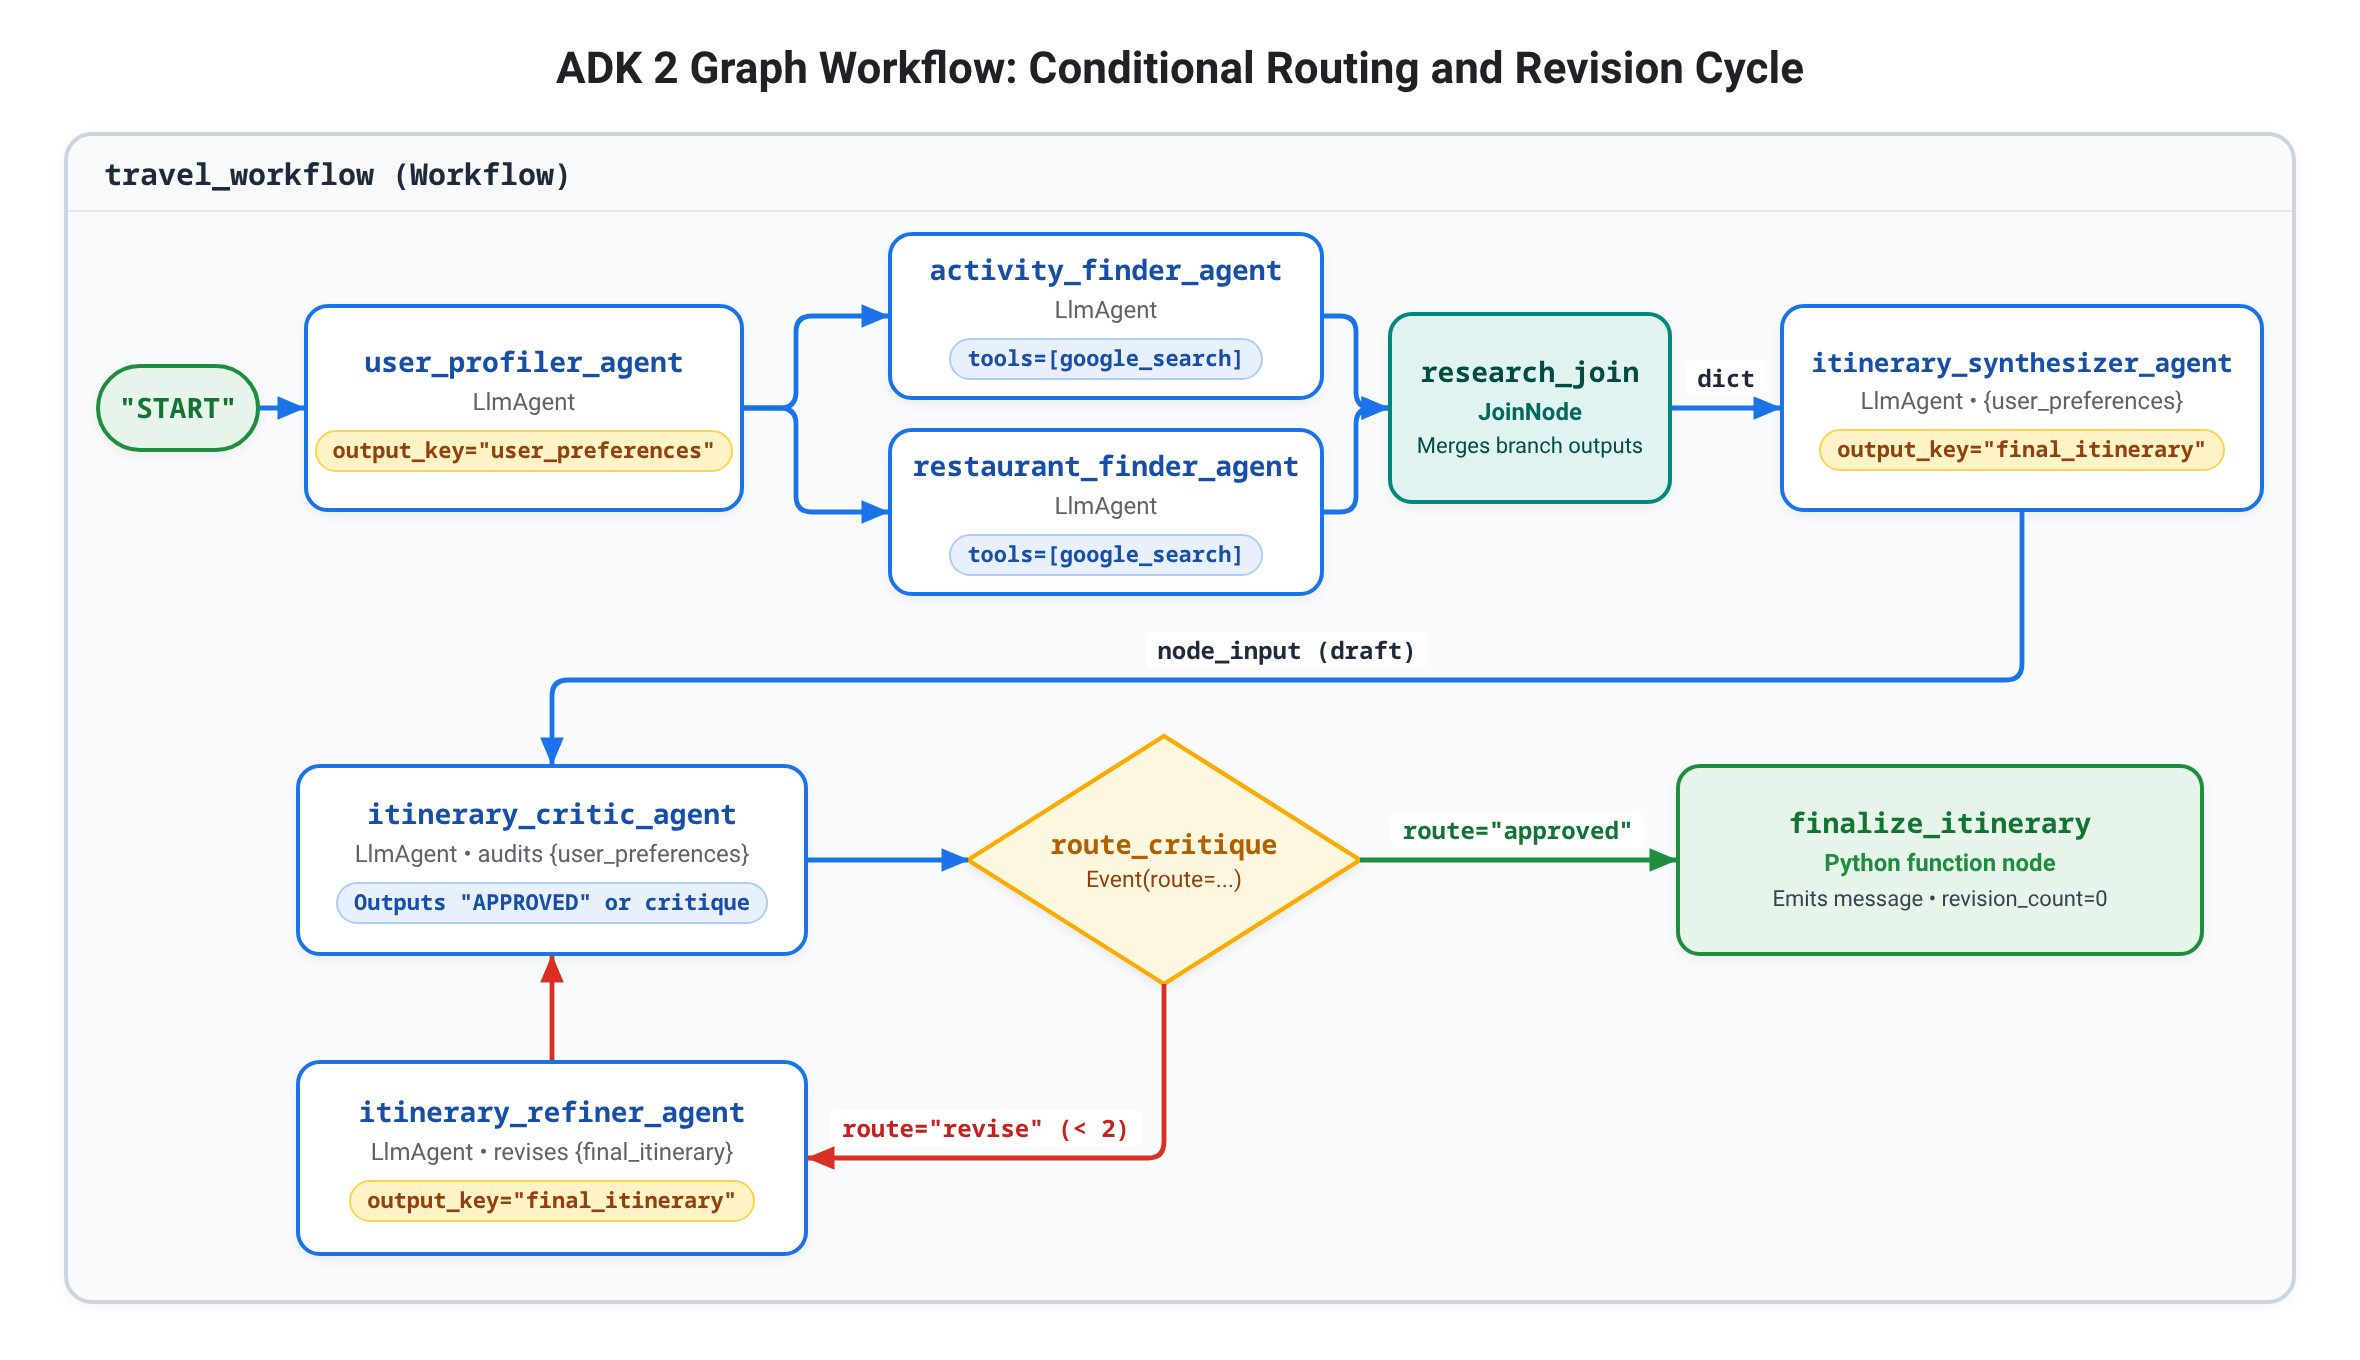
itinerary_critic_agent、itinerary_refiner_agent、ADK Event オブジェクトを返す 2 つの決定論的な Python 関数ノード(route_critique と finalize_itinerary)を追加して、予算と負の制約を適用します。
route: 辞書エッジ({"revise": ..., "approved": ...})内のどの名前付きブランチキーを次に実行するかを選択します。output: チャット メッセージをレンダリングせずに、型付きの Python 値または文字列をnode_inputとしてエッジに沿って次のノードに渡します。messageとstate:messageはチャットの文字起こしにユーザーに表示されるテキストを出力し、stateは Key-Value の更新(stateDelta)をセッション状態に commit します。
批評スペシャリストと修正スペシャリストを追加する
adk web が停止していることを確認し(Ctrl + C)、travel_planner/specialists.py を開きます。
cloudshell edit ~/adk-graph-agents/travel_planner/specialists.py
travel_planner/specialists.py の下部に itinerary_critic_agent と itinerary_refiner_agent を追加します(精製機は {final_itinerary} で収集されたアイテムを交換し、route_critique が "revise" を選択したときにのみ実行されるため、google_search ツールや exit_loop ツールは必要ありません)。
# --- Specialist 5: The Budget & Constraint Critic ---
itinerary_critic_agent = Agent(
    model=MODEL,
    name="itinerary_critic_agent",
    description="Audits the itinerary draft against budget and negative constraints.",
    instruction="""
        Audit the itinerary in the input against User Preferences ({user_preferences}).
        Verify that the USD total stays within the user's budget and no excluded venue types appear.
        If all checks pass, respond EXACTLY with the single word "APPROVED".
        Otherwise, output 1-2 concise revision instructions explaining what to swap or adjust.
    """,
)

# --- Specialist 6: The Itinerary Refiner ---
itinerary_refiner_agent = Agent(
    model=MODEL,
    name="itinerary_refiner_agent",
    description="Revises the itinerary draft using the critic's feedback.",
    instruction="""
        Revise Current Itinerary ({final_itinerary}) using the auditor critique in the input
        so all USD budget and exclusion rules in {user_preferences} pass.
        Output ONLY the updated Markdown itinerary.
    """,
    output_key="final_itinerary",
)
route_critique とサイクルを追加する
travel_planner/workflows.py を開きます。
cloudshell edit ~/adk-graph-agents/travel_planner/workflows.py
travel_planner/workflows.py の内容全体を、完全なグラフ ワークフローに置き換えます。
from google.adk import Event, Workflow
from google.adk.workflow import JoinNode
from .specialists import (
    activity_finder_agent, itinerary_critic_agent, itinerary_refiner_agent,
    itinerary_synthesizer_agent, restaurant_finder_agent, user_profiler_agent,
)

MAX_REVISIONS = 2
research_join = JoinNode(name="research_join")


def route_critique(node_input: str, revision_count: int = 0):
    """Routes to 'approved' when constraints pass, or 'revise' up to MAX_REVISIONS."""
    approved = node_input.strip().rstrip(".").upper() == "APPROVED"
    if approved or revision_count >= MAX_REVISIONS:
        return Event(route="approved", output=approved)
    return Event(
        route="revise", output=node_input, state={"revision_count": revision_count + 1}
    )


def finalize_itinerary(node_input: bool, final_itinerary: str, revision_count: int = 0):
    """Emits the verified itinerary and resets revision_count for the next turn."""
    status = (
        f"Itinerary approved after {revision_count} revision(s)."
        if node_input
        else f"Max revisions ({revision_count}) reached; returning best-effort draft."
    )
    return Event(
        message=f"{status}\n\n{final_itinerary}",
        output=final_itinerary,
        state={"revision_count": 0},
    )


travel_workflow = Workflow(
    name="travel_workflow",
    description="Orchestrates the end-to-end travel planning process as a graph workflow.",
    edges=[
        (
            "START",
            user_profiler_agent,
            (activity_finder_agent, restaurant_finder_agent),
            research_join,
            itinerary_synthesizer_agent,
            itinerary_critic_agent,
            route_critique,
        ),
        (route_critique, {"revise": itinerary_refiner_agent, "approved": finalize_itinerary}),
        (itinerary_refiner_agent, itinerary_critic_agent),
    ],
)
🔍 実施したタスクを確認する
travel_planner/workflows.py が正常にコンパイルされ、有向グラフのエッジが出力されることを確認します。
cd ~/adk-graph-agents && source .venv/bin/activate
python3 -c "from travel_planner.agent import root_agent; print('\n'.join(f'{e.from_node.name} -> {e.to_node.name} (route={e.route})' for e in root_agent.graph.edges))"
次のような出力が表示されます。
__START__ -> user_profiler_agent (route=None)
user_profiler_agent -> activity_finder_agent (route=None)
user_profiler_agent -> restaurant_finder_agent (route=None)
activity_finder_agent -> research_join (route=None)
restaurant_finder_agent -> research_join (route=None)
research_join -> itinerary_synthesizer_agent (route=None)
itinerary_synthesizer_agent -> itinerary_critic_agent (route=None)
itinerary_critic_agent -> route_critique (route=None)
route_critique -> itinerary_refiner_agent (route=revise)
route_critique -> finalize_itinerary (route=approved)
itinerary_refiner_agent -> itinerary_critic_agent (route=None)
次に、adk web を起動して、即時承認と予算トリガーによる修正の両方をテストします。
adk web --allow_origins "*"
ポート 8000 でウェブ プレビューを開き、[+ 新しいセッション] をクリックして、複数の制約を含む京都のプロンプトを送信します。
Design a full-day itinerary for Kyoto with a total budget of $100. My main interests are historical landmarks, temples, and authentic local cuisine. Please do not include any modern art museums or galleries.
route="revise" ループが実際に動作する様子を確認するには、$15 という厳しい予算を指定してフォローアップ プロンプトを送信します。
Now design a full-day Kyoto itinerary with paid temple admissions, lunch, and dinner on a strict total budget of $15 USD.
[Events] ビューに、次のような実行シーケンスが表示されます。
1. user_profiler_agent -> writes JSON constraints to state["user_preferences"]
2. (activity_finder_agent, restaurant_finder_agent) -> run google_search concurrently -> research_join
3. itinerary_synthesizer_agent -> writes initial draft to state["final_itinerary"]
4. itinerary_critic_agent -> outputs "APPROVED" (or revision instructions when over budget)
5. route_critique -> emits route="approved" (skipping refiner) or route="revise" -> itinerary_refiner_agent -> itinerary_critic_agent
6. finalize_itinerary -> emits "Itinerary approved after N revision(s)." (or max-revisions notice) and resets revision_count=0
ターミナルで Ctrl + C を押して adk web を停止します。
9. トラブルシューティング
adk web でエージェントのプルダウンが空である
- 原因:
adk webが親の~/adk-graph-agentsディレクトリではなくtravel_planner/内で開始されたか、Cloud Shell セッションが再起動されました。 - 修正方法:
Ctrl + Cを押し、親ディレクトリに戻って、cd ~/adk-graph-agents && source .venv/bin/activate && adk web --allow_origins "*"で再起動します。
404 NOT_FOUND 件のモデルエラー
- 原因:
adk createの実行中に、globalと入力する代わりに Enter キーを押してデフォルトのus-central1リージョンをそのまま使用しました。 - 修正:
~/adk-graph-agents/travel_planner/.envを開き、GOOGLE_CLOUD_LOCATION=globalが設定されていることを確認します。
ERROR: [Errno 98] address already in use(ポート 8000)
- 原因: 以前の
adk webサーバーが Cloud Shell でまだ実行されています。 - 修正: アクティブなターミナルで
Ctrl + Cを押すか、pkill -f "adk web"で既存のプロセスを停止してから、adk webを再度起動します。
10. クリーンアップ
ローカル ワークスペースを削除し、必要に応じて API を無効にするか、専用のワークショップ プロジェクトを削除します。
ローカル プロジェクト ファイルを削除する
~/adk-graph-agents ディレクトリと仮想環境を削除します。
cd ~
rm -rf ~/adk-graph-agents
Agent Platform API を無効にする(省略可)
このプロジェクトで Agent Platform API が不要になった場合は、無効にします。
gcloud services disable aiplatform.googleapis.com --quiet
🔍 実施したタスクを確認する
~/adk-graph-agents が削除されたことを確認します。
test ! -d ~/adk-graph-agents && echo "Workspace ~/adk-graph-agents removed"
次のような出力が表示されます。
Workspace ~/adk-graph-agents removed
11. 完了
ADK 2 Workflow を使用してマルチエージェント旅行プランナーを構築し、シーケンシャル チェーン、JoinNode を使用した同時 google_search ファンアウト、条件付きメーカーチェッカー サイクルを単一の宣言型エッジグラフに統合しました。
達成した内容
- ADK 2
Workflow(edges=[...])を使用してマルチエージェント パイプラインを宣言した node_inputと状態バインド パラメータを介して、Agent、JoinNode、Python 関数ノード間でデータを直接渡しながら、セッション状態を最小限に抑えました。- 同時実行の
google_searchブランチをファンアウトし、JoinNodeと同期しました LoopAgentとツールベースのループ エスカレーションを、承認済みのドラフトで不要な LLM 呼び出しをスキップする決定論的なEvent(route=...)ルーターに置き換えました。
次のステップ
- ADK のマルチエージェント システムについて確認する
- GEAR(Gemini Enterprise Agent Ready)プログラムと Get Certified プログラムに参加して、ハンズオン ワークショップと学習プログラムを利用する