

1. 概要
複数の制約がある旅行リクエスト(たとえば、歴史的な寺院と郷土料理に焦点を当て、現代アート ギャラリーは含めず、100 ドル未満で京都の 1 日の旅程を設計するなど)を満たすには、制約の抽出、観光スポットと食事の同時調査、項目別のスケジュールの作成、最終プランの監査が必要です。多くのツールを備えた単一のモノリシック エージェントに依存すると、検証ステップがスキップされたり、除外に違反したりする可能性があるため、オーケストレーションは、決定論的なワークフロー コントローラを介して専用のサブエージェントを調整します。
ADK を使用した AI エージェントの構築シリーズの第 3 部では、Agent Development Kit(ADK)2 ワークフロー コントローラ(SequentialAgent、ParallelAgent、LoopAgent)を使用して、Agent Platform 上に自己完結型のマルチエージェント旅行プランナーを構築します。3 つの段階(第 1 部または第 2 部のワークスペース設定は不要)にわたって、gemini-3.8-flash を搭載した 6 つの専門エージェントを、共有セッション状態(output_key)、同時 google_search 実行、反復的なメーカーチェッカー リファインメント ループで調整します。
前提条件
- 生成 AI のコンセプトを理解していること
- Python プログラミングの基本的なスキル
- AI エージェントの基礎と Google ADK に関する知識
学習内容
- マルチエージェント ADK 2 プロジェクトをゼロからスキャフォールディングする方法
output_keyを使用してセッション状態を共有する専門エージェントのチームを設計する方法SequentialAgentを使用して、決定論的なステップバイステップ パイプラインでサブエージェントを実行する方法ParallelAgentを使用して独立したリサーチ エージェントを同時に実行し、レイテンシを短縮する方法LoopAgentとToolContextのエスカレーションを使用して、反復的なメーカーチェッカーの改良ループを実装する方法- 順次、並列、ループのパターンを組み合わせて階層型マルチエージェント ワークフローを構築する方法
必要なもの
- Google アカウント(ワークショップのクレジットを申請する場合は、個人の
@gmail.comアカウントを使用してください) - インストラクターから提供されたワークショップ クレジット リンク(および QR コードをスキャンするためのスマートフォンのカメラ)または有効な Cloud 請求先アカウント
- Google Chrome(個人アカウントと仕事用アカウントが混在しないように、シークレット ウィンドウを使用することをおすすめします)
2. Google Cloud クレジットを申請する(省略可)
イベント クレジット リンクのあるワークショップに参加している場合は、Google Developer Program クレジットを申請して、クレジット カードなしで請求先アカウントをプロビジョニングします。
イベントのクレジットを取得する
- シークレット ウィンドウでワークショップのクレジット リンクを開き、
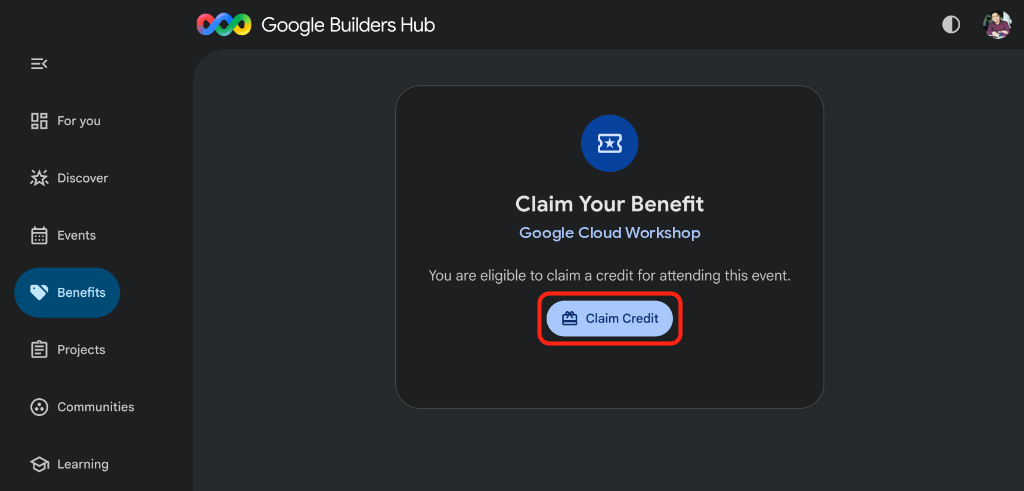
@gmail.comアカウントでログインします。 - [特典を申請] で、[クレジットを申請] をクリックします。
- Google Developer Program プロフィールの作成を求められた場合は、フォームに記入します。
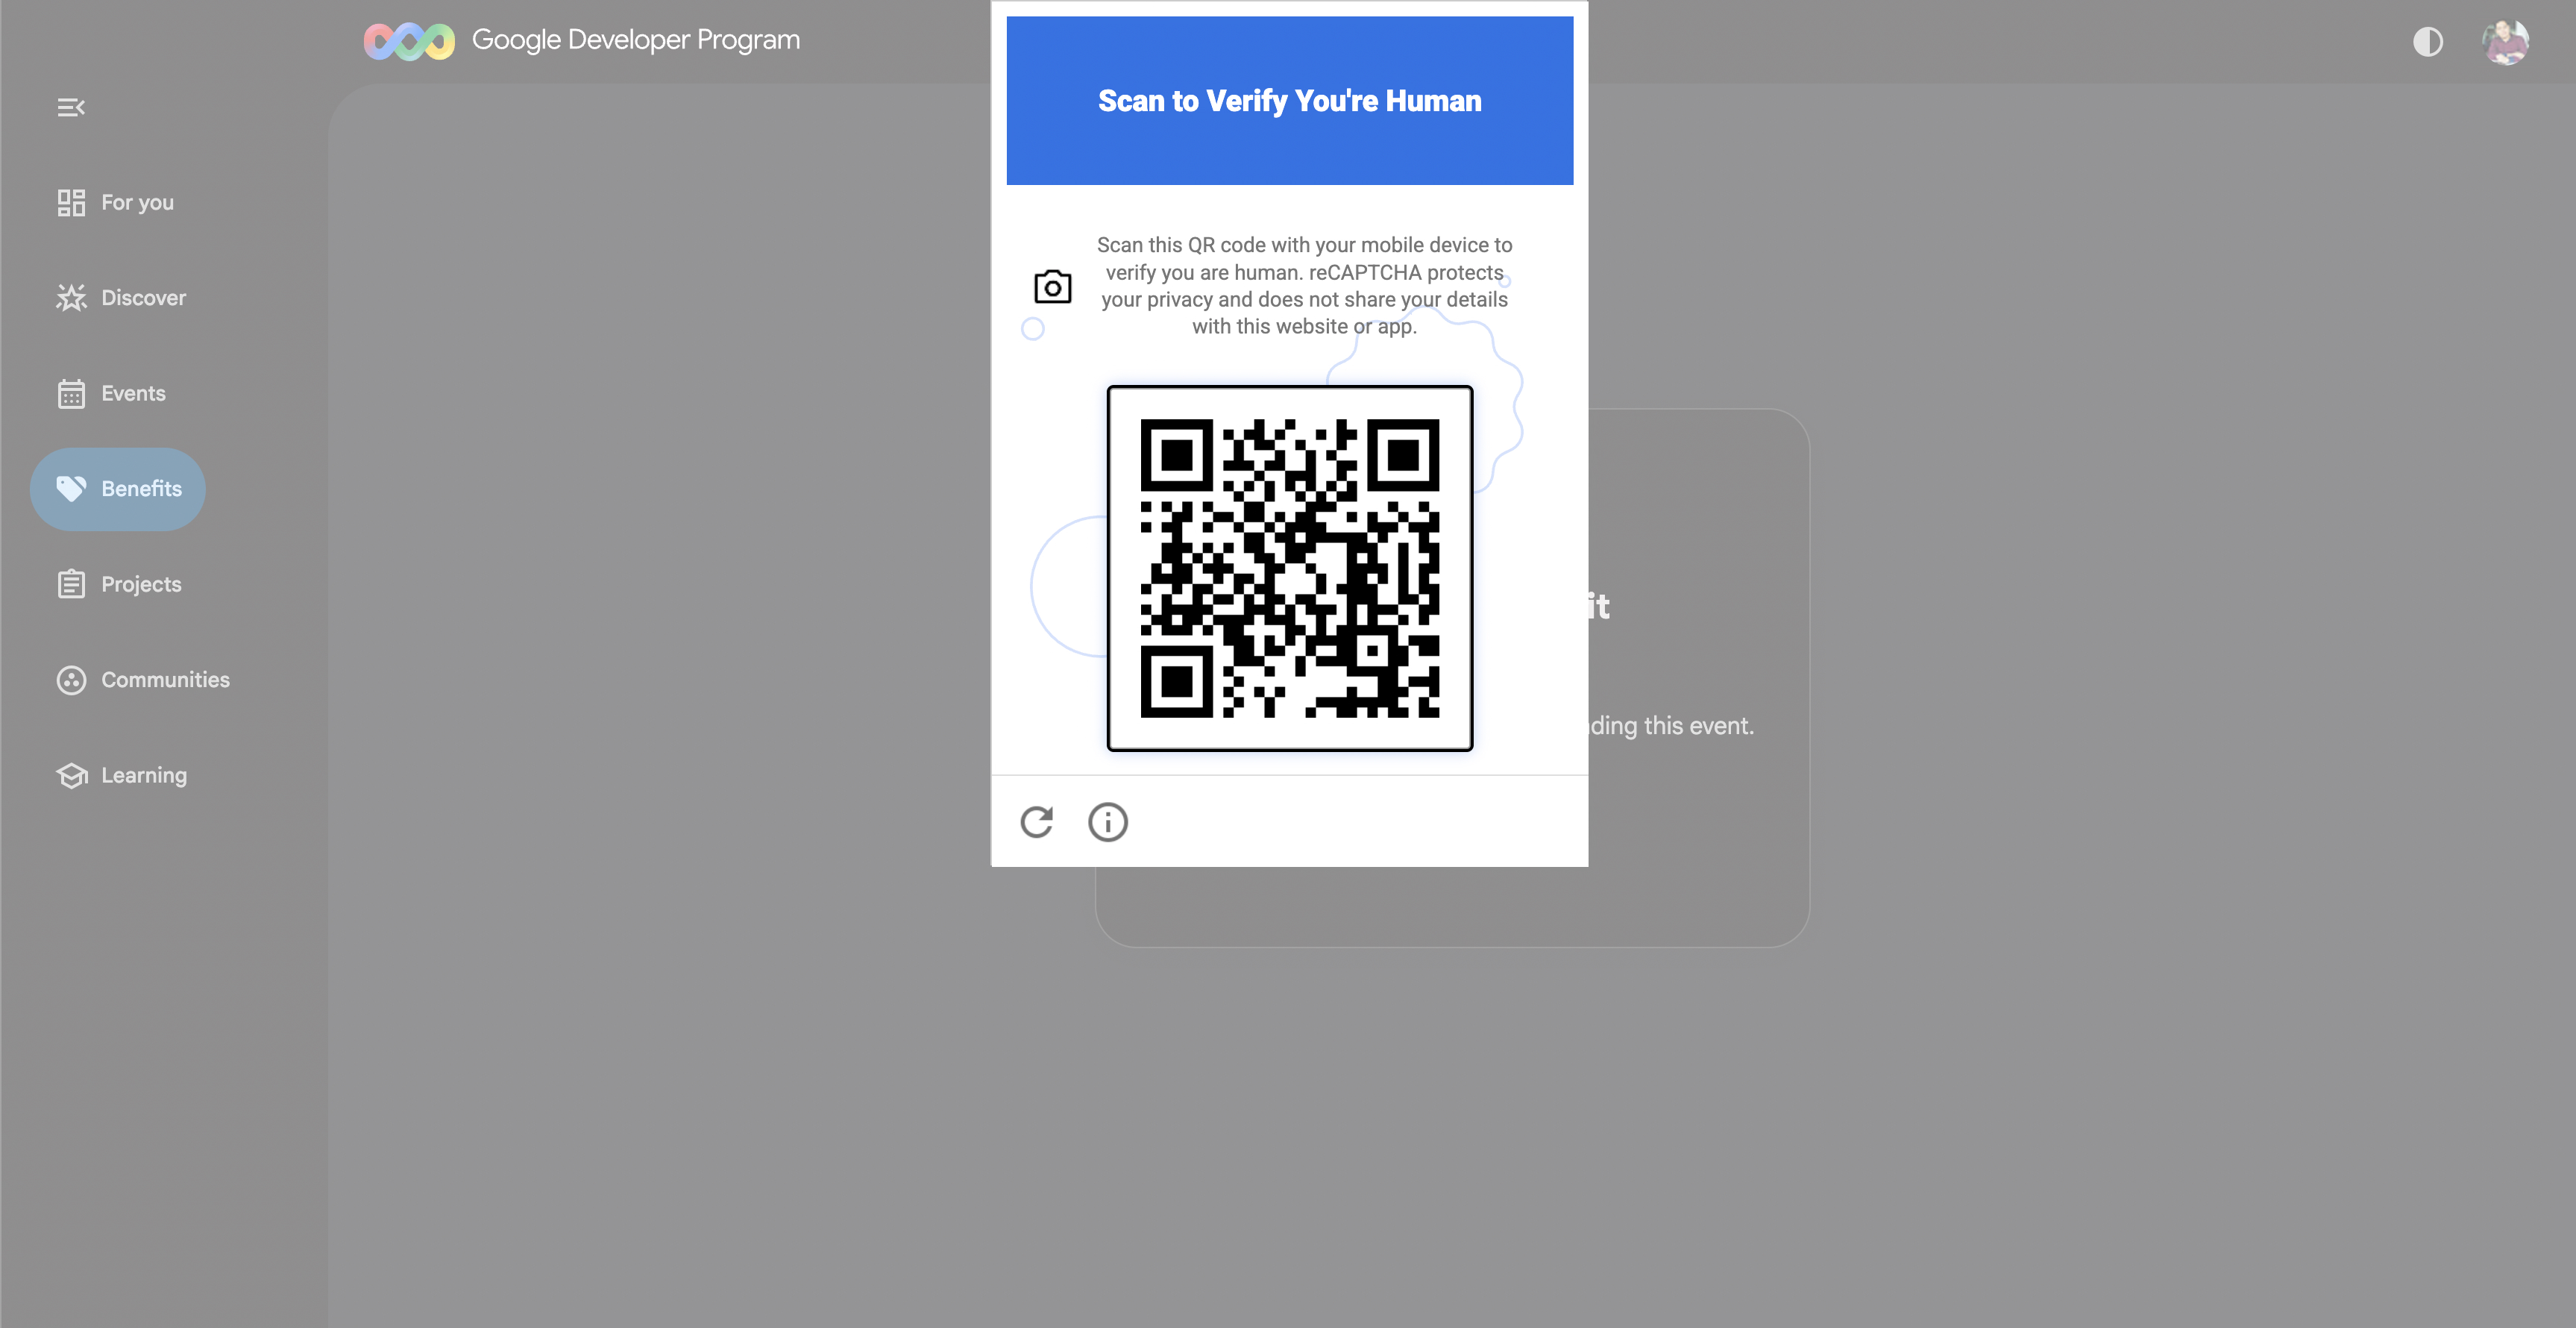
- [Scan to Verify You're Human] が表示されたら、スマートフォンで QR コードをスキャンして確認を完了します(QR コードが表示されない場合は、更新して [Claim Credit] をもう一度クリックします)。
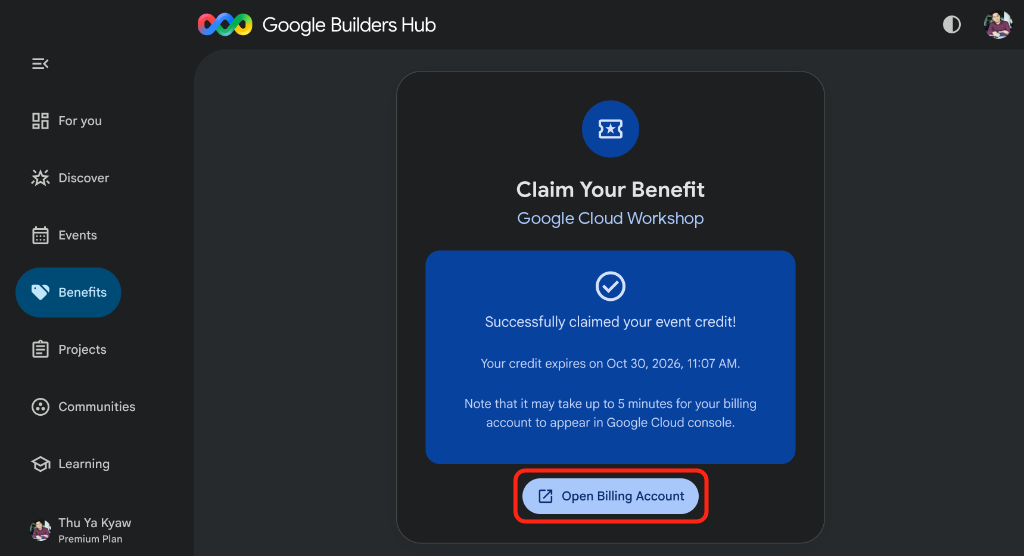
- 「イベントのクレジットを取得しました」と表示されたことを確認し、[請求先アカウントを開く] をクリックします。
🔍 実施したタスクを確認する
請求先アカウントの設定には最大 3 分かかります。
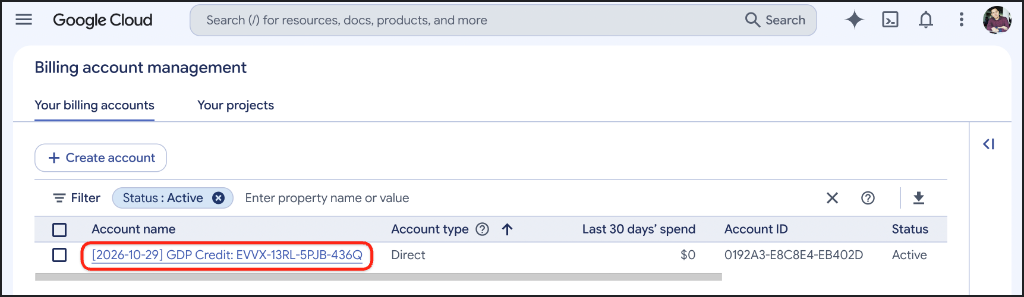
- Google Cloud Billing を開くか、URL をコピーしてシークレット ウィンドウに貼り付け、[請求先アカウント] を選択します。
https://console.cloud.google.com/billing
GDP Creditアカウントのステータスが [有効] になるまで更新します。
3. Google Cloud プロジェクトを作成する(省略可)
この Codelab のすべてのリソースが分離され、クリーンアップが容易になるように、専用の Google Cloud プロジェクトを作成します。
- [プロジェクトを作成] を開きます(または、URL をコピーしてシークレット ウィンドウに貼り付けます)。
https://console.cloud.google.com/projectcreate
- プロジェクトの詳細を入力します。
- プロジェクト名:
google-cloud-workshopなど - 請求先アカウント(表示されている場合):
GDP Credit(または有効な請求先アカウント)を選択します。 - 親リソース: 組織なし(または必要に応じて組織)
- プロジェクト名:
- プロジェクト名の下に生成されたプロジェクト ID をメモし、[作成] をクリックします。
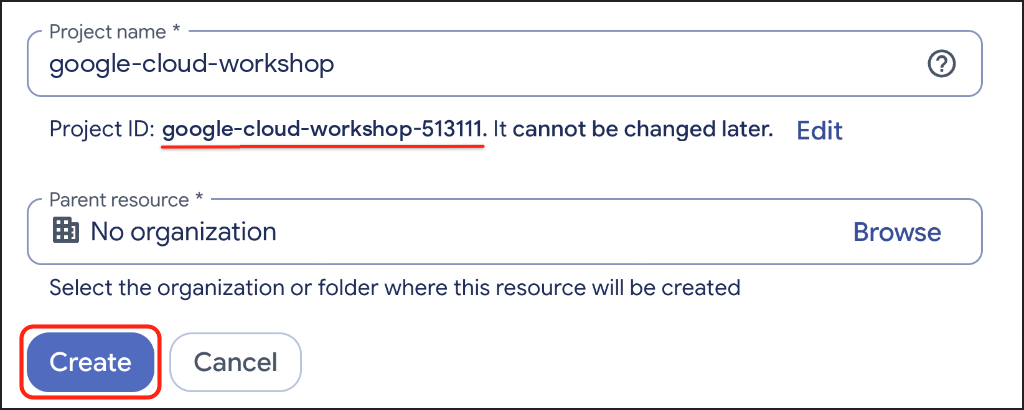
🔍 実施したタスクを確認する
右上のツールバーにある [通知] をクリックし、プロジェクトの作成が完了したら [プロジェクトを選択] をクリックします。
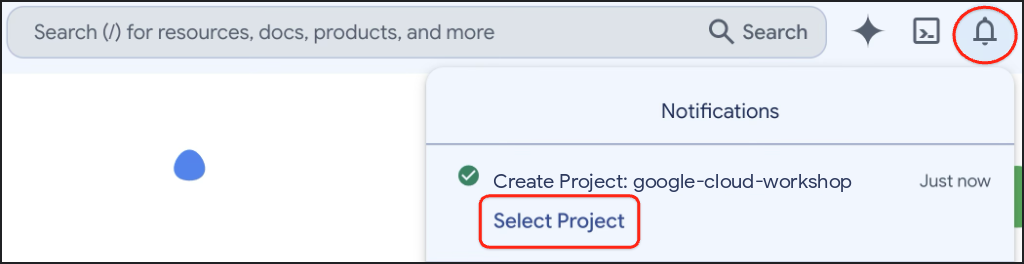
4. 環境を設定する
Google Cloud Shell を構成し、Agent Platform API を有効にして、uv を使用して隔離された Python 3.12 仮想環境を作成します。
Cloud Shell を構成する
- Google Cloud コンソールのツールバーで [Cloud Shell をアクティブにする](
>_)をクリックするか、Google Cloud Shell を直接開きます(または、URL をシークレット ウィンドウにコピーします)。
https://shell.cloud.google.com/?show=ide,terminal

- [承認] をクリックします(求められた場合)。
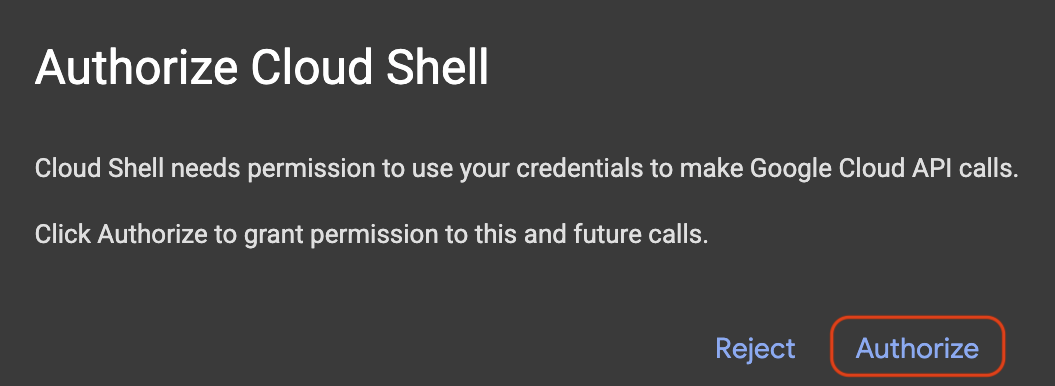
- ターミナルの番号付きメニューから、アクティブな Google Cloud プロジェクト ID を選択します。
unset CLOUDSDK_CORE_PROJECT
PS3="Select your project (e.g. 1): "
select PROJECT_ID in $(gcloud projects list --format="value(projectId)"); do
  [ -n "$PROJECT_ID" ] && gcloud config set project "$PROJECT_ID" && break
done
次のような出力が表示されます(タグ付けされていないプロジェクトでは、情報を示す [environment: untagged] 行も出力されます)。
1) google-cloud-workshop-4210
2) my-cloud-project-8812
Select your project (e.g. 1): 1
Updated property [core/project].
選択したプロジェクト ID が Cloud Shell プロンプトで黄色でハイライト表示されていることを確認します。
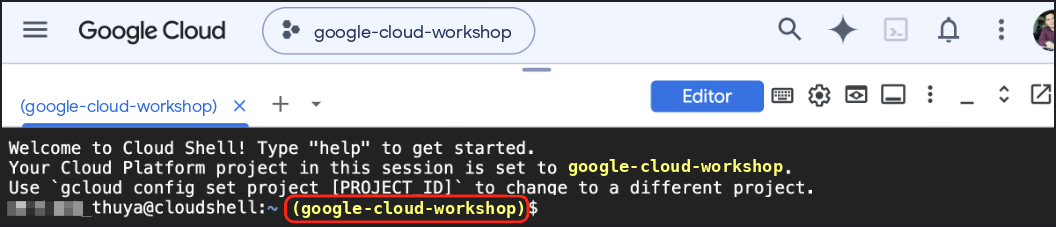
必要な API の有効化
ADK エージェントが Gemini モデルを呼び出せるように、Agent Platform API を有効にします。
gcloud services enable aiplatform.googleapis.com
次のような出力が表示されます。
Operation "operations/acat.p2-..." finished successfully.
Python 仮想環境を作成して ADK をインストールする
~/adk-agents ワークスペースを作成し、Python 3.12 仮想環境を有効にします。
cd ~
mkdir -p adk-agents && cd ~/adk-agents

which uv >/dev/null 2>&1 || curl -LsSf https://astral.sh/uv/install.sh | sh
export PATH="$HOME/.local/bin:$PATH"

uv venv .venv --python 3.12
source .venv/bin/activate
ターミナル プロンプトの先頭に (.venv) 接頭辞が表示されていることを確認します。

アクティブな仮想環境に ADK 2 をインストールします。
uv pip install --no-cache "google-adk==2.14.0"
🔍 実施したタスクを確認する
インストールされている adk CLI のバージョンを確認します。
adk --version
次のような出力が表示されます。
adk, version 2.14.0
5. 旅行プランナー エージェントをスキャフォールディングする
環境の準備ができたら、ADK の組み込みの adk create コマンドを使用して、travel_planner エージェント パッケージのスターター ファイルを生成します。
スターター パッケージを生成する
~/adk-agents ディレクトリから adk create を実行します。
cd ~/adk-agents
adk create travel_planner
ターミナルでプロンプトが表示されたら、次の構成オプションを選択します(初回実行時に Enable telemetry? [Y/n]: のプロンプトが表示された場合は、Enter キーを押すか、n と入力して Enter キーを押します)。
- ルート エージェントのモデルを選択する: 「
2」と入力してgemini-3.8-flashを選択し(オプション1はgemini-3.5-flashを選択)、Enter キーを押します。 - バックエンドを選択する: 「
2」と入力して Google Cloud Agent Platform バックエンド(以下の CLI メニューのオプション2)を選択し、Enter キーを押します。 - Enter Google Cloud project ID: Enter キーを押して、括弧内に表示されているプロジェクト ID を確定します。
- Enter Google Cloud region: 「
global」と入力して Enter キーを押します。
adk create は、GOOGLE_GENAI_USE_ENTERPRISE=1、プロジェクト ID、GOOGLE_CLOUD_LOCATION=global を travel_planner/.env に書き込みます。これにより、後で agent.py を更新しても、認証情報は構成されたままになります。
🔍 実施したタスクを確認する
次のような出力が表示されます。
Choose a model for the root agent:
1. gemini-3.5-flash
2. gemini-3.8-flash
3. Other models (fill later)
Choose model (1, 2, 3): 2
1. Google AI
2. Vertex AI
3. Login with Google
Choose a backend (1, 2, 3): 2

You need an existing Google Cloud account and project, check out this link for details:
https://google.github.io/adk-docs/get-started/quickstart/#gemini---google-cloud-vertex-ai

Enter Google Cloud project ID [google-cloud-workshop-4210]:
Enter Google Cloud region [us-central1]: global

Agent created in /home/your_username/adk-agents/travel_planner:
- .env
- .gitignore
- __init__.py
- agent.py

⚠️  WARNING: Secrets (like GOOGLE_API_KEY) are stored in .env.

Next steps:
- Chat with your agent in the terminal: adk run travel_planner
- Or in the browser: adk web .
- Have your coding agent evaluate and deploy it: uvx google-agents-cli setup
  (other install options: https://adk.dev/get-started/agents-cli/)
Cloud Shell コードエディタで現在のフォルダを開き、ターミナルと並べてファイルを確認、編集できるようにします。
which cloudshell >/dev/null 2>&1 && cloudshell workspace ~/adk-agents || true
cd ~/adk-agents
source .venv/bin/activate
デフォルトの単一エージェントをテストする
マルチエージェント ワークフローを構築する前に、ADK 開発 UI を起動して、デフォルトの単一エージェントが幅広い旅行計画クエリにどのように応答するかを確認します。
cd ~/adk-agents
adk web --allow_origins "*"
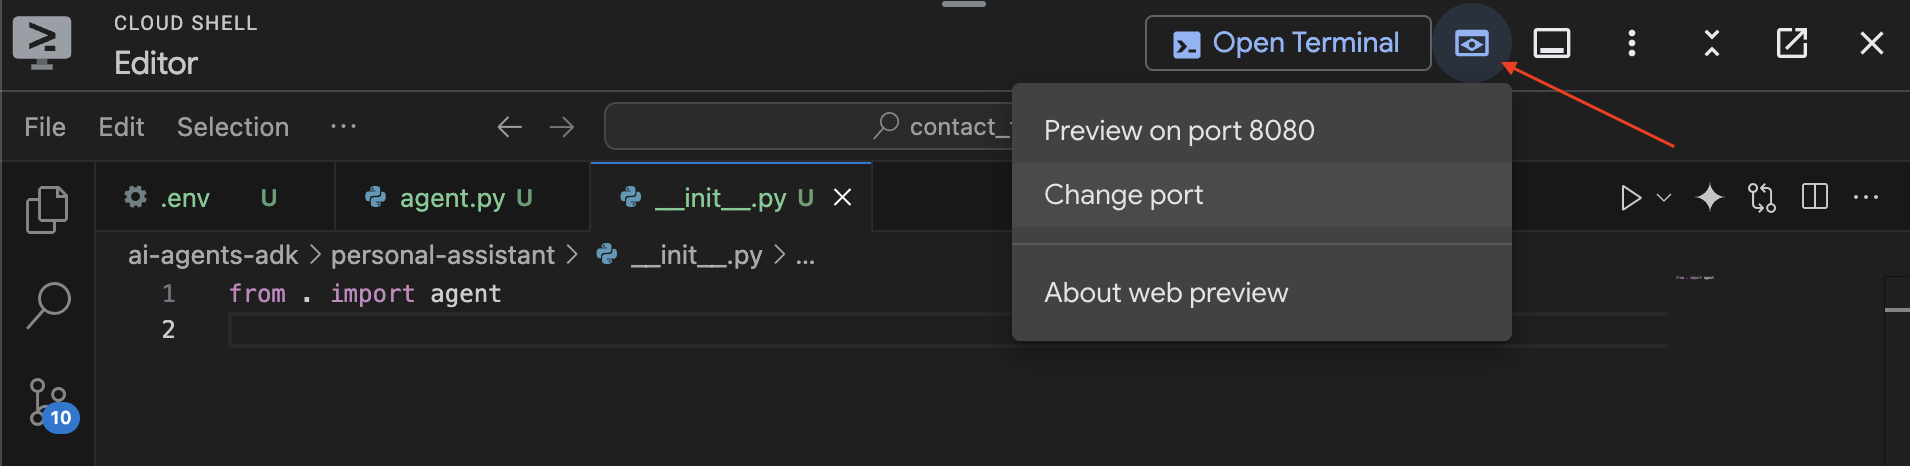
Cloud Shell のウェブ プレビューを使用して、ブラウザで開発 UI を開きます。
- Cloud Shell の右上にあるツールバーの [ウェブでプレビュー] アイコンをクリックします。
- [ポートを変更] を選択し、「
8000」と入力して [変更してプレビュー] をクリックします。
ADK ウェブ UI が読み込まれたら、"hello, what can you do?" や "Help me plan a trip to Japan" などの挨拶を送信します。
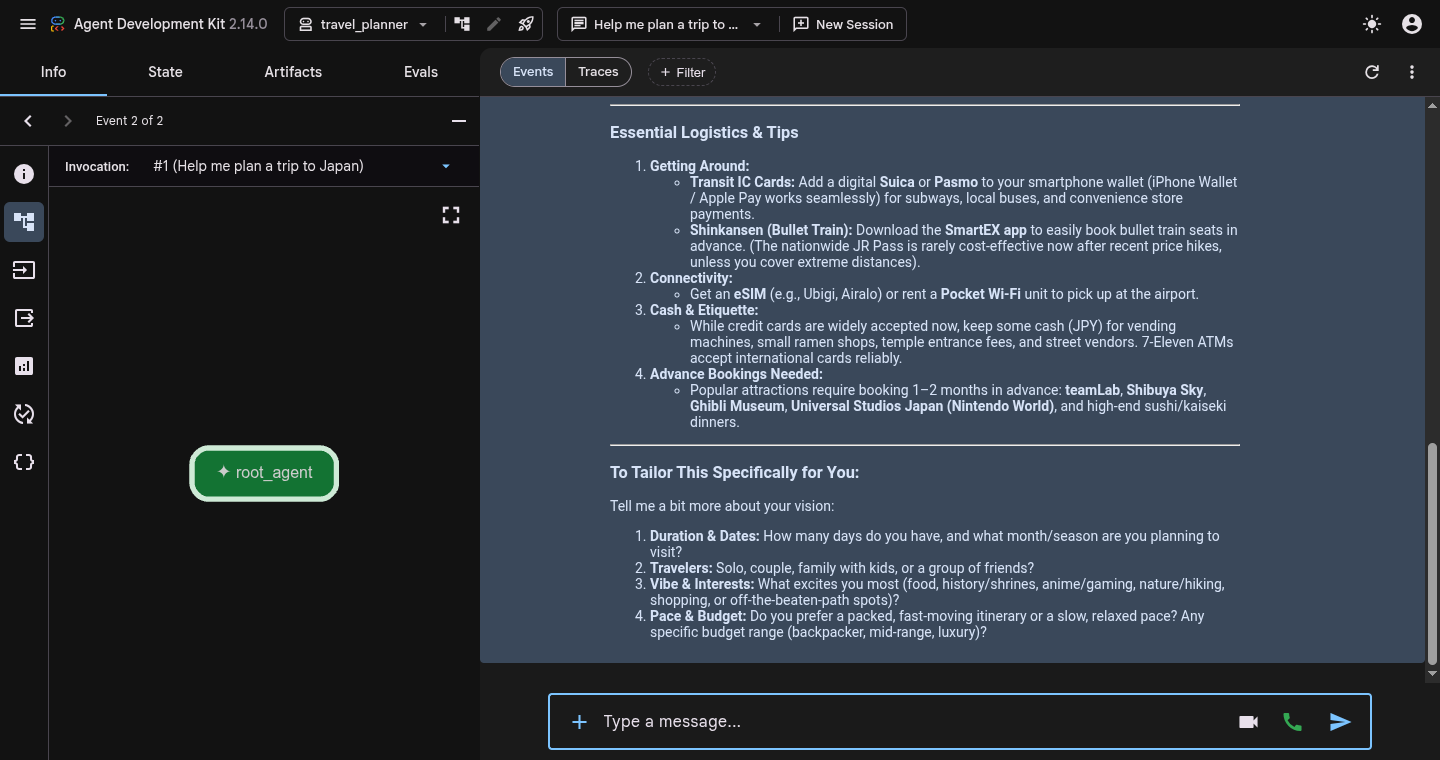
単一の root_agent は、構造化された設定の抽出、ライブウェブ検索、予算の確認を行わずに、1 回のパスで直接回答します。
テストが完了したら、Cloud Shell ターミナルで Ctrl + C を押して adk web サーバーを停止し、コマンド プロンプトに戻ります。
6. SequentialAgent ワークフローを構築する
次に、最初のオーケストレーション パターンである、SequentialAgent を活用した線形ワークフローを構築します。シーケンシャル パイプラインでは、サブエージェントは厳密な順序で実行されます。最初のスペシャリストは、構造化されたパラメータを抽出し、output_key="user_preferences" を使用して共有セッション状態に保存します。2 番目のスペシャリストは、共有状態から {user_preferences} を読み取り、旅程の下書きを作成します。
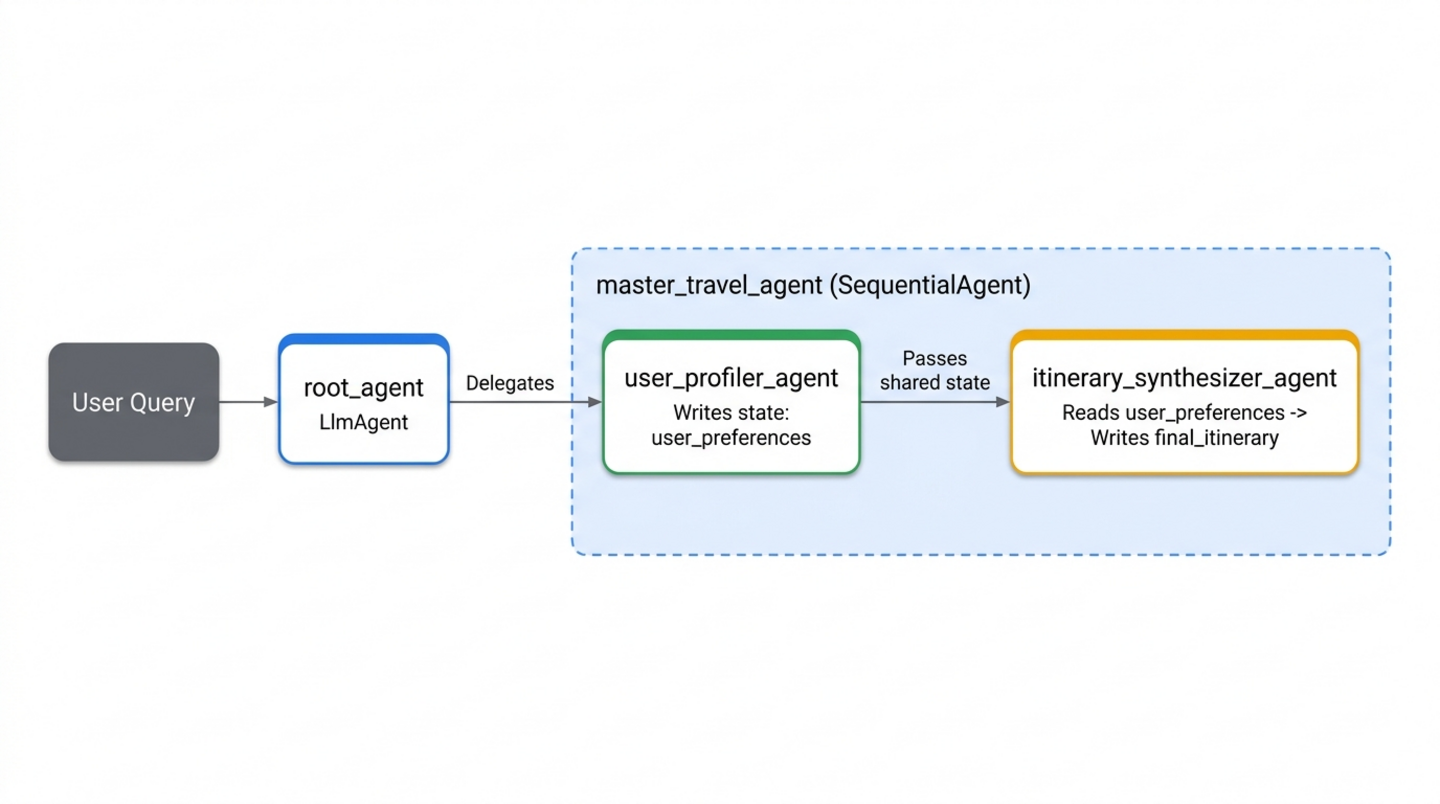
初期スペシャリストを作成する(specialists.py)
travel_planner/ 内に specialists.py という名前の新しいファイルを開きます。
cloudshell edit ~/adk-agents/travel_planner/specialists.py
次のコードを travel_planner/specialists.py に貼り付けて、user_profiler_agent と itinerary_synthesizer_agent を定義します(次のステップのために ToolContext と google_search を事前にインポートします)。
from google.adk import Agent
from google.adk.tools import ToolContext, google_search

# --- Specialist 1: The User Profiler ---
user_profiler_agent = Agent(
    name="user_profiler_agent",
    description="Extracts travel preferences and constraints from user input.",
    instruction="""
        Extract destination, duration (default 1 day), budget, interests, and exclusions.
        Return a single JSON object with keys: "destination", "duration", "budget", "interests", "exclusions".
    """,
    output_key="user_preferences",  # Saves output to state['user_preferences']
)

# --- Specialist 2: The Synthesizer ---
itinerary_synthesizer_agent = Agent(
    name="itinerary_synthesizer_agent",
    description="Compiles preferences and research into a final Markdown itinerary.",
    instruction="""
        You are an elite Travel Concierge. Write a Markdown itinerary with an itemized USD and local currency cost breakdown using:
        - User Preferences: {user_preferences}
        - Activities (if available): {activity_recommendations?}
        - Restaurants (if available): {restaurant_recommendations?}
    """,
    output_key="final_itinerary",
)
シーケンシャル パイプライン(workflows.py)を接続する
travel_planner/ 内に workflows.py という名前の新しいファイルを作成し、スペシャリストをオーケストレートします。
cloudshell edit ~/adk-agents/travel_planner/workflows.py
次の SequentialAgent 定義を travel_planner/workflows.py に追加します。
from google.adk.agents import SequentialAgent
from .specialists import (
    user_profiler_agent,
    itinerary_synthesizer_agent,
)

# 1. SEQUENTIAL PHASE: A linear two-step workflow
master_travel_agent = SequentialAgent(
    name="master_travel_agent",
    description="Orchestrates the end-to-end travel planning process for trip and itinerary requests.",
    sub_agents=[
        user_profiler_agent,         # Step 1: Extract constraints into user_preferences
        itinerary_synthesizer_agent,  # Step 2: Draft itinerary from user_preferences
    ],
)
ワークフローを root_agent(agent.py)に接続する
次に、master_travel_agent を root_agent のサブエージェントとして登録します。travel_planner/agent.py を開きます。
cloudshell edit ~/adk-agents/travel_planner/agent.py
travel_planner/agent.py の内容を次のコードに置き換えます。
from google.adk import Agent
from .workflows import master_travel_agent

MODEL = "gemini-3.8-flash"

root_agent = Agent(
    model=MODEL,
    name="root_agent",
    description="A helpful assistant for user questions.",
    instruction=(
        "Greet the user and delegate any travel or trip planning requests "
        "to master_travel_agent."
    ),
    sub_agents=[master_travel_agent],
)
🔍 実施したタスクを確認する
ターミナルから ADK ウェブ UI を起動します。
cd ~/adk-agents
adk web --allow_origins "*"
ポート 8000 でウェブ プレビューを開き、次のプロンプトを入力します。
Help me plan a trip to Kyoto
[Events] ビューに、次のような実行フローが表示されます。
1. root_agent -> calls transfer_to_agent(agent_name="master_travel_agent")
2. user_profiler_agent -> outputs JSON {"destination": "Kyoto", "duration": "1 day", ...} to state['user_preferences']
3. itinerary_synthesizer_agent -> reads {user_preferences} and outputs the formatted Markdown itinerary
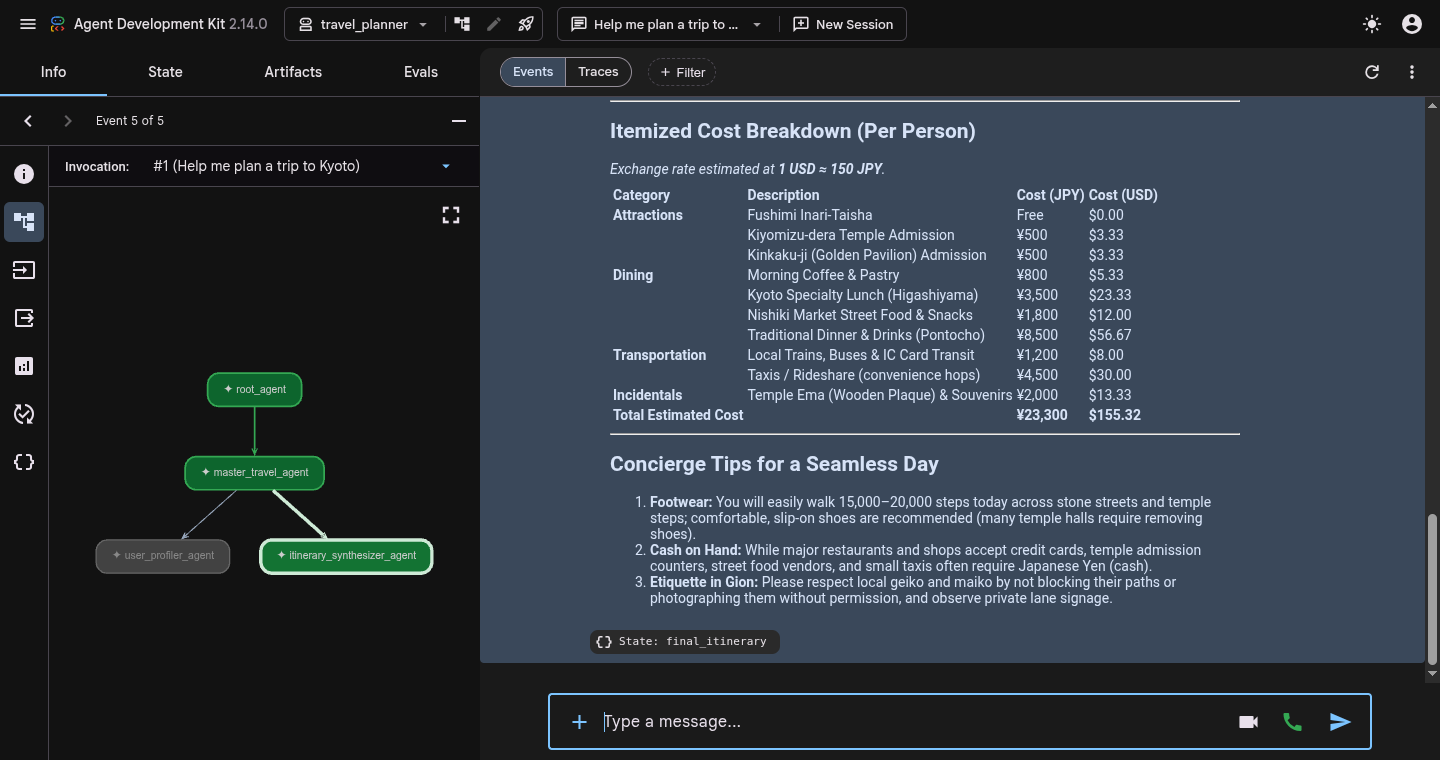
イベントバッジ(または State: final_itinerary チップ)をクリックし、左側のインスペクタ パネルで [State] タブに切り替えて、user_preferences と final_itinerary の両方がセッション状態に入力されていることを確認します。
トレースの検査が完了したら、ターミナルで Ctrl + C を押して adk web を停止します。
7. ParallelAgent を使用して調査を実行する
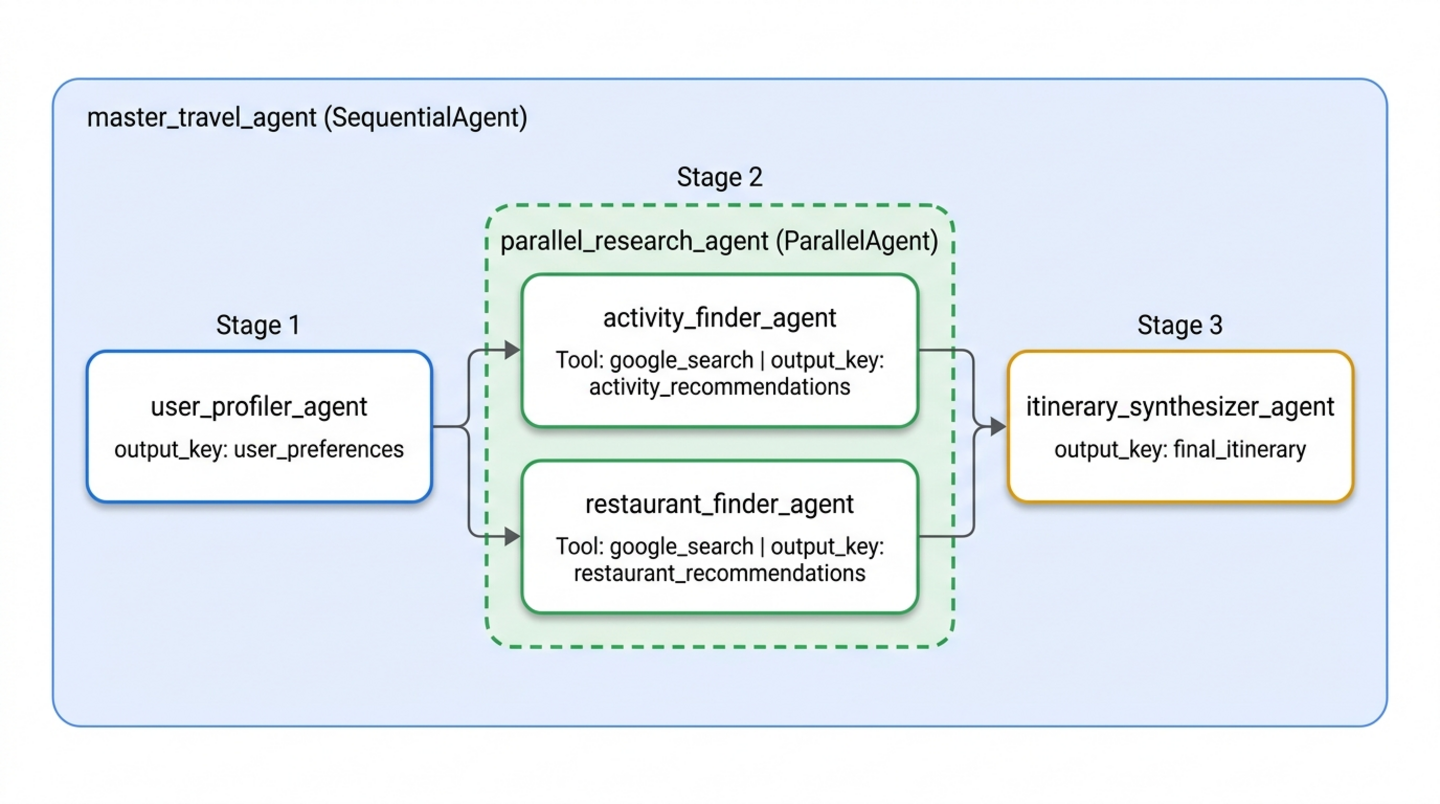
この順次ワークフローでは、好みの抽出と旅程の作成が明確に分離されていますが、推奨事項は依然としてモデルの静的なトレーニング知識にのみ依存しています。組み込みの google_search ツールを利用する 2 つの専用リサーチャーを追加することで、ライブウェブデータに基づいて旅行プランをグラウンディングできます。
activity_finder_agent: ユーザーの目的地と興味に一致する 3 つの特定の観光スポットと、推定チケット価格を検索します。restaurant_finder_agent: 評価の高い地元のレストラン 3 軒と、1 人あたりの推定費用を検索します。
観光スポットの調査とレストランの調査は互いに依存していないため、1 つずつ実行すると時間が無駄になります。代わりに、両方のリサーチャーを ParallelAgent(parallel_research_agent)でラップします。これにより、ADK は両方の Google 検索ワークフローを同時に実行し、itinerary_synthesizer_agent に引き渡す前に {activity_recommendations?} と {restaurant_recommendations?} にデータを入力します。
並行調査スペシャリストを specialists.py に追加する
travel_planner/specialists.py を開きます。
cloudshell edit ~/adk-agents/travel_planner/specialists.py
次の 2 つの Google 検索スペシャリストを travel_planner/specialists.py の末尾(itinerary_synthesizer_agent のすぐ下)に追加します。
# --- Specialist 3: The Activity Finder ---
activity_finder_agent = Agent(
    name="activity_finder_agent",
    description="Finds 3 attractions matching the user's destination and interests.",
    instruction="""
        Based on {user_preferences}, use google_search to find 3 specific attractions (including budget-friendly options).
        Return a JSON list with keys: "attraction_name", "estimated_cost_local", "estimated_cost_usd", "notes".
    """,
    tools=[google_search],
    output_key="activity_recommendations",
)

# --- Specialist 4: The Restaurant Finder ---
restaurant_finder_agent = Agent(
    name="restaurant_finder_agent",
    description="Finds 3 restaurants matching the destination and budget.",
    instruction="""
        Based on {user_preferences}, use google_search to find 3 highly-rated restaurants across price points.
        Return a JSON list with keys: "restaurant_name", "cuisine", "estimated_cost_local", "estimated_cost_usd".
    """,
    tools=[google_search],
    output_key="restaurant_recommendations",
)
ParallelAgent を workflows.py に挿入する
travel_planner/workflows.py を開きます。
cloudshell edit ~/adk-agents/travel_planner/workflows.py
travel_planner/workflows.py を更新して、ParallelAgent を使用して parallel_research_agent を定義し、user_profiler_agent と itinerary_synthesizer_agent の間に配置します。
from google.adk.agents import ParallelAgent, SequentialAgent
from .specialists import (
    activity_finder_agent,
    itinerary_synthesizer_agent,
    restaurant_finder_agent,
    user_profiler_agent,
)

# Parallel branch: Run activity and restaurant research simultaneously
parallel_research_agent = ParallelAgent(
    name="parallel_research_agent",
    description="Runs activity and restaurant research concurrently.",
    sub_agents=[
        activity_finder_agent,
        restaurant_finder_agent,
    ],
)

# Master pipeline: Profile -> Parallel Research -> Synthesize
master_travel_agent = SequentialAgent(
    name="master_travel_agent",
    description="Orchestrates the end-to-end travel planning process for trip and itinerary requests.",
    sub_agents=[
        user_profiler_agent,          # Step 1: Extract constraints
        parallel_research_agent,      # Step 2: Research activities & restaurants in parallel
        itinerary_synthesizer_agent,  # Step 3: Synthesize into an itinerary
    ],
)
🔍 実施したタスクを確認する
adk web を再度起動して、並列リサーチ パイプラインをテストします。
cd ~/adk-agents
adk web --allow_origins "*"
ウェブ プレビュー UI で、次のプロンプトを送信します。
Help me plan a trip to Kyoto focused on historic temples and ramen
[Events] ビューに、次のような出力が表示されます。
1. user_profiler_agent -> writes state['user_preferences']
2. parallel_research_agent -> fans out concurrently:
   - activity_finder_agent invokes google_search -> writes state['activity_recommendations']
   - restaurant_finder_agent invokes google_search -> writes state['restaurant_recommendations']
3. itinerary_synthesizer_agent -> merges all three state keys into state['final_itinerary']
- トレースビュー: 会話ペインの上部([イベント] の横)にある [トレース] をクリックして、ターンを検査します。
parallel_research_agentの下にactivity_finder_agentとrestaurant_finder_agentの重複するタイムライン スパンが表示され、ウェブ調査の合計レイテンシが、順次実行する場合と比較してほぼ半分に短縮されます。 - [State] タブ: 左側のインスペクタ パネルで [State] タブをクリックすると、ライブ セッション ディクショナリ(
user_preferences、activity_recommendations、restaurant_recommendations、final_itinerary)を検査できます。
テストが完了したら、ターミナルで Ctrl + C を押して adk web を停止します。
8. LoopAgent で下書きをブラッシュアップする
ライブ検索結果を使用しても、itinerary_synthesizer_agent が生成した最初のドラフトがユーザーの合計予算を超えたり、除外されたカテゴリ(ユーザーが除外を求めた現代アート ギャラリーなど)が誤って含まれたりすることがあります。
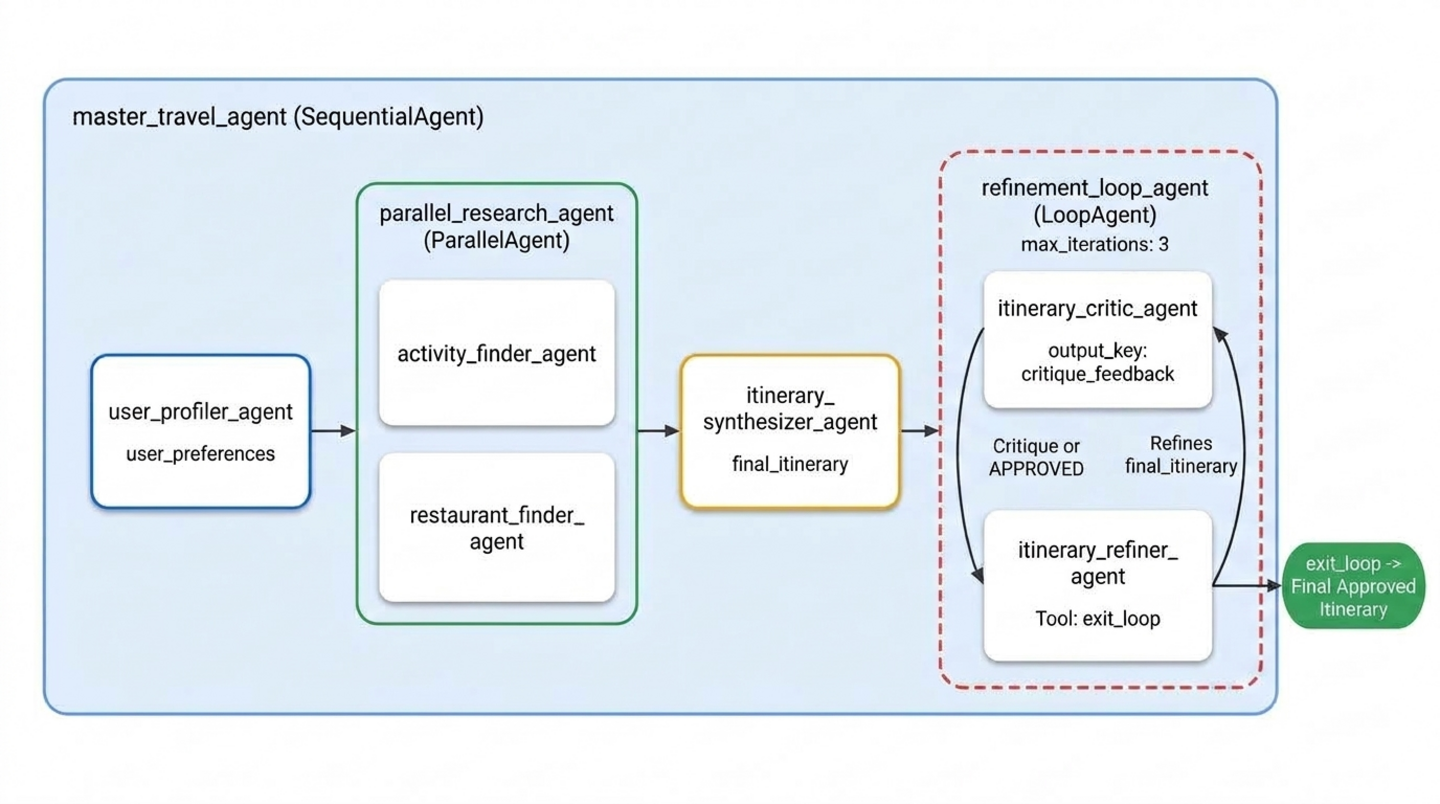
制約の遵守を保証するために、LoopAgent を使用して、パイプラインの最後にメーカーチェッカーの改良ループを追加します。
itinerary_critic_agent(チェッカー):{user_preferences}と照らし合わせて{final_itinerary}を監査します。推定費用を合計し、すべての否定的な制約をチェックして、critique_feedbackに具体的な修正指示を書き込むか、正確なフレーズ"APPROVED"で応答します。itinerary_refiner_agent(メーカー / エグジター):{critique_feedback}を読み取ります。critique が"APPROVED"と等しい場合、exit_loopツール(tool_context.actions.escalate = True)を呼び出して、LoopAgentからすぐに抜け出します。それ以外の場合は、{final_itinerary}を修正してフラグが付けられた問題を修正し、次のパスのためにfinal_itineraryを上書きします。
exit_loop、Critic、Refiner を specialists.py に追加する
travel_planner/specialists.py を開きます。
cloudshell edit ~/adk-agents/travel_planner/specialists.py
exit_loop ツール(ToolContext)、itinerary_critic_agent、itinerary_refiner_agent を travel_planner/specialists.py の末尾に追加します。
def exit_loop(tool_context: ToolContext) -> dict:
    """Call ONLY when the critique is APPROVED to exit the refinement loop."""
    print(f"[Tool Call] exit_loop triggered by {tool_context.agent_name}")
    tool_context.actions.escalate = True
    return {"status": "approved", "message": "Itinerary approved. Exiting refinement loop."}


# --- Specialist 5: The Budget & Constraint Critic (Inside LoopAgent) ---
itinerary_critic_agent = Agent(
    name="itinerary_critic_agent",
    include_contents="none",
    description="Audits the itinerary draft against budget and negative constraints.",
    instruction="""
        Audit Current Itinerary ({final_itinerary}) against User Preferences ({user_preferences}).
        Verify that the USD total stays within the user's budget and no excluded venue types appear.
        If all checks pass, respond EXACTLY with the single word "APPROVED".
        Otherwise, output 1-2 concise revision instructions explaining what to swap or adjust.
    """,
    output_key="critique_feedback",
)

# --- Specialist 6: The Itinerary Refiner / Exiter (Inside LoopAgent) ---
itinerary_refiner_agent = Agent(
    name="itinerary_refiner_agent",
    include_contents="none",
    description="Refines the itinerary from critique feedback, or calls exit_loop when APPROVED.",
    instruction="""
        Review Auditor Critique ({critique_feedback}) for Current Itinerary ({final_itinerary}).
        If the critique is EXACTLY "APPROVED", call `exit_loop` immediately and return the itinerary unchanged.
        Otherwise, revise the draft using {activity_recommendations} and {restaurant_recommendations}
        so all USD budget and exclusion rules pass, and output ONLY the updated Markdown itinerary.
    """,
    tools=[exit_loop],
    output_key="final_itinerary",
)
LoopAgent を workflows.py に追加
travel_planner/workflows.py を開きます。
cloudshell edit ~/adk-agents/travel_planner/workflows.py
travel_planner/workflows.py を更新して、itinerary_critic_agent と itinerary_refiner_agent を LoopAgent(max_iterations=3)でラップし、master_travel_agent の 4 番目のステージとして追加します。
from google.adk.agents import LoopAgent, ParallelAgent, SequentialAgent
from .specialists import (
    activity_finder_agent,
    itinerary_critic_agent,
    itinerary_refiner_agent,
    itinerary_synthesizer_agent,
    restaurant_finder_agent,
    user_profiler_agent,
)

# Stage 2: Parallel research branch
parallel_research_agent = ParallelAgent(
    name="parallel_research_agent",
    description="Runs activity and restaurant research concurrently.",
    sub_agents=[
        activity_finder_agent,
        restaurant_finder_agent,
    ],
)

# Stage 4: Iterative Maker-Checker refinement loop
refinement_loop_agent = LoopAgent(
    name="refinement_loop_agent",
    description="Iteratively audits and refines the itinerary until constraints and budget are approved.",
    sub_agents=[
        itinerary_critic_agent,
        itinerary_refiner_agent,
    ],
    max_iterations=3,
)

# Master pipeline: Profile -> Parallel Research -> Synthesize -> Refinement Loop
master_travel_agent = SequentialAgent(
    name="master_travel_agent",
    description="Orchestrates the end-to-end travel planning process for trip and itinerary requests.",
    sub_agents=[
        user_profiler_agent,          # Stage 1: Extract constraints
        parallel_research_agent,      # Stage 2: Research activities & restaurants in parallel
        itinerary_synthesizer_agent,  # Stage 3: Draft initial itinerary
        refinement_loop_agent,        # Stage 4: Audit and refine until approved
    ],
)
🔍 実施したタスクを確認する
adk web を起動して、マルチエージェント ワークフロー全体をテストします。
cd ~/adk-agents
adk web --allow_origins "*"
ポート 8000 でウェブ プレビュー UI を開き、[新しいセッション] を開始して、次の京都の複数制約プロンプトでシステム全体をテストします。
Design a full-day itinerary for Kyoto with a total budget of $100. My main interests are historical landmarks, temples, and authentic local cuisine. Please do not include any modern art museums or galleries.
[Events] ビューとターミナルログに、次のような実行シーケンスが表示されます。
1. user_profiler_agent -> writes JSON with destination="Kyoto", budget="$100", exclusions=["modern art museums", "galleries"]
2. parallel_research_agent -> runs activity_finder_agent and restaurant_finder_agent in parallel
3. itinerary_synthesizer_agent -> produces initial draft in state['final_itinerary']
4. refinement_loop_agent:
   - itinerary_critic_agent -> audits USD budget and exclusions -> outputs "APPROVED" (or revision notes)
   - itinerary_refiner_agent -> triggers [Tool Call] exit_loop triggered by itinerary_refiner_agent and outputs the approved itinerary
- イベントビュー:
itinerary_critic_agentまたはitinerary_refiner_agentのイベントチップをクリックすると、左側の [情報] タブでペイロードを検査できます。itinerary_refiner_agentがexit_loopを呼び出すときに、イベントを調べてactions.escalate: trueを確認します。これは、max_iterations=3に到達する前に反復処理を停止するようにLoopAgentに指示するシグナルです。 - [State] タブ: [State] タブをクリックして、
state['critique_feedback']とstate['final_itinerary']がパス全体で更新される様子を確認します。最初のドラフトが$100 USDを超えた場合、critique_feedbackには、final_itineraryが低コストの代替案で更新され、critique_feedbackがパス 2 で"APPROVED"に変更される前に、パス 1 での監査者の修正指示が保持されます。
テストが完了したら、ターミナルで Ctrl + C を押して adk web を停止します。
9. クリーンアップ
ローカル プロジェクト ファイルを削除する
Cloud Shell のホームフォルダから adk-agents プロジェクト ディレクトリと仮想環境を削除するには、次のコマンドを実行します。
cd ~
rm -rf ~/adk-agents
Agent Platform API を無効にする
プロジェクトで Agent Platform API を有効にする必要がなくなった場合は、gcloud を使用して無効にします。
gcloud services disable aiplatform.googleapis.com --quiet
Google Cloud プロジェクト全体を削除する(省略可)
PROJECT_ID=$(gcloud config get-value project)
gcloud projects delete "$PROJECT_ID" --quiet
🔍 実施したタスクを確認する
~/adk-agents が削除されたことを確認します。
test ! -d ~/adk-agents && echo "Workspace ~/adk-agents removed"
次のような出力が表示されます。
Workspace ~/adk-agents removed
10. 完了
おめでとうございます!Google Agent Development Kit(ADK)を使用して、6 つの専門エージェントのチームを順次、並列、反復ループのワークフローで調整する階層型マルチエージェント システムを構築しました。
達成した内容
- 共有セッション状態(
output_keyと{state_variable}テンプレート インジェクション)による構造化されたエージェント間通信 SequentialAgentを使用して、決定論的なステップバイステップのパイプラインを構築しました。ParallelAgentを使用して、独立した Google 検索リサーチ エージェントを同時に実行LoopAgentとtool_context.actions.escalate = Trueを使用して、自動化されたメーカーチェッカー検証ループを実装しました。
次のステップ
- このシリーズのパート 4「ADK を使用して AI エージェントを構築する: グラフ ワークフローのオーケストレーション」に進み、ADK 2 の統合された
Workflow、JoinNode、決定論的なEvent(route=...)サイクルを使用して、この旅行プランナーを再構築します。 - 公式の ADK ワークフロー エージェントのドキュメントを読む
- ADK のマルチエージェント システムについて確認する
- GEAR(Gemini Enterprise Agent Ready)プログラムと Get Certified プログラムに参加して、ハンズオン ワークショップと学習プログラムを利用する