

1. ภาพรวม
การตอบสนองคำขอการเดินทางที่มีข้อจำกัดหลายอย่าง (เช่น การวางแผนทริป 1 วันในเกียวโตด้วยงบ 100 ดอลลาร์ โดยมีวัดเก่าแก่ ราเมนท้องถิ่น และไม่มีพิพิธภัณฑ์ศิลปะสมัยใหม่) ต้องอาศัยการดึงข้อมูลความชอบที่มีโครงสร้าง การค้นคว้าสถานที่ต่างๆ ไปพร้อมกัน การสังเคราะห์ร่างรายการ และการตรวจสอบค่าใช้จ่ายทั้งหมดก่อนที่จะตอบกลับ ใน ADK 1.x การจัดระเบียบขั้นตอนเหล่านั้นต้องใช้ Wrapper SequentialAgent, ParallelAgent และ LoopAgent ที่ซ้อนกัน โดยบันทึกเอาต์พุตระดับกลางทุกรายการลงในสถานะเซสชัน และเรียกใช้การเรียกใช้เครื่องมือ LLM เพิ่มเติมเพื่อออกจากลูปการปรับแต่ง
ใน Codelab นี้ คุณจะได้สร้างเครื่องมือวางแผนการเดินทางแบบหลาย Agent ในแพลตฟอร์ม Agent โดยใช้เวิร์กโฟลว์กราฟ (Workflow) ของ Agent Development Kit (ADK) 2 ใน 3 ขั้นตอนที่ต่อเนื่องกัน คุณจะได้เชื่อมต่อโหนด Agent เฉพาะทาง (ขับเคลื่อนโดย gemini-3.8-flash) ในเชนเอดจ์ตามลำดับ (node_input) กระจายเครื่องมือค้นคว้า google_search ที่ทำงานพร้อมกันซึ่งซิงค์กับ JoinNode และบังคับใช้กฎงบประมาณและการยกเว้นด้วยเราเตอร์ Python เชิงกำหนด (Event(route=...)) ที่จะข้ามการปรับแต่งเมื่อใดก็ตามที่ฉบับร่างแรกผ่านการตรวจสอบ
ข้อกำหนดเบื้องต้น
- ความสามารถขั้นพื้นฐานในการเขียนโปรแกรม Python
- ความคุ้นเคยกับแนวคิด Generative AI และพื้นฐานของ AI Agent
สิ่งที่คุณจะได้เรียนรู้
- วิธีประกาศไปป์ไลน์แบบหลาย Agent ใน ADK 2 โดยใช้ทูเพิลขอบ
Workflowรายการ - วิธีที่ ADK 2 ส่งเอาต์พุตโดยตรงตามขอบเป็น
node_inputและเชื่อมโยงคีย์สถานะเซสชันเป็นพารามิเตอร์ฟังก์ชัน - วิธีแยกสาขาการวิจัยที่เกิดขึ้นพร้อมกันและรวมผลลัพธ์เข้ากับ
JoinNode - วิธีกำหนดเส้นทางวงจรผู้สร้าง-ผู้ตรวจสอบที่มีขอบเขตอย่างแน่นอนใน Python ด้วย
Event(route=...) - วิธีตรวจสอบกราฟเวิร์กโฟลว์ที่คอมไพล์แล้ว ไทม์ไลน์การดำเนินการแบบขนาน และเดลต้าสถานะใน ADK Web UI
สิ่งที่ต้องมี
- บัญชี Google (ใช้บัญชี
@gmail.comส่วนบุคคลหากต้องการรับเครดิตสำหรับเวิร์กช็อป) - ลิงก์เครดิตเวิร์กช็อปจากผู้สอน (รวมถึงกล้องโทรศัพท์เพื่อสแกนคิวอาร์โค้ด) หรือบัญชีสำหรับการเรียกเก็บเงินใน Cloud ที่ใช้งานอยู่
- Google Chrome (แนะนำให้ใช้หน้าต่างที่ไม่ระบุตัวตนเพื่อหลีกเลี่ยงการใช้บัญชีส่วนตัวและบัญชีงานปะปนกัน)
2. รับเครดิต Google Cloud (ไม่บังคับ)
หากคุณเข้าร่วมเวิร์กช็อปที่มีลิงก์เครดิตกิจกรรม ให้อ้างสิทธิ์รับเครดิต Google Developer Program เพื่อจัดสรรบัญชีสำหรับการเรียกเก็บเงินโดยไม่ต้องใช้บัตรเครดิต
รับเครดิตเหตุการณ์
- เปิดลิงก์เครดิตเวิร์กช็อปในหน้าต่างไม่ระบุตัวตน แล้วลงชื่อเข้าใช้ด้วยบัญชี
@gmail.com - ในส่วนรับสิทธิประโยชน์ ให้คลิกรับเครดิต
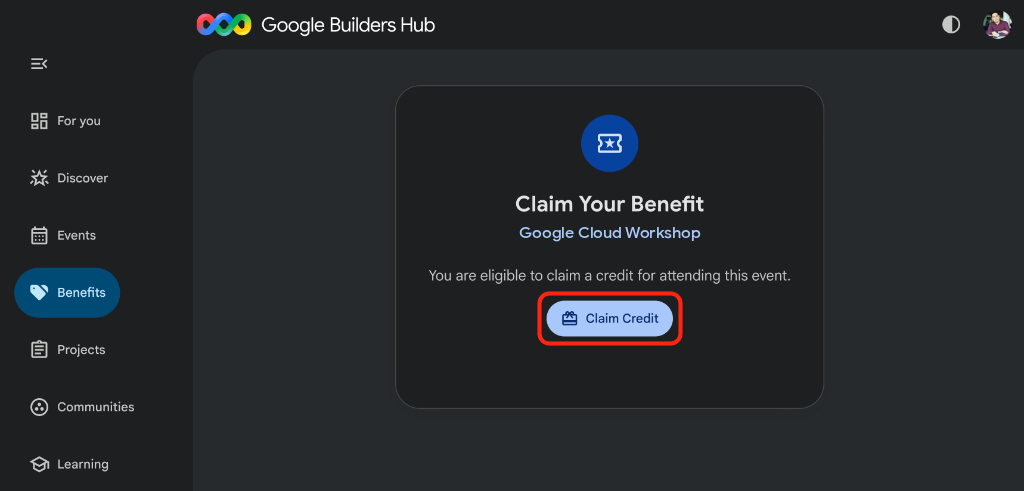
- หากได้รับข้อความแจ้งให้สร้างโปรไฟล์ Google Developer Program ให้กรอกแบบฟอร์มให้ครบถ้วน
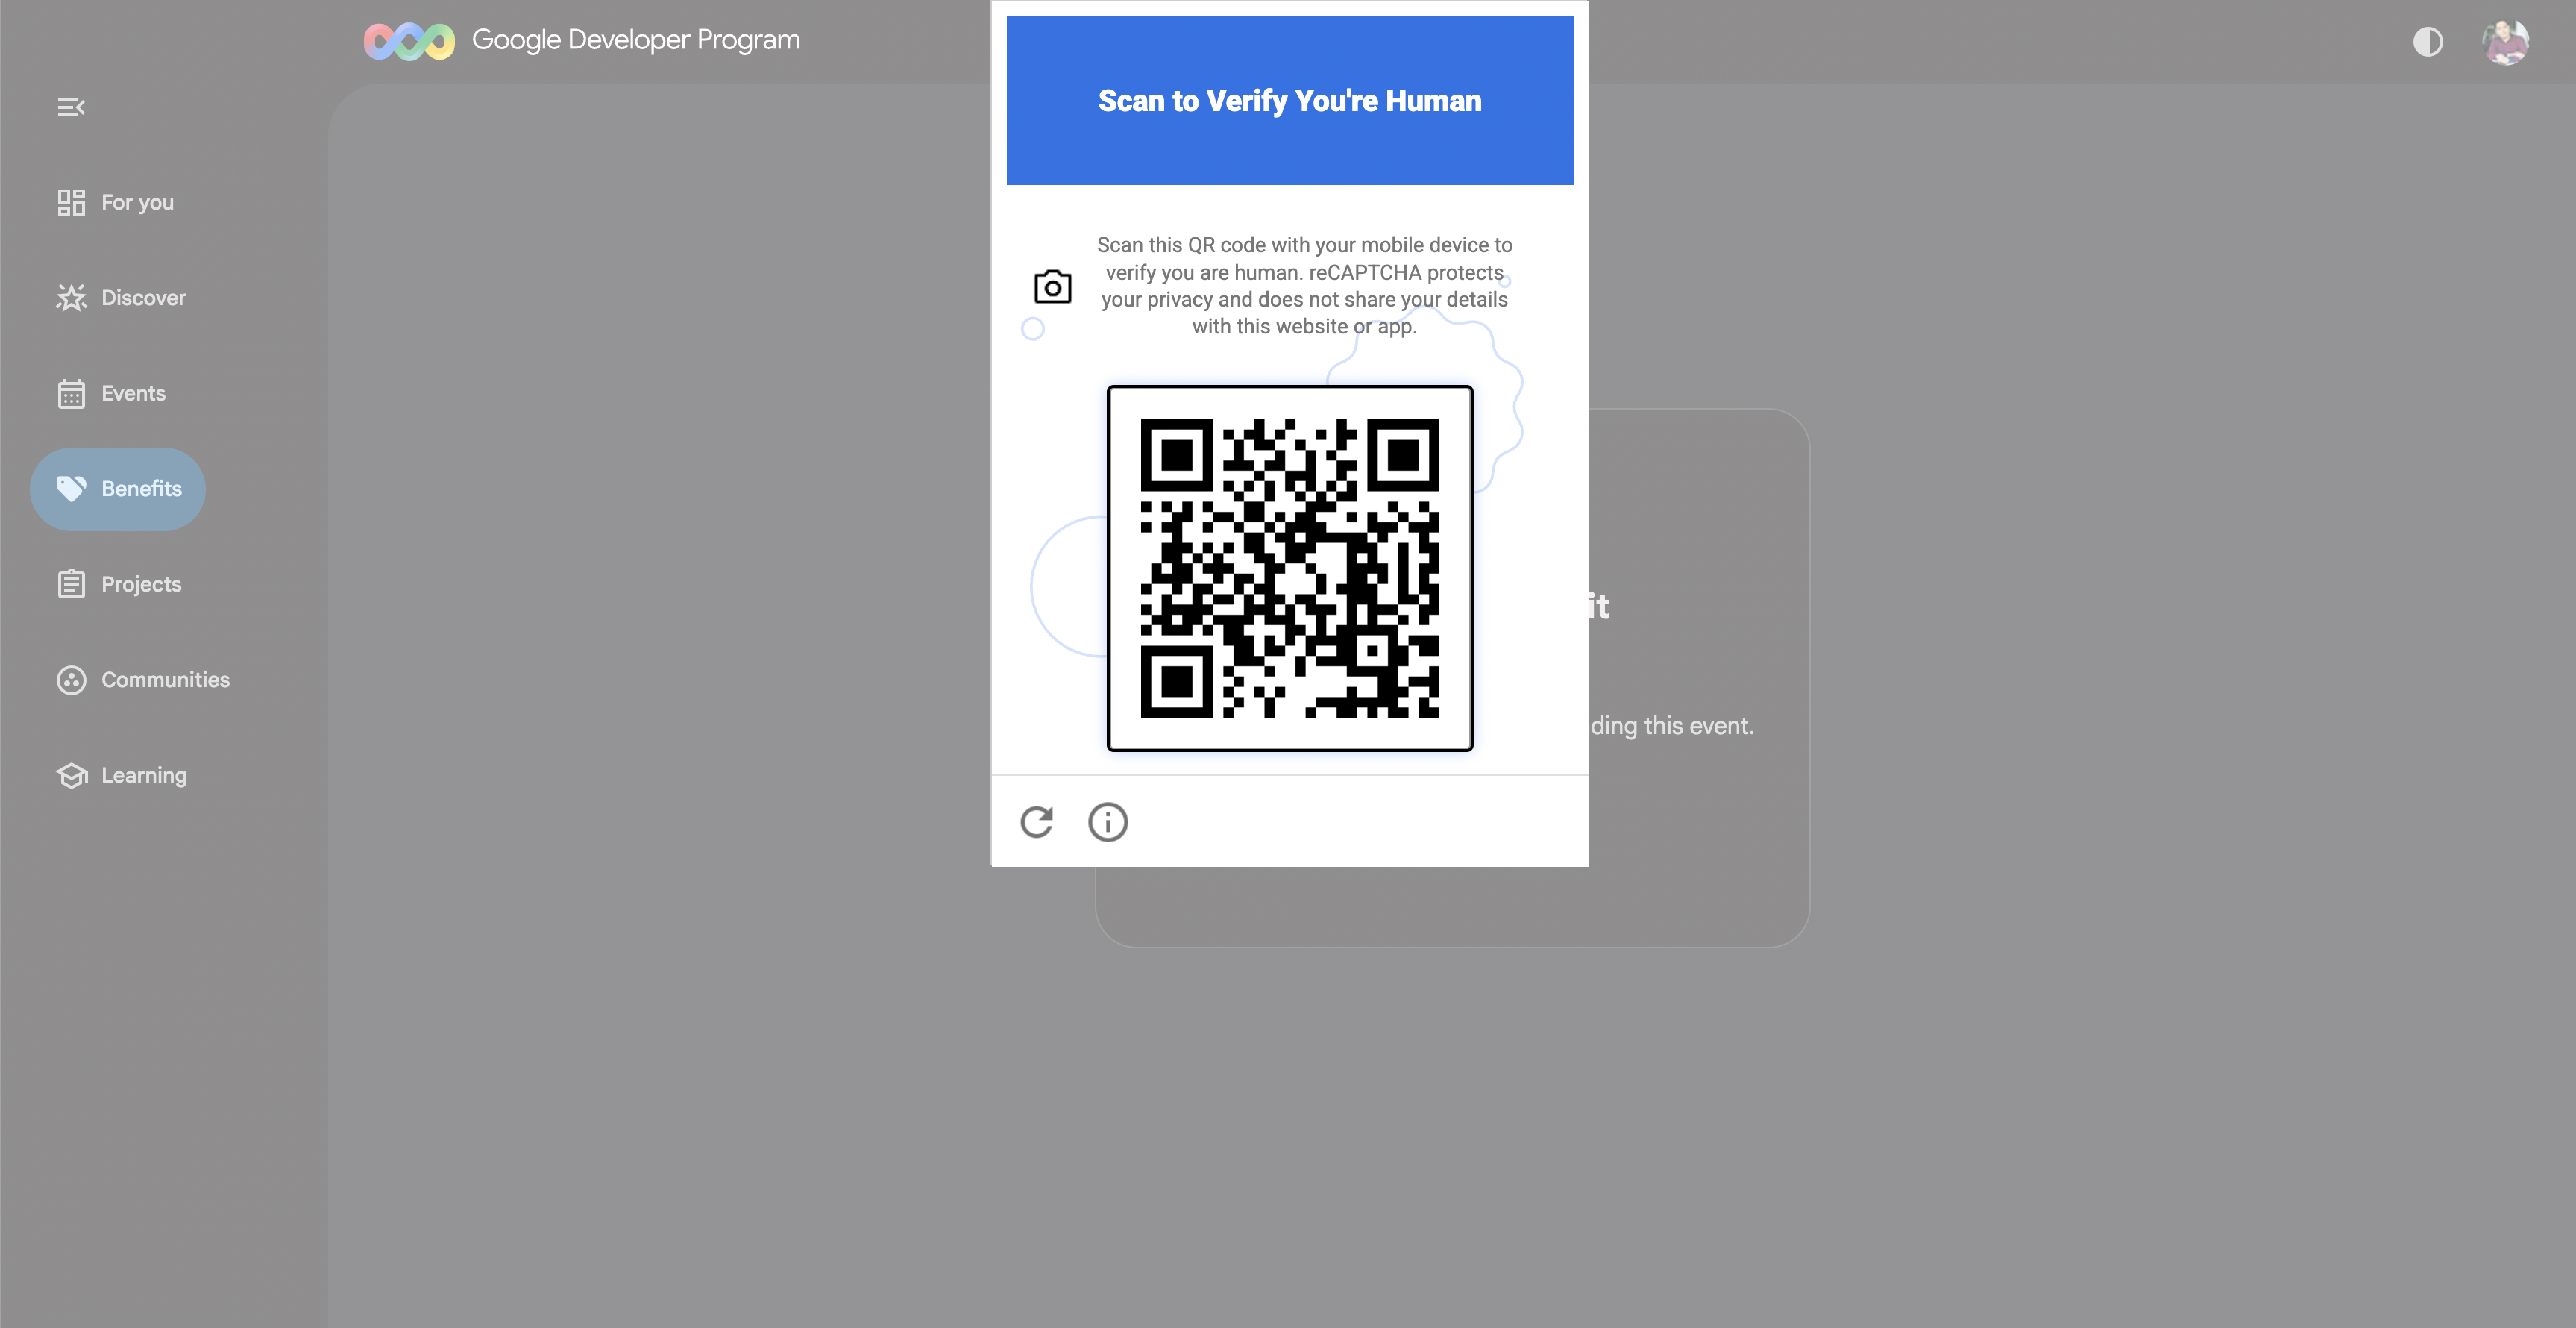
- เมื่อข้อความสแกนเพื่อยืนยันว่าคุณเป็นมนุษย์ปรากฏขึ้น ให้สแกนคิวอาร์โค้ดด้วยโทรศัพท์และทำการยืนยันให้เสร็จสมบูรณ์ (รีเฟรชและคลิกรับเครดิตอีกครั้งหากคิวอาร์โค้ดไม่ปรากฏ)
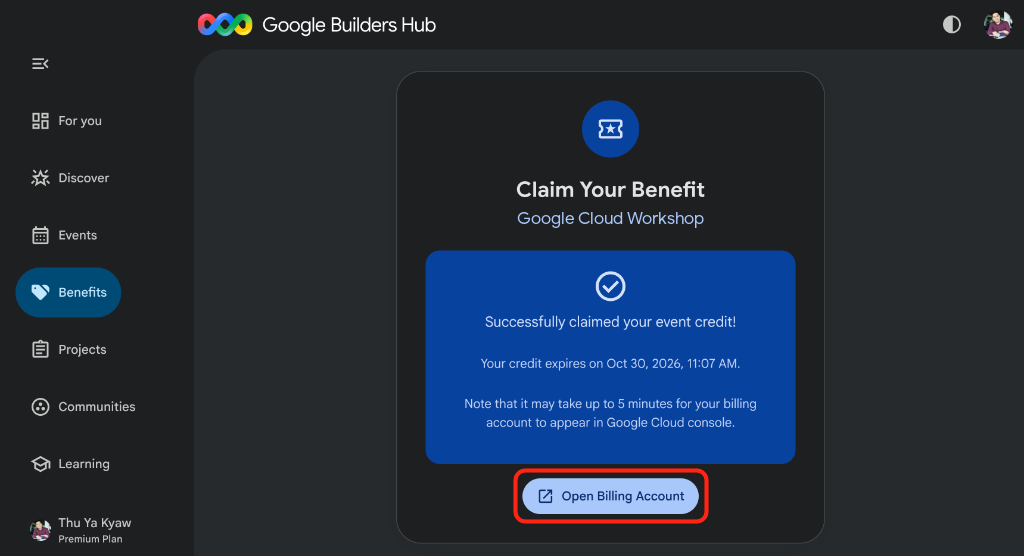
- ตรวจสอบว่าข้อความรับเครดิตกิจกรรมเรียบร้อยแล้วปรากฏขึ้น จากนั้นคลิกเปิดบัญชีสำหรับการเรียกเก็บเงิน
🔍 ตรวจสอบงานของคุณ
การสร้างบัญชีสำหรับการเรียกเก็บเงินใช้เวลาสูงสุด 3 นาที
- เปิดการเรียกเก็บเงินใน Google Cloud (หรือคัดลอก URL ลงในหน้าต่างที่ไม่ระบุตัวตน) แล้วเลือกบัญชีสำหรับการเรียกเก็บเงินของคุณ
https://console.cloud.google.com/billing
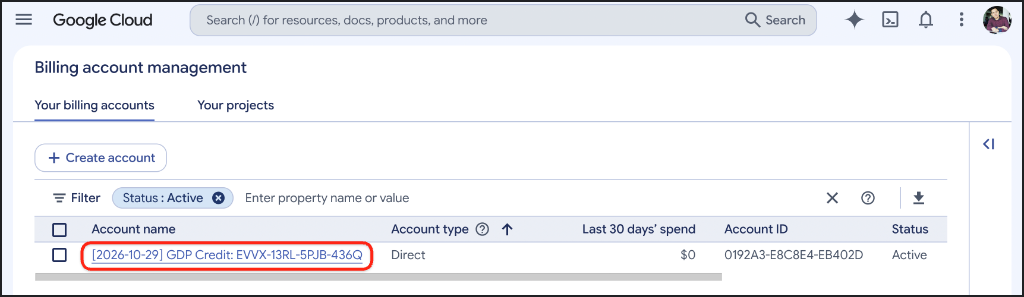
- รีเฟรชจนกว่าบัญชี
GDP Creditจะแสดงสถานะใช้งานอยู่
3. สร้างโปรเจ็กต์ Google Cloud (ไม่บังคับ)
สร้างโปรเจ็กต์ Google Cloud โดยเฉพาะเพื่อให้ทรัพยากรทั้งหมดจาก Codelab นี้แยกต่างหากและล้างข้อมูลได้ง่าย
- เปิดสร้างโปรเจ็กต์ (หรือคัดลอก URL ลงในหน้าต่างที่ไม่ระบุตัวตน) ดังนี้
https://console.cloud.google.com/projectcreate
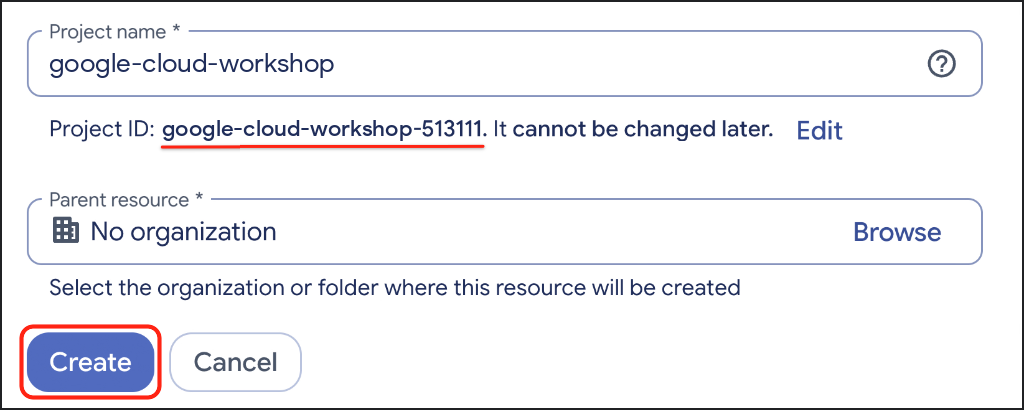
- ป้อนรายละเอียดโปรเจ็กต์ ดังนี้
- ชื่อโปรเจ็กต์: เช่น
google-cloud-workshop - บัญชีสำหรับการเรียกเก็บเงิน (หากแสดง): เลือก
GDP Credit(หรือบัญชีสำหรับการเรียกเก็บเงินที่ใช้งานอยู่) - ทรัพยากรหลัก: ไม่มีองค์กร (หรือเลือกองค์กรของคุณหากจำเป็น)
- ชื่อโปรเจ็กต์: เช่น
- จดรหัสโปรเจ็กต์ที่สร้างขึ้นใต้ชื่อโปรเจ็กต์ แล้วคลิกสร้าง
🔍 ตรวจสอบงานของคุณ
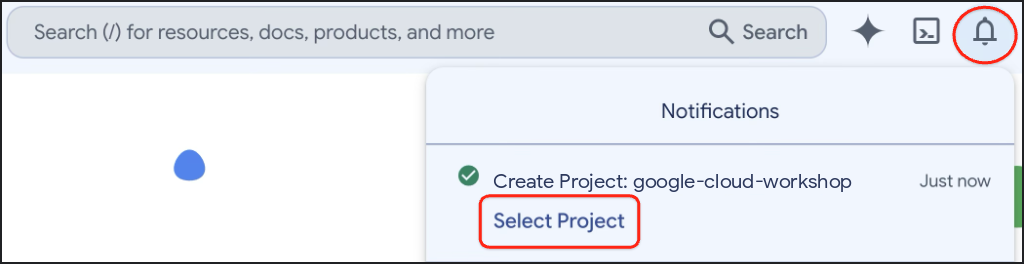
คลิกการแจ้งเตือนในแถบเครื่องมือด้านขวาบน แล้วคลิกเลือกโปรเจ็กต์เมื่อสร้างโปรเจ็กต์เสร็จแล้ว
4. ตั้งค่าสภาพแวดล้อม
กำหนดค่า Google Cloud Shell, เปิดใช้ Agent Platform API และสร้างสภาพแวดล้อมเสมือน Python 3.12 ที่แยกต่างหากด้วย uv
กำหนดค่า Cloud Shell
- คลิกเปิดใช้งาน Cloud Shell (
>_) ในแถบเครื่องมือคอนโซล Google Cloud หรือเปิด Google Cloud Shell โดยตรง (หรือคัดลอก URL ลงในหน้าต่างที่ไม่ระบุตัวตน) ดังนี้
https://shell.cloud.google.com/?show=ide,terminal

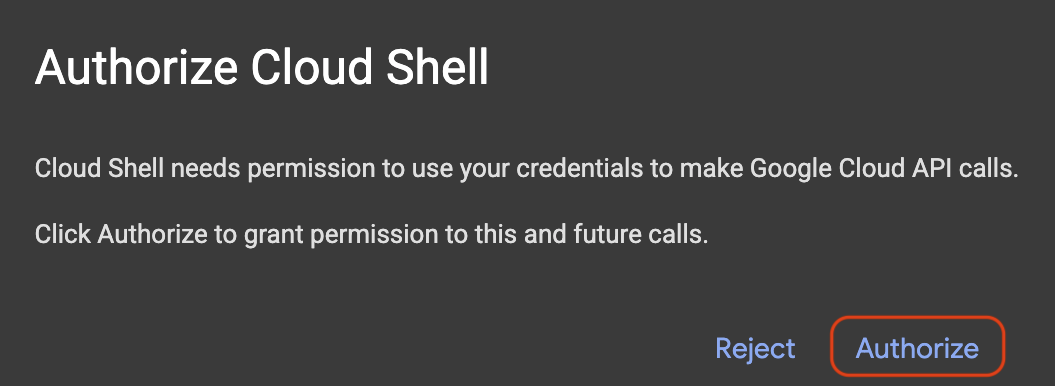
- คลิกให้สิทธิ์หากได้รับข้อความแจ้ง
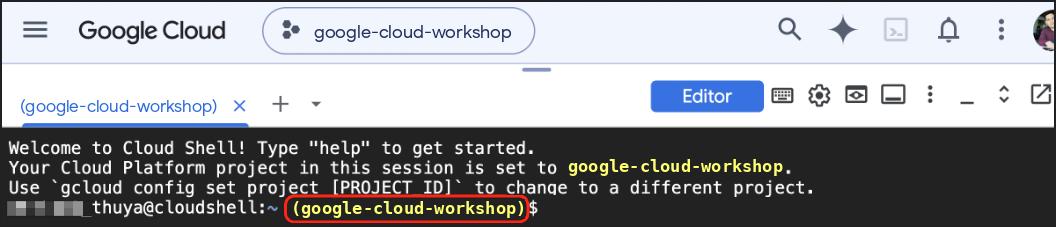
- เลือกรหัสโปรเจ็กต์ Google Cloud ที่ใช้งานอยู่จากเมนูที่มีหมายเลขกำกับในเทอร์มินัล โดยทำดังนี้
unset CLOUDSDK_CORE_PROJECT
PS3="Select your project (e.g. 1): "
select PROJECT_ID in $(gcloud projects list --format="value(projectId)"); do
  [ -n "$PROJECT_ID" ] && gcloud config set project "$PROJECT_ID" && break
done
คุณควรเห็นเอาต์พุตที่คล้ายกับ (โปรเจ็กต์ที่ไม่ได้ติดแท็กจะพิมพ์บรรทัด [environment: untagged] ที่ให้ข้อมูลด้วย) ดังนี้
1) google-cloud-workshop-4210
2) my-cloud-project-8812
Select your project (e.g. 1): 1
Updated property [core/project].
ตรวจสอบว่ารหัสโปรเจ็กต์ที่เลือกปรากฏเป็นไฮไลต์สีเหลืองในพรอมต์ Cloud Shell ดังนี้
เปิดใช้ API ที่จำเป็น
เปิดใช้ Agent Platform API เพื่อให้ Agent ของ ADK เรียกใช้โมเดล Gemini ได้ โดยทำดังนี้
gcloud services enable aiplatform.googleapis.com
คุณควรเห็นเอาต์พุตที่คล้ายกับตัวอย่างต่อไปนี้
Operation "operations/acat.p2-..." finished successfully.
สร้างสภาพแวดล้อมเสมือนของ Python และติดตั้ง ADK
สร้างพื้นที่ทำงาน ~/adk-graph-agents และเปิดใช้งานสภาพแวดล้อมเสมือน Python 3.12 โดยทำดังนี้
cd ~
mkdir -p adk-graph-agents && cd ~/adk-graph-agents

which uv >/dev/null 2>&1 || curl -LsSf https://astral.sh/uv/install.sh | sh
export PATH="$HOME/.local/bin:$PATH"

uv venv .venv --python 3.12
source .venv/bin/activate
ตรวจสอบว่าคำนำหน้า (.venv) ปรากฏที่จุดเริ่มต้นของพรอมต์เทอร์มินัล

ติดตั้ง ADK 2 ภายในสภาพแวดล้อมเสมือนที่ใช้งานอยู่โดยทำดังนี้
uv pip install --no-cache "google-adk==2.14.0"
🔍 ตรวจสอบงานของคุณ
ยืนยันเวอร์ชัน adk CLI ที่ติดตั้ง:
adk --version
คุณควรเห็นเอาต์พุตที่คล้ายกับตัวอย่างต่อไปนี้
adk, version 2.14.0
5. วางโครงสร้างเครื่องมือวางแผนการเดินทาง
สร้างแพ็กเกจ travel_planner สำหรับผู้เริ่มต้นด้วย adk create และทดสอบเกณฑ์พื้นฐานของ Agent รายเดียวเริ่มต้นใน adk web
สร้างแพ็กเกจเริ่มต้น
วิ่ง adk create จาก ~/adk-graph-agents:
cd ~/adk-graph-agents
adk create travel_planner
เลือกตัวเลือกต่อไปนี้เมื่อได้รับข้อความแจ้ง (หากได้รับข้อความแจ้ง Enable telemetry? [Y/n]: ในการเรียกใช้ครั้งแรก ให้กด Enter หรือพิมพ์ n แล้วกด Enter)
- เลือกโมเดลสำหรับ Agent ระดับรูท: พิมพ์
2เพื่อเลือกgemini-3.8-flash(ตัวเลือก1จะเลือกgemini-3.5-flash) แล้วกด Enter - เลือกแบ็กเอนด์: พิมพ์
2เพื่อเลือกแบ็กเอนด์ Agent Platform ของ Google Cloud (ตัวเลือก2ในเมนู CLI ด้านล่าง) แล้วกด Enter - ป้อนรหัสโปรเจ็กต์ Google Cloud: กด Enter เพื่อยอมรับรหัสโปรเจ็กต์ที่ตรวจพบในวงเล็บ
- ป้อนภูมิภาค Google Cloud: พิมพ์
global(เพื่อใช้ปลายทาง Gemini ทั่วโลก) แล้วกด Enter
adk create จะเขียน GOOGLE_GENAI_USE_ENTERPRISE=1, รหัสโปรเจ็กต์ และ GOOGLE_CLOUD_LOCATION=global ลงใน travel_planner/.env เพื่อให้ข้อมูลเข้าสู่ระบบยังคงอยู่เมื่อคุณแทนที่ agent.py ในภายหลัง
คุณควรเห็นเอาต์พุตที่คล้ายกับตัวอย่างต่อไปนี้
Choose a model for the root agent:
1. gemini-3.5-flash
2. gemini-3.8-flash
3. Other models (fill later)
Choose model (1, 2, 3): 2
1. Google AI
2. Vertex AI
3. Login with Google
Choose a backend (1, 2, 3): 2

You need an existing Google Cloud account and project, check out this link for details:
https://google.github.io/adk-docs/get-started/quickstart/#gemini---google-cloud-vertex-ai

Enter Google Cloud project ID [google-cloud-workshop-4210]:
Enter Google Cloud region [us-central1]: global

Agent created in /home/your_username/adk-graph-agents/travel_planner:
- .env
- .gitignore
- __init__.py
- agent.py

⚠️  WARNING: Secrets (like GOOGLE_API_KEY) are stored in .env.

Next steps:
- Chat with your agent in the terminal: adk run travel_planner
- Or in the browser: adk web .
- Have your coding agent evaluate and deploy it: uvx google-agents-cli setup
  (other install options: https://adk.dev/get-started/agents-cli/)
เปิด ~/adk-graph-agents ในตัวแก้ไขโค้ด Cloud Shell โดยทำดังนี้
which cloudshell >/dev/null 2>&1 && cloudshell workspace ~/adk-graph-agents || true
เปิดใช้งานสภาพแวดล้อมเสมือนอีกครั้งในเทอร์มินัลที่โหลดซ้ำ โดยทำดังนี้
cd ~/adk-graph-agents
source .venv/bin/activate
ทดสอบ Agent รายเดียวสำหรับผู้เริ่มต้น
เริ่ม UI บนเว็บของ ADK เพื่อดูว่า Agent เริ่มต้นที่ไม่มีการจัดการเพียงตัวเดียวตอบพรอมต์การเดินทางอย่างไร
cd ~/adk-graph-agents
adk web --allow_origins "*"
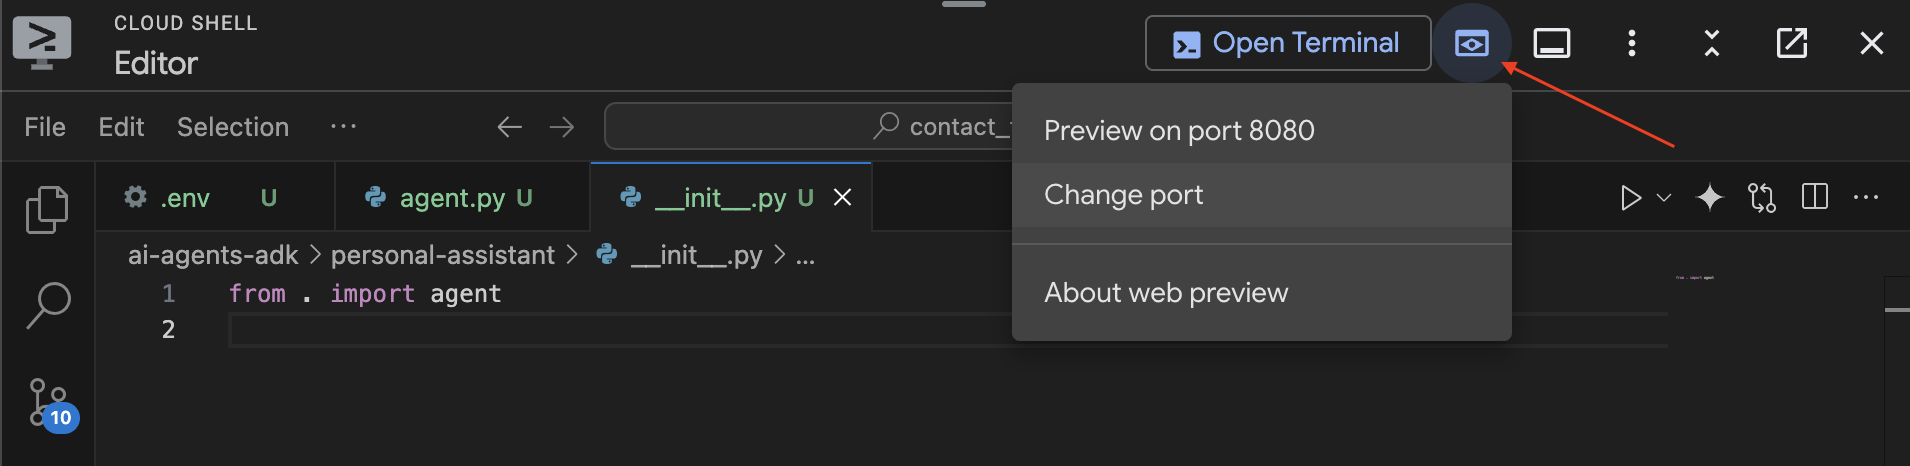
คลิกไอคอนตัวอย่างเว็บในแถบเครื่องมือ Cloud Shell ด้านขวาบน เลือกเปลี่ยนพอร์ต ป้อน 8000 แล้วคลิกเปลี่ยนและแสดงตัวอย่าง
🔍 ตรวจสอบงานของคุณ
เลือก travel_planner ในเมนูแบบเลื่อนลงด้านซ้ายบนของ adk web แล้วส่ง "Help me plan a trip to Japan":
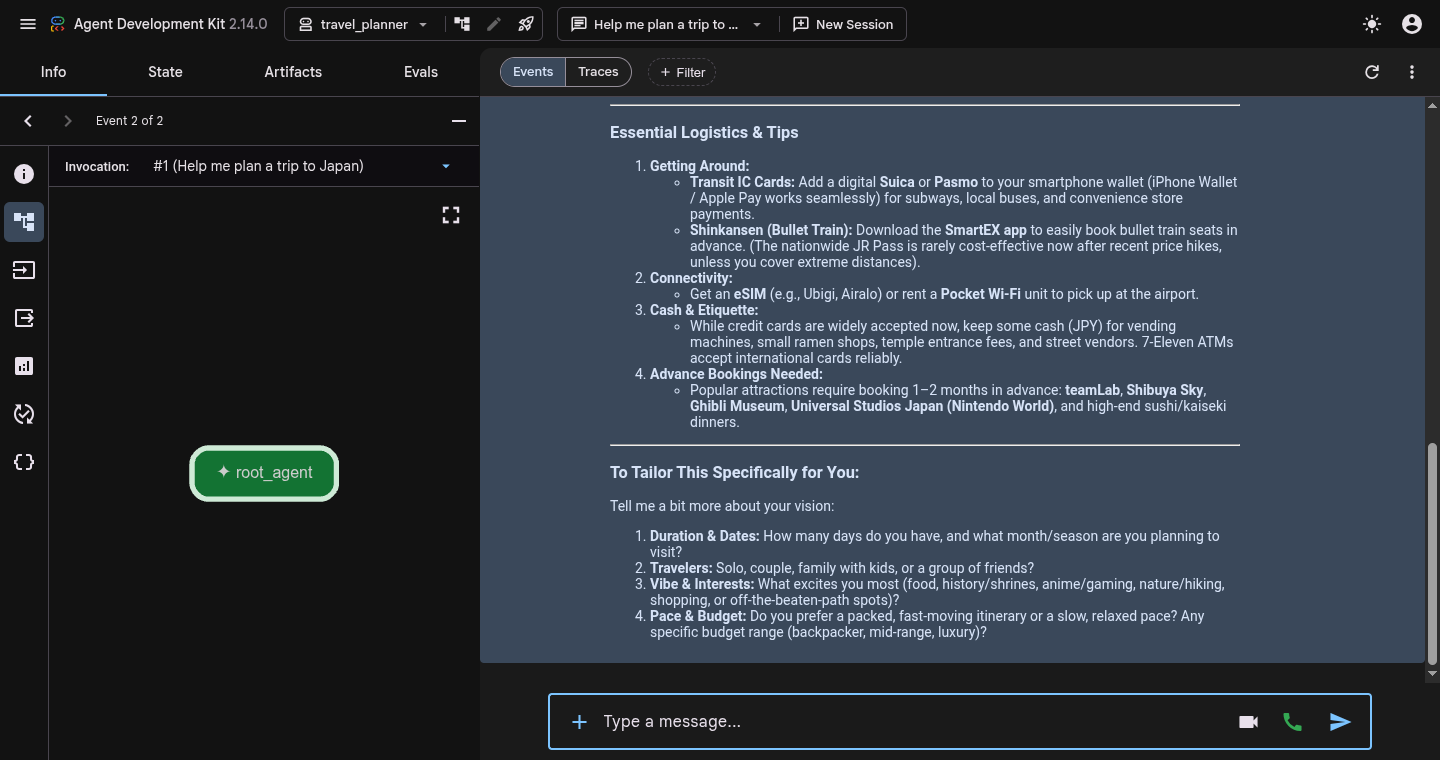
คุณควรเห็นการตอบกลับแบบสนทนาแบบครั้งเดียวในแผงแชท (โดยมีการเรียกใช้ root_agent ครั้งเดียวในเหตุการณ์) ดังนี้
root_agent -> responds in one pass without structured preference extraction, live search, or budget verification
กด Ctrl + C ในเทอร์มินัล Cloud Shell เพื่อหยุด adk web ก่อนแก้ไขไฟล์ในขั้นตอนถัดไป
6. สร้างเวิร์กโฟลว์กราฟเชิงเส้น
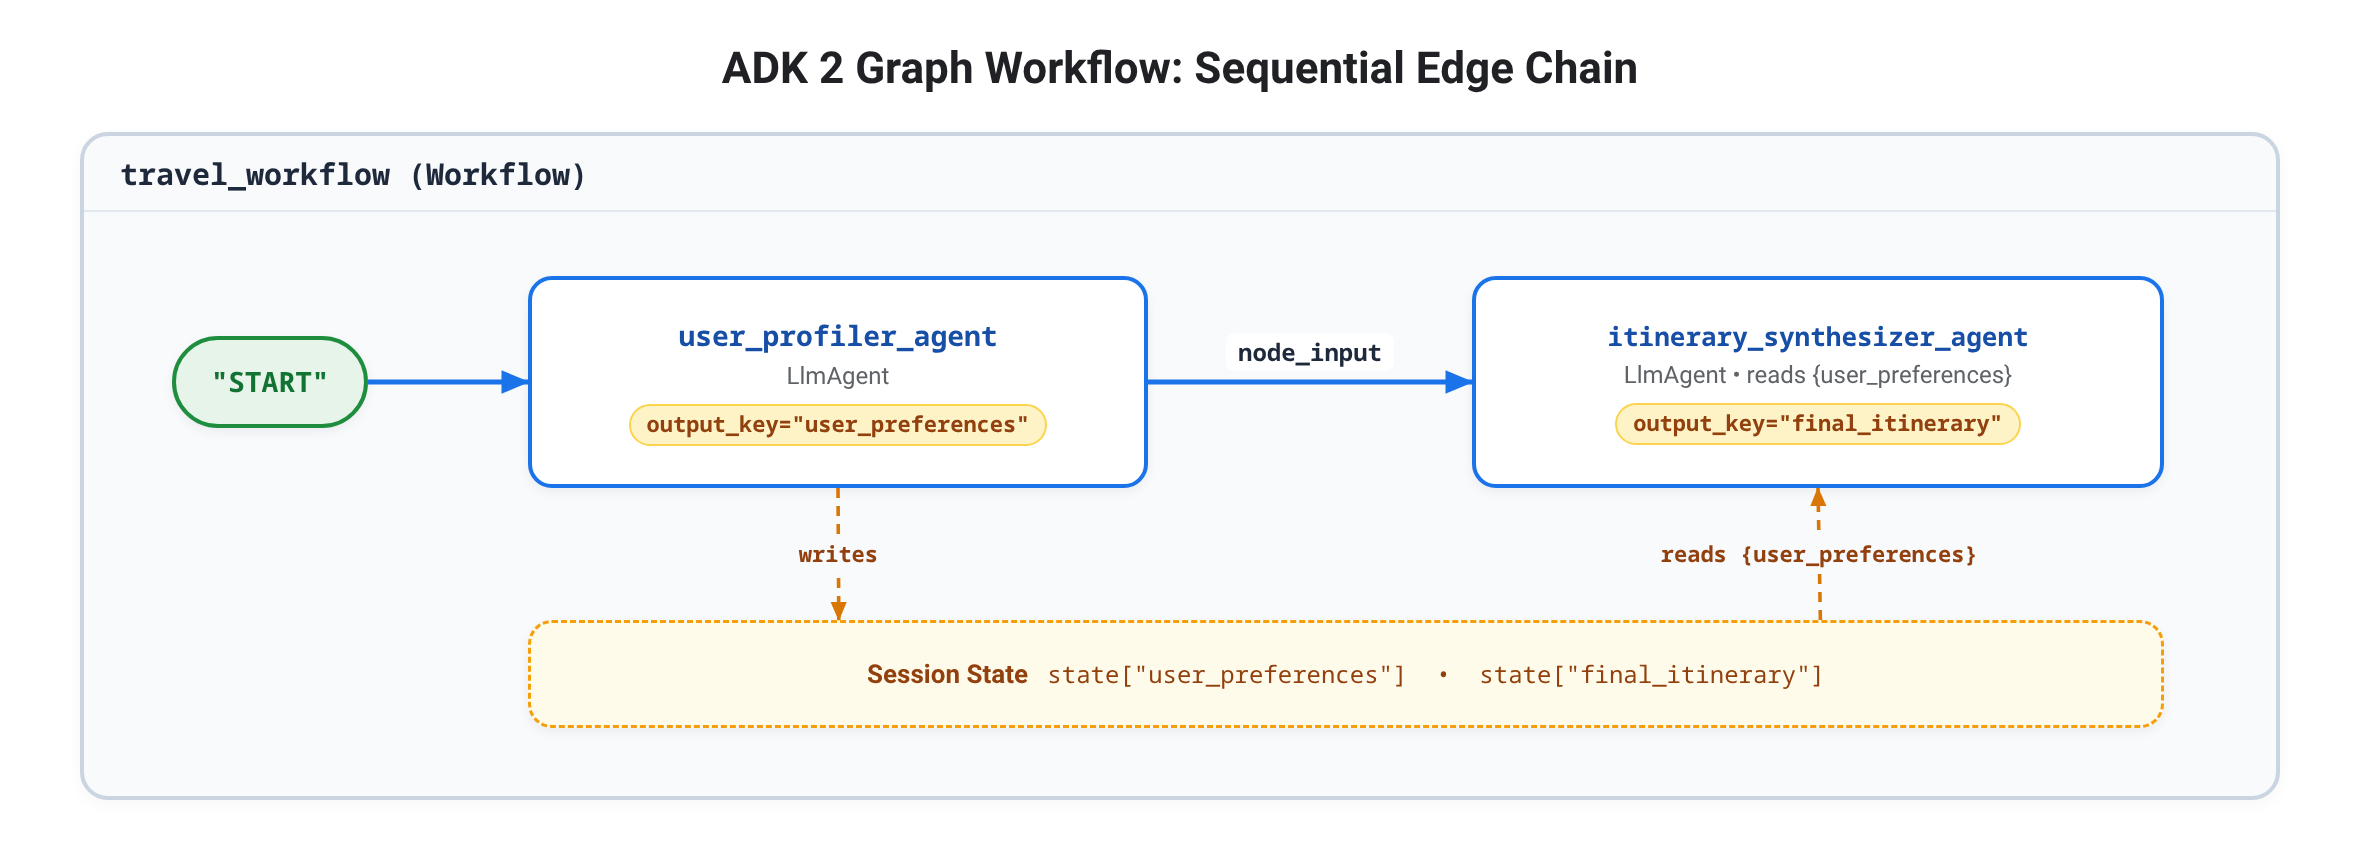
สร้าง ADK 2 Workflow รายการแรก: เชนตามลำดับที่เชื่อมต่อจุดแรกเข้า "START" ที่สงวนไว้กับ user_profiler_agent และ itinerary_synthesizer_agent (โหนดใดก็ตามที่ไม่มีขอบขาออกจะทำหน้าที่เป็นโหนดเทอร์มินัล) ทุก Edge (a, b) จะเรียกใช้โหนด Agent (ชื่อแทนของ LlmAgent) โดยอัตโนมัติในโหมด single_turn ที่แยกต่างหาก และส่งเอาต์พุตของโหนด a เป็น node_input (ข้อความขาเข้าของผู้ใช้) ไปยังโหนด b ขณะที่ {user_preferences} ในสตริงคำสั่งจะแทรกคีย์สถานะเซสชันที่ตรงกันซึ่งบันทึกไว้ผ่าน output_key
สร้างผู้เชี่ยวชาญเบื้องต้น
ตรวจสอบว่า adk web หยุดทำงานแล้ว (Ctrl + C) จากนั้นเปิดไฟล์ใหม่ชื่อ travel_planner/specialists.py:
cloudshell edit ~/adk-graph-agents/travel_planner/specialists.py
วางโค้ดต่อไปนี้ลงใน travel_planner/specialists.py เพื่อกำหนด user_profiler_agent และ itinerary_synthesizer_agent (นำเข้า google_search ล่วงหน้าสำหรับขั้นตอนถัดไป)
from google.adk import Agent
from google.adk.tools import google_search

MODEL = "gemini-3.8-flash"

# --- Specialist 1: The User Profiler ---
user_profiler_agent = Agent(
    model=MODEL,
    name="user_profiler_agent",
    description="Extracts travel preferences and constraints from user input.",
    instruction="""
        Extract destination, duration (default 1 day), budget, interests, and exclusions.
        Return a single JSON object with keys: "destination", "duration", "budget", "interests", "exclusions".
    """,
    output_key="user_preferences",  # Saved for multi-hop constraints downstream
)

# --- Specialist 2: The Synthesizer ---
itinerary_synthesizer_agent = Agent(
    model=MODEL,
    name="itinerary_synthesizer_agent",
    description="Compiles preferences and research into a final Markdown itinerary.",
    instruction="""
        You are an elite Travel Concierge. Using the incoming input and
        User Preferences ({user_preferences}), write a Markdown itinerary
        with an itemized USD and local currency cost breakdown.
    """,
    output_key="final_itinerary",
)
กำหนดเชน Edge ตามลำดับ
เปิดไฟล์ใหม่ชื่อ travel_planner/workflows.py:
cloudshell edit ~/adk-graph-agents/travel_planner/workflows.py
วางคำจำกัดความ Workflow ต่อไปนี้ (โดยที่ทูเพิลของโหนดอย่างน้อย 3 โหนดจะคอมไพล์เป็นเชนตามลำดับจาก "START")
from google.adk import Workflow
from .specialists import (
    itinerary_synthesizer_agent,
    user_profiler_agent,
)

# 1. SEQUENTIAL GRAPH: START -> user_profiler_agent -> itinerary_synthesizer_agent
travel_workflow = Workflow(
    name="travel_workflow",
    description="Orchestrates the end-to-end travel planning process as a graph workflow.",
    edges=[
        ("START", user_profiler_agent, itinerary_synthesizer_agent),
    ],
)
แสดงเวิร์กโฟลว์เป็น root_agent
เปิด travel_planner/agent.py:
cloudshell edit ~/adk-graph-agents/travel_planner/agent.py
แทนที่เนื้อหาทั้งหมดของ travel_planner/agent.py ด้วย 2 บรรทัดต่อไปนี้
from .workflows import travel_workflow

root_agent = travel_workflow
🔍 ตรวจสอบงานของคุณ
เริ่ม adk web จาก ~/adk-graph-agents:
cd ~/adk-graph-agents
adk web --allow_origins "*"
เปิดตัวอย่างเว็บในพอร์ต 8000 คลิก + เซสชันใหม่ แล้วส่งคำสั่งต่อไปนี้
Help me plan a trip to Kyoto
ในมุมมองเหตุการณ์ คุณควรเห็นลําดับเหตุการณ์ที่คล้ายกับต่อไปนี้
1. user_profiler_agent -> outputs JSON {"destination": "Kyoto", "duration": "1 day", ...} and writes state["user_preferences"]
2. itinerary_synthesizer_agent -> receives preferences via node_input and outputs the Markdown itinerary
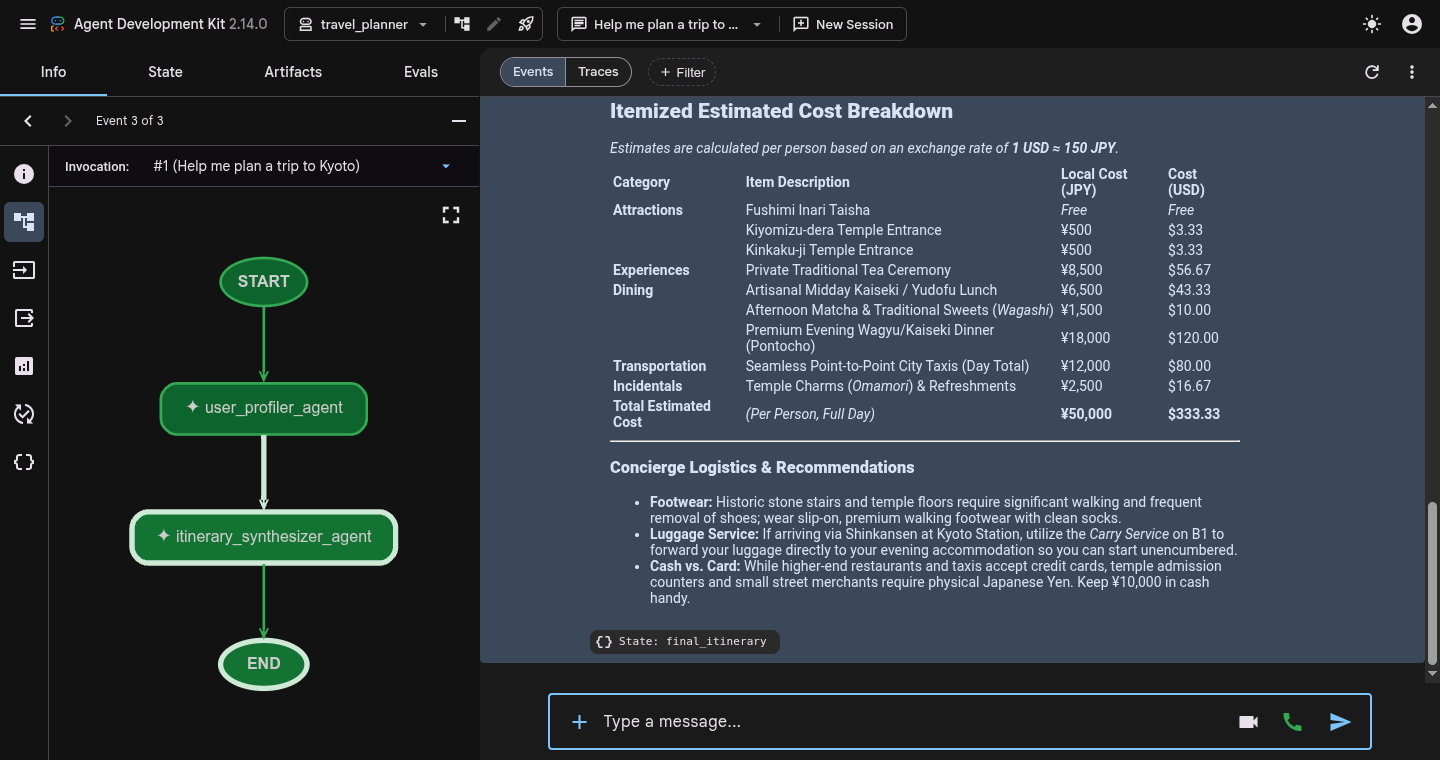
คลิกเหตุการณ์ใดก็ได้ในเหตุการณ์ แล้วคลิกไอคอนกราฟ (account_tree ในแถบเครื่องมือรายละเอียดเหตุการณ์) เพื่อตรวจสอบโทโพโลยี START -> user_profiler_agent -> itinerary_synthesizer_agent ที่คอมไพล์แล้ว จากนั้นตรวจสอบแท็บสถานะเพื่อยืนยันว่ามีการป้อนข้อมูล user_preferences และ final_itinerary
กด Ctrl + C ในเทอร์มินัลเพื่อหยุด adk web ก่อนดำเนินการต่อ
7. กระจายและรวมด้วย JoinNode
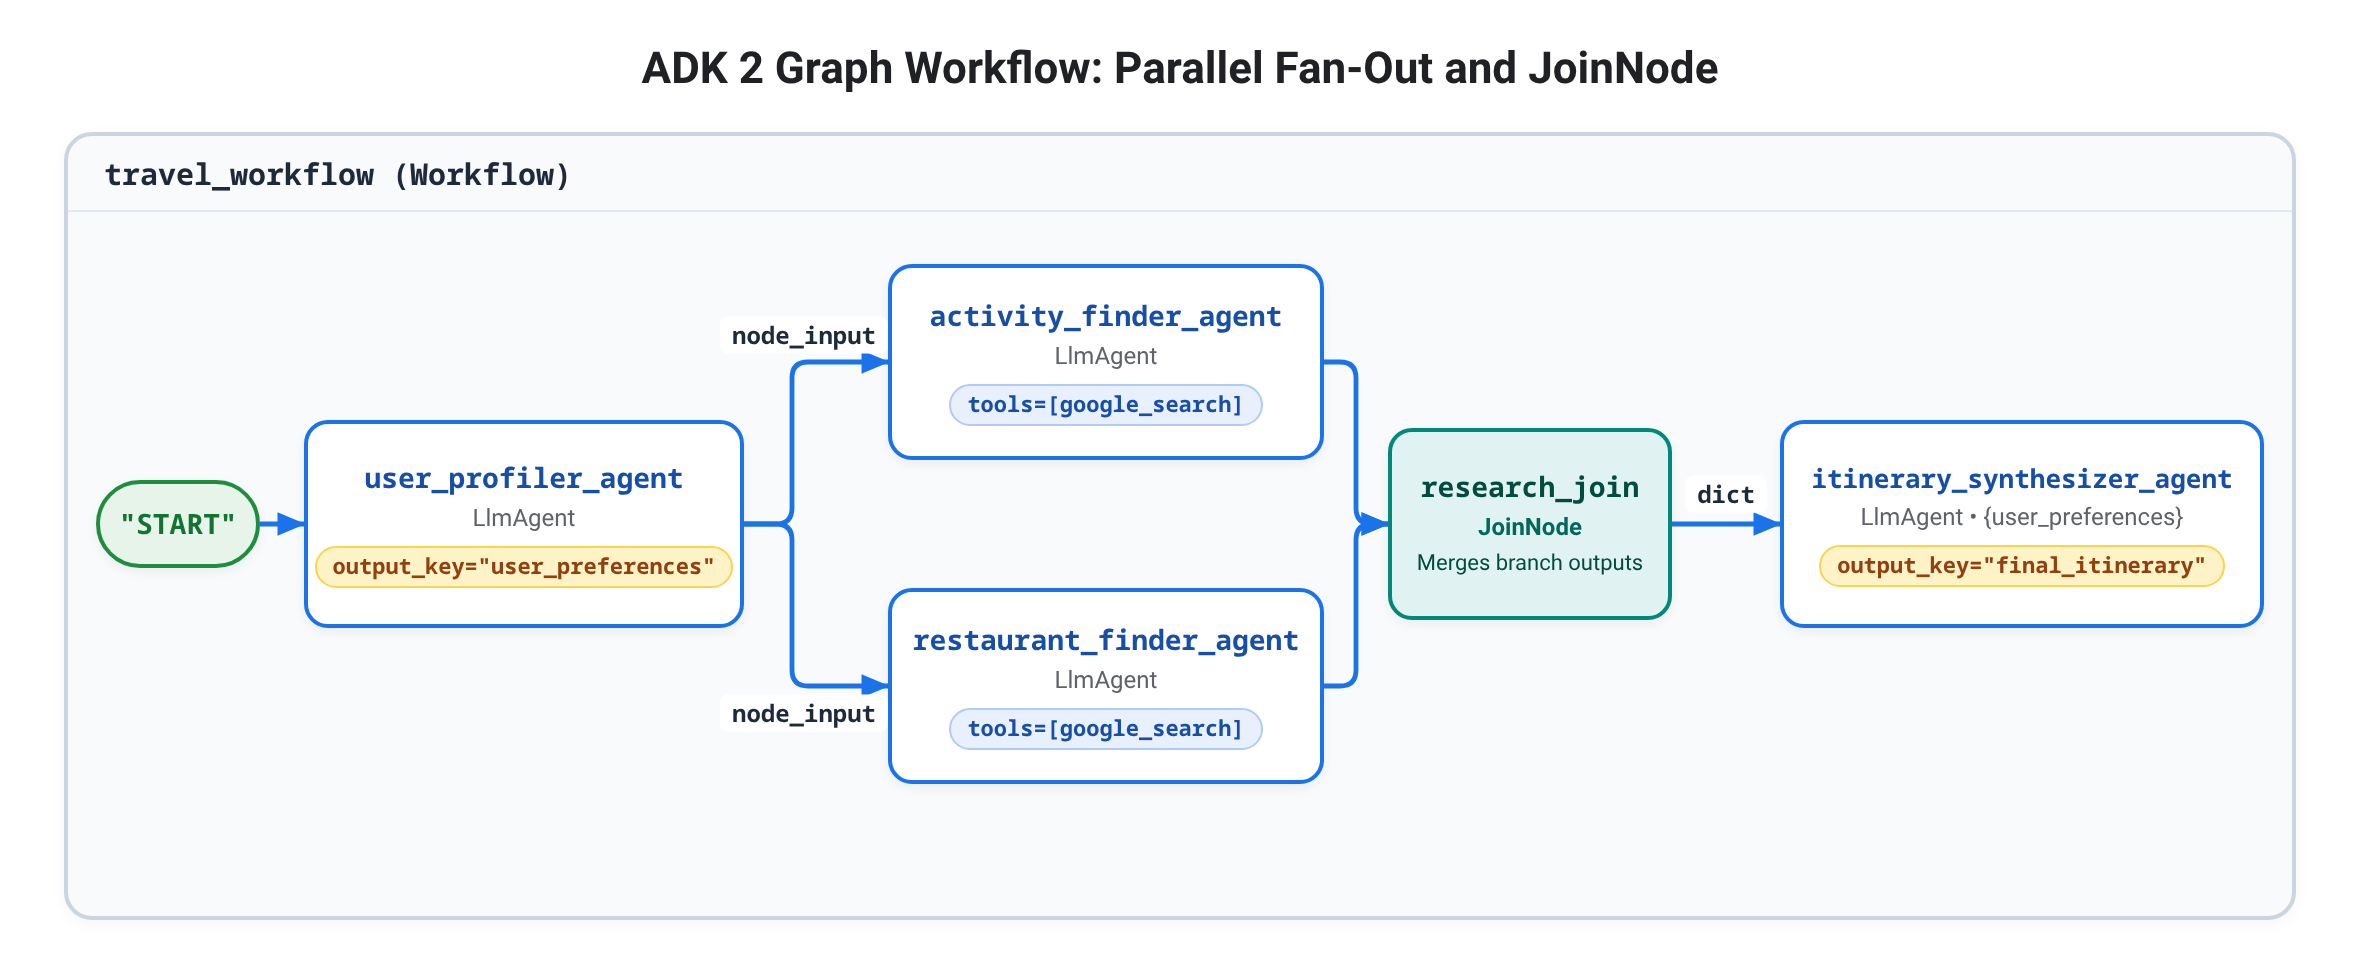
สร้างแผนการเดินทางโดยอิงตามข้อมูลเว็บแบบเรียลไทม์ด้วยการเพิ่มผู้เชี่ยวชาญ google_search 2 คน (activity_finder_agent และ restaurant_finder_agent) ที่ทำงานพร้อมกันและซิงค์ข้อมูลกับ JoinNode ดังนี้
- Fan-out tuple: การวาง
(activity_finder_agent, restaurant_finder_agent)ไว้ใน Edge tuple จะส่งเอาต์พุตของuser_profiler_agentเป็นnode_inputไปยังนักวิจัยทั้ง 2 คนพร้อมกัน - Fan-in barrier (
JoinNode): การวางJoinNode(name="research_join")ไว้หลัง Tuple จะรอจนกว่าสาขาขาเข้าทุกสาขาจะเสร็จสมบูรณ์และส่งdict({"activity_finder_agent": ..., "restaurant_finder_agent": ...}) ที่ผสานแล้ว 1 รายการเป็นnode_inputไปยังitinerary_synthesizer_agentแทนที่จะทริกเกอร์การสังเคราะห์ 2 ครั้ง
เพิ่มผู้เชี่ยวชาญด้านการวิจัย
ตรวจสอบว่า adk web หยุดทำงานแล้ว (Ctrl + C) จากนั้นเปิด travel_planner/specialists.py โดยทำดังนี้
cloudshell edit ~/adk-graph-agents/travel_planner/specialists.py
เพิ่ม activity_finder_agent และ restaurant_finder_agent ต่อท้ายด้านล่างของ travel_planner/specialists.py (ทั้ง 2 รายการไม่จำเป็นต้องมี output_key เนื่องจาก research_join จะส่งต่อเอาต์พุตทั้ง 2 รายการโดยตรงผ่าน node_input) ดังนี้
# --- Specialist 3: The Activity Finder ---
activity_finder_agent = Agent(
    model=MODEL,
    name="activity_finder_agent",
    description="Finds 3 attractions matching the user's destination and interests.",
    instruction="""
        Using the travel preferences in the input, call google_search to find 3 specific attractions
        (including budget-friendly options).
        Return a JSON list with keys: "attraction_name", "estimated_cost_local", "estimated_cost_usd", "notes".
    """,
    tools=[google_search],
)

# --- Specialist 4: The Restaurant Finder ---
restaurant_finder_agent = Agent(
    model=MODEL,
    name="restaurant_finder_agent",
    description="Finds 3 restaurants matching the destination and budget.",
    instruction="""
        Using the travel preferences in the input, call google_search to find 3 highly-rated restaurants
        across price points.
        Return a JSON list with keys: "restaurant_name", "cuisine", "estimated_cost_local", "estimated_cost_usd".
    """,
    tools=[google_search],
)
เพิ่ม Fan-out และ JoinNode ลงใน workflows.py
เปิด travel_planner/workflows.py:
cloudshell edit ~/adk-graph-agents/travel_planner/workflows.py
แทนที่เนื้อหาทั้งหมดของ travel_planner/workflows.py ด้วย Fan-out และกราฟ JoinNode ดังนี้
from google.adk import Workflow
from google.adk.workflow import JoinNode
from .specialists import (
    activity_finder_agent,
    itinerary_synthesizer_agent,
    restaurant_finder_agent,
    user_profiler_agent,
)

research_join = JoinNode(name="research_join")

# 2. FAN-OUT / FAN-IN GRAPH: Profile -> (Activities || Restaurants) -> Join -> Synthesize
travel_workflow = Workflow(
    name="travel_workflow",
    description="Orchestrates the end-to-end travel planning process as a graph workflow.",
    edges=[
        (
            "START",
            user_profiler_agent,
            (activity_finder_agent, restaurant_finder_agent),
            research_join,
            itinerary_synthesizer_agent,
        ),
    ],
)
🔍 ตรวจสอบงานของคุณ
เริ่ม adk web เพื่อทดสอบการค้นหาพร้อมกันและการซิงค์ JoinNode โดยทำดังนี้
cd ~/adk-graph-agents
adk web --allow_origins "*"
เปิดตัวอย่างเว็บในพอร์ต 8000 คลิก + เซสชันใหม่ แล้วส่งคำสั่งต่อไปนี้
Help me plan a trip to Kyoto focused on historic temples and ramen
ในมุมมองเหตุการณ์ คุณควรเห็นลําดับเหตุการณ์ที่คล้ายกับต่อไปนี้
1. user_profiler_agent -> emits JSON preferences via node_input
2. activity_finder_agent & restaurant_finder_agent -> invoke google_search concurrently
3. research_join -> merges both researcher outputs into one dict node_input
4. itinerary_synthesizer_agent -> drafts final_itinerary from the merged dict + {user_preferences}
กด Ctrl + C ในเทอร์มินัลเพื่อหยุด adk web ก่อนดำเนินการต่อ
8. วงจรการแก้ไขเส้นทาง
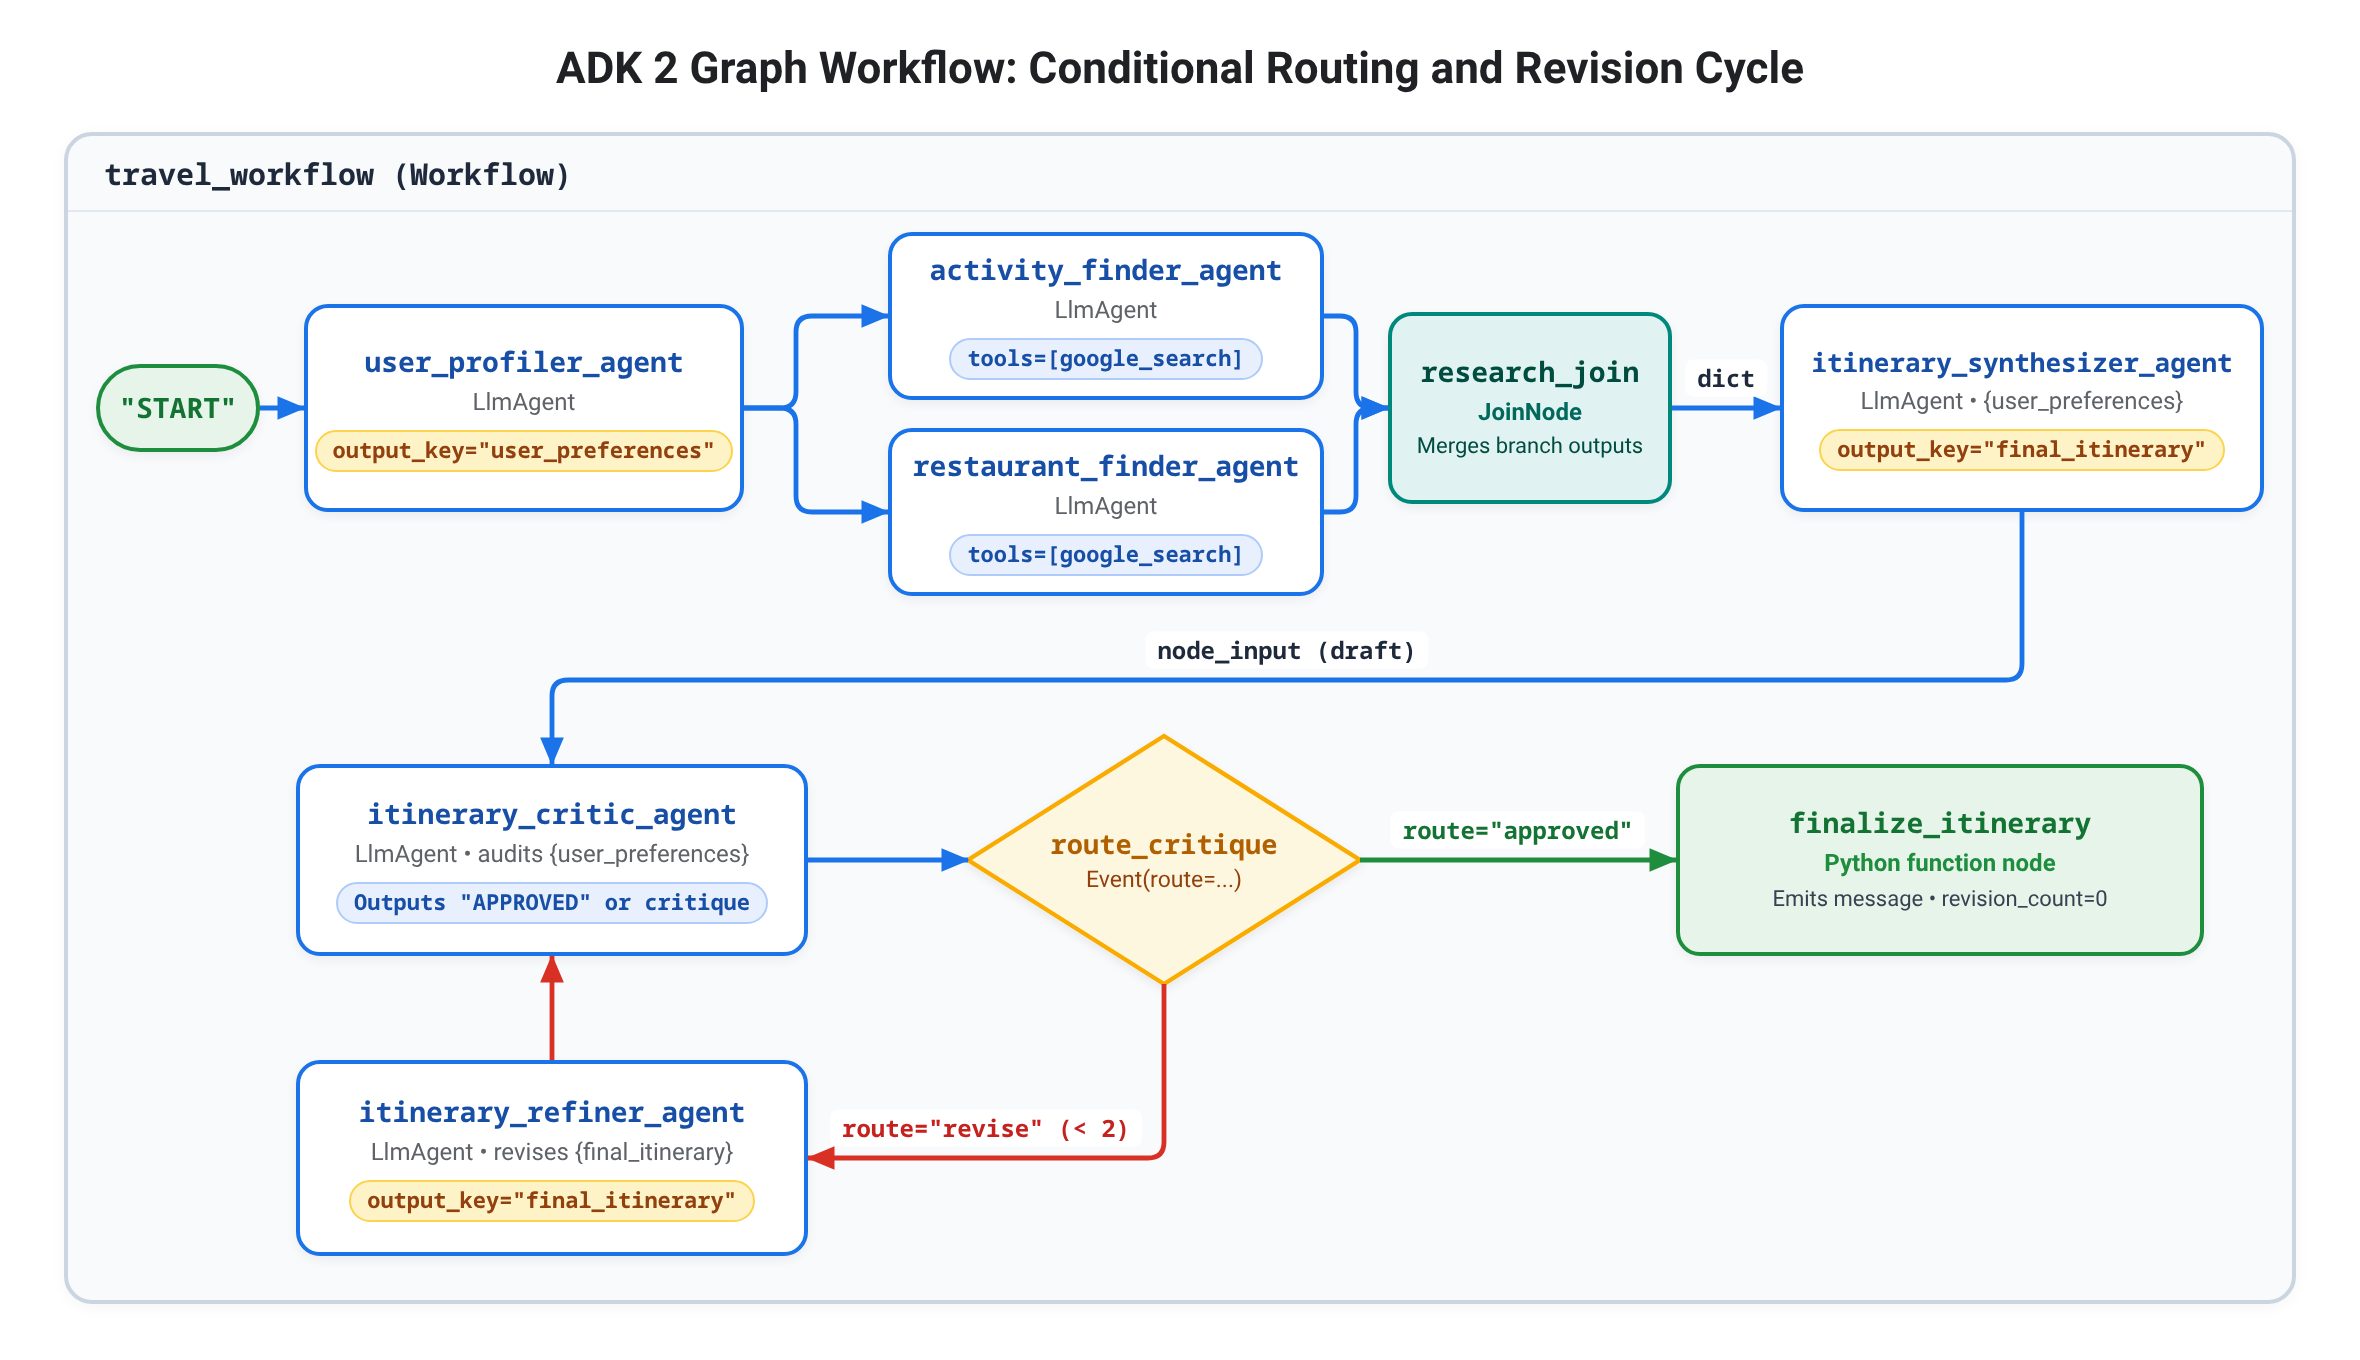
บังคับใช้งบประมาณและข้อจำกัดเชิงลบโดยเพิ่ม itinerary_critic_agent, itinerary_refiner_agent และโหนดฟังก์ชัน Python เชิงกำหนด 2 โหนด (route_critique และ finalize_itinerary) ที่แสดงผลออบเจ็กต์ ADK Event ดังนี้
route: เลือกคีย์ Branch ที่ตั้งชื่อแล้วใน Edge ของ Dict ({"revise": ..., "approved": ...}) ที่จะเรียกใช้ถัดไปoutput: ส่งค่า Python หรือสตริงที่พิมพ์ตามขอบเป็นnode_inputไปยังโหนดถัดไปโดยไม่ต้องแสดงผลข้อความแชทmessageและstate:messageจะแสดงข้อความที่ผู้ใช้มองเห็นได้ในบันทึกการถอดเสียงแชท ขณะที่stateจะคอมมิตการอัปเดตคีย์-ค่า (stateDelta) ไปยังสถานะเซสชัน
เพิ่มผู้เชี่ยวชาญด้านการวิจารณ์และการปรับแต่ง
ตรวจสอบว่า adk web หยุดทำงานแล้ว (Ctrl + C) จากนั้นเปิด travel_planner/specialists.py โดยทำดังนี้
cloudshell edit ~/adk-graph-agents/travel_planner/specialists.py
เพิ่ม itinerary_critic_agent และ itinerary_refiner_agent ไว้ที่ด้านล่างของ travel_planner/specialists.py (เครื่องกลั่นไม่จำเป็นต้องใช้เครื่องมือ google_search หรือ exit_loop เนื่องจากจะสลับไอเทมที่รวบรวมไว้แล้วใน {final_itinerary} และจะทำงานเมื่อ route_critique เลือก "revise" เท่านั้น)
# --- Specialist 5: The Budget & Constraint Critic ---
itinerary_critic_agent = Agent(
    model=MODEL,
    name="itinerary_critic_agent",
    description="Audits the itinerary draft against budget and negative constraints.",
    instruction="""
        Audit the itinerary in the input against User Preferences ({user_preferences}).
        Verify that the USD total stays within the user's budget and no excluded venue types appear.
        If all checks pass, respond EXACTLY with the single word "APPROVED".
        Otherwise, output 1-2 concise revision instructions explaining what to swap or adjust.
    """,
)

# --- Specialist 6: The Itinerary Refiner ---
itinerary_refiner_agent = Agent(
    model=MODEL,
    name="itinerary_refiner_agent",
    description="Revises the itinerary draft using the critic's feedback.",
    instruction="""
        Revise Current Itinerary ({final_itinerary}) using the auditor critique in the input
        so all USD budget and exclusion rules in {user_preferences} pass.
        Output ONLY the updated Markdown itinerary.
    """,
    output_key="final_itinerary",
)
เพิ่ม route_critique และรอบ
เปิด travel_planner/workflows.py:
cloudshell edit ~/adk-graph-agents/travel_planner/workflows.py
แทนที่เนื้อหาทั้งหมดของ travel_planner/workflows.py ด้วยเวิร์กโฟลว์กราฟที่สมบูรณ์ ดังนี้
from google.adk import Event, Workflow
from google.adk.workflow import JoinNode
from .specialists import (
    activity_finder_agent, itinerary_critic_agent, itinerary_refiner_agent,
    itinerary_synthesizer_agent, restaurant_finder_agent, user_profiler_agent,
)

MAX_REVISIONS = 2
research_join = JoinNode(name="research_join")


def route_critique(node_input: str, revision_count: int = 0):
    """Routes to 'approved' when constraints pass, or 'revise' up to MAX_REVISIONS."""
    approved = node_input.strip().rstrip(".").upper() == "APPROVED"
    if approved or revision_count >= MAX_REVISIONS:
        return Event(route="approved", output=approved)
    return Event(
        route="revise", output=node_input, state={"revision_count": revision_count + 1}
    )


def finalize_itinerary(node_input: bool, final_itinerary: str, revision_count: int = 0):
    """Emits the verified itinerary and resets revision_count for the next turn."""
    status = (
        f"Itinerary approved after {revision_count} revision(s)."
        if node_input
        else f"Max revisions ({revision_count}) reached; returning best-effort draft."
    )
    return Event(
        message=f"{status}\n\n{final_itinerary}",
        output=final_itinerary,
        state={"revision_count": 0},
    )


travel_workflow = Workflow(
    name="travel_workflow",
    description="Orchestrates the end-to-end travel planning process as a graph workflow.",
    edges=[
        (
            "START",
            user_profiler_agent,
            (activity_finder_agent, restaurant_finder_agent),
            research_join,
            itinerary_synthesizer_agent,
            itinerary_critic_agent,
            route_critique,
        ),
        (route_critique, {"revise": itinerary_refiner_agent, "approved": finalize_itinerary}),
        (itinerary_refiner_agent, itinerary_critic_agent),
    ],
)
🔍 ตรวจสอบงานของคุณ
ยืนยันว่า travel_planner/workflows.py คอมไพล์อย่างสมบูรณ์และพิมพ์ขอบกราฟแบบมีทิศทาง
cd ~/adk-graph-agents && source .venv/bin/activate
python3 -c "from travel_planner.agent import root_agent; print('\n'.join(f'{e.from_node.name} -> {e.to_node.name} (route={e.route})' for e in root_agent.graph.edges))"
คุณควรเห็นเอาต์พุตที่คล้ายกับตัวอย่างต่อไปนี้
__START__ -> user_profiler_agent (route=None)
user_profiler_agent -> activity_finder_agent (route=None)
user_profiler_agent -> restaurant_finder_agent (route=None)
activity_finder_agent -> research_join (route=None)
restaurant_finder_agent -> research_join (route=None)
research_join -> itinerary_synthesizer_agent (route=None)
itinerary_synthesizer_agent -> itinerary_critic_agent (route=None)
itinerary_critic_agent -> route_critique (route=None)
route_critique -> itinerary_refiner_agent (route=revise)
route_critique -> finalize_itinerary (route=approved)
itinerary_refiner_agent -> itinerary_critic_agent (route=None)
จากนั้นเริ่มadk webเพื่อทดสอบทั้งการอนุมัติทันทีและการแก้ไขที่ทริกเกอร์โดยงบประมาณ
adk web --allow_origins "*"
เปิด Web Preview ในพอร์ต 8000 คลิก + เซสชันใหม่ แล้วส่งพรอมต์เกี่ยวกับเกียวโตที่มีข้อจำกัดหลายข้อดังนี้
Design a full-day itinerary for Kyoto with a total budget of $100. My main interests are historical landmarks, temples, and authentic local cuisine. Please do not include any modern art museums or galleries.
หากต้องการดูการทำงานของ Loop Fire ของ route="revise" ให้ส่งพรอมต์ติดตามผลพร้อมงบประมาณที่จำกัด $15 ดังนี้
Now design a full-day Kyoto itinerary with paid temple admissions, lunch, and dinner on a strict total budget of $15 USD.
ในมุมมองเหตุการณ์ คุณควรเห็นลําดับการดําเนินการที่คล้ายกับต่อไปนี้
1. user_profiler_agent -> writes JSON constraints to state["user_preferences"]
2. (activity_finder_agent, restaurant_finder_agent) -> run google_search concurrently -> research_join
3. itinerary_synthesizer_agent -> writes initial draft to state["final_itinerary"]
4. itinerary_critic_agent -> outputs "APPROVED" (or revision instructions when over budget)
5. route_critique -> emits route="approved" (skipping refiner) or route="revise" -> itinerary_refiner_agent -> itinerary_critic_agent
6. finalize_itinerary -> emits "Itinerary approved after N revision(s)." (or max-revisions notice) and resets revision_count=0
กด Ctrl + C ในเทอร์มินัลเพื่อหยุด adk web
9. การแก้ปัญหา
เมนูแบบเลื่อนลงของตัวแทนว่างเปล่าใน adk web
- สาเหตุ:
adk webเริ่มต้นภายในtravel_planner/แทนที่จะเป็นไดเรกทอรีระดับบน~/adk-graph-agentsหรือเซสชัน Cloud Shell รีสตาร์ท - วิธีแก้ไข: กด
Ctrl + Cกลับไปที่ไดเรกทอรีระดับบน แล้วรีสตาร์ทด้วยcd ~/adk-graph-agents && source .venv/bin/activate && adk web --allow_origins "*"
ข้อผิดพลาดของโมเดล 404 NOT_FOUND
- สาเหตุ: คุณกด Enter เพื่อยอมรับภูมิภาค
us-central1เริ่มต้นระหว่างadk createแทนที่จะพิมพ์global - วิธีแก้ไข: เปิด
~/adk-graph-agents/travel_planner/.envและตรวจสอบว่าได้ตั้งค่าGOOGLE_CLOUD_LOCATION=globalแล้ว
ERROR: [Errno 98] address already in use บนพอร์ต 8000
- สาเหตุ: เซิร์ฟเวอร์
adk webก่อนหน้ายังคงทำงานอยู่ใน Cloud Shell - วิธีแก้ไข: กด
Ctrl + Cในเทอร์มินัลที่ใช้งานอยู่ หรือหยุดกระบวนการที่มีอยู่ด้วยpkill -f "adk web"ก่อนเริ่มadk webอีกครั้ง
10. ล้างข้อมูล
นำพื้นที่ทำงานในเครื่องออก และเลือกปิดใช้ API หรือลบโปรเจ็กต์เวิร์กช็อปเฉพาะได้
ลบไฟล์โปรเจ็กต์ที่อยู่ในเครื่อง
นำไดเรกทอรี ~/adk-graph-agents และสภาพแวดล้อมเสมือนออกโดยใช้คำสั่งต่อไปนี้
cd ~
rm -rf ~/adk-graph-agents
ปิดใช้ Agent Platform API (ไม่บังคับ)
ปิดใช้ Agent Platform API หากไม่ต้องการใช้ในโปรเจ็กต์นี้อีกต่อไป
gcloud services disable aiplatform.googleapis.com --quiet
🔍 ตรวจสอบงานของคุณ
ยืนยันว่านำ ~/adk-graph-agents ออกแล้ว
test ! -d ~/adk-graph-agents && echo "Workspace ~/adk-graph-agents removed"
คุณควรเห็นเอาต์พุตที่คล้ายกับตัวอย่างต่อไปนี้
Workspace ~/adk-graph-agents removed
11. ขอแสดงความยินดี
คุณได้สร้างเครื่องมือวางแผนการเดินทางแบบ Multi-Agent โดยใช้ ADK 2 Workflow, รวมเชนตามลำดับ, การกระจาย google_search พร้อมกันด้วย JoinNode และวงจร Maker-Checker แบบมีเงื่อนไขในกราฟ Edge แบบประกาศเดียว
สิ่งที่คุณทำสำเร็จ
- ประกาศไปป์ไลน์แบบ Multi-Agent โดยใช้ ADK 2
Workflow(edges=[...]) - ส่งข้อมูลโดยตรงระหว่างโหนดฟังก์ชัน
Agent,JoinNodeและ Python ผ่านnode_inputและพารามิเตอร์ที่เชื่อมโยงกับสถานะ โดยยังคงรักษาสถานะเซสชันไว้ให้น้อยที่สุด - แยกสาขา
google_searchที่เกิดขึ้นพร้อมกันและซิงค์กับJoinNode - แทนที่
LoopAgentและการส่งต่อแบบวนซ้ำที่อิงตามเครื่องมือด้วยเราเตอร์Event(route=...)เชิงกำหนดที่ข้ามการเรียก LLM ที่ไม่จำเป็นในฉบับร่างที่ได้รับอนุมัติ
ขั้นตอนถัดไป
- สำรวจระบบ Multi-Agent ใน ADK
- เข้าร่วมโปรแกรม GEAR (Gemini Enterprise Agent Ready) และโปรแกรมรับการรับรองเพื่อเข้าร่วมเวิร์กช็อปภาคปฏิบัติและเส้นทางการเรียนรู้