

1. ภาพรวม
การตอบสนองคำขอการเดินทางที่มีข้อจำกัดหลายอย่าง (เช่น การออกแบบแผนการเดินทางเต็มวันในเกียวโตในงบประมาณไม่เกิน $100 โดยเน้นที่วัดทางประวัติศาสตร์และอาหารท้องถิ่นโดยไม่มีแกลเลอรีศิลปะสมัยใหม่) ต้องอาศัยการดึงข้อจำกัดออกมา การค้นคว้าสถานที่ท่องเที่ยวและการรับประทานอาหารไปพร้อมๆ กัน การจัดทำกำหนดการแบบแยกรายการ และการตรวจสอบแผนสุดท้าย การพึ่งพา Agent แบบโมโนลิธเพียงตัวเดียวที่มีเครื่องมือหลายอย่างอาจทำให้ข้ามขั้นตอนการยืนยันหรือละเมิดการยกเว้นได้ ดังนั้นการประสานงานจึงประสานงานกับ Agent ย่อยเฉพาะทางผ่านตัวควบคุมเวิร์กโฟลว์เชิงกำหนด
ในส่วนที่ 3 ของซีรีส์การสร้าง AI Agent ด้วย ADK คุณจะได้สร้างเครื่องมือวางแผนการเดินทางแบบหลาย Agent ที่ทำงานได้ด้วยตนเองในแพลตฟอร์ม Agent โดยใช้ตัวควบคุมเวิร์กโฟลว์ (SequentialAgent, ParallelAgent และ LoopAgent) ของ Agent Development Kit (ADK) 2 ใน 3 ขั้นตอนที่ต่อเนื่องกัน (โดยไม่จำเป็นต้องตั้งค่าพื้นที่ทำงานในส่วนที่ 1 หรือส่วนที่ 2) คุณจะได้ประสานงาน Agent ผู้เชี่ยวชาญ 6 รายที่ทำงานด้วย gemini-3.8-flash โดยมีสถานะเซสชันที่แชร์ (output_key) การดำเนินการ google_search พร้อมกัน และลูปการปรับแต่งแบบ Maker-Checker ซ้ำๆ
ข้อกำหนดเบื้องต้น
- ความเข้าใจเกี่ยวกับแนวคิด Generative AI
- ความสามารถขั้นพื้นฐานในการเขียนโปรแกรม Python
- ความคุ้นเคยกับพื้นฐานของ AI Agent และ Google ADK
สิ่งที่คุณจะได้เรียนรู้
- วิธีสร้างโครงร่างโปรเจ็กต์ ADK 2 แบบหลาย Agent ตั้งแต่ต้น
- วิธีออกแบบทีม Agent เฉพาะทางที่แชร์สถานะเซสชันโดยใช้
output_key - วิธีใช้
SequentialAgentเพื่อเรียกใช้ Agent ย่อยในไปป์ไลน์แบบทีละขั้นตอนเชิงกำหนด - วิธีใช้
ParallelAgentเพื่อเรียกใช้ Agent การค้นคว้าอิสระพร้อมกันเพื่อให้มีเวลาในการตอบสนองต่ำลง - วิธีใช้การส่งต่อข้อมูลไปยัง
LoopAgentและToolContextเพื่อใช้ลูปการปรับแต่งแบบ Maker-Checker ซ้ำๆ - วิธีรวมรูปแบบตามลำดับ รูปแบบคู่ขนาน และรูปแบบวนซ้ำเข้ากับเวิร์กโฟลว์แบบหลาย Agent ตามลำดับชั้น
สิ่งที่ต้องมี
- บัญชี Google (ใช้บัญชี
@gmail.comส่วนบุคคลหากต้องการรับเครดิตสำหรับเวิร์กช็อป) - ลิงก์เครดิตเวิร์กช็อปจากผู้สอน (รวมถึงกล้องโทรศัพท์เพื่อสแกนคิวอาร์โค้ด) หรือบัญชีสำหรับการเรียกเก็บเงินใน Cloud ที่ใช้งานอยู่
- Google Chrome (แนะนำให้ใช้หน้าต่างที่ไม่ระบุตัวตนเพื่อหลีกเลี่ยงการใช้บัญชีส่วนตัวและบัญชีงานปะปนกัน)
2. รับเครดิต Google Cloud (ไม่บังคับ)
หากคุณเข้าร่วมเวิร์กช็อปที่มีลิงก์เครดิตกิจกรรม ให้อ้างสิทธิ์รับเครดิต Google Developer Program เพื่อจัดสรรบัญชีสำหรับการเรียกเก็บเงินโดยไม่ต้องใช้บัตรเครดิต
รับเครดิตเหตุการณ์
- เปิดลิงก์เครดิตเวิร์กช็อปในหน้าต่างไม่ระบุตัวตน แล้วลงชื่อเข้าใช้ด้วยบัญชี
@gmail.com - ในส่วนรับสิทธิประโยชน์ ให้คลิกรับเครดิต
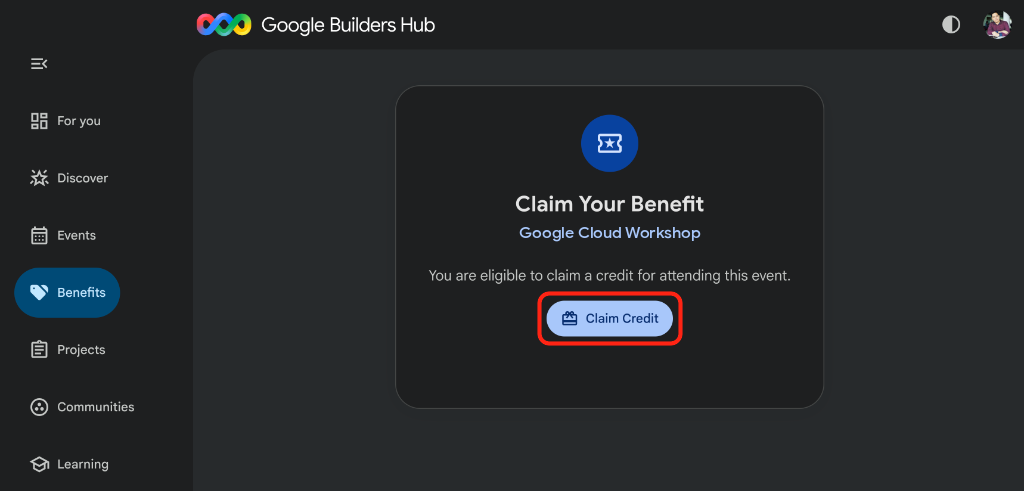
- หากได้รับข้อความแจ้งให้สร้างโปรไฟล์ Google Developer Program ให้กรอกแบบฟอร์มให้ครบถ้วน
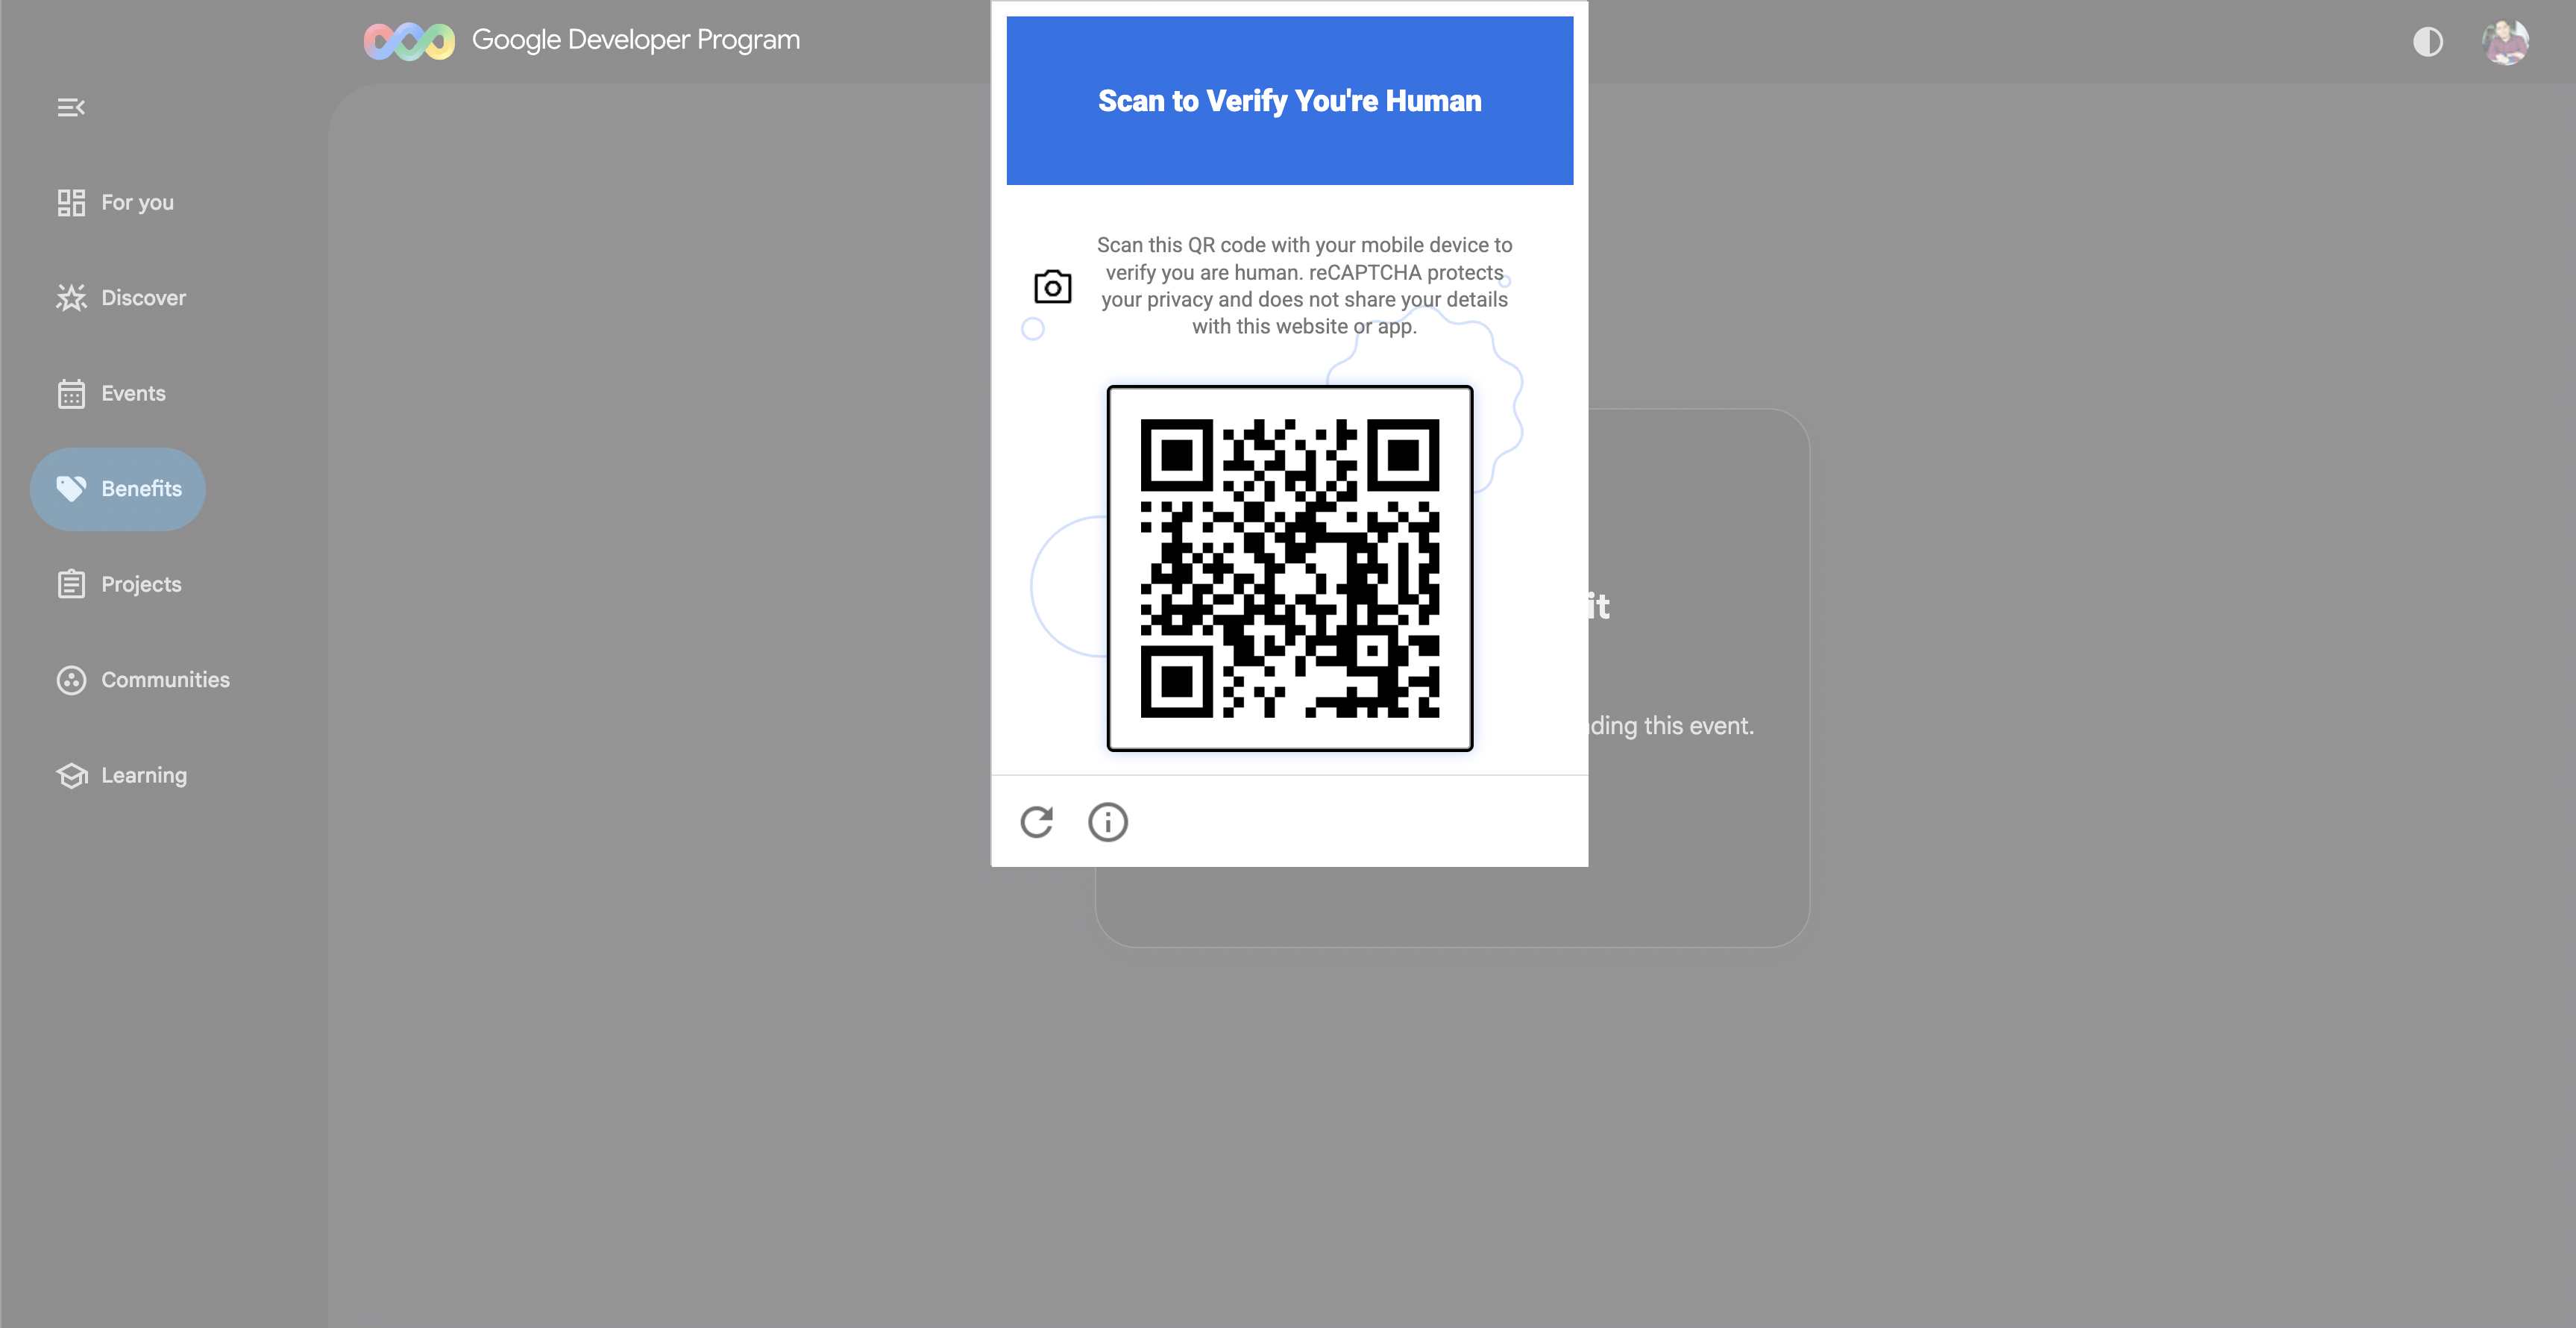
- เมื่อข้อความสแกนเพื่อยืนยันว่าคุณเป็นมนุษย์ปรากฏขึ้น ให้สแกนคิวอาร์โค้ดด้วยโทรศัพท์และทำการยืนยันให้เสร็จสมบูรณ์ (รีเฟรชและคลิกรับเครดิตอีกครั้งหากคิวอาร์โค้ดไม่ปรากฏ)
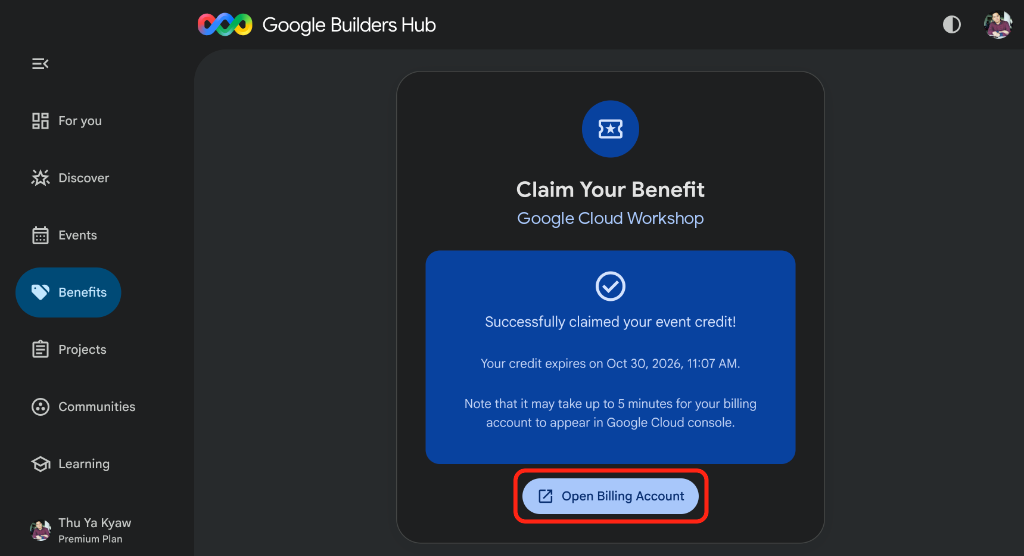
- ตรวจสอบว่าข้อความรับเครดิตกิจกรรมเรียบร้อยแล้วปรากฏขึ้น จากนั้นคลิกเปิดบัญชีสำหรับการเรียกเก็บเงิน
🔍 ตรวจสอบงานของคุณ
การสร้างบัญชีสำหรับการเรียกเก็บเงินใช้เวลาสูงสุด 3 นาที
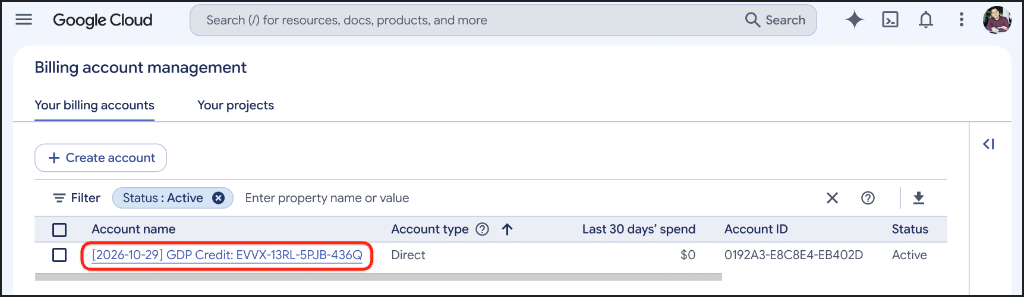
- เปิดการเรียกเก็บเงินใน Google Cloud (หรือคัดลอก URL ลงในหน้าต่างที่ไม่ระบุตัวตน) แล้วเลือกบัญชีสำหรับการเรียกเก็บเงินของคุณ
https://console.cloud.google.com/billing
- รีเฟรชจนกว่าบัญชี
GDP Creditจะแสดงสถานะใช้งานอยู่
3. สร้างโปรเจ็กต์ Google Cloud (ไม่บังคับ)
สร้างโปรเจ็กต์ Google Cloud โดยเฉพาะเพื่อให้ทรัพยากรทั้งหมดจาก Codelab นี้แยกต่างหากและล้างข้อมูลได้ง่าย
- เปิดสร้างโปรเจ็กต์ (หรือคัดลอก URL ลงในหน้าต่างที่ไม่ระบุตัวตน) ดังนี้
https://console.cloud.google.com/projectcreate
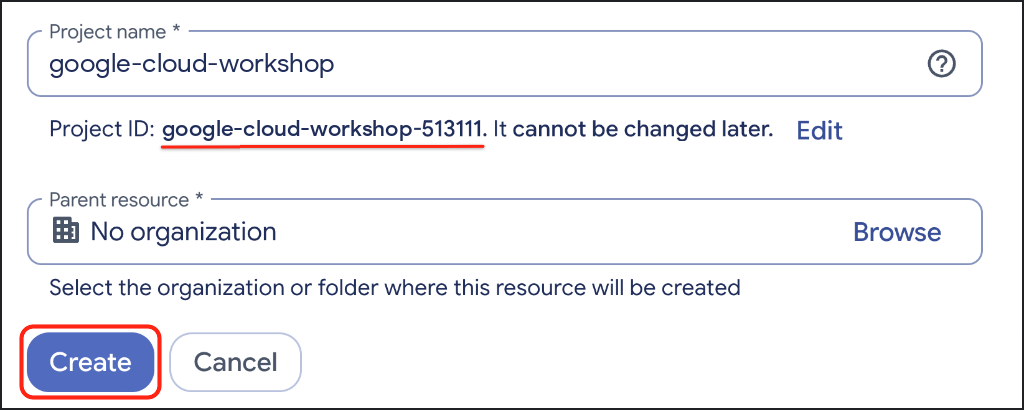
- ป้อนรายละเอียดโปรเจ็กต์ ดังนี้
- ชื่อโปรเจ็กต์: เช่น
google-cloud-workshop - บัญชีสำหรับการเรียกเก็บเงิน (หากแสดง): เลือก
GDP Credit(หรือบัญชีสำหรับการเรียกเก็บเงินที่ใช้งานอยู่) - ทรัพยากรหลัก: ไม่มีองค์กร (หรือองค์กรของคุณ หากจำเป็น)
- ชื่อโปรเจ็กต์: เช่น
- จดรหัสโปรเจ็กต์ที่สร้างขึ้นใต้ชื่อโปรเจ็กต์ แล้วคลิกสร้าง
🔍 ตรวจสอบงานของคุณ
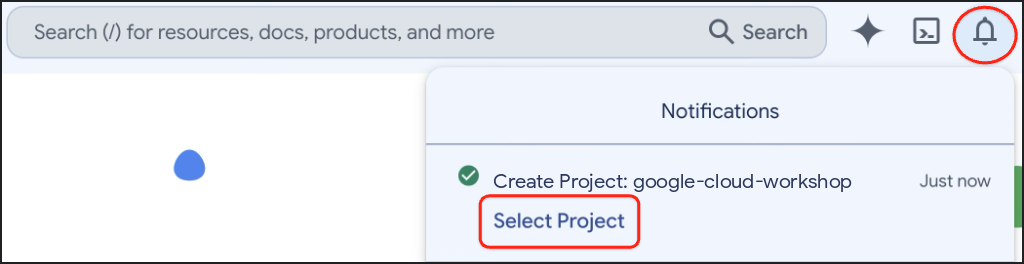
คลิกการแจ้งเตือนในแถบเครื่องมือด้านขวาบน แล้วคลิกเลือกโปรเจ็กต์เมื่อสร้างโปรเจ็กต์เสร็จแล้ว
4. ตั้งค่าสภาพแวดล้อม
กำหนดค่า Google Cloud Shell, เปิดใช้ Agent Platform API และสร้างสภาพแวดล้อมเสมือน Python 3.12 ที่แยกต่างหากด้วย uv
กำหนดค่า Cloud Shell
- คลิกเปิดใช้งาน Cloud Shell (
>_) ในแถบเครื่องมือคอนโซล Google Cloud หรือเปิด Google Cloud Shell โดยตรง (หรือคัดลอก URL ลงในหน้าต่างที่ไม่ระบุตัวตน) ดังนี้
https://shell.cloud.google.com/?show=ide,terminal

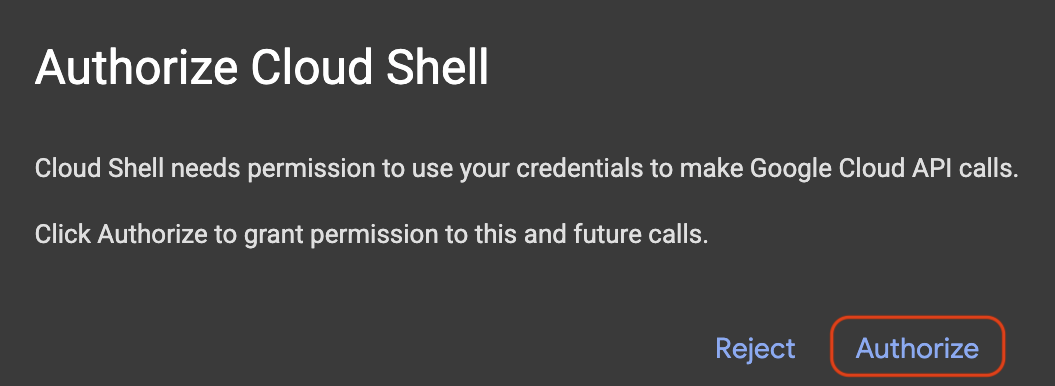
- คลิกให้สิทธิ์หากได้รับข้อความแจ้ง
- เลือกรหัสโปรเจ็กต์ Google Cloud ที่ใช้งานอยู่จากเมนูที่มีหมายเลขกำกับในเทอร์มินัล โดยทำดังนี้
unset CLOUDSDK_CORE_PROJECT
PS3="Select your project (e.g. 1): "
select PROJECT_ID in $(gcloud projects list --format="value(projectId)"); do
  [ -n "$PROJECT_ID" ] && gcloud config set project "$PROJECT_ID" && break
done
คุณควรเห็นเอาต์พุตที่คล้ายกับ (โปรเจ็กต์ที่ไม่ได้ติดแท็กจะพิมพ์บรรทัด [environment: untagged] ที่ให้ข้อมูลด้วย) ดังนี้
1) google-cloud-workshop-4210
2) my-cloud-project-8812
Select your project (e.g. 1): 1
Updated property [core/project].
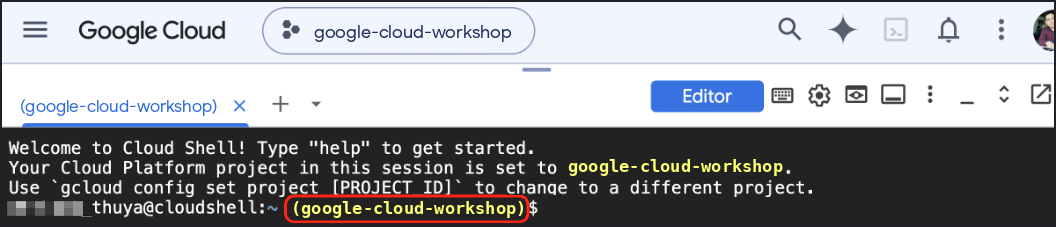
ตรวจสอบว่ารหัสโปรเจ็กต์ที่เลือกปรากฏเป็นไฮไลต์สีเหลืองในพรอมต์ Cloud Shell ดังนี้
เปิดใช้ API ที่จำเป็น
เปิดใช้ Agent Platform API เพื่อให้ Agent ของ ADK เรียกใช้โมเดล Gemini ได้ โดยทำดังนี้
gcloud services enable aiplatform.googleapis.com
คุณควรเห็นเอาต์พุตที่คล้ายกับตัวอย่างต่อไปนี้
Operation "operations/acat.p2-..." finished successfully.
สร้างสภาพแวดล้อมเสมือนของ Python และติดตั้ง ADK
สร้างพื้นที่ทำงาน ~/adk-agents และเปิดใช้งานสภาพแวดล้อมเสมือน Python 3.12 โดยทำดังนี้
cd ~
mkdir -p adk-agents && cd ~/adk-agents

which uv >/dev/null 2>&1 || curl -LsSf https://astral.sh/uv/install.sh | sh
export PATH="$HOME/.local/bin:$PATH"

uv venv .venv --python 3.12
source .venv/bin/activate
ตรวจสอบว่าคำนำหน้า (.venv) ปรากฏที่จุดเริ่มต้นของพรอมต์เทอร์มินัล

ติดตั้ง ADK 2 ภายในสภาพแวดล้อมเสมือนที่ใช้งานอยู่โดยทำดังนี้
uv pip install --no-cache "google-adk==2.14.0"
🔍 ตรวจสอบงานของคุณ
ยืนยันเวอร์ชัน adk CLI ที่ติดตั้ง:
adk --version
คุณควรเห็นเอาต์พุตที่คล้ายกับตัวอย่างต่อไปนี้
adk, version 2.14.0
5. สร้างโครงสร้าง Agent วางแผนการเดินทาง
เมื่อสภาพแวดล้อมพร้อมแล้ว ให้ใช้คำสั่ง adk create ในตัวของ ADK เพื่อสร้างไฟล์เริ่มต้นสำหรับแพ็กเกจ Agent travel_planner
สร้างแพ็กเกจเริ่มต้น
เรียกใช้ adk create จากไดเรกทอรี ~/adk-agents ดังนี้
cd ~/adk-agents
adk create travel_planner
เมื่อได้รับข้อความแจ้งในเทอร์มินัล ให้เลือกตัวเลือกการกำหนดค่าต่อไปนี้ (หากได้รับข้อความแจ้ง Enable telemetry? [Y/n]: ในการเรียกใช้ครั้งแรก ให้กด Enter หรือพิมพ์ n แล้วกด Enter)
- เลือกโมเดลสำหรับ Agent ระดับรูท: พิมพ์
2เพื่อเลือกgemini-3.8-flash(ตัวเลือก1จะเลือกgemini-3.5-flash) แล้วกด Enter - เลือกแบ็กเอนด์: พิมพ์
2เพื่อเลือกแบ็กเอนด์ Agent Platform ของ Google Cloud (ตัวเลือก2ในเมนู CLI ด้านล่าง) แล้วกด Enter - ป้อนรหัสโปรเจ็กต์ Google Cloud: ยืนยันรหัสโปรเจ็กต์ที่แสดงในวงเล็บโดยกด Enter
- ป้อนภูมิภาค Google Cloud: พิมพ์
globalแล้วกด Enter
adk create จะเขียน GOOGLE_GENAI_USE_ENTERPRISE=1, รหัสโปรเจ็กต์ และ GOOGLE_CLOUD_LOCATION=global ลงใน travel_planner/.env เพื่อให้ข้อมูลเข้าสู่ระบบยังคงได้รับการกำหนดค่าเมื่อคุณอัปเดต agent.py ในภายหลัง
🔍 ตรวจสอบงานของคุณ
คุณควรเห็นเอาต์พุตที่คล้ายกับตัวอย่างต่อไปนี้
Choose a model for the root agent:
1. gemini-3.5-flash
2. gemini-3.8-flash
3. Other models (fill later)
Choose model (1, 2, 3): 2
1. Google AI
2. Vertex AI
3. Login with Google
Choose a backend (1, 2, 3): 2

You need an existing Google Cloud account and project, check out this link for details:
https://google.github.io/adk-docs/get-started/quickstart/#gemini---google-cloud-vertex-ai

Enter Google Cloud project ID [google-cloud-workshop-4210]:
Enter Google Cloud region [us-central1]: global

Agent created in /home/your_username/adk-agents/travel_planner:
- .env
- .gitignore
- __init__.py
- agent.py

⚠️  WARNING: Secrets (like GOOGLE_API_KEY) are stored in .env.

Next steps:
- Chat with your agent in the terminal: adk run travel_planner
- Or in the browser: adk web .
- Have your coding agent evaluate and deploy it: uvx google-agents-cli setup
  (other install options: https://adk.dev/get-started/agents-cli/)
เปิดโฟลเดอร์ปัจจุบันในตัวแก้ไขโค้ด Cloud Shell เพื่อตรวจสอบและแก้ไขไฟล์ควบคู่ไปกับเทอร์มินัล โดยทำดังนี้
which cloudshell >/dev/null 2>&1 && cloudshell workspace ~/adk-agents || true
cd ~/adk-agents
source .venv/bin/activate
ทดสอบ Agent รายเดียวเริ่มต้น
ก่อนสร้างเวิร์กโฟลว์แบบ Multi-Agent ให้เปิด UI การพัฒนา ADK เพื่อดูว่า Agent ตัวเดียวเริ่มต้นตอบสนองต่อคำค้นหาการวางแผนการเดินทางแบบกว้างๆ อย่างไร
cd ~/adk-agents
adk web --allow_origins "*"
เปิด UI การพัฒนาในเบราว์เซอร์โดยใช้ตัวอย่างบนเว็บของ Cloud Shell ดังนี้
- คลิกไอคอนตัวอย่างเว็บในแถบเครื่องมือด้านขวาบนของ Cloud Shell
- เลือกเปลี่ยนพอร์ต ป้อน
8000แล้วคลิกเปลี่ยนและดูตัวอย่าง
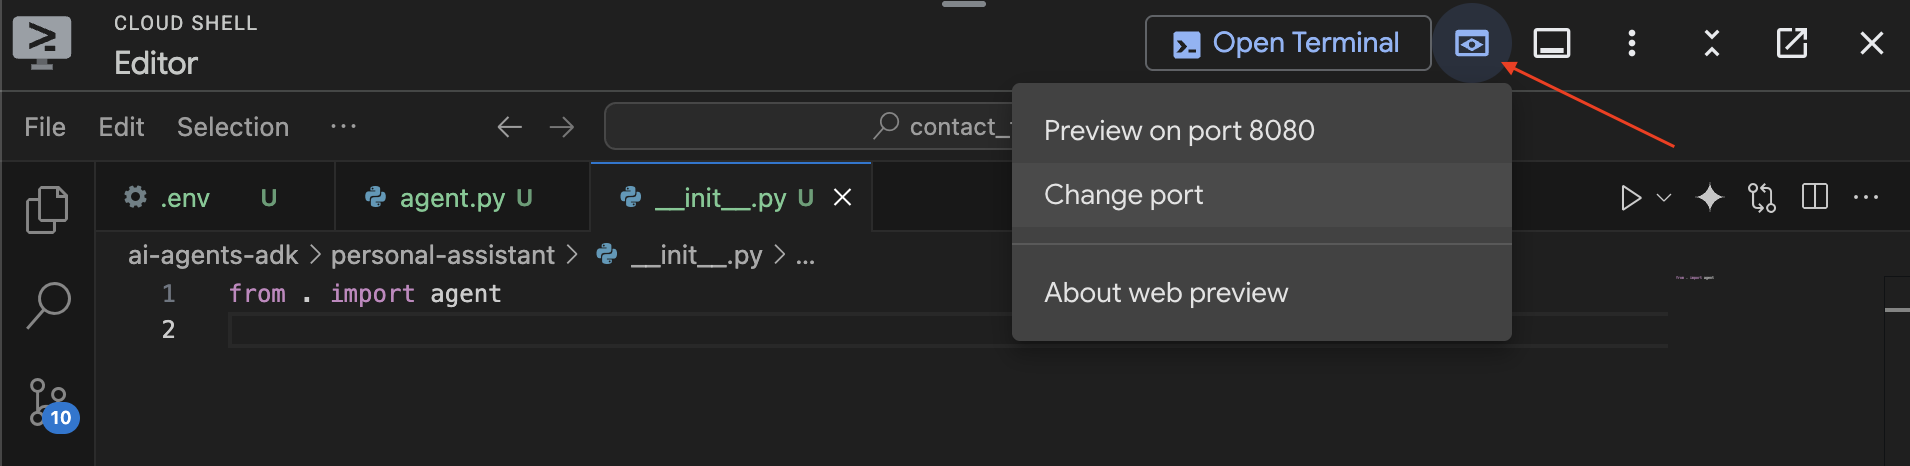
เมื่อ UI บนเว็บของ ADK โหลดแล้ว ให้ส่งคำทักทาย เช่น "hello, what can you do?" หรือ "Help me plan a trip to Japan"
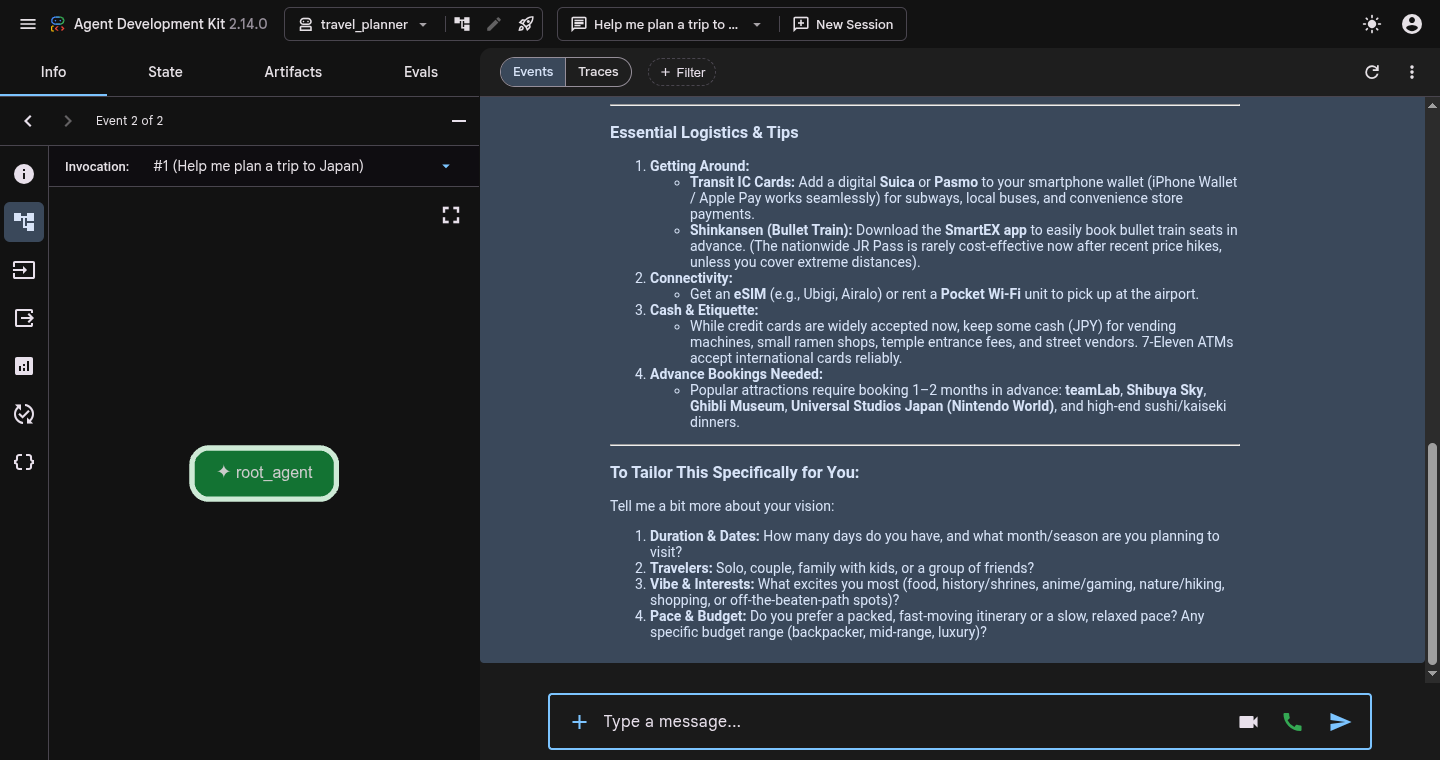
โปรดสังเกตว่า root_agent เพียงโมเดลเดียวจะตอบคำถามโดยตรงในครั้งเดียวโดยไม่มีการแยกค่ากำหนดที่มีโครงสร้าง การค้นคว้าข้อมูลในเว็บแบบเรียลไทม์ หรือการตรวจสอบงบประมาณ
เมื่อทดสอบเสร็จแล้ว ให้กด Ctrl + C ในเทอร์มินัล Cloud Shell เพื่อหยุดเซิร์ฟเวอร์ adk web และกลับไปที่ Command Prompt
6. สร้างเวิร์กโฟลว์ SequentialAgent
ตอนนี้คุณจะสร้างรูปแบบการจัดเรียงแรก ซึ่งก็คือเวิร์กโฟลว์เชิงเส้นที่ขับเคลื่อนโดย SequentialAgent ในไปป์ไลน์ตามลำดับ Agent ย่อยจะทำงานตามลำดับที่เข้มงวด ผู้เชี่ยวชาญคนแรกจะดึงพารามิเตอร์ที่มีโครงสร้างและบันทึกไว้ในสถานะเซสชันที่แชร์โดยใช้ output_key="user_preferences" และผู้เชี่ยวชาญคนที่ 2 จะอ่าน {user_preferences} จากสถานะที่แชร์เพื่อร่างแผนการเดินทาง
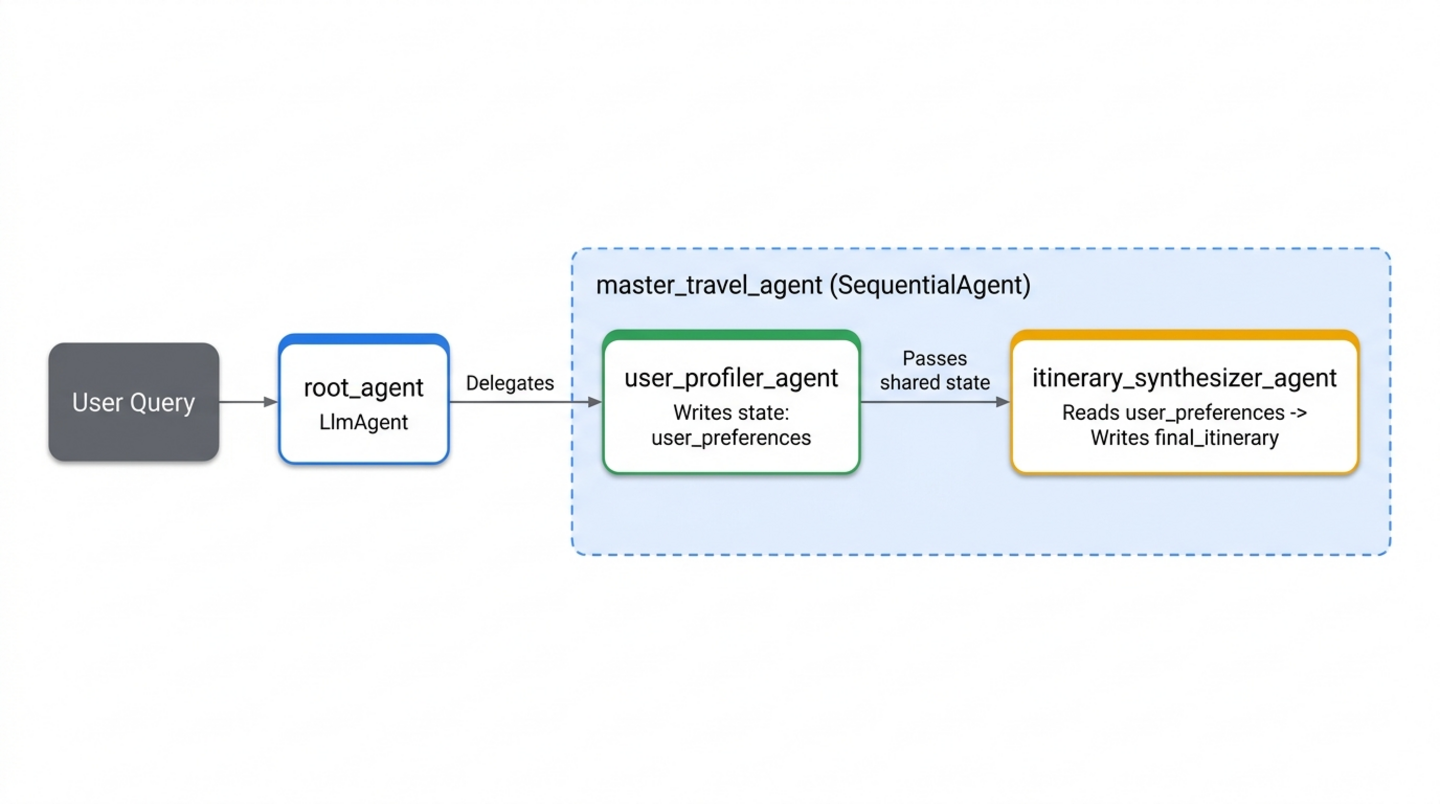
สร้างผู้เชี่ยวชาญเบื้องต้น (specialists.py)
เปิดไฟล์ใหม่ชื่อ specialists.py ใน travel_planner/ โดยทำดังนี้
cloudshell edit ~/adk-agents/travel_planner/specialists.py
วางโค้ดต่อไปนี้ลงใน travel_planner/specialists.py เพื่อกำหนด user_profiler_agent และ itinerary_synthesizer_agent (นำเข้า ToolContext และ google_search ไว้ล่วงหน้าสำหรับขั้นตอนถัดไป)
from google.adk import Agent
from google.adk.tools import ToolContext, google_search

# --- Specialist 1: The User Profiler ---
user_profiler_agent = Agent(
    name="user_profiler_agent",
    description="Extracts travel preferences and constraints from user input.",
    instruction="""
        Extract destination, duration (default 1 day), budget, interests, and exclusions.
        Return a single JSON object with keys: "destination", "duration", "budget", "interests", "exclusions".
    """,
    output_key="user_preferences",  # Saves output to state['user_preferences']
)

# --- Specialist 2: The Synthesizer ---
itinerary_synthesizer_agent = Agent(
    name="itinerary_synthesizer_agent",
    description="Compiles preferences and research into a final Markdown itinerary.",
    instruction="""
        You are an elite Travel Concierge. Write a Markdown itinerary with an itemized USD and local currency cost breakdown using:
        - User Preferences: {user_preferences}
        - Activities (if available): {activity_recommendations?}
        - Restaurants (if available): {restaurant_recommendations?}
    """,
    output_key="final_itinerary",
)
เชื่อมต่อไปป์ไลน์ตามลำดับ (workflows.py)
สร้างไฟล์ใหม่ชื่อ workflows.py ภายใน travel_planner/ เพื่อจัดระเบียบผู้เชี่ยวชาญ
cloudshell edit ~/adk-agents/travel_planner/workflows.py
เพิ่มคำจำกัดความ SequentialAgent ต่อไปนี้ลงใน travel_planner/workflows.py
from google.adk.agents import SequentialAgent
from .specialists import (
    user_profiler_agent,
    itinerary_synthesizer_agent,
)

# 1. SEQUENTIAL PHASE: A linear two-step workflow
master_travel_agent = SequentialAgent(
    name="master_travel_agent",
    description="Orchestrates the end-to-end travel planning process for trip and itinerary requests.",
    sub_agents=[
        user_profiler_agent,         # Step 1: Extract constraints into user_preferences
        itinerary_synthesizer_agent,  # Step 2: Draft itinerary from user_preferences
    ],
)
เชื่อมต่อเวิร์กโฟลว์กับ root_agent (agent.py)
ตอนนี้ให้ลงทะเบียน master_travel_agent เป็น Agent ย่อยของ root_agent เปิด travel_planner/agent.py:
cloudshell edit ~/adk-agents/travel_planner/agent.py
แทนที่เนื้อหาของ travel_planner/agent.py ด้วยโค้ดต่อไปนี้
from google.adk import Agent
from .workflows import master_travel_agent

MODEL = "gemini-3.8-flash"

root_agent = Agent(
    model=MODEL,
    name="root_agent",
    description="A helpful assistant for user questions.",
    instruction=(
        "Greet the user and delegate any travel or trip planning requests "
        "to master_travel_agent."
    ),
    sub_agents=[master_travel_agent],
)
🔍 ตรวจสอบงานของคุณ
เริ่ม UI บนเว็บของ ADK จากเทอร์มินัลโดยทำดังนี้
cd ~/adk-agents
adk web --allow_origins "*"
เปิดตัวอย่างเว็บในพอร์ต 8000 แล้วป้อนพรอมต์ต่อไปนี้
Help me plan a trip to Kyoto
คุณควรเห็นเอาต์พุตที่คล้ายกับขั้นตอนการดำเนินการต่อไปนี้ในมุมมองเหตุการณ์
1. root_agent -> calls transfer_to_agent(agent_name="master_travel_agent")
2. user_profiler_agent -> outputs JSON {"destination": "Kyoto", "duration": "1 day", ...} to state['user_preferences']
3. itinerary_synthesizer_agent -> reads {user_preferences} and outputs the formatted Markdown itinerary
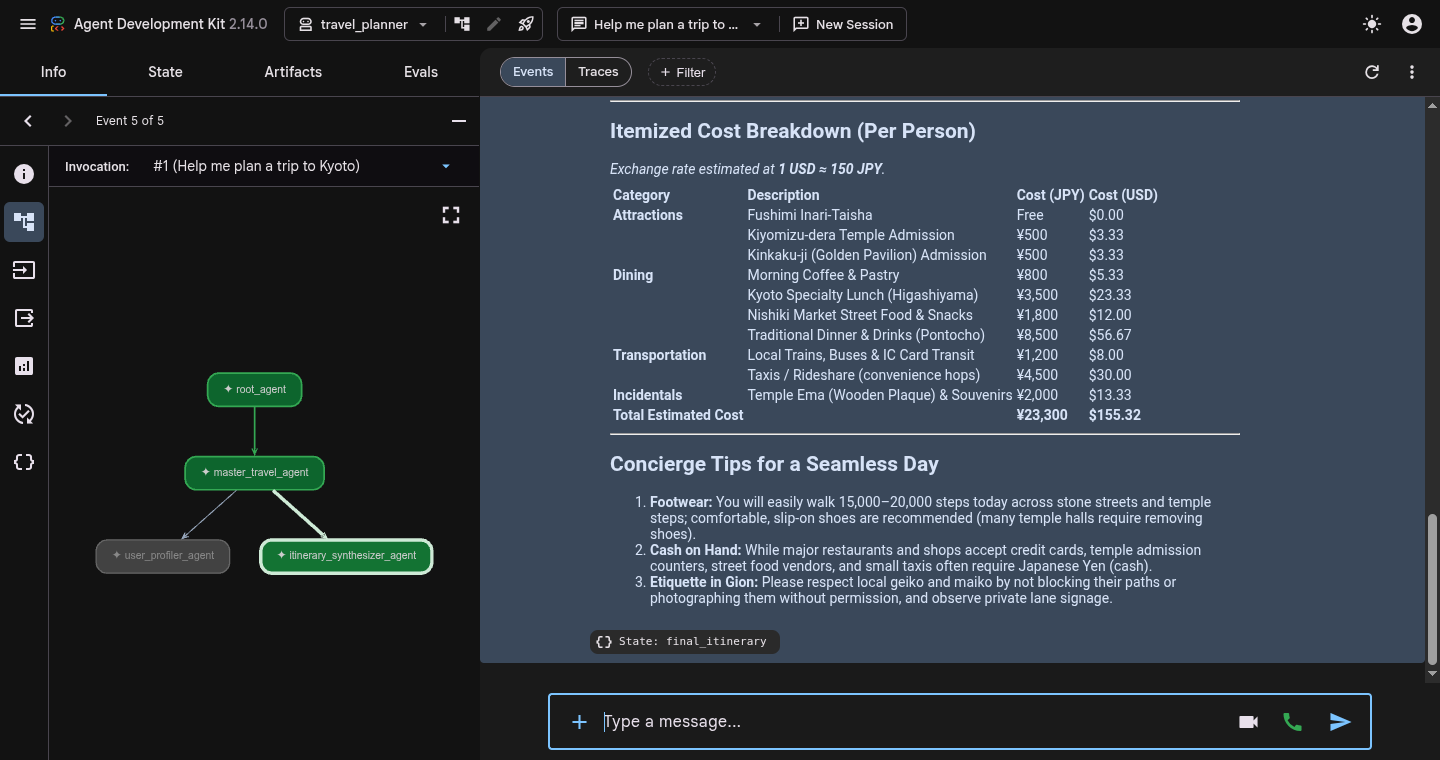
คลิกป้ายเหตุการณ์ใดก็ได้ (หรือชิป State: final_itinerary) แล้วเปลี่ยนไปที่แท็บสถานะในแผงเครื่องมือตรวจสอบด้านซ้ายเพื่อยืนยันว่าทั้ง user_preferences และ final_itinerary ปรากฏในสถานะเซสชัน
เมื่อตรวจสอบการติดตามเสร็จแล้ว ให้กด Ctrl + C ในเทอร์มินัลเพื่อหยุด adk web
7. ทำการค้นคว้าด้วย ParallelAgent
แม้ว่าเวิร์กโฟลว์ตามลำดับจะแยกการดึงข้อมูลค่ากำหนดออกจากการร่างแผนการเดินทางอย่างชัดเจน แต่คำแนะนำก็ยังคงอาศัยความรู้ด้านการฝึกแบบคงที่ของโมเดลเพียงอย่างเดียว คุณสามารถอิงข้อมูลแผนการเดินทางจากข้อมูลเว็บแบบเรียลไทม์ได้โดยเพิ่มนักวิจัยเฉพาะ 2 คนที่ทำงานด้วยเครื่องมือ google_search ในตัว ดังนี้
activity_finder_agent: ค้นหาสถานที่ท่องเที่ยวที่เฉพาะเจาะจง 3 แห่งซึ่งตรงกับจุดหมายและความสนใจของผู้ใช้ พร้อมราคาตั๋วโดยประมาณrestaurant_finder_agent: ค้นหาร้านอาหารในพื้นที่ที่ได้คะแนนสูง 3 ร้านและค่าใช้จ่ายโดยประมาณต่อคน
เนื่องจากการค้นหาสถานที่ท่องเที่ยวและการค้นหาร้านอาหารไม่ได้ขึ้นอยู่กับกันและกัน การดำเนินการทีละอย่างจึงทำให้เสียเวลา แต่คุณจะรวมนักวิจัยทั้ง 2 คนไว้ใน ParallelAgent (parallel_research_agent) เพื่อให้ ADK ดำเนินการเวิร์กโฟลว์ Google Search ทั้ง 2 รายการพร้อมกัน และป้อนข้อมูล {activity_recommendations?} และ {restaurant_recommendations?} ก่อนที่จะส่งต่อให้ itinerary_synthesizer_agent
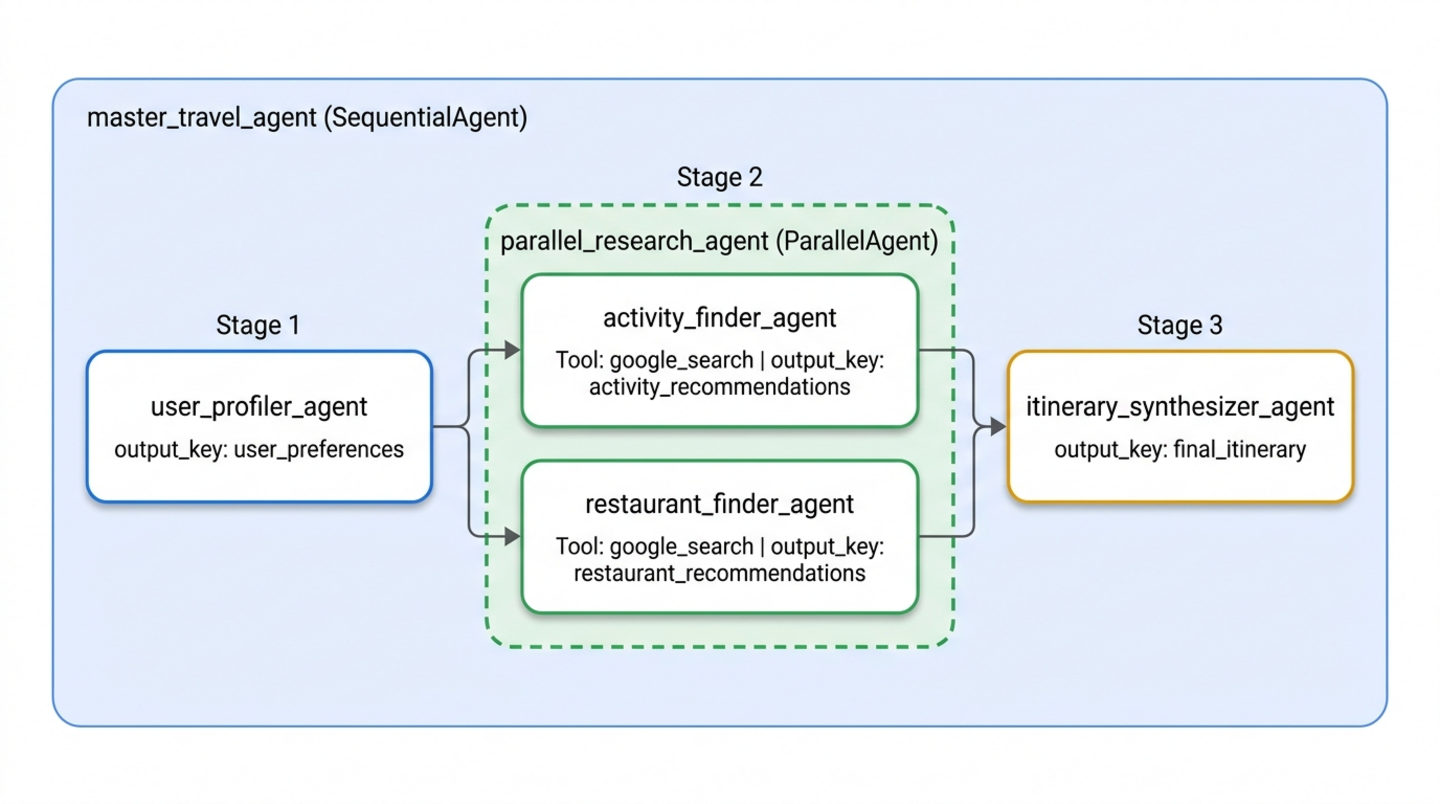
เพิ่มผู้เชี่ยวชาญด้านการวิจัยแบบคู่ขนานลงใน specialists.py
เปิด travel_planner/specialists.py:
cloudshell edit ~/adk-agents/travel_planner/specialists.py
เพิ่มผู้เชี่ยวชาญ Google Search 2 คนต่อไปนี้ที่ด้านล่างของ travel_planner/specialists.py (ใต้ itinerary_synthesizer_agent โดยตรง)
# --- Specialist 3: The Activity Finder ---
activity_finder_agent = Agent(
    name="activity_finder_agent",
    description="Finds 3 attractions matching the user's destination and interests.",
    instruction="""
        Based on {user_preferences}, use google_search to find 3 specific attractions (including budget-friendly options).
        Return a JSON list with keys: "attraction_name", "estimated_cost_local", "estimated_cost_usd", "notes".
    """,
    tools=[google_search],
    output_key="activity_recommendations",
)

# --- Specialist 4: The Restaurant Finder ---
restaurant_finder_agent = Agent(
    name="restaurant_finder_agent",
    description="Finds 3 restaurants matching the destination and budget.",
    instruction="""
        Based on {user_preferences}, use google_search to find 3 highly-rated restaurants across price points.
        Return a JSON list with keys: "restaurant_name", "cuisine", "estimated_cost_local", "estimated_cost_usd".
    """,
    tools=[google_search],
    output_key="restaurant_recommendations",
)
แทรก ParallelAgent ลงใน workflows.py
เปิด travel_planner/workflows.py:
cloudshell edit ~/adk-agents/travel_planner/workflows.py
อัปเดต travel_planner/workflows.py เพื่อกำหนด parallel_research_agent โดยใช้ ParallelAgent และวางไว้ระหว่าง user_profiler_agent และ itinerary_synthesizer_agent ดังนี้
from google.adk.agents import ParallelAgent, SequentialAgent
from .specialists import (
    activity_finder_agent,
    itinerary_synthesizer_agent,
    restaurant_finder_agent,
    user_profiler_agent,
)

# Parallel branch: Run activity and restaurant research simultaneously
parallel_research_agent = ParallelAgent(
    name="parallel_research_agent",
    description="Runs activity and restaurant research concurrently.",
    sub_agents=[
        activity_finder_agent,
        restaurant_finder_agent,
    ],
)

# Master pipeline: Profile -> Parallel Research -> Synthesize
master_travel_agent = SequentialAgent(
    name="master_travel_agent",
    description="Orchestrates the end-to-end travel planning process for trip and itinerary requests.",
    sub_agents=[
        user_profiler_agent,          # Step 1: Extract constraints
        parallel_research_agent,      # Step 2: Research activities & restaurants in parallel
        itinerary_synthesizer_agent,  # Step 3: Synthesize into an itinerary
    ],
)
🔍 ตรวจสอบงานของคุณ
เปิด adk web อีกครั้งเพื่อทดสอบไปป์ไลน์การค้นคว้าข้อมูลแบบขนาน
cd ~/adk-agents
adk web --allow_origins "*"
ใน UI ของ Web Preview ให้ส่งพรอมต์ต่อไปนี้
Help me plan a trip to Kyoto focused on historic temples and ramen
คุณควรเห็นเอาต์พุตที่คล้ายกับลำดับต่อไปนี้ในมุมมองเหตุการณ์
1. user_profiler_agent -> writes state['user_preferences']
2. parallel_research_agent -> fans out concurrently:
   - activity_finder_agent invokes google_search -> writes state['activity_recommendations']
   - restaurant_finder_agent invokes google_search -> writes state['restaurant_recommendations']
3. itinerary_synthesizer_agent -> merges all three state keys into state['final_itinerary']
- มุมมองการติดตาม: คลิกการติดตามที่ด้านบนของแผงการสนทนา (ข้างเหตุการณ์) แล้วตรวจสอบเทิร์นของคุณ คุณจะเห็นช่วงไทม์ไลน์ที่ทับซ้อนกันสำหรับ
activity_finder_agentและrestaurant_finder_agentในส่วนparallel_research_agentซึ่งช่วยลดเวลาในการตอบสนองของการค้นคว้าข้อมูลบนเว็บทั้งหมดลงเกือบครึ่งหนึ่งเมื่อเทียบกับการเรียกใช้ตามลำดับ - แท็บ State: คลิกแท็บ State ในแผงเครื่องมือตรวจสอบด้านซ้ายเพื่อตรวจสอบพจนานุกรมเซสชันแบบเรียลไทม์ (
user_preferences,activity_recommendations,restaurant_recommendationsและfinal_itinerary)
เมื่อทดสอบเสร็จแล้ว ให้กด Ctrl + C ในเทอร์มินัลเพื่อหยุด adk web
8. ปรับแต่งฉบับร่างด้วย LoopAgent
แม้จะมีผลการค้นหาแบบเรียลไทม์ แต่ฉบับร่างแรกที่ itinerary_synthesizer_agent สร้างขึ้นอาจเกินงบประมาณทั้งหมดของผู้ใช้ หรือรวมหมวดหมู่ที่ยกเว้นไว้โดยไม่ตั้งใจ (เช่น แกลเลอรีศิลปะสมัยใหม่เมื่อผู้ใช้ขอไม่ให้รวม)
เพื่อรับประกันการปฏิบัติตามข้อจำกัด คุณจะต้องเพิ่มลูปการปรับแต่งแบบ Maker-Checker ที่ส่วนท้ายของไปป์ไลน์โดยใช้ LoopAgent ดังนี้
itinerary_critic_agent(ผู้ตรวจสอบ): ตรวจสอบ{final_itinerary}เทียบกับ{user_preferences}โดยจะรวมต้นทุนโดยประมาณ ตรวจสอบข้อจำกัดเชิงลบทุกข้อ และเขียนวิธีการแก้ไขที่เฉพาะเจาะจงลงในcritique_feedbackหรือตอบกลับด้วยวลี"APPROVED"ที่ตรงกันทุกประการitinerary_refiner_agent(ผู้สร้าง/ผู้เลิกใช้): อ่าน{critique_feedback}หากการวิจารณ์เท่ากับ"APPROVED"ระบบจะเรียกใช้เครื่องมือexit_loop(tool_context.actions.escalate = True) เพื่อออกจากLoopAgentทันที ไม่เช่นนั้น ระบบจะแก้ไข{final_itinerary}เพื่อแก้ไขปัญหาที่แจ้งและเขียนทับfinal_itineraryสำหรับการส่งครั้งถัดไป
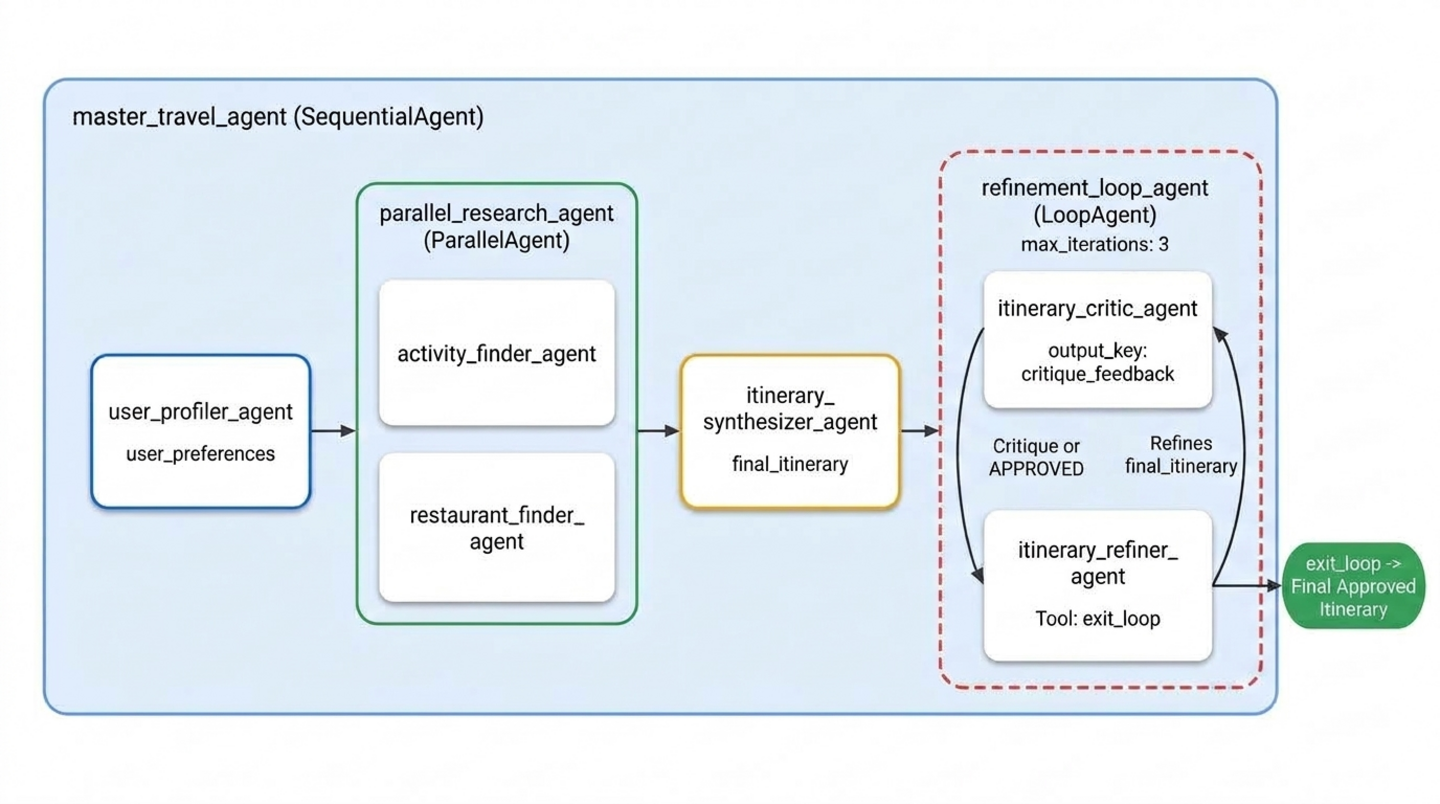
เพิ่ม exit_loop, นักวิจารณ์ และผู้ปรับแต่งลงใน specialists.py
เปิด travel_planner/specialists.py:
cloudshell edit ~/adk-agents/travel_planner/specialists.py
ต่อท้ายเครื่องมือ exit_loop (ToolContext), itinerary_critic_agent และ itinerary_refiner_agent ที่ด้านล่างของ travel_planner/specialists.py:
def exit_loop(tool_context: ToolContext) -> dict:
    """Call ONLY when the critique is APPROVED to exit the refinement loop."""
    print(f"[Tool Call] exit_loop triggered by {tool_context.agent_name}")
    tool_context.actions.escalate = True
    return {"status": "approved", "message": "Itinerary approved. Exiting refinement loop."}


# --- Specialist 5: The Budget & Constraint Critic (Inside LoopAgent) ---
itinerary_critic_agent = Agent(
    name="itinerary_critic_agent",
    include_contents="none",
    description="Audits the itinerary draft against budget and negative constraints.",
    instruction="""
        Audit Current Itinerary ({final_itinerary}) against User Preferences ({user_preferences}).
        Verify that the USD total stays within the user's budget and no excluded venue types appear.
        If all checks pass, respond EXACTLY with the single word "APPROVED".
        Otherwise, output 1-2 concise revision instructions explaining what to swap or adjust.
    """,
    output_key="critique_feedback",
)

# --- Specialist 6: The Itinerary Refiner / Exiter (Inside LoopAgent) ---
itinerary_refiner_agent = Agent(
    name="itinerary_refiner_agent",
    include_contents="none",
    description="Refines the itinerary from critique feedback, or calls exit_loop when APPROVED.",
    instruction="""
        Review Auditor Critique ({critique_feedback}) for Current Itinerary ({final_itinerary}).
        If the critique is EXACTLY "APPROVED", call `exit_loop` immediately and return the itinerary unchanged.
        Otherwise, revise the draft using {activity_recommendations} and {restaurant_recommendations}
        so all USD budget and exclusion rules pass, and output ONLY the updated Markdown itinerary.
    """,
    tools=[exit_loop],
    output_key="final_itinerary",
)
เพิ่ม LoopAgent ลงใน workflows.py
เปิด travel_planner/workflows.py:
cloudshell edit ~/adk-agents/travel_planner/workflows.py
อัปเดต travel_planner/workflows.py เพื่อรวม itinerary_critic_agent และ itinerary_refiner_agent ไว้ใน LoopAgent (max_iterations=3) และเพิ่มเป็นระยะที่ 4 ของ master_travel_agent:
from google.adk.agents import LoopAgent, ParallelAgent, SequentialAgent
from .specialists import (
    activity_finder_agent,
    itinerary_critic_agent,
    itinerary_refiner_agent,
    itinerary_synthesizer_agent,
    restaurant_finder_agent,
    user_profiler_agent,
)

# Stage 2: Parallel research branch
parallel_research_agent = ParallelAgent(
    name="parallel_research_agent",
    description="Runs activity and restaurant research concurrently.",
    sub_agents=[
        activity_finder_agent,
        restaurant_finder_agent,
    ],
)

# Stage 4: Iterative Maker-Checker refinement loop
refinement_loop_agent = LoopAgent(
    name="refinement_loop_agent",
    description="Iteratively audits and refines the itinerary until constraints and budget are approved.",
    sub_agents=[
        itinerary_critic_agent,
        itinerary_refiner_agent,
    ],
    max_iterations=3,
)

# Master pipeline: Profile -> Parallel Research -> Synthesize -> Refinement Loop
master_travel_agent = SequentialAgent(
    name="master_travel_agent",
    description="Orchestrates the end-to-end travel planning process for trip and itinerary requests.",
    sub_agents=[
        user_profiler_agent,          # Stage 1: Extract constraints
        parallel_research_agent,      # Stage 2: Research activities & restaurants in parallel
        itinerary_synthesizer_agent,  # Stage 3: Draft initial itinerary
        refinement_loop_agent,        # Stage 4: Audit and refine until approved
    ],
)
🔍 ตรวจสอบงานของคุณ
เริ่ม adk web เพื่อทดสอบเวิร์กโฟลว์แบบหลาย Agent ที่สมบูรณ์
cd ~/adk-agents
adk web --allow_origins "*"
เปิด UI ของ Web Preview ในพอร์ต 8000 เริ่มเซสชันใหม่ และทดสอบทั้งระบบด้วยพรอมต์ที่มีข้อจำกัดหลายรายการเกี่ยวกับเกียวโตต่อไปนี้
Design a full-day itinerary for Kyoto with a total budget of $100. My main interests are historical landmarks, temples, and authentic local cuisine. Please do not include any modern art museums or galleries.
คุณควรเห็นเอาต์พุตที่คล้ายกับลำดับการดำเนินการต่อไปนี้ในมุมมองเหตุการณ์และบันทึกเทอร์มินัล
1. user_profiler_agent -> writes JSON with destination="Kyoto", budget="$100", exclusions=["modern art museums", "galleries"]
2. parallel_research_agent -> runs activity_finder_agent and restaurant_finder_agent in parallel
3. itinerary_synthesizer_agent -> produces initial draft in state['final_itinerary']
4. refinement_loop_agent:
   - itinerary_critic_agent -> audits USD budget and exclusions -> outputs "APPROVED" (or revision notes)
   - itinerary_refiner_agent -> triggers [Tool Call] exit_loop triggered by itinerary_refiner_agent and outputs the approved itinerary
- มุมมองเหตุการณ์: คลิกชิปเหตุการณ์จาก
itinerary_critic_agentหรือitinerary_refiner_agentเพื่อตรวจสอบเพย์โหลดในแท็บข้อมูลทางด้านซ้าย เมื่อitinerary_refiner_agentเรียกใช้exit_loopให้ตรวจสอบเหตุการณ์เพื่อดูactions.escalate: trueซึ่งเป็นสัญญาณที่บอกให้LoopAgentหยุดทำซ้ำก่อนที่จะถึงmax_iterations=3 - แท็บสถานะ: คลิกแท็บสถานะเพื่อดูการอัปเดต
state['critique_feedback']และstate['final_itinerary']ในบัตรต่างๆ หากฉบับร่างแรกเกิน$100 USDcritique_feedbackจะเก็บวิธีการแก้ไขของผู้ตรวจสอบไว้ในรอบที่ 1 ก่อนที่final_itineraryจะอัปเดตด้วยทางเลือกที่มีต้นทุนต่ำกว่า และcritique_feedbackจะเปลี่ยนเป็น"APPROVED"ในรอบที่ 2
เมื่อทดสอบเสร็จแล้ว ให้กด Ctrl + C ในเทอร์มินัลเพื่อหยุด adk web
9. ล้างข้อมูล
ลบไฟล์โปรเจ็กต์ที่อยู่ในเครื่อง
หากต้องการนำไดเรกทอรีโปรเจ็กต์ adk-agents และสภาพแวดล้อมเสมือนออกจากโฟลเดอร์หน้าแรกของ Cloud Shell ให้เรียกใช้คำสั่งต่อไปนี้
cd ~
rm -rf ~/adk-agents
ปิดใช้ Agent Platform API
หากไม่ต้องการเปิดใช้ Agent Platform API ในโปรเจ็กต์อีกต่อไป ให้ปิดใช้ด้วย gcloud:
gcloud services disable aiplatform.googleapis.com --quiet
ลบโปรเจ็กต์ Google Cloud ทั้งโปรเจ็กต์ (ไม่บังคับ)
PROJECT_ID=$(gcloud config get-value project)
gcloud projects delete "$PROJECT_ID" --quiet
🔍 ตรวจสอบงานของคุณ
ยืนยันว่านำ ~/adk-agents ออกแล้ว
test ! -d ~/adk-agents && echo "Workspace ~/adk-agents removed"
คุณควรเห็นเอาต์พุตที่คล้ายกับตัวอย่างต่อไปนี้
Workspace ~/adk-agents removed
10. ขอแสดงความยินดี
ยินดีด้วย คุณได้สร้างระบบแบบหลาย Agent ตามลำดับชั้นด้วย Google Agent Development Kit (ADK) ซึ่งประสานงานทีม Agent เฉพาะทาง 6 รายในเวิร์กโฟลว์แบบวนซ้ำตามลำดับ แบบขนาน และแบบวนซ้ำ
สิ่งที่คุณทำสำเร็จ
- การสื่อสารระหว่าง Agent ที่มีโครงสร้างผ่านสถานะเซสชันที่แชร์ (การแทรกเทมเพลต
output_keyและ{state_variable}) - สร้างไปป์ไลน์ทีละขั้นตอนเชิงกำหนดโดยใช้
SequentialAgent - ดำเนินการตัวแทนการวิจัย Google Search อิสระพร้อมกันโดยใช้
ParallelAgent - ใช้ลูปการยืนยันแบบ Maker-Checker อัตโนมัติโดยใช้
LoopAgentและtool_context.actions.escalate = True
ขั้นตอนถัดไป
- ต่อด้วยส่วนที่ 4 ของซีรีส์ การสร้าง AI Agent ด้วย ADK: การจัดระเบียบเวิร์กโฟลว์กราฟ เพื่อสร้างเครื่องมือวางแผนการเดินทางนี้ขึ้นมาใหม่ด้วย
Workflow,JoinNodeและวงจรEvent(route=...)เชิงกำหนดที่รวมเป็นหนึ่งเดียวของ ADK 2 - อ่านเอกสารประกอบอย่างเป็นทางการเกี่ยวกับ Agent ของเวิร์กโฟลว์ ADK
- สำรวจระบบ Multi-Agent ใน ADK
- เข้าร่วมโปรแกรม GEAR (Gemini Enterprise Agent Ready) และโปรแกรมรับการรับรองเพื่อเข้าร่วมเวิร์กช็อปภาคปฏิบัติและเส้นทางการเรียนรู้