
1. Overview
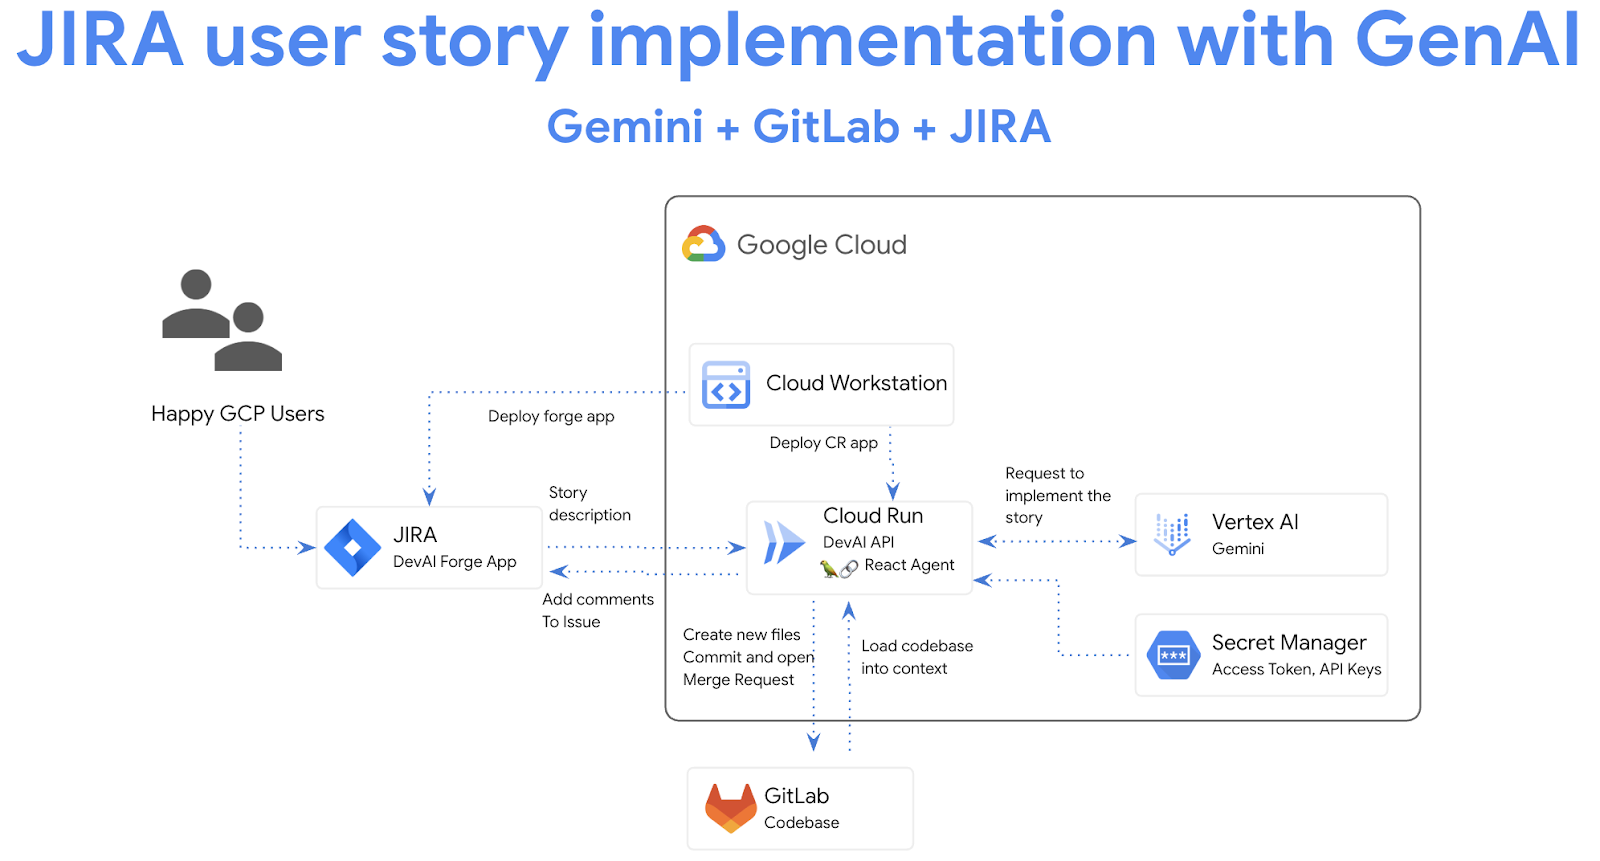
In this lab, you will build a solution to automate JIRA user stories implementation with GenAI.
What you will learn
There are several main parts to the lab:
- Deploy Cloud Run application to integrate with Gemini APIs
- Create and deploy Atlassian Forge app for JIRA
- Use LangChain ReAct Agents for GitLab tasks automation
Prerequisites
- This lab assumes familiarity with the Cloud Console and Cloud Shell environments.
2. Setup and requirements
Cloud Project setup
- Sign-in to the Google Cloud Console and create a new project or reuse an existing one. If you don't already have a Gmail or Google Workspace account, you must create one.


- The Project name is the display name for this project's participants. It is a character string not used by Google APIs. You can always update it.
- The Project ID is unique across all Google Cloud projects and is immutable (cannot be changed after it has been set). The Cloud Console auto-generates a unique string; usually you don't care what it is. In most codelabs, you'll need to reference your Project ID (typically identified as
PROJECT_ID). If you don't like the generated ID, you might generate another random one. Alternatively, you can try your own, and see if it's available. It can't be changed after this step and remains for the duration of the project. - For your information, there is a third value, a Project Number, which some APIs use. Learn more about all three of these values in the documentation.
- Next, you'll need to enable billing in the Cloud Console to use Cloud resources/APIs. Running through this codelab won't cost much, if anything at all. To shut down resources to avoid incurring billing beyond this tutorial, you can delete the resources you created or delete the project. New Google Cloud users are eligible for the $300 USD Free Trial program.
Environment setup
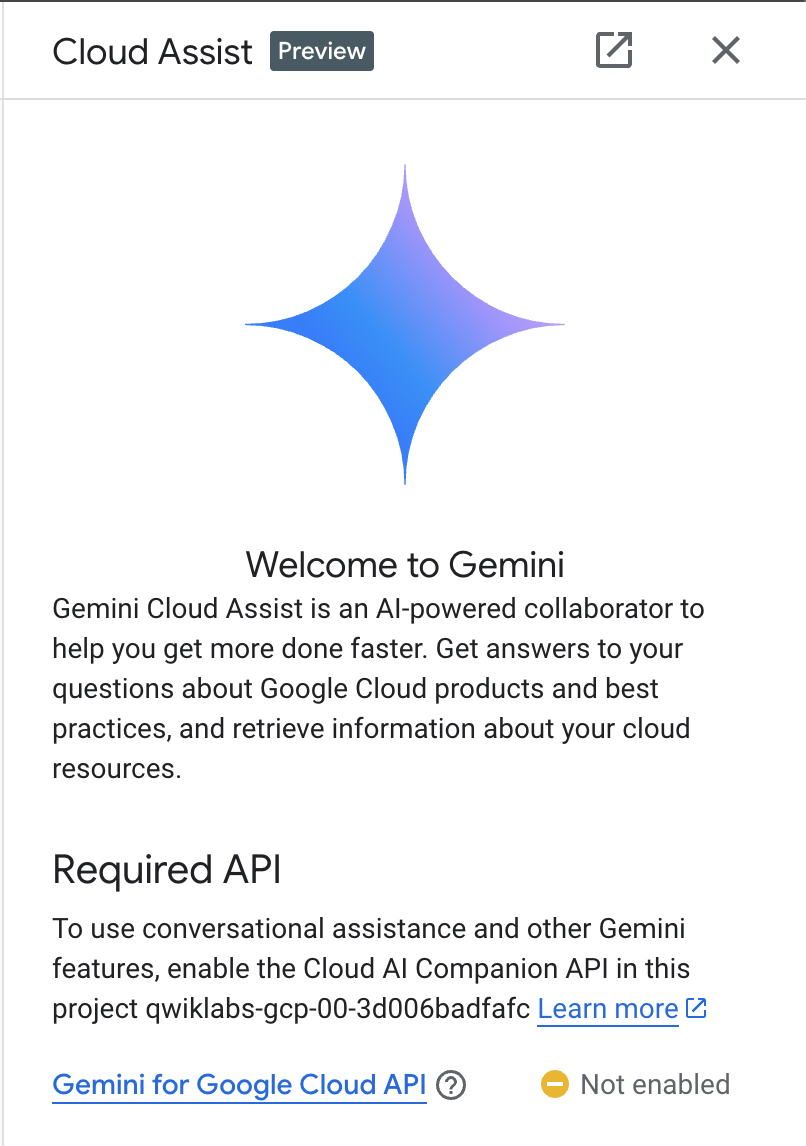
Open Gemini chat.

Or type "Ask Gemini" in the search bar.

Enable Gemini for Google Cloud API:
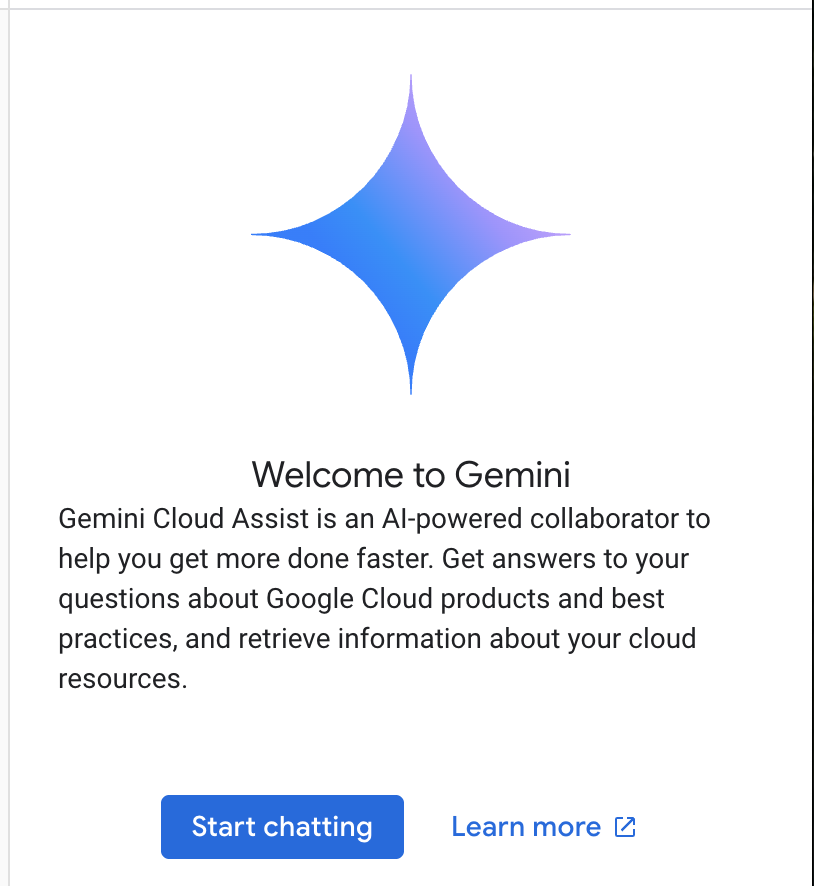
Click "Start chatting" and follow one of the sample questions or type your own prompt to try it out.
Prompts to try:
- Explain Cloud Run in 5 key points.
- You are Google Cloud Run Product Manager, explain Cloud Run to a student in 5 short key points.
- You are Google Cloud Run Product Manager, explain Cloud Run to a Certified Kubernetes Developer in 5 short key points.
- You are Google Cloud Run Product Manager, explain when would you use Cloud Run versus GKE to a Senior Developer in 5 short key points.
Check out the Prompt Guide to learn more about writing better prompts.
How Gemini for Google Cloud uses your data
Google's privacy commitment
Google was one of the first in the industry to publish an AI/ML privacy commitment, which outlines our belief that customers should have the highest level of security and control over their data that's stored in the cloud.
Data you submit and receive
The questions that you ask Gemini, including any input information or code that you submit to Gemini to analyze or complete, are called prompts. The answers or code completions that you receive from Gemini are called responses. Gemini doesn't use your prompts or its responses as data to train its models.
Encryption of prompts
When you submit prompts to Gemini, your data is encrypted in-transit as input to the underlying model in Gemini.
Program data generated from Gemini
Gemini is trained on first-party Google Cloud code as well as selected third-party code. You're responsible for the security, testing, and effectiveness of your code, including any code completion, generation, or analysis that Gemini offers you.
Learn more how Google handles your prompts.
3. Options to test prompts
You have several options to test prompts.
Vertex AI Studio is a part of Google Cloud's Vertex AI platform, specifically designed to simplify and accelerate the development and use of generative AI models.
Google AI Studio is a web-based tool for prototyping and experimenting with prompt engineering and the Gemini API.
- Gemini Web App (gemini.google.com)
The Google Gemini web app (gemini.google.com) is a web-based tool designed to help you explore and utilize the power of Google's Gemini AI models.
- Google Gemini mobile app for Android and Google app on iOS
4. Review application
Create Service Account
Return to Google Cloud Console and activate Cloud Shell by clicking on the icon to the right of the search bar.

In the opened terminal, run following commands to create a new service account and keys.
You will use this service account to make API calls to Vertex AI Gemini API from Cloud Run application.
Configure project details using your Qwiklabs project details.
Example: qwiklabs-gcp-00-2c10937585bb
gcloud config set project YOUR_QWIKLABS_PROJECT_ID
Create a service account.
PROJECT_ID=$(gcloud config get-value project)
SERVICE_ACCOUNT_NAME='vertex-client'
DISPLAY_NAME='Vertex Client'

gcloud iam service-accounts create $SERVICE_ACCOUNT_NAME --project $PROJECT_ID --display-name "$DISPLAY_NAME"
Grant roles.
gcloud projects add-iam-policy-binding $PROJECT_ID --member="serviceAccount:$SERVICE_ACCOUNT_NAME@$PROJECT_ID.iam.gserviceaccount.com" --role="roles/aiplatform.admin"

gcloud projects add-iam-policy-binding $PROJECT_ID --member="serviceAccount:$SERVICE_ACCOUNT_NAME@$PROJECT_ID.iam.gserviceaccount.com" --role="roles/aiplatform.user"

gcloud projects add-iam-policy-binding $PROJECT_ID --member="serviceAccount:$SERVICE_ACCOUNT_NAME@$PROJECT_ID.iam.gserviceaccount.com" --role="roles/cloudbuild.builds.editor"

gcloud projects add-iam-policy-binding $PROJECT_ID --member="serviceAccount:$SERVICE_ACCOUNT_NAME@$PROJECT_ID.iam.gserviceaccount.com" --role="roles/artifactregistry.admin"

gcloud projects add-iam-policy-binding $PROJECT_ID --member="serviceAccount:$SERVICE_ACCOUNT_NAME@$PROJECT_ID.iam.gserviceaccount.com" --role="roles/storage.admin"

gcloud projects add-iam-policy-binding $PROJECT_ID --member="serviceAccount:$SERVICE_ACCOUNT_NAME@$PROJECT_ID.iam.gserviceaccount.com" --role="roles/run.admin"

gcloud projects add-iam-policy-binding $PROJECT_ID --member="serviceAccount:$SERVICE_ACCOUNT_NAME@$PROJECT_ID.iam.gserviceaccount.com" --role="roles/secretmanager.secretAccessor"
If prompted to authorize, click "Authorize" to continue.

Enable required services to use Vertex AI APIs and Gemini chat.
gcloud services enable \
    generativelanguage.googleapis.com \
    aiplatform.googleapis.com \
    cloudaicompanion.googleapis.com \
    run.googleapis.com \
    cloudresourcemanager.googleapis.com
Enable required services to use Vertex AI APIs and Gemini chat.
gcloud services enable \
    artifactregistry.googleapis.com \
    cloudbuild.googleapis.com \
    runapps.googleapis.com \
    workstations.googleapis.com \
    servicemanagement.googleapis.com \
    secretmanager.googleapis.com \
    containerscanning.googleapis.com
Clone GitHub Repository
Clone the GitHub repository.
git clone https://github.com/GoogleCloudPlatform/genai-for-developers.git
Open Cloud Shell Editor

Using the "File / Open Folder" menu item, open "genai-for-developers".
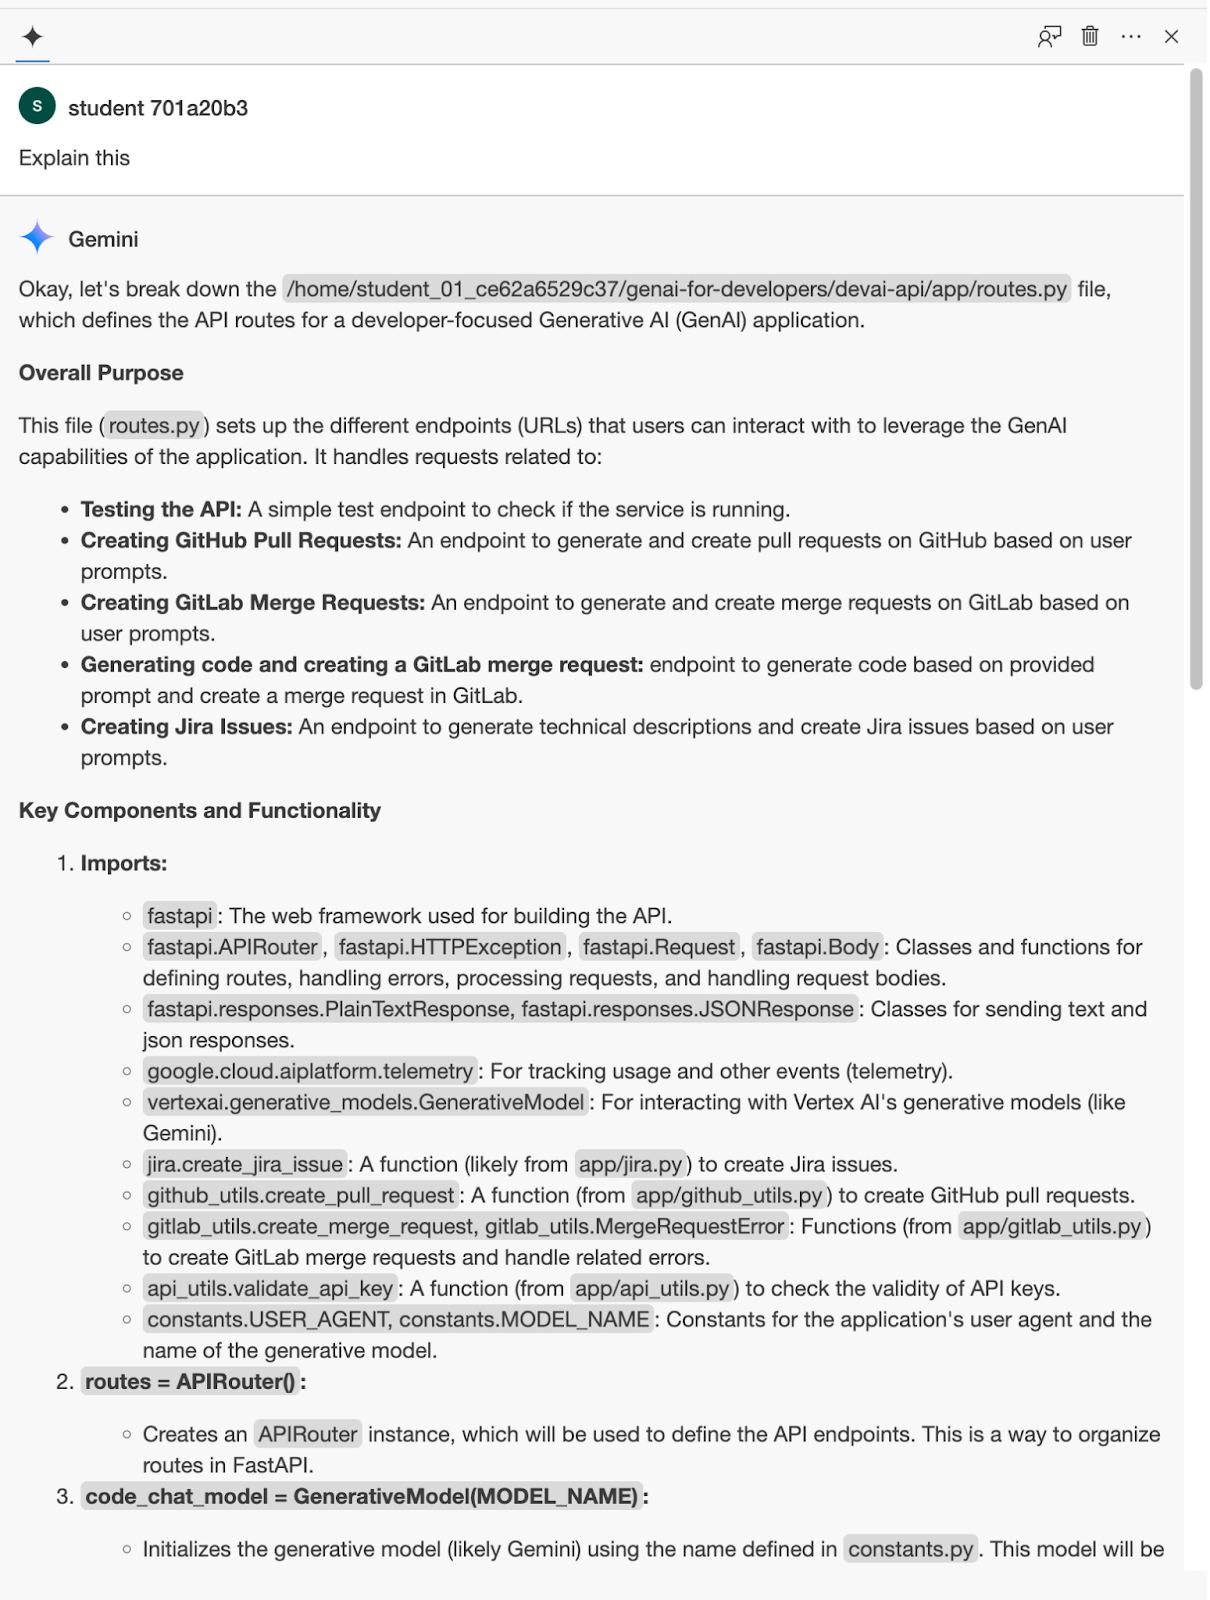
Open file "devai-api/app/routes.py" and then right click anywhere in the file and select "Gemini > Explain this" from the context menu.

Review Gemini's explanation for the selected file.
5. GitLab Repository and Toolkit configuration
In this lab, you will use the GitLabToolkit to automate GitLab merge requests creation.
LangChain Toolkits Overview
LangChain Toolkits are sets of tools designed to streamline and enhance the development of applications with LangChain. They offer various functionalities depending on the specific toolkit, but generally, they help with:
- Connecting to external data sources: Access and incorporate information from APIs, databases, and other external sources into your LangChain applications.
- Advanced prompting techniques: Utilize pre-built prompts or create custom ones to optimize interactions with language models.
- Chain creation and management: Build complex chains with ease and manage them efficiently.
- Evaluation and monitoring: Analyze the performance of your LangChain applications and chains.
Some popular LangChain Toolkits include:
- Agent Executor Toolkits: Tools for developing agents that can interact with the real world through actions like web browsing or code execution.
- Prompt Engineering Toolkit: A collection of resources for crafting effective prompts.
GitLab Toolkit Overview
The Gitlab toolkit contains tools that enable a LLM agent to interact with a gitlab repository. The tool is a wrapper for the python-gitlab library.
GitLab toolkit can perform following tasks:
- Create File - creates a new file in the repository.
- Read File - reads a file from the repository.
- Update File - updates a file in the repository.
- Create Pull Request - creates a pull request from the bot's working branch to the base branch.
- Get Issues - fetches issues from the repository.
- Get Issue - fetches details about a specific issue.
- Comment on Issue - posts a comment on a specific issue.
- Delete File - deletes a file from the repository.
GitLab Project Setup
Open GitLab, create a new project and set up Project Access Token under "Settings / Access Tokens".
Use following details:
- Token name:
devai-api-qwiklabs - Role:
Maintainer - Select scopes:
api
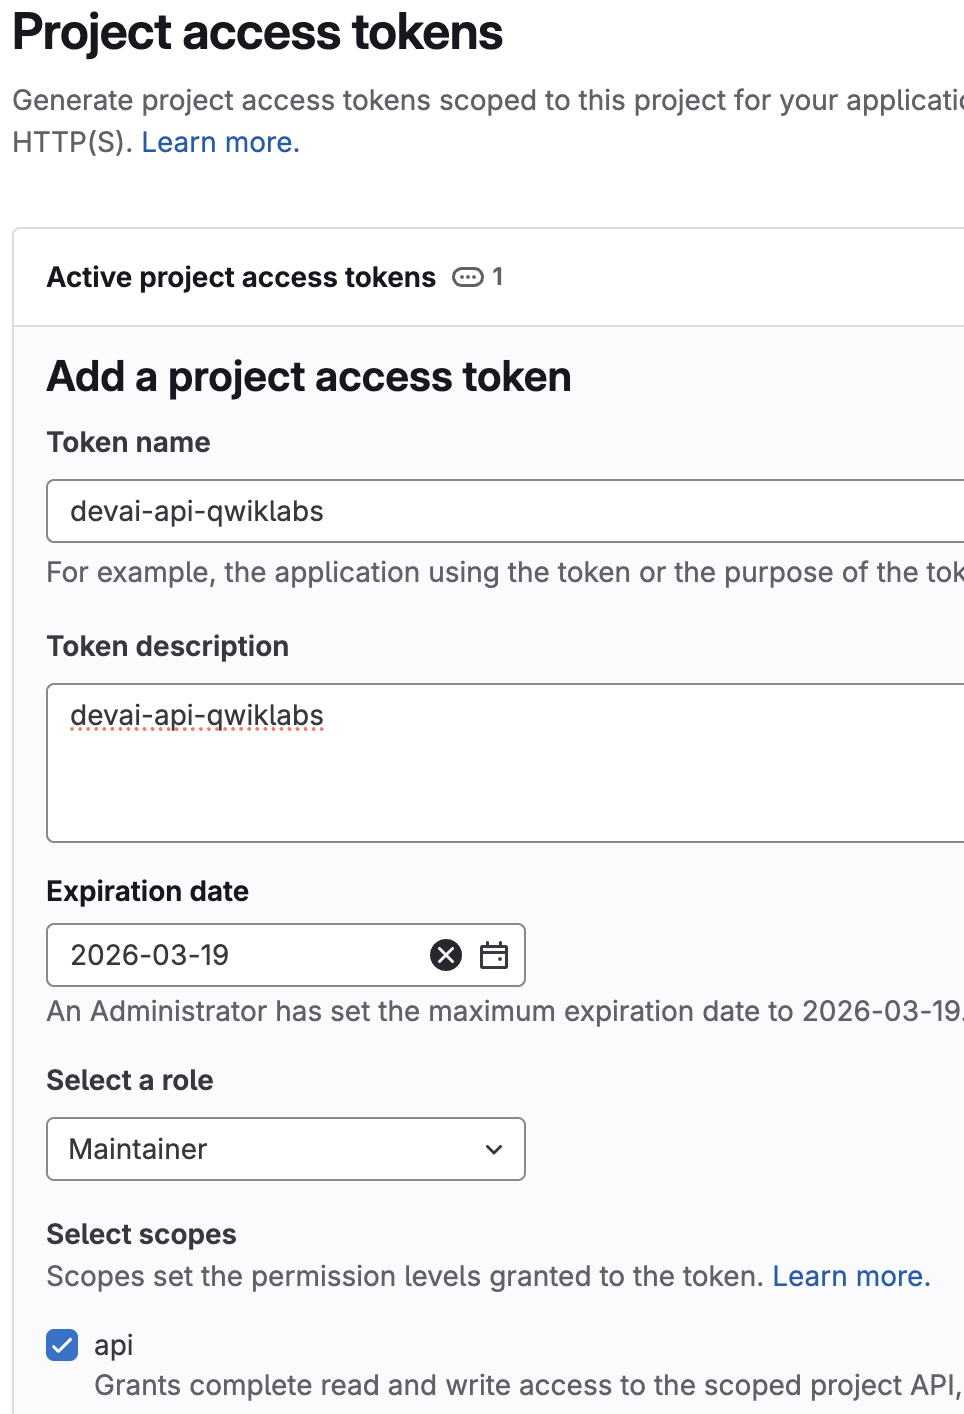
Copy and paste the Access Token value into a temp file on your laptop, it will be used in the next steps.
6. Prepare to deploy application on Cloud Run
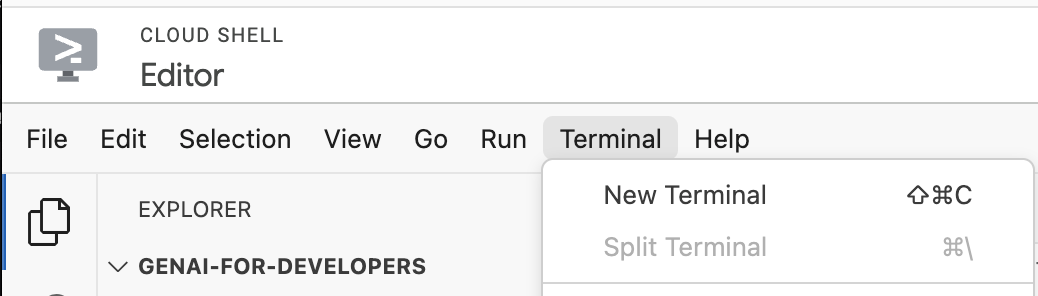
Return to the Cloud Shell Editor and use existing or open a new terminal.
Configure project details using your Qwiklabs project details.
Example: qwiklabs-gcp-00-2c10937585bb
gcloud config set project YOUR-QWIKLABS-PROJECT-ID
Set rest of the environment variables:
export PROJECT_ID=$(gcloud config get-value project)
export LOCATION=us-central1
export REPO_NAME=devai-api
export SERVICE_NAME=devai-api
Set environment variables required for GitLab integration.
export GITLAB_PERSONAL_ACCESS_TOKEN=gitlab-token
To avoid exposing sensitive information in the terminal, the best practice is to use read -s GITLAB_PERSONAL_ACCESS_TOKEN this is a secure way to set environment variables without value showing up in the console's command history. After running it, you have to paste the value and hit enter. You will need to export the environment variable as well: export GITLAB_PERSONAL_ACCESS_TOKEN
This command requires you to update your GitLab userid and repository name.
Example: export GITLAB_REPOSITORY="gitrey/qwiklabs-test"

export GITLAB_REPOSITORY="USERID/REPOSITORY"
Set rest of the environment variables:
export GITLAB_URL="https://gitlab.com"
export GITLAB_BRANCH="devai"
export GITLAB_BASE_BRANCH="main"
LangSmith LLM tracing configuration
Setup the account if you want to view agent tracing information in LangSmith, otherwise execute the commands as is.
Create a LangSmith account and generate a Service API key in the Settings section. https://smith.langchain.com/settings
Set environment variables required for LangSmith integration.
export LANGCHAIN_TRACING_V2=true
export LANGCHAIN_ENDPOINT="https://api.smith.langchain.com"

export LANGCHAIN_API_KEY=langchain-service-api-key
JIRA configuration
These values are not used in this lab, so you don't need to update it to your specific JIRA project values before executing the commands.
Set environment variables required for Cloud Run service deployment.
export JIRA_API_TOKEN=jira-token
export JIRA_USERNAME="YOUR-EMAIL"
export JIRA_INSTANCE_URL="https://YOUR-JIRA-PROJECT.atlassian.net"
export JIRA_PROJECT_KEY="YOUR-JIRA-PROJECT-KEY"
export JIRA_CLOUD=true
Create API key
Create a new API key in the Cloud Console / API & Services / Credentials section.
This key will be used to authenticate JIRA API calls to Cloud Run application.
For the production environment, you would configure application and API restrictions for created API key. Application restrictions limit an API key's usage to specific websites(e.g. Your JIRA instance).
Set environment variables required for Cloud Run service deployment.
export DEVAI_API_KEY=your-api-key
Create secrets in Secret Manager
For this lab, we follow best practices and use Secret Manager to store and reference the Access Tokens, API Key and LangChain API Key values in Cloud Run.
Create and store required secrets in Secret Manager.
echo -n $DEVAI_API_KEY | \
 gcloud secrets create DEVAI_API_KEY \
 --data-file=-

echo -n $JIRA_API_TOKEN | \
 gcloud secrets create JIRA_API_TOKEN \
 --data-file=-

echo -n $GITLAB_PERSONAL_ACCESS_TOKEN | \
 gcloud secrets create GITLAB_PERSONAL_ACCESS_TOKEN \
 --data-file=-

echo -n $LANGCHAIN_API_KEY | \
 gcloud secrets create LANGCHAIN_API_KEY \
 --data-file=-
7. Deploy Devai-API to Cloud Run
Check that you are in the right folder.
cd ~/genai-for-developers/devai-api
Deploy application to Cloud Run.
gcloud run deploy "$SERVICE_NAME" \
  --source=. \
  --region="$LOCATION" \
  --allow-unauthenticated \
  --service-account vertex-client \
  --set-env-vars PROJECT_ID="$PROJECT_ID" \
  --set-env-vars LOCATION="$LOCATION" \
  --set-env-vars GITLAB_URL="$GITLAB_URL" \
  --set-env-vars GITLAB_REPOSITORY="$GITLAB_REPOSITORY" \
  --set-env-vars GITLAB_BRANCH="$GITLAB_BRANCH" \
  --set-env-vars GITLAB_BASE_BRANCH="$GITLAB_BASE_BRANCH" \
  --set-env-vars JIRA_USERNAME="$JIRA_USERNAME" \
  --set-env-vars JIRA_INSTANCE_URL="$JIRA_INSTANCE_URL" \
  --set-env-vars JIRA_PROJECT_KEY="$JIRA_PROJECT_KEY" \
  --set-env-vars JIRA_CLOUD="$JIRA_CLOUD" \
  --set-env-vars LANGCHAIN_TRACING_V2="$LANGCHAIN_TRACING_V2" \
  --update-secrets="LANGCHAIN_API_KEY=LANGCHAIN_API_KEY:latest" \
  --update-secrets="GITLAB_PERSONAL_ACCESS_TOKEN=GITLAB_PERSONAL_ACCESS_TOKEN:latest" \
  --update-secrets="JIRA_API_TOKEN=JIRA_API_TOKEN:latest" \
  --update-secrets="DEVAI_API_KEY=DEVAI_API_KEY:latest" \
  --min-instances=1 \
  --max-instances=3
Answer Y to create Artifact Registry Docker repository.
Deploying from source requires an Artifact Registry Docker repository to store built containers. A repository named [cloud-run-source-deploy] in
region [us-central1] will be created.

Do you want to continue (Y/n)?  y
Review gcloud run deploy SERVICE_NAME --source=. flow below. Learn more.

Behind the scenes, this command uses Google Cloud's buildpacks and Cloud Build to automatically build container images from your source code without having to install Docker on your machine or set up buildpacks or Cloud Build. That is, the single command described above does what would otherwise require the gcloud builds submit and the gcloud run deploy commands.
If you have provided Dockerfile(which we did in this repository) then Cloud Build will use it to build container images vs relying on the buildpacks to automatically detect and build container images. To learn more about buildpacks check out documentation.
Review Cloud Build logs in the Console.
Review created Docker image in Artifact Registry.
Review Cloud Run instance details in the Cloud Console.
Test application
Test endpoint by running curl command.
Update with your Cloud Run service url before running the command.
Example:
curl -H "X-devai-api-key: $DEVAI_API_KEY" https://devai-api-1110000001.us-central1.run.app/test
8. Automate story implementation
Forge is a platform that allows developers to build apps that integrate with Atlassian products, such as Jira, Confluence, Compass and Bitbucket.

Install Forge CLI
Install the Forge CLI globally by running:
npm install -g @forge/cli
For this lab, we will use environment variables to login.

Setup JIRA project
Use your personal account to create/view JIRA projects.
Review your existing JIRA projects: https://admin.atlassian.com/
Create a new JIRA project using your personal account.
Go to https://team.atlassian.com/your-work and click  and then select
  . After that, select "JIRA Software" - "Try it now". Follow the prompts to complete project/site creation.

Select JIRA Software.

Create a new project.

Create Atlassian API token
Create or use an existing Atlassian API token to log in to the CLI.
The CLI uses your token when running commands.
- Go to https://id.atlassian.com/manage/api-tokens.
- Click Create API token.
- Enter a label to describe your API token. For example, forge-api-token.
- Click Create.
- Click Copy to clipboard and close the dialog.
Configure Forge environment settings
Return to Cloud Console and run commands below in the terminal.
Log in to the Forge CLI to start using Forge commands.
Set your JIRA/FORGE email address. Replace with your email address.
export FORGE_EMAIL=your-email
Set Forge API token. Replace with your JIRA API token.
export FORGE_API_TOKEN=your-jira-api-token
Test forge cli by running the command below. Answer "No" when asked to collect analytics.
forge settings set usage-analytics false
Check if you are logged in.
forge whoami
Sample output.
Logged in as John Green (johngreen@email.com)
Account ID: 123090:aaabbcc-076a-455c-99d0-d1aavvccdd
Create Forge application
Check that you are in the "~/genai-for-developers" folder.
Run command to create a Forge application.
forge create
Use following values when prompted:
- App name:
devai-jira-ui-qwiklabs - Select a category:
UI Kit - Select a product:
Jira - Select a template:
jira-issue-panel

Change into the application folder.
cd devai-jira-ui-qwiklabs/
Run command to install dependencies.
npm install
Run deployment command.
forge deploy
Sample output:
Deploying your app to the development environment.
Press Ctrl+C to cancel.

Running forge lint...
No issues found.

✔ Deploying devai-jira-ui-qwiklabs to development...

ℹ Packaging app files
ℹ Uploading app
ℹ Validating manifest
ℹ Snapshotting functions
ℹ Deploying to environment

✔ Deployed

Deployed devai-jira-ui-qwiklabs to the development environment.
Install application.
forge install
Use following values when prompted:
- Select a product:
Jira - Enter the site URL:
your-domain.atlassian.net
Sample output:
Select the product your app uses.

? Select a product: Jira

Enter your site. For example, your-domain.atlassian.net

? Enter the site URL: genai-for-developers.atlassian.net

Installing your app onto an Atlassian site.
Press Ctrl+C to cancel.

? Do you want to continue? Yes

✔ Install complete!

Your app in the development environment is now installed in Jira on genai-for-developers.atlassian.net
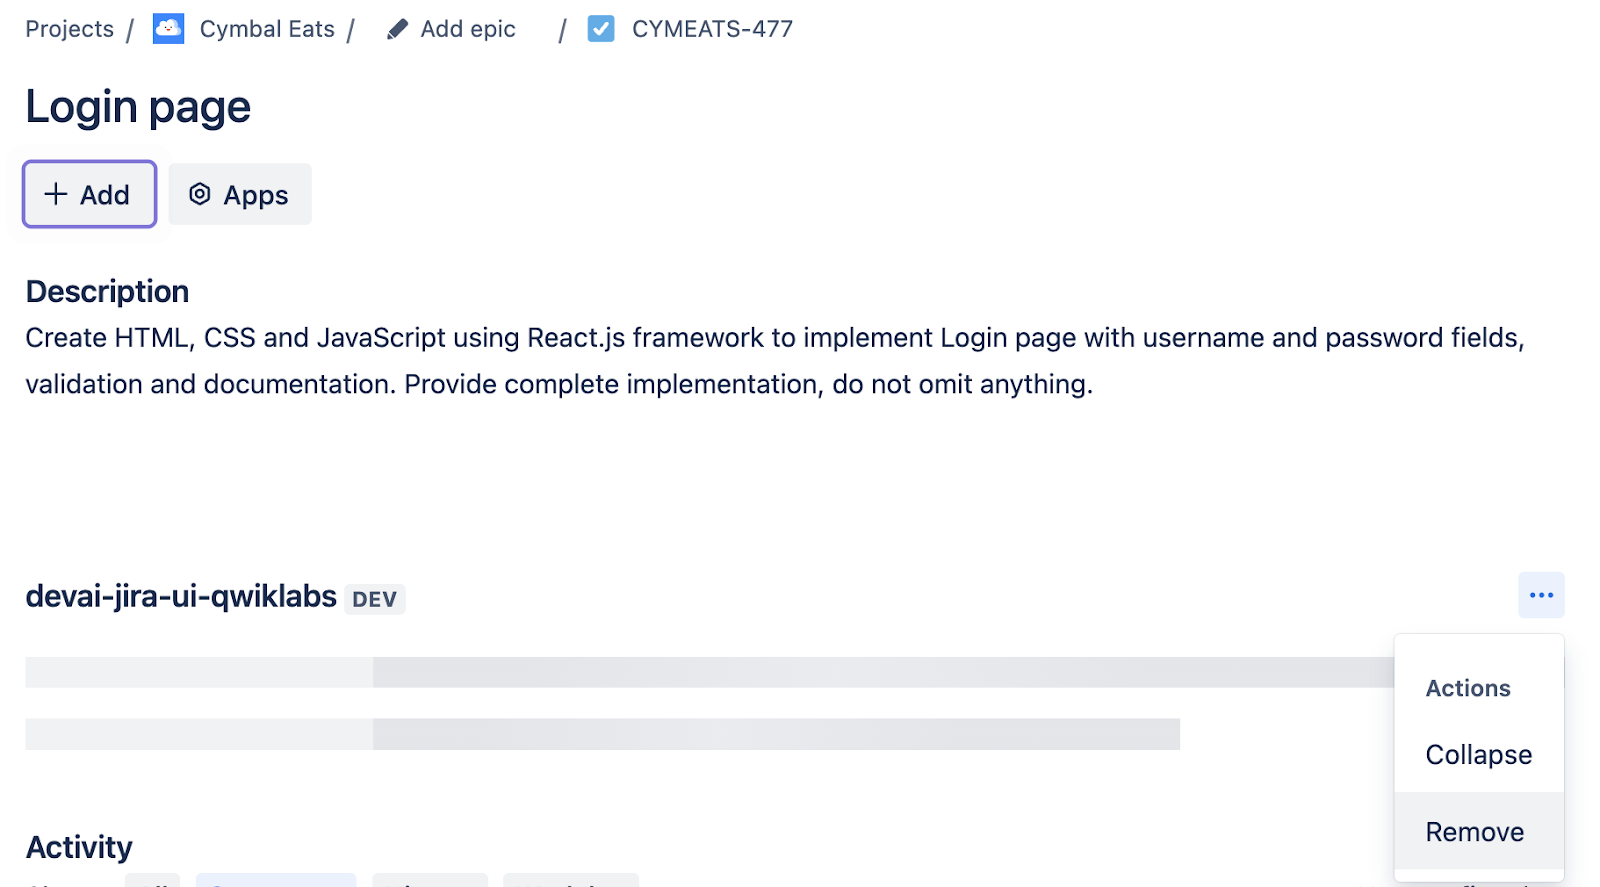
Open your JIRA site and create a new JIRA task with following description:
Create HTML, CSS and JavaScript using React.js framework to implement Login page with username and password fields, validation and documentation. Provide complete implementation, do not omit anything.
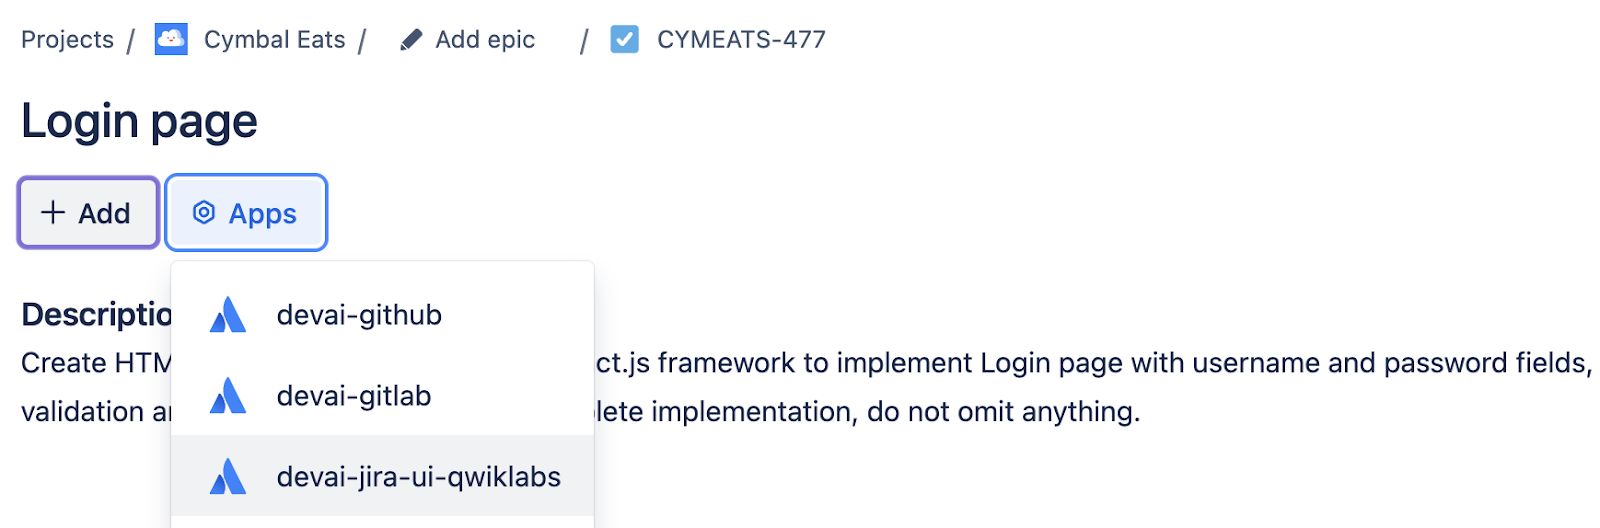
When you open the task, you will see the "devai-jira-ui-qwiklabs" button.
Click the button and review changes in the UI.
View forge backend logs.
forge logs
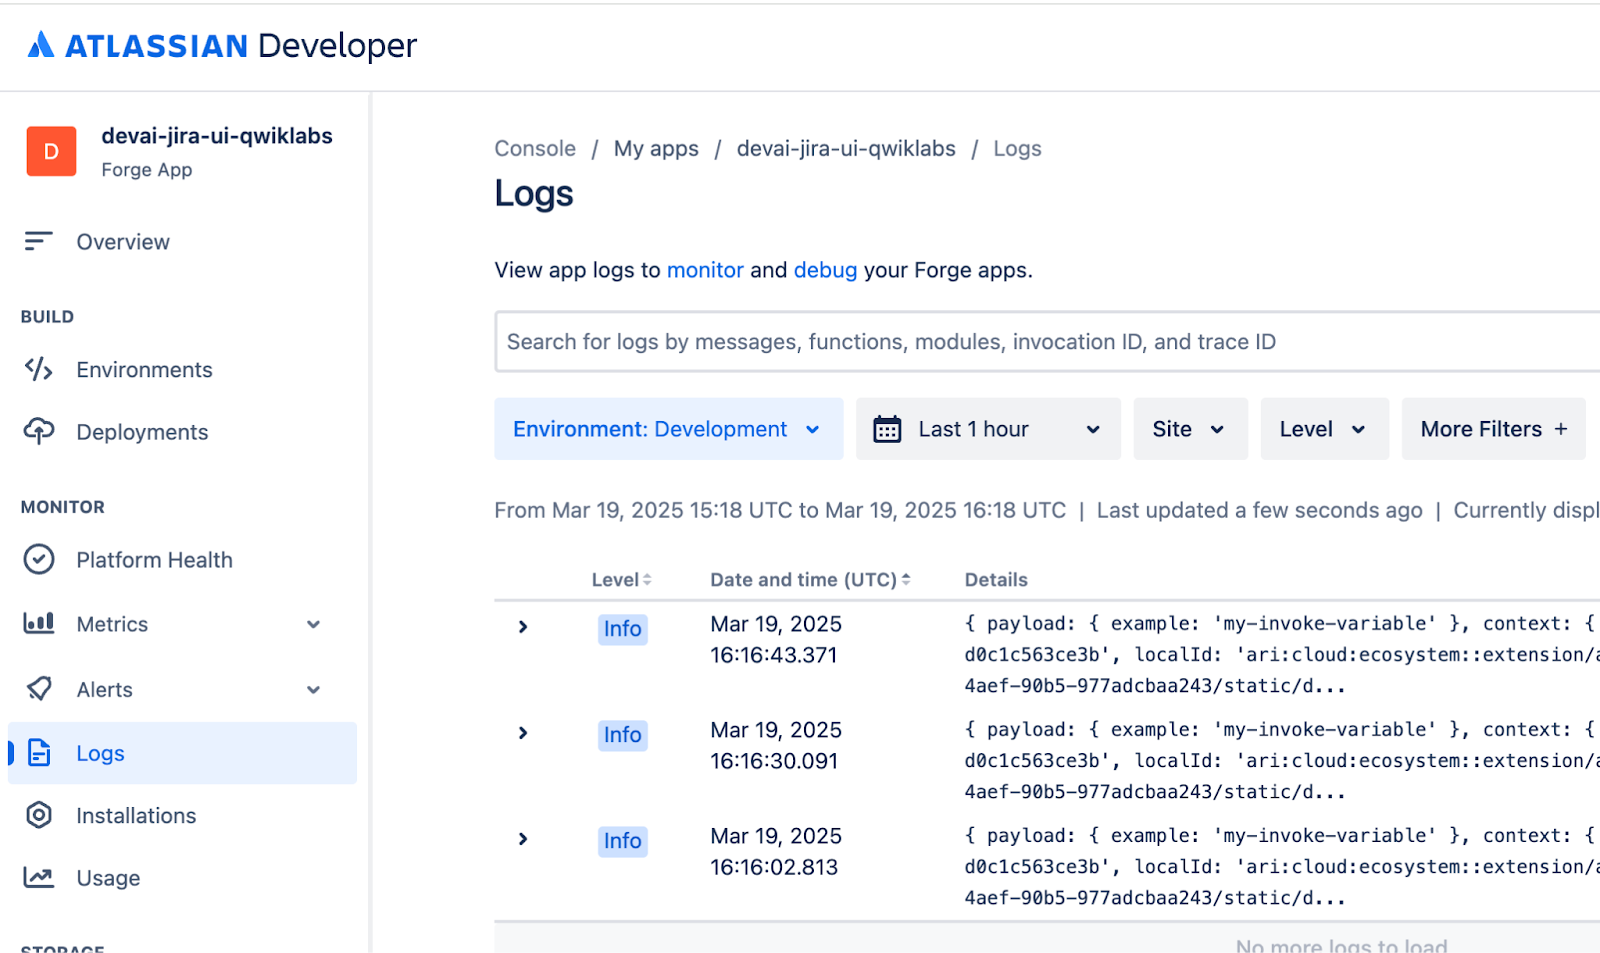
Atlassian Developer Console
You can also view and manage deployed apps in Atlassian Developer Console.
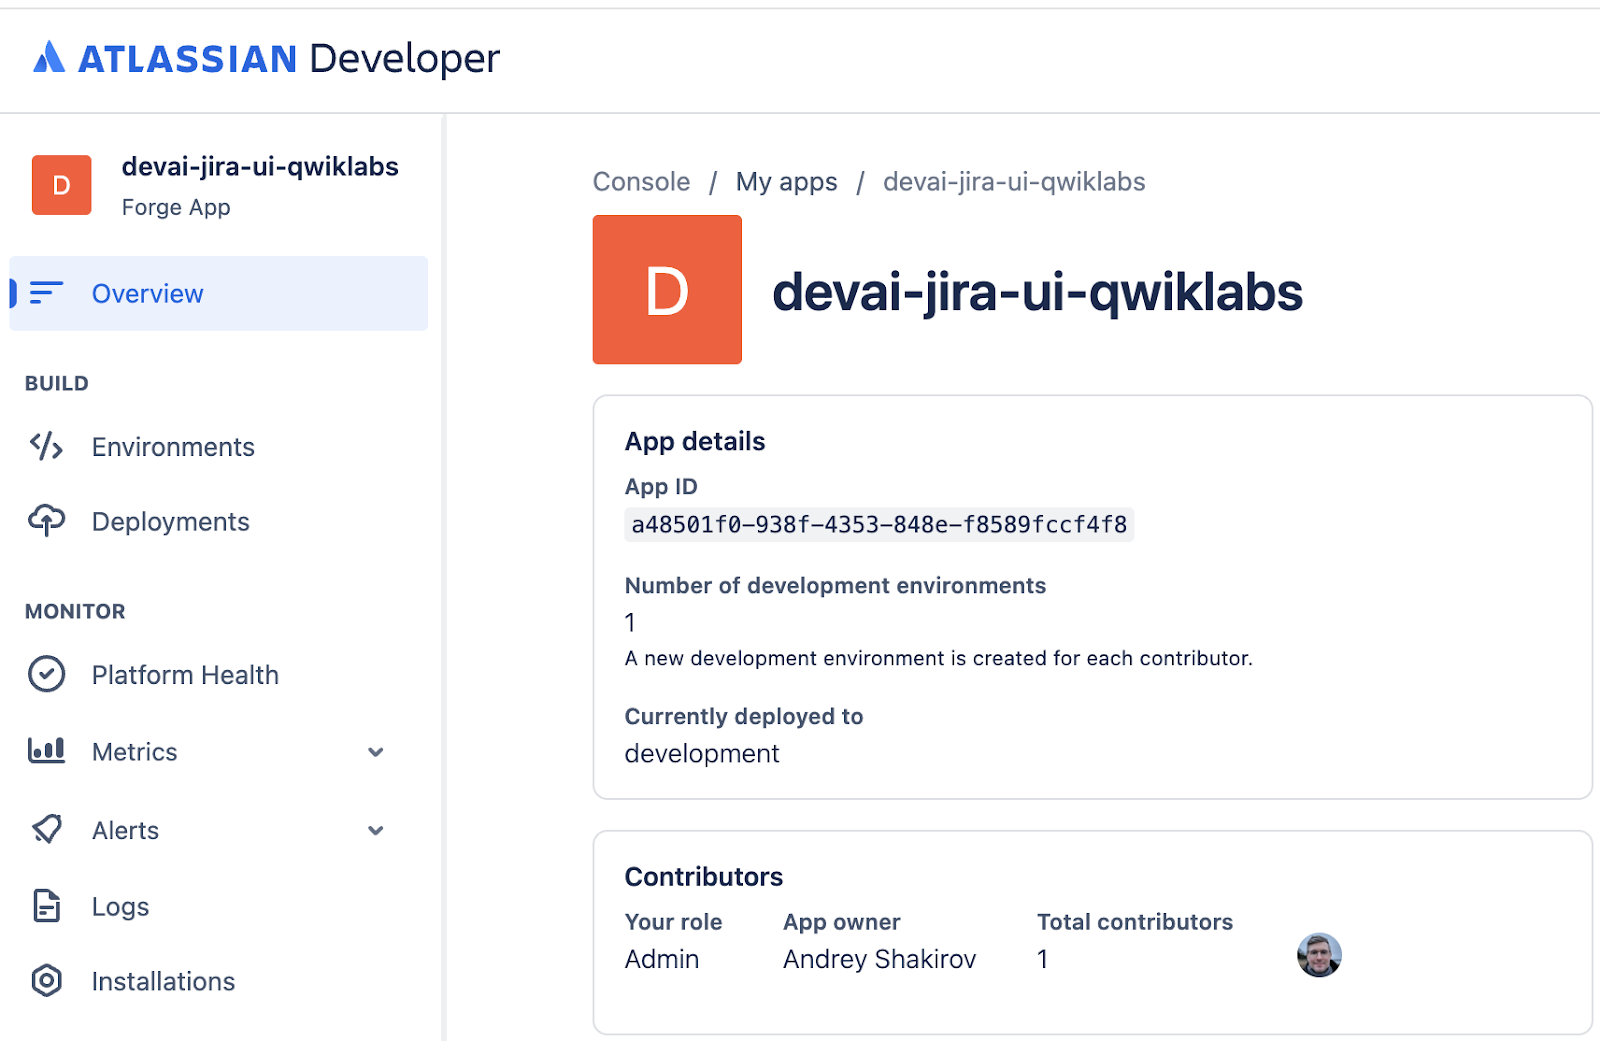
Review logs - switch to Development environment,
Review Forge application manifest and source code
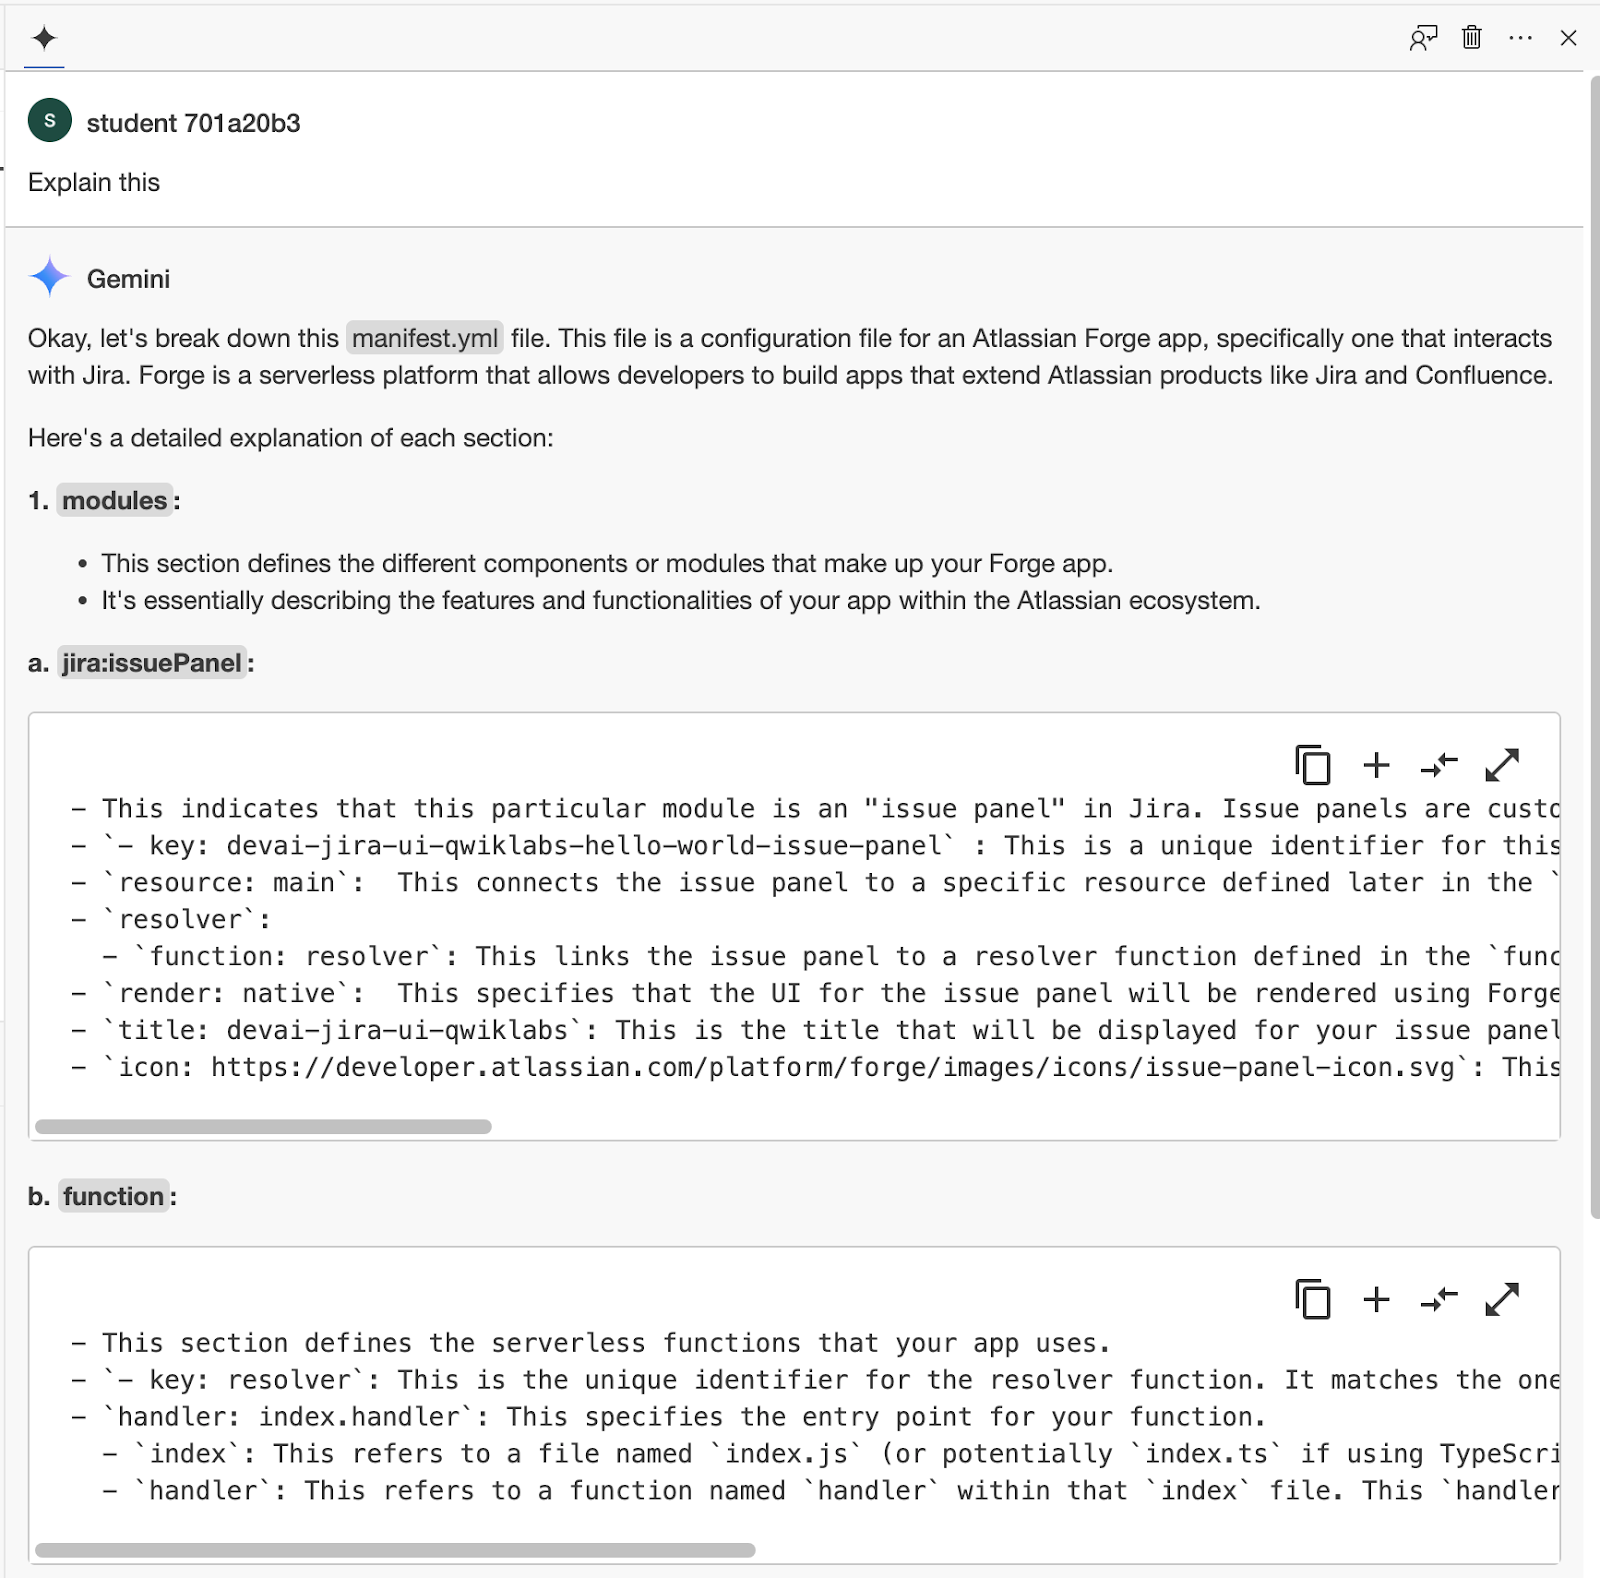
Open the "devai-jira-ui-qwiklabs/manifest.yml" file and use Gemini Code Assist to explain the configuration.
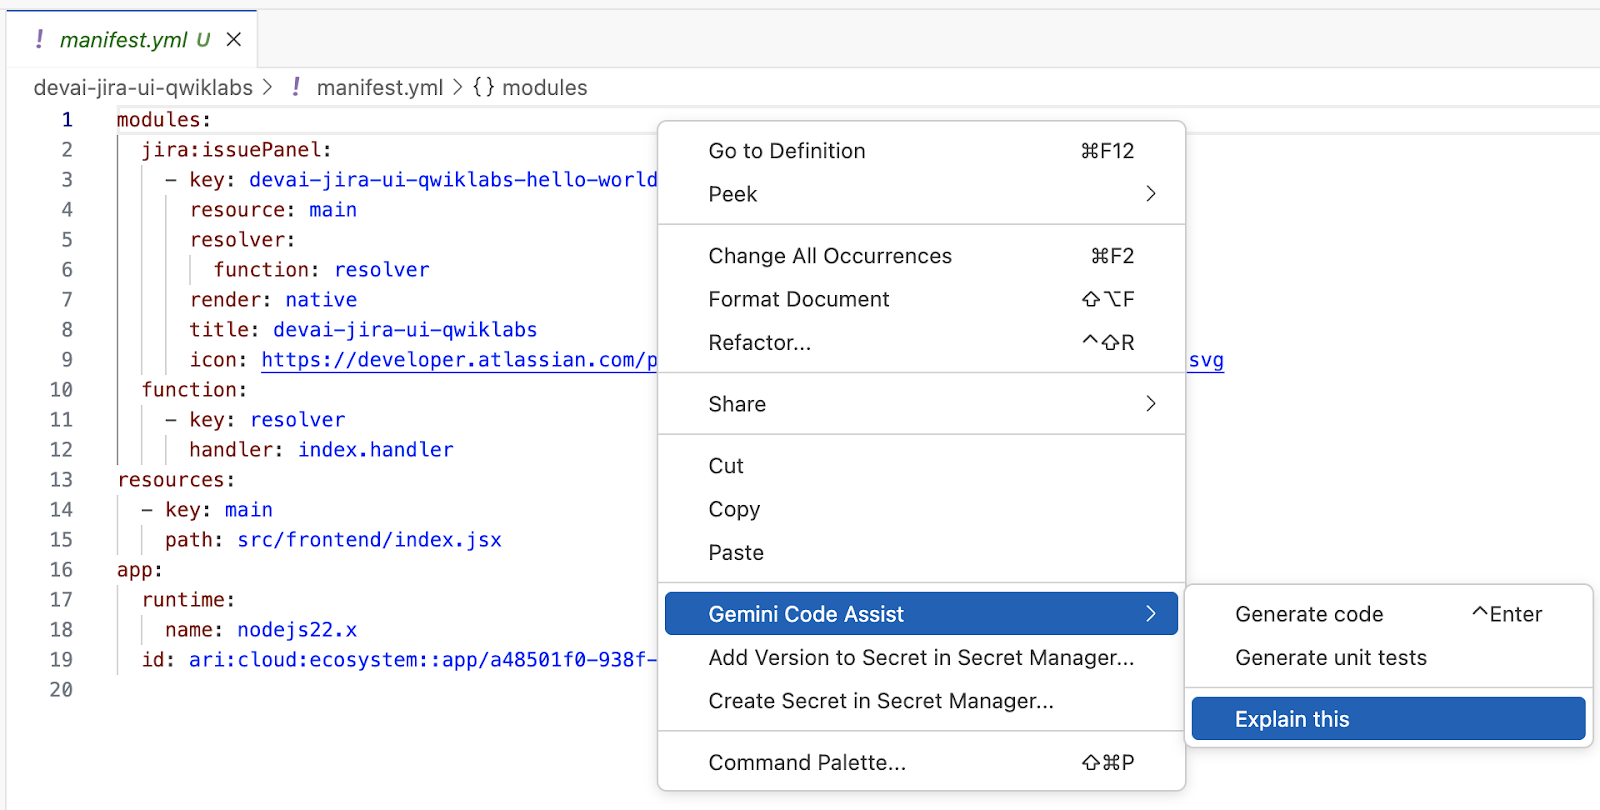
Review explanation.
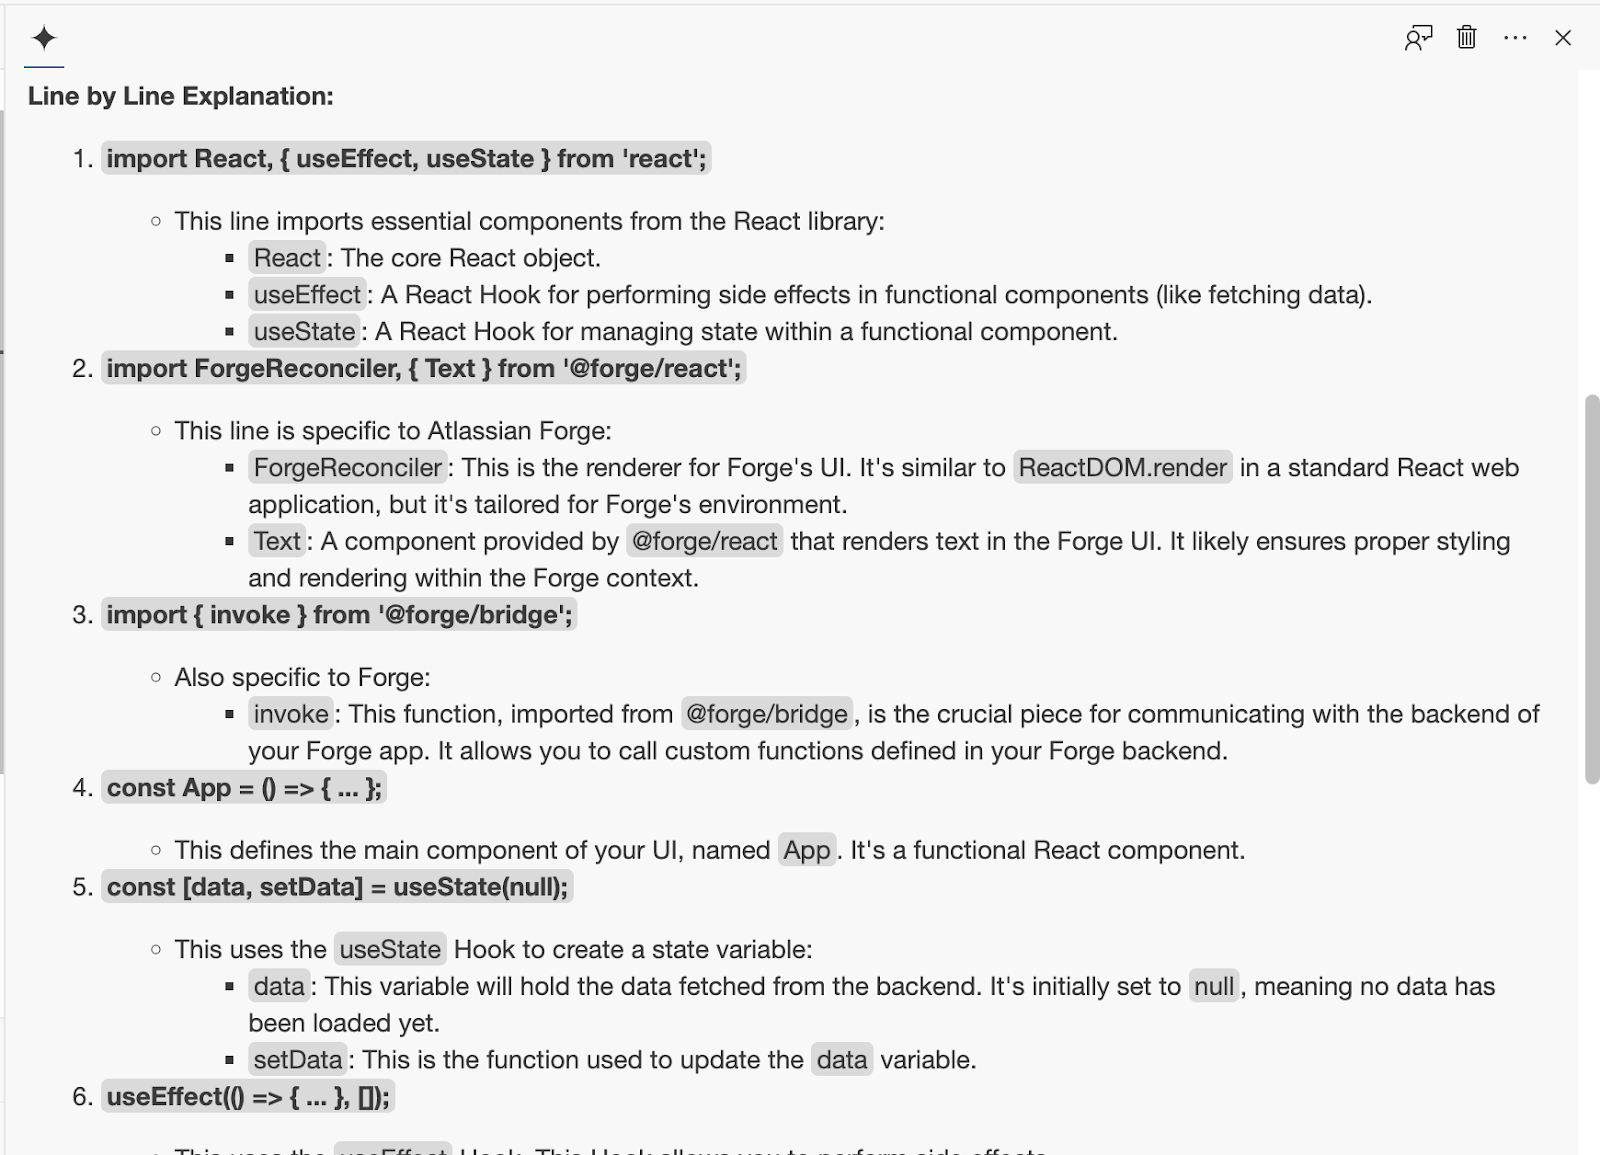
Open following files and ask Gemini Code Assist to explain them:
devai-jira-ui-qwiklabs/src/frontend/index.jsxdevai-jira-ui-qwiklabs/src/resolvers/index.js
Update Forge app with DevAI API Cloud Run endpoint
Check if GCP PROJECT ID is set:
gcloud config get project
If not, set your GCP project using project id from Qwiklabs lab page:
Example: qwiklabs-gcp-00-2c10937585bb
gcloud config set project YOUR_QWIKLABS_PROJECT_ID
Set Cloud Run service url:
export DEVAI_API_URL=$(gcloud run services list --filter="(devai-api)" --format="value(URL)")

forge variables set DEVAI_API_URL $DEVAI_API_URL
Set DEVAI API Key:
export DEVAI_API_KEY=api-key-that-you-created

forge variables set --encrypt DEVAI_API_KEY $DEVAI_API_KEY
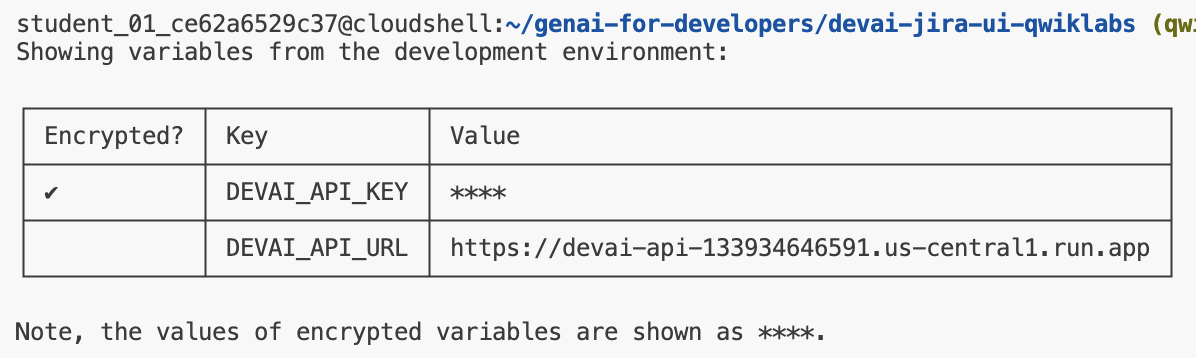
Confirm by running command below:
forge variables list
Sample output
Update Forge application manifest and code
These code snippets can be found in the repo under sample-devai-jira-ui folder.
Open manifest file in the editor: devai-jira-ui-qwiklabs/manifest.yml
Add lines below at the end of the file - replace Cloud Run endpoint with the one that you deployed.
permissions:
  scopes:
    - read:jira-work
    - write:jira-work
  external:
    fetch:
      client:
        - devai-api-gjerpi6qqq-uc.a.run.app/create-gitlab-mr # replace with YOUR CLOUD RUN URL
Open resolvers/index file in the editor: devai-jira-ui-qwiklabs/src/resolvers/index.js
Add lines below after the existing getText function.
resolver.define('getApiKey', (req) => {
  return process.env.DEVAI_API_KEY;
});

resolver.define('getDevAIApiUrl', (req) => {
  return process.env.DEVAI_API_URL;
});
Open frontend/index file in the editor: devai-jira-ui-qwiklabs/src/frontend/index.jsx
Replace index.jsx with content below. Update link to your GitLab userid/repository.
There are two places where you need to update YOUR-GIT-USERID and YOUR-GIT-REPO.
Search for this line in the file and make the changes:
https://gitlab.com/YOUR-GIT-USERID/YOUR-GIT-REPO/-/merge_requests
import React from 'react';
import ForgeReconciler, { Text, Link, useProductContext } from '@forge/react';
import { requestJira } from '@forge/bridge';
import { invoke } from '@forge/bridge';
import api, { route, assumeTrustedRoute } from '@forge/api';
const devAIApiKey = await invoke("getApiKey")
const devAIApiUrl = await invoke("getDevAIApiUrl")
const App = () => {
const context = useProductContext();
const [description, setDescription] = React.useState();
const fetchDescriptionForIssue = async () => {
const issueId = context?.extension.issue.id;
const res = await requestJira(`/rest/api/2/issue/${issueId}`);
const data = await res.json();
const bodyGenerateData = `{"prompt": ${JSON.stringify(data.fields.description)}}`;
const generateRes = await api.fetch(devAIApiUrl+'/create-gitlab-mr,
{
body: bodyGenerateData,
method: 'post',
headers: {
'Content-Type': 'application/json',
'x-devai-api-key': devAIApiKey,
},
}
)
const resData = await generateRes.text();
// Add link to the GitLab merge request page as a comment
await requestJira(`/rest/api/2/issue/${issueId}/comment`, {
method: 'POST',
headers: {
'Accept': 'application/json',
'Content-Type': 'application/json'
},
body: `{"body": "[GitLab Merge Request|https://gitlab.com/YOUR-GIT-USERID/YOUR-GIT-REPO/-/merge_requests]"}`
});
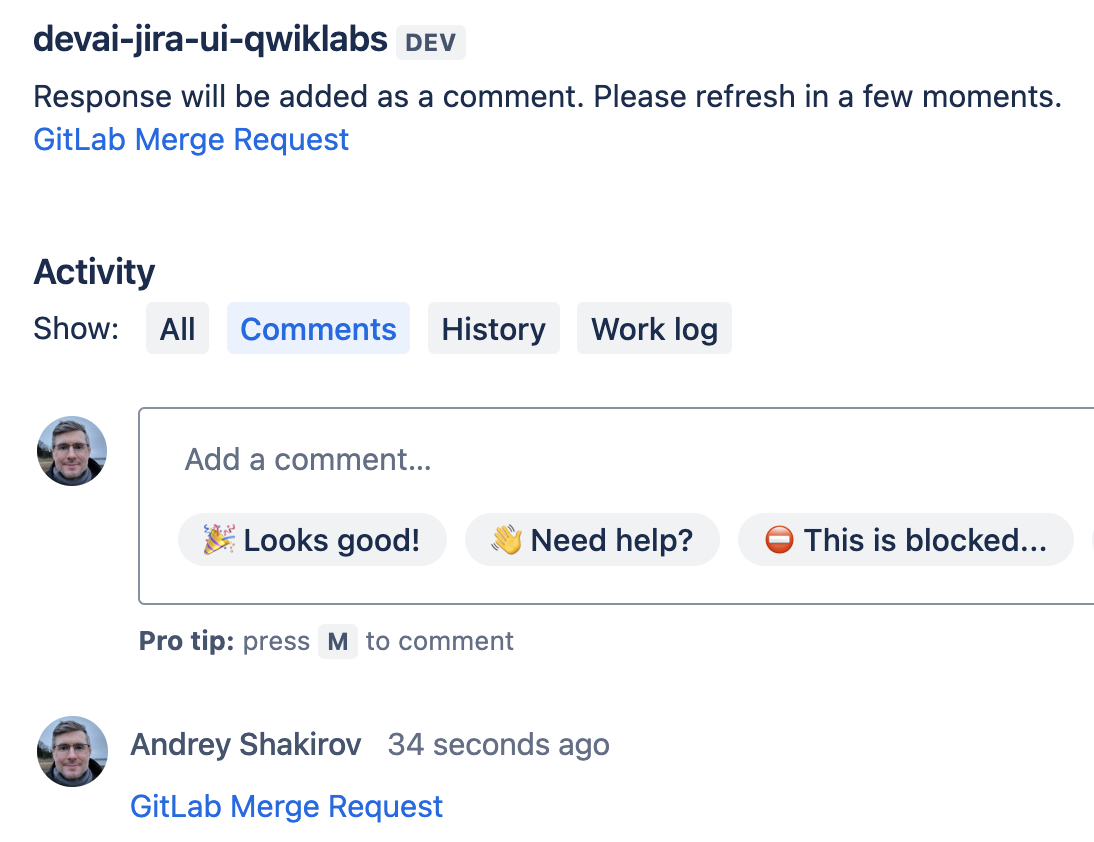
return "Response will be added as a comment. Please refresh in a few moments.";
};
React.useEffect(() => {
if (context) {
fetchDescriptionForIssue().then(setDescription);
}
}, [context]);
return (
<>
<Text>{description}</Text>
<Link href='https://gitlab.com/YOUR-GIT-USERID/YOUR-GIT-REPO/-/merge_requests' openNewTab={true}>GitLab Merge Request</Link>
</>
);
};
ForgeReconciler.render(
<React.StrictMode>
<App />
</React.StrictMode>
);
Redeploy Forge application
Add dependencies in package.json file:
"@forge/api": "4.0.0",
Run command to install dependencies:
npm install
Deploy updated application:
forge deploy
Sample output:
ℹ Uploading app
ℹ Validating manifest
ℹ Snapshotting functions
ℹ Deploying to environment

✔ Deployed

Deployed devai-jira-ui-qwiklabs to the development environment.

We've detected new scopes or egress URLs in your app.
Run forge install --upgrade and restart your tunnel to put them into effect.
Install updated application:
forge install --upgrade

Sample output:
Upgrading your app on the Atlassian site.

Your app will be upgraded with the following additional scopes:
- read:jira-work
- write:jira-work

Your app will exchange data with the following urls:
- devai-api-7su2ctuqpq-uc.a.run.app

? Do you want to continue? Yes

✔ Upgrade complete!

Your app in the development environment is now the latest in Jira on genai-for-developers.atlassian.net.
Test Forge application
Open existing or create a new JIRA task in your JIRA project.
You will need to remove the previous panel if it was added already.
Click "..." and select remove from the menu. After that, you can click on the button again.
Check Jira comments
Once you get back a response from DEVAI API, a comment will be added on the JIRA issue.
- GitLab merge request link
Toggle between "History" and "Comments" tabs to refresh the view.
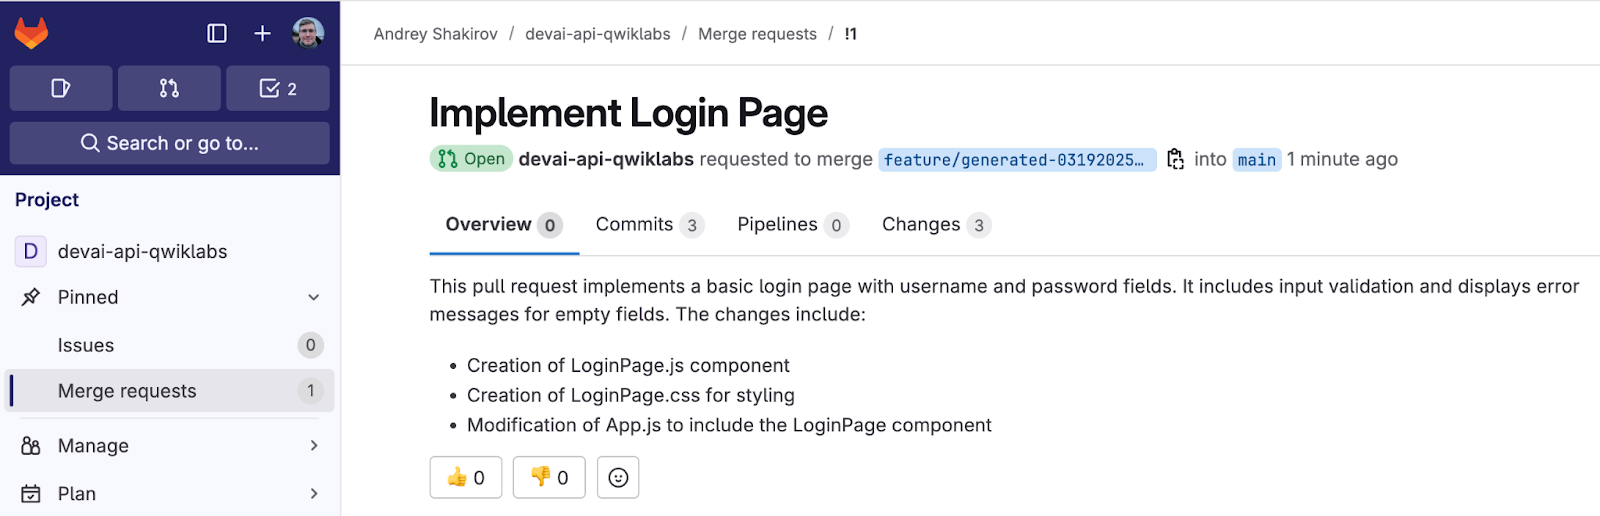
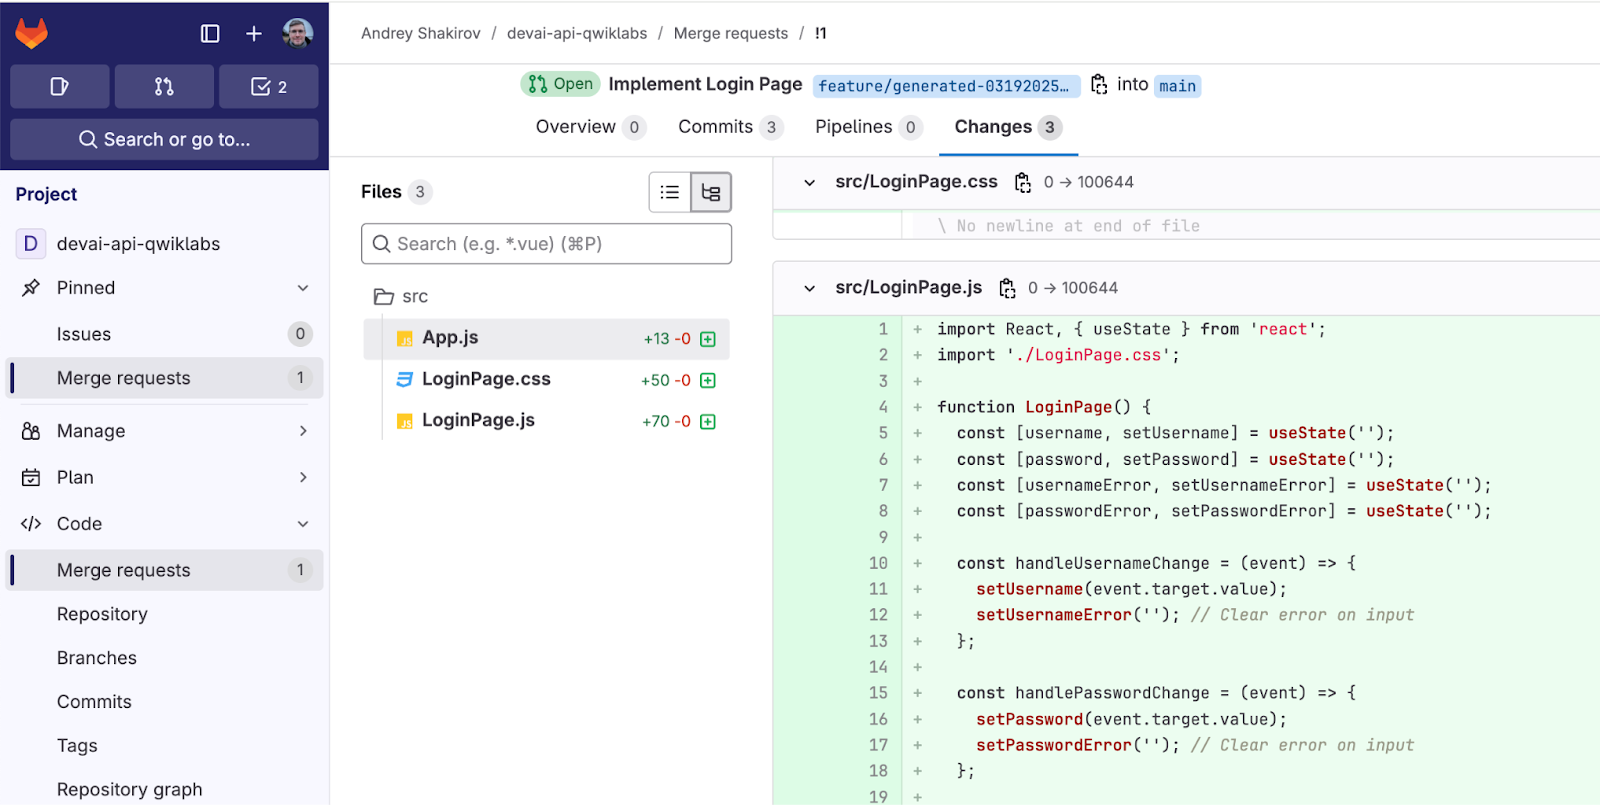
Verify GitLab merge request
Open GitLab and check for new merge requests in your project.
LangSmith LLM traces
If you configured LLM tracing, open LangSmith portal and review LLM trace for GitLab merge request creation call.
Sample LangSmith LLM trace.

9. Push your changes to GitHub repo
(OPTIONAL SECTION)
Go to GitHub website and create a new repository to push changes for this lab to your personal repository.
Go back to Cloud Console and set Git user name and email in the terminal.
Update the values before running the commands.
git config --global user.name "Your Name"
git config --global user.email "your_email@example.com"
Generate SSH key and add it in the GitHub repository.
Update your email before running the commands.
Do not enter passphrase and hit enter multiple times to complete key generation.
ssh-keygen -t ed25519 -C "your-email-address"
eval "$(ssh-agent -s)"

ssh-add ~/.ssh/id_ed25519

cat ~/.ssh/id_ed25519.pub
Add generated public key to your GitHub account.
Open https://github.com/settings/keys and click "New SSH key".
For the key name use "qwiklabs-key" and copy/paste the output from the last command.
Go back to the terminal, commit and push changes.
cd ~/genai-for-developers

git remote rm origin
Set remote origin using the repository that was created above.
Replace with your repository url.
git remote add origin git@github.com:YOUR-GITHUB-USERID/YOUR-GITHUB-REPO.git
Add, commit and push the changes.
git add .

git commit -m "lab changes"

git push -u origin main
10. Congratulations!
Congratulations, you finished the lab!
What we've covered:
- How to deploy Cloud Run applications to integrate with Gemini APIs.
- How to create and deploy Atlassian Forge app for JIRA.
- How to use LangChain ReAct Agents for GitLab tasks automation.
- How to review LLM traces in LangSmith.
What's next:
- More hands-on sessions are coming!
Clean up
To avoid incurring charges to your Google Cloud account for the resources used in this tutorial, either delete the project that contains the resources, or keep the project and delete the individual resources.
Deleting the project
The easiest way to eliminate billing is to delete the project that you created for the tutorial.
©2024 Google LLC All rights reserved. Google and the Google logo are trademarks of Google LLC. All other company and product names may be trademarks of the respective companies with which they are associated.