

1. 简介
此 Codelab 是一个由两部分组成的系列教程的第二部分,将介绍如何构建具有治理意识的 AI 智能体。
(您可以阅读本系列教程的第一部分,了解如何通过注册 Knowledge Catalog 方面类型、将方面应用于 BigQuery 表以及通过 AGY CLI 在本地测试规则来建立数据基础。👉 阅读第 1 部分)
不过,在本地 CLI 中进行测试只是开始。如需将此功能推广到整个公司,您需要集中式安全性、标准化的 AI 工具连接以及适当的应用框架来编排智能体的逻辑并提供熟悉的聊天界面。
在第二部分中,您将解决这些挑战并扩展到生产环境。您不会部署自定义 MCP 服务器,而是将智能体直接连接到 Google 管理的 Knowledge Catalog MCP 服务器 。然后,您将使用 Google 的 智能体开发套件 (ADK) 构建实际的智能体应用,从本地智能体技能加载治理规则,并将其部署到 Cloud Run,其中包含专业的 Web 界面
。
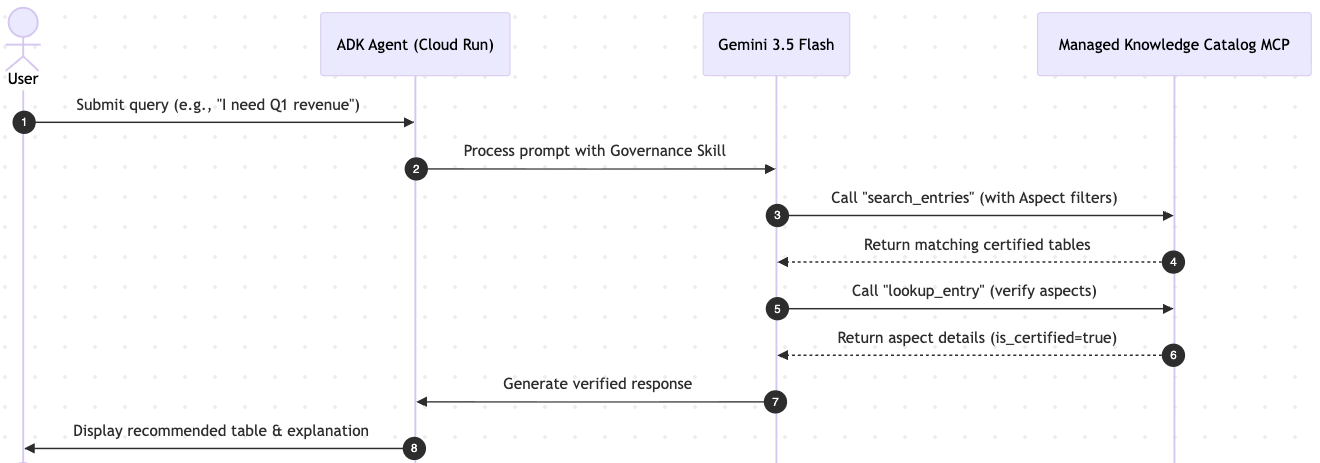
当用户与 ADK 界面互动时,会发生以下序列:
学习内容
- 如何使用 Model Context Protocol (MCP) 来标准化 AI 智能体与 Google Cloud 数据的互动方式。
- ADK 智能体如何连接到 Google 管理的 Knowledge Catalog MCP 服务器。
- 如何从共享智能体技能动态加载治理规则。
- 如何将智能体部署到 Cloud Run 并运行 ADK 的内置 Web 游乐场。
所需条件
- 启用了结算功能的 Google Cloud 项目。
- 能够访问 Google Cloud Shell。
- 对 Cloud Run、IAM 服务账号和 Python 有基本的了解。
- 在第 1 部分中创建的 BigQuery 数据集和 Knowledge Catalog 方面。(如果您删除了这些数据集和方面,请不要担心;我们在下面提供了一个快速通道脚本来重新创建它们!)
主要概念
- 模型上下文协议 (MCP): 将 MCP 视为 AI 智能体的“通用 USB-C 电缆”。MCP 不会为每个 AI 模型编写自定义 API 集成代码,而是为 AI 提供了一种安全连接到企业数据工具(如 Knowledge Catalog 和 BigQuery)的标准方式。
- 智能体开发套件 (ADK): Google 提供的灵活的开源框架,旨在简化 AI 智能体的端到端开发。它将软件工程原理应用于智能体创建,让您可以编排复杂的工具、管理状态,并轻松启动内置的开发者界面以进行测试和部署。
- Gemini Enterprise Agent Platform(GEAP): 用于在 Google Cloud 上部署 AI 智能体的企业级托管和编排环境。
2. 设置和要求
启动 Cloud Shell
虽然可以通过笔记本电脑对 Google Cloud 进行远程操作,但在此 Codelab 中,您将使用 Google Cloud Shell,这是一个在云端运行的命令行环境。
在 Google Cloud 控制台 中,点击右上角工具栏中的 Cloud Shell 图标:

预配和连接到环境应该只需要片刻时间。完成后,您应该会看到如下内容:

这个虚拟机已加载了您需要的所有开发工具。它提供了一个持久的 5 GB 主目录,并且在 Google Cloud 中运行,大大增强了网络性能和身份验证功能。您在此 Codelab 中的所有工作都可以在浏览器中完成。您无需安装任何程序。
初始化环境
打开 Cloud Shell 并设置项目变量,以确保所有命令都以正确的基础架构为目标。
export PROJECT_ID=$(gcloud config get-value project)
gcloud config set project $PROJECT_ID
export REGION="us-central1"
启用必需的 API
启用管理数据基础、运行 Vertex AI 模型以及在 Cloud Run 上托管 ADK 智能体所需的最低限度的 Google Cloud API。
gcloud services enable \
    dataplex.googleapis.com \
    bigquery.googleapis.com \
    aiplatform.googleapis.com \
    run.googleapis.com \
    artifactregistry.googleapis.com \
    cloudbuild.googleapis.com
检查点:继续还是重新构建?
由于这是第 2 部分,因此智能体需要第 1 部分中的受治理数据才能正常运行。请选择您的路径:
路径 A:我刚刚完成第 1 部分,资源仍在运行
太棒了!导航到工作目录,即可继续操作。
cd ~/devrel-demos/data-analytics/governance-context
路径 B:我跳过了第 1 部分,或者删除了资源(已清理)
没关系!我们在下面提供了一个“快速通道”命令块。这将自动重新构建 BigQuery 数据湖、注册方面类型并应用治理元数据,与我们在第 1 部分中的操作完全相同。
# 1. Clone the repo and navigate to the working directory
git clone --depth 1 --filter=blob:none --sparse https://github.com/GoogleCloudPlatform/devrel-demos.git
cd devrel-demos
git sparse-checkout set data-analytics/governance-context
cd data-analytics/governance-context

# 2. Rebuild the BigQuery datasets and tables
chmod +x ./setup_bq_tables.sh
./setup_bq_tables.sh

# 3. Register the Knowledge Catalog aspect type
gcloud dataplex aspect-types create official-data-product-spec \
    --location="${REGION}" \
    --project="${PROJECT_ID}" \
    --metadata-template-file-name="aspect_template.json"

# 4. Generate and apply aspects (governance rules)
chmod +x ./generate_payloads.sh ./apply_governance.sh
./generate_payloads.sh
./apply_governance.sh
3. 集中式数据控制平面(托管 MCP)
在实际的企业环境中,您需要一个安全、集中的数据控制平面。我们不会构建自定义 MCP 服务器容器并将其部署到 Cloud Run,而是将智能体直接连接到 Google 管理的 Knowledge Catalog MCP 服务器 。
通过使用此托管式端点,我们可以实现以下目标:
- 零维护: 无需管理 MCP 服务器的容器、扩缩或补丁。
- 标准化: 智能体使用 Model Context Protocol(SSE 传输)连接到标准、安全的 Google API 端点。
- 受控范围: MCP 服务器仅公开必要的元数据工具(
search_entries、lookup_context、lookup_entry),强制执行只读、治理优先的推理循环。
Google 管理的 Knowledge Catalog MCP 服务器可通过以下安全网址访问:
https://dataplex.googleapis.com/mcp
由于这是 Google 第一方 API,因此智能体必须使用标准 Google Cloud OAuth2 访问令牌 而不是 ID 令牌进行身份验证。我们将在应用代码中自动处理此身份验证。
4. 使用 ADK 构建智能体后端
您拥有安全、托管的数据控制平面。现在,AI 智能体需要一个框架来编排其逻辑,例如处理用户输入、决定何时调用 MCP 服务器以及格式化输出。
我们将使用 Google 的智能体开发套件 (ADK) 。ADK 是一个代码优先框架,可自动将智能体逻辑封装到 FastAPI 后端中,并提供内置的 Web 界面以进行即时测试。
在 Cloud Shell 编辑器中打开智能体代码
我们不会将整个文件转储到终端中,而是在 Cloud Shell 编辑器 中打开它,以便您可以轻松检查、修改和理解代码。
在终端中运行以下命令,并在编辑器中查看代码结构。该应用是使用 Google 的智能体开发套件 (ADK) 构建的:
cd ~/devrel-demos/data-analytics/governance-context/mcp_server

# Copy the governance skill directory inside the application bundle so it packages during Cloud Run deployment
mkdir -p skills
cp -r ../.agents/skills/knowledge-catalog-governance skills/

cloudshell edit agent.py
(注意:agent.py 顶部包含样板代码,用于处理 Google Cloud OAuth2 身份验证和令牌刷新,确保智能体可以安全地与 Google 管理的 Knowledge Catalog API 通信)。
1. 原生技能加载
为了构建高度优化的智能体,我们使用 ADK 的原生 load_skill_from_dir 从外部智能体技能目录加载治理说明。这种方法支持渐进式披露:
- L1 元数据: 智能体仅在启动时加载技能的名称和说明。这种最小的上下文可让 LLM 识别何时使用技能,而无需预先消耗大量令牌。
- L2 说明: 仅当模型确定相关时,才会动态提取
SKILL.md中的完整指令集。
base_dir = Path(__file__).parent
governance_skill = load_skill_from_dir(
    base_dir / "skills" / "knowledge-catalog-governance"
)

# Bundle the skill and MCP tools together into a SkillToolset
governance_skill_toolset = skill_toolset.SkillToolset(
    skills=[governance_skill],
    additional_tools=[tools]
)
2. 智能体编排
ADK 允许您通过将多个智能体链接在一起来编排复杂的智能体行为。我们定义了一个由两个专用智能体组成的 SequentialAgent 工作流:
governance_researcher:配备了governance_skill_toolset和 Knowledge Catalog MCPtools。它会检查查询是否在数据目录和合规性范围内,然后使用注入到其系统说明中的环境变量查询 Knowledge Catalog。compliance_formatter:负责将原始 JSON 元数据搜索结果转换为干净的响应,或者在请求超出范围时优雅地解释范围边界。
# 1. Researcher Agent (has access to the encapsulated SkillToolset)
governance_researcher = LlmAgent(
    name="governance_researcher",
    model=model_name,
    description="Dynamically interprets metadata schema (Booleans/Enums) and searches for assets using strict syntax.",
    instruction=f"""
    You are a governance researcher. Your job is to verify Knowledge Catalog metadata rules and find compliant assets for the user's query.

    YOUR ACTIVE ENVIRONMENT CONTEXT:
    - Google Cloud Project ID: {project_id}
    - Location (Region): {location}

    YOUR WORKFLOW:
    1. First, check if the user query is related to data analytics assets, database tables, or data compliance.
       - If YES: Call `load_skill` with `name="knowledge-catalog-governance"` to load the rules, then use search/lookup tools to locate a certified compliant table.
       - If NO (e.g., general chit-chat, unrelated tasks): Skip skill loading and output a JSON object indicating it is out of scope:
         {"error": "out_of_scope", "message": "The query does not pertain to data catalog search or governance compliance."}
    2. Populate the required projectId and location parameters in tool calls with the active environment parameters.
    3. Return the verified table's metadata in JSON format as your final research output.
    """,
    tools=[governance_skill_toolset, tools],
    output_key="research_data"
)

# 2. Formatter Agent (formats the output or explains out-of-scope errors)
compliance_formatter = LlmAgent(
    name="compliance_formatter",
    model=model_name,
    description="Formats the JSON research data into a helpful response for the user.",
    instruction="""
    You are the **Intelligent Data Governance Specialist**.
    Your job is to explain the findings of the governance research clearly to the user.

    **YOUR GOAL:**
    1. If the researcher found a matching table (valid JSON with table metadata):
       - Explain the logical connection between the User's Request, the Governance Schema (translated criteria), and the Recommended Table.
       - Use the following RESPONSE TEMPLATE:
         - **Analysis:** "I analyzed the metadata schema and translated your request into the following technical criteria:..."
         - **Recommendation:** "Based on this, I recommend the following table:"
           - **Table:** [Insert Table Name]
           - **Description:** [Insert Table Description]
         - **Verification:** "This asset is a verified match because: [Explain the verification details]."
    2. If the researcher returned an 'out_of_scope' error or no matching tables were found:
       - Apologize politely and explain that no data asset currently matches the strict governance criteria defined in `official-data-product-spec`.
       - Clearly state what domain of questions this agent is certified to answer (e.g., Data Catalog Search and Data Governance compliance).
    """
)

# 3. Orchestrated Workflow (Exported as root_agent)
root_agent = SequentialAgent(
    name="governance_workflow",
    description="Workflow to learn metadata rules, search with strict syntax, and recommend assets.",
    sub_agents=[
        governance_researcher,
        compliance_formatter,
    ]
)
配置运行时变量
如需运行智能体,我们必须告知它托管式 MCP 服务器的位置,并配置其项目和区域。我们将这些变量保存到 ADK 将在运行时读取的 .env 文件中。
运行以下命令以生成 .env 文件。请注意,MCP_SERVER_URL 直接指向 Google 管理的 Knowledge Catalog API 端点:
export MCP_SERVER_URL="https://dataplex.googleapis.com/mcp"

echo MCP_SERVER_URL=$MCP_SERVER_URL > .env
echo GOOGLE_GENAI_USE_VERTEXAI=1 >> .env
echo GOOGLE_CLOUD_PROJECT=$PROJECT_ID >> .env
echo GOOGLE_CLOUD_LOCATION=$REGION >> .env
5. 在本地运行并测试智能体
在将智能体部署到云端之前,您应在 Cloud Shell 中本地运行它,以验证其行为。由于智能体依赖于多个 Python 软件包(包括 Google Cloud Logging 和 ADK 库),因此我们将设置本地虚拟环境来安装这些依赖项。
在 Cloud Shell 中本地运行时,智能体会自动使用您的有效 Google Cloud 用户凭据,因此它已拥有访问 Vertex AI 和 Knowledge Catalog 所需的权限。
- 导航到
mcp_server目录,创建虚拟环境,然后安装依赖项:
cd ~/devrel-demos/data-analytics/governance-context/mcp_server

# Create a virtual environment using uv
uv venv
source .venv/bin/activate

# Install the dependencies listed in requirements.txt
uv pip install -r requirements.txt
- 在终端中启动交互式聊天会话:
adk run .
- 会话开始后,您会看到提示。输入查询以测试智能体的治理逻辑:
I need the Q1 revenue summary for our internal board meeting.
智能体将处理您的请求,通过托管式 MCP 服务器查询 Knowledge Catalog,并在终端中直接输出其建议和推理。
- 如需退出交互式会话,请输入
exit或quit(或按Ctrl+C)。退出后,您可以停用虚拟环境:
deactivate
6. 将智能体部署到生产环境
现在,您已在本地验证了智能体,接下来可以将其部署到 Google Cloud 以供生产使用。
创建服务账号
为确保安全,部署的智能体不应在您的个人凭据下运行。我们将为智能体创建一个单独的身份 (knowledge-catalog-agent-sa),遵循最小权限原则。
运行以下命令以创建服务账号:
export AGENT_SA=knowledge-catalog-agent-sa
export AGENT_SERVICE_ACCOUNT="${AGENT_SA}@${PROJECT_ID}.iam.gserviceaccount.com"

gcloud iam service-accounts create ${AGENT_SA} \
    --display-name="Service Account for Knowledge Catalog Agent"
授予权限
即使智能体将治理检查委托给 MCP 服务器,它仍然需要基本权限才能运行。
gcloud projects add-iam-policy-binding $PROJECT_ID \
  --member="serviceAccount:$AGENT_SERVICE_ACCOUNT" \
  --role="roles/aiplatform.user"

gcloud projects add-iam-policy-binding $PROJECT_ID \
  --member="serviceAccount:$AGENT_SERVICE_ACCOUNT" \
  --role="roles/dataplex.catalogAdmin"

gcloud projects add-iam-policy-binding $PROJECT_ID \
  --member="serviceAccount:$AGENT_SERVICE_ACCOUNT" \
  --role="roles/bigquery.dataViewer"

gcloud projects add-iam-policy-binding $PROJECT_ID \
  --member="serviceAccount:$AGENT_SERVICE_ACCOUNT" \
  --role="roles/mcp.toolUser"

gcloud projects add-iam-policy-binding $PROJECT_ID \
  --member="serviceAccount:$AGENT_SERVICE_ACCOUNT" \
  --role="roles/viewer"
部署到 Cloud Run
最后,我们将智能体部署到 Cloud Run。以下命令使用当前目录中的 Dockerfile 构建容器映像,将其上传到 Artifact Registry,然后将其部署到 Cloud Run。此过程可能需要 1-3 分钟才能完成。
gcloud run deploy knowledge-catalog-agent \
  --source . \
  --project=$PROJECT_ID \
  --region=$REGION \
  --service-account=$AGENT_SERVICE_ACCOUNT \
  --allow-unauthenticated \
  --clear-base-image \
  --labels created-by=adk
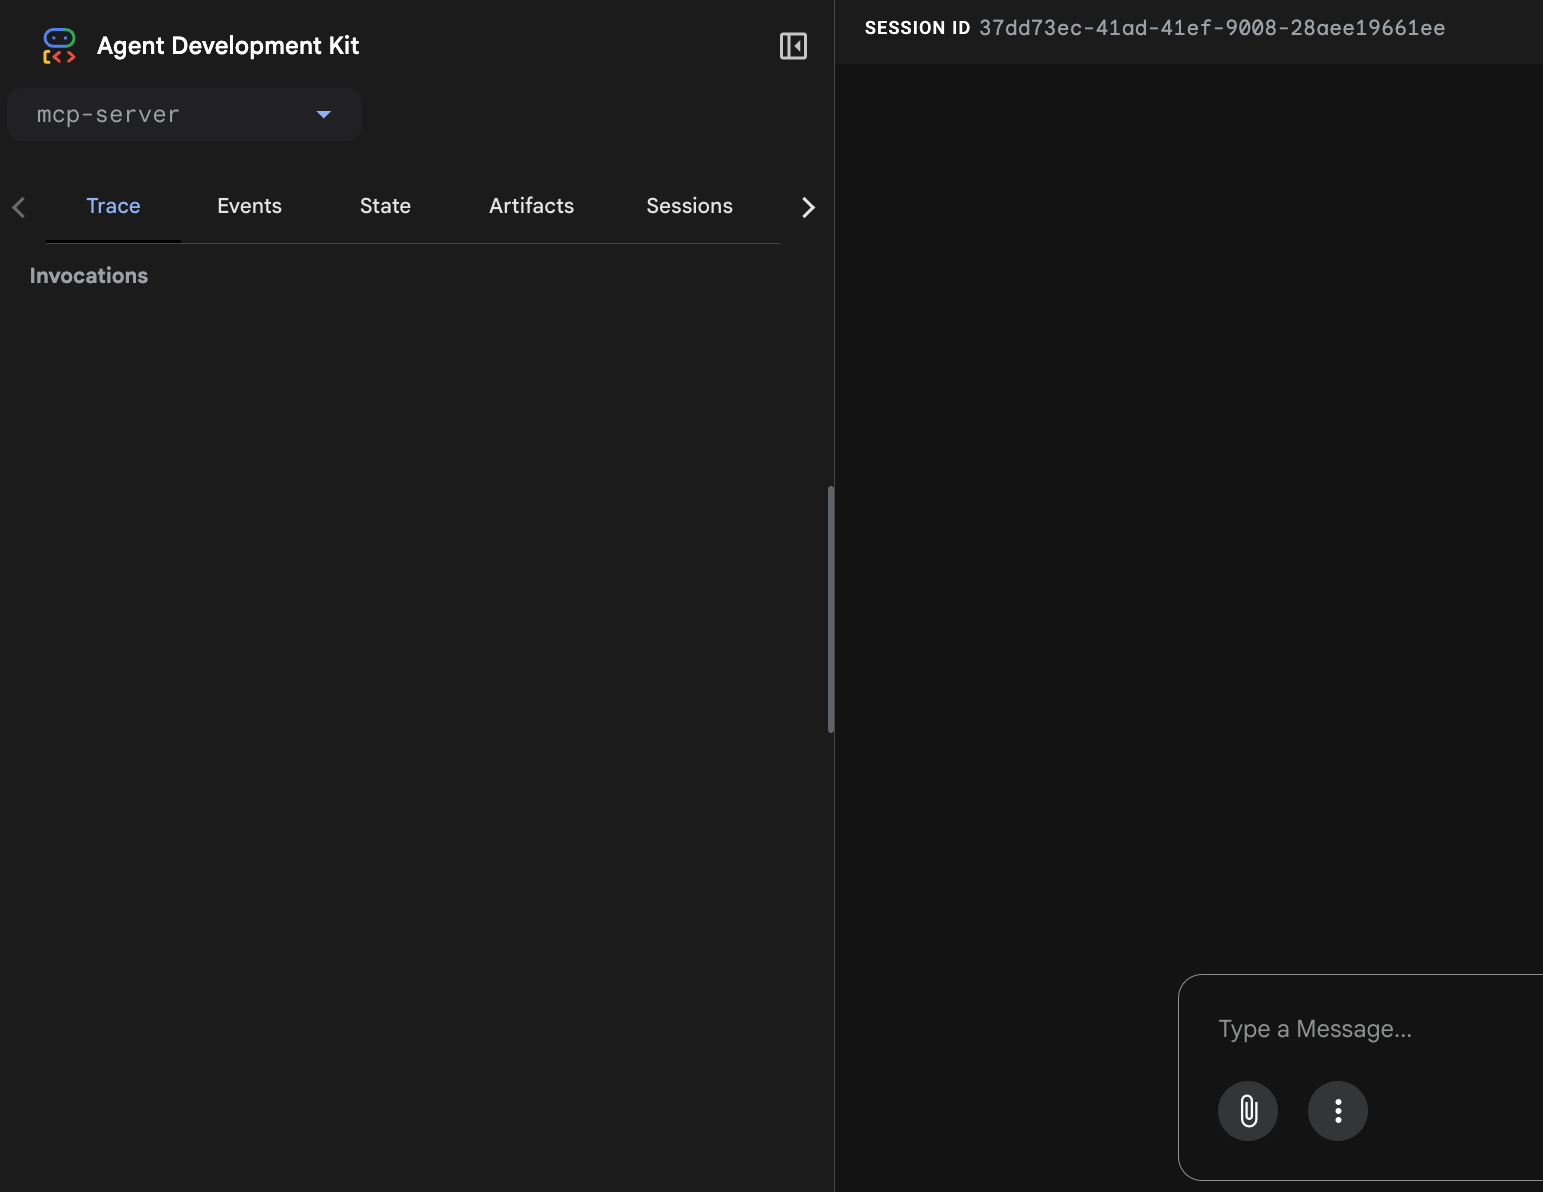
此命令完成后,将输出服务网址 (例如 https://knowledge-catalog-agent-xyz.run.app)。点击该链接即可打开完全受治理的 GenAI 聊天界面。
7. 测试实时智能体
现在智能体已上线,让我们来测试治理场景。逻辑保持不变,但您现在与已部署的 ADK Web 游乐场互动,该游乐场会直观呈现内部状态和工具执行情况。
在浏览器中打开在上一步中生成的服务网址(例如 https://knowledge-catalog-agent-xyz.run.app)。粘贴以下提示:
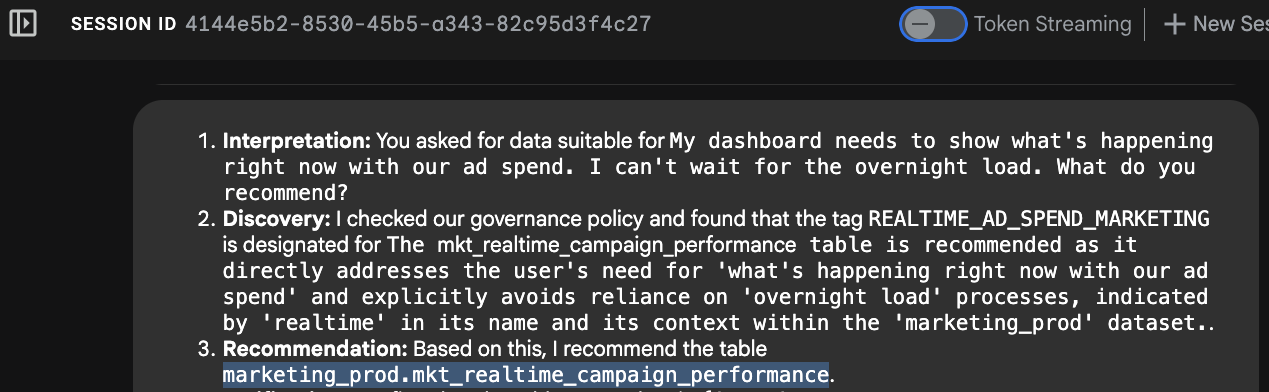
"My dashboard needs to show what's happening right now with our ad spend. I can't wait for the overnight load. What do you recommend?"
在开发者界面中观察智能体的推理过程:
- 意图识别: 智能体解析“right now”和“can't wait for overnight”。
- 元数据查找: 它使用查询
[PROJECT_ID].us-central1.official-data-product-spec.update_frequency=REALTIME_STREAMING调用 MCP 工具 search_entries - 选择: 它确定表
mkt_realtime_campaign_performance符合这些条件。 - 响应: 智能体推荐实时表。
为什么这很重要:
如果没有此治理元数据,LLM 可能会推荐 fin_monthly_closing_internal 表,仅仅因为它有一个名为“ad_spend”的列,而忽略了数据是 24 小时前的数据这一事实。您的元数据上下文避免了业务错误。
您还可以测试“Board Meeting”提示,了解智能体如何根据 Data Product Tier 方面切换到不同的表:
"We are preparing the deck for an internal Board of Directors meeting next week. I need the numbers to be absolutely finalized, trustworthy, and kept strictly confidential. Which table is safe to use?"
8. 清理
为避免 Google Cloud 账号产生费用,请按照以下步骤销毁在此 Codelab 中创建的所有基础架构。
销毁数据湖
使用清理脚本来拆除 BigQuery 表、数据集和 Knowledge Catalog 方面定义。
cd ~/devrel-demos/data-analytics/governance-context
chmod +x ./cleanup_data_lake.sh
./cleanup_data_lake.sh
删除 Cloud Run 服务
移除计算资源,以停止对正在运行的容器的任何有效结算。
gcloud run services delete knowledge-catalog-agent --region=$REGION --quiet
清理构建工件和暂存存储空间
部署 ADK 智能体时,系统会自动构建容器映像,并将源代码上传到临时 Cloud Storage 存储分区。
移除 Artifact Registry 代码库和 Cloud Storage 暂存存储分区:
# Delete the repository used for the agent build
gcloud artifacts repositories delete cloud-run-source-deploy \
    --location=$REGION \
    --quiet

# Delete the staging bucket created by Cloud Run source deploy
gcloud storage rm --recursive gs://run-sources-${PROJECT_ID}-${REGION}
删除身份和权限
先移除 IAM 政策绑定,然后删除服务账号。
# Remove IAM roles granted to the Agent Service Account
gcloud projects remove-iam-policy-binding $PROJECT_ID \
  --member="serviceAccount:$AGENT_SERVICE_ACCOUNT" \
  --role="roles/aiplatform.user" --quiet

gcloud projects remove-iam-policy-binding $PROJECT_ID \
  --member="serviceAccount:$AGENT_SERVICE_ACCOUNT" \
  --role="roles/dataplex.catalogViewer" --quiet

gcloud projects remove-iam-policy-binding $PROJECT_ID \
  --member="serviceAccount:$AGENT_SERVICE_ACCOUNT" \
  --role="roles/mcp.toolUser" --quiet

gcloud projects remove-iam-policy-binding $PROJECT_ID \
  --member="serviceAccount:$AGENT_SERVICE_ACCOUNT" \
  --role="roles/bigquery.dataViewer" --quiet

# Delete the Service Account
gcloud iam service-accounts delete $AGENT_SERVICE_ACCOUNT --quiet
移除本地配置
最后,清理 Cloud Shell 中的本地配置文件和环境变量。
# Uninstall the AGY CLI plugin
agy plugin uninstall dataplex

# Remove local repository files and unset variables
cd ~
rm -rf ~/devrel-demos
unset MCP_SERVER_URL
unset AGENT_SERVICE_ACCOUNT
9. 恭喜!
您已成功部署端到端、具有治理意识的 GenAI 智能体。
在此由两部分组成的 Codelab 中,您超越了简单的提示工程,实现了稳健的可用于生产用途的架构。通过将数据治理视为 GenAI 的先决条件,您建立了一种系统方法来防止模型检索未经认证或虚构的数据。
要点总结
- 通过元数据实现确定性 AI: 您没有依赖 LLM 根据列名称猜测正确的表,而是使用 Google 管理的 Knowledge Catalog MCP 服务器强制执行严格的推理循环,迫使模型在推荐表之前验证数据认证。
- 解耦架构: 前端智能体不需要包含数据库逻辑;它只需要通过 MCP 标准进行通信。这意味着您可以将任何未来的 AI 模型或客户端插入到同一个受治理的后端。
- 职责分离: 您通过隔离 IAM 身份应用了最小权限原则。面向用户的 ADK 智能体在权限受限的情况下运行,仅限于模型调用和 API 路由。
- 代码优先的智能体编排: 您利用 Google 智能体开发套件 (ADK) 将 Python 智能体逻辑即时封装到可扩缩的 FastAPI 后端中,并利用其内置的开发者界面来直观呈现和调试智能体的内部工具执行情况。
接下来怎么做?
- Knowledge Catalog 基础治理 Codelab:在添加 AI 层之前,掌握 Knowledge Catalog 中的数据治理基础知识。
- 智能体开发套件 (ADK) 文档:浏览有关使用 ADK 构建和部署智能体的官方文档。
- 深入了解 MCP:查看官方 MCP 规范,了解如何为内部企业 API 构建自定义服务器。