
1. Introduzione
Una delle principali sfide della migrazione a IPv6 è il mantenimento della raggiungibilità degli endpoint e delle reti solo IPv4. Una tecnologia all'avanguardia per affrontare questa sfida è la combinazione dell'utilizzo di DNS64 (definito nella RFC6147) per tradurre i record A in record AAAA per i client, che viene poi combinato con NAT64 (definito nella RFC6146) per tradurre gli indirizzi IPv6 con formattazione speciale in IPv4, dove l'indirizzo IPv4 è incorporato nell'indirizzo IPv6 speciale. Questo codelab guida l'utente alla configurazione di entrambe le funzionalità in un Virtual Private Cloud (VPC) di Google Cloud (GCP). Se configurati insieme, GCP NAT64 e DNS64 consentono alle istanze solo IPv6 di comunicare con i server solo IPv4 su internet.
In questo lab configurerai un VPC con diversi tipi di subnet e istanze IPv6 : GUA (Global Unicast Address) solo IPv6, ULA (Unique Local Address) solo IPv6 e ULA dual-stack. Dopodiché, configurerai e testerai i servizi DNS64 e NAT64 gestiti di Google Cloud per accedere ai siti web solo IPv4.
2. Obiettivi didattici
- Come creare subnet e istanze solo IPv6
- Come attivare il servizio DNS64 gestito di Google Cloud per un VPC .
- Come creare un gateway Google Cloud NAT configurato per NAT64 .
- Come testare la risoluzione DNS64 dalle istanze solo IPv6 alle destinazioni solo IPv4.
- In che modo il comportamento di DNS64 e NAT64 differisce tra le istanze a stack singolo e a doppio stack.
- Come configurare un gateway NAT per NAT64.
- Come testare la connettività NAT64 dalle istanze solo IPv6 alle destinazioni solo IPv4.
3. Prima di iniziare
Aggiorna il progetto per supportare il codelab
Questo codelab utilizza le variabili $per facilitare l'implementazione della configurazione di gcloud in Cloud Shell.
In Cloud Shell, esegui le seguenti operazioni:
gcloud config list project
gcloud config set project [YOUR-PROJECT-ID]
export projectname=$(gcloud config list --format="value(core.project)")
export zonename=[COMPUTE ZONE NAME]
export regionname=[REGION NAME]
Architettura complessiva del lab
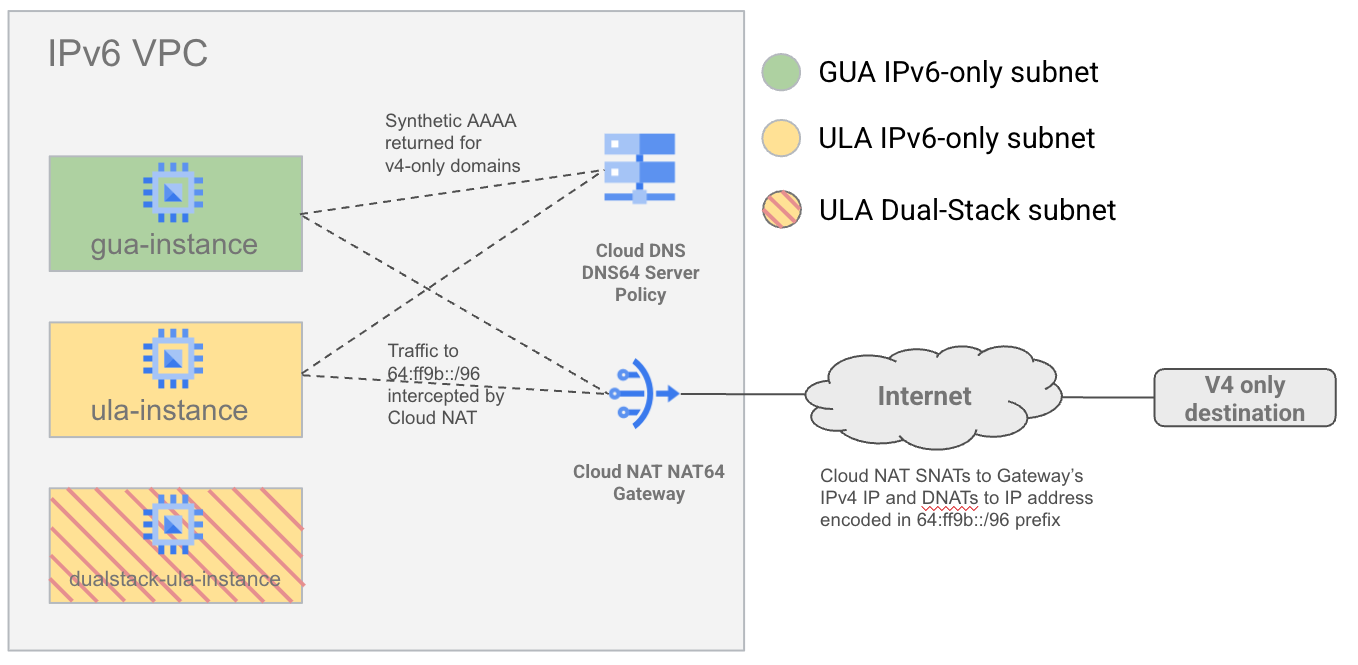
Per dimostrare come NAT64 e DNS64 interagiscono con diversi tipi di subnet IPv6, creerai un singolo VPC con subnet IPv6 sia in GUA che in ULA. Creerai anche una subnet a doppio stack (utilizzando l'indirizzamento ULA) per dimostrare che DNS64 e NAT64 non si applicano alle VM a doppio stack.
A questo punto, configurerai DNS64 e NAT64 e testerai la connettività alle destinazioni IPv6 e IPv4 su internet.
4. Passaggi di preparazione
Per prima cosa, configura il service account, IAM, l'infrastruttura di rete e le istanze necessari nel tuo progetto Google Cloud.
Crea il service account e le associazioni IAM
Iniziamo creando un nuovo service account per consentire alle istanze di connettersi tra loro tramite SSH utilizzando gcloud. Avremo bisogno di questa funzionalità perché non possiamo utilizzare IAP per accedere all'istanza solo IPv6 di GUA e Cloud Shell non consente ancora l'accesso IPv6 diretto. Esegui i seguenti comandi in Cloud Shell.
gcloud iam service-accounts create ipv6-codelab \
     --description="temporary service account for a codelab" \
     --display-name="ipv6codelabSA" \
     --project $projectname

gcloud projects add-iam-policy-binding  $projectname \
--member=serviceAccount:ipv6-codelab@$projectname.iam.gserviceaccount.com \
--role=roles/compute.instanceAdmin.v1

gcloud iam service-accounts add-iam-policy-binding \
    ipv6-codelab@$projectname.iam.gserviceaccount.com \
--member=serviceAccount:ipv6-codelab@$projectname.iam.gserviceaccount.com \
--role=roles/iam.serviceAccountUser
Crea un VPC e attiva l'ULA
Crea una rete VPC con modalità subnet personalizzata e IPv6 interno ULA abilitato eseguendo i seguenti comandi in Cloud Shell.
gcloud compute networks create ipv6-only-vpc \
--project=$projectname \
--subnet-mode=custom \
--mtu=1500 --bgp-routing-mode=global \
--enable-ula-internal-ipv6
Crea regole firewall
Crea regole firewall per consentire l'accesso SSH. Una regola consente SSH dall'intervallo ULA complessivo (fd20::/20). Altre due regole consentono il traffico dagli intervalli IPv6 e IPv4 predefiniti di IAP (rispettivamente 2600:2d00:1:7::/64 e 35.235.240.0/20).
Esegui questi comandi in Cloud Shell:
gcloud compute firewall-rules create allow-v6-ssh-ula \
--direction=INGRESS --priority=200 \
--network=ipv6-only-vpc --action=ALLOW \
--rules=tcp:22 --source-ranges=fd20::/20 \
--project=$projectname

gcloud compute firewall-rules create allow-v6-iap \
--direction=INGRESS --priority=300 \
--network=ipv6-only-vpc --action=ALLOW \
--rules=tcp --source-ranges=2600:2d00:1:7::/64 \
--project=$projectname

gcloud compute firewall-rules create allow-v4-iap \
--direction=INGRESS --priority=300 \
--network=ipv6-only-vpc --action=ALLOW \
--rules=tcp --source-ranges=35.235.240.0/20 \
--project=$projectname
Crea subnet
Crea una subnet solo GUA v6, una subnet solo ULA v6 e una subnet ULA a doppio stack. Esegui questi comandi in Cloud Shell:
gcloud compute networks subnets create gua-v6only-subnet \
--network=ipv6-only-vpc \
--project=$projectname \
--stack-type=IPV6_ONLY \
--ipv6-access-type=external \
--region=$regionname

gcloud compute networks subnets create ula-v6only-subnet  \
--network=ipv6-only-vpc \
--project=$projectname \
--stack-type=IPV6_ONLY \
--ipv6-access-type=internal \
--enable-private-ip-google-access \
--region=$regionname

gcloud compute networks subnets create ula-dualstack-subnet  \
--network=ipv6-only-vpc \
--project=$projectname \
--stack-type=IPV4_IPV6 \
--range=10.120.0.0/16 \
--ipv6-access-type=internal \
--region=$regionname
Creare istanze
Crea istanze in ciascuna delle subnet appena create. L'istanza ULA solo IPv6 è specificata con cloud-platform per consentirci di utilizzarla come jumpbox per l'istanza GUA solo IPv6. Esegui questi comandi in Cloud Shell:
gcloud compute instances create gua-instance \
--subnet gua-v6only-subnet \
--stack-type IPV6_ONLY \
--zone $zonename \
--scopes=https://www.googleapis.com/auth/cloud-platform \
--service-account=ipv6-codelab@$projectname.iam.gserviceaccount.com \
--project=$projectname

gcloud compute instances create ula-instance \
--subnet ula-v6only-subnet \
--stack-type IPV6_ONLY \
--zone $zonename \
--scopes=https://www.googleapis.com/auth/cloud-platform \
--service-account=ipv6-codelab@$projectname.iam.gserviceaccount.com \
--project=$projectname

gcloud compute instances create dualstack-ula-instance \
--subnet ula-dualstack-subnet \
--stack-type IPV4_IPV6 \
--zone $zonename \
--project=$projectname
Accesso e configurazione iniziali dell'istanza
Esegui SSH nell'istanza ULA che utilizzerà IAP per impostazione predefinita. Utilizza il seguente comando in Cloud Shell per SSH nell'istanza ULA:
gcloud compute ssh ula-instance --project $projectname --zone $zonename

<username>@ula-instance:~$
Utilizzeremo anche l'istanza ULA come jumpbox per l'istanza GUA (perché IAP non funziona con le istanze GUA e le VM Cloud Shell non possono accedere alle destinazioni IPv6).
Mentre ti trovi ancora all'interno della shell dell'istanza ULA. Prova a connetterti all'istanza GUA tramite SSH utilizzando il seguente comando gcloud.
La prima volta che esegui un comando SSH all'interno di un'istanza, ti verrà chiesto di configurare una coppia di chiavi SSH. Continua a premere Invio finché non viene creata la chiave e viene eseguito il comando SSH. In questo modo viene creata una nuova coppia di chiavi senza passphrase.
ula-instance:~$ gcloud compute ssh gua-instance

WARNING: The private SSH key file for gcloud does not exist.
WARNING: The public SSH key file for gcloud does not exist.
WARNING: You do not have an SSH key for gcloud.
WARNING: SSH keygen will be executed to generate a key.
Generating public/private rsa key pair.

Enter passphrase (empty for no passphrase):
Enter same passphrase again:
Your identification has been saved in /home/galhabian/.ssh/google_compute_engine
Your public key has been saved in /home/galhabian/.ssh/google_compute_engine.pub
The key fingerprint is:
SHA256:5PYzydjcpWYiFtzetYCBI6vmy9dqyLsxgDORkB9ynqY galhabian@ula-instance
The key's randomart image is:
+---[RSA 3072]----+
|..               |
|+.o      .       |
|o= o  . + .      |
| o=    * o o     |
|+o.   . S o . o  |
|Eo . . . O + = . |
|   .=. .+ @ * .  |
|   +ooo... *     |
|    **..         |
+----[SHA256]-----+
In caso di esito positivo, il comando SSH verrà eseguito correttamente e avrai eseguito l'accesso SSH all'istanza GUA:
Updating instance ssh metadata...done.
Waiting for SSH key to propagate.
Warning: Permanently added 'compute.3639038240056074485' (ED25519) to the list of known hosts.
Linux gua-instance 6.1.0-34-cloud-amd64 #1 SMP PREEMPT_DYNAMIC Debian 6.1.135-1 (2025-04-25) x86_64

The programs included with the Debian GNU/Linux system are free software;
the exact distribution terms for each program are described in the
individual files in /usr/share/doc/*/copyright.

Debian GNU/Linux comes with ABSOLUTELY NO WARRANTY, to the extent
permitted by applicable law.

<username>@gua-instance:~$
5. Esamina le istanze solo IPv6.
Esaminiamo entrambe le istanze solo IPv6 eseguendo SSH e controllando le relative tabelle di routing.
Esamina l'istanza GUA
Accedi a "gua-instance" passando prima per l'istanza "ula-instance".
gcloud compute ssh ula-instance --project $projectname --zone $zonename
<username>@ula-instance:~$ gcloud compute ssh gua-instance
Esaminiamo la tabella di routing IPv6 dell'istanza utilizzando il seguente comando
<username>@gua-instance:~$ ip -6 route

2600:1900:4041:461::/65 via fe80::56:11ff:fef9:88c1 dev ens4 proto ra metric 100 expires 81sec pref medium
fe80::/64 dev ens4 proto kernel metric 256 pref medium
default via fe80::56:11ff:fef9:88c1 dev ens4 proto ra metric 100 expires 81sec mtu 1500 pref medium
Notiamo tre voci nella tabella di routing
- Una route /65 per la subnet GUA a cui appartiene l'istanza con un hop successivo derivato che utilizza un indirizzo link-local per il gateway predefinito. Ricorda che /65 superiore è riservato ai bilanciatori del carico di rete passthrough IPv6
- Una route /64 integrata per il prefisso unicast link-local fe80::/64
- Una route predefinita che punta all'indirizzo link-local del gateway predefinito della subnet.
Esaminiamo la tabella di routing IPv4 eseguendo questo comando
<username>@gua-instance:~$ ip -4 route

default via 169.254.1.1 dev ens4 proto dhcp src 169.254.1.2 metric 100
169.254.1.1 dev ens4 proto dhcp scope link src 169.254.1.2 metric 100
169.254.169.254 via 169.254.1.1 dev ens4 proto dhcp src 169.254.1.2 metric 100
Sorprendente, no? Infatti, manteniamo una tabella di routing IPv4 nelle istanze solo IPv6 esclusivamente per consentire l'accesso al server di metadati di Compute (169.254.169.154), poiché è ancora un endpoint solo IPv4.
Poiché l'istanza assume l'IP 169.254.1.2 quando è un'istanza solo IPv6. Questo IP non è instradabile in nessun luogo tranne che al server dei metadati Compute, quindi l'istanza è effettivamente isolata da tutte le reti IPv4.
Test di curl
Testiamo la connettività effettiva ai siti web solo IPv4 e solo IPv6 utilizzando curl.
<username>@gua-instance:~$ curl -vv --connect-timeout 10 v6.ipv6test.app
<username>@gua-instance:~$ curl -vv --connect-timeout 10 v4.ipv6test.app
Di seguito è riportato un output di esempio.
<username>@gua-instance:~$ curl -vv --connect-timeout 10 v6.ipv6test.app
*   Trying [2600:9000:20be:cc00:9:ec55:a1c0:93a1]:80...
* Connected to v6.ipv6test.app (2600:9000:20be:cc00:9:ec55:a1c0:93a1) port 80 (#0)
> GET / HTTP/1.1
> Host: v6.ipv6test.app
> User-Agent: curl/7.88.1
> Accept: */*
>
< HTTP/1.1 200 OK
!! Rest of output truncated

<username>@gua-instance:~$ curl -vv --connect-timeout 10 v4.ipv6test.app
*   Trying 3.163.165.4:80...
* ipv4 connect timeout after 4985ms, move on!
*   Trying 3.163.165.50:80...
* ipv4 connect timeout after 2492ms, move on!
*   Trying 3.163.165.127:80...
* ipv4 connect timeout after 1246ms, move on!
*   Trying 3.163.165.37:80...
* ipv4 connect timeout after 1245ms, move on!
* Failed to connect to v4.ipv6test.app port 80 after 10000 ms: Timeout was reached
* Closing connection 0
curl: (28) Failed to connect to v4.ipv6test.app port 80 after 10000 ms: Timeout was reached
Come previsto, non è possibile raggiungere un endpoint internet IPv4 da un'istanza solo IPv6. Senza il provisioning di DNS64 e NAT64, l'istanza solo IPv6 non ha un percorso verso una destinazione IPv4. La raggiungibilità di una destinazione IPv6 funziona normalmente perché l'istanza ha un indirizzo IPv6 GUA.
Esamina l'istanza ULA
Accedi tramite SSH all'istanza "ula-instance" (utilizza IAP per impostazione predefinita).
gcloud compute ssh ula-instance --project $projectname --zone $zonename
Esaminiamo la tabella di routing IPv6 dell'istanza utilizzando il seguente comando
<username>@ula-instance:~$ ip -6 route

fd20:f06:2e5e:2000::/64 via fe80::55:82ff:fe6b:1d7 dev ens4 proto ra metric 100 expires 84sec pref medium
fe80::/64 dev ens4 proto kernel metric 256 pref medium
default via fe80::55:82ff:fe6b:1d7 dev ens4 proto ra metric 100 expires 84sec mtu 1500 pref medium
Notiamo tre voci nella tabella di routing, simili all'istanza GUA, ad eccezione della maschera che è /64 anziché /65. e la route di subnet appartiene a un intervallo ULA. (nell'aggregato fd20::/20)
Esaminiamo la tabella di routing IPv4 eseguendo questo comando
<username>@ula-instance:~$ ip -4 route

default via 169.254.1.1 dev ens4 proto dhcp src 169.254.1.2 metric 100
169.254.1.1 dev ens4 proto dhcp scope link src 169.254.1.2 metric 100
169.254.169.254 via 169.254.1.1 dev ens4 proto dhcp src 169.254.1.2 metric 100
che mostra una situazione simile a quella dell'istanza GUA.
Test di curl
Ripetizione dei test di connettività a siti web solo IPv4 e solo IPv6 utilizzando curl.
<username>@ula-instance:~$ curl -vv --connect-timeout 10 v6.ipv6test.app
<username>@ula-instance:~$ curl -vv --connect-timeout 10 v4.ipv6test.app
Di seguito è riportato un output di esempio.
<username>@ula-instance:~$ curl -vv --connect-timeout 10 v6.ipv6test.app
*   Trying [2600:9000:20be:8400:9:ec55:a1c0:93a1]:80...
* ipv6 connect timeout after 4986ms, move on!
*   Trying [2600:9000:20be:9000:9:ec55:a1c0:93a1]:80...
* ipv6 connect timeout after 2493ms, move on!
*   Trying [2600:9000:20be:d600:9:ec55:a1c0:93a1]:80...
* ipv6 connect timeout after 1246ms, move on!
*   Trying [2600:9000:20be:b000:9:ec55:a1c0:93a1]:80...
* ipv6 connect timeout after 622ms, move on!
*   Trying [2600:9000:20be:7200:9:ec55:a1c0:93a1]:80...
* ipv6 connect timeout after 312ms, move on!
*   Trying [2600:9000:20be:8600:9:ec55:a1c0:93a1]:80...
* ipv6 connect timeout after 155ms, move on!
*   Trying [2600:9000:20be:7a00:9:ec55:a1c0:93a1]:80...
* ipv6 connect timeout after 77ms, move on!
*   Trying [2600:9000:20be:ce00:9:ec55:a1c0:93a1]:80...
* ipv6 connect timeout after 77ms, move on!
* Failed to connect to v6.ipv6test.app port 80 after 10000 ms: Timeout was reached
* Closing connection 0

<username>@ula-instance:~$ curl -vv --connect-timeout 10 v4.ipv6test.app
*   Trying 3.163.165.4:80...
* ipv4 connect timeout after 4985ms, move on!
*   Trying 3.163.165.50:80...
* ipv4 connect timeout after 2492ms, move on!
*   Trying 3.163.165.127:80...
* ipv4 connect timeout after 1246ms, move on!
*   Trying 3.163.165.37:80...
* ipv4 connect timeout after 1245ms, move on!
* Failed to connect to v4.ipv6test.app port 80 after 10000 ms: Timeout was reached
* Closing connection 0
curl: (28) Failed to connect to v4.ipv6test.app port 80 after 10000 ms: Timeout was reached
Nel caso dell'istanza ULA, non è possibile raggiungere entrambi gli endpoint internet poiché per l'endpoint IPv6 non possiamo utilizzare un indirizzo ULA per comunicare e l'istanza non può raggiungere IPv4 in quanto istanza solo IPv6.
6. Abilita NAT64 e DNS64
Configura i servizi DNS64 e NAT64 gestiti per il tuo VPC.
DNS64
Attiva la policy del server DNS64 per il tuo VPC . Indica al resolver DNS del VPC di sintetizzare i record AAAA per le risposte solo A. Esegui questi comandi in Cloud Shell:
gcloud beta dns policies create allow-dns64 \
    --description="Enable DNS64 Policy" \
    --networks=ipv6-only-vpc \
    --enable-dns64-all-queries \
    --project $projectname
NAT64
Crea un router Cloud, necessario per Cloud NAT . Poi, crea un gateway Cloud NAT configurato per NAT64, attivandolo per tutti gli intervalli IP di subnet solo IPv6 e allocando automaticamente gli IP esterni. Esegui questi comandi in Cloud Shell:
gcloud compute routers create nat64-router \
--network=ipv6-only-vpc \
--region=$regionname \
--project=$projectname


gcloud beta compute routers nats create nat64-natgw \
--router=nat64-router \
--region=$regionname \
--auto-allocate-nat-external-ips \
--nat64-all-v6-subnet-ip-ranges \
--project=$projectname
7. Testare NAT64 e DNS64
Ora testiamo la configurazione NAT64 e DNS64 dalle istanze solo IPv6, a partire dall'istanza GUA seguita dall'istanza ULA.
Test di DNS64/NAT64 da un'istanza GUA
Accedi a "gua-instance" passando prima per l'istanza "ula-instance".
gcloud compute ssh ula-instance --project $projectname --zone $zonename
<username>@ula-instance:~$ gcloud compute ssh gua-instance
Test DNS
Testa la risoluzione DNS di un sito web solo IPv6 (ad es. v6.ipv6test.app, ma qualsiasi sito web solo IPv6 dovrebbe produrre un risultato simile).
<username>@gua-instance:~$ host -t AAAA v6.ipv6test.app
<username>@gua-instance:~$ host -t A v6.ipv6test.app
Prevediamo che vengano restituite solo risposte AAAA IPv6.
Output di esempio
<username>@gua-instance:~$ host -t AAAA v6.ipv6test.app
v6.ipv6test.app has IPv6 address 2600:9000:269f:1000:9:ec55:a1c0:93a1
v6.ipv6test.app has IPv6 address 2600:9000:269f:6600:9:ec55:a1c0:93a1
v6.ipv6test.app has IPv6 address 2600:9000:269f:b600:9:ec55:a1c0:93a1
v6.ipv6test.app has IPv6 address 2600:9000:269f:3e00:9:ec55:a1c0:93a1
v6.ipv6test.app has IPv6 address 2600:9000:269f:9c00:9:ec55:a1c0:93a1
v6.ipv6test.app has IPv6 address 2600:9000:269f:b200:9:ec55:a1c0:93a1
v6.ipv6test.app has IPv6 address 2600:9000:269f:a600:9:ec55:a1c0:93a1
v6.ipv6test.app has IPv6 address 2600:9000:269f:1400:9:ec55:a1c0:93a1

<username>@gua-instance:~$ host -t A v6.ipv6test.app
v6.ipv6test.app has no A record
Testa la risoluzione DNS di un sito web solo IPv4 (ad es. v4.ipv6test.app). Ti aspetti sia un record A (l'IPv4 originale) sia un record AAAA sintetizzato da DNS64 utilizzando il prefisso well-known 64:ff9b::/96 .
<username>@gua-instance:~$ host -t AAAA v4.ipv6test.app
<username>@gua-instance:~$ host -t A v4.ipv6test.app
Output di esempio
<username>@gua-instance:~$ host -t AAAA v4.ipv6test.app
v4.ipv6test.app has IPv6 address 64:ff9b::36c0:3318
v4.ipv6test.app has IPv6 address 64:ff9b::36c0:3344
v4.ipv6test.app has IPv6 address 64:ff9b::36c0:333c
v4.ipv6test.app has IPv6 address 64:ff9b::36c0:3326

<username>@gua-instance:~$ host -t A v4.ipv6test.app
v4.ipv6test.app has address 54.192.51.68
v4.ipv6test.app has address 54.192.51.24
v4.ipv6test.app has address 54.192.51.60
v4.ipv6test.app has address 54.192.51.38
Nell'esempio precedente, l'indirizzo IPv4 (54.192.51.38) in formato decimale si traduce in (36 c0 33 26) in formato esadecimale e quindi ci aspettiamo che la risposta per il record AAAA sia (64:ff9b::36c0:3326), che corrisponde a una delle risposte AAAA che abbiamo ricevuto.
Test di arricciatura
Testiamo la connettività effettiva agli stessi endpoint solo IPv4 e solo IPv6 utilizzando curl su IPv6
<username>@gua-instance:~$ curl -vv -6 v6.ipv6test.app

<username>@gua-instance:~$ curl -vv -6 v4.ipv6test.app
Di seguito è riportato un output di esempio.
<username>@gua-instance:~$ curl -vv -6 v6.ipv6test.app
*   Trying [2600:9000:269f:1000:9:ec55:a1c0:93a1]:80...
* Connected to v6.ipv6test.app (2600:9000:269f:1000:9:ec55:a1c0:93a1) port 80 (#0)
> GET / HTTP/1.1

##
## <Output truncated for brevity>
##

<username>@gua-instance:~$ curl -vv -6 v4.ipv6test.app
*   Trying [64:ff9b::36c0:333c]:80...
* Connected to v4.ipv6test.app (64:ff9b::36c0:333c) port 80 (#0)
> GET / HTTP/1.1

##
## <Output truncated for brevity>
##
Entrambi i comandi curl hanno esito positivo. Nota come la connessione a un sito web solo IPv4 tramite IPv6 è stata possibile grazie a NAT64 e DNS64 che hanno funzionato in tandem per consentire la connettività.
Controlla gli IP di origine
Utilizziamo un servizio di riflessione IP per controllare l'IP di origine osservato dalla destinazione .
<username>@gua-instance:~$ curl -6 v4.ipv6test.app

<username>@gua-instance:~$ curl -6 v6.ipv6test.app
Esempio di output
<username>@gua-instance:~$ curl -6 v4.ipv6test.app
34.47.60.91

<username>@gua-instance:~$ curl -6 v6.ipv6test.app
2600:1900:40e0:6f:0:1::
L'indirizzo IPv6 segnalato deve corrispondere all'indirizzo IPv6 dell'istanza . Questo indirizzo deve corrispondere all'output del comando "ip -6 address" sull'istanza. Ad esempio
<username>@gua-instance:~$ ip -6 addr
1: lo: <LOOPBACK,UP,LOWER_UP> mtu 65536 state UNKNOWN qlen 1000
    inet6 ::1/128 scope host noprefixroute
       valid_lft forever preferred_lft forever
2: ens4: <BROADCAST,MULTICAST,UP,LOWER_UP> mtu 1500 state UP qlen 1000
    inet6 2600:1900:40e0:6f:0:1::/128 scope global dynamic noprefixroute
       valid_lft 79912sec preferred_lft 79912sec
    inet6 fe80::86:d9ff:fe34:27ed/64 scope link
       valid_lft forever preferred_lft forever
L'indirizzo IPv4 segnalato, tuttavia, deve corrispondere all'indirizzo IP esterno del gateway Cloud NAT, poiché esegue la funzione NAT64 prima dell'uscita a internet. Puoi verificarlo eseguendo questo comando gcloud in Cloud Shell
gcloud compute routers get-nat-ip-info \
       nat64-router \
       --region=$regionname
Esempio di output
result:
- natIpInfoMappings:
  - mode: AUTO
    natIp: 34.47.60.91
    usage: IN_USE
  natName: nat64-natgw
Tieni presente che "natIp" riportato nell'output corrisponde all'output ricevuto dal sito web di riflessione IP.
Test di DNS64/NAT64 da un'istanza ULA
Innanzitutto, accedi tramite SSH all'istanza ULA "ula-instance".
gcloud compute ssh ula-instance --project $projectname --zone $zonename

<username>@ula-instance:~$
Test DNS
Testa la risoluzione DNS di un sito web solo IPv6 (ad es. v6.ipv6test.app, ma qualsiasi sito web solo IPv6 dovrebbe produrre un risultato simile).
<username>@ula-instance:~$ host -t AAAA v6.ipv6test.app
<username>@ula-instance:~$ host -t A v6.ipv6test.app
Prevediamo che vengano restituite solo risposte AAAA IPv6.
Output di esempio
<username>@ula-instance:~$ host -t AAAA v6.ipv6test.app
v6.ipv6test.app has IPv6 address 2600:9000:269f:1000:9:ec55:a1c0:93a1
v6.ipv6test.app has IPv6 address 2600:9000:269f:6600:9:ec55:a1c0:93a1
v6.ipv6test.app has IPv6 address 2600:9000:269f:b600:9:ec55:a1c0:93a1
v6.ipv6test.app has IPv6 address 2600:9000:269f:3e00:9:ec55:a1c0:93a1
v6.ipv6test.app has IPv6 address 2600:9000:269f:9c00:9:ec55:a1c0:93a1
v6.ipv6test.app has IPv6 address 2600:9000:269f:b200:9:ec55:a1c0:93a1
v6.ipv6test.app has IPv6 address 2600:9000:269f:a600:9:ec55:a1c0:93a1
v6.ipv6test.app has IPv6 address 2600:9000:269f:1400:9:ec55:a1c0:93a1

<username>@ula-instance:~$ host -t A v6.ipv6test.app
v6.ipv6test.app has no A record
Testa la risoluzione DNS di un sito web solo IPv4 (ad es. v4.ipv6test.app). Ti aspetti sia un record A (l'IPv4 originale) sia un record AAAA sintetizzato da DNS64 utilizzando il prefisso well-known 64:ff9b::/96 .
<username>@ula-instance:~$ host -t AAAA v4.ipv6test.app
<username>@ula-instance:~$ host -t A v4.ipv6test.app
Output di esempio
<username>@gua-instance:~$ host -t AAAA v4.ipv6test.app
v4.ipv6test.app has IPv6 address 64:ff9b::36c0:3318
v4.ipv6test.app has IPv6 address 64:ff9b::36c0:3344
v4.ipv6test.app has IPv6 address 64:ff9b::36c0:333c
v4.ipv6test.app has IPv6 address 64:ff9b::36c0:3326

<username>@gua-instance:~$ host -t A v4.ipv6test.app
v4.ipv6test.app has address 54.192.51.68
v4.ipv6test.app has address 54.192.51.24
v4.ipv6test.app has address 54.192.51.60
v4.ipv6test.app has address 54.192.51.38
Nell'esempio precedente, l'indirizzo IPv4 (54.192.51.38) in formato decimale si traduce in (36 c0 33 26) in formato esadecimale e quindi ci aspettiamo che la risposta per il record AAAA sia (64:ff9b::36c0:3326), che corrisponde a una delle risposte AAAA che abbiamo ricevuto.
Test di curl
Testiamo la connettività effettiva agli stessi endpoint solo IPv4 e solo IPv6 utilizzando curl.
Come punto di partenza, mostriamo che la raggiungibilità tramite IPv4 non è possibile perché l'istanza è solo IPv6.
<username>@ula-instance:~$ curl -vv -4 --connect-timeout 10 v6.ipv6test.app
<username>@ula-instance:~$ curl -vv -4 --connect-timeout 10 v4.ipv6test.app
Entrambe le richieste non andranno a buon fine. Non andranno a buon fine per motivi diversi. Di seguito è riportato un output di esempio.
<username>@ula-instance:~$ curl -vv -4 v6.ipv6test.app
* Could not resolve host: v6.ipv6test.app
* Closing connection 0
curl: (6) Could not resolve host: v6.ipv6test.app

<username>@ula-instance:~$ curl -vv -4 --connect-timeout 10 v4.ipv6test.app
*   Trying 54.192.51.68:80...
* ipv4 connect timeout after 4993ms, move on!
*   Trying 54.192.51.38:80...
* ipv4 connect timeout after 2496ms, move on!
*   Trying 54.192.51.24:80...
* ipv4 connect timeout after 1248ms, move on!
*   Trying 54.192.51.60:80...
* Connection timeout after 10000 ms
* Closing connection 0
curl: (28) Connection timeout after 10000 ms
Il comando curl IPv4 a un endpoint solo IPv6 non riesce perché la risoluzione DNS per il record A non va a buon fine (come dimostrato durante i test DNS). Il comando curl IPv4 a un endpoint solo IPv4 non va a buon fine perché un'istanza solo IPv6 non ha raggiungibilità a nessun indirizzo IPv4 e si verifica un timeout.
Ora testiamo la raggiungibilità tramite IPv6.
<username>@ula-instance:~$ curl -vv -6 v6.ipv6test.app

<username>@ula-instance:~$ curl -vv -6 v4.ipv6test.app
Di seguito è riportato un output di esempio.
<username>@ula-instance:~$ curl -vv -6 v6.ipv6test.app
*   Trying [2600:9000:20be:c000:9:ec55:a1c0:93a1]:80...
* connect to 2600:9000:20be:c000:9:ec55:a1c0:93a1 port 80 failed: Connection timed out
*   Trying [2600:9000:20be:f000:9:ec55:a1c0:93a1]:80...
* ipv6 connect timeout after 84507ms, move on!
*   Trying [2600:9000:20be:ae00:9:ec55:a1c0:93a1]:80...
* ipv6 connect timeout after 42253ms, move on!
*   Trying [2600:9000:20be:2000:9:ec55:a1c0:93a1]:80...
* ipv6 connect timeout after 21126ms, move on!
*   Trying [2600:9000:20be:b600:9:ec55:a1c0:93a1]:80...
* ipv6 connect timeout after 10563ms, move on!
*   Trying [2600:9000:20be:7600:9:ec55:a1c0:93a1]:80...
* ipv6 connect timeout after 5282ms, move on!
*   Trying [2600:9000:20be:b000:9:ec55:a1c0:93a1]:80...
* ipv6 connect timeout after 2640ms, move on!
*   Trying [2600:9000:20be:3400:9:ec55:a1c0:93a1]:80...
* ipv6 connect timeout after 2642ms, move on!
* Failed to connect to v6.ipv6test.app port 80 after 300361 ms: Timeout was reached
* Closing connection 0

<username>@ula-instance:~$ curl -vv -6 v4.ipv6test.app
*   Trying [64:ff9b::36c0:333c]:80...
* Connected to v4.ipv6test.app (64:ff9b::36c0:333c) port 80 (#0)
> GET / HTTP/1.1

##
## <Output truncated for brevity>
##
Il comando curl al sito web solo IPv6 non va a buon fine perché le subnet ULA non hanno raggiungibilità diretta a internet. Il comando curl al sito web solo IPv4 ha esito positivo perché DNS64 e NAT64 funzionano allo stesso modo per le istanze GUA e ULA; l'unico requisito è che l'istanza sia solo IPv6.
Test di DNS64/NAT64 da un'istanza ULA dual-stack
Innanzitutto, accedi tramite SSH all'istanza ULA dual-stack "dualstack-ula-instance". Dobbiamo utilizzare il flag "–tunnel-through-iap" per forzare gcloud a utilizzare l'indirizzo IPv4 per IAP.
gcloud compute ssh dualstack-ula-instance --project $projectname --zone $zonename --tunnel-through-iap

<username>@dualstack-ula-instance:~$
Ora testiamo DNS64 utilizzando l'utilità "host".
<username>@dualstack-ula-instance:~$ host v4.ipv6test.app
v4.ipv6test.app has address 54.192.51.38
v4.ipv6test.app has address 54.192.51.24
v4.ipv6test.app has address 54.192.51.68
v4.ipv6test.app has address 54.192.51.60

<username>@dualstack-ula-instance:~$ host v6.ipv6test.app
v6.ipv6test.app has IPv6 address 2600:9000:269f:fc00:9:ec55:a1c0:93a1
v6.ipv6test.app has IPv6 address 2600:9000:269f:1c00:9:ec55:a1c0:93a1
v6.ipv6test.app has IPv6 address 2600:9000:269f:a200:9:ec55:a1c0:93a1
v6.ipv6test.app has IPv6 address 2600:9000:269f:8a00:9:ec55:a1c0:93a1
v6.ipv6test.app has IPv6 address 2600:9000:269f:c800:9:ec55:a1c0:93a1
v6.ipv6test.app has IPv6 address 2600:9000:269f:c200:9:ec55:a1c0:93a1
v6.ipv6test.app has IPv6 address 2600:9000:269f:5800:9:ec55:a1c0:93a1
v6.ipv6test.app has IPv6 address 2600:9000:269f:dc00:9:ec55:a1c0:93a1
Nota come il sito web solo IPv4 ora restituisce solo indirizzi IPv4 e non più le risposte DNS64 sintetiche. Questo perché DNS64 viene applicato solo alle istanze solo IPv6 e non viene valutato per le istanze a doppio stack.
Per evitare la necessità di DNS64, aggiungiamo una voce al file /etc/hosts per verificare se NAT64 funziona. Esegui questo comando all'interno dell'istanza dual-stack:
<username>@dualstack-ula-instance:~$ echo '64:ff9b::36c0:3326 v4.ipv6test.app' | sudo tee -a /etc/hosts
Poi utilizziamo curl per testare il raggiungimento del sito web IPv4 tramite IPv6
<username>@dualstack-ula-instance:~$ curl -vv -6 --connect-timeout 10 v4.ipv6test.app
Ecco un output di esempio del comando precedente
<username>@dualstack-ula-instance:~$ curl -vv -6 --connect-timeout 10 v4.ipv6test.app

*   Trying [64:ff9b::36c0:3326]:80...
* ipv6 connect timeout after 10000ms, move on!
* Failed to connect to v4.ipv6test.app port 80 after 10001 ms: Timeout was reached
* Closing connection 0
curl: (28) Failed to connect to v4.ipv6test.app port 80 after 10001 ms: Timeout was reached
Il comando curl dovrebbe andare in timeout perché, proprio come DNS64, anche NAT64 richiede che l'istanza sia solo IPv6 per essere applicato.
Per verificare che NAT64 non venga effettivamente applicato all'istanza dual-stack, utilizziamo il comando "get-nat-mapping" per elencare tutti i mapping delle porte applicati dal gateway NAT. Esegui questi comandi in Cloud Shell:
gcloud compute routers get-nat-mapping-info \
      nat64-router --region $regionname \
      --project $projectname
Dovresti aspettarti un output simile al seguente snippet:
---
instanceName: gua-instance
interfaceNatMappings:
- natIpPortRanges:
  - 34.47.60.91:1024-1055
  numTotalDrainNatPorts: 0
  numTotalNatPorts: 32
  sourceAliasIpRange: ''
  sourceVirtualIp: '2600:1900:40e0:6f:0:1::'
- natIpPortRanges:
  - 34.47.60.91:32768-32799
  numTotalDrainNatPorts: 0
  numTotalNatPorts: 32
  sourceAliasIpRange: ''
  sourceVirtualIp: '2600:1900:40e0:6f:0:1::'
---
instanceName: ula-instance
interfaceNatMappings:
- natIpPortRanges:
  - 34.47.60.91:1056-1087
  numTotalDrainNatPorts: 0
  numTotalNatPorts: 32
  sourceAliasIpRange: ''
  sourceVirtualIp: fd20:9c2:93fc:2800:0:0:0:0
- natIpPortRanges:
  - 34.47.60.91:32800-32831
  numTotalDrainNatPorts: 0
  numTotalNatPorts: 32
  sourceAliasIpRange: ''
  sourceVirtualIp: fd20:9c2:93fc:2800:0:0:0:0
L'output NAT mostra che il gateway NAT64 ha allocato porte solo per le istanze GUA e ULA solo IPv6, ma non per l'istanza a doppio stack.
8. Esegui la pulizia
Libera spazio sul router Cloud
In Cloud Shell, esegui le seguenti operazioni:
gcloud compute routers delete nat64-router \
      --region $regionname \
      --project $projectname --quiet
Scollega e pulisci la policy DNS
In Cloud Shell, esegui le seguenti operazioni:
gcloud beta dns policies update allow-dns64 \
    --networks="" \
    --project $projectname
gcloud beta dns policies delete allow-dns64 \
    --project $projectname --quiet
Liberare spazio dalle istanze
In Cloud Shell, esegui le seguenti operazioni: (nota: gcloud beta viene utilizzato per consentirci di utilizzare il flag no-graceful-shutdown per un'operazione di eliminazione dell'istanza più rapida)
gcloud beta compute instances delete gua-instance \
         --zone $zonename \
         --no-graceful-shutdown \
         --project=$projectname --quiet

gcloud beta compute instances delete ula-instance \
         --zone $zonename \
         --no-graceful-shutdown \
         --project=$projectname --quiet

gcloud beta compute instances delete dualstack-ula-instance \
         --zone $zonename \
         --no-graceful-shutdown \
         --project=$projectname --quiet
Pulire le subnet
In Cloud Shell, esegui le seguenti operazioni:
gcloud compute networks subnets delete gua-v6only-subnet \
    --project=$projectname --quiet \
    --region=$regionname

gcloud compute networks subnets delete ula-v6only-subnet \
    --project=$projectname --quiet \
    --region=$regionname

gcloud compute networks subnets delete ula-dualstack-subnet \
    --project=$projectname --quiet \
    --region=$regionname
Pulire le regole firewall
In Cloud Shell, esegui le seguenti operazioni:
gcloud compute firewall-rules delete allow-v6-iap \
       --project=$projectname \
       --quiet

gcloud compute firewall-rules delete allow-v6-ssh-ula \
       --project=$projectname \
       --quiet

gcloud compute firewall-rules delete allow-v4-iap \
--project=$projectname \
--quiet
Libera spazio nel VPC
In Cloud Shell, esegui le seguenti operazioni:
gcloud compute networks delete ipv6-only-vpc \
       --project=$projectname \
       --quiet
Esegui la pulizia delle autorizzazioni IAM e del service account
In Cloud Shell, esegui le seguenti operazioni:
gcloud projects remove-iam-policy-binding  $projectname \
--member=serviceAccount:ipv6-codelab@$projectname.iam.gserviceaccount.com \
--role=roles/compute.instanceAdmin.v1

gcloud iam service-accounts delete \
     ipv6-codelab@$projectname.iam.gserviceaccount.com \
     --quiet \
     --project $projectname
9. Complimenti
Hai utilizzato correttamente NAT64 e DNS64 per consentire alle istanze solo IPv6 di raggiungere destinazioni solo IPv4 su internet.
Passaggi successivi
Dai un'occhiata ad alcuni di questi codelab...
- Accedi alle API di Google da host on-premise con indirizzi IPv6
- Opzioni di indirizzamento IP IPv4 e IPv6
- Utilizzo dell'istanza di hop successivo delle route statiche IPv6, dell'indirizzo di hop successivo e del gateway di hop successivo