1. Introduction
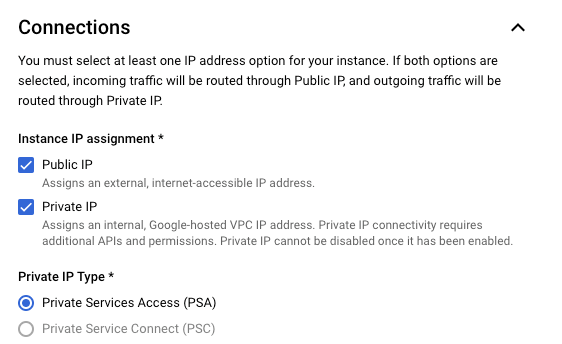
Only Looker (Google Cloud core) instances that use private services access for their private connection support a private IP and public IP configuration.
A Looker (Google Cloud core) instance that has both a private IP (private services access) connection and a public IP connection has a public URL, and all incoming traffic will go through the public IP connection. Outgoing traffic is routed through your VPC, which can be configured to allow only private IP traffic as illustrated in figure1.
Figure1
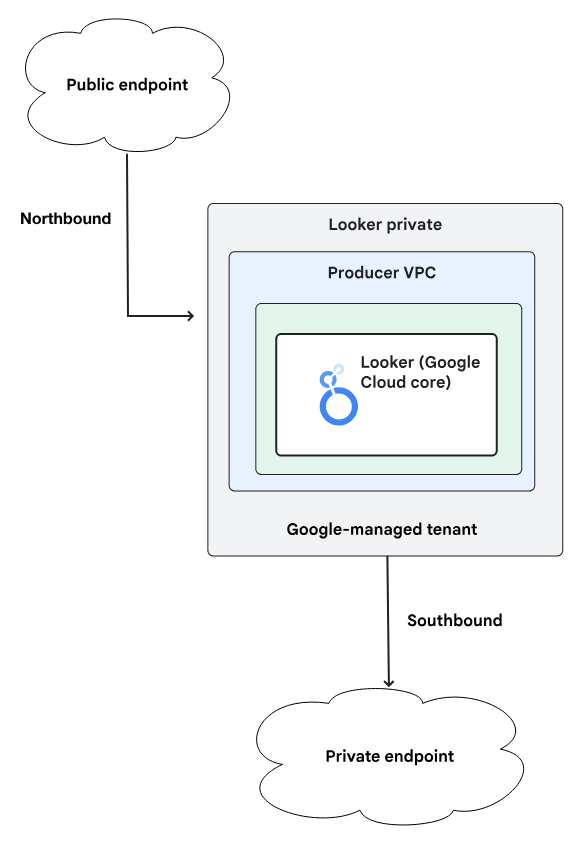
Communication to github.com is resolved to a public IP address therefore unreachable from a Looker instance deployed as Private or Public+Private.
In this codelab you will perform a southbound HTTPS connection to GitHub using an internal tcp proxy load balancer and internet network endpoint group (NEG) invoked from Looker PSA.
What you'll learn
- Network requirements
- Establish connectivity to GitHub from Looker using a Test Connection
What you'll need
- Google Cloud Project with Owner permissions
- GitHub account and repository
- GitHub Personal Access Token (Classic)
- Existing Looker PSA Instance with Public + Private or Private only enabled
2. What you'll build
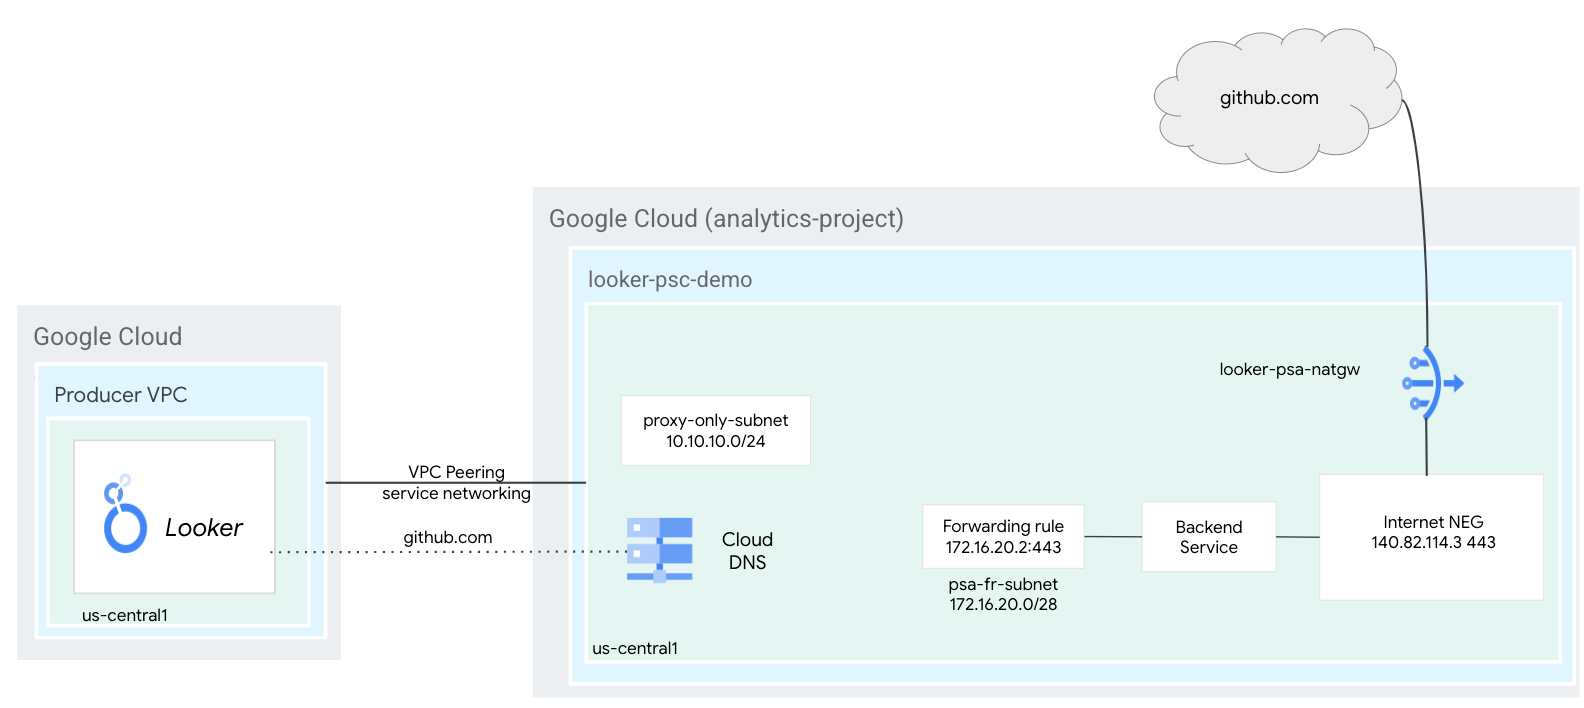
You'll deploy an internal tcp proxy load balancer and Internet NEG configured with the resolved IP address of github.com that leverages Cloud NAT for internet egress to github.com organizations resolved by Looker.
3. Network requirements
Below is the breakdown of network requirements:
Components | Description |
VPC ($vpc_network) | Custom mode VPC |
forwarding rule subnet | Used to allocate an IP address for the Regional Internal TCP Proxy Load Balancer |
Proxy Only Subnet | Each of the load balancer's proxies is assigned an internal IP address. Packets sent from a proxy to a backend VM or endpoint has a source IP address from the proxy-only subnet. |
Internet NEG | A resource used to define an external backend for the load balancer. The endpoint cannot be reachable only over Cloud VPN or Cloud Interconnect. |
Backend Service | A backend service acts as a bridge between your load balancer and your backend resources. In the tutorial, the backend service is associated with the Internet NEG. |
Cloud Router | Cloud NAT relies on Cloud Routers for control plane capabilities, but not for BGP session management. |
Cloud NAT | The regional internet NEG leverages Cloud NAT for internet egress. |
4. Codelab topology
5. Setup and Requirements
Self-paced environment setup
- Sign-in to the Google Cloud Console and create a new project or reuse an existing one. If you don't already have a Gmail or Google Workspace account, you must create one.

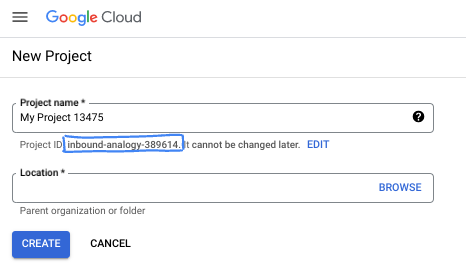
- The Project name is the display name for this project's participants. It is a character string not used by Google APIs. You can always update it.
- The Project ID is unique across all Google Cloud projects and is immutable (cannot be changed after it has been set). The Cloud Console auto-generates a unique string; usually you don't care what it is. In most codelabs, you'll need to reference your Project ID (typically identified as
PROJECT_ID). If you don't like the generated ID, you might generate another random one. Alternatively, you can try your own, and see if it's available. It can't be changed after this step and remains for the duration of the project. - For your information, there is a third value, a Project Number, which some APIs use. Learn more about all three of these values in the documentation.
- Next, you'll need to enable billing in the Cloud Console to use Cloud resources/APIs. Running through this codelab won't cost much, if anything at all. To shut down resources to avoid incurring billing beyond this tutorial, you can delete the resources you created or delete the project. New Google Cloud users are eligible for the $300 USD Free Trial program.
Start Cloud Shell
While Google Cloud can be operated remotely from your laptop, in this codelab you will be using Google Cloud Shell, a command line environment running in the Cloud.
From the Google Cloud Console, click the Cloud Shell icon on the top right toolbar:

It should only take a few moments to provision and connect to the environment. When it is finished, you should see something like this:

This virtual machine is loaded with all the development tools you'll need. It offers a persistent 5GB home directory, and runs on Google Cloud, greatly enhancing network performance and authentication. All of your work in this codelab can be done within a browser. You do not need to install anything.
6. Before you begin
Enable APIs
Inside Cloud Shell, make sure that your project id is set up:
gcloud config list project
gcloud config set project [YOUR-PROJECT-ID]
project=[YOUR-PROJECT-ID]
region=[YOUR-REGION]
vpc_network=[VPC Name]
echo $project
echo $region
echo $vpc-network
Enable all necessary services:
gcloud services enable compute.googleapis.com
7. VPC Network Components
VPC Network
The tutorial's prerequisite is an existing PSA Looker Instance hence the associated VPC is already created.
Inside Cloud Shell, create the forwarding rule subnet:
gcloud compute networks subnets create psa-fr-subnet --network $vpc_network --range 172.16.20.0/28 --region $region --enable-private-ip-google-access
Inside Cloud Shell, create the regional proxy only subnet:
gcloud compute networks subnets create $region-proxyonly-subnet \
  --purpose=REGIONAL_MANAGED_PROXY \
  --role=ACTIVE \
  --region=$region \
  --network=$vpc_network \
  --range=10.10.10.0/24
Create the Public NAT gateway
The NAT Gateway is used by the regional internal tcp proxy load balancer for internet egress with the configuration option, –endpoint-types=ENDPOINT_TYPE_MANAGED_PROXY_LB, therefore the same NATGW will not support GCE/GKE internet egress. Deploy an additional NAT GW with the –endpoint-types=ENDPOINT_TYPE_VM for GCE/GKE internet egress.
Inside Cloud Shell, create the Cloud Router:
gcloud compute routers create $vpc_network-cloud-router --network $vpc_network --region $region
Inside Cloud Shell, create the Cloud NAT gateway enabling internet egress for the tcp proxy load balancer:
gcloud compute routers nats create $vpc_network-natgw \
  --router=$vpc_network-cloud-router \
  --endpoint-types=ENDPOINT_TYPE_MANAGED_PROXY_LB \
  --nat-custom-subnet-ip-ranges=$region-proxyonly-subnet \
  --auto-allocate-nat-external-ips \
  --region=$region
Reserve the load balancer's IP address
Inside Cloud Shell, reserve an internal IP address for the load balancer that will be used later as the DNS A record for github.com:
gcloud compute addresses create internet-neg-lb-ip \
  --region=$region \
  --subnet=psa-fr-subnet
Inside Cloud Shell, view the reserved IP Address:
gcloud compute addresses describe internet-neg-lb-ip \
  --region=$region | grep -i address:
Example output:
user@cloudshell$ gcloud compute addresses describe internet-neg-lb-ip   --region=$region | grep -i address:
address: 172.16.20.2
8. Internet NEG
There are two ways to configure the external endpoint referenced by the Internet NEG: INTERNET_FQDN_PORT or INTERNET_IP_PORT. If the INTERNET_IP_PORT (Option 1) format is chosen, only a public internet routable IP address can be used; if the INTERNET_FQDN_PORT (Option 2) format is chosen the FQDN can be resolved to either a public internet routable IP address or to a private IP address depending on the scope of the endpoint: regional or global.
Option 1: Set up the Internet NEG using IP Address
The Internet NEG requires the resolved IP address of Github.com, therefore for the best performance open a local terminal and perform a dig and obtain the IP Address of github.com.
Example from a local terminal generates the resolved IP Address 140.82.113.4
bash-3.2$ dig github.com
; <<>> DiG 9.10.6 <<>> github.com
;; global options: +cmd
;; Got answer:
;; ->>HEADER<<- opcode: QUERY, status: NOERROR, id: 64801
;; flags: qr rd ra; QUERY: 1, ANSWER: 1, AUTHORITY: 0, ADDITIONAL: 1
;; OPT PSEUDOSECTION:
; EDNS: version: 0, flags:; udp: 4096
;; QUESTION SECTION:
;github.com.                        IN        A
;; ANSWER SECTION:
github.com.                60        IN        A        140.82.113.4
;; Query time: 409 msec
;; SERVER: ::1#53(::1)
;; WHEN: Thu Sep 26 15:50:45 CDT 2024
;; MSG SIZE  rcvd: 65
Create an Internet NEG, and set the –network-endpoint-type to internet_ip_port.
Inside Cloud Shell, create a Internet NEG used for github.com:
gcloud compute network-endpoint-groups create github-internet-neg \
    --network-endpoint-type=INTERNET_IP_PORT \
    --network=$vpc_network \
    --region=$region
Inside Cloud Shell, update the Internet NEG github-internet-neg with the resolved IP address of github.com and port 443:
gcloud compute network-endpoint-groups update github-internet-neg \
    --add-endpoint="ip=[your-resolved-ip],port=443" \
    --region=$region
Example:
gcloud compute network-endpoint-groups update github-internet-neg \
    --add-endpoint="ip=140.82.113.4,port=443" \
    --region=$region
Option 2: Set up internet NEG using FQDN
Optionally, you can create an Internet NEG, and set the –network-endpoint-type to internet_FQDN_port.
Inside Cloud Shell, create a Internet NEG used for github.com:
gcloud compute network-endpoint-groups create github-internet-neg \
    --network-endpoint-type=INTERNET_FQDN_PORT \
    --network=$vpc_network \
    --region=$region
Inside Cloud Shell, update the Internet NEG github-internet-neg with the FQDN github.com:
gcloud compute network-endpoint-groups update github-internet-neg \
    --add-endpoint="fqdn=github.com,port=443" \
    --region=$region
9. Create the Github service
Create Load Balancer Components
Inside Cloud Shell, perform the following:
gcloud compute backend-services create psa-backend-svc  --protocol=tcp --region=$region --load-balancing-scheme=INTERNAL_MANAGED

gcloud compute backend-services add-backend psa-backend-svc --network-endpoint-group=github-internet-neg --network-endpoint-group-region=$region --region=$region
In Cloud Shell, Create a target TCP proxy to route requests to your backend service:
gcloud compute target-tcp-proxies create producer-lb-tcp-proxy \
      --backend-service=psa-backend-svc  \
      --region=$region
In the following syntax, create a forwarding rule (internal tcp proxy load balancer).
In Cloud Shell, perform the following:
gcloud compute forwarding-rules create psa-github-fr \
     --load-balancing-scheme=INTERNAL_MANAGED \
     --network-tier=PREMIUM \
     --network=$vpc_network \
     --subnet=psa-fr-subnet \
     --address=internet-neg-lb-ip \
     --target-tcp-proxy=producer-lb-tcp-proxy \
     --target-tcp-proxy-region=$region \
     --region=$region \
     --ports=443
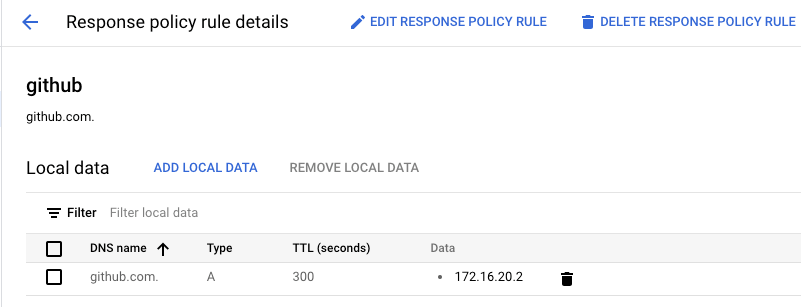
10. GitHub DNS Zone
In the following section, you will create a DNS response policy for GitHub.com with an A record consisting of the internal tcp proxy load balancer IP address.
Thereafter, DNS peering will share the github.com zone with Looker PSA allowing connectivity to github through the internal load balancer in combination with the Internet NEG and Cloud NAT.
In Cloud Shell, create the response policy zone:
gcloud dns --project=$project response-policies create github-com --description="" --networks="$vpc_network"
In Cloud Shell, create the DNS A record consisting of the tcp proxy load balancer IP Address, [insert-your-ip-address]:
gcloud dns --project=$project response-policies rules create github --response-policy="github-com" --dns-name="github.com." --local-data=name="github.com.",type="A",ttl=300,rrdatas="[insert-your-ip-address]"
Example:
gcloud dns --project=$project response-policies rules create github --response-policy="github-com" --dns-name="github.com." --local-data=name="github.com.",type="A",ttl=300,rrdatas="172.16.20.2"
Update DNS peering
In this section, you'll use the syntax "gcloud services peered-dns-domains create" that creates a peered DNS domain for a private service connection which sends requests for records in a given namespace originating in the service producer VPC network to the consumer VPC network to be resolved.
In Cloud Shell, create a peered-dns-domain that looker will query for github.com:
gcloud services peered-dns-domains create github-com --project=$project --network=$vpc_network --dns-suffix=github.com.
11. Test Connectivity to GitHub
In the following steps, you'll use Looker Console to create a project to validate HTTPS connectivity to github.com.
12. Create a new project
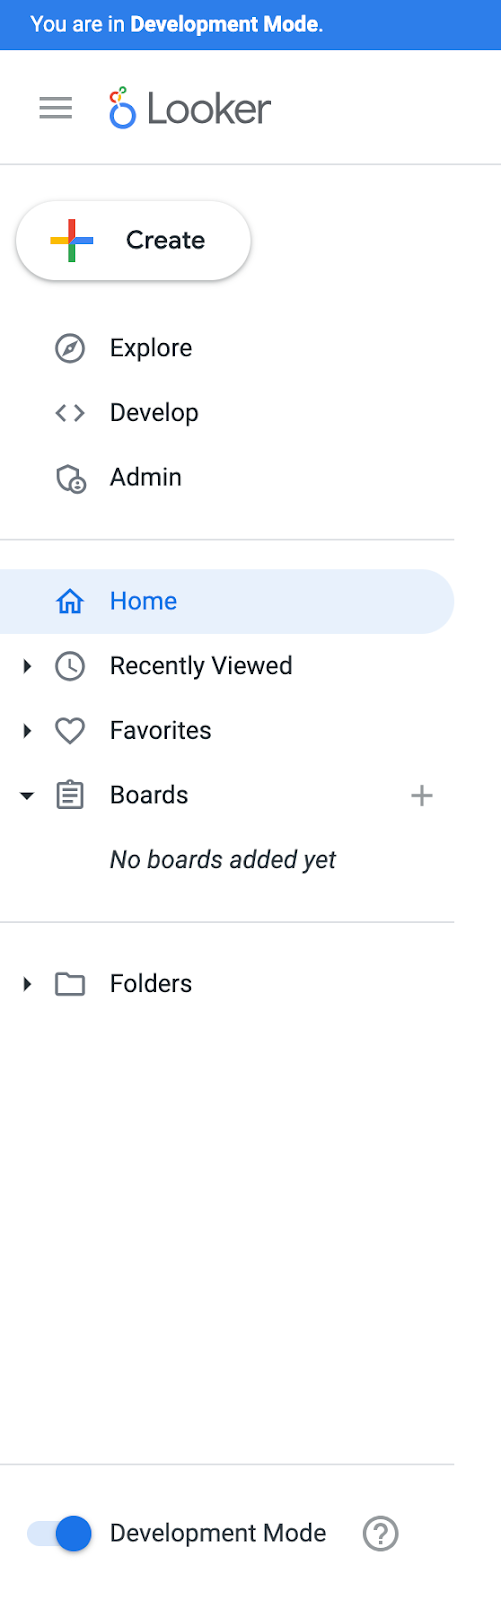
Enable Development mode
In Looker Console, navigate to:
Enable Development Mode (bottom left page), once selected the banner ‘You are in Development Mode' is displayed.
Create a new project
In Cloud Console, navigate to:
Develop → Projects

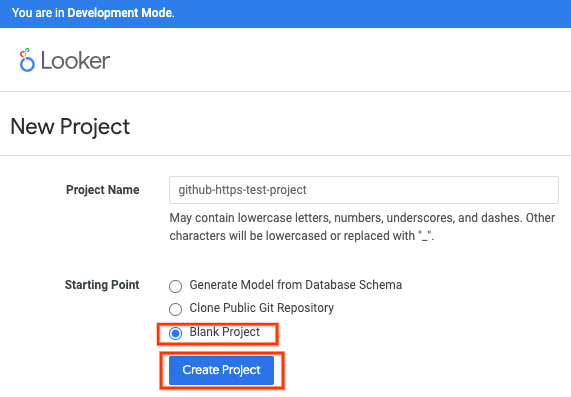
Select New LookML Project
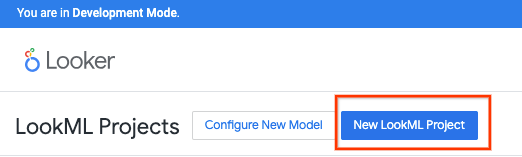
Provide a project name, select Blank Project then Create Project.
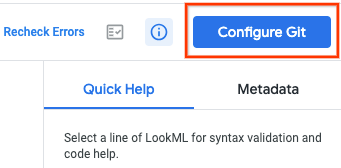
Select Configure Git
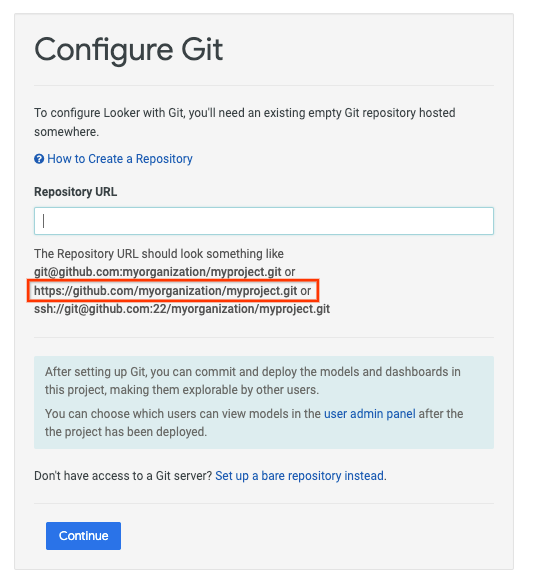
Configure Git
Update the Repository URL with your HTTPS github details, ensure to append the URL with .git then select Continue.
Example:

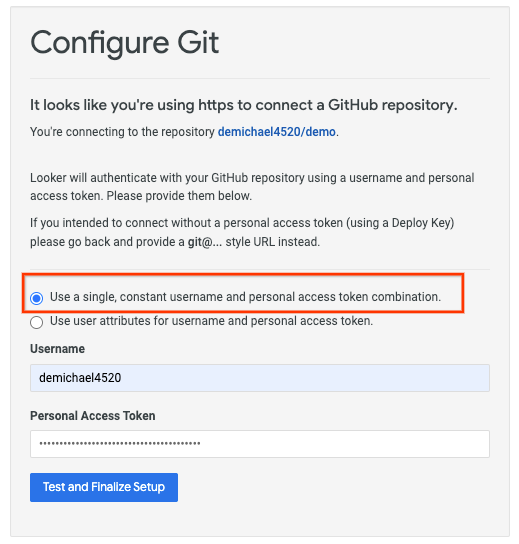
Update the selection with your GitHub username and Personal Access token (classic), then select Test and Finalize Setup.
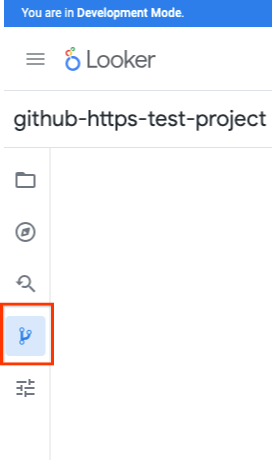
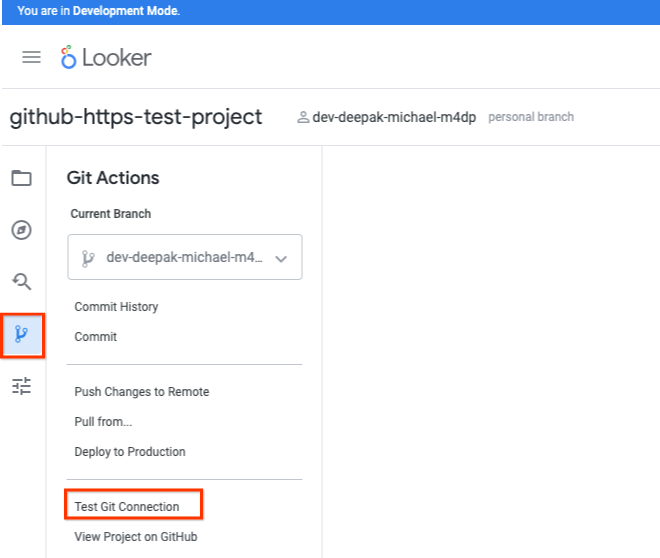
Select Git Actions
Select Test Git Connection
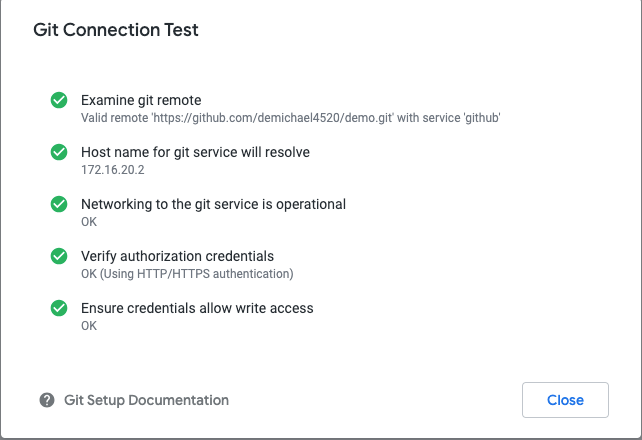
Validate the Git Connection Test
13. Clean up
From a single Cloud Shell terminal delete lab components:
gcloud compute forwarding-rules delete psa-github-fr --region=$region -q

gcloud compute target-tcp-proxies delete producer-lb-tcp-proxy --region=$region -q

gcloud compute backend-services delete psa-backend-svc --region=$region -q

gcloud compute routers nats delete $vpc_network-natgw --router=$vpc_network-cloud-router --router-region=$region -q

gcloud compute routers delete $vpc_network-cloud-router --region=$region -q

gcloud compute network-endpoint-groups delete github-internet-neg --region=$region -q

gcloud compute addresses delete internet-neg-lb-ip --region=$region -q

gcloud compute networks subnets delete psa-fr-subnet $region-proxyonly-subnet --region=$region -q

gcloud services peered-dns-domains delete github-com --network=$vpc_network -q

gcloud dns --project=$project response-policies rules delete github --response-policy="github-com" -q

gcloud dns response-policies update github-com --networks= -q

gcloud dns response-policies delete github-com
14. Congratulations
Congratulations, you've successfully configured and validated connectivity to GitHub using Looker Console.
Cosmopup thinks codelabs are awesome!!