
1. Introduction
In this codelab, we'll create a movie score prediction model using Vertex AI AutoML and have the deployed model endpoint triggered from Java Cloud Functions. The model is trained with data stored in BigQuery and registered in Vertex AI. The list of services can be composed into two sections:
- ML Model creation and deployment
- Trigger to predict using the ML API
ML Model Creation:
- Data sourced from CSV to BigQuery
- BigQuery data integrated into Vertex AI for AutoML model creation
- Model deployed in Vertex AI Model Registry for generating endpoint API
Trigger to predict using the ML API:
- Java Cloud Functions to trigger invocation of the deployed AutoML model's endpoint that takes in movie details as request from the UI, returns the predicted movie SCORE
Below is the high-level architectural overview of the application:
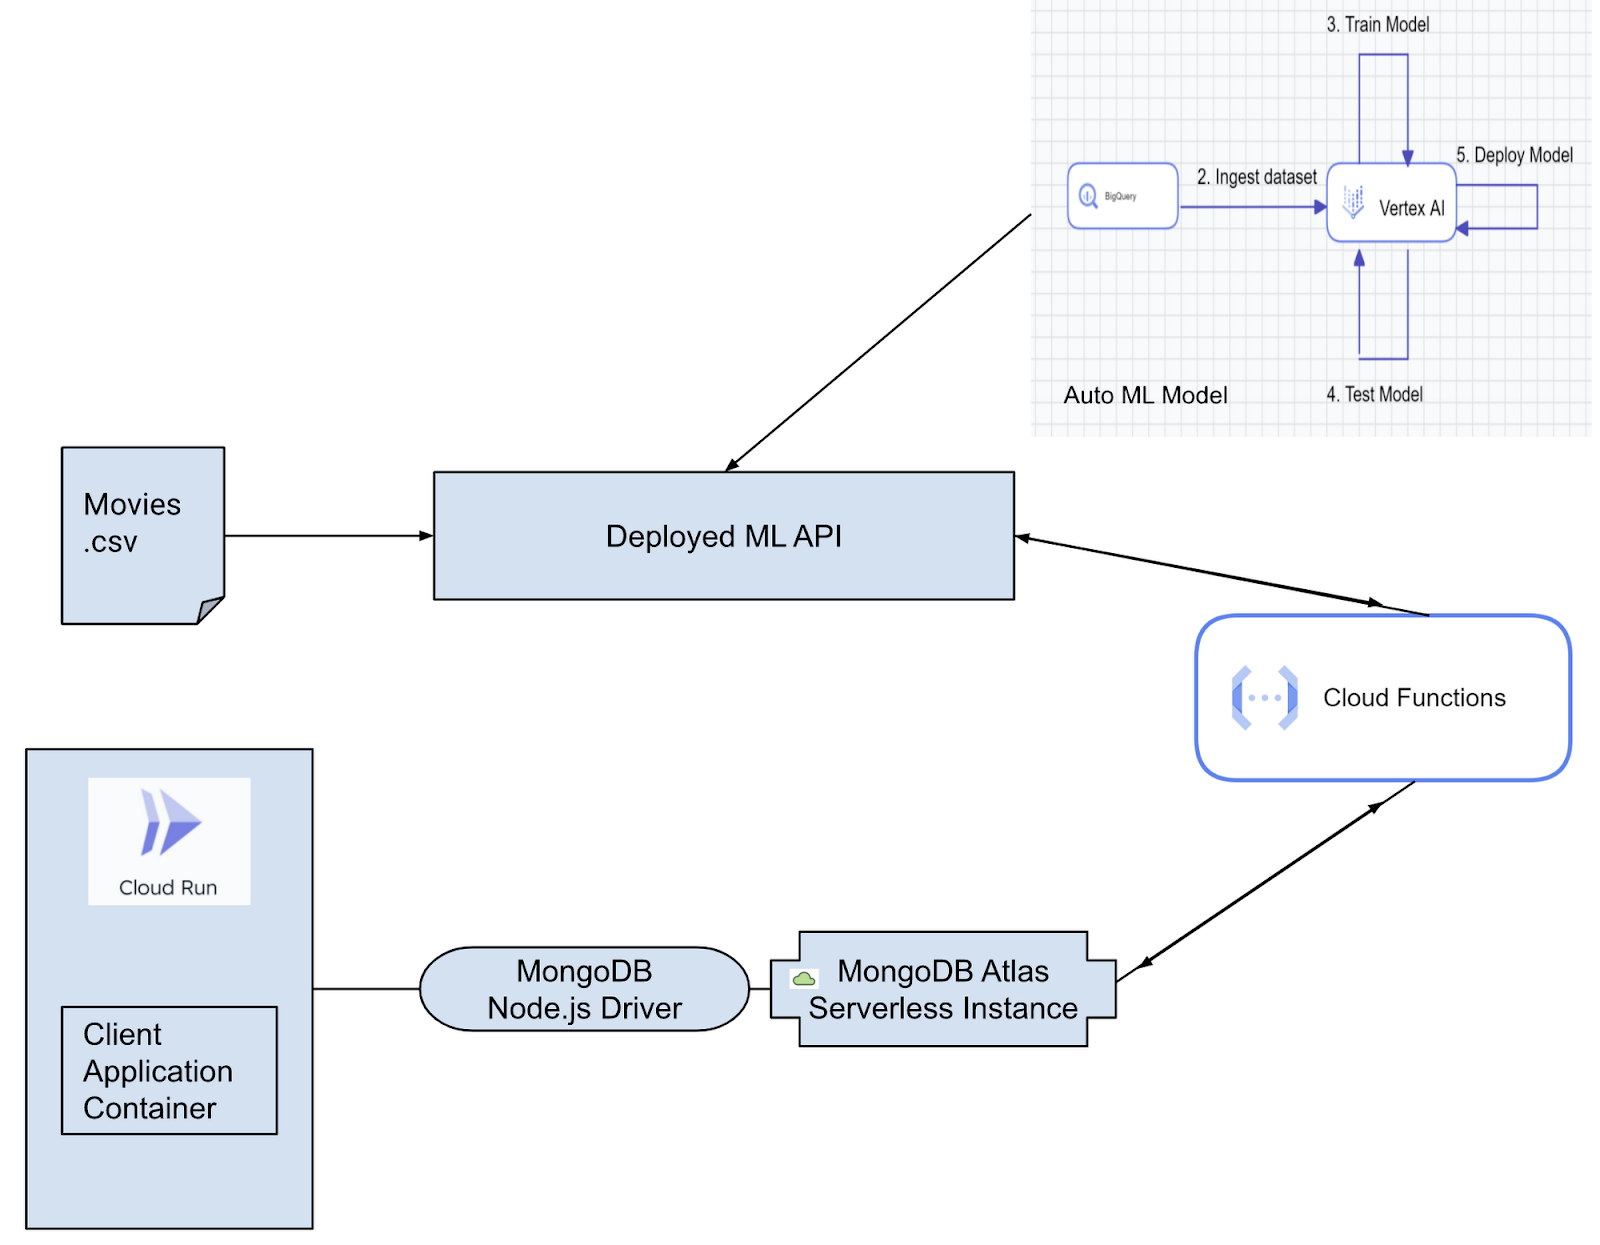
The application of the above architecture is out of scope for this codelab but if you like to develop the client application as well, please refer to the blog.
Let's dive into the implementation steps.
What you'll build
You'll create a
- A BigQuery Dataset to contain the table and model components
- Vertex AI AutoML Model (create and deploy)
- Java Cloud Functions Trigger to predict using the ML API
2. Requirements
Below are the prerequisites:
Create your project
- In the Google Cloud Console, on the project selector page, select or create a Google Cloud project.
- Make sure that billing is enabled for your Cloud project. Learn how to check if billing is enabled on a project.
- Navigate to BigQuery to enable the API. You can also open the BigQuery web UI directly by entering the following URL in your browser: https://console.cloud.google.com/bigquery
Activate Cloud Shell
- You will use Cloud Shell, a command-line environment running in Google Cloud that comes pre-loaded with bq: From the Cloud Console, click Activate Cloud Shell on the top right corner:

- Once connected to Cloud Shell, you should see that you are already authenticated and that the project is already set to your project ID. Run the following command in Cloud Shell to confirm that you are authenticated:
gcloud auth list
- Run the following command in Cloud Shell to confirm that the gcloud command knows about your project
gcloud config list project
- If your project is not set, use the following command to set it:
gcloud config set project <PROJECT_ID>
Refer documentation for gcloud commands and usage.
3. Preparing training data
This is a major step in all data related projects, products and apps that requires a lot of domain expertise in addition to the technology to prepare an optimal dataset and make it ready for your ML project. For the purpose of this codelab we are going to assume that the data is already prepared and use this already processed data file.
4. Creating and loading the dataset
A BigQuery dataset is a collection of tables. All tables in a dataset are stored in the same data location. You can also attach custom access controls to limit access to a dataset and its tables.
- In Cloud Shell, use the bq mk command to create a dataset called "movies."
bq mk --location=<<LOCATION>> movies
Set the location to a region (asia-south1). Remember to set it as the region for the VERTEX AI step as well (both instances should be on the same region).
- Make sure you have the data file (.csv) ready. Execute the following commands in Cloud Shell to clone the repository and navigate to the project:
git clone <<repository link>>

cd movie-score
- Use the bq load command to load your CSV file into a BigQuery table (please note that you can also directly upload from the BigQuery UI):
bq load --source_format=CSV --skip_leading_rows=1 movies.movies_score \
./movies_bq_src.csv \ Id:numeric,name:string,rating:string,genre:string,year:numeric,released:string,score:string,director:string,writer:string,star:string,country:string,budget:numeric,company:string,runtime:numeric,data_cat:string
- Query in one of the 3 ways:
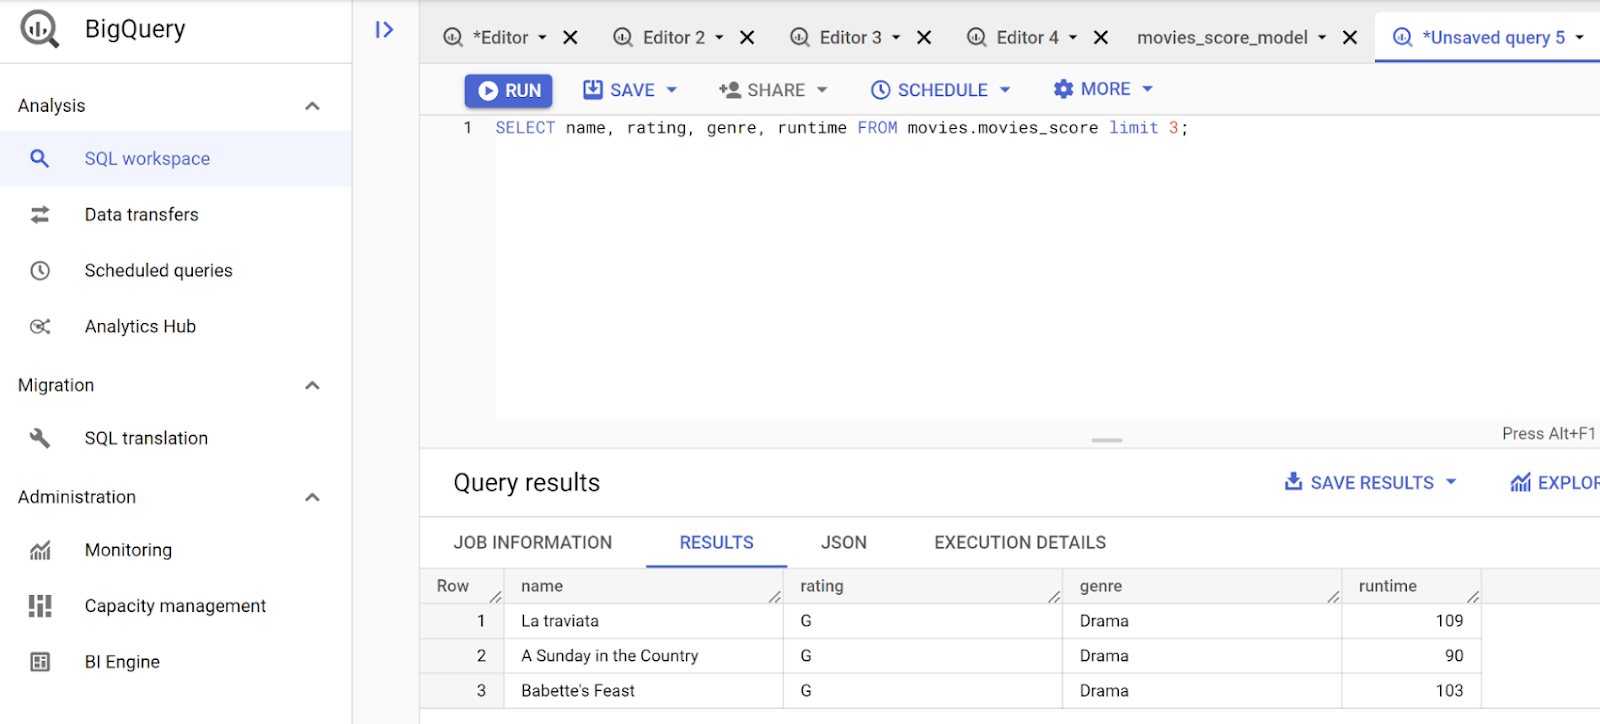
We can interact with BigQuery in three ways, we'll try out two of those: a. BigQuery web UI b. The bq command c. API
SELECT name, rating, genre, runtime FROM movies.movies_score limit 3;
I have used the BigQuery Web SQL Workspace to run queries. The SQL Workspace looks like this:
Using bq command:
bq query --use_legacy_sql=false \
SELECT name, rating, genre, runtime FROM movies.movies_score limit 3;
5. Using BigQuery data in Vertex AI AutoML
Use your data from BigQuery to directly create an AutoML model with Vertex AI. Remember, we can also perform AutoML from BigQuery itself and register the model with VertexAI and expose the endpoint. Refer to the documentation for BigQuery AutoML. In this example, however, we will use Vertex AI AutoML to create our model.
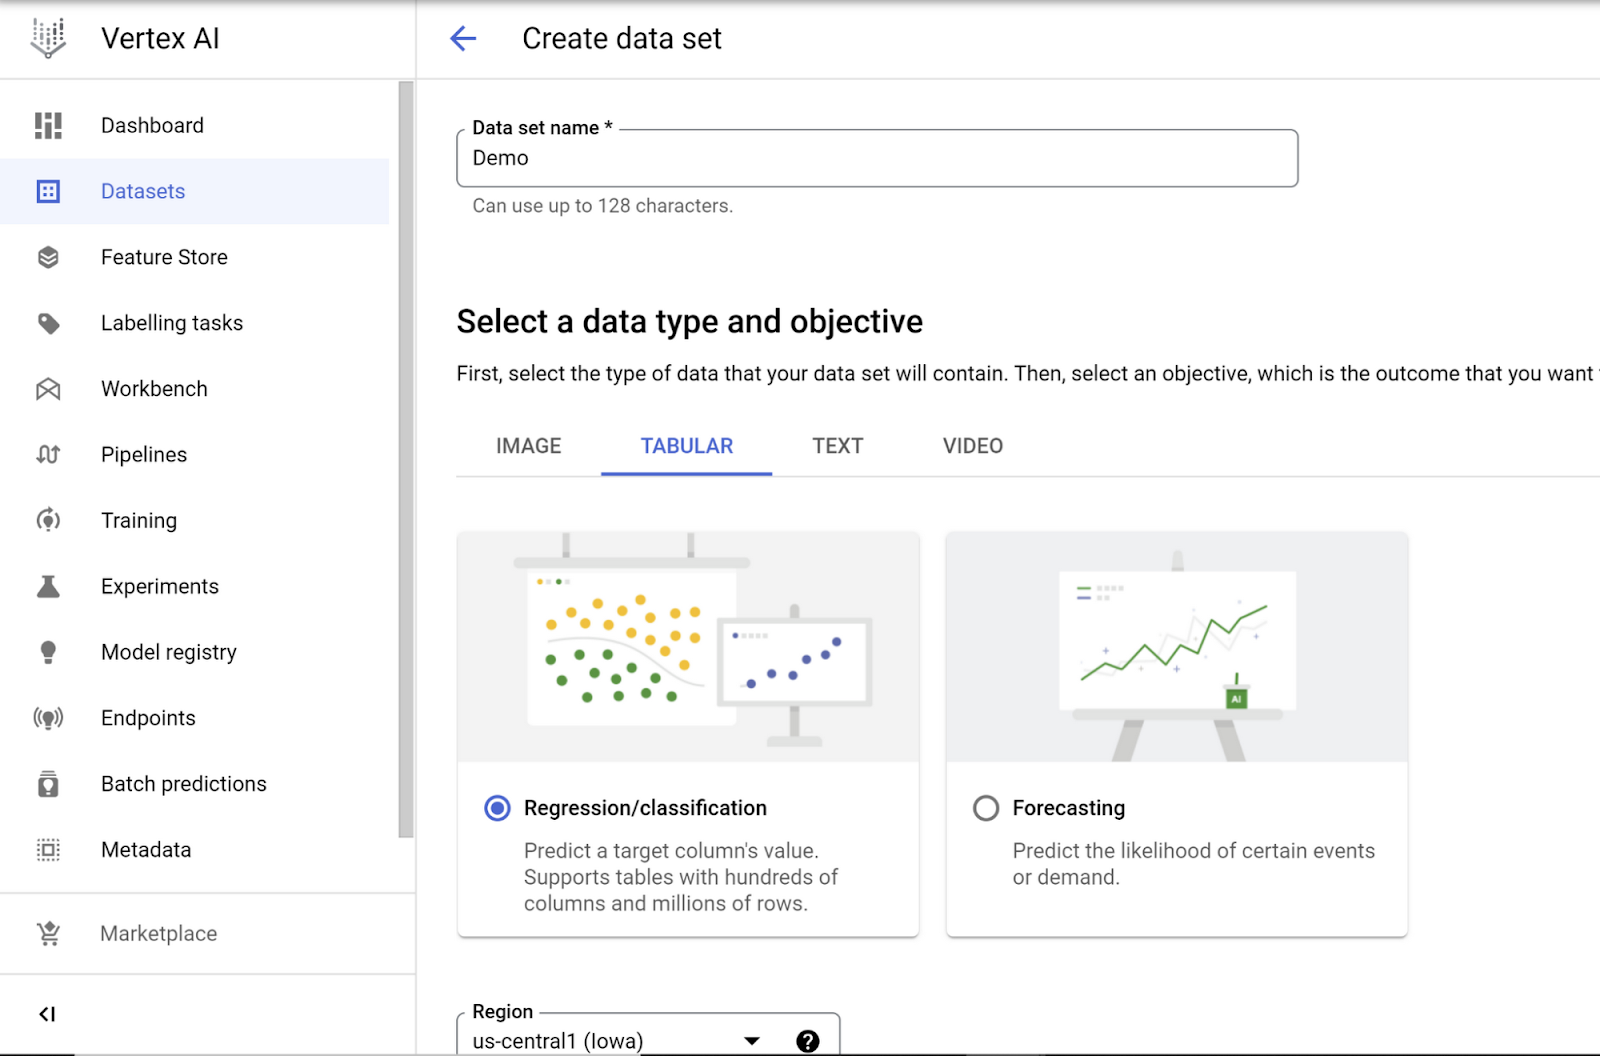
Creating a Vertex AI Dataset
Go to Vertex AI from Google Cloud Console, enable Vertex AI API if not already done, expand data and select Datasets, click on Create data set, select TABULAR data type and the "Regression / classification" option, and click Create:
Select Data Source
On the next page, select a data source. Choose the "Select a table or view from BigQuery" option and select the table from BigQuery in the BigQuery path BROWSE field. Click Continue.
Remember: The BigQuery instance and Vertex AI data sets should have the same region in order for the BigQuery table to show up in Vertex AI.
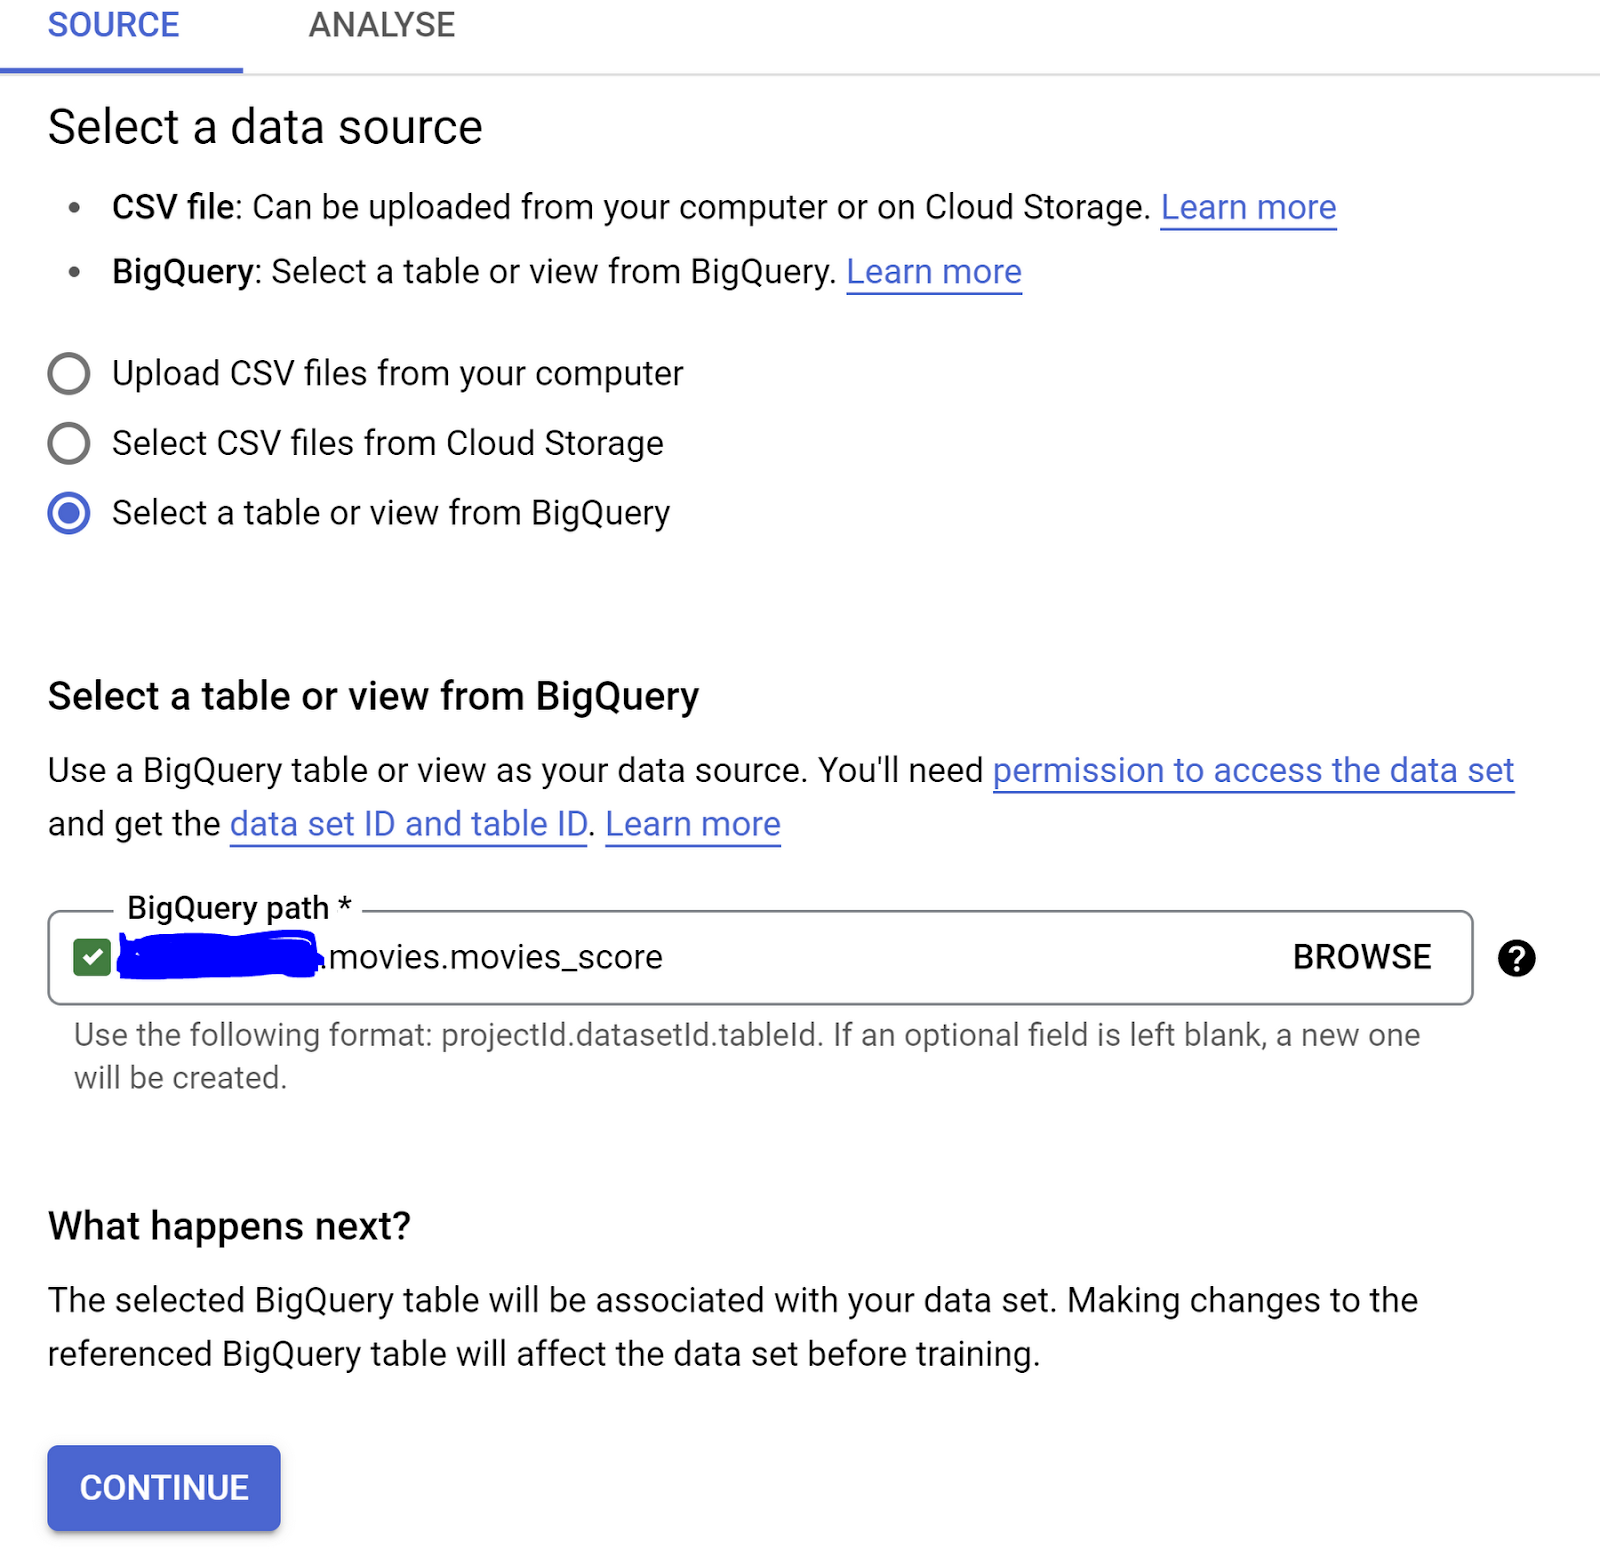
When you are selecting your source table/view, from the browse list, remember to click on the radio button to continue with the below steps. If you accidentally click on the name of the table/view, you will be taken to Dataplex. You just need to browse back to Vertex AI if this happens to you.
Train the Model
- Once the dataset is created, you should see the Analyze page with the option to train a new model. Click that:
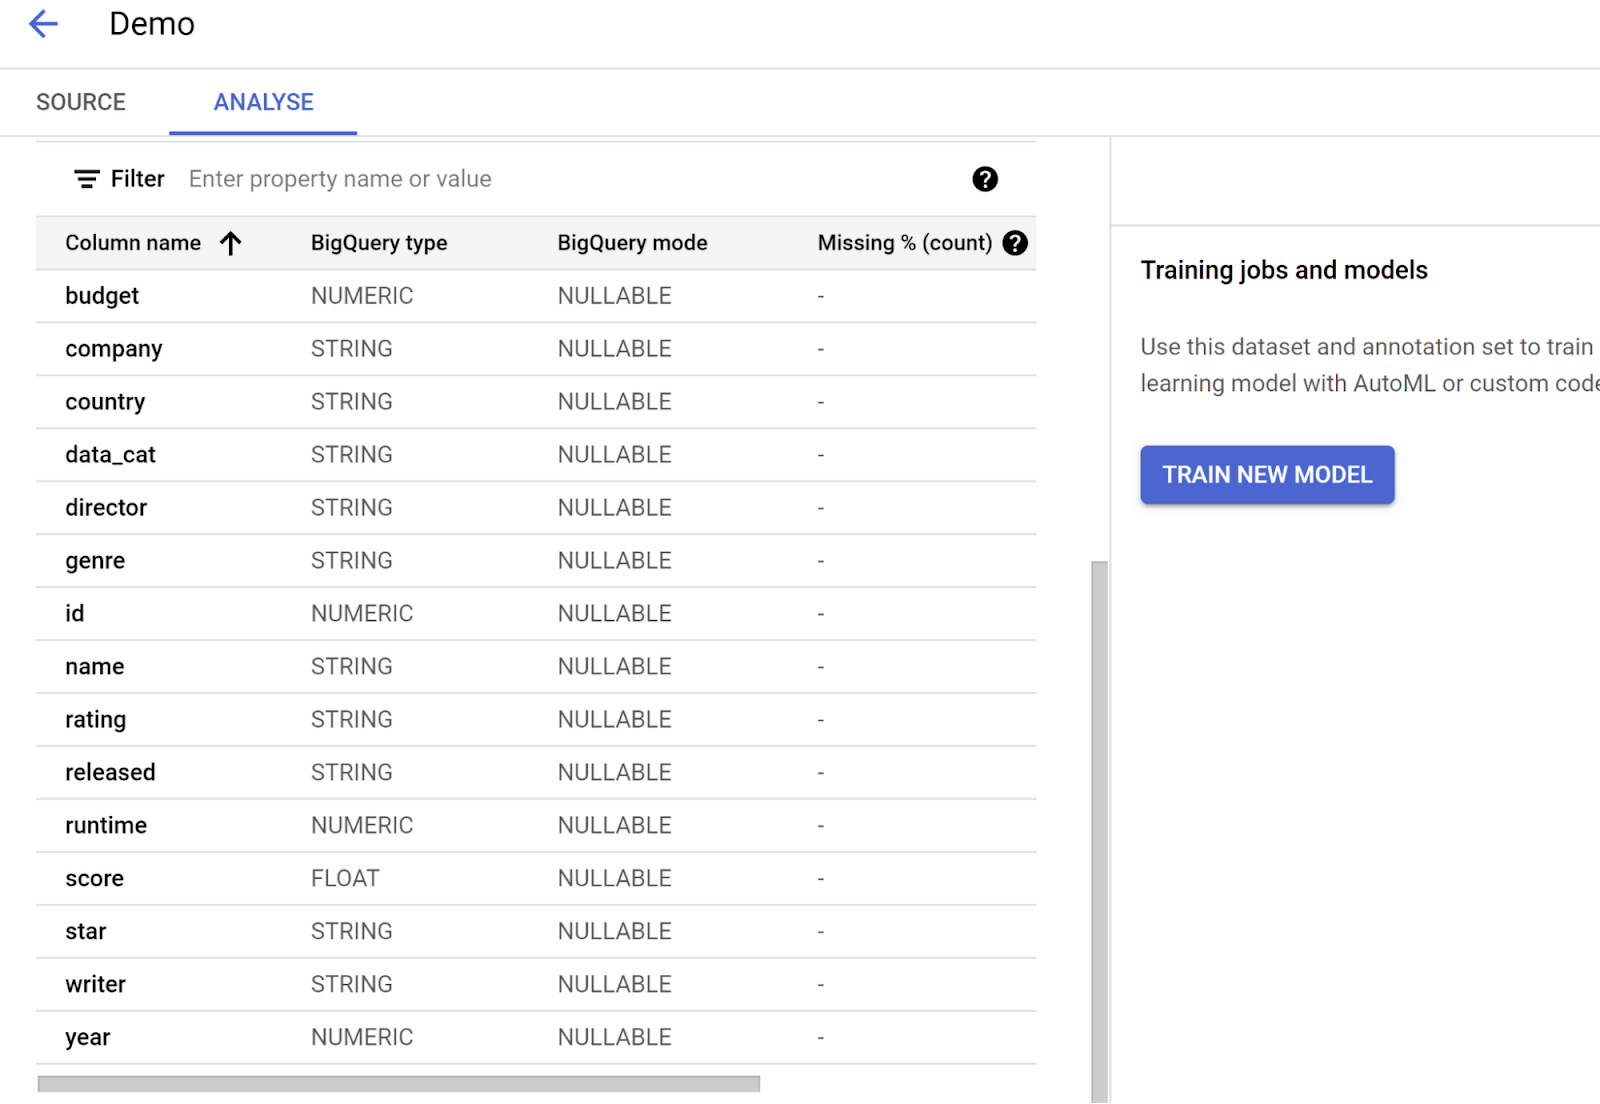
- Leave Objective as Classification and select AutoML option in first page and click continue:

- Give your model a name and select Target Column name as "Score" from the dropdown that shows and click Continue.
- Also note that you can check the "Export test dataset to BigQuery" option, which makes it easy to see the test set with results in the database efficiently without an extra integration layer or having to move data between services.
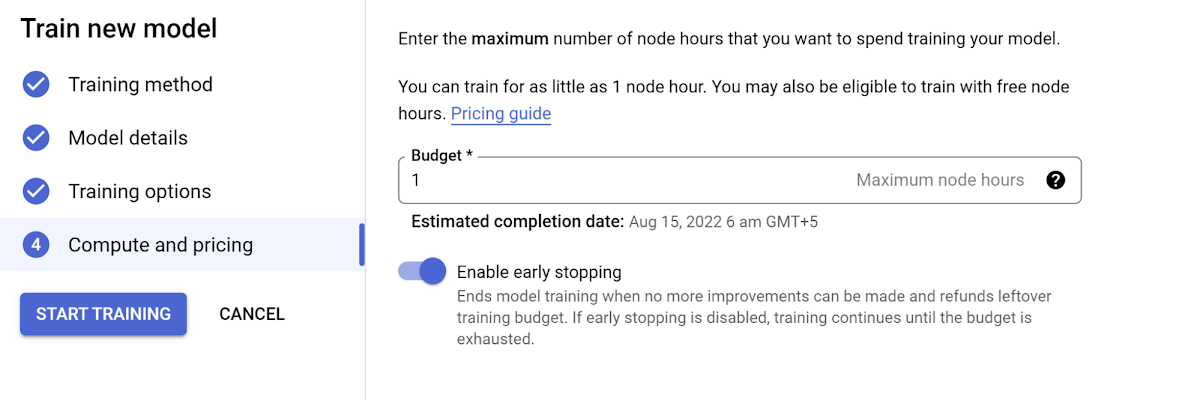
- On the next page, you have the option to select any advanced training options you need and the hours you want to set the model to train. Please note that you might want to be mindful of the pricing before you increase the number of node hours you want to use for training.
Click Start Training to begin training your new model.
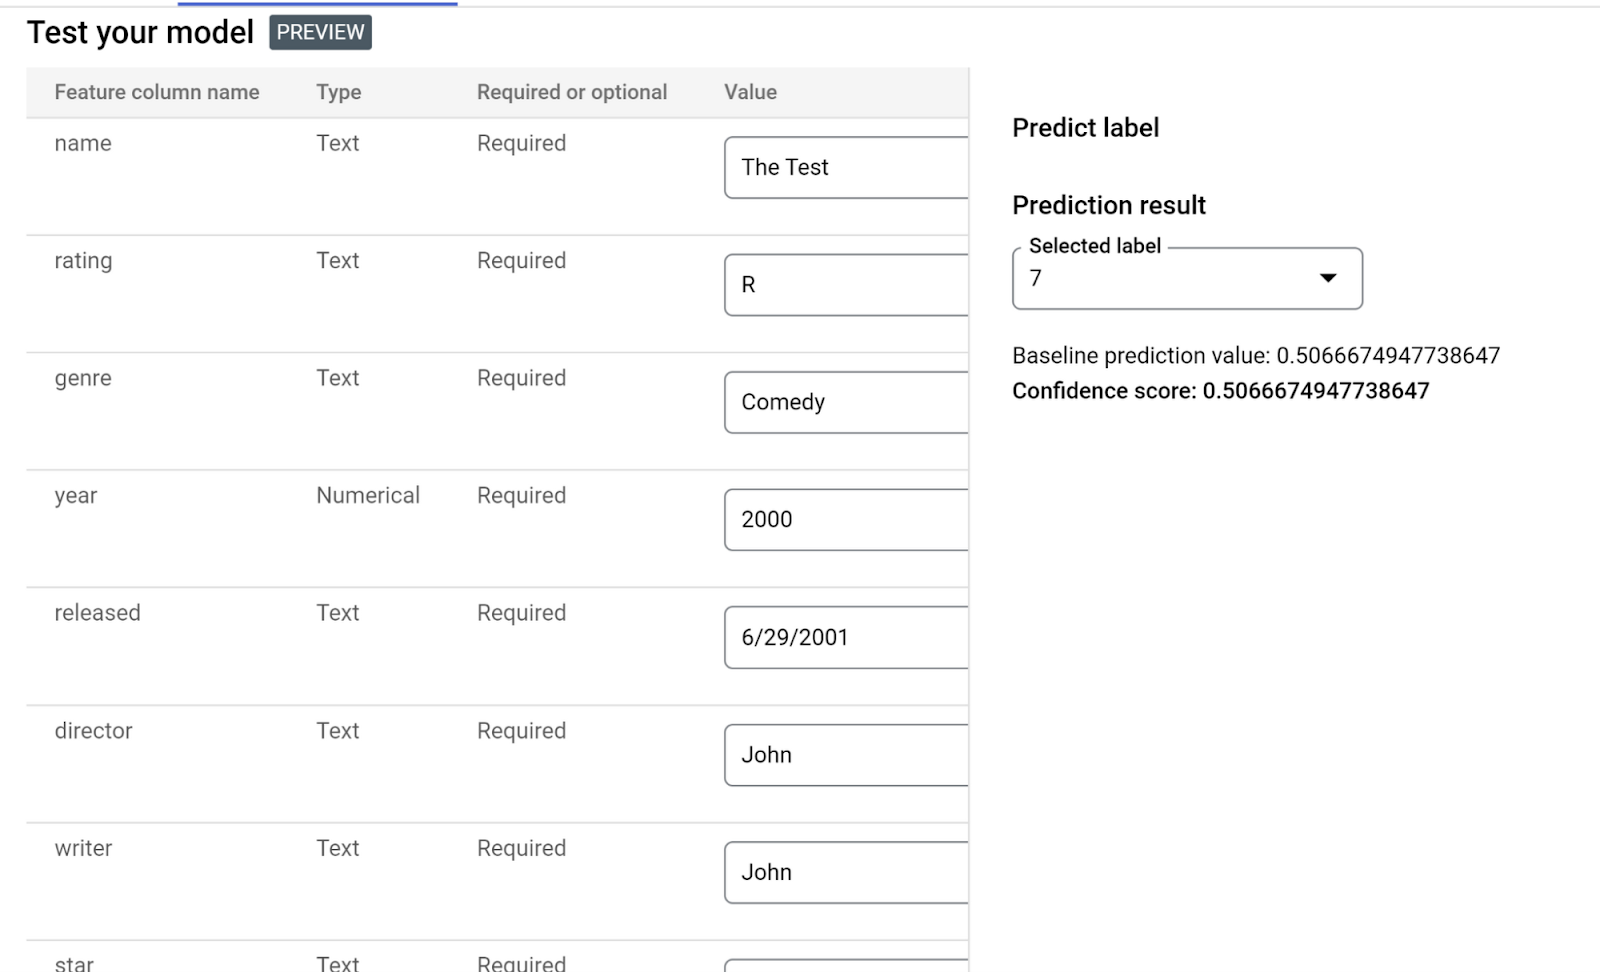
Evaluate, Deploy and Test the Model
Once the training is completed, you should be able to click Training (under the Model Development heading in the left-side menu) and see your training listed in the Training Pipelines section. Click that to land on the Model Registry page. You should be able to:
- View and evaluate the training results

- Deploy and test the model with your API endpoint
Once you deploy your model, an API endpoint gets created which can be used in your application to send requests and get model prediction results in the response.
Before you move on from this section, make sure you take a note of the deployed model's Endpoint id, location, and other details on your Vertex AI endpoint section.
6. Java Cloud Function to trigger ML invocation
Remember how we have the endpoint and other details from the ML deployment step? We are going to use that here, and since we are using Java Cloud Functions, we will use pom.xml for handling dependencies. We use google-cloud-aiplatform library to consume the Vertex AI AutoML endpoint API.
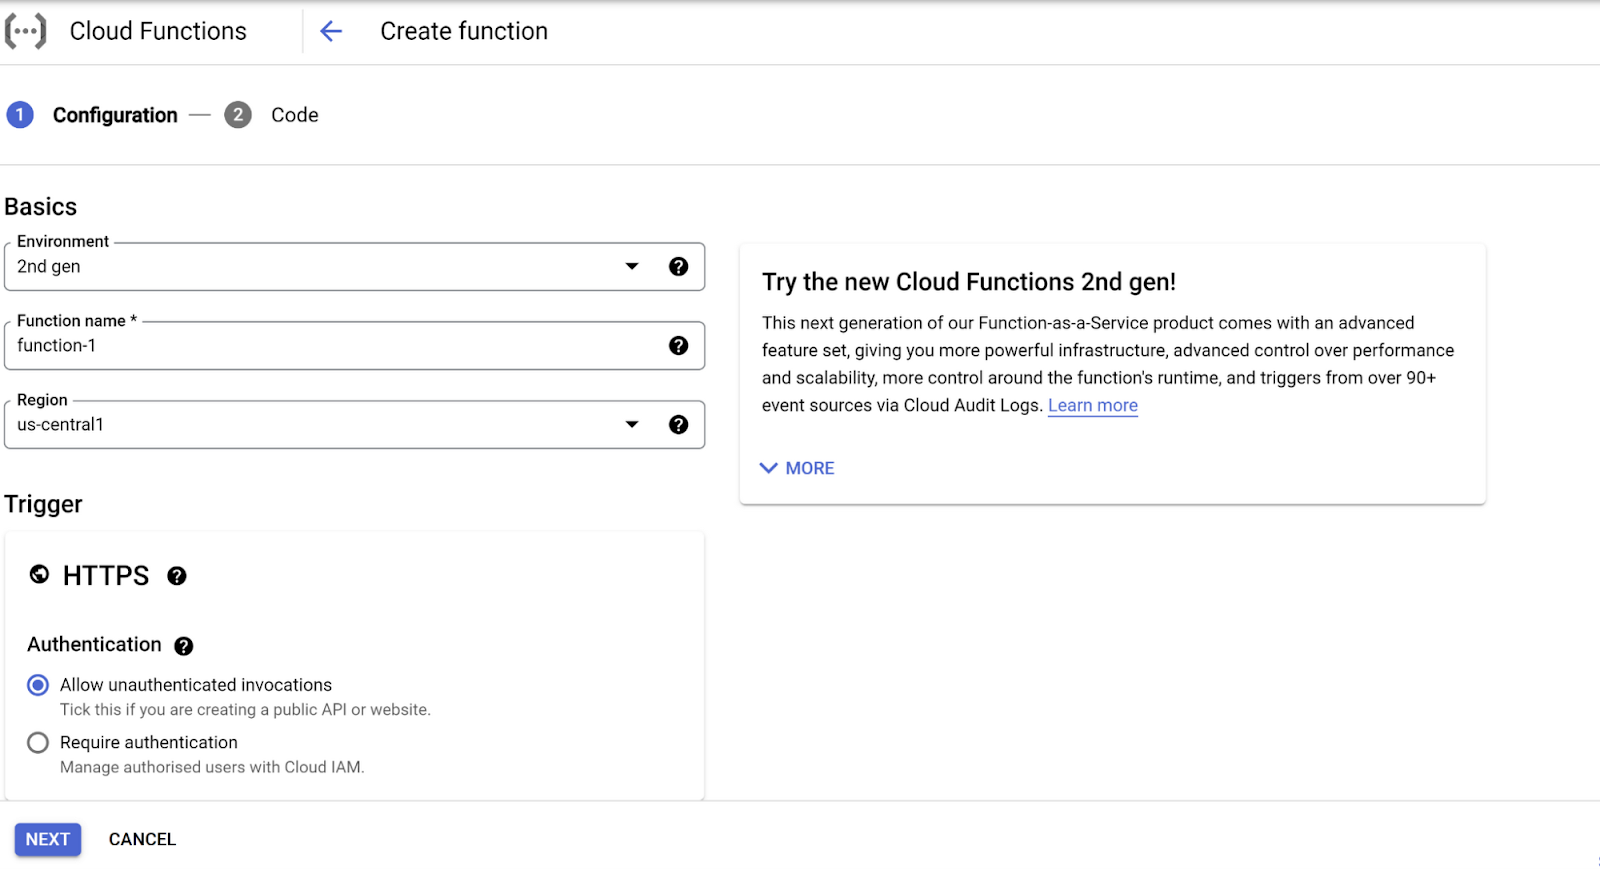
- Search for Cloud Functions in Google Cloud console and click "Create Function."
- Enter the configuration details, like Environment, Function name, Region, Trigger (in this case, HTTPS), Authentication of your choice, enable "Require HTTPS," and click next/save
- On the next page, select Runtime (Java 11), Source Code (Inline or upload), and start editing
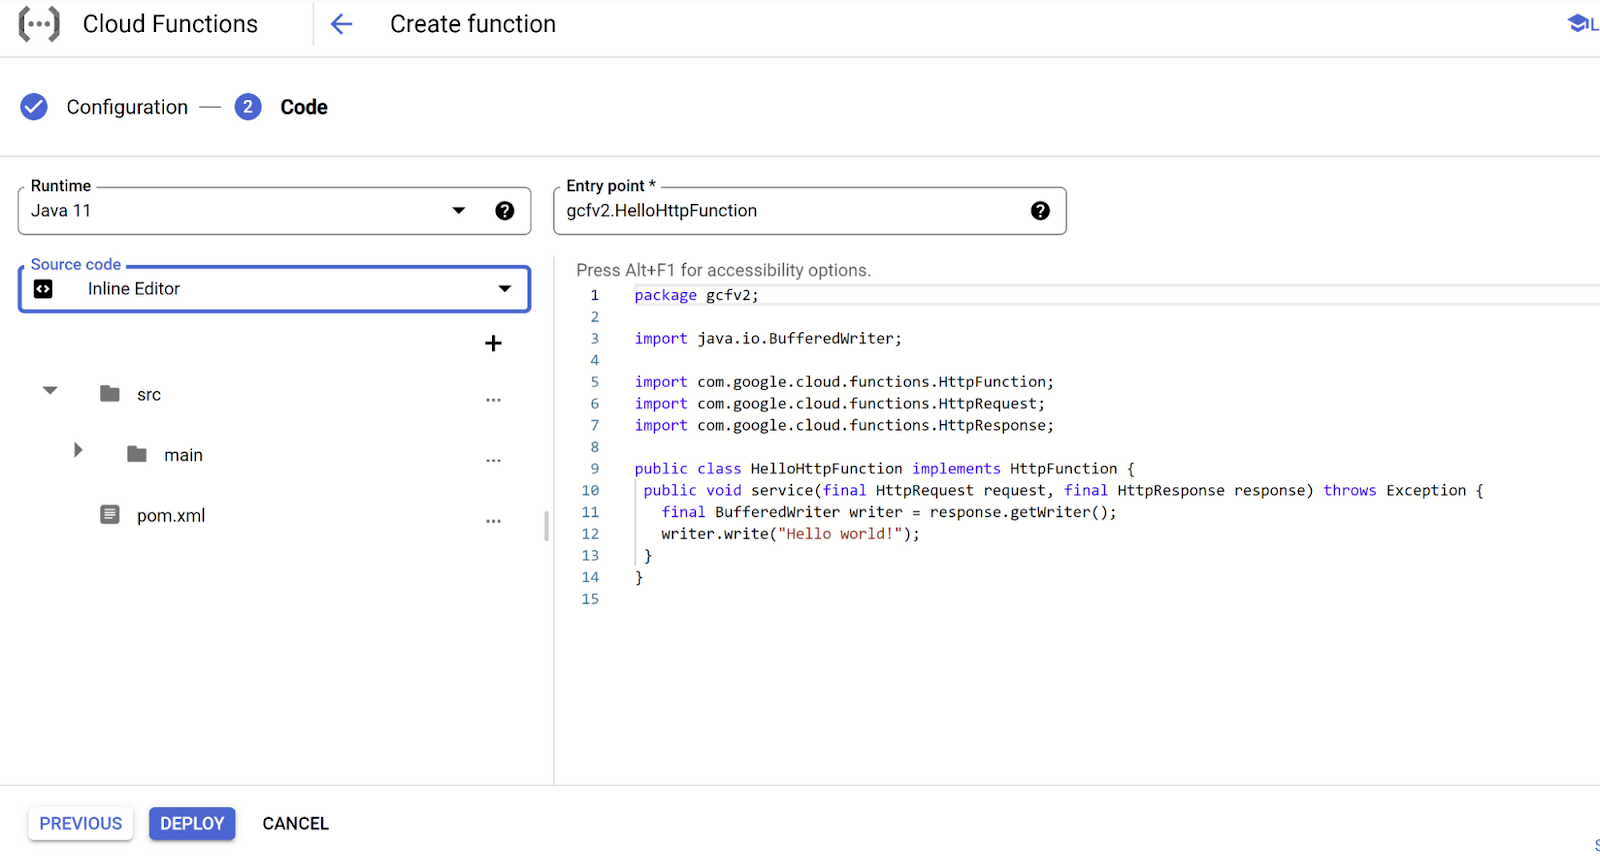
- Copy java and pom.xml files from repo and paste in the respective files in the inline editor, if you are using your local editor (recommended) then clone the source from repo
- Change the project id, endpoint id, location and endpoint in the .java source file for this example, but please note that the best practice is to use Secret Manager for storing credentials
- For the scope of this codelab, comment out the MongoDB parts in the .java class in your copied source code
Go ahead and deploy the function once all changes are completed. You should see the endpoint URL that can be used in your client application to send requests to this Cloud Function and receive movie score as a response.
7. Clean up
To avoid incurring charges to your Google Cloud account for the resources used in this post, follow these steps:
- In the Google Cloud console, go to the Manage resources page
- In the project list, select the project that you want to delete, and then click Delete
- In the dialog, type the project ID, and then click Shut down to delete the project
8. Congratulations
Congratulations! You have successfully created and deployed a Movie Score Prediction Model in Vertex AI AutoML and triggered the deployed model from Cloud Functions.