
1. 簡介
總覽
在本實驗室中,使用者將瞭解 Network Connectivity Center 的中樞如何將 Private Service Connect 端點傳播至虛擬私有雲輪輻。
中樞資源提供集中式連線管理模式,可將虛擬私有雲輪輻流量互連至 PSC 端點。
建構項目
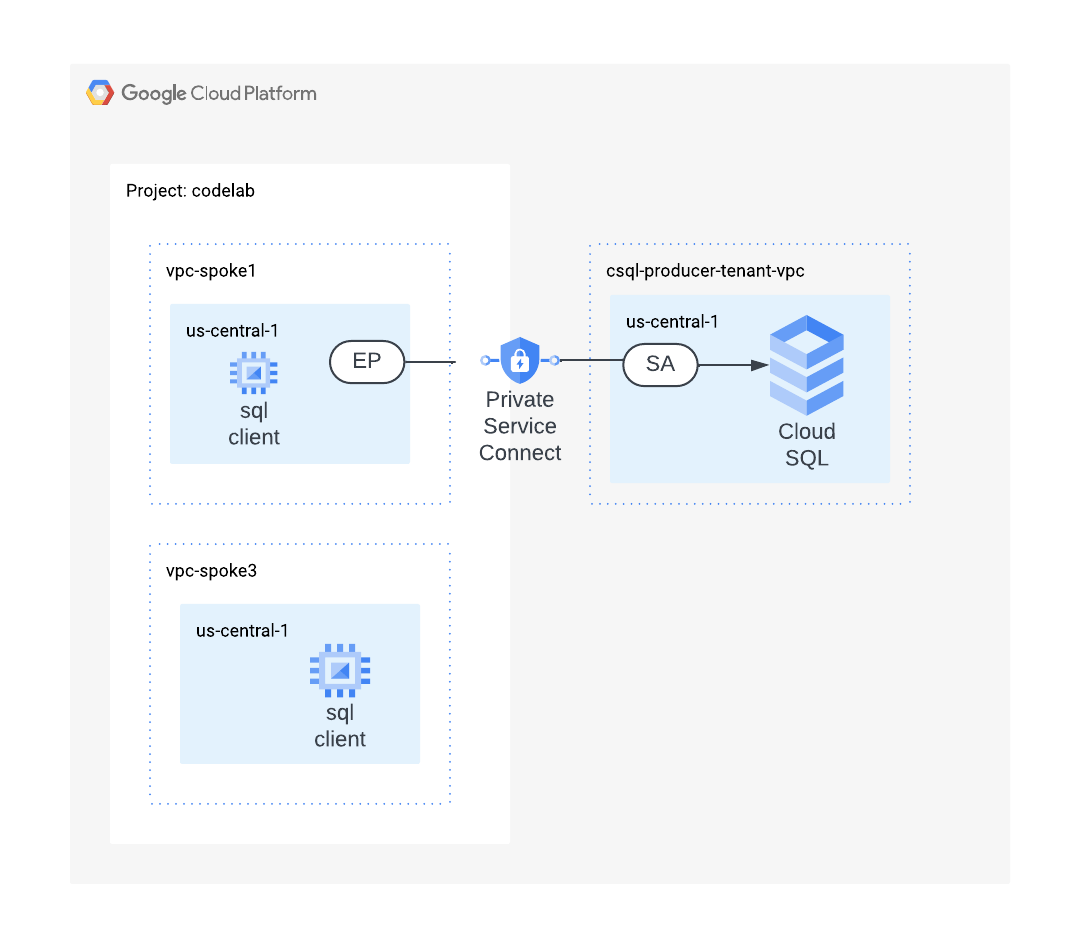
在本程式碼實驗室中,您將建構 NCC 網路,將 Private Service Connect 端點傳播至 Cloud SQL 執行個體。

課程內容
- 使用 Private Service Connect 連線至 Cloud SQL 執行個體
- 使用 NCC 中樞將 PSC 子網路傳播至所有 VPC 輪輻,允許來自多個 VPC 網路的網路連線。
軟硬體需求
- 熟悉 GCP Cloud Networking
- Cloud SQL 的基本知識
- Google Cloud 專案
- 檢查「配額:網路」,並視需要要求新增網路,如下方螢幕截圖所示:

目標
- 設定 GCP 環境
- 設定使用 Private Service Connect 的 MySQL 適用的 Cloud SQL 執行個體
- 設定 Network Connectivity Center 中樞,傳播 PSC 端點
- 設定 Network Connectivity Center,將 VPC 設為輪輻
- 驗證資料路徑
- 探索 NCC 服務功能
- 清除所用資源
事前準備
Google Cloud 控制台和 Cloud Shell
在本實驗室中,我們將使用 Google Cloud 控制台和 Cloud Shell 與 GCP 互動。
Google Cloud 控制台的 NCC 中樞專案
如要使用 Cloud 控制台,請前往 https://console.cloud.google.com。
在 Google Cloud 中設定下列項目,即可更輕鬆地設定 Network Connectivity Center:
在 Google Cloud 控制台的專案選取器頁面中,選取或建立 Google Cloud 專案。
啟動 Cloud Shell。本程式碼研究室會使用 $variables,協助您在 Cloud Shell 中實作 gcloud 設定。
gcloud auth list
gcloud config list project
gcloud config set project $project
project=[YOUR-PROJECT-NAME]
echo $project
IAM 角色
NCC 需要 IAM 角色才能存取特定 API。請務必視需要為使用者設定 NCC IAM 角色。
角色/說明 | 權限 |
networkconnectivity.networkAdmin:允許網路管理員管理中樞和輪輻。 | networkconnectivity.hubs.networkconnectivity.spokes. |
networkconnectivity.networkSpokeManager - 允許在中樞新增及管理輪輻。在 Shared VPC 中使用,其中主專案擁有中樞,但其他專案中的其他管理員可以為其連結新增輪輻至中樞。 | networkconnectivity.spokes.** |
networkconnectivity.networkUsernetworkconnectivity.networkViewer - 允許網路使用者查看中樞和輪輻的不同屬性。 | networkconnectivity.hubs.getnetworkconnectivity.hubs.listnetworkconnectivity.spokes.getnetworkconnectivity.spokes.listnetworkconnectivity.spokes.aggregatedList |
2. 設定網路環境
總覽
在本節中,我們會在單一專案中部署兩個虛擬私有雲網路和防火牆規則。邏輯圖說明您將在本步驟中設定的網路環境。
建立 VPC1 和子網路
虛擬私有雲網路包含子網路,您將安裝 GCE VM 來驗證資料路徑
vpc_spoke_network_name="vpc1-spoke"
vpc_spoke_subnet_name="subnet1"
vpc_spoke_subnet_ip_range="10.0.1.0/24"
region="us-central1"
zone="us-central1-a"

gcloud compute networks create "${vpc_spoke_network_name}" \
--subnet-mode=custom \

gcloud compute networks subnets create "${vpc_spoke_subnet_name}" \
--network="${vpc_spoke_network_name}" \
--range="${vpc_spoke_subnet_ip_range}" \
--region="${region}"
在虛擬私有雲中建立 PSC 子網路
使用下列指令在虛擬私有雲輪輻中建立子網路,並分配給 PSC-EP。
vpc_spoke_network_name="vpc1-spoke"
vpc_spoke_subnet_name="csql-psc-subnet"
region="us-central1"
vpc_spoke_subnet_ip_range="192.168.0.0/24"

gcloud compute networks subnets create "${vpc_spoke_subnet_name}" \
--network="${vpc_spoke_network_name}" \
--range="${vpc_spoke_subnet_ip_range}" \
--region="${region}"
建立 VPC3 和子網路
vpc_spoke_network_name="vpc3-spoke"
vpc_spoke_subnet_name="subnet3"
vpc_spoke_subnet_ip_range="10.0.3.0/24"
region="us-central1"
zone="us-central1-a"

gcloud compute networks create "${vpc_spoke_network_name}" \
--subnet-mode=custom \

gcloud compute networks subnets create "${vpc_spoke_subnet_name}" \
--network="${vpc_spoke_network_name}" \
--range="${vpc_spoke_subnet_ip_range}" \
--region="${region}"
設定 VPC1 的防火牆規則
這些規則會允許來自 RFC1918 和 Identity Access Proxy 範圍的網路連線
vpc_spoke_network_name="vpc1-spoke"

gcloud compute firewall-rules create vpc1-allow-all \
--network="${vpc_spoke_network_name}" \
--allow=all \
--source-ranges=10.0.0.0/8,172.16.0.0/12,192.168.0.0/16

gcloud compute firewall-rules create vpc1-allow-iap \
--network="${vpc_spoke_network_name}" \
--allow all \
--source-ranges 35.235.240.0/20
設定路由 VPC 和 VPC 防火牆規則
vpc_spoke_network_name="vpc3-spoke"

gcloud compute firewall-rules create vpc3-allow-all \
--network="${vpc_spoke_network_name}" \
--allow=all \
--source-ranges=10.0.0.0/8,172.16.0.0/12,192.168.0.0/16

gcloud compute firewall-rules create vpc3-allow-iap \
--network="${vpc_spoke_network_name}" \
--allow all \
--source-ranges 35.235.240.0/20
在 VPC1 中設定 GCE VM
您需要暫時存取網際網路才能安裝套件,因此請將執行個體設定為使用外部 IP 位址。
vm_vpc1_spoke_name="csql-vpc1-vm"
vpc_spoke_network_name="vpc1-spoke"
vpc_spoke_subnet_name="subnet1"
region="us-central1"
zone="us-central1-a"

gcloud compute instances create "${vm_vpc1_spoke_name}" \
--machine-type="e2-medium" \
--subnet="${vpc_spoke_subnet_name}" \
--zone="${zone}" \
--image-family=debian-11 \
--image-project=debian-cloud \
--metadata=startup-script='#!/bin/bash
sudo apt-get update
sudo apt-get install -y default-mysql-client'
在 VPC3 中設定 GCE VM
您需要暫時存取網際網路才能安裝套件,因此請將執行個體設定為使用外部 IP 位址。
vm_vpc_spoke_name="csql-vpc3-vm"
vpc_spoke_network_name="vpc3-spoke"
vpc_spoke_subnet_name="subnet3"
region="us-central1"
zone="us-central1-a"

gcloud compute instances create "${vm_vpc_spoke_name}" \
--machine-type="e2-medium" \
--subnet="${vpc_spoke_subnet_name}" \
--zone="${zone}" \
--image-family=debian-11 \
--image-project=debian-cloud \
--metadata=startup-script='#!/bin/bash
sudo apt-get update
sudo apt-get install -y default-mysql-client'
3. 建立 Cloud SQL 執行個體
使用下列指令建立執行個體,並啟用 Private Service Connect。
這項作業需要幾分鐘才能完成。
gcloud config set project ${project}

gcloud sql instances create mysql-instance \
--project="${project}" \
--region=us-central1 \
--enable-private-service-connect \
--allowed-psc-projects="${project}" \
--availability-type=zonal \
--no-assign-ip \
--tier=db-f1-micro \
--database-version=MYSQL_8_0 \
--enable-bin-log
找出 Cloud SQL 執行個體的服務連結 URI
使用 gcloud sql instances describe 指令,查看已啟用 Private Service Connect 的執行個體相關資訊。請記下 pscServiceAttachmentLink 欄位,其中會顯示指向執行個體服務連結的 URI。下一節會用到這項資訊。
gcloud sql instances describe mysql-instance \
--format='value(pscServiceAttachmentLink)'
4. Cloud SQL 的 PSC 端點
為 PSC 端點保留內部 IP 位址
使用下列指令為 Private Service Connect 端點預留內部 IP 位址,
region="us-central1"
vpc_spoke_subnet_name="csql-psc-subnet"

gcloud compute addresses create csql-psc-ip \
--subnet="${vpc_spoke_subnet_name}" \
--region="${region}" \
--addresses=192.168.0.253
查閱與預留 IP 位址相關聯的 NAME。這會用於轉送規則設定。
gcloud compute addresses list \
--filter="name=csql-psc-ip"
在 VPC1 中建立 Private Service Connect 轉送規則
使用下列指令建立 Private Service Connect 端點,並指向 Cloud SQL 服務連結。
vpc_spoke_network_name="vpc1-spoke"
vpc_spoke_subnet_name="csql-psc-subnet"
region="us-central1"
csql_psc_ep_name="csql-psc-ep"
sa_uri=$(gcloud sql instances describe mysql-instance \
  --format='value(pscServiceAttachmentLink)')
echo "$sa_uri"

gcloud compute forwarding-rules create "${csql_psc_ep_name}" \
--address=csql-psc-ip \
--region="${region}" \
--network="${vpc_spoke_network_name}" \
--target-service-attachment="${sa_uri}" \
--allow-psc-global-access
使用下列指令,確認 cSQL 服務附件接受端點:
gcloud compute forwarding-rules describe csql-psc-ep \
--region=us-central1 \
--format='value(pscConnectionStatus)'
從 VPC1 驗證 MySQL 的資料路徑
建立新的 Cloud SQL 執行個體時,必須先設定預設使用者帳戶的密碼,才能連線至執行個體。
gcloud sql users set-password root \
--host=% \
--instance=mysql-instance \
--prompt-for-password
使用下列指令找出與 Cloud SQL 服務連結相關聯的 PSC 端點 IP 位址。
gcloud compute addresses describe csql-psc-ip \
--region=us-central1 \
--format='value(address)'
從 VPC1 中的 VM 連線至 Cloud SQL 執行個體
開啟 csql-vpc1-vm 的 SSH 工作階段
gcloud compute ssh csql-vpc1-vm \
--zone=us-central1-a \
--tunnel-through-iap
請使用下列指令連線至 Cloud SQL 執行個體。系統提示時,請輸入在上個步驟中建立的密碼。
mysql -h 192.168.0.253 -u root -p
登入成功後,系統會顯示以下輸出內容,
Welcome to the MariaDB monitor.  Commands end with ; or \g.
Your MySQL connection id is 8350
Server version: 8.0.31-google (Google)

Copyright (c) 2000, 2018, Oracle, MariaDB Corporation Ab and others.

Type 'help;' or '\h' for help. Type '\c' to clear the current input statement.

MySQL [(none)]>
使用 show databases; 指令驗證 MySql 預設建立的資料庫。
MySQL [(none)]> show databases;
從 VPC3 中的 VM 連線至 Cloud SQL 執行個體
開啟 csql-vpc3-vm 的 SSH 工作階段,
gcloud compute ssh csql-vpc3-vm \
--zone=us-central1-a \
--tunnel-through-iap
請使用下列指令連線至 Cloud SQL 執行個體。系統提示時,請輸入在上個步驟中建立的密碼。
mysql -h 192.168.0.253 -u root -p
VPC3 上的 VM 工作階段會失敗,因為 VPC3 沒有通往 Private Service Connect 端點的資料路徑。使用按鍵組合中斷工作階段。
Ctrl + C
5. Network Connectivity Center 中樞
總覽
在本節中,我們將以 gcloud 指令設定 NCC 中樞。NCC 中樞會做為控制層,負責從 VPC 輪輻建立資料路徑到 Private Service Connect 端點。

啟用 API 服務
如果尚未啟用,請啟用 Network Connectivity API:
gcloud services enable networkconnectivity.googleapis.com
建立 NCC 中樞
使用下列 gcloud 指令建立 NCC 中樞。「–export-psc」旗標會指示 NCC 中樞將已知的 PSC 端點傳播至所有 VPC 輪輻。
hub_name="ncc-hub"
gcloud network-connectivity hubs create "${hub_name}" \
--export-psc
描述新建立的 NCC 中樞,並記下名稱和相關聯的路徑:
gcloud network-connectivity hubs describe ncc-hub
將 VPC1 設為 NCC 輪輻
hub_name="ncc-hub"
vpc_spoke_name="sql-vpc1-spoke"
vpc_spoke_network_name="vpc1-spoke"

gcloud network-connectivity spokes linked-vpc-network create "${vpc_spoke_name}" \
--hub="${hub_name}" \
--vpc-network="${vpc_spoke_network_name}" \
--global
將 VPC3 設為 NCC 輪輻
hub_name="ncc-hub"
vpc_spoke_name="sql-vpc3-spoke"
vpc_spoke_network_name="vpc3-spoke"

gcloud network-connectivity spokes linked-vpc-network create "${vpc_spoke_name}" \
--hub="${hub_name}" \
--vpc-network="${vpc_spoke_network_name}" \
--global
使用下列指令檢查 NCC 中樞的路由表,確認是否有通往 PSC 子網路的路由。
gcloud network-connectivity hubs route-tables routes list \
--route_table=default \
--hub=ncc-hub
6. 驗證 NCC 資料路徑
在這個步驟中,我們將驗證 NCC 混合式輪輻和 VPC 輪輻之間的資料路徑。
確認 NCC 設定的資料路徑是否指向 Cloud SQL 執行個體 PSC 端點
執行下列 gcloud 指令,依輸出內容登入地端部署 VM。
gcloud compute instances list --filter="name=csql-vpc3-vm"
登入地端部署網路內的 VM 執行個體。
gcloud compute ssh csql-vpc3-vm \
--zone=us-central1-a \
--tunnel-through-iap
使用下列 mysql 指令連線至 Cloud SQL 執行個體。系統提示時,請輸入在上個步驟中建立的密碼。
mysql -h 192.168.0.253 -u root -p
登入成功後,系統會顯示以下輸出內容,
Welcome to the MariaDB monitor.  Commands end with ; or \g.
Your MySQL connection id is 8501
Server version: 8.0.31-google (Google)

Copyright (c) 2000, 2018, Oracle, MariaDB Corporation Ab and others.

Type 'help;' or '\h' for help. Type '\c' to clear the current input statement.

MySQL [(none)]> show databases;
+--------------------+
| Database           |
+--------------------+
| information_schema |
| mysql              |
| performance_schema |
| sys                |
+--------------------+
4 rows in set (0.005 sec)
使用 show databases; 指令,驗證 MySql 預設建立的資料庫
MySQL [(none)]> show databases;
7. 清除
登入 Cloud Shell 並刪除 GCP 資源。
刪除 Cloud SQL PSC 端點
gcloud compute forwarding-rules delete csql-psc-ep \
--region=us-central1 \
--quiet

gcloud compute addresses delete csql-psc-ip \
--region=us-central1 \
--quiet

gcloud compute networks subnets delete csql-psc-subnet \
--region=us-central1 \
--quiet
刪除 Cloud SQL 執行個體
gcloud sql instances delete mysql-instance --quiet
刪除防火牆規則
vpc_spoke_network_name="vpc3-spoke"

gcloud compute firewall-rules delete vpc3-allow-all \ --network="${vpc_spoke_network_name}"
gcloud compute firewall-rules delete vpc3-allow-iap \ --network="${vpc_spoke_network_name}"
vpc_spoke_network_name="vpc1-spoke"

gcloud compute firewall-rules delete vpc1-allow-all \ --network="${vpc_spoke_network_name}"
gcloud compute firewall-rules delete vpc1-allow-iap \ --network="${vpc_spoke_network_name}"
刪除 VPC1 和 VPC3 中的 GCE 執行個體
vm_vpc1_spoke_name="csql-vpc1-vm"
zone="us-central1-a"
gcloud compute instances delete "${vm_vpc1_spoke_name}" \
--zone="${zone}" \
--quiet


vm_vpc_spoke_name="csql-vpc3-vm"
zone="us-central1-a"
gcloud compute instances delete "${vm_vpc_spoke_name}" \
--zone="${zone}" --quiet
刪除 NCC 輪輻
vpc_spoke_name="sql-vpc1-spoke"
gcloud network-connectivity spokes delete "${vpc_spoke_name}" \
--global \
--quiet
vpc_spoke_name="sql-vpc3-spoke"
gcloud network-connectivity spokes delete "${vpc_spoke_name}" \
--global \
--quiet
刪除 NCC 中樞
hub_name="ncc-hub"
gcloud network-connectivity hubs delete "${hub_name}" \
  --project=${project}
刪除所有虛擬私有雲中的子網路
vpc_spoke_subnet_name="csql-psc-subnet"
region="us-central1"

gcloud compute networks subnets delete "${vpc_spoke_subnet_name}" \
--region="${region}" \
--quiet
vpc_spoke_subnet_name="subnet1"
region="us-central1"

gcloud compute networks subnets delete "${vpc_spoke_subnet_name}" \
--region="${region}" \
--quiet
vpc_spoke_subnet_name="subnet3"
region="us-central1"

gcloud compute networks subnets delete "${vpc_spoke_subnet_name}" \
--region="${region}" \
--quiet
刪除 VPC1 和 VPC3
gcloud compute networks delete vpc1-spoke vpc3-spoke
8. 恭喜!
您已完成「透過 Network Connectivity Center 傳播 Private Service Connect」實驗室!
涵蓋範圍
- 透過 Network Connectivity Center 傳播 Private Service Connect 端點
後續步驟