
1. Overview
Remember our journey building a dynamic hybrid retail experience with AlloyDB, combining faceted filtering and vector search? That application was a powerful demonstration of modern retail needs, but getting there — and iterating on it — required significant development effort. For full-stack developers, the constant back-and-forth between code editors and database tools can often be a bottleneck, slowing down innovation and the crucial process of understanding your data.
Solution
This is precisely where the power of accelerated application development truly shines, and it's why I'm so excited to share how the MCP (Modern Cloud Platform) Toolbox, accessible through the intuitive Gemini CLI, has become an indispensable part of my toolkit. Imagine seamlessly interacting with your AlloyDB instance, writing queries, and understanding your dataset — all directly within your Integrated Development Environment (IDE). This isn't just about convenience; it's about fundamentally reducing the friction in the development lifecycle, allowing you to focus on building innovative features rather than wrestling with external tools.
In the context of our retail e-commerce app, where we needed to efficiently query product data, handle complex filtering, and leverage the nuances of vector search, the ability to quickly iterate on database interactions was paramount. The MCP Toolbox, powered by Gemini CLI, not only simplifies this but accelerates, transforming how we can explore, test, and refine the database logic that underpins our applications. Let's dive into how this game-changing combination is making full-stack development faster, smarter, and more enjoyable.
What you'll learn & build
A Retail Search Application utilizing the MCP Toolbox within the IDE, powered by the Gemini CLI. We will cover:
- How to integrate the MCP Toolbox directly into your IDE for seamless AlloyDB interaction.
- Practical examples of using the Gemini CLI to write and execute SQL queries against your retail data.
- Leverage the Gemini CLI to interact with our retail e-commerce dataset, writing queries that would typically require separate tools, and seeing the results instantly.
- Discover new ways to probe and understand the data — from checking table structures to performing quick data sanity checks — all through familiar command-line interfaces within our IDE.
- How this accelerated database workflow directly contributes to quicker full-stack development cycles, allowing for rapid prototyping and iteration.
Techstack
We are using:
- AlloyDB for database
- MCP Toolbox for abstracting advanced generative and AI features of databases from the application
- Cloud Run for serverless deployment.
- Gemini CLI to understand and analyze the dataset and build the database part of the retail e-commerce application.
Requirements
2. Before you begin
Create a project
- In the Google Cloud Console, on the project selector page, select or create a Google Cloud project.
- Make sure that billing is enabled for your Cloud project. Learn how to check if billing is enabled on a project.
- You'll use Cloud Shell, a command-line environment running in Google Cloud. Click Activate Cloud Shell at the top of the Google Cloud console.

- Once connected to Cloud Shell, you check that you're already authenticated and that the project is set to your project ID using the following command:
gcloud auth list
- Run the following command in Cloud Shell to confirm that the gcloud command knows about your project.
gcloud config list project
- If your project is not set, use the following command to set it:
gcloud config set project <YOUR_PROJECT_ID>
- Enable the required APIs: Follow the link and enable the APIs.
Alternatively you can use the gcloud command for this. Refer documentation for gcloud commands and usage.
3. Database setup
In this lab we'll use AlloyDB as the database for the ecommerce data. It uses clusters to hold all of the resources, such as databases and logs. Each cluster has a primary instance that provides an access point to the data. Tables will hold the actual data.
Let's create an AlloyDB cluster, instance and table where the ecommerce dataset will be loaded.
Create a cluster and instance
- Navigate the AlloyDB page in the Cloud Console. An easy way to find most pages in Cloud Console is to search for them using the search bar of the console.
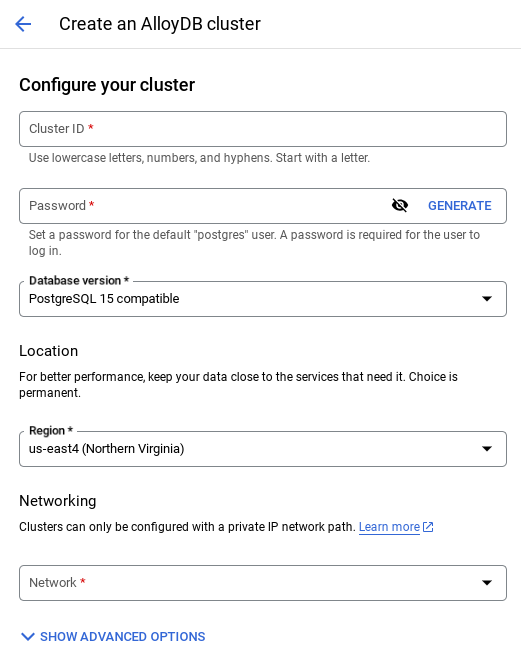
- Select CREATE CLUSTER from that page:
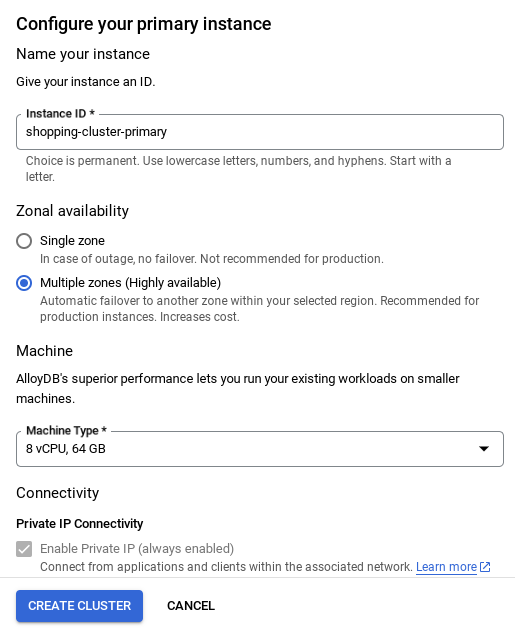
- You'll see a screen like the one below. Create a cluster and instance with the following values (Make sure the values match in case you are cloning the application code from the repo):
- cluster id: "
vector-cluster" - password: "
alloydb" - PostgreSQL 15 / latest recommended
- Region: "
us-central1" - Networking: "
default"
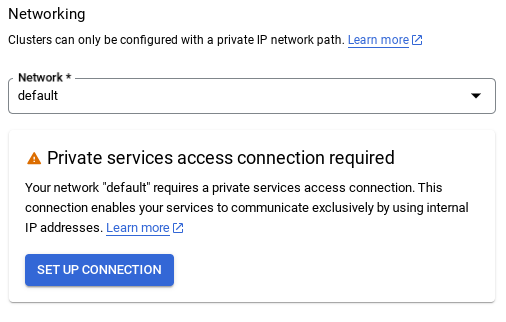
- When you select the default network, you'll see a screen like the one below.
Select SET UP CONNECTION.
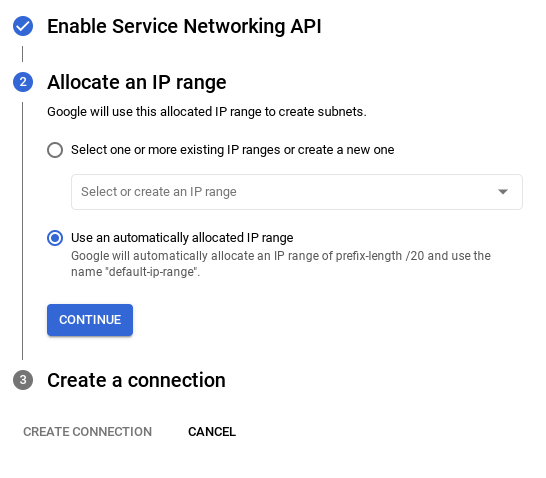
- From there, select "Use an automatically allocated IP range" and Continue. After reviewing the information, select CREATE CONNECTION.
- Once your network is set up, you can continue to create your cluster. Click CREATE CLUSTER to complete setting up of the cluster as shown below:
IMPORTANT NOTE:
- Make sure to change the instance id (which you can find at the time of configuration of the cluster / instance) to **
vector-instance**. If you cannot change it, remember to **use your instance id** in all the upcoming references. - Note that the Cluster creation will take around 10 minutes. Once it is successful, you should see a screen that shows the overview of your cluster you just created.
4. Data ingestion
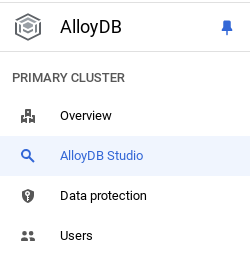
Now it's time to add a table with the data about the store. Navigate to AlloyDB, select the primary cluster and then AlloyDB Studio:
You may need to wait for your instance to finish being created. Once it is, sign into AlloyDB using the credentials you created when you created the cluster. Use the following data for authenticating to PostgreSQL:
- Username : "
postgres" - Database : "
postgres" - Password : "
alloydb"
Once you have authenticated successfully into AlloyDB Studio, SQL commands are entered in the Editor. You can add multiple Editor windows using the plus to the right of the last window.
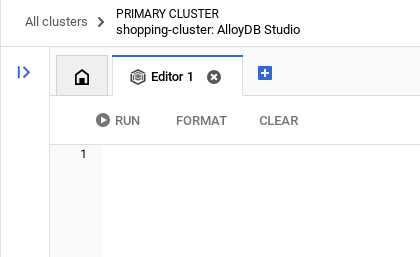
You'll enter commands for AlloyDB in editor windows, using the Run, Format, and Clear options as necessary.
Enable Extensions
For building this app, we will use the extensions pgvector and google_ml_integration. The pgvector extension allows you to store and search vector embeddings. The google_ml_integration extension provides functions you use to access Vertex AI prediction endpoints to get predictions in SQL. Enable these extensions by running the following DDLs:
CREATE EXTENSION IF NOT EXISTS google_ml_integration CASCADE;
CREATE EXTENSION IF NOT EXISTS vector;
If you would like to check the extensions that have been enabled on your database, run this SQL command:
select extname, extversion from pg_extension;
Create a table
You can create a table using the DDL statement below in the AlloyDB Studio:
CREATE TABLE apparels (
  id BIGINT,
  category VARCHAR(100),
  sub_category VARCHAR(50),
  uri VARCHAR(200),
  gsutil_uri VARCHAR(200),
  image VARCHAR(100),
  content VARCHAR(2000),
  pdt_desc VARCHAR(5000),
  color VARCHAR(2000),
  gender VARCHAR(200),
  embedding vector(768),
  img_embeddings vector(1408),
  additional_specification VARCHAR(100000));
The embedding column will allow storage for the vector values of the text.
Grant Permission
Run the below statement to grant execute on the "embedding" function:
GRANT EXECUTE ON FUNCTION embedding TO postgres;
Grant Vertex AI User ROLE to the AlloyDB service account
From Google Cloud IAM console, grant the AlloyDB service account (that looks like this: service-<<PROJECT_NUMBER>>@gcp-sa-alloydb.iam.gserviceaccount.com) access to the role "Vertex AI User". PROJECT_NUMBER will have your project number.
Alternatively you can run the below command from the Cloud Shell Terminal:
PROJECT_ID=$(gcloud config get-value project)


gcloud projects add-iam-policy-binding $PROJECT_ID \
  --member="serviceAccount:service-$(gcloud projects describe $PROJECT_ID --format="value(projectNumber)")@gcp-sa-alloydb.iam.gserviceaccount.com" \
--role="roles/aiplatform.user"
Load data into the database
- Copy the
insertquery statements from theinsert scripts sqlin the sheet to the mentioned above to the editor. You can copy 10-50 insert statements for a quick demo of this use case. There is a selected list of inserts here in this "Selected Inserts 25-30 rows" tab. - Click Run. The results of your query appear in the Results table.
IMPORTANT NOTE:
Make sure to copy only 25-50 records to insert and make sure it is from a range of category, sub_category, color, gender types.
5. Create Embeddings for the data
The true innovation in modern search lies in understanding meaning, not just keywords. This is where embeddings and vector search come into play.
We transformed product descriptions and user queries into high-dimensional numerical representations called "embeddings" using pre-trained language models. These embeddings capture the semantic meaning, allowing us to find products that are "similar in meaning" rather than just containing matching words. Initially, we experimented with direct vector similarity search on these embeddings to establish a baseline, demonstrating the power of semantic understanding even before performance optimizations.
The embedding column will allow storage for the vector values of the product description text. The img_embeddings column will allow storage of image embeddings (multimodal). This way you can also use text against image distance based search. But we'll only use text embeddings in this lab.
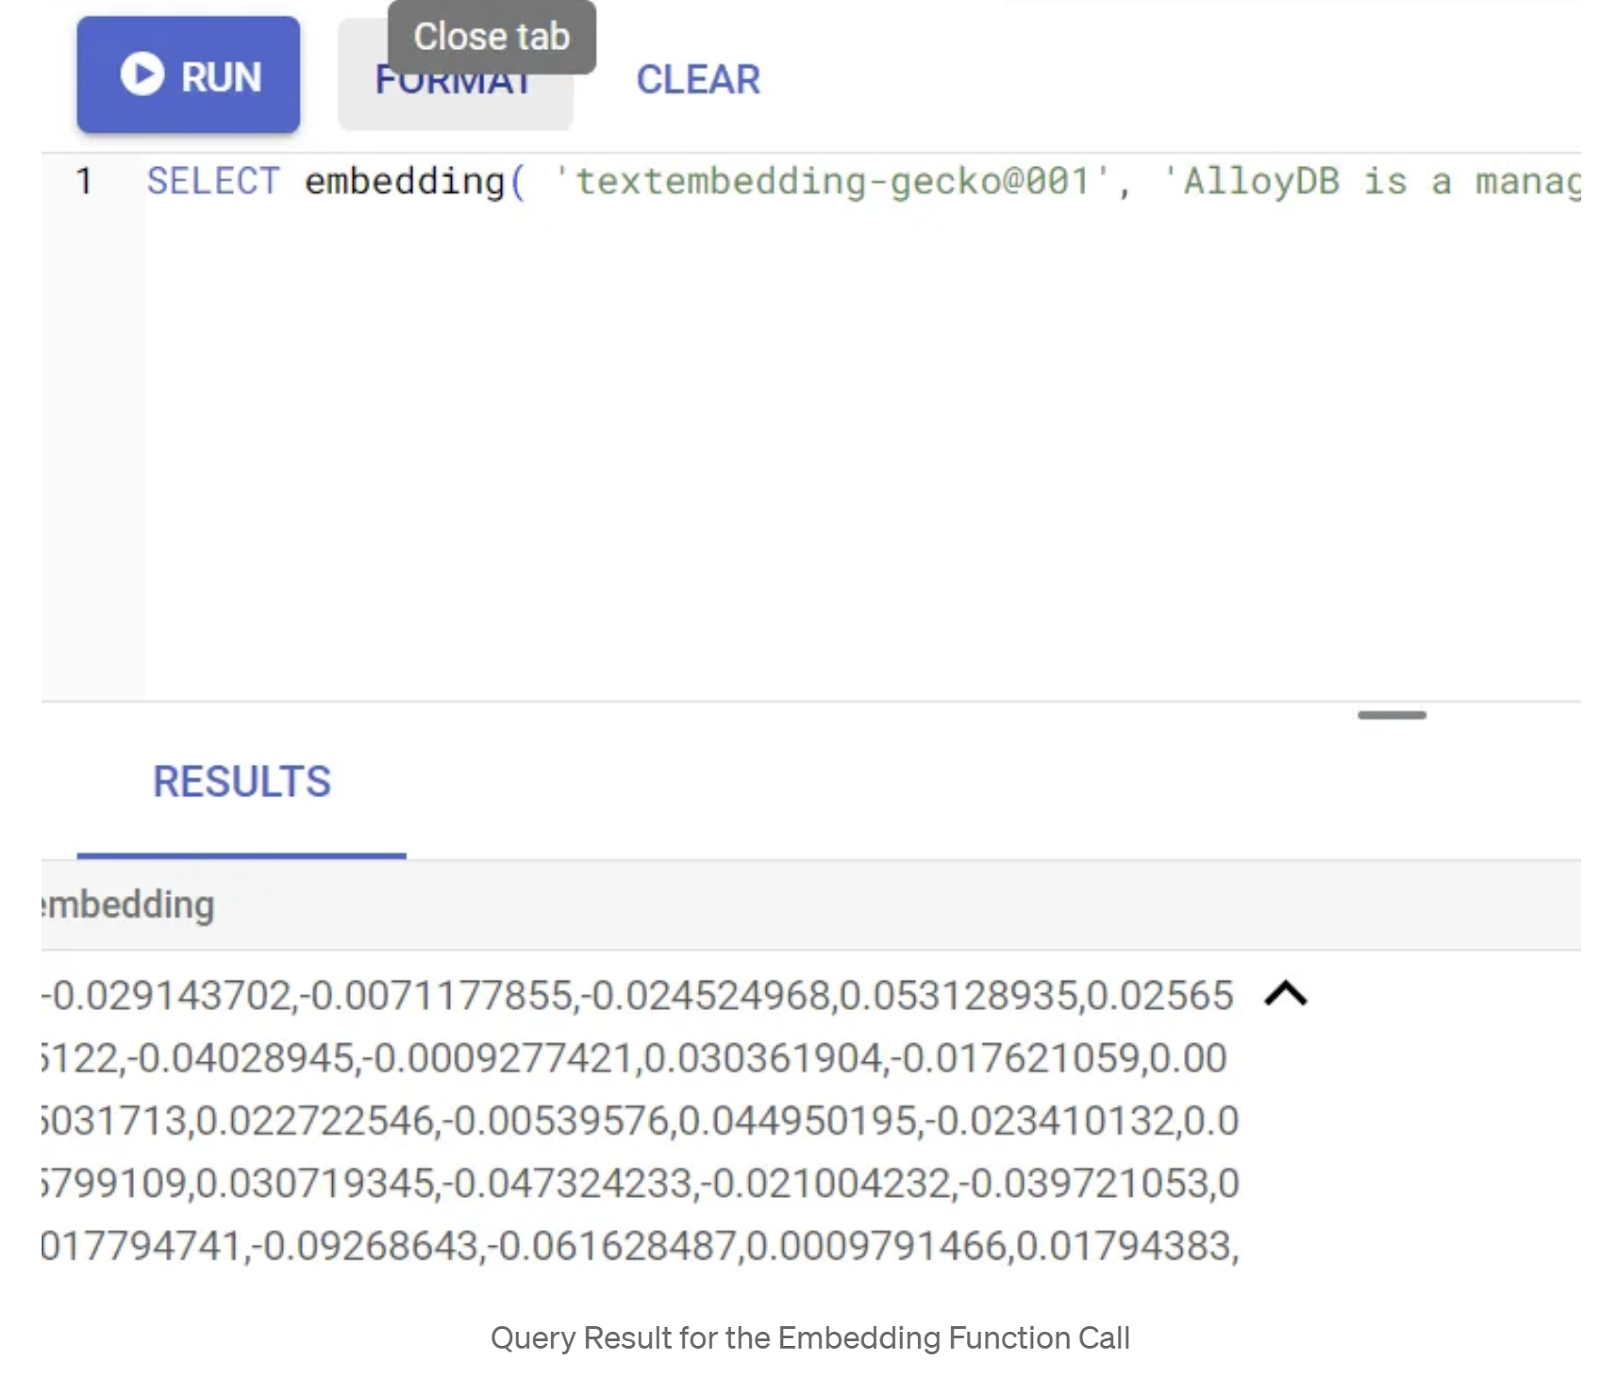
SELECT embedding('text-embedding-005', 'AlloyDB is a managed, cloud-hosted SQL database service.');
This should return the embeddings vector, that looks like an array of floats, for the sample text in the query. Looks like this:
Update the abstract_embeddings Vector field
Run the below DML to update the content description in the table with the corresponding embeddings:
UPDATE apparels SET embedding = embedding('text-embedding-005',pdt_desc)::vector
WHERE pdt_desc IS NOT NULL;
You may have trouble generating more than a few embeddings (say 20-25 max) if you are using a trial credit billing account for Google Cloud. So limit the number of rows in the insert script.
If you want to generate image embeddings (for performing multimodal contextual search) run the below update as well:
update apparels set img_embeddings = ai.image_embedding(
  model_id => 'multimodalembedding@001',
  image => gsutil_uri,
  mimetype => 'image/jpg')
where gsutil_uri is not null
6. MCP Toolbox for Databases (AlloyDB)
Behind the scenes, robust tooling and a well-structured application ensure smooth operation.
The MCP (Model Context Protocol) Toolbox for Databases simplifies the integration of Generative AI and Agentic tools with AlloyDB. It acts as an open-source server that streamlines connection pooling, authentication, and the secure exposure of database functionalities to AI agents or other applications.
In our application we have used MCP Toolbox for Databases as an abstraction layer for all our intelligent hybrid search queries.
Follow the steps below to set up, deploy Toolbox for our use case:
You can see that one of the databases supported by MCP Toolbox for Databases is AlloyDB and since we have already provisioned that in the previous section, let's go ahead and set up Toolbox.
- Navigate to your Cloud Shell Terminal and make sure your project is selected and shown in the terminal's prompt. Run the below command from your Cloud Shell Terminal to navigate into your project directory:
mkdir gemini-cli-project

cd gemini-cli-project
- Run the below command to download and install toolbox in your new folder:
# see releases page for other versions
export VERSION=0.7.0
curl -O https://storage.googleapis.com/mcp-toolbox-for-databases/v$VERSION/linux/amd64/toolbox
chmod +x toolbox
This should create the toolbox in your current directory. Copy the path to the toolbox.
- Navigate to the Cloud Shell Editor (for code edit mode) and in the project root folder "gemini-cli-project", add a file called "tools.yaml".
sources:
    alloydb:
        kind: "alloydb-postgres"
        project: "<<YOUR_PROJECT_ID>>"
        region: "us-central1"
        cluster: "vector-cluster"
        instance: "vector-instance"
        database: "postgres"
        user: "postgres"
        password: "alloydb"


tools:
   get-apparels:
    kind: postgres-sql
    source: alloydb
    description: Get all apparel data.
    statement: |
      select id, content, uri, category, sub_category,color,gender from apparels;
Let's understand tools.yaml:
Sources represent your different data sources that a tool can interact with. A source represents a data source that a tool can interact with. You can define Sources as a map in the sources section of your tools.yaml file. Typically, a source configuration will contain any information needed to connect with and interact with the database.
Tools define actions an agent can take – such as reading and writing to a source. A tool represents an action your agent can take, such as running a SQL statement. You can define Tools as a map in the tools section of your tools.yaml file. Typically, a tool will require a source to act on.
For more details on configuring your tools.yaml, refer to this documentation.
As you can see in the Tools.yaml file above, the tool "get-apparels" lists all the apparels' details from the database.
7. Set up Gemini CLI
From the Cloud Shell Editor, create a new folder called .gemini inside the gemini-cli-project folder and create a new file named settings.json in it.
{
  "mcpServers": {
"AlloyDBServer": {
  "command": "/home/user/gemini-cli-project/toolbox",
  "args": ["--tools-file", "tools.yaml", "--stdio"]
}
  }
}
In the command section in the snippet above, replace "/home/user/gemini-cli-project/toolbox" with your path to toolbox.
Install Gemini CLI
Finally from the Cloud Shell Terminal, let's install Gemini CLI in the same directory gemini-cli-project by executing the command:
sudo npm install -g @google/gemini-cli
Set your Project Id
Make sure you have the active project id set in the environment:
export GOOGLE_CLOUD_PROJECT=<<YOUR_PROJECT_ID>>
Get started with Gemini CLI
From command line, enter the command:
gemini
You should be able to see a response similar to the below:
Authenticate and continue to the next step.
8. Start interacting with Gemini CLI
Use the command /mcp to list the MCP servers configured.
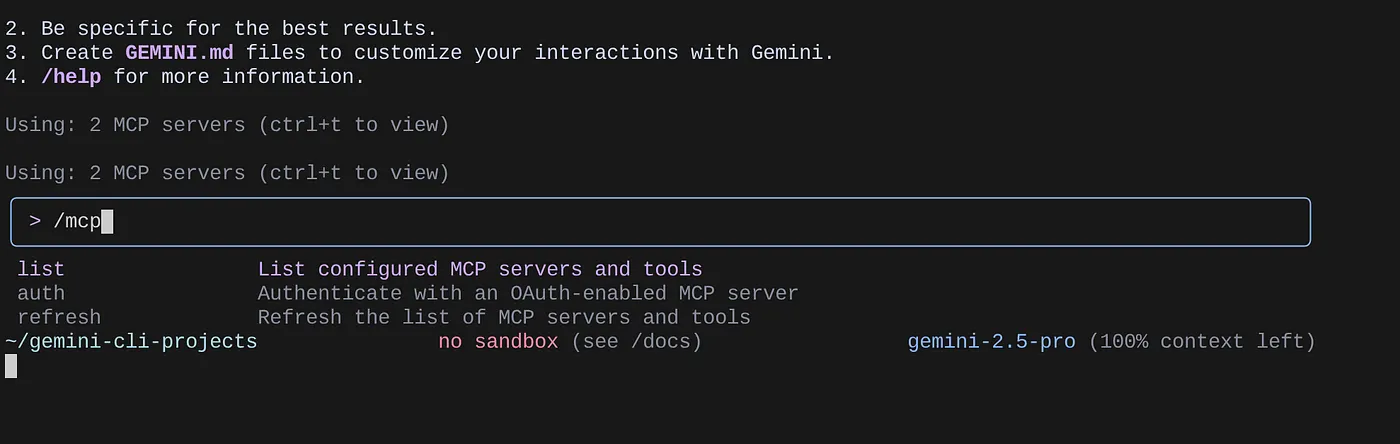
You should be able to see the 2 MCP servers we configured: GitHub and MCP Toolbox for Databases listed along with their tools.
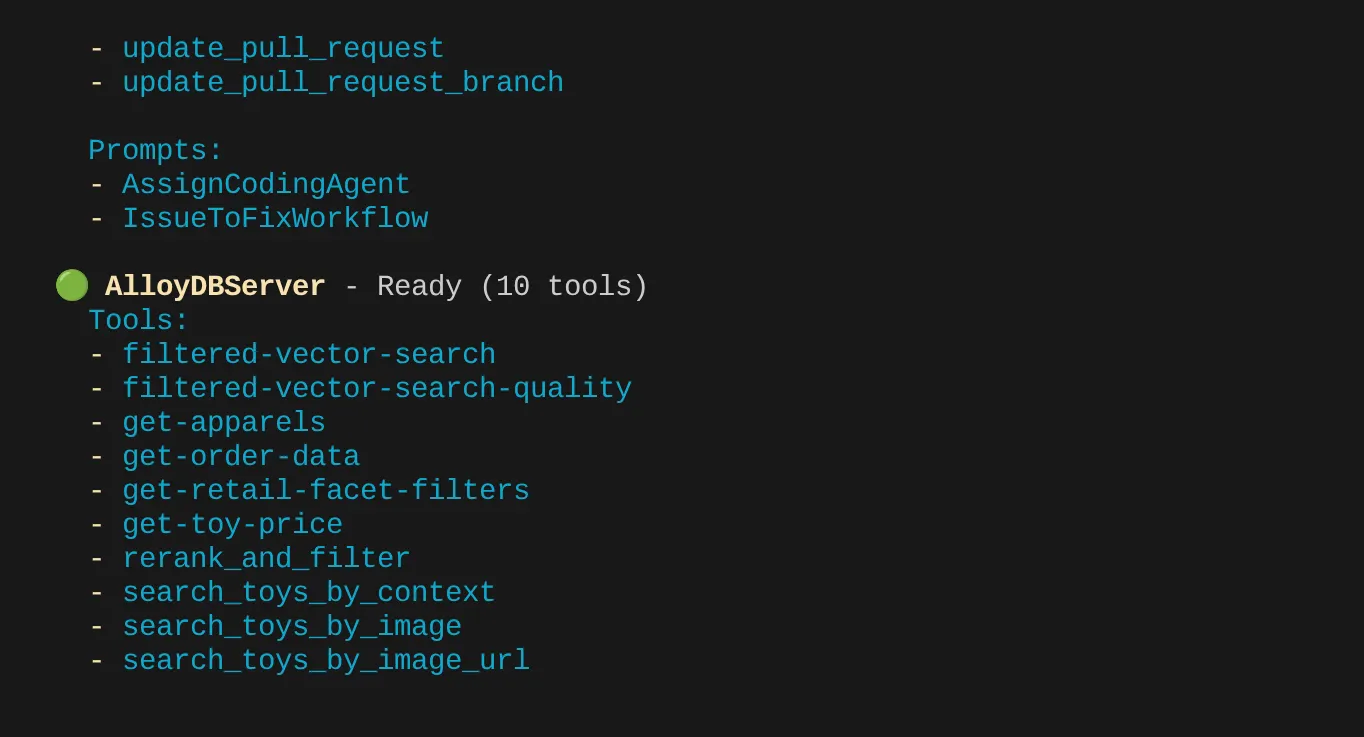
In my case I have more tools. So ignore it for now. You should see get-apparels tool in your AlloyDB MCP server.
Start querying the database through the MCP Toolbox
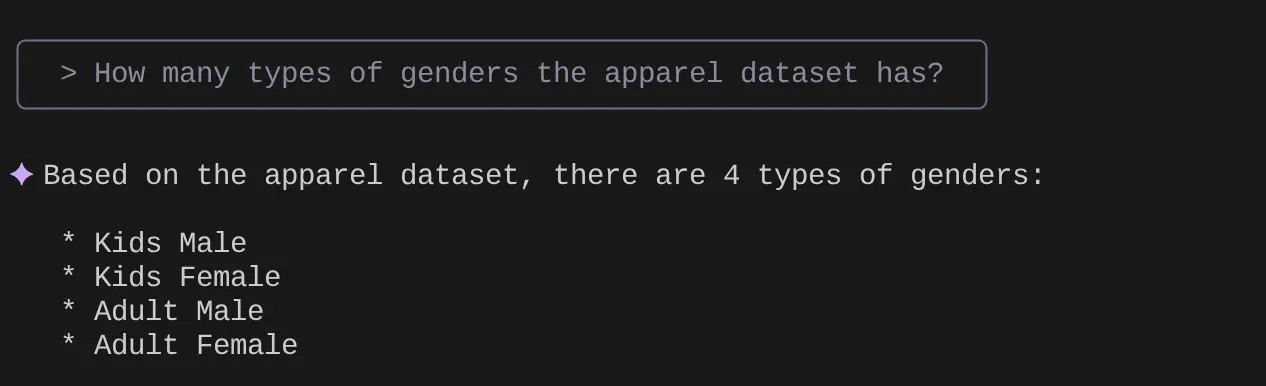
Now try asking natural language questions to fetch responses and queries for the dataset that we are working with:
> How many types of genders the apparel dataset has?
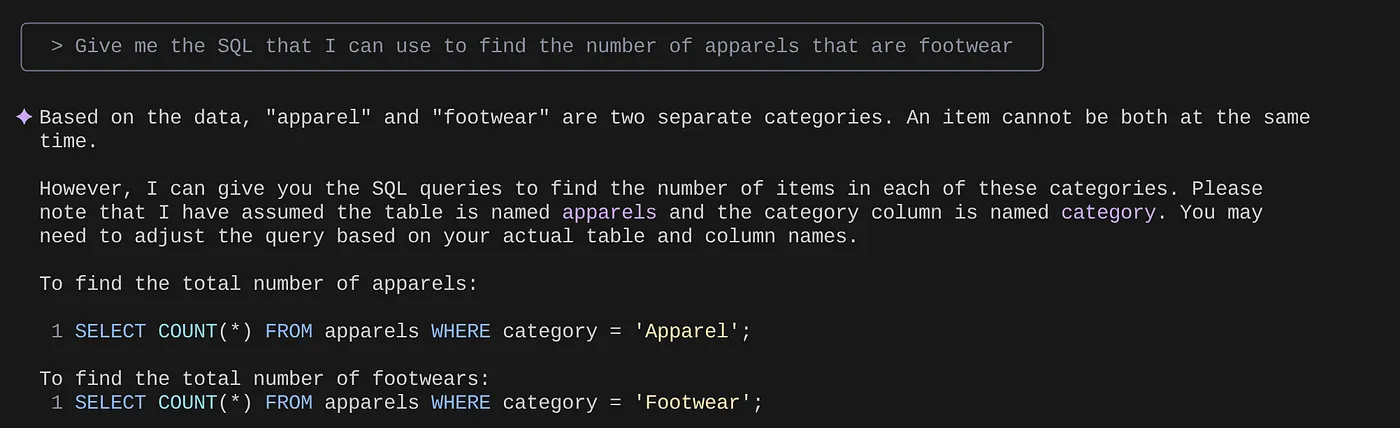
> Give me the SQL that I can use to find the number of apparels that are footwear
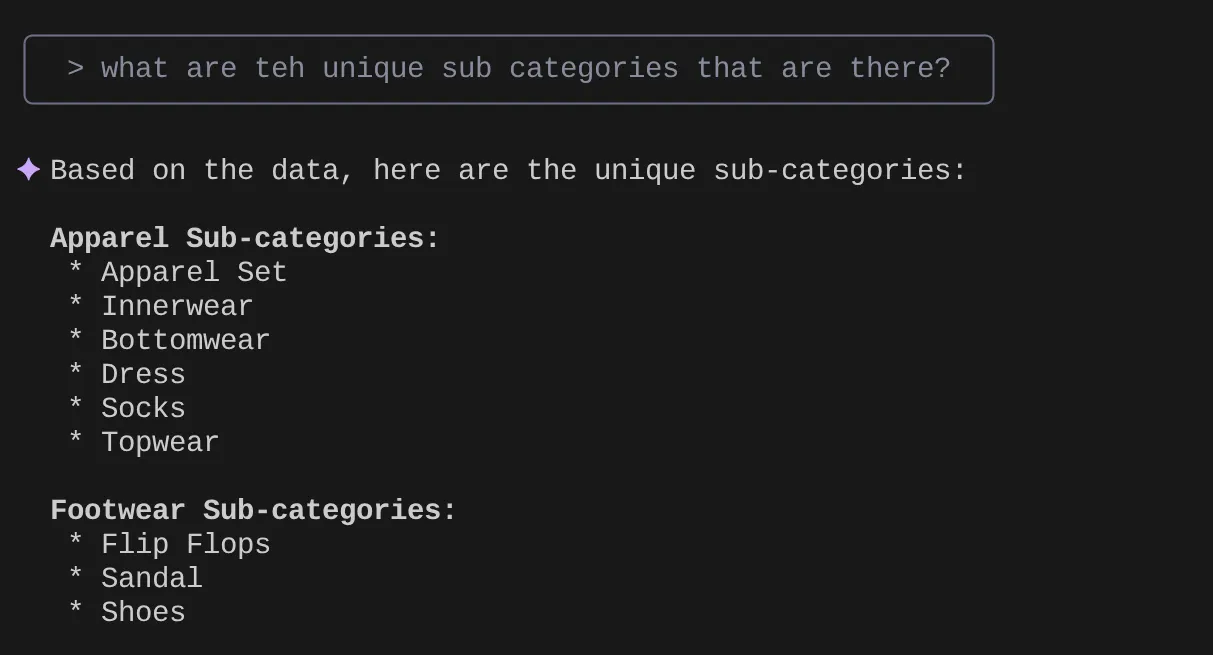
> What are the unique sub categories that are there?
that I can use to find the number of apparels that are footwear
Now let's say based on my insights and many such queries I came up with a detailed query and want to test it out. Or let's say the database engineers already built the Tools.yaml for you as below:
sources:
    alloydb:
        kind: "alloydb-postgres"
        project: "<<YOUR_PROJECT_ID>>"
        region: "us-central1"
        cluster: "vector-cluster"
        instance: "vector-instance"
        database: "postgres"
        user: "postgres"
        password: "alloydb"

tools:
   get-apparels:
    kind: postgres-sql
    source: alloydb
    description: Get all apparel data.
    statement: |
      select id, content, uri, category, sub_category,color,gender from apparels;

   filtered-vector-search:
    kind: postgres-sql
    source: alloydb
    description: Get the list of facet filter values from the retail dataset.
    parameters:
      - name: categories
        type: array
        description: List of categories preferred by the user.
        items:
          name: category
          type: string
          description: Category value.
      - name: subCategories
        type: array
        description: List of sub-categories preferred by the user.
        items:
          name: subCategory
          type: string
          description: Sub-Category value.
      - name: colors
        type: array
        description: List of colors preferred by the user.
        items:
          name: color
          type: string
          description: Color value.
      - name: genders
        type: array
        description: List of genders preferred by the user for apparel fitting.
        items:
          name: gender
          type: string
          description: Gender name.
      - name: searchtext
        type: string
        description: Description of the product that the user wants to find database matches for.
    statement: |
      SELECT id, content, uri, category, sub_category,color,gender FROM apparels
      where category = ANY($1) and sub_Category = ANY($2) and color = ANY($3) and gender = ANY($4)
      order by embedding <=> embedding('text-embedding-005',$5)::vector limit 10
Now let's try a natural language search:
> How many yellow shirts are there for boys?
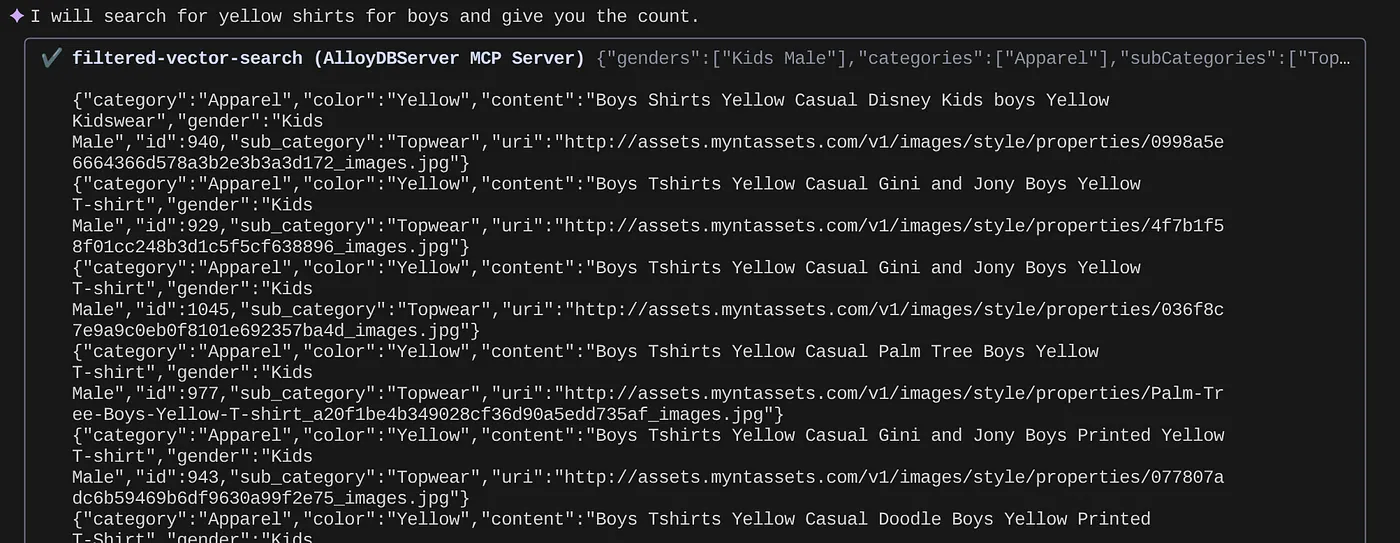

Pretty cool isn't it? Now I can fix the yaml file for more advancements in queries while I continue to deliver new functionalities in my application in an accelerated timeline.
9. Accelerated App Development
The beauty of bringing database capabilities directly into your IDE via Gemini CLI and the MCP Toolbox isn't just theoretical. It translates into tangible, speed-boosting workflows, especially for a complex application like our hybrid retail experience. Let's look at a few scenarios:
1. Rapidly Iterating on Product Filtering Logic
Imagine we've just launched a new promotion for "summer active-wear." We want to test how our faceted filters (e.g., by brand, size, color, price range) interact with this new category.
Without the IDE integration:
I'd likely switch to a separate SQL client, write my query, execute it, analyze the results, go back to my IDE to adjust the application code, switch back to the client, and repeat. This context-switching is a major drag.
With Gemini CLI & MCP:
I can stay in my IDE and more:
- Querying: I can quickly update the query in the yaml with (hypothetical dataset) "SELECT DISTINCT brand FROM products WHERE category = ‘activewear' AND season = ‘summer'" and try it right in my terminal.
- Data Exploration: See the returned brands instantly. If I need to see product availability for a specific brand and size, it's another quick query:"SELECT COUNT(*) FROM products WHERE brand = ‘SummitGear' AND size = ‘M' AND category = ‘activewear' AND season = ‘summer'"
- Code Integration: I can then immediately adjust the front-end filtering logic or backend API calls based on these quick, in-IDE data insights, significantly cutting down the feedback loop.
2. Fine-Tuning Vector Search for Product Recommendations
Our hybrid search relies on vector embeddings for relevant product recommendations. Let's say we're seeing a dip in click-through rates for "men's running shoes" recommendations.
Without the IDE integration:
I'd be running custom scripts or queries in a database tool to analyze the similarity scores of recommended shoes, compare them to user interaction data, and try to correlate any patterns.
With Gemini CLI & MCP:
- Analyzing Embeddings: I can directly query for product embeddings and their associated metadata: "SELECT product_id, name, vector_embedding FROM products WHERE category = ‘running shoes' AND gender = ‘male' LIMIT 10"
- Cross-Referencing: I can also perform a quick check of the actual vector similarity between a chosen product and its recommendations, right there. For example, if product A is recommended to users who looked at product B, I could run a query to retrieve and compare their vector embeddings.
- Debugging: This allows for faster debugging and hypothesis testing. Is the embedding model behaving as expected? Are there anomalies in the data that affect recommendation quality? I can get initial answers without leaving my coding environment.
3. Understanding Schema and Data Distribution for New Features
Let's say we're planning to add a "customer reviews" feature. Before we write the backend API, we need to understand the existing customer data and how reviews might be structured.
Without the IDE integration:
I'd need to connect to a database client, run DESCRIBE commands on tables like customers and orders, and then query for sample data to understand relationships and data types.
With Gemini CLI & MCP:
- Schema Exploration: I can simply query the table in the yaml file and execute it directly in the terminal.
- Data Sampling: I can then pull sample data to understand customer demographics and purchase history: "SELECT customer_id, name, signup_date, total_orders FROM customers ORDER BY signup_date DESC LIMIT 5"
- Planning: This quick access to schema and data distribution helps us make informed decisions about how to design the new reviews table, what foreign keys to establish, and how to efficiently link reviews to customers and products, all before writing a single line of application code for the new feature.
These are just a few examples, but they highlight the core benefit: reducing friction and increasing developer velocity. By bringing AlloyDB interaction directly into the IDE, the Gemini CLI and MCP Toolbox empower us to build better, more responsive applications faster.
10. Clean up
To avoid incurring charges to your Google Cloud account for the resources used in this post, follow these steps:
- In the Google Cloud console, go to the resource manager page.
- In the project list, select the project that you want to delete, and then click Delete.
- In the dialog, type the project ID, and then click Shut down to delete the project.
- Alternatively, you can just delete the AlloyDB cluster (change the location in this hyperlink if you didn't choose us-central1 for the cluster at the time of configuration) that we just created for this project by clicking the DELETE CLUSTER button.
11. Congratulations
Congratulations! You have successfully integrated MCP Toolbox directly into your IDE for seamless AlloyDB interaction and leveraged Gemini CLI to interact with our retail e-commerce dataset to write queries that would typically require separate tools. You have learnt new ways to probe and understand the data — from checking table structures to performing quick data sanity checks — all through familiar command-line interfaces within our IDE.
Go ahead and clone the repo, analyze and let me know if you enhanced the application using Gemini CLI and MCP Toolbox for Databases.
For more such data driven applications built with Gemini CLI, MCP and deployed on Serverless runtimes, register for our upcoming season of Code Vipassana where you get instructor-lead hands-on sessions and more such codelabs!!!