

1. 簡介
在本程式碼實驗室中,您會在 Google Cloud 建構及部署 gCurrenC 計算機網頁應用程式,然後保護應用程式,防止未經授權的存取。您將使用 Google Antigravity、Google Cloud Developer 外掛程式和 Developer Knowledge (DK) MCP 伺服器,設計及實作安全性架構,控管應用程式存取權限,並防止未經授權的使用。
在本實驗室中,您會將 Google Antigravity 連結至 DK MCP 伺服器,讓 Antigravity 根據官方即時 Google Cloud 說明文件提供資訊。Antigravity 不會依賴靜態訓練資料或過時的模型權重,而是動態擷取目前的架構模式、最新 gcloud CLI 語法和安全性參數,減少幻覺,並根據最新知識提供回覆。
建構項目
- 私人運算工作負載:兩個 Compute Engine 虛擬機器 (VM) 在自訂虛擬私有雲 (VPC) 網路中執行 gCurrenC 計算機網頁應用程式,沒有公開 IP 位址。
- 安全輸入管道:全域外部應用程式負載平衡器,具有專屬的 Proxy 專用子網路,可透過 Google Front End (GFE) 將網際網路流量轉送至私人 VM,不會將 VM 暴露於公開網際網路。
- 安全的輸出管道:Cloud Router 和 Cloud NAT 閘道,搭配專案層級的 Cloud Next Generation Firewall (Cloud NGFW) Enterprise 和憑證授權單位服務 (CAS),對傳出 HTTPS 貨幣兌換 API 流量執行即時 TLS 檢查和入侵預防服務 (IPS) 掃描。
課程內容
- 使用 Antigravity CLI 安裝
google-cloud-developer外掛程式,並在 Antigravity 中設定 DK MCP 伺服器。 - 使用 Identity-Aware Proxy (IAP) TCP 轉送功能,在 Compute Engine 上部署及測試獨立的私人網頁應用程式。
- 在 Antigravity 中使用有依據的多輪提示,設計專案層級的輸入和輸出安全架構。
- 生成、自行稽核及執行
bash部署指令碼,用於全域外部應用程式負載平衡、Cloud NAT、CAS 和 Cloud NGFW Enterprise。
2. 事前準備
必要條件
開始進行本程式碼實驗室前,請確認您具備以下項目:
- Google 帳戶和 Google Chrome 瀏覽器。
- 新的 Google Cloud 專案,且已啟用計費功能。記下專案 ID (
PROJECT_ID),因為在本程式碼實驗室中,您會使用這個 ID 啟用 API、建立 API 金鑰,以及部署 Google Cloud 資源。 - Google Cloud 專案的 Identity and Access Management (IAM) 權限,可建立 API 金鑰、Compute Engine 資源、虛擬私有雲網路、CAS 集區、IAP 通道和 Cloud NGFW 端點。
- 使用
gcloudCLI 驗證身分、設定有效的 Google Cloud 雲端專案,並啟用必要的 API:- 在終端機或 Cloud Shell 中,確認您已通過驗證:
gcloud auth listgcloud auth login - 確認
gcloudCLI 已設為使用您的專案:gcloud config list projectPROJECT_ID替換為您的 Google Cloud 專案 ID:export PROJECT_ID=PROJECT_ID gcloud config set project PROJECT_ID - 在 Google Cloud 專案中啟用必要的 API:
gcloud services enable \
   compute.googleapis.com \
   iap.googleapis.com \
   networksecurity.googleapis.com \
   privateca.googleapis.com \
   developerknowledge.googleapis.com \
   apikeys.googleapis.com
- 在終端機或 Cloud Shell 中,確認您已通過驗證:
- 前往 Google Antigravity 下載頁面,在本機系統安裝 Antigravity 2.0。
使用 Antigravity CLI 安裝 Google Cloud Developer 外掛程式
如要使用 Antigravity CLI 安裝 Google Cloud Developer 外掛程式,請按照下列步驟操作:
- 如要在本機工作站安裝 Antigravity CLI,請按照下列步驟操作:
- 開啟本機終端機。
- 執行安裝程式指令碼:
curl -fsSL https://antigravity.google/cli/install.sh | bash - 關閉並重新開啟終端機工作階段,讓 Antigravity CLI 二進位檔
agy可以在系統PATH中使用。
- 在本機終端機執行下列指令,安裝
google-cloud-developer外掛程式:agy plugin install https://github.com/google/skills/plugins/cloud/google-cloud-developerCloning plugin from https://github.com/google/skills.git... [ok] google-cloud-developer ✔ skills : 5 processed - agents : skipped (not found) - commands : skipped (not found) ✔ mcpServers : 1 processed - hooks : skipped (not found)
3. 設定 Antigravity 和 DK MCP 伺服器
在本節中,您將使用受限制的 Google Cloud API 金鑰,在 Antigravity 中設定 DK MCP 伺服器。
- 開啟 Antigravity,輸入
/goal並按下 Enter 鍵,啟用目標模式,然後貼上以下提示,建立受限制的 API 金鑰並設定 DK MCP 伺服器。 將PROJECT_ID替換為「事前準備」一節中的 Google Cloud 專案 ID。詳情請參閱 google-cloud-developer 外掛程式。Set up Antigravity to use the Developer Knowledge MCP server on my local machine. Run the necessary terminal commands to complete the following: 1. Create a restricted API key named 'DKP-MCP-Key' that can only target the Developer Knowledge API. Use the PROJECT_ID to create the API key. 2. Retrieve the actual key string of the newly created API key. 3. Create or safely update my ~/.gemini/config/mcp_config.json file (preserve any existing MCP servers) with the correct JSON structure to connect the developer-knowledge server using that API key in the headers. You MUST use the following JSON structure for the new server: "developer-knowledge": { "serverUrl": "https://developerknowledge.googleapis.com/mcp", "headers": { "x-goog-api-key": "<INSERT_RETRIEVED_API_KEY_HERE>" } } When you are done, confirm that the setup is complete. - 如要確認 DK MCP 伺服器是否處於啟用狀態,請在 Antigravity 對話視窗中輸入下列提示:
Which MCP servers are available?developer-knowledge及其可用工具 (search_documents、answer_query和get_documents):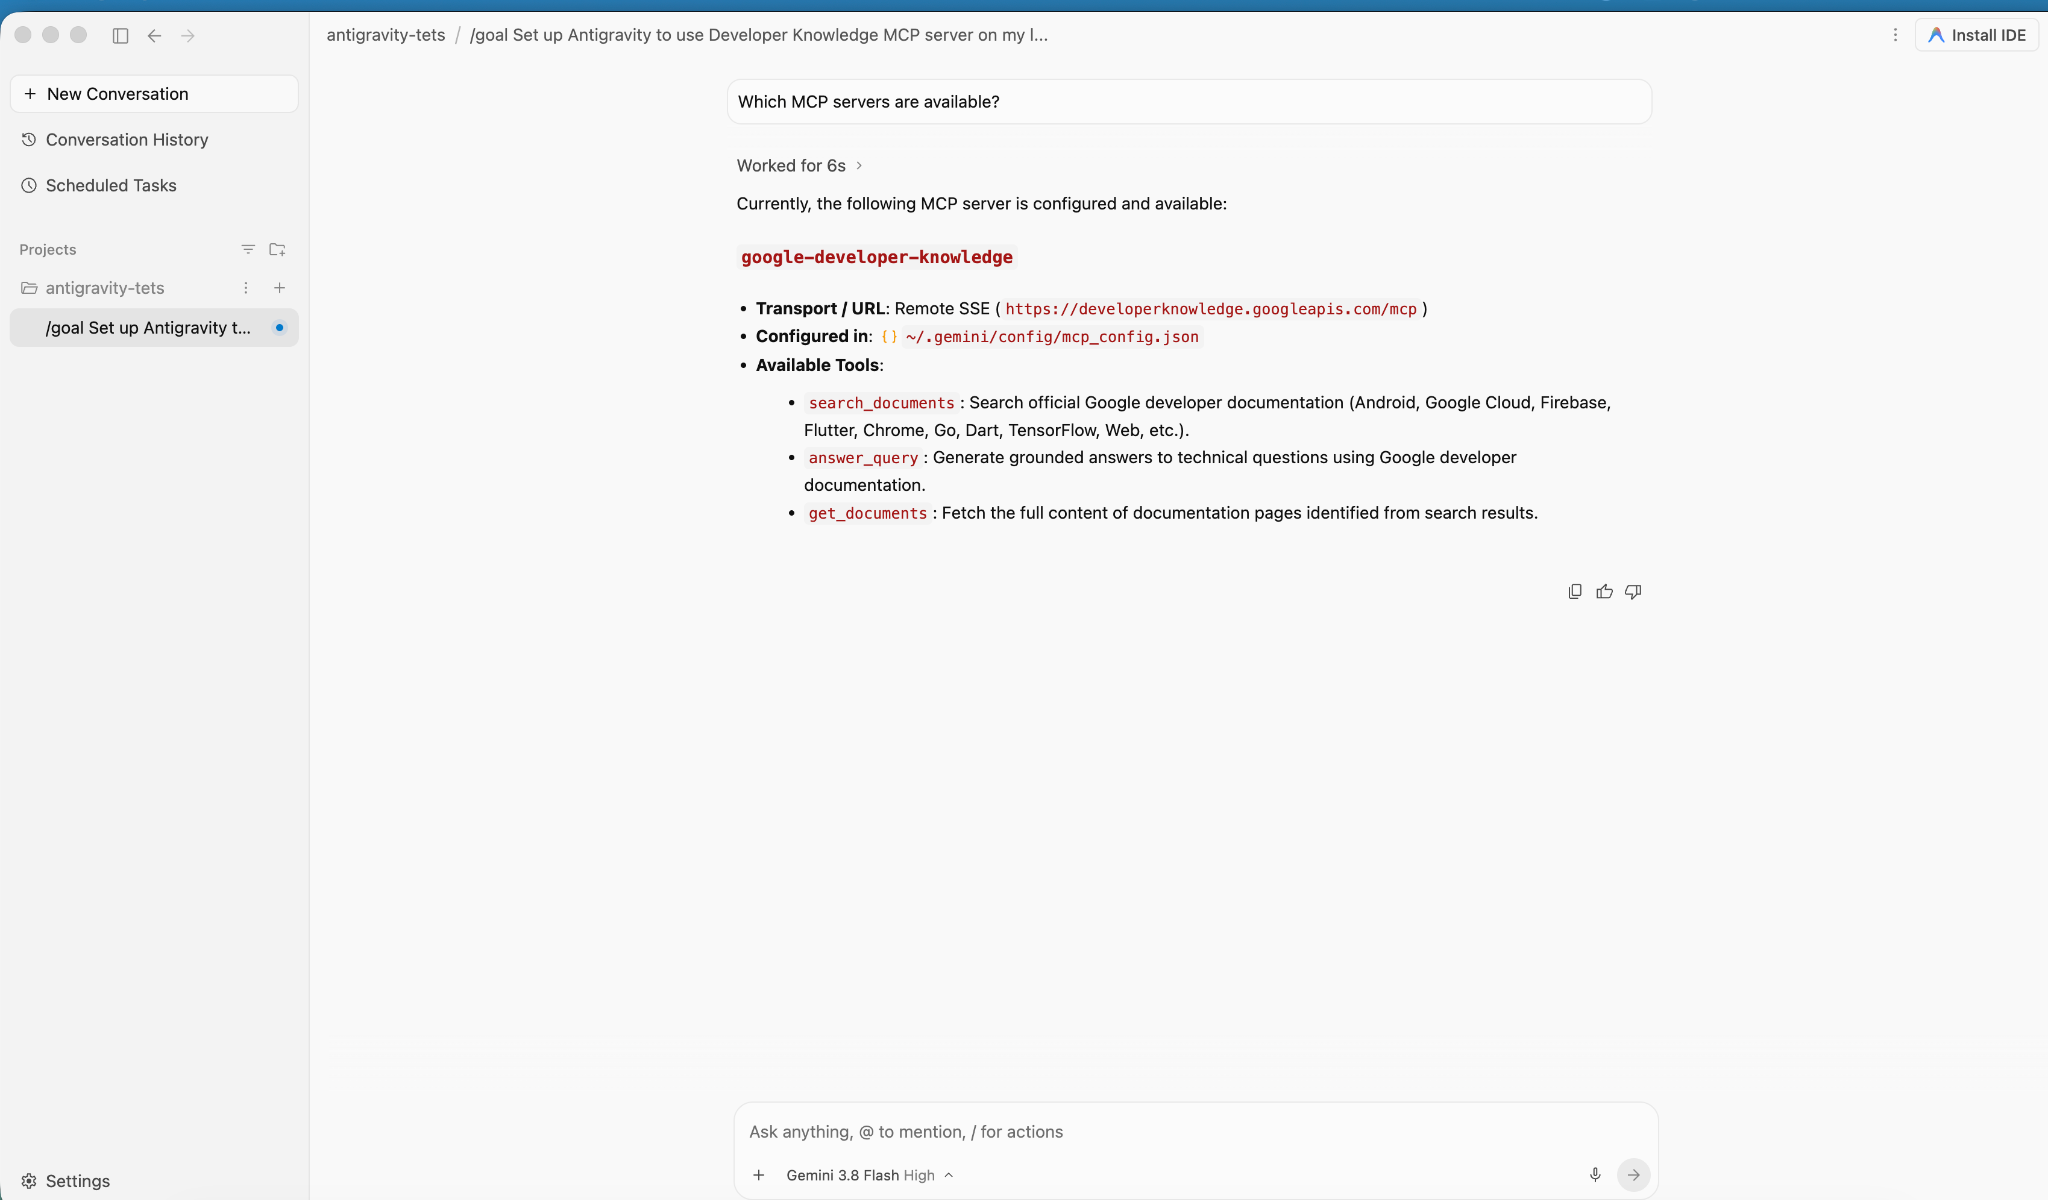
4. 建立及部署應用程式
在本節中,您會在自訂虛擬私有雲網路中的兩個私人 Compute Engine VM 上,部署 gCurrenC calculator 應用程式。
這個應用程式提供:
- 即時貨幣換算工具,支援
USD、EUR、GBP、JPY、CAD、INR和AUD,使用 Python 內建的http.server標準程式庫,在通訊埠8080上執行,並提供/healthz健康狀態檢查端點。 - 安全驗證控制台:執行即時傳出 API 連線和加密威脅防護探測。
- 一項輸入防火牆規則,允許 Google 的 IAP 範圍連至通訊埠
22和8080,以便進行管理測試,且不公開 IP 位址。
部署應用程式
- 在 Antigravity 對話視窗中輸入
/goal,然後執行下列提示:You are a Cloud developer. Deploy the "gCurrenC calculator" app onto two (2) Compute Engine VMs with no external IP addresses (`--no-address`) inside a dedicated custom VPC network and private subnet. CRITICAL INSTRUCTIONS ON OUTPUT: - The VMs are strictly private with no external IP addresses and the local IAP tunnel has NOT been started yet. Any web URL is completely unreachable and will fail with a connection error. - In your final response, simply confirm that the private VMs and Managed Instance Group are deployed, and state that the user should establish the IAP tunnel. Do not output, format, or suggest any web preview link or URL (such as http://localhost:8080 or internal IP addresses) in your final response. Run this script in the terminal: ```bash #!/usr/bin/env bash set -euxo pipefail # Disable any interactive confirmation prompts so execution never hangs export CLOUDSDK_CORE_DISABLE_PROMPTS=1 # --- User Configuration --- PROJECT_ID="[PROJECT_ID]" REGION="us-central1" ZONE="us-central1-a" NETWORK="gcurrenc-vpc" SUBNET="gcurrenc-app-subnet" SUBNET_RANGE="10.10.1.0/24" # -------------------------- echo "==> [1/5] Configuring project, default region/zone, and enabling APIs..." gcloud config set project "${PROJECT_ID}" gcloud config set compute/region "${REGION}" gcloud config set compute/zone "${ZONE}" gcloud services enable compute.googleapis.com echo "==> [2/5] Creating custom VPC network and private workload subnet..." gcloud compute networks create "${NETWORK}" \ --subnet-mode=custom \ --description="Dedicated VPC for currency exchange app demo" 2>/dev/null || true gcloud compute networks subnets create "${SUBNET}" \ --network="${NETWORK}" \ --region="${REGION}" \ --range="${SUBNET_RANGE}" \ --enable-private-ip-google-access \ --description="Private subnet hosting backend compute instances" 2>/dev/null || true echo "==> [3/5] Generating standalone Python standard-library startup script..." cat << 'STARTUP_EOF' > /tmp/private_app_startup.sh #!/bin/bash set -euxo pipefail mkdir -p /opt/gcurrenc-app # Pure Python standard-library application (zero pip/apt dependencies needed at boot) cat << 'APPEOF' > /opt/gcurrenc-app/app.py import os import sys import json import socket import urllib.request import urllib.parse import ssl from http.server import BaseHTTPRequestHandler, ThreadingHTTPServer SUPPORTED_CURRENCIES = ["USD", "EUR", "GBP", "JPY", "CAD", "INR", "AUD"] class CurrencyAppHandler(BaseHTTPRequestHandler): def address_string(self): return str(self.client_address[0]) def do_GET(self): parsed = urllib.parse.urlparse(self.path) path = parsed.path params = urllib.parse.parse_qs(parsed.query) if path == "/favicon.ico": self.send_response(204) self.end_headers() return if path == "/healthz": self.send_response(200) self.send_header("Content-Type", "text/plain") self.end_headers() self.wfile.write(b"OK") return if path == "/api/security-test": mode = params.get("mode", ["safe"])[0] target = "https://secure.eicar.org/eicar.com.txt" if mode == "threat" else "https://api.frankfurter.dev/v1/latest?from=USD&to=EUR" try: req = urllib.request.Request(target, headers={"User-Agent": "SecureCurrencyApp/1.0"}) ctx = ssl.create_default_context() with urllib.request.urlopen(req, timeout=5, context=ctx) as resp: data = {"verdict": "PERMITTED", "target": target, "http_status": resp.status} code = 200 except Exception as e: data = {"verdict": "BLOCKED_OR_FAILED", "target": target, "error": str(e)} code = 502 self.send_response(code) self.send_header("Content-Type", "application/json") self.end_headers() self.wfile.write(json.dumps(data, indent=2).encode("utf-8")) return self.render_page() def do_POST(self): parsed = urllib.parse.urlparse(self.path) if parsed.path == "/generate": content_length = int(self.headers.get("Content-Length", 0)) post_body = self.rfile.read(content_length).decode("utf-8") form = urllib.parse.parse_qs(post_body) base_curr = form.get("base_curr", ["USD"])[0] target_curr = form.get("target_curr", ["EUR"])[0] try: amount = float(form.get("amount", ["2500.00"])[0]) except ValueError: amount = 2500.00 rate_str = "Unavailable" total_str = "Rate lookup pending outbound internet activation" try: if base_curr == target_curr: rate = 1.0 else: url = f"https://api.frankfurter.dev/v1/latest?from={base_curr}&to={target_curr}" req = urllib.request.Request(url, headers={"User-Agent": "SecureCurrencyApp/1.0"}) with urllib.request.urlopen(req, timeout=4) as resp: res_json = json.loads(resp.read().decode("utf-8")) rate = res_json["rates"][target_curr] rate_str = str(rate) total_str = f"{round(amount * rate, 2):,.2f} {target_curr}" except Exception as e: total_str = f"Outbound connection unavailable {str(e)}" self.render_page(base_curr, target_curr, amount, rate_str, total_str) return self.send_response(404) self.end_headers() def render_page(self, base_curr="USD", target_curr="EUR", amount=2500.00, fx_rate="1.00", total_str=""): hostname = socket.gethostname() curr_options_base = "".join([f'<option value="{c}" {"selected" if c == base_curr else ""}>{c}</option>' for c in SUPPORTED_CURRENCIES]) curr_options_target = "".join([f'<option value="{c}" {"selected" if c == target_curr else ""}>{c}</option>' for c in SUPPORTED_CURRENCIES]) result_block = "" if total_str: if fx_rate == "Unavailable": rate_line = "<p style='margin: 6px 0;'>Exchange Rate: <span style='color: #d93025; font-weight: bold;'>⚠️ Offline-Outbound internet blocked</span></p>" else: rate_line = f"<p style='margin: 6px 0; font-size: 14px; color: #137333;'>🟢 Exchange Rate: <strong>1 {base_curr} = {fx_rate} {target_curr}</strong> (Secured via Cloud NAT & Cloud NGFW)</p>" result_block = f""" <div style="margin-top: 22px; background: #e6f4ea; border: 1px solid #c6e1c6; border-left: 5px solid #34a853; padding: 18px 20px; border-radius: 8px;"> <h4 style="margin: 0 0 6px 0; text-transform: uppercase; font-size: 12px; color: #137333; letter-spacing: 0.5px;">Conversion Result</h4> <div style="font-size: 24px; font-weight: 700; color: #202124; margin-bottom: 6px;"> {amount:,.2f} {base_curr} = <span style="color: #1a73e8;">{total_str}</span> </div> {rate_line} </div> """ html = ("""<!DOCTYPE html> <html lang="en"> <head> <meta charset="UTF-8"> <meta name="viewport" content="width=device-width, initial-scale=1.0"> <title>gCurrenC calculator</title> <style> body { font-family: -apple-system, BlinkMacSystemFont, "Segoe UI", Roboto, "Helvetica Neue", Arial, sans-serif; background: #f8f9fa; margin: 30px 15px; color: #202124; display: flex; justify-content: center; } .container { width: 100%; max-width: 860px; } .card { background: white; padding: 24px 28px; border-radius: 12px; box-shadow: 0 1px 3px rgba(60,64,67,0.12), 0 4px 8px rgba(60,64,67,0.06); border: 1px solid #dadce0; margin-bottom: 20px; } .header { display: flex; justify-content: space-between; align-items: center; border-bottom: 1px solid #e8eaed; padding-bottom: 14px; margin-bottom: 20px; } .header h2 { margin: 0 0 4px 0; font-size: 20px; font-weight: 600; } .header p { margin: 0; font-size: 13px; color: #5f6368; } .badge { background: #e8f0fe; color: #1a73e8; padding: 6px 12px; border-radius: 16px; font-weight: 600; font-size: 12px; border: 1px solid #d2e3fc; display: flex; align-items: center; gap: 6px; } .badge::before { content: ""; width: 8px; height: 8px; border-radius: 50%; background-color: #34a853; } .form-row { display: flex; gap: 14px; align-items: flex-end; flex-wrap: wrap; } .form-group { display: flex; flex-direction: column; gap: 6px; } .form-group label { font-size: 12px; font-weight: 600; color: #5f6368; text-transform: uppercase; letter-spacing: 0.5px; } input, select { padding: 10px 14px; border: 1px solid #dadce0; border-radius: 6px; font-size: 14px; color: #202124; background-color: #fff; box-sizing: border-box; transition: border-color 0.15s, box-shadow 0.15s; } input:focus, select:focus { outline: none; border-color: #1a73e8; box-shadow: 0 0 0 3px rgba(26, 115, 232, 0.15); } button { padding: 11px 20px; background: #1a73e8; color: white; border: none; border-radius: 6px; font-size: 14px; font-weight: 500; cursor: pointer; transition: background 0.15s, box-shadow 0.15s; } button:hover { background: #1557b0; box-shadow: 0 1px 2px rgba(60,64,67,0.3); } .danger-btn { background: #d93025; } .danger-btn:hover { background: #b31412; } pre { background: #202124; color: #8ab4f8; padding: 14px; border-radius: 6px; overflow-x: auto; font-family: "SF Mono", "Fira Code", Consolas, monospace; font-size: 13px; line-height: 1.5; margin: 0; } /* Collapsible Security Console */ details.security-drawer { background: white; border-radius: 12px; box-shadow: 0 1px 3px rgba(60,64,67,0.12); border: 1px solid #dadce0; overflow: hidden; margin-bottom: 24px; } details.security-drawer summary { padding: 16px 20px; font-size: 14px; font-weight: 600; cursor: pointer; list-style: none; display: flex; justify-content: space-between; align-items: center; user-select: none; background: #fafafa; transition: background 0.15s; } details.security-drawer summary::-webkit-details-marker { display: none; } details.security-drawer summary:hover { background: #f1f3f4; } details.security-drawer[open] summary { border-bottom: 1px solid #dadce0; background: #ffffff; } .expand-toggle { font-size: 13px; font-weight: 500; } details.security-drawer summary .expand-toggle::before { content: "▶ Click to Expand"; color: #1a73e8; } details.security-drawer[open] summary .expand-toggle::before { content: "▼ Click to Collapse"; color: #5f6368; } .drawer-body { padding: 20px; background: #ffffff; } .drawer-body p { margin-top: 0; font-size: 13px; color: #5f6368; } .probe-buttons { display: flex; gap: 10px; margin-bottom: 14px; } </style> </head> <body> <div class="container"> <div class="card"> <div class="header"> <div> <h2>💱 gCurrenC calculator</h2> </div> <div class="badge">Serving host: {hostname}</div> </div> <form method="POST" action="/generate"> <div class="form-row"> <div class="form-group" style="flex: 1.5; min-width: 140px;"> <label>Amount</label> <input type="number" step="0.01" name="amount" value="{amount}" required> </div> <div class="form-group" style="flex: 1; min-width: 100px;"> <label>From</label> <select name="base_curr">{curr_options_base}</select> </div> <div class="form-group" style="flex: 1; min-width: 100px;"> <label>To (Target)</label> <select name="target_curr">{curr_options_target}</select> </div> <div class="form-group"> <button type="submit">Convert currency ➔</button> </div> </div> </form> {result_block} </div> <!-- Collapsible Security Verification Console --> <details class="security-drawer"> <summary> <span>🛡️ Security verification console</span> <span class="expand-toggle"></span> </summary> <div class="drawer-body"> <p>Test outbound HTTPS traffic and threat prevention capabilities in real time:</p> <div class="probe-buttons"> <button type="button" onclick="runProbe('safe')">Test Outbound API Connection</button> <button type="button" class="danger-btn" onclick="runProbe('threat')">Simulate Encrypted Threat (EICAR)</button> </div> <pre id="output">Waiting for command...</pre> </div> </details> </div> <script> function runProbe(mode) { const el = document.getElementById('output'); el.innerText = 'Executing outbound request...'; fetch('/api/security-test?mode=' + mode) .then(res => res.json()) .then(data => el.innerText = JSON.stringify(data, null, 2)) .catch(err => el.innerText = 'Connection dropped / reset by Firewall: ' + err); } </script> </body> </html>""" .replace("{hostname}", str(hostname)) .replace("{amount}", str(amount)) .replace("{curr_options_base}", curr_options_base) .replace("{curr_options_target}", curr_options_target) .replace("{result_block}", result_block) ) self.send_response(200) self.send_header("Content-Type", "text/html; charset=utf-8") self.end_headers() self.wfile.write(html.encode("utf-8")) def run(): server_address = ('0.0.0.0', 8080) httpd = ThreadingHTTPServer(server_address, CurrencyAppHandler) httpd.serve_forever() if __name__ == '__main__': run() APPEOF # Register and start systemd unit cat << 'SERVICEEOF' > /etc/systemd/system/gcurrenc-app.service [Unit] Description=Currency exchange calculator web application After=network.target [Service] Type=simple User=root WorkingDirectory=/opt/gcurrenc-app ExecStart=/usr/bin/python3 /opt/gcurrenc-app/app.py Restart=always [Install] WantedBy=multi-user.target SERVICEEOF systemctl daemon-reload systemctl enable gcurrenc-app systemctl start gcurrenc-app STARTUP_EOF echo "==> [4/5] Creating Firewall, Regional Instance Template, and 2-VM MIG..." gcloud compute firewall-rules create allow-iap-admin \ --network="${NETWORK}" \ --allow=tcp:22,tcp:8080 \ --source-ranges=35.235.240.0/20 \ --target-tags=gcurrenc-app-vm \ --description="Allow IAP SSH and port 8080 access to private VMs" \ --quiet 2>/dev/null || true # Explicitly pass both --region and --instance-template-region to avoid prompt gcloud compute instance-templates create gcurrenc-app-template \ --instance-template-region="${REGION}" \ --region="${REGION}" \ --network="${NETWORK}" \ --subnet="${SUBNET}" \ --machine-type=e2-medium \ --no-address \ --tags=gcurrenc-app-vm \ --metadata-from-file=startup-script=/tmp/private_app_startup.sh \ --quiet gcloud compute instance-groups managed create gcurrenc-app-mig \ --base-instance-name=gcurrenc-vm \ --template="projects/${PROJECT_ID}/regions/${REGION}/instanceTemplates/gcurrenc-app-template" \ --size=2 \ --zone="${ZONE}" \ --quiet gcloud compute instance-groups managed set-named-ports gcurrenc-app-mig \ --named-ports=http-port:8080 \ --zone="${ZONE}" \ --quiet echo "==> [5/5] Verifying private VM deployment and internal status..." sleep 30 gcloud compute instances list \ --filter="name ~ '^gcurrenc-vm-'" \ --zones="${ZONE}" \ --format="table(name,zone.basename():label=ZONE,networkInterfaces[0].networkIP:label=INTERNAL_IP,status)" FIRST_VM=$(gcloud compute instances list \ --filter="name ~ '^gcurrenc-vm-'" \ --zones="${ZONE}" \ --format="value(name)" \ --limit=1) echo "Testing healthz on ${FIRST_VM} via IAP tunnel..." gcloud compute ssh "${FIRST_VM}" \ --zone="${ZONE}" \ --tunnel-through-iap \ --quiet \ --command="curl -fsS http://localhost:8080/healthz" echo "" echo "==========================================================================" echo "PREREQUISITE COMPLETE: 2 private VMs deployed with no external IPs." echo "VPC: ${NETWORK} | Subnet: ${SUBNET} (${SUBNET_RANGE})" echo "Instance Group: gcurrenc-app-mig (Zone: ${ZONE}, Port: 8080)" echo "" echo "The VMs are private and the IAP tunnel is not active. Set up the background IAP tunnel first to access the deployed app." echo "" echo "==========================================================================" ```
確認 VM 執行個體建立作業
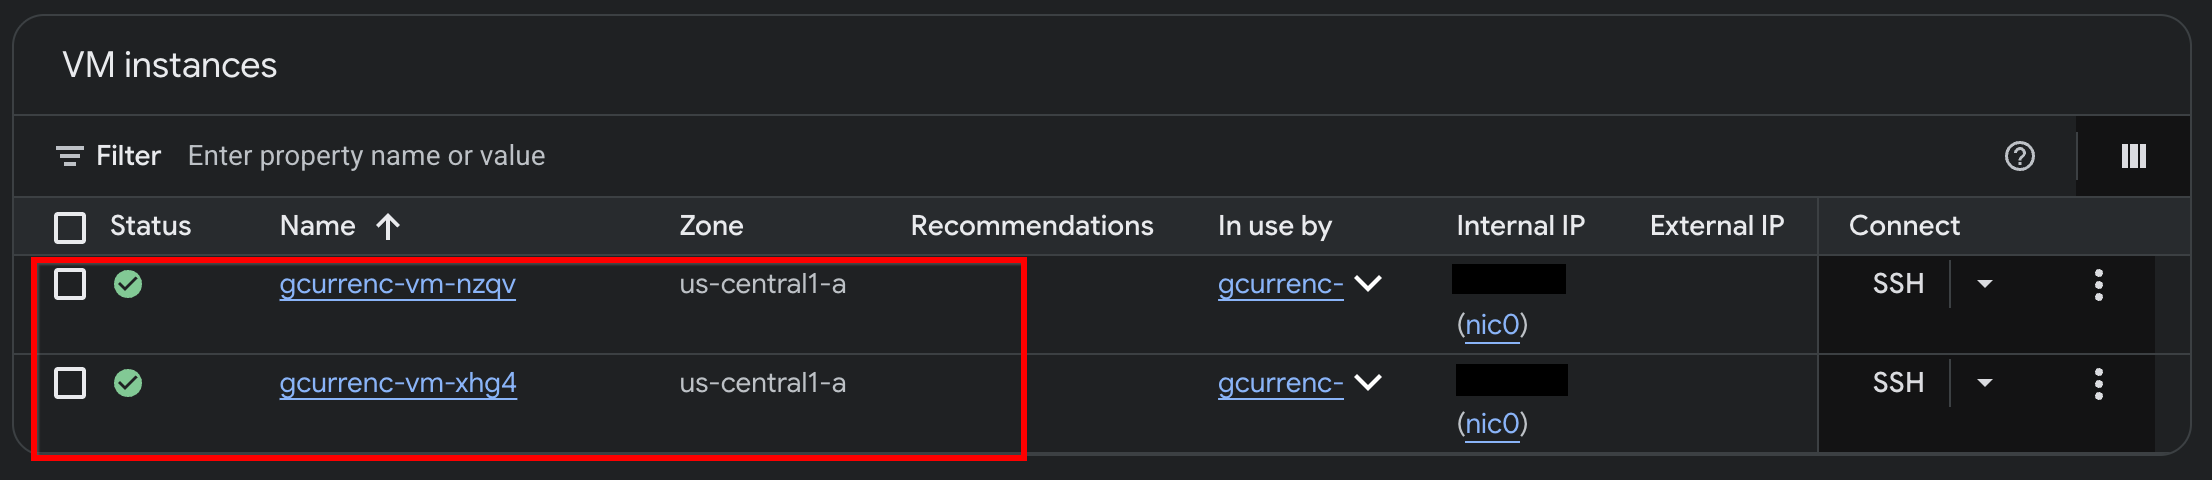
Antigravity 在兩個私人 Compute Engine VM 部署應用程式後,請在 Google Cloud 控制台驗證執行個體:
- 在 Google Cloud 控制台中,前往「VM instances」(VM 執行個體)。
- 確認兩個 VM 執行個體都使用內部 IP 位址運作,且沒有外部 IP 位址:
5. 測試應用程式
由於私人 VM 沒有外部 IP 位址 (--no-address) 和 Cloud NAT 閘道,因此沒有網際網路路由,無法連線至外部貨幣兌換 API。設定安全傳出存取權前,請先透過本機 IAP 通道測試應用程式,確認無法存取網際網路。
- 在
/goal模式中,於 Antigravity 對話視窗執行下列提示詞:Automate the IAP tunnel configuration and health verification for the web app, then output the live test URL. Run a terminal script that performs the following steps non-interactively: 1. Firewall Check: - Identify the active network ('gcurrenc-vpc' if it exists, otherwise 'default'). - Idempotently ensure an ingress firewall rule exists permitting 'tcp:22,tcp:8080' from the Google IAP range '35.235.240.0/20' targeting 'gcurrenc-app-vm'. 2. VM Health Verification: - Find the first running instance matching '^gcurrenc-vm-' in zone 'us-central1-a'. - Via 'gcloud compute ssh --tunnel-through-iap', verify that the 'gcurrenc-app' systemd service is active. If not active, restart it. 3. Background IAP Tunnel: - Free up local port 8080 if an old tunnel or process is lingering (e.g., using 'lsof -ti:8080 | xargs kill -9' or 'fuser -k 8080/tcp'). - Launch 'gcloud compute start-iap-tunnel <VM_NAME> 8080 --local-host-port=localhost:8080 --zone=us-central1-a' in the background using nohup, redirecting output to '/tmp/iap_tunnel.log'. - Wait up to 10 seconds for the tunnel to establish, checking with 'curl -fsS http://localhost:8080/healthz'. 4. Output Web Preview URL: - Detect whether the environment is Google Cloud Shell (check if $CLOUD_SHELL is true) or a local workstation. - If Cloud Shell, print instructions and the direct web preview link. - If local machine, provide the clickable 'http://localhost:8080' URL. - 通道啟動後,請在網路瀏覽器中開啟
http://localhost:8080/: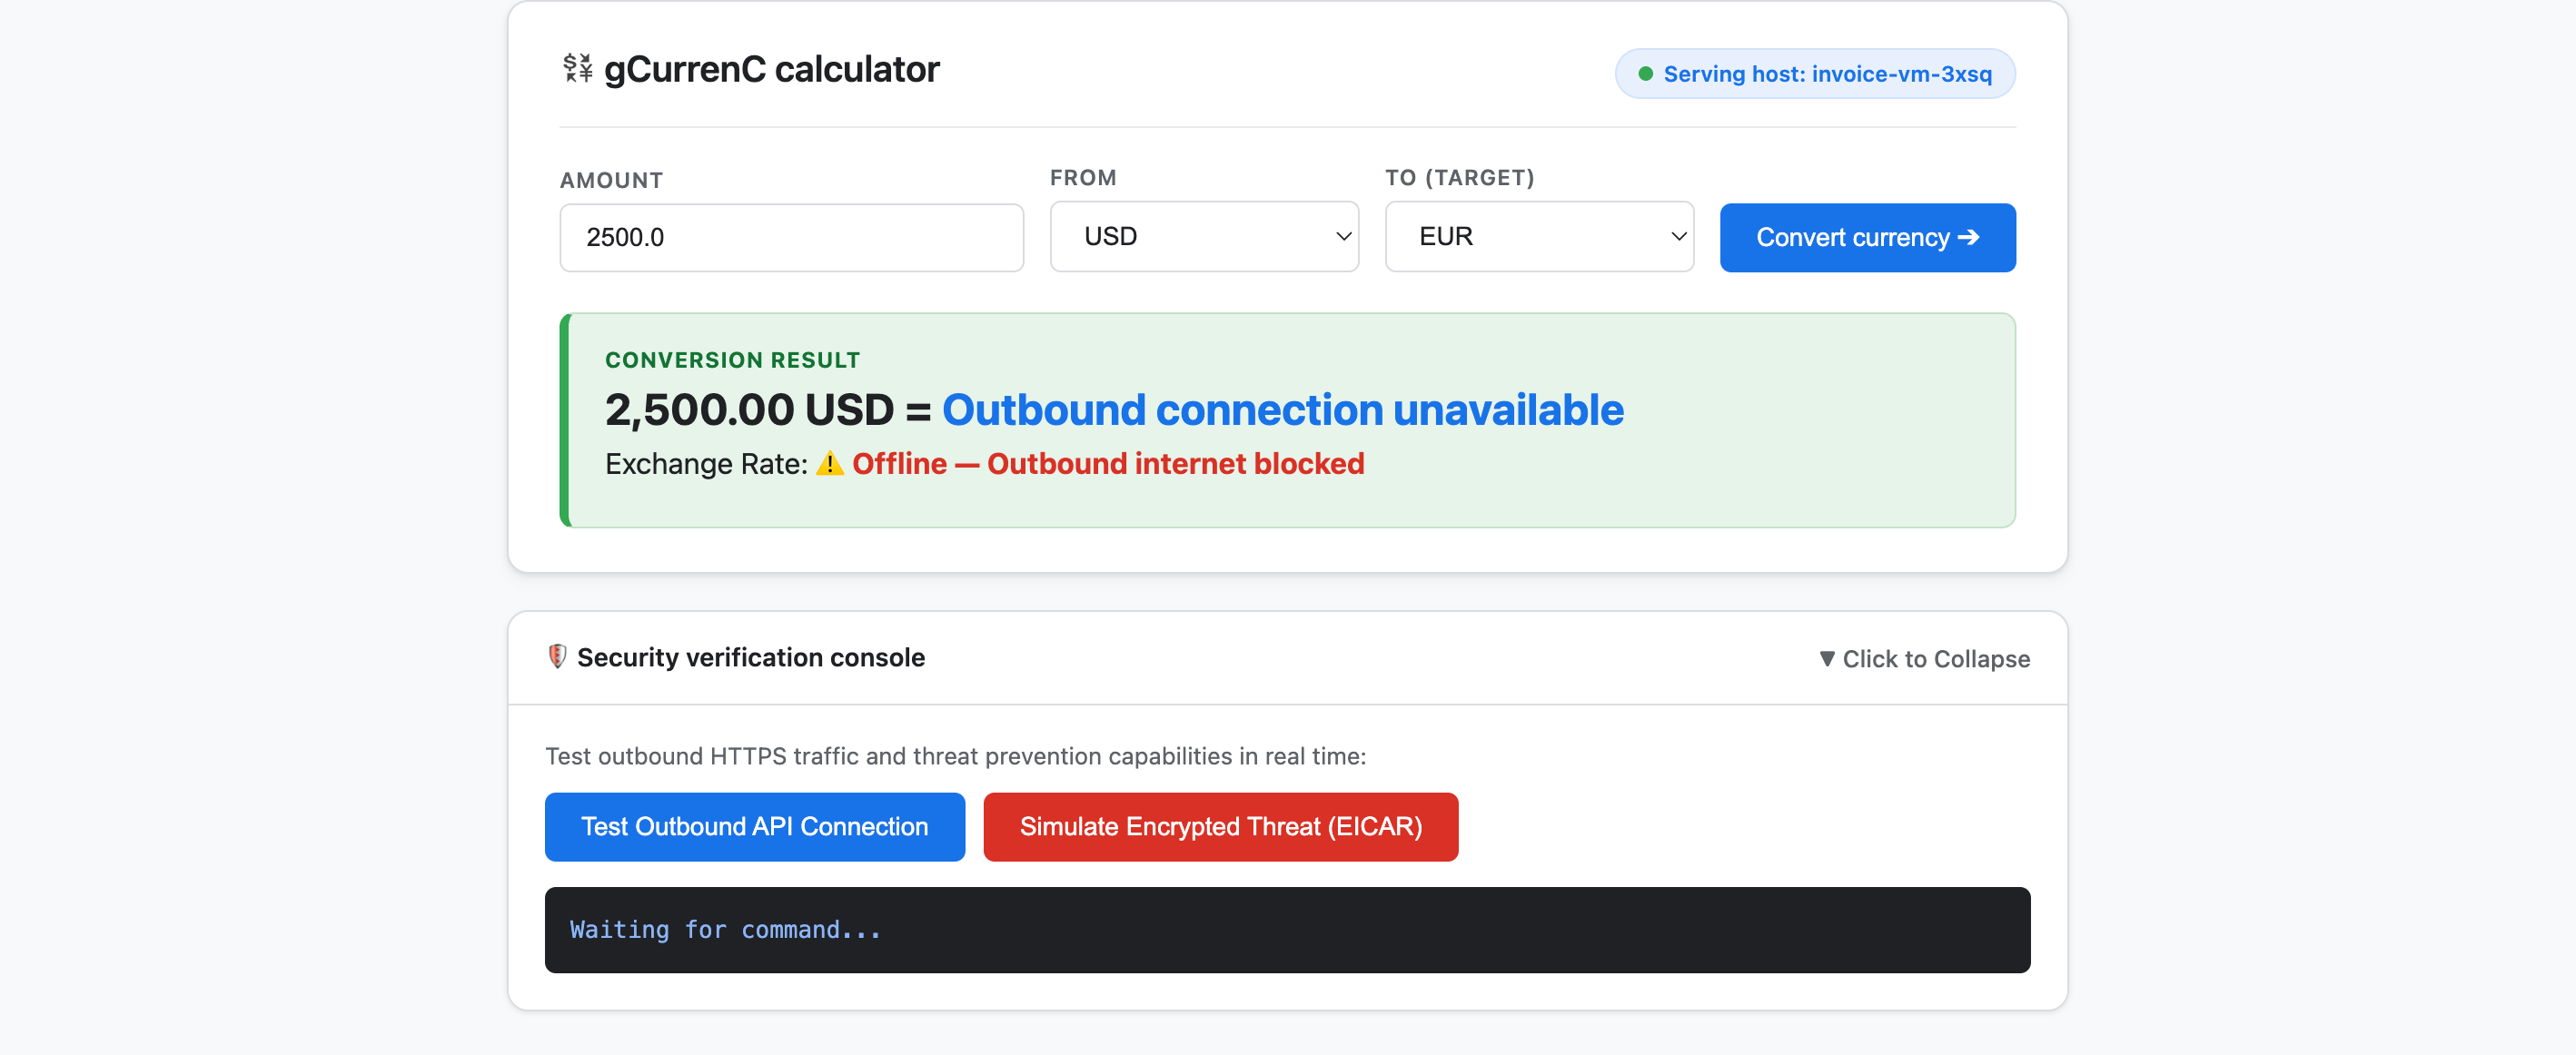
- 測試應用程式:
- 按一下「轉換幣別」。轉換結果會顯示
Offline - Outbound internet blocked和Outbound connection unavailable。這是預期結果,因為私人 VM 無法連線至網際網路,因此無法擷取最新匯率。 - 展開「Security verification console」,然後按一下「Test outbound API connection」。輸出內容會顯示
https://api.frankfurter.dev/v1/latest的verdict: BLOCKED_OR_FAILED(https://api.frankfurter.dev/v1/latest擷取匯率。 - 按一下「模擬加密威脅 (EICAR)」。輸出內容也會顯示
https://secure.eicar.org/eicar.com.txt的verdict: BLOCKED_OR_FAILED。這項結果也符合預期,因為私人 VM 沒有網際網路連線。
- 按一下「轉換幣別」。轉換結果會顯示
停止本機 IAP 通道
設計及部署安全架構前,請先終止本機 IAP 通道,釋出通訊埠 8080:
- 在
/goal模式中,執行下列提示:Free up local port 8080 and terminate any running Google Cloud IAP tunnels (e.g., kill processes matching 'start-iap-tunnel' or listening on port 8080).8080已釋出。
6. 保護應用程式
在先前的部分,您建立了沒有公開 IP 位址的私人 Compute Engine VM,並驗證了兩項核心網路和安全性挑戰:
- 傳入存取權 (輸入):網際網路使用者無法直接連至私人 VM 執行個體,如要公開網頁應用程式,必須透過全域外部應用程式負載平衡器和專用 Proxy 子網路轉送流量,不將 VM 公開至網際網路。
- 傳出存取權 (輸出):私人 VM 沒有連往網際網路的路由,無法查詢即時 HTTPS 貨幣匯率 API。如要啟用傳出存取權,必須檢查加密流量是否含有惡意軟體和資料竊取行為,同時不破壞 SSL/TLS 信任。
在本節中,您將引導 Antigravity 按照 Google Cloud 官方說明文件 (@retrieving-developer-knowledge) 的簡化工作流程,為應用程式設計、自我稽核及部署專案層級的輸入和輸出安全性架構。
設計統一的安全架構
- 在
/goal模式中執行下列提示,生成端對端架構圖和說明,涵蓋傳入和傳出流量:You are a Google Cloud Network and Security Architect. We need to design an end-to-end security architecture for our "gCurrenC calculator" app running on private Compute Engine VMs with no external IP addresses inside 'gcurrenc-vpc'. We are operating in a standalone Google Cloud project without an Organization resource, so all security resources must be scoped at the project level. Use the @retrieving-developer-knowledge skill to consult official Google Cloud documentation and suggest an architecture diagram and explanation covering both flows: 1. Ingress Flow: - How internet users securely reach the private VMs via a global external Application Load Balancer. - Why Envoy-based external Application Load Balancers require a dedicated proxy-only subnet, and how Google Front Ends (GFEs) proxy traffic to private backends without exposing VMs to the public internet. 2. Egress Flow: - How private VMs reach the internet via Cloud NAT to query live currency exchange APIs, such as frankfurter.dev. - How Cloud NGFW Enterprise provides Layer 7 deep packet inspection and intrusion prevention (IPS) for outbound encrypted HTTPS traffic. - How TLS inspection backed by Certificate Authority Service (CAS) decrypts outbound HTTPS sessions on the fly, and what Root CA trust configuration the private VMs require. Provide a clear diagram and explain how these components connect together.
生成架構資源大綱
- 輸入下列提示,將設計架構整理成專案層級資源大綱,並依類別區分,然後生成部署指令碼:
Act as a Lead Network Security Architect. Using the @retrieving-developer-knowledge skill, provide an architectural outline of all the Google Cloud resources required to secure the "gCurrenC calculator" app.

Our starting state:
- The custom VPC ('gcurrenc-vpc'), workload subnet ('gcurrenc-app-subnet'), and 2-instance MIG ('gcurrenc-app-mig', port 8080) are already deployed.
- All newly added security components must be project-level resources (no organization resources).

Structure your resource outline into three distinct categories, indicating which resources are new additions:
1. Core VPC Infrastructure: proxy-only subnet ('gcurrenc-proxy-subnet', 10.10.2.0/24), Cloud Router, and Cloud NAT gateway.
2. Inbound security (ingress): global external ALB components (forwarding rule on port 443, target HTTPS proxy, SSL certificate, URL map, backend service attached to 'gcurrenc-app-mig' on port 8080, and HTTP health check on '/healthz') and ingress firewall rules.
3. Outbound security (egress): CAS DevOps CA pool and root CA, project-level Cloud NGFW Enterprise components (Threat Prevention profile, Security Profile Group, Firewall Endpoint in zone us-central1-a, and Endpoint Association attaching the TLS policy), and global network firewall policy egress rules.

For each resource, briefly state its role in the security boundary and how it connects to adjacent components.
生成及自行稽核部署指令碼
- 在
/goal模式中,執行下列提示詞,生成完整的非互動式bash部署指令碼,並在同一回合中自動根據法規遵循要求進行自我稽核:Act as a Principal Infrastructure Engineer. Using the @retrieving-developer-knowledge skill, generate a complete, non-interactive Bash script to deploy this entire security architecture for our "gCurrenC calculator" app, and self-audit the script before outputting it. Requirements: - Discover the project ID, region, and zone dynamically from the existing 'gcurrenc-app-subnet' and 'gcurrenc-app-mig'. - Keep all resources scoped strictly to the project level (no Organization resource). - Deploy the proxy-only subnet, global external Application Load Balancer, Cloud Router, and Cloud NAT. Don't use Cloud Armor. - Deploy project-level Cloud NGFW Enterprise with CAS TLS inspection ('--tls-inspect' on the firewall policy egress rule and 'gcloud beta' for the project-level firewall endpoint association) and an explicit DENY override for malware and antivirus threats. - Distribute the root CA to the private VMs over IAP SSH with connection timeouts so the guest OS trust store is updated. - Print the final Load Balancer URL ('https://${LB_IP}') at the end. Wrap the script in 'set -euxo pipefail' and output only the single executable bash script block.bash指令碼,根據法規遵循限制自我稽核每項指令,並輸出包裝在set -euxo pipefail中的單一可執行指令碼區塊。
執行安全性部署指令碼
- 在
/goal模式中,將上一個提示生成的bash指令碼,以下列格式貼到 Antigravity 對話視窗,執行部署作業並輸出即時應用程式網址 (https://<LB_IP>):Run this script. <PASTED-SCRIPT>
7. 驗證受保護的應用程式
部署指令碼執行完畢後,Antigravity 會輸出全域外部應用程式負載平衡器 (https://<LB_IP>) 的外部 HTTPS 網址。
- 在網路瀏覽器中開啟
https://<LB_IP>,並略過瀏覽器的自行簽署憑證警告,載入 gCurrenC 計算機介面: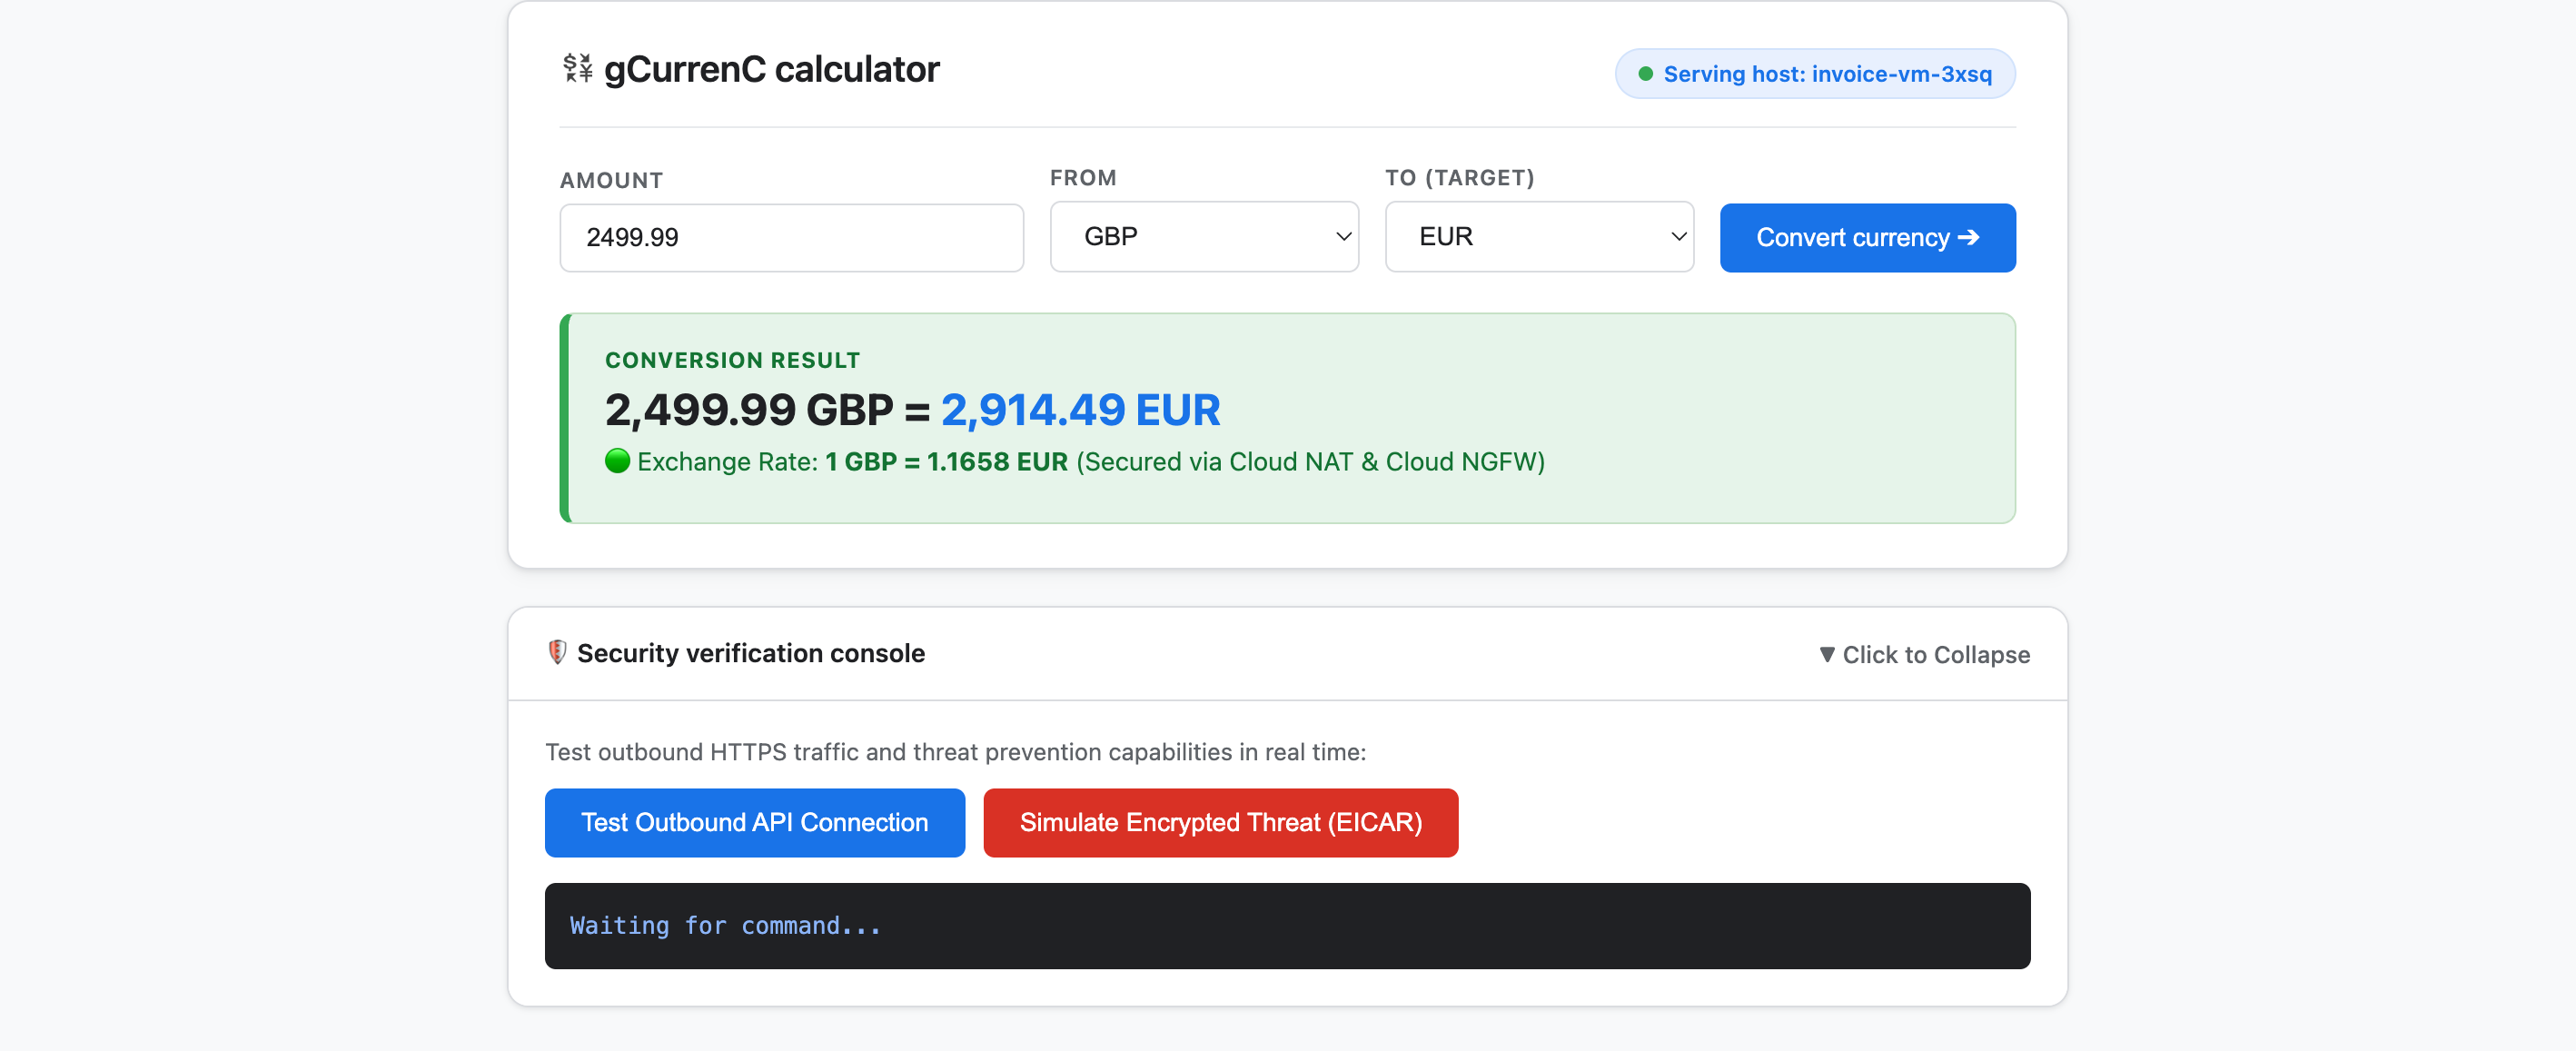
- 測試應用程式,確認輸出連線和威脅防護功能是否正常運作:
- 按一下「轉換幣別」。應用程式會立即顯示即時換算匯率。這代表輸入負載平衡功能可順利透過 Google Front End (GFE) 和僅限 Proxy 的子網路轉送流量,而 Cloud NAT 則會從
api.frankfurter.dev擷取即時匯率。 - 展開「Security verification console」,然後按一下「Test outbound API connection」。應用程式會顯示
verdict: PERMITTED(HTTP 200),確認 Cloud NAT 轉送功能正常運作,且 VM 作業系統信任私人 CAS 根憑證授權單位,可解密 HTTPS 工作階段。 - 按一下「模擬加密威脅 (EICAR)」。應用程式會顯示
verdict: PERMITTED。這表示 Cloud NGFW Enterprise 會使用 CAS 支援的 TLS 檢查功能,解密傳出的 HTTPS 要求,並透過入侵預防服務 (IPS) 檢查 EICAR 測試簽章。
- 按一下「轉換幣別」。應用程式會立即顯示即時換算匯率。這代表輸入負載平衡功能可順利透過 Google Front End (GFE) 和僅限 Proxy 的子網路轉送流量,而 Cloud NAT 則會從
8. 清除
為避免系統持續向您的 Google Cloud 帳戶收取本程式碼實驗室所建立資源的相關費用,您可以只刪除程式碼實驗室資源,或刪除 Google Cloud 雲端專案。
- 如要保留 Google Cloud 雲端專案,只移除在本程式碼實驗室建立的資源,請在 Antigravity 聊天視窗中,以
/goal模式執行下列提示詞:Remove all resources created in this session, including the gcurrenc app and its resources. Don't delete the project. - 如果您為這個程式碼實驗室建立了專屬 Google Cloud 雲端專案,並想刪除整個專案,請在 Antigravity 聊天視窗中,以
/goal模式執行下列提示詞:Clean up the demo environment by deleting the Google Cloud project. Run the following command in the terminal: gcloud projects delete "$(gcloud config get-value project 2>/dev/null)" --quiet
9. 恭喜
恭喜!您已在 Google Antigravity 中使用 Google Cloud Developer 外掛程式 (DK MCP 伺服器),在 Google Cloud 部署並保護 gCurrenC 計算機網頁應用程式。
後續步驟
如要進一步瞭解本程式碼實驗室使用的服務,請參閱 Google Cloud 官方說明文件: