

1. 事前準備
歡迎參加 DevSecOps with CodeMender 三部曲的第三部:
- 第 1 部分:使用 CodeMender 保護應用程式 (在 OWASP Juice Shop 稽核開發人員內部迴圈)。
- 第 2 部分:使用 CodeMender 保護 CI/CD 管道 (使用 GitHub Actions、WIF 和 SARIF 自動化外迴圈管道)。
- 第 3 部分 (本程式碼實驗室):使用 CodeMender 和 Antigravity 保護直覺式程式開發應用程式 (LLM 生成全端功能的 AI 原生安全迴圈)。
背景故事
產品經理希望您今天就為 OWASP Juice Shop 打造出採用 Gemini 技術的客服助理原型。您向 Antigravity (
agy
),幾分鐘後就會編譯。看起來完成了。
但 AI 程式設計助理會優先考量程式碼是否能運作,而非是否安全。他們會按照您的要求行事,很少會添加您未要求的內容。因此,在提交之前,您要求 Antigravity 使用 CodeMender 檢查變更。本程式碼實驗室會延續這個故事:
- 您使用 Antigravity 直覺式程式開發這項功能。
- CodeMender 只會檢查您變更的內容,並在新的路徑中封鎖 SQL 注入的修訂版本。
- 您親自查看差異,發現掃描未標記的問題:新路徑未經驗證,因此兩個端點 (包括付費 Gemini 呼叫) 都開放給所有人。
- CodeMender 會編寫並驗證 SQL 注入的修正程式。Antigravity 新增驗證。
- 您提交後,預先提交掛鉤會檢查日後的每次提交。
- 您會看到 CodeMender 步驟的費用。
您從不手動執行安全性工具。Antigravity 使用開放原始碼 codemender-security
外掛程式,讓 Gemini 瞭解如何安全執行 CodeMender:
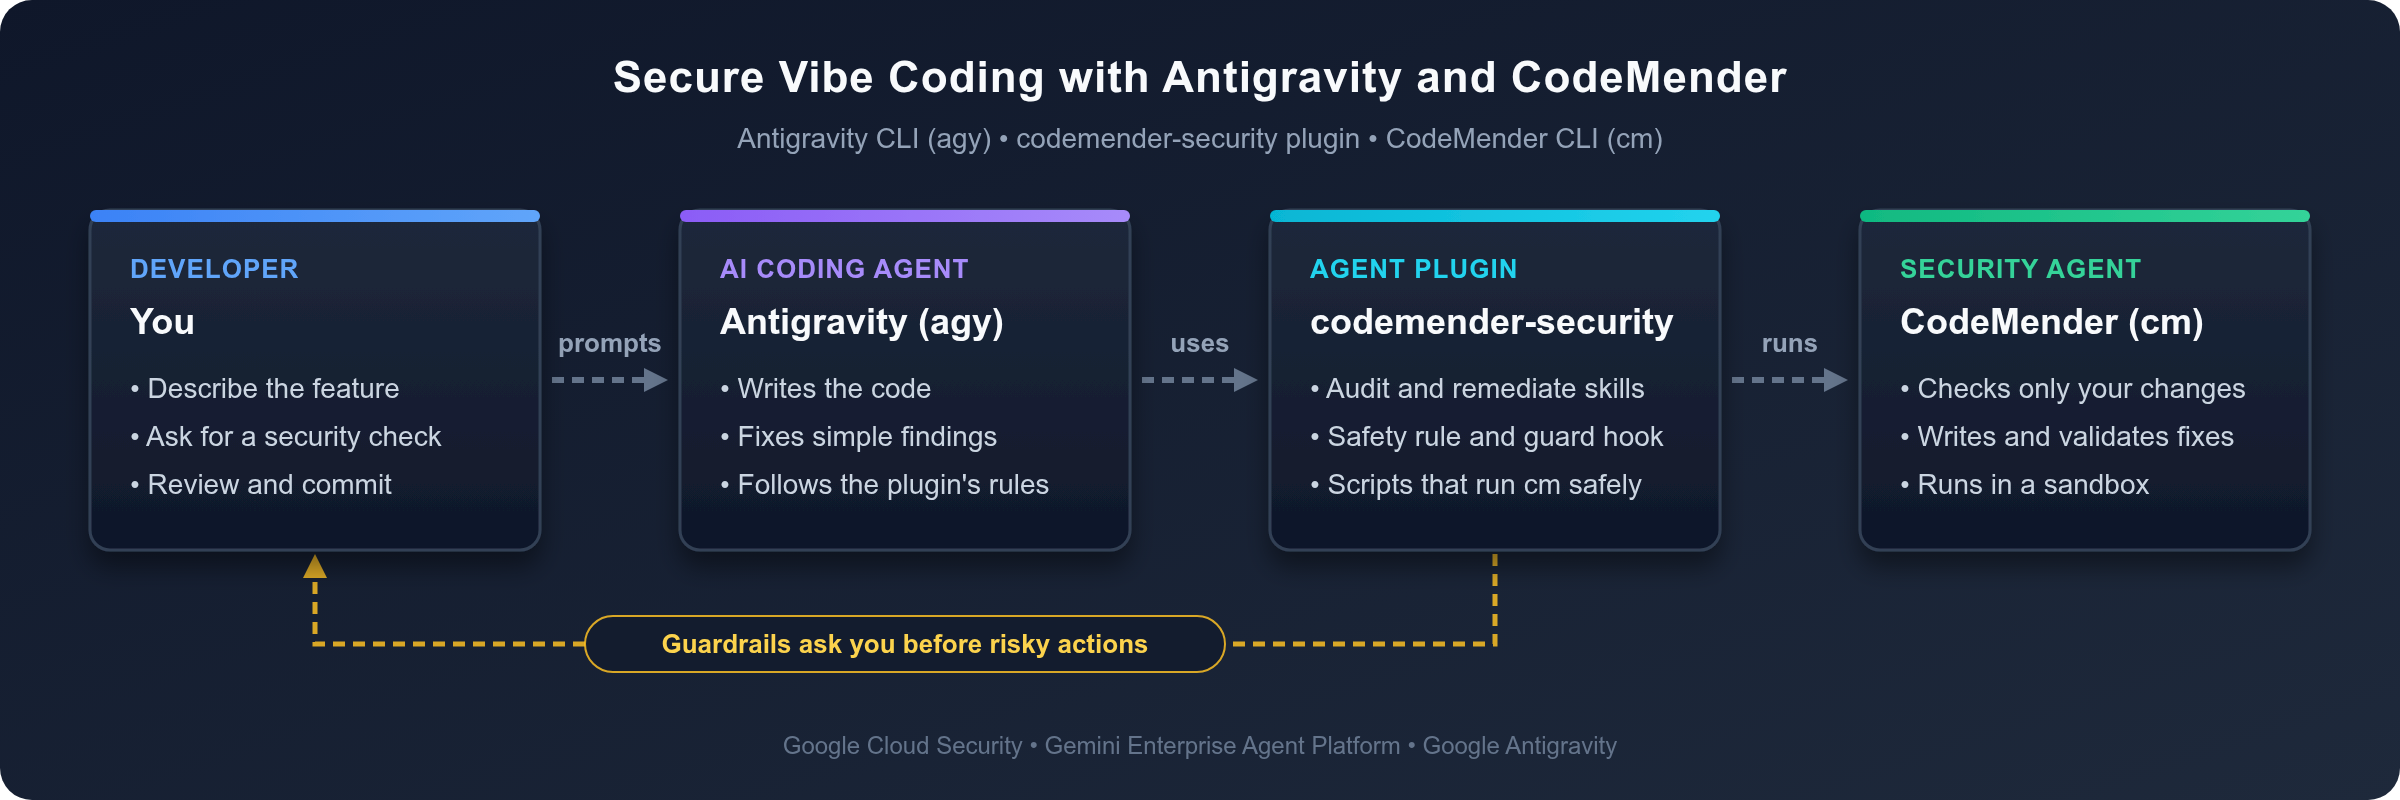
此外,外掛程式的防護機制也會讓 Antigravity 在執行有風險的操作前先徵求您的同意,例如安裝軟體或變更修訂版本的運作方式。
必要條件
- 對 Node.js、Express 和 TypeScript 有基本瞭解。
- 對常見網路安全漏洞 (例如 OWASP Top 10) 有基本瞭解。
- 已啟用計費功能且可存取 CodeMender 的 Google Cloud 雲端專案。
課程內容
- 如何為 Antigravity CLI (
agy) 啟用codemender-security外掛程式。 - 如何在提交前,只檢查您變更的內容 (包括新檔案)。
- 掃描後仍須檢查整個變更的原因:使用 AI 的掃描器可能會遺漏發現項目。
- 如何決定誰負責修正什麼:CodeMender 負責修正其回報的發現項目,並驗證修正內容;Antigravity 負責修正您指定的變更。
- 預先修訂掛鉤如何持續檢查日後的修訂,而不會重複掃描相同的變更。
- 如何查看 CodeMender 的詞元用量並估算費用。
需求條件
- 網路瀏覽器,例如 Google Chrome。
- Google Cloud Shell,包含
gcloud、git、Node.js 和 Antigravity CLI (agy)。
本程式碼實驗室搭配 CodeMender CLI 0.22.0、codemender-security 外掛程式 1.8.0 版、OWASP Juice Shop v20.3.0 和 Node.js 22、24 和 26 進行測試。如果使用其他版本,輸出內容可能會有所不同。
如何完成這個程式碼實驗室
- 提示:在 Antigravity 中輸入後方的區塊是提示。在 Antigravity 提示中輸入。
- 指令:您輸入的其他區塊是殼層指令。請在 Cloud Shell 中執行這些指令:在第一個分頁中執行,直到啟動 Antigravity,然後在第二個分頁中執行。
- 輸出:輸出或輸出內容大致如下後方的區塊會顯示預期結果。在 Antigravity 中,指令輸出內容預設為收合狀態 (按下
Ctrl+O即可展開指令),且 Antigravity 會在回覆中提供結果摘要。您的發現項目 ID、時間和權杖數量會有所不同,CodeMender 的發現項目也可能不同。 - 需要人工操作的步驟:代理無法在瀏覽器中登入 Google Cloud、回答 Antigravity 的首次執行提示,或核准外掛程式安裝 CodeMender CLI 和預先修訂掛鉤的要求。自行執行這些操作。
2. 使用 CodeMender 外掛程式設定 Antigravity
在這個步驟中,您將準備 Cloud Shell、安裝外掛程式、取得 Juice Shop 程式碼,並讓 Antigravity 設定 CodeMender。
開啟 Google Cloud Shell 並設定憑證
開啟瀏覽器並前往 Google Cloud Shell。
確認有效的 Google Cloud 專案:
export PROJECT_ID=$(gcloud config get-value project 2>/dev/null)
echo "Active Google Cloud Project: ${PROJECT_ID}"
如果專案 ID 為空白,請執行 gcloud config set project PROJECT_ID,並將 PROJECT_ID 替換為您的專案 ID,然後再次執行這兩項指令。
啟用必要的 Gemini Enterprise Agent Platform 和 Resource Manager API:
gcloud services enable \
  aiplatform.googleapis.com \
  cloudresourcemanager.googleapis.com \
  --project="${PROJECT_ID}"
使用 Google Cloud 應用程式預設憑證 (ADC) 驗證環境:
gcloud auth application-default login
按照畫面上的瀏覽器連結操作,授予同意聲明並完成驗證流程。
在 Antigravity 中安裝 CodeMender 外掛程式
使用 Antigravity CLI 安裝 codemender-security 外掛程式:
agy plugin install https://github.com/edwardc-gcp/codemender-security.git
輸出結果會與下列內容相似:
Cloning plugin from https://github.com/edwardc-gcp/codemender-security.git...
  [ok]    codemender-security
          ✔ skills      : 2 installed (codemender-audit, codemender-remediate)
          ✔ rules       : 1 installed (codemender-safety)
          ✔ hooks       : 1 installed (codemender-safety-guard)
          Installed to /home/<user>/.gemini/config/plugins/codemender-security
此外,外掛程式還會新增兩項技能,教導 Antigravity 如何使用 CodeMender 稽核及修正程式碼、一項全天候運作的安全規則,以及一個在 Antigravity 執行前檢查每個殼層指令的掛鉤。確認外掛程式已啟用:
agy plugin list
輸出結果會與下列內容相似:
Installed plugins:
- codemender-security (enabled, 1.8.0)
    Source:     antigravity
    Components: 2 skills, 1 rule, 1 hook
取得 OWASP Juice Shop 程式碼
您將使用 OWASP Juice Shop,也就是第 1 部分和第 2 部分使用的 Node.js 和 TypeScript 應用程式。
複製本程式碼實驗室測試過的 Juice Shop 版本,並為您的工作建立分支版本:
cd ~
git clone --branch v20.3.0 --depth 1 https://github.com/juice-shop/juice-shop.git
cd juice-shop
git switch -c codelab
Juice Shop 支援 Node.js 22 至 26。查看版本:
node --version
Cloud Shell 的輸出內容大致如下:
v26.13.0
如果版本低於 22,請安裝 Node.js 22,並將其設為新分頁的預設版本:
nvm install 22
nvm alias default 22
安裝伺服器依附元件並編譯伺服器。--ignore-scripts 旗標會略過 Angular 前端建構作業,本程式碼實驗室不需要這項作業:
npm install --ignore-scripts && npm run build:server
輸出內容結尾會類似下列幾行。您可以忽略 npm warn deprecated 訊息和 npm audit 摘要,因為這些內容與 Juice Shop 的依附元件有關,而本程式碼實驗室著重於您新增的程式碼。
...
added 1333 packages, and audited 1334 packages in 1m
...
39 vulnerabilities (2 low, 13 moderate, 17 high, 7 critical)
...
npm notice run juice-shop@20.3.0 build:server
npm notice run tsc
在 CodeMender 變更程式碼前,外掛程式會將您的工作提交為檢查點,確保不會遺失任何內容,而您會在程式碼實驗室結束時提交功能。兩項修訂版本都需要 Git 身分。請為這個存放區設定一個:
git config user.name "Codelab User"
git config user.email "codelab-user@example.com"
啟動 Antigravity
如果 PATH 包含 ~/.local/bin 目錄,外掛程式的安裝程式會將 CodeMender CLI (cm) 放入該目錄。當 AGY_ADC_AUTH 為 true 時,Antigravity 可以使用您透過 gcloud auth application-default login 建立的應用程式預設憑證登入 (請參閱「設定應用程式預設憑證 (ADC)」)。請為這個分頁和 ~/.bashrc 設定這兩項變數,以便用於新分頁和重新連線,然後從存放區啟動 Antigravity:
mkdir -p ~/.local/bin
export PATH="$HOME/.local/bin:$PATH"
grep -qxF 'export PATH="$HOME/.local/bin:$PATH"' ~/.bashrc || echo 'export PATH="$HOME/.local/bin:$PATH"' >> ~/.bashrc
export AGY_ADC_AUTH=true
grep -qxF 'export AGY_ADC_AUTH=true' ~/.bashrc || echo 'export AGY_ADC_AUTH=true' >> ~/.bashrc
agy
Antigravity 會使用應用程式預設憑證登入,並在 Google Cloud 專案中使用 Gemini,因此不會要求您登入 Google 帳戶。
首次啟動 agy 時,系統會顯示類似下方的歡迎畫面:
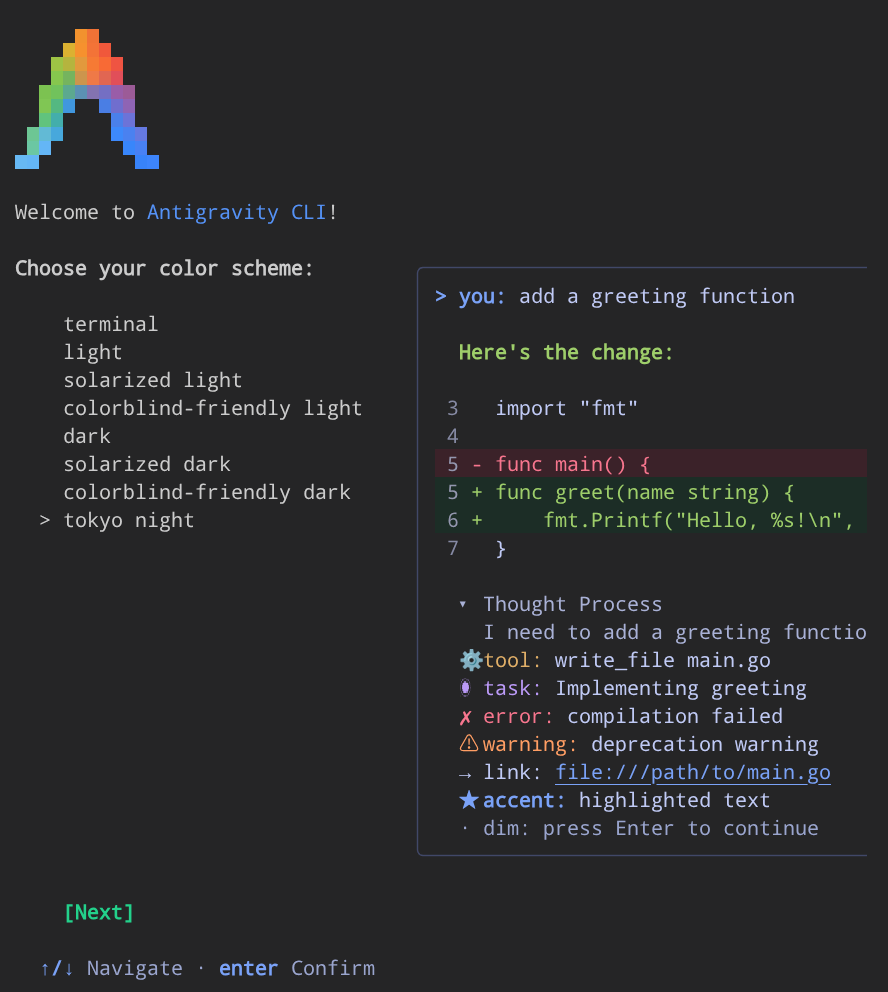
完成首次執行提示:
- 使用向上鍵和向下鍵選取偏好的色彩配置,然後按下 Enter 鍵。
- 在系統提示時接受使用條款。
- 如果出現系統提示,請確認您信任目前的工作區目錄
~/juice-shop。
在本程式碼研究室的其餘部分,請在 Antigravity 提示中輸入提示。在第二個 Cloud Shell 分頁中執行殼層指令。
檢查環境
在 Antigravity 中輸入:
Check that the CodeMender plugin and its environment are ready.
Antigravity 會執行外掛程式的環境檢查。在新的 Cloud Shell 中,CodeMender CLI 尚未安裝,因此輸出內容會類似下列內容:
========================================================================
 🛡️  CodeMender Security Plugin (v1.8.0) - Diagnostic Health Check
========================================================================

CodeMender CLI                 : ❌ Missing
CLI Version                    : N/A
Google Cloud Project           : <your-project-id>
Google Cloud ADC               : ✔ Valid (run this check again after installing cm)
Active Skills Count            : 2 skills loaded (codemender-audit, codemender-remediate)
Runtime Hook Guard             : ✔ Registered (PreToolUse)
Workspace Data Protection      : ⚠️ Not Configured (cm_exec.sh adds the entries on first use)
========================================================================
⚠️ Action required:
   - Install the CodeMender CLI (ask before running install_cm.sh).
Antigravity 會先徵求您的同意,再下載任何內容:外掛程式的護欄機制不允許代理在未經您同意的情況下安裝軟體。核准安裝。Antigravity 會安裝 cm 並再次執行檢查。輸出結果會與下列內容相似:
========================================================================
 🛡️  CodeMender Security Plugin (v1.8.0) - Diagnostic Health Check
========================================================================

CodeMender CLI                 : ✔ Installed (/home/<user>/.local/bin/cm)
CLI Version                    : cm version 0.22.0 (Latest)
Google Cloud Project           : <your-project-id>
CodeMender Health              : ✔ Healthy (credentials, config, reachability, authorization)
Active Skills Count            : 2 skills loaded (codemender-audit, codemender-remediate)
Runtime Hook Guard             : ✔ Registered (PreToolUse)
Workspace Data Protection      : ⚠️ Not Configured (cm_exec.sh adds the entries on first use)
========================================================================
✔ Environment is 100% READY for autonomous CodeMender security tasks.
設定 Juice Shop 專用的 CodeMender
CodeMender 會執行建構指令,驗證編寫的修補程式。在 Antigravity 中輸入:
Set up CodeMender for this project, with npm run build:server as the build command, and check that the build passes in CodeMender's sandbox.
Antigravity 初始化 CodeMender、設定建構指令,並檢查設定。使用 Ctrl+O 展開指令輸出內容,即可查看類似下方的詳細資料:
✅ Initialized CodeMender workspace at /home/<user>/juice-shop/.codemender
...
✅ /home/<user>/juice-shop/.codemender/config.yaml: no problems found (0 warning(s), 0 note(s)).
🔍 CodeMender Environment Verification
───────────────────────────────────────────────────────
  ✅ Workspace directory    /home/<user>/juice-shop/.codemender
  ✅ Config file            /home/<user>/juice-shop/.codemender/config.yaml
  ✅ Config parsing         Config loaded successfully
  ✅ Server                 https://aiplatform.googleapis.com
  ⚠️ Server connectivity    Skipped — not supported by this client transport
  ✅ Build command          cd "$(git rev-parse --show-toplevel)" && npm run build:server
  ✅ VCS type               git (reset: git checkout HEAD -- . && git clean -fd)
  ⚠️ State database         Not yet created. Will be created on first scan/fix.
───────────────────────────────────────────────────────
  Results: 6 passed, 2 warnings

  All critical checks passed. Resolve warnings for best experience.
這兩個警告是預期中的情況:這個用戶端不支援連線能力檢查,且 CodeMender 會在首次掃描時建立狀態資料庫。Antigravity 可能會直接將 build.command 設為 "npm run build:server" (因為 npm 會向上尋找 package.json),或在前面加上 cd "$(git rev-parse --show-toplevel)" &&,讓需要存放區根目錄的指令從正確的目錄執行。外掛程式也會將 .codemender/ 新增至 .git/info/exclude,因此 CodeMender 的本機檔案不會出現在修訂版本中。
Antigravity 接著會在 CodeMender 的沙箱中執行建構指令,就像 CodeMender 驗證修正一樣,因此您在第一次修正前,就能知道驗證是否可行。這項檢查不會使用任何 Gemini 權杖。輸出結果看起來與下列內容相似:
[INFO] Running: npm run build:server

npm notice run juice-shop@20.3.0 build:server
npm notice run tsc

[INFO] Sandbox violations detected during command:
sandbox: denied read /home/<user>/juice-shop/.npmrc

[OK] Build succeeded.
在沙箱中,建構作業無法存取網路,且只能在存放區內寫入。沙箱也封鎖了 Juice Shop 的 .npmrc 檔案 (npm 設定檔可保存註冊權杖) 和 ftp/encrypt.pyc (Juice Shop 挑戰中的編譯 Python 檔案)。建構作業不需要這些檔案,因此會成功。如果建構作業失敗,請先修正原因,再要求 CodeMender 修正,例如先安裝缺少的依附元件:建構作業無法在沙箱中下載任何內容。
3. 以直覺方式開發 AI 客服助理
現在,請按照許多開發人員目前採用的方式建構功能:描述功能,然後讓 AI 編寫程式碼。
描述功能
在 Antigravity 中輸入:
In this Juice Shop codebase, build a new Express router in 'routes/aiAssistant.ts' and mount it in 'server.ts' at '/api/assistant', right after the '/dataerasure' route:
1. Create a GET '/order-status' endpoint: Read 'orderId' from req.query. Use models.sequelize.query() to fetch the matching order from the 'Deliveries' table so customer service can check shipment progress.
2. Create a POST '/refund-triage' endpoint: Read 'customerComplaint' from req.body. Prepend the prompt 'Summarize this customer complaint in 1 sentence and decide whether to approve an immediate refund:' and send the prompt to Gemini via @google/genai to triage customer requests.
3. Keep the implementation concise and modular for our MVP, and change only these two files and package.json.
Antigravity 會建立 routes/aiAssistant.ts、安裝 @google/genai 套件,並將路由器掛接在 server.ts。
確認是否能編譯
在第二個 Cloud Shell 分頁中執行下列指令:
cd ~/juice-shop
npm run build:server && echo "Compilation: OK"
輸出內容:
npm notice run juice-shop@20.3.0 build:server
npm notice run tsc
Compilation: OK
功能會編譯,並按照您的要求執行。看起來已經完成,但請先不要提交。
選用:使用參考版本
AI 助理不會每次都生成相同的程式碼。如果 Antigravity 編寫的程式碼不同 (例如已使用參數化查詢),CodeMender 在後續步驟中的發現可能會與本程式碼實驗室不同。如要更精確地跟著操作,請將您的版本替換為參考版本。在第二個分頁中執行:
cd ~/juice-shop
git checkout -- server.ts
npm install @google/genai
cat > routes/aiAssistant.ts <<'EOF'
import express, { type NextFunction, type Request, type Response } from 'express'
import { GoogleGenAI } from '@google/genai'
import * as models from '../models/index'

const router = express.Router()
const ai = new GoogleGenAI({ apiKey: process.env.GEMINI_API_KEY })

// GET /api/assistant/order-status?orderId=<id>: lets customer service check shipment progress
router.get('/order-status', async (req: Request, res: Response, next: NextFunction) => {
  try {
    const orderId = req.query.orderId
    const [orders] = await models.sequelize.query(`SELECT * FROM Deliveries WHERE id = '${orderId}'`)
    res.status(200).json({ status: 'success', data: orders })
  } catch (error) {
    next(error)
  }
})

// POST /api/assistant/refund-triage: triages customer requests with Gemini
router.post('/refund-triage', async (req: Request, res: Response, next: NextFunction) => {
  try {
    const customerComplaint = req.body?.customerComplaint
    const prompt = `Summarize this customer complaint in 1 sentence and decide whether to approve an immediate refund: ${customerComplaint}`
    const response = await ai.models.generateContent({
      model: 'gemini-2.5-flash',
      contents: prompt
    })
    res.status(200).json({ status: 'success', result: response.text })
  } catch (error) {
    next(error)
  }
})

export default router
EOF
sed -i "s#^import dataErasure from './routes/dataErasure'#&\nimport aiAssistant from './routes/aiAssistant'#" server.ts
sed -i "s#^  app.use('/dataerasure', dataErasure)#&\n\n  /* Route for the AI support assistant */\n  app.use('/api/assistant', aiAssistant)#" server.ts
npm run build:server && echo "Compilation: OK"
確認參考版本已就緒:
git status --short
grep -n "app.use('/api/assistant'" server.ts
輸出內容:
 M package.json
 M server.ts
?? routes/aiAssistant.ts
688:  app.use('/api/assistant', aiAssistant)
如果 git status 列出 Antigravity 建立的其他檔案,請一併刪除。
4. 提交前先詢問 CodeMender
提交 AI 生成的程式碼前,請先檢查。在 Antigravity 中輸入:
Is this safe to commit? Check my changes with CodeMender.
Antigravity 會執行差異掃描 (cm_diff_scan.sh):CodeMender 只會檢查您變更的部分,而非整個存放區。掃描作業會在幾分鐘內完成,Antigravity 會在回覆中提供結果摘要 (在掃描指令上按下 Ctrl+O,即可查看各檔案的完整工作記錄):
No, these changes are not safe to commit.
The CodeMender diff scan identified 1 blocking HIGH-severity vulnerability introduced by the new changes, causing the pre-commit CI gate to fail (--fail-on=CRITICAL,HIGH).

 Severity │ Finding ID │ File & Line                │ Type                                │ CWE
──────────┼────────────┼────────────────────────────┼─────────────────────────────────────┼────────
 HIGH     │ 989cc3da   │ routes/aiAssistant.ts:9    │ SQL Injection in Order Status Query │ CWE-89
事情的原委是這樣的:
- 在幕後 (按下
Ctrl+O展開cm_diff_scan.sh步驟即可查看),CodeMender 檢查了三個變更的檔案,包括外掛程式自動加入掃描的未追蹤routes/aiAssistant.ts,以及三個受變更影響的 1 跳鄰近檔案 (app.ts、lib/utils.ts和frontend/src/app/Services/local-backup.service.ts)。 - Juice Shop 刻意保留許多安全漏洞,但 CodeMender 忽略了既有問題,只回報您變更後產生的
HIGH嚴重程度 SQL 注入。 CI Gate Failure(--fail-on=CRITICAL,HIGH) 代表「先不要提交」。這是掃描結果,而非當機,執行期間記錄的任何預期沙箱讀取封鎖 (例如 Juice Shop 的.npmrc和ftp/encrypt.pyc檔案) 都不會影響結果。
外掛程式會以非互動方式執行 CodeMender (使用 -y,並在修正程式碼時使用 --bypass-warning),因此 CodeMender 本身不會要求確認。Antigravity 和外掛程式的風險動作防護機制會改為詢問您。
5. 瞭解 AI 答錯的原因
詢問 Antigravity 哪裡出錯。在 Antigravity 中輸入:
Explain the findings and show me the vulnerable code.
新檔案中的 SQL 注入 (CWE-89)
/order-status 端點會將 orderId 查詢參數直接放入 SQL 陳述式:
router.get('/order-status', async (req: Request, res: Response, next: NextFunction) => {
  try {
    const orderId = req.query.orderId
    const [orders] = await models.sequelize.query(`SELECT * FROM Deliveries WHERE id = '${orderId}'`)
    res.status(200).json({ status: 'success', data: orders })
  } catch (error) {
    next(error)
  }
})
Antigravity 的細目會追蹤汙點流程:
- 來源 (
req.query.orderId):來自查詢字串的不信任使用者輸入內容。 - 傳播 (範本文字):直接插入
`... '${orderId}'`,不進行逸出、類型驗證或參數化。 - 接收器 (
models.sequelize.query(...)):將原始 SQL 字串直接傳遞至 SQLite。
這份報告也顯示兩個攻擊向量:任何人都可以傳送 GET /api/assistant/order-status?orderId=1' OR '1'='1 傳回所有外送記錄,或使用 UNION SELECT 讀取其他資料表,例如 Users 中的使用者憑證。
掃描作業未標記的項目:新路徑未經驗證
CodeMender 發現 routes/aiAssistant.ts 有 SQL 注入漏洞,Antigravity 的漏洞說明甚至指出,未經驗證的攻擊者可以呼叫端點,但掃描作業並未標記 server.ts。請自行檢查其餘零錢。在第二個分頁中執行:
cd ~/juice-shop
git diff server.ts
輸出內容:
diff --git a/server.ts b/server.ts
index a8b429c..91d428e 100644
--- a/server.ts
+++ b/server.ts
@@ -78,6 +78,7 @@ import * as recycles from './routes/recycles'
 import * as twoFactorAuth from './routes/2fa'
 import { applyCoupon } from './routes/coupon'
 import dataErasure from './routes/dataErasure'
+import aiAssistant from './routes/aiAssistant'
 import { dataExport } from './routes/dataExport'
 import { chat } from './routes/chat'
 import { retrieveBasket } from './routes/basket'
@@ -683,6 +684,9 @@ function configureApp (app: ReturnType<typeof express>, seq: typeof sequelize) {
   /* Route for dataerasure page */
   app.use('/dataerasure', dataErasure)

+  /* Route for the AI support assistant */
+  app.use('/api/assistant', aiAssistant)
+
   /* Route for redirects */
   app.get('/redirect', performRedirect())
server.ts 會公開掛接 /api/assistant,不需驗證或檢查角色 (例如 security.isAuthorized()),這與受保護的端點 (例如 /rest/basket 或 /b2b/v2) 不同。這會導致兩個端點都暴露在外:未經驗證的呼叫端可以利用 /order-status,而且任何人都能傳送要求至 /refund-triage,讓貴公司支付 Gemini 呼叫費用。
即使 CodeMender 在執行作業中,確實回報 server.ts 是 SQL 注入攻擊的未經驗證路徑,但報告中並未提及 /refund-triage。請務必詳閱所有變更的差異,掃描結果並不能證明程式碼安全無虞。
6. 使用合適的工具修正各項問題
這兩個問題需要不同的修正方式:
- SQL 注入:CodeMender 回報了這項問題,因此請 CodeMender 修正。CodeMender 會編寫修補程式,並使用建構指令進行驗證,然後外掛程式會檢查修正程式是否有新的安全漏洞。
- 缺少驗證:修正方式遵循
server.ts已用於其他端點的模式:security.isAuthorized()。你清楚知道要如何修改,因此只要告訴 Antigravity,幾秒內就能完成。這項修正可保護兩個端點,包括 CodeMender 報告未提及的/refund-triage。
要求同時修正
在 Antigravity 中輸入:
Have CodeMender fix the SQL injection in routes/aiAssistant.ts, by its finding ID, and validate the fix. Fix the missing authentication yourself: add security.isAuthorized() to the /api/assistant route, like other endpoints in server.ts. Then stage all the changes, including the new file, and check the staged changes with CodeMender.
Antigravity 會執行 CodeMender 的修復迴圈、編輯 server.ts、暫存所有三個檔案、重新掃描暫存的差異,並列印所有四個動作的摘要 (在任何指令上按下 Ctrl+O 即可查看詳細記錄)。
CodeMender 修正 SQL 注入問題。Antigravity 會針對該發現項目執行外掛程式的修復迴圈,這項作業需要 10 到 15 分鐘。展開後的修復輸出內容大致如下:
📌 Checkpointed uncommitted work as b70ebe3 so cm fix can see it and its workspace reset cannot delete it.
🧱 Checking build.command in CodeMender's sandbox before the first fix (cm build, no model tokens)...
✅ build.command passes in the sandbox, so cm fix can validate its patches.
🛠️  Remediating finding: 989cc3da-d9f2-5803-9d23-1c6a41bba185
...
📡 Waiting for fix agent (https://aiplatform.googleapis.com)...
...
✨ Patch generated successfully!

diff --git a/routes/aiAssistant.ts b/routes/aiAssistant.ts
index 1a6d972..cf6aa51 100644
--- a/routes/aiAssistant.ts
+++ b/routes/aiAssistant.ts
@@ -9,7 +9,9 @@ const ai = new GoogleGenAI({ apiKey: process.env.GEMINI_API_KEY })
 router.get('/order-status', async (req: Request, res: Response, next: NextFunction) => {
   try {
     const orderId = req.query.orderId
-    const [orders] = await models.sequelize.query(`SELECT * FROM Deliveries WHERE id = '${orderId}'`)
+    const [orders] = await models.sequelize.query('SELECT * FROM Deliveries WHERE id = :orderId', {
+      replacements: { orderId: orderId ?? null }
+    })
     res.status(200).json({ status: 'success', data: orders })
   } catch (error) {
     next(error)

────────────────────────────────────────────────────────────

[INFO] Running build and test validation: npm run build:server

npm notice run juice-shop@20.3.0 build:server
npm notice run tsc

[INFO] Sandbox violations detected during command:
sandbox: denied read /home/<user>/juice-shop/.npmrc

[OK] Build and test validation succeeded.
...
🧪 Running outer-shell build hard gate: npm run build:server
...
✅ Committed verified fix for 989cc3da-d9f2-5803-9d23-1c6a41bba185
🔍 Scanning the fix commit for regressions...
...
✅ No blocking findings in the last-commit scope (--fail-on=CRITICAL,HIGH). Report: /home/<user>/juice-shop/.codemender/remediate-last-commit.json
📋 Remediation summary: 1 fixed (989cc3da-d9f2-5803-9d23-1c6a41bba185), 0 not fixed.
🔄 Restored your uncommitted changes (now including any applied security fixes) on top of f189f52. Previously staged changes are now unstaged.
CodeMender 修正問題時,外掛程式如何保護您的工作:
- 它會提交未提交的工作做為檢查點,因此 CodeMender 會處理您的程式碼,而修正內容會成為外掛程式可檢查的獨立提交。如果使用 CodeMender 0.17.0 以上版本,外掛程式也會指示
cm fix不要重設工作區 (--no-reset)。 - 它在 CodeMender 的沙箱中再次檢查建構作業,不使用權杖,因此不會啟動 CodeMender 無法驗證的修正作業。
- CodeMender 編寫了一小段修補程式,將
orderId做為繫結的:orderId替換參數傳遞給 Sequelize,而不是放入 SQL 字串。 - CodeMender 在沙箱中執行建構指令,驗證修補程式,結果與設定期間的建構檢查相同。接著,外掛程式在沙箱外再次執行建構作業,然後才提交修正。
- 外掛程式檢查修正修訂版本是否有新的安全漏洞,但未發現任何漏洞。
- 完成後,外掛程式會將變更還原為未提交的工作,現在包含修正項目。
Antigravity 新增驗證。在 server.ts 中掛接路由器的行中加入 security.isAuthorized()。您將在下一個步驟中查看確切的變更。
Antigravity 再次檢查所有項目。系統會暫存所有變更,並執行另一項差異掃描,這項作業需要幾分鐘才能完成:
════════════════════════════════════════════════════════════
🔍 Impact-Aware PR Delta Scan (--diff=STAGED)
════════════════════════════════════════════════════════════
   Modified files in PR: 3
     • package.json
     • routes/aiAssistant.ts
     • server.ts
   Modified symbols: configureApp
   1-Hop Impacted Neighbors: 3 file(s)
     • app.ts (Tier 1: same package import of 'server')
     • lib/utils.ts (Tier 2: sibling module import of 'package')
     • frontend/src/app/Services/local-backup.service.ts (Tier 4: imports modified module 'server')
   Running 6 diff audit jobs with 4 concurrent workers...

[1/6] ✅ app.ts [1-hop neighbor] (28s) | 27.9k tok - 0 vulnerabilities
...
[2/6] ✅ package.json [changed] (44s) | 80.5k tok - 0 vulnerabilities
[3/6] ✅ frontend/src/app/Services/local-backup.service.ts [1-hop neighbor] (17.4s) | 16.3k tok - 0 vulnerabilities
...
[4/6] ✅ lib/utils.ts [1-hop neighbor] (56.6s) | 163.8k tok - 0 vulnerabilities
...
[5/6] ✅ server.ts [changed] (3m4.7s) | 488.0k tok - 0 vulnerabilities
...
[6/6] ✅ routes/aiAssistant.ts [changed] (3m12.6s) | 236.8k tok - 0 vulnerabilities
────────────────────────────────────────────────────────────
📊 PR Delta Scan Complete: 6 jobs (6 succeeded, 0 failed) in 3m14s
...
   Total tokens consumed: 1.0M (in: 982.7k | out: 1.9k | thought: 28.7k | tool: 0)
💾 Report saved to /home/<user>/juice-shop/.codemender/last-diff-scan.json

✅ CI Gate Passed: 0 blocking vulnerabilities detected in PR diff.
No findings reported for this change.
✅ No blocking findings in the staged scope (--fail-on=CRITICAL,HIGH). Report: /home/<user>/juice-shop/.codemender/last-diff-scan.json
兩項發現項目都已消失:SQL 注入問題已修正,且系統檢查您即將提交的所有內容 (包括新的驗證機制) 後,未回報任何發現項目。
查看變更
雖然沒有任何因素會阻礙提交,但您仍是提交者。在第二個分頁中,執行伺服器單元測試:
cd ~/juice-shop
npm run test:server
輸出內容結尾大致如下:
ℹ tests 419
ℹ suites 133
ℹ pass 417
ℹ fail 0
ℹ cancelled 0
ℹ skipped 2
ℹ todo 0
ℹ duration_ms 8166.978622
接著,查看目前如何掛接特徵:
git diff --staged server.ts
輸出內容:
diff --git a/server.ts b/server.ts
index a8b429c..cb4cbf7 100644
--- a/server.ts
+++ b/server.ts
@@ -78,6 +78,7 @@ import * as recycles from './routes/recycles'
 import * as twoFactorAuth from './routes/2fa'
 import { applyCoupon } from './routes/coupon'
 import dataErasure from './routes/dataErasure'
+import aiAssistant from './routes/aiAssistant'
 import { dataExport } from './routes/dataExport'
 import { chat } from './routes/chat'
 import { retrieveBasket } from './routes/basket'
@@ -683,6 +684,9 @@ function configureApp (app: ReturnType<typeof express>, seq: typeof sequelize) {
   /* Route for dataerasure page */
   app.use('/dataerasure', dataErasure)

+  /* Route for the AI support assistant */
+  app.use('/api/assistant', security.isAuthorized(), aiAssistant)
+
   /* Route for redirects */
   app.get('/redirect', performRedirect())
7. Commit with a safety net
變更作業不會再受到阻礙。提交這項設定,並確保日後每次提交都會經過檢查。在 Antigravity 中輸入:
Install the CodeMender pre-commit hook, then commit the staged changes. They already passed a staged scan, so the hook can reuse that result.
掛鉤會改變存放區中所有後續修訂版本的運作方式,因此外掛程式的護欄會讓 Antigravity 先徵求您的權限。要求中會說明原因:
Installing the CodeMender git hook changes every future commit (or push) in this repository: each one with source changes runs a diff scan that takes minutes and uses tokens. Explicit user permission is required.
核准。Antigravity 會安裝掛鉤並提交變更。輸出結果看起來與下列內容相似:
✅ Copied the hook runner to /home/<user>/juice-shop/.git/codemender/ (run install again after updating the plugin).
✅ Installed the CodeMender pre-commit hook: /home/<user>/juice-shop/.git/hooks/pre-commit
   Each commit with source changes now runs a diff scan (often several minutes, and it uses tokens).
   Run cm_diff_scan.sh --scope staged before committing, and the hook reuses that result.
   Skip once with: git commit --no-verify (or CM_SKIP_HOOK=1).
✅ CodeMender: these staged changes already passed a diff scan, so they weren't scanned again.
[codelab a6da289] feat: add AI assistant endpoint with authorized access and secure query
 3 files changed, 45 insertions(+)
 create mode 100644 routes/aiAssistant.ts
提交作業不到一秒就完成了。掛鉤發現這些暫存變更已通過差異掃描,因此不會再次掃描。從現在起,這個存放區中每次有來源變更的修訂版本都會先經過檢查,而有阻斷性發現項目的修訂版本會維持封鎖狀態,直到您修正問題為止。
8. 查看安全性成本
在 Antigravity 中輸入:
How much did CodeMender cost me? Show the token usage.
Antigravity 執行 cm stats (23 分 46 秒內,171 次輪詢共 24 項要求)。細目大致如下:
 Command        │ Requests │ Input Tokens │ Cached Tokens │ Output Tokens │ Thought Tokens │ Total Tokens │ Cache Hit % │ Duration
────────────────┼──────────┼──────────────┼───────────────┼───────────────┼────────────────┼──────────────┼─────────────┼──────────
 cm find --diff │       23 │    2,529,320 │     1,813,096 │         6,606 │         88,338 │    2,624,264 │       71.7% │   16m 13s
 cm fix         │        1 │      640,418 │       493,851 │         1,571 │          6,944 │      648,933 │       77.1% │   07m 33s
 Total          │       24 │    3,169,738 │     2,306,947 │         8,177 │         95,282 │    3,273,197 │       72.8% │   23m 46s
如要將權杖換算成美元,請根據 CodeMender 使用的模型,查看 Gemini 定價。第一次掃描時使用的模型名稱為 Gemini 3.8 Flash (標準,全球)。快取輸入內容的費用是一般輸入內容的十分之一,思考詞元則按輸出內容計費:
每 100 萬個詞元的價格 | 輸入 | 快取輸入內容 | 輸出內容 (包括思考過程) |
2026 年 12 月 31 日前 | $0.75 美元 | $0.075 美元 | $3.75 美元 |
2027 年 1 月 1 日起 | $1.50 美元 | $0.15 美元 | $7.50 美元 |
以上述執行作業為例,計算結果如下:
指令 | 未快取的輸入內容 | 快取輸入內容 | 輸出內容和思考過程 | 優惠只到 2026 年 12 月 31 日 | 2027 年 1 月 1 日起 |
| 716,224 | 1,813,096 | 94,944 | $1.03 美元 | $2.06 美元 |
| 146,567 | 493,851 | 8,515 | $0.18 美元 | $0.36 美元 |
總計 | 862,791 | 2,306,947 | 103,459 | $1.21 美元 | $2.42 美元 |
這些數字僅涵蓋 CodeMender。Antigravity 自己的 Gemini 要求也會在 Google Cloud 雲端專案中執行,且 cm stats 不會計入這些要求。
代表意義:
- 檢查每項變更的費用很低:三次差異掃描 (第一次檢查、迴圈檢查修正修訂版本,以及暫存重新檢查) 的總費用約為$1.03 美元。
- 詞元數量不等於成本:
cm fix使用了將近 64.9 萬個詞元,其中 77% 的輸入詞元經過快取,因此驗證修正項目的費用約為$0.18 美元。 - 安全網可重複使用掃描結果,因此不會產生費用:掛鉤重複使用上次的掃描結果,因此提交作業不會產生費用。
9. 清除
移除預先修訂版本掛鉤
在 Antigravity 中輸入:
Uninstall the CodeMender pre-commit hook.
輸出內容:
✅ Removed .git/hooks/pre-commit
✅ Removed the hook runner from .git/codemender/
結束 Antigravity 工作階段
輸入 /exit (或按下 Ctrl+D Ctrl+D) 退出 Antigravity,返回 bash 殼層:
/exit
刪除 Juice Shop 工作副本
在終端機中刪除存放區。這項操作也會刪除 CodeMender 的本機狀態和記錄,這些資料儲存在存放區的 .codemender/ 目錄中:
cd ~
rm -rf ~/juice-shop
(選用) 移除 CodeMender CLI、停止 Antigravity 使用應用程式預設憑證登入,並撤銷憑證:
rm ~/.local/bin/cm
sed -i '/^export AGY_ADC_AUTH=true$/d' ~/.bashrc
unset AGY_ADC_AUTH
gcloud auth application-default revoke
10. 恭喜
恭喜!您已完成第 3 部分,並精通整個 DevSecOps with CodeMender Trilogy。
這三部曲涵蓋安全開發的三個迴圈:
- 第 1 部分:開發人員內部迴圈:使用 CodeMender CLI (
cm find、cm verify和cm fix) 進行互動式、本機優先的存放區稽核和修補程式驗證。 - 第 2 部分:CI/CD 管道外層迴圈:自動化持續安全性掃描、GitHub Actions 整合、無金鑰 Google Cloud Workload Identity Federation (WIF),以及自我修復提取要求。
- 第 3 部分:AI 原生直覺式程式開發迴圈 (本程式碼實驗室):在提交前檢查 AI 生成的變更、使用合適的工具修正各項發現,並確保每次提交都經過檢查,一切都透過與 Antigravity 對話完成。
涵蓋內容
- 提交前檢查:CodeMender 只檢查您的變更 (包括新檔案),並找出 AI 引入的 SQL 注入。
- 不只掃描,還要檢查:您親自查看差異,發現缺少驗證機制不只會導致 SQL 注入,因為使用 AI 的掃描器不會在每次執行時回報所有問題。
- 針對不同修正項目使用合適工具:CodeMender 編寫並驗證 SQL 注入修正程式。Antigravity 使用 Juice Shop 的
security.isAuthorized()中介軟體,新增了您要求的驗證檢查。 - 先詢問再執行的護欄:外掛程式讓 Antigravity 在安裝 CodeMender CLI 和預先修訂掛鉤前,先詢問使用者。此外,在修正程式碼耗用權杖前,系統也會在 CodeMender 的沙箱中檢查建構作業,並在 CodeMender 修正程式碼時,保護未提交的工作。
- 為每次修訂提供安全防護:預先修訂掛鉤會檢查日後的每次修訂,並重複使用已通過的掃描。
- 費用須知:CodeMender 步驟的費用約為$1.21 美元 (新用戶優惠結束後約為$2.42 美元)。
開發人員思維轉變
未經檢查的直覺式程式開發 | 使用 CodeMender 進行直覺式程式開發 |
編譯後提交:希望 AI 編寫的程式碼安全無虞。 | 提交前檢查:只對變更內容進行差異掃描,只需幾分鐘。 |
只檢查掃描器標記的內容:忽略 AI 遺漏的部分,例如另一個檔案中缺少的驗證檢查。 | 查看所有變更:CodeMender 會檢查每個變更的檔案,以及受變更影響的檔案。您仍須查看差異,因為掃描器可能會遺漏某些部分。 |
手動修正所有問題,或完全不修正:花時間修正工具可驗證的問題。 | 使用合適的工具修正問題:CodeMender 會驗證修補程式,確保能修正回報的問題;Antigravity 則會精準變更程式碼,填補您發現的漏洞。 |
憑記憶:忘記查看下一個變更。 | 讓掛鉤記住:每次修訂都會經過檢查,不會重複掃描相同的變更。 |
後續步驟
- 如要瞭解外掛程式背後的 CodeMender CLI,請參閱第 1 部分:使用 CodeMender 保護應用程式 (OWASP Juice Shop 上的
cm find、cm verify和cm fix)。 - 使用第 2 部分「使用 CodeMender 保護 CI/CD 管道」中的相同檢查項目,控管每項提取要求 (GitHub Actions、WIF 和 SARIF)。
- 探索 Google Cloud CodeMender 說明文件。
- 查看 codemender-security 外掛程式 GitHub 存放區。
- 在自己的 Antigravity 設定中安裝
codemender-security外掛程式,並在提交前檢查 AI 生成的變更。