
1. 事前準備
在本程式碼研究室中,您將更新在先前的「開始使用行動裝置文字分類」程式碼研究室中建構的應用程式。
必要條件
- 本程式碼研究室是為剛接觸機器學習的有經驗開發人員所設計。
- 這個程式碼研究室是循序路徑的一部分。如果您尚未完成「建構基本訊息樣式應用程式」或「建構垃圾留言機器學習模型」,請立即完成。
[建構或學習]內容
- 您將瞭解如何將自訂模型整合至先前步驟中建構的應用程式。
軟硬體需求
- Android Studio,或 iOS 適用的 CocoaPods
2. 開啟現有的 Android 應用程式
您可以按照程式碼研究室 1 的步驟取得這項程式碼,或是複製這個存放區,然後從 TextClassificationStep1 載入應用程式。
git clone https://github.com/googlecodelabs/odml-pathways
您可以在 TextClassificationOnMobile->Android 路徑中找到這項資訊。
您也可以使用TextClassificationStep2取得完成的程式碼。
開啟後,即可繼續進行步驟 2。
3. 匯入模型檔案和中繼資料
在「建構垃圾留言機器學習模型」程式碼研究室中,您建立了 .TFLITE 模型。
您應該已下載模型檔案。如果沒有,可以從這個程式碼研究室的 存放區 取得,模型則可從這裡取得。
建立素材資源目錄,即可將其新增至專案。
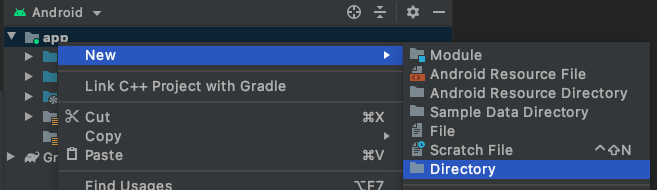
- 使用專案導覽器,確認頂端已選取「Android」Android。
- 在「app」資料夾上按一下滑鼠右鍵。依序選取「New」 >「Directory」。
- 在「New Directory」對話方塊中,選取「src/main/assets」。
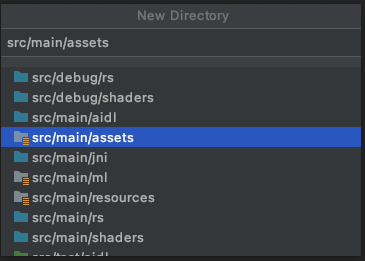
您會看到應用程式中現在有新的「assets」資料夾。
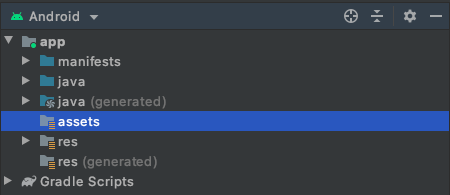
- 按一下滑鼠右鍵「assets」。
- 在開啟的選單中,你會看到 (在 Mac 上)「在 Finder 中顯示」。選取該項目。(在 Windows 上會顯示「在檔案總管中顯示」,在 Ubuntu 上則會顯示「在檔案中顯示」)。
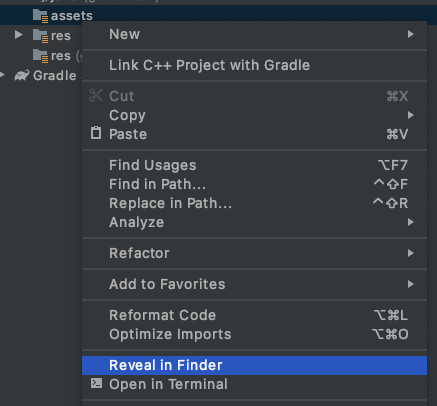
系統會啟動「Finder」並顯示檔案位置 (Windows 上的「檔案總管」,Linux 上的「檔案」)。
- 將
labels.txt、model.tflite和vocab檔案複製到這個目錄。
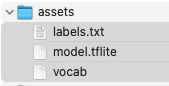
- 返回 Android Studio,您會看到這些素材顯示在 assets 資料夾中。

4. 更新 build.gradle,使用 TensorFlow Lite
如要使用 TensorFlow Lite 和支援該技術的 TensorFlow Lite 工作程式庫,請更新 build.gradle 檔案。
Android 專案通常有多個,因此請務必找到應用程式層級的專案。在 Android 檢視畫面的專案瀏覽器中,於「Gradle Scripts」部分找到該檔案。正確的檔案會標示為「.app」,如下所示:

您需要對這個檔案進行兩項變更。第一個位於底部的「dependencies」部分。為 TensorFlow Lite 工作程式庫新增文字 implementation,如下所示:
implementation 'org.tensorflow:tensorflow-lite-task-text:0.1.0'
撰寫本文時的版本號碼可能已變更,請務必前往 https://www.tensorflow.org/lite/inference_with_metadata/task_library/nl_classifier 查看最新版本。
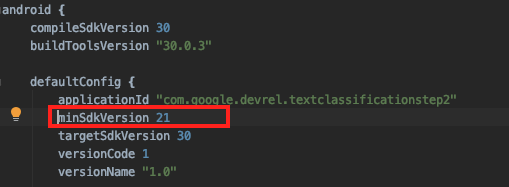
工作程式庫的 SDK 最低需求版本為 21。依序前往 android > default config 即可找到這項設定,並將其變更為 21:
您現在已擁有所有依附元件,可以開始編寫程式碼了!
5. 新增 Helper 類別
如要將應用程式使用模型的推論邏輯與使用者介面分開,請建立另一個類別來處理模型推論。將此類別稱為「輔助」類別。
- 在
MainActivity程式碼所在的套件名稱上按一下滑鼠右鍵。 - 依序選取「New」(新增) >「Package」(套件)。

- 畫面中央會顯示對話方塊,要求您輸入套件名稱。將其加到目前套件名稱的結尾。(在此稱為「輔助程式」)。

- 完成後,在專案檔案總管中,對 helpers 資料夾按一下滑鼠右鍵。
- 依序選取「New」>「Java Class」,然後將其命名為
TextClassificationClient。您將在下一個步驟編輯檔案。
您的 TextClassificationClient 輔助類別會如下所示 (但套件名稱可能不同)。
package com.google.devrel.textclassificationstep1.helpers;

public class TextClassificationClient {
}
- 使用下列程式碼更新檔案:
package com.google.devrel.textclassificationstep2.helpers;

import android.content.Context;
import android.util.Log;
import java.io.IOException;
import java.util.List;

import org.tensorflow.lite.support.label.Category;
import org.tensorflow.lite.task.text.nlclassifier.NLClassifier;

public class TextClassificationClient {
    private static final String MODEL_PATH = "model.tflite";
    private static final String TAG = "CommentSpam";
    private final Context context;

    NLClassifier classifier;

    public TextClassificationClient(Context context) {
        this.context = context;
    }

    public void load() {
        try {
            classifier = NLClassifier.createFromFile(context, MODEL_PATH);
        } catch (IOException e) {
            Log.e(TAG, e.getMessage());
        }
    }

    public void unload() {
        classifier.close();
        classifier = null;
    }

    public List<Category> classify(String text) {
        List<Category> apiResults = classifier.classify(text);
        return apiResults;
    }

}
這個類別會提供 TensorFlow Lite 解譯器的封裝函式,載入模型並簡化應用程式與模型之間資料交換的管理複雜度。
在 load() 方法中,系統會從模型路徑例項化新的 NLClassifier 型別。模型路徑就是模型名稱 model.tflite。NLClassifier 型別屬於文字工作程式庫,可將字串轉換為符記、使用正確的序列長度、將其傳遞至模型,以及剖析結果,藉此提供協助。
(如要進一步瞭解這些項目,請重新瀏覽「建構垃圾留言機器學習模型」一節)。
分類作業會在 classify 方法中執行,您只要傳遞字串,該方法就會傳回 List。使用機器學習模型分類內容時,如果想判斷字串是否為垃圾內容,系統通常會傳回所有答案,並指派機率。舉例來說,如果傳送的訊息看起來像是垃圾內容,系統會傳回 2 個答案的清單,分別是訊息為垃圾內容的機率,以及訊息不是垃圾內容的機率。「垃圾內容」/「非垃圾內容」是類別,因此傳回的 List 會包含這些機率。稍後會剖析這項資料。
現在您已擁有輔助類別,請返回 MainActivity 並更新,使用這個類別分類文字。您會在下一個步驟中看到這項資訊!
6. 分類文字
首先,請在 MainActivity 中匯入您剛建立的輔助函式!
- 在
MainActivity.kt頂端,與其他匯入項目一起新增:
import com.google.devrel.textclassificationstep2.helpers.TextClassificationClient
import org.tensorflow.lite.support.label.Category
- 接著載入輔助程式。在
onCreate中,緊接在setContentView行之後,新增以下幾行來例項化及載入輔助類別:
val client = TextClassificationClient(applicationContext)
client.load()
目前按鈕的 onClickListener 應如下所示:
btnSendText.setOnClickListener {
     var toSend:String = txtInput.text.toString()
     txtOutput.text = toSend
 }
- 更新為以下內容:
btnSendText.setOnClickListener {
    var toSend:String = txtInput.text.toString()
    var results:List<Category> = client.classify(toSend)
    val score = results[1].score
    if(score>0.8){
        txtOutput.text = "Your message was detected as spam with a score of " + score.toString() + " and not sent!"
    } else {
        txtOutput.text = "Message sent! \nSpam score was:" + score.toString()
    }
    txtInput.text.clear()
}
這項變更會將功能從單純輸出使用者輸入內容,改為先分類。
- 這行程式碼會擷取使用者輸入的字串並傳遞至模型,然後取得結果:
var results:List<Category> = client.classify(toSend)
只有 2 個類別,分別是 False 和 True
。 (TensorFlow 會依字母順序排序,因此 False 會是第 0 個項目,True 則是第 1 個項目)。
- 如要取得值為
True的機率分數,可以查看 results[1].score,如下所示:
val score = results[1].score
- 選取閾值 (本例為 0.8),如果「True」類別的分數高於閾值 (0.8),則該訊息為垃圾內容。否則,這不是垃圾內容,可以放心傳送訊息:
    if(score>0.8){
        txtOutput.text = "Your message was detected as spam with a score of " + score.toString() + " and not sent!"
    } else {
        txtOutput.text = "Message sent! \nSpam score was:" + score.toString()
    }
- 請參閱這篇文章,瞭解模型的實際運作方式。系統將「快來我的網誌買東西!」這則訊息標示為極有可能是垃圾內容:

反之,「嘿,很有趣的教學課程,謝謝!」這類訊息則不太可能被視為垃圾內容:
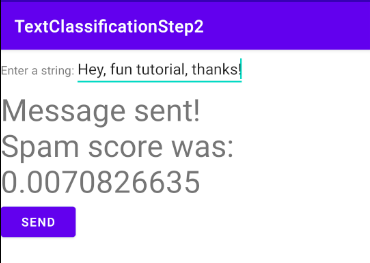
7. 更新 iOS 應用程式,使用 TensorFlow Lite 模型
您可以按照程式碼研究室 1 的步驟取得這項程式碼,或是複製這個存放區,然後從 TextClassificationStep1 載入應用程式。您可以在 TextClassificationOnMobile->iOS 路徑中找到這項資訊。
您也可以使用TextClassificationStep2取得完成的程式碼。
在「建構垃圾留言機器學習模型」程式碼研究室中,您建立了一個非常簡單的應用程式,可讓使用者在 UITextView 中輸入訊息,然後直接輸出,不經過任何篩選。
現在,您要更新該應用程式,使用 TensorFlow Lite 模型偵測文字中的垃圾留言,再傳送出去。只要在這個應用程式中模擬傳送作業,在輸出標籤中算繪文字即可 (但實際應用程式可能會有公告欄、即時通訊或其他類似功能)。
如要開始使用,您需要步驟 1 中的應用程式,可以從存放區複製。
如要整合 TensorFlow Lite,請使用 CocoaPods。如果尚未安裝,請按照 https://cocoapods.org/ 的操作說明安裝。
- 安裝 CocoaPods 後,請在 TextClassification 應用程式的
.xcproject所在目錄中,建立名為 Podfile 的檔案。這個檔案的內容應如下所示:
target 'TextClassificationStep2' do
  use_frameworks!

  # Pods for NLPClassifier
    pod 'TensorFlowLiteSwift'

end
第一行應為應用程式名稱,而非「TextClassificationStep2」。
使用「終端機」前往該目錄,然後執行 pod install。如果成功,您會看到名為「Pods」的新目錄,以及系統為您建立的新 .xcworkspace 檔案。日後請使用該檔案,而非 .xcproject。
如果失敗,請確認 Podfile 位於 .xcproject 所在的目錄中。通常是 Podfile 位於錯誤的目錄,或是目標名稱有誤!
8. 新增模型和詞彙檔案
使用 TensorFlow Lite Model Maker 建立模型時,您可以輸出模型 (如 model.tflite) 和詞彙 (如 vocab.txt)。
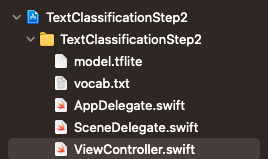
- 從 Finder 拖曳至專案視窗,即可將檔案新增至專案。請務必勾選「新增至目標」:
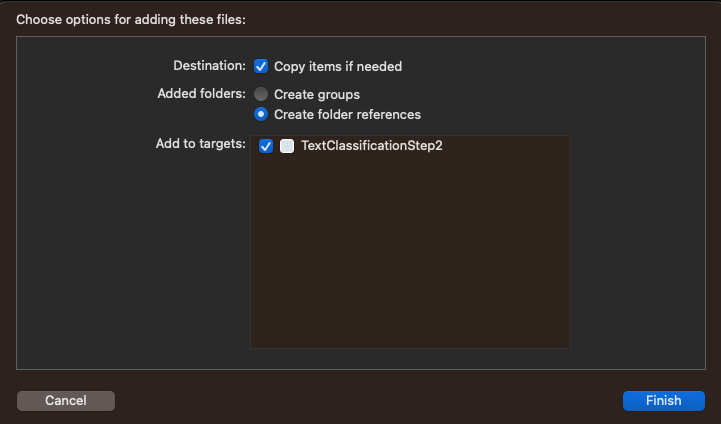
完成後,您應該會在專案中看到這些檔案:
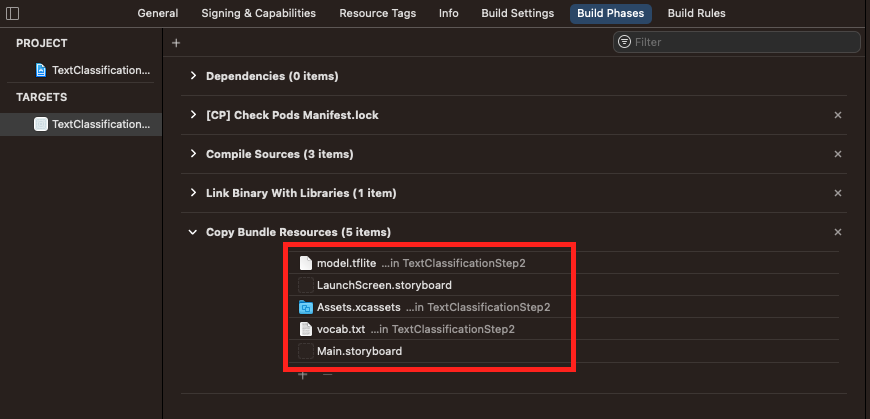
- 選取專案 (在上方的螢幕截圖中,是藍色圖示 TextClassificationStep2),然後查看 Build Phases 分頁,再次確認這些檔案已新增至軟體包 (以便部署至裝置):
9. 載入 Vocab
進行自然語言處理分類時,模型會使用編碼為向量的字詞進行訓練。模型會使用一組特定的名稱和值編碼字詞,這些名稱和值會在模型訓練時學習。請注意,大多數模型會有不同的詞彙,因此請務必使用訓練時產生的模型詞彙。這是您剛才新增至應用程式的 vocab.txt 檔案。
您可以在 Xcode 中開啟檔案,查看編碼。「song」會編碼為 6,「love」則為 12。實際順序是頻率順序,因此「I」是資料集中最常見的字詞,其次是「check」。
使用者輸入字詞後,您需要先使用這個字彙將字詞編碼,再傳送至模型進行分類。
我們來看看這段程式碼。首先載入詞彙。
- 定義類別層級變數,用來儲存字典:
var words_dictionary = [String : Int]()
- 然後在類別中建立
func,將字彙表載入這個字典:
func loadVocab(){
    // This func will take the file at vocab.txt and load it into a has table
    // called words_dictionary. This will be used to tokenize the words before passing them
    // to the model trained by TensorFlow Lite Model Maker
    if let filePath = Bundle.main.path(forResource: "vocab", ofType: "txt") {
        do {
            let dictionary_contents = try String(contentsOfFile: filePath)
            let lines = dictionary_contents.split(whereSeparator: \.isNewline)
            for line in lines{
                let tokens = line.components(separatedBy: " ")
                let key = String(tokens[0])
                let value = Int(tokens[1])
                words_dictionary[key] = value
            }
        } catch {
            print("Error vocab could not be loaded")
        }
    } else {
        print("Error -- vocab file not found")

    }
}
- 您可以從
viewDidLoad內呼叫此函式來執行:
override func viewDidLoad() {
    super.viewDidLoad()
    txtInput.delegate = self
    loadVocab()
}
10. 將字串轉換為一系列權杖
使用者輸入的字詞會組成句子,並成為字串。如果句子中的每個字詞都存在於字典中,系統會根據詞彙表中的定義,將字詞編碼為字詞的鍵值。
NLP 模型通常會接受固定序列長度。使用 ragged tensors 建構的模型是例外,但大部分情況下,這項問題都會獲得修正。您在建立模型時指定了這個長度。請務必在 iOS 應用程式中使用相同長度。
您稍早使用的 TensorFlow Lite Model Maker Colab 預設值為 20,因此請在此處也設定為 20:
let SEQUENCE_LENGTH = 20
新增這個 func,將字串轉換為小寫,並移除所有標點符號:
func convert_sentence(sentence: String) -> [Int32]{
// This func will split a sentence into individual words, while stripping punctuation
// If the word is present in the dictionary it's value from the dictionary will be added to
// the sequence. Otherwise we'll continue

// Initialize the sequence to be all 0s, and the length to be determined
// by the const SEQUENCE_LENGTH. This should be the same length as the
// sequences that the model was trained for
  var sequence = [Int32](repeating: 0, count: SEQUENCE_LENGTH)
  var words : [String] = []
  sentence.enumerateSubstrings(
    in: sentence.startIndex..<sentence.endIndex,options: .byWords) {
            (substring, _, _, _) -> () in words.append(substring!) }
  var thisWord = 0
  for word in words{
    if (thisWord>=SEQUENCE_LENGTH){
      break
    }
    let seekword = word.lowercased()
    if let val = words_dictionary[seekword]{
      sequence[thisWord]=Int32(val)
      thisWord = thisWord + 1
    }
  }
  return sequence
}
請注意,這個序列會是 Int32。這是刻意選擇的,因為將值傳遞至 TensorFlow Lite 時,您會處理低階記憶體,而 TensorFlow Lite 會將字串序列中的整數視為 32 位元整數。這樣在將字串傳遞至模型時,您會輕鬆一些。
11. 進行分類
如要分類句子,必須先根據句子中的字詞轉換為一連串的符記。這項操作已在步驟 9 中完成。
現在,您要將句子傳遞至模型、讓模型對句子進行推論,並剖析結果。
這會使用 TensorFlow Lite 解譯器,您需要匯入該解譯器:
import TensorFlowLite
首先,請建立一個 func,其中包含您的序列 (Int32 型別的陣列):
func classify(sequence: [Int32]){
  // Model Path is the location of the model in the bundle
  let modelPath = Bundle.main.path(forResource: "model", ofType: "tflite")
  var interpreter: Interpreter
  do{
    interpreter = try Interpreter(modelPath: modelPath!)
  } catch _{
    print("Error loading model!")
    return
  }
這會從軟體包載入模型檔案,並使用該檔案叫用解譯器。
下一步是將序列中儲存的基礎記憶體複製到名為 myData, 的緩衝區,以便傳遞至張量。實作 TensorFlow Lite Pod 和解譯器時,您會取得 Tensor 型別的存取權。
以這種方式啟動程式碼 (仍在分類 func 中):
let tSequence = Array(sequence)
let myData = Data(copyingBufferOf: tSequence.map { Int32($0) })
let outputTensor: Tensor
如果 copyingBufferOf 發生錯誤,請別擔心。稍後會將此功能實作為擴充功能。
現在,請在解譯器上分配張量、將您剛建立的資料緩衝區複製到輸入張量,然後叫用解譯器進行推論:
do {
  // Allocate memory for the model's input `Tensor`s.
  try interpreter.allocateTensors()

  // Copy the data to the input `Tensor`.
  try interpreter.copy(myData, toInputAt: 0)

  // Run inference by invoking the `Interpreter`.
  try interpreter.invoke()
叫用完成後,您可以查看解譯器的輸出內容,瞭解結果。
這些是原始值 (每個神經元 4 個位元組),您必須讀取並轉換。由於這個特定模型有 2 個輸出神經元,因此您需要讀取 8 個位元組,這些位元組會轉換為 Float32,以供剖析。您正在處理低階記憶體,因此會出現 unsafeData。
// Get the output `Tensor` to process the inference results.
outputTensor = try interpreter.output(at: 0)
// Turn the output tensor into an array. This will have 2 values
// Value at index 0 is the probability of negative sentiment
// Value at index 1 is the probability of positive sentiment
let resultsArray = outputTensor.data
let results: [Float32] = [Float32](unsafeData: resultsArray) ?? []
現在,您可以相對輕鬆地剖析資料,判斷垃圾內容品質。模型有 2 個輸出內容,第一個是郵件不是垃圾內容的機率,第二個則是郵件是垃圾內容的機率。因此,您可以查看 results[1] 找出垃圾內容值:
let positiveSpamValue = results[1]
var outputString = ""
if(positiveSpamValue>0.8){
    outputString = "Message not sent. Spam detected with probability: " + String(positiveSpamValue)
} else {
    outputString = "Message sent!"
}
txtOutput.text = outputString
為方便起見,以下提供完整方法:
func classify(sequence: [Int32]){
  // Model Path is the location of the model in the bundle
  let modelPath = Bundle.main.path(forResource: "model", ofType: "tflite")
  var interpreter: Interpreter
  do{
    interpreter = try Interpreter(modelPath: modelPath!)
    } catch _{
      print("Error loading model!")
      Return
  }

  let tSequence = Array(sequence)
  let myData = Data(copyingBufferOf: tSequence.map { Int32($0) })
  let outputTensor: Tensor
  do {
    // Allocate memory for the model's input `Tensor`s.
    try interpreter.allocateTensors()

    // Copy the data to the input `Tensor`.
    try interpreter.copy(myData, toInputAt: 0)

    // Run inference by invoking the `Interpreter`.
    try interpreter.invoke()

    // Get the output `Tensor` to process the inference results.
    outputTensor = try interpreter.output(at: 0)
    // Turn the output tensor into an array. This will have 2 values
    // Value at index 0 is the probability of negative sentiment
    // Value at index 1 is the probability of positive sentiment
    let resultsArray = outputTensor.data
    let results: [Float32] = [Float32](unsafeData: resultsArray) ?? []

    let positiveSpamValue = results[1]
    var outputString = ""
    if(positiveSpamValue>0.8){
      outputString = "Message not sent. Spam detected with probability: " +
                      String(positiveSpamValue)
    } else {
      outputString = "Message sent!"
    }
    txtOutput.text = outputString

  } catch let error {
    print("Failed to invoke the interpreter with error: \(error.localizedDescription)")
  }
}
12. 新增 Swift 擴充功能
上述程式碼使用 Data 型別的擴充功能,可讓您將 Int32 陣列的原始位元複製到 Data。以下是該擴充功能的程式碼:
extension Data {
  /// Creates a new buffer by copying the buffer pointer of the given array.
  ///
  /// - Warning: The given array's element type `T` must be trivial in that it can be copied bit
  ///     for bit with no indirection or reference-counting operations; otherwise, reinterpreting
  ///     data from the resulting buffer has undefined behavior.
  /// - Parameter array: An array with elements of type `T`.
  init<T>(copyingBufferOf array: [T]) {
    self = array.withUnsafeBufferPointer(Data.init)
  }
}
處理低層級記憶體時,您會使用「不安全」的資料,而上述程式碼需要您初始化不安全資料的陣列。這項擴充功能可讓您達成這個目標:
extension Array {
  /// Creates a new array from the bytes of the given unsafe data.
  ///
  /// - Warning: The array's `Element` type must be trivial in that it can be copied bit for bit
  ///     with no indirection or reference-counting operations; otherwise, copying the raw bytes in
  ///     the `unsafeData`'s buffer to a new array returns an unsafe copy.
  /// - Note: Returns `nil` if `unsafeData.count` is not a multiple of
  ///     `MemoryLayout<Element>.stride`.
  /// - Parameter unsafeData: The data containing the bytes to turn into an array.
  init?(unsafeData: Data) {
    guard unsafeData.count % MemoryLayout<Element>.stride == 0 else { return nil }
    #if swift(>=5.0)
    self = unsafeData.withUnsafeBytes { .init($0.bindMemory(to: Element.self)) }
    #else
    self = unsafeData.withUnsafeBytes {
      .init(UnsafeBufferPointer<Element>(
        start: $0,
        count: unsafeData.count / MemoryLayout<Element>.stride
      ))
    }
    #endif  // swift(>=5.0)
  }
}
13. 執行 iOS 應用程式
執行並測試應用程式。
如果一切順利,裝置上應該會顯示如下所示的應用程式:
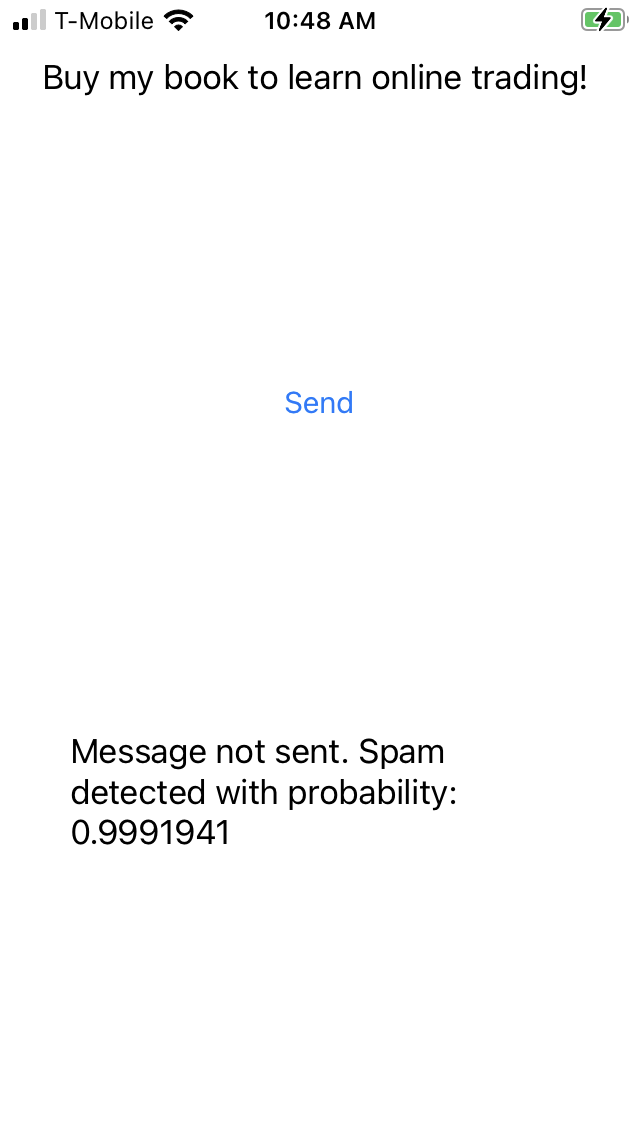
當應用程式收到「Buy my book to learn online trading!」(購買我的書,學習線上交易!) 這則訊息時,會回傳垃圾訊息偵測警示,並顯示 0 .99 的機率!
14. 恭喜!
您現在已建立非常簡單的應用程式,可使用以垃圾留言網誌資料訓練的模型,篩選出留言中的垃圾留言。
在典型的開發人員生命週期中,下一步是根據您社群中的資料,瞭解如何自訂模型。我們會在下一個課程活動中說明相關做法。