
1. परेशानी का सिग्नल

आपका एस्केप पॉड, किसी अनजान दुनिया के वायुमंडल से होकर गुज़रता है. हर पैनल पर चेतावनी वाली लाइटें चमकती हैं. नेविगेशन सिस्टम खराब हो गया है. कम्यूनिकेशन की सुविधाएं कुछ समय के लिए उपलब्ध नहीं हैं. पॉड के आपातकालीन प्रोटोकॉल चालू होने पर, एआई असिस्टेंट की आवाज़ सुनाई देती है:
"सर्वाइवर का पता चला. विमान की इमरजेंसी लैंडिंग हो गई है. Initiating rescue beacon protocol..."
"चेतावनी: पहचान की पुष्टि करना ज़रूरी है. गैलेक्टिक रेस्क्यू नेटवर्क, बिना रजिस्ट्रेशन वाले एक्सप्लोरर का पता नहीं लगा सकता. कृपया अपने बीकन को चालू करने के लिए, अपनी पहचान की पुष्टि करें."
व्यूपोर्ट के बाहर देखना. एलियन का लैंडस्केप, जो क्षितिज तक फैला हुआ है. इसमें अजीबोगरीब चट्टानें, अनजान वनस्पति, और अजीब रंग का आसमान दिख रहा है. इस ग्रह की सतह पर, आपके मिशन के अन्य सर्वाइवर बिखरे हुए हैं.
लेकिन सबसे पहले: आपका सिस्टम में मौजूद होना ज़रूरी है.
आपको क्या बनाना है
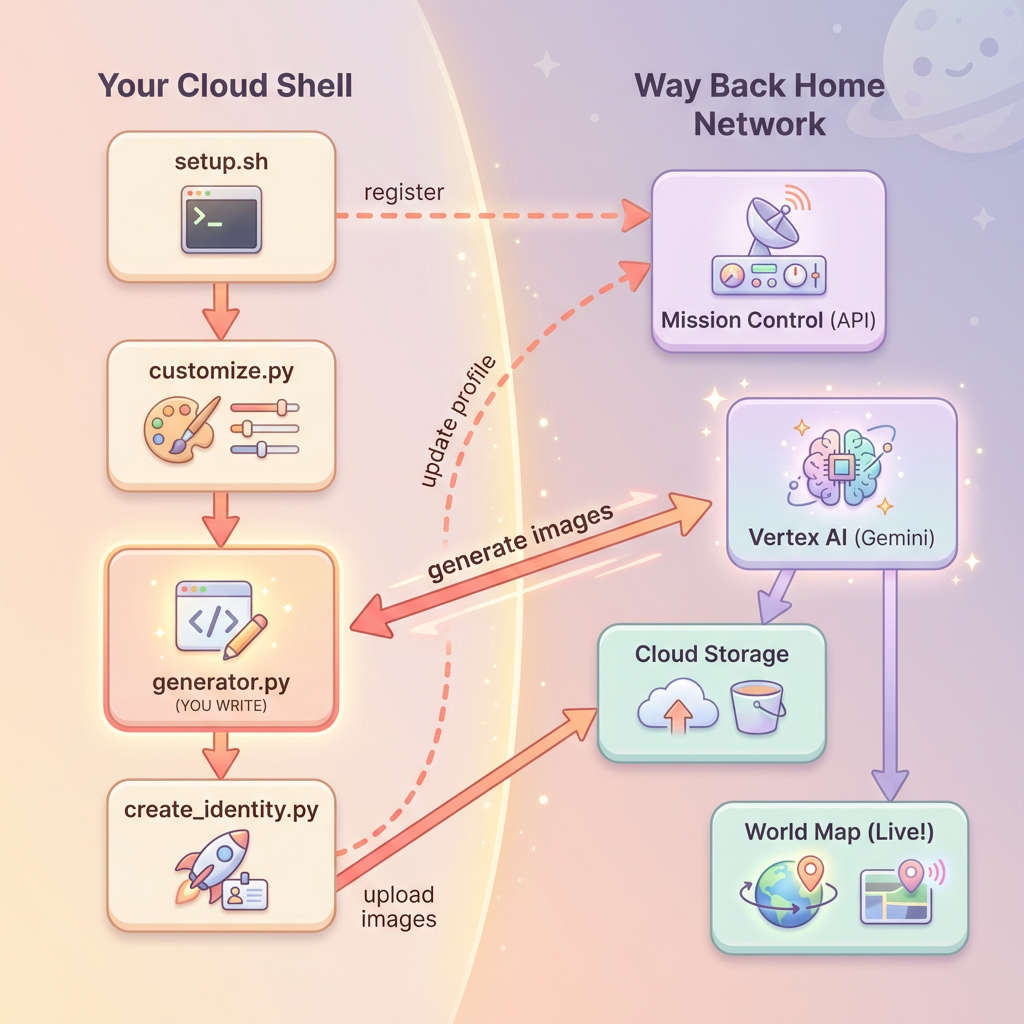
इस लेवल में, आपको कई बार इमेज जनरेट करने की सुविधा का इस्तेमाल करके, स्पेस एक्सप्लोरर के तौर पर अपनी खास पहचान बनानी होगी. इसके लिए, Google के Gemini इमेज जनरेट करने वाले मॉडल (इन्हें Nano Banana 🍌 भी कहा जाता है) का इस्तेमाल करें. आपका अवतार, ग्लोबल रेस्क्यू मैप पर दिखेगा. इसे वर्कशॉप इवेंट में शामिल अन्य सभी लोग देख पाएंगे.
आपको क्या सीखने को मिलेगा
सिद्धांत | ब्यौरा |
कई चरणों में इमेज जनरेट करना | चैट सेशन का इस्तेमाल करके, जनरेट की गई अलग-अलग इमेज में किसी किरदार का लुक एक जैसा रखने का तरीका |
इमेज के लिए प्रॉम्प्ट इंजीनियरिंग | स्टाइल के हिसाब से और एक जैसे आउटपुट पाने के लिए, खास शर्तों के साथ असरदार प्रॉम्प्ट लिखना |
Gemini Image API (Nano Banana) | Python SDK के ज़रिए, Gemini की इमेज जनरेट करने की सुविधा का इस्तेमाल करना |
चैट सेशन | बातचीत के कॉन्टेक्स्ट का इस्तेमाल करके, जवाब को बार-बार बेहतर बनाना और किरदार की बातों में एकरूपता बनाए रखना |
इस लेवल के खत्म होने तक, आपके पास ये होंगे:
✅ टेक्स्ट-टू-इमेज एआई
का इस्तेमाल करके, एक्सप्लोरर का पोर्ट्रेट जनरेट किया गया हो ✅ मल्टी-टर्न बातचीत
का इस्तेमाल करके, एक जैसा मैप आइकॉन बनाया गया हो ✅ रेस्क्यू नेटवर्क में अपनी पहचान रजिस्टर की गई हो
✅ लाइव वर्ल्ड मैप पर, अन्य एक्सप्लोरर के साथ आपकी पहचान दिख रही हो
चलिए, आपको मैप पर दिखाते हैं! 📍
2. अपना एनवायरमेंट तैयार करना
Cloud Shell ऐक्सेस करना
सबसे पहले, हम Cloud Shell खोलेंगे. यह ब्राउज़र पर आधारित एक टर्मिनल है. इसमें Google Cloud SDK और अन्य ज़रूरी टूल पहले से इंस्टॉल होते हैं.
Google Cloud Console में सबसे ऊपर मौजूद, Cloud Shell चालू करें पर क्लिक करें. यह सबसे ऊपर दाएं कोने में मौजूद नेविगेशन बार में टर्मिनल आइकॉन होता है.
Cloud Shell खुलने के बाद, पुष्टि करें कि आपने पुष्टि कर ली है:
# Check that you are logged in
gcloud auth list
आपको अपना खाता (ACTIVE) के तौर पर दिखेगा.
डेटा स्टोर करने की जगह का क्लोन बनाना
Way Back Home के डेटा स्टोर करने की जगह को क्लोन करें और प्रोजेक्ट पर जाएं:
git clone https://github.com/gca-americas/way-back-home.git
cd way-back-home
डिपेंडेंसी इंस्टॉल करना
लेवल 0 पर जाएं और ज़रूरी Python पैकेज इंस्टॉल करें:
cd level_0
uv sync
मुख्य डिपेंडेंसी ये हैं:
पैकेज | मकसद |
| इमेज जनरेट करने के लिए Gemini API क्लाइंट |
| Mission Control को एपीआई कॉल के लिए एचटीटीपी क्लाइंट |
| इमेज प्रोसेसिंग और फ़ाइल हैंडलिंग |
सेटअप की पुष्टि करना
यह पक्का करने के लिए कि सब कुछ सही तरीके से कॉन्फ़िगर किया गया है, पुष्टि करने की प्रोसेस को तुरंत पूरा करें:
uv run python ../scripts/verify_setup.py
आपको यह दिखना चाहिए:
✓ Authenticated as: your-email@google.com
✓ Python environment ready (uv)
✓ Ready to proceed!
आपने अभी-अभी क्या पूरा किया
✓ Cloud Shell खोला गया हो
✓ Google Cloud से पुष्टि की गई हो
✓ कोडलैब रिपॉज़िटरी क्लोन की गई हो
✓ uv
की मदद से, Python की डिपेंडेंसी इंस्टॉल की गई हों
✓ सेटअप की पुष्टि की गई हो
अगला चरण: Mission Control से कनेक्ट करें. सेटअप स्क्रिप्ट, आपके Google Cloud प्रोजेक्ट और एपीआई को अपने-आप कॉन्फ़िगर कर देगी.
3. मिशन कंट्रोल से कनेक्ट करना
सेटअप स्क्रिप्ट चलाना
सेटअप स्क्रिप्ट, आपको Way Back Home रेस्क्यू नेटवर्क से कनेक्ट करती है और आपकी एक्सप्लोरर पहचान को सुरक्षित रखती है. इसे प्रोजेक्ट के रूट से चलाएं:
cd $HOME/way-back-home
chmod +x scripts/setup.sh
./scripts/setup.sh
आपको दो तरह की जानकारी देने के लिए कहा जाएगा.
अपना इवेंट कोड डालें
इवेंट कोड से यह पता चलता है कि आपने किस वर्कशॉप इवेंट में हिस्सा लिया है.
अगर आप किसी वर्कशॉप में हैं: क्यूआर कोड, स्लाइड या वर्कशॉप के इंस्ट्रक्टर से मिला इवेंट कोड डालें.
🚀 Welcome to Way Back Home!

Enter event code (from QR/slide): devfest-nyc-26
Validating event...
✓ Connected to: DevFest NYC 2026
अगर आपको खुद से सीखना है, तो: सार्वजनिक लर्निंग एनवायरमेंट में शामिल होने के लिए, sandbox डालें.
🚀 Welcome to Way Back Home!

Enter event code (from QR/slide): sandbox
Validating event...
✓ Connected to: Way Back Home Sandbox
एक्सप्लोरर का नाम चुनना
अपने एक्सप्लोरर के लिए कोई यूनीक नाम चुनें. दुनिया के मैप और लीडरबोर्ड पर आपकी प्रोफ़ाइल ऐसी दिखेगी.
Choose your explorer name: AstroAyo
✓ Username available!
अगर आपके चुने गए नाम का इस्तेमाल, उसी इवेंट में हिस्सा लेने वाला कोई दूसरा व्यक्ति पहले से कर रहा है, तो:
Choose your explorer name: SpaceExplorer
⚠️  That name is taken. Try another.
Choose your explorer name: SpaceExplorer42
✓ Username available!
सेटअप पूर्ण
प्रोसेस पूरी होने के बाद, आपको पुष्टि का यह मैसेज दिखेगा:
Initializing your explorer profile...

✓ Environment configured!
  Explorer ID: a1b2c3d4
  Starting coordinates: (47, 23)

Next: cd level_0 && python customize.py
लेवल 0 पर जाएं
अब लेवल 0 डायरेक्ट्री पर जाएं (आपकी डिपेंडेंसी, मॉड्यूल 2 से पहले ही इंस्टॉल हो चुकी हैं):
cd level_0
अपने कॉन्फ़िगरेशन की जांच करना
देखें कि क्या सेव किया गया है (config.json, प्रोजेक्ट रूट में है):
cat ../config.json
{
    "event_code": "devfest-nyc-26",
    "event_name": "DevFest NYC 2026",
    "username": "AstroAyo",
    "participant_id": "a1b2c3d4",
    "starting_x": 47,
    "starting_y": 23,
    "api_base": "https://api.waybackhome.dev",
    "project_id": "your-project-id"
}
इस कॉन्फ़िगरेशन फ़ाइल का इस्तेमाल, बाद की स्क्रिप्ट करेंगी. इससे, रेस्क्यू नेटवर्क को आपकी पहचान करने में मदद मिलेगी.
आपने अभी-अभी क्या पूरा किया
✓ Mission Control API से कनेक्ट किया गया हो
✓ एक्सप्लोरर के लिए यूनीक नाम रिज़र्व किया गया हो
✓ आपको प्रतिभागी आईडी और शुरुआती कोऑर्डिनेट मिल गए हों
✓ अगले चरणों के लिए कॉन्फ़िगरेशन सेव किया गया हो
इसके बाद: एक्सप्लोरर के लुक को पसंद के मुताबिक बनाएं.
4. एक्सप्लोरर को पसंद के मुताबिक बनाना
कस्टम स्क्रिप्ट चलाना
अपना अवतार जनरेट करने से पहले, आपको एक्सप्लोरर के लुक के बारे में कुछ विकल्प चुनने होंगे:
uv run python customize.py
अपने सूट का रंग चुनें
एक्सप्लोरर के स्पेस सूट के लिए कोई रंग चुनें:
🎨 Let's create your explorer identity!

Select suit color:
  1. Deep Blue
  2. Crimson Red
  3. Forest Green
  4. Royal Purple
  5. Solar Gold
  6. Silver

Choice [1-6, default=6]: 1
✓ Deep Blue selected
अपने एक्सप्लोरर के बारे में बताएं (ज़रूरी नहीं)
एक्सप्लोरर की बनावट के बारे में कम शब्दों में जानकारी दी जा सकती है. इसके अलावा, रैंडम असाइनमेंट के लिए Enter दबाएं:
Brief description of your explorer (or Enter for random):
Example: 'short dark hair, glasses, friendly smile'
> short dark hair, glasses, determined expression

✓ Preferences saved!
अगर आपने कुछ भी टाइप किए बिना Enter दबाया, तो आपको रैंडम तौर पर कुछ विशेषताएं मिलेंगी:
>
✓ Random traits: confident expression, short styled hair
कॉन्फ़िगरेशन अपडेट किया गया
आपकी प्राथमिकताएं अब सेव हो गई हैं:
✓ Preferences saved!
Next: Open generator.py and follow the codelab instructions
अपडेट किए गए कॉन्फ़िगरेशन की पुष्टि करें:
cat ../config.json
आपको अपनी जोड़ी गई प्राथमिकताएं दिखेंगी:
{
    "event_code": "devfest-nyc-26",
    "event_name": "DevFest NYC 2026",
    "username": "AstroAyo",
    "participant_id": "a1b2c3d4",
    "starting_x": 47,
    "starting_y": 23,
    "api_base": "https://api.waybackhome.dev",
    "project_id": "your-project-id",
    "suit_color": "deep blue with silver accents",
    "appearance": "short dark hair, glasses, determined expression"
}
आपने अभी-अभी क्या पूरा किया
✓ आपने अपने सूट का रंग चुना हो
✓ आपने एक्सप्लोरर की इमेज तय की हो
✓ इमेज जनरेट करने के लिए कॉन्फ़िगरेशन तैयार हो
इसके बाद: मुख्य इवेंट—इमेज जनरेट करने का कोड लिखना!
5. अवतार जनरेट करने की सुविधा बनाना
यह मुख्य लर्निंग मॉड्यूल है. आपको Python कोड लिखना होगा. यह कोड, Gemini की इमेज जनरेट करने की सुविधा (Nano Banana) का इस्तेमाल करके, आपका यूनीक एक्सप्लोरर अवतार जनरेट करेगा.
जनरेटर फ़ाइल खोलें
Cloud Shell Editor में अवतार जनरेट करने वाला टूल खोलें:
cloudshell edit generator.py
इसके अलावा, Cloud Shell में Open Editor पर क्लिक करें और level_0 फ़ोल्डर में generator.py पर जाएं.
फ़ाइल स्ट्रक्चर को समझना
इस फ़ाइल में स्टार्टर कोड और तीन प्लेसहोल्डर सेक्शन होते हैं. इनमें आपको अपना कोड जोड़ना होता है:
"""
Level 0: Avatar Generator

This module generates your unique space explorer avatar using
multi-turn image generation with Gemini (Nano Banana) for
character consistency across portrait and icon.
"""

from google import genai
from google.genai import types
from PIL import Image
import json
import os
import io

# Load configuration from setup (config.json is in project root)
CONFIG_PATH = "../config.json"

with open(CONFIG_PATH) as f:
    config = json.load(f)

USERNAME = config["username"]
SUIT_COLOR = config["suit_color"]
APPEARANCE = config["appearance"]

# Initialize the Gemini client for Vertex AI
client = genai.Client(
    vertexai=True,
    project=os.environ.get("GOOGLE_CLOUD_PROJECT", config.get("project_id")),
    location="us-central1"
)


def generate_explorer_avatar() -> dict:
    """
    Generate portrait and icon using multi-turn chat for consistency.

    The key technique here is using a CHAT SESSION rather than independent
    API calls. This allows Gemini to "remember" the character it created
    in the first turn, ensuring the icon matches the portrait.

    Returns:
        dict with portrait_path and icon_path
    """

    # MODULE_5_STEP_1_CREATE_CHAT_SESSION
    # TODO: Create a chat session for multi-turn generation
    chat = None  # Replace this line

    # MODULE_5_STEP_2_GENERATE_PORTRAIT
    # TODO: Generate the explorer portrait
    portrait_image = None  # Replace this section

    # MODULE_5_STEP_3_GENERATE_ICON
    # TODO: Generate a consistent map icon
    icon_image = None  # Replace this section

    return {
        "portrait_path": "outputs/portrait.png",
        "icon_path": "outputs/icon.png"
    }


if __name__ == "__main__":
    # Create outputs directory if it doesn't exist
    os.makedirs("outputs", exist_ok=True)

    print(f"Generating avatar for {USERNAME}...")
    result = generate_explorer_avatar()
    print(f"✅ Avatar created!")
    print(f"   Portrait: {result['portrait_path']}")
    print(f"   Icon: {result['icon_path']}")
आपको तीन TODO सेक्शन को अपने कोड से बदलना होगा.
पहला चरण: चैट सेशन बनाना
MODULE_5_STEP_1_CREATE_CHAT_SESSION प्लेसहोल्डर ढूंढें और chat = None # Replace this line लाइन को इससे बदलें:
    # MODULE_5_STEP_1_CREATE_CHAT_SESSION
    # Create a chat session to maintain character consistency across generations.
    # The chat session preserves context between turns, so Gemini "remembers"
    # what it generated and can create consistent variations.
    chat = client.chats.create(
        model="gemini-2.5-flash-image",  # Nano Banana - Gemini with image generation
        config=types.GenerateContentConfig(
            response_modalities=["TEXT", "IMAGE"]
        )
    )
दूसरा चरण: पोर्ट्रेट जनरेट करना
MODULE_5_STEP_2_GENERATE_PORTRAIT ढूंढें और portrait_image = None # Replace this section को इस कोड से बदलें:
    # MODULE_5_STEP_2_GENERATE_PORTRAIT
    # First turn: Generate the explorer portrait.
    # This establishes the character that will be referenced in subsequent turns.
    portrait_prompt = f"""Create a stylized space explorer portrait.

Character appearance: {APPEARANCE}
Name on suit patch: "{USERNAME}"
Suit color: {SUIT_COLOR}

CRITICAL STYLE REQUIREMENTS:
- Digital illustration style, clean lines, vibrant saturated colors
- Futuristic but weathered space suit with visible mission patches
- Background: Pure solid white (#FFFFFF) - absolutely no gradients, patterns, or elements
- Frame: Head and shoulders only, 3/4 view facing slightly left
- Lighting: Soft diffused studio lighting, no harsh shadows
- Expression: Determined but approachable
- Art style: Modern animated movie character portrait (similar to Pixar or Dreamworks style)

The white background is essential - the avatar will be composited onto a map."""

    print("🎨 Generating your portrait...")
    portrait_response = chat.send_message(portrait_prompt)

    # Extract the image from the response.
    # Gemini returns a response with multiple "parts" - we need to find the image part.
    portrait_image = None
    for part in portrait_response.candidates[0].content.parts:
        if part.inline_data is not None:
            # Found the image! Convert from bytes to PIL Image and save.
            image_bytes = part.inline_data.data
            portrait_image = Image.open(io.BytesIO(image_bytes))
            portrait_image.save("outputs/portrait.png")
            break

    if portrait_image is None:
        raise Exception("Failed to generate portrait - no image in response")

    print("✓ Portrait generated!")
तीसरा चरण: मैप आइकॉन जनरेट करना
MODULE_5_STEP_3_GENERATE_ICON को ढूंढें और icon_image = None # Replace this section को इससे बदलें:
    # MODULE_5_STEP_3_GENERATE_ICON
    # Second turn: Generate a consistent icon for the map.
    # Because we're in the same chat session, Gemini remembers the character
    # from the portrait and will maintain visual consistency.
    icon_prompt = """Now create a circular map icon of this SAME character.

CRITICAL REQUIREMENTS:
- SAME person, SAME face, SAME expression, SAME suit — maintain perfect consistency with the portrait
- Tighter crop: just the head and very top of shoulders
- Background: Pure solid white (#FFFFFF)
- Optimized for small display sizes (will be used as a 64px map marker)
- Keep the exact same art style, colors, and lighting as the portrait
- Square 1:1 aspect ratio

This icon must be immediately recognizable as the same character from the portrait."""

    print("🖼️  Creating map icon...")
    icon_response = chat.send_message(icon_prompt)

    # Extract the icon image from the response
    icon_image = None
    for part in icon_response.candidates[0].content.parts:
        if part.inline_data is not None:
            image_bytes = part.inline_data.data
            icon_image = Image.open(io.BytesIO(image_bytes))
            icon_image.save("outputs/icon.png")
            break

    if icon_image is None:
        raise Exception("Failed to generate icon - no image in response")

    print("✓ Icon generated!")
आपका लिखा गया कोड
तीनों सेक्शन जोड़ने के बाद, आपका generate_explorer_avatar() फ़ंक्शन कुछ ऐसा दिखेगा:
def generate_explorer_avatar() -> dict:
    """
    Generate portrait and icon using multi-turn chat for consistency.

    The key technique here is using a CHAT SESSION rather than independent
    API calls. This allows Gemini to "remember" the character it created
    in the first turn, ensuring the icon matches the portrait.

    Returns:
        dict with portrait_path and icon_path
    """

    # MODULE_5_STEP_1_CREATE_CHAT_SESSION
    # Create a chat session to maintain character consistency across generations.
    # The chat session preserves context between turns, so Gemini "remembers"
    # what it generated and can create consistent variations.
    chat = client.chats.create(
        model="gemini-2.5-flash-image",  # Nano Banana - Gemini with image generation
        config=types.GenerateContentConfig(
            response_modalities=["TEXT", "IMAGE"]
        )
    )

    # MODULE_5_STEP_2_GENERATE_PORTRAIT
    # First turn: Generate the explorer portrait.
    # This establishes the character that will be referenced in subsequent turns.
    portrait_prompt = f"""Create a stylized space explorer portrait.

Character appearance: {APPEARANCE}
Name on suit patch: "{USERNAME}"
Suit color: {SUIT_COLOR}

CRITICAL STYLE REQUIREMENTS:
- Digital illustration style, clean lines, vibrant saturated colors
- Futuristic but weathered space suit with visible mission patches
- Background: Pure solid white (#FFFFFF) - absolutely no gradients, patterns, or elements
- Frame: Head and shoulders only, 3/4 view facing slightly left
- Lighting: Soft diffused studio lighting, no harsh shadows
- Expression: Determined but approachable
- Art style: Modern animated movie character portrait (similar to Pixar or Dreamworks style)

The white background is essential - the avatar will be composited onto a map."""

    print("🎨 Generating your portrait...")
    portrait_response = chat.send_message(portrait_prompt)

    # Extract the image from the response.
    # Gemini returns a response with multiple "parts" - we need to find the image part.
    portrait_image = None
    for part in portrait_response.candidates[0].content.parts:
        if part.inline_data is not None:
            # Found the image! Convert from bytes to PIL Image and save.
            image_bytes = part.inline_data.data
            portrait_image = Image.open(io.BytesIO(image_bytes))
            portrait_image.save("outputs/portrait.png")
            break

    if portrait_image is None:
        raise Exception("Failed to generate portrait - no image in response")

    print("✓ Portrait generated!")

    # MODULE_5_STEP_3_GENERATE_ICON
    # Second turn: Generate a consistent icon for the map.
    # Because we're in the same chat session, Gemini remembers the character
    # from the portrait and will maintain visual consistency.
    icon_prompt = """Now create a circular map icon of this SAME character.

CRITICAL REQUIREMENTS:
- SAME person, SAME face, SAME expression, SAME suit — maintain perfect consistency with the portrait
- Tighter crop: just the head and very top of shoulders
- Background: Pure solid white (#FFFFFF)
- Optimized for small display sizes (will be used as a 64px map marker)
- Keep the exact same art style, colors, and lighting as the portrait
- Square 1:1 aspect ratio

This icon must be immediately recognizable as the same character from the portrait."""

    print("🖼️  Creating map icon...")
    icon_response = chat.send_message(icon_prompt)

    # Extract the icon image from the response
    icon_image = None
    for part in icon_response.candidates[0].content.parts:
        if part.inline_data is not None:
            image_bytes = part.inline_data.data
            icon_image = Image.open(io.BytesIO(image_bytes))
            icon_image.save("outputs/icon.png")
            break

    if icon_image is None:
        raise Exception("Failed to generate icon - no image in response")

    print("✓ Icon generated!")

    return {
        "portrait_path": "outputs/portrait.png",
        "icon_path": "outputs/icon.png"
    }
अपनी फ़ाइल सेव करना
generator.py को सेव करना न भूलें:
- Cloud Shell Editor: Ctrl+S (Windows/Linux) या Cmd+S (Mac)
- vim: Escape दबाएं. इसके बाद,
:wqऔर Enter टाइप करें
आपने अभी-अभी क्या बनाया
✓ एक से ज़्यादा बार इमेज जनरेट करने के लिए चैट सेशन बनाया गया
✓ स्टाइल से जुड़ी पाबंदियों के साथ पोर्ट्रेट जनरेट करने के लिए, पूरी जानकारी वाला प्रॉम्प्ट तैयार किया गया
✓ बातचीत के संदर्भ का इस्तेमाल करके, मैप का एक जैसा आइकॉन जनरेट किया गया
✓ Gemini से मिले जवाबों से इमेज डेटा को पार्स करने का तरीका सीखा गया
मास्टर किए गए मुख्य सिद्धांत:
सिद्धांत | आपने क्या सीखा |
चैट सेशन |
|
जवाब देने के तरीके |
|
प्रॉम्प्ट का स्ट्रक्चर | विषय → वैरिएबल → स्टाइल → तकनीकी सीमाएं |
कैरेक्टर की स्टाइल एक जैसी रखना | एक ही चैट सेशन = सभी इमेज में एक ही वर्ण |
जवाब को पार्स करना | जवाब के हिस्सों में, |
अगला चरण: अपना कोड चलाएं और मैप पर अपनी जगह देखें!
6. जनरेट करें और रजिस्टर करें
प्रोजेक्ट आईडी सेट करना
पक्का करें कि आपका प्रोजेक्ट आईडी, एनवायरमेंट वैरिएबल के तौर पर उपलब्ध हो:
export GOOGLE_CLOUD_PROJECT=$(gcloud config get-value project)
Identity Creator को चलाएं
अब मुख्य स्क्रिप्ट चलाएं. यह स्क्रिप्ट, जनरेट करने, अपलोड करने, और रजिस्टर करने की प्रोसेस को मैनेज करती है:
uv run python create_identity.py
आपको जनरेट होने की प्रोसेस रीयल टाइम में दिखेगी:
ध्यान दें: लाइव मैप पर आपका अवतार दिखने में पांच सेकंड लग सकते हैं. इसलिए, अगर आपको मैप पर तुरंत अपना अवतार नहीं दिखता है, तो पेज को रीफ़्रेश करें.
🚀 Creating identity for AstroAyo...

🎨 Generating your portrait...
✓ Portrait generated!
🖼️  Creating map icon...
✓ Icon generated!

☁️  Uploading to mission database...
✓ Avatar uploaded!

📍 Registering with rescue network...
✓ Registration complete!

╔═══════════════════════════════════════════════════════════════╗
║                    ✅ IDENTITY CONFIRMED!                      ║
╠═══════════════════════════════════════════════════════════════╣
║                                                               ║
║  Explorer: AstroAyo                                           ║
║  Location: (47, 23) — unconfirmed                             ║
║                                                               ║
║  🗺️  You're now on the map!                                   ║
║  https://waybackhome.dev/e/devfest-nyc-26                     ║
║                                                               ║
║  NEXT: Proceed to Level 1 to pinpoint your exact location!   ║
║                                                               ║
╚═══════════════════════════════════════════════════════════════╝
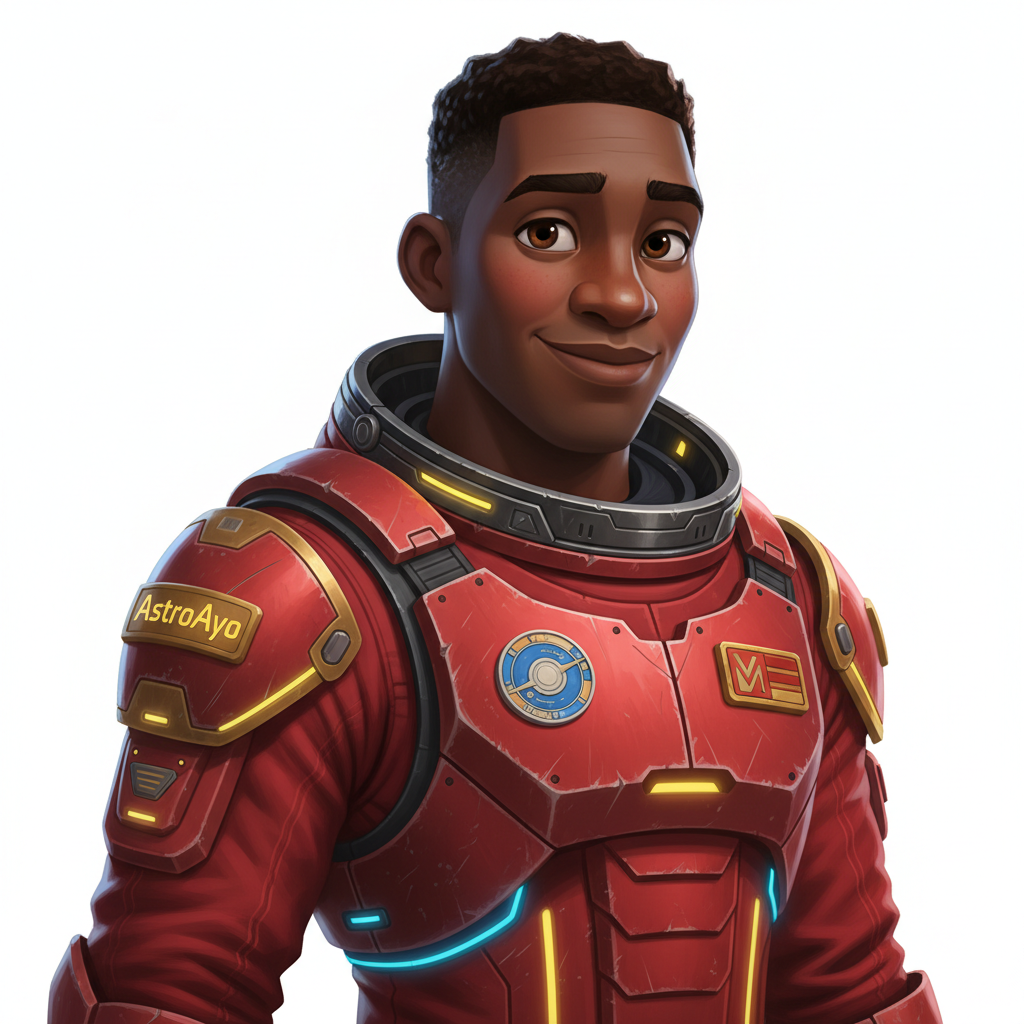
जनरेट किया गया अवतार देखना
जनरेट की गई इमेज को स्थानीय तौर पर देखें:
# List the generated files
ls -la outputs/

# Download to view on your local machine
cloudshell download outputs/portrait.png
cloudshell download outputs/icon.png
इसके अलावा, outputs/ फ़ोल्डर पर जाकर और इमेज फ़ाइलों पर क्लिक करके, उन्हें सीधे Cloud Shell Editor में देखा जा सकता है.
जनरेट किया गया पोर्ट्रेट और आइकॉन, इन इमेज की तरह दिखेगा:
![]()
मैप पर अपनी जगह की जानकारी देखना!
अपने आउटपुट में दिखाया गया दुनिया का मैप यूआरएल खोलें:
https://waybackhome.dev/e/{your-event-code}
उदाहरण के लिए: https://waybackhome.dev/e/devfest-nyc-26
मैप पर अपना अवतार ढूंढें! आपको ये चीज़ें दिखेंगी:
- आइकॉन, जो पृथ्वी की सतह पर आपकी जगह दिखाता है
- आपके आइकॉन के नीचे लेबल के तौर पर आपका एक्सप्लोरर का नाम
- आपके मार्कर के आस-पास धीरे-धीरे पल्स करने वाला हल्का बीकन
![]()
ज़्यादा जानकारी वाले कार्ड में अपनी पूरी इमेज देखने के लिए, अपने मार्कर पर क्लिक करें.
क्या आपको अपना अवतार पसंद नहीं है? फिर से जनरेट करो!
अगर आपको कोई दूसरा अवतार चाहिए, तो उसे फिर से जनरेट किया जा सकता है:
# Option 1: Change your appearance settings first
uv run python customize.py

# Option 2: Just regenerate with current settings
uv run python create_identity.py
create_identity.py का इस्तेमाल करने पर, हर बार एक पूरी तरह से नया अवतार जनरेट होता है. साथ ही, यह आपके रजिस्ट्रेशन को अपडेट करता है. (नया चैट सेशन = नया किरदार) जब तक आपको मनमुताबिक नतीजा न मिल जाए, तब तक अलग-अलग तरह से प्रॉम्प्ट देना जारी रखें!
समस्या का हल
आपने अभी-अभी क्या पूरा किया
✓ आपने एक्सप्लोरर का अपना यूनीक पोर्ट्रेट जनरेट किया हो
✓ आपने मैप का एक जैसा आइकॉन बनाया हो
✓ आपने मिशन कंट्रोल में ऐसेट अपलोड की हों
✓ आपने रेस्क्यू नेटवर्क में अपनी पहचान रजिस्टर की हो
✓ आपकी जानकारी लाइव वर्ल्ड मैप पर दिख रही हो!
बधाई हो, एक्सप्लोरर! अब आप बचाव नेटवर्क में शामिल हो गए हैं. आपका बीकन चालू है (हालांकि, यह धुंधला है). साथ ही, अन्य सर्वाइवर आपको मैप पर देख सकते हैं.
7. नतीजा
आपने क्या बनाया
आपने सिर्फ़ 10 मिनट में, एआई की मदद से इमेज जनरेट करने वाले सिस्टम का इस्तेमाल करके, अवतार जनरेट करने वाला पूरा सिस्टम बनाया:
┌─────────────────────────────────────────────────────────────┐
│                     Your Creation                           │
├─────────────────────────────────────────────────────────────┤
│                                                             │
│   📝 Input                       🖼️  Output                  │
│   ──────────                     ────────                    │
│   • Explorer name                • Stylized portrait         │
│   • Suit color                   • Consistent map icon       │
│   • Appearance description       • Live map presence         │
│                                                              │
├─────────────────────────────────────────────────────────────┤
│                                                             │
│   🧠 Techniques You Used                                     │
│   ──────────────────────                                    │
│   • Multi-turn chat sessions for character consistency      │
│   • Structured prompt engineering with style constraints    │
│   • Response parsing to extract generated images            │
│   • API integration for cloud registration                  │
│                                                             │
└─────────────────────────────────────────────────────────────┘
सीखने लायक ज़रूरी बातें
लेसन | यह ज़रूरी क्यों है |
चैट सेशन में कॉन्टेक्स्ट बनाए रखना | यह सुविधा, एक जैसी दिखने वाली कई इमेज जनरेट करने के लिए ज़रूरी है. इससे इमेज में मौजूद किरदार की बनावट में बदलाव नहीं होता |
प्रॉम्प्ट का स्ट्रक्चर मायने रखता है | साफ़ तौर पर बताई गई शर्तों (व्हाइट बैकग्राउंड, खास स्टाइल, फ़्रेमिंग) के हिसाब से, अनुमानित और प्रोडक्शन के लिए तैयार नतीजे मिलते हैं |
एक से ज़्यादा बार बातचीत करने की सुविधा, अलग-अलग कॉल करने की सुविधा से बेहतर है | चैट में मौजूद हर मैसेज, पिछले कॉन्टेक्स्ट के आधार पर तैयार होता है. इससे, जवाब को बेहतर बनाने और उसमें एकरूपता बनाए रखने में मदद मिलती है |
जवाब देने के तरीके से जुड़े कंट्रोल का आउटपुट | इमेज जनरेट करने के लिए, |
कीमत की खास जानकारी
इस लेवल के लिए, आपने Gemini 2.5 Flash (Nano Banana) का इस्तेमाल करके दो इमेज जनरेट की हैं:
आइटम | टोकन | लागत |
पोर्ट्रेट (1024×1024) | ~1,290 आउटपुट टोकन | ~4.35 रुपये |
आइकॉन (1024×1024) | ~1,290 आउटपुट टोकन | ~4.35 रुपये |
कुल | ~2,580 टोकन | ~0.08 डॉलर |
सफ़र जारी है
एक्सप्लोरर के तौर पर आपकी पहचान की पुष्टि हो गई है, लेकिन एक समस्या है: आपकी जगह की जानकारी की पुष्टि नहीं हुई है.
दुनिया के मैप पर देखें—आपका बीकन धुंधला है और धीरे-धीरे पल्स कर रहा है. रेस्क्यू नेटवर्क को पता है कि आप मौजूद हैं, लेकिन उन्हें यह नहीं पता कि आप किस जगह पर हैं. आपकी लोकेशन, पृथ्वी की सतह के किसी बड़े हिस्से में कहीं भी हो सकती है.
लेवल 1: अपनी जगह की जानकारी पिन करना में, आपको ये काम करने होंगे:
- Google के Agent Development Kit (ADK) का इस्तेमाल करके, मल्टी-एजेंट सिस्टम बनाना
- भूवैज्ञानिक, वनस्पति विज्ञान, और खगोलीय विश्लेषण के लिए एमसीपी सर्वर बनाना
- टेक्स्ट, इमेज, और वीडियो वगैरह का इस्तेमाल करके दिए गए इनपुट को प्रोसेस करना (दुर्घटना की जगह की इमेज)
- एआई की मदद से, पुष्टि की गई जगह का टपोग्राफ़िकल मैप जनरेट करना
- अपने बीकन को चालू करें, ताकि बचाव दल आपको ढूंढ सके!
लेवल 1 में, ज़्यादा बेहतर कॉन्सेप्ट के बारे में बताया गया है: मल्टी-एजेंट ऑर्केस्ट्रेशन, मॉडल कॉन्टेक्स्ट प्रोटोकॉल (एमसीपी), और प्रोडक्शन डिप्लॉयमेंट पैटर्न. आपको एक मॉडल की सुविधा इस्तेमाल करने से लेकर, पूरा एजेंटिक सिस्टम बनाने तक की जानकारी मिलेगी.
डेटा साफ़ करना (ज़रूरी नहीं)
अगर आपको लोकल फ़ाइलों को क्लीन अप करना है (level_0 डायरेक्ट्री से चलाएं):
rm -rf outputs/
deactivate  # Exit virtual environment
रेस्क्यू नेटवर्क के साथ आपका रजिस्ट्रेशन बना रहता है. लोकल फ़ाइलें मिटाने के बाद भी, आपको मैप पर दिखाया जाएगा. इमेज को क्लाउड में सेव किया जाता है, न कि डिवाइस में.
संसाधन
- Gemini का इस्तेमाल करके इमेज जनरेट करने की सुविधा से जुड़ा दस्तावेज़
- इमेज के लिए प्रॉम्प्ट इंजीनियरिंग गाइड
- Nano Banana से जुड़ी सूचना देने वाला ब्लॉग
- Way Back Home Repository
- पहला लेवल: अपनी जगह की जानकारी शेयर करना
आपके बीकन की पुष्टि होना बाकी है. एक्सप्लोरर, लेवल 1 में मिलते हैं. 🚀
8. बोनस: फ़ोटो पर आधारित अवतार (ज़रूरी नहीं)
फ़ोटो से अवतार बनाने की सुविधा का इस्तेमाल कब करना चाहिए
अगर आपको ये काम करने हैं, तो यह तरीका आपके लिए बेहतर हो सकता है:
- आपको अपने अवतार को अपनी तरह बनाना है
- आपको किसी फ़ोटो को स्टाइल करना है
- आपको Gemini की इमेज को दूसरी इमेज में बदलने की सुविधाओं के बारे में जानना हो
यह कैसे काम करता है
सिर्फ़ टेक्स्ट के ब्यौरे के आधार पर कोई किरदार जनरेट करने के बजाय, कोई फ़ोटो दें और Gemini से उसे बदलने के लिए कहें. साथ ही, यह भी कहें कि व्यक्ति के लुक में कोई बदलाव न किया जाए:
![]()
अपनी फ़ोटो अपलोड करें
सबसे पहले, Cloud Shell में कोई फ़ोटो अपलोड करें:
- Cloud Shell में, टर्मिनल टूलबार में मौजूद तीन बिंदु वाले मेन्यू (⋮) पर क्लिक करें
- अपलोड करें को चुनें
- साफ़ तौर पर दिखने वाली हेडशॉट फ़ोटो चुनें (JPEG या PNG)
- अपलोड किए गए पाथ को नोट करें. उदाहरण के लिए,
/home/your-username/my_photo.jpg
जनरेटर में बदलाव करना
किसी फ़ोटो का इस्तेमाल करने के लिए, आपको generator.py में पोर्ट्रेट जनरेट करने के चरण में बदलाव करना होगा. सिर्फ़ टेक्स्ट वाले प्रॉम्प्ट की जगह, मल्टीमॉडल प्रॉम्प्ट का इस्तेमाल करें. इसमें अपनी फ़ोटो शामिल करें:
    # MODULE_5_STEP_2_GENERATE_PORTRAIT (Photo-based version)

    # Load your photo
    photo_path = "/home/your-username/my_photo.jpg"  # Update this path!
    user_photo = Image.open(photo_path)

    # Convert photo to bytes for the API
    photo_buffer = io.BytesIO()
    user_photo.save(photo_buffer, format="JPEG")
    photo_bytes = photo_buffer.getvalue()

    portrait_prompt = f"""Transform this person into a stylized space explorer portrait.

PRESERVE from the original photo:
- The person's facial features, face shape, and likeness
- Their general expression and personality
- Any distinctive features (glasses, facial hair, etc.)

TRANSFORM with this style:
- Digital illustration style, clean lines, vibrant saturated colors
- Add a futuristic space suit with the name "{USERNAME}" on a shoulder patch
- Suit color: {SUIT_COLOR}
- Background: Pure solid white (#FFFFFF) - no gradients or elements
- Frame: Head and shoulders, 3/4 view
- Lighting: Soft diffused studio lighting
- Art style: Modern animated movie character (Pixar/Dreamworks aesthetic)

The result should be clearly recognizable as THIS specific person, but illustrated as a heroic space explorer."""

    print("🎨 Transforming your photo into an explorer portrait...")

    # Send both the prompt AND the image
    portrait_response = chat.send_message([
        portrait_prompt,
        types.Part.from_bytes(data=photo_bytes, mime_type="image/jpeg")
    ])

    # Rest of the extraction code stays the same...
अब भी मल्टी-टर्न कंसिस्टेंसी की सुविधा काम करती है
फ़ोटो के आधार पर इमेज जनरेट करने के लिए, बातचीत के कई चरणों वाली सुविधा इसी तरह काम करती है:
- पहला चरण: फ़ोटो + प्रॉम्प्ट → स्टाइल वाला पोर्ट्रेट (आपकी तरह दिखने वाला, इलस्ट्रेटेड)
- दूसरा चरण: "इसी किरदार का आइकॉन बनाओ" → एक जैसा आइकॉन
चैट सेशन में, स्टाइल की गई इमेज सेव होती है, न कि ओरिजनल फ़ोटो. इसलिए, आइकॉन, बदले गए पोर्ट्रेट से पूरी तरह मेल खाएगा.
निजता से जुड़ी बातें
Vertex AI Studio में आज़माएं
कोड लिखने से पहले, Google Cloud Console में जाकर फ़ोटो को इंटरैक्टिव तरीके से बदलने की सुविधा को आज़माया जा सकता है:
- Vertex AI Studio पर जाएं
- इमेज से जुड़ी सुविधाओं वाला Gemini का कोई मॉडल चुनें
- अटैचमेंट बटन का इस्तेमाल करके, अपनी फ़ोटो अपलोड करें
- इमेज ट्रांसफ़ॉर्म करने के लिए प्रॉम्प्ट डालें
- जब तक आपको मनमुताबिक नतीजा न मिल जाए, तब तक अलग-अलग स्टाइल में प्रॉम्प्ट देना जारी रखें
यह इंटरैक्टिव तरीका, प्रॉम्प्ट के साथ एक्सपेरिमेंट करने और कोड लिखने से पहले रीयल-टाइम में नतीजे देखने के लिए बेहतरीन है!
आपने क्या सीखा (बोनस)
✓ Gemini की मदद से, इमेज को दूसरी इमेज में बदलने की सुविधा का इस्तेमाल कैसे करें
✓ एक ही मैसेज में टेक्स्ट और इमेज जैसे कई तरह के कॉन्टेंट को भेजना
✓ आर्टिस्टिक स्टाइल ट्रांसफ़र की सुविधा का इस्तेमाल करते समय, इमेज की समानता को बनाए रखना
✓ फ़ोटो के आधार पर एआई जनरेशन के लिए, निजता से जुड़ी बातों का ध्यान रखना