
1. 救難信号
脱出ポッドが未知の世界の大気圏を突き抜けます。警告灯がすべてのパネルで点滅します。ナビゲーション システムが故障しています。通信がダウンしています。ポッドの緊急プロトコルが起動すると、AI アシスタントが起動します。
「生存者を発見しました。緊急着陸に成功しました。救難ビーコン プロトコルを開始しています..."
「警告: 身元確認が必要です。銀河救助ネットワークは、登録されていない探検家を見つけることができません。ビーコンを有効にするには、本人確認を行ってください。」
ビューポートから外を見ます。地平線まで広がる異星の風景。奇妙な岩の形状、見慣れない植生、奇妙な色の空。この惑星の表面には、ミッションの他の生存者が散らばっています。
ただし、まず、システムに存在する必要があります。
作成する機能
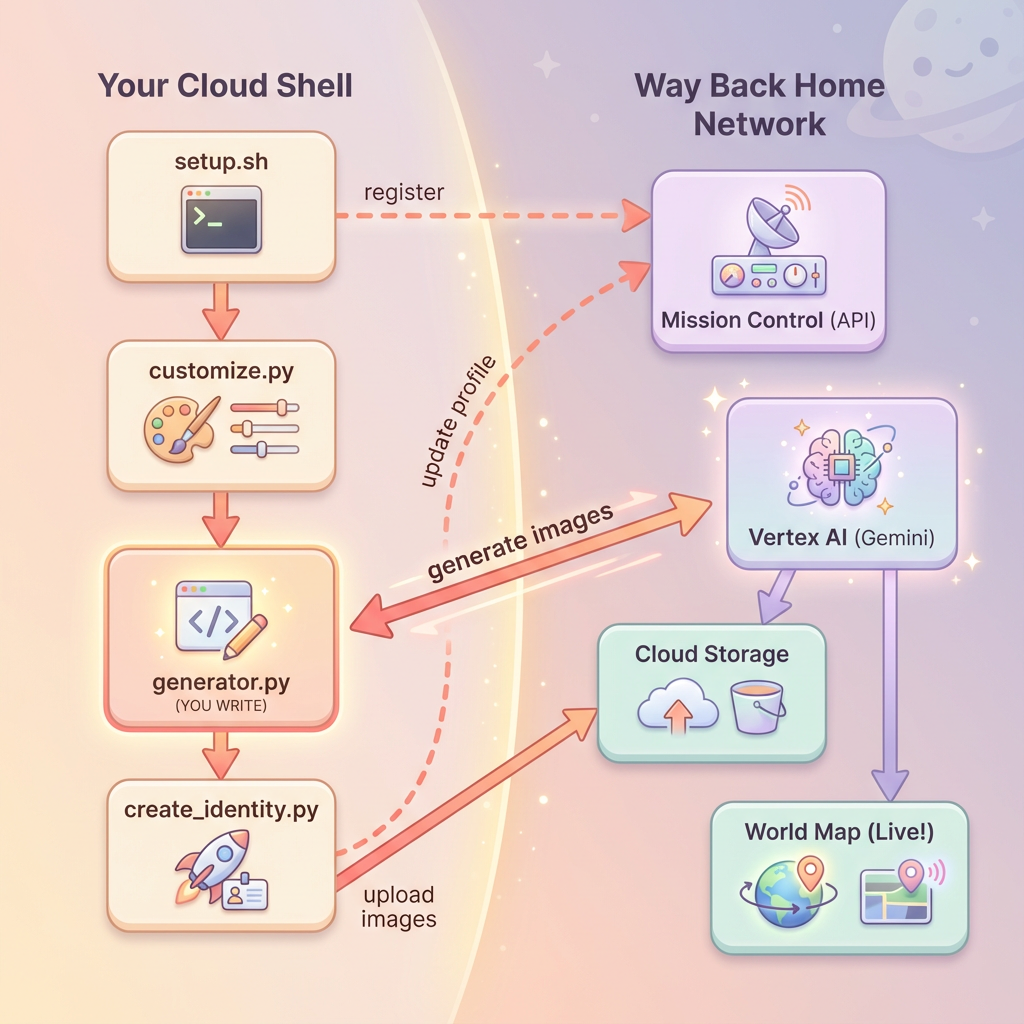
このレベルでは、Google の Gemini 画像生成モデル(Nano Banana 🍌 とも呼ばれます)を使用して複数ターンの画像生成を行い、独自の宇宙探検家 ID を作成します。作成したアバターは、ワークショップ イベントに参加している他のすべての生存者が見ることができるグローバル救助マップに表示されます。
学習内容
コンセプト | 説明 |
マルチターン画像生成 | チャット セッションを使用して複数の画像生成でキャラクターの整合性を維持する方法 |
画像用のプロンプト エンジニアリング | 特定の制約があるスタイル化された一貫性のある出力を得るための効果的なプロンプトを作成する |
Gemini Image API(Nano Banana) | Python SDK を介して Gemini のネイティブ画像生成機能を使用する |
Chat Sessions(チャット セッション) | 会話コンテキストを活用して反復的な改善とキャラクターの一貫性を実現する |
このレベルを修了すると、次のことができるようになります。
✅ テキスト画像変換 AI を使用して、探検家の肖像画を生成した
✅ マルチターンの会話を使用して、一貫性のある地図アイコンを作成した
✅ 救助ネットワークに身元を登録した
✅ 他の探検家とともに、ライブの世界地図に表示された
地図に掲載しましょう。📍
2. 環境を準備する
Cloud Shell にアクセスする
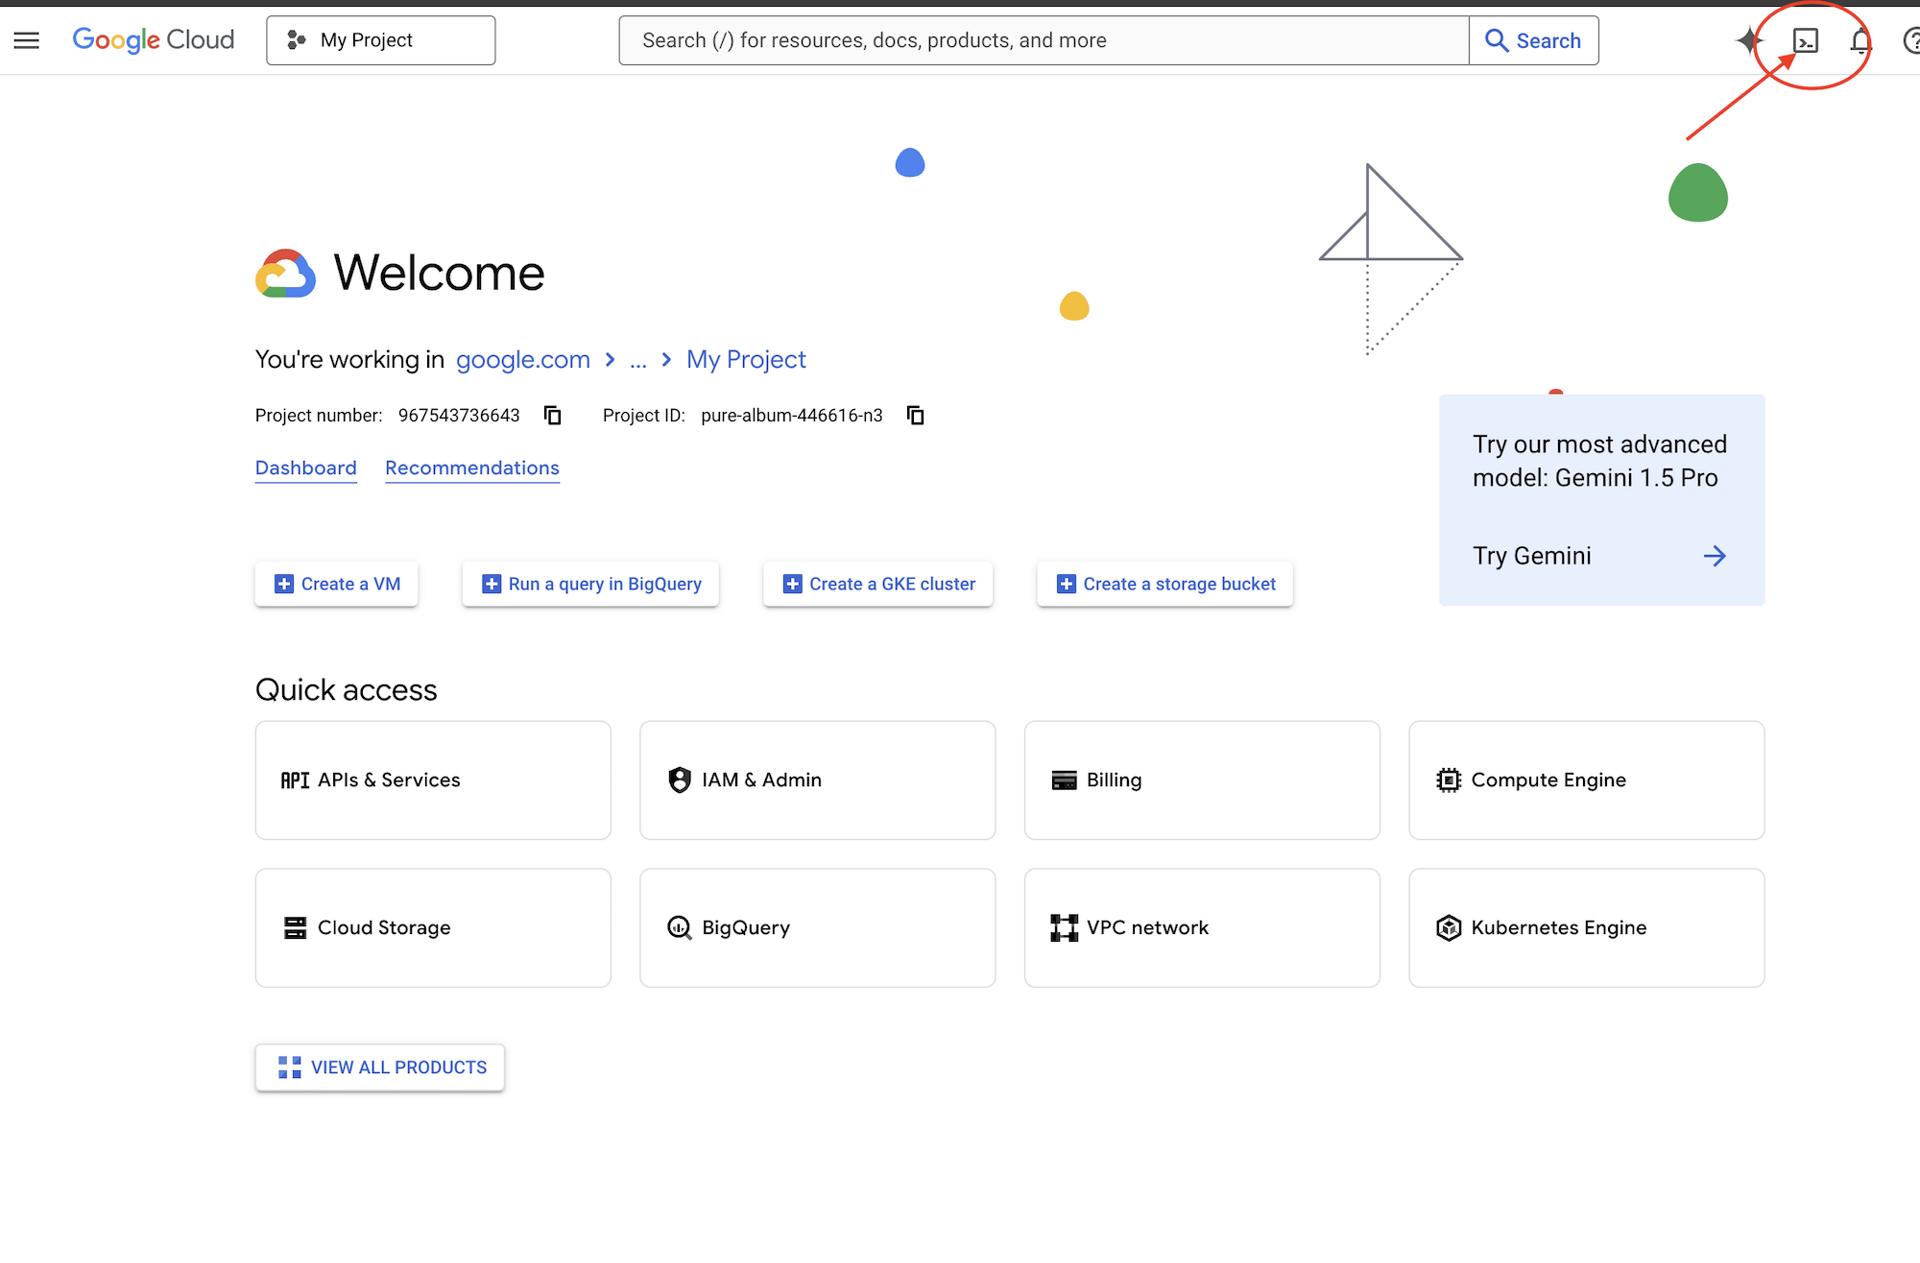
まず、Cloud Shell を開きます。これは、Google Cloud SDK やその他の重要なツールがプリインストールされたブラウザベースのターミナルです。
Google Cloud コンソールの上部にある [Cloud Shell をアクティブにする] をクリックします(右上隅のナビゲーション バーにあるターミナル アイコンです)。
Cloud Shell が開いたら、認証されていることを確認します。
# Check that you are logged in
gcloud auth list
アカウントが (ACTIVE) として表示されます。
リポジトリのクローンを作成する
Way Back Home リポジトリのクローンを作成し、プロジェクトに移動します。
git clone https://github.com/gca-americas/way-back-home.git
cd way-back-home
依存関係のインストール
レベル 0 に移動し、必要な Python パッケージをインストールします。
cd level_0
uv sync
主な依存関係は次のとおりです。
パッケージ | 目的 |
| 画像生成用の Gemini API クライアント |
| Mission Control への API 呼び出し用の HTTP クライアント |
| 画像処理とファイル処理 |
設定を確認する
簡単な検証を実行して、すべてが正しく構成されていることを確認します。
uv run python ../scripts/verify_setup.py
以下のように表示されます。
✓ Authenticated as: your-email@google.com
✓ Python environment ready (uv)
✓ Ready to proceed!
完了した内容
✓ Cloud Shell を開いた
✓ Google Cloud で認証した
✓ Codelab リポジトリをクローンした
✓ uv を使用して Python の依存関係をインストールした
✓ 設定を確認した
次へ: Mission Control に接続する - 設定スクリプトにより、Google Cloud プロジェクトと API が自動的に構成されます。
3. Mission Control に接続する
設定スクリプトを実行する
セットアップ スクリプトは、Way Back Home レスキュー ネットワークに接続し、エクスプローラの ID を予約します。プロジェクトのルートから実行します。
cd $HOME/way-back-home
chmod +x scripts/setup.sh
./scripts/setup.sh
2 つの情報の入力を求められます。
イベントコードを入力する
イベントコードは、参加するワークショップ イベントを識別します。
ワークショップに参加している場合: QR コード、スライド、ワークショップの講師から提供されたイベントコードを入力します。
🚀 Welcome to Way Back Home!

Enter event code (from QR/slide): devfest-nyc-26
Validating event...
✓ Connected to: DevFest NYC 2026
個人で学習する場合: sandbox と入力して、公開学習環境に参加します。
🚀 Welcome to Way Back Home!

Enter event code (from QR/slide): sandbox
Validating event...
✓ Connected to: Way Back Home Sandbox
エクスプローラの名前を選択する
エクスプローラの固有の名前を選択します。世界地図とランキングに表示されるユーザー名は、このようになります。
Choose your explorer name: AstroAyo
✓ Username available!
選択した名前が同じイベントの別の参加者によってすでに使用されている場合:
Choose your explorer name: SpaceExplorer
⚠️  That name is taken. Try another.
Choose your explorer name: SpaceExplorer42
✓ Username available!
セットアップ完了
完了すると、確認メッセージが表示されます。
Initializing your explorer profile...

✓ Environment configured!
  Explorer ID: a1b2c3d4
  Starting coordinates: (47, 23)

Next: cd level_0 && python customize.py
レベル 0 に移動する
レベル 0 ディレクトリに移動します(依存関係はモジュール 2 でインストール済みです)。
cd level_0
構成を確認する
保存された内容を確認します(config.json はプロジェクト ルートにあります)。
cat ../config.json
{
    "event_code": "devfest-nyc-26",
    "event_name": "DevFest NYC 2026",
    "username": "AstroAyo",
    "participant_id": "a1b2c3d4",
    "starting_x": 47,
    "starting_y": 23,
    "api_base": "https://api.waybackhome.dev",
    "project_id": "your-project-id"
}
この構成ファイルは、後続のスクリプトでレスキュー ネットワークにユーザーを識別するために使用されます。
完了した内容
✓ Mission Control API に接続しました
✓ 固有のエクスプローラ名を予約しました
✓ 参加者 ID と開始座標を受け取りました
✓ 後続の手順用に構成を保存しました
次へ: エクスプローラの外観をカスタマイズします。
4. エクスプローラをカスタマイズする
カスタマイズ スクリプトを実行する
アバターを生成する前に、エクスプローラーの外見についていくつかの選択を行います。
uv run python customize.py
スーツの色を選択する
探検家の宇宙服の色を選択します。
🎨 Let's create your explorer identity!

Select suit color:
  1. Deep Blue
  2. Crimson Red
  3. Forest Green
  4. Royal Purple
  5. Solar Gold
  6. Silver

Choice [1-6, default=6]: 1
✓ Deep Blue selected
Explorer の説明(省略可)
エクスプローラの外観を簡単に説明するか、Enter キーを押してランダムに割り当てることができます。
Brief description of your explorer (or Enter for random):
Example: 'short dark hair, glasses, friendly smile'
> short dark hair, glasses, determined expression

✓ Preferences saved!
何も入力せずに Enter キーを押すと、ランダムな特性が表示されます。
>
✓ Random traits: confident expression, short styled hair
構成を更新しました
設定が保存されました。
✓ Preferences saved!
Next: Open generator.py and follow the codelab instructions
更新された構成を確認します。
cat ../config.json
設定が追加されます。
{
    "event_code": "devfest-nyc-26",
    "event_name": "DevFest NYC 2026",
    "username": "AstroAyo",
    "participant_id": "a1b2c3d4",
    "starting_x": 47,
    "starting_y": 23,
    "api_base": "https://api.waybackhome.dev",
    "project_id": "your-project-id",
    "suit_color": "deep blue with silver accents",
    "appearance": "short dark hair, glasses, determined expression"
}
完了した内容
✓ スーツの色を選択した
✓ 探検家の外見を定義した
✓ 画像生成の準備が完了した
次へ: メインイベント - 画像生成コードの作成
5. アバター ジェネレータを構築する
これがコア学習モジュールです。Gemini のマルチターン画像生成機能(Nano Banana)を使用して、独自の探検家アバターを生成する Python コードを作成します。
ジェネレーター ファイルを開く
Cloud Shell エディタでアバター ジェネレータを開きます。
cloudshell edit generator.py
または、Cloud Shell で [エディタを開く] をクリックし、level_0 フォルダの generator.py に移動します。
ファイル構造について
このファイルには、スターター コードと、実装を追加する 3 つのプレースホルダ セクションがあります。
"""
Level 0: Avatar Generator

This module generates your unique space explorer avatar using
multi-turn image generation with Gemini (Nano Banana) for
character consistency across portrait and icon.
"""

from google import genai
from google.genai import types
from PIL import Image
import json
import os
import io

# Load configuration from setup (config.json is in project root)
CONFIG_PATH = "../config.json"

with open(CONFIG_PATH) as f:
    config = json.load(f)

USERNAME = config["username"]
SUIT_COLOR = config["suit_color"]
APPEARANCE = config["appearance"]

# Initialize the Gemini client for Vertex AI
client = genai.Client(
    vertexai=True,
    project=os.environ.get("GOOGLE_CLOUD_PROJECT", config.get("project_id")),
    location="us-central1"
)


def generate_explorer_avatar() -> dict:
    """
    Generate portrait and icon using multi-turn chat for consistency.

    The key technique here is using a CHAT SESSION rather than independent
    API calls. This allows Gemini to "remember" the character it created
    in the first turn, ensuring the icon matches the portrait.

    Returns:
        dict with portrait_path and icon_path
    """

    # MODULE_5_STEP_1_CREATE_CHAT_SESSION
    # TODO: Create a chat session for multi-turn generation
    chat = None  # Replace this line

    # MODULE_5_STEP_2_GENERATE_PORTRAIT
    # TODO: Generate the explorer portrait
    portrait_image = None  # Replace this section

    # MODULE_5_STEP_3_GENERATE_ICON
    # TODO: Generate a consistent map icon
    icon_image = None  # Replace this section

    return {
        "portrait_path": "outputs/portrait.png",
        "icon_path": "outputs/icon.png"
    }


if __name__ == "__main__":
    # Create outputs directory if it doesn't exist
    os.makedirs("outputs", exist_ok=True)

    print(f"Generating avatar for {USERNAME}...")
    result = generate_explorer_avatar()
    print(f"✅ Avatar created!")
    print(f"   Portrait: {result['portrait_path']}")
    print(f"   Icon: {result['icon_path']}")
3 つの TODO セクションは、独自の実装に置き換えます。
ステップ 1: チャット セッションを作成する
プレースホルダ MODULE_5_STEP_1_CREATE_CHAT_SESSION を見つけて、行 chat = None # Replace this line を次のように置き換えます。
    # MODULE_5_STEP_1_CREATE_CHAT_SESSION
    # Create a chat session to maintain character consistency across generations.
    # The chat session preserves context between turns, so Gemini "remembers"
    # what it generated and can create consistent variations.
    chat = client.chats.create(
        model="gemini-2.5-flash-image",  # Nano Banana - Gemini with image generation
        config=types.GenerateContentConfig(
            response_modalities=["TEXT", "IMAGE"]
        )
    )
ステップ 2: ポートレートを生成する
MODULE_5_STEP_2_GENERATE_PORTRAIT を検索して、portrait_image = None # Replace this section を次のコードに置き換えます。
    # MODULE_5_STEP_2_GENERATE_PORTRAIT
    # First turn: Generate the explorer portrait.
    # This establishes the character that will be referenced in subsequent turns.
    portrait_prompt = f"""Create a stylized space explorer portrait.

Character appearance: {APPEARANCE}
Name on suit patch: "{USERNAME}"
Suit color: {SUIT_COLOR}

CRITICAL STYLE REQUIREMENTS:
- Digital illustration style, clean lines, vibrant saturated colors
- Futuristic but weathered space suit with visible mission patches
- Background: Pure solid white (#FFFFFF) - absolutely no gradients, patterns, or elements
- Frame: Head and shoulders only, 3/4 view facing slightly left
- Lighting: Soft diffused studio lighting, no harsh shadows
- Expression: Determined but approachable
- Art style: Modern animated movie character portrait (similar to Pixar or Dreamworks style)

The white background is essential - the avatar will be composited onto a map."""

    print("🎨 Generating your portrait...")
    portrait_response = chat.send_message(portrait_prompt)

    # Extract the image from the response.
    # Gemini returns a response with multiple "parts" - we need to find the image part.
    portrait_image = None
    for part in portrait_response.candidates[0].content.parts:
        if part.inline_data is not None:
            # Found the image! Convert from bytes to PIL Image and save.
            image_bytes = part.inline_data.data
            portrait_image = Image.open(io.BytesIO(image_bytes))
            portrait_image.save("outputs/portrait.png")
            break

    if portrait_image is None:
        raise Exception("Failed to generate portrait - no image in response")

    print("✓ Portrait generated!")
ステップ 3: 地図アイコンを生成する
MODULE_5_STEP_3_GENERATE_ICON を見つけて、icon_image = None # Replace this section を次のように置き換えます。
    # MODULE_5_STEP_3_GENERATE_ICON
    # Second turn: Generate a consistent icon for the map.
    # Because we're in the same chat session, Gemini remembers the character
    # from the portrait and will maintain visual consistency.
    icon_prompt = """Now create a circular map icon of this SAME character.

CRITICAL REQUIREMENTS:
- SAME person, SAME face, SAME expression, SAME suit — maintain perfect consistency with the portrait
- Tighter crop: just the head and very top of shoulders
- Background: Pure solid white (#FFFFFF)
- Optimized for small display sizes (will be used as a 64px map marker)
- Keep the exact same art style, colors, and lighting as the portrait
- Square 1:1 aspect ratio

This icon must be immediately recognizable as the same character from the portrait."""

    print("🖼️  Creating map icon...")
    icon_response = chat.send_message(icon_prompt)

    # Extract the icon image from the response
    icon_image = None
    for part in icon_response.candidates[0].content.parts:
        if part.inline_data is not None:
            image_bytes = part.inline_data.data
            icon_image = Image.open(io.BytesIO(image_bytes))
            icon_image.save("outputs/icon.png")
            break

    if icon_image is None:
        raise Exception("Failed to generate icon - no image in response")

    print("✓ Icon generated!")
完成したコード
3 つのセクションをすべて追加すると、generate_explorer_avatar() 関数は次のようになります。
def generate_explorer_avatar() -> dict:
    """
    Generate portrait and icon using multi-turn chat for consistency.

    The key technique here is using a CHAT SESSION rather than independent
    API calls. This allows Gemini to "remember" the character it created
    in the first turn, ensuring the icon matches the portrait.

    Returns:
        dict with portrait_path and icon_path
    """

    # MODULE_5_STEP_1_CREATE_CHAT_SESSION
    # Create a chat session to maintain character consistency across generations.
    # The chat session preserves context between turns, so Gemini "remembers"
    # what it generated and can create consistent variations.
    chat = client.chats.create(
        model="gemini-2.5-flash-image",  # Nano Banana - Gemini with image generation
        config=types.GenerateContentConfig(
            response_modalities=["TEXT", "IMAGE"]
        )
    )

    # MODULE_5_STEP_2_GENERATE_PORTRAIT
    # First turn: Generate the explorer portrait.
    # This establishes the character that will be referenced in subsequent turns.
    portrait_prompt = f"""Create a stylized space explorer portrait.

Character appearance: {APPEARANCE}
Name on suit patch: "{USERNAME}"
Suit color: {SUIT_COLOR}

CRITICAL STYLE REQUIREMENTS:
- Digital illustration style, clean lines, vibrant saturated colors
- Futuristic but weathered space suit with visible mission patches
- Background: Pure solid white (#FFFFFF) - absolutely no gradients, patterns, or elements
- Frame: Head and shoulders only, 3/4 view facing slightly left
- Lighting: Soft diffused studio lighting, no harsh shadows
- Expression: Determined but approachable
- Art style: Modern animated movie character portrait (similar to Pixar or Dreamworks style)

The white background is essential - the avatar will be composited onto a map."""

    print("🎨 Generating your portrait...")
    portrait_response = chat.send_message(portrait_prompt)

    # Extract the image from the response.
    # Gemini returns a response with multiple "parts" - we need to find the image part.
    portrait_image = None
    for part in portrait_response.candidates[0].content.parts:
        if part.inline_data is not None:
            # Found the image! Convert from bytes to PIL Image and save.
            image_bytes = part.inline_data.data
            portrait_image = Image.open(io.BytesIO(image_bytes))
            portrait_image.save("outputs/portrait.png")
            break

    if portrait_image is None:
        raise Exception("Failed to generate portrait - no image in response")

    print("✓ Portrait generated!")

    # MODULE_5_STEP_3_GENERATE_ICON
    # Second turn: Generate a consistent icon for the map.
    # Because we're in the same chat session, Gemini remembers the character
    # from the portrait and will maintain visual consistency.
    icon_prompt = """Now create a circular map icon of this SAME character.

CRITICAL REQUIREMENTS:
- SAME person, SAME face, SAME expression, SAME suit — maintain perfect consistency with the portrait
- Tighter crop: just the head and very top of shoulders
- Background: Pure solid white (#FFFFFF)
- Optimized for small display sizes (will be used as a 64px map marker)
- Keep the exact same art style, colors, and lighting as the portrait
- Square 1:1 aspect ratio

This icon must be immediately recognizable as the same character from the portrait."""

    print("🖼️  Creating map icon...")
    icon_response = chat.send_message(icon_prompt)

    # Extract the icon image from the response
    icon_image = None
    for part in icon_response.candidates[0].content.parts:
        if part.inline_data is not None:
            image_bytes = part.inline_data.data
            icon_image = Image.open(io.BytesIO(image_bytes))
            icon_image.save("outputs/icon.png")
            break

    if icon_image is None:
        raise Exception("Failed to generate icon - no image in response")

    print("✓ Icon generated!")

    return {
        "portrait_path": "outputs/portrait.png",
        "icon_path": "outputs/icon.png"
    }
ファイルを保存する
必ず generator.py を保存してください。
- Cloud Shell エディタ: Ctrl+S(Windows/Linux)または Cmd+S(Mac)
- vim: Escape キーを押し、
:wqと入力して Enter キーを押します。
構築した内容
✓ 複数ターンの画像生成用のチャット セッションを作成しました
✓ スタイル制約のあるポートレート生成用の詳細なプロンプトを作成しました
✓ 会話コンテキストを使用して一貫性のある地図アイコンを生成しました
✓ Gemini のレスポンスから画像データを解析する方法を学びました
習得した主なコンセプト:
コンセプト | 学習内容 |
Chat Sessions(チャット セッション) |
|
応答モード |
|
プロンプトの構造 | Subject(トピック)→ Variables(変数)→ Style(スタイル)→ Technical Constraints(技術的な制約) |
キャラクターの一貫性 | 同じチャット セッション = 画像間で同じキャラクター |
レスポンスの解析 | レスポンス パーツの |
次へ: コードを実行して地図上に自分を表示する
6. 生成して登録する
プロジェクト ID を設定する
プロジェクト ID が環境変数として使用可能であることを確認します。
export GOOGLE_CLOUD_PROJECT=$(gcloud config get-value project)
Identity Creator を実行する
生成、アップロード、登録をオーケストレートするメイン スクリプトを実行します。
uv run python create_identity.py
生成の進行状況がリアルタイムで表示されます。
注: アバターが公開中の地図に表示されるまでに最大 5 秒かかることがあります。マップにすぐに表示されない場合は、更新してください。
🚀 Creating identity for AstroAyo...

🎨 Generating your portrait...
✓ Portrait generated!
🖼️  Creating map icon...
✓ Icon generated!

☁️  Uploading to mission database...
✓ Avatar uploaded!

📍 Registering with rescue network...
✓ Registration complete!

╔═══════════════════════════════════════════════════════════════╗
║                    ✅ IDENTITY CONFIRMED!                      ║
╠═══════════════════════════════════════════════════════════════╣
║                                                               ║
║  Explorer: AstroAyo                                           ║
║  Location: (47, 23) — unconfirmed                             ║
║                                                               ║
║  🗺️  You're now on the map!                                   ║
║  https://waybackhome.dev/e/devfest-nyc-26                     ║
║                                                               ║
║  NEXT: Proceed to Level 1 to pinpoint your exact location!   ║
║                                                               ║
╚═══════════════════════════════════════════════════════════════╝
生成されたアバターを表示する
生成された画像をローカルで確認します。
# List the generated files
ls -la outputs/

# Download to view on your local machine
cloudshell download outputs/portrait.png
cloudshell download outputs/icon.png
または、outputs/ フォルダに移動して画像ファイルをクリックすると、Cloud Shell エディタで直接表示できます。
生成されたポートレートとアイコンは、次の画像のようになります。
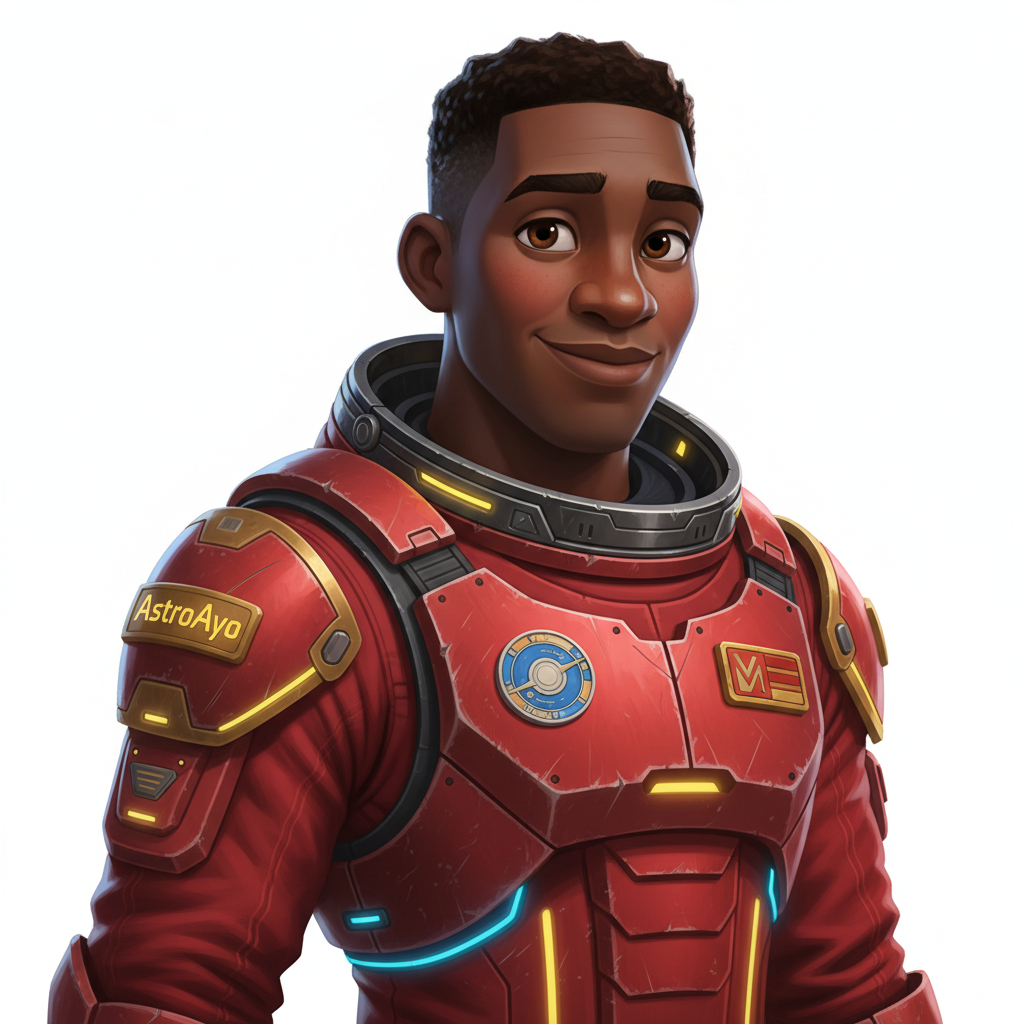
![]()
地図上で自分の位置を確認する
出力に表示された世界地図の URL を開きます。
https://waybackhome.dev/e/{your-event-code}
例: https://waybackhome.dev/e/devfest-nyc-26
地図上でアバターを見つけましょう。表示される項目
- 地球の表面上の現在地を示すアイコン
- アイコンの下のラベルとしてのエクスプローラ名
- マーカーの周りをゆっくりと点滅する薄暗いビーコン
![]()
マーカーをクリックすると、詳細カードにポートレート全体が表示されます。
アバターにご満足いただけませんか?再生成!
別のアバターが必要な場合は、再生成できます。
# Option 1: Change your appearance settings first
uv run python customize.py

# Option 2: Just regenerate with current settings
uv run python create_identity.py
create_identity.py を実行するたびに、まったく新しいアバター(新しいチャット セッション = 新しいキャラクター)が生成され、登録が更新されます。結果に満足するまで、自由に繰り返してください。
トラブルシューティング
完了した内容
✓ 独自の探検家ポートレートを生成した
✓ 一貫性のある地図アイコンを作成した
✓ アセットをミッション コントロールにアップロードした
✓ 救助ネットワークに身元を登録した
✓ ライブの世界地図に表示された
おめでとうございます。これで、救助ネットワークに登録されました。ビーコンが有効になり(ただし、暗くなります)、他の生存者がマップ上であなたを確認できます。
7. まとめ
構築した内容
わずか 10 分で、マルチターンの AI 画像生成を使用して完全なアバター生成システムを作成しました。
┌─────────────────────────────────────────────────────────────┐
│                     Your Creation                           │
├─────────────────────────────────────────────────────────────┤
│                                                             │
│   📝 Input                       🖼️  Output                  │
│   ──────────                     ────────                    │
│   • Explorer name                • Stylized portrait         │
│   • Suit color                   • Consistent map icon       │
│   • Appearance description       • Live map presence         │
│                                                              │
├─────────────────────────────────────────────────────────────┤
│                                                             │
│   🧠 Techniques You Used                                     │
│   ──────────────────────                                    │
│   • Multi-turn chat sessions for character consistency      │
│   • Structured prompt engineering with style constraints    │
│   • Response parsing to extract generated images            │
│   • API integration for cloud registration                  │
│                                                             │
└─────────────────────────────────────────────────────────────┘
重要ポイント
レッスン | これが重要である理由 |
チャット セッションでコンテキストが維持される | バリエーションのドリフトなしで複数の画像にわたって一貫したキャラクターを生成するために不可欠 |
プロンプトの構造が重要 | 明確な制約(白い背景、特定のスタイル、フレーミング)により、予測可能で本番環境に対応した結果が得られる |
マルチターンは独立した呼び出しよりも優先される | チャット内の各メッセージは前のコンテキストに基づいており、反復的な絞り込みと一貫性を実現します。 |
レスポンス モダリティで出力を制御する | 画像生成には |
費用の概要
このレベルでは、Gemini 2.5 Flash(Nano Banana)を使用して 2 枚の画像を生成しました。
項目 | トークン | 費用 |
縦向き(1,024×1,024) | 約 1,290 個の出力トークン | ~$0.039 |
アイコン(1,024×1,024) | 約 1,290 個の出力トークン | ~$0.039 |
合計 | 約 2,580 個のトークン | ~$0.08 |
取り組みの継続
エクスプローラの身元は確認されましたが、位置情報が確認されていません。
世界地図を見ると、ビーコンがゆっくりと点滅しています。救助ネットワークはあなたの存在を認識していますが、正確な位置は把握していません。現在地は惑星の表面の広大な領域内のどこかにあります。
レベル 1: 位置情報を特定するでは、次のことを行います。
- Google の Agent Development Kit(ADK)を使用してマルチエージェント システムを構築する
- 地質学、植物学、天文学の分析用の MCP サーバーを作成する
- マルチモーダル入力(墜落現場の画像)を処理する
- AI を使用して、確認済みの場所の地形図を生成する
- ビーコンを実際に点灯して、救助隊があなたを見つけられるようにしましょう。
レベル 1 では、マルチエージェント オーケストレーション、Model Context Protocol(MCP)、本番環境のデプロイ パターンなど、はるかに高度なコンセプトが導入されています。単一のモデル機能の使用から、完全なエージェント システムの構築までを行います。
クリーンアップ(省略可)
ローカル ファイルをクリーンアップする場合(level_0 ディレクトリから実行):
rm -rf outputs/
deactivate  # Exit virtual environment
救助ネットワークへの登録は維持されます。ローカル ファイルを削除した後も、地図に表示されます。画像はローカルではなくクラウドに保存されます。
リソース
- Gemini 画像生成のドキュメント
- 画像のプロンプト エンジニアリング ガイド
- Nano Banana の発表に関するブログ記事
- Way Back Home リポジトリ
- レベル 1: 位置情報を特定する
ビーコンの確認待ちです。レベル 1 でお会いしましょう。🚀
8. ボーナス: 写真ベースのアバター(省略可)
写真からアバターへの変換機能を使用する場面
このアプローチは、次のような場合に適しています。
- アバターを自分に似せたい
- 特定の写真をスタイル設定したい
- Gemini の画像から画像への変換機能を試したい
仕組み
テキストの説明だけに基づいてキャラクターを生成するのではなく、写真を提供して、人物のライクネスを保持しながら変換するよう Gemini に相談します。
![]()
写真をアップロードする
まず、Cloud Shell に写真をアップロードします。
- Cloud Shell で、ターミナル ツールバーのその他メニュー(⋮)をクリックします。
- [アップロード] を選択します。
- 鮮明な顔写真(JPEG または PNG)を選択する
- アップロードされたパス(例:
/home/your-username/my_photo.jpg)をメモします。
ジェネレーターを変更する
写真を使用するには、generator.py でポートレート生成ステップを変更します。テキストのみのプロンプトを、写真を含むマルチモーダル プロンプトに置き換えます。
    # MODULE_5_STEP_2_GENERATE_PORTRAIT (Photo-based version)

    # Load your photo
    photo_path = "/home/your-username/my_photo.jpg"  # Update this path!
    user_photo = Image.open(photo_path)

    # Convert photo to bytes for the API
    photo_buffer = io.BytesIO()
    user_photo.save(photo_buffer, format="JPEG")
    photo_bytes = photo_buffer.getvalue()

    portrait_prompt = f"""Transform this person into a stylized space explorer portrait.

PRESERVE from the original photo:
- The person's facial features, face shape, and likeness
- Their general expression and personality
- Any distinctive features (glasses, facial hair, etc.)

TRANSFORM with this style:
- Digital illustration style, clean lines, vibrant saturated colors
- Add a futuristic space suit with the name "{USERNAME}" on a shoulder patch
- Suit color: {SUIT_COLOR}
- Background: Pure solid white (#FFFFFF) - no gradients or elements
- Frame: Head and shoulders, 3/4 view
- Lighting: Soft diffused studio lighting
- Art style: Modern animated movie character (Pixar/Dreamworks aesthetic)

The result should be clearly recognizable as THIS specific person, but illustrated as a heroic space explorer."""

    print("🎨 Transforming your photo into an explorer portrait...")

    # Send both the prompt AND the image
    portrait_response = chat.send_message([
        portrait_prompt,
        types.Part.from_bytes(data=photo_bytes, mime_type="image/jpeg")
    ])

    # Rest of the extraction code stays the same...
マルチターンの整合性は維持される
マルチターンのアプローチは、写真ベースの生成でも同様に機能します。
- ターン 1: 写真 + プロンプト → スタイライズされたポートレート(似顔絵、イラスト)
- ターン 2: 「この同じキャラクターのアイコンを作成して」→ 一貫性のあるアイコン
チャット セッションでは、作成したスタイル設定されたバージョン(元の写真ではない)が記憶されるため、アイコンは変換されたポートレートと完全に一致します。
プライバシーに関する考慮事項
Vertex AI Studio で試す
コードを記述する前に、Google Cloud コンソールで写真の変換をインタラクティブに試すこともできます。
- Vertex AI Studio に移動します。
- 画像機能を持つ Gemini モデルを選択する
- 添付ボタンを使用して写真をアップロードする
- 変換プロンプトを入力する
- 結果に満足するまでスタイルを調整する
このインタラクティブなアプローチは、コードをコミットする前にプロンプトを試して結果をリアルタイムで確認するのに最適です。
学習内容(ボーナス)
✓ Gemini で画像から画像への変換を使用する方法
✓ 1 つのメッセージでマルチモーダル コンテンツ(テキスト + 画像)を送信する
✓ アート風のスタイル転送を適用しながら類似性を維持する
✓ 写真ベースの AI 生成に関するプライバシーの考慮事項