
1. ミッション

緊急 AI に身元を特定され、ビーコンが惑星地図上で点滅していますが、静電気に紛れてほとんど見えません。軌道からスキャンしている救助隊は、あなたの座標で何かを確認できますが、ロックオンできません。信号が弱すぎます。
ビーコンを最大までブーストするには、正確な位置情報を確認する必要があります。ポッドのナビゲーション システムは故障しましたが、着陸地点に回収可能な証拠が散らばっています。土壌サンプル。奇妙な植物。異星の夜空がはっきりと見える。
この証拠を分析して、地球上のどの地域にいるかを特定できれば、AI は位置を三角測量してビーコン信号を増幅できます。そうすれば、誰かがあなたを見つけてくれるかもしれません。
それでは、これまでの内容をまとめましょう。
前提条件
⚠️ このレベルを完了するには、レベル 0 を完了する必要があります。
開始する前に、次のことを確認してください。
- [ ]
config.jsonをプロジェクト ルートに配置し、参加者 ID と座標を指定します - [ ] アバターが世界地図に表示される
- [ ] 座標の位置にビーコンが(薄く)表示される
レベル 0 を完了していない場合は、まずレベル 0 から開始してください。
作成する機能
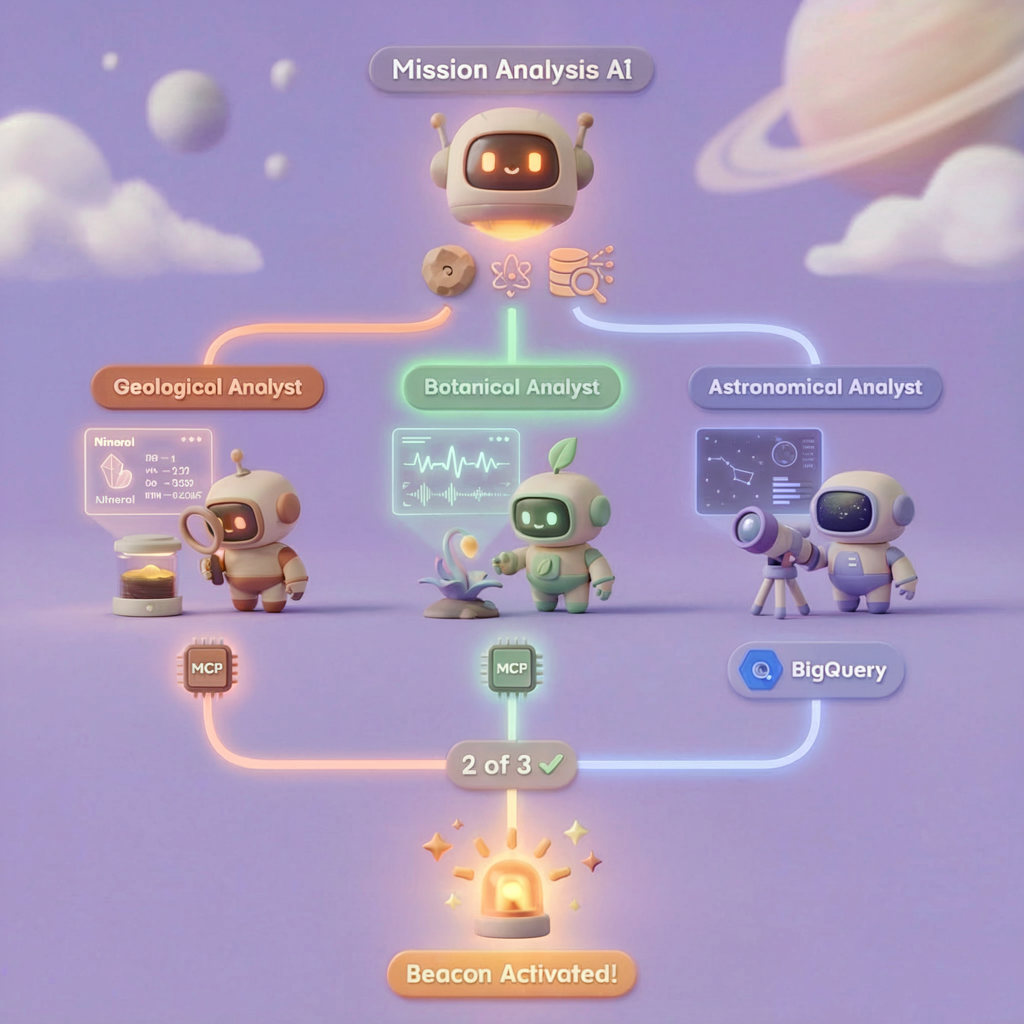
このレベルでは、並列処理を使用して墜落現場の証拠を分析するマルチエージェント AI システムを構築します。

学習目標
コンセプト | 学習内容 |
マルチエージェント システム | 単一の責任を持つ専門エージェントを構築する |
ParallelAgent | 独立したエージェントを構成して同時に実行する |
before_agent_callback | エージェントの実行前に構成を取得して状態を設定する |
ToolContext | ツール関数で状態値にアクセスする |
カスタム MCP サーバー | 命令型パターンでツールを構築する(Cloud Run の Python コード) |
OneMCP BigQuery | BigQuery アクセス用に Google のマネージド MCP に接続する |
マルチモーダル AI | Gemini を使用して画像と動画+音声を分析する |
エージェント オーケストレーション | ルート オーケストレーターを使用して複数のエージェントを調整する |
Cloud Deployment | MCP サーバーとエージェントを Cloud Run にデプロイする |
A2A の準備 | 将来のエージェント間のコミュニケーション用にエージェントを構造化する |
地球のバイオーム
惑星の表面は 4 つの異なるバイオームに分かれており、それぞれに固有の特徴があります。
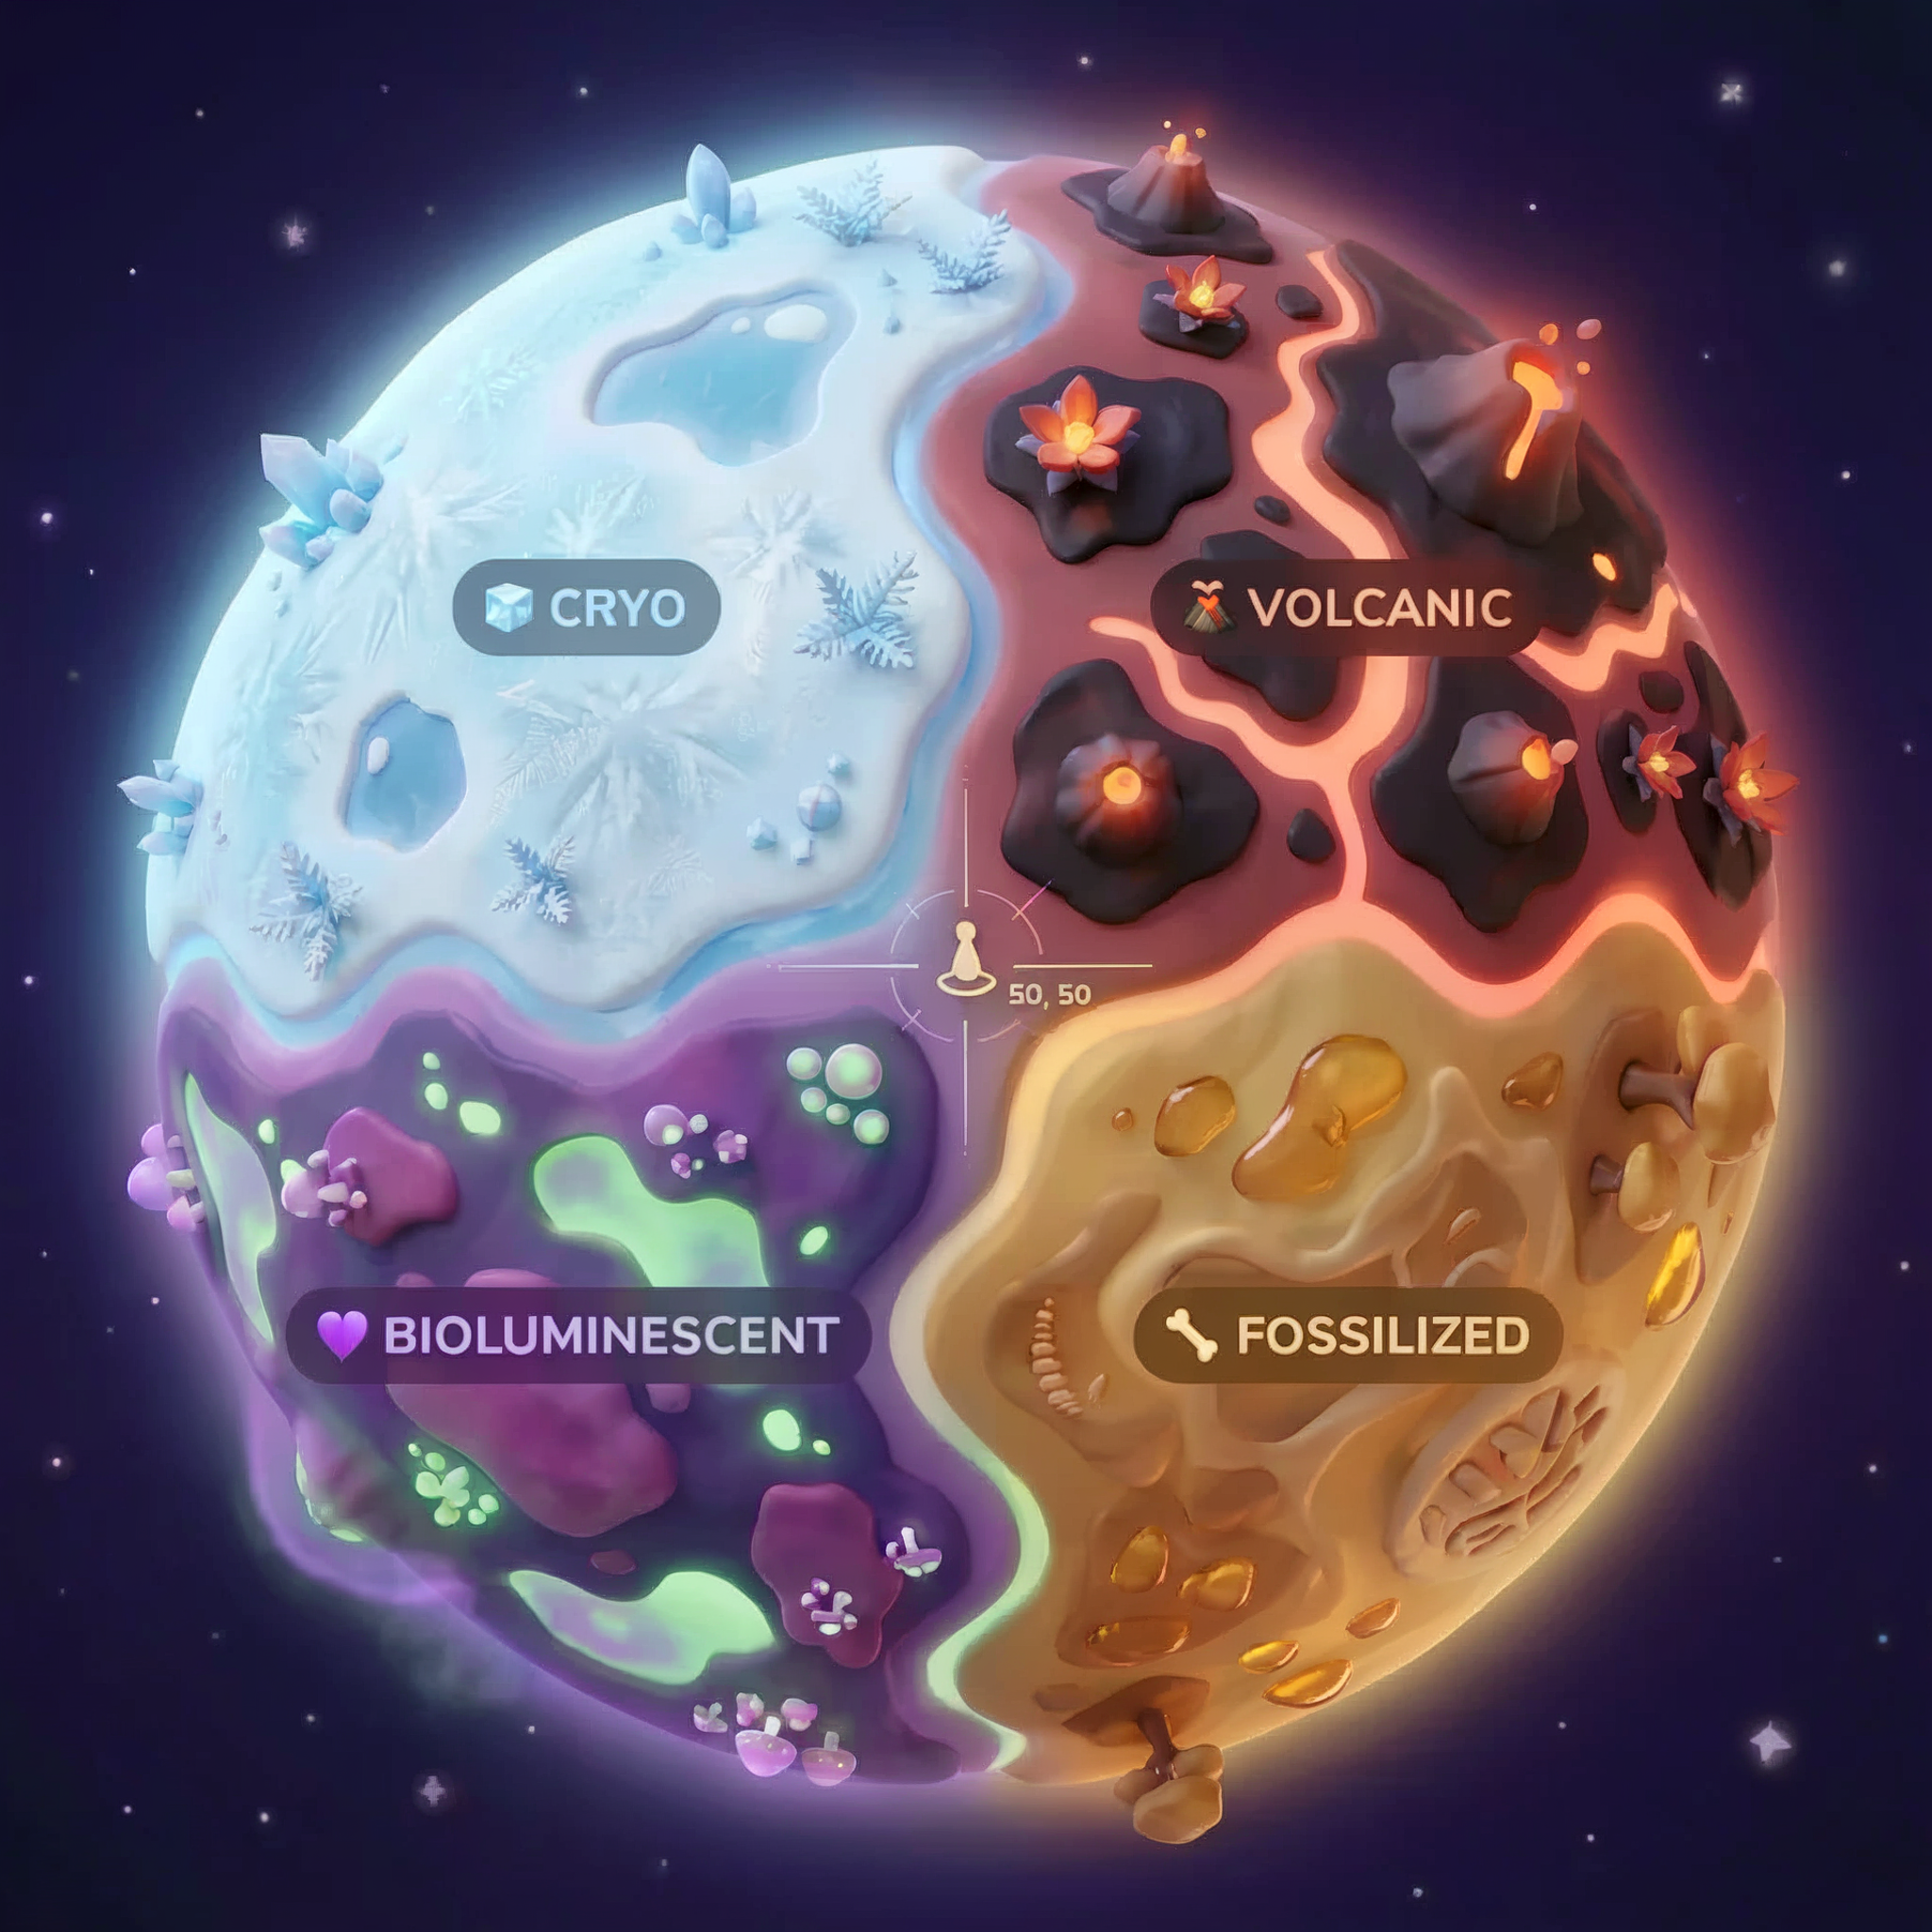
座標によって、墜落したバイオームが決まります。墜落現場の証拠には、そのバイオームの特徴が反映されています。
バイオーム | 象限 | 地質学的証拠 | 植物の証拠 | 天文学的証拠 |
🧊 CRYO | NW(x<50、y≥50) | 凍ったメタン、氷の結晶 | 霜のシダ、低温植物 | 青色巨星 |
🌋 VOLCANIC | NE(x≥50、y≥50) | 黒曜石の堆積物 | 火の開花、耐熱性の植物 | 赤色矮星連星 |
💜 BIOLUMINESCENT | SW(x<50、y<50) | 発光する土 | 光る菌類、発光する植物 | 緑色のパルサー |
🦴 FOSSILIZED | SE(x≥50、y<50) | 琥珀の堆積物、ite 鉱物 | 石化した木々、古代の植物 | 黄色い太陽 |
あなたの仕事は、証拠を分析してどのバイオームにいるかを推測できる AI エージェントを構築することです。
2. 環境をセットアップする
環境設定スクリプトを実行する
証拠を生成する前に、BigQuery 用の OneMCP など、必要な Google Cloud APIs を有効にする必要があります。これにより、BigQuery へのマネージド MCP アクセスが提供されます。
👉💻 環境設定スクリプトを実行します。
cd $HOME/way-back-home/level_1
chmod +x setup/setup_env.sh
./setup/setup_env.sh
次のような出力が表示されます。
================================================================
Level 1: Environment Setup
================================================================
Project: your-project-id

[1/6] Enabling core Google Cloud APIs...
      ✓ Vertex AI API enabled
      ✓ Cloud Run API enabled
      ✓ Cloud Build API enabled
      ✓ BigQuery API enabled
      ✓ Artifact Registry API enabled
      ✓ IAM API enabled

[2/6] Enabling OneMCP BigQuery (Managed MCP)...
      ✓ OneMCP BigQuery enabled

[3/6] Setting up service account and IAM permissions...
      ✓ Service account 'way-back-home-sa' created
      ✓ Vertex AI User role granted
      ✓ Cloud Run Invoker role granted
      ✓ BigQuery User role granted
      ✓ BigQuery Data Viewer role granted
      ✓ Storage Object Viewer role granted

[4/6] Configuring Cloud Build IAM for deployments...
      ✓ Cloud Build can now deploy services as way-back-home-sa
      ✓ Cloud Run Admin role granted to Compute SA

[5/6] Creating Artifact Registry repository...
      ✓ Repository 'way-back-home' created

[6/6] Creating environment variables file...
      Found PARTICIPANT_ID in config.json: abc123...
      ✓ Created ../set_env.sh

================================================================
✅ Environment Setup Complete!
================================================================
ソース環境変数
👉💻 環境変数を取得します。
source $HOME/way-back-home/set_env.sh
依存関係のインストール
👉💻 レベル 1 の Python 依存関係をインストールします。
cd $HOME/way-back-home/level_1
uv sync
星のカタログを設定する
👉💻 BigQuery で星のカタログを設定します。
uv run python setup/setup_star_catalog.py
以下のように表示されます。
Setting up star catalog in project: your-project-id
==================================================
✓ Dataset way_back_home already exists
✓ Created table star_catalog
✓ Inserted 12 rows into star_catalog

📊 Star Catalog Summary:
----------------------------------------
  NE (VOLCANIC): 3 stellar patterns
  NW (CRYO): 3 stellar patterns
  SE (FOSSILIZED): 3 stellar patterns
  SW (BIOLUMINESCENT): 3 stellar patterns
----------------------------------------
✓ Star catalog is ready for triangulation queries

==================================================
✅ Star catalog setup complete!
3. クラッシュ サイトの証拠を生成する
次に、座標に基づいてパーソナライズされた墜落現場の証拠を生成します。
証拠ジェネレータを実行する
👉💻 level_1 ディレクトリから次のコマンドを実行します。
cd $HOME/way-back-home/level_1
uv run python generate_evidence.py
次のような出力が表示されます。
✓ Welcome back, Explorer_Aria!
  Coordinates: (23, 67)
  Ready to analyze your crash site.

📍 Crash site analysis initiated...
   Generating evidence for your location...

🔬 Generating soil sample...
✓ Soil sample captured: outputs/soil_sample.png
✨ Capturing star field...
✓ Star field captured: outputs/star_field.png
🌿 Recording flora activity...
   (This may take 1-2 minutes for video generation)
   Generating video...
   Generating video...
   Generating video...
✓ Flora recorded: outputs/flora_recording.mp4

📤 Uploading evidence to Mission Control...
✓ Config updated with evidence URLs

==================================================
✅ Evidence generation complete!
==================================================
証拠を確認する
👉 outputs/ フォルダに生成された証拠ファイルを確認します。それぞれがクラッシュした場所のバイオームの特徴を反映していますが、AI エージェントが分析するまで、どのバイオームかはわかりません。
生成された証明書は、お住まいの地域によって次のように表示されます。


4. カスタム MCP サーバーをビルドする
脱出ポッドのオンボード分析システムは故障しましたが、元のセンサーデータはクラッシュを免れました。FastMCP を使用して、地質学と植物学の分析ツールを提供する MCP サーバーを構築します。
地質分析ツールを作成する
このツールは、土壌サンプル画像を分析して鉱物組成を特定します。
👉✏️ $HOME/way-back-home/level_1/mcp-server/main.py を開いて #REPLACE-GEOLOGICAL-TOOL を見つけます。次のように置き換えます。
GEOLOGICAL_PROMPT = """Analyze this alien soil sample image.

Classify the PRIMARY characteristic (choose exactly one):

1. CRYO - Frozen/icy minerals, crystalline structures, frost patterns,
   blue-white coloration, permafrost indicators

2. VOLCANIC - Volcanic rock, basalt, obsidian, sulfur deposits,
   red-orange minerals, heat-formed crystite structures

3. BIOLUMINESCENT - Glowing particles, phosphorescent minerals,
   organic-mineral hybrids, purple-green luminescence

4. FOSSILIZED - Ancient compressed minerals, amber deposits,
   petrified organic matter, golden-brown stratification

Respond ONLY with valid JSON (no markdown, no explanation):
{
    "biome": "CRYO|VOLCANIC|BIOLUMINESCENT|FOSSILIZED",
    "confidence": 0.0-1.0,
    "minerals_detected": ["mineral1", "mineral2"],
    "description": "Brief description of what you observe"
}
"""


@mcp.tool()
def analyze_geological(
    image_url: Annotated[
        str,
        Field(description="Cloud Storage URL (gs://...) of the soil sample image")
    ]
) -> dict:
    """
    Analyzes a soil sample image to identify mineral composition and classify the planetary biome.

    Args:
        image_url: Cloud Storage URL of the soil sample image (gs://bucket/path/image.png)

    Returns:
        dict with biome, confidence, minerals_detected, and description
    """
    logger.info(f">>> 🔬 Tool: 'analyze_geological' called for '{image_url}'")

    try:
        response = client.models.generate_content(
            model="gemini-2.5-flash",
            contents=[
                GEOLOGICAL_PROMPT,
                genai_types.Part.from_uri(file_uri=image_url, mime_type="image/png")
            ]
        )

        result = parse_json_response(response.text)
        logger.info(f"    ✓ Geological analysis complete: {result.get('biome', 'UNKNOWN')}")
        return result

    except Exception as e:
        logger.error(f"    ✗ Geological analysis failed: {str(e)}")
        return {"error": str(e), "biome": "UNKNOWN", "confidence": 0.0}
植物分析ツールを作成する
このツールは、音声トラックを含む植物の動画録画を分析します。
👉✏️ 同じファイル($HOME/way-back-home/level_1/mcp-server/main.py)で #REPLACE-BOTANICAL-TOOL を見つけて、次のように置き換えます。
BOTANICAL_PROMPT = """Analyze this alien flora video recording.

Pay attention to BOTH:
1. VISUAL elements: Plant appearance, movement patterns, colors, bioluminescence
2. AUDIO elements: Ambient sounds, rustling, organic noises, frequencies

Classify the PRIMARY biome (choose exactly one):

1. CRYO - Crystalline ice-plants, frost-covered vegetation,
   crackling/tinkling sounds, slow brittle movements, blue-white flora

2. VOLCANIC - Heat-resistant plants, sulfur-adapted species,
   hissing/bubbling sounds, smoke-filtering vegetation, red-orange flora

3. BIOLUMINESCENT - Glowing plants, pulsing light patterns,
   humming/resonating sounds, reactive to stimuli, purple-green flora

4. FOSSILIZED - Ancient petrified plants, amber-preserved specimens,
   deep resonant sounds, minimal movement, golden-brown flora

Respond ONLY with valid JSON (no markdown, no explanation):
{
    "biome": "CRYO|VOLCANIC|BIOLUMINESCENT|FOSSILIZED",
    "confidence": 0.0-1.0,
    "species_detected": ["species1", "species2"],
    "audio_signatures": ["sound1", "sound2"],
    "description": "Brief description of visual and audio observations"
}
"""


@mcp.tool()
def analyze_botanical(
    video_url: Annotated[
        str,
        Field(description="Cloud Storage URL (gs://...) of the flora video recording")
    ]
) -> dict:
    """
    Analyzes a flora video recording (visual + audio) to identify plant species and classify the biome.

    Args:
        video_url: Cloud Storage URL of the flora video (gs://bucket/path/video.mp4)

    Returns:
        dict with biome, confidence, species_detected, audio_signatures, and description
    """
    logger.info(f">>> 🌿 Tool: 'analyze_botanical' called for '{video_url}'")

    try:
        response = client.models.generate_content(
            model="gemini-2.5-flash",
            contents=[
                BOTANICAL_PROMPT,
                genai_types.Part.from_uri(file_uri=video_url, mime_type="video/mp4")
            ]
        )

        result = parse_json_response(response.text)
        logger.info(f"    ✓ Botanical analysis complete: {result.get('biome', 'UNKNOWN')}")
        return result

    except Exception as e:
        logger.error(f"    ✗ Botanical analysis failed: {str(e)}")
        return {"error": str(e), "biome": "UNKNOWN", "confidence": 0.0}
MCP サーバーをローカルでテストする
👉💻 MCP サーバーをテストします。
cd $HOME/way-back-home/level_1/mcp-server
pip install -r requirements.txt
python main.py
以下のように表示されます。
[INFO] Initialized Gemini client for project: your-project-id
[INFO] 🚀 Location Analyzer MCP Server starting on port 8080
[INFO] 📍 MCP endpoint: http://0.0.0.0:8080/mcp
[INFO] 🔧 Tools: analyze_geological, analyze_botanical
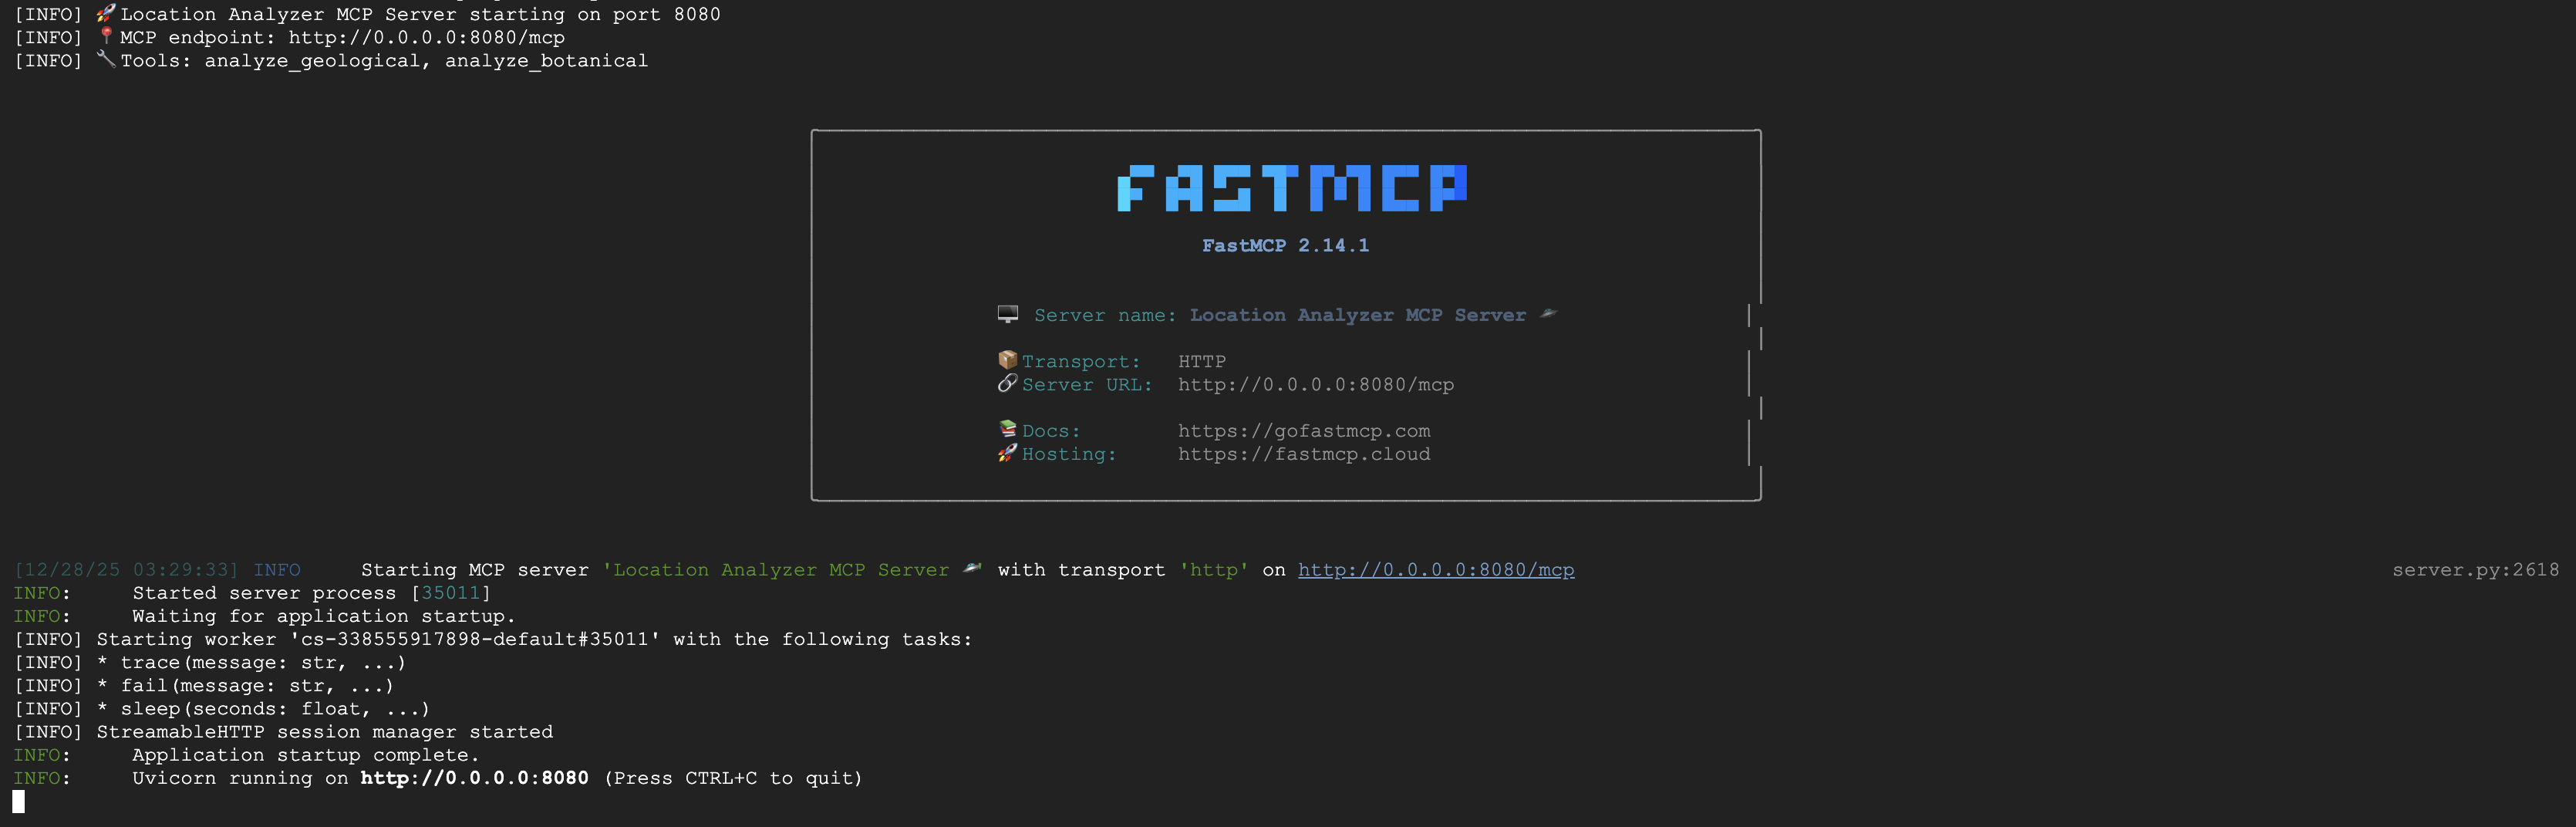
FastMCP サーバーが HTTP トランスポートで実行されています。Ctrl+C を押して停止します。
MCP サーバーを Cloud Run にデプロイする
👉💻 デプロイ:
cd $HOME/way-back-home/level_1/mcp-server
source $HOME/way-back-home/set_env.sh

gcloud builds submit . \
  --config=cloudbuild.yaml \
  --substitutions=_REGION="$REGION",_REPO_NAME="$REPO_NAME",_SERVICE_ACCOUNT="$SERVICE_ACCOUNT"
サービス URL を保存する
👉💻 サービス URL を保存します。
export MCP_SERVER_URL=$(gcloud run services describe location-analyzer \
  --region=$REGION --format='value(status.url)')
echo "MCP Server URL: $MCP_SERVER_URL"

# Add to set_env.sh for later use
echo "export MCP_SERVER_URL=\"$MCP_SERVER_URL\"" >> $HOME/way-back-home/set_env.sh
5. スペシャリスト エージェントを構築する
次に、それぞれが単一の責任を負う 3 つのスペシャリスト エージェントを作成します。
地質アナリスト エージェントを作成する
👉✏️ agent/agents/geological_analyst.py を開いて #REPLACE-GEOLOGICAL-AGENT を見つけます。次のように置き換えます。
from google.adk.agents import Agent
from agent.tools.mcp_tools import get_geological_tool

geological_analyst = Agent(
    name="GeologicalAnalyst",
    model="gemini-2.5-flash",
    description="Analyzes soil samples to classify planetary biome based on mineral composition.",
    instruction="""You are a geological specialist analyzing alien soil samples.

## YOUR EVIDENCE TO ANALYZE
Soil sample URL: {soil_url}

## YOUR TASK
1. Call the analyze_geological tool with the soil sample URL above
2. Examine the results for mineral composition and biome indicators
3. Report your findings clearly

The four possible biomes are:
- CRYO: Frozen, icy minerals, blue/white coloring
- VOLCANIC: Magma, obsidian, volcanic rock, red/orange coloring
- BIOLUMINESCENT: Glowing, phosphorescent minerals, purple/green
- FOSSILIZED: Amber, ancient preserved matter, golden/brown

## REPORTING FORMAT
Always report your classification clearly:
"GEOLOGICAL ANALYSIS: [BIOME] (confidence: X%)"

Include a brief description of what you observed in the sample.

## IMPORTANT
- You do NOT synthesize with other evidence
- You do NOT confirm locations
- Just analyze the soil sample and report what you find
- Call the tool immediately with the URL provided above""",
    tools=[get_geological_tool()]
)
植物アナリスト エージェントを作成する
👉✏️ agent/agents/botanical_analyst.py を開いて #REPLACE-BOTANICAL-AGENT を見つけます。次のように置き換えます。
from google.adk.agents import Agent
from agent.tools.mcp_tools import get_botanical_tool

botanical_analyst = Agent(
    name="BotanicalAnalyst",
    model="gemini-2.5-flash",
    description="Analyzes flora recordings to classify planetary biome based on plant life and ambient sounds.",
    instruction="""You are a botanical specialist analyzing alien flora recordings.

## YOUR EVIDENCE TO ANALYZE
Flora recording URL: {flora_url}

## YOUR TASK
1. Call the analyze_botanical tool with the flora recording URL above
2. Pay attention to BOTH visual AND audio elements in the recording
3. Report your findings clearly

The four possible biomes are:
- CRYO: Frost ferns, crystalline plants, cold wind sounds, crackling ice
- VOLCANIC: Fire blooms, heat-resistant flora, crackling/hissing sounds
- BIOLUMINESCENT: Glowing fungi, luminescent plants, ethereal hum, chiming
- FOSSILIZED: Petrified trees, ancient formations, deep resonant sounds

## REPORTING FORMAT
Always report your classification clearly:
"BOTANICAL ANALYSIS: [BIOME] (confidence: X%)"

Include descriptions of what you SAW and what you HEARD.

## IMPORTANT
- You do NOT synthesize with other evidence
- You do NOT confirm locations
- Just analyze the flora recording and report what you find
- Call the tool immediately with the URL provided above""",
    tools=[get_botanical_tool()]
)
天文アナリスト エージェントを作成する
このエージェントは、2 つのツールパターンを使用して別の方法を使用します。
- ローカル FunctionTool: Gemini Vision で星の特徴を抽出
- OneMCP BigQuery: Google のマネージド MCP を介して星カタログをクエリする
👉✏️ agent/agents/astronomical_analyst.py を開いて #REPLACE-ASTRONOMICAL-AGENT を見つけます。次のように置き換えます。
from google.adk.agents import Agent
from agent.tools.star_tools import (
    extract_star_features_tool,
    get_bigquery_mcp_toolset,
)

# Get the BigQuery MCP toolset
bigquery_toolset = get_bigquery_mcp_toolset()

astronomical_analyst = Agent(
    name="AstronomicalAnalyst",
    model="gemini-2.5-flash",
    description="Analyzes star field images and queries the star catalog via OneMCP BigQuery.",
    instruction="""You are an astronomical specialist analyzing alien night skies.

## YOUR EVIDENCE TO ANALYZE
Star field URL: {stars_url}

## YOUR TWO TOOLS

### TOOL 1: extract_star_features (Local Gemini Vision)
Call this FIRST with the star field URL above.
Returns: "primary_star": "...", "nebula_type": "...", "stellar_color": "..."

### TOOL 2: BigQuery MCP (execute_query)
Call this SECOND with the results from Tool 1.
Use this exact SQL query (replace the placeholders with values from Step 1):

SELECT quadrant, biome, primary_star, nebula_type
FROM `{project_id}.way_back_home.star_catalog`
WHERE LOWER(primary_star) = LOWER('PRIMARY_STAR_FROM_STEP_1')
  AND LOWER(nebula_type) = LOWER('NEBULA_TYPE_FROM_STEP_1')
LIMIT 1

## YOUR WORKFLOW
1. Call extract_star_features with: {stars_url}
2. Get the primary_star and nebula_type from the result
3. Call execute_query with the SQL above (replacing placeholders)
4. Report the biome and quadrant from the query result

## BIOME REFERENCE
| Biome | Quadrant | Primary Star | Nebula Type |
|-------|----------|--------------|-------------|
| CRYO | NW | blue_giant | ice_blue |
| VOLCANIC | NE | red_dwarf_binary | fire |
| BIOLUMINESCENT | SW | green_pulsar | purple_magenta |
| FOSSILIZED | SE | yellow_sun | golden |

## REPORTING FORMAT
"ASTRONOMICAL ANALYSIS: [BIOME] in [QUADRANT] quadrant (confidence: X%)"

Include a description of the stellar features you observed.

## IMPORTANT
- You do NOT synthesize with other evidence
- You do NOT confirm locations
- Just analyze the stars and report what you find
- Start by calling extract_star_features with the URL above""",
    tools=[extract_star_features_tool, bigquery_toolset]
)
6. MCP ツール接続を構築する
次に、ADK エージェントが MCP サーバーと通信できるようにする Python ラッパーを作成します。これらのラッパーは、接続のライフサイクル(セッションの確立、ツールの呼び出し、レスポンスの解析)を処理します。
MCP ツール接続を作成する(カスタム MCP)
これにより、Cloud Run にデプロイされたカスタム FastMCP サーバーに接続されます。
👉✏️ agent/tools/mcp_tools.py を開いて #REPLACE-MCP-TOOL-CONNECTION を見つけます。次のように置き換えます。
import os
import logging

from google.adk.tools.mcp_tool.mcp_toolset import MCPToolset
from google.adk.tools.mcp_tool.mcp_session_manager import StreamableHTTPConnectionParams

logger = logging.getLogger(__name__)

MCP_SERVER_URL = os.environ.get("MCP_SERVER_URL")

_mcp_toolset = None

def get_mcp_toolset():
    """Get the MCPToolset connected to the location-analyzer server."""
    global _mcp_toolset

    if _mcp_toolset is not None:
        return _mcp_toolset

    if not MCP_SERVER_URL:
        raise ValueError(
            "MCP_SERVER_URL not set. Please run:\n"
            "  export MCP_SERVER_URL='https://location-analyzer-xxx.a.run.app'"
        )

    # FastMCP exposes MCP protocol at /mcp endpoint
    mcp_endpoint = f"{MCP_SERVER_URL}/mcp"
    logger.info(f"[MCP Tools] Connecting to: {mcp_endpoint}")

    _mcp_toolset = MCPToolset(
        connection_params=StreamableHTTPConnectionParams(
            url=mcp_endpoint,
            timeout=120,  # 2 minutes for Gemini analysis
        )
    )

    return _mcp_toolset

def get_geological_tool():
    """Get the geological analysis tool from the MCP server."""
    return get_mcp_toolset()

def get_botanical_tool():
    """Get the botanical analysis tool from the MCP server."""
    return get_mcp_toolset()
スター分析ツールを作成する(OneMCP BigQuery)
先ほど BigQuery に読み込んだ星カタログには、各バイオームの星のパターンが含まれています。BigQuery クライアント コードを記述してクエリを実行する代わりに、Google の OneMCP BigQuery サーバーに接続します。このサーバーは、BigQuery の execute_query 機能を、任意の ADK エージェントが直接使用できる MCP ツールとして公開します。
👉✏️ agent/tools/star_tools.py を開いて #REPLACE-STAR-TOOLS を見つけます。次のように置き換えます。
import os
import json
import logging

from google import genai
from google.genai import types as genai_types
from google.adk.tools import FunctionTool
from google.adk.tools.mcp_tool.mcp_toolset import MCPToolset
from google.adk.tools.mcp_tool.mcp_session_manager import StreamableHTTPConnectionParams
import google.auth
import google.auth.transport.requests

logger = logging.getLogger(__name__)

# =============================================================================
# CONFIGURATION - Environment variables only
# =============================================================================

PROJECT_ID = os.environ.get("GOOGLE_CLOUD_PROJECT", "")

if not PROJECT_ID:
    logger.warning("[Star Tools] GOOGLE_CLOUD_PROJECT not set")

# Initialize Gemini client for star feature extraction
genai_client = genai.Client(
    vertexai=True,
    project=PROJECT_ID or "placeholder",
    location=os.environ.get("GOOGLE_CLOUD_LOCATION", "us-central1")
)

logger.info(f"[Star Tools] Initialized for project: {PROJECT_ID}")

# =============================================================================
# OneMCP BigQuery Connection
# =============================================================================

BIGQUERY_MCP_URL = "https://bigquery.googleapis.com/mcp"

_bigquery_toolset = None

def get_bigquery_mcp_toolset():
    """
    Get the MCPToolset connected to Google's BigQuery MCP server.

    This uses OAuth 2.0 authentication with Application Default Credentials.
    The toolset provides access to BigQuery's pre-built MCP tools like:
    - execute_query: Run SQL queries
    - list_datasets: List available datasets
    - get_table_schema: Get table structure
   """
    global _bigquery_toolset

    if _bigquery_toolset is not None:
        return _bigquery_toolset

    logger.info("[Star Tools] Connecting to OneMCP BigQuery...")

    # Get OAuth credentials
    credentials, project_id = google.auth.default(
        scopes=["https://www.googleapis.com/auth/bigquery"]
    )

    # Refresh to get a valid token
    credentials.refresh(google.auth.transport.requests.Request())
    oauth_token = credentials.token

    # Configure headers for BigQuery MCP
    headers = {
        "Authorization": f"Bearer {oauth_token}",
        "x-goog-user-project": project_id or PROJECT_ID
    }

    # Create MCPToolset with StreamableHTTP connection
    _bigquery_toolset = MCPToolset(
        connection_params=StreamableHTTPConnectionParams(
            url=BIGQUERY_MCP_URL,
            headers=headers
        )
    )

    logger.info("[Star Tools] Connected to BigQuery MCP")
    return _bigquery_toolset


# =============================================================================
# Local FunctionTool: Star Feature Extraction
# =============================================================================
# This is a LOCAL tool that calls Gemini directly - demonstrating that
# you can mix local FunctionTools with MCP tools in the same agent.

STAR_EXTRACTION_PROMPT = """Analyze this alien night sky image and extract stellar features.

Identify:
1. PRIMARY STAR TYPE: blue_giant, red_dwarf, red_dwarf_binary, green_pulsar, yellow_sun, etc.
2. NEBULA TYPE: ice_blue, fire, purple_magenta, golden, etc.
3. STELLAR COLOR: blue_white, red_orange, green_purple, yellow_gold, etc.

Respond ONLY with valid JSON:
{"primary_star": "...", "nebula_type": "...", "stellar_color": "...", "description": "..."}
"""


def _parse_json_response(text: str) -> dict:
    """Parse JSON from Gemini response, handling markdown formatting."""
    cleaned = text.strip()
    if cleaned.startswith("```json"):
        cleaned = cleaned[7:]
    elif cleaned.startswith("```"):
        cleaned = cleaned[3:]
    if cleaned.endswith("```"):
        cleaned = cleaned[:-3]
    cleaned = cleaned.strip()

    try:
        return json.loads(cleaned)
    except json.JSONDecodeError as e:
        logger.error(f"Failed to parse JSON: {e}")
        return {"error": f"Failed to parse response: {str(e)}"}


def extract_star_features(image_url: str) -> dict:
    """
    Extract stellar features from a star field image using Gemini Vision.

    This is a LOCAL FunctionTool - we call Gemini directly, not through MCP.
    The agent will use this alongside the BigQuery MCP tools.
    """
    logger.info(f"[Stars] Extracting features from: {image_url}")

    response = genai_client.models.generate_content(
        model="gemini-2.5-flash",
        contents=[
            STAR_EXTRACTION_PROMPT,
            genai_types.Part.from_uri(file_uri=image_url, mime_type="image/png")
        ]
    )

    result = _parse_json_response(response.text)
    logger.info(f"[Stars] Extracted: primary_star={result.get('primary_star')}")
    return result


# Create the local FunctionTool
extract_star_features_tool = FunctionTool(extract_star_features)
7. オーケストレーターをビルドする
次に、すべてを調整する並列クルーとルート オーケストレーターを作成します。
並列分析クルーを作成する
3 人のスペシャリストを並行して実行する理由は何ですか?完全に独立しているため、地質学アナリストは植物学アナリストの結果を待つ必要がなく、その逆も同様です。各スペシャリストは、異なるツールを使用して異なる証拠を分析します。ParallelAgent は 3 つすべてを同時に実行するため、合計分析時間を約 30 秒(順次)から約 10 秒(並列)に短縮します。
👉✏️ agent/agent.py を開いて #REPLACE-PARALLEL-CREW を見つけます。次のように置き換えます。
import os
import logging
import httpx

from google.adk.agents import Agent, ParallelAgent
from google.adk.agents.callback_context import CallbackContext

# Import specialist agents
from agent.agents.geological_analyst import geological_analyst
from agent.agents.botanical_analyst import botanical_analyst
from agent.agents.astronomical_analyst import astronomical_analyst

# Import confirmation tool
from agent.tools.confirm_tools import confirm_location_tool

logger = logging.getLogger(__name__)


# =============================================================================
# BEFORE AGENT CALLBACK - Fetches config and sets state
# =============================================================================

async def setup_participant_context(callback_context: CallbackContext) -> None:
    """
    Fetch participant configuration and populate state for all agents.

    This callback:
    1. Reads PARTICIPANT_ID and BACKEND_URL from environment
    2. Fetches participant data from the backend API
    3. Sets state values: soil_url, flora_url, stars_url, username, x, y, etc.
    4. Returns None to continue normal agent execution
    """
    participant_id = os.environ.get("PARTICIPANT_ID", "")
    backend_url = os.environ.get("BACKEND_URL", "https://api.waybackhome.dev")
    project_id = os.environ.get("GOOGLE_CLOUD_PROJECT", "")

    logger.info(f"[Callback] Setting up context for participant: {participant_id}")

    # Set project_id and backend_url in state immediately
    callback_context.state["project_id"] = project_id
    callback_context.state["backend_url"] = backend_url
    callback_context.state["participant_id"] = participant_id

    if not participant_id:
        logger.warning("[Callback] No PARTICIPANT_ID set - using placeholder values")
        callback_context.state["username"] = "Explorer"
        callback_context.state["x"] = 0
        callback_context.state["y"] = 0
        callback_context.state["soil_url"] = "Not available - set PARTICIPANT_ID"
        callback_context.state["flora_url"] = "Not available - set PARTICIPANT_ID"
        callback_context.state["stars_url"] = "Not available - set PARTICIPANT_ID"
        return None

    # Fetch participant data from backend API
    try:
        url = f"{backend_url}/participants/{participant_id}"
        logger.info(f"[Callback] Fetching from: {url}")

        async with httpx.AsyncClient(timeout=30.0) as client:
            response = await client.get(url)
            response.raise_for_status()
            data = response.json()

        # Extract evidence URLs
        evidence_urls = data.get("evidence_urls", {})

        # Set all state values for sub-agents to access
        callback_context.state["username"] = data.get("username", "Explorer")
        callback_context.state["x"] = data.get("x", 0)
        callback_context.state["y"] = data.get("y", 0)
        callback_context.state["soil_url"] = evidence_urls.get("soil", "Not available")
        callback_context.state["flora_url"] = evidence_urls.get("flora", "Not available")
        callback_context.state["stars_url"] = evidence_urls.get("stars", "Not available")

        logger.info(f"[Callback] State populated for {data.get('username')}")

    except Exception as e:
        logger.error(f"[Callback] Error fetching participant config: {e}")
        callback_context.state["username"] = "Explorer"
        callback_context.state["x"] = 0
        callback_context.state["y"] = 0
        callback_context.state["soil_url"] = f"Error: {e}"
        callback_context.state["flora_url"] = f"Error: {e}"
        callback_context.state["stars_url"] = f"Error: {e}"

    return None


# =============================================================================
# PARALLEL ANALYSIS CREW
# =============================================================================

evidence_analysis_crew = ParallelAgent(
    name="EvidenceAnalysisCrew",
    description="Runs geological, botanical, and astronomical analysis in parallel.",
    sub_agents=[geological_analyst, botanical_analyst, astronomical_analyst]
)
ルート オーケストレーターを作成する
次に、すべてを調整し、コールバックを使用するルート エージェントを作成します。
👉✏️ 同じファイル(agent/agent.py)で、#REPLACE-ROOT-ORCHESTRATOR を探します。次のように置き換えます。
root_agent = Agent(
    name="MissionAnalysisAI",
    model="gemini-2.5-flash",
    description="Coordinates crash site analysis to confirm explorer location.",
    instruction="""You are the Mission Analysis AI coordinating a rescue operation.

## Explorer Information
- Name: {username}
- Coordinates: ({x}, {y})

## Evidence URLs (automatically provided to specialists via state)
- Soil sample: {soil_url}
- Flora recording: {flora_url}
- Star field: {stars_url}

## Your Workflow

### STEP 1: DELEGATE TO ANALYSIS CREW
Tell the EvidenceAnalysisCrew to analyze all the evidence.
The evidence URLs are already available to the specialists.

### STEP 2: COLLECT RESULTS
Each specialist will report:
- "GEOLOGICAL ANALYSIS: [BIOME] (confidence: X%)"
- "BOTANICAL ANALYSIS: [BIOME] (confidence: X%)"
- "ASTRONOMICAL ANALYSIS: [BIOME] in [QUADRANT] quadrant (confidence: X%)"

### STEP 3: APPLY 2-OF-3 AGREEMENT RULE
- If 2 or 3 specialists agree → that's the answer
- If all 3 disagree → use judgment based on confidence

### STEP 4: CONFIRM LOCATION
Call confirm_location with the determined biome.

## Biome Reference
| Biome | Quadrant | Key Characteristics |
|-------|----------|---------------------|
| CRYO | NW | Frozen, blue, ice crystals |
| VOLCANIC | NE | Magma, red/orange, obsidian |
| BIOLUMINESCENT | SW | Glowing, purple/green |
| FOSSILIZED | SE | Amber, golden, ancient |

## Response Style
Be encouraging and narrative! Celebrate when the beacon activates!
""",
    sub_agents=[evidence_analysis_crew],
    tools=[confirm_location_tool],
    before_agent_callback=setup_participant_context
)
位置情報確認ツールを作成する
これが最後のステップです。このツールは、ミッション コントロールに位置情報を確認し、ビーコンを有効にします。ルート オーケストレータが(3 分の 2 の合意ルールを使用して)どのバイオームにいるかを判断すると、このツールを呼び出して結果をバックエンド API に送信します。
このツールは ToolContext を使用します。これにより、以前に before_agent_callback によって設定された状態値(participant_id や backend_url など)にアクセスできます。
👉✏️ agent/tools/confirm_tools.py で #REPLACE-CONFIRM-TOOL を探します。次のように置き換えます。
import os
import logging
import requests

from google.adk.tools import FunctionTool
from google.adk.tools.tool_context import ToolContext

logger = logging.getLogger(__name__)

BIOME_TO_QUADRANT = {
    "CRYO": "NW",
    "VOLCANIC": "NE",
    "BIOLUMINESCENT": "SW",
    "FOSSILIZED": "SE"
}


def _get_actual_biome(x: int, y: int) -> tuple[str, str]:
    """Determine actual biome and quadrant from coordinates."""
    if x < 50 and y >= 50:
        return "NW", "CRYO"
    elif x >= 50 and y >= 50:
        return "NE", "VOLCANIC"
    elif x < 50 and y < 50:
        return "SW", "BIOLUMINESCENT"
    else:
        return "SE", "FOSSILIZED"


def confirm_location(biome: str, tool_context: ToolContext) -> dict:
    """
    Confirm the explorer's location and activate the rescue beacon.

    Uses ToolContext to read state values set by before_agent_callback.
    """
    # Read from state (set by before_agent_callback)
    participant_id = tool_context.state.get("participant_id", "")
    x = tool_context.state.get("x", 0)
    y = tool_context.state.get("y", 0)
    backend_url = tool_context.state.get("backend_url", "https://api.waybackhome.dev")

    # Fallback to environment variables
    if not participant_id:
        participant_id = os.environ.get("PARTICIPANT_ID", "")
    if not backend_url:
        backend_url = os.environ.get("BACKEND_URL", "https://api.waybackhome.dev")

    if not participant_id:
        return {"success": False, "message": "❌ No participant ID available."}

    biome_upper = biome.upper().strip()

    if biome_upper not in BIOME_TO_QUADRANT:
        return {"success": False, "message": f"❌ Unknown biome: {biome}"}

    # Get actual biome from coordinates
    actual_quadrant, actual_biome = _get_actual_biome(x, y)

    if biome_upper != actual_biome:
        return {
            "success": False,
            "message": f"❌ Mismatch! Analysis: {biome_upper}, Actual: {actual_biome}"
        }

    quadrant = BIOME_TO_QUADRANT[biome_upper]

    try:
        response = requests.patch(
            f"{backend_url}/participants/{participant_id}/location",
            params={"x": x, "y": y},
            timeout=10
        )
        response.raise_for_status()

        return {
            "success": True,
            "message": f"🔦 BEACON ACTIVATED!\n\nLocation: {biome_upper} in {quadrant}\nCoordinates: ({x}, {y})"
        }

    except requests.exceptions.ConnectionError:
        return {
            "success": True,
            "message": f"🔦 BEACON ACTIVATED! (Local)\n\nLocation: {biome_upper} in {quadrant}",
            "simulated": True
        }

    except Exception as e:
        return {"success": False, "message": f"❌ Failed: {str(e)}"}


confirm_location_tool = FunctionTool(confirm_location)
8. ADK ウェブ UI でテストする
次に、マルチエージェント システム全体をローカルでテストします。
ADK ウェブサーバーを起動する
👉💻 環境変数を設定して ADK ウェブサーバーを起動します。
cd $HOME/way-back-home/level_1
source $HOME/way-back-home/set_env.sh

# Verify environment is set
echo "PARTICIPANT_ID: $PARTICIPANT_ID"
echo "MCP Server: $MCP_SERVER_URL"

# Start ADK web server
uv run adk web
以下のように表示されます。
+-----------------------------------------------------------------------------+
| ADK Web Server started                                                      |
|                                                                             |
| For local testing, access at http://localhost:8000.                         |
+-----------------------------------------------------------------------------+

INFO:     Application startup complete.
INFO:     Uvicorn running on http://0.0.0.0:8000 (Press CTRL+C to quit)
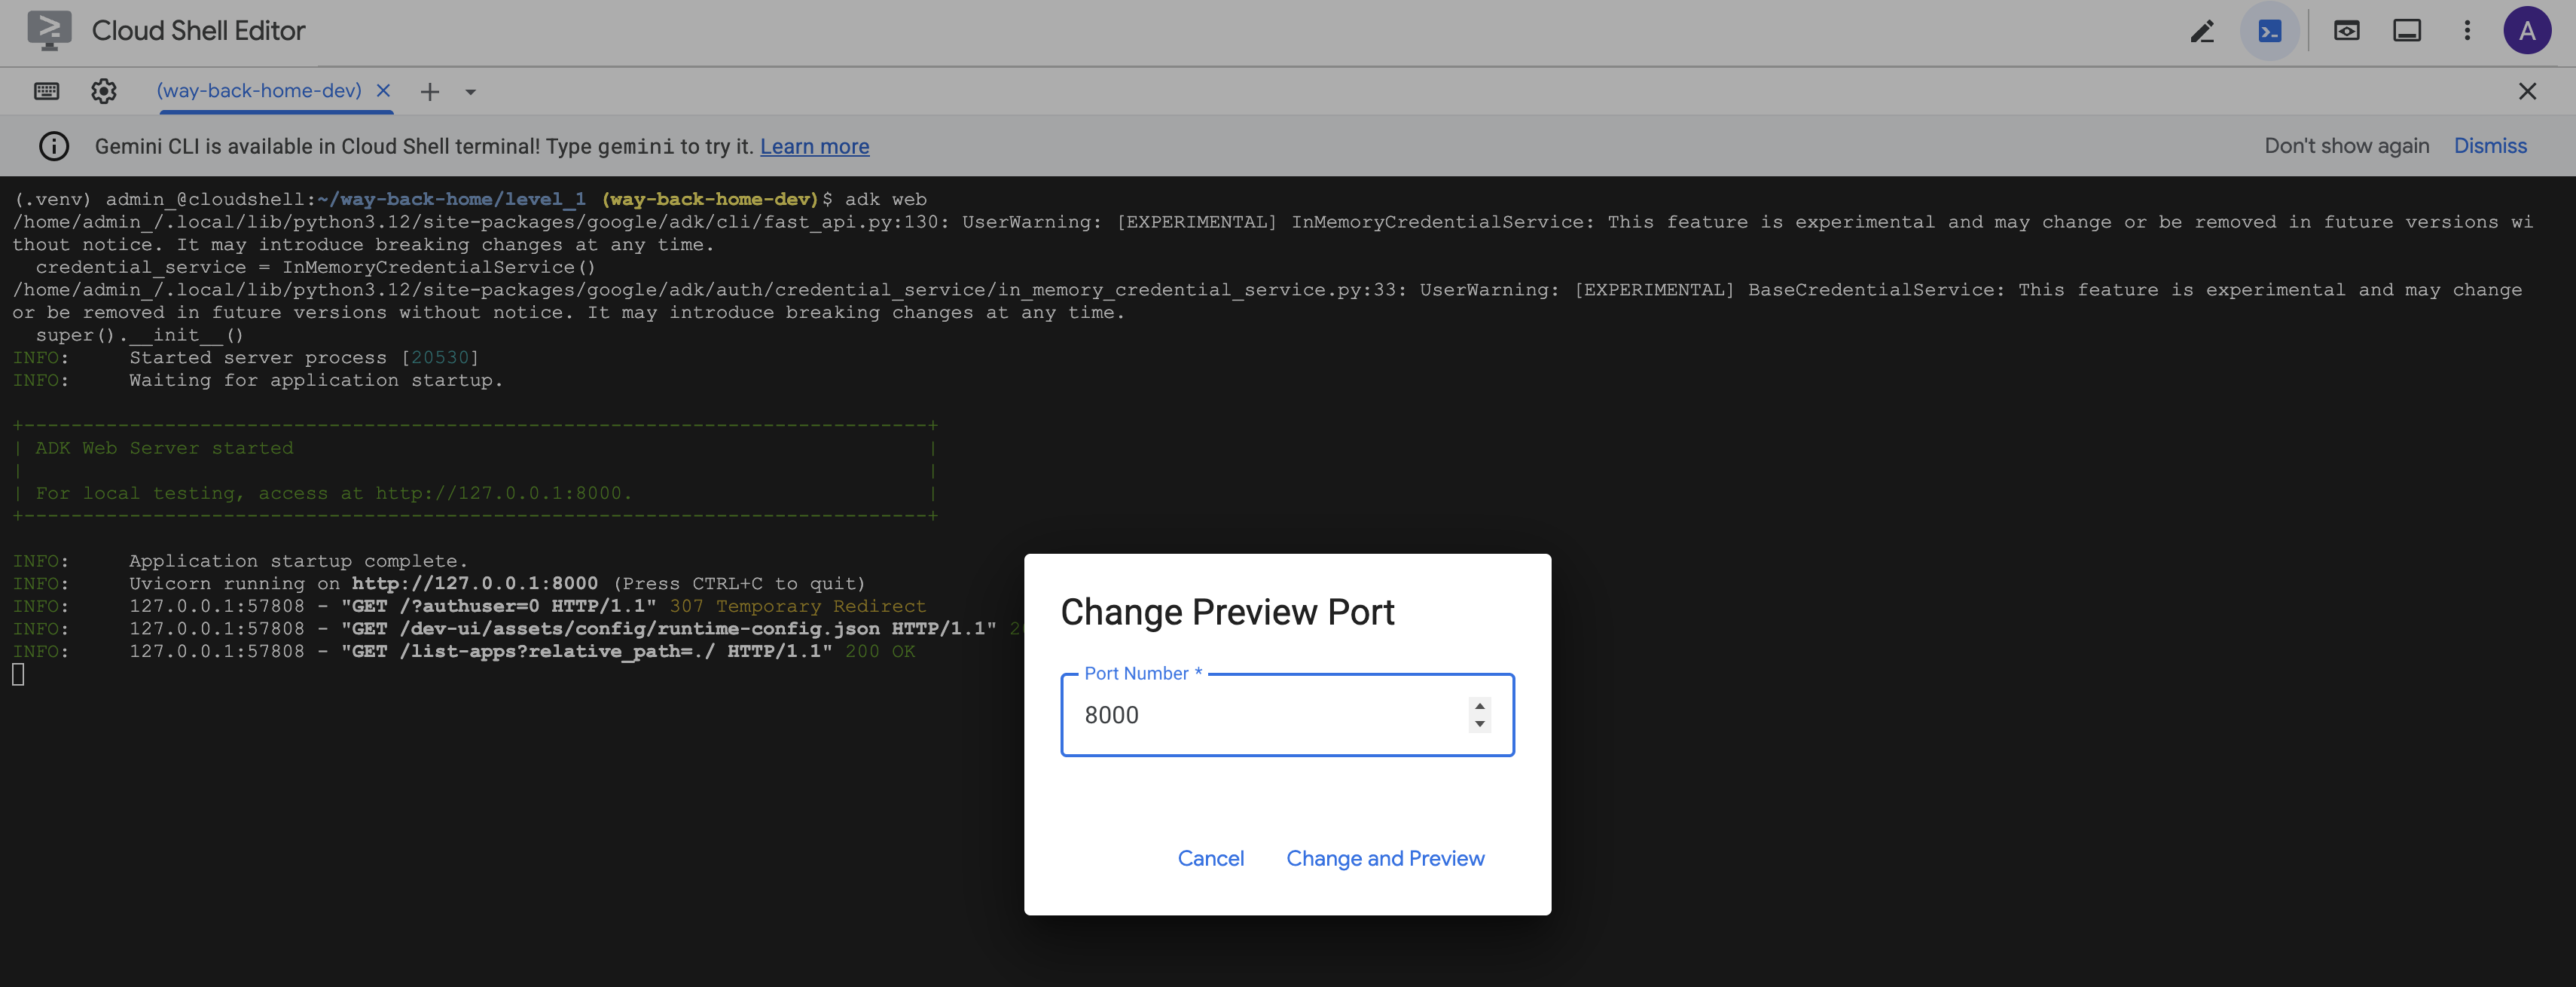
ウェブ UI にアクセスする
👉 Cloud Shell ツールバー(右上)の [ウェブでプレビュー] アイコンから、[ポートを変更] を選択します。
![]()
👉 ポートを 8000 に設定し、[変更してプレビュー] をクリックします。
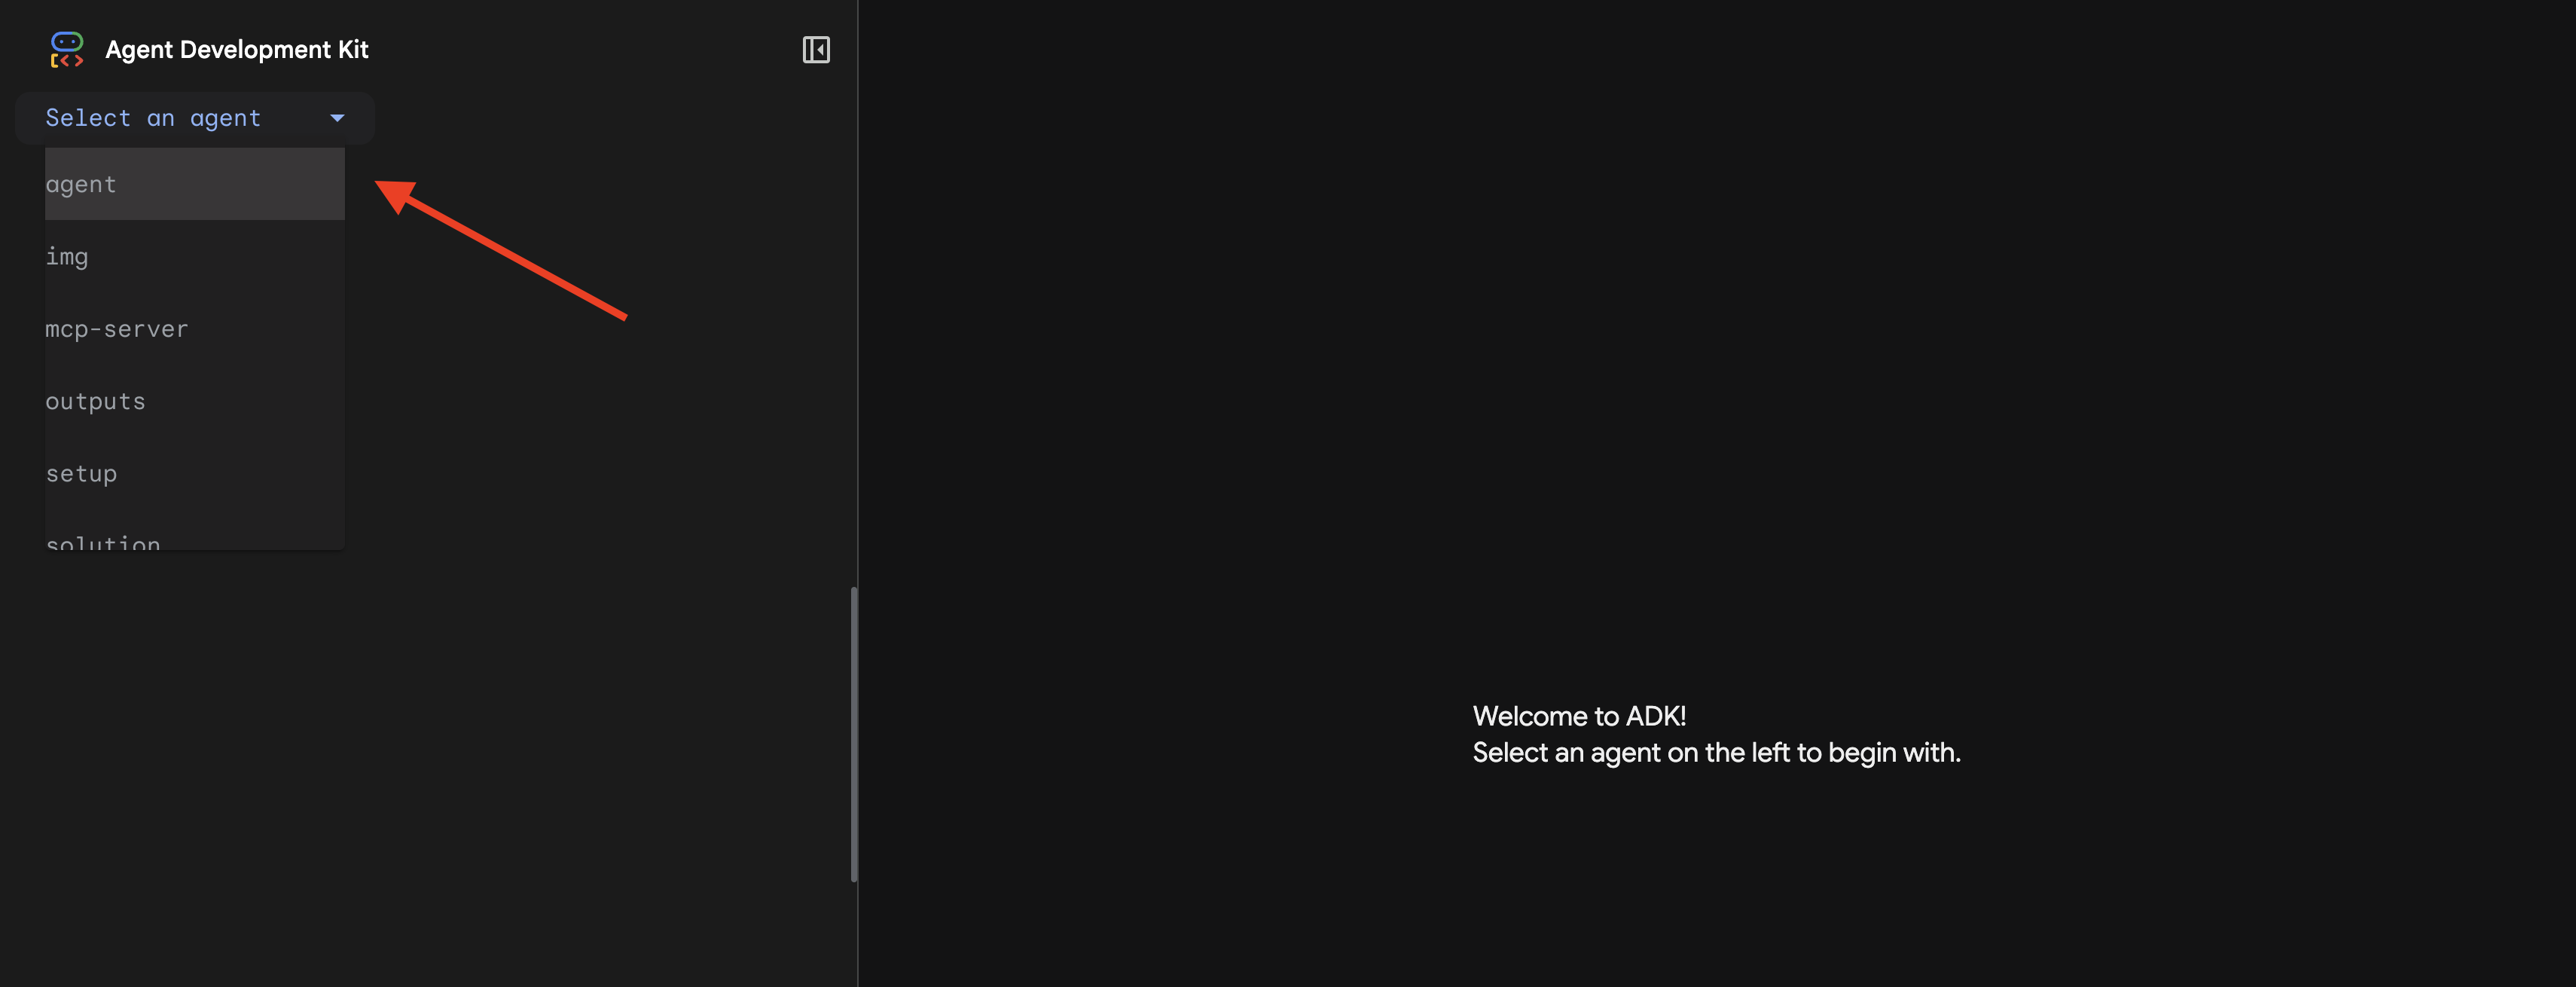
👉 ADK ウェブ UI が開きます。プルダウン メニューから [agent] を選択します。
分析を実行する
👉 チャット インターフェースで、次のように入力します。
Analyze the evidence from my crash site and confirm my location to activate the beacon.
マルチエージェント システムの動作をご覧ください。
👉 3 つのエージェントが分析を完了したら、次のように入力します。
Where am I?
リクエストの処理方法:

右側のトレースパネルには、エージェントのやり取りとツール呼び出しがすべて表示されます。
👉 テストが完了したら、ターミナルで Ctrl+C キーを押してサーバーを停止します。
9. Cloud Run にデプロイする
これで、マルチエージェント システムを Cloud Run にデプロイして A2A の準備が整いました。
エージェントをデプロイする
👉💻 ADK CLI を使用して Cloud Run にデプロイします。
cd $HOME/way-back-home/level_1
source $HOME/way-back-home/set_env.sh

uv run adk deploy cloud_run \
  --project=$GOOGLE_CLOUD_PROJECT \
  --region=$REGION \
  --service_name=mission-analysis-ai \
  --with_ui \
  --a2a \
  ./agent
Do you want to continue (Y/n) と Allow unauthenticated invocations to [mission-analysis-ai] (Y/n)? の入力を求められたら、両方に Y と入力して、A2A エージェントをデプロイし、一般公開アクセスを許可します。
次のような出力が表示されます。
Building and deploying agent to Cloud Run...
✓ Container built successfully
✓ Deploying to Cloud Run...
✓ Service deployed: https://mission-analysis-ai-abc123-uc.a.run.app
Cloud Run で環境変数を設定する
デプロイされたエージェントは環境変数にアクセスする必要があります。サービスを更新します。
👉💻 必要な環境変数を設定します。
gcloud run services update mission-analysis-ai \
  --region=$REGION \
  --labels=dev-tutorial=multi-modal \
  --set-env-vars="GOOGLE_CLOUD_PROJECT=$GOOGLE_CLOUD_PROJECT,GOOGLE_CLOUD_LOCATION=$REGION,MCP_SERVER_URL=$MCP_SERVER_URL,BACKEND_URL=$BACKEND_URL,PARTICIPANT_ID=$PARTICIPANT_ID,GOOGLE_GENAI_USE_VERTEXAI=True"
エージェントの URL を保存する
👉💻 デプロイされた URL を取得します。
export AGENT_URL=$(gcloud run services describe mission-analysis-ai \
  --region=$REGION --format='value(status.url)')
echo "Agent URL: $AGENT_URL"

# Add to set_env.sh
echo "export LEVEL1_AGENT_URL=\"$AGENT_URL\"" >> $HOME/way-back-home/set_env.sh
Deployment を確認する
👉💻 ブラウザで URL を開いてデプロイしたエージェントをテストします(--with_ui フラグで ADK ウェブ インターフェースがデプロイされます)。または、curl を使用してテストします。
curl -X GET "$AGENT_URL/list-apps"
エージェントのリストがレスポンスに表示されます。
10. まとめ
🎉 レベル 1 を完了しました
救難ビーコンが最大強度で発信されています。三角測量された信号は、大気圏の干渉を切り抜け、「ここにいる」という安定したパルスを送信します。私は生き残った。見つけてね。」
しかし、この惑星に住んでいるのはあなただけではありません。ビーコンが起動すると、地平線の向こうで他の光が点滅し始めます。他の生存者、他の墜落現場、生き残った他の探検家たちです。
![]()
レベル 2 では、SOS 信号の受信と、他の生存者との連携について学びます。救助は、見つかるだけでなく、互いを見つけることも意味します。
トラブルシューティング
「MCP_SERVER_URL が設定されていません」
export MCP_SERVER_URL=$(gcloud run services describe location-analyzer \
  --region=$REGION --format='value(status.url)')
「PARTICIPANT_ID が設定されていません」
source $HOME/way-back-home/set_env.sh
echo $PARTICIPANT_ID
「BigQuery テーブルが見つかりません」
uv run python setup/setup_star_catalog.py
「Specialists asking for URLs」(スペシャリストが URL を要求している): {key} テンプレートが機能していないことを意味します。確認:
- ルート エージェントに
before_agent_callbackが設定されていますか? - コールバックは状態値を正しく設定していますか?
- サブエージェントは
{soil_url}(f 文字列ではない)を使用していますか?
「3 つの分析すべてが一致しない」証拠を再生成する: uv run python generate_evidence.py
「Agent not responding in adk web」
- ポート 8000 が正しいことを確認する
- MCP_SERVER_URL と PARTICIPANT_ID が設定されていることを確認する
- ターミナルでエラー メッセージを確認する
アーキテクチャの概要
コンポーネント | タイプ | パターン | 目的 |
setup_participant_context | コールバック | before_agent_callback | 構成を取得して状態を設定する |
GeologicalAnalyst | エージェント | {soil_url} テンプレート | 土壌分類 |
BotanicalAnalyst | エージェント | {flora_url} テンプレート | 植物の分類 |
AstronomicalAnalyst | エージェント | {stars_url}, {project_id} | 星の三角測量 |
confirm_location | ツール | ToolContext 状態へのアクセス | ビーコンを有効にする |
EvidenceAnalysisCrew | ParallelAgent | サブエージェントの構成 | スペシャリストを同時に実行する |
MissionAnalysisAI | エージェント(ルート) | オーケストレーター + コールバック | 調整 + 合成 |
location-analyzer | FastMCP サーバー | カスタム MCP | 地質学 + 植物学分析 |
bigquery.googleapis.com/mcp | OneMCP | マネージド MCP | BigQuery へのアクセス |
習得した主なコンセプト
✓ before_agent_callback: エージェントの実行前に構成を取得する
✓ {key} 状態のテンプレート: エージェントの指示で状態値にアクセスする
✓ ToolContext: ツール関数で状態値にアクセスする
✓ State Sharing: InvocationContext を介してサブエージェントで親状態を自動的に使用可能にする
✓ Multi-Agent Architecture: 単一の責任を持つ特殊なエージェント
✓ ParallelAgent: 独立したタスクの同時実行
✓ Custom MCP Server: Cloud Run 上の独自の MCP サーバー
✓ OneMCP BigQuery: データベース アクセス用のマネージド MCP パターン
✓ Cloud Deployment: 環境変数を使用したステートレス デプロイ
✓ A2A Preparation: エージェント間の通信に対応したエージェント
ゲームをしない人向け: 実世界での応用
「位置情報の特定」は、複数の専門的な AI 分析を同時に実行して結果を統合する Parallel Expert Analysis with Consensus を表しています。
エンタープライズ アプリケーション
ユースケース | Parallel Experts | 合成ルール |
医学的診断 | 画像アナリスト、症状アナリスト、ラボアナリスト | 2/3 の信頼度のしきい値 |
不正行為の検出 | 取引アナリスト、行動アナリスト、ネットワーク アナリスト | 1 つのフラグ = 審査 |
ドキュメント処理 | OCR エージェント、分類エージェント、抽出エージェント | 全員が同意する必要があります |
品質検証(QC) | 外観検査担当者、センサー アナリスト、仕様チェッカー | 2-of-3 パス |
主なアーキテクチャの分析情報
- 構成の before_agent_callback: 開始時に構成を 1 回取得し、すべてのサブエージェントの状態を設定します。サブエージェントでの構成ファイルの読み取りはありません。
- {key} 状態テンプレート: 宣言的で、クリーンで、慣用的なコード。f 文字列、インポート、sys.path 操作はありません。
- コンセンサス メカニズム: 3 つのうち 2 つの合意により、全会一致の合意を必要とせずに、曖昧さを堅牢に処理します。
- 独立したタスク用の ParallelAgent: 分析が互いに依存しない場合は、同時に実行して高速化します。
- 2 つの MCP パターン: カスタム(独自に構築)と OneMCP(Google ホスト)。どちらも StreamableHTTP を使用します。
- ステートレス デプロイ: 同じコードがローカルとデプロイで動作します。環境変数 + バックエンド API = コンテナに構成ファイルがない。
次のステップ
イベント ドリブン パターンやより高度なエージェント調整を使用して、他の生存者からの緊急信号を処理する方法を学びます。