
1. 조난 신호

탈출 포드가 알 수 없는 세계의 대기를 뚫고 나아갑니다. 경고등이 모든 패널에서 깜박입니다. 내비게이션 시스템이 고장 났어. 통신이 중단되었습니다. 포드의 긴급 프로토콜이 작동하면 AI 어시스턴트가 활성화됩니다.
'생존자가 감지되었습니다. 긴급 착륙이 완료되었습니다. 구조 신호 프로토콜을 시작합니다...'
'경고: 신원 확인이 필요합니다. 은하계 구조 네트워크는 등록되지 않은 탐험가를 찾을 수 없습니다. 비콘을 활성화하려면 신원을 확인하세요.'
표시 영역을 살펴봅니다. 외계 행성의 풍경이 지평선까지 펼쳐져 있습니다. 기이한 암석 지형, 낯선 식물, 이상한 색의 하늘이 보입니다. 어딘가에 내 임무의 다른 생존자들이 이 행성 표면에 흩어져 있습니다.
하지만 먼저 시스템에 있어야 합니다.
빌드할 항목
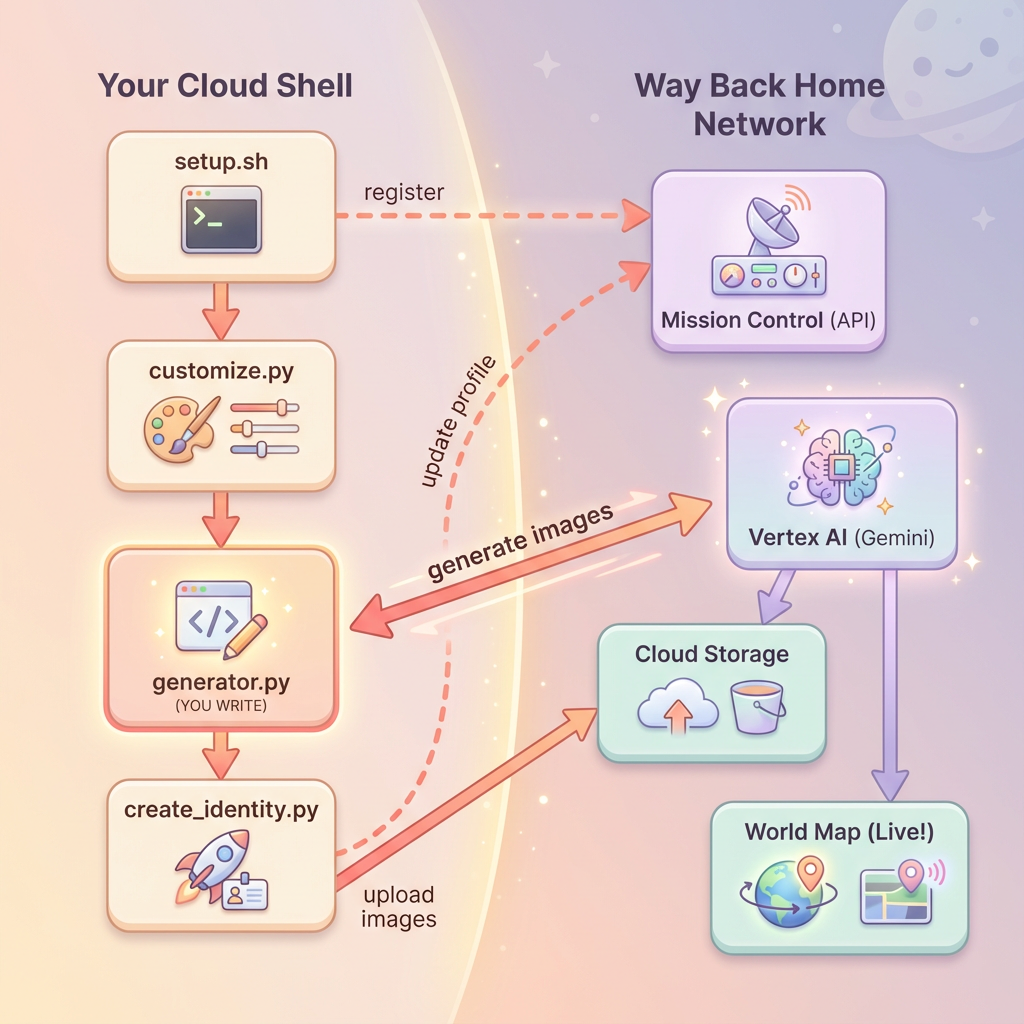
이 레벨에서는 Google의 Gemini 이미지 생성 모델 (Nano Banana 🍌라고도 함)을 사용하여 멀티턴 이미지 생성으로 나만의 우주 탐험가 아이덴티티를 만듭니다. 아바타는 워크숍 이벤트에 참여하는 다른 생존자에게 표시되는 글로벌 구조 지도에 표시됩니다.
학습할 내용
개념 | 설명 |
멀티턴 이미지 생성 | 채팅 세션을 사용하여 여러 이미지 생성에서 캐릭터 일관성을 유지하는 방법 |
이미지를 위한 프롬프트 엔지니어링 | 특정 제약 조건이 있는 스타일화된 일관된 출력을 위한 효과적인 프롬프트 작성 |
Gemini Image API (Nano Banana) | Python SDK를 통해 Gemini의 기본 이미지 생성 기능 사용 |
채팅 세션 | 대화 컨텍스트를 활용하여 반복적인 개선 및 캐릭터 일관성 유지 |
이 레벨을 마치면 다음을 수행할 수 있습니다.
✅ 텍스트-이미지 AI를 사용하여 탐험가의 인물 사진을 생성했습니다.
✅ 멀티턴 대화를 사용하여 일관된 지도 아이콘을 만들었습니다.
✅ 구조 네트워크에 신원을 등록했습니다.
✅ 다른 탐험가와 함께 실시간 세계 지도에 표시되었습니다.
지도에 표시해 보세요. 📍
2. 환경 준비
Cloud Shell 액세스
먼저 Google Cloud SDK 및 기타 필수 도구가 사전 설치된 브라우저 기반 터미널인 Cloud Shell을 엽니다.
Google Cloud 콘솔 상단에서 Cloud Shell 활성화를 클릭합니다 (오른쪽 상단 탐색 메뉴의 터미널 아이콘).

Cloud Shell이 열리면 인증되었는지 확인합니다.
# Check that you are logged in
gcloud auth list
계정이 (ACTIVE)로 표시됩니다.
저장소 클론
Way Back Home 저장소를 클론하고 프로젝트로 이동합니다.
git clone https://github.com/gca-americas/way-back-home.git
cd way-back-home
종속 항목 설치
레벨 0으로 이동하여 필요한 Python 패키지를 설치합니다.
cd level_0
uv sync
주요 종속 항목은 다음과 같습니다.
패키지 | 목적 |
| 이미지 생성을 위한 Gemini API 클라이언트 |
| Mission Control에 대한 API 호출용 HTTP 클라이언트 |
| 이미지 처리 및 파일 처리 |
설정 확인
간단한 확인을 실행하여 모든 항목이 올바르게 구성되었는지 확인합니다.
uv run python ../scripts/verify_setup.py
다음과 같이 표시됩니다.
✓ Authenticated as: your-email@google.com
✓ Python environment ready (uv)
✓ Ready to proceed!
최근에 완료한 항목
✓ Cloud Shell 열기
✓ Google Cloud로 인증
✓ Codelab 저장소 클론
✓ uv로 Python 종속 항목 설치
✓ 설정 확인
다음: Mission Control에 연결합니다. 설정 스크립트가 Google Cloud 프로젝트와 API를 자동으로 구성합니다.
3. Mission Control에 연결
설정 스크립트 실행
설정 스크립트는 Way Back Home 구조 네트워크에 연결하고 탐험가 ID를 예약합니다. 프로젝트 루트에서 실행합니다.
cd $HOME/way-back-home
chmod +x scripts/setup.sh
./scripts/setup.sh
두 가지 정보를 입력하라는 메시지가 표시됩니다.
이벤트 코드 입력
이벤트 코드는 참여 중인 워크숍 이벤트를 식별합니다.
워크숍에 참석하는 경우: QR 코드, 슬라이드 또는 워크숍 강사에게 받은 이벤트 코드를 입력합니다.
🚀 Welcome to Way Back Home!

Enter event code (from QR/slide): devfest-nyc-26
Validating event...
✓ Connected to: DevFest NYC 2026
혼자 학습하는 경우: sandbox를 입력하여 공개 학습 환경에 참여합니다.
🚀 Welcome to Way Back Home!

Enter event code (from QR/slide): sandbox
Validating event...
✓ Connected to: Way Back Home Sandbox
탐험가 이름 선택
탐색기에 고유한 이름을 선택합니다. 전 세계 지도와 리더보드에 표시되는 방식입니다.
Choose your explorer name: AstroAyo
✓ Username available!
선택한 이름을 동일한 이벤트의 다른 참가자가 이미 사용하고 있는 경우:
Choose your explorer name: SpaceExplorer
⚠️  That name is taken. Try another.
Choose your explorer name: SpaceExplorer42
✓ Username available!
설정 완료
완료되면 다음과 같은 확인 메시지가 표시됩니다.
Initializing your explorer profile...

✓ Environment configured!
  Explorer ID: a1b2c3d4
  Starting coordinates: (47, 23)

Next: cd level_0 && python customize.py
레벨 0으로 이동
이제 레벨 0 디렉터리로 이동합니다 (종속 항목은 모듈 2에서 이미 설치됨).
cd level_0
구성 검사
저장된 내용을 확인합니다 (config.json은 프로젝트 루트에 있음).
cat ../config.json
{
    "event_code": "devfest-nyc-26",
    "event_name": "DevFest NYC 2026",
    "username": "AstroAyo",
    "participant_id": "a1b2c3d4",
    "starting_x": 47,
    "starting_y": 23,
    "api_base": "https://api.waybackhome.dev",
    "project_id": "your-project-id"
}
이 구성 파일은 후속 스크립트에서 복구 네트워크에 사용자를 식별하는 데 사용됩니다.
최근에 완료한 항목
✓ Mission Control API에 연결됨
✓ 고유한 탐험가 이름을 예약함
✓ 참여자 ID와 시작 좌표를 받음
✓ 후속 단계를 위해 구성이 저장됨
다음: 탐색기의 모양을 맞춤설정합니다.
4. 탐색기 맞춤설정
맞춤설정 스크립트 실행
아바타를 생성하기 전에 탐험가의 외모에 관해 몇 가지 선택을 합니다.
uv run python customize.py
정장 색상 선택
탐험가의 우주복 색상을 선택하세요.
🎨 Let's create your explorer identity!

Select suit color:
  1. Deep Blue
  2. Crimson Red
  3. Forest Green
  4. Royal Purple
  5. Solar Gold
  6. Silver

Choice [1-6, default=6]: 1
✓ Deep Blue selected
탐색기 설명 (선택사항)
탐험가의 외모에 대한 간단한 설명을 제공하거나 Enter 키를 눌러 무작위로 할당할 수 있습니다.
Brief description of your explorer (or Enter for random):
Example: 'short dark hair, glasses, friendly smile'
> short dark hair, glasses, determined expression

✓ Preferences saved!
아무것도 입력하지 않고 Enter 키를 누르면 무작위 특성이 표시됩니다.
>
✓ Random traits: confident expression, short styled hair
구성이 업데이트됨
이제 환경설정이 저장됩니다.
✓ Preferences saved!
Next: Open generator.py and follow the codelab instructions
업데이트된 구성을 확인합니다.
cat ../config.json
환경설정이 추가된 것을 확인할 수 있습니다.
{
    "event_code": "devfest-nyc-26",
    "event_name": "DevFest NYC 2026",
    "username": "AstroAyo",
    "participant_id": "a1b2c3d4",
    "starting_x": 47,
    "starting_y": 23,
    "api_base": "https://api.waybackhome.dev",
    "project_id": "your-project-id",
    "suit_color": "deep blue with silver accents",
    "appearance": "short dark hair, glasses, determined expression"
}
최근에 완료한 항목
✓ 슈트 색상 선택
✓ 탐험가 외모 정의
✓ 이미지 생성을 위한 구성 준비 완료
다음: 이미지 생성 코드 작성이라는 주요 이벤트
5. 아바타 생성기 빌드
이것이 핵심 학습 모듈입니다. Gemini의 다중 턴 이미지 생성 기능 (Nano Banana)을 사용하여 나만의 탐험가 아바타를 생성하는 Python 코드를 작성합니다.
생성기 파일 열기
Cloud Shell 편집기에서 아바타 생성기를 엽니다.
cloudshell edit generator.py
또는 Cloud Shell에서 편집기 열기를 클릭하고 level_0 폴더에서 generator.py로 이동합니다.
파일 구조 이해하기
파일에는 시작 코드와 구현을 추가할 세 개의 자리표시자 섹션이 있습니다.
"""
Level 0: Avatar Generator

This module generates your unique space explorer avatar using
multi-turn image generation with Gemini (Nano Banana) for
character consistency across portrait and icon.
"""

from google import genai
from google.genai import types
from PIL import Image
import json
import os
import io

# Load configuration from setup (config.json is in project root)
CONFIG_PATH = "../config.json"

with open(CONFIG_PATH) as f:
    config = json.load(f)

USERNAME = config["username"]
SUIT_COLOR = config["suit_color"]
APPEARANCE = config["appearance"]

# Initialize the Gemini client for Vertex AI
client = genai.Client(
    vertexai=True,
    project=os.environ.get("GOOGLE_CLOUD_PROJECT", config.get("project_id")),
    location="us-central1"
)


def generate_explorer_avatar() -> dict:
    """
    Generate portrait and icon using multi-turn chat for consistency.

    The key technique here is using a CHAT SESSION rather than independent
    API calls. This allows Gemini to "remember" the character it created
    in the first turn, ensuring the icon matches the portrait.

    Returns:
        dict with portrait_path and icon_path
    """

    # MODULE_5_STEP_1_CREATE_CHAT_SESSION
    # TODO: Create a chat session for multi-turn generation
    chat = None  # Replace this line

    # MODULE_5_STEP_2_GENERATE_PORTRAIT
    # TODO: Generate the explorer portrait
    portrait_image = None  # Replace this section

    # MODULE_5_STEP_3_GENERATE_ICON
    # TODO: Generate a consistent map icon
    icon_image = None  # Replace this section

    return {
        "portrait_path": "outputs/portrait.png",
        "icon_path": "outputs/icon.png"
    }


if __name__ == "__main__":
    # Create outputs directory if it doesn't exist
    os.makedirs("outputs", exist_ok=True)

    print(f"Generating avatar for {USERNAME}...")
    result = generate_explorer_avatar()
    print(f"✅ Avatar created!")
    print(f"   Portrait: {result['portrait_path']}")
    print(f"   Icon: {result['icon_path']}")
세 개의 TODO 섹션을 구현으로 바꿉니다.
1단계: 채팅 세션 만들기
자리표시자 MODULE_5_STEP_1_CREATE_CHAT_SESSION를 찾아 chat = None # Replace this line 줄을 다음으로 바꿉니다.
    # MODULE_5_STEP_1_CREATE_CHAT_SESSION
    # Create a chat session to maintain character consistency across generations.
    # The chat session preserves context between turns, so Gemini "remembers"
    # what it generated and can create consistent variations.
    chat = client.chats.create(
        model="gemini-2.5-flash-image",  # Nano Banana - Gemini with image generation
        config=types.GenerateContentConfig(
            response_modalities=["TEXT", "IMAGE"]
        )
    )
2단계: 인물 사진 생성
MODULE_5_STEP_2_GENERATE_PORTRAIT를 찾아 portrait_image = None # Replace this section을 다음 코드로 바꿉니다.
    # MODULE_5_STEP_2_GENERATE_PORTRAIT
    # First turn: Generate the explorer portrait.
    # This establishes the character that will be referenced in subsequent turns.
    portrait_prompt = f"""Create a stylized space explorer portrait.

Character appearance: {APPEARANCE}
Name on suit patch: "{USERNAME}"
Suit color: {SUIT_COLOR}

CRITICAL STYLE REQUIREMENTS:
- Digital illustration style, clean lines, vibrant saturated colors
- Futuristic but weathered space suit with visible mission patches
- Background: Pure solid white (#FFFFFF) - absolutely no gradients, patterns, or elements
- Frame: Head and shoulders only, 3/4 view facing slightly left
- Lighting: Soft diffused studio lighting, no harsh shadows
- Expression: Determined but approachable
- Art style: Modern animated movie character portrait (similar to Pixar or Dreamworks style)

The white background is essential - the avatar will be composited onto a map."""

    print("🎨 Generating your portrait...")
    portrait_response = chat.send_message(portrait_prompt)

    # Extract the image from the response.
    # Gemini returns a response with multiple "parts" - we need to find the image part.
    portrait_image = None
    for part in portrait_response.candidates[0].content.parts:
        if part.inline_data is not None:
            # Found the image! Convert from bytes to PIL Image and save.
            image_bytes = part.inline_data.data
            portrait_image = Image.open(io.BytesIO(image_bytes))
            portrait_image.save("outputs/portrait.png")
            break

    if portrait_image is None:
        raise Exception("Failed to generate portrait - no image in response")

    print("✓ Portrait generated!")
3단계: 지도 아이콘 생성
MODULE_5_STEP_3_GENERATE_ICON를 찾아 icon_image = None # Replace this section를 다음으로 바꿉니다.
    # MODULE_5_STEP_3_GENERATE_ICON
    # Second turn: Generate a consistent icon for the map.
    # Because we're in the same chat session, Gemini remembers the character
    # from the portrait and will maintain visual consistency.
    icon_prompt = """Now create a circular map icon of this SAME character.

CRITICAL REQUIREMENTS:
- SAME person, SAME face, SAME expression, SAME suit — maintain perfect consistency with the portrait
- Tighter crop: just the head and very top of shoulders
- Background: Pure solid white (#FFFFFF)
- Optimized for small display sizes (will be used as a 64px map marker)
- Keep the exact same art style, colors, and lighting as the portrait
- Square 1:1 aspect ratio

This icon must be immediately recognizable as the same character from the portrait."""

    print("🖼️  Creating map icon...")
    icon_response = chat.send_message(icon_prompt)

    # Extract the icon image from the response
    icon_image = None
    for part in icon_response.candidates[0].content.parts:
        if part.inline_data is not None:
            image_bytes = part.inline_data.data
            icon_image = Image.open(io.BytesIO(image_bytes))
            icon_image.save("outputs/icon.png")
            break

    if icon_image is None:
        raise Exception("Failed to generate icon - no image in response")

    print("✓ Icon generated!")
완성된 코드
세 섹션을 모두 추가하면 generate_explorer_avatar() 함수가 다음과 같이 표시됩니다.
def generate_explorer_avatar() -> dict:
    """
    Generate portrait and icon using multi-turn chat for consistency.

    The key technique here is using a CHAT SESSION rather than independent
    API calls. This allows Gemini to "remember" the character it created
    in the first turn, ensuring the icon matches the portrait.

    Returns:
        dict with portrait_path and icon_path
    """

    # MODULE_5_STEP_1_CREATE_CHAT_SESSION
    # Create a chat session to maintain character consistency across generations.
    # The chat session preserves context between turns, so Gemini "remembers"
    # what it generated and can create consistent variations.
    chat = client.chats.create(
        model="gemini-2.5-flash-image",  # Nano Banana - Gemini with image generation
        config=types.GenerateContentConfig(
            response_modalities=["TEXT", "IMAGE"]
        )
    )

    # MODULE_5_STEP_2_GENERATE_PORTRAIT
    # First turn: Generate the explorer portrait.
    # This establishes the character that will be referenced in subsequent turns.
    portrait_prompt = f"""Create a stylized space explorer portrait.

Character appearance: {APPEARANCE}
Name on suit patch: "{USERNAME}"
Suit color: {SUIT_COLOR}

CRITICAL STYLE REQUIREMENTS:
- Digital illustration style, clean lines, vibrant saturated colors
- Futuristic but weathered space suit with visible mission patches
- Background: Pure solid white (#FFFFFF) - absolutely no gradients, patterns, or elements
- Frame: Head and shoulders only, 3/4 view facing slightly left
- Lighting: Soft diffused studio lighting, no harsh shadows
- Expression: Determined but approachable
- Art style: Modern animated movie character portrait (similar to Pixar or Dreamworks style)

The white background is essential - the avatar will be composited onto a map."""

    print("🎨 Generating your portrait...")
    portrait_response = chat.send_message(portrait_prompt)

    # Extract the image from the response.
    # Gemini returns a response with multiple "parts" - we need to find the image part.
    portrait_image = None
    for part in portrait_response.candidates[0].content.parts:
        if part.inline_data is not None:
            # Found the image! Convert from bytes to PIL Image and save.
            image_bytes = part.inline_data.data
            portrait_image = Image.open(io.BytesIO(image_bytes))
            portrait_image.save("outputs/portrait.png")
            break

    if portrait_image is None:
        raise Exception("Failed to generate portrait - no image in response")

    print("✓ Portrait generated!")

    # MODULE_5_STEP_3_GENERATE_ICON
    # Second turn: Generate a consistent icon for the map.
    # Because we're in the same chat session, Gemini remembers the character
    # from the portrait and will maintain visual consistency.
    icon_prompt = """Now create a circular map icon of this SAME character.

CRITICAL REQUIREMENTS:
- SAME person, SAME face, SAME expression, SAME suit — maintain perfect consistency with the portrait
- Tighter crop: just the head and very top of shoulders
- Background: Pure solid white (#FFFFFF)
- Optimized for small display sizes (will be used as a 64px map marker)
- Keep the exact same art style, colors, and lighting as the portrait
- Square 1:1 aspect ratio

This icon must be immediately recognizable as the same character from the portrait."""

    print("🖼️  Creating map icon...")
    icon_response = chat.send_message(icon_prompt)

    # Extract the icon image from the response
    icon_image = None
    for part in icon_response.candidates[0].content.parts:
        if part.inline_data is not None:
            image_bytes = part.inline_data.data
            icon_image = Image.open(io.BytesIO(image_bytes))
            icon_image.save("outputs/icon.png")
            break

    if icon_image is None:
        raise Exception("Failed to generate icon - no image in response")

    print("✓ Icon generated!")

    return {
        "portrait_path": "outputs/portrait.png",
        "icon_path": "outputs/icon.png"
    }
파일 저장
generator.py를 저장해야 합니다.
- Cloud Shell 편집기: Ctrl+S (Windows/Linux) 또는 Cmd+S (Mac)
- vim: Esc 키를 누른 다음
:wq를 입력하고 Enter 키를 누릅니다.
방금 빌드한 항목
✓ 멀티턴 이미지 생성을 위한 채팅 세션을 만들었습니다.
✓ 스타일 제약 조건이 있는 인물 사진 생성을 위한 자세한 프롬프트를 작성했습니다.
✓ 대화 컨텍스트를 사용하여 일관된 지도 아이콘을 생성했습니다.
✓ Gemini 대답에서 이미지 데이터를 파싱하는 방법을 배웠습니다.
숙달한 주요 개념:
개념 | 학습한 내용 |
채팅 세션 |
|
대답 모달리티 |
|
프롬프트 구조 | 주제 → 변수 → 스타일 → 기술적 제약 |
캐릭터 일관성 | 동일한 채팅 세션 = 이미지 전반에서 동일한 캐릭터 |
응답 파싱 | 대답 부분에서 |
다음: 코드를 실행하고 지도에 표시되는 내 모습을 확인하세요.
6. 생성 및 등록
프로젝트 ID 설정
프로젝트 ID가 환경 변수로 제공되는지 확인합니다.
export GOOGLE_CLOUD_PROJECT=$(gcloud config get-value project)
ID 생성기 실행
이제 생성, 업로드, 등록을 조정하는 기본 스크립트를 실행합니다.
uv run python create_identity.py
생성 진행 상황이 실시간으로 표시됩니다.
참고: 아바타가 라이브 지도에 표시되는 데 최대 5초가 걸릴 수 있으므로 지도에 바로 표시되지 않으면 새로고침하세요.
🚀 Creating identity for AstroAyo...

🎨 Generating your portrait...
✓ Portrait generated!
🖼️  Creating map icon...
✓ Icon generated!

☁️  Uploading to mission database...
✓ Avatar uploaded!

📍 Registering with rescue network...
✓ Registration complete!

╔═══════════════════════════════════════════════════════════════╗
║                    ✅ IDENTITY CONFIRMED!                      ║
╠═══════════════════════════════════════════════════════════════╣
║                                                               ║
║  Explorer: AstroAyo                                           ║
║  Location: (47, 23) — unconfirmed                             ║
║                                                               ║
║  🗺️  You're now on the map!                                   ║
║  https://waybackhome.dev/e/devfest-nyc-26                     ║
║                                                               ║
║  NEXT: Proceed to Level 1 to pinpoint your exact location!   ║
║                                                               ║
╚═══════════════════════════════════════════════════════════════╝
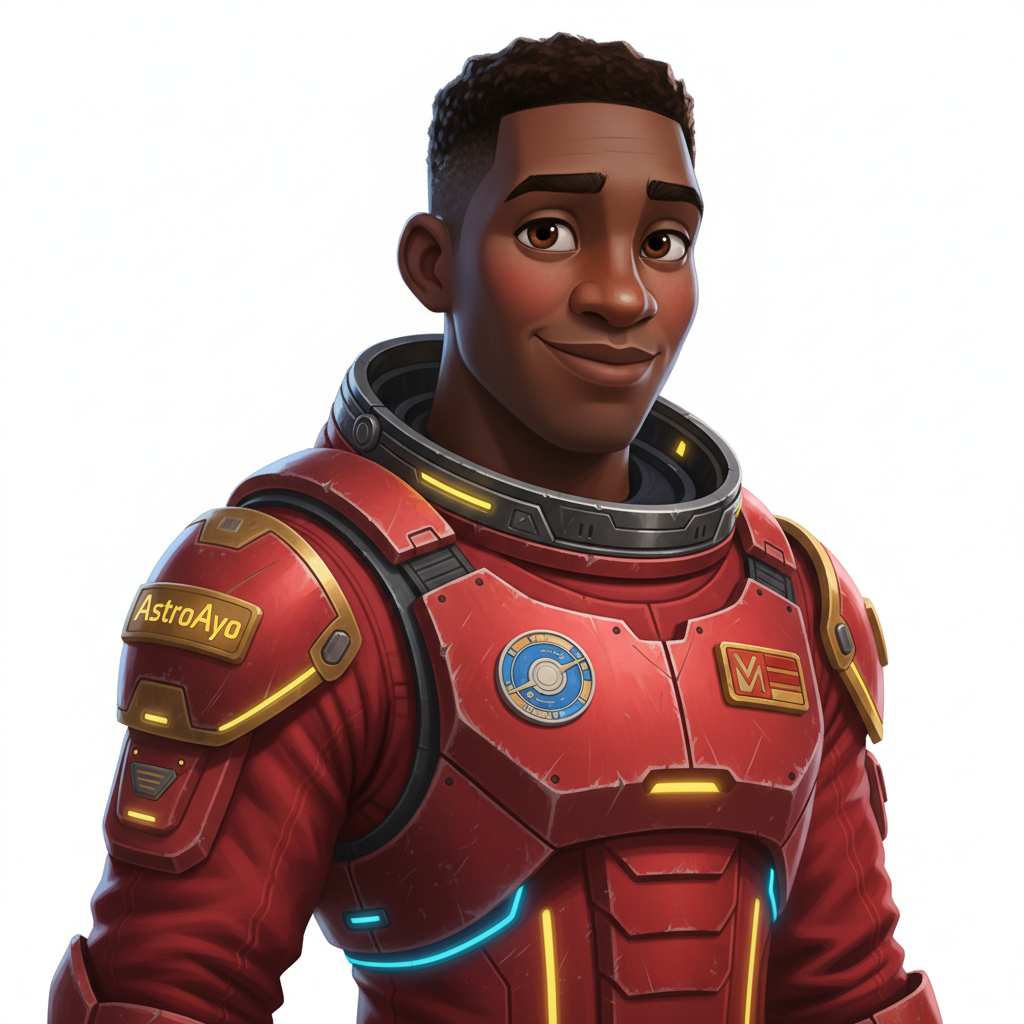
생성된 아바타 보기
생성된 이미지를 로컬에서 확인합니다.
# List the generated files
ls -la outputs/

# Download to view on your local machine
cloudshell download outputs/portrait.png
cloudshell download outputs/icon.png
또는 outputs/ 폴더로 이동하여 이미지 파일을 클릭하여 Cloud Shell 편집기에서 직접 볼 수 있습니다.
생성된 프로필 사진과 아이콘은 다음과 같은 이미지와 비슷합니다.
![]()
지도에서 내 위치 확인하기
출력에 표시된 세계 지도 URL을 엽니다.
https://waybackhome.dev/e/{your-event-code}
예: https://waybackhome.dev/e/devfest-nyc-26
지도에서 아바타를 찾아보세요. 다음 내용이 표시됩니다.
- 지구 표면에서 내 위치를 표시하는 아이콘
- 아이콘 아래에 라벨로 표시되는 탐색기 이름
- 마커 주위에서 천천히 깜박이는 어두운 비콘
![]()
마커를 클릭하면 세부정보 카드에 전체 프로필이 표시됩니다.
아바타가 마음에 들지 않으신가요? 다시 생성해 줘.
다른 아바타를 사용하려면 다음과 같이 재생성하면 됩니다.
# Option 1: Change your appearance settings first
uv run python customize.py

# Option 2: Just regenerate with current settings
uv run python create_identity.py
create_identity.py를 실행할 때마다 완전히 새로운 아바타가 생성되고 (새 채팅 세션 = 새 캐릭터) 등록이 업데이트됩니다. 결과가 만족스러울 때까지 자유롭게 반복하세요.
문제 해결
최근에 완료한 항목
✓ 고유한 탐험가 초상화 생성
✓ 일관된 지도 아이콘 생성
✓ Mission Control에 애셋 업로드
✓ 구조 네트워크에 ID 등록
✓ 실시간 세계 지도에 표시됨
탐험가님, 수고하셨습니다. 이제 복구 네트워크에 포함됩니다. 비컨이 활성화되어 있으며 (어둡게 표시됨) 다른 생존자가 지도에서 나를 볼 수 있습니다.
7. 결론
빌드한 항목
10분 만에 멀티턴 AI 이미지 생성을 사용하여 완전한 아바타 생성 시스템을 만들었습니다.
┌─────────────────────────────────────────────────────────────┐
│                     Your Creation                           │
├─────────────────────────────────────────────────────────────┤
│                                                             │
│   📝 Input                       🖼️  Output                  │
│   ──────────                     ────────                    │
│   • Explorer name                • Stylized portrait         │
│   • Suit color                   • Consistent map icon       │
│   • Appearance description       • Live map presence         │
│                                                              │
├─────────────────────────────────────────────────────────────┤
│                                                             │
│   🧠 Techniques You Used                                     │
│   ──────────────────────                                    │
│   • Multi-turn chat sessions for character consistency      │
│   • Structured prompt engineering with style constraints    │
│   • Response parsing to extract generated images            │
│   • API integration for cloud registration                  │
│                                                             │
└─────────────────────────────────────────────────────────────┘
핵심 요점
강의 | 중요한 이유 |
채팅 세션에서 컨텍스트 유지 | 변형 드리프트 없이 여러 이미지에서 일관된 캐릭터를 생성하는 데 필수적입니다. |
프롬프트 구조의 중요성 | 명확한 제약 조건 (흰색 배경, 특정 스타일, 프레임)은 예측 가능하고 프로덕션 준비가 완료된 결과를 생성합니다. |
멀티턴이 독립 호출보다 우수함 | 채팅의 각 메시지는 이전 컨텍스트를 기반으로 하므로 반복적인 개선과 일관성이 가능합니다. |
대답 모달리티로 출력 제어 | 이미지를 생성하려면 |
비용 요약
이 레벨에서는 Gemini 2.5 Flash (Nano Banana)를 사용하여 2개의 이미지를 생성했습니다.
항목 | 토큰 | 비용 |
세로 모드 (1024×1024) | 출력 토큰 약 1,290개 | ~$0.039 |
아이콘 (1024×1024) | 출력 토큰 약 1,290개 | ~$0.039 |
합계 | 토큰 약 2,580개 | ~$0.08 |
여정은 계속됩니다
탐험가 신원이 확인되었지만 위치가 확인되지 않았습니다.
세계 지도를 보면 내 위치 표시기가 어둡고 천천히 깜박입니다. 구조 네트워크는 사용자의 존재를 알지만 정확한 위치는 알지 못합니다. 지구 표면의 광활한 지역 어디에나 있을 수 있습니다.
1단계: 위치 지정에서는 다음 작업을 수행합니다.
- Google의 에이전트 개발 키트 (ADK)를 사용하여 멀티 에이전트 시스템 빌드
- 지질, 식물, 천문 분석을 위한 MCP 서버 만들기
- 멀티모달 입력 (비정상 종료 사이트의 이미지) 처리
- AI를 사용하여 확인된 위치의 지형도 생성
- 구조팀이 사용자를 찾을 수 있도록 비컨을 실제로 켜세요.
레벨 1에서는 멀티 에이전트 오케스트레이션, 모델 컨텍스트 프로토콜 (MCP), 프로덕션 배포 패턴과 같은 훨씬 더 고급 개념을 소개합니다. 단일 모델 기능을 사용하는 것에서 완전한 에이전트 시스템을 구축하는 것으로 나아갑니다.
정리 (선택사항)
로컬 파일을 정리하려면 (level_0 디렉터리에서 실행) 다음을 실행하세요.
rm -rf outputs/
deactivate  # Exit virtual environment
구조 네트워크에 등록한 정보는 유지되므로 로컬 파일을 삭제한 후에도 지도에 계속 표시됩니다. 이미지는 로컬이 아닌 클라우드에 저장됩니다.
리소스
비콘이 확인을 기다리고 있습니다. 레벨 1에서 뵙겠습니다. 🚀
8. 보너스: 사진 기반 아바타 (선택사항)
사진을 아바타로 변환하는 기능을 사용해야 하는 경우
다음과 같은 경우 이 방법을 사용하는 것이 좋습니다.
- 아바타가 실제 나와 비슷해야 함
- 스타일을 지정하려는 특정 사진이 있는 경우
- Gemini의 이미지-이미지 변환 기능을 살펴보고 싶습니다.
작동 방식
텍스트 설명만으로 캐릭터를 생성하는 대신 사진을 제공하고 Gemini에게 인물의 외모를 유지하면서 변신시켜 달라고 요청합니다.
![]()
사진 업로드
먼저 Cloud Shell에 사진을 업로드합니다.
- Cloud Shell에서 터미널 툴바에 있는 점 3개 메뉴 (⋮)를 클릭합니다.
- 업로드를 선택합니다.
- 선명한 인물 사진 (JPEG 또는 PNG) 선택
- 업로드된 경로 (예:
/home/your-username/my_photo.jpg)를 확인합니다.
생성기 수정
사진을 사용하려면 generator.py에서 인물 사진 생성 단계를 수정합니다. 텍스트 전용 프롬프트를 사진이 포함된 멀티모달 프롬프트로 바꿉니다.
    # MODULE_5_STEP_2_GENERATE_PORTRAIT (Photo-based version)

    # Load your photo
    photo_path = "/home/your-username/my_photo.jpg"  # Update this path!
    user_photo = Image.open(photo_path)

    # Convert photo to bytes for the API
    photo_buffer = io.BytesIO()
    user_photo.save(photo_buffer, format="JPEG")
    photo_bytes = photo_buffer.getvalue()

    portrait_prompt = f"""Transform this person into a stylized space explorer portrait.

PRESERVE from the original photo:
- The person's facial features, face shape, and likeness
- Their general expression and personality
- Any distinctive features (glasses, facial hair, etc.)

TRANSFORM with this style:
- Digital illustration style, clean lines, vibrant saturated colors
- Add a futuristic space suit with the name "{USERNAME}" on a shoulder patch
- Suit color: {SUIT_COLOR}
- Background: Pure solid white (#FFFFFF) - no gradients or elements
- Frame: Head and shoulders, 3/4 view
- Lighting: Soft diffused studio lighting
- Art style: Modern animated movie character (Pixar/Dreamworks aesthetic)

The result should be clearly recognizable as THIS specific person, but illustrated as a heroic space explorer."""

    print("🎨 Transforming your photo into an explorer portrait...")

    # Send both the prompt AND the image
    portrait_response = chat.send_message([
        portrait_prompt,
        types.Part.from_bytes(data=photo_bytes, mime_type="image/jpeg")
    ])

    # Rest of the extraction code stays the same...
멀티턴 일관성이 여전히 작동함
멀티턴 방식은 사진 기반 생성에서도 동일하게 작동합니다.
- 1번째 턴: 사진 + 프롬프트 → 스타일이 지정된 인물 사진 (내 모습, 일러스트레이션)
- 2번째 턴: '이 동일한 캐릭터의 아이콘을 만들어 줘' → 일관된 아이콘
채팅 세션에서는 생성된 스타일 지정 버전 (원본 사진 아님)을 기억하므로 아이콘이 변환된 인물 사진과 완벽하게 일치합니다.
개인 정보 보호 고려사항
Vertex AI Studio에서 사용해 보기
코드를 작성하기 전에 Google Cloud 콘솔에서 사진 변환을 대화형으로 실험할 수도 있습니다.
- Vertex AI Studio로 이동합니다.
- 이미지 기능이 있는 Gemini 모델 선택
- 첨부 파일 버튼을 사용하여 사진을 업로드합니다.
- 변환 프롬프트 입력
- 결과가 만족스러울 때까지 스타일을 반복합니다.
이 대화형 접근 방식은 코드를 커밋하기 전에 프롬프트를 실험하고 결과를 실시간으로 확인하는 데 유용합니다.
학습한 내용 (보너스)
✓ Gemini로 이미지 대 이미지 변환을 사용하는 방법
✓ 단일 메시지에서 멀티모달 콘텐츠 (텍스트 + 이미지) 전송
✓ 예술적 스타일 전송을 적용하면서 유사성 유지
✓ 사진 기반 AI 생성의 개인 정보 보호 고려사항