
1. 미션

긴급 AI에 신원을 확인했고 이제 행성 지도에서 비컨이 깜박이지만 정적 사이에 가려져 거의 보이지 않습니다. 궤도에서 스캔하는 구조팀은 내 좌표에서 무언가를 볼 수 있지만 위치를 고정할 수는 없습니다. 신호가 너무 약합니다.
비콘을 최대 강도로 높이려면 정확한 위치를 확인해야 합니다. 포드의 탐색 시스템은 고장 났지만, 추락으로 인해 착륙 지점에 복구 가능한 증거가 흩어져 있습니다. 토양 샘플 이상한 식물. 외계인 밤하늘이 잘 보이는 곳에 있습니다.
이 증거를 분석하여 지구상의 어느 지역에 있는지 확인할 수 있다면 AI가 내 위치를 삼각 측량하고 비콘 신호를 증폭할 수 있습니다. 그러면 누군가 나를 찾을 수 있을지도 모릅니다.
이제 조각들을 맞춰 볼 시간입니다.
기본 요건
⚠️ 이 레벨을 완료하려면 레벨 0을 완료해야 합니다.
시작하기 전에 다음 사항을 확인하세요.
- [ ] 프로젝트 루트에서
config.json를 참여자 ID와 좌표로 바꿉니다. - [ ] 내 아바타가 세계 지도에 표시됨
- [ ] 좌표에 비컨이 표시됨 (흐림)
0단계를 완료하지 않았다면 먼저 0단계부터 시작하세요.
빌드할 항목
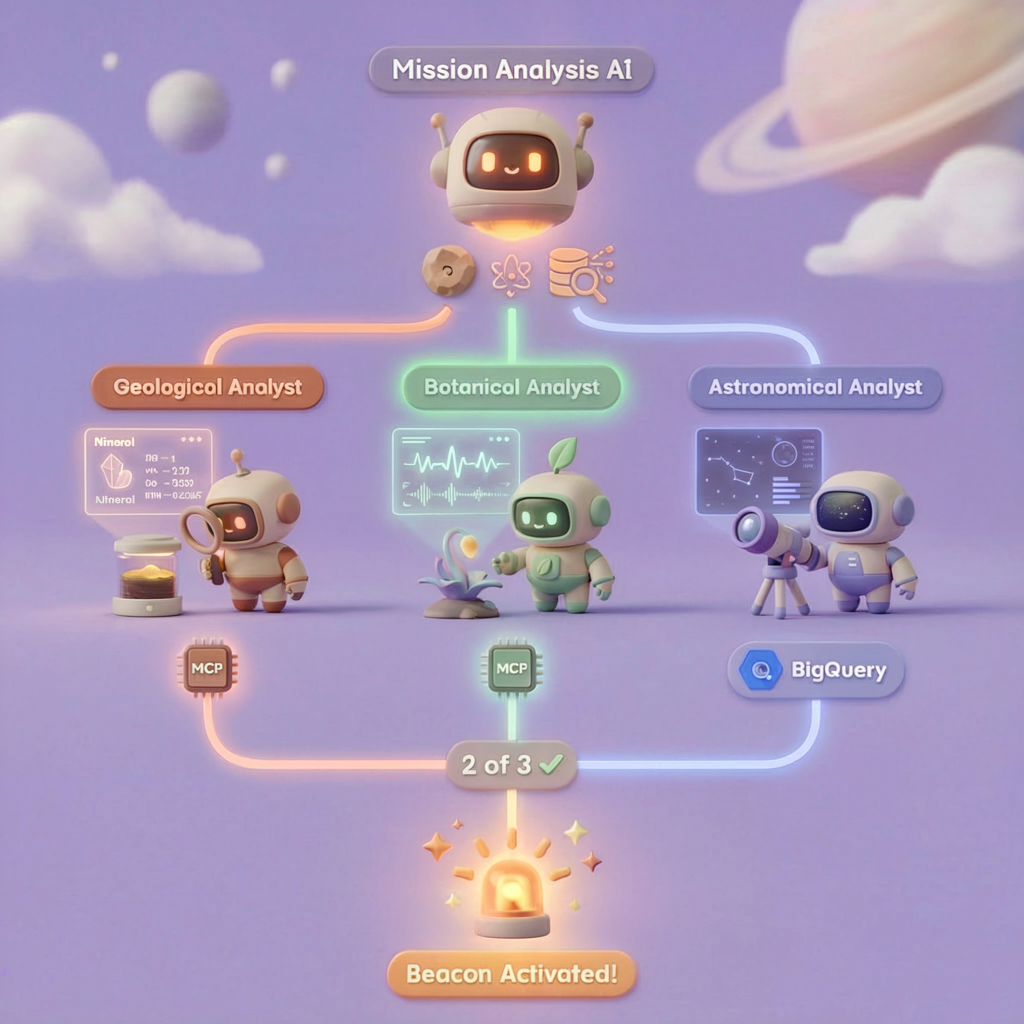
이 레벨에서는 병렬 처리를 사용하여 비행기 추락 현장 증거를 분석하는 멀티 에이전트 AI 시스템을 구성합니다.

학습 목표
개념 | 학습할 내용 |
멀티 에이전트 시스템 | 단일 책임을 갖는 전문 에이전트 빌드 |
ParallelAgent | 동시에 실행할 독립 에이전트 구성 |
before_agent_callback | 에이전트가 실행되기 전에 구성을 가져오고 상태 설정 |
ToolContext | 도구 함수에서 상태 값 액세스 |
맞춤 MCP 서버 | 명령형 패턴으로 도구 빌드 (Cloud Run의 Python 코드) |
OneMCP BigQuery | BigQuery 액세스를 위해 Google의 관리형 MCP에 연결 |
멀티모달 AI | Gemini를 사용한 이미지 및 동영상+오디오 분석 |
에이전트 조정 | 루트 오케스트레이터로 여러 에이전트 조정 |
클라우드 배포 | Cloud Run에 MCP 서버 및 에이전트 배포 |
A2A 준비 | 향후 에이전트 간 커뮤니케이션을 위해 에이전트 구조화 |
지구의 생물 군계
행성 표면은 고유한 특성을 지닌 4개의 서로 다른 생물 군계로 나뉩니다.
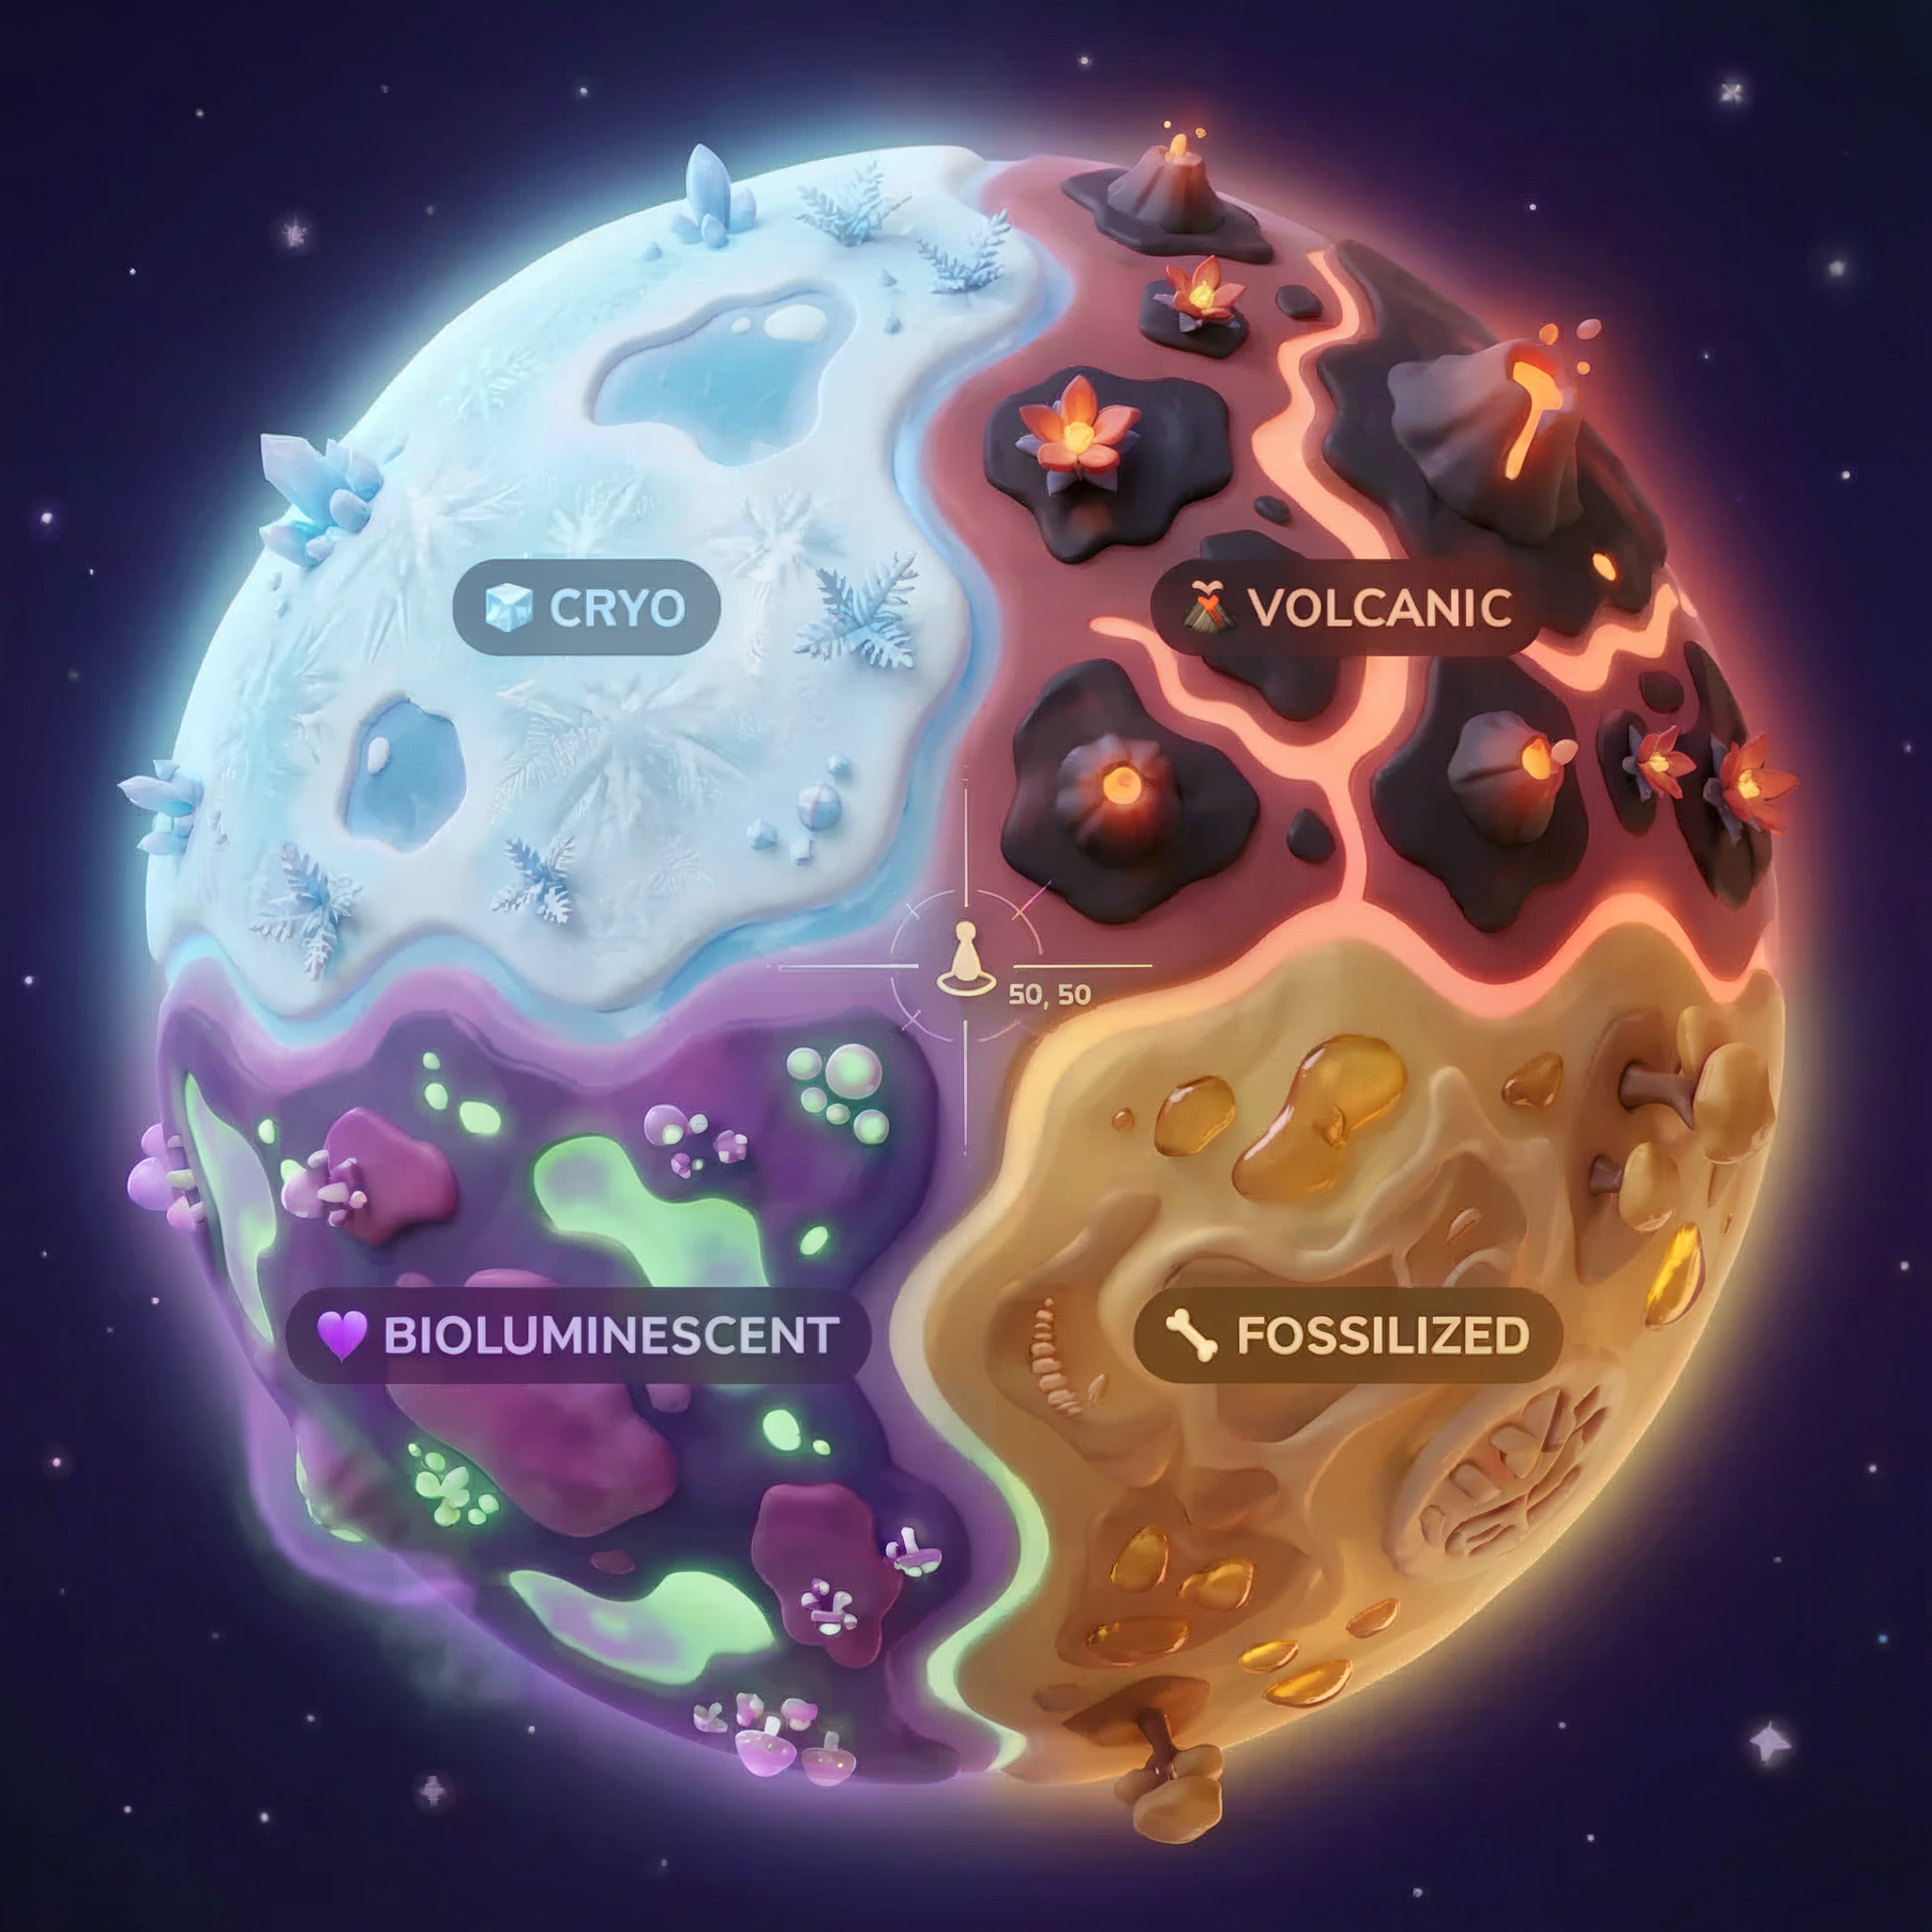
좌표에 따라 추락한 생물 군계가 결정됩니다. 추락한 지역의 증거는 해당 생태계의 특징을 반영합니다.
생물군계 | 사분면 | 지질학적 증거 | 식물 증거 | 천문학적 증거 |
🧊 CRYO | NW (x<50, y≥50) | 얼어붙은 메탄, 얼음 결정 | 서리 고사리, 냉동 식물 | 청색 거성 |
🌋 VOLCANIC | NE (x≥50, y≥50) | 흑요석,ite 침전물 | 불꽃, 내열성 식물 | 적색 왜성 쌍성 |
💜 BIOLUMINESCENT | SW (x<50, y<50) | 인광 토양 | 빛나는 곰팡이, 발광 식물 | 녹색 펄서 |
🦴 FOSSILIZED | SE (x≥50, y<50) | 호박 퇴적물, 이트 광물 | 규화목, 고대 식물 | 노란색 태양 |
여러분의 임무는 증거를 분석하고 어떤 생물군계에 있는지 추론할 수 있는 AI 에이전트를 빌드하는 것입니다.
2. 환경 설정
환경 설정 스크립트 실행
증거를 생성하기 전에 BigQuery에 관리 MCP 액세스를 제공하는 BigQuery용 OneMCP를 비롯한 필수 Google Cloud API를 사용 설정해야 합니다.
👉💻 환경 설정 스크립트를 실행합니다.
cd $HOME/way-back-home/level_1
chmod +x setup/setup_env.sh
./setup/setup_env.sh
다음과 같은 출력이 표시됩니다.
================================================================
Level 1: Environment Setup
================================================================
Project: your-project-id

[1/6] Enabling core Google Cloud APIs...
      ✓ Vertex AI API enabled
      ✓ Cloud Run API enabled
      ✓ Cloud Build API enabled
      ✓ BigQuery API enabled
      ✓ Artifact Registry API enabled
      ✓ IAM API enabled

[2/6] Enabling OneMCP BigQuery (Managed MCP)...
      ✓ OneMCP BigQuery enabled

[3/6] Setting up service account and IAM permissions...
      ✓ Service account 'way-back-home-sa' created
      ✓ Vertex AI User role granted
      ✓ Cloud Run Invoker role granted
      ✓ BigQuery User role granted
      ✓ BigQuery Data Viewer role granted
      ✓ Storage Object Viewer role granted

[4/6] Configuring Cloud Build IAM for deployments...
      ✓ Cloud Build can now deploy services as way-back-home-sa
      ✓ Cloud Run Admin role granted to Compute SA

[5/6] Creating Artifact Registry repository...
      ✓ Repository 'way-back-home' created

[6/6] Creating environment variables file...
      Found PARTICIPANT_ID in config.json: abc123...
      ✓ Created ../set_env.sh

================================================================
✅ Environment Setup Complete!
================================================================
소스 환경 변수
👉💻 환경 변수를 소싱합니다.
source $HOME/way-back-home/set_env.sh
종속 항목 설치
👉💻 레벨 1 Python 종속 항목을 설치합니다.
cd $HOME/way-back-home/level_1
uv sync
별 카탈로그 설정
👉💻 BigQuery에서 별 카탈로그를 설정합니다.
uv run python setup/setup_star_catalog.py
다음과 같이 표시됩니다.
Setting up star catalog in project: your-project-id
==================================================
✓ Dataset way_back_home already exists
✓ Created table star_catalog
✓ Inserted 12 rows into star_catalog

📊 Star Catalog Summary:
----------------------------------------
  NE (VOLCANIC): 3 stellar patterns
  NW (CRYO): 3 stellar patterns
  SE (FOSSILIZED): 3 stellar patterns
  SW (BIOLUMINESCENT): 3 stellar patterns
----------------------------------------
✓ Star catalog is ready for triangulation queries

==================================================
✅ Star catalog setup complete!
3. 비정상 종료 사이트 증거 생성
이제 좌표를 기반으로 맞춤 추락 현장 증거를 생성합니다.
증거 생성기 실행
👉💻 level_1 디렉터리에서 다음을 실행합니다.
cd $HOME/way-back-home/level_1
uv run python generate_evidence.py
다음과 같은 출력이 표시됩니다.
✓ Welcome back, Explorer_Aria!
  Coordinates: (23, 67)
  Ready to analyze your crash site.

📍 Crash site analysis initiated...
   Generating evidence for your location...

🔬 Generating soil sample...
✓ Soil sample captured: outputs/soil_sample.png
✨ Capturing star field...
✓ Star field captured: outputs/star_field.png
🌿 Recording flora activity...
   (This may take 1-2 minutes for video generation)
   Generating video...
   Generating video...
   Generating video...
✓ Flora recorded: outputs/flora_recording.mp4

📤 Uploading evidence to Mission Control...
✓ Config updated with evidence URLs

==================================================
✅ Evidence generation complete!
==================================================
증빙 자료 검토
👉 outputs/ 폴더에서 생성된 증거 파일을 잠시 살펴보세요. 각각은 추락한 위치의 생물군계 특성을 반영하지만, AI 에이전트가 분석하기 전까지는 어떤 생물군계인지 알 수 없습니다.
생성된 증빙 자료는 위치에 따라 다음과 같이 표시될 수 있습니다.


4. 맞춤 MCP 서버 빌드
탈출 포드의 온보드 분석 시스템은 고장 났지만 원시 센서 데이터는 충돌에서 살아남았습니다. 지질 및 식물 분석 도구를 제공하는 FastMCP로 MCP 서버를 빌드합니다.
지질 분석 도구 만들기
이 도구는 토양 샘플 이미지를 분석하여 광물 구성을 식별합니다.
👉✏️ $HOME/way-back-home/level_1/mcp-server/main.py을 열고 #REPLACE-GEOLOGICAL-TOOL을 찾습니다. 다음으로 바꿉니다.
GEOLOGICAL_PROMPT = """Analyze this alien soil sample image.

Classify the PRIMARY characteristic (choose exactly one):

1. CRYO - Frozen/icy minerals, crystalline structures, frost patterns,
   blue-white coloration, permafrost indicators

2. VOLCANIC - Volcanic rock, basalt, obsidian, sulfur deposits,
   red-orange minerals, heat-formed crystite structures

3. BIOLUMINESCENT - Glowing particles, phosphorescent minerals,
   organic-mineral hybrids, purple-green luminescence

4. FOSSILIZED - Ancient compressed minerals, amber deposits,
   petrified organic matter, golden-brown stratification

Respond ONLY with valid JSON (no markdown, no explanation):
{
    "biome": "CRYO|VOLCANIC|BIOLUMINESCENT|FOSSILIZED",
    "confidence": 0.0-1.0,
    "minerals_detected": ["mineral1", "mineral2"],
    "description": "Brief description of what you observe"
}
"""


@mcp.tool()
def analyze_geological(
    image_url: Annotated[
        str,
        Field(description="Cloud Storage URL (gs://...) of the soil sample image")
    ]
) -> dict:
    """
    Analyzes a soil sample image to identify mineral composition and classify the planetary biome.

    Args:
        image_url: Cloud Storage URL of the soil sample image (gs://bucket/path/image.png)

    Returns:
        dict with biome, confidence, minerals_detected, and description
    """
    logger.info(f">>> 🔬 Tool: 'analyze_geological' called for '{image_url}'")

    try:
        response = client.models.generate_content(
            model="gemini-2.5-flash",
            contents=[
                GEOLOGICAL_PROMPT,
                genai_types.Part.from_uri(file_uri=image_url, mime_type="image/png")
            ]
        )

        result = parse_json_response(response.text)
        logger.info(f"    ✓ Geological analysis complete: {result.get('biome', 'UNKNOWN')}")
        return result

    except Exception as e:
        logger.error(f"    ✗ Geological analysis failed: {str(e)}")
        return {"error": str(e), "biome": "UNKNOWN", "confidence": 0.0}
식물 분석 도구 만들기
이 도구는 오디오 트랙을 포함한 식물 동영상 녹화 파일을 분석합니다.
👉✏️ 동일한 파일 ($HOME/way-back-home/level_1/mcp-server/main.py)에서 #REPLACE-BOTANICAL-TOOL를 찾아 다음으로 바꿉니다.
BOTANICAL_PROMPT = """Analyze this alien flora video recording.

Pay attention to BOTH:
1. VISUAL elements: Plant appearance, movement patterns, colors, bioluminescence
2. AUDIO elements: Ambient sounds, rustling, organic noises, frequencies

Classify the PRIMARY biome (choose exactly one):

1. CRYO - Crystalline ice-plants, frost-covered vegetation,
   crackling/tinkling sounds, slow brittle movements, blue-white flora

2. VOLCANIC - Heat-resistant plants, sulfur-adapted species,
   hissing/bubbling sounds, smoke-filtering vegetation, red-orange flora

3. BIOLUMINESCENT - Glowing plants, pulsing light patterns,
   humming/resonating sounds, reactive to stimuli, purple-green flora

4. FOSSILIZED - Ancient petrified plants, amber-preserved specimens,
   deep resonant sounds, minimal movement, golden-brown flora

Respond ONLY with valid JSON (no markdown, no explanation):
{
    "biome": "CRYO|VOLCANIC|BIOLUMINESCENT|FOSSILIZED",
    "confidence": 0.0-1.0,
    "species_detected": ["species1", "species2"],
    "audio_signatures": ["sound1", "sound2"],
    "description": "Brief description of visual and audio observations"
}
"""


@mcp.tool()
def analyze_botanical(
    video_url: Annotated[
        str,
        Field(description="Cloud Storage URL (gs://...) of the flora video recording")
    ]
) -> dict:
    """
    Analyzes a flora video recording (visual + audio) to identify plant species and classify the biome.

    Args:
        video_url: Cloud Storage URL of the flora video (gs://bucket/path/video.mp4)

    Returns:
        dict with biome, confidence, species_detected, audio_signatures, and description
    """
    logger.info(f">>> 🌿 Tool: 'analyze_botanical' called for '{video_url}'")

    try:
        response = client.models.generate_content(
            model="gemini-2.5-flash",
            contents=[
                BOTANICAL_PROMPT,
                genai_types.Part.from_uri(file_uri=video_url, mime_type="video/mp4")
            ]
        )

        result = parse_json_response(response.text)
        logger.info(f"    ✓ Botanical analysis complete: {result.get('biome', 'UNKNOWN')}")
        return result

    except Exception as e:
        logger.error(f"    ✗ Botanical analysis failed: {str(e)}")
        return {"error": str(e), "biome": "UNKNOWN", "confidence": 0.0}
로컬에서 MCP 서버 테스트
👉💻 MCP 서버 테스트:
cd $HOME/way-back-home/level_1/mcp-server
pip install -r requirements.txt
python main.py
다음과 같이 표시됩니다.
[INFO] Initialized Gemini client for project: your-project-id
[INFO] 🚀 Location Analyzer MCP Server starting on port 8080
[INFO] 📍 MCP endpoint: http://0.0.0.0:8080/mcp
[INFO] 🔧 Tools: analyze_geological, analyze_botanical
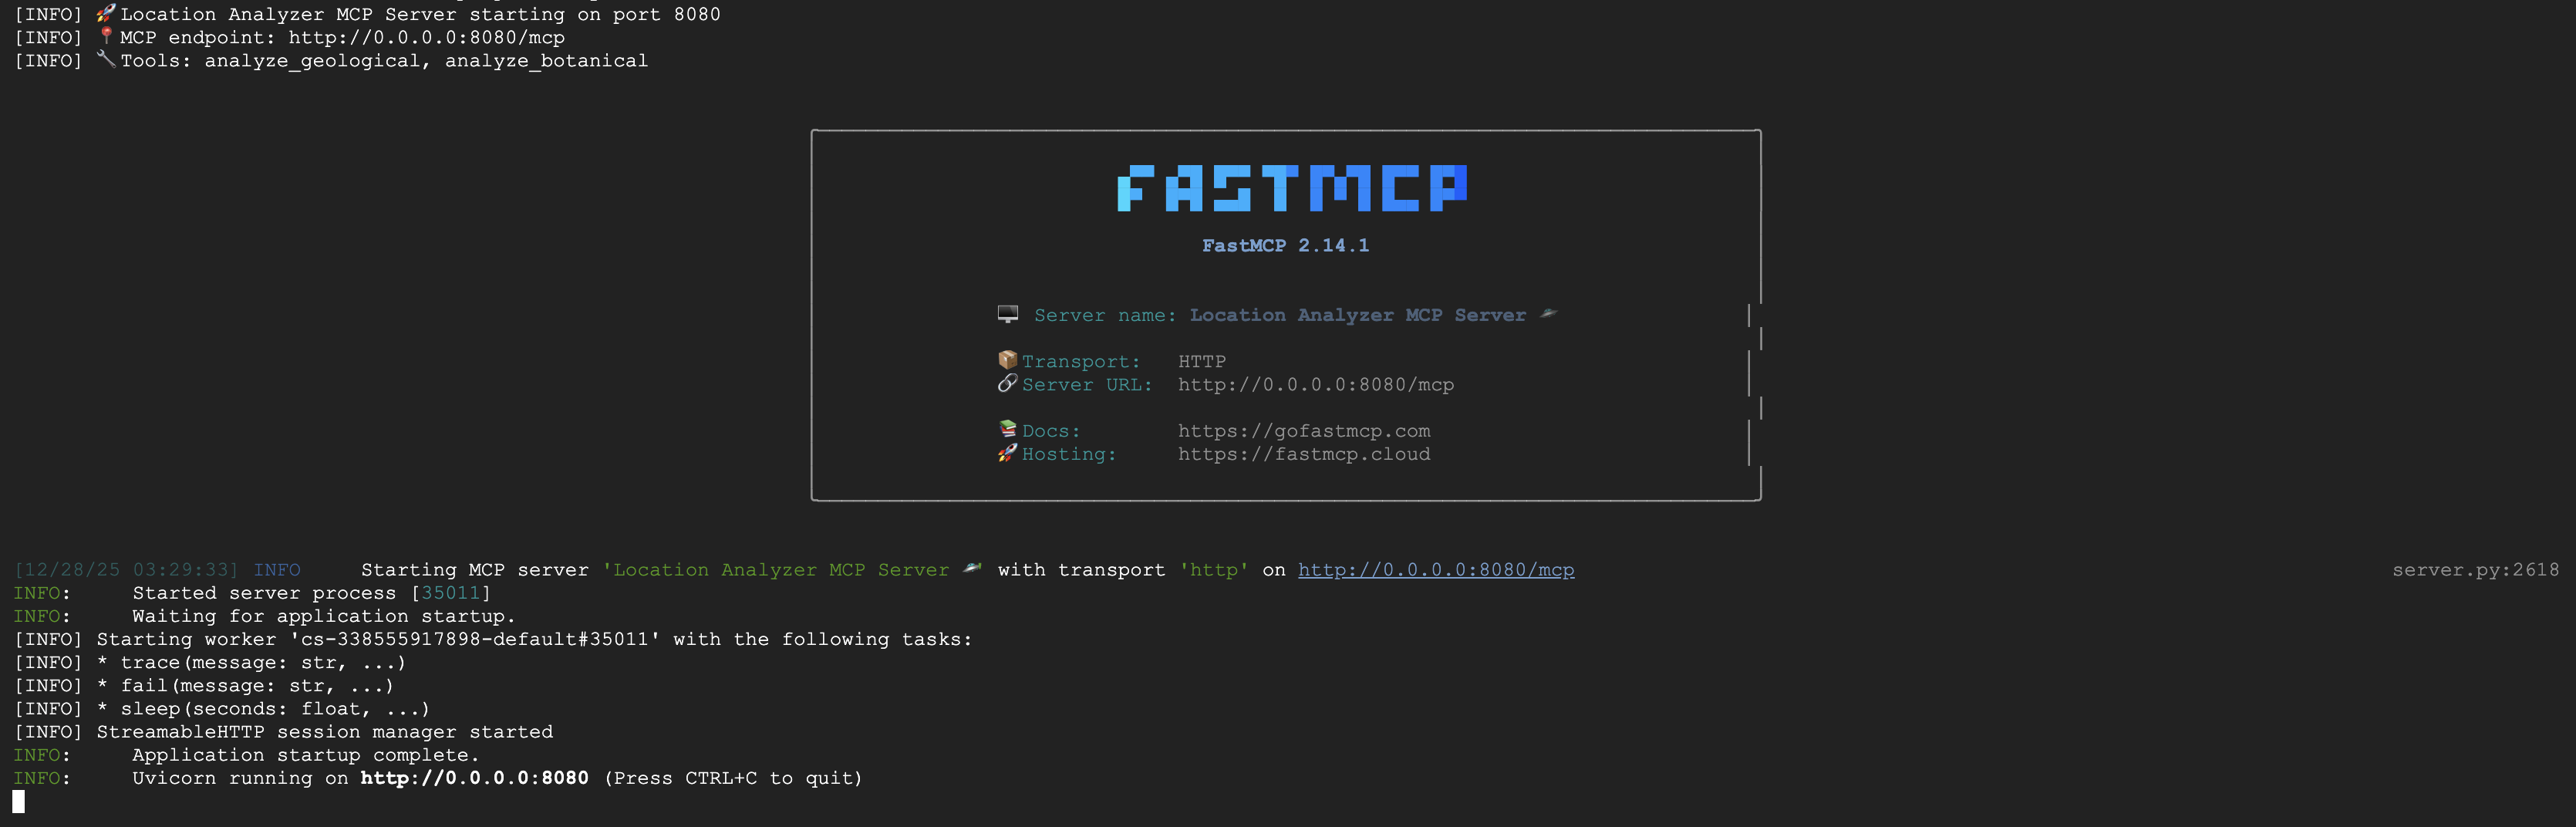
이제 FastMCP 서버가 HTTP 전송으로 실행됩니다. 중지하려면 Ctrl+C를 누르세요.
Cloud Run에 MCP 서버 배포
👉💻 배포:
cd $HOME/way-back-home/level_1/mcp-server
source $HOME/way-back-home/set_env.sh

gcloud builds submit . \
  --config=cloudbuild.yaml \
  --substitutions=_REGION="$REGION",_REPO_NAME="$REPO_NAME",_SERVICE_ACCOUNT="$SERVICE_ACCOUNT"
서비스 URL 저장
👉💻 서비스 URL을 저장합니다.
export MCP_SERVER_URL=$(gcloud run services describe location-analyzer \
  --region=$REGION --format='value(status.url)')
echo "MCP Server URL: $MCP_SERVER_URL"

# Add to set_env.sh for later use
echo "export MCP_SERVER_URL=\"$MCP_SERVER_URL\"" >> $HOME/way-back-home/set_env.sh
5. 전문가 에이전트 빌드
이제 각각 단일 책임을 갖는 세 명의 전문가 에이전트를 만듭니다.
지질 분석가 에이전트 만들기
👉✏️ agent/agents/geological_analyst.py을 열고 #REPLACE-GEOLOGICAL-AGENT을 찾습니다. 다음으로 바꿉니다.
from google.adk.agents import Agent
from agent.tools.mcp_tools import get_geological_tool

geological_analyst = Agent(
    name="GeologicalAnalyst",
    model="gemini-2.5-flash",
    description="Analyzes soil samples to classify planetary biome based on mineral composition.",
    instruction="""You are a geological specialist analyzing alien soil samples.

## YOUR EVIDENCE TO ANALYZE
Soil sample URL: {soil_url}

## YOUR TASK
1. Call the analyze_geological tool with the soil sample URL above
2. Examine the results for mineral composition and biome indicators
3. Report your findings clearly

The four possible biomes are:
- CRYO: Frozen, icy minerals, blue/white coloring
- VOLCANIC: Magma, obsidian, volcanic rock, red/orange coloring
- BIOLUMINESCENT: Glowing, phosphorescent minerals, purple/green
- FOSSILIZED: Amber, ancient preserved matter, golden/brown

## REPORTING FORMAT
Always report your classification clearly:
"GEOLOGICAL ANALYSIS: [BIOME] (confidence: X%)"

Include a brief description of what you observed in the sample.

## IMPORTANT
- You do NOT synthesize with other evidence
- You do NOT confirm locations
- Just analyze the soil sample and report what you find
- Call the tool immediately with the URL provided above""",
    tools=[get_geological_tool()]
)
식물 분석가 에이전트 만들기
👉✏️ agent/agents/botanical_analyst.py을 열고 #REPLACE-BOTANICAL-AGENT을 찾습니다. 다음으로 바꿉니다.
from google.adk.agents import Agent
from agent.tools.mcp_tools import get_botanical_tool

botanical_analyst = Agent(
    name="BotanicalAnalyst",
    model="gemini-2.5-flash",
    description="Analyzes flora recordings to classify planetary biome based on plant life and ambient sounds.",
    instruction="""You are a botanical specialist analyzing alien flora recordings.

## YOUR EVIDENCE TO ANALYZE
Flora recording URL: {flora_url}

## YOUR TASK
1. Call the analyze_botanical tool with the flora recording URL above
2. Pay attention to BOTH visual AND audio elements in the recording
3. Report your findings clearly

The four possible biomes are:
- CRYO: Frost ferns, crystalline plants, cold wind sounds, crackling ice
- VOLCANIC: Fire blooms, heat-resistant flora, crackling/hissing sounds
- BIOLUMINESCENT: Glowing fungi, luminescent plants, ethereal hum, chiming
- FOSSILIZED: Petrified trees, ancient formations, deep resonant sounds

## REPORTING FORMAT
Always report your classification clearly:
"BOTANICAL ANALYSIS: [BIOME] (confidence: X%)"

Include descriptions of what you SAW and what you HEARD.

## IMPORTANT
- You do NOT synthesize with other evidence
- You do NOT confirm locations
- Just analyze the flora recording and report what you find
- Call the tool immediately with the URL provided above""",
    tools=[get_botanical_tool()]
)
천문학 분석가 에이전트 만들기
이 에이전트는 두 가지 도구 패턴을 사용하여 다른 접근 방식을 사용합니다.
- Local FunctionTool: Gemini Vision을 사용하여 별표 기능 추출
- OneMCP BigQuery: Google의 관리형 MCP를 통해 별 카탈로그 쿼리
👉✏️ agent/agents/astronomical_analyst.py을 열고 #REPLACE-ASTRONOMICAL-AGENT을 찾습니다. 다음으로 바꿉니다.
from google.adk.agents import Agent
from agent.tools.star_tools import (
    extract_star_features_tool,
    get_bigquery_mcp_toolset,
)

# Get the BigQuery MCP toolset
bigquery_toolset = get_bigquery_mcp_toolset()

astronomical_analyst = Agent(
    name="AstronomicalAnalyst",
    model="gemini-2.5-flash",
    description="Analyzes star field images and queries the star catalog via OneMCP BigQuery.",
    instruction="""You are an astronomical specialist analyzing alien night skies.

## YOUR EVIDENCE TO ANALYZE
Star field URL: {stars_url}

## YOUR TWO TOOLS

### TOOL 1: extract_star_features (Local Gemini Vision)
Call this FIRST with the star field URL above.
Returns: "primary_star": "...", "nebula_type": "...", "stellar_color": "..."

### TOOL 2: BigQuery MCP (execute_query)
Call this SECOND with the results from Tool 1.
Use this exact SQL query (replace the placeholders with values from Step 1):

SELECT quadrant, biome, primary_star, nebula_type
FROM `{project_id}.way_back_home.star_catalog`
WHERE LOWER(primary_star) = LOWER('PRIMARY_STAR_FROM_STEP_1')
  AND LOWER(nebula_type) = LOWER('NEBULA_TYPE_FROM_STEP_1')
LIMIT 1

## YOUR WORKFLOW
1. Call extract_star_features with: {stars_url}
2. Get the primary_star and nebula_type from the result
3. Call execute_query with the SQL above (replacing placeholders)
4. Report the biome and quadrant from the query result

## BIOME REFERENCE
| Biome | Quadrant | Primary Star | Nebula Type |
|-------|----------|--------------|-------------|
| CRYO | NW | blue_giant | ice_blue |
| VOLCANIC | NE | red_dwarf_binary | fire |
| BIOLUMINESCENT | SW | green_pulsar | purple_magenta |
| FOSSILIZED | SE | yellow_sun | golden |

## REPORTING FORMAT
"ASTRONOMICAL ANALYSIS: [BIOME] in [QUADRANT] quadrant (confidence: X%)"

Include a description of the stellar features you observed.

## IMPORTANT
- You do NOT synthesize with other evidence
- You do NOT confirm locations
- Just analyze the stars and report what you find
- Start by calling extract_star_features with the URL above""",
    tools=[extract_star_features_tool, bigquery_toolset]
)
6. MCP 도구 연결 빌드
이제 ADK 에이전트가 MCP 서버와 통신할 수 있도록 하는 Python 래퍼를 만듭니다. 이러한 래퍼는 세션 설정, 도구 호출, 응답 파싱 등 연결 수명 주기를 처리합니다.
MCP 도구 연결 만들기 (맞춤 MCP)
이렇게 하면 Cloud Run에 배포된 맞춤 FastMCP 서버에 연결됩니다.
👉✏️ agent/tools/mcp_tools.py을 열고 #REPLACE-MCP-TOOL-CONNECTION을 찾습니다. 다음으로 바꿉니다.
import os
import logging

from google.adk.tools.mcp_tool.mcp_toolset import MCPToolset
from google.adk.tools.mcp_tool.mcp_session_manager import StreamableHTTPConnectionParams

logger = logging.getLogger(__name__)

MCP_SERVER_URL = os.environ.get("MCP_SERVER_URL")

_mcp_toolset = None

def get_mcp_toolset():
    """Get the MCPToolset connected to the location-analyzer server."""
    global _mcp_toolset

    if _mcp_toolset is not None:
        return _mcp_toolset

    if not MCP_SERVER_URL:
        raise ValueError(
            "MCP_SERVER_URL not set. Please run:\n"
            "  export MCP_SERVER_URL='https://location-analyzer-xxx.a.run.app'"
        )

    # FastMCP exposes MCP protocol at /mcp endpoint
    mcp_endpoint = f"{MCP_SERVER_URL}/mcp"
    logger.info(f"[MCP Tools] Connecting to: {mcp_endpoint}")

    _mcp_toolset = MCPToolset(
        connection_params=StreamableHTTPConnectionParams(
            url=mcp_endpoint,
            timeout=120,  # 2 minutes for Gemini analysis
        )
    )

    return _mcp_toolset

def get_geological_tool():
    """Get the geological analysis tool from the MCP server."""
    return get_mcp_toolset()

def get_botanical_tool():
    """Get the botanical analysis tool from the MCP server."""
    return get_mcp_toolset()
별 분석 도구 만들기 (OneMCP BigQuery)
앞서 BigQuery에 로드한 별 카탈로그에는 각 생태계의 별 패턴이 포함되어 있습니다. BigQuery 클라이언트 코드를 작성하여 쿼리하는 대신 Google의 OneMCP BigQuery 서버에 연결합니다. 이 서버는 BigQuery의 execute_query 기능을 모든 ADK 에이전트가 직접 사용할 수 있는 MCP 도구로 노출합니다.
👉✏️ agent/tools/star_tools.py을 열고 #REPLACE-STAR-TOOLS을 찾습니다. 다음으로 바꿉니다.
import os
import json
import logging

from google import genai
from google.genai import types as genai_types
from google.adk.tools import FunctionTool
from google.adk.tools.mcp_tool.mcp_toolset import MCPToolset
from google.adk.tools.mcp_tool.mcp_session_manager import StreamableHTTPConnectionParams
import google.auth
import google.auth.transport.requests

logger = logging.getLogger(__name__)

# =============================================================================
# CONFIGURATION - Environment variables only
# =============================================================================

PROJECT_ID = os.environ.get("GOOGLE_CLOUD_PROJECT", "")

if not PROJECT_ID:
    logger.warning("[Star Tools] GOOGLE_CLOUD_PROJECT not set")

# Initialize Gemini client for star feature extraction
genai_client = genai.Client(
    vertexai=True,
    project=PROJECT_ID or "placeholder",
    location=os.environ.get("GOOGLE_CLOUD_LOCATION", "us-central1")
)

logger.info(f"[Star Tools] Initialized for project: {PROJECT_ID}")

# =============================================================================
# OneMCP BigQuery Connection
# =============================================================================

BIGQUERY_MCP_URL = "https://bigquery.googleapis.com/mcp"

_bigquery_toolset = None

def get_bigquery_mcp_toolset():
    """
    Get the MCPToolset connected to Google's BigQuery MCP server.

    This uses OAuth 2.0 authentication with Application Default Credentials.
    The toolset provides access to BigQuery's pre-built MCP tools like:
    - execute_query: Run SQL queries
    - list_datasets: List available datasets
    - get_table_schema: Get table structure
   """
    global _bigquery_toolset

    if _bigquery_toolset is not None:
        return _bigquery_toolset

    logger.info("[Star Tools] Connecting to OneMCP BigQuery...")

    # Get OAuth credentials
    credentials, project_id = google.auth.default(
        scopes=["https://www.googleapis.com/auth/bigquery"]
    )

    # Refresh to get a valid token
    credentials.refresh(google.auth.transport.requests.Request())
    oauth_token = credentials.token

    # Configure headers for BigQuery MCP
    headers = {
        "Authorization": f"Bearer {oauth_token}",
        "x-goog-user-project": project_id or PROJECT_ID
    }

    # Create MCPToolset with StreamableHTTP connection
    _bigquery_toolset = MCPToolset(
        connection_params=StreamableHTTPConnectionParams(
            url=BIGQUERY_MCP_URL,
            headers=headers
        )
    )

    logger.info("[Star Tools] Connected to BigQuery MCP")
    return _bigquery_toolset


# =============================================================================
# Local FunctionTool: Star Feature Extraction
# =============================================================================
# This is a LOCAL tool that calls Gemini directly - demonstrating that
# you can mix local FunctionTools with MCP tools in the same agent.

STAR_EXTRACTION_PROMPT = """Analyze this alien night sky image and extract stellar features.

Identify:
1. PRIMARY STAR TYPE: blue_giant, red_dwarf, red_dwarf_binary, green_pulsar, yellow_sun, etc.
2. NEBULA TYPE: ice_blue, fire, purple_magenta, golden, etc.
3. STELLAR COLOR: blue_white, red_orange, green_purple, yellow_gold, etc.

Respond ONLY with valid JSON:
{"primary_star": "...", "nebula_type": "...", "stellar_color": "...", "description": "..."}
"""


def _parse_json_response(text: str) -> dict:
    """Parse JSON from Gemini response, handling markdown formatting."""
    cleaned = text.strip()
    if cleaned.startswith("```json"):
        cleaned = cleaned[7:]
    elif cleaned.startswith("```"):
        cleaned = cleaned[3:]
    if cleaned.endswith("```"):
        cleaned = cleaned[:-3]
    cleaned = cleaned.strip()

    try:
        return json.loads(cleaned)
    except json.JSONDecodeError as e:
        logger.error(f"Failed to parse JSON: {e}")
        return {"error": f"Failed to parse response: {str(e)}"}


def extract_star_features(image_url: str) -> dict:
    """
    Extract stellar features from a star field image using Gemini Vision.

    This is a LOCAL FunctionTool - we call Gemini directly, not through MCP.
    The agent will use this alongside the BigQuery MCP tools.
    """
    logger.info(f"[Stars] Extracting features from: {image_url}")

    response = genai_client.models.generate_content(
        model="gemini-2.5-flash",
        contents=[
            STAR_EXTRACTION_PROMPT,
            genai_types.Part.from_uri(file_uri=image_url, mime_type="image/png")
        ]
    )

    result = _parse_json_response(response.text)
    logger.info(f"[Stars] Extracted: primary_star={result.get('primary_star')}")
    return result


# Create the local FunctionTool
extract_star_features_tool = FunctionTool(extract_star_features)
7. 조정자 빌드
이제 모든 것을 조정하는 병렬 작업자 및 루트 오케스트레이터를 만듭니다.
Parallel Analysis Crew 만들기
세 전문가를 동시에 실행하는 이유는 무엇인가요? 완전히 독립적이기 때문입니다. 지질학 분석가는 식물학 분석가의 결과를 기다릴 필요가 없으며 그 반대의 경우도 마찬가지입니다. 각 전문가가 서로 다른 도구를 사용하여 서로 다른 증거를 분석합니다. ParallelAgent는 세 가지를 모두 동시에 실행하여 총 분석 시간을 ~30초 (순차)에서 ~10초 (병렬)로 줄입니다.
👉✏️ agent/agent.py을 열고 #REPLACE-PARALLEL-CREW을 찾습니다. 다음으로 바꿉니다.
import os
import logging
import httpx

from google.adk.agents import Agent, ParallelAgent
from google.adk.agents.callback_context import CallbackContext

# Import specialist agents
from agent.agents.geological_analyst import geological_analyst
from agent.agents.botanical_analyst import botanical_analyst
from agent.agents.astronomical_analyst import astronomical_analyst

# Import confirmation tool
from agent.tools.confirm_tools import confirm_location_tool

logger = logging.getLogger(__name__)


# =============================================================================
# BEFORE AGENT CALLBACK - Fetches config and sets state
# =============================================================================

async def setup_participant_context(callback_context: CallbackContext) -> None:
    """
    Fetch participant configuration and populate state for all agents.

    This callback:
    1. Reads PARTICIPANT_ID and BACKEND_URL from environment
    2. Fetches participant data from the backend API
    3. Sets state values: soil_url, flora_url, stars_url, username, x, y, etc.
    4. Returns None to continue normal agent execution
    """
    participant_id = os.environ.get("PARTICIPANT_ID", "")
    backend_url = os.environ.get("BACKEND_URL", "https://api.waybackhome.dev")
    project_id = os.environ.get("GOOGLE_CLOUD_PROJECT", "")

    logger.info(f"[Callback] Setting up context for participant: {participant_id}")

    # Set project_id and backend_url in state immediately
    callback_context.state["project_id"] = project_id
    callback_context.state["backend_url"] = backend_url
    callback_context.state["participant_id"] = participant_id

    if not participant_id:
        logger.warning("[Callback] No PARTICIPANT_ID set - using placeholder values")
        callback_context.state["username"] = "Explorer"
        callback_context.state["x"] = 0
        callback_context.state["y"] = 0
        callback_context.state["soil_url"] = "Not available - set PARTICIPANT_ID"
        callback_context.state["flora_url"] = "Not available - set PARTICIPANT_ID"
        callback_context.state["stars_url"] = "Not available - set PARTICIPANT_ID"
        return None

    # Fetch participant data from backend API
    try:
        url = f"{backend_url}/participants/{participant_id}"
        logger.info(f"[Callback] Fetching from: {url}")

        async with httpx.AsyncClient(timeout=30.0) as client:
            response = await client.get(url)
            response.raise_for_status()
            data = response.json()

        # Extract evidence URLs
        evidence_urls = data.get("evidence_urls", {})

        # Set all state values for sub-agents to access
        callback_context.state["username"] = data.get("username", "Explorer")
        callback_context.state["x"] = data.get("x", 0)
        callback_context.state["y"] = data.get("y", 0)
        callback_context.state["soil_url"] = evidence_urls.get("soil", "Not available")
        callback_context.state["flora_url"] = evidence_urls.get("flora", "Not available")
        callback_context.state["stars_url"] = evidence_urls.get("stars", "Not available")

        logger.info(f"[Callback] State populated for {data.get('username')}")

    except Exception as e:
        logger.error(f"[Callback] Error fetching participant config: {e}")
        callback_context.state["username"] = "Explorer"
        callback_context.state["x"] = 0
        callback_context.state["y"] = 0
        callback_context.state["soil_url"] = f"Error: {e}"
        callback_context.state["flora_url"] = f"Error: {e}"
        callback_context.state["stars_url"] = f"Error: {e}"

    return None


# =============================================================================
# PARALLEL ANALYSIS CREW
# =============================================================================

evidence_analysis_crew = ParallelAgent(
    name="EvidenceAnalysisCrew",
    description="Runs geological, botanical, and astronomical analysis in parallel.",
    sub_agents=[geological_analyst, botanical_analyst, astronomical_analyst]
)
루트 조정자 만들기
이제 모든 것을 조정하고 콜백을 사용하는 루트 에이전트를 만듭니다.
👉✏️ 동일한 파일 (agent/agent.py)에서 #REPLACE-ROOT-ORCHESTRATOR을 찾습니다. 다음으로 바꿉니다.
root_agent = Agent(
    name="MissionAnalysisAI",
    model="gemini-2.5-flash",
    description="Coordinates crash site analysis to confirm explorer location.",
    instruction="""You are the Mission Analysis AI coordinating a rescue operation.

## Explorer Information
- Name: {username}
- Coordinates: ({x}, {y})

## Evidence URLs (automatically provided to specialists via state)
- Soil sample: {soil_url}
- Flora recording: {flora_url}
- Star field: {stars_url}

## Your Workflow

### STEP 1: DELEGATE TO ANALYSIS CREW
Tell the EvidenceAnalysisCrew to analyze all the evidence.
The evidence URLs are already available to the specialists.

### STEP 2: COLLECT RESULTS
Each specialist will report:
- "GEOLOGICAL ANALYSIS: [BIOME] (confidence: X%)"
- "BOTANICAL ANALYSIS: [BIOME] (confidence: X%)"
- "ASTRONOMICAL ANALYSIS: [BIOME] in [QUADRANT] quadrant (confidence: X%)"

### STEP 3: APPLY 2-OF-3 AGREEMENT RULE
- If 2 or 3 specialists agree → that's the answer
- If all 3 disagree → use judgment based on confidence

### STEP 4: CONFIRM LOCATION
Call confirm_location with the determined biome.

## Biome Reference
| Biome | Quadrant | Key Characteristics |
|-------|----------|---------------------|
| CRYO | NW | Frozen, blue, ice crystals |
| VOLCANIC | NE | Magma, red/orange, obsidian |
| BIOLUMINESCENT | SW | Glowing, purple/green |
| FOSSILIZED | SE | Amber, golden, ancient |

## Response Style
Be encouraging and narrative! Celebrate when the beacon activates!
""",
    sub_agents=[evidence_analysis_crew],
    tools=[confirm_location_tool],
    before_agent_callback=setup_participant_context
)
위치 확인 도구 만들기
이것이 마지막 단계입니다. 미션 컨트롤에 위치를 확인하고 비컨을 활성화하는 도구입니다. 루트 오케스트레이터가 2/3 동의 규칙을 사용하여 사용자가 속한 생태계를 결정하면 이 도구를 호출하여 결과를 백엔드 API로 전송합니다.
이 도구는 ToolContext를 사용하므로 before_agent_callback에서 이전에 설정한 상태 값 (예: participant_id 및 backend_url)에 액세스할 수 있습니다.
👉✏️ agent/tools/confirm_tools.py에서 #REPLACE-CONFIRM-TOOL을 찾습니다. 다음으로 바꿉니다.
import os
import logging
import requests

from google.adk.tools import FunctionTool
from google.adk.tools.tool_context import ToolContext

logger = logging.getLogger(__name__)

BIOME_TO_QUADRANT = {
    "CRYO": "NW",
    "VOLCANIC": "NE",
    "BIOLUMINESCENT": "SW",
    "FOSSILIZED": "SE"
}


def _get_actual_biome(x: int, y: int) -> tuple[str, str]:
    """Determine actual biome and quadrant from coordinates."""
    if x < 50 and y >= 50:
        return "NW", "CRYO"
    elif x >= 50 and y >= 50:
        return "NE", "VOLCANIC"
    elif x < 50 and y < 50:
        return "SW", "BIOLUMINESCENT"
    else:
        return "SE", "FOSSILIZED"


def confirm_location(biome: str, tool_context: ToolContext) -> dict:
    """
    Confirm the explorer's location and activate the rescue beacon.

    Uses ToolContext to read state values set by before_agent_callback.
    """
    # Read from state (set by before_agent_callback)
    participant_id = tool_context.state.get("participant_id", "")
    x = tool_context.state.get("x", 0)
    y = tool_context.state.get("y", 0)
    backend_url = tool_context.state.get("backend_url", "https://api.waybackhome.dev")

    # Fallback to environment variables
    if not participant_id:
        participant_id = os.environ.get("PARTICIPANT_ID", "")
    if not backend_url:
        backend_url = os.environ.get("BACKEND_URL", "https://api.waybackhome.dev")

    if not participant_id:
        return {"success": False, "message": "❌ No participant ID available."}

    biome_upper = biome.upper().strip()

    if biome_upper not in BIOME_TO_QUADRANT:
        return {"success": False, "message": f"❌ Unknown biome: {biome}"}

    # Get actual biome from coordinates
    actual_quadrant, actual_biome = _get_actual_biome(x, y)

    if biome_upper != actual_biome:
        return {
            "success": False,
            "message": f"❌ Mismatch! Analysis: {biome_upper}, Actual: {actual_biome}"
        }

    quadrant = BIOME_TO_QUADRANT[biome_upper]

    try:
        response = requests.patch(
            f"{backend_url}/participants/{participant_id}/location",
            params={"x": x, "y": y},
            timeout=10
        )
        response.raise_for_status()

        return {
            "success": True,
            "message": f"🔦 BEACON ACTIVATED!\n\nLocation: {biome_upper} in {quadrant}\nCoordinates: ({x}, {y})"
        }

    except requests.exceptions.ConnectionError:
        return {
            "success": True,
            "message": f"🔦 BEACON ACTIVATED! (Local)\n\nLocation: {biome_upper} in {quadrant}",
            "simulated": True
        }

    except Exception as e:
        return {"success": False, "message": f"❌ Failed: {str(e)}"}


confirm_location_tool = FunctionTool(confirm_location)
8. ADK 웹 UI로 테스트
이제 전체 멀티 에이전트 시스템을 로컬에서 테스트해 보겠습니다.
ADK 웹 서버 시작
👉💻 환경 변수를 설정하고 ADK 웹 서버를 시작합니다.
cd $HOME/way-back-home/level_1
source $HOME/way-back-home/set_env.sh

# Verify environment is set
echo "PARTICIPANT_ID: $PARTICIPANT_ID"
echo "MCP Server: $MCP_SERVER_URL"

# Start ADK web server
uv run adk web
다음과 같이 표시됩니다.
+-----------------------------------------------------------------------------+
| ADK Web Server started                                                      |
|                                                                             |
| For local testing, access at http://localhost:8000.                         |
+-----------------------------------------------------------------------------+

INFO:     Application startup complete.
INFO:     Uvicorn running on http://0.0.0.0:8000 (Press CTRL+C to quit)
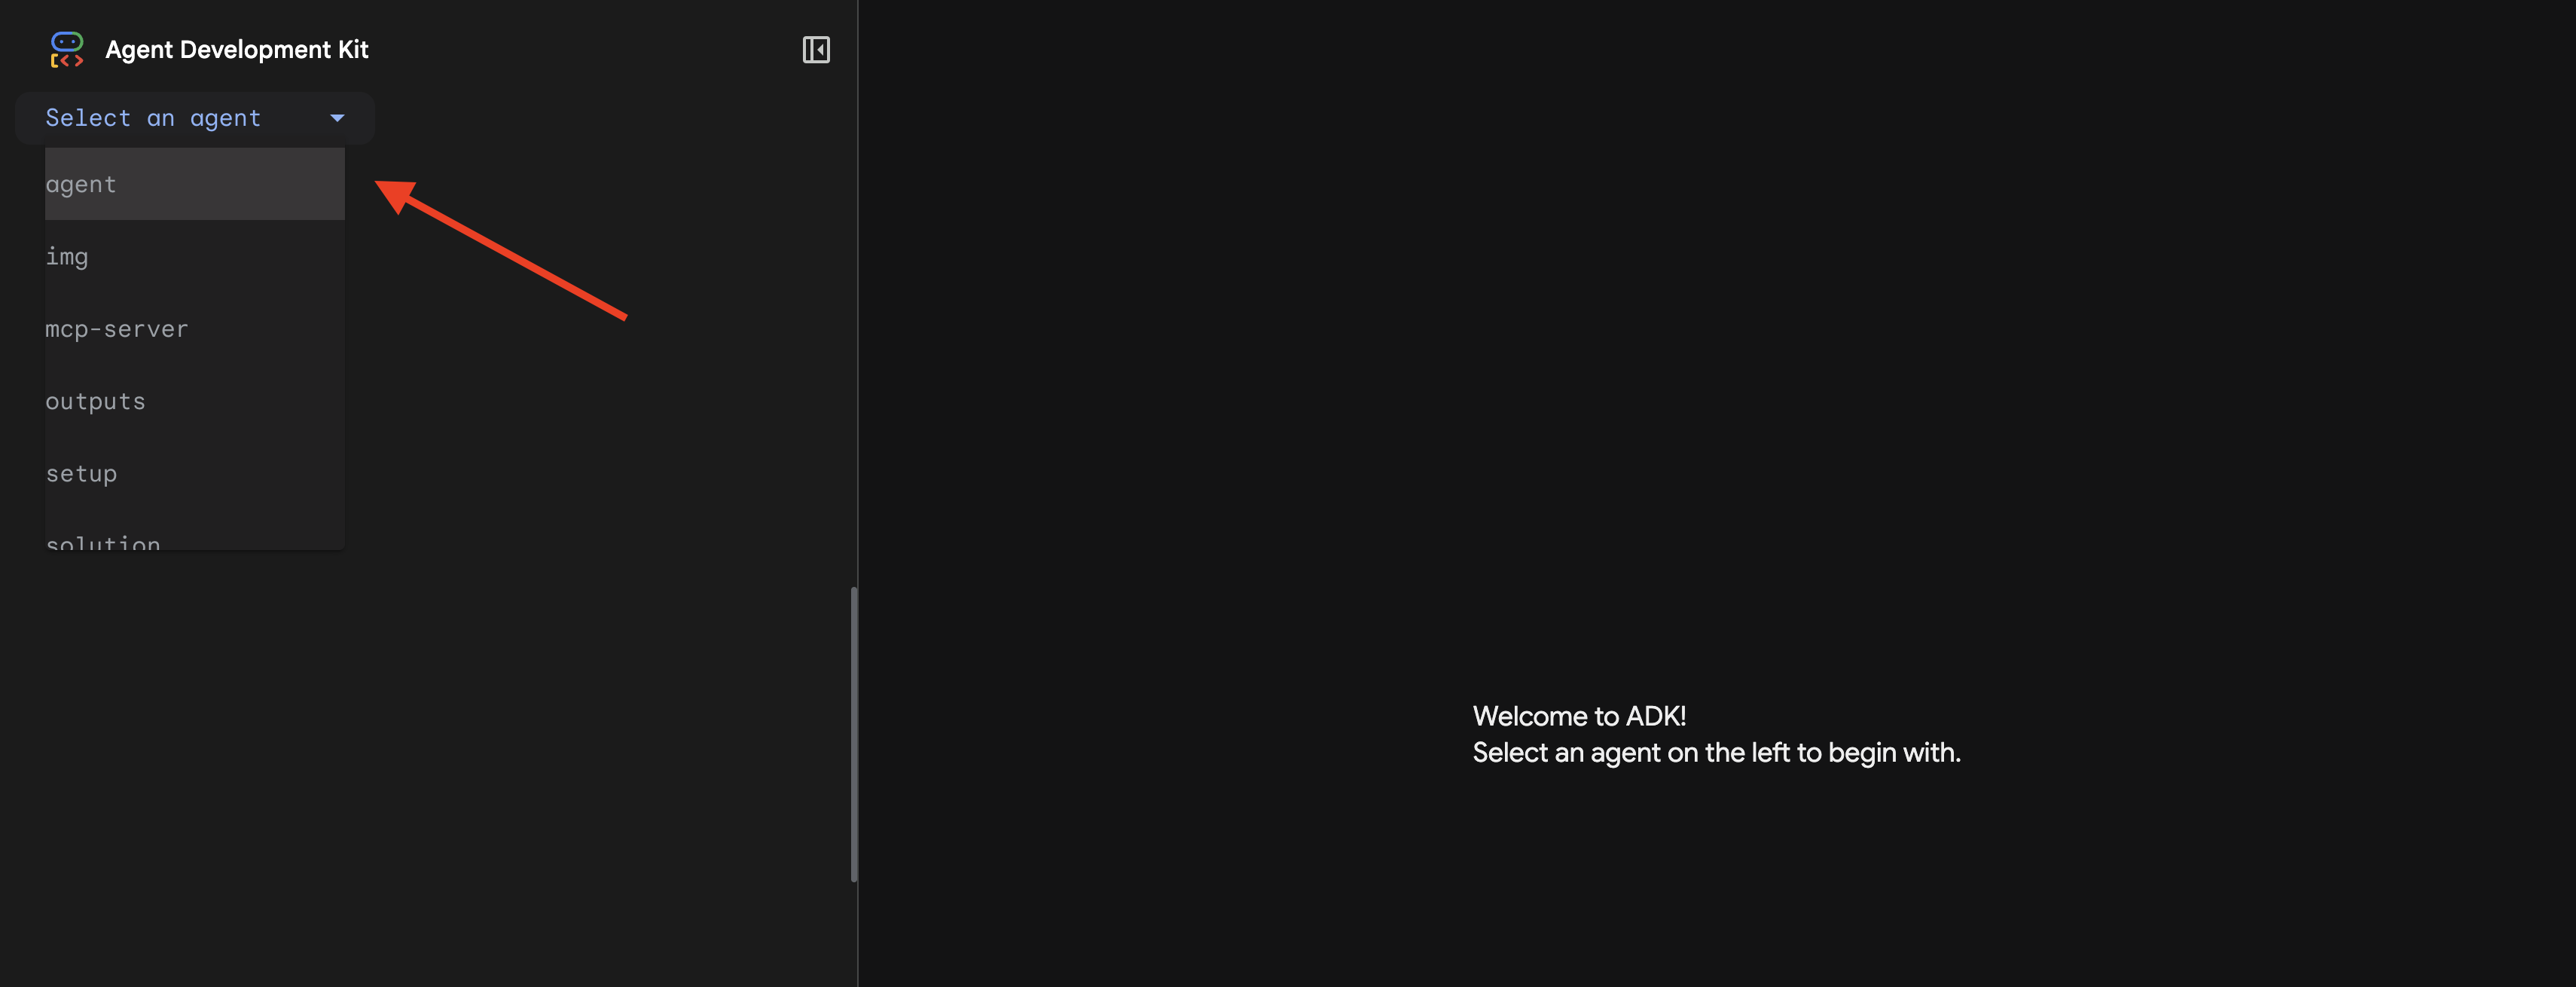
웹 UI 액세스
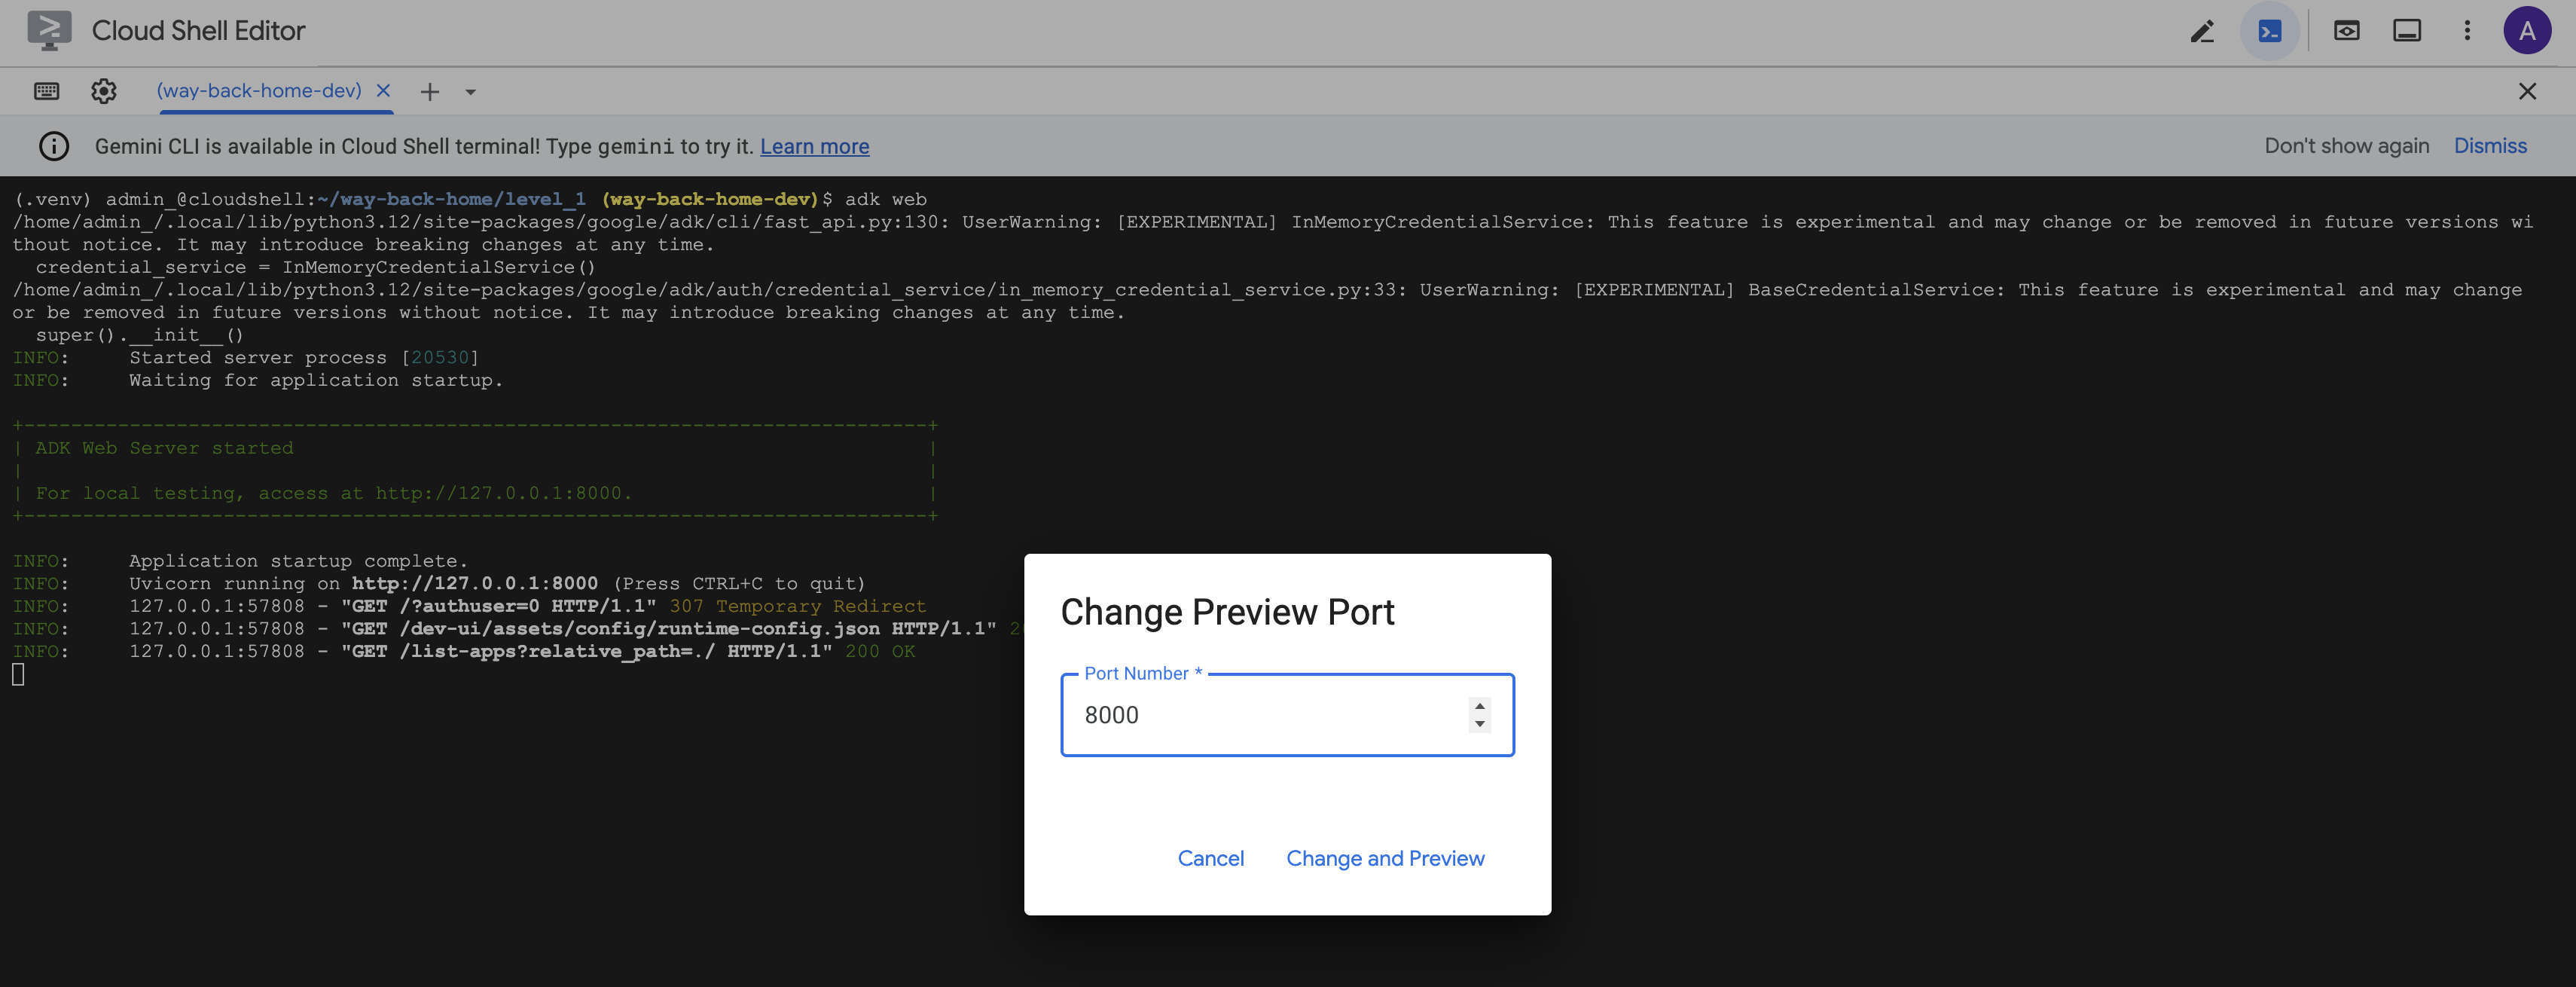
👉 Cloud Shell 툴바 (오른쪽 상단)의 웹 미리보기 아이콘에서 포트 변경을 선택합니다.
![]()
👉 포트를 8000으로 설정하고 변경 및 미리보기를 클릭합니다.
👉 ADK 웹 UI가 열립니다. 드롭다운 메뉴에서 agent를 선택합니다.
분석 실행
👉 채팅 인터페이스에 다음을 입력합니다.
Analyze the evidence from my crash site and confirm my location to activate the beacon.
멀티 에이전트 시스템의 작동 방식을 확인하세요.

👉 세 에이전트가 분석을 완료하면 다음을 입력합니다.
Where am I?
시스템에서 요청을 처리하는 방법:

오른쪽의 트레이스 패널에는 모든 상담사 상호작용과 도구 호출이 표시됩니다.
👉 테스트가 완료되면 터미널에서 Ctrl+C를 눌러 서버를 중지합니다.
9. Cloud Run에 배포
이제 A2A 준비를 위해 멀티 에이전트 시스템을 Cloud Run에 배포합니다.
에이전트 배포
👉💻 ADK CLI를 사용하여 Cloud Run에 배포합니다.
cd $HOME/way-back-home/level_1
source $HOME/way-back-home/set_env.sh

uv run adk deploy cloud_run \
  --project=$GOOGLE_CLOUD_PROJECT \
  --region=$REGION \
  --service_name=mission-analysis-ai \
  --with_ui \
  --a2a \
  ./agent
Do you want to continue (Y/n) 및 Allow unauthenticated invocations to [mission-analysis-ai] (Y/n)?라는 메시지가 표시되면 두 항목 모두에 Y를 입력하여 A2A 에이전트를 배포하고 공개 액세스를 허용합니다.
다음과 같은 출력이 표시됩니다.
Building and deploying agent to Cloud Run...
✓ Container built successfully
✓ Deploying to Cloud Run...
✓ Service deployed: https://mission-analysis-ai-abc123-uc.a.run.app
Cloud Run에서 환경 변수 설정
배포된 에이전트가 환경 변수에 액세스할 수 있어야 합니다. 서비스를 업데이트합니다.
👉💻 필수 환경 변수를 설정합니다.
gcloud run services update mission-analysis-ai \
  --region=$REGION \
  --labels=dev-tutorial=multi-modal \
  --set-env-vars="GOOGLE_CLOUD_PROJECT=$GOOGLE_CLOUD_PROJECT,GOOGLE_CLOUD_LOCATION=$REGION,MCP_SERVER_URL=$MCP_SERVER_URL,BACKEND_URL=$BACKEND_URL,PARTICIPANT_ID=$PARTICIPANT_ID,GOOGLE_GENAI_USE_VERTEXAI=True"
에이전트 URL 저장
👉💻 배포된 URL을 가져옵니다.
export AGENT_URL=$(gcloud run services describe mission-analysis-ai \
  --region=$REGION --format='value(status.url)')
echo "Agent URL: $AGENT_URL"

# Add to set_env.sh
echo "export LEVEL1_AGENT_URL=\"$AGENT_URL\"" >> $HOME/way-back-home/set_env.sh
배포 확인
👉💻 브라우저에서 URL을 열어 배포된 에이전트를 테스트하거나 (--with_ui 플래그가 ADK 웹 인터페이스를 배포함) curl을 통해 테스트합니다.
curl -X GET "$AGENT_URL/list-apps"
에이전트가 나열된 응답이 표시됩니다.
10. 결론
🎉 레벨 1 완료!
이제 구조 요청 신호가 최대 강도로 브로드캐스트됩니다. 삼각 측량된 신호는 대기 간섭을 뚫고 '여기 있습니다. 나는 살아남았어. 나를 찾아줘'
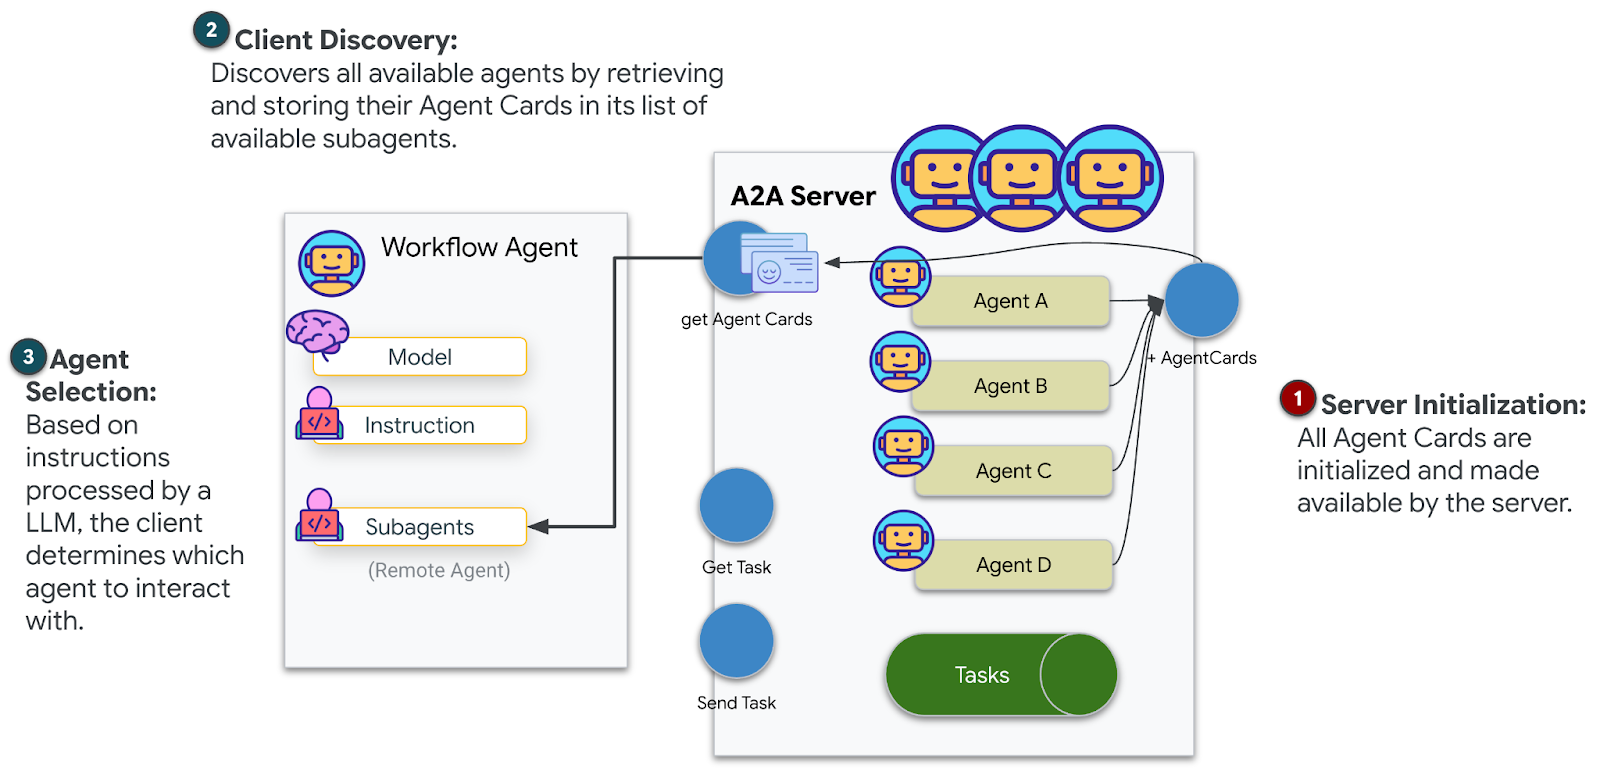
하지만 이 행성에는 너만 있는 게 아니야. 비컨이 활성화되자 지평선 너머에서 다른 불빛이 깜박이는 것이 보입니다. 다른 생존자, 다른 추락 지점, 다른 탐험가들이 살아남은 것입니다.
![]()
레벨 2에서는 수신되는 SOS 신호를 처리하고 다른 생존자와 협력하는 방법을 배웁니다. 구조는 단순히 발견되는 것뿐만 아니라 서로를 찾는 것입니다.
문제 해결
'MCP_SERVER_URL이 설정되지 않음'
export MCP_SERVER_URL=$(gcloud run services describe location-analyzer \
  --region=$REGION --format='value(status.url)')
'PARTICIPANT_ID가 설정되지 않음'
source $HOME/way-back-home/set_env.sh
echo $PARTICIPANT_ID
'BigQuery 테이블을 찾을 수 없음'
uv run python setup/setup_star_catalog.py
'전문가가 URL을 요청함': {key} 템플릿이 작동하지 않음을 의미합니다. 확인:
before_agent_callback이 루트 에이전트에 설정되어 있나요?- 콜백이 상태 값을 올바르게 설정하고 있나요?
- 하위 에이전트가 f-string이 아닌
{soil_url}를 사용하고 있나요?
'세 가지 분석 모두 동의하지 않음' 증거 재생성: uv run python generate_evidence.py
'adk web에서 에이전트가 응답하지 않음'
- 포트 8000이 올바른지 확인
- MCP_SERVER_URL 및 PARTICIPANT_ID가 설정되어 있는지 확인
- 터미널에서 오류 메시지 확인
아키텍처 요약
구성요소 | 유형 | 패턴 | 목적 |
setup_participant_context | 콜백 | before_agent_callback | 구성을 가져오고 상태를 설정합니다. |
GeologicalAnalyst | 에이전트 | {soil_url} 템플릿 | 토양 분류 |
BotanicalAnalyst | 에이전트 | {flora_url} 템플릿 | 식물 분류 |
AstronomicalAnalyst | 에이전트 | {stars_url}, {project_id} | 별 삼각 측량 |
confirm_location | 도구 | ToolContext 상태 액세스 | 표지 활성화 |
EvidenceAnalysisCrew | ParallelAgent | 하위 에이전트 구성 | 전문가 동시 실행 |
MissionAnalysisAI | 상담사 (루트) | 조정자 + 콜백 | 조정 + 합성 |
location-analyzer | FastMCP 서버 | 맞춤 MCP | 지질학 + 식물학 분석 |
bigquery.googleapis.com/mcp | OneMCP | 관리형 MCP | BigQuery 액세스 |
학습한 핵심 개념
✓ before_agent_callback: 에이전트가 실행되기 전에 구성 가져오기
✓ {key} 상태 템플릿: 에이전트 명령에서 상태 값 액세스
✓ ToolContext: 도구 함수에서 상태 값 액세스
✓ 상태 공유: InvocationContext를 통해 하위 에이전트에서 상위 상태를 자동으로 사용 가능
✓ 다중 에이전트 아키텍처: 단일 책임이 있는 전문 에이전트
✓ ParallelAgent: 독립적인 작업의 동시 실행
✓ 맞춤 MCP 서버: Cloud Run의 자체 MCP 서버
✓ OneMCP BigQuery: 데이터베이스 액세스를 위한 관리형 MCP 패턴
✓ 클라우드 배포: 환경 변수를 사용한 상태 비저장 배포
✓ A2A 준비: 에이전트 간 통신을 위한 에이전트 준비
비게이머: 실제 적용
'위치 정확히 파악'은 합의를 통한 병렬 전문가 분석을 나타냅니다. 여러 전문 AI 분석을 동시에 실행하고 결과를 종합합니다.
엔터프라이즈 애플리케이션
사용 사례 | Parallel Experts | 합성 규칙 |
의료 진단 | 이미지 분석가, 증상 분석가, 실험실 분석가 | 2/3 신뢰도 기준 |
사기 감지 | 거래 분석가, 행동 분석가, 네트워크 분석가 | 플래그 1개 = 검토 |
문서 처리 | OCR 에이전트, 분류 에이전트, 추출 에이전트 | 모두 동의해야 함 |
품질 관리 | 비주얼 검사관, 센서 분석가, 사양 검사기 | 3개 중 2개 통과 |
주요 아키텍처 통계
- 구성의 before_agent_callback: 시작 시 구성을 한 번 가져오고 모든 하위 에이전트의 상태를 채웁니다. 하위 에이전트에서 구성 파일을 읽지 않습니다.
- {key} 상태 템플릿: 선언적이고 깔끔하며 관용적입니다. f-string도, 가져오기도, sys.path 조작도 없습니다.
- 합의 메커니즘: 3개 중 2개 동의는 만장일치 동의 없이도 모호성을 강력하게 처리합니다.
- 독립적인 작업을 위한 ParallelAgent: 분석이 서로 종속되지 않는 경우 속도를 위해 동시에 실행합니다.
- 두 가지 MCP 패턴: 맞춤 (직접 빌드)과 OneMCP (Google 호스팅). 둘 다 StreamableHTTP를 사용합니다.
- 스테이트리스 배포: 동일한 코드가 로컬 및 배포된 환경에서 작동합니다. 환경 변수 + 백엔드 API = 컨테이너에 구성 파일 없음
다음 단계
이벤트 기반 패턴과 고급 에이전트 조정을 사용하여 다른 생존자로부터 수신되는 조난 신호를 처리하는 방법을 알아봅니다.