
1. สัญญาณขอความช่วยเหลือ
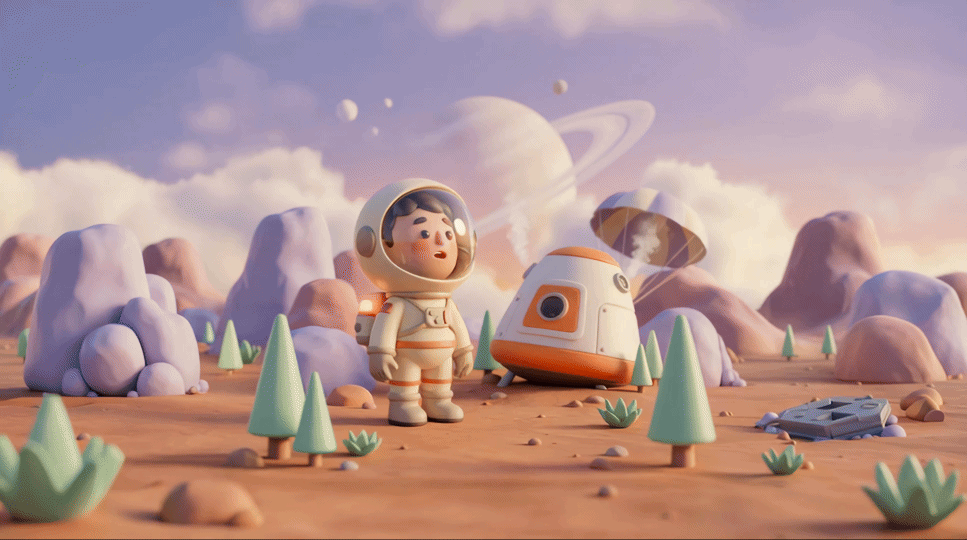
ยานหลบหนีของคุณทะยานผ่านชั้นบรรยากาศของโลกที่ไม่รู้จัก ไฟเตือนจะกะพริบในทุกแผง ระบบนำทางเสีย การสื่อสารขัดข้อง เมื่อโปรโตคอลฉุกเฉินของพ็อดทำงาน ผู้ช่วย AI ก็จะเริ่มทำงาน
"ตรวจพบผู้รอดชีวิต ลงจอดฉุกเฉินสำเร็จ กำลังเริ่มโปรโตคอลสัญญาณขอความช่วยเหลือ..."
"คำเตือน: ต้องมีการยืนยันตัวตน เครือข่ายกู้ภัยกาแล็กซีไม่สามารถระบุตำแหน่งนักสำรวจที่ไม่ได้ลงทะเบียน โปรดยืนยันตัวตนเพื่อเปิดใช้งานบีคอน"
คุณมองออกไปนอกวิวพอร์ต ภูมิทัศน์ต่างดาวทอดยาวสุดลูกหูลูกตา มีกลุ่มหินแปลกตา พืชพรรณที่ไม่คุ้นเคย และท้องฟ้าสีประหลาด ผู้รอดชีวิตคนอื่นๆ จากภารกิจของคุณกระจัดกระจายอยู่ทั่วพื้นผิวของดาวเคราะห์ดวงนี้
แต่ก่อนอื่น คุณต้องมีอยู่ในระบบ
สิ่งที่คุณจะสร้าง
ในระดับนี้ คุณจะได้สร้างตัวตนนักสำรวจอวกาศที่ไม่เหมือนใครโดยใช้การสร้างรูปภาพแบบหลายรอบด้วยโมเดลการสร้างรูปภาพ Gemini ของ Google (หรือที่เรียกว่า Nano Banana 🍌) อวตารของคุณจะปรากฏบนแผนที่กู้ภัยทั่วโลก ซึ่งผู้รอดชีวิตคนอื่นๆ ทั้งหมดจะเห็นได้ในกิจกรรมเวิร์กช็อป
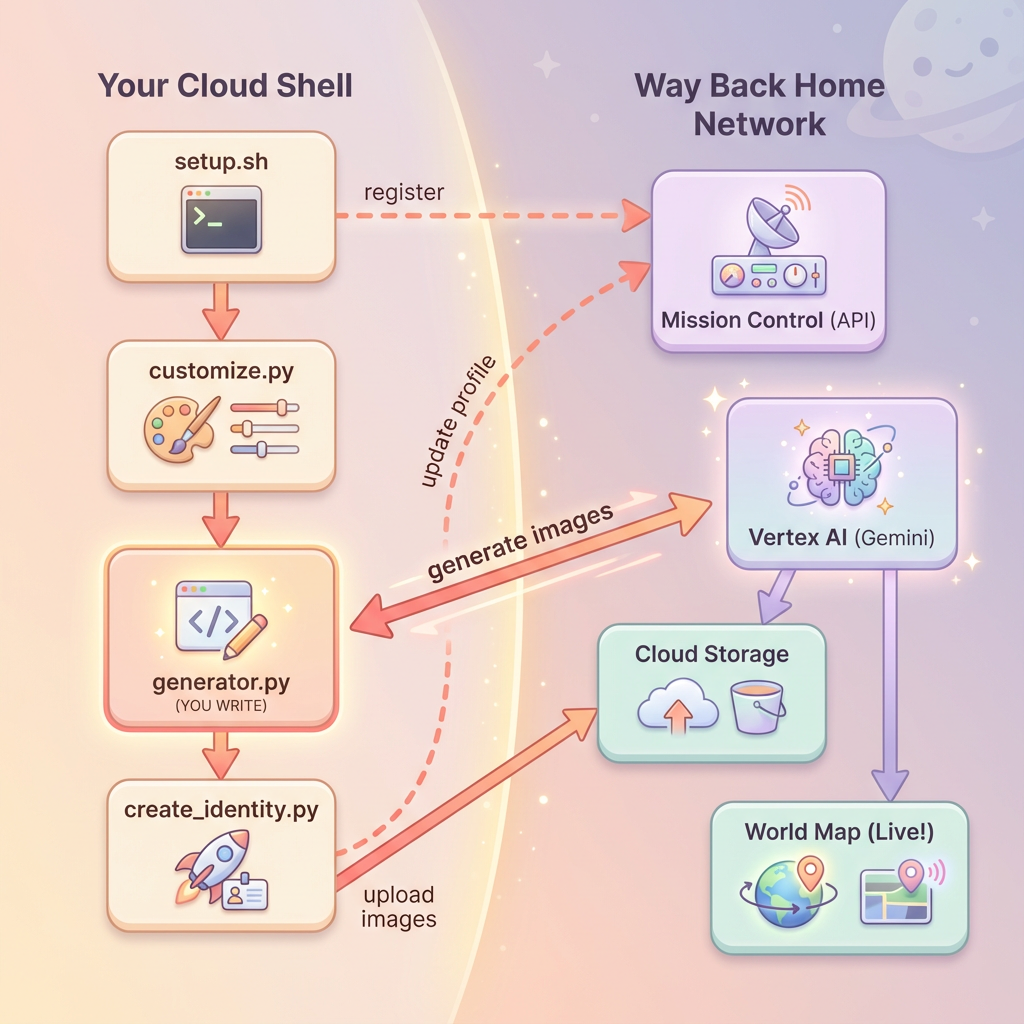
สิ่งที่คุณจะได้เรียนรู้
แนวคิด | คำอธิบาย |
การสร้างรูปภาพแบบหลายรอบ | วิธีรักษาความสอดคล้องของตัวละครในการสร้างรูปภาพหลายครั้งโดยใช้เซสชันแชท |
วิศวกรรมพรอมต์สำหรับรูปภาพ | การสร้างพรอมต์ที่มีประสิทธิภาพสำหรับเอาต์พุตที่สอดคล้องกันและมีสไตล์พร้อมข้อจำกัดที่เฉพาะเจาะจง |
Gemini Image API (Nano Banana) | การใช้ความสามารถในการสร้างรูปภาพดั้งเดิมของ Gemini ผ่าน Python SDK |
เซสชันแชท | ใช้ประโยชน์จากบริบทของการสนทนาเพื่อการปรับแต่งแบบวนซ้ำและความสอดคล้องของตัวละคร |
เมื่อจบเลเวลนี้ คุณจะมีสิ่งต่อไปนี้
✅ สร้างภาพบุคคลของนักสำรวจโดยใช้ AI การเปลี่ยนข้อความเป็นรูปภาพ
✅ สร้างไอคอนแผนที่ที่สอดคล้องกันโดยใช้การสนทนาแบบหลายรอบ
✅ ลงทะเบียนตัวตนกับเครือข่ายกู้ภัย
✅ ปรากฏบนแผนที่โลกแบบเรียลไทม์พร้อมกับนักสำรวจคนอื่นๆ
มาทำให้คุณปรากฏบนแผนที่กัน 📍
2. เตรียมสภาพแวดล้อม
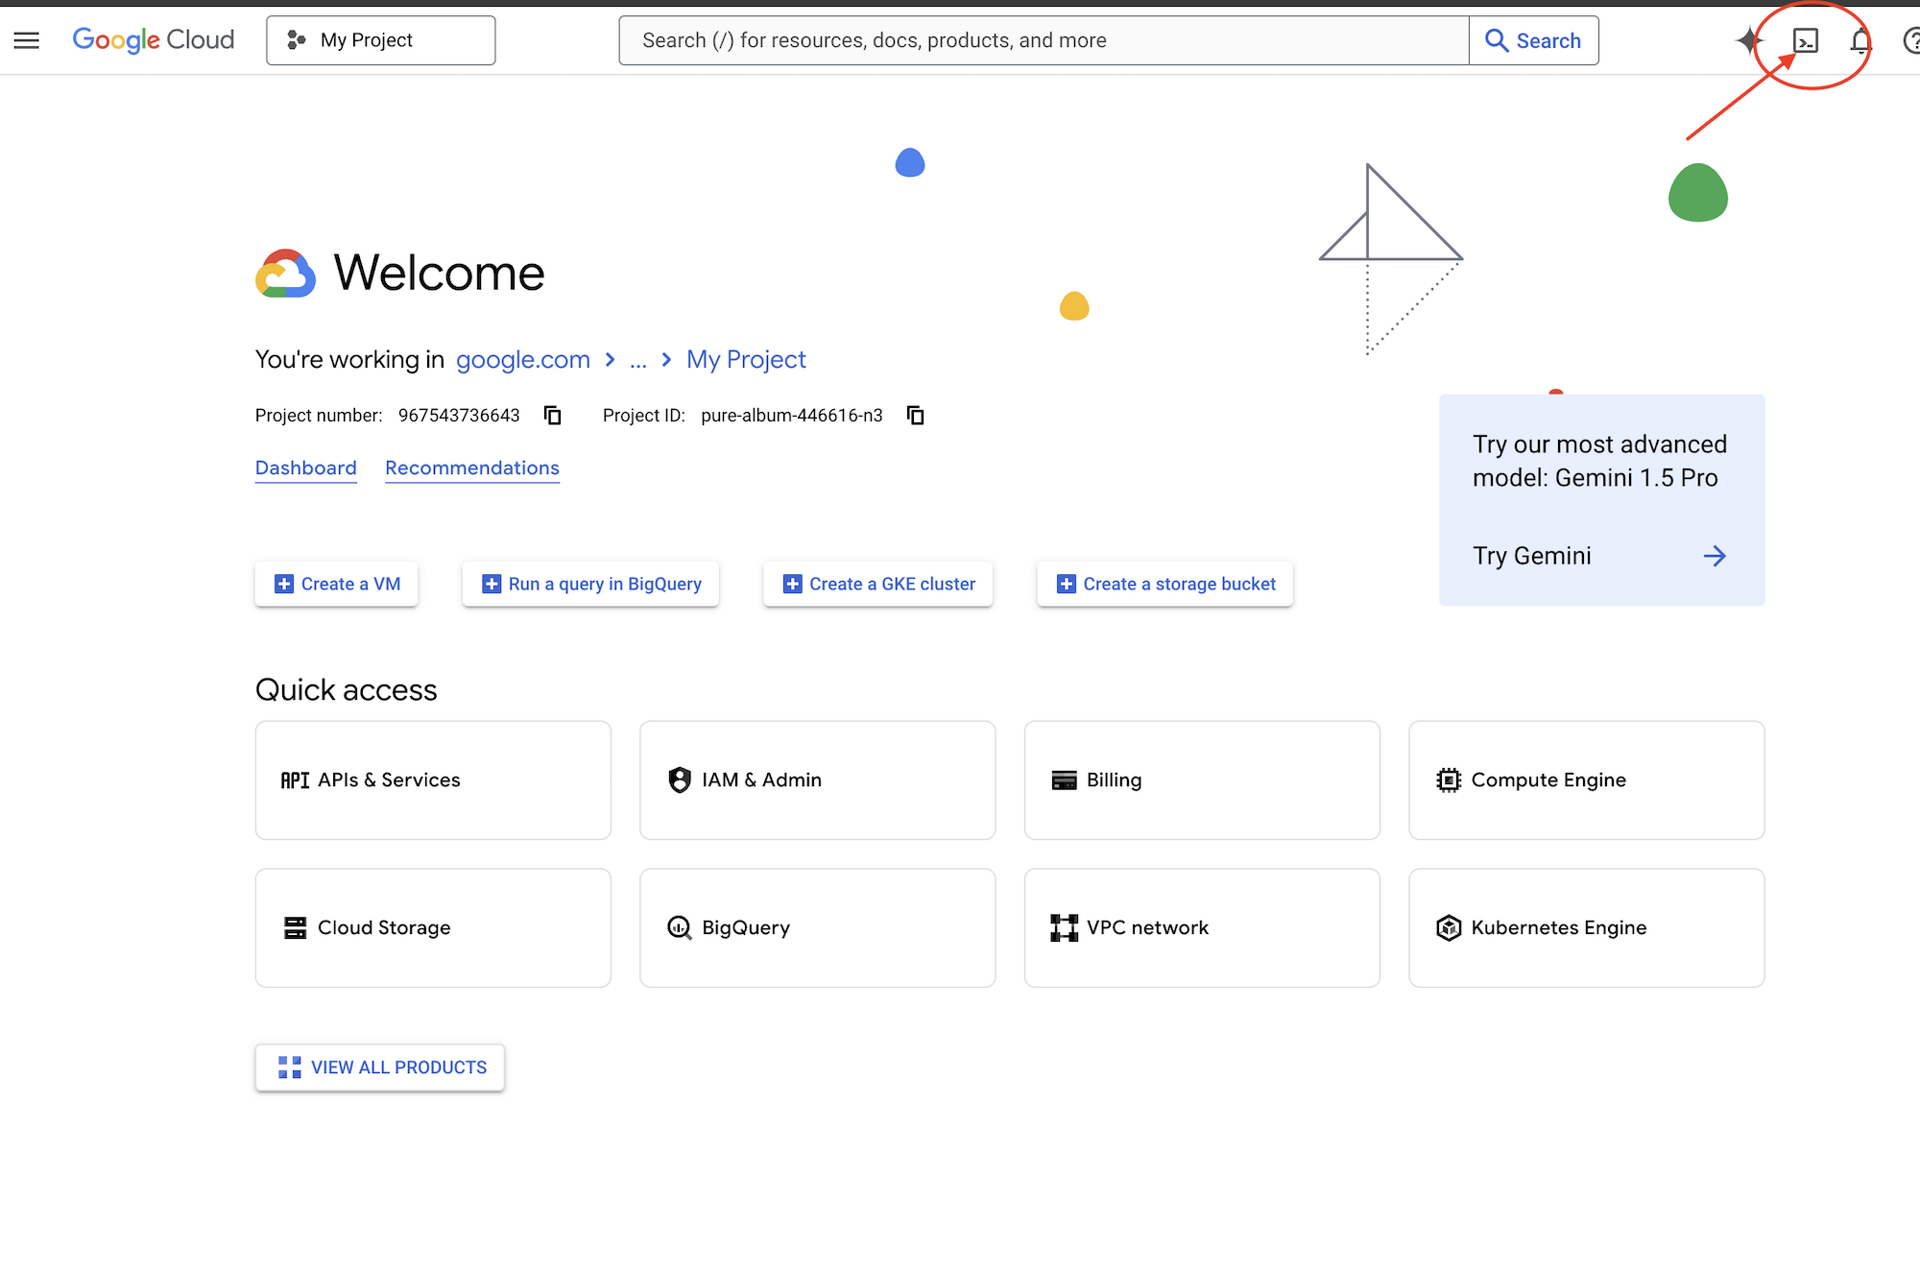
เข้าถึง Cloud Shell
ก่อนอื่น เราจะเปิด Cloud Shell ซึ่งเป็นเทอร์มินัลบนเบราว์เซอร์ที่มี Google Cloud SDK และเครื่องมือสำคัญอื่นๆ ติดตั้งไว้ล่วงหน้า
คลิกเปิดใช้งาน Cloud Shell ที่ด้านบนของคอนโซล Google Cloud (เป็นไอคอนเทอร์มินัลในแถบนำทางด้านขวาบน)
เมื่อ Cloud Shell เปิดขึ้น ให้ตรวจสอบว่าคุณได้รับการตรวจสอบสิทธิ์แล้วโดยทำดังนี้
# Check that you are logged in
gcloud auth list
คุณควรเห็นบัญชีของคุณแสดงเป็น (ACTIVE)
โคลนที่เก็บ
โคลนที่เก็บ Way Back Home แล้วไปที่โปรเจ็กต์
git clone https://github.com/gca-americas/way-back-home.git
cd way-back-home
ติดตั้งการอ้างอิง
ไปที่ระดับ 0 แล้วติดตั้งแพ็กเกจ Python ที่จำเป็น
cd level_0
uv sync
โดยมีข้อกำหนดที่สำคัญดังนี้
แพ็กเกจ | วัตถุประสงค์ |
| ไคลเอ็นต์ Gemini API สำหรับการสร้างรูปภาพ |
| ไคลเอ็นต์ HTTP สำหรับการเรียก API ไปยัง Mission Control |
| การประมวลผลรูปภาพและการจัดการไฟล์ |
ยืนยันการตั้งค่า
ทำการยืนยันอย่างรวดเร็วเพื่อให้แน่ใจว่าทุกอย่างได้รับการกำหนดค่าอย่างถูกต้อง
uv run python ../scripts/verify_setup.py
คุณควรเห็นข้อมูลต่อไปนี้
✓ Authenticated as: your-email@google.com
✓ Python environment ready (uv)
✓ Ready to proceed!
สิ่งที่คุณเพิ่งทำเสร็จ
✓ เปิด Cloud Shell
✓ ตรวจสอบสิทธิ์กับ Google Cloud
✓ โคลนที่เก็บ Codelab
✓ ติดตั้งทรัพยากร Dependency ของ Python ด้วย uv
✓ ยืนยันการตั้งค่า
ถัดไป: เชื่อมต่อกับ Mission Control - สคริปต์การตั้งค่าจะกำหนดค่าโปรเจ็กต์ที่อยู่ในระบบคลาวด์และ API ของ Google Cloud โดยอัตโนมัติ
3. เชื่อมต่อกับ Mission Control
เรียกใช้สคริปต์การตั้งค่า
สคริปต์การตั้งค่าจะเชื่อมต่อคุณกับเครือข่ายกู้ภัย Way Back Home และสงวนข้อมูลประจำตัวของนักสำรวจ เรียกใช้จากรูทของโปรเจ็กต์
cd $HOME/way-back-home
chmod +x scripts/setup.sh
./scripts/setup.sh
ระบบจะแจ้งให้คุณระบุข้อมูล 2 อย่าง
ป้อนรหัสกิจกรรม
รหัสกิจกรรมจะระบุว่าคุณกำลังเข้าร่วมกิจกรรมเวิร์กช็อปใด
หากคุณเข้าร่วมเวิร์กช็อป: ป้อนรหัสกิจกรรมจากคิวอาร์โค้ด สไลด์ หรือผู้สอนเวิร์กช็อป
🚀 Welcome to Way Back Home!

Enter event code (from QR/slide): devfest-nyc-26
Validating event...
✓ Connected to: DevFest NYC 2026
หากคุณกำลังเรียนรู้ด้วยตนเอง ให้ป้อน sandbox เพื่อเข้าร่วมสภาพแวดล้อมการเรียนรู้แบบสาธารณะ
🚀 Welcome to Way Back Home!

Enter event code (from QR/slide): sandbox
Validating event...
✓ Connected to: Way Back Home Sandbox
เลือกชื่อ Explorer
เลือกชื่อที่ไม่ซ้ำกันสำหรับ Explorer คุณจะปรากฏบนแผนที่โลกและลีดเดอร์บอร์ดในลักษณะนี้
Choose your explorer name: AstroAyo
✓ Username available!
หากชื่อที่คุณเลือกมีผู้เข้าร่วมคนอื่นใช้ในกิจกรรมเดียวกันแล้ว ให้ทำดังนี้
Choose your explorer name: SpaceExplorer
⚠️  That name is taken. Try another.
Choose your explorer name: SpaceExplorer42
✓ Username available!
การตั้งค่าเสร็จสมบูรณ์
เมื่อดำเนินการเสร็จแล้ว คุณจะเห็นการยืนยันดังนี้
Initializing your explorer profile...

✓ Environment configured!
  Explorer ID: a1b2c3d4
  Starting coordinates: (47, 23)

Next: cd level_0 && python customize.py
ไปยังระดับ 0
ตอนนี้ให้ไปที่ไดเรกทอรีระดับ 0 (คุณได้ติดตั้งทรัพยากร Dependency จากโมดูลที่ 2 แล้ว)
cd level_0
ตรวจสอบการกำหนดค่า
ดูสิ่งที่บันทึกไว้ (config.json อยู่ในรูทของโปรเจ็กต์)
cat ../config.json
{
    "event_code": "devfest-nyc-26",
    "event_name": "DevFest NYC 2026",
    "username": "AstroAyo",
    "participant_id": "a1b2c3d4",
    "starting_x": 47,
    "starting_y": 23,
    "api_base": "https://api.waybackhome.dev",
    "project_id": "your-project-id"
}
สคริปต์ที่ตามมาจะใช้ไฟล์การกำหนดค่านี้เพื่อระบุตัวคุณในเครือข่ายการกู้คืน
สิ่งที่คุณเพิ่งทำเสร็จ
✓ เชื่อมต่อกับ Mission Control API
✓ จองชื่อ Explorer ที่ไม่ซ้ำกันแล้ว
✓ ได้รับรหัสผู้เข้าร่วมและพิกัดเริ่มต้นแล้ว
✓ บันทึกการกำหนดค่าสำหรับขั้นตอนถัดไปแล้ว
ถัดไป: ปรับแต่งรูปลักษณ์ของเครื่องมือสำรวจ
4. ปรับแต่งเครื่องมือสำรวจ
เรียกใช้สคริปต์การปรับแต่ง
ก่อนสร้างอวาตาร์ คุณจะต้องเลือกตัวเลือก 2-3 อย่างเกี่ยวกับลักษณะที่ปรากฏของนักสำรวจ
uv run python customize.py
เลือกสีชุด
เลือกสีชุดอวกาศของนักสำรวจ
🎨 Let's create your explorer identity!

Select suit color:
  1. Deep Blue
  2. Crimson Red
  3. Forest Green
  4. Royal Purple
  5. Solar Gold
  6. Silver

Choice [1-6, default=6]: 1
✓ Deep Blue selected
อธิบาย Explorer ของคุณ (ไม่บังคับ)
คุณสามารถใส่คำอธิบายสั้นๆ เกี่ยวกับลักษณะที่ปรากฏของนักสำรวจ หรือกด Enter เพื่อกำหนดแบบสุ่ม
Brief description of your explorer (or Enter for random):
Example: 'short dark hair, glasses, friendly smile'
> short dark hair, glasses, determined expression

✓ Preferences saved!
หากกด Enter โดยไม่พิมพ์อะไรเลย คุณจะได้รับลักษณะที่สุ่มดังนี้
>
✓ Random traits: confident expression, short styled hair
อัปเดตการกำหนดค่าแล้ว
ระบบได้บันทึกค่ากำหนดของคุณแล้ว
✓ Preferences saved!
Next: Open generator.py and follow the codelab instructions
ตรวจสอบการกำหนดค่าที่อัปเดตแล้ว
cat ../config.json
คุณจะเห็นค่ากำหนดที่เพิ่มไว้ดังนี้
{
    "event_code": "devfest-nyc-26",
    "event_name": "DevFest NYC 2026",
    "username": "AstroAyo",
    "participant_id": "a1b2c3d4",
    "starting_x": 47,
    "starting_y": 23,
    "api_base": "https://api.waybackhome.dev",
    "project_id": "your-project-id",
    "suit_color": "deep blue with silver accents",
    "appearance": "short dark hair, glasses, determined expression"
}
สิ่งที่คุณเพิ่งทำเสร็จ
✓ เลือกสีชุด
✓ กำหนดลักษณะของนักสำรวจ
✓ การกำหนดค่าพร้อมสำหรับการสร้างรูปภาพ
ถัดไป: กิจกรรมหลัก นั่นคือการเขียนโค้ดสร้างรูปภาพ
5. สร้างเครื่องมือสร้างอวาตาร์
นี่คือโมดูลการเรียนรู้หลัก คุณจะเขียนโค้ด Python ที่สร้างอวตารนักสำรวจที่ไม่ซ้ำใครโดยใช้ความสามารถในการสร้างรูปภาพแบบหลายรอบของ Gemini (Nano Banana)
เปิดไฟล์เครื่องมือสร้าง Sitemap
เปิดเครื่องมือสร้างอวตารใน Cloud Shell Editor โดยทำดังนี้
cloudshell edit generator.py
หรือคลิกเปิดตัวแก้ไขใน Cloud Shell แล้วไปที่ generator.py ในโฟลเดอร์ level_0
ทำความเข้าใจโครงสร้างไฟล์
ไฟล์มีโค้ดเริ่มต้นและส่วนตัวยึดตำแหน่ง 3 ส่วนที่คุณจะเพิ่มการติดตั้งใช้งานได้
"""
Level 0: Avatar Generator

This module generates your unique space explorer avatar using
multi-turn image generation with Gemini (Nano Banana) for
character consistency across portrait and icon.
"""

from google import genai
from google.genai import types
from PIL import Image
import json
import os
import io

# Load configuration from setup (config.json is in project root)
CONFIG_PATH = "../config.json"

with open(CONFIG_PATH) as f:
    config = json.load(f)

USERNAME = config["username"]
SUIT_COLOR = config["suit_color"]
APPEARANCE = config["appearance"]

# Initialize the Gemini client for Vertex AI
client = genai.Client(
    vertexai=True,
    project=os.environ.get("GOOGLE_CLOUD_PROJECT", config.get("project_id")),
    location="us-central1"
)


def generate_explorer_avatar() -> dict:
    """
    Generate portrait and icon using multi-turn chat for consistency.

    The key technique here is using a CHAT SESSION rather than independent
    API calls. This allows Gemini to "remember" the character it created
    in the first turn, ensuring the icon matches the portrait.

    Returns:
        dict with portrait_path and icon_path
    """

    # MODULE_5_STEP_1_CREATE_CHAT_SESSION
    # TODO: Create a chat session for multi-turn generation
    chat = None  # Replace this line

    # MODULE_5_STEP_2_GENERATE_PORTRAIT
    # TODO: Generate the explorer portrait
    portrait_image = None  # Replace this section

    # MODULE_5_STEP_3_GENERATE_ICON
    # TODO: Generate a consistent map icon
    icon_image = None  # Replace this section

    return {
        "portrait_path": "outputs/portrait.png",
        "icon_path": "outputs/icon.png"
    }


if __name__ == "__main__":
    # Create outputs directory if it doesn't exist
    os.makedirs("outputs", exist_ok=True)

    print(f"Generating avatar for {USERNAME}...")
    result = generate_explorer_avatar()
    print(f"✅ Avatar created!")
    print(f"   Portrait: {result['portrait_path']}")
    print(f"   Icon: {result['icon_path']}")
คุณจะแทนที่ส่วน TODO ทั้ง 3 ส่วนด้วยการติดตั้งใช้งานของคุณ
ขั้นตอนที่ 1: สร้างเซสชันแชท
ค้นหาตัวยึดตำแหน่ง MODULE_5_STEP_1_CREATE_CHAT_SESSION แล้วแทนที่บรรทัด chat = None # Replace this line ด้วย
    # MODULE_5_STEP_1_CREATE_CHAT_SESSION
    # Create a chat session to maintain character consistency across generations.
    # The chat session preserves context between turns, so Gemini "remembers"
    # what it generated and can create consistent variations.
    chat = client.chats.create(
        model="gemini-2.5-flash-image",  # Nano Banana - Gemini with image generation
        config=types.GenerateContentConfig(
            response_modalities=["TEXT", "IMAGE"]
        )
    )
ขั้นตอนที่ 2: สร้างภาพบุคคล
ค้นหา MODULE_5_STEP_2_GENERATE_PORTRAIT และแทนที่ portrait_image = None # Replace this section ด้วยโค้ดต่อไปนี้
    # MODULE_5_STEP_2_GENERATE_PORTRAIT
    # First turn: Generate the explorer portrait.
    # This establishes the character that will be referenced in subsequent turns.
    portrait_prompt = f"""Create a stylized space explorer portrait.

Character appearance: {APPEARANCE}
Name on suit patch: "{USERNAME}"
Suit color: {SUIT_COLOR}

CRITICAL STYLE REQUIREMENTS:
- Digital illustration style, clean lines, vibrant saturated colors
- Futuristic but weathered space suit with visible mission patches
- Background: Pure solid white (#FFFFFF) - absolutely no gradients, patterns, or elements
- Frame: Head and shoulders only, 3/4 view facing slightly left
- Lighting: Soft diffused studio lighting, no harsh shadows
- Expression: Determined but approachable
- Art style: Modern animated movie character portrait (similar to Pixar or Dreamworks style)

The white background is essential - the avatar will be composited onto a map."""

    print("🎨 Generating your portrait...")
    portrait_response = chat.send_message(portrait_prompt)

    # Extract the image from the response.
    # Gemini returns a response with multiple "parts" - we need to find the image part.
    portrait_image = None
    for part in portrait_response.candidates[0].content.parts:
        if part.inline_data is not None:
            # Found the image! Convert from bytes to PIL Image and save.
            image_bytes = part.inline_data.data
            portrait_image = Image.open(io.BytesIO(image_bytes))
            portrait_image.save("outputs/portrait.png")
            break

    if portrait_image is None:
        raise Exception("Failed to generate portrait - no image in response")

    print("✓ Portrait generated!")
ขั้นตอนที่ 3: สร้างไอคอนแผนที่
ค้นหา MODULE_5_STEP_3_GENERATE_ICON และแทนที่ icon_image = None # Replace this section ด้วย
    # MODULE_5_STEP_3_GENERATE_ICON
    # Second turn: Generate a consistent icon for the map.
    # Because we're in the same chat session, Gemini remembers the character
    # from the portrait and will maintain visual consistency.
    icon_prompt = """Now create a circular map icon of this SAME character.

CRITICAL REQUIREMENTS:
- SAME person, SAME face, SAME expression, SAME suit — maintain perfect consistency with the portrait
- Tighter crop: just the head and very top of shoulders
- Background: Pure solid white (#FFFFFF)
- Optimized for small display sizes (will be used as a 64px map marker)
- Keep the exact same art style, colors, and lighting as the portrait
- Square 1:1 aspect ratio

This icon must be immediately recognizable as the same character from the portrait."""

    print("🖼️  Creating map icon...")
    icon_response = chat.send_message(icon_prompt)

    # Extract the icon image from the response
    icon_image = None
    for part in icon_response.candidates[0].content.parts:
        if part.inline_data is not None:
            image_bytes = part.inline_data.data
            icon_image = Image.open(io.BytesIO(image_bytes))
            icon_image.save("outputs/icon.png")
            break

    if icon_image is None:
        raise Exception("Failed to generate icon - no image in response")

    print("✓ Icon generated!")
โค้ดที่เสร็จสมบูรณ์
หลังจากเพิ่มทั้ง 3 ส่วนแล้ว ฟังก์ชัน generate_explorer_avatar() ควรมีลักษณะดังนี้
def generate_explorer_avatar() -> dict:
    """
    Generate portrait and icon using multi-turn chat for consistency.

    The key technique here is using a CHAT SESSION rather than independent
    API calls. This allows Gemini to "remember" the character it created
    in the first turn, ensuring the icon matches the portrait.

    Returns:
        dict with portrait_path and icon_path
    """

    # MODULE_5_STEP_1_CREATE_CHAT_SESSION
    # Create a chat session to maintain character consistency across generations.
    # The chat session preserves context between turns, so Gemini "remembers"
    # what it generated and can create consistent variations.
    chat = client.chats.create(
        model="gemini-2.5-flash-image",  # Nano Banana - Gemini with image generation
        config=types.GenerateContentConfig(
            response_modalities=["TEXT", "IMAGE"]
        )
    )

    # MODULE_5_STEP_2_GENERATE_PORTRAIT
    # First turn: Generate the explorer portrait.
    # This establishes the character that will be referenced in subsequent turns.
    portrait_prompt = f"""Create a stylized space explorer portrait.

Character appearance: {APPEARANCE}
Name on suit patch: "{USERNAME}"
Suit color: {SUIT_COLOR}

CRITICAL STYLE REQUIREMENTS:
- Digital illustration style, clean lines, vibrant saturated colors
- Futuristic but weathered space suit with visible mission patches
- Background: Pure solid white (#FFFFFF) - absolutely no gradients, patterns, or elements
- Frame: Head and shoulders only, 3/4 view facing slightly left
- Lighting: Soft diffused studio lighting, no harsh shadows
- Expression: Determined but approachable
- Art style: Modern animated movie character portrait (similar to Pixar or Dreamworks style)

The white background is essential - the avatar will be composited onto a map."""

    print("🎨 Generating your portrait...")
    portrait_response = chat.send_message(portrait_prompt)

    # Extract the image from the response.
    # Gemini returns a response with multiple "parts" - we need to find the image part.
    portrait_image = None
    for part in portrait_response.candidates[0].content.parts:
        if part.inline_data is not None:
            # Found the image! Convert from bytes to PIL Image and save.
            image_bytes = part.inline_data.data
            portrait_image = Image.open(io.BytesIO(image_bytes))
            portrait_image.save("outputs/portrait.png")
            break

    if portrait_image is None:
        raise Exception("Failed to generate portrait - no image in response")

    print("✓ Portrait generated!")

    # MODULE_5_STEP_3_GENERATE_ICON
    # Second turn: Generate a consistent icon for the map.
    # Because we're in the same chat session, Gemini remembers the character
    # from the portrait and will maintain visual consistency.
    icon_prompt = """Now create a circular map icon of this SAME character.

CRITICAL REQUIREMENTS:
- SAME person, SAME face, SAME expression, SAME suit — maintain perfect consistency with the portrait
- Tighter crop: just the head and very top of shoulders
- Background: Pure solid white (#FFFFFF)
- Optimized for small display sizes (will be used as a 64px map marker)
- Keep the exact same art style, colors, and lighting as the portrait
- Square 1:1 aspect ratio

This icon must be immediately recognizable as the same character from the portrait."""

    print("🖼️  Creating map icon...")
    icon_response = chat.send_message(icon_prompt)

    # Extract the icon image from the response
    icon_image = None
    for part in icon_response.candidates[0].content.parts:
        if part.inline_data is not None:
            image_bytes = part.inline_data.data
            icon_image = Image.open(io.BytesIO(image_bytes))
            icon_image.save("outputs/icon.png")
            break

    if icon_image is None:
        raise Exception("Failed to generate icon - no image in response")

    print("✓ Icon generated!")

    return {
        "portrait_path": "outputs/portrait.png",
        "icon_path": "outputs/icon.png"
    }
บันทึกไฟล์
อย่าลืมบันทึก generator.py
- Cloud Shell Editor: Ctrl+S (Windows/Linux) หรือ Cmd+S (Mac)
- vim: กด Escape แล้วพิมพ์
:wqแล้วกด Enter
สิ่งที่คุณเพิ่งสร้าง
✓ สร้างเซสชันการแชทสำหรับการสร้างรูปภาพแบบหลายรอบ
✓ สร้างพรอมต์แบบละเอียดสำหรับการสร้างภาพบุคคลที่มีข้อจำกัดด้านสไตล์
✓ สร้างไอคอนแผนที่ที่สอดคล้องกันโดยใช้บริบทการสนทนา
✓ เรียนรู้วิธีแยกวิเคราะห์ข้อมูลรูปภาพจากคำตอบของ Gemini
แนวคิดหลักที่เชี่ยวชาญ:
แนวคิด | สิ่งที่คุณได้เรียนรู้ |
เซสชันแชท |
|
รูปแบบการตอบกลับ |
|
โครงสร้างพรอมต์ | เรื่อง → ตัวแปร → รูปแบบ → ข้อจำกัดทางเทคนิค |
ความสอดคล้องของตัวละคร | เซสชันการแชทเดียวกัน = ตัวละครเดียวกันในรูปภาพ |
การแยกวิเคราะห์การตอบกลับ | การแยกรูปภาพจาก |
ถัดไป: เรียกใช้โค้ดและดูตัวคุณเองบนแผนที่
6. สร้างและลงทะเบียน
ตั้งค่ารหัสโปรเจ็กต์
ตรวจสอบว่ารหัสโปรเจ็กต์พร้อมใช้งานเป็นตัวแปรสภาพแวดล้อม
export GOOGLE_CLOUD_PROJECT=$(gcloud config get-value project)
เรียกใช้เครื่องมือสร้างข้อมูลประจำตัว
ตอนนี้ให้เรียกใช้สคริปต์หลักที่ประสานงานการสร้าง การอัปโหลด และการลงทะเบียน
uv run python create_identity.py
คุณจะเห็นความคืบหน้าในการสร้างแบบเรียลไทม์
หมายเหตุ: ระบบอาจใช้เวลาสูงสุด 5 วินาทีในการแสดงอวตาร์ของคุณบนแผนที่สด ดังนั้นให้รีเฟรชหากไม่เห็นตัวเองบนแผนที่ทันที
🚀 Creating identity for AstroAyo...

🎨 Generating your portrait...
✓ Portrait generated!
🖼️  Creating map icon...
✓ Icon generated!

☁️  Uploading to mission database...
✓ Avatar uploaded!

📍 Registering with rescue network...
✓ Registration complete!

╔═══════════════════════════════════════════════════════════════╗
║                    ✅ IDENTITY CONFIRMED!                      ║
╠═══════════════════════════════════════════════════════════════╣
║                                                               ║
║  Explorer: AstroAyo                                           ║
║  Location: (47, 23) — unconfirmed                             ║
║                                                               ║
║  🗺️  You're now on the map!                                   ║
║  https://waybackhome.dev/e/devfest-nyc-26                     ║
║                                                               ║
║  NEXT: Proceed to Level 1 to pinpoint your exact location!   ║
║                                                               ║
╚═══════════════════════════════════════════════════════════════╝
ดูอวาตาร์ที่สร้างขึ้น
ดูรูปภาพที่สร้างขึ้นในเครื่อง
# List the generated files
ls -la outputs/

# Download to view on your local machine
cloudshell download outputs/portrait.png
cloudshell download outputs/icon.png
หรือดูรูปภาพโดยตรงใน Cloud Shell Editor โดยไปที่โฟลเดอร์ outputs/ แล้วคลิกไฟล์รูปภาพ
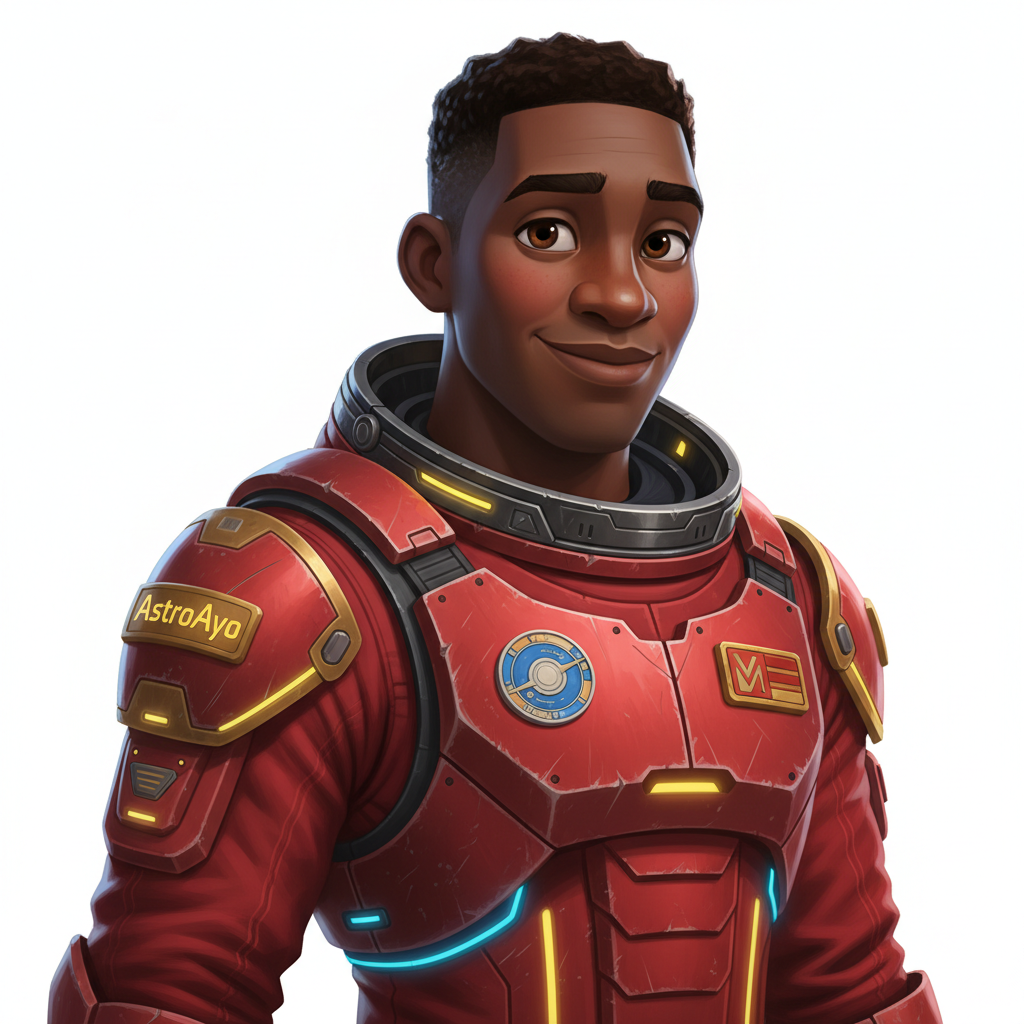
ภาพบุคคลและไอคอนที่สร้างขึ้นจะมีลักษณะคล้ายกับรูปภาพต่อไปนี้
![]()
ดูตัวคุณเองบนแผนที่
เปิด URL แผนที่โลกที่แสดงในเอาต์พุต
https://waybackhome.dev/e/{your-event-code}
เช่น https://waybackhome.dev/e/devfest-nyc-26
ค้นหาอวาตาร์ของคุณบนแผนที่ คุณจะเห็นข้อมูลดังนี้
- ไอคอนที่ทำเครื่องหมายตำแหน่งของคุณบนพื้นผิวโลก
- ชื่อผู้สำรวจของคุณเป็นป้ายกำกับใต้ไอคอน
- สัญญาณบีคอนที่หรี่แสงจะกะพริบช้าๆ รอบเครื่องหมาย
![]()
คลิกเครื่องหมายเพื่อดูภาพบุคคลแบบเต็มในการ์ดรายละเอียด
ไม่พอใจกับอวาตาร์ใช่ไหม สร้างใหม่
หากต้องการรูปโปรไฟล์อื่น คุณสามารถสร้างใหม่ได้โดยทำดังนี้
# Option 1: Change your appearance settings first
uv run python customize.py

# Option 2: Just regenerate with current settings
uv run python create_identity.py
ทุกครั้งที่คุณเรียกใช้ create_identity.py ระบบจะสร้างอวาตาร์ใหม่ทั้งหมด (เซสชันการแชทใหม่ = ตัวละครใหม่) และอัปเดตการลงทะเบียนของคุณ คุณสามารถทำซ้ำได้จนกว่าจะพอใจกับผลลัพธ์
การแก้ปัญหา
สิ่งที่คุณเพิ่งทำเสร็จ
✓ สร้างภาพบุคคลนักสำรวจที่ไม่ซ้ำใคร
✓ สร้างไอคอนแผนที่ที่สอดคล้องกัน
✓ อัปโหลดชิ้นงานไปยัง Mission Control
✓ ลงทะเบียนตัวตนกับเครือข่ายกู้ภัย
✓ ปรากฏบนแผนที่โลกแบบเรียลไทม์
ยินดีด้วย นักสำรวจ ตอนนี้คุณอยู่ในเครือข่ายกู้ภัยแล้ว สัญญาณของคุณทำงานอยู่ (แม้จะอ่อน) และผู้รอดชีวิตคนอื่นๆ จะเห็นคุณบนแผนที่
7. บทสรุป
สิ่งที่คุณสร้าง
ในเวลาเพียง 10 นาที คุณได้สร้างระบบการสร้างอวาตาร์ที่สมบูรณ์โดยใช้การสร้างรูปภาพด้วย AI แบบหลายรอบ
┌─────────────────────────────────────────────────────────────┐
│                     Your Creation                           │
├─────────────────────────────────────────────────────────────┤
│                                                             │
│   📝 Input                       🖼️  Output                  │
│   ──────────                     ────────                    │
│   • Explorer name                • Stylized portrait         │
│   • Suit color                   • Consistent map icon       │
│   • Appearance description       • Live map presence         │
│                                                              │
├─────────────────────────────────────────────────────────────┤
│                                                             │
│   🧠 Techniques You Used                                     │
│   ──────────────────────                                    │
│   • Multi-turn chat sessions for character consistency      │
│   • Structured prompt engineering with style constraints    │
│   • Response parsing to extract generated images            │
│   • API integration for cloud registration                  │
│                                                             │
└─────────────────────────────────────────────────────────────┘
สิ่งสำคัญที่เรียนรู้
บทเรียน | ความสำคัญ |
เซสชันแชทจะคงบริบทไว้ | จำเป็นต่อการสร้างตัวละครที่สอดคล้องกันในรูปภาพหลายรูปโดยไม่ให้ตัวละครเปลี่ยนแปลงไป |
โครงสร้างพรอมต์มีความสำคัญ | ข้อจำกัดที่ชัดเจน (พื้นหลังสีขาว สไตล์ที่เฉพาะเจาะจง การจัดเฟรม) จะให้ผลลัพธ์ที่คาดการณ์ได้และพร้อมใช้งานจริง |
การโทรแบบหลายรอบดีกว่าการโทรแบบครั้งเดียว | ข้อความแต่ละข้อความในการแชทจะสร้างขึ้นจากบริบทก่อนหน้า ซึ่งช่วยให้สามารถปรับแต่งและรักษาความสอดคล้องกันได้ |
รูปแบบการตอบกลับจะควบคุมเอาต์พุต | ต้องตั้งค่า |
สรุปค่าใช้จ่าย
สำหรับระดับนี้ คุณสร้างรูปภาพ 2 รูปโดยใช้ Gemini 2.5 Flash (Nano Banana) ดังนี้
รายการ | โทเค็น | ค่าใช้จ่าย |
แนวตั้ง (1024×1024) | โทเค็นเอาต์พุตประมาณ 1,290 รายการ | ~$0.039 |
ไอคอน (1024×1024) | โทเค็นเอาต์พุตประมาณ 1,290 รายการ | ~$0.039 |
รวม | โทเค็นประมาณ 2,580 รายการ | ~2.40 บาท |
การเดินทางยังคงดำเนินต่อไป
เรายืนยันตัวตนของคุณในฐานะผู้สำรวจแล้ว แต่พบปัญหาคือตำแหน่งของคุณยังไม่ได้รับการยืนยัน
ดูแผนที่โลก บีคอนของคุณจะสลัวและกะพริบช้าๆ เครือข่ายกู้ภัยทราบว่าคุณมีตัวตน แต่ไม่ทราบตำแหน่งที่แน่นอนของคุณ คุณอาจอยู่ที่ไหนก็ได้ภายในภูมิภาคกว้างใหญ่บนพื้นผิวโลก
ในระดับ 1: ระบุตำแหน่งของคุณ คุณจะทำสิ่งต่อไปนี้
- สร้างระบบแบบหลาย Agent โดยใช้ Agent Development Kit (ADK) ของ Google
- สร้างเซิร์ฟเวอร์ MCP สำหรับการวิเคราะห์ทางธรณีวิทยา พฤกษศาสตร์ และดาราศาสตร์
- ประมวลผลอินพุตหลายรูปแบบ (รูปภาพจากจุดที่เกิดอุบัติเหตุ)
- สร้างแผนที่ภูมิประเทศของตำแหน่งที่ยืนยันแล้วโดยใช้ AI
- เปิดสัญญาณขอความช่วยเหลือจริงๆ เพื่อให้ทีมกู้ภัยค้นหาคุณได้
ระดับ 1 จะแนะนำแนวคิดขั้นสูงเพิ่มเติม ได้แก่ การจัดการเป็นกลุ่มแบบหลาย Agent, Model Context Protocol (MCP) และรูปแบบการทำให้ใช้งานได้จริง คุณจะเปลี่ยนจากการใช้ฟีเจอร์โมเดลเดียวไปเป็นการสร้างระบบเอเจนต์ที่สมบูรณ์
ล้างข้อมูล (ไม่บังคับ)
หากต้องการล้างไฟล์ในเครื่อง (เรียกใช้จากไดเรกทอรี level_0) ให้ทำดังนี้
rm -rf outputs/
deactivate  # Exit virtual environment
การลงทะเบียนกับเครือข่ายช่วยเหลือจะยังคงอยู่ คุณจะยังคงปรากฏบนแผนที่แม้หลังจากลบไฟล์ในเครื่องแล้ว ระบบจะจัดเก็บรูปภาพไว้ในระบบคลาวด์ ไม่ใช่ในเครื่อง
แหล่งข้อมูล
- เอกสารประกอบเกี่ยวกับการสร้างรูปภาพด้วย Gemini
- คู่มือวิศวกรรมพรอมต์สำหรับรูปภาพ
- บล็อกประกาศ Nano Banana
- ที่เก็บ Way Back Home
- ระดับ 1: ระบุตำแหน่งของคุณ
บีคอนของคุณกำลังรอการยืนยัน แล้วเจอกันในเลเวล 1 นะ นักสำรวจ 🚀
8. โบนัส: อวาตาร์จากรูปภาพ (ไม่บังคับ)
กรณีที่ควรใช้ฟีเจอร์เปลี่ยนรูปภาพเป็นอวาตาร์
คุณอาจชอบแนวทางนี้ในกรณีต่อไปนี้
- คุณต้องการให้รูปโปรไฟล์มีลักษณะคล้ายกับตัวคุณจริงๆ
- คุณมีรูปภาพที่ต้องการปรับแต่ง
- คุณต้องการสำรวจความสามารถในการเปลี่ยนรูปภาพเป็นรูปภาพของ Gemini
วิธีการทำงาน
แทนที่จะสร้างตัวละครจากคำอธิบายข้อความเพียงอย่างเดียว คุณสามารถให้รูปภาพและขอความช่วยเหลือจาก Gemini เปลี่ยนรูปภาพนั้นโดยคงความคล้ายคลึงของบุคคลไว้ได้
![]()
อัปโหลดรูปภาพ
ก่อนอื่น ให้อัปโหลดรูปภาพไปยัง Cloud Shell โดยทำดังนี้
- ใน Cloud Shell ให้คลิกเมนู 3 จุด (⋮) ในแถบเครื่องมือของเทอร์มินัล
- เลือกอัปโหลด
- เลือกรูปภาพใบหน้าที่ชัดเจน (JPEG หรือ PNG)
- จดเส้นทางที่อัปโหลด (เช่น
/home/your-username/my_photo.jpg)
แก้ไขเครื่องมือสร้าง Sitemap
หากต้องการใช้รูปภาพ คุณจะต้องแก้ไขขั้นตอนการสร้างภาพบุคคลใน generator.py แทนที่พรอมต์ข้อความอย่างเดียวด้วยพรอมต์แบบหลายรูปแบบที่มีรูปภาพของคุณ
    # MODULE_5_STEP_2_GENERATE_PORTRAIT (Photo-based version)

    # Load your photo
    photo_path = "/home/your-username/my_photo.jpg"  # Update this path!
    user_photo = Image.open(photo_path)

    # Convert photo to bytes for the API
    photo_buffer = io.BytesIO()
    user_photo.save(photo_buffer, format="JPEG")
    photo_bytes = photo_buffer.getvalue()

    portrait_prompt = f"""Transform this person into a stylized space explorer portrait.

PRESERVE from the original photo:
- The person's facial features, face shape, and likeness
- Their general expression and personality
- Any distinctive features (glasses, facial hair, etc.)

TRANSFORM with this style:
- Digital illustration style, clean lines, vibrant saturated colors
- Add a futuristic space suit with the name "{USERNAME}" on a shoulder patch
- Suit color: {SUIT_COLOR}
- Background: Pure solid white (#FFFFFF) - no gradients or elements
- Frame: Head and shoulders, 3/4 view
- Lighting: Soft diffused studio lighting
- Art style: Modern animated movie character (Pixar/Dreamworks aesthetic)

The result should be clearly recognizable as THIS specific person, but illustrated as a heroic space explorer."""

    print("🎨 Transforming your photo into an explorer portrait...")

    # Send both the prompt AND the image
    portrait_response = chat.send_message([
        portrait_prompt,
        types.Part.from_bytes(data=photo_bytes, mime_type="image/jpeg")
    ])

    # Rest of the extraction code stays the same...
ความสอดคล้องแบบหลายรอบยังคงใช้งานได้
วิธีการแบบหลายรอบจะทำงานในลักษณะเดียวกันกับการสร้างจากรูปภาพ
- เทิร์น 1: รูปภาพ + พรอมต์ → ภาพบุคคลที่ปรับแต่งสไตล์ (ภาพเหมือนของคุณที่วาดภาพ)
- เทิร์นที่ 2: "สร้างไอคอนของตัวละครตัวเดียวกันนี้" → ไอคอนที่สอดคล้องกัน
เนื่องจากเซสชันการแชทจะจดจำเวอร์ชันที่ปรับแต่งแล้วที่สร้างขึ้น (ไม่ใช่รูปภาพต้นฉบับ) ไอคอนจึงจะตรงกับภาพบุคคลที่แปลงแล้วอย่างสมบูรณ์
ข้อควรพิจารณาเกี่ยวกับความเป็นส่วนตัว
ลองใช้ใน Vertex AI Studio
นอกจากนี้ คุณยังทดลองใช้การเปลี่ยนรูปภาพแบบอินเทอร์แอกทีฟในคอนโซล Google Cloud ก่อนเขียนโค้ดได้ด้วย โดยทำดังนี้
- ไปที่ Vertex AI Studio
- เลือกโมเดล Gemini ที่มีความสามารถด้านรูปภาพ
- อัปโหลดรูปภาพโดยใช้ปุ่มไฟล์แนบ
- ป้อนพรอมต์สำหรับเปลี่ยนรูปแบบ
- ปรับสไตล์ไปเรื่อยๆ จนกว่าจะพอใจกับผลลัพธ์
แนวทางแบบอินเทอร์แอกทีฟนี้เหมาะอย่างยิ่งสำหรับการทดลองใช้พรอมต์และดูผลลัพธ์แบบเรียลไทม์ก่อนที่จะเขียนโค้ด
สิ่งที่คุณได้เรียนรู้ (โบนัส)
✓ วิธีใช้การเปลี่ยนรูปแบบจากรูปภาพเป็นรูปภาพด้วย Gemini
✓ การส่งเนื้อหาแบบมัลติโมดัล (ข้อความ + รูปภาพ) ในข้อความเดียว
✓ การคงความเหมือนเดิมขณะใช้การโอนสไตล์ศิลปะ
✓ ข้อควรพิจารณาด้านความเป็นส่วนตัวสำหรับการสร้าง AI จากรูปภาพ