
1. ภารกิจ

คุณได้ระบุตัวตนต่อ AI ฉุกเฉินแล้ว และตอนนี้บีคอนของคุณกำลังสว่างวาบบนแผนที่ดาวเคราะห์ แต่เป็นเพียงแสงริบหรี่ที่หายไปในสัญญาณรบกวน ทีมกู้ภัยที่สแกนจากวงโคจรจะเห็นบางอย่างที่พิกัดของคุณ แต่จะล็อกพิกัดไม่ได้ สัญญาณอ่อนเกินไป
หากต้องการเพิ่มความแรงของบีคอนให้เต็มกำลัง คุณต้องยืนยันตำแหน่งที่แน่นอน ระบบนำทางของพ็อดเสียหาย แต่การชนทำให้หลักฐานที่กู้คืนได้กระจัดกระจายไปทั่วพื้นที่ลงจอด ตัวอย่างดิน พืชพรรณแปลกตา ภาพท้องฟ้ายามค่ำคืนของดาวเคราะห์นอกโลกที่มองเห็นได้อย่างชัดเจน
หากคุณวิเคราะห์หลักฐานนี้และระบุได้ว่าคุณอยู่ภูมิภาคใดของโลก AI จะสามารถหาตำแหน่งของคุณและขยายสัญญาณบีคอนได้ จากนั้นอาจมีคนค้นพบคุณ
ได้เวลาปะติดปะต่อชิ้นส่วนต่างๆ เข้าด้วยกันแล้ว
ข้อกำหนดเบื้องต้น
⚠️ ระดับนี้ต้องผ่านระดับ 0 ให้ได้ก่อน
โปรดตรวจสอบว่าคุณมีสิ่งต่อไปนี้ก่อนเริ่มต้น
- [ ]
config.jsonในรูทของโปรเจ็กต์พร้อมรหัสผู้เข้าร่วมและพิกัด - [ ] อวาตาร์ของคุณจะปรากฏบนแผนที่โลก
- [ ] บีคอนของคุณแสดง (หรี่) ที่พิกัดของคุณ
หากยังไม่ได้ทำระดับ 0 ให้เริ่มจากระดับ 0 ก่อน
สิ่งที่คุณจะสร้าง
ในระดับนี้ คุณจะสร้างระบบ AI แบบหลายเอเจนต์ที่วิเคราะห์หลักฐานในที่เกิดเหตุโดยใช้การประมวลผลแบบคู่ขนาน

วัตถุประสงค์การเรียนรู้
แนวคิด | สิ่งที่คุณจะได้เรียนรู้ |
ระบบหลายเอเจนต์ | สร้างเอเจนต์เฉพาะทางที่มีความรับผิดชอบเดียว |
ParallelAgent | สร้าง Agent อิสระให้ทำงานพร้อมกัน |
before_agent_callback | ดึงข้อมูลการกำหนดค่าและตั้งค่าสถานะก่อนที่ตัวแทนจะทำงาน |
ToolContext | เข้าถึงค่าสถานะในฟังก์ชันเครื่องมือ |
เซิร์ฟเวอร์ MCP ที่กำหนดเอง | สร้างเครื่องมือด้วยรูปแบบคำสั่ง (โค้ด Python ใน Cloud Run) |
BigQuery ของ OneMCP | เชื่อมต่อกับ MCP ที่ Google จัดการเพื่อเข้าถึง BigQuery |
AI แบบมัลติโมดัล | วิเคราะห์รูปภาพและวิดีโอ+เสียงด้วย Gemini |
การจัดการเป็นกลุ่มของ Agent | ประสานงานกับ Agent หลายตัวด้วยตัวจัดสรรรูท |
การติดตั้งใช้งานระบบคลาวด์ | ติดตั้งใช้งานเซิร์ฟเวอร์และ Agent ของ MCP ใน Cloud Run |
การเตรียม A2A | จัดโครงสร้างเอเจนต์สำหรับการสื่อสารระหว่างเอเจนต์ในอนาคต |
ไบโอมของโลก
พื้นผิวของดาวเคราะห์แบ่งออกเป็น 4 ชีวนิเวศที่แตกต่างกัน โดยแต่ละชีวนิเวศจะมีลักษณะเฉพาะตัว
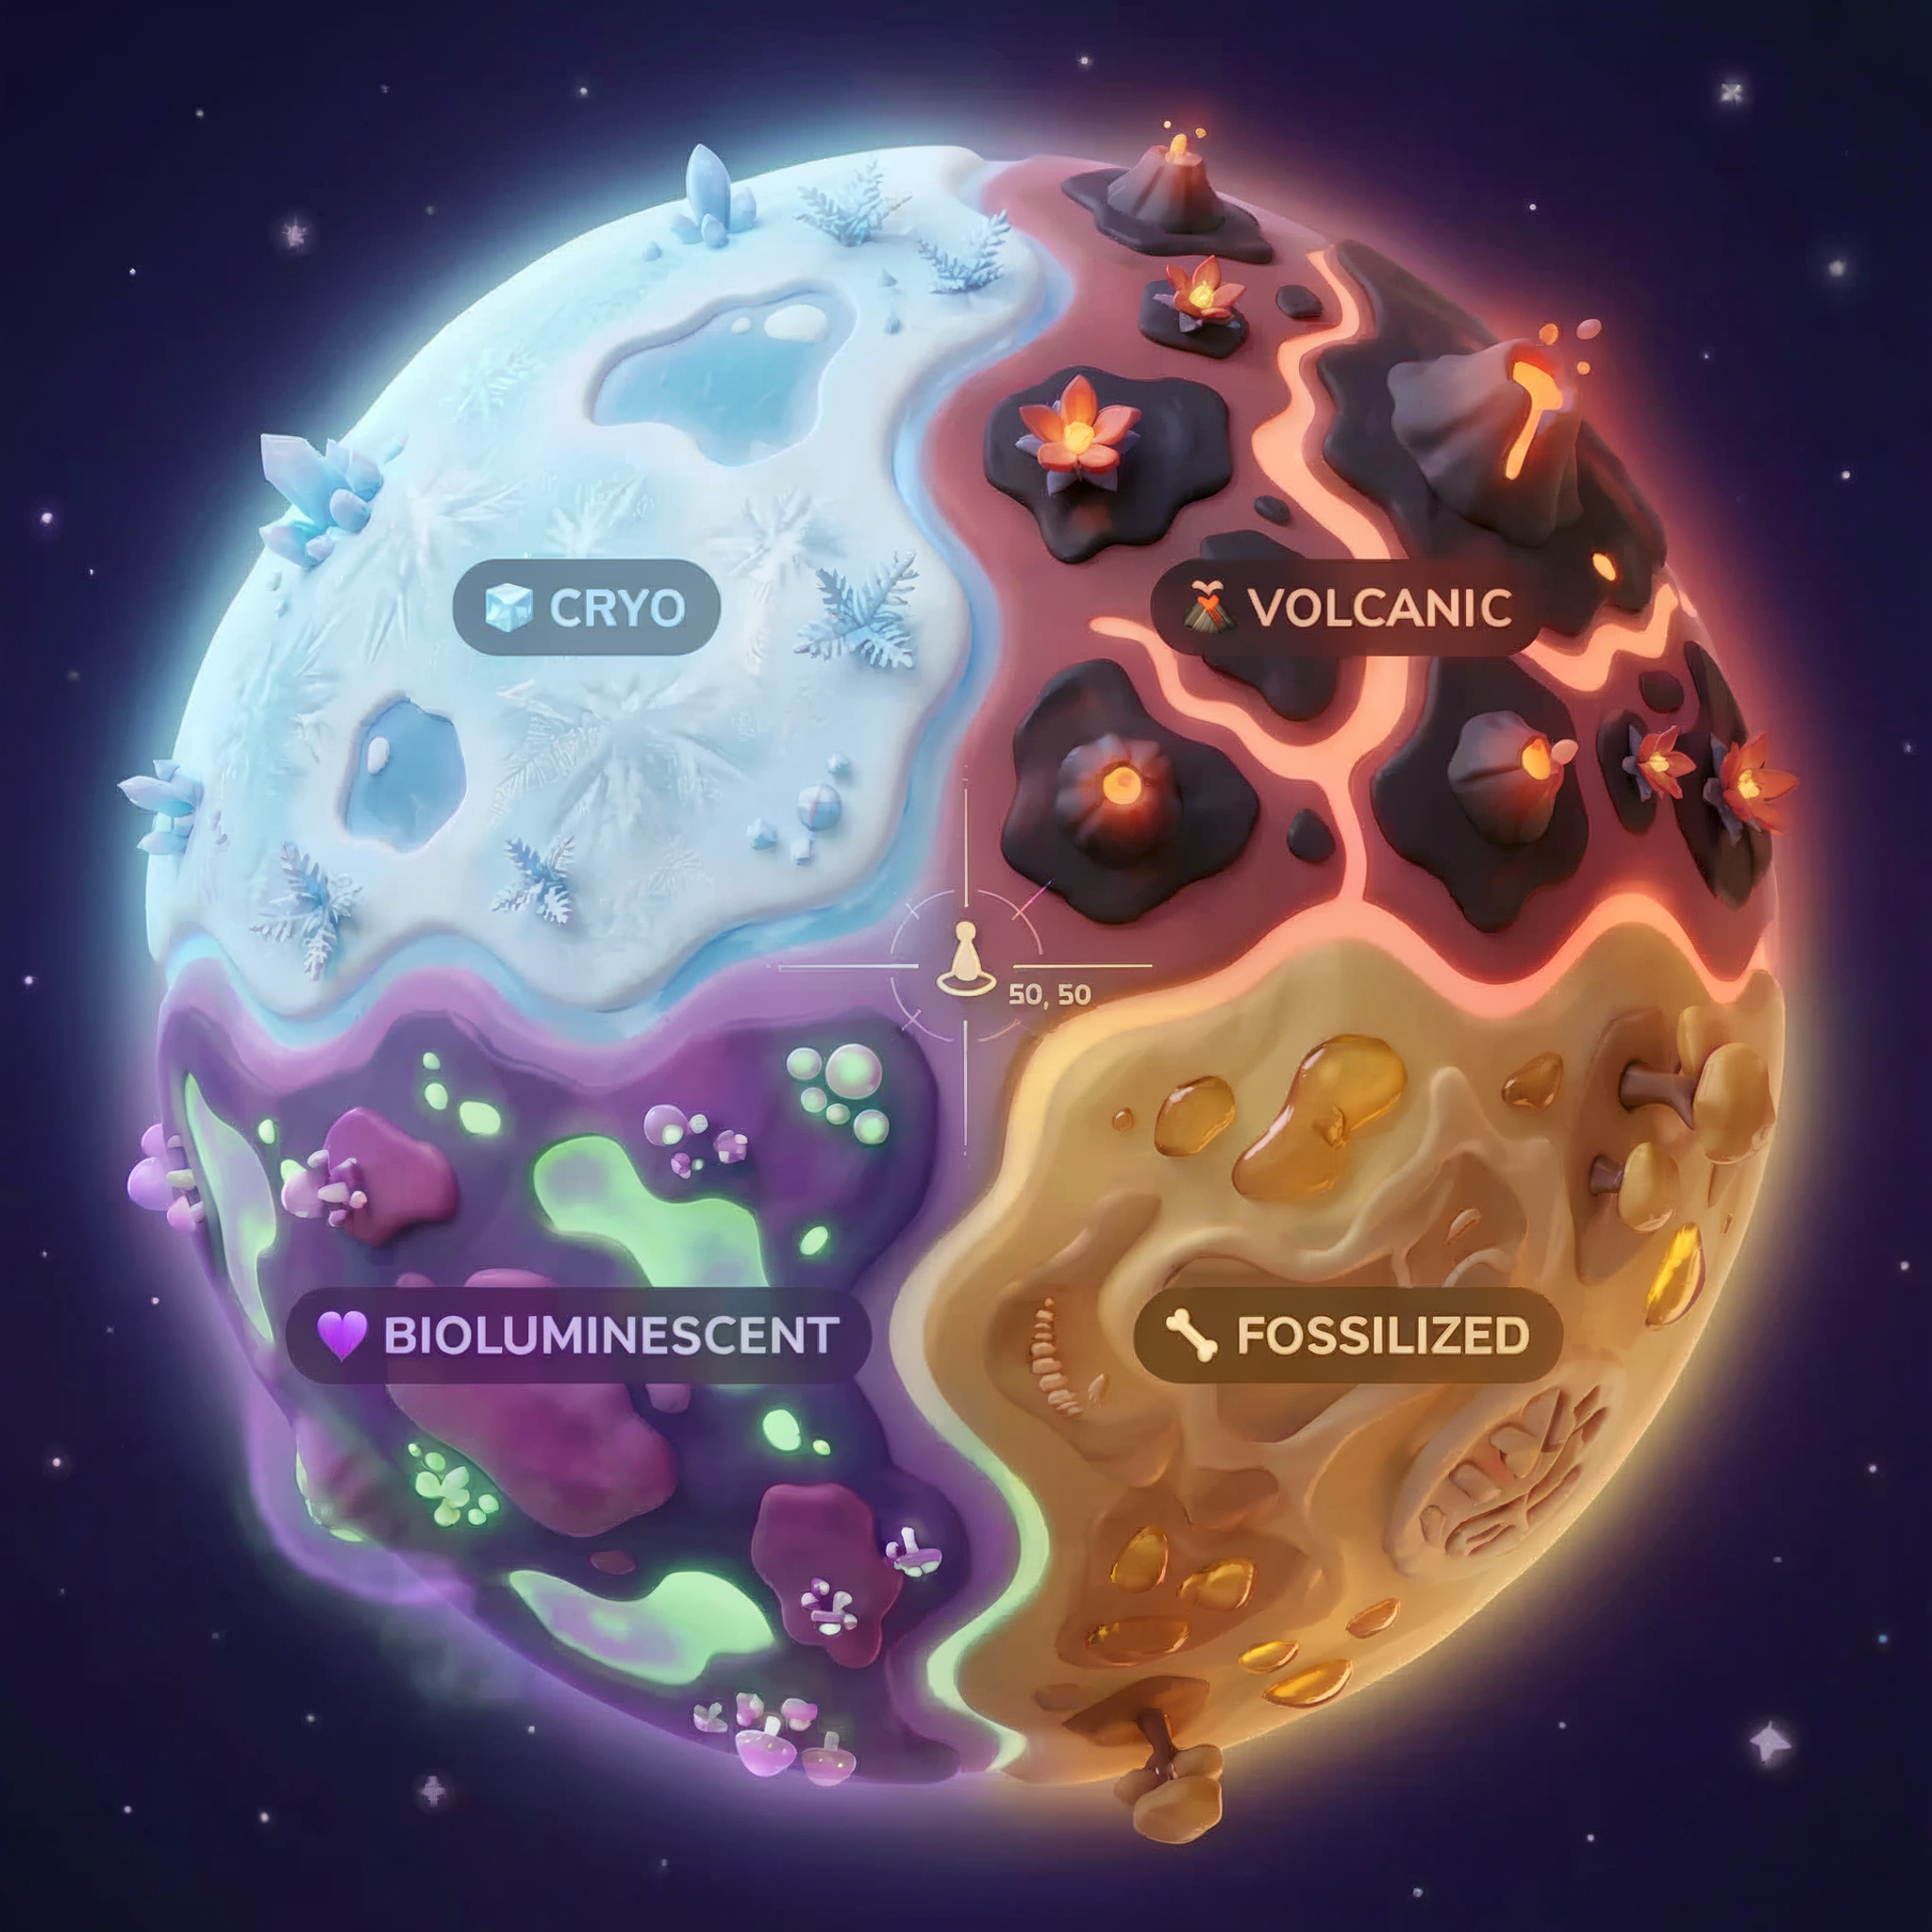
พิกัดจะกำหนดไบโอมที่คุณตกลงมา หลักฐานที่จุดเกิดเหตุเครื่องบินตกแสดงให้เห็นลักษณะของชีวนิเวศนั้น
ชีวนิเวศ | จตุภาค | หลักฐานทางธรณีวิทยา | หลักฐานทางพฤกษศาสตร์ | หลักฐานทางดาราศาสตร์ |
🧊 CRYO | NW (x<50, y≥50) | มีเทนแข็งตัว ผลึกน้ำแข็ง | เฟิร์นน้ำแข็ง พืชแช่แข็ง | ดาวฤกษ์ยักษ์น้ำเงิน |
🌋 VOLCANIC | NE (x≥50, y≥50) | แหล่งแร่ออบซิเดียน | ดอกไม้ไฟ พืชที่ทนความร้อน | ระบบดาวคู่คนแคระแดง |
💜 BIOLUMINESCENT | SW (x<50, y<50) | ดินเรืองแสง | เห็ดเรืองแสง พืชเรืองแสง | พัลซาร์สีเขียว |
🦴 FOSSILIZED | SE (x≥50, y<50) | แหล่งสะสมอำพัน แร่ไอต์ | ต้นไม้กลายเป็นหิน พืชโบราณ | ดวงอาทิตย์สีเหลือง |
งานของคุณคือสร้างเอเจนต์ AI ที่สามารถวิเคราะห์หลักฐานและอนุมานได้ว่าคุณอยู่ในไบโอมใด
2. ตั้งค่าสภาพแวดล้อม
เรียกใช้สคริปต์การตั้งค่าสภาพแวดล้อม
ก่อนที่จะสร้างหลักฐาน คุณต้องเปิดใช้ Google Cloud API ที่จำเป็น ซึ่งรวมถึง OneMCP สำหรับ BigQuery ซึ่งให้สิทธิ์เข้าถึง BigQuery ที่มีการจัดการของ MCP
👉💻 เรียกใช้สคริปต์การตั้งค่าสภาพแวดล้อม
cd $HOME/way-back-home/level_1
chmod +x setup/setup_env.sh
./setup/setup_env.sh
คุณควรเห็นเอาต์พุตดังนี้
================================================================
Level 1: Environment Setup
================================================================
Project: your-project-id

[1/6] Enabling core Google Cloud APIs...
      ✓ Vertex AI API enabled
      ✓ Cloud Run API enabled
      ✓ Cloud Build API enabled
      ✓ BigQuery API enabled
      ✓ Artifact Registry API enabled
      ✓ IAM API enabled

[2/6] Enabling OneMCP BigQuery (Managed MCP)...
      ✓ OneMCP BigQuery enabled

[3/6] Setting up service account and IAM permissions...
      ✓ Service account 'way-back-home-sa' created
      ✓ Vertex AI User role granted
      ✓ Cloud Run Invoker role granted
      ✓ BigQuery User role granted
      ✓ BigQuery Data Viewer role granted
      ✓ Storage Object Viewer role granted

[4/6] Configuring Cloud Build IAM for deployments...
      ✓ Cloud Build can now deploy services as way-back-home-sa
      ✓ Cloud Run Admin role granted to Compute SA

[5/6] Creating Artifact Registry repository...
      ✓ Repository 'way-back-home' created

[6/6] Creating environment variables file...
      Found PARTICIPANT_ID in config.json: abc123...
      ✓ Created ../set_env.sh

================================================================
✅ Environment Setup Complete!
================================================================
ตัวแปรสภาพแวดล้อมของแหล่งที่มา
👉💻 เรียกใช้ตัวแปรสภาพแวดล้อม
source $HOME/way-back-home/set_env.sh
ติดตั้งการอ้างอิง
👉💻 ติดตั้งการอ้างอิง Python ระดับ 1
cd $HOME/way-back-home/level_1
uv sync
ตั้งค่าแคตตาล็อกดาว
👉💻 ตั้งค่าแคตตาล็อกดาวใน BigQuery
uv run python setup/setup_star_catalog.py
คุณควรเห็นข้อมูลต่อไปนี้
Setting up star catalog in project: your-project-id
==================================================
✓ Dataset way_back_home already exists
✓ Created table star_catalog
✓ Inserted 12 rows into star_catalog

📊 Star Catalog Summary:
----------------------------------------
  NE (VOLCANIC): 3 stellar patterns
  NW (CRYO): 3 stellar patterns
  SE (FOSSILIZED): 3 stellar patterns
  SW (BIOLUMINESCENT): 3 stellar patterns
----------------------------------------
✓ Star catalog is ready for triangulation queries

==================================================
✅ Star catalog setup complete!
3. สร้างหลักฐานของเว็บไซต์ที่ขัดข้อง
ตอนนี้คุณสามารถสร้างหลักฐานสถานที่เกิดอุบัติเหตุที่ปรับเปลี่ยนในแบบของคุณโดยอิงตามพิกัดของคุณ
เรียกใช้เครื่องมือสร้างหลักฐาน
👉💻 จากไดเรกทอรี level_1 ให้เรียกใช้คำสั่งต่อไปนี้
cd $HOME/way-back-home/level_1
uv run python generate_evidence.py
คุณควรเห็นเอาต์พุตดังนี้
✓ Welcome back, Explorer_Aria!
  Coordinates: (23, 67)
  Ready to analyze your crash site.

📍 Crash site analysis initiated...
   Generating evidence for your location...

🔬 Generating soil sample...
✓ Soil sample captured: outputs/soil_sample.png
✨ Capturing star field...
✓ Star field captured: outputs/star_field.png
🌿 Recording flora activity...
   (This may take 1-2 minutes for video generation)
   Generating video...
   Generating video...
   Generating video...
✓ Flora recorded: outputs/flora_recording.mp4

📤 Uploading evidence to Mission Control...
✓ Config updated with evidence URLs

==================================================
✅ Evidence generation complete!
==================================================
ตรวจสอบหลักฐาน
👉 โปรดใช้เวลาสักครู่เพื่อดูไฟล์หลักฐานที่สร้างขึ้นในโฟลเดอร์ outputs/ แต่ละชิ้นจะสะท้อนลักษณะไบโอมของตำแหน่งที่ยานตก แม้ว่าคุณจะไม่ทราบว่าไบโอมใดจนกว่าเอเจนต์ AI จะวิเคราะห์ก็ตาม
หลักฐานที่สร้างขึ้นอาจมีลักษณะดังนี้ ทั้งนี้ขึ้นอยู่กับสถานที่ตั้งของคุณ


4. สร้างเซิร์ฟเวอร์ MCP ที่กำหนดเอง
ระบบวิเคราะห์ในยานหลบหนีของคุณเสียหาย แต่ข้อมูลเซ็นเซอร์ดิบยังคงอยู่หลังจากการชน คุณจะสร้างเซิร์ฟเวอร์ MCP ด้วย FastMCP ซึ่งมีเครื่องมือวิเคราะห์ทางธรณีวิทยาและพฤกษศาสตร์
สร้างเครื่องมือวิเคราะห์ทางธรณีวิทยา
เครื่องมือนี้จะวิเคราะห์รูปภาพตัวอย่างดินเพื่อระบุองค์ประกอบของแร่ธาตุ
👉✏️ เปิด $HOME/way-back-home/level_1/mcp-server/main.py แล้วค้นหา #REPLACE-GEOLOGICAL-TOOL แทนที่ด้วย
GEOLOGICAL_PROMPT = """Analyze this alien soil sample image.

Classify the PRIMARY characteristic (choose exactly one):

1. CRYO - Frozen/icy minerals, crystalline structures, frost patterns,
   blue-white coloration, permafrost indicators

2. VOLCANIC - Volcanic rock, basalt, obsidian, sulfur deposits,
   red-orange minerals, heat-formed crystite structures

3. BIOLUMINESCENT - Glowing particles, phosphorescent minerals,
   organic-mineral hybrids, purple-green luminescence

4. FOSSILIZED - Ancient compressed minerals, amber deposits,
   petrified organic matter, golden-brown stratification

Respond ONLY with valid JSON (no markdown, no explanation):
{
    "biome": "CRYO|VOLCANIC|BIOLUMINESCENT|FOSSILIZED",
    "confidence": 0.0-1.0,
    "minerals_detected": ["mineral1", "mineral2"],
    "description": "Brief description of what you observe"
}
"""


@mcp.tool()
def analyze_geological(
    image_url: Annotated[
        str,
        Field(description="Cloud Storage URL (gs://...) of the soil sample image")
    ]
) -> dict:
    """
    Analyzes a soil sample image to identify mineral composition and classify the planetary biome.

    Args:
        image_url: Cloud Storage URL of the soil sample image (gs://bucket/path/image.png)

    Returns:
        dict with biome, confidence, minerals_detected, and description
    """
    logger.info(f">>> 🔬 Tool: 'analyze_geological' called for '{image_url}'")

    try:
        response = client.models.generate_content(
            model="gemini-2.5-flash",
            contents=[
                GEOLOGICAL_PROMPT,
                genai_types.Part.from_uri(file_uri=image_url, mime_type="image/png")
            ]
        )

        result = parse_json_response(response.text)
        logger.info(f"    ✓ Geological analysis complete: {result.get('biome', 'UNKNOWN')}")
        return result

    except Exception as e:
        logger.error(f"    ✗ Geological analysis failed: {str(e)}")
        return {"error": str(e), "biome": "UNKNOWN", "confidence": 0.0}
สร้างเครื่องมือวิเคราะห์พฤกษศาสตร์
เครื่องมือนี้จะวิเคราะห์วิดีโอที่บันทึกพืช รวมถึงแทร็กเสียง
👉✏️ ในไฟล์เดียวกัน ($HOME/way-back-home/level_1/mcp-server/main.py) ให้ค้นหา #REPLACE-BOTANICAL-TOOL แล้วแทนที่ด้วย
BOTANICAL_PROMPT = """Analyze this alien flora video recording.

Pay attention to BOTH:
1. VISUAL elements: Plant appearance, movement patterns, colors, bioluminescence
2. AUDIO elements: Ambient sounds, rustling, organic noises, frequencies

Classify the PRIMARY biome (choose exactly one):

1. CRYO - Crystalline ice-plants, frost-covered vegetation,
   crackling/tinkling sounds, slow brittle movements, blue-white flora

2. VOLCANIC - Heat-resistant plants, sulfur-adapted species,
   hissing/bubbling sounds, smoke-filtering vegetation, red-orange flora

3. BIOLUMINESCENT - Glowing plants, pulsing light patterns,
   humming/resonating sounds, reactive to stimuli, purple-green flora

4. FOSSILIZED - Ancient petrified plants, amber-preserved specimens,
   deep resonant sounds, minimal movement, golden-brown flora

Respond ONLY with valid JSON (no markdown, no explanation):
{
    "biome": "CRYO|VOLCANIC|BIOLUMINESCENT|FOSSILIZED",
    "confidence": 0.0-1.0,
    "species_detected": ["species1", "species2"],
    "audio_signatures": ["sound1", "sound2"],
    "description": "Brief description of visual and audio observations"
}
"""


@mcp.tool()
def analyze_botanical(
    video_url: Annotated[
        str,
        Field(description="Cloud Storage URL (gs://...) of the flora video recording")
    ]
) -> dict:
    """
    Analyzes a flora video recording (visual + audio) to identify plant species and classify the biome.

    Args:
        video_url: Cloud Storage URL of the flora video (gs://bucket/path/video.mp4)

    Returns:
        dict with biome, confidence, species_detected, audio_signatures, and description
    """
    logger.info(f">>> 🌿 Tool: 'analyze_botanical' called for '{video_url}'")

    try:
        response = client.models.generate_content(
            model="gemini-2.5-flash",
            contents=[
                BOTANICAL_PROMPT,
                genai_types.Part.from_uri(file_uri=video_url, mime_type="video/mp4")
            ]
        )

        result = parse_json_response(response.text)
        logger.info(f"    ✓ Botanical analysis complete: {result.get('biome', 'UNKNOWN')}")
        return result

    except Exception as e:
        logger.error(f"    ✗ Botanical analysis failed: {str(e)}")
        return {"error": str(e), "biome": "UNKNOWN", "confidence": 0.0}
ทดสอบเซิร์ฟเวอร์ MCP ในเครื่อง
👉💻 ทดสอบเซิร์ฟเวอร์ MCP
cd $HOME/way-back-home/level_1/mcp-server
pip install -r requirements.txt
python main.py
คุณควรเห็นข้อมูลต่อไปนี้
[INFO] Initialized Gemini client for project: your-project-id
[INFO] 🚀 Location Analyzer MCP Server starting on port 8080
[INFO] 📍 MCP endpoint: http://0.0.0.0:8080/mcp
[INFO] 🔧 Tools: analyze_geological, analyze_botanical
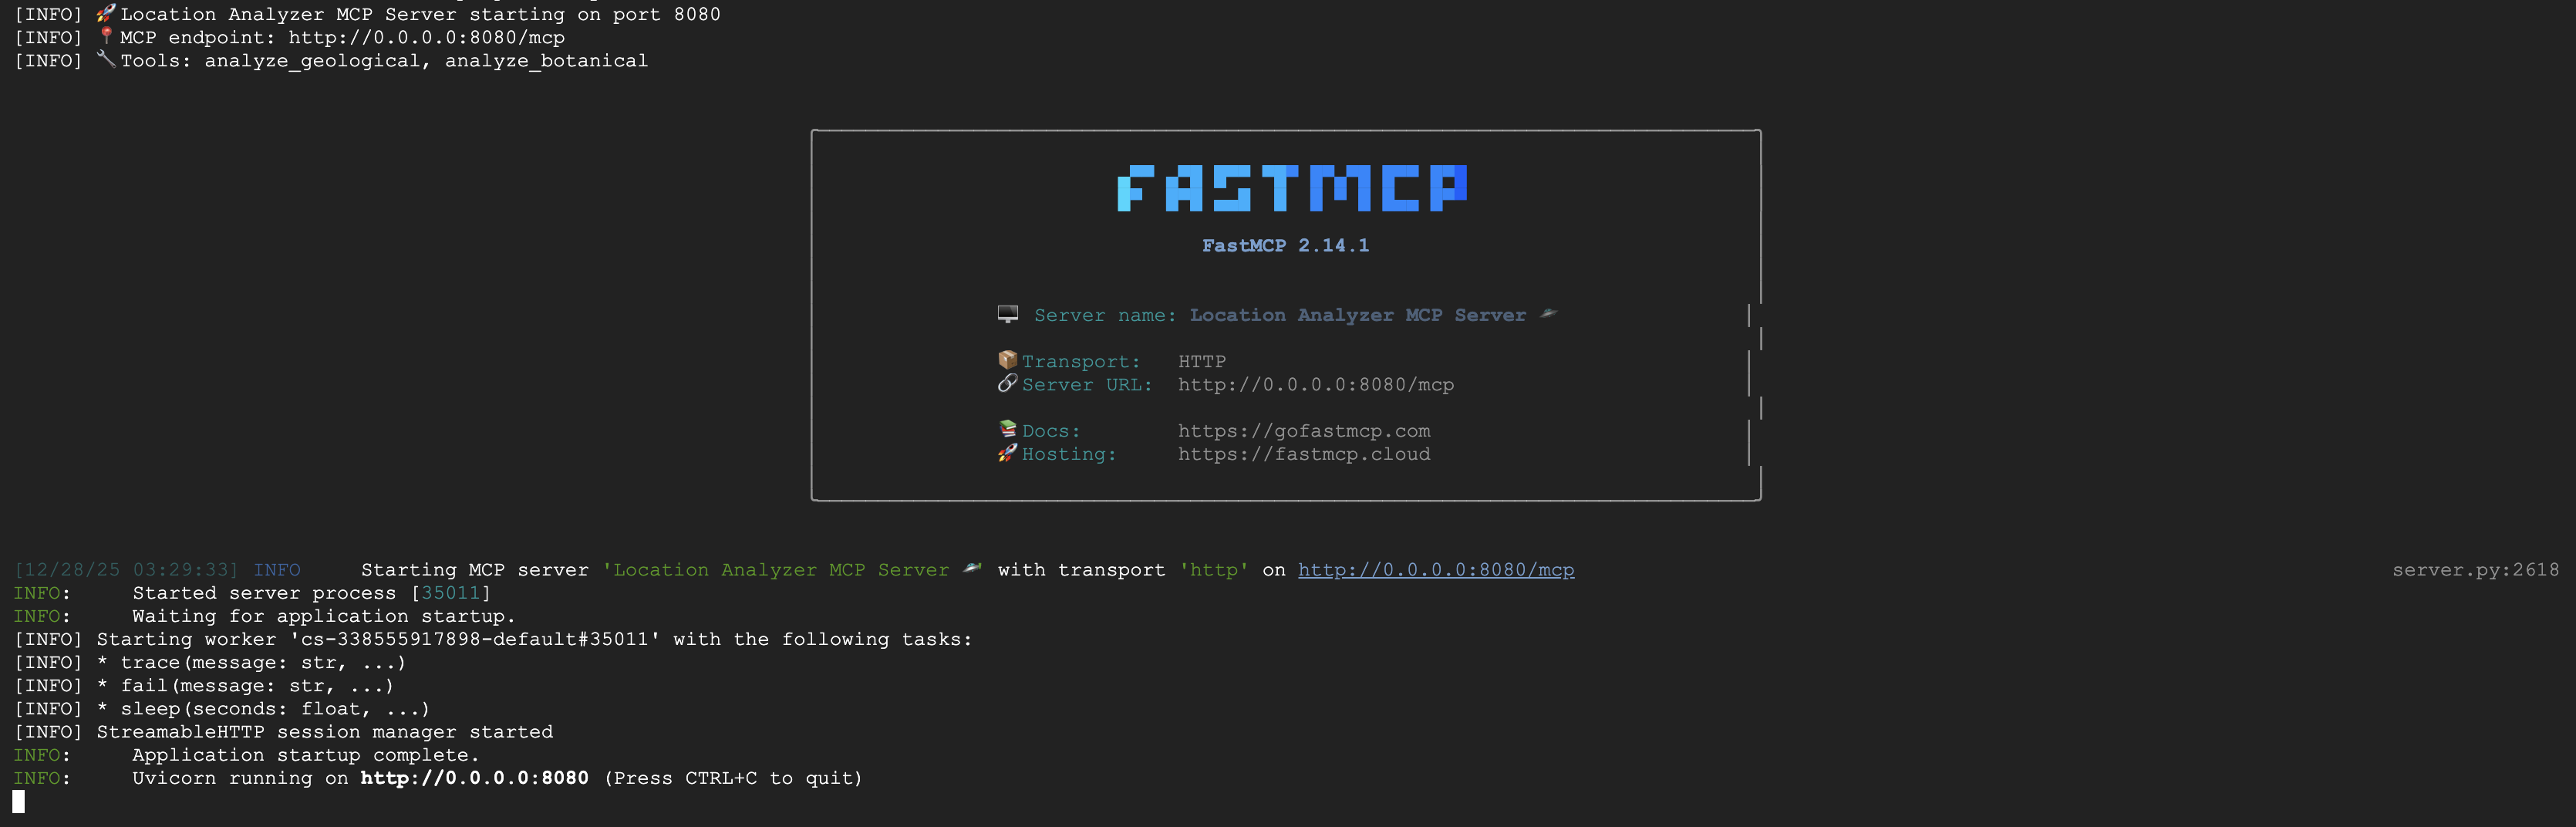
ตอนนี้เซิร์ฟเวอร์ FastMCP ทำงานด้วยการรับส่ง HTTP แล้ว กด Ctrl+C เพื่อหยุด
ติดตั้งใช้งาน MCP Server ใน Cloud Run
👉💻 ทำให้ใช้งานได้
cd $HOME/way-back-home/level_1/mcp-server
source $HOME/way-back-home/set_env.sh

gcloud builds submit . \
  --config=cloudbuild.yaml \
  --substitutions=_REGION="$REGION",_REPO_NAME="$REPO_NAME",_SERVICE_ACCOUNT="$SERVICE_ACCOUNT"
บันทึก URL ของบริการ
👉💻 บันทึก URL ของบริการ
export MCP_SERVER_URL=$(gcloud run services describe location-analyzer \
  --region=$REGION --format='value(status.url)')
echo "MCP Server URL: $MCP_SERVER_URL"

# Add to set_env.sh for later use
echo "export MCP_SERVER_URL=\"$MCP_SERVER_URL\"" >> $HOME/way-back-home/set_env.sh
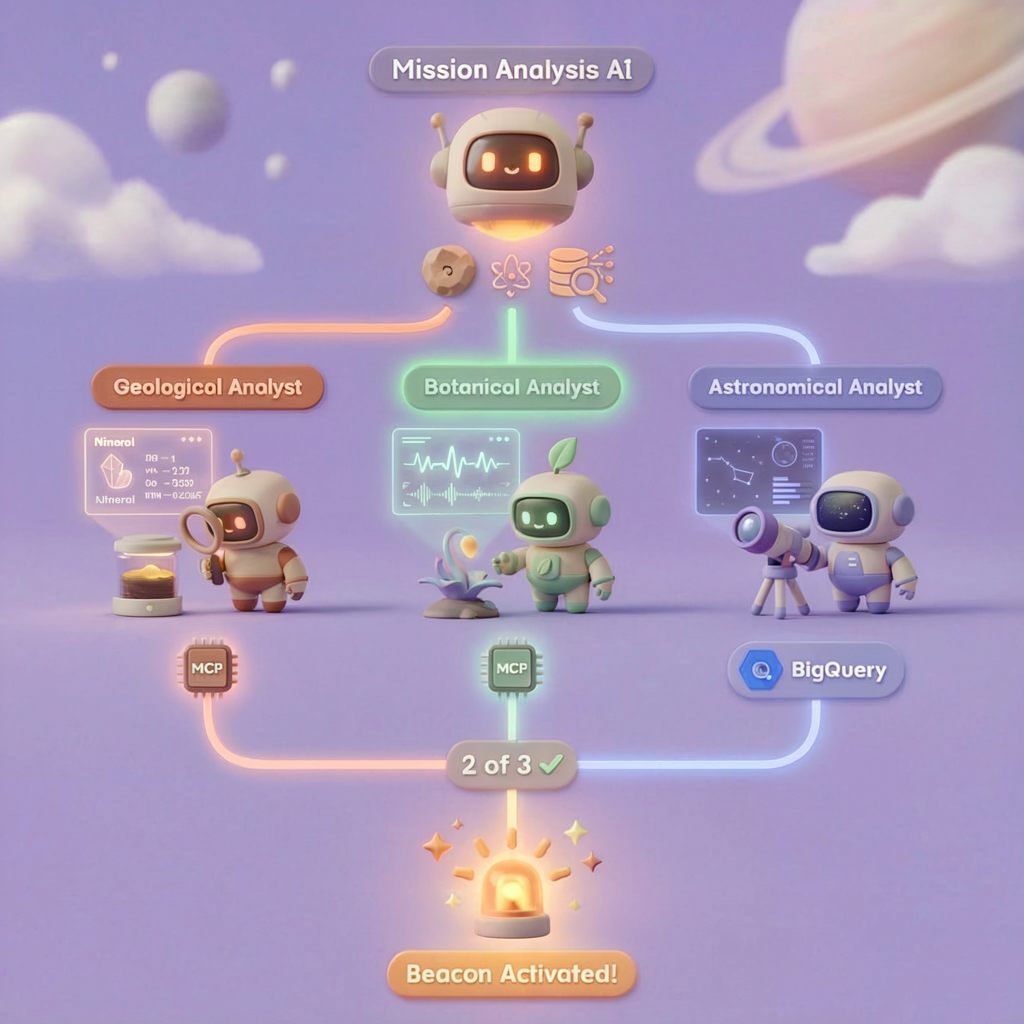
5. สร้างเอเจนต์ผู้เชี่ยวชาญ
ตอนนี้คุณจะสร้างเอเจนต์ผู้เชี่ยวชาญ 3 คน โดยแต่ละคนจะมีหน้าที่รับผิดชอบเพียงอย่างเดียว
สร้างเอเจนต์นักวิเคราะห์ด้านธรณีวิทยา
👉✏️ เปิด agent/agents/geological_analyst.py แล้วค้นหา #REPLACE-GEOLOGICAL-AGENT แทนที่ด้วย
from google.adk.agents import Agent
from agent.tools.mcp_tools import get_geological_tool

geological_analyst = Agent(
    name="GeologicalAnalyst",
    model="gemini-2.5-flash",
    description="Analyzes soil samples to classify planetary biome based on mineral composition.",
    instruction="""You are a geological specialist analyzing alien soil samples.

## YOUR EVIDENCE TO ANALYZE
Soil sample URL: {soil_url}

## YOUR TASK
1. Call the analyze_geological tool with the soil sample URL above
2. Examine the results for mineral composition and biome indicators
3. Report your findings clearly

The four possible biomes are:
- CRYO: Frozen, icy minerals, blue/white coloring
- VOLCANIC: Magma, obsidian, volcanic rock, red/orange coloring
- BIOLUMINESCENT: Glowing, phosphorescent minerals, purple/green
- FOSSILIZED: Amber, ancient preserved matter, golden/brown

## REPORTING FORMAT
Always report your classification clearly:
"GEOLOGICAL ANALYSIS: [BIOME] (confidence: X%)"

Include a brief description of what you observed in the sample.

## IMPORTANT
- You do NOT synthesize with other evidence
- You do NOT confirm locations
- Just analyze the soil sample and report what you find
- Call the tool immediately with the URL provided above""",
    tools=[get_geological_tool()]
)
สร้างเอเจนต์นักวิเคราะห์พฤกษศาสตร์
👉✏️ เปิด agent/agents/botanical_analyst.py แล้วค้นหา #REPLACE-BOTANICAL-AGENT แทนที่ด้วย
from google.adk.agents import Agent
from agent.tools.mcp_tools import get_botanical_tool

botanical_analyst = Agent(
    name="BotanicalAnalyst",
    model="gemini-2.5-flash",
    description="Analyzes flora recordings to classify planetary biome based on plant life and ambient sounds.",
    instruction="""You are a botanical specialist analyzing alien flora recordings.

## YOUR EVIDENCE TO ANALYZE
Flora recording URL: {flora_url}

## YOUR TASK
1. Call the analyze_botanical tool with the flora recording URL above
2. Pay attention to BOTH visual AND audio elements in the recording
3. Report your findings clearly

The four possible biomes are:
- CRYO: Frost ferns, crystalline plants, cold wind sounds, crackling ice
- VOLCANIC: Fire blooms, heat-resistant flora, crackling/hissing sounds
- BIOLUMINESCENT: Glowing fungi, luminescent plants, ethereal hum, chiming
- FOSSILIZED: Petrified trees, ancient formations, deep resonant sounds

## REPORTING FORMAT
Always report your classification clearly:
"BOTANICAL ANALYSIS: [BIOME] (confidence: X%)"

Include descriptions of what you SAW and what you HEARD.

## IMPORTANT
- You do NOT synthesize with other evidence
- You do NOT confirm locations
- Just analyze the flora recording and report what you find
- Call the tool immediately with the URL provided above""",
    tools=[get_botanical_tool()]
)
สร้างเอเจนต์นักวิเคราะห์ดาราศาสตร์
เอเจนต์นี้ใช้วิธีการที่แตกต่างออกไปโดยมีรูปแบบเครื่องมือ 2 แบบ ดังนี้
- Local FunctionTool: Gemini Vision เพื่อดึงฟีเจอร์ของดาว
- OneMCP BigQuery: ค้นหาแคตตาล็อกดาวผ่าน MCP ที่จัดการของ Google
👉✏️ เปิด agent/agents/astronomical_analyst.py แล้วค้นหา #REPLACE-ASTRONOMICAL-AGENT แทนที่ด้วย
from google.adk.agents import Agent
from agent.tools.star_tools import (
    extract_star_features_tool,
    get_bigquery_mcp_toolset,
)

# Get the BigQuery MCP toolset
bigquery_toolset = get_bigquery_mcp_toolset()

astronomical_analyst = Agent(
    name="AstronomicalAnalyst",
    model="gemini-2.5-flash",
    description="Analyzes star field images and queries the star catalog via OneMCP BigQuery.",
    instruction="""You are an astronomical specialist analyzing alien night skies.

## YOUR EVIDENCE TO ANALYZE
Star field URL: {stars_url}

## YOUR TWO TOOLS

### TOOL 1: extract_star_features (Local Gemini Vision)
Call this FIRST with the star field URL above.
Returns: "primary_star": "...", "nebula_type": "...", "stellar_color": "..."

### TOOL 2: BigQuery MCP (execute_query)
Call this SECOND with the results from Tool 1.
Use this exact SQL query (replace the placeholders with values from Step 1):

SELECT quadrant, biome, primary_star, nebula_type
FROM `{project_id}.way_back_home.star_catalog`
WHERE LOWER(primary_star) = LOWER('PRIMARY_STAR_FROM_STEP_1')
  AND LOWER(nebula_type) = LOWER('NEBULA_TYPE_FROM_STEP_1')
LIMIT 1

## YOUR WORKFLOW
1. Call extract_star_features with: {stars_url}
2. Get the primary_star and nebula_type from the result
3. Call execute_query with the SQL above (replacing placeholders)
4. Report the biome and quadrant from the query result

## BIOME REFERENCE
| Biome | Quadrant | Primary Star | Nebula Type |
|-------|----------|--------------|-------------|
| CRYO | NW | blue_giant | ice_blue |
| VOLCANIC | NE | red_dwarf_binary | fire |
| BIOLUMINESCENT | SW | green_pulsar | purple_magenta |
| FOSSILIZED | SE | yellow_sun | golden |

## REPORTING FORMAT
"ASTRONOMICAL ANALYSIS: [BIOME] in [QUADRANT] quadrant (confidence: X%)"

Include a description of the stellar features you observed.

## IMPORTANT
- You do NOT synthesize with other evidence
- You do NOT confirm locations
- Just analyze the stars and report what you find
- Start by calling extract_star_features with the URL above""",
    tools=[extract_star_features_tool, bigquery_toolset]
)
6. สร้างการเชื่อมต่อเครื่องมือ MCP
ตอนนี้คุณจะสร้าง Wrapper ของ Python ที่ช่วยให้ Agent ของ ADK สื่อสารกับเซิร์ฟเวอร์ MCP ได้ ซึ่งจะจัดการวงจรการเชื่อมต่อ ได้แก่ การสร้างเซสชัน การเรียกใช้เครื่องมือ และการแยกวิเคราะห์การตอบกลับ
สร้างการเชื่อมต่อเครื่องมือ MCP (MCP ที่กำหนดเอง)
ซึ่งจะเชื่อมต่อกับเซิร์ฟเวอร์ FastMCP ที่กำหนดเองซึ่งติดตั้งใช้งานใน Cloud Run
👉✏️ เปิด agent/tools/mcp_tools.py แล้วค้นหา #REPLACE-MCP-TOOL-CONNECTION แทนที่ด้วย
import os
import logging

from google.adk.tools.mcp_tool.mcp_toolset import MCPToolset
from google.adk.tools.mcp_tool.mcp_session_manager import StreamableHTTPConnectionParams

logger = logging.getLogger(__name__)

MCP_SERVER_URL = os.environ.get("MCP_SERVER_URL")

_mcp_toolset = None

def get_mcp_toolset():
    """Get the MCPToolset connected to the location-analyzer server."""
    global _mcp_toolset

    if _mcp_toolset is not None:
        return _mcp_toolset

    if not MCP_SERVER_URL:
        raise ValueError(
            "MCP_SERVER_URL not set. Please run:\n"
            "  export MCP_SERVER_URL='https://location-analyzer-xxx.a.run.app'"
        )

    # FastMCP exposes MCP protocol at /mcp endpoint
    mcp_endpoint = f"{MCP_SERVER_URL}/mcp"
    logger.info(f"[MCP Tools] Connecting to: {mcp_endpoint}")

    _mcp_toolset = MCPToolset(
        connection_params=StreamableHTTPConnectionParams(
            url=mcp_endpoint,
            timeout=120,  # 2 minutes for Gemini analysis
        )
    )

    return _mcp_toolset

def get_geological_tool():
    """Get the geological analysis tool from the MCP server."""
    return get_mcp_toolset()

def get_botanical_tool():
    """Get the botanical analysis tool from the MCP server."""
    return get_mcp_toolset()
สร้างเครื่องมือวิเคราะห์ดาว (BigQuery ของ OneMCP)
แคตตาล็อกดาวที่คุณโหลดลงใน BigQuery ก่อนหน้านี้มีรูปแบบดาวสำหรับแต่ละไบโอม แทนที่จะเขียนโค้ดไคลเอ็นต์ BigQuery เพื่อค้นหา เราจะเชื่อมต่อกับเซิร์ฟเวอร์ OneMCP BigQuery ของ Google ซึ่งจะแสดงexecute_queryความสามารถของ BigQuery เป็นเครื่องมือ MCP ที่ Agent ADK ใดก็ได้ใช้ได้โดยตรง
👉✏️ เปิด agent/tools/star_tools.py แล้วค้นหา #REPLACE-STAR-TOOLS แทนที่ด้วย
import os
import json
import logging

from google import genai
from google.genai import types as genai_types
from google.adk.tools import FunctionTool
from google.adk.tools.mcp_tool.mcp_toolset import MCPToolset
from google.adk.tools.mcp_tool.mcp_session_manager import StreamableHTTPConnectionParams
import google.auth
import google.auth.transport.requests

logger = logging.getLogger(__name__)

# =============================================================================
# CONFIGURATION - Environment variables only
# =============================================================================

PROJECT_ID = os.environ.get("GOOGLE_CLOUD_PROJECT", "")

if not PROJECT_ID:
    logger.warning("[Star Tools] GOOGLE_CLOUD_PROJECT not set")

# Initialize Gemini client for star feature extraction
genai_client = genai.Client(
    vertexai=True,
    project=PROJECT_ID or "placeholder",
    location=os.environ.get("GOOGLE_CLOUD_LOCATION", "us-central1")
)

logger.info(f"[Star Tools] Initialized for project: {PROJECT_ID}")

# =============================================================================
# OneMCP BigQuery Connection
# =============================================================================

BIGQUERY_MCP_URL = "https://bigquery.googleapis.com/mcp"

_bigquery_toolset = None

def get_bigquery_mcp_toolset():
    """
    Get the MCPToolset connected to Google's BigQuery MCP server.

    This uses OAuth 2.0 authentication with Application Default Credentials.
    The toolset provides access to BigQuery's pre-built MCP tools like:
    - execute_query: Run SQL queries
    - list_datasets: List available datasets
    - get_table_schema: Get table structure
   """
    global _bigquery_toolset

    if _bigquery_toolset is not None:
        return _bigquery_toolset

    logger.info("[Star Tools] Connecting to OneMCP BigQuery...")

    # Get OAuth credentials
    credentials, project_id = google.auth.default(
        scopes=["https://www.googleapis.com/auth/bigquery"]
    )

    # Refresh to get a valid token
    credentials.refresh(google.auth.transport.requests.Request())
    oauth_token = credentials.token

    # Configure headers for BigQuery MCP
    headers = {
        "Authorization": f"Bearer {oauth_token}",
        "x-goog-user-project": project_id or PROJECT_ID
    }

    # Create MCPToolset with StreamableHTTP connection
    _bigquery_toolset = MCPToolset(
        connection_params=StreamableHTTPConnectionParams(
            url=BIGQUERY_MCP_URL,
            headers=headers
        )
    )

    logger.info("[Star Tools] Connected to BigQuery MCP")
    return _bigquery_toolset


# =============================================================================
# Local FunctionTool: Star Feature Extraction
# =============================================================================
# This is a LOCAL tool that calls Gemini directly - demonstrating that
# you can mix local FunctionTools with MCP tools in the same agent.

STAR_EXTRACTION_PROMPT = """Analyze this alien night sky image and extract stellar features.

Identify:
1. PRIMARY STAR TYPE: blue_giant, red_dwarf, red_dwarf_binary, green_pulsar, yellow_sun, etc.
2. NEBULA TYPE: ice_blue, fire, purple_magenta, golden, etc.
3. STELLAR COLOR: blue_white, red_orange, green_purple, yellow_gold, etc.

Respond ONLY with valid JSON:
{"primary_star": "...", "nebula_type": "...", "stellar_color": "...", "description": "..."}
"""


def _parse_json_response(text: str) -> dict:
    """Parse JSON from Gemini response, handling markdown formatting."""
    cleaned = text.strip()
    if cleaned.startswith("```json"):
        cleaned = cleaned[7:]
    elif cleaned.startswith("```"):
        cleaned = cleaned[3:]
    if cleaned.endswith("```"):
        cleaned = cleaned[:-3]
    cleaned = cleaned.strip()

    try:
        return json.loads(cleaned)
    except json.JSONDecodeError as e:
        logger.error(f"Failed to parse JSON: {e}")
        return {"error": f"Failed to parse response: {str(e)}"}


def extract_star_features(image_url: str) -> dict:
    """
    Extract stellar features from a star field image using Gemini Vision.

    This is a LOCAL FunctionTool - we call Gemini directly, not through MCP.
    The agent will use this alongside the BigQuery MCP tools.
    """
    logger.info(f"[Stars] Extracting features from: {image_url}")

    response = genai_client.models.generate_content(
        model="gemini-2.5-flash",
        contents=[
            STAR_EXTRACTION_PROMPT,
            genai_types.Part.from_uri(file_uri=image_url, mime_type="image/png")
        ]
    )

    result = _parse_json_response(response.text)
    logger.info(f"[Stars] Extracted: primary_star={result.get('primary_star')}")
    return result


# Create the local FunctionTool
extract_star_features_tool = FunctionTool(extract_star_features)
7. สร้าง Orchestrator
ตอนนี้ให้สร้างทีมคู่ขนานและผู้ประสานงานหลักที่ประสานงานทุกอย่าง
สร้างทีมวิเคราะห์แบบคู่ขนาน
เหตุใดจึงควรให้ผู้เชี่ยวชาญทั้ง 3 คนทำงานพร้อมกัน เนื่องจากเป็นอิสระโดยสมบูรณ์ นักวิเคราะห์ด้านธรณีวิทยาจึงไม่จำเป็นต้องรอผลลัพธ์ของนักวิเคราะห์ด้านพฤกษศาสตร์ และในทางกลับกัน ผู้เชี่ยวชาญแต่ละคนจะวิเคราะห์หลักฐานที่แตกต่างกันโดยใช้เครื่องมือที่แตกต่างกัน ParallelAgent จะเรียกใช้ทั้ง 3 รายการพร้อมกัน ซึ่งจะช่วยลดเวลาในการวิเคราะห์ทั้งหมดจากประมาณ 30 วินาที (ตามลำดับ) เป็นประมาณ 10 วินาที (แบบขนาน)
👉✏️ เปิด agent/agent.py แล้วค้นหา #REPLACE-PARALLEL-CREW แทนที่ด้วย
import os
import logging
import httpx

from google.adk.agents import Agent, ParallelAgent
from google.adk.agents.callback_context import CallbackContext

# Import specialist agents
from agent.agents.geological_analyst import geological_analyst
from agent.agents.botanical_analyst import botanical_analyst
from agent.agents.astronomical_analyst import astronomical_analyst

# Import confirmation tool
from agent.tools.confirm_tools import confirm_location_tool

logger = logging.getLogger(__name__)


# =============================================================================
# BEFORE AGENT CALLBACK - Fetches config and sets state
# =============================================================================

async def setup_participant_context(callback_context: CallbackContext) -> None:
    """
    Fetch participant configuration and populate state for all agents.

    This callback:
    1. Reads PARTICIPANT_ID and BACKEND_URL from environment
    2. Fetches participant data from the backend API
    3. Sets state values: soil_url, flora_url, stars_url, username, x, y, etc.
    4. Returns None to continue normal agent execution
    """
    participant_id = os.environ.get("PARTICIPANT_ID", "")
    backend_url = os.environ.get("BACKEND_URL", "https://api.waybackhome.dev")
    project_id = os.environ.get("GOOGLE_CLOUD_PROJECT", "")

    logger.info(f"[Callback] Setting up context for participant: {participant_id}")

    # Set project_id and backend_url in state immediately
    callback_context.state["project_id"] = project_id
    callback_context.state["backend_url"] = backend_url
    callback_context.state["participant_id"] = participant_id

    if not participant_id:
        logger.warning("[Callback] No PARTICIPANT_ID set - using placeholder values")
        callback_context.state["username"] = "Explorer"
        callback_context.state["x"] = 0
        callback_context.state["y"] = 0
        callback_context.state["soil_url"] = "Not available - set PARTICIPANT_ID"
        callback_context.state["flora_url"] = "Not available - set PARTICIPANT_ID"
        callback_context.state["stars_url"] = "Not available - set PARTICIPANT_ID"
        return None

    # Fetch participant data from backend API
    try:
        url = f"{backend_url}/participants/{participant_id}"
        logger.info(f"[Callback] Fetching from: {url}")

        async with httpx.AsyncClient(timeout=30.0) as client:
            response = await client.get(url)
            response.raise_for_status()
            data = response.json()

        # Extract evidence URLs
        evidence_urls = data.get("evidence_urls", {})

        # Set all state values for sub-agents to access
        callback_context.state["username"] = data.get("username", "Explorer")
        callback_context.state["x"] = data.get("x", 0)
        callback_context.state["y"] = data.get("y", 0)
        callback_context.state["soil_url"] = evidence_urls.get("soil", "Not available")
        callback_context.state["flora_url"] = evidence_urls.get("flora", "Not available")
        callback_context.state["stars_url"] = evidence_urls.get("stars", "Not available")

        logger.info(f"[Callback] State populated for {data.get('username')}")

    except Exception as e:
        logger.error(f"[Callback] Error fetching participant config: {e}")
        callback_context.state["username"] = "Explorer"
        callback_context.state["x"] = 0
        callback_context.state["y"] = 0
        callback_context.state["soil_url"] = f"Error: {e}"
        callback_context.state["flora_url"] = f"Error: {e}"
        callback_context.state["stars_url"] = f"Error: {e}"

    return None


# =============================================================================
# PARALLEL ANALYSIS CREW
# =============================================================================

evidence_analysis_crew = ParallelAgent(
    name="EvidenceAnalysisCrew",
    description="Runs geological, botanical, and astronomical analysis in parallel.",
    sub_agents=[geological_analyst, botanical_analyst, astronomical_analyst]
)
สร้าง Root Orchestrator
ตอนนี้ให้สร้างเอเจนต์รูทที่ประสานงานทุกอย่างและใช้การเรียกกลับ
👉✏️ ในไฟล์เดียวกัน (agent/agent.py) ให้ค้นหา #REPLACE-ROOT-ORCHESTRATOR แทนที่ด้วย
root_agent = Agent(
    name="MissionAnalysisAI",
    model="gemini-2.5-flash",
    description="Coordinates crash site analysis to confirm explorer location.",
    instruction="""You are the Mission Analysis AI coordinating a rescue operation.

## Explorer Information
- Name: {username}
- Coordinates: ({x}, {y})

## Evidence URLs (automatically provided to specialists via state)
- Soil sample: {soil_url}
- Flora recording: {flora_url}
- Star field: {stars_url}

## Your Workflow

### STEP 1: DELEGATE TO ANALYSIS CREW
Tell the EvidenceAnalysisCrew to analyze all the evidence.
The evidence URLs are already available to the specialists.

### STEP 2: COLLECT RESULTS
Each specialist will report:
- "GEOLOGICAL ANALYSIS: [BIOME] (confidence: X%)"
- "BOTANICAL ANALYSIS: [BIOME] (confidence: X%)"
- "ASTRONOMICAL ANALYSIS: [BIOME] in [QUADRANT] quadrant (confidence: X%)"

### STEP 3: APPLY 2-OF-3 AGREEMENT RULE
- If 2 or 3 specialists agree → that's the answer
- If all 3 disagree → use judgment based on confidence

### STEP 4: CONFIRM LOCATION
Call confirm_location with the determined biome.

## Biome Reference
| Biome | Quadrant | Key Characteristics |
|-------|----------|---------------------|
| CRYO | NW | Frozen, blue, ice crystals |
| VOLCANIC | NE | Magma, red/orange, obsidian |
| BIOLUMINESCENT | SW | Glowing, purple/green |
| FOSSILIZED | SE | Amber, golden, ancient |

## Response Style
Be encouraging and narrative! Celebrate when the beacon activates!
""",
    sub_agents=[evidence_analysis_crew],
    tools=[confirm_location_tool],
    before_agent_callback=setup_participant_context
)
สร้างเครื่องมือยืนยันตำแหน่ง
นี่คือขั้นตอนสุดท้าย ซึ่งเป็นเครื่องมือที่ยืนยันตำแหน่งของคุณกับศูนย์ควบคุมและเปิดใช้งานบีคอน เมื่อตัวจัดสรรรูทระบุไบโอมที่คุณอยู่ (โดยใช้กฎข้อตกลง 2 ใน 3) ตัวจัดสรรจะเรียกใช้เครื่องมือนี้เพื่อส่งผลลัพธ์ไปยัง API แบ็กเอนด์
เครื่องมือนี้ใช้ ToolContext ซึ่งช่วยให้เข้าถึงค่าสถานะ (เช่น participant_id และ backend_url) ที่ before_agent_callback ตั้งค่าไว้ก่อนหน้านี้ได้
👉✏️ ใน agent/tools/confirm_tools.py ให้ค้นหา #REPLACE-CONFIRM-TOOL แทนที่ด้วย
import os
import logging
import requests

from google.adk.tools import FunctionTool
from google.adk.tools.tool_context import ToolContext

logger = logging.getLogger(__name__)

BIOME_TO_QUADRANT = {
    "CRYO": "NW",
    "VOLCANIC": "NE",
    "BIOLUMINESCENT": "SW",
    "FOSSILIZED": "SE"
}


def _get_actual_biome(x: int, y: int) -> tuple[str, str]:
    """Determine actual biome and quadrant from coordinates."""
    if x < 50 and y >= 50:
        return "NW", "CRYO"
    elif x >= 50 and y >= 50:
        return "NE", "VOLCANIC"
    elif x < 50 and y < 50:
        return "SW", "BIOLUMINESCENT"
    else:
        return "SE", "FOSSILIZED"


def confirm_location(biome: str, tool_context: ToolContext) -> dict:
    """
    Confirm the explorer's location and activate the rescue beacon.

    Uses ToolContext to read state values set by before_agent_callback.
    """
    # Read from state (set by before_agent_callback)
    participant_id = tool_context.state.get("participant_id", "")
    x = tool_context.state.get("x", 0)
    y = tool_context.state.get("y", 0)
    backend_url = tool_context.state.get("backend_url", "https://api.waybackhome.dev")

    # Fallback to environment variables
    if not participant_id:
        participant_id = os.environ.get("PARTICIPANT_ID", "")
    if not backend_url:
        backend_url = os.environ.get("BACKEND_URL", "https://api.waybackhome.dev")

    if not participant_id:
        return {"success": False, "message": "❌ No participant ID available."}

    biome_upper = biome.upper().strip()

    if biome_upper not in BIOME_TO_QUADRANT:
        return {"success": False, "message": f"❌ Unknown biome: {biome}"}

    # Get actual biome from coordinates
    actual_quadrant, actual_biome = _get_actual_biome(x, y)

    if biome_upper != actual_biome:
        return {
            "success": False,
            "message": f"❌ Mismatch! Analysis: {biome_upper}, Actual: {actual_biome}"
        }

    quadrant = BIOME_TO_QUADRANT[biome_upper]

    try:
        response = requests.patch(
            f"{backend_url}/participants/{participant_id}/location",
            params={"x": x, "y": y},
            timeout=10
        )
        response.raise_for_status()

        return {
            "success": True,
            "message": f"🔦 BEACON ACTIVATED!\n\nLocation: {biome_upper} in {quadrant}\nCoordinates: ({x}, {y})"
        }

    except requests.exceptions.ConnectionError:
        return {
            "success": True,
            "message": f"🔦 BEACON ACTIVATED! (Local)\n\nLocation: {biome_upper} in {quadrant}",
            "simulated": True
        }

    except Exception as e:
        return {"success": False, "message": f"❌ Failed: {str(e)}"}


confirm_location_tool = FunctionTool(confirm_location)
8. ทดสอบด้วย ADK Web UI
ตอนนี้มาทดสอบระบบหลายเอเจนต์ที่สมบูรณ์แบบในเครื่องกัน
เริ่มเซิร์ฟเวอร์เว็บ ADK
👉💻 ตั้งค่าตัวแปรสภาพแวดล้อมและเริ่มเว็บเซิร์ฟเวอร์ ADK
cd $HOME/way-back-home/level_1
source $HOME/way-back-home/set_env.sh

# Verify environment is set
echo "PARTICIPANT_ID: $PARTICIPANT_ID"
echo "MCP Server: $MCP_SERVER_URL"

# Start ADK web server
uv run adk web
คุณควรเห็นข้อมูลต่อไปนี้
+-----------------------------------------------------------------------------+
| ADK Web Server started                                                      |
|                                                                             |
| For local testing, access at http://localhost:8000.                         |
+-----------------------------------------------------------------------------+

INFO:     Application startup complete.
INFO:     Uvicorn running on http://0.0.0.0:8000 (Press CTRL+C to quit)
เข้าถึง UI บนเว็บ
👉 จากไอคอนตัวอย่างเว็บในแถบเครื่องมือ Cloud Shell (ด้านขวาบน) ให้เลือกเปลี่ยนพอร์ต
![]()
👉 ตั้งค่าพอร์ตเป็น 8000 แล้วคลิก "เปลี่ยนและแสดงตัวอย่าง"
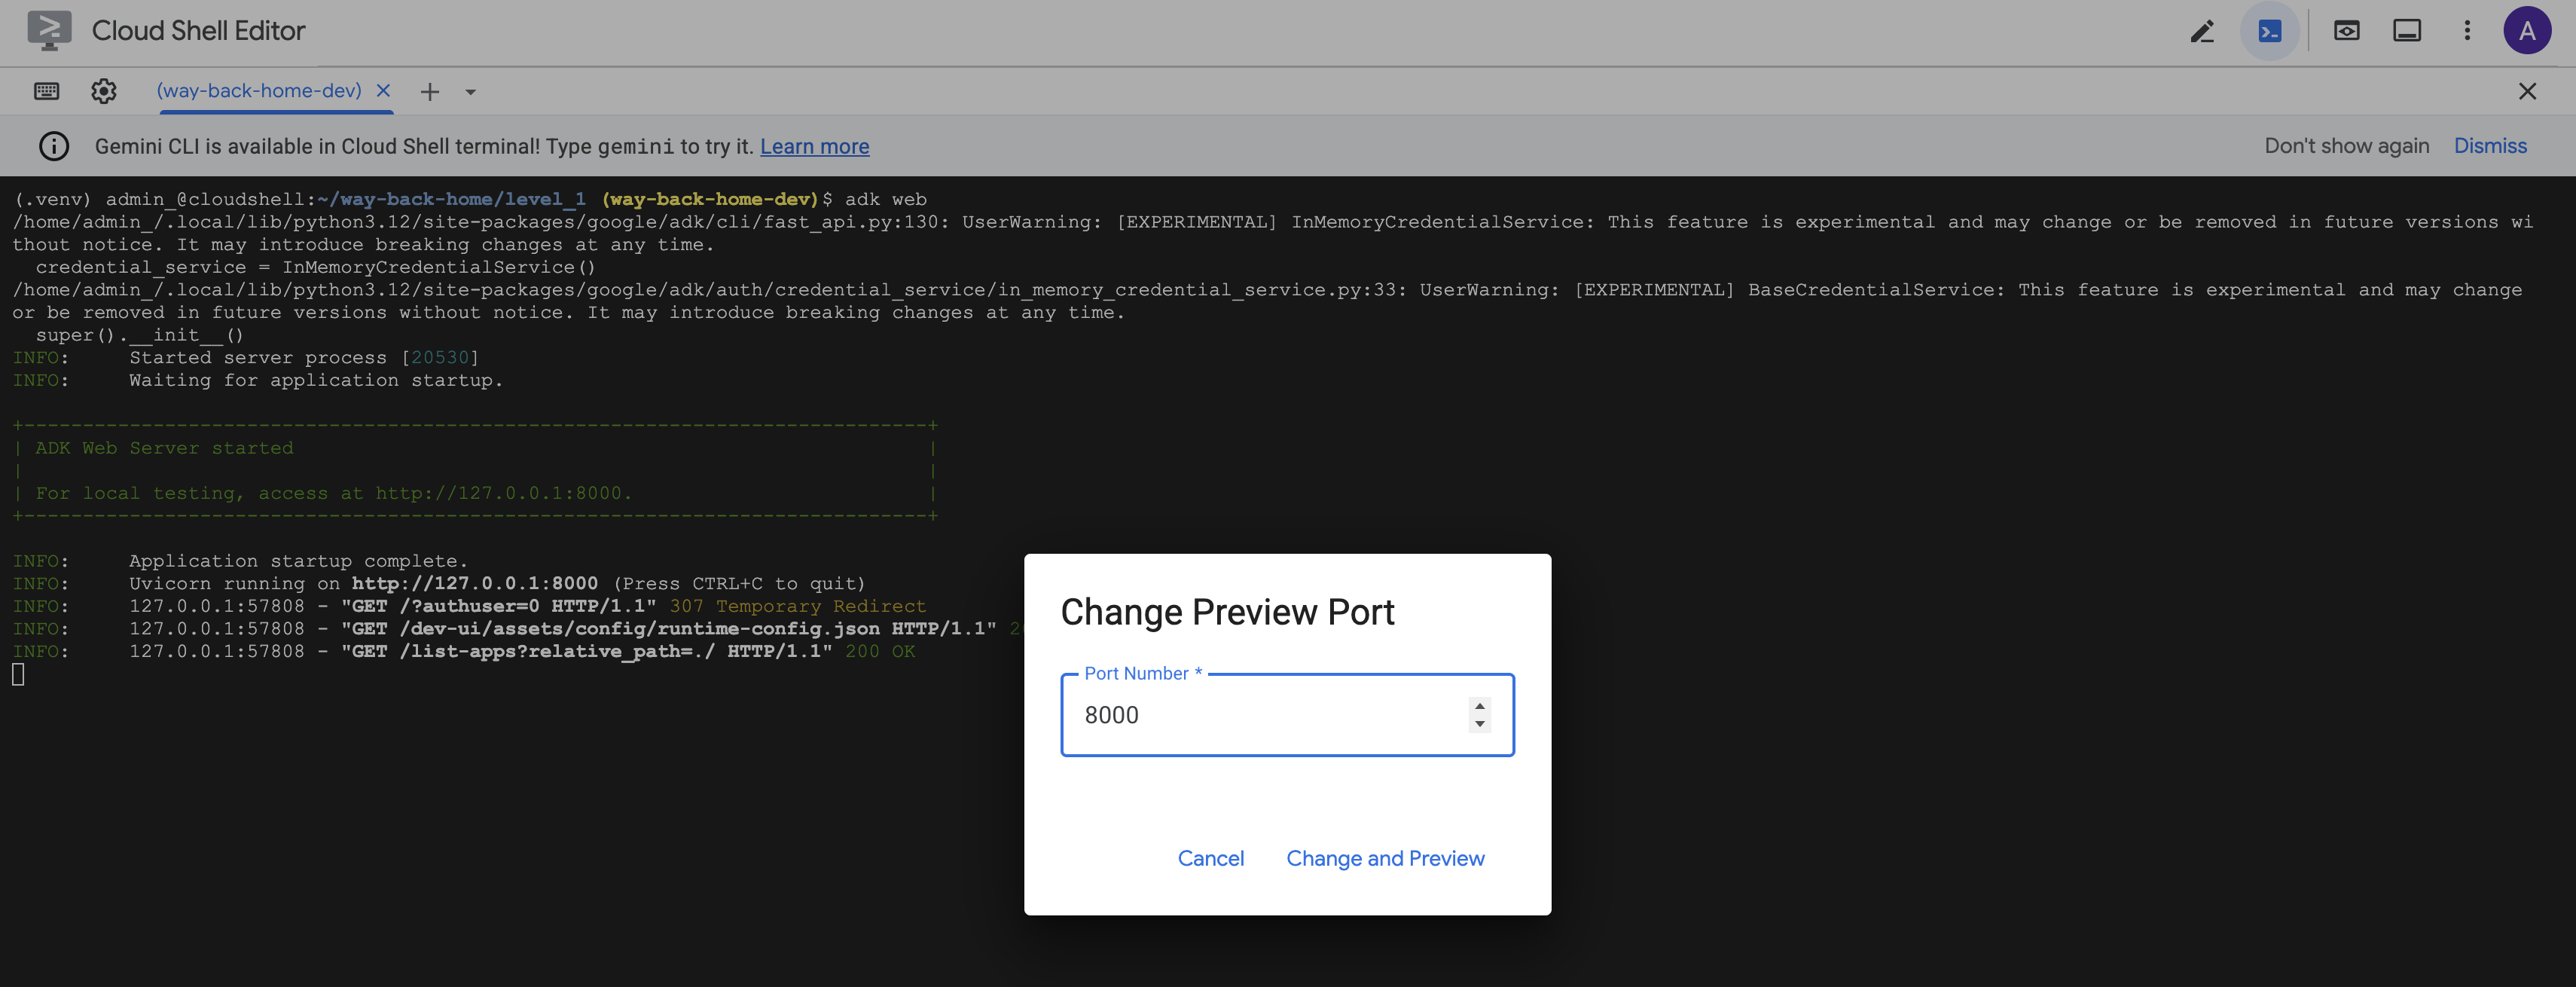
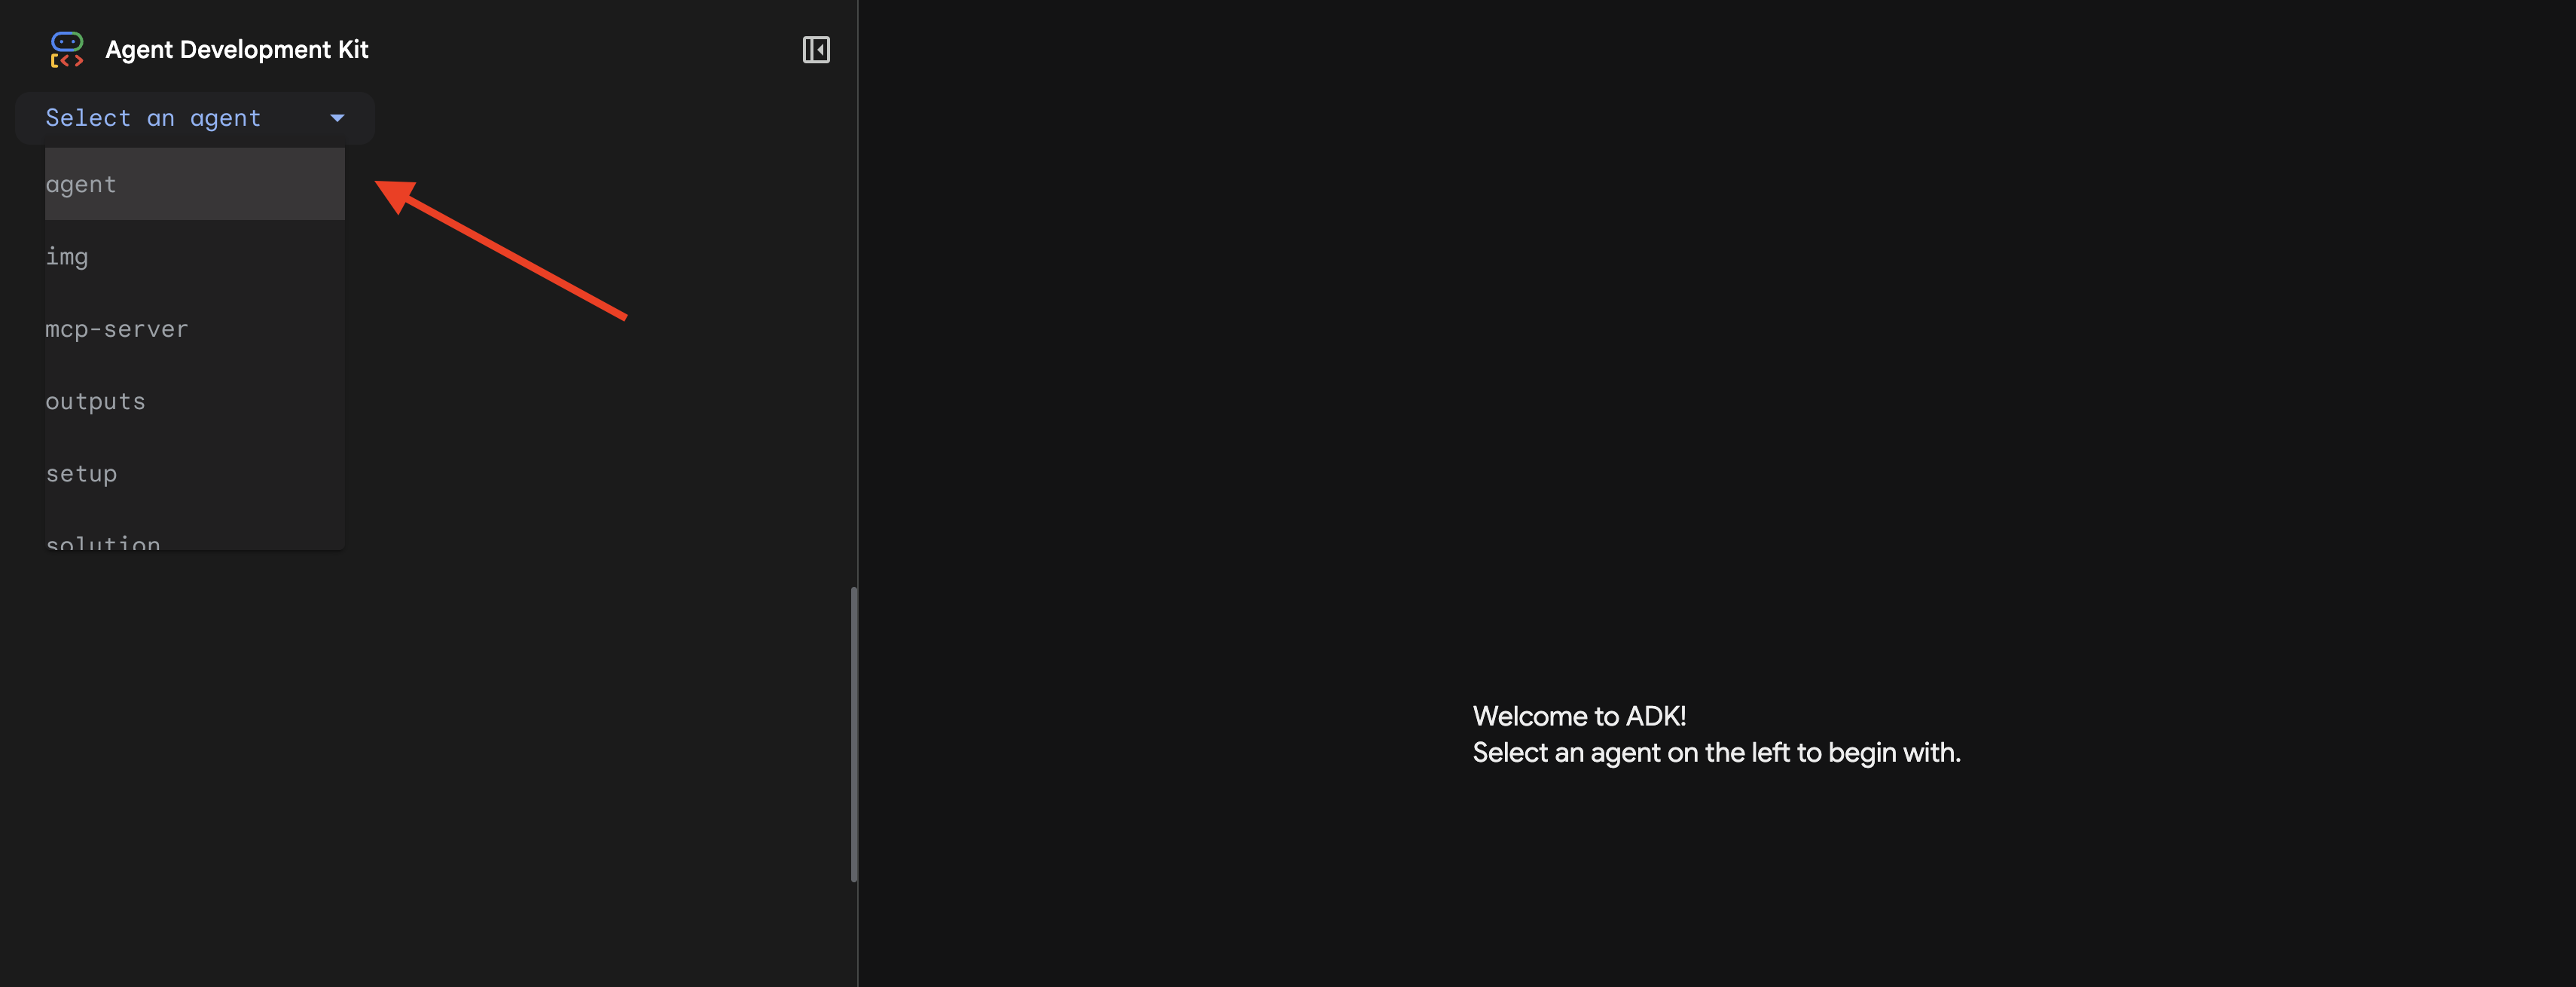
👉 UI เว็บของ ADK จะเปิดขึ้น เลือกตัวแทนจากเมนูแบบเลื่อนลง
เรียกใช้การวิเคราะห์
👉 ในอินเทอร์เฟซของแชท ให้พิมพ์ข้อความต่อไปนี้
Analyze the evidence from my crash site and confirm my location to activate the beacon.
ดูการทำงานของระบบแบบหลายเอเจนต์

👉 เมื่อเอเจนต์ทั้ง 3 วิเคราะห์เสร็จแล้ว ให้พิมพ์
Where am I?
วิธีที่ระบบประมวลผลคำขอของคุณ

แผงการติดตามทางด้านขวาจะแสดงการโต้ตอบของเอเจนต์และการเรียกใช้เครื่องมือทั้งหมด
👉 กด Ctrl+C ในเทอร์มินัลเพื่อหยุดเซิร์ฟเวอร์เมื่อทดสอบเสร็จแล้ว
9. ทำให้ใช้งานได้กับ Cloud Run
ตอนนี้ให้ติดตั้งใช้งานระบบแบบหลาย Agent ใน Cloud Run เพื่อเตรียมพร้อมสำหรับ A2A
ติดตั้งใช้งาน Agent
👉💻 ทำให้ใช้งานได้กับ Cloud Run โดยใช้ ADK CLI
cd $HOME/way-back-home/level_1
source $HOME/way-back-home/set_env.sh

uv run adk deploy cloud_run \
  --project=$GOOGLE_CLOUD_PROJECT \
  --region=$REGION \
  --service_name=mission-analysis-ai \
  --with_ui \
  --a2a \
  ./agent
เมื่อได้รับข้อความแจ้ง Do you want to continue (Y/n) และ Allow unauthenticated invocations to [mission-analysis-ai] (Y/n)? ให้ป้อน Y สำหรับทั้ง 2 รายการเพื่อติดตั้งใช้งานและอนุญาตให้เข้าถึงตัวแทน A2A แบบสาธารณะ
คุณควรเห็นเอาต์พุตดังนี้
Building and deploying agent to Cloud Run...
✓ Container built successfully
✓ Deploying to Cloud Run...
✓ Service deployed: https://mission-analysis-ai-abc123-uc.a.run.app
ตั้งค่าตัวแปรสภาพแวดล้อมใน Cloud Run
เอเจนต์ที่ติดตั้งใช้งานต้องมีสิทธิ์เข้าถึงตัวแปรสภาพแวดล้อม อัปเดตบริการโดยทำดังนี้
👉💻 ตั้งค่าตัวแปรสภาพแวดล้อมที่จำเป็น
gcloud run services update mission-analysis-ai \
  --region=$REGION \
  --labels=dev-tutorial=multi-modal \
  --set-env-vars="GOOGLE_CLOUD_PROJECT=$GOOGLE_CLOUD_PROJECT,GOOGLE_CLOUD_LOCATION=$REGION,MCP_SERVER_URL=$MCP_SERVER_URL,BACKEND_URL=$BACKEND_URL,PARTICIPANT_ID=$PARTICIPANT_ID,GOOGLE_GENAI_USE_VERTEXAI=True"
บันทึก URL ของ Agent
👉💻 รับ URL ที่ทำให้ใช้งานได้
export AGENT_URL=$(gcloud run services describe mission-analysis-ai \
  --region=$REGION --format='value(status.url)')
echo "Agent URL: $AGENT_URL"

# Add to set_env.sh
echo "export LEVEL1_AGENT_URL=\"$AGENT_URL\"" >> $HOME/way-back-home/set_env.sh
ยืนยันการติดตั้งใช้งาน
👉💻 ทดสอบตัวแทนที่ติดตั้งใช้งานโดยเปิด URL ในเบราว์เซอร์ (แฟล็ก --with_ui ติดตั้งใช้งานเว็บอินเทอร์เฟซ ADK) หรือทดสอบผ่าน curl ดังนี้
curl -X GET "$AGENT_URL/list-apps"
คุณควรเห็นคำตอบที่แสดงรายการเอเจนต์
10. บทสรุป
🎉 จบหลักสูตรระดับ 1 แล้ว!
ตอนนี้สัญญาณขอความช่วยเหลือของคุณกำลังออกอากาศอย่างเต็มกำลัง สัญญาณที่ระบุตำแหน่งได้จะตัดผ่านการรบกวนในชั้นบรรยากาศ ซึ่งเป็นพัลส์ที่สม่ำเสมอที่บอกว่า "ฉันอยู่นี่ ฉันรอดมาได้ มาหาฉันสิ"
แต่คุณไม่ได้อยู่บนโลกนี้เพียงคนเดียว เมื่อบีคอนของคุณเปิดใช้งาน คุณจะเห็นแสงอื่นๆ กระพริบขึ้นที่ขอบฟ้า ซึ่งเป็นผู้รอดชีวิตคนอื่นๆ จุดที่เครื่องบินตก และนักสำรวจคนอื่นๆ ที่รอดมาได้
![]()
ในระดับ 2 คุณจะได้เรียนรู้วิธีประมวลผลสัญญาณ SOS ที่เข้ามาและประสานงานกับผู้รอดชีวิตคนอื่นๆ การช่วยเหลือไม่ได้มีไว้แค่ให้คนพบคุณ แต่ยังช่วยให้คุณพบคนอื่นๆ ด้วย
การแก้ปัญหา
"ไม่ได้ตั้งค่า MCP_SERVER_URL"
export MCP_SERVER_URL=$(gcloud run services describe location-analyzer \
  --region=$REGION --format='value(status.url)')
"ไม่ได้ตั้งค่า PARTICIPANT_ID"
source $HOME/way-back-home/set_env.sh
echo $PARTICIPANT_ID
"ไม่พบตาราง BigQuery"
uv run python setup/setup_star_catalog.py
"ผู้เชี่ยวชาญขอ URL" หมายความว่าการใช้เทมเพลต {key} ไม่ได้ผล ตรวจสอบ:
before_agent_callbackตั้งค่าในเอเจนต์รูทแล้วใช่ไหม- ค่าสถานะการตั้งค่าการเรียกกลับถูกต้องไหม
- เอเจนต์ย่อยใช้
{soil_url}(ไม่ใช่ f-string) หรือไม่
"การวิเคราะห์ทั้ง 3 รายการไม่เห็นด้วย" สร้างหลักฐานใหม่: uv run python generate_evidence.py
"ตัวแทนไม่ตอบกลับในเว็บ adk"
- ตรวจสอบว่าพอร์ต 8000 ถูกต้อง
- ตรวจสอบว่าได้ตั้งค่า MCP_SERVER_URL และ PARTICIPANT_ID แล้ว
- ตรวจสอบข้อความแสดงข้อผิดพลาดในเทอร์มินัล
สรุปสถาปัตยกรรม
ส่วนประกอบ | ประเภท | รูปแบบ | วัตถุประสงค์ |
setup_participant_context | การติดต่อกลับ | before_agent_callback | ดึงข้อมูลการกำหนดค่า ตั้งค่าสถานะ |
GeologicalAnalyst | Agent | การใช้เทมเพลต {soil_url} | การจัดประเภทดิน |
BotanicalAnalyst | Agent | การใช้เทมเพลต {flora_url} | การจัดประเภทพืช |
AstronomicalAnalyst | Agent | {stars_url}, {project_id} | การหาตำแหน่งโดยใช้ดาว |
confirm_location | เครื่องมือ | การเข้าถึงสถานะ ToolContext | เปิดใช้งานบีคอน |
EvidenceAnalysisCrew | ParallelAgent | องค์ประกอบของ Agent ย่อย | เรียกใช้ผู้เชี่ยวชาญพร้อมกัน |
MissionAnalysisAI | ตัวแทน (รูท) | Orchestrator + การติดต่อกลับ | ประสานงาน + สังเคราะห์ |
เครื่องมือวิเคราะห์ตำแหน่ง | เซิร์ฟเวอร์ FastMCP | MCP ที่กำหนดเอง | การวิเคราะห์ทางธรณีวิทยา + พฤกษศาสตร์ |
bigquery.googleapis.com/mcp | OneMCP | MCP ที่มีการจัดการ | สิทธิ์เข้าถึง BigQuery |
แนวคิดหลักที่เชี่ยวชาญ
✓ before_agent_callback: ดึงข้อมูลการกำหนดค่าก่อนที่เอเจนต์จะทำงาน
✓ การสร้างเทมเพลตสถานะ {key}: เข้าถึงค่าสถานะในคำสั่งของเอเจนต์
✓ ToolContext: เข้าถึงค่าสถานะในฟังก์ชันเครื่องมือ
✓ การแชร์สถานะ: สถานะหลักจะพร้อมใช้งานโดยอัตโนมัติสำหรับเอเจนต์ย่อยผ่าน InvocationContext
✓ สถาปัตยกรรมแบบหลายเอเจนต์: เอเจนต์เฉพาะที่มีความรับผิดชอบเดียว
✓ ParallelAgent: การดำเนินการพร้อมกันของงานอิสระ
✓ เซิร์ฟเวอร์ MCP ที่กำหนดเอง: เซิร์ฟเวอร์ MCP ของคุณเองใน Cloud Run
✓ OneMCP BigQuery: รูปแบบ MCP ที่มีการจัดการสำหรับการเข้าถึงฐานข้อมูล
✓ การติดตั้งใช้งานในระบบคลาวด์: การติดตั้งใช้งานแบบไม่เก็บสถานะโดยใช้ตัวแปรสภาพแวดล้อม
✓ การเตรียม A2A: เอเจนต์พร้อมสำหรับการสื่อสารระหว่างเอเจนต์
สำหรับผู้ที่ไม่ได้เล่นเกม: การประยุกต์ใช้ในชีวิตจริง
"ระบุตำแหน่งของคุณ" แสดงถึงการวิเคราะห์โดยผู้เชี่ยวชาญแบบคู่ขนานพร้อมด้วยฉันทามติ ซึ่งเป็นการเรียกใช้การวิเคราะห์ AI เฉพาะทางหลายรายการพร้อมกันและสังเคราะห์ผลลัพธ์
แอปพลิเคชันสำหรับองค์กร
กรณีการใช้งาน | Parallel Experts | กฎการสังเคราะห์ |
การวินิจฉัยทางการแพทย์ | นักวิเคราะห์รูปภาพ นักวิเคราะห์อาการ นักวิเคราะห์ห้องปฏิบัติการ | เกณฑ์ความเชื่อมั่น 2 ใน 3 |
การตรวจจับการประพฤติมิชอบ | นักวิเคราะห์ธุรกรรม นักวิเคราะห์พฤติกรรม นักวิเคราะห์เครือข่าย | มีการแจ้ง 1 รายการ = ตรวจสอบ |
การประมวลผลเอกสาร | OCR Agent, Classification Agent, Extraction Agent | ทุกคนต้องเห็นด้วย |
การควบคุมคุณภาพ | ผู้ตรวจสอบด้วยภาพ นักวิเคราะห์เซ็นเซอร์ ผู้ตรวจสอบสเปค | การส่งผ่าน 2 ใน 3 |
ข้อมูลเชิงลึกด้านสถาปัตยกรรมที่สำคัญ
- before_agent_callback สำหรับการกำหนดค่า: ดึงข้อมูลการกำหนดค่า 1 ครั้งเมื่อเริ่มต้น และป้อนข้อมูลสถานะสำหรับเอเจนต์ย่อยทั้งหมด ไม่มีการอ่านไฟล์กำหนดค่าในเอเจนต์ย่อย
- การสร้างเทมเพลตสถานะ {key}: ประกาศ, สะอาด, สำนวน ไม่มี f-string, ไม่มีการนำเข้า, ไม่มีการจัดการ sys.path
- กลไกฉันทามติ: ข้อตกลงแบบ 2 ใน 3 จะจัดการความคลุมเครือได้อย่างมีประสิทธิภาพโดยไม่ต้องมีข้อตกลงที่เป็นเอกฉันท์
- ParallelAgent สำหรับงานที่ไม่ขึ้นต่อกัน: เมื่อการวิเคราะห์ไม่ได้ขึ้นต่อกัน ให้เรียกใช้พร้อมกันเพื่อเพิ่มความเร็ว
- รูปแบบ MCP 2 รูปแบบ: กำหนดเอง (สร้างเอง) กับ OneMCP (โฮสต์โดย Google) ทั้ง 2 อย่างใช้ StreamableHTTP
- การติดตั้งใช้งานแบบไม่เก็บสถานะ: โค้ดเดียวกันจะทำงานในเครื่องและเมื่อติดตั้งใช้งาน ตัวแปรสภาพแวดล้อม + API แบ็กเอนด์ = ไม่มีไฟล์กำหนดค่าในคอนเทนเนอร์
ขั้นตอนต่อไปคือ
ระดับที่ 2: การประมวลผลสัญญาณ SOS →
เรียนรู้วิธีประมวลผลสัญญาณขอความช่วยเหลือที่เข้ามาจากผู้รอดชีวิตคนอื่นๆ โดยใช้รูปแบบที่ขับเคลื่อนด้วยเหตุการณ์และการประสานงานของเอเจนต์ขั้นสูง