
1. 遇险信号

您的逃生舱撕裂了某个未知世界的大气层。每个面板上都会闪烁警告灯。导航系统坏了。通信中断。随着太空舱的紧急协议启动,AI 助理开始发出噼啪声:
“检测到幸存者。紧急降落成功。正在启动救援信标协议…"
“警告:必须进行身份验证。银河救援网络无法定位未注册的探险者。请确认您的身份以激活信标。”
您透过视口向外看。异星地貌一直延伸到地平线,有奇特的岩层、陌生的植被和色彩怪异的天空。在某个地方,您任务中的其他幸存者散落在该星球的表面。
不过,首先您需要在系统中存在。
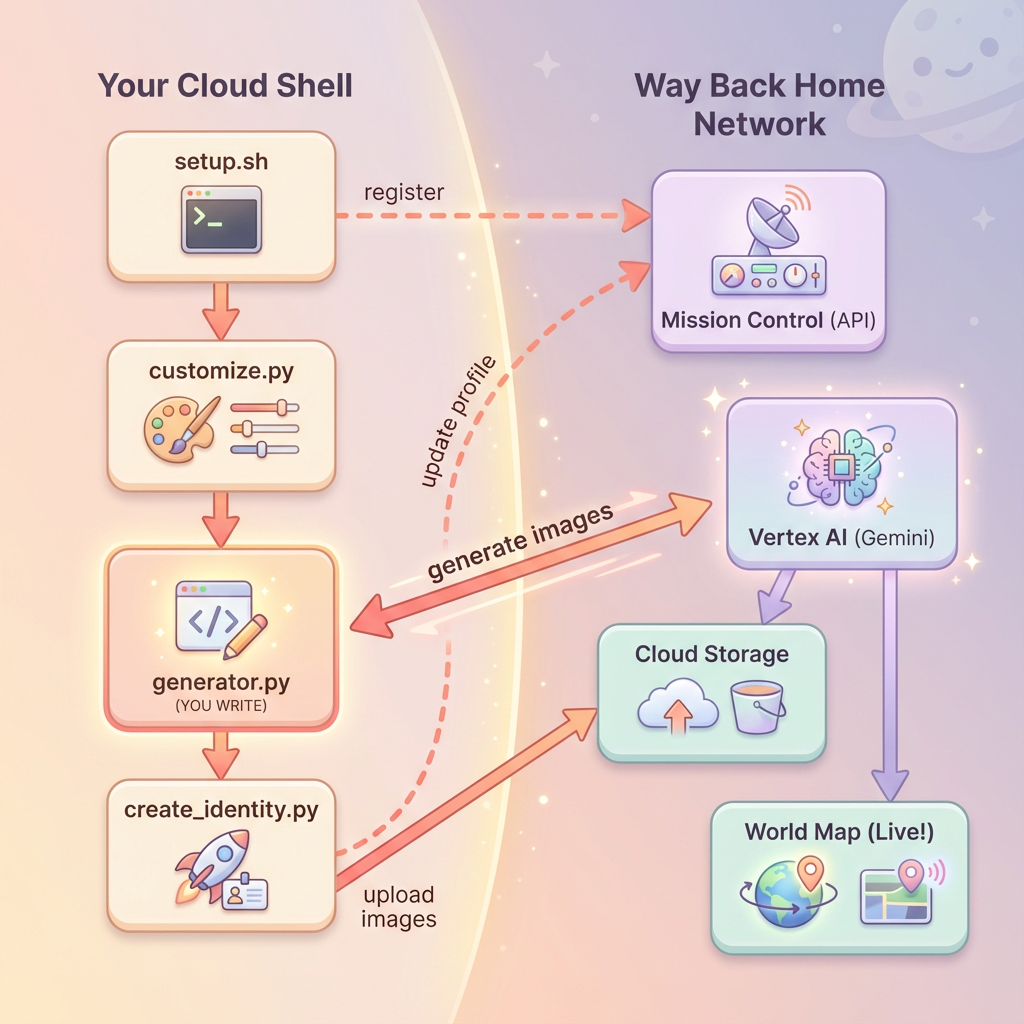
构建内容
在此关卡中,您将使用 Google 的 Gemini 图片生成模型(也称为 Nano Banana 🍌)通过多轮图片生成来创建独特的太空探险者身份。您的头像将显示在全局救援地图上,您工作坊活动中的所有其他幸存者都能看到。
学习内容
概念 | 说明 |
多轮图片生成 | 如何通过聊天会话在多次图片生成过程中保持角色一致性 |
图片提示工程 | 精心设计有效的提示,以生成具有特定限制的风格化一致输出 |
Gemini Image API (Nano Banana) | 通过 Python SDK 使用 Gemini 的原生图片生成功能 |
聊天会话 | 利用对话上下文进行迭代优化和保持角色一致性 |
完成本关卡后,您将:
✅ 使用文生图 AI 生成了探险者的肖像
✅ 使用多轮对话创建了统一的地图图标
✅ 向救援网络注册了您的身份
✅ 与其他探险者一起出现在实时世界地图上
让我们帮助您在地图上展示商家信息!📍
2. 准备环境
访问 Cloud Shell
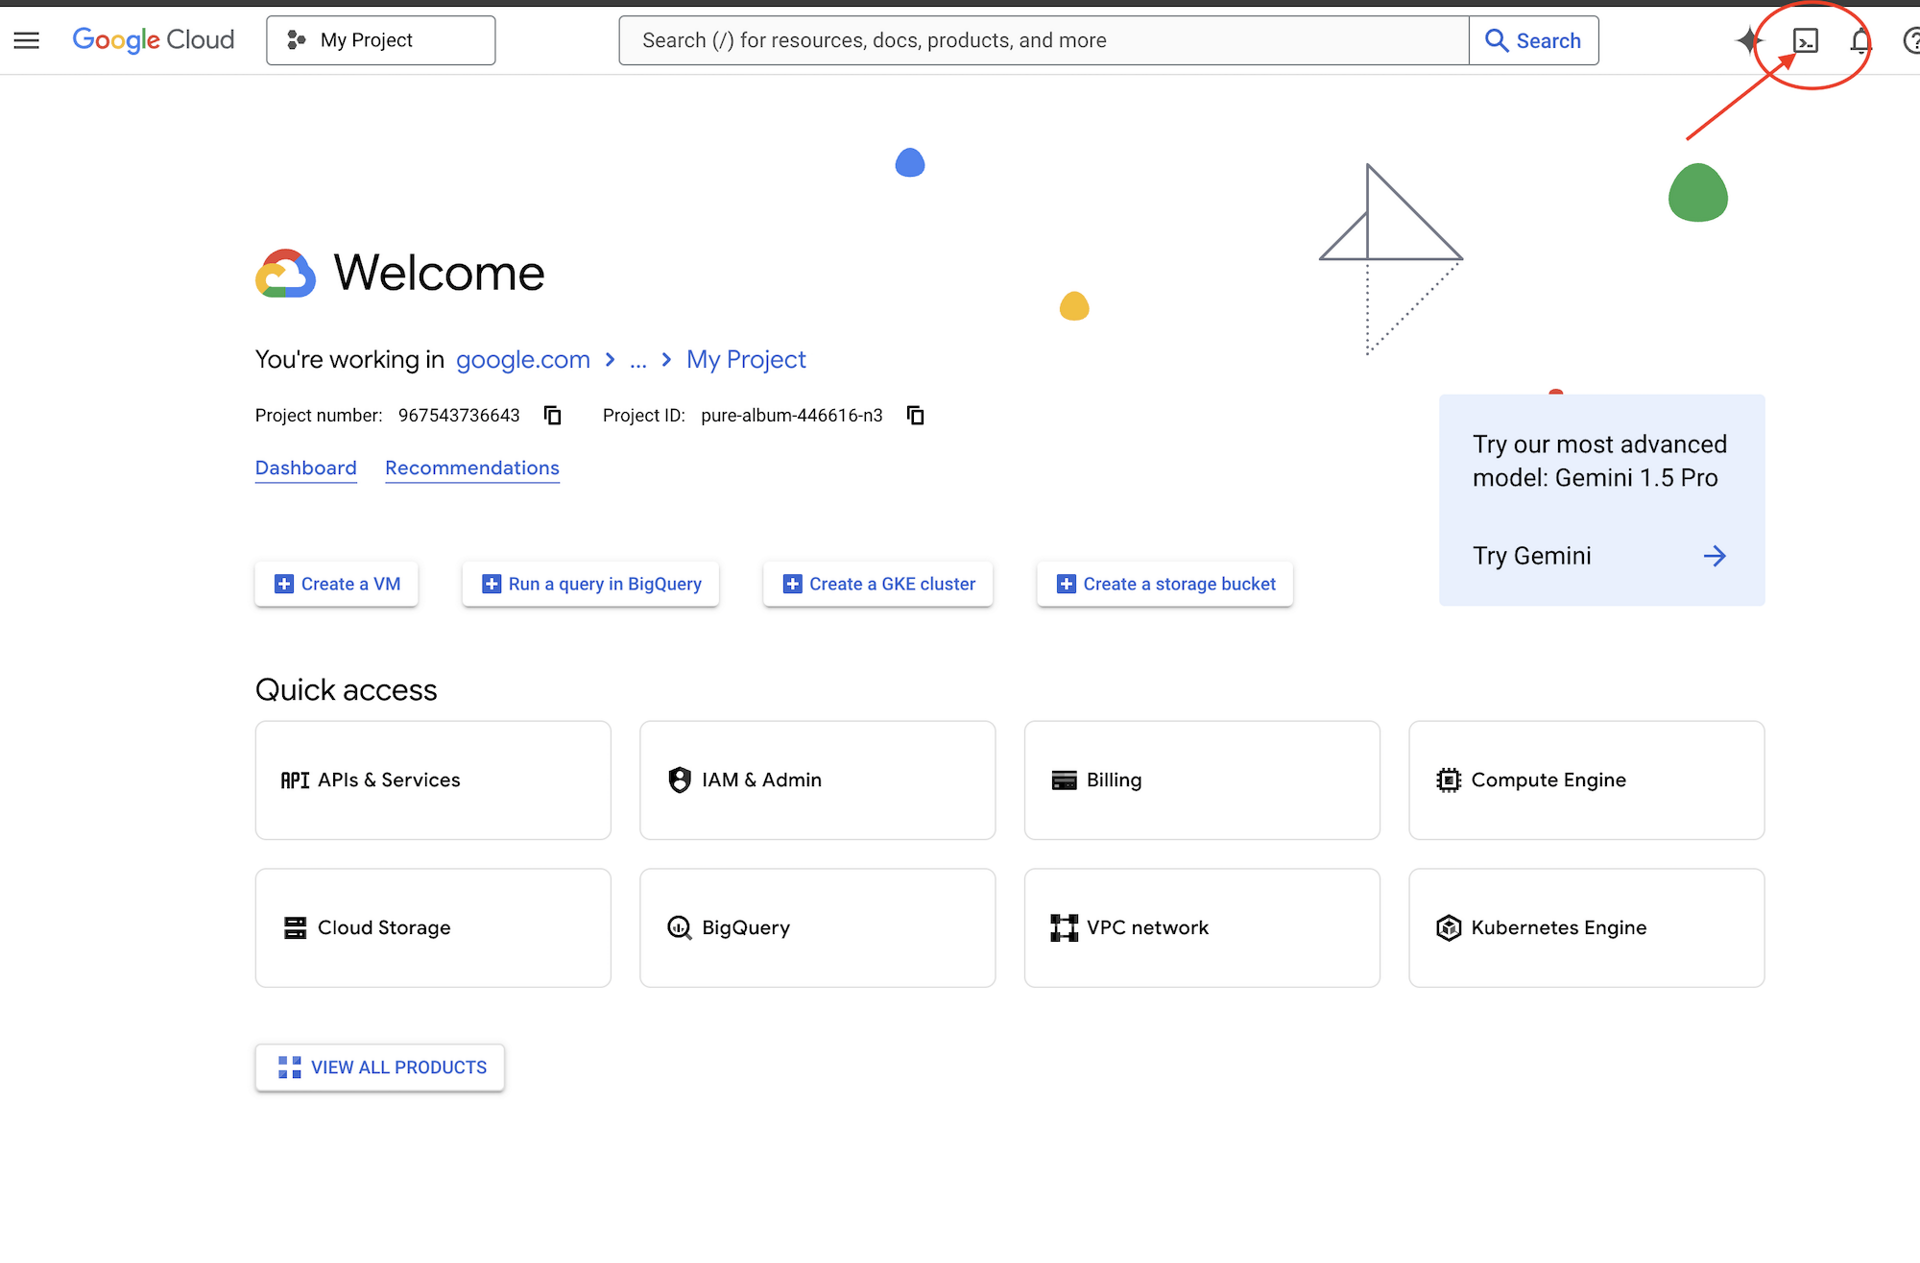
首先,我们将打开 Cloud Shell,这是一个基于浏览器的终端,其中预安装了 Google Cloud SDK 和其他必备工具。
点击 Google Cloud 控制台顶部的激活 Cloud Shell(这是右上角导航栏中的终端图标)。
Cloud Shell 打开后,验证您是否已通过身份验证:
# Check that you are logged in
gcloud auth list
您应该会看到自己的账号显示为 (ACTIVE)。
克隆代码库
克隆 Way Back Home 代码库并前往相应项目:
git clone https://github.com/gca-americas/way-back-home.git
cd way-back-home
安装依赖项
前往 Level 0 并安装所需的 Python 软件包:
cd level_0
uv sync
关键依赖项包括:
软件包 | 用途 |
| 用于生成图片的 Gemini API 客户端 |
| 用于向 Mission Control 发出 API 调用的 HTTP 客户端 |
| 图片处理和文件处理 |
验证设置
运行快速验证,确保一切配置正确无误:
uv run python ../scripts/verify_setup.py
您应该会看到:
✓ Authenticated as: your-email@google.com
✓ Python environment ready (uv)
✓ Ready to proceed!
您刚刚完成的内容
✓ 已打开 Cloud Shell
✓ 已通过 Google Cloud 进行身份验证
✓ 已克隆 Codelab 代码库
✓ 已使用 uv 安装 Python 依赖项
✓ 已验证设置
下一步:连接到 Mission Control - 设置脚本将自动配置您的 Google Cloud 云项目和 API。
3. 连接到任务控制中心
运行设置脚本
设置脚本会将您连接到 Way Back Home 救援网络,并预留您的探索者身份。从项目根目录运行:
cd $HOME/way-back-home
chmod +x scripts/setup.sh
./scripts/setup.sh
系统会提示您输入两项信息。
输入您的活动代码
活动代码用于标识您参加的是哪个研讨会活动。
如果您正在参加研讨会:请输入二维码、幻灯片或研讨会讲师提供的活动代码。
🚀 Welcome to Way Back Home!

Enter event code (from QR/slide): devfest-nyc-26
Validating event...
✓ Connected to: DevFest NYC 2026
如果您是自学:请输入 sandbox 加入公开学习环境。
🚀 Welcome to Way Back Home!

Enter event code (from QR/slide): sandbox
Validating event...
✓ Connected to: Way Back Home Sandbox
选择您的探索者名称
为您的探索器选择一个唯一名称。您在世界地图和排行榜上的显示方式。
Choose your explorer name: AstroAyo
✓ Username available!
如果您选择的名称已被同一活动中的其他参与者使用,请执行以下操作:
Choose your explorer name: SpaceExplorer
⚠️  That name is taken. Try another.
Choose your explorer name: SpaceExplorer42
✓ Username available!
设置完成
完成后,您会看到确认消息:
Initializing your explorer profile...

✓ Environment configured!
  Explorer ID: a1b2c3d4
  Starting coordinates: (47, 23)

Next: cd level_0 && python customize.py
导航到第 0 级
现在,前往 Level 0 目录(您已在模块 2 中安装了依赖项):
cd level_0
检查配置
查看已保存的内容(config.json 位于项目根目录中):
cat ../config.json
{
    "event_code": "devfest-nyc-26",
    "event_name": "DevFest NYC 2026",
    "username": "AstroAyo",
    "participant_id": "a1b2c3d4",
    "starting_x": 47,
    "starting_y": 23,
    "api_base": "https://api.waybackhome.dev",
    "project_id": "your-project-id"
}
后续脚本将使用此配置文件来向救援网络标识您的身份。
您刚刚完成的内容
✓ 已连接到 Mission Control API
✓ 已预留您的专属探险者名称
✓ 已收到您的参与者 ID 和起始坐标
✓ 已保存配置以供后续步骤使用
下一步:自定义探索器的外观。
4. 自定义探索器
运行自定义脚本
在生成虚拟形象之前,您需要就探险者的外观做出一些选择:
uv run python customize.py
选择西装颜色
为探险家的太空服选择颜色:
🎨 Let's create your explorer identity!

Select suit color:
  1. Deep Blue
  2. Crimson Red
  3. Forest Green
  4. Royal Purple
  5. Solar Gold
  6. Silver

Choice [1-6, default=6]: 1
✓ Deep Blue selected
描述您的 Explorer(可选)
您可以简要说明探索者的外观,也可以按 Enter 键随机分配:
Brief description of your explorer (or Enter for random):
Example: 'short dark hair, glasses, friendly smile'
> short dark hair, glasses, determined expression

✓ Preferences saved!
如果您在未输入任何内容的情况下按 Enter 键,系统会随机生成特征:
>
✓ Random traits: confident expression, short styled hair
配置已更新
您的偏好设置现已保存:
✓ Preferences saved!
Next: Open generator.py and follow the codelab instructions
验证更新后的配置:
cat ../config.json
您会看到已添加的偏好设置:
{
    "event_code": "devfest-nyc-26",
    "event_name": "DevFest NYC 2026",
    "username": "AstroAyo",
    "participant_id": "a1b2c3d4",
    "starting_x": 47,
    "starting_y": 23,
    "api_base": "https://api.waybackhome.dev",
    "project_id": "your-project-id",
    "suit_color": "deep blue with silver accents",
    "appearance": "short dark hair, glasses, determined expression"
}
您刚刚完成的内容
✓ 选择了套装颜色
✓ 定义了探险者的外观
✓ 配置已准备就绪,可以生成图片
下一步:主要活动 - 编写图片生成代码!
5. 构建虚拟形象生成器
这是核心学习模块。您将编写 Python 代码,使用 Gemini 的多轮图片生成功能 (Nano Banana) 生成专属的探索者头像。
打开生成器文件
在 Cloud Shell Editor 中打开头像生成器:
cloudshell edit generator.py
或者,在 Cloud Shell 中点击打开编辑器,然后前往 level_0 文件夹中的 generator.py。
了解文件结构
该文件包含起始代码和三个占位符部分,您将在其中添加实现:
"""
Level 0: Avatar Generator

This module generates your unique space explorer avatar using
multi-turn image generation with Gemini (Nano Banana) for
character consistency across portrait and icon.
"""

from google import genai
from google.genai import types
from PIL import Image
import json
import os
import io

# Load configuration from setup (config.json is in project root)
CONFIG_PATH = "../config.json"

with open(CONFIG_PATH) as f:
    config = json.load(f)

USERNAME = config["username"]
SUIT_COLOR = config["suit_color"]
APPEARANCE = config["appearance"]

# Initialize the Gemini client for Vertex AI
client = genai.Client(
    vertexai=True,
    project=os.environ.get("GOOGLE_CLOUD_PROJECT", config.get("project_id")),
    location="us-central1"
)


def generate_explorer_avatar() -> dict:
    """
    Generate portrait and icon using multi-turn chat for consistency.

    The key technique here is using a CHAT SESSION rather than independent
    API calls. This allows Gemini to "remember" the character it created
    in the first turn, ensuring the icon matches the portrait.

    Returns:
        dict with portrait_path and icon_path
    """

    # MODULE_5_STEP_1_CREATE_CHAT_SESSION
    # TODO: Create a chat session for multi-turn generation
    chat = None  # Replace this line

    # MODULE_5_STEP_2_GENERATE_PORTRAIT
    # TODO: Generate the explorer portrait
    portrait_image = None  # Replace this section

    # MODULE_5_STEP_3_GENERATE_ICON
    # TODO: Generate a consistent map icon
    icon_image = None  # Replace this section

    return {
        "portrait_path": "outputs/portrait.png",
        "icon_path": "outputs/icon.png"
    }


if __name__ == "__main__":
    # Create outputs directory if it doesn't exist
    os.makedirs("outputs", exist_ok=True)

    print(f"Generating avatar for {USERNAME}...")
    result = generate_explorer_avatar()
    print(f"✅ Avatar created!")
    print(f"   Portrait: {result['portrait_path']}")
    print(f"   Icon: {result['icon_path']}")
您需要将三个 TODO 部分替换为您的实现。
第 1 步:创建聊天会话
找到占位符 MODULE_5_STEP_1_CREATE_CHAT_SESSION,并将 chat = None # Replace this line 行替换为:
    # MODULE_5_STEP_1_CREATE_CHAT_SESSION
    # Create a chat session to maintain character consistency across generations.
    # The chat session preserves context between turns, so Gemini "remembers"
    # what it generated and can create consistent variations.
    chat = client.chats.create(
        model="gemini-2.5-flash-image",  # Nano Banana - Gemini with image generation
        config=types.GenerateContentConfig(
            response_modalities=["TEXT", "IMAGE"]
        )
    )
第 2 步:生成人像
找到 MODULE_5_STEP_2_GENERATE_PORTRAIT 并将 portrait_image = None # Replace this section 替换为以下代码:
    # MODULE_5_STEP_2_GENERATE_PORTRAIT
    # First turn: Generate the explorer portrait.
    # This establishes the character that will be referenced in subsequent turns.
    portrait_prompt = f"""Create a stylized space explorer portrait.

Character appearance: {APPEARANCE}
Name on suit patch: "{USERNAME}"
Suit color: {SUIT_COLOR}

CRITICAL STYLE REQUIREMENTS:
- Digital illustration style, clean lines, vibrant saturated colors
- Futuristic but weathered space suit with visible mission patches
- Background: Pure solid white (#FFFFFF) - absolutely no gradients, patterns, or elements
- Frame: Head and shoulders only, 3/4 view facing slightly left
- Lighting: Soft diffused studio lighting, no harsh shadows
- Expression: Determined but approachable
- Art style: Modern animated movie character portrait (similar to Pixar or Dreamworks style)

The white background is essential - the avatar will be composited onto a map."""

    print("🎨 Generating your portrait...")
    portrait_response = chat.send_message(portrait_prompt)

    # Extract the image from the response.
    # Gemini returns a response with multiple "parts" - we need to find the image part.
    portrait_image = None
    for part in portrait_response.candidates[0].content.parts:
        if part.inline_data is not None:
            # Found the image! Convert from bytes to PIL Image and save.
            image_bytes = part.inline_data.data
            portrait_image = Image.open(io.BytesIO(image_bytes))
            portrait_image.save("outputs/portrait.png")
            break

    if portrait_image is None:
        raise Exception("Failed to generate portrait - no image in response")

    print("✓ Portrait generated!")
第 3 步:生成地图图标
查找 MODULE_5_STEP_3_GENERATE_ICON 并将 icon_image = None # Replace this section 替换为:
    # MODULE_5_STEP_3_GENERATE_ICON
    # Second turn: Generate a consistent icon for the map.
    # Because we're in the same chat session, Gemini remembers the character
    # from the portrait and will maintain visual consistency.
    icon_prompt = """Now create a circular map icon of this SAME character.

CRITICAL REQUIREMENTS:
- SAME person, SAME face, SAME expression, SAME suit — maintain perfect consistency with the portrait
- Tighter crop: just the head and very top of shoulders
- Background: Pure solid white (#FFFFFF)
- Optimized for small display sizes (will be used as a 64px map marker)
- Keep the exact same art style, colors, and lighting as the portrait
- Square 1:1 aspect ratio

This icon must be immediately recognizable as the same character from the portrait."""

    print("🖼️  Creating map icon...")
    icon_response = chat.send_message(icon_prompt)

    # Extract the icon image from the response
    icon_image = None
    for part in icon_response.candidates[0].content.parts:
        if part.inline_data is not None:
            image_bytes = part.inline_data.data
            icon_image = Image.open(io.BytesIO(image_bytes))
            icon_image.save("outputs/icon.png")
            break

    if icon_image is None:
        raise Exception("Failed to generate icon - no image in response")

    print("✓ Icon generated!")
您完成的代码
添加所有三个部分后,您的 generate_explorer_avatar() 函数应如下所示:
def generate_explorer_avatar() -> dict:
    """
    Generate portrait and icon using multi-turn chat for consistency.

    The key technique here is using a CHAT SESSION rather than independent
    API calls. This allows Gemini to "remember" the character it created
    in the first turn, ensuring the icon matches the portrait.

    Returns:
        dict with portrait_path and icon_path
    """

    # MODULE_5_STEP_1_CREATE_CHAT_SESSION
    # Create a chat session to maintain character consistency across generations.
    # The chat session preserves context between turns, so Gemini "remembers"
    # what it generated and can create consistent variations.
    chat = client.chats.create(
        model="gemini-2.5-flash-image",  # Nano Banana - Gemini with image generation
        config=types.GenerateContentConfig(
            response_modalities=["TEXT", "IMAGE"]
        )
    )

    # MODULE_5_STEP_2_GENERATE_PORTRAIT
    # First turn: Generate the explorer portrait.
    # This establishes the character that will be referenced in subsequent turns.
    portrait_prompt = f"""Create a stylized space explorer portrait.

Character appearance: {APPEARANCE}
Name on suit patch: "{USERNAME}"
Suit color: {SUIT_COLOR}

CRITICAL STYLE REQUIREMENTS:
- Digital illustration style, clean lines, vibrant saturated colors
- Futuristic but weathered space suit with visible mission patches
- Background: Pure solid white (#FFFFFF) - absolutely no gradients, patterns, or elements
- Frame: Head and shoulders only, 3/4 view facing slightly left
- Lighting: Soft diffused studio lighting, no harsh shadows
- Expression: Determined but approachable
- Art style: Modern animated movie character portrait (similar to Pixar or Dreamworks style)

The white background is essential - the avatar will be composited onto a map."""

    print("🎨 Generating your portrait...")
    portrait_response = chat.send_message(portrait_prompt)

    # Extract the image from the response.
    # Gemini returns a response with multiple "parts" - we need to find the image part.
    portrait_image = None
    for part in portrait_response.candidates[0].content.parts:
        if part.inline_data is not None:
            # Found the image! Convert from bytes to PIL Image and save.
            image_bytes = part.inline_data.data
            portrait_image = Image.open(io.BytesIO(image_bytes))
            portrait_image.save("outputs/portrait.png")
            break

    if portrait_image is None:
        raise Exception("Failed to generate portrait - no image in response")

    print("✓ Portrait generated!")

    # MODULE_5_STEP_3_GENERATE_ICON
    # Second turn: Generate a consistent icon for the map.
    # Because we're in the same chat session, Gemini remembers the character
    # from the portrait and will maintain visual consistency.
    icon_prompt = """Now create a circular map icon of this SAME character.

CRITICAL REQUIREMENTS:
- SAME person, SAME face, SAME expression, SAME suit — maintain perfect consistency with the portrait
- Tighter crop: just the head and very top of shoulders
- Background: Pure solid white (#FFFFFF)
- Optimized for small display sizes (will be used as a 64px map marker)
- Keep the exact same art style, colors, and lighting as the portrait
- Square 1:1 aspect ratio

This icon must be immediately recognizable as the same character from the portrait."""

    print("🖼️  Creating map icon...")
    icon_response = chat.send_message(icon_prompt)

    # Extract the icon image from the response
    icon_image = None
    for part in icon_response.candidates[0].content.parts:
        if part.inline_data is not None:
            image_bytes = part.inline_data.data
            icon_image = Image.open(io.BytesIO(image_bytes))
            icon_image.save("outputs/icon.png")
            break

    if icon_image is None:
        raise Exception("Failed to generate icon - no image in response")

    print("✓ Icon generated!")

    return {
        "portrait_path": "outputs/portrait.png",
        "icon_path": "outputs/icon.png"
    }
保存文件
请务必节省 generator.py:
- Cloud Shell 编辑器:Ctrl+S (Windows/Linux) 或 Cmd+S (Mac)
- vim:按 Escape 键,然后输入
:wq并按 Enter 键
您刚刚构建的内容
✓ 创建了用于多轮图片生成的聊天会话
✓ 撰写了详细的提示,用于生成具有样式限制的人像
✓ 使用对话上下文生成了一致的地图图标
✓ 学习了如何解析 Gemini 回答中的图片数据
掌握的关键概念:
概念 | 学习内容 |
聊天会话 |
|
响应模态 |
|
提示结构 | 主题 → 变量 → 样式 → 技术限制 |
角色一致性 | 同一聊天会话 = 图片中的角色相同 |
响应解析 | 从响应部分的 |
下一步:运行代码,在地图上看到自己!
6. 生成并注册
设置项目 ID
确保项目 ID 可用作环境变量:
export GOOGLE_CLOUD_PROJECT=$(gcloud config get-value project)
运行身份创建器
现在,运行用于编排生成、上传和注册的主脚本:
uv run python create_identity.py
您将实时看到生成进度:
注意:您的头像可能需要最多 5 秒才能显示在已发布的地图上,因此如果您没有立即在已发布的地图上看到自己,请刷新页面。
🚀 Creating identity for AstroAyo...

🎨 Generating your portrait...
✓ Portrait generated!
🖼️  Creating map icon...
✓ Icon generated!

☁️  Uploading to mission database...
✓ Avatar uploaded!

📍 Registering with rescue network...
✓ Registration complete!

╔═══════════════════════════════════════════════════════════════╗
║                    ✅ IDENTITY CONFIRMED!                      ║
╠═══════════════════════════════════════════════════════════════╣
║                                                               ║
║  Explorer: AstroAyo                                           ║
║  Location: (47, 23) — unconfirmed                             ║
║                                                               ║
║  🗺️  You're now on the map!                                   ║
║  https://waybackhome.dev/e/devfest-nyc-26                     ║
║                                                               ║
║  NEXT: Proceed to Level 1 to pinpoint your exact location!   ║
║                                                               ║
╚═══════════════════════════════════════════════════════════════╝
查看生成的虚拟形象
在本地查看生成的图片:
# List the generated files
ls -la outputs/

# Download to view on your local machine
cloudshell download outputs/portrait.png
cloudshell download outputs/icon.png
或者,您也可以直接在 Cloud Shell 编辑器中查看这些图片,只需前往 outputs/ 文件夹并点击图片文件即可。
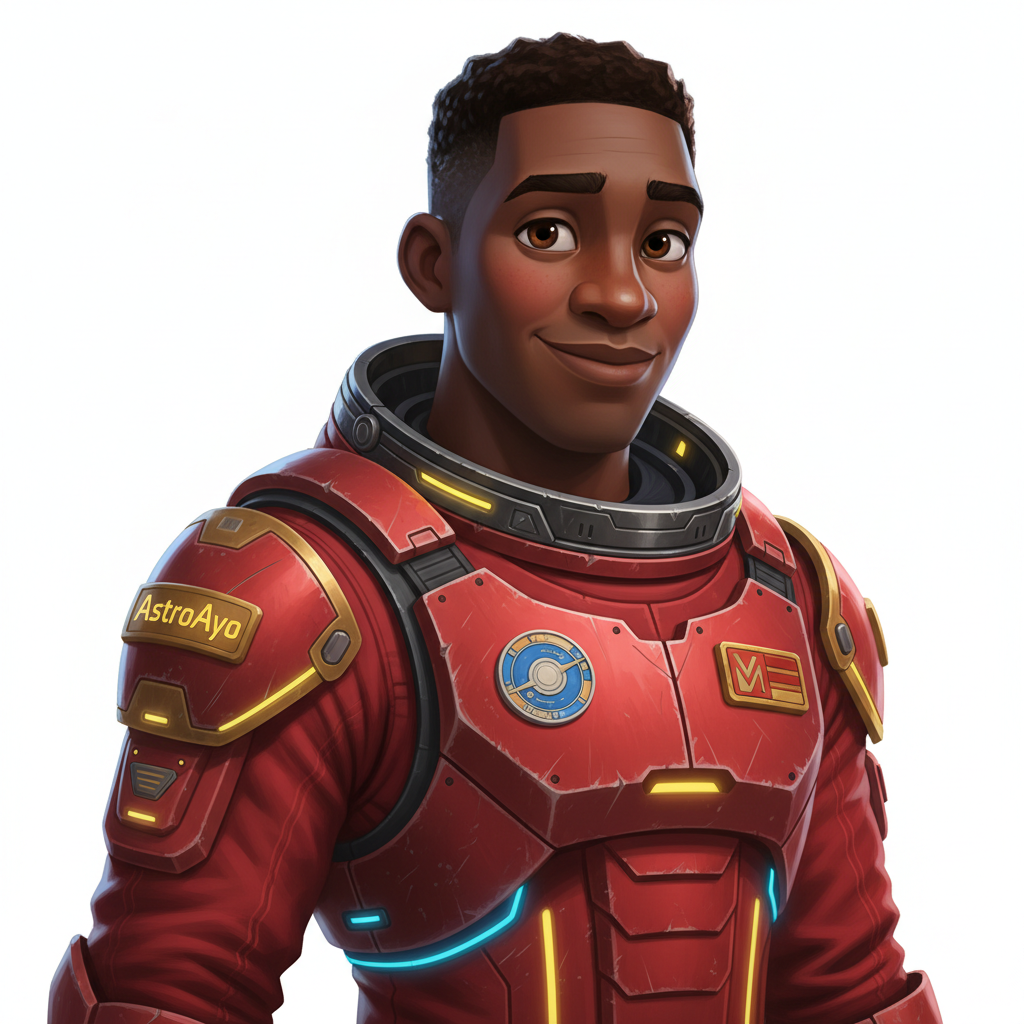
生成的头像和图标将如下图所示:
![]()
在地图上查看自己的位置!
打开输出中显示的世界地图网址:
https://waybackhome.dev/e/{your-event-code}
例如:https://waybackhome.dev/e/devfest-nyc-26
在地图上找到您的头像!您会看到:
- 用于标记您在地球表面的位置的图标
- 您的探索者名称(显示在图标下方的标签)
- 在标记周围缓慢闪烁的变暗的信标
![]()
点击标记即可在详情卡片中查看完整的人像。
对虚拟形象不满意?重新生成!
如果您想要其他头像,可以重新生成:
# Option 1: Change your appearance settings first
uv run python customize.py

# Option 2: Just regenerate with current settings
uv run python create_identity.py
每次运行 create_identity.py 时,它都会生成一个全新的虚拟形象(新的聊天会话 = 新的角色),并更新您的注册信息。您可以随意迭代,直到对结果感到满意为止!
问题排查
您刚刚完成的内容
✓ 生成了专属的探险者肖像
✓ 创建了统一的地图图标
✓ 将资源上传到了任务控制中心
✓ 向救援网络注册了您的身份
✓ 出现在了实时世界地图上!
恭喜,探索者!您现在已加入救援网络。信标处于有效状态(但亮度较暗),其他幸存者可以在地图上看到您。
7. 总结
您构建的内容
仅用了 10 分钟,您就使用多轮 AI 图片生成创建了一个完整的虚拟形象生成系统:
┌─────────────────────────────────────────────────────────────┐
│                     Your Creation                           │
├─────────────────────────────────────────────────────────────┤
│                                                             │
│   📝 Input                       🖼️  Output                  │
│   ──────────                     ────────                    │
│   • Explorer name                • Stylized portrait         │
│   • Suit color                   • Consistent map icon       │
│   • Appearance description       • Live map presence         │
│                                                              │
├─────────────────────────────────────────────────────────────┤
│                                                             │
│   🧠 Techniques You Used                                     │
│   ──────────────────────                                    │
│   • Multi-turn chat sessions for character consistency      │
│   • Structured prompt engineering with style constraints    │
│   • Response parsing to extract generated images            │
│   • API integration for cloud registration                  │
│                                                             │
└─────────────────────────────────────────────────────────────┘
重点小结
课程 | 重要意义 |
聊天会话可保持上下文 | 对于在多张图片中生成一致的角色至关重要,可避免出现变化漂移 |
提示结构至关重要 | 明确的限制条件(白色背景、特定样式、取景)可生成可预测的、可用于生产用途的结果 |
多轮对话优于独立调用 | 聊天中的每条消息都基于之前的上下文,从而实现迭代改进和一致性 |
响应模态控制输出 | 必须设置 |
费用摘要
在此级别中,您使用 Gemini 2.5 Flash(Nano Banana)生成了 2 张图片:
项 | 令牌 | 费用 |
纵向 (1024×1024) | 约 1,290 个输出 token | 约 0.039 美元 |
图标 (1024×1024) | 约 1,290 个输出 token | 约 0.039 美元 |
总计 | 约 2,580 个 token | ~0.08 美元 |
历程仍在继续
您的探索者身份已确认,但存在一个问题:您的位置信息未确认。
查看世界地图,您的信标会变暗,并缓慢闪烁。救援网络知道您存在,但不知道您的确切位置。您可能位于地球表面广阔区域内的任何位置。
在第 1 级:精确定位中,您将:
- 使用 Google 的智能体开发套件 (ADK) 构建多智能体系统
- 创建用于地质、植物学和天文学分析的 MCP 服务器
- 处理多模态输入(来自事故现场的图片)
- 使用 AI 生成已确认位置的地形图
- 点亮信标,以便救援队找到您!
第 1 级介绍了更高级的概念:多智能体编排、Model Context Protocol (MCP) 和生产部署模式。您将从使用单一模型功能到构建完整的智能体系统。
清理(可选)
如果您想清理本地文件(从 level_0 目录运行):
rm -rf outputs/
deactivate  # Exit virtual environment
您在救援网络中的注册信息会保留,即使删除本地文件,您仍会显示在地图上。图片存储在云端,而不是本地。
资源
您的信标正在等待确认。期待在第 1 级与您相见,探索者。🚀
8. 奖励:基于照片的头像(可选)
何时使用“照片转头像”功能
在以下情况下,您可能更喜欢此方法:
- 您希望自己的虚拟形象与您本人相似
- 您有想要进行风格化的特定照片
- 您想探索 Gemini 的图片到图片转换功能
工作方式
您无需仅根据文字描述生成角色,而是可以提供一张照片,并让 Gemini 在保留人物样貌的同时转换照片:
![]()
上传您的照片
首先,将照片上传到 Cloud Shell:
- 在 Cloud Shell 中,点击终端工具栏中的三点状菜单 (⋮)
- 选择上传
- 选择一张清晰的头像照片(JPEG 或 PNG)
- 记下上传的路径(例如
/home/your-username/my_photo.jpg)
修改生成器
如需使用照片,您需要修改 generator.py 中的人像生成步骤。将纯文本提示替换为包含您照片的多模态提示:
    # MODULE_5_STEP_2_GENERATE_PORTRAIT (Photo-based version)

    # Load your photo
    photo_path = "/home/your-username/my_photo.jpg"  # Update this path!
    user_photo = Image.open(photo_path)

    # Convert photo to bytes for the API
    photo_buffer = io.BytesIO()
    user_photo.save(photo_buffer, format="JPEG")
    photo_bytes = photo_buffer.getvalue()

    portrait_prompt = f"""Transform this person into a stylized space explorer portrait.

PRESERVE from the original photo:
- The person's facial features, face shape, and likeness
- Their general expression and personality
- Any distinctive features (glasses, facial hair, etc.)

TRANSFORM with this style:
- Digital illustration style, clean lines, vibrant saturated colors
- Add a futuristic space suit with the name "{USERNAME}" on a shoulder patch
- Suit color: {SUIT_COLOR}
- Background: Pure solid white (#FFFFFF) - no gradients or elements
- Frame: Head and shoulders, 3/4 view
- Lighting: Soft diffused studio lighting
- Art style: Modern animated movie character (Pixar/Dreamworks aesthetic)

The result should be clearly recognizable as THIS specific person, but illustrated as a heroic space explorer."""

    print("🎨 Transforming your photo into an explorer portrait...")

    # Send both the prompt AND the image
    portrait_response = chat.send_message([
        portrait_prompt,
        types.Part.from_bytes(data=photo_bytes, mime_type="image/jpeg")
    ])

    # Rest of the extraction code stays the same...
多轮对话一致性仍有效
多轮对话方法在基于照片的生成中以相同的方式运作:
- 第 1 轮:照片 + 提示 → 风格化的人像(您的肖像,插画风格)
- 第 2 轮:“为这个相同的角色创建图标”→ 一致的图标
由于聊天会话会记住其创建的风格化版本(而不是原始照片),因此该图标将与转换后的肖像完全一致。
隐私保护注意事项
在 Vertex AI Studio 中试用
您还可以在编写代码之前,在 Google Cloud 控制台中以交互方式试验照片转换:
- 前往 Vertex AI Studio
- 选择具有图片功能的 Gemini 模型
- 使用附件按钮上传照片
- 输入转换提示
- 不断调整样式,直到您对结果感到满意为止
这种互动式方法非常适合在提交代码之前尝试提示并实时查看结果!
您学到的内容(奖励)
✓ 如何使用 Gemini 进行图生图转换
✓ 在一条消息中发送多模态内容(文字 + 图片)
✓ 在应用艺术风格转换的同时保留相似度
✓ 基于照片的 AI 生成功能的隐私权注意事项