
1. 求救信號

你的逃生艙劃破未知世界的的大氣層,每個面板都會閃爍警示燈。導航系統壞掉了,通訊服務中斷。太空艙的緊急通訊協定啟動後,AI 助理開始運作:
「偵測到倖存者,緊急降落成功。Initiating rescue beacon protocol..."
「警告:必須完成身分驗證。銀河救援網路無法找到未註冊的探險家。請確認您的身分,以啟用信標。」
你從觀景窗往外看,外星地景延伸至地平線,有奇異的岩層結構、不熟悉的植被和顏色怪異的天空。在某處,你任務中的其他倖存者散落在這個星球的表面。
但首先,您必須存在於系統中。
建構項目
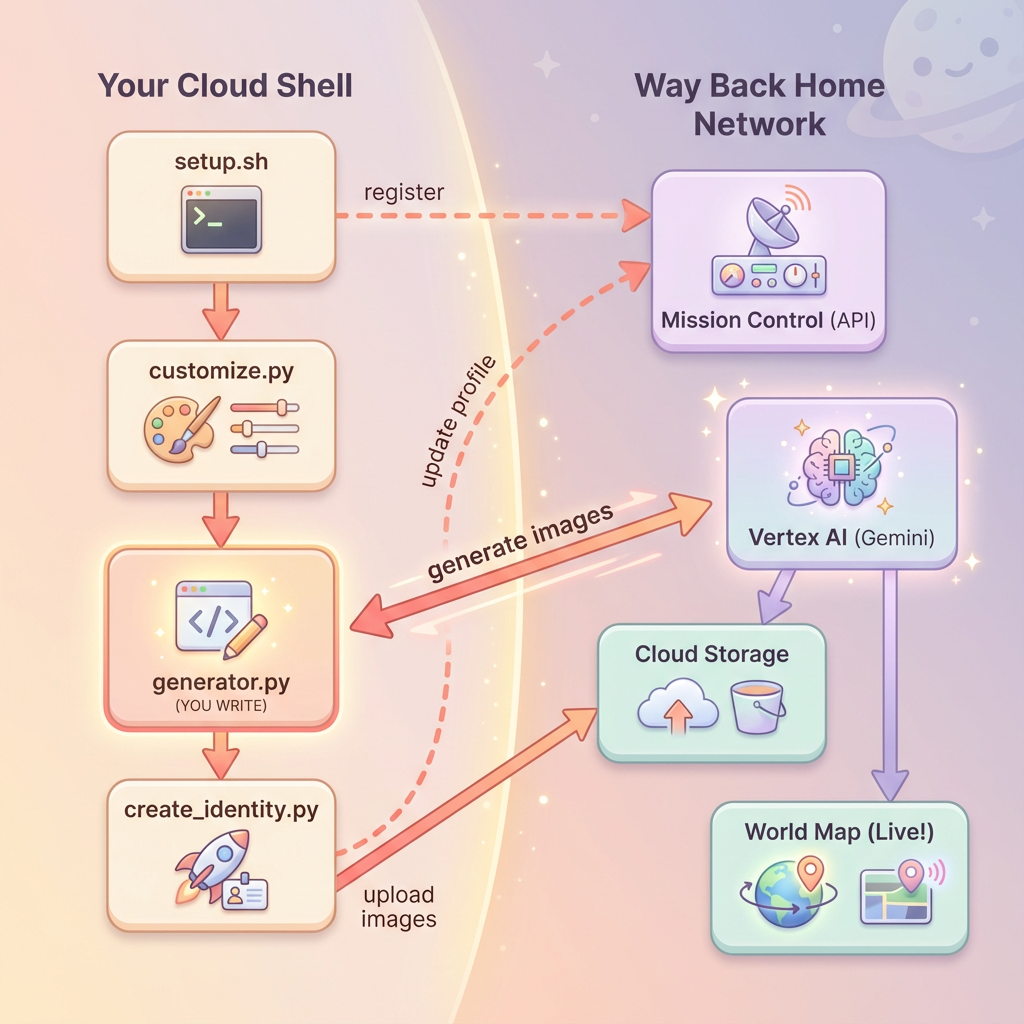
在這個關卡中,您將使用 Google 的 Gemini 圖像生成模型 (又稱 Nano Banana 🍌) 進行多輪圖像生成,打造專屬的太空探險家身分。您的虛擬人偶會顯示在全球救援地圖上,讓工作坊活動中的所有其他倖存者都能看到。
課程內容
概念 | 說明 |
多輪圖像生成 | 如何透過對話工作階段,在多張生成圖像中維持角色一致性 |
圖片提示工程 | 設計有效的提示,在特定限制下生成風格一致的輸出內容 |
Gemini Image API (Nano Banana) | 透過 Python SDK 使用 Gemini 的原生圖像生成功能 |
對話工作階段 | 運用對話脈絡進行反覆修正,並確保角色一致性 |
完成本級別後,您將:
✅ 使用文字轉圖像 AI 生成探索者的肖像
✅ 使用多輪對話建立一致的地圖圖示
✅ 向救援網路註冊身分
✅ 與其他探索者一起顯示在即時世界地圖上
讓我們在地圖上顯示你的位置!📍
2. 準備環境
存取 Cloud Shell
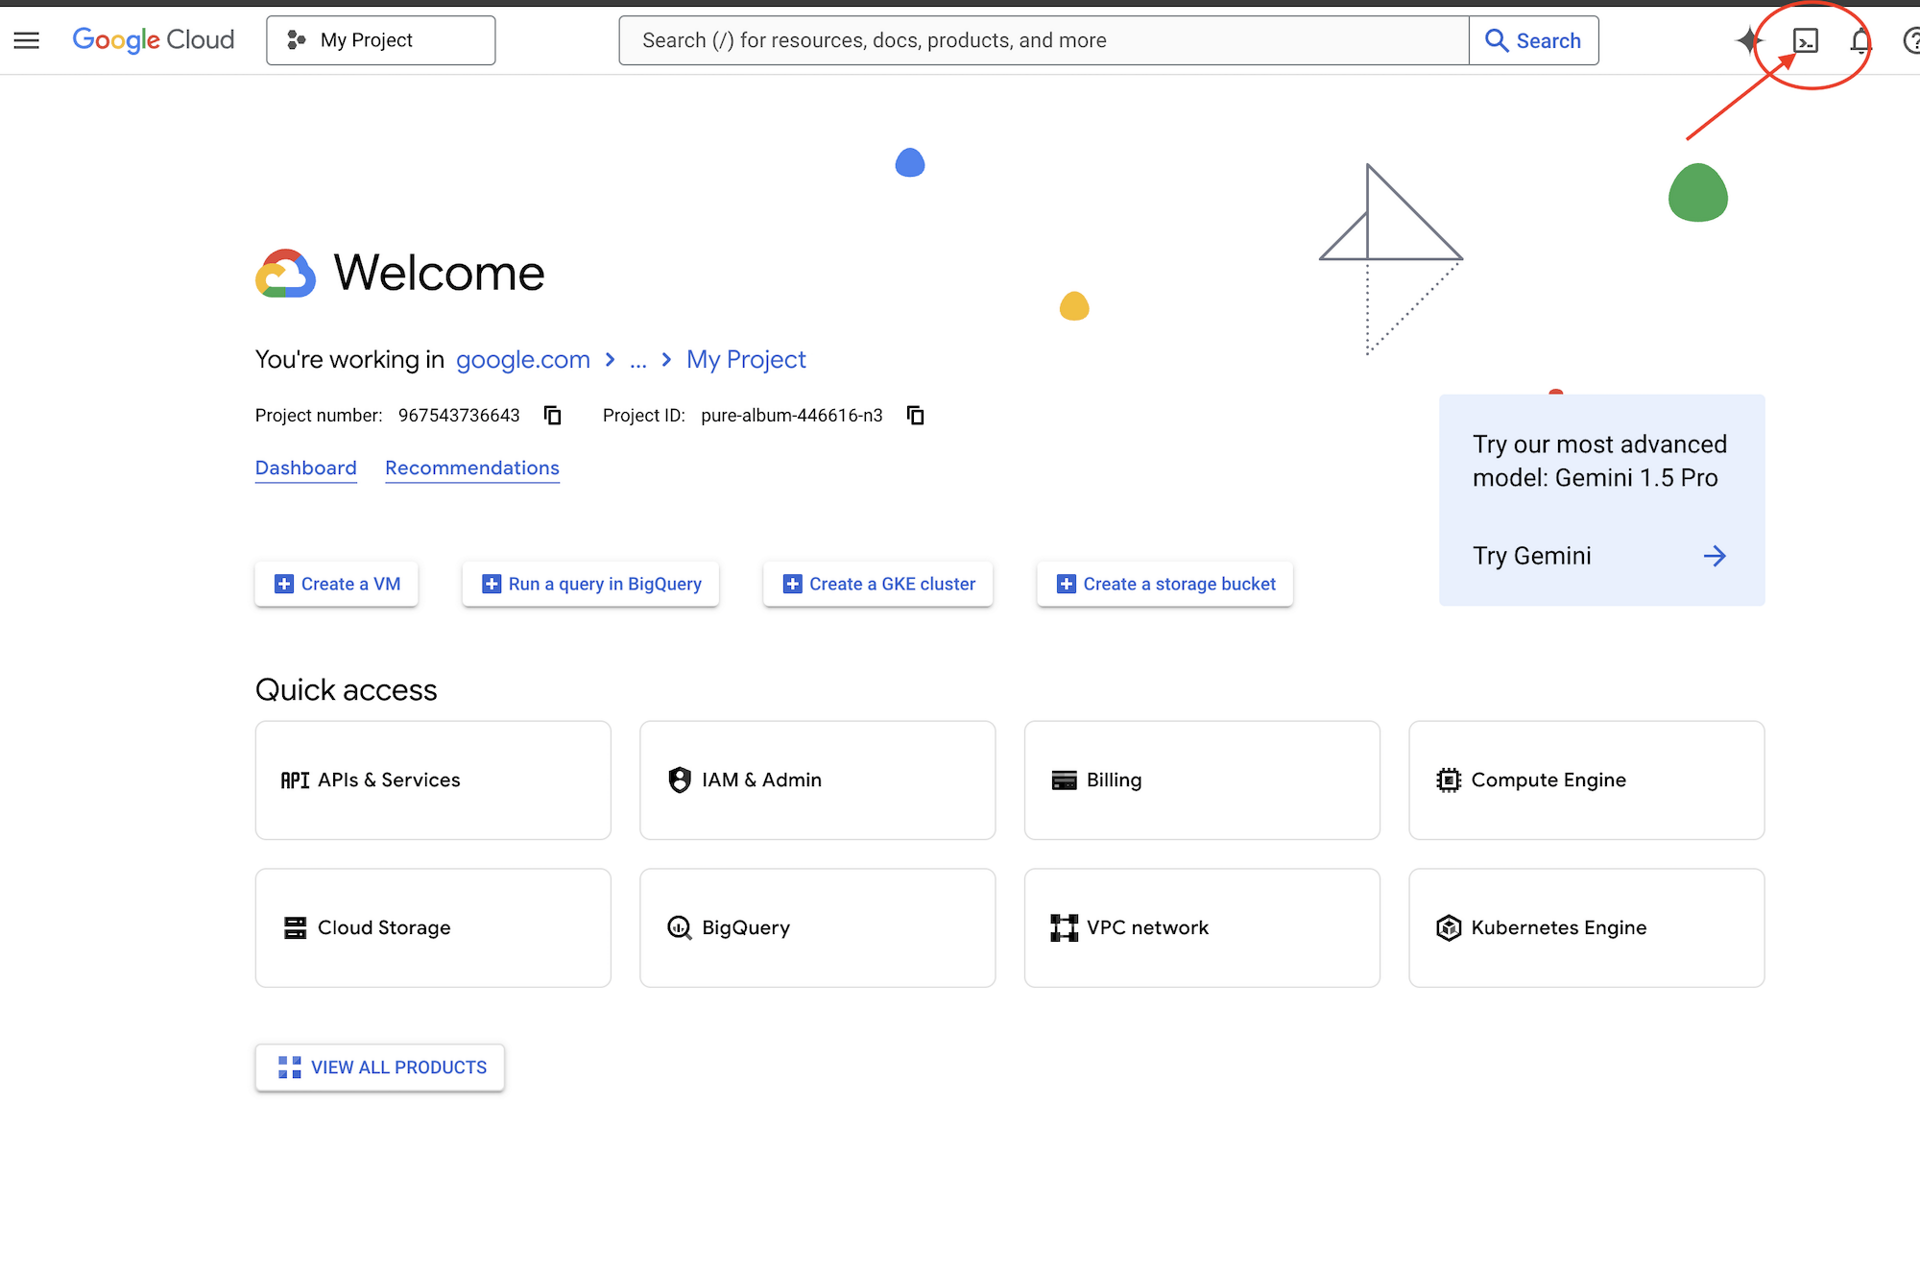
首先,我們要開啟 Cloud Shell。這是以瀏覽器為基礎的終端機,已預先安裝 Google Cloud SDK 和其他必要工具。
點選 Google Cloud 控制台頂端的「啟用 Cloud Shell」 (右上角導覽列中的終端機圖示)。
開啟 Cloud Shell 後,請確認您已通過驗證:
# Check that you are logged in
gcloud auth list
您的帳戶應該會顯示為 (ACTIVE)。
複製存放區
複製 Way Back Home 存放區,然後前往專案:
git clone https://github.com/gca-americas/way-back-home.git
cd way-back-home
安裝依附元件
前往 Level 0 並安裝必要的 Python 套件:
cd level_0
uv sync
主要依附元件如下:
套件 | 目的 |
| 用於生成圖片的 Gemini API 用戶端 |
| 用於對 Mission Control 進行 API 呼叫的 HTTP 用戶端 |
| 圖片處理和檔案處理 |
驗證設定
快速驗證,確保所有設定皆正確無誤:
uv run python ../scripts/verify_setup.py
如下所示:
✓ Authenticated as: your-email@google.com
✓ Python environment ready (uv)
✓ Ready to proceed!
您剛完成的項目
✓ 開啟 Cloud Shell
✓ 向 Google Cloud 進行驗證
✓ 複製程式碼研究室存放區
✓ 使用 uv
安裝 Python 依附元件 ✓ 驗證設定
後續步驟:連線至 Mission Control,設定指令碼會自動設定 Google 雲端專案和 API。
3. 連線至任務控制中心
執行設定指令碼
設定指令碼會將你連線至 Way Back Home 救援網路,並保留你的探索者身分。從專案根目錄執行:
cd $HOME/way-back-home
chmod +x scripts/setup.sh
./scripts/setup.sh
系統會提示您輸入兩項資訊。
輸入活動代碼
活動代碼可識別你參加的講習課程活動。
如果你在研討會現場:輸入 QR code、投影片或研討會講師提供的活動代碼。
🚀 Welcome to Way Back Home!

Enter event code (from QR/slide): devfest-nyc-26
Validating event...
✓ Connected to: DevFest NYC 2026
如果是自學:輸入 sandbox 即可加入公開學習環境。
🚀 Welcome to Way Back Home!

Enter event code (from QR/slide): sandbox
Validating event...
✓ Connected to: Way Back Home Sandbox
選擇探索者名稱
為探索器選擇專屬名稱,世界地圖和排行榜會顯示此個人資料。
Choose your explorer name: AstroAyo
✓ Username available!
如果所選名稱已由同一活動的其他出席者使用:
Choose your explorer name: SpaceExplorer
⚠️  That name is taken. Try another.
Choose your explorer name: SpaceExplorer42
✓ Username available!
安裝完成
完成後,你會看到確認訊息:
Initializing your explorer profile...

✓ Environment configured!
  Explorer ID: a1b2c3d4
  Starting coordinates: (47, 23)

Next: cd level_0 && python customize.py
前往第 0 層
現在前往 Level 0 目錄 (您已從第 2 模組安裝依附元件):
cd level_0
檢查設定
查看儲存的內容 (config.json 位於專案根目錄中):
cat ../config.json
{
    "event_code": "devfest-nyc-26",
    "event_name": "DevFest NYC 2026",
    "username": "AstroAyo",
    "participant_id": "a1b2c3d4",
    "starting_x": 47,
    "starting_y": 23,
    "api_base": "https://api.waybackhome.dev",
    "project_id": "your-project-id"
}
後續指令碼會使用這個設定檔,向救援網路驗證您的身分。
您剛完成的項目
✓ 已連線至 Mission Control API
✓ 已預留專屬探索者名稱
✓ 已收到參與者 ID 和起始座標
✓ 已儲存設定,可進行後續步驟
下一步:自訂多層檢視的外觀。
4. 自訂多層檢視
執行自訂指令碼
生成虛擬化身前,請先選擇探索者的外觀:
uv run python customize.py
選取西裝顏色
選擇探險家的太空裝顏色:
🎨 Let's create your explorer identity!

Select suit color:
  1. Deep Blue
  2. Crimson Red
  3. Forest Green
  4. Royal Purple
  5. Solar Gold
  6. Silver

Choice [1-6, default=6]: 1
✓ Deep Blue selected
描述你的 Explorer (選填)
你可以簡短描述探索者的外觀,或按 Enter 隨機指派:
Brief description of your explorer (or Enter for random):
Example: 'short dark hair, glasses, friendly smile'
> short dark hair, glasses, determined expression

✓ Preferences saved!
如果未輸入任何內容就按下 Enter 鍵,系統會隨機產生特徵:
>
✓ Random traits: confident expression, short styled hair
已更新設定
系統現在會儲存你的偏好設定:
✓ Preferences saved!
Next: Open generator.py and follow the codelab instructions
驗證更新後的設定:
cat ../config.json
您會看到新增的偏好設定:
{
    "event_code": "devfest-nyc-26",
    "event_name": "DevFest NYC 2026",
    "username": "AstroAyo",
    "participant_id": "a1b2c3d4",
    "starting_x": 47,
    "starting_y": 23,
    "api_base": "https://api.waybackhome.dev",
    "project_id": "your-project-id",
    "suit_color": "deep blue with silver accents",
    "appearance": "short dark hair, glasses, determined expression"
}
您剛完成的項目
✓ 選取套裝顏色
✓ 定義探索者的外觀
✓ 設定完成,可生成圖片
下一步:主要活動,也就是撰寫圖片生成程式碼!
5. 建構虛擬化身生成器
這是核心學習單元。您將編寫 Python 程式碼,使用 Gemini 的多輪圖像生成功能 (Nano Banana) 生成專屬的探險家虛擬人偶。
開啟產生器檔案
在 Cloud Shell 編輯器中開啟虛擬人偶產生器:
cloudshell edit generator.py
或者,在 Cloud Shell 中點選「開啟編輯器」,然後前往 level_0 資料夾中的 generator.py。
瞭解檔案結構
這個檔案包含範例程式碼和三個預留位置區段,您將在這些區段中新增實作項目:
"""
Level 0: Avatar Generator

This module generates your unique space explorer avatar using
multi-turn image generation with Gemini (Nano Banana) for
character consistency across portrait and icon.
"""

from google import genai
from google.genai import types
from PIL import Image
import json
import os
import io

# Load configuration from setup (config.json is in project root)
CONFIG_PATH = "../config.json"

with open(CONFIG_PATH) as f:
    config = json.load(f)

USERNAME = config["username"]
SUIT_COLOR = config["suit_color"]
APPEARANCE = config["appearance"]

# Initialize the Gemini client for Vertex AI
client = genai.Client(
    vertexai=True,
    project=os.environ.get("GOOGLE_CLOUD_PROJECT", config.get("project_id")),
    location="us-central1"
)


def generate_explorer_avatar() -> dict:
    """
    Generate portrait and icon using multi-turn chat for consistency.

    The key technique here is using a CHAT SESSION rather than independent
    API calls. This allows Gemini to "remember" the character it created
    in the first turn, ensuring the icon matches the portrait.

    Returns:
        dict with portrait_path and icon_path
    """

    # MODULE_5_STEP_1_CREATE_CHAT_SESSION
    # TODO: Create a chat session for multi-turn generation
    chat = None  # Replace this line

    # MODULE_5_STEP_2_GENERATE_PORTRAIT
    # TODO: Generate the explorer portrait
    portrait_image = None  # Replace this section

    # MODULE_5_STEP_3_GENERATE_ICON
    # TODO: Generate a consistent map icon
    icon_image = None  # Replace this section

    return {
        "portrait_path": "outputs/portrait.png",
        "icon_path": "outputs/icon.png"
    }


if __name__ == "__main__":
    # Create outputs directory if it doesn't exist
    os.makedirs("outputs", exist_ok=True)

    print(f"Generating avatar for {USERNAME}...")
    result = generate_explorer_avatar()
    print(f"✅ Avatar created!")
    print(f"   Portrait: {result['portrait_path']}")
    print(f"   Icon: {result['icon_path']}")
您會將三個 TODO 區段替換為自己的實作項目。
步驟 1:建立即時通訊工作階段
找出預留位置 MODULE_5_STEP_1_CREATE_CHAT_SESSION,並將 chat = None # Replace this line 行替換為:
    # MODULE_5_STEP_1_CREATE_CHAT_SESSION
    # Create a chat session to maintain character consistency across generations.
    # The chat session preserves context between turns, so Gemini "remembers"
    # what it generated and can create consistent variations.
    chat = client.chats.create(
        model="gemini-2.5-flash-image",  # Nano Banana - Gemini with image generation
        config=types.GenerateContentConfig(
            response_modalities=["TEXT", "IMAGE"]
        )
    )
步驟 2:生成肖像
找出 MODULE_5_STEP_2_GENERATE_PORTRAIT,然後將 portrait_image = None # Replace this section 替換為下列程式碼:
    # MODULE_5_STEP_2_GENERATE_PORTRAIT
    # First turn: Generate the explorer portrait.
    # This establishes the character that will be referenced in subsequent turns.
    portrait_prompt = f"""Create a stylized space explorer portrait.

Character appearance: {APPEARANCE}
Name on suit patch: "{USERNAME}"
Suit color: {SUIT_COLOR}

CRITICAL STYLE REQUIREMENTS:
- Digital illustration style, clean lines, vibrant saturated colors
- Futuristic but weathered space suit with visible mission patches
- Background: Pure solid white (#FFFFFF) - absolutely no gradients, patterns, or elements
- Frame: Head and shoulders only, 3/4 view facing slightly left
- Lighting: Soft diffused studio lighting, no harsh shadows
- Expression: Determined but approachable
- Art style: Modern animated movie character portrait (similar to Pixar or Dreamworks style)

The white background is essential - the avatar will be composited onto a map."""

    print("🎨 Generating your portrait...")
    portrait_response = chat.send_message(portrait_prompt)

    # Extract the image from the response.
    # Gemini returns a response with multiple "parts" - we need to find the image part.
    portrait_image = None
    for part in portrait_response.candidates[0].content.parts:
        if part.inline_data is not None:
            # Found the image! Convert from bytes to PIL Image and save.
            image_bytes = part.inline_data.data
            portrait_image = Image.open(io.BytesIO(image_bytes))
            portrait_image.save("outputs/portrait.png")
            break

    if portrait_image is None:
        raise Exception("Failed to generate portrait - no image in response")

    print("✓ Portrait generated!")
步驟 3:生成地圖圖示
找出 MODULE_5_STEP_3_GENERATE_ICON,並將 icon_image = None # Replace this section 替換為:
    # MODULE_5_STEP_3_GENERATE_ICON
    # Second turn: Generate a consistent icon for the map.
    # Because we're in the same chat session, Gemini remembers the character
    # from the portrait and will maintain visual consistency.
    icon_prompt = """Now create a circular map icon of this SAME character.

CRITICAL REQUIREMENTS:
- SAME person, SAME face, SAME expression, SAME suit — maintain perfect consistency with the portrait
- Tighter crop: just the head and very top of shoulders
- Background: Pure solid white (#FFFFFF)
- Optimized for small display sizes (will be used as a 64px map marker)
- Keep the exact same art style, colors, and lighting as the portrait
- Square 1:1 aspect ratio

This icon must be immediately recognizable as the same character from the portrait."""

    print("🖼️  Creating map icon...")
    icon_response = chat.send_message(icon_prompt)

    # Extract the icon image from the response
    icon_image = None
    for part in icon_response.candidates[0].content.parts:
        if part.inline_data is not None:
            image_bytes = part.inline_data.data
            icon_image = Image.open(io.BytesIO(image_bytes))
            icon_image.save("outputs/icon.png")
            break

    if icon_image is None:
        raise Exception("Failed to generate icon - no image in response")

    print("✓ Icon generated!")
您完成的程式碼
新增所有三個區段後,generate_explorer_avatar() 函式應如下所示:
def generate_explorer_avatar() -> dict:
    """
    Generate portrait and icon using multi-turn chat for consistency.

    The key technique here is using a CHAT SESSION rather than independent
    API calls. This allows Gemini to "remember" the character it created
    in the first turn, ensuring the icon matches the portrait.

    Returns:
        dict with portrait_path and icon_path
    """

    # MODULE_5_STEP_1_CREATE_CHAT_SESSION
    # Create a chat session to maintain character consistency across generations.
    # The chat session preserves context between turns, so Gemini "remembers"
    # what it generated and can create consistent variations.
    chat = client.chats.create(
        model="gemini-2.5-flash-image",  # Nano Banana - Gemini with image generation
        config=types.GenerateContentConfig(
            response_modalities=["TEXT", "IMAGE"]
        )
    )

    # MODULE_5_STEP_2_GENERATE_PORTRAIT
    # First turn: Generate the explorer portrait.
    # This establishes the character that will be referenced in subsequent turns.
    portrait_prompt = f"""Create a stylized space explorer portrait.

Character appearance: {APPEARANCE}
Name on suit patch: "{USERNAME}"
Suit color: {SUIT_COLOR}

CRITICAL STYLE REQUIREMENTS:
- Digital illustration style, clean lines, vibrant saturated colors
- Futuristic but weathered space suit with visible mission patches
- Background: Pure solid white (#FFFFFF) - absolutely no gradients, patterns, or elements
- Frame: Head and shoulders only, 3/4 view facing slightly left
- Lighting: Soft diffused studio lighting, no harsh shadows
- Expression: Determined but approachable
- Art style: Modern animated movie character portrait (similar to Pixar or Dreamworks style)

The white background is essential - the avatar will be composited onto a map."""

    print("🎨 Generating your portrait...")
    portrait_response = chat.send_message(portrait_prompt)

    # Extract the image from the response.
    # Gemini returns a response with multiple "parts" - we need to find the image part.
    portrait_image = None
    for part in portrait_response.candidates[0].content.parts:
        if part.inline_data is not None:
            # Found the image! Convert from bytes to PIL Image and save.
            image_bytes = part.inline_data.data
            portrait_image = Image.open(io.BytesIO(image_bytes))
            portrait_image.save("outputs/portrait.png")
            break

    if portrait_image is None:
        raise Exception("Failed to generate portrait - no image in response")

    print("✓ Portrait generated!")

    # MODULE_5_STEP_3_GENERATE_ICON
    # Second turn: Generate a consistent icon for the map.
    # Because we're in the same chat session, Gemini remembers the character
    # from the portrait and will maintain visual consistency.
    icon_prompt = """Now create a circular map icon of this SAME character.

CRITICAL REQUIREMENTS:
- SAME person, SAME face, SAME expression, SAME suit — maintain perfect consistency with the portrait
- Tighter crop: just the head and very top of shoulders
- Background: Pure solid white (#FFFFFF)
- Optimized for small display sizes (will be used as a 64px map marker)
- Keep the exact same art style, colors, and lighting as the portrait
- Square 1:1 aspect ratio

This icon must be immediately recognizable as the same character from the portrait."""

    print("🖼️  Creating map icon...")
    icon_response = chat.send_message(icon_prompt)

    # Extract the icon image from the response
    icon_image = None
    for part in icon_response.candidates[0].content.parts:
        if part.inline_data is not None:
            image_bytes = part.inline_data.data
            icon_image = Image.open(io.BytesIO(image_bytes))
            icon_image.save("outputs/icon.png")
            break

    if icon_image is None:
        raise Exception("Failed to generate icon - no image in response")

    print("✓ Icon generated!")

    return {
        "portrait_path": "outputs/portrait.png",
        "icon_path": "outputs/icon.png"
    }
儲存檔案
請務必省下 generator.py:
- Cloud Shell 編輯器:Ctrl+S (Windows/Linux) 或 Cmd+S (Mac)
- vim:按下 Escape 鍵,然後輸入
:wq並按下 Enter 鍵
您剛建構的內容
✓ 建立即時通訊工作階段,進行多輪圖像生成
✓ 撰寫詳細的肖像生成提示,並設定樣式限制
✓ 運用對話內容生成一致的地圖圖示
✓ 瞭解如何剖析 Gemini 回覆中的圖像資料
已掌握的重要概念:
概念 | 您學到的內容 |
對話工作階段 |
|
回覆方式 |
|
提示結構 | 主題 → 變數 → 樣式 → 技術限制 |
角色一致性 | 同一場即時通訊工作階段 = 圖片中的角色相同 |
剖析回應 | 從回應部分的 |
後續步驟:執行程式碼,在地圖上查看自己的位置!
6. 產生並註冊
設定專案 ID
確認專案 ID 可做為環境變數:
export GOOGLE_CLOUD_PROJECT=$(gcloud config get-value project)
執行身分建立工具
現在請執行主要指令碼,協調產生、上傳及註冊作業:
uv run python create_identity.py
系統會即時顯示生成進度:
注意:你的顯示圖片可能需要最多 5 秒才會顯示在線上地圖上,如果沒有立即看到自己,請重新整理地圖。
🚀 Creating identity for AstroAyo...

🎨 Generating your portrait...
✓ Portrait generated!
🖼️  Creating map icon...
✓ Icon generated!

☁️  Uploading to mission database...
✓ Avatar uploaded!

📍 Registering with rescue network...
✓ Registration complete!

╔═══════════════════════════════════════════════════════════════╗
║                    ✅ IDENTITY CONFIRMED!                      ║
╠═══════════════════════════════════════════════════════════════╣
║                                                               ║
║  Explorer: AstroAyo                                           ║
║  Location: (47, 23) — unconfirmed                             ║
║                                                               ║
║  🗺️  You're now on the map!                                   ║
║  https://waybackhome.dev/e/devfest-nyc-26                     ║
║                                                               ║
║  NEXT: Proceed to Level 1 to pinpoint your exact location!   ║
║                                                               ║
╚═══════════════════════════════════════════════════════════════╝
查看生成的虛擬化身
在本機查看生成的圖像:
# List the generated files
ls -la outputs/

# Download to view on your local machine
cloudshell download outputs/portrait.png
cloudshell download outputs/icon.png
或者,您也可以前往 outputs/ 資料夾並點選圖片檔,直接在 Cloud Shell 編輯器中查看。
生成的肖像和圖示如下圖所示:
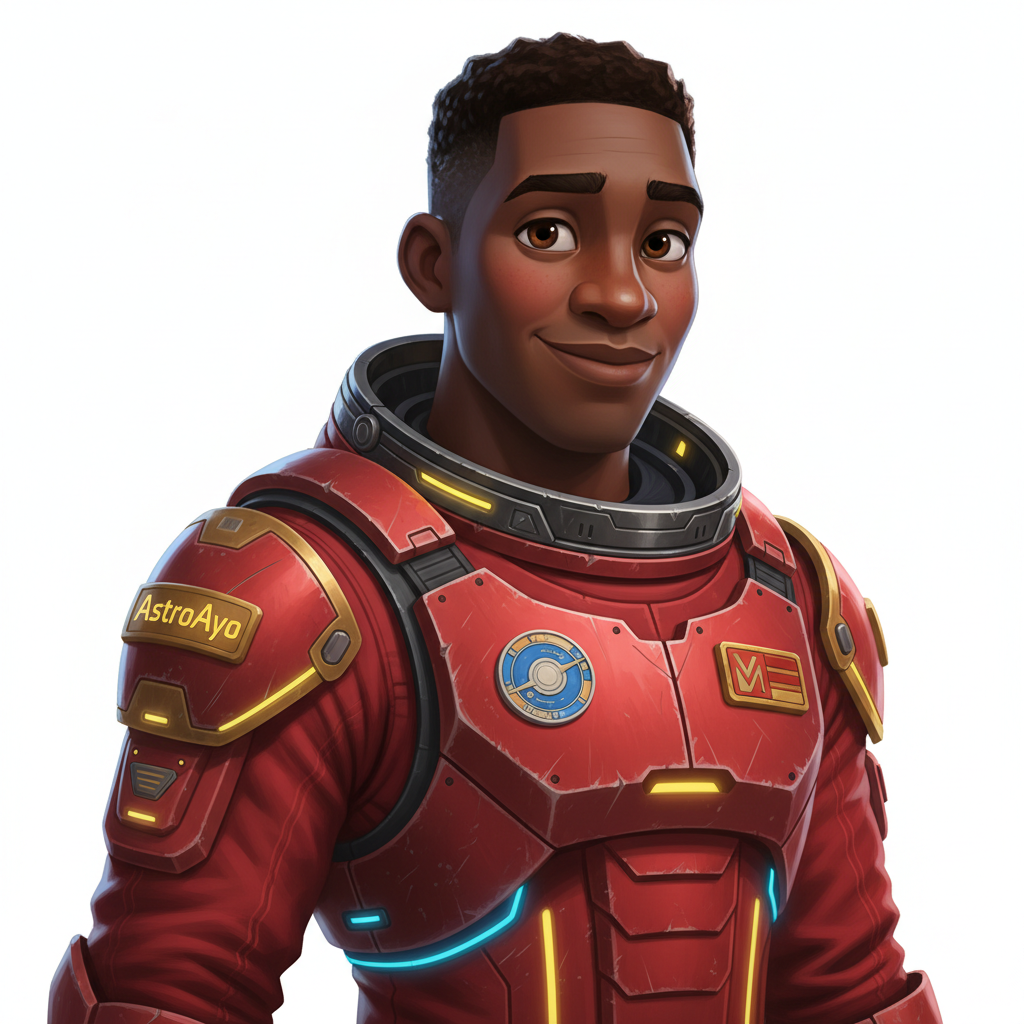
![]()
在地圖上查看自己的位置!
開啟輸出內容中顯示的世界地圖網址:
https://waybackhome.dev/e/{your-event-code}
例如:https://waybackhome.dev/e/devfest-nyc-26
在地圖上尋找你的顯示圖片!您會看到:
- 標示您在地球表面位置的圖示
- 圖示下方的標籤會顯示檔案總管名稱
- 標記周圍緩慢閃爍的微弱信號
![]()
按一下標記,即可在詳細資料卡片中查看完整肖像。
不滿意虛擬化身嗎?重新生成!
如要使用其他虛擬化身,可以重新生成:
# Option 1: Change your appearance settings first
uv run python customize.py

# Option 2: Just regenerate with current settings
uv run python create_identity.py
每次執行 create_identity.py 時,系統都會生成全新的虛擬化身 (新的即時通訊工作階段 = 新的角色),並更新註冊資訊。歡迎反覆調整,直到滿意為止!
疑難排解
您剛完成的項目
✓ 生成專屬的探索者肖像
✓ 建立一致的地圖圖示
✓ 將資產上傳至任務控制中心
✓ 向救援網路註冊身分
✓ 出現在即時世界地圖上!
恭喜,探險家!你現在已加入救援網路。信標會亮起 (但亮度較暗),其他倖存者可以在地圖上看到你。
7. 結語
建構內容
您在短短 10 分鐘內,就使用多輪 AI 圖像生成功能,建立完整的虛擬化身生成系統:
┌─────────────────────────────────────────────────────────────┐
│                     Your Creation                           │
├─────────────────────────────────────────────────────────────┤
│                                                             │
│   📝 Input                       🖼️  Output                  │
│   ──────────                     ────────                    │
│   • Explorer name                • Stylized portrait         │
│   • Suit color                   • Consistent map icon       │
│   • Appearance description       • Live map presence         │
│                                                              │
├─────────────────────────────────────────────────────────────┤
│                                                             │
│   🧠 Techniques You Used                                     │
│   ──────────────────────                                    │
│   • Multi-turn chat sessions for character consistency      │
│   • Structured prompt engineering with style constraints    │
│   • Response parsing to extract generated images            │
│   • API integration for cloud registration                  │
│                                                             │
└─────────────────────────────────────────────────────────────┘
重點回顧
課程 | 重要性 |
對話工作階段會保留脈絡 | 在多張圖片中生成一致的角色,避免變異漂移 |
提示結構很重要 | 明確的限制 (白色背景、特定風格、構圖) 可產生可預測且可直接用於製作的結果 |
多輪對話優於獨立呼叫 | 對話中的每則訊息都會以前後文為基礎,因此可反覆修正並保持一致性 |
回應模式可控制輸出內容 | 生成圖片時必須設定 |
費用摘要
在本層級中,您使用 Gemini 2.5 Flash (Nano Banana) 生成了 2 張圖片:
項目 | 符記數 | 費用 |
直向 (1024×1024) | 約 1,290 個輸出詞元 | ~$0.039 |
圖示 (1024×1024) | 約 1,290 個輸出詞元 | ~$0.039 |
總計 | 約 2,580 個權杖 | ~$0.08 美元 |
旅程仍在繼續
系統已確認你的探索者身分,但發生問題:無法確認你的位置。
查看世界地圖,您的信標會呈現微弱的亮度,並緩慢閃爍。救援網路知道你存在,但不知道你的確切位置。您可能位於星球表面廣大區域的任何位置。
在「第 1 級:找出您的位置」中,您將:
- 使用 Google 的 Agent Development Kit (ADK) 建構多代理系統
- 建立 MCP 伺服器,用於地質、植物和天文分析
- 處理多模態輸入內容 (當機網站的圖片)
- 使用 AI 生成確認位置的地形圖
- 啟動信標,讓搜救隊伍找到你!
第 1 級會介紹更進階的概念:多代理程式協調、Model Context Protocol (MCP) 和正式環境部署模式。您將從使用單一模型功能,進展到建構完整的代理系統。
清除 (選用)
如要清理本機檔案 (從 level_0 目錄執行):
rm -rf outputs/
deactivate  # Exit virtual environment
你仍會註冊救援網路,即使刪除本機檔案,地圖上仍會顯示你的位置。圖片會儲存在雲端,而非本機。
資源
信標正在等待確認。我們第 1 級見,探索者。🚀
8. 額外步驟:以相片為基礎的虛擬化身 (選填)
使用相片製作虛擬化身的時機
在下列情況下,您可能會偏好這種做法:
- 希望虛擬人偶與你本人相似
- 您想為特定相片套用風格
- 您想探索 Gemini 的圖片轉換功能
運作方式
你不用只提供文字描述,而是提供相片,並問問 Gemini 轉換相片,同時保留人物的樣貌:
![]()
上傳相片
首先,將相片上傳至 Cloud Shell:
- 在 Cloud Shell 中,點選終端機工具列中的三點選單 (⋮)
- 選取「上傳」
- 選擇清晰的證件照 (JPEG 或 PNG)
- 請記下上傳的路徑 (例如
/home/your-username/my_photo.jpg)
修改生成器
如要使用相片,請在 generator.py 中修改肖像生成步驟。將只有文字的提示換成包含相片的多模態提示:
    # MODULE_5_STEP_2_GENERATE_PORTRAIT (Photo-based version)

    # Load your photo
    photo_path = "/home/your-username/my_photo.jpg"  # Update this path!
    user_photo = Image.open(photo_path)

    # Convert photo to bytes for the API
    photo_buffer = io.BytesIO()
    user_photo.save(photo_buffer, format="JPEG")
    photo_bytes = photo_buffer.getvalue()

    portrait_prompt = f"""Transform this person into a stylized space explorer portrait.

PRESERVE from the original photo:
- The person's facial features, face shape, and likeness
- Their general expression and personality
- Any distinctive features (glasses, facial hair, etc.)

TRANSFORM with this style:
- Digital illustration style, clean lines, vibrant saturated colors
- Add a futuristic space suit with the name "{USERNAME}" on a shoulder patch
- Suit color: {SUIT_COLOR}
- Background: Pure solid white (#FFFFFF) - no gradients or elements
- Frame: Head and shoulders, 3/4 view
- Lighting: Soft diffused studio lighting
- Art style: Modern animated movie character (Pixar/Dreamworks aesthetic)

The result should be clearly recognizable as THIS specific person, but illustrated as a heroic space explorer."""

    print("🎨 Transforming your photo into an explorer portrait...")

    # Send both the prompt AND the image
    portrait_response = chat.send_message([
        portrait_prompt,
        types.Part.from_bytes(data=photo_bytes, mime_type="image/jpeg")
    ])

    # Rest of the extraction code stays the same...
多輪對話一致性仍可運作
以相片為基礎的生成方式也適用於多輪對話:
- 第 1 輪:相片 + 提示 → 經過風格化的肖像 (你的相似度,插畫風格)
- 第 2 輪:「Create icon of this SAME character」(建立這個相同角色的圖示) → 一致的圖示
由於即時通訊工作階段會記住建立的風格化版本 (而非原始相片),因此圖示會與轉換後的肖像完全相符。
隱私權注意事項
在 Vertex AI Studio 中試用
您也可以在編寫程式碼前,先在 Google Cloud 控制台以互動方式試用相片轉換功能:
- 前往 Vertex AI Studio
- 選取具備圖片功能的 Gemini 模型
- 使用附件按鈕上傳相片
- 輸入變形提示詞
- 反覆調整樣式,直到滿意為止
這種互動式方法非常適合用來實驗提示,並在確定程式碼前即時查看結果!
您學到的內容 (加分題)
✓ 如何使用 Gemini 的「圖片到圖片」轉換功能
✓ 在單一訊息中傳送多模態內容 (文字 + 圖片)
✓ 在套用藝術風格轉換時保留相似度
✓ 以相片為基礎生成 AI 內容時的隱私權注意事項