

1. 소개
고객이 이미 사용한 메시지 애플리케이션에서 직접 참여할 수 있는 원활한 대화형 에이전트형 AI 환경을 만드세요. 웹 인터페이스와 최신 메시지 채널에서 원활하게 실행되는 지능형 애플리케이션을 개발하고 배포하는 방법을 알아보세요.
빌드할 항목
Gemini 기반의 ADK 기반 애플리케이션인 'Restaurant Concierge'와 Telegram 채팅 앱 간의 통합입니다. 'Restaurant Concierge'는 식사하는 사람이 레스토랑 메뉴를 탐색하고 예약을 할 수 있도록 지원합니다. Telegram 봇과 상호작용하고 '매콤한 채식 요리를 먹고 싶어'와 같은 자연어 설명을 요청할 수 있습니다. 그러면 봇이 데이터베이스용 MCP 도구 상자를 통해 Cloud SQL PostgreSQL 데이터베이스에서 읽고 쓰는 ADK 에이전트에 연결됩니다. 데이터베이스용 MCP 도구 상자는 벡터 검색을 위한 자동 임베딩 생성을 비롯한 모든 데이터베이스 액세스를 처리합니다. 한편 사용자는 봇이 메시지를 인식하고 ADK 에이전트의 반환을 기다리는 동안 응답을 위해 ... typing을 입력하는 것을 볼 수 있습니다.
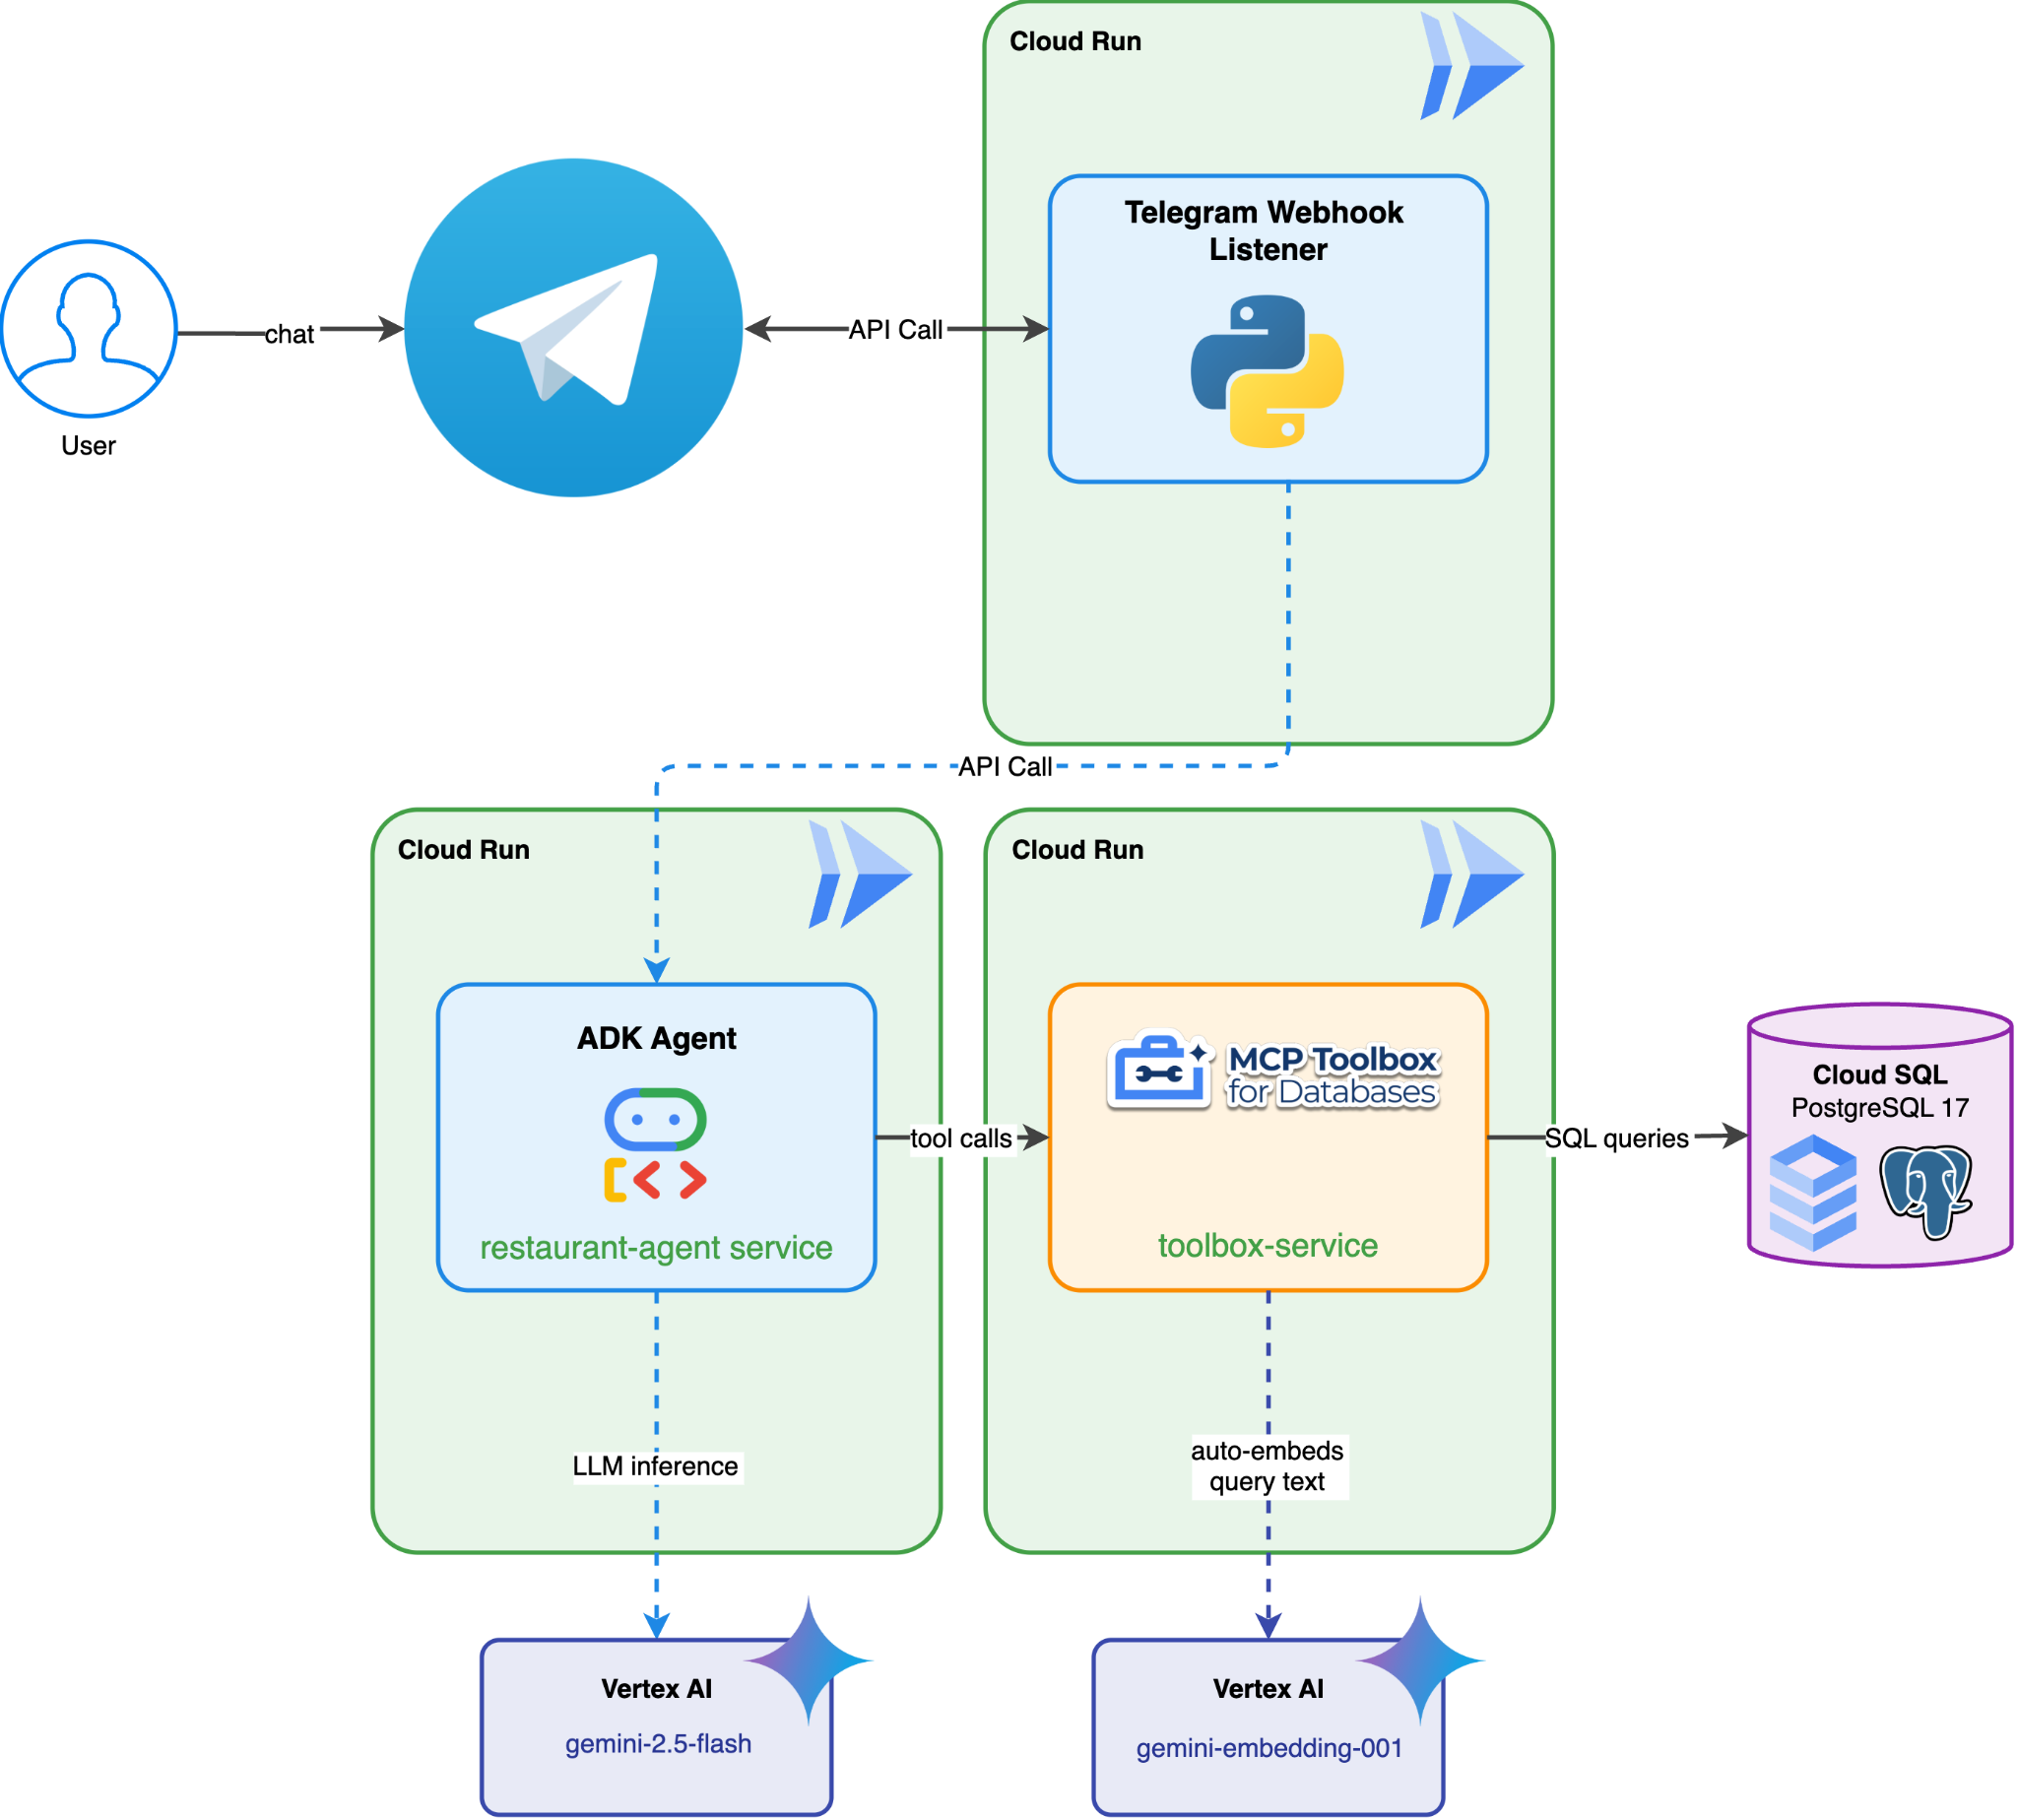
학습할 내용
- Gemini 기반의 ADK 기반 애플리케이션인 작동하는 'Restaurant Concierge' 배포
- BotFather를 사용하여 Telegram 채팅 봇 설정
- 봇 웹훅을 수신 대기하는 Python 애플리케이션 작성
- 사용자 메시지에 Telegram에서
... typing알림을 제공하는 채팅 작업을 전송하고 실제 응답을 기다리는 동안... typing을 주기적으로 전송하는 폴링 실행 Restaurant ConciergeCloud Run 엔드포인트를 호출하여 사용자 문의 처리- ADK 에이전트의 반환 처리, Telegram에 메시지 전송, 버퍼 닫기
- Python 애플리케이션을 Cloud Run에 배포
- Telegram 봇과 상호작용
기본 요건
- 체험 결제 계정이 있는 Google Cloud 계정
- Python에 대한 기본 지식
- ADK 및 Cloud Run 배포 경험이 있으면 도움이 됨
- Telegram 계정
- (권장) 다음 Codelab을 완료했습니다.
- ADK, MCP Toolbox, Cloud SQL을 사용한 에이전트형 RAG -> 이 Codelab에서 에이전트 빌드를 계속할 수 있으며 제공된 시작 코드는 동일합니다.
- (또는) 대규모 에이전트: 에이전트 런타임 및 ADK 통합에서 A2A 프로토콜을 사용하는 멀티 에이전트 아키텍처 -> 멀티 에이전트 아키텍처를 사용하여 에이전트를 더 풍부하게 만들려는 경우
2. 환경 설정 - 이전 Codelab에서 계속
이 Codelab에서 제공하는 설명은 실제로 이 기본 Codelab: ADK, MCP Toolbox, Cloud SQL을 사용한 에이전트형 RAG 또는 대규모 에이전트: 에이전트 런타임 및 ADK 통합에서 A2A 프로토콜을 사용하는 멀티 에이전트 아키텍처에서 계속됩니다. 이전 Codelab에서 작업을 계속할 수 있습니다.
이전 Codelab 작업 디렉터리 ( 작업 디렉터리는 build-agent-adk-toolbox-cloudsql 또는 adk-a2a-agent-runtime-starter여야 함)에서 빌드를 시작할 수 있습니다. 혼동을 방지하기 위해 새로 시작할 때 사용하는 것과 동일한 디렉터리 이름으로 디렉터리 이름을 바꾸겠습니다.
ADK, MCP Toolbox, Cloud SQL을 사용한 에이전트형 RAG 실습 에서 계속하는 경우 :
mv ~/build-agent-adk-toolbox-cloudsql ~/build-agent-adk-telegram
또는 대규모 에이전트: 에이전트 런타임 및 ADK 통합에서 A2A 프로토콜을 사용하는 멀티 에이전트 아키텍처 실습에서 계속하는 경우
mv ~/adk-a2a-agent-runtime-starter ~/build-agent-adk-telegram
그런 다음 작업 디렉터리를 변경합니다.
cloudshell workspace ~/build-agent-adk-telegram && cd ~/build-agent-adk-telegram
source .env
그런 다음 restaurant-agent가 이미 배포되어 있고 액세스할 수 있는 공개 URL이 있는지 확인합니다.
AGENT_URL=$(gcloud run services describe restaurant-agent \
    --region="$REGION" \
    --format='value(status.url)')

echo "      ✓ Agent service deployed"
echo "      Agent URL: $AGENT_URL"
echo ""
URL에 액세스할 수 있다면 다음 섹션인 Create Telegram Bot로 이동하면 됩니다.
3. 환경 설정 - 시작 저장소로 새로 시작
이 단계에서는 Cloud Shell 환경을 준비하고, Google Cloud 프로젝트를 구성하고, 시작 저장소를 클론합니다.
Cloud Shell 열기
브라우저에서 Cloud Shell을 엽니다. Cloud Shell은 이 Codelab에 필요한 모든 도구가 포함된 사전 구성된 환경을 제공합니다. 메시지가 표시되면 승인 을 클릭합니다.
그런 다음 "보기" -> "터미널"을 클릭하여 터미널을 엽니다. 인터페이스는 다음과 비슷하게 표시됩니다.
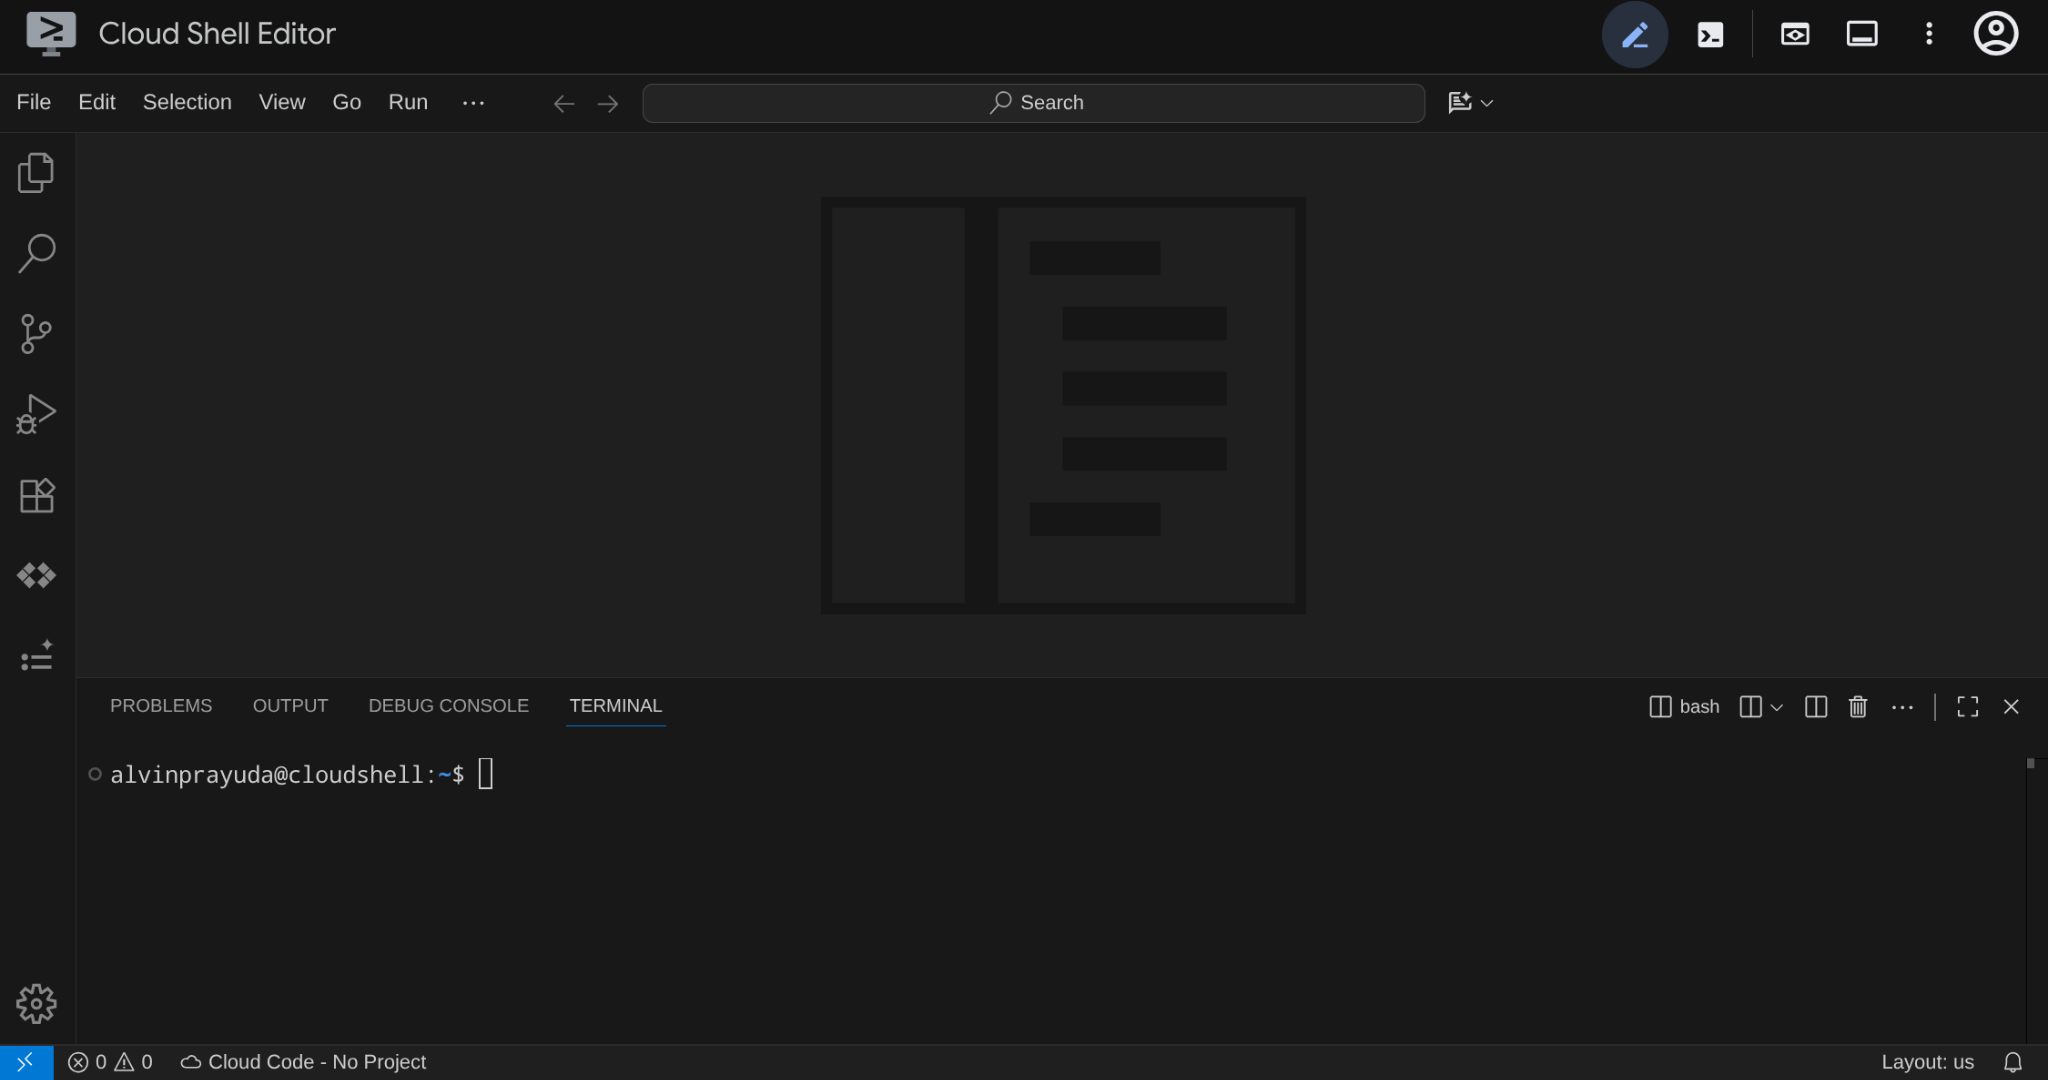
이것이 기본 인터페이스가 됩니다. 상단에는 IDE가 있고 하단에는 터미널이 있습니다.
작업 디렉터리 설정하기
시작 저장소를 클론합니다. 이 Codelab에서 작성하는 모든 코드는 여기에 있습니다.
rm -rf ~/build-agent-adk-telegram
git clone https://github.com/alphinside/adk-a2a-agent-runtime-starter.git build-agent-adk-telegram
cloudshell workspace ~/build-agent-adk-telegram && cd ~/build-agent-adk-telegram
제공된 템플릿에서 .env 파일을 만듭니다.
cp .env.example .env
터미널에서 프로젝트 설정을 간소화하려면 이 프로젝트 설정 스크립트를 작업 디렉터리에 다운로드하세요.
curl -sL https://raw.githubusercontent.com/alphinside/cloud-trial-project-setup/main/setup_verify_trial_project.sh -o setup_verify_trial_project.sh
스크립트를 실행합니다. 체험 결제 계정을 확인하고, 새 프로젝트를 만들거나 기존 프로젝트의 유효성을 검사하고, 프로젝트 ID를 현재 디렉터리의 .env 파일에 저장하고, gcloud에서 활성 프로젝트를 설정합니다.
bash setup_verify_trial_project.sh && source .env
스크립트는 다음을 수행합니다.
- 활성 체험 결제 계정이 있는지 확인합니다.
.env에 기존 프로젝트가 있는지 확인합니다 (있는 경우).- 새 프로젝트를 만들거나 기존 프로젝트를 재사용합니다.
- 체험 결제 계정을 프로젝트에 연결합니다.
- 프로젝트 ID를
.env에 저장합니다. - 프로젝트를 활성
gcloud프로젝트로 설정합니다.
Cloud Shell 터미널 프롬프트에서 작업 디렉터리 옆에 있는 노란색 텍스트 를 확인하여 프로젝트가 올바르게 설정되었는지 확인합니다. 프로젝트 ID가 표시되어야 합니다.

시작 인프라 설정
먼저 uv를 사용하여 Python 종속 항목을 설치해야 합니다. 이는 Rust로 작성된 빠른 Python 패키지 및 프로젝트 관리자입니다 ( uv 문서). 이 Codelab에서는 Python 프로젝트를 유지관리하는 데 속도와 단순성을 위해 이를 사용합니다.
uv sync
그런 다음 전체 설정 스크립트를 실행합니다. 이 스크립트는 Cloud SQL 인스턴스를 만들고, 데이터를 시드하고, 레스토랑 에이전트의 초기 상태로 작동하는 Toolbox 서비스를 배포합니다.
bash scripts/full_setup.sh > logs/full_setup.log 2>&1 &
이 작업으로 인해 나타날 수 있는 결과는 다음과 같습니다.
- Cloud SQL 인스턴스를 만들고 데이터베이스를 시드합니다 (1단계).
- 에이전트 환경 구성을 생성하고 로컬 Toolbox 서비스를 시작합니다 (2단계).
- Toolbox 및 에이전트 서비스를 Cloud Run에 배포합니다 (3단계).
이 배포가 완료되면 Cloud Run URL에서 ADK 개발 UI에 액세스할 수 있습니다.
source .env
AGENT_URL=$(gcloud run services describe restaurant-agent \
    --region="$REGION" \
    --format='value(status.url)')

echo "      ✓ Agent service deployed"
echo "      Agent URL: $AGENT_URL"
echo ""
ADK 개발 UI를 열고 restaurant_agent를 선택하고 다음 예와 같은 쿼리로 테스트합니다.
What Italian dishes do you have?
또는
I want something spicy and creamy
이제 다음 작업은 웹 개발 인터페이스에서 Telegram 메시지 채널로 이동하는 방법입니다.
4. Telegram 봇 만들기
Telegram은 커뮤니티 기반 참여에 널리 사용되는 잘 알려진 무료 메시지 플랫폼입니다. 그 이유 중 하나는 쉽게 통합할 수 있는 다양한 방법을 제공하므로 사람들이 다양한 기능을 갖춘 자체 봇을 쉽게 만들 수 있기 때문입니다.
이 경우 BotFather를 사용하여 처음으로 자체 봇을 만듭니다. 이 세션에서는 Telegram을 사용하지만 동일한 방법을 WhatsApp 또는 선택한 다른 메시지 플랫폼에 사용할 수 있습니다.
BotFather를 사용하여 자체 봇 만들기
웹브라우저를 가리키고 https://telegram.me/BotFather를 방문하여 자체 Telegram 봇을 만듭니다.
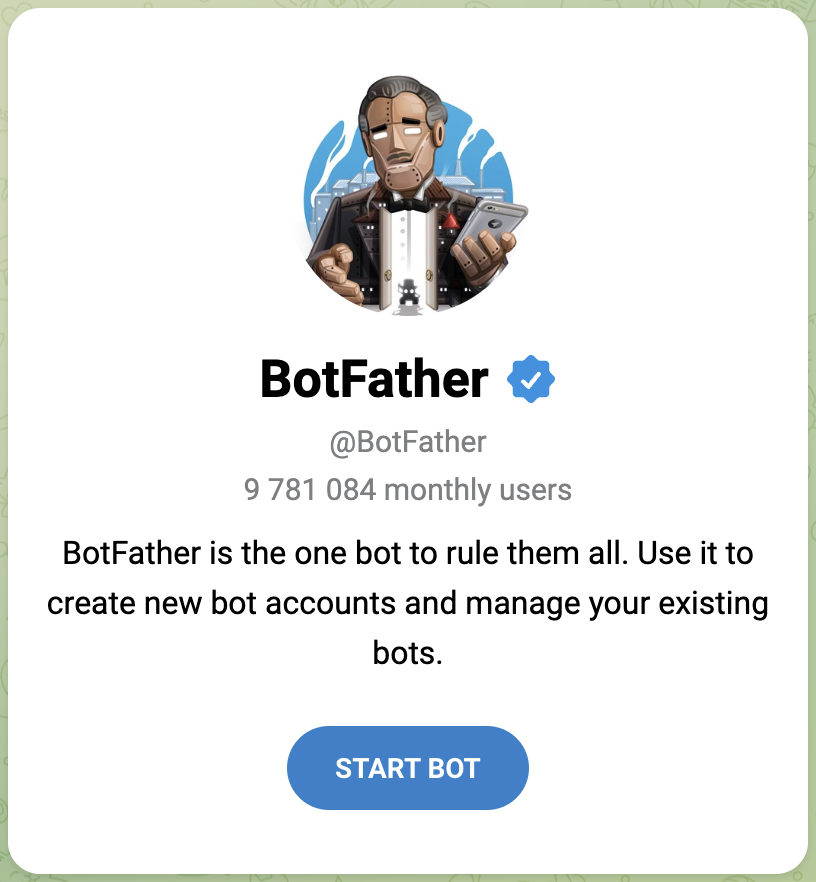
BotFather와 상호작용 시작
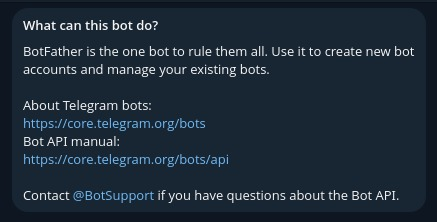
/start 명령어 전송
BotFather를 시작하고 첫 번째 봇을 만들려면 BotFather에 /start 메시지를 호출해야 합니다. 그러면 BotFather가 추가로 상호작용할 수 있는 모든 명령어를 공유합니다.
/start
/newbot 명령어로 봇 생성 시작
BotFather에 /newbot 명령어를 전송하여 새 봇을 만들어 보겠습니다. 봇의 이름을 지정하라는 메시지가 표시된 후 항상 bot로 끝나야 하는 봇 username을 지정하라는 메시지가 표시됩니다 . 예를 들어 TetrisBot 또는 tetris_bot입니다. 이 이름은 고유해야 합니다.
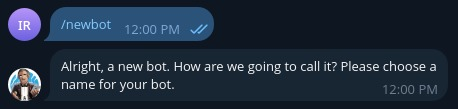
봇이 생성되면 BotFather로부터 다음 메시지가 수신됩니다.
Done! Congratulations on your new bot. You will find it at t.me/AdkTelegramTest_bot. You can now add a description, about section and profile picture for your bot, see /help for a list of commands. By the way, when you've finished creating your cool bot, ping our Bot Support if you want a better username for it. Just make sure the bot is fully operational before you do this.

Use this token to access the HTTP API:
<YOUR_TELEGRAM_API_KEY>
Keep your token secure and store it safely, it can be used by anyone to control your bot.

For a description of the Bot API, see this page: https://core.telegram.org/bots/api
YOUR_TELEGRAM_API_KEY를 기록해 두세요. 다음 섹션에서 사용합니다.
5. Telegram 웹훅 애플리케이션 개발
Telegram 웹훅 애플리케이션 개발을 시작할 작업 디렉터리를 준비해 보겠습니다.
mkdir ~/build-agent-adk-telegram/telegram-integration
cd ~/build-agent-adk-telegram
필요한 종속 항목 추가
다음 콘텐츠가 포함된 requirements.txt 스크립트를 만들어 Telegram 웹훅 리스너 스크립트에 적절한 종속 항목을 제공합니다.
cloudshell edit ./telegram-integration/requirements.txt
그런 다음 다음 종속 항목을 추가합니다.
python-telegram-bot[webhooks]
httpx
Telegram 웹훅 리스너용 스크립트 만들기
종속 항목이 설치되면 이제 통합 애플리케이션을 위한 Python 스크립트 main.py 스크립트를 만들 수 있습니다.
cloudshell edit ~/build-agent-adk-telegram/telegram-integration/main.py
그런 다음 다음 코드를 복사하여 붙여넣습니다.
# ./telegram-integration/main.py

import asyncio
import os
import sys
from telegram import Update
from telegram.ext import Application, CommandHandler, MessageHandler, filters, CallbackContext
from telegram.constants import ChatAction
import httpx

# Read token from environment variable
TOKEN = os.environ.get("TELEGRAM_BOT_TOKEN")
ADK_SERVER_URL = os.environ.get("ADK_SERVER_URL", "http://localhost:8000")
ADK_APP_NAME = os.environ.get("ADK_APP_NAME", "restaurant_agent")

# Parse base URL out of ADK_SERVER_URL
BASE_URL = ADK_SERVER_URL.rstrip('/')
if BASE_URL.endswith('/run'):
    BASE_URL = BASE_URL[:-4]
elif BASE_URL.endswith('/query'):
    BASE_URL = BASE_URL[:-6]

if not TOKEN:
    print("Error: TELEGRAM_BOT_TOKEN environment variable not set.")
    print("Please set it before running the application.")
    sys.exit(1)

async def start(update: Update, context: CallbackContext) -> None:
    """Send a message when the command /start is issued."""
    await update.message.reply_text('Hi! I am your ADK Integration Bot. Send me a message and I will forward it to the ADK server.')

async def send_typing_loop(chat_id: int, bot, stop_event: asyncio.Event):
    """Send typing action periodically until the stop event is set."""
    while not stop_event.is_set():
        try:
            await bot.send_chat_action(chat_id=chat_id, action=ChatAction.TYPING)
            # The research suggested repeating every 4 seconds
            await asyncio.sleep(4)
        except Exception as e:
            print(f"Error sending chat action: {e}")
            await asyncio.sleep(1) # Wait a bit before retrying if error

async def handle_message(update: Update, context: CallbackContext) -> None:
    """Handle incoming user messages."""
    user_message = update.message.text
    chat_id = update.message.chat_id
    raw_user_id = str(update.message.from_user.id)

    # Derive unique user_id and session_id for this user
    user_id = f"tg_{raw_user_id}"
    session_id = f"tg_sess_{raw_user_id}"

    print(f"Received message from {user_id}: {user_message}")

    # Create a stop event for the typing loop
    stop_event = asyncio.Event()

    # Start the typing loop as a background task
    typing_task = asyncio.create_task(send_typing_loop(chat_id, context.bot, stop_event))

    try:
        async with httpx.AsyncClient() as client:
            # 1. Check if the session exists
            session_url = f"{BASE_URL}/apps/{ADK_APP_NAME}/users/{user_id}/sessions/{session_id}"
            session_check = await client.get(session_url, timeout=10.0)

            if session_check.status_code == 404:
                # 2. If session doesn't exist, create it
                print(f"Session {session_id} not found. Creating session...")
                session_create = await client.post(session_url, json={}, timeout=10.0)
                if session_create.status_code != 200:
                    raise Exception(f"Failed to create session: {session_create.status_code} {session_create.text}")
            elif session_check.status_code != 200:
                raise Exception(f"Error checking session: {session_check.status_code} {session_check.text}")

            # 3. Run the ADK agent
            run_url = f"{BASE_URL}/run"
            payload = {
                "appName": ADK_APP_NAME,
                "userId": user_id,
                "sessionId": session_id,
                "newMessage": {
                    "role": "user",
                    "parts": [{"text": user_message}]
                }
            }
            response = await client.post(run_url, json=payload, timeout=60.0)

        if response.status_code == 200:
            events = response.json()
            if isinstance(events, list) and len(events) > 0:
                # The last event contains the final text response
                last_event = events[-1]
                content = last_event.get("content", {})
                parts = content.get("parts", [])
                if parts and "text" in parts[0]:
                    reply_text = parts[0]["text"]
                else:
                    reply_text = "ADK agent returned an empty or non-text response."
            else:
                reply_text = "No events returned from ADK agent."
        else:
            reply_text = f"Error communicating with ADK server (Status: {response.status_code})."

    except Exception as e:
        reply_text = f"Failed to connect to ADK server: {e}"
    finally:
        # Stop the typing loop
        stop_event.set()
        await typing_task

    # Send the final response back to the user
    await update.message.reply_text(reply_text)

def main() -> None:
    """Start the bot."""
    # Create the Application and pass it your bot's token.
    application = Application.builder().token(TOKEN).build()

    # on different commands - answer in Telegram
    application.add_handler(CommandHandler("start", start))

    # on non command i.e message - echo the message on Telegram
    application.add_handler(MessageHandler(filters.TEXT & ~filters.COMMAND, handle_message))

    # Check if running in webhook mode (e.g., on Cloud Run)
    port = os.environ.get("PORT")
    service_url = os.environ.get("SERVICE_URL")

    if port and service_url:
        if not service_url.startswith("http"):
            service_url = f"https://{service_url}"

        print(f"Starting bot in WEBHOOK mode on port {port} with url {service_url}")

        application.run_webhook(
            listen="0.0.0.0",
            port=int(port),
            url_path=TOKEN,
            webhook_url=f"{service_url}/{TOKEN}",
            allowed_updates=Update.ALL_TYPES
        )
    else:
        print("Starting bot in POLLING mode")
        # Run the bot until the user presses Ctrl-C
        application.run_polling(allowed_updates=Update.ALL_TYPES)


if __name__ == "__main__":
    main()
Telegram 봇 통합 코드 이해
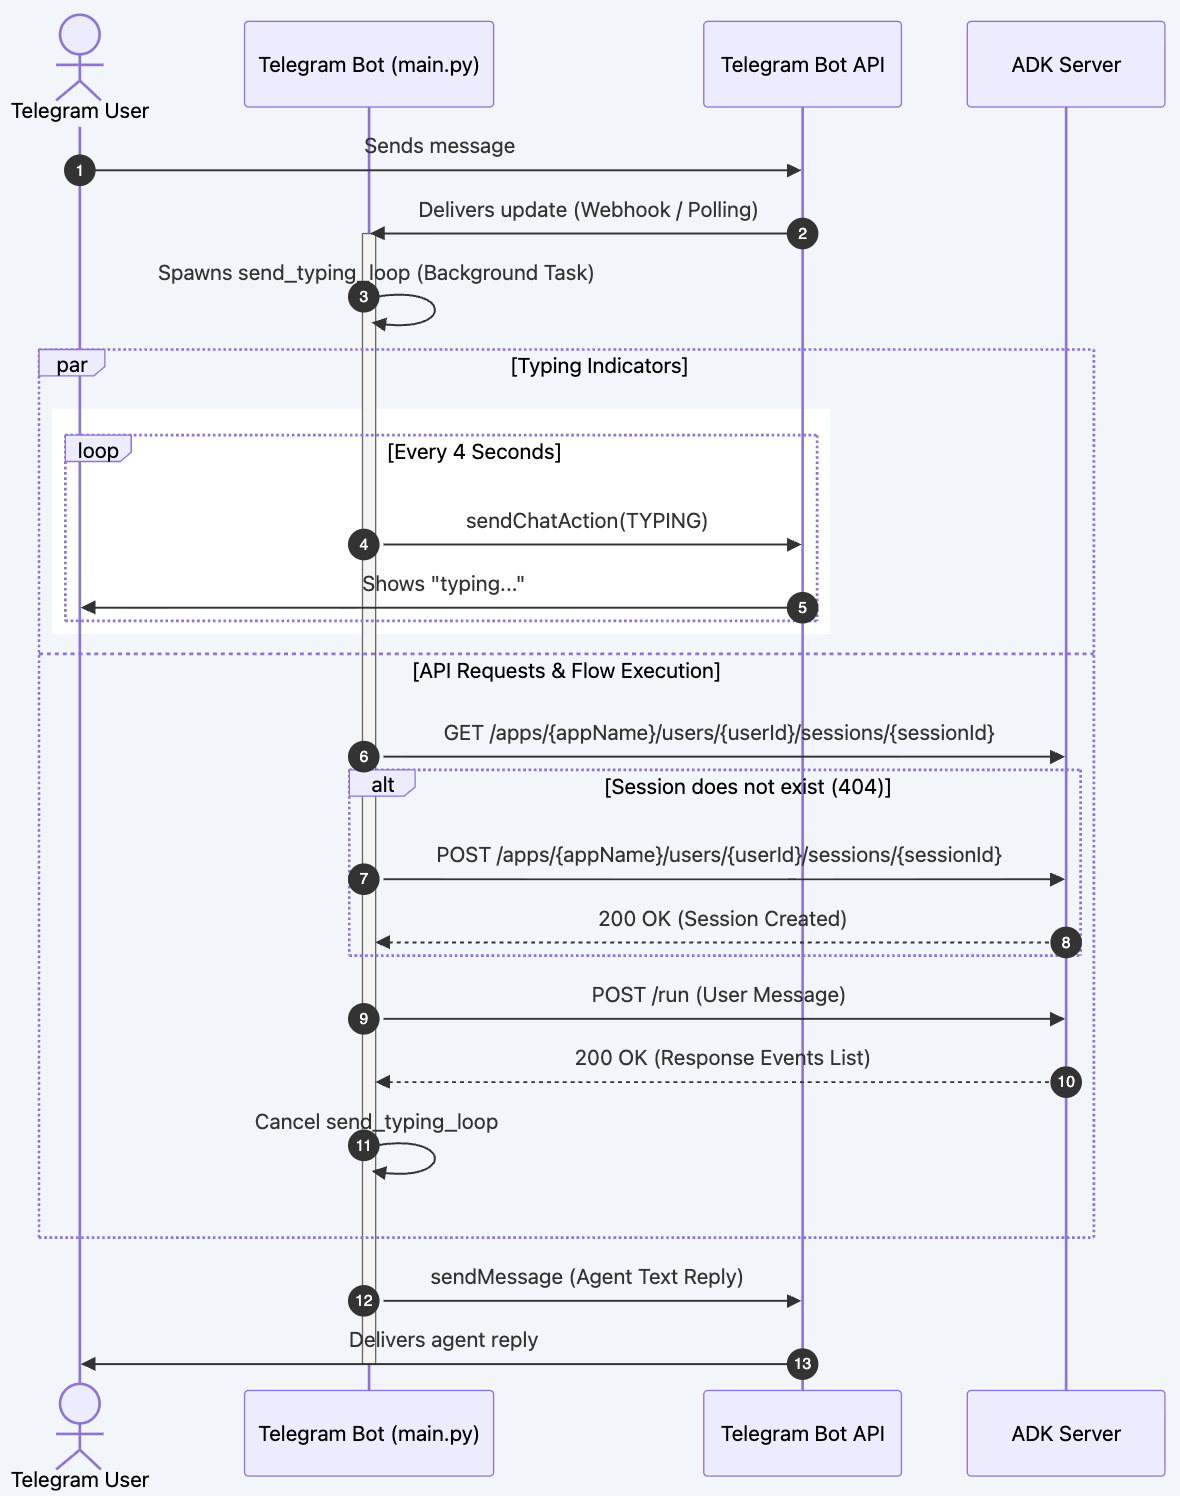
사용자가 메시지를 보내면 다음 파이프라인이 handle_message()에서 실행됩니다.
1단계: ID 및 세션 파생
봇은 Telegram 사용자 ID를 고유한 ADK 식별자에 매핑하여 사용자 세션을 구분합니다.
user_id = f"tg_{raw_user_id}"
session_id = f"tg_sess_{raw_user_id}"
2단계: 비동기 '입력 중' 상태 (53~58번째 줄)
ADK 에이전트가 프롬프트를 처리하는 동안 (몇 초가 걸릴 수 있음) 매우 반응성이 높은 사용자 환경을 보장하기 위해 봇은 비동기 백그라운드 루프를 시작합니다.
asyncio.Event가stop_event로 인스턴스화됩니다.asyncio.create_task는 백그라운드에서send_typing_loop(...)를 생성합니다.- 루프는
stop_event가 설정될 때까지 4초마다 Telegram에ChatAction.TYPING작업을 전송합니다.
3단계: ADK 세션 확인 및 생성 (61~72번째 줄)
에이전트를 실행하기 전에 봇은 세션이 이미 존재하는지 확인합니다.
GET요청을/apps/{appName}/users/{userId}/sessions/{sessionId}로 전송합니다.- 응답이
404 Not Found이면 빈 JSON 본문으로 동일한 URL에 대한POST요청을 통해 세션을 만듭니다. 200또는404이외의 상태가 반환되면 예외가 발생합니다.
4단계: 에이전트에 요청 전송 (74~85번째 줄)
메시지 페이로드가 ADK /run 엔드포인트로 전달됩니다.
- 엔드포인트:
POST /run - 복잡한 추론 또는 업스트림 지연 시간을 허용하도록 요청 제한 시간이
60.0초로 설정됩니다. - 페이로드 구조:
{
  "appName": "restaurant_agent",
  "userId": "tg_<user_id>",
  "sessionId": "tg_sess_<user_id>",
  "newMessage": {
    "role": "user",
    "parts": [{"text": "<user_message>"}]
  }
}
5단계: 응답 파싱 (87~101번째 줄)
ADK 서버는 메시지 이벤트 목록을 반환합니다. 봇은 반환된 배열을 검사합니다.
- 목록에서 최종 이벤트 (
events[-1])를 가져옵니다. event["content"]["parts"][0]["text"]를 통해 텍스트 콘텐츠로 이동합니다.- 이벤트가 반환되지 않거나 텍스트 구조가 누락된 경우 설명 자리표시자 텍스트가 설정됩니다.
6단계: 종료 및 응답 디스패치 (103~111번째 줄)
finally블록에서stop_event가 설정되어 입력 작업 루프가 중지됩니다.- 봇은
typing_task가 완료될 때까지 기다려 리소스가 정리되도록 합니다. - 마지막으로 봇은 파싱된 응답 텍스트로 Telegram 채팅에 응답합니다.
6. Telegram 웹훅 애플리케이션을 Cloud Run에 배포
다음으로 Telegram 웹훅 리스너를 Cloud Run에 배포하여 봇이 리스너와 통신할 수 있도록 합니다.
Dockerfile 만들기
먼저 Dockerfile을 만들어야 합니다.
cloudshell edit ~/build-agent-adk-telegram/telegram-integration/Dockerfile
그런 다음 다음 코드를 복사하여 붙여넣습니다.
# Use an official Python runtime as a parent image
FROM python:3.11-slim

# Prevent Python from writing pyc files to disc and buffering stdout/stderr
ENV PYTHONDONTWRITEBYTECODE=1
ENV PYTHONUNBUFFERED=1

# Set the working directory in the container
WORKDIR /app

# Install system dependencies if needed
RUN apt-get update && apt-get install -y --no-install-recommends \
    build-essential \
    && rm -rf /var/lib/apt/lists/*

# Copy the dependencies file to the working directory
COPY requirements.txt .

# Install any needed packages specified in requirements.txt
RUN pip install --no-cache-dir -r requirements.txt

# Copy the rest of the application code
COPY main.py .

# Expose the port that Cloud Run will provide via environment variable
EXPOSE 8080

# Run main.py when the container launches
CMD ["python", "main.py"]
서비스는 이미지 공간을 작게 유지하기 위해 python:3.11-slim을 사용하여 컨테이너화됩니다.
requirements.txt(python-telegram-bot[webhooks]및httpx)에서 종속 항목을 설치합니다.- 표준 포트
8080을 노출합니다. python main.py를 실행합니다.
환경 변수 준비
그런 다음 에이전트가 성공적으로 배포되었는지 다시 확인해 보겠습니다.
AGENT_URL=$(gcloud run services describe restaurant-agent \
    --region="$REGION" \
    --format='value(status.url)')

echo "      ✓ Agent service deployed"
echo "      Agent URL: $AGENT_URL"
echo ""
다음으로 이전에 가져온 TELEGRAM_BOT_TOKEN을 .env에 넣습니다.
echo "TELEGRAM_BOT_TOKEN=YOUR_TELEGRAM_API_KEY" >> .env
그런 다음 필요한 다른 값으로 .env 데이터를 채웁니다.
echo "ADK_SERVER_URL=$AGENT_URL" >> .env
echo "ADK_APP_NAME=restaurant_agent" >> .env
echo "SERVICE_NAME=telegram-integration" >> .env
source .env
배포 스크립트 만들기
완전한 검사를 제공하고 앱을 Cloud Run에 배포하는 배포 스크립트를 만들어 보겠습니다.
cloudshell edit ~/build-agent-adk-telegram/telegram-integration/deploy.sh
다음 코드를 파일에 복사합니다.
#!/usr/bin/env bash
# ./telegram-integration/deploy.sh

# Exit immediately if a command exits with a non-zero status
set -euo pipefail

# Color codes for neat terminal output
RED='\033[0;31m'
GREEN='\033[0;32m'
YELLOW='\033[1;33m'
BLUE='\033[0;34m'
NC='\033[0;37m' # No Color
# Load environment variables from .env if it exists
if [ -f .env ]; then
    echo -e "${GREEN}✔ Loading environment variables from .env...${NC}"
    export $(grep -v '^#' .env | xargs)
fi

echo -e "${BLUE}====================================================${NC}"
echo -e "${BLUE}   Google Cloud Run Deployment: Telegram Bot        ${NC}"
echo -e "${BLUE}====================================================${NC}"

# 1. Check for gcloud CLI
if ! command -v gcloud &> /dev/null; then
    echo -e "${RED}Error: 'gcloud' CLI is not installed.${NC}"
    echo "Please install the Google Cloud SDK and try again."
    echo "See: https://cloud.google.com/sdk/docs/install"
    exit 1
fi

# 2. Check active gcloud account/auth
ACTIVE_ACCOUNT=$(gcloud auth list --filter=status:ACTIVE --format="value(account)" 2>/dev/null || true)
if [ -z "$ACTIVE_ACCOUNT" ]; then
    echo -e "${RED}Error: No active Google Cloud account found.${NC}"
    echo "Please run: gcloud auth login"
    exit 1
fi

# 3. Detect / Prompt for GCP Project
DEFAULT_PROJECT=${GCP_PROJECT_ID:-$(gcloud config get-value project 2>/dev/null || true)}
if [ -n "${DEFAULT_PROJECT}" ]; then
    echo -e "${GREEN}✔ Using GCP Project: $DEFAULT_PROJECT${NC}"
    GCP_PROJECT="$DEFAULT_PROJECT"
else
    echo -n "Enter GCP Project ID: "
    read -r GCP_PROJECT
fi

if [ -z "$GCP_PROJECT" ]; then
    echo -e "${RED}Error: GCP Project ID is required.${NC}"
    exit 1
fi

# Set active project
gcloud config set project "$GCP_PROJECT" &> /dev/null

# 4. Configure Service Parameters
DEFAULT_SERVICE=${SERVICE_NAME:-"telegram-integration"}
if [ -n "${SERVICE_NAME:-}" ]; then
    echo -e "${GREEN}✔ Using Cloud Run Service Name: $SERVICE_NAME${NC}"
else
    echo -n "Enter Cloud Run Service Name [Default: $DEFAULT_SERVICE]: "
    read -r SERVICE_NAME
    SERVICE_NAME=${SERVICE_NAME:-$DEFAULT_SERVICE}
fi

DEFAULT_REGION=${REGION:-"us-central1"}
if [ -n "${REGION:-}" ]; then
    echo -e "${GREEN}✔ Using Cloud Run Region: $REGION${NC}"
else
    echo -n "Enter Cloud Run Region [Default: $DEFAULT_REGION]: "
    read -r REGION
    REGION=${REGION:-$DEFAULT_REGION}
fi

DEFAULT_ADK_APP=${ADK_APP_NAME:-"restaurant_agent"}
if [ -n "${ADK_APP_NAME:-}" ]; then
    echo -e "${GREEN}✔ Using ADK App Name: $ADK_APP_NAME${NC}"
    ADK_APP="$ADK_APP_NAME"
else
    echo -n "Enter ADK App Name [Default: $DEFAULT_ADK_APP]: "
    read -r ADK_APP
    ADK_APP=${ADK_APP:-$DEFAULT_ADK_APP}
fi

# 5. Retrieve/Prompt for Telegram Bot Token
if [ -n "${TELEGRAM_BOT_TOKEN:-}" ]; then
    echo -e "${GREEN}✔ Found TELEGRAM_BOT_TOKEN in environment.${NC}"
    BOT_TOKEN="$TELEGRAM_BOT_TOKEN"
else
    echo -e "${YELLOW}TELEGRAM_BOT_TOKEN is not set in your environment.${NC}"
    echo -n "Enter your Telegram Bot Token (input will be hidden): "
    read -s -r BOT_TOKEN
    echo ""
fi

if [ -z "$BOT_TOKEN" ]; then
    echo -e "${RED}Error: Telegram Bot Token is required.${NC}"
    exit 1
fi

# 6. Retrieve/Prompt for ADK Server URL
DEFAULT_ADK_URL="http://localhost:8000"
if [ -n "${ADK_SERVER_URL:-}" ]; then
    echo -e "${GREEN}✔ Found ADK_SERVER_URL in environment: $ADK_SERVER_URL${NC}"
    ADK_URL="$ADK_SERVER_URL"
else
    echo -n "Enter your ADK Server URL [Default: $DEFAULT_ADK_URL]: "
    read -r ADK_URL
    ADK_URL=${ADK_URL:-$DEFAULT_ADK_URL}
fi

# Enable required GCP services
echo -e "\n${YELLOW}Checking and enabling required GCP services...${NC}"
gcloud services enable run.googleapis.com cloudbuild.googleapis.com artifactregistry.googleapis.com --project "$GCP_PROJECT"

# Determine source directory dynamically
SOURCE_DIR="."
if [ -d "telegram-integration" ]; then
    SOURCE_DIR="telegram-integration"
    echo -e "${GREEN}✔ Found source directory: telegram-integration${NC}"
elif [ -f "Dockerfile" ]; then
    SOURCE_DIR="."
    echo -e "${GREEN}✔ Dockerfile found in current directory. Using current directory as source.${NC}"
else
    echo -e "${RED}Error: Could not find source directory 'telegram-integration' or Dockerfile in current directory.${NC}"
    exit 1
fi

# 7. First-pass Deployment with placeholder SERVICE_URL
# This boots the container in Webhook mode (so health check binds to port)
# but uses a high-reliability placeholder URL (google.com) to pass DNS verification checks.
echo -e "\n${YELLOW}Deploying to Cloud Run (Step 1/2: Initial Deploy)...${NC}"
gcloud run deploy "$SERVICE_NAME" \
  --source "$SOURCE_DIR" \
  --region "$REGION" \
  --allow-unauthenticated \
  --set-env-vars "TELEGRAM_BOT_TOKEN=$BOT_TOKEN,ADK_SERVER_URL=$ADK_URL,ADK_APP_NAME=$ADK_APP,SERVICE_URL=https://google.com" \
  --project "$GCP_PROJECT"

# 8. Retrieve the actual service URL
echo -e "\n${YELLOW}Retrieving service URL...${NC}"
SERVICE_URL=$(gcloud run services describe "$SERVICE_NAME" --region "$REGION" --project "$GCP_PROJECT" --format 'value(status.url)')
echo -e "${GREEN}✔ Service URL is: $SERVICE_URL${NC}"

# 9. Update service environment variables with the real SERVICE_URL
# This triggers a rolling update and registers the correct webhook with Telegram automatically!
echo -e "\n${YELLOW}Updating configuration with final Webhook URL (Step 2/2)...${NC}"
gcloud run services update "$SERVICE_NAME" \
  --region "$REGION" \
  --set-env-vars "TELEGRAM_BOT_TOKEN=$BOT_TOKEN,ADK_SERVER_URL=$ADK_URL,ADK_APP_NAME=$ADK_APP,SERVICE_URL=$SERVICE_URL" \
  --project "$GCP_PROJECT"

echo -e "\n${GREEN}====================================================${NC}"
echo -e "${GREEN}   Deployment Completed Successfully! 🎉            ${NC}"
echo -e "${GREEN}====================================================${NC}"
echo -e "Service Name:   ${BLUE}$SERVICE_NAME${NC}"
echo -e "Region:         ${BLUE}$REGION${NC}"
echo -e "Active URL:     ${BLUE}$SERVICE_URL${NC}"
echo -e "Webhook Path:   ${BLUE}$SERVICE_URL/<bot-token>${NC}"
echo -e "ADK Backend:    ${BLUE}$ADK_URL${NC}"
echo -e "ADK App Name:   ${BLUE}$ADK_APP${NC}"
echo -e "${GREEN}====================================================${NC}"
echo "Your Telegram Bot has been configured to use webhooks."
echo "Any message sent to your bot will now trigger this Cloud Run instance."
이중 배포 스크립트 (deploy.sh)
Google Cloud Run에 배포할 때 봇은 환경에서 자체 URL (SERVICE_URL)을 지정하여 Telegram에 웹훅 타겟으로 등록할 수 있어야 합니다. 이 순환 종속 항목 (배포될 때까지 URL을 알 수 없지만 서비스는 상태 확인 오류 없이 부팅하기 위해 URL이 필요함)을 해결하기 위해 deploy.sh는 2단계 배포를 실행합니다.
- 1단계: 초기 배포: 자리표시자 DNS (
https://google.com)로 컨테이너를 부팅하여 서비스가 성공적으로 시작되고, 로컬 포트에 바인딩되고, 초기 Cloud Run 상태 확인을 통과합니다. - 2단계: URL 가져오기:
gcloud run services describe를 사용하여 새로 생성된 Cloud Run 엔드포인트를 프로그래매틱 방식으로 추출합니다. - 3단계: 구성 업데이트: 환경 변수를 실제 라이브 서비스 URL로 업데이트합니다. 이렇게 하면 Cloud Run에서 클린 순차적 업데이트가 트리거되고 올바른 웹훅 타겟이 Telegram API에 안전하게 등록됩니다.
Cloud Run에 배포
배포 스크립트는 에이전트 URL을 출력합니다. 브라우저에서 열어 Cloud Run에서 실행되는 동일한 ADK 개발 UI에 액세스합니다.
cd ~/build-agent-adk-telegram
bash ./telegram-integration/deploy.sh
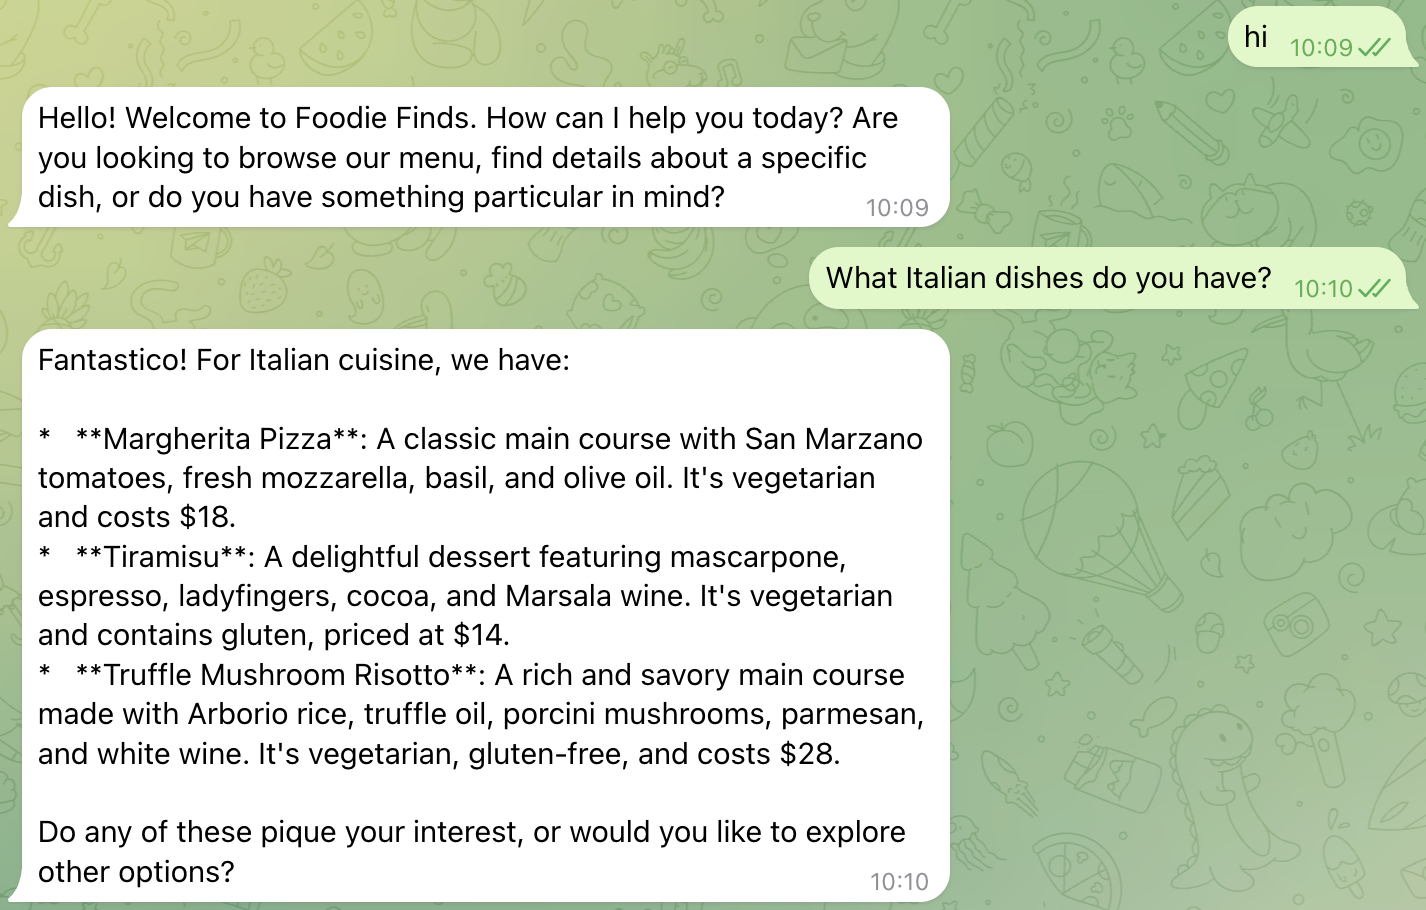
모든 것이 잘 진행되면 Telegram 채팅 애플리케이션에서 직접 봇과 채팅을 시작하고, 방금 만든 봇을 찾아 상호작용을 시작할 수 있습니다.
What Italian dishes do you have?
또는
I want something spicy and creamy
봇이 상태를 전송하는 것을 확인하세요. '...입력 중'이 표시된 후 곧 이전에 만든 ADK에서 메시지를 반환합니다.
7. 축하합니다.
HTTP 클라이언트 서버 통신을 통해 스마트 레스토랑 메뉴 어시스턴트 ADK 기반 AI 에이전트를 빌드, 배포, Telegram과 완전히 통합하여 사람들이 좋아하는 메뉴를 쿼리하고 레스토랑을 예약할 수 있도록 했습니다.
학습한 내용
- Restaurant Concierge, ADK 기반 에이전트, MCP Toolbox를 Cloud Run에 배포하고 구성
- BotFather를 사용하여 Telegram 봇을 설정하는 방법
- Telegram 웹훅을 수신 대기하고 ADK 에이전트와 상호작용하여 사용자 쿼리 및 응답을 적절하게 전달하는 Python 스크립트를 작성하는 방법
- ADK 에이전트가 응답을 기다리는 동안 메시지가 실시간 피드백으로 처리되고 있음을 사용자에게 알리기 위해 Telegram에서
"... typing"을 구현하는 방법 - Python 스크립트를 Cloud Run에 배포하고 상호작용할 수 있는 방법
정리
Google Cloud 계정에 비용이 청구되지 않도록 하려면 이 Codelab에서 만든 리소스를 삭제합니다.
옵션 1: 프로젝트 삭제 (권장)
gcloud projects delete $GOOGLE_CLOUD_PROJECT
옵션 2: 개별 리소스 삭제
# If you follow from previous A2A Agent Runtime codelab
# Delete the Agent Runtime deployment (skip if not found)
uv run python -c "
import vertexai
from google.genai import types
vertexai.init(project='$GOOGLE_CLOUD_PROJECT', location='$REGION')
client = vertexai.Client(
    project='$GOOGLE_CLOUD_PROJECT', location='$REGION',
    http_options=types.HttpOptions(api_version='v1beta1'),
)
try:
    agent = client.agent_engines.get(name='$RESERVATION_AGENT_RESOURCE_NAME')
    agent.delete(force=True)
    print('Agent Runtime deployment deleted.')
except Exception as e:
    print(f'No agent deployment found or already deleted, skipping. ({e})')
"

# Delete GCS staging bucket (skip if STAGING_BUCKET is not set)
if [ -n "$STAGING_BUCKET" ]; then
  gsutil rm -r gs://$STAGING_BUCKET
else
  echo "STAGING_BUCKET not set, skipping bucket deletion."
fi

# Delete Cloud Run services
gcloud run services delete restaurant-agent --region=$REGION --quiet
gcloud run services delete toolbox-service --region=$REGION --quiet
gcloud run services delete telegram-integration --region=$REGION --quiet

# Delete Cloud SQL instance
gcloud sql instances delete $DB_INSTANCE --quiet