

1. 簡介
打造流暢的互動式代理式 AI 體驗,讓顧客直接透過他們已使用的訊息應用程式與 AI 互動。瞭解如何開發及部署智慧型應用程式,在網頁介面和現代通訊管道中順暢運作。
建構項目
整合「餐廳服務專員」與 Telegram 即時通訊應用程式。「餐廳服務專員」是採用 Gemini 技術的 ADK 應用程式,可協助用餐者瀏覽餐廳菜單及預訂座位。您可以與 Telegram 機器人互動,並以自然語言描述需求,例如「我想吃辣的素食」。接著,機器人會連線至 ADK 代理,透過 MCP Toolbox for Databases 讀取及寫入 Cloud SQL PostgreSQL 資料庫,並處理所有資料庫存取作業 (包括自動產生向量搜尋的嵌入),同時使用者會看到機器人確認訊息並輸入 ... typing 以產生回覆,等待 ADK 代理傳回結果。
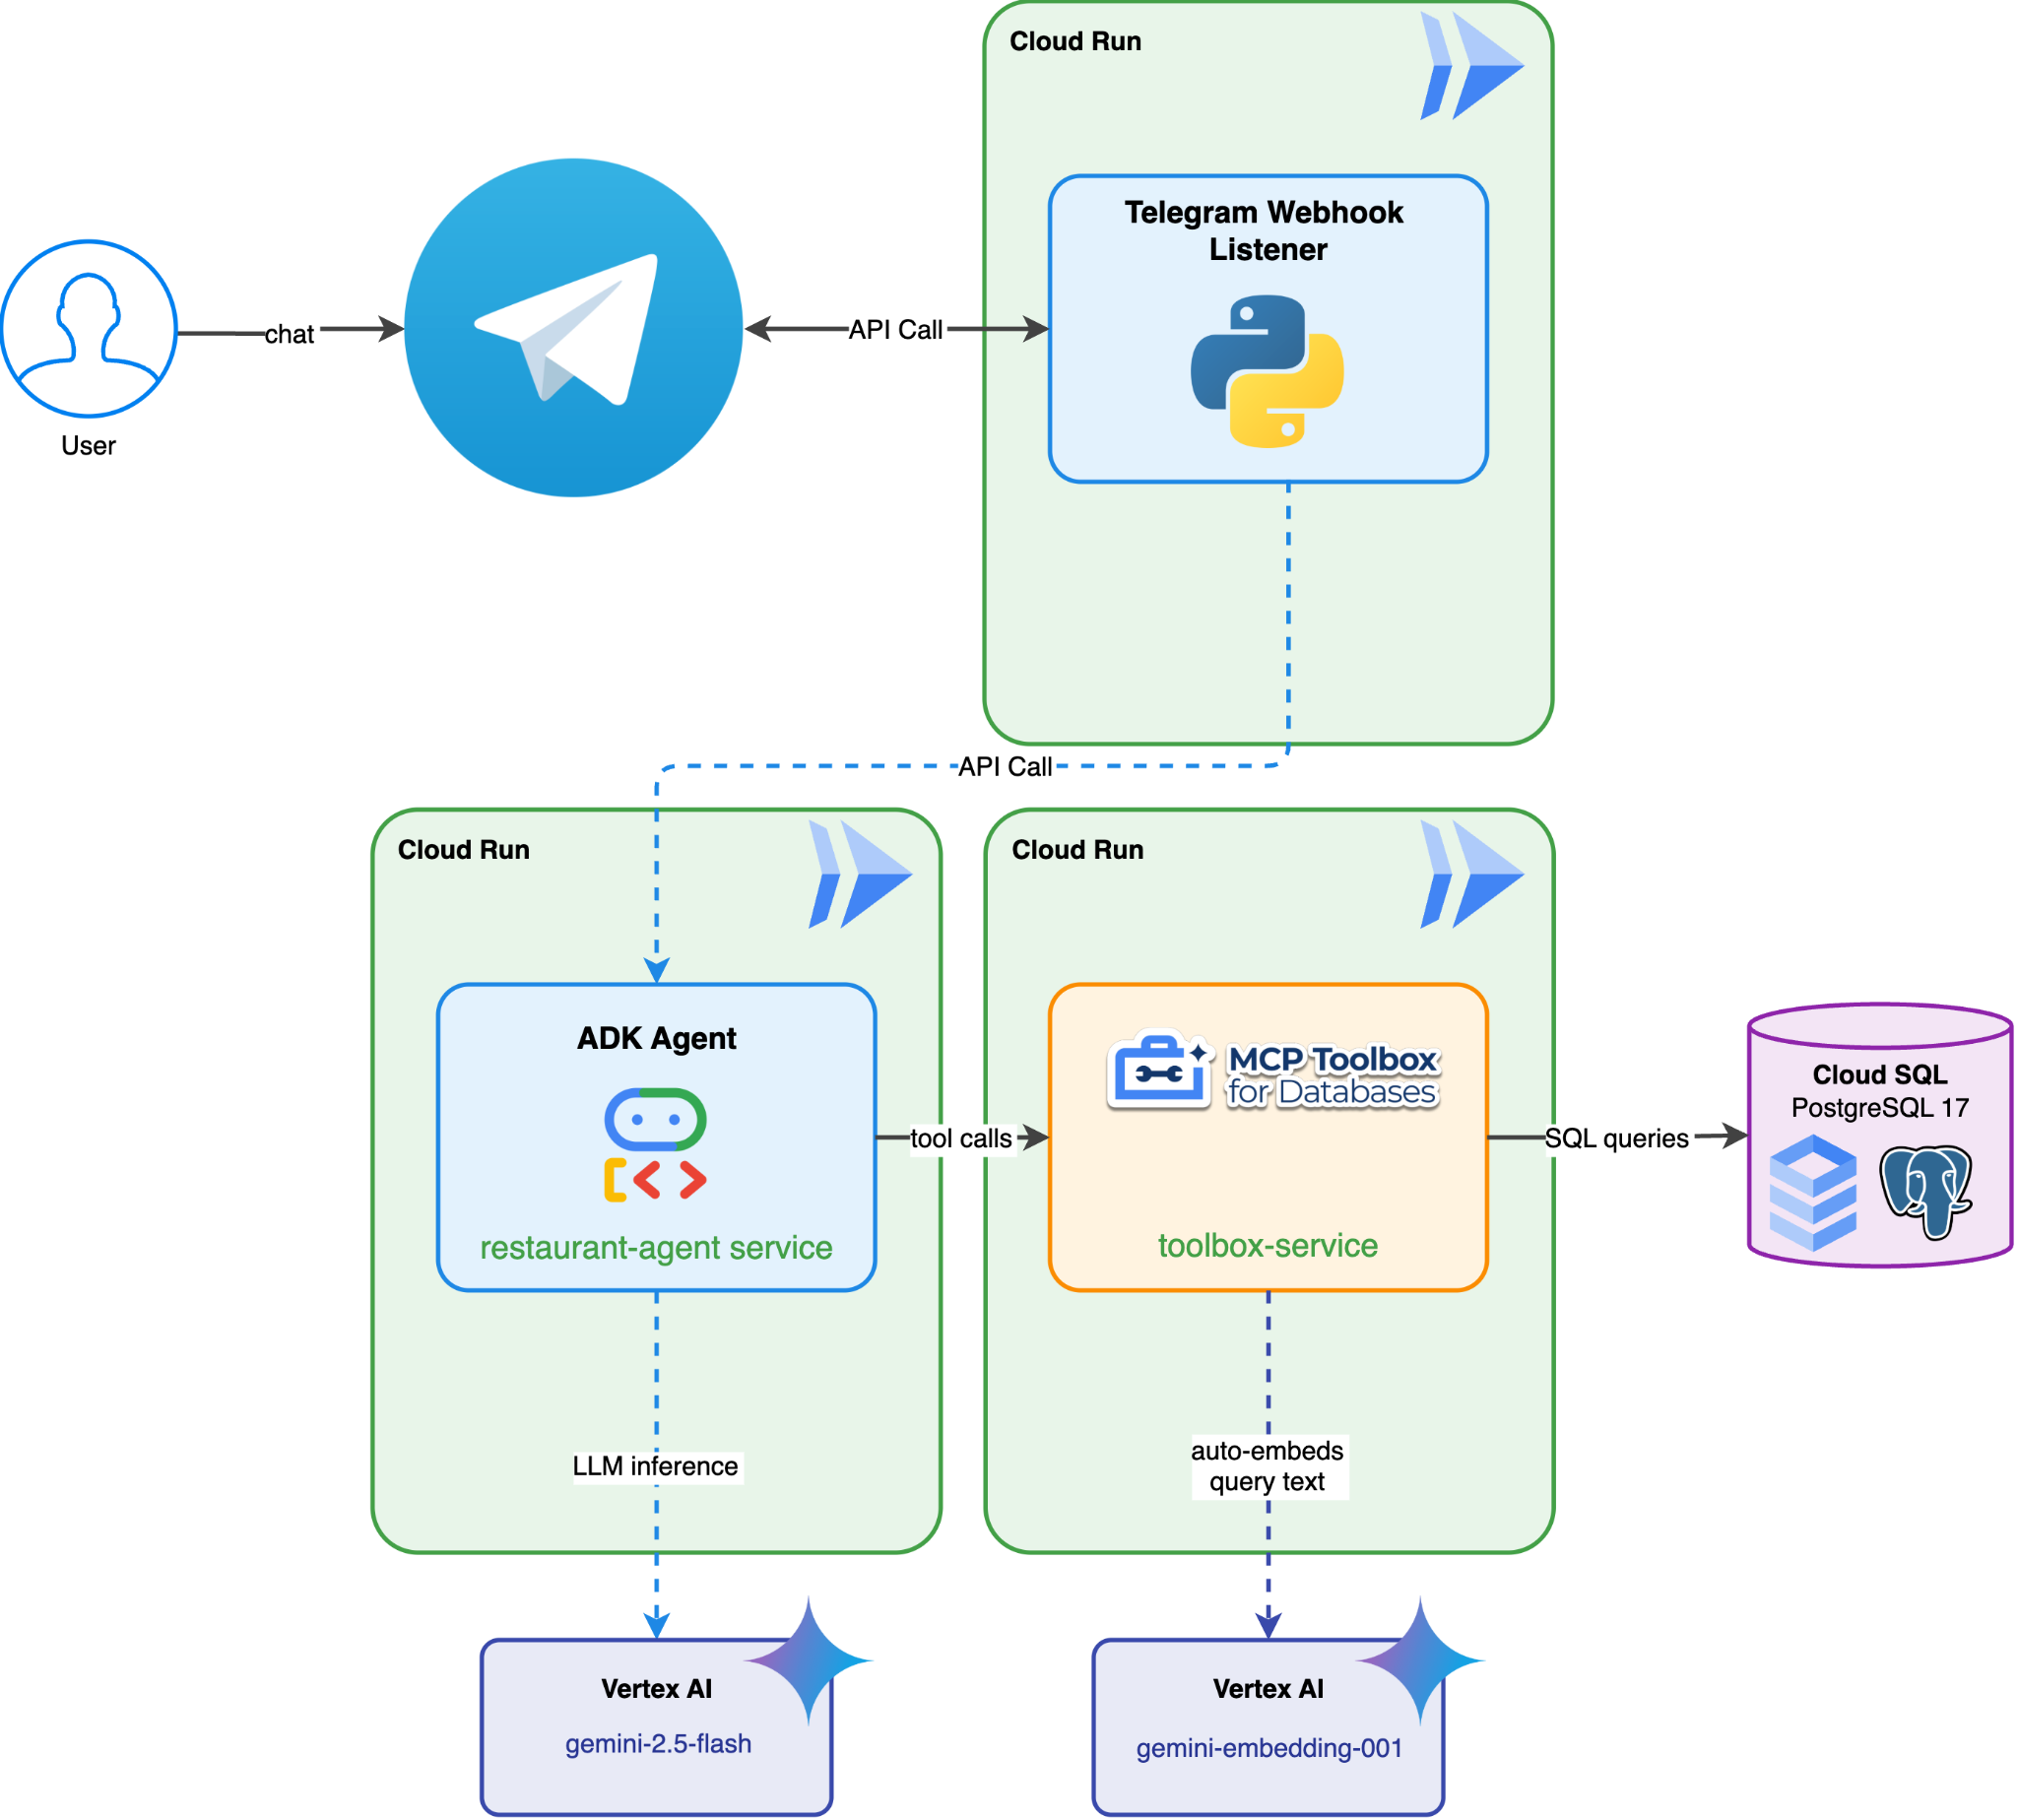
課程內容
- 部署可實際運作的「餐廳服務專員」應用程式,這是以 ADK 為基礎,並採用 Gemini 技術的應用程式
- 使用 BotFather 設定 Telegram 聊天機器人
- 編寫 Python 應用程式,監聽機器人 Webhook
- 傳送即時通訊動作,在 Telegram 中提供使用者訊息的
... typing通知,並在等待實際回覆時定期輪詢,以傳送... typing - 呼叫
Restaurant ConciergeCloud Run 端點來處理使用者的查詢 - 處理從 ADK 代理程式傳回的內容,然後傳送訊息至 Telegram 並關閉緩衝區
- 將 Python 應用程式部署至 Cloud Run
- 與 Telegram 機器人互動
必要條件
- 具有試用帳單帳戶的 Google Cloud 帳戶
- 對 Python 有基本的瞭解
- 具備 ADK 和 Cloud Run 部署經驗者尤佳
- Telegram 帳戶
- (建議) 完成下列程式碼研究室:
- 運用 ADK、MCP Toolbox 和 Cloud SQL 建構代理式 RAG -> 您可以繼續使用這個程式碼實驗室建構代理程式,提供的範例程式碼完全相同
- (或) 大規模代理:透過 Agent Runtime 和 ADK 整合,使用 A2A 通訊協定建立多代理架構 - 如果想使用多代理架構進一步擴充代理
2. 環境設定 - 接續先前的程式碼研究室
本程式碼實驗室提供的敘事內容,實際上是延續這個必要程式碼實驗室:運用 ADK、MCP Toolbox 和 Cloud SQL 建構代理式 RAG,或這個程式碼實驗室:大規模代理:在代理執行階段和 ADK 整合中,使用 A2A 通訊協定的多代理架構。您可以繼續先前的程式碼研究室
我們可以在先前的程式碼研究室工作目錄中開始建構 ( 工作目錄應為 build-agent-adk-toolbox-cloudsql 或 adk-a2a-agent-runtime-starter)。為避免混淆,請重新命名目錄,並使用我們從頭開始時使用的相同目錄名稱
如果您要繼續進行「運用 ADK、MCP Toolbox 和 Cloud SQL 建構代理式 RAG」實驗室:
mv ~/build-agent-adk-toolbox-cloudsql ~/build-agent-adk-telegram
如果您要繼續進行實驗室「Agents at Scale: Multi-Agent Architecture with A2A Protocol on Agent Runtime and ADK Integration」
mv ~/adk-a2a-agent-runtime-starter ~/build-agent-adk-telegram
然後將工作目錄變更為該目錄
cloudshell workspace ~/build-agent-adk-telegram && cd ~/build-agent-adk-telegram
source .env
接著,請確認 restaurant-agent 已部署完成,且可透過公開網址存取
AGENT_URL=$(gcloud run services describe restaurant-agent \
    --region="$REGION" \
    --format='value(status.url)')

echo "      ✓ Agent service deployed"
echo "      Agent URL: $AGENT_URL"
echo ""
如果可以存取網址,請前往下一節:Create Telegram Bot
3. 環境設定 - 使用入門儲存空間重新開始
這個步驟會準備 Cloud Shell 環境、設定 Google Cloud 專案,並複製範例存放區。
開啟 Cloud Shell
在瀏覽器中開啟 Cloud Shell。Cloud Shell 提供預先設定的環境,內含本程式碼研究室所需的所有工具。看到授權提示時,按一下「授權」。
然後依序點選「View」(檢視) ->「Terminal」(終端機),開啟終端機。介面應與下圖類似:
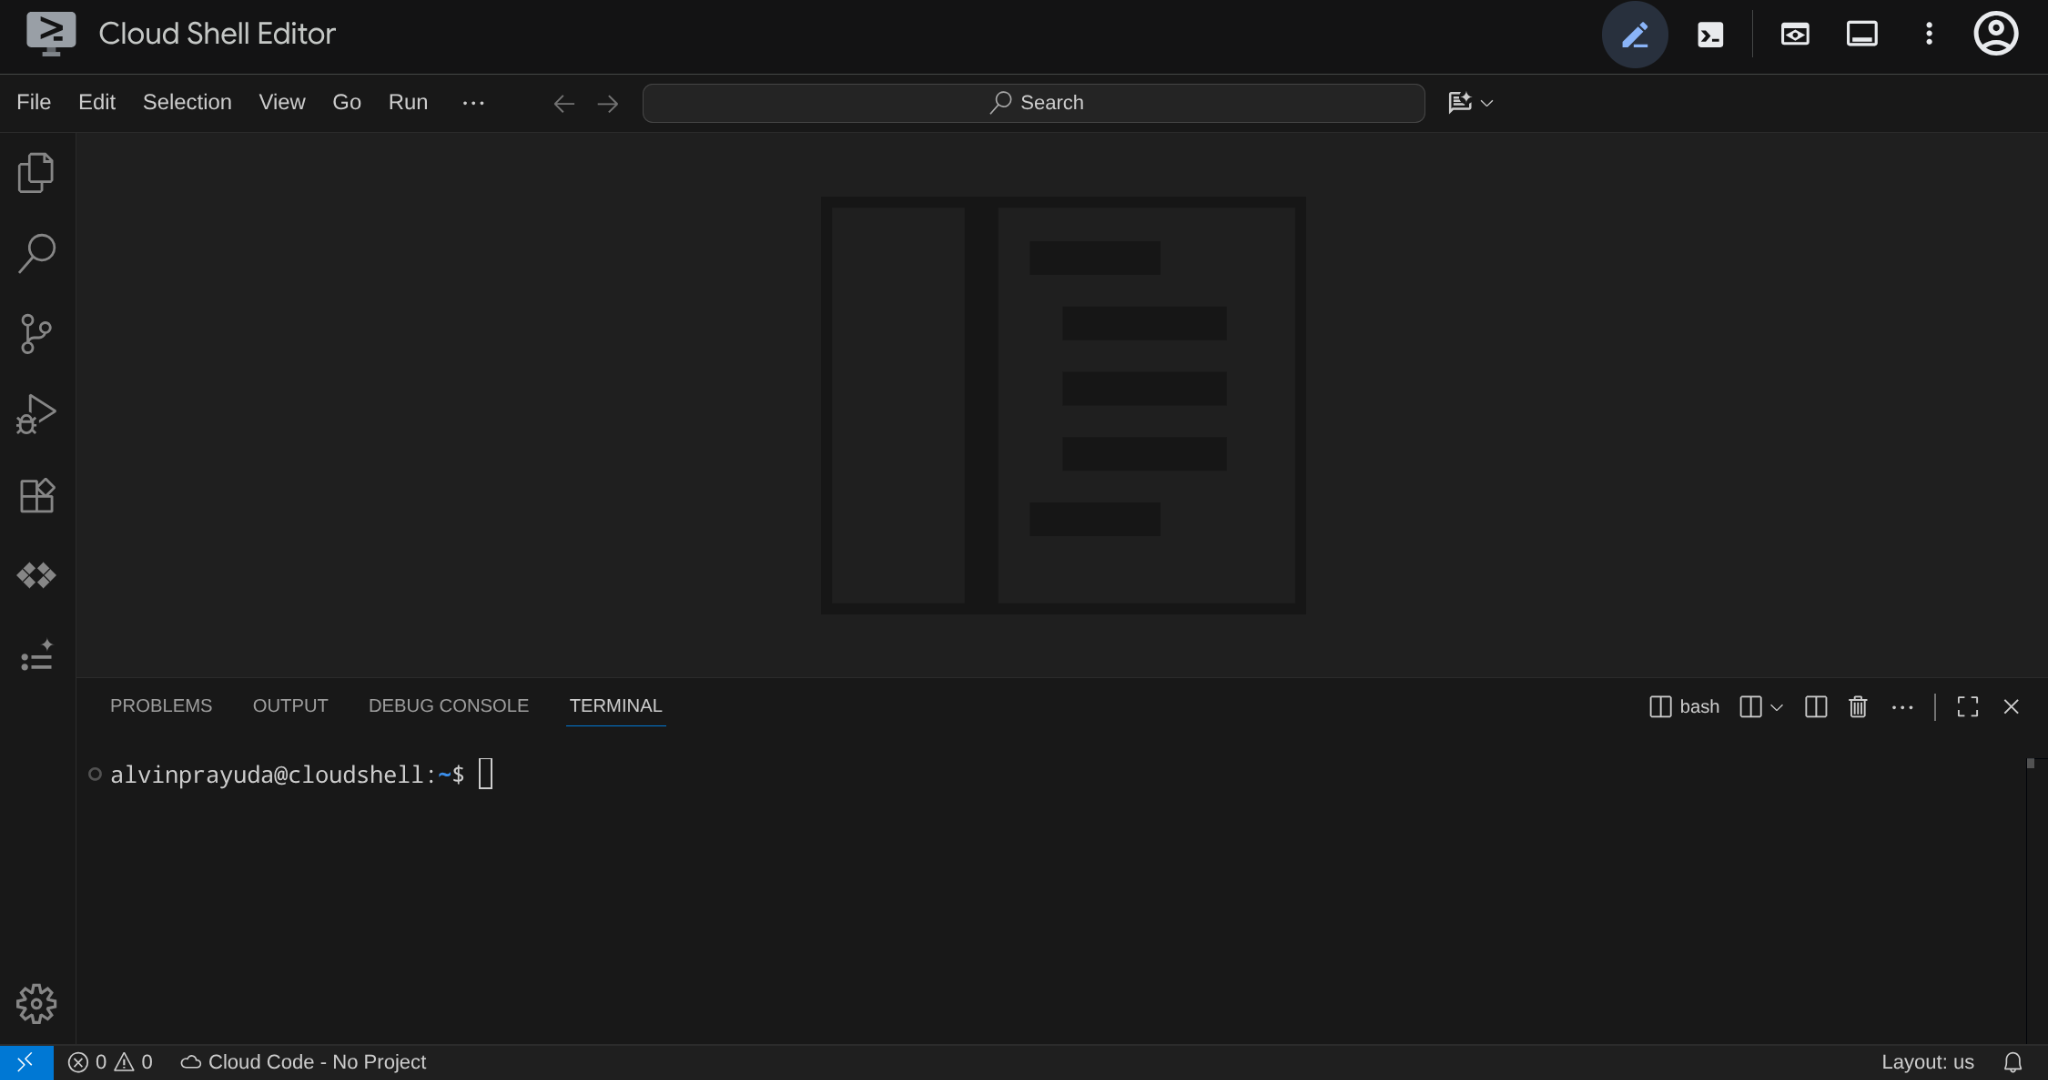
這會是我們的主要介面,頂端是 IDE,底部是終端機
設定工作目錄
複製範例存放區,您在本程式碼研究室中編寫的所有程式碼都會儲存在這裡:
rm -rf ~/build-agent-adk-telegram
git clone https://github.com/alphinside/adk-a2a-agent-runtime-starter.git build-agent-adk-telegram
cloudshell workspace ~/build-agent-adk-telegram && cd ~/build-agent-adk-telegram
使用提供的範本建立 .env 檔案:
cp .env.example .env
如要簡化終端機中的專案設定,請將這個專案設定指令碼下載到工作目錄:
curl -sL https://raw.githubusercontent.com/alphinside/cloud-trial-project-setup/main/setup_verify_trial_project.sh -o setup_verify_trial_project.sh
執行指令碼,這個指令會驗證試用帳單帳戶、建立新專案 (或驗證現有專案)、將專案 ID 儲存至目前目錄中的 .env 檔案,並在 gcloud 中設定有效專案。
bash setup_verify_trial_project.sh && source .env
指令碼會執行下列動作:
- 確認您有有效的試用帳單帳戶
- 檢查
.env中是否有現有專案 (如有) - 建立新專案或重複使用現有專案
- 將試用帳單帳戶連結至專案
- 將專案 ID 儲存至
.env - 將專案設為有效的
gcloud專案
在 Cloud Shell 終端機提示中,檢查工作目錄旁的黃色文字,確認專案設定正確。應該會顯示專案 ID。

入門基礎架構設定
首先,我們需要使用 uv 安裝 Python 依附元件。這是以 Rust 編寫的快速 Python 套件和專案管理工具 ( uv 文件)。本程式碼研究室使用這項工具,可快速且輕鬆地維護 Python 專案
uv sync
接著執行完整設定指令碼,建立 Cloud SQL 執行個體、植入資料,並部署 Toolbox 服務,做為餐廳代理程式的初始狀態
bash scripts/full_setup.sh > logs/full_setup.log 2>&1 &
系統接著就會:
- 建立 Cloud SQL 執行個體並植入資料庫 (第 1 階段)
- 產生代理程式環境設定並啟動本機 Toolbox 服務 (第 2 階段)
- 將 Toolbox 和 Agent 服務部署至 Cloud Run (第 3 階段)
部署完成後,您可以在 Cloud Run 網址上存取 ADK 開發 UI
source .env
AGENT_URL=$(gcloud run services describe restaurant-agent \
    --region="$REGION" \
    --format='value(status.url)')

echo "      ✓ Agent service deployed"
echo "      Agent URL: $AGENT_URL"
echo ""
開啟 ADK 開發 UI,選取 restaurant_agent,然後使用下列範例查詢進行測試:
What Italian dishes do you have?
或者,您也可以
I want something spicy and creamy
現在,下一個動作是,如何從僅限網頁開發介面移至 Telegram 訊息管道
4. 建立 Telegram 機器人
Telegram 是知名的免費訊息平台,廣泛用於社群互動,原因之一是它提供許多簡單的整合方式,因此使用者可以輕鬆建立自己的機器人,並提供各種不同的功能。
在本例中,我們將使用 BotFather 首次建立自己的機器人。請注意,雖然我們在本課程中使用 Telegram,但相同方法也適用於 WhatsApp 或其他即時通訊平台。
使用 BotFather 建立專屬機器人
開啟網路瀏覽器並前往 https://telegram.me/BotFather,開始建立自己的 Telegram 機器人。
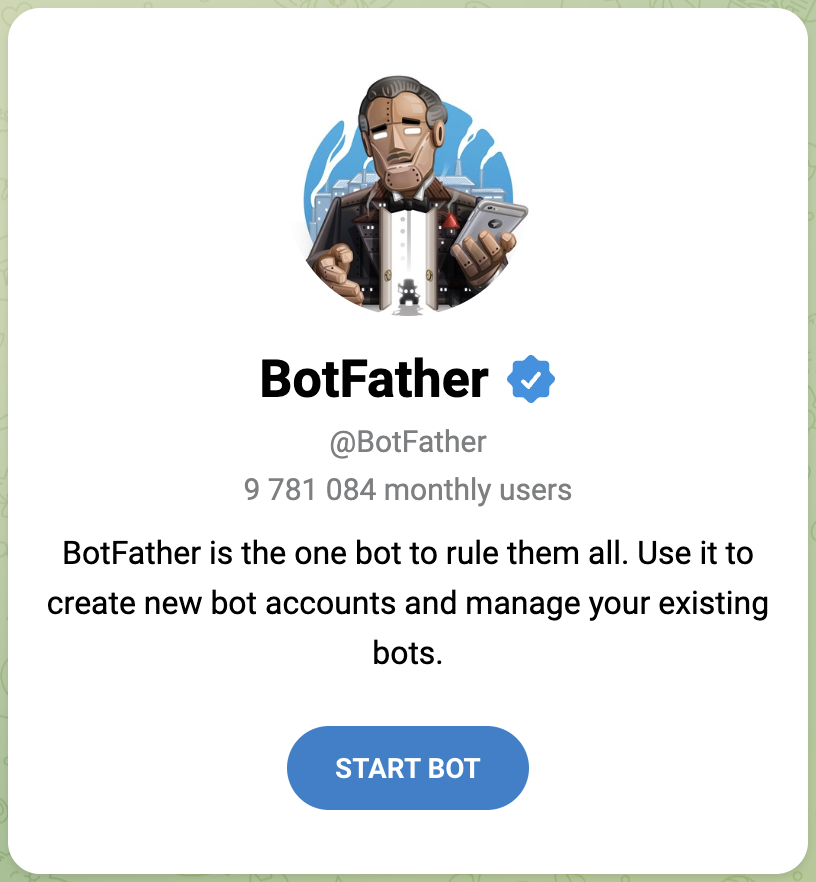
開始與 BotFather 互動
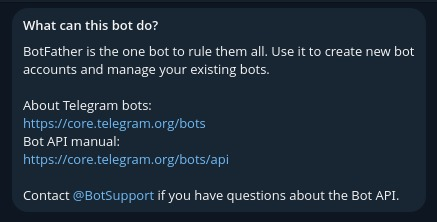
傳送 /start 指令
如要開始使用 BotFather 並建立第一個機器人,請對 BotFather 呼叫 /start 訊息,BotFather 就會分享所有指令,供您進一步互動。
/start
使用 /newbot 指令啟動機器人建立程序
請將 /newbot 指令傳送給 BotFather,建立新的機器人。系統會要求你為機器人命名,然後要求你為機器人提供 username,且必須以 bot 結尾。例如 TetrisBot 或 tetris_bot。這個名稱不得重複。
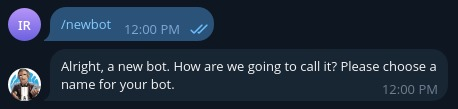
成功建立機器人後,BotFather 會傳送以下訊息
Done! Congratulations on your new bot. You will find it at t.me/AdkTelegramTest_bot. You can now add a description, about section and profile picture for your bot, see /help for a list of commands. By the way, when you've finished creating your cool bot, ping our Bot Support if you want a better username for it. Just make sure the bot is fully operational before you do this.

Use this token to access the HTTP API:
<YOUR_TELEGRAM_API_KEY>
Keep your token secure and store it safely, it can be used by anyone to control your bot.

For a description of the Bot API, see this page: https://core.telegram.org/bots/api
請記下 YOUR_TELEGRAM_API_KEY,我們會在後續章節中使用。
5. 開發 Telegram Webhook 應用程式
準備好工作目錄,開始開發 Telegram Webhook 應用程式
mkdir ~/build-agent-adk-telegram/telegram-integration
cd ~/build-agent-adk-telegram
新增必要的依附元件
建立含有以下內容的 requirements.txt 指令碼,為 Telegram 網頁掛鉤監聽器指令碼提供適當的依附元件。
cloudshell edit ./telegram-integration/requirements.txt
然後新增下列依附元件
python-telegram-bot[webhooks]
httpx
建立 Telegram Webhook 監聽器指令碼
安裝依附元件後,現在我們可以為整合應用程式建立 Python 指令碼 main.py 指令碼
cloudshell edit ~/build-agent-adk-telegram/telegram-integration/main.py
然後將下列程式碼複製到該檔案中
# ./telegram-integration/main.py

import asyncio
import os
import sys
from telegram import Update
from telegram.ext import Application, CommandHandler, MessageHandler, filters, CallbackContext
from telegram.constants import ChatAction
import httpx

# Read token from environment variable
TOKEN = os.environ.get("TELEGRAM_BOT_TOKEN")
ADK_SERVER_URL = os.environ.get("ADK_SERVER_URL", "http://localhost:8000")
ADK_APP_NAME = os.environ.get("ADK_APP_NAME", "restaurant_agent")

# Parse base URL out of ADK_SERVER_URL
BASE_URL = ADK_SERVER_URL.rstrip('/')
if BASE_URL.endswith('/run'):
    BASE_URL = BASE_URL[:-4]
elif BASE_URL.endswith('/query'):
    BASE_URL = BASE_URL[:-6]

if not TOKEN:
    print("Error: TELEGRAM_BOT_TOKEN environment variable not set.")
    print("Please set it before running the application.")
    sys.exit(1)

async def start(update: Update, context: CallbackContext) -> None:
    """Send a message when the command /start is issued."""
    await update.message.reply_text('Hi! I am your ADK Integration Bot. Send me a message and I will forward it to the ADK server.')

async def send_typing_loop(chat_id: int, bot, stop_event: asyncio.Event):
    """Send typing action periodically until the stop event is set."""
    while not stop_event.is_set():
        try:
            await bot.send_chat_action(chat_id=chat_id, action=ChatAction.TYPING)
            # The research suggested repeating every 4 seconds
            await asyncio.sleep(4)
        except Exception as e:
            print(f"Error sending chat action: {e}")
            await asyncio.sleep(1) # Wait a bit before retrying if error

async def handle_message(update: Update, context: CallbackContext) -> None:
    """Handle incoming user messages."""
    user_message = update.message.text
    chat_id = update.message.chat_id
    raw_user_id = str(update.message.from_user.id)

    # Derive unique user_id and session_id for this user
    user_id = f"tg_{raw_user_id}"
    session_id = f"tg_sess_{raw_user_id}"

    print(f"Received message from {user_id}: {user_message}")

    # Create a stop event for the typing loop
    stop_event = asyncio.Event()

    # Start the typing loop as a background task
    typing_task = asyncio.create_task(send_typing_loop(chat_id, context.bot, stop_event))

    try:
        async with httpx.AsyncClient() as client:
            # 1. Check if the session exists
            session_url = f"{BASE_URL}/apps/{ADK_APP_NAME}/users/{user_id}/sessions/{session_id}"
            session_check = await client.get(session_url, timeout=10.0)

            if session_check.status_code == 404:
                # 2. If session doesn't exist, create it
                print(f"Session {session_id} not found. Creating session...")
                session_create = await client.post(session_url, json={}, timeout=10.0)
                if session_create.status_code != 200:
                    raise Exception(f"Failed to create session: {session_create.status_code} {session_create.text}")
            elif session_check.status_code != 200:
                raise Exception(f"Error checking session: {session_check.status_code} {session_check.text}")

            # 3. Run the ADK agent
            run_url = f"{BASE_URL}/run"
            payload = {
                "appName": ADK_APP_NAME,
                "userId": user_id,
                "sessionId": session_id,
                "newMessage": {
                    "role": "user",
                    "parts": [{"text": user_message}]
                }
            }
            response = await client.post(run_url, json=payload, timeout=60.0)

        if response.status_code == 200:
            events = response.json()
            if isinstance(events, list) and len(events) > 0:
                # The last event contains the final text response
                last_event = events[-1]
                content = last_event.get("content", {})
                parts = content.get("parts", [])
                if parts and "text" in parts[0]:
                    reply_text = parts[0]["text"]
                else:
                    reply_text = "ADK agent returned an empty or non-text response."
            else:
                reply_text = "No events returned from ADK agent."
        else:
            reply_text = f"Error communicating with ADK server (Status: {response.status_code})."

    except Exception as e:
        reply_text = f"Failed to connect to ADK server: {e}"
    finally:
        # Stop the typing loop
        stop_event.set()
        await typing_task

    # Send the final response back to the user
    await update.message.reply_text(reply_text)

def main() -> None:
    """Start the bot."""
    # Create the Application and pass it your bot's token.
    application = Application.builder().token(TOKEN).build()

    # on different commands - answer in Telegram
    application.add_handler(CommandHandler("start", start))

    # on non command i.e message - echo the message on Telegram
    application.add_handler(MessageHandler(filters.TEXT & ~filters.COMMAND, handle_message))

    # Check if running in webhook mode (e.g., on Cloud Run)
    port = os.environ.get("PORT")
    service_url = os.environ.get("SERVICE_URL")

    if port and service_url:
        if not service_url.startswith("http"):
            service_url = f"https://{service_url}"

        print(f"Starting bot in WEBHOOK mode on port {port} with url {service_url}")

        application.run_webhook(
            listen="0.0.0.0",
            port=int(port),
            url_path=TOKEN,
            webhook_url=f"{service_url}/{TOKEN}",
            allowed_updates=Update.ALL_TYPES
        )
    else:
        print("Starting bot in POLLING mode")
        # Run the bot until the user presses Ctrl-C
        application.run_polling(allowed_updates=Update.ALL_TYPES)


if __name__ == "__main__":
    main()
瞭解 Telegram 機器人整合代碼
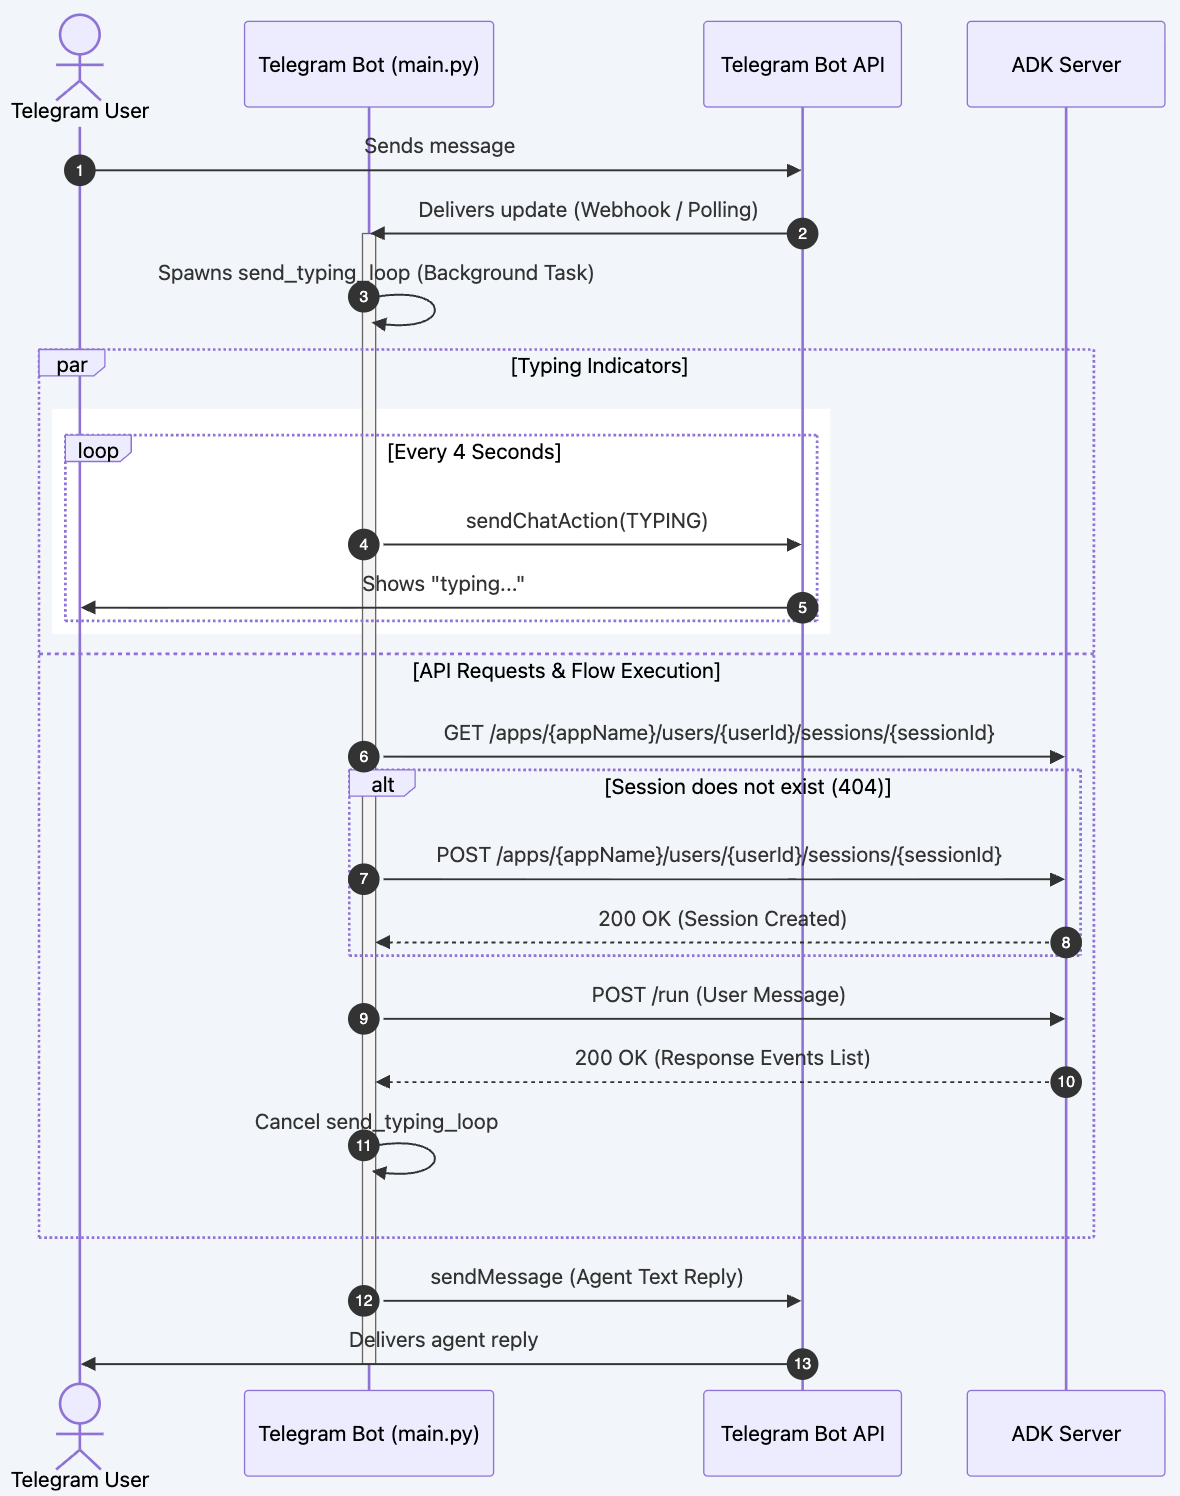
使用者傳送訊息時,系統會在 handle_message() 下執行下列管道
步驟 1:身分識別與工作階段衍生
機器人會將 Telegram 使用者 ID 對應至不重複的 ADK ID,確保使用者工作階段彼此區隔:
user_id = f"tg_{raw_user_id}"
session_id = f"tg_sess_{raw_user_id}"
步驟 2:非同步「輸入」狀態 (第 53 至 58 行)
為確保 ADK 代理程式處理提示時 (可能需要幾秒鐘),使用者體驗具有高度回應性,機器人會啟動非同步背景迴圈:
asyncio.Event會以stop_event例項化。asyncio.create_task會在背景產生send_typing_loop(...)。- 迴圈每隔 4 秒會將
ChatAction.TYPING動作傳送至 Telegram,直到設定stop_event為止。
步驟 3:ADK 工作階段驗證和建立 (第 61 至 72 行)
機器人會在執行服務專員前,檢查是否已有工作階段:
- 將
GET要求傳送至/apps/{appName}/users/{userId}/sessions/{sessionId}。 - 如果回應為
404 Not Found,系統會透過對相同網址發出的POST要求 (JSON 主體為空白),建立工作階段。 - 如果傳回的狀態不是
200或404,系統就會引發例外狀況。
步驟 4:將要求傳送至代理程式 (第 74 至 85 行)
訊息酬載會轉送至 ADK /run 端點:
- 端點:
POST /run - 要求逾時時間設為
60.0秒,以便進行複雜的推論或處理上游延遲。 - 酬載結構:
{
  "appName": "restaurant_agent",
  "userId": "tg_<user_id>",
  "sessionId": "tg_sess_<user_id>",
  "newMessage": {
    "role": "user",
    "parts": [{"text": "<user_message>"}]
  }
}
步驟 5:剖析回應 (第 87 至 101 行)
ADK 伺服器會傳回訊息事件清單。機器人會檢查傳回的陣列:
- 並擷取清單中的最後一個事件 (
events[-1])。 - 它會透過
event["content"]["parts"][0]["text"]導覽至文字內容。 - 如果沒有傳回任何事件或缺少文字結構,系統會設定描述性預留位置文字。
步驟 6:拆除及回應調度 (第 103 至 111 行)
- 在
finally區塊中,系統會設定stop_event,停止輸入動作迴圈。 - 為確保資源乾淨無虞,機器人會等待
typing_task完成。 - 最後,機器人會將剖析過的回覆文字傳送至 Telegram 對話。
6. 將 Telegram Webhook 應用程式部署至 Cloud Run
接著,我們會將 Telegram Webhook 監聽器部署至 Cloud Run,讓機器人與其通訊
建立 Dockerfile
首先,我們需要建立 Dockerfile。
cloudshell edit ~/build-agent-adk-telegram/telegram-integration/Dockerfile
然後將下列程式碼複製到該檔案中
# Use an official Python runtime as a parent image
FROM python:3.11-slim

# Prevent Python from writing pyc files to disc and buffering stdout/stderr
ENV PYTHONDONTWRITEBYTECODE=1
ENV PYTHONUNBUFFERED=1

# Set the working directory in the container
WORKDIR /app

# Install system dependencies if needed
RUN apt-get update && apt-get install -y --no-install-recommends \
    build-essential \
    && rm -rf /var/lib/apt/lists/*

# Copy the dependencies file to the working directory
COPY requirements.txt .

# Install any needed packages specified in requirements.txt
RUN pip install --no-cache-dir -r requirements.txt

# Copy the rest of the application code
COPY main.py .

# Expose the port that Cloud Run will provide via environment variable
EXPOSE 8080

# Run main.py when the container launches
CMD ["python", "main.py"]
這項服務會使用 python:3.11-slim 容器化,以縮小映像檔足跡:
- 從
requirements.txt(python-telegram-bot[webhooks]和httpx) 安裝依附元件。 - 公開標準通訊埠
8080。 - 啟動
python main.py。
準備環境變數
接著,請重新檢查代理程式是否已成功部署
AGENT_URL=$(gcloud run services describe restaurant-agent \
    --region="$REGION" \
    --format='value(status.url)')

echo "      ✓ Agent service deployed"
echo "      Agent URL: $AGENT_URL"
echo ""
接著,將先前取得的 TELEGRAM_BOT_TOKEN 放入 .env
echo "TELEGRAM_BOT_TOKEN=YOUR_TELEGRAM_API_KEY" >> .env
接著,讓我們使用所需其他值填入 .env 資料。
echo "ADK_SERVER_URL=$AGENT_URL" >> .env
echo "ADK_APP_NAME=restaurant_agent" >> .env
echo "SERVICE_NAME=telegram-integration" >> .env
source .env
建立部署指令碼
現在來建立部署指令碼,提供完整檢查,並將應用程式部署至 Cloud Run
cloudshell edit ~/build-agent-adk-telegram/telegram-integration/deploy.sh
然後將下列程式碼複製到檔案中
#!/usr/bin/env bash
# ./telegram-integration/deploy.sh

# Exit immediately if a command exits with a non-zero status
set -euo pipefail

# Color codes for neat terminal output
RED='\033[0;31m'
GREEN='\033[0;32m'
YELLOW='\033[1;33m'
BLUE='\033[0;34m'
NC='\033[0;37m' # No Color
# Load environment variables from .env if it exists
if [ -f .env ]; then
    echo -e "${GREEN}✔ Loading environment variables from .env...${NC}"
    export $(grep -v '^#' .env | xargs)
fi

echo -e "${BLUE}====================================================${NC}"
echo -e "${BLUE}   Google Cloud Run Deployment: Telegram Bot        ${NC}"
echo -e "${BLUE}====================================================${NC}"

# 1. Check for gcloud CLI
if ! command -v gcloud &> /dev/null; then
    echo -e "${RED}Error: 'gcloud' CLI is not installed.${NC}"
    echo "Please install the Google Cloud SDK and try again."
    echo "See: https://cloud.google.com/sdk/docs/install"
    exit 1
fi

# 2. Check active gcloud account/auth
ACTIVE_ACCOUNT=$(gcloud auth list --filter=status:ACTIVE --format="value(account)" 2>/dev/null || true)
if [ -z "$ACTIVE_ACCOUNT" ]; then
    echo -e "${RED}Error: No active Google Cloud account found.${NC}"
    echo "Please run: gcloud auth login"
    exit 1
fi

# 3. Detect / Prompt for GCP Project
DEFAULT_PROJECT=${GCP_PROJECT_ID:-$(gcloud config get-value project 2>/dev/null || true)}
if [ -n "${DEFAULT_PROJECT}" ]; then
    echo -e "${GREEN}✔ Using GCP Project: $DEFAULT_PROJECT${NC}"
    GCP_PROJECT="$DEFAULT_PROJECT"
else
    echo -n "Enter GCP Project ID: "
    read -r GCP_PROJECT
fi

if [ -z "$GCP_PROJECT" ]; then
    echo -e "${RED}Error: GCP Project ID is required.${NC}"
    exit 1
fi

# Set active project
gcloud config set project "$GCP_PROJECT" &> /dev/null

# 4. Configure Service Parameters
DEFAULT_SERVICE=${SERVICE_NAME:-"telegram-integration"}
if [ -n "${SERVICE_NAME:-}" ]; then
    echo -e "${GREEN}✔ Using Cloud Run Service Name: $SERVICE_NAME${NC}"
else
    echo -n "Enter Cloud Run Service Name [Default: $DEFAULT_SERVICE]: "
    read -r SERVICE_NAME
    SERVICE_NAME=${SERVICE_NAME:-$DEFAULT_SERVICE}
fi

DEFAULT_REGION=${REGION:-"us-central1"}
if [ -n "${REGION:-}" ]; then
    echo -e "${GREEN}✔ Using Cloud Run Region: $REGION${NC}"
else
    echo -n "Enter Cloud Run Region [Default: $DEFAULT_REGION]: "
    read -r REGION
    REGION=${REGION:-$DEFAULT_REGION}
fi

DEFAULT_ADK_APP=${ADK_APP_NAME:-"restaurant_agent"}
if [ -n "${ADK_APP_NAME:-}" ]; then
    echo -e "${GREEN}✔ Using ADK App Name: $ADK_APP_NAME${NC}"
    ADK_APP="$ADK_APP_NAME"
else
    echo -n "Enter ADK App Name [Default: $DEFAULT_ADK_APP]: "
    read -r ADK_APP
    ADK_APP=${ADK_APP:-$DEFAULT_ADK_APP}
fi

# 5. Retrieve/Prompt for Telegram Bot Token
if [ -n "${TELEGRAM_BOT_TOKEN:-}" ]; then
    echo -e "${GREEN}✔ Found TELEGRAM_BOT_TOKEN in environment.${NC}"
    BOT_TOKEN="$TELEGRAM_BOT_TOKEN"
else
    echo -e "${YELLOW}TELEGRAM_BOT_TOKEN is not set in your environment.${NC}"
    echo -n "Enter your Telegram Bot Token (input will be hidden): "
    read -s -r BOT_TOKEN
    echo ""
fi

if [ -z "$BOT_TOKEN" ]; then
    echo -e "${RED}Error: Telegram Bot Token is required.${NC}"
    exit 1
fi

# 6. Retrieve/Prompt for ADK Server URL
DEFAULT_ADK_URL="http://localhost:8000"
if [ -n "${ADK_SERVER_URL:-}" ]; then
    echo -e "${GREEN}✔ Found ADK_SERVER_URL in environment: $ADK_SERVER_URL${NC}"
    ADK_URL="$ADK_SERVER_URL"
else
    echo -n "Enter your ADK Server URL [Default: $DEFAULT_ADK_URL]: "
    read -r ADK_URL
    ADK_URL=${ADK_URL:-$DEFAULT_ADK_URL}
fi

# Enable required GCP services
echo -e "\n${YELLOW}Checking and enabling required GCP services...${NC}"
gcloud services enable run.googleapis.com cloudbuild.googleapis.com artifactregistry.googleapis.com --project "$GCP_PROJECT"

# Determine source directory dynamically
SOURCE_DIR="."
if [ -d "telegram-integration" ]; then
    SOURCE_DIR="telegram-integration"
    echo -e "${GREEN}✔ Found source directory: telegram-integration${NC}"
elif [ -f "Dockerfile" ]; then
    SOURCE_DIR="."
    echo -e "${GREEN}✔ Dockerfile found in current directory. Using current directory as source.${NC}"
else
    echo -e "${RED}Error: Could not find source directory 'telegram-integration' or Dockerfile in current directory.${NC}"
    exit 1
fi

# 7. First-pass Deployment with placeholder SERVICE_URL
# This boots the container in Webhook mode (so health check binds to port)
# but uses a high-reliability placeholder URL (google.com) to pass DNS verification checks.
echo -e "\n${YELLOW}Deploying to Cloud Run (Step 1/2: Initial Deploy)...${NC}"
gcloud run deploy "$SERVICE_NAME" \
  --source "$SOURCE_DIR" \
  --region "$REGION" \
  --allow-unauthenticated \
  --set-env-vars "TELEGRAM_BOT_TOKEN=$BOT_TOKEN,ADK_SERVER_URL=$ADK_URL,ADK_APP_NAME=$ADK_APP,SERVICE_URL=https://google.com" \
  --project "$GCP_PROJECT"

# 8. Retrieve the actual service URL
echo -e "\n${YELLOW}Retrieving service URL...${NC}"
SERVICE_URL=$(gcloud run services describe "$SERVICE_NAME" --region "$REGION" --project "$GCP_PROJECT" --format 'value(status.url)')
echo -e "${GREEN}✔ Service URL is: $SERVICE_URL${NC}"

# 9. Update service environment variables with the real SERVICE_URL
# This triggers a rolling update and registers the correct webhook with Telegram automatically!
echo -e "\n${YELLOW}Updating configuration with final Webhook URL (Step 2/2)...${NC}"
gcloud run services update "$SERVICE_NAME" \
  --region "$REGION" \
  --set-env-vars "TELEGRAM_BOT_TOKEN=$BOT_TOKEN,ADK_SERVER_URL=$ADK_URL,ADK_APP_NAME=$ADK_APP,SERVICE_URL=$SERVICE_URL" \
  --project "$GCP_PROJECT"

echo -e "\n${GREEN}====================================================${NC}"
echo -e "${GREEN}   Deployment Completed Successfully! 🎉            ${NC}"
echo -e "${GREEN}====================================================${NC}"
echo -e "Service Name:   ${BLUE}$SERVICE_NAME${NC}"
echo -e "Region:         ${BLUE}$REGION${NC}"
echo -e "Active URL:     ${BLUE}$SERVICE_URL${NC}"
echo -e "Webhook Path:   ${BLUE}$SERVICE_URL/<bot-token>${NC}"
echo -e "ADK Backend:    ${BLUE}$ADK_URL${NC}"
echo -e "ADK App Name:   ${BLUE}$ADK_APP${NC}"
echo -e "${GREEN}====================================================${NC}"
echo "Your Telegram Bot has been configured to use webhooks."
echo "Any message sent to your bot will now trigger this Cloud Run instance."
雙重部署指令碼 (deploy.sh)
部署至 Google Cloud Run 時,機器人需要在環境中指定自己的網址 (SERVICE_URL),才能向 Telegram 註冊為 Webhook 目標。如要解決這個循環依附元件 (網址在部署前不明,但服務需要網址才能啟動,且不能發生健康狀態檢查失敗),deploy.sh 會執行兩階段部署:
- 步驟 1:初始部署:使用預留位置 DNS (
https://google.com) 啟動容器,讓服務順利啟動、繫結至本機連接埠,並通過初始 Cloud Run 健康狀態檢查。 - 步驟 2:擷取網址:使用
gcloud run services describe以程式輔助方式擷取新建立的 Cloud Run 端點。 - 步驟 3:更新設定:使用實際的即時服務網址更新環境變數。這會觸發 Cloud Run 的乾淨滾動式更新,並向 Telegram API 安全地註冊正確的 Webhook 目標。
部署至 Cloud Run
部署指令碼會列印代理程式網址。在瀏覽器中開啟,即可存取在 Cloud Run 上執行的相同 ADK 開發 UI。
cd ~/build-agent-adk-telegram
bash ./telegram-integration/deploy.sh
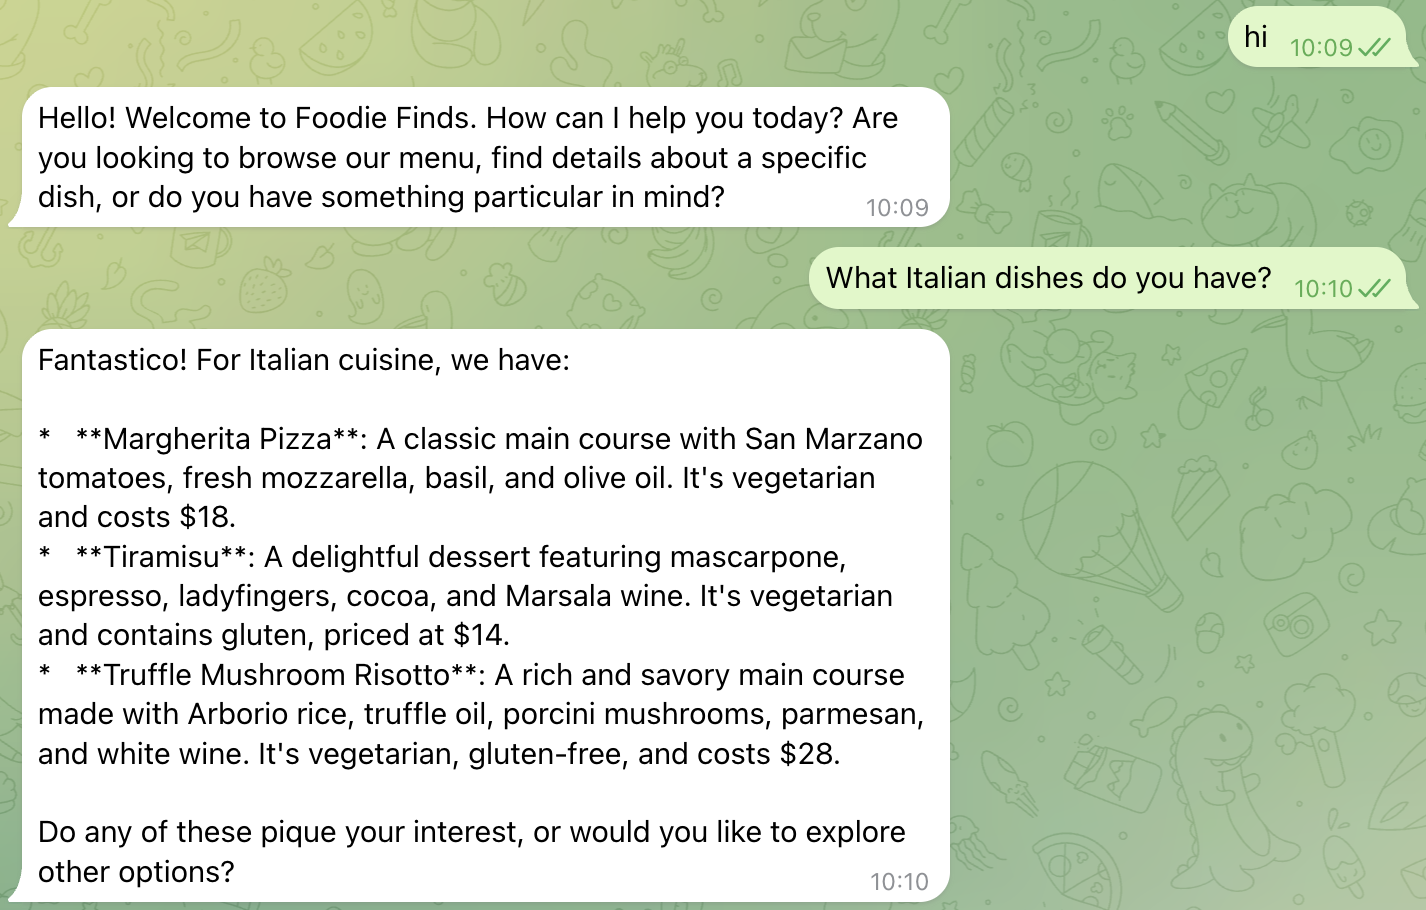
一切順利的話,這時你就可以直接透過 Telegram 即時通訊應用程式與機器人對話,找到剛建立的機器人並開始互動:
What Italian dishes do you have?
或者,您也可以
I want something spicy and creamy
觀察機器人傳送狀態「...正在輸入」,不久後,機器人就會傳回您先前建立的 ADK 訊息!
7. 恭喜!
您已透過 HTTP 用戶端伺服器通訊,建構、部署及完整整合我們的智慧餐廳菜單助理 ADK 型 AI 代理程式與 Telegram,讓使用者查詢喜愛的菜單並預訂餐廳。
您已經瞭解的內容
- 將 Restaurant Concierge、以 ADK 為基礎的代理和 MCP Toolbox 部署至 Cloud Run 並進行設定
- 如何使用 BotFather 設定 Telegram 機器人
- 如何編寫 Python 指令碼,監聽 Telegram Webhook 並與 ADK 代理互動,據此傳遞使用者查詢和回覆
- 如何在 Telegram 中導入
"... typing",在等待 ADK 代理程式回覆時,向使用者發出訊息正在處理中的即時回饋信號。 - 如何將 Python 指令碼部署至 Cloud Run,並與其互動
清理
如要避免系統向您的 Google Cloud 帳戶收費,請刪除本程式碼研究室建立的資源。
方法 1:刪除專案 (建議)
gcloud projects delete $GOOGLE_CLOUD_PROJECT
方法 2:刪除個別資源
# If you follow from previous A2A Agent Runtime codelab
# Delete the Agent Runtime deployment (skip if not found)
uv run python -c "
import vertexai
from google.genai import types
vertexai.init(project='$GOOGLE_CLOUD_PROJECT', location='$REGION')
client = vertexai.Client(
    project='$GOOGLE_CLOUD_PROJECT', location='$REGION',
    http_options=types.HttpOptions(api_version='v1beta1'),
)
try:
    agent = client.agent_engines.get(name='$RESERVATION_AGENT_RESOURCE_NAME')
    agent.delete(force=True)
    print('Agent Runtime deployment deleted.')
except Exception as e:
    print(f'No agent deployment found or already deleted, skipping. ({e})')
"

# Delete GCS staging bucket (skip if STAGING_BUCKET is not set)
if [ -n "$STAGING_BUCKET" ]; then
  gsutil rm -r gs://$STAGING_BUCKET
else
  echo "STAGING_BUCKET not set, skipping bucket deletion."
fi

# Delete Cloud Run services
gcloud run services delete restaurant-agent --region=$REGION --quiet
gcloud run services delete toolbox-service --region=$REGION --quiet
gcloud run services delete telegram-integration --region=$REGION --quiet

# Delete Cloud SQL instance
gcloud sql instances delete $DB_INSTANCE --quiet