1. Introduction
Last Updated: 2026-06-22
Building a Simple Travel Agent with ADK
Welcome to this ADK Python(*) workshop, which comes with batteries included, thanks to Gemini CLI!
This codelab is divided in two 🏅 milestones:
- A common, simple learning path: setup + instant gratification.
- A personalized path where you choose a quest to solve with the assistance of Gemini CLI
The second part makes this codelab perfect for a hackathon (and prizes for the most creative solutions!)
Milestone1: Your first agent with ADK and Gemini CLI
The goal of this milestone is to build a simple travel agent with ADK step-by-step. To do so, we first want to set up Gemini CLI so that it helps us code with ADK; this will make your local shell able to pick the latest version of Python ADK, inept the code and the docs, and provide the latest/best code to work with it for your goal.
This is a hand-guided part where we achieve a full-working app through small, simple, increments. This usually takes around one hour (plus installation time).
Milestone 2: Extending your agent
After that, we give you a dozen options (of varying difficulty) to extend the app to your liking. This allows you to explore different aspects (UI, Ops, Complex agent interactions, ..)
What you'll build
In this codelab, you're going to build a Travel Agent app using ADK and Gemini CLI. Your app will:
- Connect to Airbnb APIs through Airbnb MCP.
- Search online for up-to-date information (weather, dates, ..)
- Execute custom tools.
- Create imagery of the apartments/rooms using NanoBanana.
Gemini CLI will guide you through all of this: write/review code and find latest docs in a local mirror of the ADK repo (in Python, or your favorite language).
What you'll learn
- How to create and create an app with ADK
- How to use Gemini CLI to code apps based on local docs!
- How to interact with an MCP server to connect to real-time external data sources, like this:
What you'll need
- A computer which allows you to install packages (eg
npm install ..) - Basic coding ability in either Python, TypeScript, Go, Java.
- An IDE of sort (Antigravity, vscode, IntelliJ, vim) is strongly encouraged.
Why ADK + Gemini CLI?
Some of you might wonder: Why do I need to use ADK (an agent builder SDK) in conjunction with a local agentic code helper (like Gemini CLI)? The reason is that both tools are incredibly powerful, yet their interaction is not trivial; many people have tried to work with both in conjunction and failed (mostly due to a "loop in a loop" issues). This codelab is trying to share a few tips on how to make this coexistence possible.
2. Getting set up
Choose one of the following options: Self-paced environment setup if you want to run this codelab on your own machine, or; Start Cloud Shell if you want to run this codelab entirely in the cloud.
Self-paced environment setup
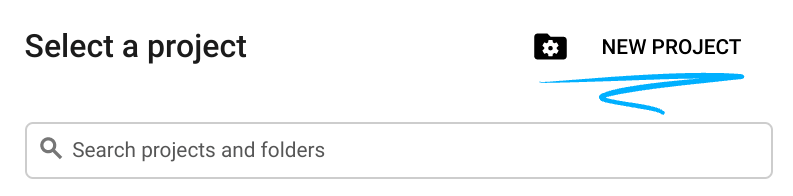
- Sign-in to the Google Cloud Console and create a new project or reuse an existing one. If you don't already have a Gmail or Google Workspace account, you must create one.

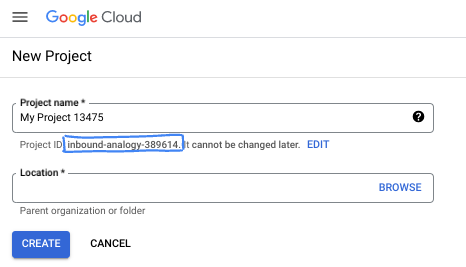
- The Project name is the display name for this project's participants. It is a character string not used by Google APIs. You can always update it.
- The Project ID is unique across all Google Cloud projects and is immutable (cannot be changed after it has been set). The Cloud Console auto-generates a unique string; usually you don't care what it is. In most codelabs, you'll need to reference your Project ID (typically identified as
PROJECT_ID). If you don't like the generated ID, you might generate another random one. Alternatively, you can try your own, and see if it's available. It can't be changed after this step and remains for the duration of the project. - For your information, there is a third value, a Project Number, which some APIs use. Learn more about all three of these values in the documentation.
- Next, you'll need to enable billing in the Cloud Console to use Cloud resources/APIs. Running through this codelab won't cost much, if anything at all. To shut down resources to avoid incurring billing beyond this tutorial, you can delete the resources you created or delete the project. New Google Cloud users are eligible for the $300 USD Free Trial program.
Start Cloud Shell
While Google Cloud can be operated remotely from your laptop, in this codelab you will be using Google Cloud Shell, a command line environment running in the Cloud.
From the Google Cloud Console, click the Cloud Shell icon on the top right toolbar:

It should only take a few moments to provision and connect to the environment. When it is finished, you should see something like this:

This virtual machine is loaded with all the development tools you'll need. It offers a persistent 5GB home directory, and runs on Google Cloud, greatly enhancing network performance and authentication. All of your work in this codelab can be done within a browser. You do not need to install anything.
3. Prerequisites (Installation)
For this tutorial, you need to install:
1. Python and uv
python and uv (package manager for Python). This is needed for ADK. Ensure you have uv installed:
$ curl -LsSf https://astral.sh/uv/install.sh | sh
Why uv? While you can use whichever Python manager you prefer, using uv will ensure the ENV/PATH setup for python will be equal for you and for Gemini CLI, so your shell experience will be mostly the same as Gemini CLI's. If you use virtualenv , for instance, Gemini CLI will be forced to do things like "source .env/venv/bin/activate && my-original-command" to mimic your environment.
2. Gemini CLI
For gemini CLI, find installation instructions here: https://github.com/google-gemini/gemini-cli .
# Note: This requires having npm or npx installed.
npm install -g @google/gemini-cli
- On Mac, you can use
brewas per official docs. - On Windows, you can use
chocolateyor just download the executable from https://nodejs.org/en/download
For step 4 (later on), you'll also need npx installed. Both npm and npx should come naturally as part of Gemini CLI. If not, ask Gemini CLI to help you here.
Authentication
You need either a Google Cloud Project with Vertex AI enabled, or a Google AI Studio API Key.
Option A (Recommended for Workshop): Export your API Key:
export GOOGLE_API_KEY="your-api-key"
Option B (Vertex AI): Authenticate with gcloud:
export GOOGLE_CLOUD_PROJECT="YOUR_PROJECT_ID"
export GOOGLE_CLOUD_LOCATION="YOUR_PROJECT_LOCATION"
export GOOGLE_GENAI_USE_VERTEXAI=true
gcloud auth application-default login
Set up your work environment
You're going to create your OWN solution under mysolution/ so let's create the folder and the two files we need.
This is the moment where you can open your IDE (Visual Studio Code, IntelliJ, RubyMine, ..) and open the folder.
# 1. Find an empty directory, and download this repo.
git clone https://github.com/palladius/adk-gemini-cli-workshop
cd adk-gemini-cli-workshop/

# 2. Create your solution empty skeleton
mkdir -p mysolution/
touch mysolution/__init__.py mysolution/agent.py

# 3. This installs ADK and MCP via `uv` by reading pyproject.toml
uv init
uv sync

# 4. Call Gemini CLI
gemini  # This runs Gemini CLI under the adk-gemini-cli-workshop/ folder.
# Login with your GMail account.
uv sync is not strictly required, but if it fails, you know you need to fix your Python or uv installation. This should install adk and other useful scripts into the ./.venv/bin/ folder.
To test your setup, you can simply run make test-step1 and check that you don't get a 403 PERMISSION DENIED.
Solutions available
The code is all contained under 📂 steps/. You're free to copy the code from there.
This codelab is not about learning how to write good ADK code; it's about setting up your environment to get GOOD code automatically written under your direction.
- Installing the software
- configuring / getting it to work, and
- entering a righteous Feedback Loop
This is what we really want you to learn here. You can also test them all at the same time via $ make web-4steps!
4. Step 1: Basic Agent
Let's start by creating a basic agent that can have a conversation.
Edit the file called mysolution/__init__.py by adding the following content:
from .agent import root_agent
As simple as that! This allows ADK to know where your code is: in agent.py.
Edit the file called mysolution/agent.py by adding the following content:
from google.adk.agents import Agent

root_agent = Agent(
    name="travel_basic",
    model="gemini-2.5-flash",
    instruction="You are a helpful travel assistant." +
    "You can help with general travel advice based on your knowledge.",
)
Testing the agent
This is true for all the steps. ADK allows you to test your agent in two ways: CLI and Web.
- CLI is best for quick and automated tests
- Web is the best to visually see what's happening, use microphone (!), and troubleshooting.
Tip: for the purpose of this exercise, in order to accomplish anything (except unit testing), use the Web. It's really amazing! Keep CLI just for automated testing.
A good prompt which properly tests steps 1-2-3-4 can be this (smart "litmus prompt"):
Hi, I'd like to book a hotel in Paris for tomorrow evening alone, one night, in Paris city center. Ideally close to Gare de Lyon. Budget: below 200eur per night.
- Tell me which YYYYMMDD and Day of the Week is tomorrow.
- Tell me which hotel do you see for tomorrow (at least 3). I want to see: > price, address, some rating (in form of XX/YY, eg "4.7/5" - from Google Hotels, Booking or Airbnb), # reviews. Give me them in TABULAR format. Ideally, hotel name should be linked to some sort of URL of the hotel (do no bother adding a URL column). Ensure the link is legit (it works and page points to info about the hotel!)
This is a smart prompt as it tests time and hotels and will fail differently in steps 1,2,3 and should fully succeed only in step 4. You can of course use any prompt you want!
Run it from bash (CLI):
# 1. If ADK was installed:
adk run mysolution/
# ... but if you get: -bash: adk: command not found"
# 2. Call ADK cli script through UV to avoid python install nightmares.
uv run adk run mysolution/
Try using it the "litmus prompt" above.
It will likely fail to know specific dates. We need to teach it to know the date!
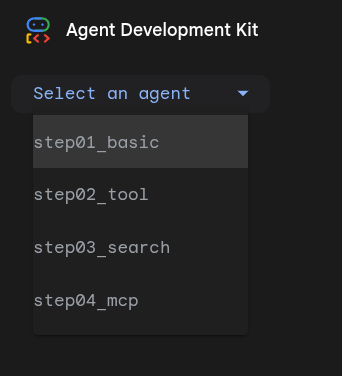
For web, you can do this:
uv run adk web .: This runs all agents under this folder. You want to point it to "mysolution/" subfolder- choose
mysolution/on top right (See image beside) - Ask your question in text or via microphone something along the lines of the "litmus prompt".

Note you need to call adk web from the upper folder, respect to the CLI version.
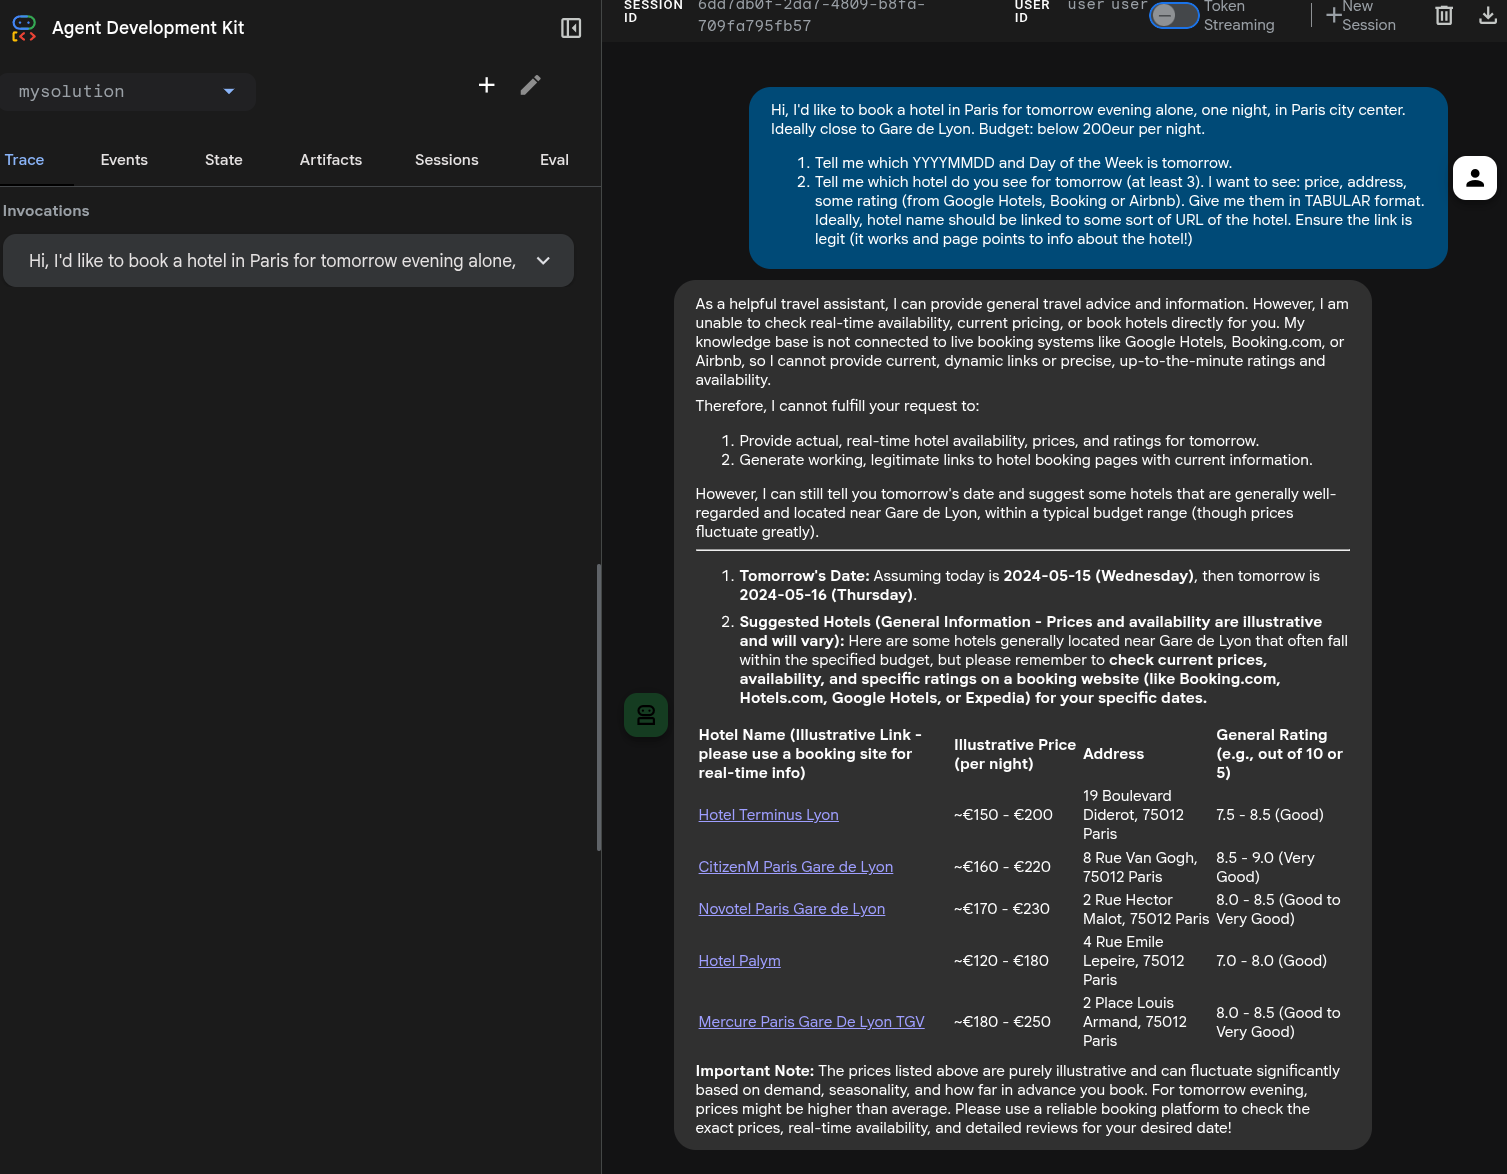
Here's a possible solution, with a date semi-hallucination. Note 3 of the 5 booking links are working! Not bad.
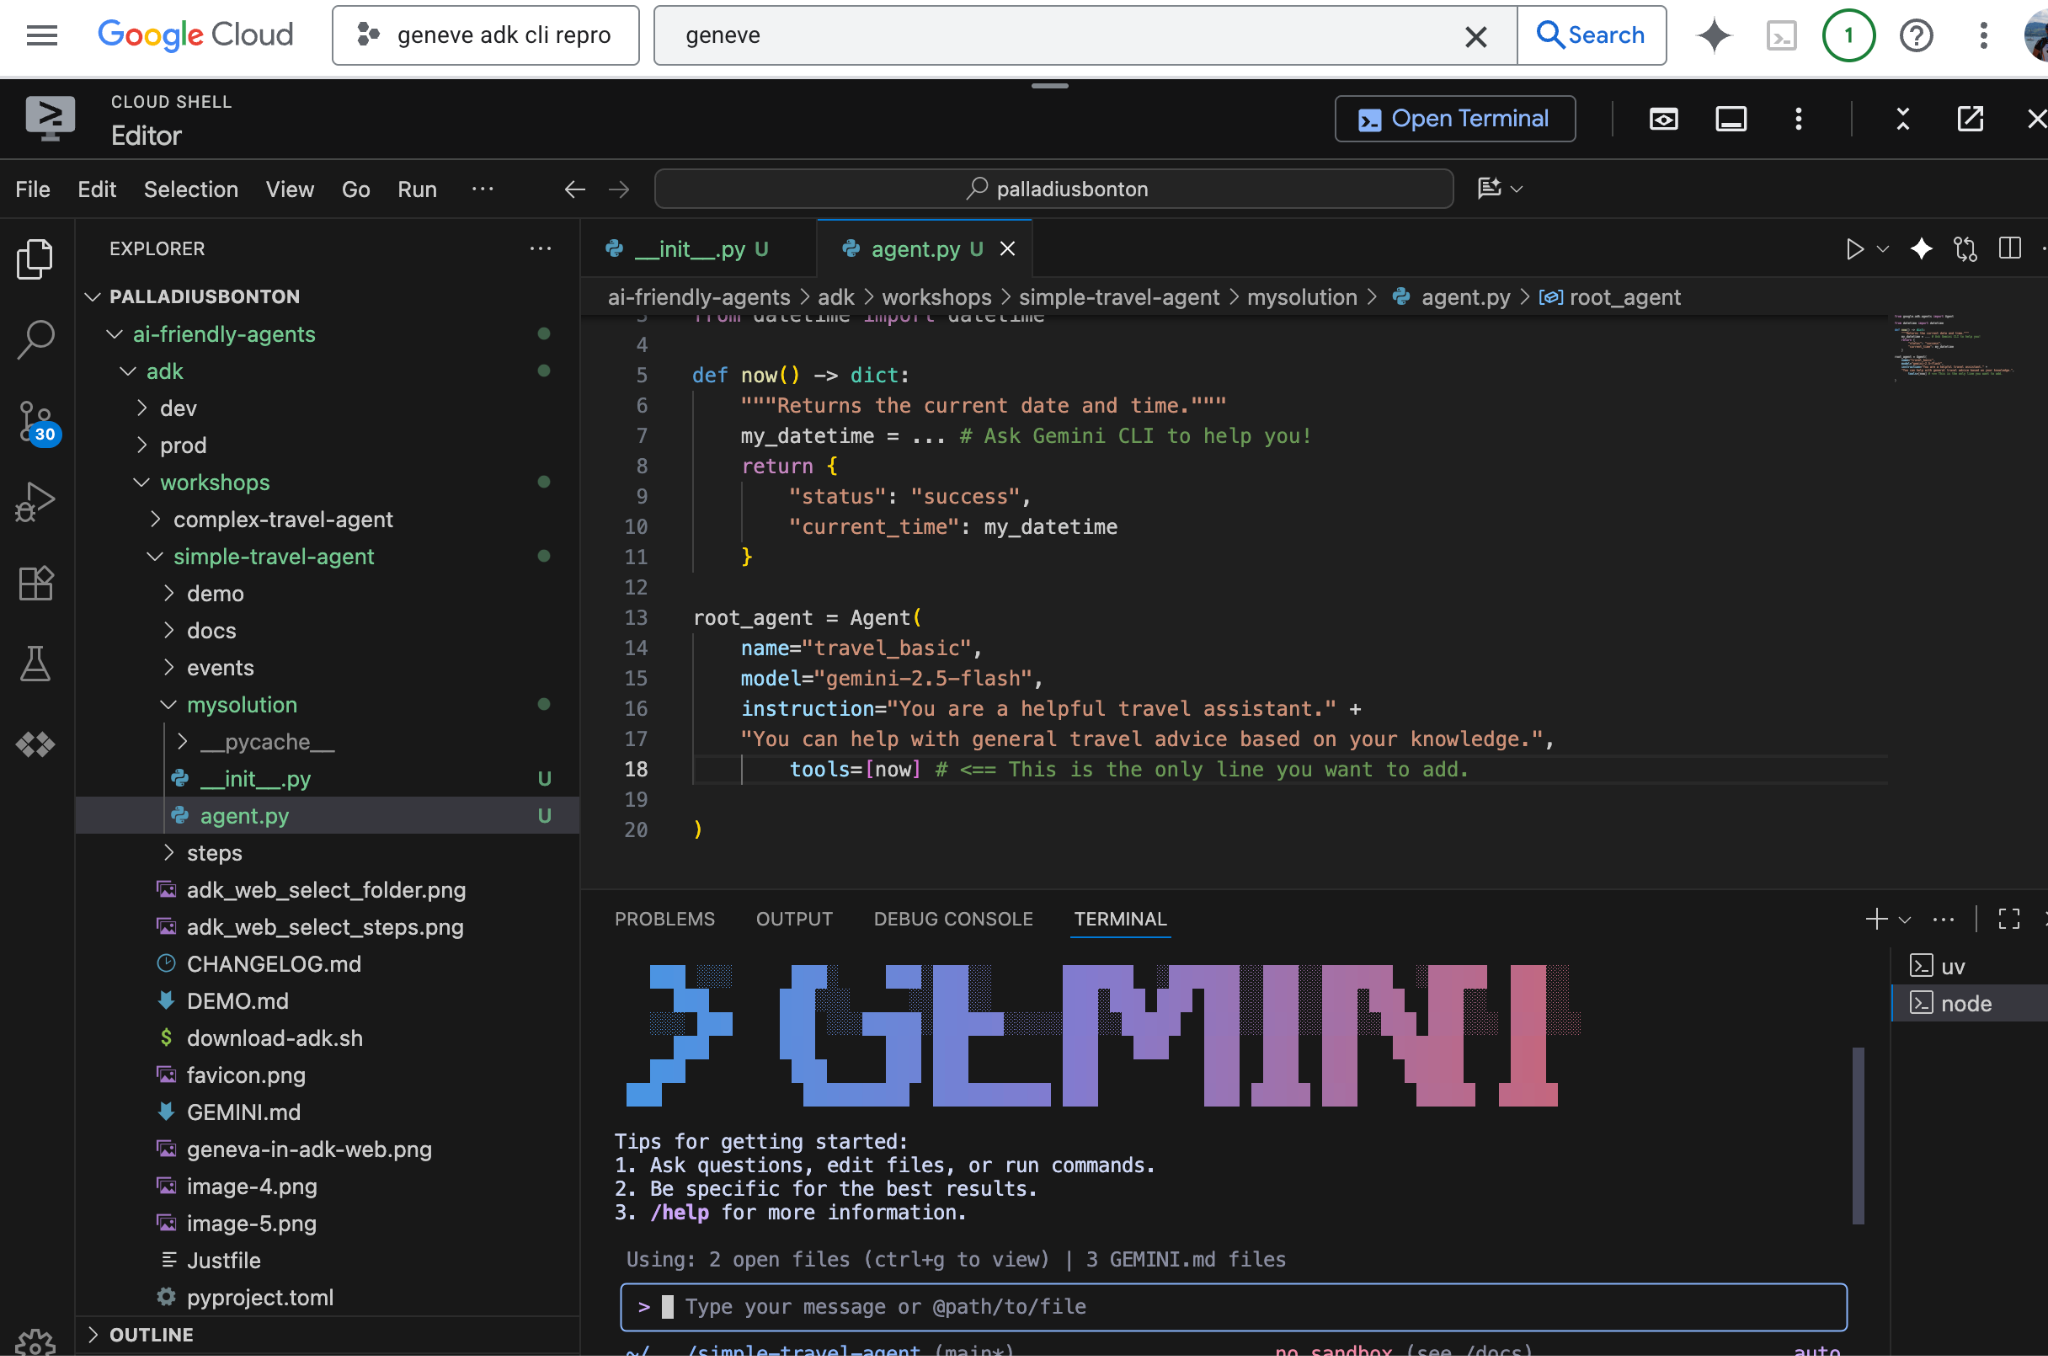
5. Step 2: Add the now() tool
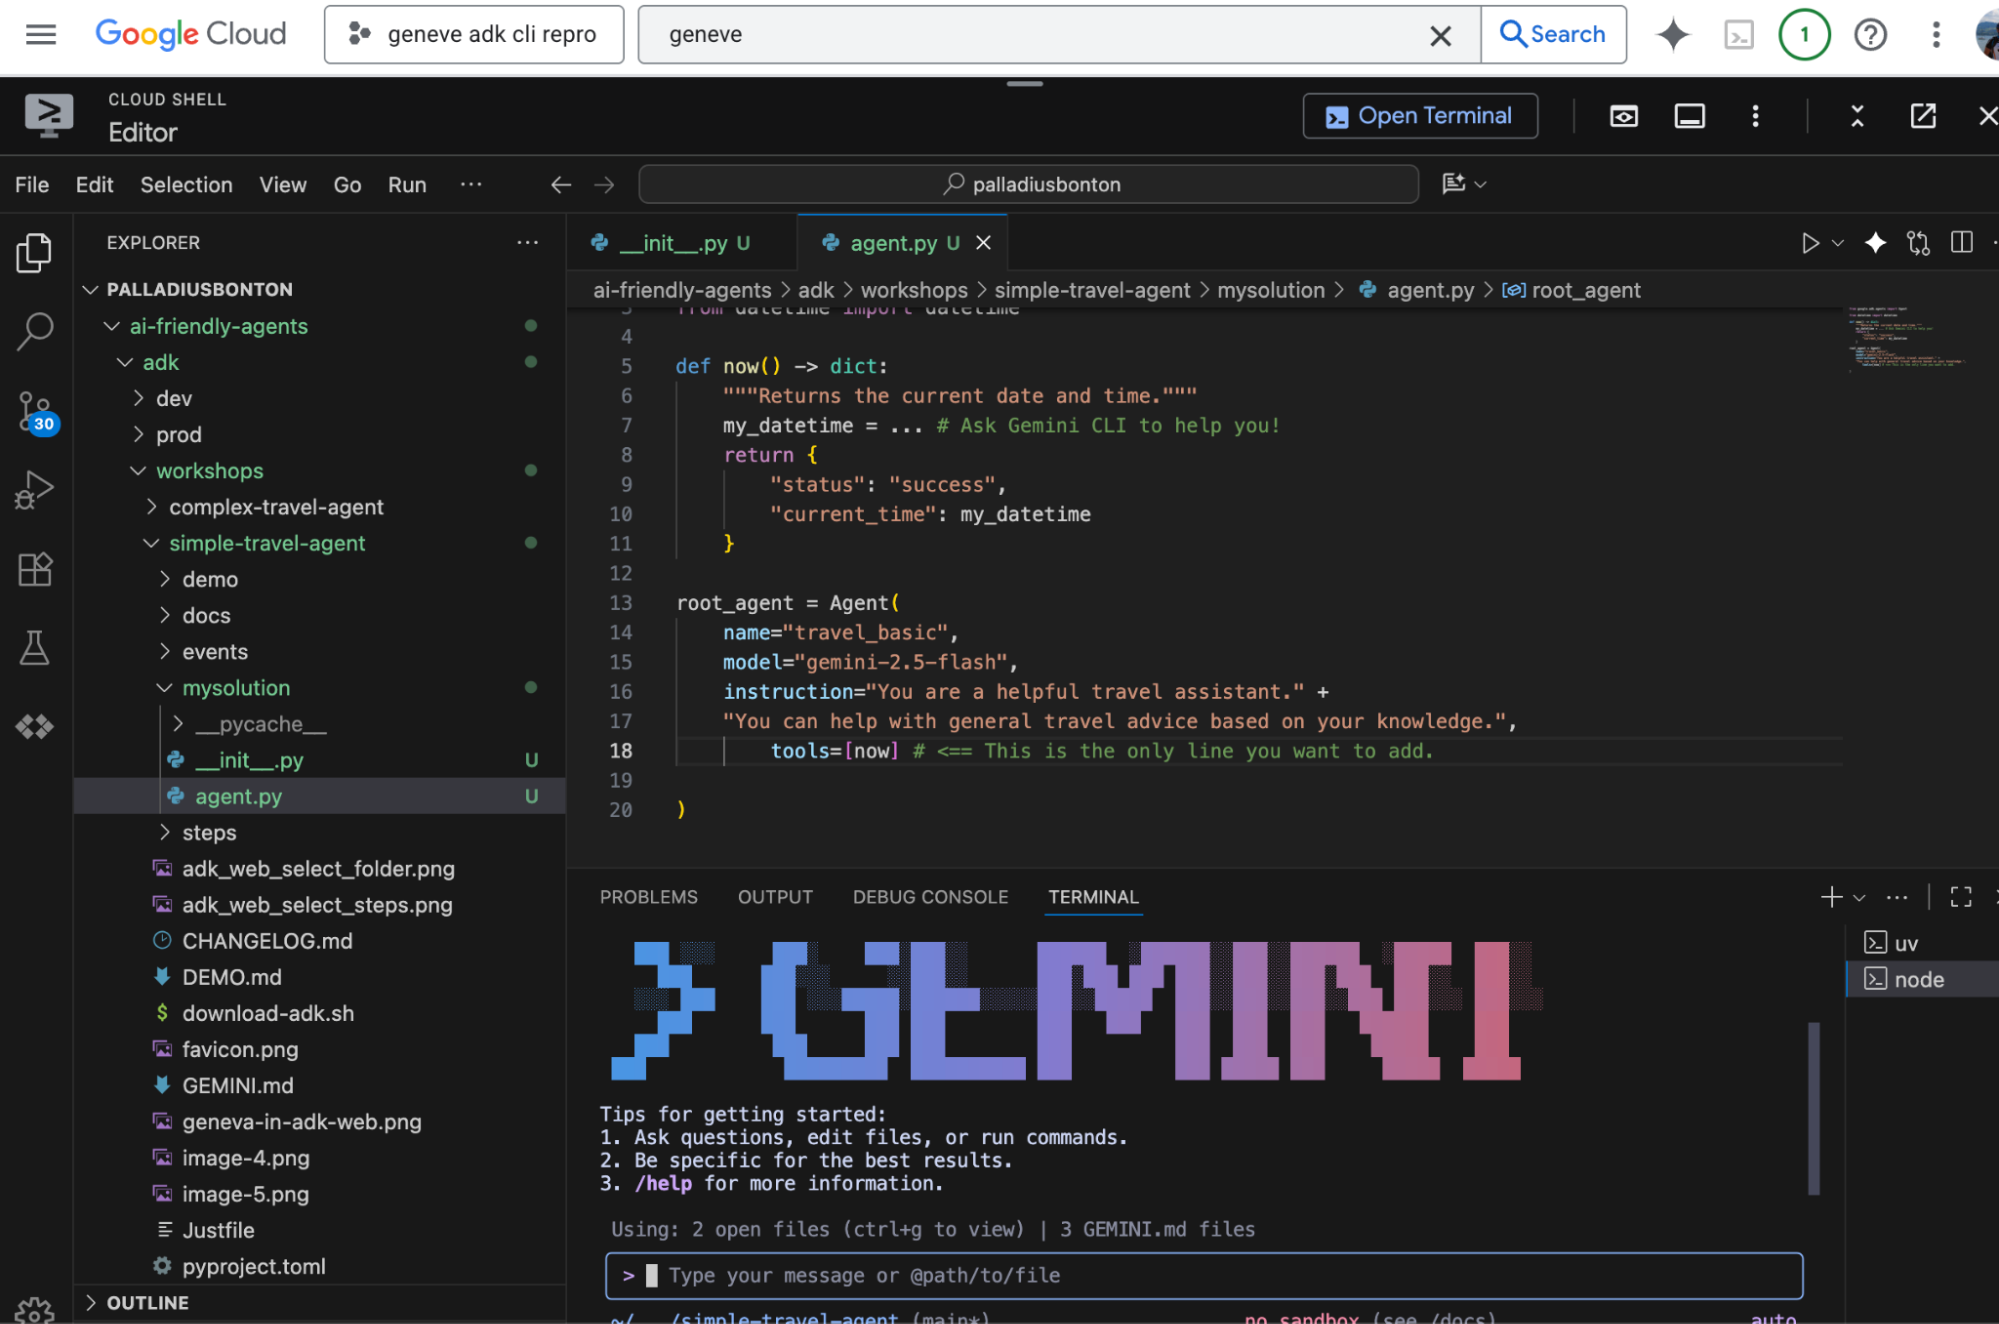
Add this function to agent.py just before the root_agent definition:
from datetime import datetime

def now() -> dict:
    """Returns the current date and time."""
    my_datetime = ... # Ask Gemini CLI to help you!
    return {
        "status": "success",
        "current_time": my_datetime
    }
Update the agent definition to include the tool:
  # file XXX.py

  root_agent = Agent(
        name="..",
        model="..",
        instruction="..",
        tools=[now] # <== This is the only line you want to add.
    )
Run it again and ask the same question. It should now know the date (good), and be vague about hotels (bad)!
You can also test it with something like this:
# Let's pretend we're in Milan. This should call the tool
# and respond correctly (possibly with some TZ math issues)
echo "What time is it in Milan?" | uv run adk run mysolution/
6. Step 3: Let's switch gears: google_search
google_search. This allows our agent to access real-time information from the web.

Your task is to modify the agent from Step 2. Instead of using the now tool, you will import and use the google_search tool from the ADK library.
# Full Code: `steps/step03_search/agent.py`
# Remember to REMOVE the now() tool here. See above why.
from google.adk.agents import Agent
from google.adk.tools import google_search

root_agent = Agent(
    name="travel_agent",
    model="gemini-2.5-flash",
    tools=[google_search],
    instruction="""You are a travel agent.
Your job is to help the user plan a trip.
You have access to a search engine.
If you don't know the answer, you can use the search engine.
When you are done, reply with "DONE".""",
)
How to Run
Same as per step 1.
Experts only. For a more advanced integration (using google_search and now together), check the code in steps/step03b_search_and_tool/agent.py and run it with make run-step3b. This is totally optional.
7. Step 4: A more sophisticated Tool: MCP

Now that we've seen both custom and built-in tools, let's graduate to something more powerful: the Model-as-a-Tool pattern using the Model Context Protocol (MCP).
To keep this step focused on the powerful capabilities of MCP, we will once again replace our previous tool (google_search). We will reintroduce our simple now tool to run alongside the airbnb_mcp tool. This demonstrates how an agent can use multiple, compatible tools (in this case, a FunctionTool and an MCPToolset) to perform complex tasks.
# Full Code: steps/step04_mcp/agent.py
# ... Imports as before
from google.adk.tools.mcp_tool.mcp_toolset import MCPToolset
from google.adk.tools.mcp_tool.mcp_session_manager import StdioConnectionParams
from mcp import StdioServerParameters

def now() -> dict:
    # ... as before

# Configure the Airbnb MCP Toolset
airbnb_mcp = MCPToolset(
    connection_params=StdioConnectionParams(
        server_params=StdioServerParameters(
            command='npx',
            args=["-y", "@openbnb/mcp-server-airbnb", "--ignore-robots-txt"],
        ),
    )
)

root_agent = Agent(
    name="travel_mcp",
    model="gemini-2.5-flash",
    instruction="You are a helpful travel assistant. You can find accommodation using Airbnb, and have access to the current time.",
    tools=[now, airbnb_mcp],
)
How to Run
This step requires npx to be installed on your system. For the rest, this is the same as above.
Caveats/ Errors
- If you get a
robots.txtrestriction error, you cn patch the MCP with an ignore robots directive. Read the docs for more details: https://github.com/openbnb-org/mcp-server-airbnb - If you get a
timeouterror (5 seconds being too low for Airbnb to get responses), look at ADK documentation on how to increase the timeout to, say, 30 seconds. Or.. use Gemini CLI to do it! Note that on 3dec25m Cloud Shell gave me a timeout error, I fixed the timeout error, and still got errors, until I forced it to the previous version:args=["-y", "@openbnb/mcp-server-airbnb@0.1.2", "--ignore-robots-txt"].
8. 🏅 Milestone 1 Complete!
🏅 Congratulations! 🏅 You are now an ADK expert! You've completed the first part of the workshop and have successfully built and tested AI agents with custom tools, built-in tools, and advanced MCP tools. You are now ready to build your own amazing agents with the Google Agent Development Kit!
You now have a functional travel agent that knows the time and can search the web. The sky is now the limit!
Now it's time to add an additional functionality with "Gemini CLI".
9. 🏅 Milestone 2: vibe coding your way through ADK via Gemini CLI
Now we enter the interesting part of the workshop.
- ensure you have
git committed the code somewhere safe. You can fork the original code, or create a branch: don't worry, Gemini CLI is great at helping you here! - Find an 💡 idea to implement. You can check the ideas below, find one yourself, or ask Gemini to look at documentation in rag/ and propose a few smart ideas.
- Follow the prerequisites to ensure Gemini can read ADK docs, and then you're good to go!
💡 Ideas
- 🟢 [easy] Are you a language polyglot? Would you like to give
goorjavaorTypeScript? Refactoring the existing code is very simple! Just make sure to download the proper ADK and ask Gemini CLI to do the translation! - 🟢 [easy] Add emojis or specify some output format you like (eg, a table with hotel emoji, followed by price, followed by 1-5 star emojis based with 🌕🌕🌕🌗🌑 to do halves too!).
- 🟢 [easy] Change the prompt to teach it things you're specifically looking for or against (pet-friendly, no ground floor, silent, close to public transport, ..) and test it. Maybe add a personal rating like "a YOUR_NAME-rating from 1-10" based on the above, and sort by that rating.
- 🟢 [easy] Any Operator in the room? Deploy to Cloud Run! Or to Vertex AI Agent Engine! Did you know you can integrate this agent and call it directly from the new Gemini Enterprise?
- 🟢 [easy] Integrate
adk runwith 🍌 NanoBanana MCP. Requires a Gemini API Key. Here you'll be able to create images but not visualize them. See below for a harder variant. - 🟡 [medium] Create a subagent who does the
HotelSearchand create aBudgetAgentor aLocationAgentwhich can double down and iterate over hotels respecting your location needs, eg "not more than X km from LOCATION". If the API doesn't allow this, there might be some back and forth helped by GoogleSearch. Note: Gemini CLI can help you. - 🟡 [medium] Implement a
AirbnbReviewAgentwhich goes into the reviews and summarize positives and negatives in a few color-coded bullets, for 1 or N hotels reslting from a search. You already have 2 ingredients (GoogleSearch and MCP Airbnb), then you need to connect this to the main Agent and maybe invent some sort of protocol for them to communicate. - 🟡 [medium] Integrate with A2A. Make it an A2A agent! Again, ask Gemini CLI for help!
- 🔴 [complex] You can integrate with Flights or other MCP functionality to create a multi-faceted multi functional travel agent.
- 🔴 [complex] Integrate ADK web with 🍌 NanoBanana MCP. This is harder than the one above, and you can find some tips in https://github.com/palladius/ai-friendly-agents/issues/11 . This took the author 3 hours of back and forth with Gemini CLI, Gemini3 and both of us reading docs/code from
rag/!
Looking for further inspiration?
- Check in the official ADK tutorial for some ideas.
- Ask Gemini CLI to find ideas by looking at documentation under
rag/: a possible prompt might be:Is there a feature in here which seems very succulent to you? Give me 3 proposals and let's implement together the one I choose.
Prerequisites for ADK "RAG"
To vibe code a functionality, we recommend that you download the whole ADK python ADK (note: this can be adapted very easily to your favorite language, like Java or Go!)
Code is under ./rag and can be downloaded with ./download-adk.sh.
Because the rag folder is listed in your .gitignore file make sure your .gemini/settings.json contains the following:
{
 "context": {
   "includeDirectories": ["rag"]
 }
}
Why? We want Gemini to be able to read those files, while they're safely git-ignored. Technically you could also unhide all .gitignore files by setting context.fileFiltering.respectGitIgnore to false but this opens a lot of node_modules/ and __pycache__/ garbage - so the explicit folder inclusion is the preferred option.
10. Next steps
Curiosity: This workshop was built with help from Gemini CLI. If you're curious, you can find how I did it by looking at the GEMINI.md and WORKSHOP_PLAN.md in this folder.
Lessons learnt
We've learnt how to pair ADK with Gemini CLI
Additional readings
- Check these two official Antigravity codelabs:
- Check in the official ADK tutorial for some ideas.