1. 简介
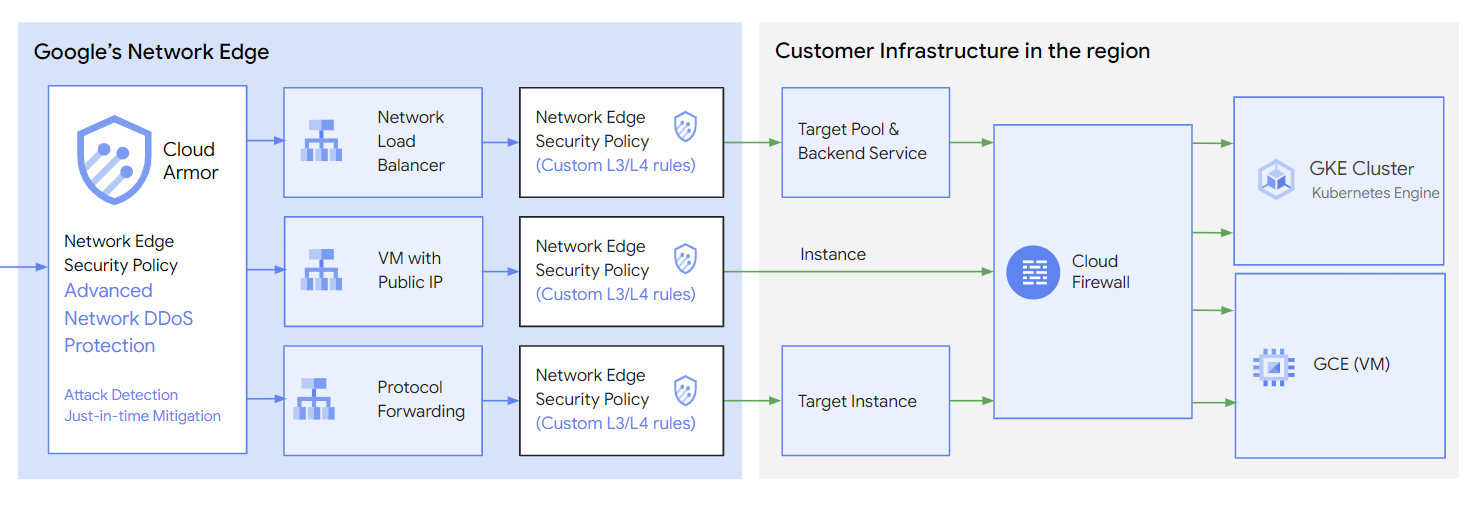
Cloud Armor 安全政策用于配置用户定义的规则,以过滤 Google 网络边缘(基础架构的上游)的流量。网络边缘安全政策有助于保护和允许或阻止针对以下端点类型的流量:网络负载平衡器、协议转发和具有公共 IP 的虚拟机。

在此 Codelab 中,我们将演示如何使用用户定义的规则配置 Cloud Armor 安全政策,以防止 DDoS 攻击。

图 1. 适用于具有公共 IP 保护的虚拟机的 Cloud Armor。
学习内容
- 具有用户定义的规则配置的 Cloud Armor 安全政策
- UDP 偏移配置和测试。
所需条件
- 了解 TCP/IP
- 了解 Unix/Linux 命令行
2. 准备工作
在 Cloud Shell 中,确保已设置项目 ID
gcloud config list project
gcloud config set project [YOUR-PROJECT-NAME]
prodproject=YOUR-PROJECT-NAME
echo $prodproject
3. 创建目标 VPC 网络
在下一部分,我们将设置 VPC 网络和相关网络配置。Cloud Armor 网络边缘安全政策基于区域,我们在 asia-southeast1 区域中设置所有相关资源。
VPC 网络
通过 Cloud Shell
gcloud compute networks create ca4nlb --project=$prodproject --subnet-mode=custom
创建子网
通过 Cloud Shell
gcloud compute networks subnets create ca4nlb-asia-southeast1 --project=$prodproject --range=10.0.0.0/24 --network=ca4nlb --region=asia-southeast1
创建防火墙规则。
在本部分中,我们将添加一条防火墙规则,以允许预期的 UDP 流量传输到端口 10000。
在 Cloud Shell 中,创建防火墙规则以打开 UDP 端口 10000 以进行以下测试。
gcloud compute firewall-rules create ca4nlb-udp10000 --allow udp:10000 --network ca4nlb --source-ranges 0.0.0.0/0 --enable-logging
在 Cloud Shell 中,创建防火墙规则以允许 IAP 连接到您的虚拟机实例。
gcloud compute firewall-rules create ca4nlb-iap-prod --network ca4nlb --allow tcp:22 --source-ranges=35.235.240.0/20 --enable-logging
4. 创建目标虚拟机实例
创建用于测试安全政策的目标虚拟机。此虚拟机应具有公共 IP 地址和打开 UDP 端口 10000。
通过 Cloud Shell 创建实例 targetvm
gcloud compute instances create targetvm \
--zone=asia-southeast1-b \
--image-family=debian-11 \
--image-project=debian-cloud \
--network-interface=network-tier=PREMIUM,nic-type=GVNIC,stack-type=IPV4_ONLY,subnet=ca4nlb-asia-southeast1 \
--shielded-secure-boot \
--shielded-vtpm \
--shielded-integrity-monitoring
5. 配置高级网络 DDoS 防护
通过 Cloud Shell
 gcloud compute security-policies create ca_advanced_ddos \
     --type CLOUD_ARMOR_NETWORK \
     --region asia-southeast1

 gcloud compute security-policies update ca_advanced_ddos \
     --network-ddos-protection ADVANCED \
     --region asia-southeast1

 gcloud compute network-edge-security-services create caedgepolicy \
     --security-policy ca_advanced_ddos \
     --region asia-southeast1
6. 使用默认规则创建网络边缘安全政策
创建网络边缘安全政策
通过 Cloud Shell
gcloud alpha compute security-policies create customnetworkedge --type=CLOUD_ARMOR_NETWORK --region=asia-southeast1
修改默认规则
通过 Cloud Shell
gcloud alpha compute security-policies rules update 2147483647 --security-policy=customnetworkedge --action=deny --region=asia-southeast1
7. 使用已用配置规则创建网络边缘安全政策
用户预定义的 UDP 偏移量,并在 Cloud Armor 政策中配置。具有此“偏移量值”的数据包将通过政策检查并将其发送到后端虚拟机。在以下示例中,我们将定义两个“偏移量”不同的值。
第一个值紧跟在 UDP 标头后面,完全匹配 2 个字节 0x1700
第二个值是 UDP 标头的偏移量 8 个字节,完全匹配 4 个字节 0x12345678
高于预定义值将转换为 UDP 数据包位视图。

通过 Cloud Shell
gcloud alpha compute security-policies add-user-defined-field customnetworkedge \
--user-defined-field-name=SIG1_AT_0 \
--base=udp --offset=8 --size=2 --mask=0xFF00 \
--region=asia-southeast1

gcloud alpha compute security-policies add-user-defined-field customnetworkedge \
--user-defined-field-name=SIG2_AT_8 \
--base=udp --offset=16 --size=4 --mask=0xFFFFFFFF \
--region=asia-southeast1

gcloud alpha compute security-policies rules create 1000 \
--security-policy=customnetworkedge \
--network-user-defined-fields="SIG1_AT_0;0x1700,SIG2_AT_8;0x12345678" \
--action=allow --region=asia-southeast1
8. 将安全政策附加到目标虚拟机
通过 Cloud Shell 将安全政策附加到受保护的虚拟机。
gcloud alpha compute instances network-interfaces update targetvm \
--security-policy=customnetworkedge \
--security-policy-region=asia-southeast1 \
--network-interface=nic0 \
--zone=asia-southeast1-b
通过 Cloud Shell 描述目标虚拟机,将会看到 securityPolicy 已附加。记录用于后续测试的公共 IP。
gcloud alpha compute instances describe targetvm --zone=asia-southeast1-b

networkInterfaces:
- accessConfigs:
  - kind: compute#accessConfig
    name: External NAT
    natIP: 35.240.148.100
    networkTier: PREMIUM
    securityPolicy: https://www.googleapis.com/compute/alpha/projects/<project>/regions/asia-southeast1/securityPolicies/customnetworkedge
通过 Cloud Shell 将安全政策与受保护的虚拟机分离。
gcloud alpha compute instances network-interfaces update targetvm \
--network-interface=nic0 \
--zone=asia-southeast1-b \
--security-policy=
9. 准备测试资源。
创建测试 VPC 网络
通过 Cloud Shell
gcloud compute networks create test --project=$prodproject --subnet-mode=custom
创建测试子网
通过 Cloud Shell
gcloud compute networks subnets create test-asia-southeast1 --project=$prodproject --range=10.0.1.0/24 --network=test --region=asia-southeast1
创建防火墙
在 Cloud Shell 中,创建防火墙规则以允许 IAP 连接到您的虚拟机实例。
gcloud compute firewall-rules create test-iap-prod --network test --allow tcp:22 --source-ranges=35.235.240.0/20 --enable-logging
创建测试虚拟机
通过 Cloud Shell
gcloud compute instances create test01 \
    --zone=asia-southeast1-b \
    --image-family=debian-11 \
    --image-project=debian-cloud \
    --network-interface=network-tier=PREMIUM,nic-type=GVNIC,stack-type=IPV4_ONLY,subnet=test-asia-southeast1 \
    --shielded-secure-boot \
    --shielded-vtpm \
    --shielded-integrity-monitoring
10. 验证
登录测试虚拟机控制台并安装数据包生成器 packit。
sudo apt install packit
遵循 UDP 偏移设计,使用 packit 生成 UDP 数据包。我们使用来源端口 (-S 10000) 的接口 (-s ens4) 源 IP 地址 (-s 10.0.1.2) 模拟 (-t udp) 数据包,以目标端口 (-D 10000) 作为目标虚拟机目标 IP 地址 (-d 35.240.148.100)。数据包内容与值匹配 (-p ‘0x 17 00 00 00 00 00 00 00 12 34 56 78')。我们将发送 (-c 4) 数据包。
sudo packit -m inject -t UDP -i ens4 -s 10.0.1.2 -d 35.240.148.100 -S 10000 -D 10000 -p '0x 17 00 00 00 00 00 00 00 12 34 56 78' -c 4
在目标虚拟机中,运行 tcpdump 以捕获 UDP 数据包。
sudo tcpdump port 10000 -v -n

tcpdump: listening on ens4, link-type EN10MB (Ethernet), snapshot length 262144 bytes
06:36:18.434106 IP (tos 0x0, ttl 128, id 17173, offset 0, flags [none], proto UDP (17), length 40)
    35.197.157.140.10000 > 10.0.0.2.10000: UDP, length 12
06:36:19.433656 IP (tos 0x0, ttl 128, id 55641, offset 0, flags [none], proto UDP (17), length 40)
    35.197.157.140.10000 > 10.0.0.2.10000: UDP, length 12
06:36:20.433935 IP (tos 0x0, ttl 128, id 27161, offset 0, flags [none], proto UDP (17), length 40)
    35.197.157.140.10000 > 10.0.0.2.10000: UDP, length 12
06:36:21.434150 IP (tos 0x0, ttl 128, id 46782, offset 0, flags [none], proto UDP (17), length 40)
    35.197.157.140.10000 > 10.0.0.2.10000: UDP, length 12
如果我们更改测试虚拟机中的流量模式,则无法在目标虚拟机中捕获任何数据包。
sudo packit -m inject -t UDP -i ens4 -s 10.148.0.6 -d 34.87.79.31 -S 10000 -D 10000 -p '0x 33 33 00 00 00 00 00 00 12 34 56 78' -c 4
11. 遥测
打开 Cloud 指标,使用以下 MQL 查询 NetworkSercurityPolicy 遥测数据。
fetch networksecurity.googleapis.com/RegionalNetworkSecurityPolicy
| metric 'networksecurity.googleapis.com/l3/external/packet_count'
| filter (resource.policy_name == 'customnetworkedge')
| align rate(1m)
| every 1m
| group_by [metric.blocked], [value_packet_count_mean: mean(value.packet_count)]
| group_by 1m, [value_packet_count_mean_mean: mean(value_packet_count_mean)]
| every 1m
使用“match offset”命令生成高流量。
sudo packit -m inject -t UDP -i ens4 -s 10.148.0.6 -d 34.87.79.31 -S 10000 -D 10000 -p '0x 17 00 00 00 00 00 00 00 12 34 56 78' -c 1000000 -w 0.001

[result]
Injected: 1000000  Packets/Sec: 10309.27  Bytes/Sec: 412371.13  Errors: 0
使用不匹配的偏移量命令生成高流量。
sudo packit -m inject -t UDP -i ens4 -s 10.148.0.6 -d 34.87.79.31 -S 10000 -D 10000 -p '0x 11 00 00 00 00 00 00 00 12 34 56 78' -c 1000000 -w 0.001

[result]
Injected: 1000000  Packets/Sec: 10309.27  Bytes/Sec: 412371.13  Errors: 0
遥测数据按 policy_name 过滤,并按“已屏蔽”分组。蓝线表示政策规则允许的流量。绿线表示政策规则禁止的流量。

12. 清理步骤
通过终端中的单个 Cloud Shell 删除实验组件
gcloud compute instances delete targetvm --zone=asia-southeast1-b

gcloud compute firewall-rules delete ca4nlb-udp10000

gcloud compute firewall-rules delete ca4nlb-iap-prod

gcloud compute networks subnets delete ca4nlb-asia-southeast1 --region=asia-southeast1

gcloud compute networks delete ca4nlb

gcloud alpha compute security-policies delete customnetworkedge --region=asia-southeast1

gcloud alpha compute network-edge-security-services delete caedgepolicy --region=asia-southeast1

gcloud alpha compute security-policies delete ca_advanced_ddos --region=asia-southeast1

gcloud compute instances delete test01 --zone=asia-southeast1-b

gcloud compute firewall-rules delete test-iap-prod

gcloud compute networks subnets delete test-asia-southeast1 --region=asia-southeast1

gcloud compute networks delete test
13. 恭喜!
恭喜您完成此 Codelab。
所学内容
- Cloud Armor 安全政策与客户定义的规则
