
1. 簡介
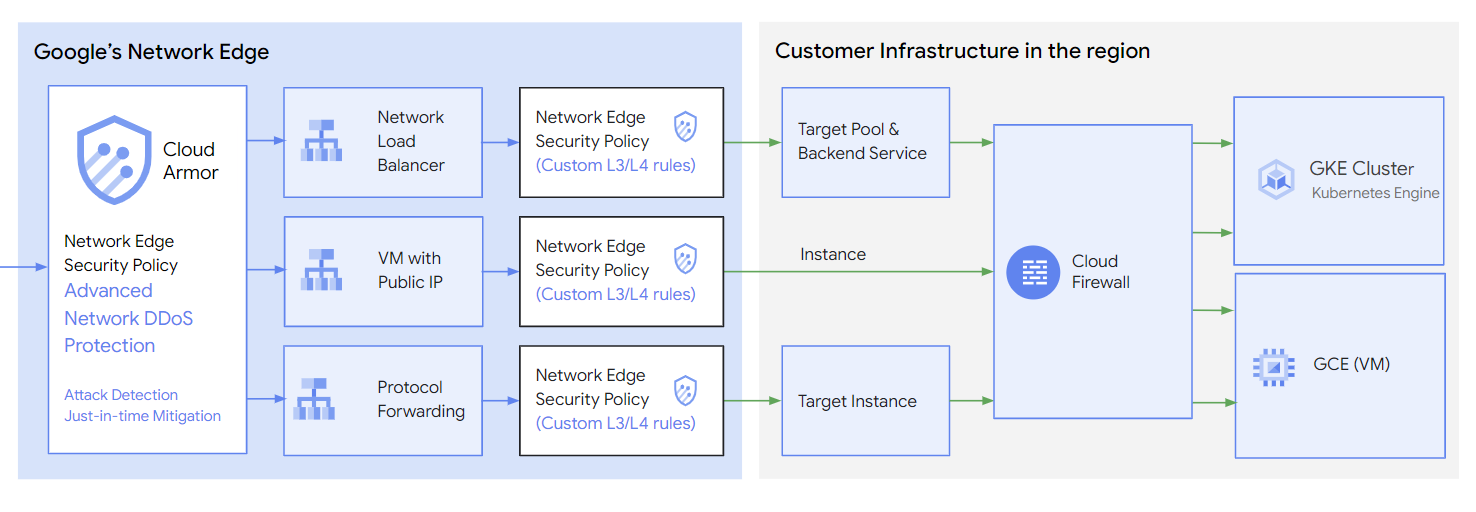
Cloud Armor 安全性政策可用於設定使用者定義的規則,在 Google 網路邊緣 (基礎架構的上游) 篩選流量。網路邊緣安全性政策可協助保護及允許/封鎖以下端點類型的流量:網路負載平衡器、通訊協定轉送和具有公開 IP 的 VM。
在本程式碼研究室中,我們將示範如何設定 Cloud Armor 安全性政策和使用者定義的規則,防範 DDoS 攻擊。

圖 1. Cloud Armor,可保護採用公開 IP 的 VM。
課程內容
- 設定 Cloud Armor 安全性政策和使用者定義的規則
- UDP 偏移設定和測試。
軟硬體需求
- TCP/IP 相關知識
- 熟悉 Unix/Linux 指令列
2. 事前準備
在 Cloud Shell 中,確認專案 ID 已設定完畢
gcloud config list project
gcloud config set project [YOUR-PROJECT-NAME]
prodproject=YOUR-PROJECT-NAME
echo $prodproject
3. 建立目標虛擬私有雲網路
在下一節中,我們將設定虛擬私有雲網路和相關網路設定。Cloud Armor 網路邊緣安全性政策是以區域為準,因此我們會在 asia-southeast1 區域中設定所有相關資源。
虛擬私人雲端網路
透過 Cloud Shell
gcloud compute networks create ca4nlb --project=$prodproject --subnet-mode=custom
建立子網路
透過 Cloud Shell
gcloud compute networks subnets create ca4nlb-asia-southeast1 --project=$prodproject --range=10.0.0.0/24 --network=ca4nlb --region=asia-southeast1
建立防火牆規則。
在本節中,我們將新增防火牆規則,允許預期的 UDP 流量傳輸至通訊埠 10000。
在 Cloud Shell 中建立防火牆規則,開啟 UDP 通訊埠 10000 以進行後續測試。
gcloud compute firewall-rules create ca4nlb-udp10000 --allow udp:10000 --network ca4nlb --source-ranges 0.0.0.0/0 --enable-logging
在 Cloud Shell 中建立防火牆規則,允許 IAP 連線至 VM 執行個體。
gcloud compute firewall-rules create ca4nlb-iap-prod --network ca4nlb --allow tcp:22 --source-ranges=35.235.240.0/20 --enable-logging
4. 建立目標 VM 執行個體
建立目標 VM,用於測試安全性政策。這個 VM 應具備公開 IP 位址,並開啟 UDP 通訊埠 10000。
從 Cloud Shell 建立執行個體 targetvm
gcloud compute instances create targetvm \
--zone=asia-southeast1-b \
--image-family=debian-11 \
--image-project=debian-cloud \
--network-interface=network-tier=PREMIUM,nic-type=GVNIC,stack-type=IPV4_ONLY,subnet=ca4nlb-asia-southeast1 \
--shielded-secure-boot \
--shielded-vtpm \
--shielded-integrity-monitoring
5. 設定進階網路分散式阻斷服務防護功能
透過 Cloud Shell
 gcloud compute security-policies create ca_advanced_ddos \
     --type CLOUD_ARMOR_NETWORK \
     --region asia-southeast1

 gcloud compute security-policies update ca_advanced_ddos \
     --network-ddos-protection ADVANCED \
     --region asia-southeast1

 gcloud compute network-edge-security-services create caedgepolicy \
     --security-policy ca_advanced_ddos \
     --region asia-southeast1
6. 使用預設規則建立網路邊緣安全性政策
建立 Network Edge 安全性政策
透過 Cloud Shell
gcloud alpha compute security-policies create customnetworkedge --type=CLOUD_ARMOR_NETWORK --region=asia-southeast1
修改預設規則
透過 Cloud Shell
gcloud alpha compute security-policies rules update 2147483647 --security-policy=customnetworkedge --action=deny --region=asia-southeast1
7. 使用已設定的規則建立網路邊緣安全性政策
使用者預先定義的 UDP 位移,並在 Cloud Armor 政策中設定。含有這些「偏移值」的封包會通過政策檢查,並傳送至後端 VM。在下列範例中,我們會定義兩個「位移」,並使用不同的值。
第一個值位於 UDP 標頭後方,完全符合 2 個位元組 0x1700
第二個值是 UDP 標頭的 8 位元組偏移,與 4 位元組 0x12345678 完全相符
上述預先定義的值會轉換為 UDP 封包位元檢視畫面。

透過 Cloud Shell
gcloud alpha compute security-policies add-user-defined-field customnetworkedge \
--user-defined-field-name=SIG1_AT_0 \
--base=udp --offset=8 --size=2 --mask=0xFF00 \
--region=asia-southeast1

gcloud alpha compute security-policies add-user-defined-field customnetworkedge \
--user-defined-field-name=SIG2_AT_8 \
--base=udp --offset=16 --size=4 --mask=0xFFFFFFFF \
--region=asia-southeast1

gcloud alpha compute security-policies rules create 1000 \
--security-policy=customnetworkedge \
--network-user-defined-fields="SIG1_AT_0;0x1700,SIG2_AT_8;0x12345678" \
--action=allow --region=asia-southeast1
8. 將安全性政策附加至目標 VM
在 Cloud Shell 中,將安全性政策附加至受保護的 VM。
gcloud alpha compute instances network-interfaces update targetvm \
--security-policy=customnetworkedge \
--security-policy-region=asia-southeast1 \
--network-interface=nic0 \
--zone=asia-southeast1-b
從 Cloud Shell 說明目標 VM,您會看到已附加 securityPolicy。記下公開 IP,以利後續測試。
gcloud alpha compute instances describe targetvm --zone=asia-southeast1-b

networkInterfaces:
- accessConfigs:
  - kind: compute#accessConfig
    name: External NAT
    natIP: 35.240.148.100
    networkTier: PREMIUM
    securityPolicy: https://www.googleapis.com/compute/alpha/projects/<project>/regions/asia-southeast1/securityPolicies/customnetworkedge
在 Cloud Shell 中,從受保護的 VM 卸離安全性政策。
gcloud alpha compute instances network-interfaces update targetvm \
--network-interface=nic0 \
--zone=asia-southeast1-b \
--security-policy=
9. 準備測試資源。
建立測試虛擬私有雲網路
透過 Cloud Shell
gcloud compute networks create test --project=$prodproject --subnet-mode=custom
建立測試子網路
透過 Cloud Shell
gcloud compute networks subnets create test-asia-southeast1 --project=$prodproject --range=10.0.1.0/24 --network=test --region=asia-southeast1
建立防火牆
在 Cloud Shell 中建立防火牆規則,允許 IAP 連線至 VM 執行個體。
gcloud compute firewall-rules create test-iap-prod --network test --allow tcp:22 --source-ranges=35.235.240.0/20 --enable-logging
建立測試 VM
透過 Cloud Shell
gcloud compute instances create test01 \
    --zone=asia-southeast1-b \
    --image-family=debian-11 \
    --image-project=debian-cloud \
    --network-interface=network-tier=PREMIUM,nic-type=GVNIC,stack-type=IPV4_ONLY,subnet=test-asia-southeast1 \
    --shielded-secure-boot \
    --shielded-vtpm \
    --shielded-integrity-monitoring
10. 驗證
登入測試 VM 控制台,然後安裝封包產生器 packit。
sudo apt install packit
按照 UDP 位移設計,使用 packit 生成 UDP 封包。我們模擬從介面 (-s ens4) 來源 IP 位址 (-s 10.0.1.2) 傳送至 targetVM 目的地 IP 位址 (-d 35.240.148.100) 的 (-t udp) 封包,來源通訊埠為 (-S 10000),目的地通訊埠為 (-D 10000)。封包內容符合值 (-p ‘0x 17 00 00 00 00 00 00 00 12 34 56 78')。我們會傳送 (-c 4) 封包。
sudo packit -m inject -t UDP -i ens4 -s 10.0.1.2 -d 35.240.148.100 -S 10000 -D 10000 -p '0x 17 00 00 00 00 00 00 00 12 34 56 78' -c 4
在目標 VM 中執行 tcpdump,擷取 UDP 封包。
sudo tcpdump port 10000 -v -n

tcpdump: listening on ens4, link-type EN10MB (Ethernet), snapshot length 262144 bytes
06:36:18.434106 IP (tos 0x0, ttl 128, id 17173, offset 0, flags [none], proto UDP (17), length 40)
    35.197.157.140.10000 > 10.0.0.2.10000: UDP, length 12
06:36:19.433656 IP (tos 0x0, ttl 128, id 55641, offset 0, flags [none], proto UDP (17), length 40)
    35.197.157.140.10000 > 10.0.0.2.10000: UDP, length 12
06:36:20.433935 IP (tos 0x0, ttl 128, id 27161, offset 0, flags [none], proto UDP (17), length 40)
    35.197.157.140.10000 > 10.0.0.2.10000: UDP, length 12
06:36:21.434150 IP (tos 0x0, ttl 128, id 46782, offset 0, flags [none], proto UDP (17), length 40)
    35.197.157.140.10000 > 10.0.0.2.10000: UDP, length 12
如果我們變更測試 VM 中的流量模式,就無法在目標 VM 中擷取任何封包。
sudo packit -m inject -t UDP -i ens4 -s 10.148.0.6 -d 34.87.79.31 -S 10000 -D 10000 -p '0x 33 33 00 00 00 00 00 00 12 34 56 78' -c 4
11. 遙測
開啟 Cloud Metric,使用下列 MQL 查詢 NetworkSercurityPolicy 遙測資料。
fetch networksecurity.googleapis.com/RegionalNetworkSecurityPolicy
| metric 'networksecurity.googleapis.com/l3/external/packet_count'
| filter (resource.policy_name == 'customnetworkedge')
| align rate(1m)
| every 1m
| group_by [metric.blocked], [value_packet_count_mean: mean(value.packet_count)]
| group_by 1m, [value_packet_count_mean_mean: mean(value_packet_count_mean)]
| every 1m
使用比對偏移指令產生大量流量。
sudo packit -m inject -t UDP -i ens4 -s 10.148.0.6 -d 34.87.79.31 -S 10000 -D 10000 -p '0x 17 00 00 00 00 00 00 00 12 34 56 78' -c 1000000 -w 0.001

[result]
Injected: 1000000  Packets/Sec: 10309.27  Bytes/Sec: 412371.13  Errors: 0
使用不相符的位移指令產生大量流量。
sudo packit -m inject -t UDP -i ens4 -s 10.148.0.6 -d 34.87.79.31 -S 10000 -D 10000 -p '0x 11 00 00 00 00 00 00 00 12 34 56 78' -c 1000000 -w 0.001

[result]
Injected: 1000000  Packets/Sec: 10309.27  Bytes/Sec: 412371.13  Errors: 0
遙測資料會依 policy_name 篩選,並依封鎖狀態分組。藍線表示政策規則允許的流量。綠線代表因政策規則而遭到封鎖的流量。

12. 清除步驟
從終端機中的單一 Cloud Shell 刪除實驗室元件
gcloud compute instances delete targetvm --zone=asia-southeast1-b

gcloud compute firewall-rules delete ca4nlb-udp10000

gcloud compute firewall-rules delete ca4nlb-iap-prod

gcloud compute networks subnets delete ca4nlb-asia-southeast1 --region=asia-southeast1

gcloud compute networks delete ca4nlb

gcloud alpha compute security-policies delete customnetworkedge --region=asia-southeast1

gcloud alpha compute network-edge-security-services delete caedgepolicy --region=asia-southeast1

gcloud alpha compute security-policies delete ca_advanced_ddos --region=asia-southeast1

gcloud compute instances delete test01 --zone=asia-southeast1-b

gcloud compute firewall-rules delete test-iap-prod

gcloud compute networks subnets delete test-asia-southeast1 --region=asia-southeast1

gcloud compute networks delete test
13. 恭喜!
恭喜您完成本程式碼研究室。
涵蓋內容
- Cloud Armor 安全性政策 (含客戶定義的規則)