
1. 簡介
Dart 3 在語言中導入模式,這是重要的全新文法類別。除了這種新的 Dart 程式碼編寫方式,還有多項其他語言強化功能,包括:
- 記錄:用於將不同類型的資料組合在一起,
- 類別修飾符,用於控管存取權,以及
- 新的切換運算式和 if-case 陳述式。
這些功能可擴充您編寫 Dart 程式碼時的選擇。在本程式碼研究室中,您將瞭解如何使用這些功能,讓程式碼更精簡、簡化及彈性。
本程式碼研究室假設您對 Flutter 和 Dart 有一定的瞭解。如果覺得有點生疏,建議您透過下列資源溫習基本知識:
建構項目
本程式碼研究室會建立一個應用程式,在 Flutter 中顯示 JSON 文件。這個應用程式會模擬來自外部來源的 JSON。JSON 檔案包含文件資料,例如修改日期、標題、標頭和段落。您會編寫程式碼,將資料整齊封裝到記錄中,以便在 Flutter 小工具需要資料時,傳輸及解壓縮資料。
然後,當值符合該模式時,您可以使用模式建構適當的小工具。您也會瞭解如何使用模式將資料解構為本機變數。

課程內容
- 如何建立可儲存多個不同類型值的記錄。
- 如何使用記錄從函式傳回多個值。
- 如何使用模式比對、驗證及解構記錄和其他物件的資料。
- 如何將模式比對的值繫結至新變數或現有變數。
- 如何使用新的 switch 陳述式功能、switch 運算式和 if-case 陳述式。
- 如何善用詳盡檢查,確保系統會處理 switch 陳述式或 switch 運算式中的每個情況。
2. 設定環境
- 安裝 Flutter SDK。
- 設定編輯器,例如 Visual Studio Code (VS Code)。
- 至少為一個目標平台 (iOS、Android、桌機或網頁瀏覽器) 完成「平台設定」步驟。
3. 建立專案
在深入瞭解模式、記錄和其他新功能之前,請先建立 Flutter 專案,並編寫所有程式碼。
建立 Flutter 專案
- 使用
flutter create指令建立名為patterns_codelab的新專案。--empty旗標可防止在lib/main.dart檔案中建立標準計數器應用程式,您無論如何都必須移除該應用程式。
flutter create --empty patterns_codelab
- 然後使用 VS Code 開啟
patterns_codelab目錄。
code patterns_codelab
設定最低 SDK 版本
- 將專案的 SDK 版本限制設為依附於 Dart 3 以上版本。
pubspec.yaml
environment:
  sdk: ^3.0.0
4. 設定專案
在這個步驟中,您會建立或更新兩個 Dart 檔案:
- 包含應用程式小工具的
main.dart檔案,以及 - 提供應用程式資料的
data.dart檔案。
您會在後續步驟中繼續修改這兩個檔案。
定義應用程式的資料
- 建立新檔案
lib/data.dart,並在其中加入下列程式碼:
lib/data.dart
import 'dart:convert';

class Document {
  final Map<String, Object?> _json;
  Document() : _json = jsonDecode(documentJson);
}

const documentJson = '''
{
  "metadata": {
    "title": "My Document",
    "modified": "2023-05-10"
  },
  "blocks": [
    {
      "type": "h1",
      "text": "Chapter 1"
    },
    {
      "type": "p",
      "text": "Lorem ipsum dolor sit amet, consectetur adipiscing elit."
    },
    {
      "type": "checkbox",
      "checked": false,
      "text": "Learn Dart 3"
    }
  ]
}
''';
假設某個程式會接收來自外部來源的資料,例如 I/O 串流或 HTTP 要求。在本程式碼研究室中,您要透過 documentJson 變數中的多行字串模擬傳入的 JSON 資料,簡化這個更貼近現實的使用案例。
JSON 資料定義在 Document 類別中。在本程式碼研究室的後續步驟中,您會新增函式,從剖析的 JSON 傳回資料。這個類別會在建構函式中定義及初始化 _json 欄位。
執行應用程式
flutter create 指令會建立 lib/main.dart 檔案,做為預設 Flutter 檔案結構的一部分。
- 如要建立應用程式的起點,請將
main.dart的內容換成下列程式碼:
lib/main.dart
import 'package:flutter/material.dart';

import 'data.dart';

void main() {
  runApp(const DocumentApp());
}

class DocumentApp extends StatelessWidget {
  const DocumentApp({super.key});

  @override
  Widget build(BuildContext context) {
    return MaterialApp(
      theme: ThemeData(),
      home: DocumentScreen(document: Document()),
    );
  }
}

class DocumentScreen extends StatelessWidget {
  final Document document;

  const DocumentScreen({required this.document, super.key});

  @override
  Widget build(BuildContext context) {
    return Scaffold(
      appBar: AppBar(title: const Text('Title goes here')),
      body: const Column(children: [Center(child: Text('Body goes here'))]),
    );
  }
}
您已在應用程式中新增下列兩個小工具:
DocumentApp會設定最新版本的 Material Design,用於設定 UI 主題。DocumentScreen使用Scaffold小工具提供網頁的視覺版面配置。
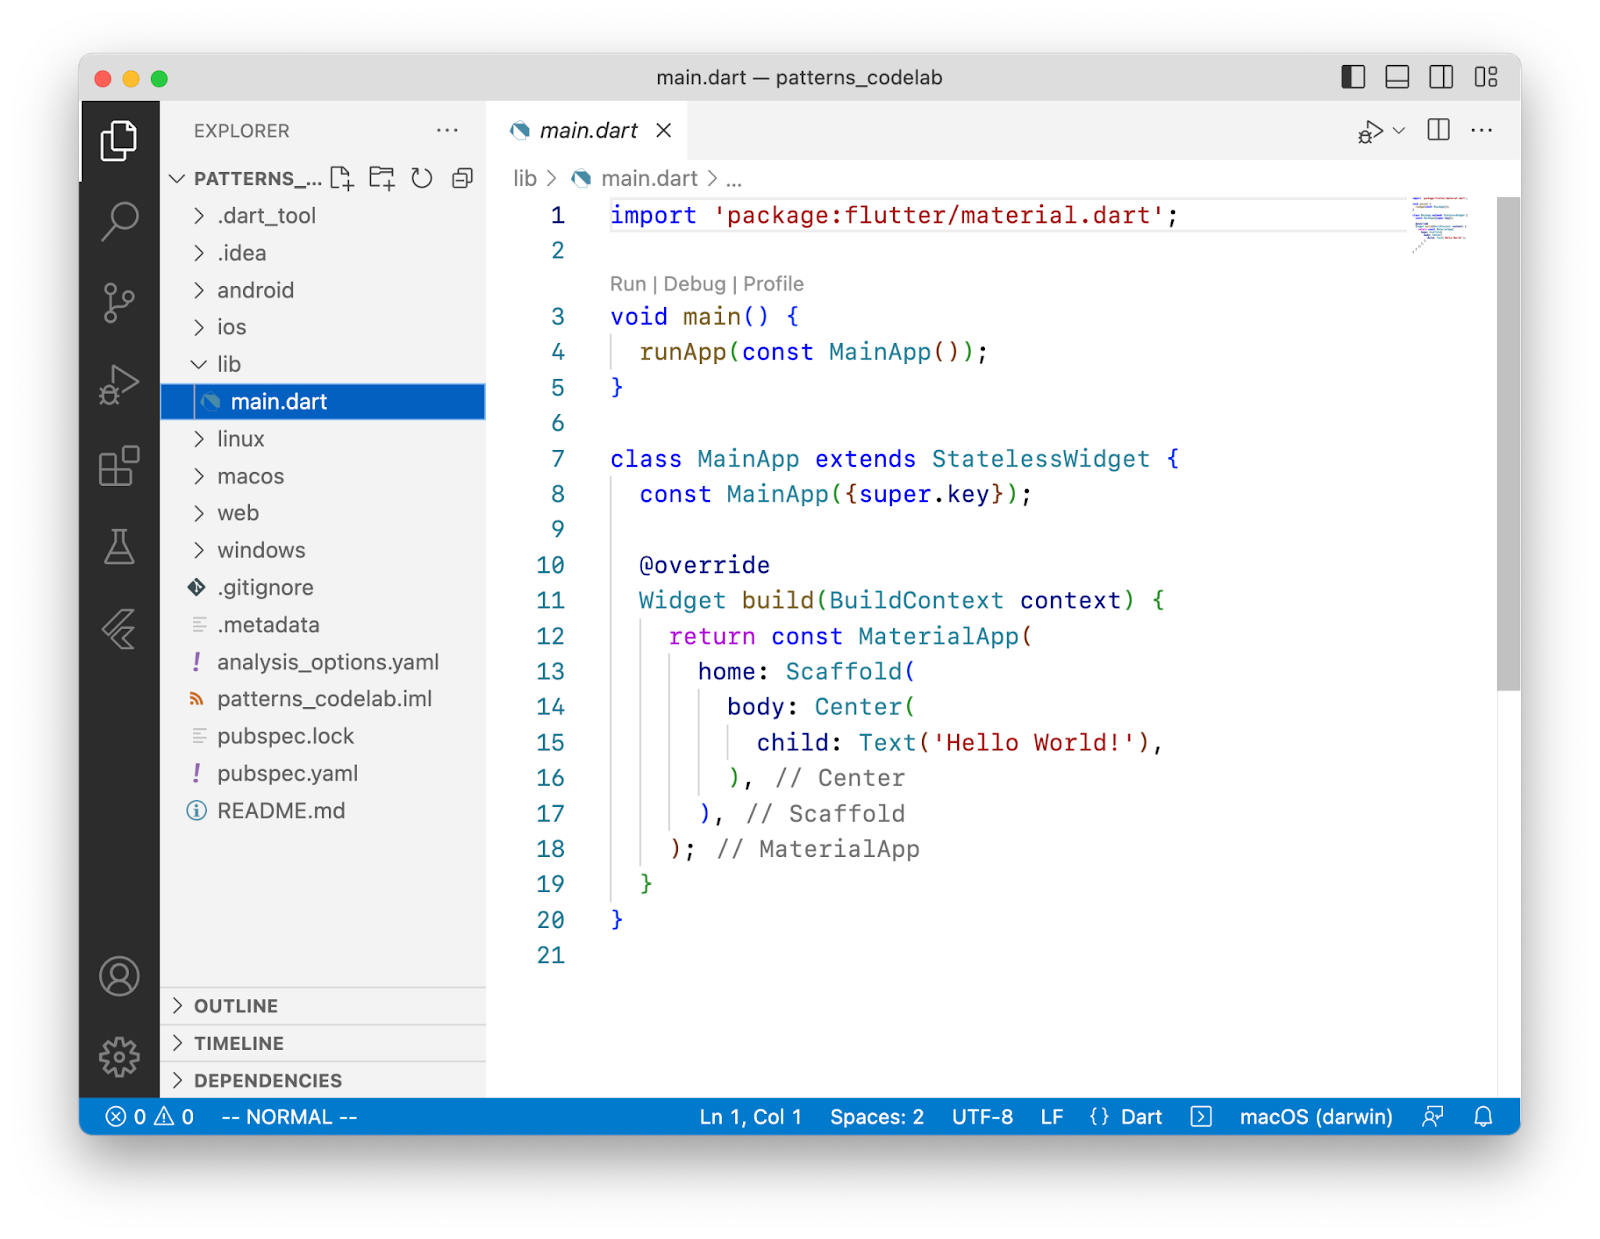
- 如要確保一切運作順暢,請按一下「Run and Debug」(執行並偵錯),在本機執行應用程式:

- 根據預設,Flutter 會選擇可用的目標平台。如要變更目標平台,請選取狀態列上的目前平台:

您應該會看到空白影格,其中定義了 title 和 body 元素 (位於 DocumentScreen 小工具中):
5. 建立及傳回記錄
在這個步驟中,您會使用記錄從函式呼叫傳回多個值。接著,您可以在 DocumentScreen 小工具中呼叫該函式,存取這些值並反映在 UI 中。
建立及傳回記錄
- 在
data.dart中,為 Document 類別新增名為metadata的 Getter 方法,該方法會傳回記錄:
lib/data.dart
import 'dart:convert';

class Document {
  final Map<String, Object?> _json;
  Document() : _json = jsonDecode(documentJson);

  (String, {DateTime modified}) get metadata {           // Add from here...
    const title = 'My Document';
    final now = DateTime.now();

    return (title, modified: now);
  }                                                      // to here.
}
這個函式的傳回型別是含有兩個欄位的記錄,一個的型別為 String,另一個的型別為 DateTime。
傳回陳述式會將兩個值括在半形括號中,藉此建構新記錄 (title, modified: now)。
第一個欄位是位置欄位,沒有名稱,第二個欄位則命名為 modified。
存取記錄欄位
- 在
DocumentScreen小工具中,於build方法中呼叫metadatagetter 方法,即可取得記錄並存取其值:
lib/main.dart
class DocumentScreen extends StatelessWidget {
  final Document document;

  const DocumentScreen({required this.document, super.key});

  @override
  Widget build(BuildContext context) {
    final metadataRecord = document.metadata;              // Add this line.

    return Scaffold(
      appBar: AppBar(title: Text(metadataRecord.$1)),      // Modify this line,
      body: Column(
        children: [                                        // And the following line.
          Center(child: Text('Last modified ${metadataRecord.modified}')),
        ],
      ),
    );
  }
}
metadata getter 方法會傳回記錄,並指派給區域變數 metadataRecord。記錄是一種輕巧簡單的方式,可從單一函式呼叫傳回多個值,並將這些值指派給變數。
如要存取該記錄中組成的個別欄位,可以使用記錄內建的 getter 語法。
- 如要取得位置欄位 (沒有名稱的欄位,例如
title),請在記錄中使用 getter modified等具名欄位沒有位置擷取器,因此您可以直接使用其名稱,例如metadataRecord.modified。
如要判斷位置欄位的 getter 名稱,請從 $1 開始,並略過具名欄位。例如:
var record = (named: 'v', 'y', named2: 'x', 'z');
print(record.$1);                               // prints y
print(record.$2);                               // prints z
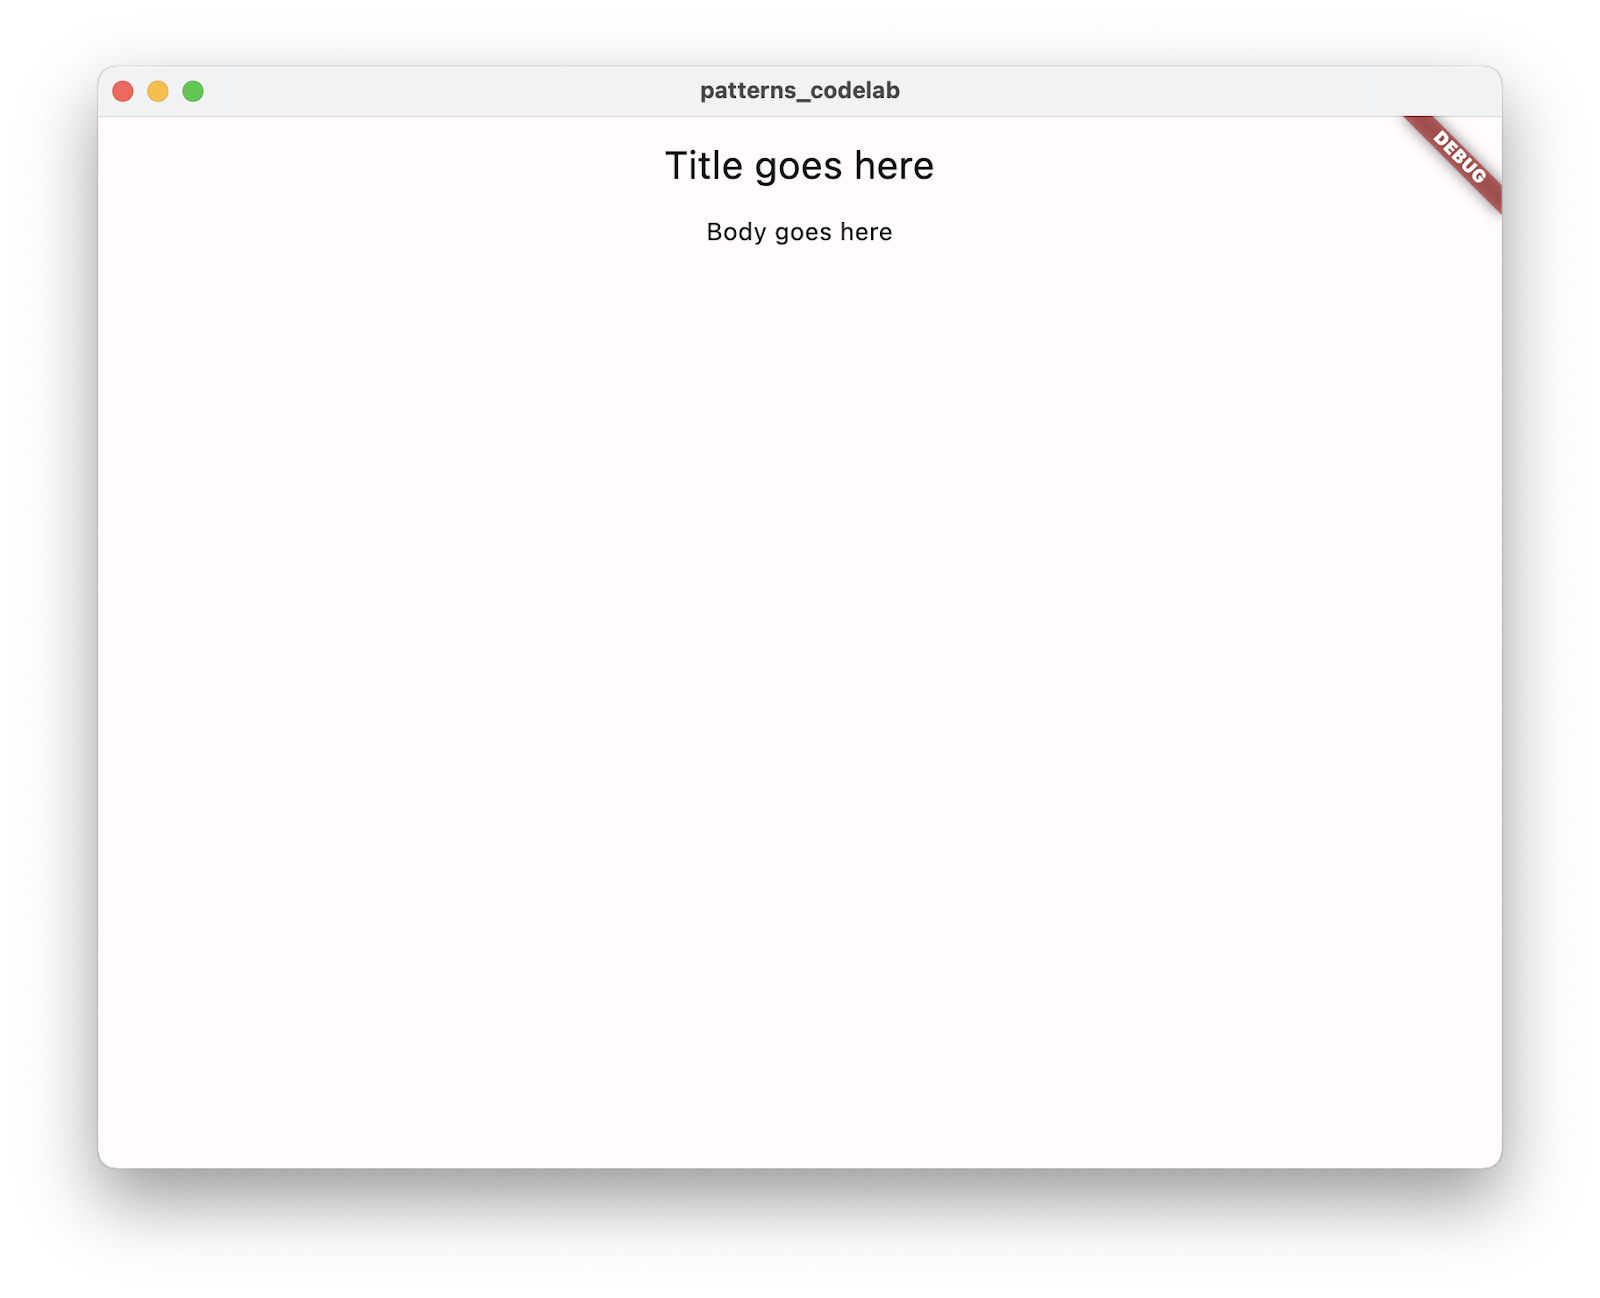
- 進行熱重載,即可在應用程式中看到顯示的 JSON 值。每次儲存檔案時,VS Code Dart 外掛程式都會進行熱重載。
您會發現每個欄位確實都維持了原有的類型。
Text()方法會使用字串做為第一個引數。modified欄位是 DateTime,並使用字串內插轉換為String。
如要以其他型別安全的方式傳回不同類型的資料,可以定義類別,但這種做法較為冗長。
6. 使用模式進行比對和解構
記錄可有效收集不同類型的資料,並輕鬆傳遞。現在,請使用模式改善程式碼。
模式代表一或多個值可採用的結構,類似於藍圖。模式會與實際值比較,判斷是否相符。
部分模式相符時,會解構相符的值,從中擷取資料。解構可讓您從物件解壓縮值,並指派給本機變數,或對這些值執行進一步比對。
將記錄解構為本機變數
- 重構
DocumentScreen的build方法,呼叫metadata並用來初始化模式變數宣告:
lib/main.dart
class DocumentScreen extends StatelessWidget {
  final Document document;

  const DocumentScreen({required this.document, super.key});

  @override
  Widget build(BuildContext context) {
    final (title, modified: modified) = document.metadata;   // Modify

    return Scaffold(
      appBar: AppBar(title: Text(title)),                    // Modify from here...
      body: Column(children: [Center(child: Text('Last modified $modified'))]),
    );                                                       // To here.
  }
}
記錄模式 (title, modified: modified) 包含兩個變數模式,可與 metadata 傳回的記錄欄位相符。
- 運算式會比對子模式,因為結果是含有兩個欄位的記錄,其中一個欄位名為
modified。 - 由於兩者相符,變數宣告模式會解構運算式、存取其值,並將這些值繫結至相同類型和名稱的新本機變數,即
String title和DateTime modified。
如果欄位名稱和填入欄位的變數相同,可以使用簡寫。按照下列方式重構 DocumentScreen 的 build 方法。
lib/main.dart
class DocumentScreen extends StatelessWidget {
  final Document document;

  const DocumentScreen({required this.document, super.key});

  @override
  Widget build(BuildContext context) {
    final (title, :modified) = document.metadata;            // Modify

    return Scaffold(
      appBar: AppBar(title: Text(title)),
      body: Column(children: [Center(child: Text('Last modified $modified'))]),
    );
  }
}
變數模式 :modified 是 modified: modified 的簡寫。如要使用不同名稱的新區域變數,可以改為寫入 modified: localModified。
- 熱重載,查看與上一個步驟相同的結果。行為完全相同,只是程式碼更簡潔。
7. 使用模式擷取資料
在特定情況下,模式不僅會比對和解構,還會根據模式是否相符,決定程式碼的用途。這些稱為可反駁模式。
您在上一個步驟中使用的變數宣告模式是「不可反駁的模式」:值必須符合模式,否則會發生錯誤,且不會進行解構。請回想任何變數宣告或指派作業;如果變數類型不同,您就無法為變數指派值。
另一方面,可反駁模式則用於控制流程情境:
- 他們預期部分比較值不相符。
- 這些運算子會根據值是否相符,影響控制流程。
- 如果不相符,這些函式不會中斷執行作業,只會移至下一個陳述式。
- 他們可以解構及繫結變數,這些變數只能在相符時使用
讀取沒有模式的 JSON 值
在本節中,您將讀取沒有模式比對的資料,瞭解模式如何協助您處理 JSON 資料。
- 將舊版
metadata替換為可從_json對應讀取值的版本。將這個版本的metadata複製並貼到Document課程:
lib/data.dart
class Document {
  final Map<String, Object?> _json;
  Document() : _json = jsonDecode(documentJson);

  (String, {DateTime modified}) get metadata {
    if (_json.containsKey('metadata')) {                     // Modify from here...
      final metadataJson = _json['metadata'];
      if (metadataJson is Map) {
        final title = metadataJson['title'] as String;
        final localModified = DateTime.parse(
          metadataJson['modified'] as String,
        );
        return (title, modified: localModified);
      }
    }
    throw const FormatException('Unexpected JSON');          // to here.
  }
}
這段程式碼會驗證資料結構是否正確,但不會使用模式。在後續步驟中,您會使用模式比對,以較少的程式碼執行相同的驗證。在執行任何其他動作前,它會進行三項檢查:
- JSON 包含您預期的資料結構:
if (_json.containsKey('metadata')) - 資料具有您預期的類型:
if (metadataJson is Map) - 資料「不是空值」,這點在先前的檢查中已隱含確認。
使用對應模式讀取 JSON 值
使用可反駁的模式,您可以使用對應模式驗證 JSON 是否具有預期結構。
- 使用下列程式碼取代先前的
metadata版本:
lib/data.dart
class Document {
  final Map<String, Object?> _json;
  Document() : _json = jsonDecode(documentJson);

  (String, {DateTime modified}) get metadata {
    if (_json case {                                         // Modify from here...
      'metadata': {'title': String title, 'modified': String localModified},
    }) {
      return (title, modified: DateTime.parse(localModified));
    } else {
      throw const FormatException('Unexpected JSON');
    }                                                        // to here.
  }
}
您會看到一種新的 if 陳述式 (在 Dart 3 中導入),即 if-case。只有在案例模式與 _json 中的資料相符時,案例主體才會執行。這個比對會執行您在 metadata 第一版中編寫的相同檢查,以驗證傳入的 JSON。這段程式碼會驗證下列項目:
_json是地圖類型。_json包含metadata鍵。_json不是空值。_json['metadata']也是地圖類型。_json['metadata']包含title和modified鍵。title和localModified是字串,且不得為空值。
如果值不相符,模式會駁斥 (拒絕繼續執行),並前往 else 子句。如果比對成功,模式會從對應中解構 title 和 modified 的值,並將這些值繫結至新的本機變數。
如需完整模式清單,請參閱功能規格的「模式」一節中的表格。
8. 準備好讓應用程式支援更多模式
目前為止,您已處理 JSON 資料的 metadata 部分。在這個步驟中,您要進一步調整商業邏輯,以便處理 blocks 清單中的資料,並將資料算繪到應用程式中。
{
  "metadata": {
    // ...
  },
  "blocks": [
    {
      "type": "h1",
      "text": "Chapter 1"
    },
    // ...
  ]
}
建立儲存資料的類別
- 在
data.dart中新增Block類別,用於讀取及儲存 JSON 資料中其中一個區塊的資料。
lib/data.dart
class Block {
  final String type;
  final String text;
  Block(this.type, this.text);

  factory Block.fromJson(Map<String, dynamic> json) {
    if (json case {'type': final type, 'text': final text}) {
      return Block(type, text);
    } else {
      throw const FormatException('Unexpected JSON format');
    }
  }
}
工廠建構函式 fromJson() 使用的 if 案例與您先前看過的對應模式相同。
您會發現 JSON 資料看起來符合預期模式,即使其中包含模式中沒有的額外資訊 (稱為 checked)。這是因為使用這類模式 (稱為「對應模式」) 時,系統只會處理您在模式中定義的特定項目,並忽略資料中的其他項目。
傳回 Block 物件清單
- 接著,將新函式
getBlocks()新增至Document類別。getBlocks()會將 JSON 剖析為Block類別的執行個體,並傳回要在 UI 中算繪的區塊清單:
lib/data.dart
class Document {
  final Map<String, Object?> _json;
  Document() : _json = jsonDecode(documentJson);

  (String, {DateTime modified}) get metadata {
    if (_json case {
      'metadata': {'title': String title, 'modified': String localModified},
    }) {
      return (title, modified: DateTime.parse(localModified));
    } else {
      throw const FormatException('Unexpected JSON');
    }
  }

  List<Block> getBlocks() {                                  // Add from here...
    if (_json case {'blocks': List blocksJson}) {
      return [for (final blockJson in blocksJson) Block.fromJson(blockJson)];
    } else {
      throw const FormatException('Unexpected JSON format');
    }
  }                                                          // to here.
}
getBlocks() 函式會傳回 Block 物件清單,您稍後會使用這些物件建構 UI。熟悉的 if-case 陳述式會執行驗證,並將 blocks 中繼資料的值轉換為名為 blocksJson 的新 List (如果沒有模式,您需要使用 toList() 方法進行轉換)。
清單常值包含 collection for,可填入 Block 物件的新清單。
本節不會介紹您在本程式碼研究室中尚未嘗試的任何模式相關功能。在下一個步驟中,您將準備在 UI 中算繪清單項目。
9. 使用模式顯示文件
您現在已成功使用 if-case 陳述式和可反駁模式,解構並重組 JSON 資料。但 if 案例只是模式提供的控制流程結構強化功能之一。現在,請運用可反駁模式的知識來處理 switch 陳述式。
使用含有 switch 陳述式的模式控制要算繪的內容
- 在
main.dart中建立新小工具BlockWidget,根據每個區塊的type欄位決定樣式。
lib/main.dart
class BlockWidget extends StatelessWidget {
  final Block block;

  const BlockWidget({required this.block, super.key});

  @override
  Widget build(BuildContext context) {
    TextStyle? textStyle;
    switch (block.type) {
      case 'h1':
        textStyle = Theme.of(context).textTheme.displayMedium;
      case 'p' || 'checkbox':
        textStyle = Theme.of(context).textTheme.bodyMedium;
      case _:
        textStyle = Theme.of(context).textTheme.bodySmall;
    }

    return Container(
      margin: const EdgeInsets.all(8),
      child: Text(block.text, style: textStyle),
    );
  }
}
build 方法中的 switch 陳述式會切換 block 物件的 type 欄位。
- 第一個 case 陳述式使用常數字串模式。如果
block.type等於常數值h1,模式就會相符。 - 第二個 case 陳述式使用邏輯 OR 模式,並以兩個常數字串模式做為子模式。如果
block.type符合子模式p或checkbox,模式就會相符。
- 最後一個案例是萬用字元模式
_。switch 案例中的萬用字元會比對其他所有項目。這些子句的行為與default子句相同,仍可在 switch 陳述式中使用 (只是稍微冗長)。
凡是允許使用模式的地方,都可以使用萬用字元模式,例如變數宣告模式:var (title, _) = document.metadata;
在這個情況下,萬用字元不會繫結任何變數。並捨棄第二個欄位。
在下一節中,您將瞭解顯示 Block 物件後,切換器提供的更多功能。
顯示文件內容
在 DocumentScreen 小工具的 build 方法中呼叫 getBlocks(),建立包含 Block 物件清單的本機變數。
- 將
DocumentationScreen中現有的build方法替換為這個版本:
lib/main.dart
class DocumentScreen extends StatelessWidget {
  final Document document;

  const DocumentScreen({required this.document, super.key});

  @override
  Widget build(BuildContext context) {
    final (title, :modified) = document.metadata;
    final blocks = document.getBlocks();                           // Add this line

    return Scaffold(
      appBar: AppBar(title: Text(title)),
      body: Column(
        children: [
          Text('Last modified: $modified'),                        // Modify from here
          Expanded(
            child: ListView.builder(
              itemCount: blocks.length,
              itemBuilder: (context, index) {
                return BlockWidget(block: blocks[index]);
              },
            ),
          ),                                                       // to here.
        ],
      ),
    );
  }
}
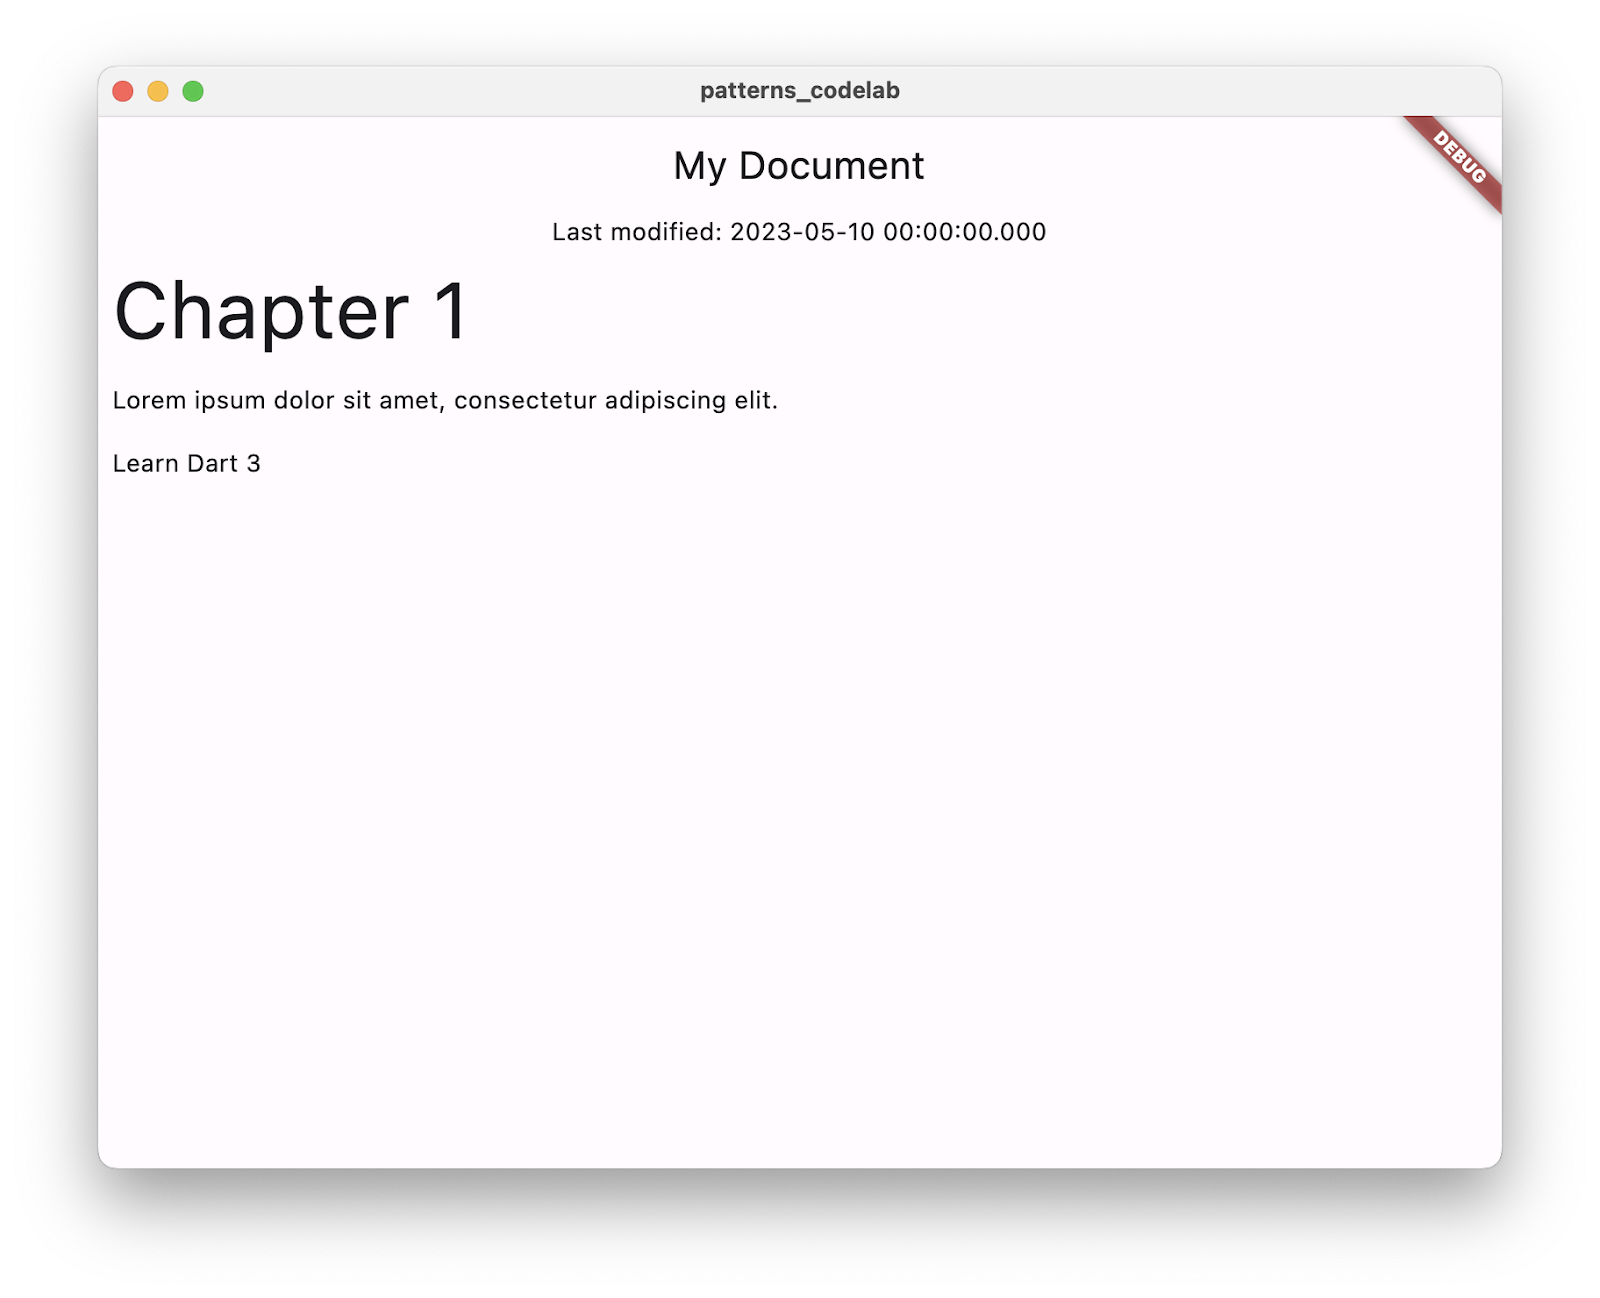
BlockWidget(block: blocks[index]) 行會為 getBlocks() 方法傳回的區塊清單中每個項目建構 BlockWidget 小工具。
- 執行應用程式,畫面上應會顯示方塊:
10. 使用 switch 運算式
模式為 switch 和 case 新增許多功能。為了讓這些運算式可在更多地方使用,Dart 提供了切換運算式。一系列的案例可以直接為變數指派或回傳陳述式提供值。
將 switch 陳述式轉換為 switch 運算式
Dart 分析器會提供輔助功能,協助您變更程式碼。
- 將游標移至上一個區段的 switch 陳述式。
- 按一下燈泡即可查看可用的輔助功能。
- 選取「轉換為 switch 運算式」輔助功能。

新版程式碼如下所示:
lib/main.dart
class BlockWidget extends StatelessWidget {
  final Block block;

  const BlockWidget({required this.block, super.key});

  @override
  Widget build(BuildContext context) {
    TextStyle? textStyle;                                          // Modify from here
    textStyle = switch (block.type) {
      'h1' => Theme.of(context).textTheme.displayMedium,
      'p' || 'checkbox' => Theme.of(context).textTheme.bodyMedium,
      _ => Theme.of(context).textTheme.bodySmall,
    };                                                             // to here.

    return Container(
      margin: const EdgeInsets.all(8),
      child: Text(block.text, style: textStyle),
    );
  }
}
切換運算式與切換陳述式類似,但會省略 case 關鍵字,並使用 => 將模式與案例主體分開。與 switch 陳述式不同,switch 運算式會傳回值,且可在任何可使用運算式的地方使用。
11. 使用物件模式
Dart 是物件導向語言,因此模式適用於所有物件。在這個步驟中,您將開啟 物件模式,並解構物件屬性,以提升 UI 的日期算繪邏輯。
從物件模式擷取屬性
在本節中,您會使用模式改善上次修改日期的顯示方式。
- 將
formatDate方法新增至main.dart:
lib/main.dart
String formatDate(DateTime dateTime) {
  final today = DateTime.now();
  final difference = dateTime.difference(today);

  return switch (difference) {
    Duration(inDays: 0) => 'today',
    Duration(inDays: 1) => 'tomorrow',
    Duration(inDays: -1) => 'yesterday',
    Duration(inDays: final days, isNegative: true) => '${days.abs()} days ago',
    Duration(inDays: final days) => '$days days from now',
  };
}
這個方法會傳回切換運算式,該運算式會根據值 difference (Duration 物件) 切換。代表 JSON 資料中 today 和 modified 值之間的時間間隔。
每個 switch 運算式案例都會使用物件模式,透過呼叫物件屬性 inDays 和 isNegative 的 getter 來比對。語法看起來像是要建構 Duration 物件,但實際上是存取 difference 物件的欄位。
前三種情況會使用常數子模式 0、1 和 -1 比對物件屬性 inDays,並傳回對應的字串。
最後兩個案例會處理今天、昨天和明天以外的時長:
- 如果
isNegative屬性符合 布林常數模式true,表示修改日期是過去的日期,則會顯示「幾天前」。 - 如果該情況無法找出差異,則天數必須為正數 (不必使用
isNegative: false明確驗證),因此修改日期會是未來日期,並顯示「從現在起算 天」。
新增週的格式設定邏輯
- 在格式化函式中新增兩個案例,以便識別超過 7 天的時長,讓使用者介面以「週」顯示:
lib/main.dart
String formatDate(DateTime dateTime) {
  final today = DateTime.now();
  final difference = dateTime.difference(today);

  return switch (difference) {
    Duration(inDays: 0) => 'today',
    Duration(inDays: 1) => 'tomorrow',
    Duration(inDays: -1) => 'yesterday',
    Duration(inDays: final days) when days > 7 => '${days ~/ 7} weeks from now', // Add from here
    Duration(inDays: final days) when days < -7 =>
      '${days.abs() ~/ 7} weeks ago',                                            // to here.
    Duration(inDays: final days, isNegative: true) => '${days.abs()} days ago',
    Duration(inDays: final days) => '$days days from now',
  };
}
這段程式碼會介紹防護子句:
- 防護子句會在案例模式後使用
when關鍵字。 - 可用於 if 案例、switch 陳述式和 switch 運算式。
- 只有在模式相符時,才會新增條件。
- 如果防護子句評估結果為 false,則整個模式會遭到駁斥,執行作業會繼續處理下一個案例。
將新格式的日期新增至 UI
- 最後,更新
DocumentScreen中的build方法,以使用formatDate函式:
lib/main.dart
class DocumentScreen extends StatelessWidget {
  final Document document;

  const DocumentScreen({required this.document, super.key});

  @override
  Widget build(BuildContext context) {
    final (title, :modified) = document.metadata;
    final formattedModifiedDate = formatDate(modified);            // Add this line
    final blocks = document.getBlocks();

    return Scaffold(
      appBar: AppBar(title: Text(title)),
      body: Column(
        children: [
          Text('Last modified: $formattedModifiedDate'),           // Modify this line
          Expanded(
            child: ListView.builder(
              itemCount: blocks.length,
              itemBuilder: (context, index) {
                return BlockWidget(block: blocks[index]);
              },
            ),
          ),
        ],
      ),
    );
  }
}
- 如要查看應用程式中的變更,請執行熱重載:
12. 密封類別以進行詳盡切換
請注意,您並未在最後一個切換結尾使用萬用字元或預設大小寫。雖然一律為可能落空的值加入案例是個好做法,但在這個簡單的範例中,由於您知道定義的案例會考量所有可能的值 inDays,因此可以省略。
處理完 switch 中的每個 case 後,即為「詳盡 switch」。舉例來說,如果 bool 類型有 true 和 false 的情況,開啟 bool 類型時就會詳盡列出這些情況。如果列舉的每個值都有對應的案例,開啟 enum 型別也會是詳盡的,因為列舉代表固定數量的常數值。
Dart 3 透過新的類別修飾符 sealed,將詳盡檢查擴展至物件和類別階層。將 Block 類別重構為密封的父類別。
建立子類別
- 在
data.dart中建立三個新類別 (HeaderBlock、ParagraphBlock和CheckboxBlock),並擴充Block:
lib/data.dart
class HeaderBlock extends Block {
  final String text;
  HeaderBlock(this.text);
}

class ParagraphBlock extends Block {
  final String text;
  ParagraphBlock(this.text);
}

class CheckboxBlock extends Block {
  final String text;
  final bool isChecked;
  CheckboxBlock(this.text, this.isChecked);
}
這些類別分別對應原始 JSON 中的不同 type 值:'h1'、'p' 和 'checkbox'。
密封父類別
- 將
Block類別標示為sealed。接著,將 if 案例重構為 switch 運算式,傳回與 JSON 中指定的type相對應的子類別:
lib/data.dart
sealed class Block {
  Block();

  factory Block.fromJson(Map<String, Object?> json) {
    return switch (json) {
      {'type': 'h1', 'text': String text} => HeaderBlock(text),
      {'type': 'p', 'text': String text} => ParagraphBlock(text),
      {'type': 'checkbox', 'text': String text, 'checked': bool checked} =>
        CheckboxBlock(text, checked),
      _ => throw const FormatException('Unexpected JSON format'),
    };
  }
}
sealed 關鍵字是類別修飾符,表示您只能在同一個程式庫中擴充或實作這個類別。由於分析器知道這個類別的子型別,因此如果切換無法涵蓋其中一個子型別,且不完整,就會回報錯誤。
使用切換運算式顯示小工具
- 在
main.dart中更新BlockWidget類別,並使用每個案例的物件模式:
lib/main.dart
class BlockWidget extends StatelessWidget {
  final Block block;

  const BlockWidget({required this.block, super.key});

  @override
  Widget build(BuildContext context) {
    return Container(
      margin: const EdgeInsets.all(8),
      child: switch (block) {
        HeaderBlock(:final text) => Text(
          text,
          style: Theme.of(context).textTheme.displayMedium,
        ),
        ParagraphBlock(:final text) => Text(text),
        CheckboxBlock(:final text, :final isChecked) => Row(
          children: [
            Checkbox(value: isChecked, onChanged: (_) {}),
            Text(text),
          ],
        ),
      },
    );
  }
}
在第一個版本的 BlockWidget 中,您開啟了 Block 物件的欄位,傳回 TextStyle。現在,您要切換 Block 物件本身的例項,並比對代表其子類別的物件模式,同時擷取物件的屬性。
由於您將 Block 設為密封類別,Dart 分析器可以檢查每個子類別是否在 switch 運算式中處理。
另請注意,使用切換運算式可直接將結果傳遞至 child 元素,不必像之前一樣使用個別的回傳陳述式。
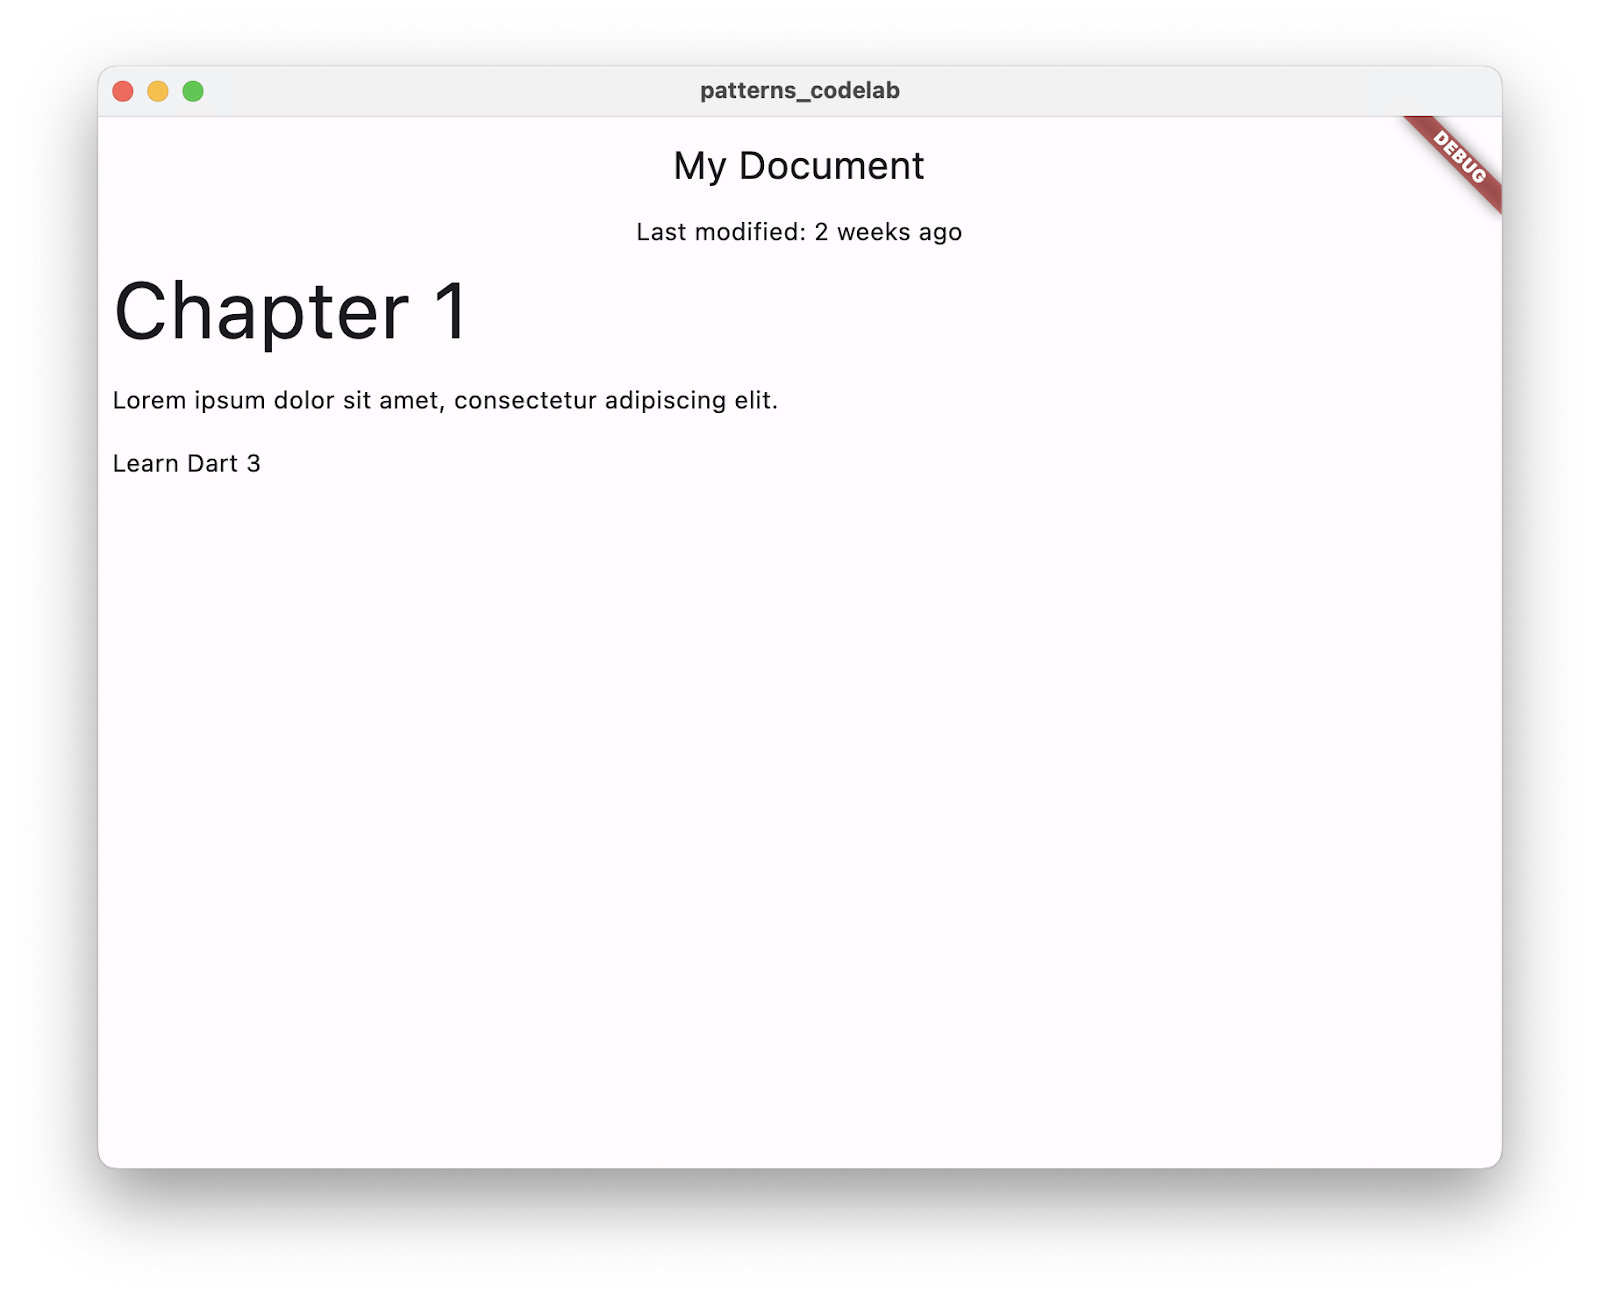
- 熱重載,首次查看已算繪的核取方塊 JSON 資料:

13. 恭喜
您已成功實驗模式、記錄、強化版 switch 和 case,以及密封類別。您介紹了許多資訊,但這些功能只是冰山一角。如要進一步瞭解模式,請參閱功能規格。
模式類型、模式出現的不同情境,以及子模式的潛在巢狀結構,讓行為模式的可能性似乎無窮無盡。但很容易看到。
您可以想像在 Flutter 中使用模式顯示內容的各種方式。您可以使用模式安全地擷取資料,只需幾行程式碼即可建構 UI。
後續步驟
- 請參閱 Dart 說明文件語言部分,瞭解模式、記錄、強化切換和案例,以及類別修飾符。
參考文件
如需完整的逐步範例程式碼,請參閱 flutter/codelabs 存放區。
如要深入瞭解各項新功能的規格,請參閱原始設計文件: