
1. Tổng quan
Document AI là gì?
Document AI là một giải pháp hiểu tài liệu, lấy dữ liệu không có cấu trúc (ví dụ: tài liệu, email, hoá đơn, biểu mẫu, v.v.) và giúp dữ liệu dễ hiểu, dễ phân tích và dễ sử dụng hơn. API này cung cấp cấu trúc thông qua việc phân loại nội dung, trích xuất thực thể, tìm kiếm nâng cao, v.v.
Trong phòng thí nghiệm này, bạn sẽ tìm hiểu cách thực hiện tính năng Nhận dạng ký tự quang học bằng Document AI API với Python.
Chúng ta sẽ sử dụng một tệp PDF của cuốn tiểu thuyết kinh điển "Winnie the Pooh" của A.A. Milne. Cuốn tiểu thuyết này gần đây đã trở thành một phần của Phạm vi công cộng ở Hoa Kỳ. Tệp này được Google Sách quét và chuyển đổi sang dạng kỹ thuật số.
Kiến thức bạn sẽ học được
- Cách bật Document AI API
- Cách xác thực các yêu cầu API
- Cách cài đặt thư viện ứng dụng cho Python
- Cách sử dụng API xử lý hàng loạt và trực tuyến
- Cách phân tích cú pháp văn bản từ tệp PDF
Bạn cần có
- Một dự án trên Google Cloud
- Một trình duyệt, chẳng hạn như Chrome hoặc Firefox
- Làm quen với cách sử dụng Python (3.9 trở lên)
Bản khảo sát
Bạn sẽ sử dụng hướng dẫn này như thế nào?
Bạn đánh giá thế nào về trải nghiệm của mình với Python?
Bạn đánh giá thế nào về trải nghiệm khi sử dụng các dịch vụ của Google Cloud?
2. Thiết lập và yêu cầu
Thiết lập môi trường theo tốc độ của riêng bạn
- Đăng nhập vào Cloud Console rồi tạo một dự án mới hoặc sử dụng lại một dự án hiện có. (Nếu chưa có tài khoản Gmail hoặc Google Workspace, bạn phải tạo một tài khoản.)


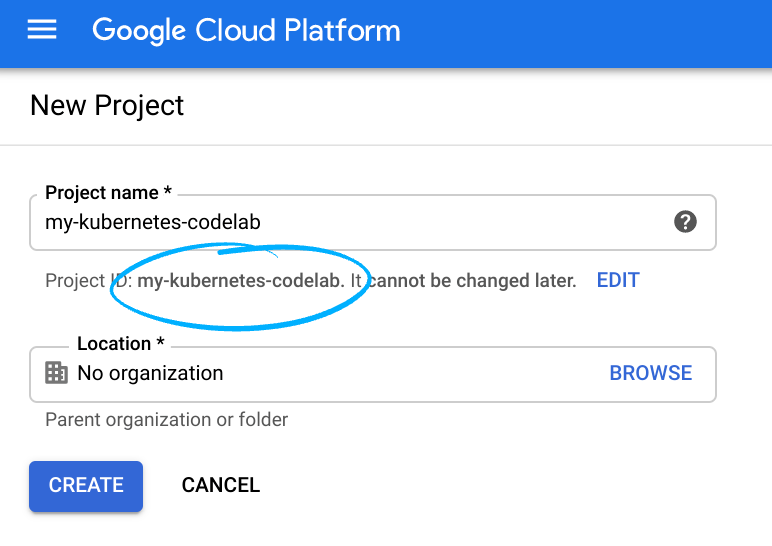
Ghi nhớ mã dự án, một tên riêng biệt cho tất cả các dự án trên Google Cloud. (Mã dự án ở trên đã được sử dụng và sẽ không hoạt động đối với bạn, xin lỗi!). Sau này, bạn phải cung cấp mã nhận dạng này dưới dạng PROJECT_ID.
- Tiếp theo, bạn phải bật tính năng thanh toán trong Cloud Console để sử dụng các tài nguyên của Google Cloud.
Hãy nhớ làm theo mọi hướng dẫn trong phần "Dọn dẹp". Phần này hướng dẫn bạn cách tắt các tài nguyên để không phải thanh toán ngoài phạm vi hướng dẫn này. Người dùng mới của Google Cloud đủ điều kiện tham gia chương trình Dùng thử miễn phí trị giá 300 USD.
Khởi động Cloud Shell
Mặc dù có thể vận hành Google Cloud từ xa trên máy tính xách tay, nhưng lớp học lập trình này sử dụng Google Cloud Shell, một môi trường dòng lệnh chạy trên Đám mây.
Kích hoạt Cloud Shell
- Trên Cloud Console, hãy nhấp vào Kích hoạt Cloud Shell


Nếu chưa từng khởi động Cloud Shell, bạn sẽ thấy một màn hình trung gian (bên dưới phần hiển thị đầu tiên) mô tả về Cloud Shell. Nếu vậy, hãy nhấp vào Tiếp tục (và bạn sẽ không bao giờ thấy màn hình này nữa). Sau đây là giao diện của màn hình xuất hiện một lần:

Quá trình cấp phép và kết nối với Cloud Shell chỉ mất vài giây.

Cloud Shell cung cấp cho bạn quyền truy cập vào dòng lệnh của một máy ảo được lưu trữ trên đám mây. Máy ảo này bao gồm tất cả các công cụ phát triển mà bạn cần. Nền tảng này cung cấp một thư mục chính có dung lượng 5 GB và chạy trong Google Cloud, giúp tăng cường đáng kể hiệu suất mạng và hoạt động xác thực. Bạn có thể thực hiện hầu hết, nếu không muốn nói là tất cả, công việc của mình trong lớp học lập trình này chỉ bằng một trình duyệt.
Sau khi kết nối với Cloud Shell, bạn sẽ thấy rằng mình đã được xác thực và dự án đã được đặt thành mã dự án của bạn.
- Chạy lệnh sau trong Cloud Shell để xác nhận rằng bạn đã được xác thực:
gcloud auth list
Đầu ra của lệnh
 Credentialed Accounts
ACTIVE  ACCOUNT
*      <my_account>@<my_domain.com>

To set the active account, run:
    $ gcloud config set account `ACCOUNT`
gcloud config list project
Đầu ra của lệnh
[core]
project = <PROJECT_ID>
Nếu không, bạn có thể đặt nó bằng lệnh sau:
gcloud config set project <PROJECT_ID>
Đầu ra của lệnh
Updated property [core/project].
3. Bật Document AI API
Trước khi có thể bắt đầu sử dụng Document AI, bạn phải bật API này. Bạn có thể thực hiện việc này bằng giao diện dòng lệnh gcloud hoặc Cloud Console.
Sử dụng gcloud CLI
- Nếu bạn không sử dụng Cloud Shell, hãy làm theo các bước trong phần Cài đặt
gcloudCLI trên máy cục bộ. - Bạn có thể bật các API này bằng các lệnh
gcloudsau.
gcloud services enable documentai.googleapis.com storage.googleapis.com
Bạn sẽ thấy như sau:
Operation "operations/..." finished successfully.
Sử dụng Cloud Console
Mở Cloud Console trong trình duyệt.
- Sử dụng Thanh tìm kiếm ở đầu bảng điều khiển, tìm "Document AI API", sau đó nhấp vào Bật để sử dụng API này trong dự án trên đám mây của Google Cloud

- Lặp lại bước trước đó cho API Google Cloud Storage.
Giờ đây, bạn có thể sử dụng Document AI!
4. Tạo và kiểm thử một bộ xử lý
Trước tiên, bạn phải tạo một phiên bản của trình xử lý OCR tài liệu để thực hiện việc trích xuất. Bạn có thể hoàn tất việc này bằng Cloud Console hoặc Processor Management API.
Cloud Console
- Trong bảng điều khiển, hãy chuyển đến phần Tổng quan về Document AI Platform

- Nhấp vào Khám phá các quy trình rồi chọn OCR tài liệu

- Đặt tên cho
codelab-ocr(hoặc một tên khác mà bạn sẽ nhớ) rồi chọn khu vực gần nhất trong danh sách. - Nhấp vào Tạo để tạo bộ xử lý
- Sao chép Mã nhận dạng bộ xử lý. Sau này, bạn phải sử dụng mã này trong mã của mình.
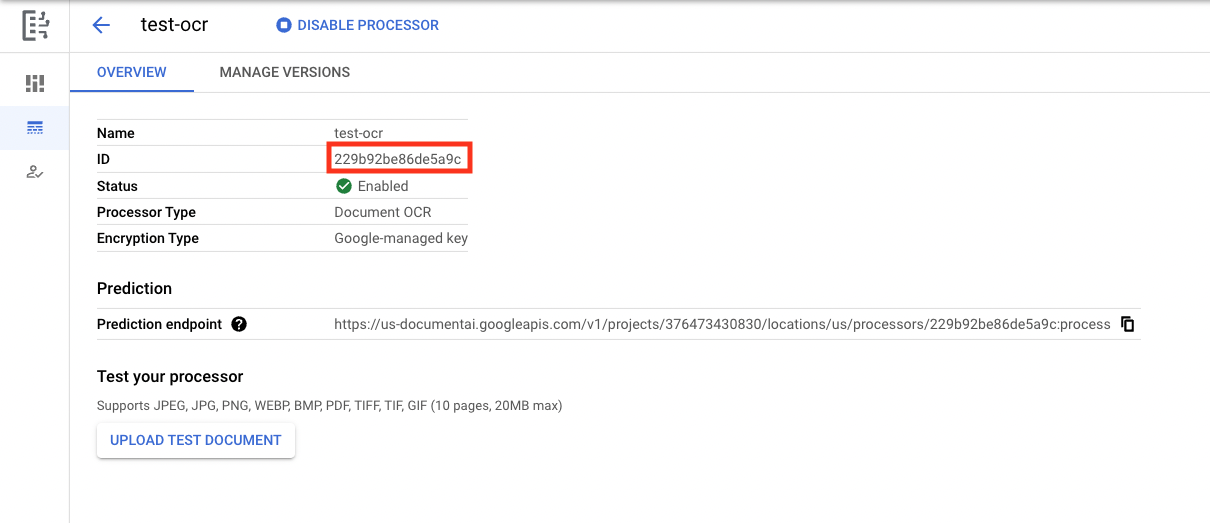
Bạn có thể kiểm thử bộ xử lý trong bảng điều khiển bằng cách tải một tài liệu lên. Nhấp vào Tải tài liệu kiểm thử lên rồi chọn một tài liệu để phân tích cú pháp.
Bạn có thể tải tệp PDF bên dưới xuống. Tệp này chứa 3 trang đầu tiên của tiểu thuyết.

Kết quả đầu ra sẽ có dạng như sau: 
Thư viện ứng dụng Python
Hãy làm theo lớp học lập trình này để tìm hiểu cách quản lý các bộ xử lý Document AI bằng Thư viện ứng dụng Python:
Quản lý các bộ xử lý Document AI bằng Python – Lớp học lập trình
5. Xác thực các yêu cầu API
Để đưa ra yêu cầu cho Document AI API, bạn phải sử dụng Tài khoản dịch vụ. Tài khoản dịch vụ thuộc về dự án của bạn và được Thư viện ứng dụng Python dùng để thực hiện các yêu cầu API. Giống như mọi tài khoản người dùng khác, tài khoản dịch vụ được biểu thị bằng một địa chỉ email. Trong phần này, bạn sẽ sử dụng Cloud SDK để tạo một tài khoản dịch vụ, sau đó tạo thông tin đăng nhập cần thiết để xác thực dưới dạng tài khoản dịch vụ.
Trước tiên, hãy mở Cloud Shell và đặt một biến môi trường bằng PROJECT_ID mà bạn sẽ dùng trong suốt lớp học lập trình này:
export GOOGLE_CLOUD_PROJECT=$(gcloud config get-value core/project)
Tiếp theo, hãy tạo một tài khoản dịch vụ mới để truy cập vào Document AI API bằng cách sử dụng:
gcloud iam service-accounts create my-docai-sa \
  --display-name "my-docai-service-account"
Tiếp theo, hãy cấp cho tài khoản dịch vụ của bạn quyền truy cập vào Document AI và Cloud Storage trong dự án.
gcloud projects add-iam-policy-binding ${GOOGLE_CLOUD_PROJECT} \
    --member="serviceAccount:my-docai-sa@${GOOGLE_CLOUD_PROJECT}.iam.gserviceaccount.com" \
    --role="roles/documentai.admin"

gcloud projects add-iam-policy-binding ${GOOGLE_CLOUD_PROJECT} \
    --member="serviceAccount:my-docai-sa@${GOOGLE_CLOUD_PROJECT}.iam.gserviceaccount.com" \
    --role="roles/storage.admin"

gcloud projects add-iam-policy-binding ${GOOGLE_CLOUD_PROJECT} \
    --member="serviceAccount:my-docai-sa@${GOOGLE_CLOUD_PROJECT}.iam.gserviceaccount.com" \
    --role="roles/serviceusage.serviceUsageConsumer"
Tiếp theo, hãy tạo thông tin đăng nhập mà mã Python của bạn dùng để đăng nhập dưới dạng tài khoản dịch vụ mới. Tạo thông tin đăng nhập này và lưu dưới dạng tệp JSON ~/key.json bằng lệnh sau:
gcloud iam service-accounts keys create ~/key.json \
  --iam-account  my-docai-sa@${GOOGLE_CLOUD_PROJECT}.iam.gserviceaccount.com
Cuối cùng, hãy đặt biến môi trường GOOGLE_APPLICATION_CREDENTIALS. Thư viện này dùng biến môi trường này để tìm thông tin đăng nhập của bạn. Để đọc thêm về phương thức xác thực này, hãy xem hướng dẫn. Bạn nên đặt biến môi trường thành đường dẫn đầy đủ của tệp JSON chứa thông tin đăng nhập mà bạn đã tạo bằng cách sử dụng:
export GOOGLE_APPLICATION_CREDENTIALS="/path/to/key.json"
6. Cài đặt thư viện ứng dụng
Cài đặt thư viện ứng dụng Python cho Document AI, Cloud Storage và Document AI Toolbox:
pip3 install --upgrade google-cloud-documentai
pip3 install --upgrade google-cloud-storage
pip3 install --upgrade google-cloud-documentai-toolbox
Bạn sẽ thấy như sau:
...
Installing collected packages: google-cloud-documentai
Successfully installed google-cloud-documentai-2.15.0
.
.
Installing collected packages: google-cloud-storage
Successfully installed google-cloud-storage-2.9.0
.
.
Installing collected packages: google-cloud-documentai-toolbox
Successfully installed google-cloud-documentai-toolbox-0.6.0a0
Giờ đây, bạn đã sẵn sàng sử dụng Document AI API!
7. Tải tệp PDF mẫu xuống
Chúng tôi có một tài liệu mẫu chứa 3 trang đầu tiên của tiểu thuyết.
Bạn có thể tải tệp PDF xuống bằng đường liên kết sau. Sau đó, hãy tải tệp đó lên phiên bản cloudshell.
Bạn cũng có thể tải tệp này xuống từ Bộ chứa Google Cloud Storage công khai của chúng tôi bằng cách sử dụng gsutil.
gsutil cp gs://cloud-samples-data/documentai/codelabs/ocr/Winnie_the_Pooh_3_Pages.pdf .
8. Gửi yêu cầu xử lý trực tuyến
Trong bước này, bạn sẽ xử lý 3 trang đầu tiên của tiểu thuyết bằng API xử lý trực tuyến (đồng bộ). Phương thức này phù hợp nhất với những tài liệu nhỏ được lưu trữ trên thiết bị. Hãy xem danh sách đầy đủ các đơn vị xử lý thanh toán để biết số trang và kích thước tệp tối đa cho từng loại đơn vị xử lý thanh toán.
Sử dụng Cloud Shell Editor hoặc một trình chỉnh sửa văn bản trên máy tính cục bộ để tạo một tệp có tên là online_processing.py và sử dụng mã bên dưới.
Thay thế YOUR_PROJECT_ID, YOUR_PROJECT_LOCATION, YOUR_PROCESSOR_ID và FILE_PATH bằng các giá trị phù hợp cho môi trường của bạn.
online_processing.py
from google.api_core.client_options import ClientOptions
from google.cloud import documentai


PROJECT_ID = "YOUR_PROJECT_ID"
LOCATION = "YOUR_PROJECT_LOCATION"  # Format is 'us' or 'eu'
PROCESSOR_ID = "YOUR_PROCESSOR_ID"  # Create processor in Cloud Console

# The local file in your current working directory
FILE_PATH = "Winnie_the_Pooh_3_Pages.pdf"
# Refer to https://cloud.google.com/document-ai/docs/file-types
# for supported file types
MIME_TYPE = "application/pdf"

# Instantiates a client
docai_client = documentai.DocumentProcessorServiceClient(
    client_options=ClientOptions(api_endpoint=f"{LOCATION}-documentai.googleapis.com")
)

# The full resource name of the processor, e.g.:
# projects/project-id/locations/location/processor/processor-id
# You must create new processors in the Cloud Console first
RESOURCE_NAME = docai_client.processor_path(PROJECT_ID, LOCATION, PROCESSOR_ID)

# Read the file into memory
with open(FILE_PATH, "rb") as image:
    image_content = image.read()

# Load Binary Data into Document AI RawDocument Object
raw_document = documentai.RawDocument(content=image_content, mime_type=MIME_TYPE)

# Configure the process request
request = documentai.ProcessRequest(name=RESOURCE_NAME, raw_document=raw_document)

# Use the Document AI client to process the sample form
result = docai_client.process_document(request=request)

document_object = result.document
print("Document processing complete.")
print(f"Text: {document_object.text}")
Chạy mã này để trích xuất văn bản và in văn bản đó ra bảng điều khiển.
Bạn sẽ thấy kết quả sau đây nếu sử dụng tài liệu mẫu của chúng tôi:
Document processing complete.
Text: CHAPTER I
IN WHICH We Are Introduced to
Winnie-the-Pooh and Some
Bees, and the Stories Begin
Here is Edward Bear, coming
downstairs now, bump, bump, bump, on the back
of his head, behind Christopher Robin. It is, as far
as he knows, the only way of coming downstairs,
but sometimes he feels that there really is another
way, if only he could stop bumping for a moment
and think of it. And then he feels that perhaps there
isn't. Anyhow, here he is at the bottom, and ready
to be introduced to you. Winnie-the-Pooh.
When I first heard his name, I said, just as you
are going to say, "But I thought he was a boy?"
"So did I," said Christopher Robin.
"Then you can't call him Winnie?"
"I don't."
"But you said "

...

Digitized by
Google
9. Đưa ra yêu cầu xử lý hàng loạt
Giả sử bạn muốn đọc văn bản trong toàn bộ cuốn tiểu thuyết.
- Tính năng Xử lý trực tuyến có giới hạn về số trang và kích thước tệp có thể gửi và chỉ cho phép một tệp tài liệu cho mỗi lệnh gọi API.
- Xử lý hàng loạt cho phép xử lý nhiều tệp/tệp có kích thước lớn hơn bằng phương thức không đồng bộ.
Trong bước này, chúng ta sẽ xử lý toàn bộ tiểu thuyết "Winnie the Pooh" bằng Document AI Batch Processing API và xuất văn bản vào một bộ chứa Google Cloud Storage.
Xử lý hàng loạt sử dụng Long Running Operations (Thao tác diễn ra trong thời gian dài) để quản lý các yêu cầu theo cách không đồng bộ. Vì vậy, chúng ta phải đưa ra yêu cầu và truy xuất đầu ra theo cách khác với xử lý trực tuyến. Tuy nhiên, đầu ra sẽ có cùng định dạng đối tượng Document cho dù bạn sử dụng chế độ xử lý trực tuyến hay xử lý hàng loạt.
Bước này cho biết cách cung cấp các tài liệu cụ thể để Document AI xử lý. Một bước sau đó sẽ cho biết cách xử lý toàn bộ thư mục tài liệu.
Tải tệp PDF lên Cloud Storage
Phương thức batch_process_documents() hiện chấp nhận các tệp từ Google Cloud Storage. Bạn có thể tham khảo documentai_v1.types.BatchProcessRequest để biết thêm thông tin về cấu trúc đối tượng.
Trong ví dụ này, bạn có thể đọc tệp trực tiếp từ nhóm mẫu của chúng tôi.
Bạn cũng có thể sao chép tệp vào nhóm của riêng mình bằng cách sử dụng gsutil...
gsutil cp gs://cloud-samples-data/documentai/codelabs/ocr/Winnie_the_Pooh.pdf gs://YOUR_BUCKET_NAME/
...hoặc bạn có thể tải tệp mẫu của tiểu thuyết xuống qua đường liên kết bên dưới rồi tải tệp đó lên nhóm của riêng bạn.
Bạn cũng cần có một Nhóm GCS để lưu trữ đầu ra của API.
Bạn có thể làm theo Tài liệu về Cloud Storage để tìm hiểu cách tạo bộ chứa lưu trữ.
Sử dụng phương thức batch_process_documents()
Tạo một tệp có tên là batch_processing.py và sử dụng mã dưới đây.
Thay thế YOUR_PROJECT_ID, YOUR_PROCESSOR_LOCATION, YOUR_PROCESSOR_ID, YOUR_INPUT_URI và YOUR_OUTPUT_URI bằng các giá trị phù hợp cho môi trường của bạn.
Đảm bảo rằng YOUR_INPUT_URI dẫn trực tiếp đến tệp PDF, ví dụ: gs://cloud-samples-data/documentai/codelabs/ocr/Winnie_the_Pooh.pdf.
batch_processing.py
"""
Makes a Batch Processing Request to Document AI
"""

import re

from google.api_core.client_options import ClientOptions
from google.api_core.exceptions import InternalServerError
from google.api_core.exceptions import RetryError
from google.cloud import documentai
from google.cloud import storage

# TODO(developer): Fill these variables before running the sample.
project_id = "YOUR_PROJECT_ID"
location = "YOUR_PROCESSOR_LOCATION"  # Format is "us" or "eu"
processor_id = "YOUR_PROCESSOR_ID"  # Create processor before running sample
gcs_output_uri = "YOUR_OUTPUT_URI"  # Must end with a trailing slash `/`. Format: gs://bucket/directory/subdirectory/
processor_version_id = (
    "YOUR_PROCESSOR_VERSION_ID"  # Optional. Example: pretrained-ocr-v1.0-2020-09-23
)

# TODO(developer): If `gcs_input_uri` is a single file, `mime_type` must be specified.
gcs_input_uri = "YOUR_INPUT_URI"  # Format: `gs://bucket/directory/file.pdf` or `gs://bucket/directory/`
input_mime_type = "application/pdf"
field_mask = "text,entities,pages.pageNumber"  # Optional. The fields to return in the Document object.


def batch_process_documents(
    project_id: str,
    location: str,
    processor_id: str,
    gcs_input_uri: str,
    gcs_output_uri: str,
    processor_version_id: str = None,
    input_mime_type: str = None,
    field_mask: str = None,
    timeout: int = 400,
):
    # You must set the api_endpoint if you use a location other than "us".
    opts = ClientOptions(api_endpoint=f"{location}-documentai.googleapis.com")

    client = documentai.DocumentProcessorServiceClient(client_options=opts)

    if not gcs_input_uri.endswith("/") and "." in gcs_input_uri:
        # Specify specific GCS URIs to process individual documents
        gcs_document = documentai.GcsDocument(
            gcs_uri=gcs_input_uri, mime_type=input_mime_type
        )
        # Load GCS Input URI into a List of document files
        gcs_documents = documentai.GcsDocuments(documents=[gcs_document])
        input_config = documentai.BatchDocumentsInputConfig(gcs_documents=gcs_documents)
    else:
        # Specify a GCS URI Prefix to process an entire directory
        gcs_prefix = documentai.GcsPrefix(gcs_uri_prefix=gcs_input_uri)
        input_config = documentai.BatchDocumentsInputConfig(gcs_prefix=gcs_prefix)

    # Cloud Storage URI for the Output Directory
    gcs_output_config = documentai.DocumentOutputConfig.GcsOutputConfig(
        gcs_uri=gcs_output_uri, field_mask=field_mask
    )

    # Where to write results
    output_config = documentai.DocumentOutputConfig(gcs_output_config=gcs_output_config)

    if processor_version_id:
        # The full resource name of the processor version, e.g.:
        # projects/{project_id}/locations/{location}/processors/{processor_id}/processorVersions/{processor_version_id}
        name = client.processor_version_path(
            project_id, location, processor_id, processor_version_id
        )
    else:
        # The full resource name of the processor, e.g.:
        # projects/{project_id}/locations/{location}/processors/{processor_id}
        name = client.processor_path(project_id, location, processor_id)

    request = documentai.BatchProcessRequest(
        name=name,
        input_documents=input_config,
        document_output_config=output_config,
    )

    # BatchProcess returns a Long Running Operation (LRO)
    operation = client.batch_process_documents(request)

    # Continually polls the operation until it is complete.
    # This could take some time for larger files
    # Format: projects/{project_id}/locations/{location}/operations/{operation_id}
    try:
        print(f"Waiting for operation {operation.operation.name} to complete...")
        operation.result(timeout=timeout)
    # Catch exception when operation doesn"t finish before timeout
    except (RetryError, InternalServerError) as e:
        print(e.message)

    # NOTE: Can also use callbacks for asynchronous processing
    #
    # def my_callback(future):
    #   result = future.result()
    #
    # operation.add_done_callback(my_callback)

    # Once the operation is complete,
    # get output document information from operation metadata
    metadata = documentai.BatchProcessMetadata(operation.metadata)

    if metadata.state != documentai.BatchProcessMetadata.State.SUCCEEDED:
        raise ValueError(f"Batch Process Failed: {metadata.state_message}")

    storage_client = storage.Client()

    print("Output files:")
    # One process per Input Document
    for process in list(metadata.individual_process_statuses):
        # output_gcs_destination format: gs://BUCKET/PREFIX/OPERATION_NUMBER/INPUT_FILE_NUMBER/
        # The Cloud Storage API requires the bucket name and URI prefix separately
        matches = re.match(r"gs://(.*?)/(.*)", process.output_gcs_destination)
        if not matches:
            print(
                "Could not parse output GCS destination:",
                process.output_gcs_destination,
            )
            continue

        output_bucket, output_prefix = matches.groups()

        # Get List of Document Objects from the Output Bucket
        output_blobs = storage_client.list_blobs(output_bucket, prefix=output_prefix)

        # Document AI may output multiple JSON files per source file
        for blob in output_blobs:
            # Document AI should only output JSON files to GCS
            if blob.content_type != "application/json":
                print(
                    f"Skipping non-supported file: {blob.name} - Mimetype: {blob.content_type}"
                )
                continue

            # Download JSON File as bytes object and convert to Document Object
            print(f"Fetching {blob.name}")
            document = documentai.Document.from_json(
                blob.download_as_bytes(), ignore_unknown_fields=True
            )

            # For a full list of Document object attributes, please reference this page:
            # https://cloud.google.com/python/docs/reference/documentai/latest/google.cloud.documentai_v1.types.Document

            # Read the text recognition output from the processor
            print("The document contains the following text:")
            print(document.text)


if __name__ == "__main__":
    batch_process_documents(
        project_id=project_id,
        location=location,
        processor_id=processor_id,
        gcs_input_uri=gcs_input_uri,
        gcs_output_uri=gcs_output_uri,
        input_mime_type=input_mime_type,
        field_mask=field_mask,
    )
Chạy mã và bạn sẽ thấy toàn bộ văn bản tiểu thuyết được trích xuất và in trong bảng điều khiển.
Quá trình này có thể mất chút thời gian để hoàn tất vì tệp này lớn hơn nhiều so với ví dụ trước. (Ôi, phiền phức quá...)
Tuy nhiên, với Batch Processing API, bạn sẽ nhận được một mã nhận dạng thao tác. Mã này có thể dùng để lấy đầu ra từ GCS sau khi tác vụ hoàn tất.
Đầu ra của bạn sẽ có dạng như sau:
Waiting for operation projects/PROJECT_NUMBER/locations/LOCATION/operations/OPERATION_NUMBER to complete...
Document processing complete.
Fetching docai-output/OPERATION_NUMBER/0/Winnie_the_Pooh-0.json
Fetching docai-output/OPERATION_NUMBER/0/Winnie_the_Pooh-1.json
Fetching docai-output/OPERATION_NUMBER/0/Winnie_the_Pooh-10.json
Fetching docai-output/OPERATION_NUMBER/0/Winnie_the_Pooh-11.json
Fetching docai-output/OPERATION_NUMBER/0/Winnie_the_Pooh-12.json
Fetching docai-output/OPERATION_NUMBER/0/Winnie_the_Pooh-13.json
Fetching docai-output/OPERATION_NUMBER/0/Winnie_the_Pooh-14.json
Fetching docai-output/OPERATION_NUMBER/0/Winnie_the_Pooh-15.json
Fetching docai-output/OPERATION_NUMBER/0/Winnie_the_Pooh-16.json
Fetching docai-output/OPERATION_NUMBER/0/Winnie_the_Pooh-17.json
Fetching docai-output/OPERATION_NUMBER/0/Winnie_the_Pooh-18.json
Fetching docai-output/OPERATION_NUMBER/0/Winnie_the_Pooh-2.json
Fetching docai-output/OPERATION_NUMBER/0/Winnie_the_Pooh-3.json
Fetching docai-output/OPERATION_NUMBER/0/Winnie_the_Pooh-4.json
Fetching docai-output/OPERATION_NUMBER/0/Winnie_the_Pooh-5.json
Fetching docai-output/OPERATION_NUMBER/0/Winnie_the_Pooh-6.json
Fetching docai-output/OPERATION_NUMBER/0/Winnie_the_Pooh-7.json
Fetching docai-output/OPERATION_NUMBER/0/Winnie_the_Pooh-8.json
Fetching docai-output/OPERATION_NUMBER/0/Winnie_the_Pooh-9.json

This is a reproduction of a library book that was digitized
by Google as part of an ongoing effort to preserve the
information in books and make it universally accessible.
TM
Google books
https://books.google.com

.....

He nodded and went
out ... and in a moment
I heard Winnie-the-Pooh
-bump, bump, bump-go-ing up the stairs behind
him.
Digitized by
Google
10. Đưa ra yêu cầu xử lý hàng loạt cho một thư mục
Đôi khi, bạn có thể muốn xử lý toàn bộ thư mục tài liệu mà không cần liệt kê từng tài liệu riêng lẻ. Phương thức batch_process_documents() hỗ trợ việc nhập danh sách các tài liệu cụ thể hoặc đường dẫn thư mục.
Bước này sẽ hướng dẫn cách xử lý toàn bộ thư mục tệp tài liệu. Hầu hết mã đều hoạt động giống như bước trước, điểm khác biệt duy nhất là URI GCS được gửi bằng BatchProcessRequest.
Chúng tôi có một thư mục trong nhóm mẫu chứa nhiều trang của tiểu thuyết trong các tệp riêng biệt.
gs://cloud-samples-data/documentai/codelabs/ocr/multi-document/
Bạn có thể đọc trực tiếp các tệp này hoặc sao chép chúng vào bộ chứa Cloud Storage của riêng bạn.
Chạy lại mã từ bước trước, thay thế YOUR_INPUT_URI bằng một thư mục trong Cloud Storage.
Chạy mã và bạn sẽ thấy văn bản được trích xuất từ tất cả các tệp tài liệu trong thư mục Cloud Storage.
Đầu ra của bạn sẽ có dạng như sau:
Waiting for operation projects/PROJECT_NUMBER/locations/LOCATION/operations/OPERATION_NUMBER to complete...
Document processing complete.
Fetching docai-output/OPERATION_NUMBER/0/Winnie_the_Pooh_Page_0-0.json
Fetching docai-output/OPERATION_NUMBER/1/Winnie_the_Pooh_Page_1-0.json
Fetching docai-output/OPERATION_NUMBER/2/Winnie_the_Pooh_Page_10-0.json
Fetching docai-output/OPERATION_NUMBER/3/Winnie_the_Pooh_Page_12-0.json
Fetching docai-output/OPERATION_NUMBER/4/Winnie_the_Pooh_Page_16-0.json
Fetching docai-output/OPERATION_NUMBER/5/Winnie_the_Pooh_Page_7-0.json

Introduction
(I₂
F YOU happen to have read another
book about Christopher Robin, you may remember
th
CHAPTER I
IN WHICH We Are Introduced to
Winnie-the-Pooh and Some
Bees, and the Stories Begin
HERE is
10
WINNIE-THE-POOH
"I wonder if you've got such a thing as a balloon
about you?"
"A balloon?"
"Yes,
12
WINNIE-THE-POOH
and you took your gun with you, just in case, as
you always did, and Winnie-the-P
16
WINNIE-THE-POOH
this song, and one bee sat down on the nose of the
cloud for a moment, and then g
WE ARE INTRODUCED
7
"Oh, help!" said Pooh, as he dropped ten feet on
the branch below him.
"If only
11. Xử lý phản hồi xử lý hàng loạt bằng Document AI Toolbox
Xử lý hàng loạt đòi hỏi khá nhiều bước để hoàn thành do tích hợp với bộ nhớ trên đám mây. Đầu ra Document cũng có thể được "phân đoạn" thành nhiều tệp .json, tuỳ thuộc vào kích thước của tài liệu đầu vào.
SDK Python Document AI Toolbox được tạo ra để đơn giản hoá quá trình xử lý hậu kỳ và các tác vụ phổ biến khác bằng Document AI. Thư viện này dùng để bổ sung cho thư viện ứng dụng Document AI chứ không phải để thay thế. Hãy xem tài liệu tham khảo để biết toàn bộ quy cách.
Bước này cho thấy cách thực hiện yêu cầu xử lý hàng loạt và truy xuất đầu ra bằng Document AI Toolbox.
batch_processing_toolbox.py
"""
Makes a Batch Processing Request to Document AI using Document AI Toolbox
"""

from google.api_core.client_options import ClientOptions
from google.cloud import documentai
from google.cloud import documentai_toolbox

# TODO(developer): Fill these variables before running the sample.
project_id = "YOUR_PROJECT_ID"
location = "YOUR_PROCESSOR_LOCATION"  # Format is "us" or "eu"
processor_id = "YOUR_PROCESSOR_ID"  # Create processor before running sample
gcs_output_uri = "YOUR_OUTPUT_URI"  # Must end with a trailing slash `/`. Format: gs://bucket/directory/subdirectory/
processor_version_id = (
    "YOUR_PROCESSOR_VERSION_ID"  # Optional. Example: pretrained-ocr-v1.0-2020-09-23
)

# TODO(developer): If `gcs_input_uri` is a single file, `mime_type` must be specified.
gcs_input_uri = "YOUR_INPUT_URI"  # Format: `gs://bucket/directory/file.pdf`` or `gs://bucket/directory/``
input_mime_type = "application/pdf"
field_mask = "text,entities,pages.pageNumber"  # Optional. The fields to return in the Document object.


def batch_process_toolbox(
    project_id: str,
    location: str,
    processor_id: str,
    gcs_input_uri: str,
    gcs_output_uri: str,
    processor_version_id: str = None,
    input_mime_type: str = None,
    field_mask: str = None,
):
    # You must set the api_endpoint if you use a location other than "us".
    opts = ClientOptions(api_endpoint=f"{location}-documentai.googleapis.com")

    client = documentai.DocumentProcessorServiceClient(client_options=opts)

    if not gcs_input_uri.endswith("/") and "." in gcs_input_uri:
        # Specify specific GCS URIs to process individual documents
        gcs_document = documentai.GcsDocument(
            gcs_uri=gcs_input_uri, mime_type=input_mime_type
        )
        # Load GCS Input URI into a List of document files
        gcs_documents = documentai.GcsDocuments(documents=[gcs_document])
        input_config = documentai.BatchDocumentsInputConfig(gcs_documents=gcs_documents)
    else:
        # Specify a GCS URI Prefix to process an entire directory
        gcs_prefix = documentai.GcsPrefix(gcs_uri_prefix=gcs_input_uri)
        input_config = documentai.BatchDocumentsInputConfig(gcs_prefix=gcs_prefix)

    # Cloud Storage URI for the Output Directory
    gcs_output_config = documentai.DocumentOutputConfig.GcsOutputConfig(
        gcs_uri=gcs_output_uri, field_mask=field_mask
    )

    # Where to write results
    output_config = documentai.DocumentOutputConfig(gcs_output_config=gcs_output_config)

    if processor_version_id:
        # The full resource name of the processor version, e.g.:
        # projects/{project_id}/locations/{location}/processors/{processor_id}/processorVersions/{processor_version_id}
        name = client.processor_version_path(
            project_id, location, processor_id, processor_version_id
        )
    else:
        # The full resource name of the processor, e.g.:
        # projects/{project_id}/locations/{location}/processors/{processor_id}
        name = client.processor_path(project_id, location, processor_id)

    request = documentai.BatchProcessRequest(
        name=name,
        input_documents=input_config,
        document_output_config=output_config,
    )

    # BatchProcess returns a Long Running Operation (LRO)
    operation = client.batch_process_documents(request)

    # Operation Name Format: projects/{project_id}/locations/{location}/operations/{operation_id}
    documents = documentai_toolbox.document.Document.from_batch_process_operation(
        location=location, operation_name=operation.operation.name
    )

    for document in documents:
        # Read the text recognition output from the processor
        print("The document contains the following text:")
        # Truncated at 100 characters for brevity
        print(document.text[:100])


if __name__ == "__main__":
    batch_process_toolbox(
        project_id=project_id,
        location=location,
        processor_id=processor_id,
        gcs_input_uri=gcs_input_uri,
        gcs_output_uri=gcs_output_uri,
        input_mime_type=input_mime_type,
        field_mask=field_mask,
    )
12. Xin chúc mừng
Bạn đã sử dụng thành công Document AI để trích xuất văn bản từ một cuốn tiểu thuyết bằng cách sử dụng tính năng Xử lý trực tuyến, Xử lý hàng loạt và Hộp công cụ Document AI.
Bạn nên thử nghiệm với các tài liệu khác và khám phá những trình xử lý khác có trên nền tảng này.
Dọn dẹp
Để tránh phát sinh phí cho tài khoản Google Cloud của bạn đối với các tài nguyên được dùng trong hướng dẫn này, hãy làm như sau:
- Trong Cloud Console, hãy chuyển đến trang Quản lý tài nguyên.
- Trong danh sách dự án, hãy chọn dự án của bạn rồi nhấp vào Xoá.
- Trong hộp thoại, hãy nhập mã dự án rồi nhấp vào Tắt để xoá dự án.
Tìm hiểu thêm
Tiếp tục tìm hiểu về Document AI thông qua các lớp học lập trình tiếp theo này.
- Phân tích cú pháp biểu mẫu bằng Document AI (Python)
- Bộ xử lý chuyên dụng có Document AI (Python)
- Quản lý các bộ xử lý Document AI bằng Python
- Document AI: Sự tham gia của con người vào quy trình
Tài nguyên
- The Future of Documents – YouTube Playlist
- Tài liệu về Document AI
- Thư viện ứng dụng Document AI Python
- Kho lưu trữ mẫu Document AI
Giấy phép
Tác phẩm này được cấp phép theo giấy phép Ghi công theo Creative Commons 2.0 Chung.