1. 소개
머티리얼 구성요소(MDC)를 통해 개발자는 머티리얼 디자인을 구현할 수 있습니다. Google의 엔지니어와 UX 디자이너로 구성된 팀에서 만든 MDC는 아름답고 기능적인 수십 가지의 UI 구성요소가 특징이며 Android, iOS, 웹, Flutter.material.io/develop에서 제공됩니다. |
Android용 Material Design 및 Material 구성요소란 무엇인가요?
머티리얼 디자인은 대담하고 멋진 디지털 제품을 빌드하는 시스템입니다. 일련의 일관된 원칙과 구성요소 아래 스타일과 브랜딩, 상호작용, 모션을 통합하여 제품팀은 가능한 최고의 디자인을 실현할 수 있습니다.
Android 애플리케이션의 경우 Android용 Material 구성요소 (MDC Android)는 디자인 및 엔지니어링을 구성요소 라이브러리와 통합하여 애플리케이션 전체에서 일관성을 높입니다. Material Design 시스템이 발전함에 따라 이러한 구성요소는 일관된 픽셀 완벽 구현과 Google의 프런트엔드 개발 표준 준수를 보장하기 위해 업데이트됩니다. MDC는 웹, iOS, Flutter에도 사용할 수 있습니다.
이 Codelab에서는 여러 MDC Android 구성요소를 사용하여 로그인 페이지를 빌드합니다.
빌드할 항목
이 Codelab은 의류와 가정용품을 판매하는 전자상거래 Android 앱인 Shrine 앱을 빌드하는 방법을 설명하는 네 가지 Codelab 중 첫 번째 Codelab입니다. MDC-Android를 사용하여 브랜드나 스타일을 반영하도록 구성요소를 맞춤설정하는 방법을 보여줍니다.
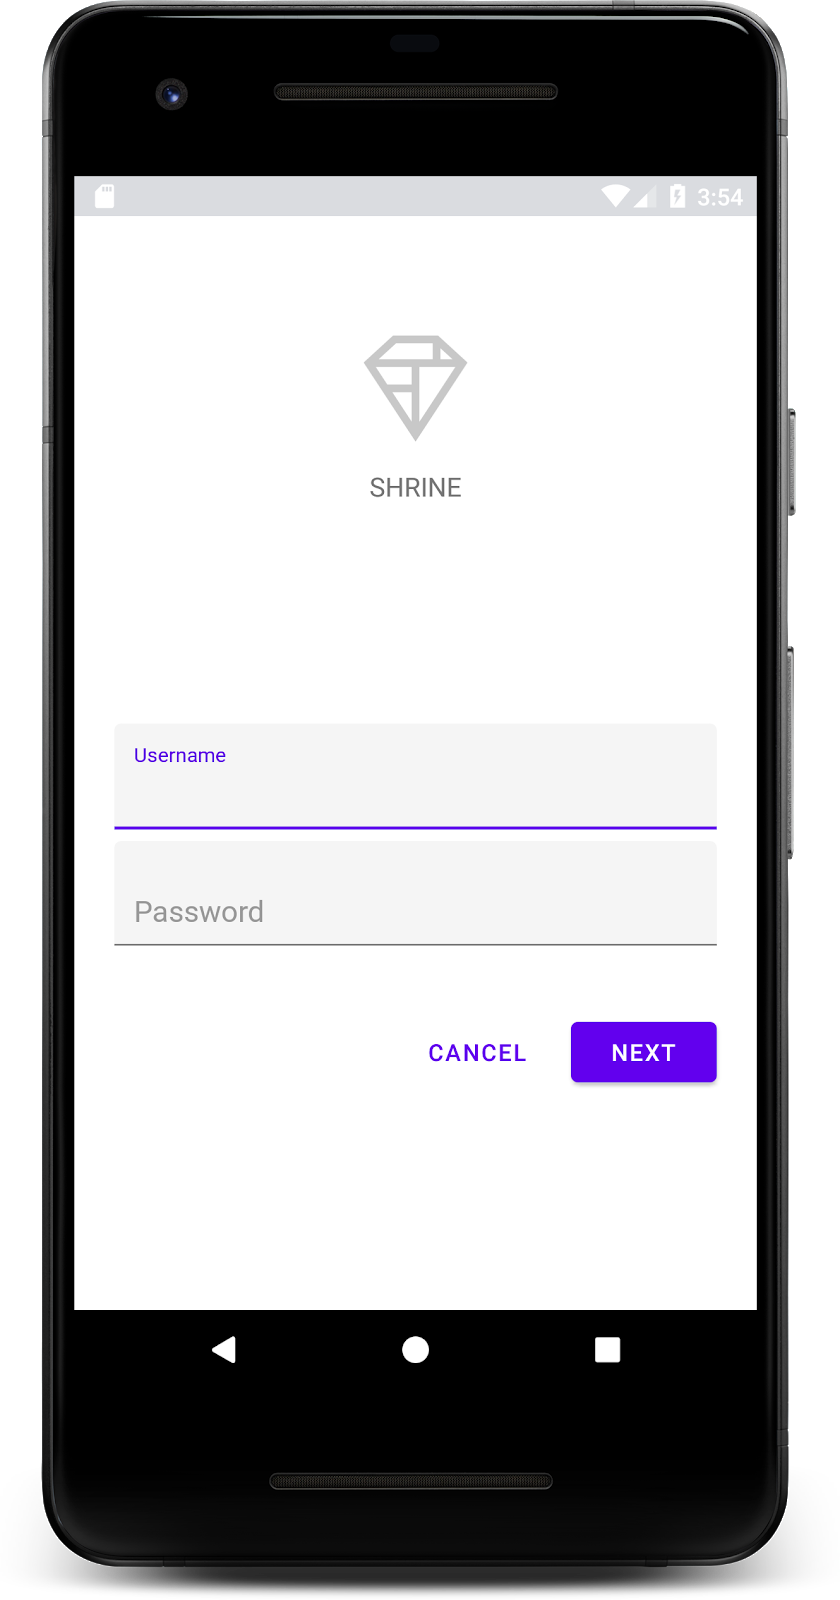
이 Codelab에서는 다음이 포함된 Shrine의 로그인 페이지를 빌드합니다.
- 텍스트 입력란 두 개. 하나는 사용자 이름 입력용, 하나는 비밀번호 입력용
- '취소' 버튼 2개 다른 하나는 '다음'
- 앱 이름(Shrine)
- Shrine의 로고 이미지

이 Codelab의 MDC Android 구성요소
- 텍스트 필드
- 버튼
필요한 항목
- Android 개발에 관한 기본 지식
- Android 스튜디오(아직 다운로드하지 않은 경우 여기에서 다운로드)
- Android Emulator 또는 기기(Android 스튜디오를 통해 사용 가능)
- 샘플 코드(다음 단계 참고)
귀하의 Android 앱 빌드 경험 수준을 평가해 주세요.
<ph type="x-smartling-placeholder">2. 개발 환경 설정
Android 스튜디오 시작
Android 스튜디오를 열면 'Welcome to Android Studio'라는 창이 표시됩니다. 그러나 Android 스튜디오를 처음 실행하는 경우 기본값을 사용하여 Android 스튜디오 설정 마법사 단계를 진행합니다. 이 단계는 필요한 파일을 다운로드하고 설치하는 데 몇 분 정도 걸릴 수 있으므로 다음 섹션을 진행하는 동안 이 작업이 백그라운드에서 실행되도록 하면 됩니다.
시작 Codelab 앱 다운로드
시작 앱은 material-components-android-codelabs-101-starter/java 디렉터리에 있습니다.
...또는 GitHub에서 클론
이 Codelab을 GitHub에서 클론하려면 다음 명령어를 실행하세요.
git clone https://github.com/material-components/material-components-android-codelabs
cd material-components-android-codelabs/
git checkout 101-starter
Android 스튜디오에서 시작 코드 로드
- 설정 마법사가 완료되고 Welcome to Android Studio 창이 표시되면 Open an existing Android Studio project를 클릭합니다. 샘플 코드를 설치한 디렉토리로 이동하고 java -> Shrine (또는 컴퓨터에서 shrine을 검색)하여 Shrine 프로젝트를 엽니다.
- Android 스튜디오 창 하단의 활동 표시기에 나타나는 것처럼 Android 스튜디오가 프로젝트를 빌드하고 동기화할 때까지 잠시 기다립니다.
- 이 시점에서 Android 스튜디오에 아래와 같은 빌드 오류가 발생할 수 있습니다. Android SDK나 빌드 도구가 누락되었기 때문입니다. Android 스튜디오의 안내를 따라 이러한 항목을 설치/업데이트하고 프로젝트를 동기화합니다.
프로젝트 종속 항목 추가
프로젝트에는 MDC Android 지원 라이브러리에 대한 종속 항목이 필요합니다. 다운로드한 샘플 코드에는 이 종속 항목이 이미 나열되어 있지만, 다음 단계를 수행하여 확인하는 것이 좋습니다.
app모듈의build.gradle파일로 이동하여dependencies블록에 MDC Android 종속 항목이 포함되어 있는지 확인합니다.
api 'com.google.android.material:material:1.1.0-alpha06'
- (선택사항) 필요한 경우
build.gradle파일을 수정하여 다음 종속 항목을 추가하고 프로젝트를 동기화합니다.
dependencies {
    api 'com.google.android.material:material:1.1.0-alpha06'
    implementation 'androidx.legacy:legacy-support-v4:1.0.0'
    implementation 'com.android.volley:volley:1.1.1'
    implementation 'com.google.code.gson:gson:2.8.5'
    implementation "org.jetbrains.kotlin:kotlin-stdlib-jdk7:1.3.21"
    testImplementation 'junit:junit:4.12'
    androidTestImplementation 'androidx.test:core:1.1.0'
    androidTestImplementation 'androidx.test.ext:junit:1.1.0'
    androidTestImplementation 'androidx.test:runner:1.2.0-alpha05'
    androidTestImplementation 'androidx.test.espresso:espresso-core:3.2.0-alpha05'
}
시작 앱 실행
|
완료되었습니다. Shrine의 로그인 페이지를 위한 시작 코드가 에뮬레이터에서 실행되고 있어야 합니다. 'Shrine'이라는 이름이 표시됩니다. 바로 아래에 Shrine 로고가 있습니다.

이제 코드를 살펴보겠습니다. 샘플 코드에 프래그먼트를 표시하고 프래그먼트 간에 이동하는 간단한 Fragment 탐색 프레임워크를 제공했습니다.
shrine -> app -> src -> main -> java -> com.google.codelabs.mdc.java.shrine 디렉터리에서 MainActivity.java를 엽니다. 다음이 포함되어 있어야 합니다.
MainActivity.java
package com.google.codelabs.mdc.java.shrine;

import android.os.Bundle;
import androidx.appcompat.app.AppCompatActivity;
import androidx.fragment.app.Fragment;
import androidx.fragment.app.FragmentTransaction;

public class MainActivity extends AppCompatActivity implements NavigationHost {

   @Override
   protected void onCreate(Bundle savedInstanceState) {
       super.onCreate(savedInstanceState);
       setContentView(R.layout.shr_main_activity);

       if (savedInstanceState == null) {
           getSupportFragmentManager()
                   .beginTransaction()
                   .add(R.id.container, new LoginFragment())
                   .commit();
       }
   }

   /**
    * Navigate to the given fragment.
    *
    * @param fragment       Fragment to navigate to.
    * @param addToBackstack Whether or not the current fragment should be added to the backstack.
    */
   @Override
   public void navigateTo(Fragment fragment, boolean addToBackstack) {
       FragmentTransaction transaction =
               getSupportFragmentManager()
                       .beginTransaction()
                       .replace(R.id.container, fragment);

       if (addToBackstack) {
           transaction.addToBackStack(null);
       }

       transaction.commit();
   }
}
이 활동은 shr_main_activity.xml에 정의된 R.layout.shr_main_activity 레이아웃 파일을 표시합니다.
onCreate(),에서 MainActivity.java가 LoginFragment를 표시하기 위해 Fragment 트랜잭션을 시작하는 것을 확인할 수 있습니다. LoginFragment. 이 Codelab에서 이를 수정합니다. 이 활동은 NavigationHost에 정의된 navigateTo(Fragment) 메서드도 구현합니다. 이 메서드를 통해 모든 프래그먼트가 다른 프래그먼트로 이동할 수 있습니다.
활동 파일에서 Command + 클릭 (또는 Control + 클릭) shr_main_activity을 눌러 레이아웃 파일을 열거나 app -> res -> layout -> shr_main_activity.xml에 있는 레이아웃 파일로 이동합니다.
shr_main_activity.xml
<?xml version="1.0" encoding="utf-8"?>
<FrameLayout xmlns:android="http://schemas.android.com/apk/res/android"
   xmlns:tools="http://schemas.android.com/tools"
   android:id="@+id/container"
   android:layout_width="match_parent"
   android:layout_height="match_parent"
   tools:context=".MainActivity" />
여기서 활동이 표시하는 프래그먼트의 컨테이너 역할을 하는 간단한 <FrameLayout>을 확인할 수 있습니다. LoginFragment.java를 열어 보겠습니다.
LoginFragment.java
package com.google.codelabs.mdc.java.shrine;

import android.os.Bundle;
import android.view.LayoutInflater;
import android.view.View;
import android.view.ViewGroup;
import androidx.annotation.NonNull;
import androidx.fragment.app.Fragment;

/**
* Fragment representing the login screen for Shrine.
*/
public class LoginFragment extends Fragment {

   @Override
   public View onCreateView(
           @NonNull LayoutInflater inflater, ViewGroup container, Bundle savedInstanceState) {
       // Inflate the layout for this fragment
       View view = inflater.inflate(R.layout.shr_login_fragment, container, false);

       // Snippet from "Navigate to the next Fragment" section goes here.

       return view;
   }

   // "isPasswordValid" from "Navigate to the next Fragment" section method goes here
}
LoginFragment는 shr_login_fragment 레이아웃 파일을 확장하여 onCreateView()에 표시합니다. shr_login_fragment.xml 레이아웃 파일에서 로그인 페이지가 어떻게 표시되는지 살펴보겠습니다.
shr_login_fragment.xml
<?xml version="1.0" encoding="utf-8"?>
<ScrollView xmlns:android="http://schemas.android.com/apk/res/android"
   xmlns:app="http://schemas.android.com/apk/res-auto"
   xmlns:tools="http://schemas.android.com/tools"
   android:layout_width="match_parent"
   android:layout_height="match_parent"
   android:background="@color/loginPageBackgroundColor"
   tools:context=".LoginFragment">

   <LinearLayout
       android:layout_width="match_parent"
       android:layout_height="wrap_content"
       android:clipChildren="false"
       android:clipToPadding="false"
       android:orientation="vertical"
       android:padding="24dp"
       android:paddingTop="16dp">

       <ImageView
           android:layout_width="64dp"
           android:layout_height="64dp"
           android:layout_gravity="center_horizontal"
           android:layout_marginTop="48dp"
           android:layout_marginBottom="16dp"
           app:srcCompat="@drawable/shr_logo" />

       <TextView
           android:layout_width="wrap_content"
           android:layout_height="wrap_content"
           android:layout_gravity="center_horizontal"
           android:layout_marginBottom="132dp"
           android:text="@string/shr_app_name"
           android:textAllCaps="true"
           android:textSize="16sp" />

       <!-- Snippet from "Add text fields" section goes here. -->

       <!-- Snippet from "Add buttons" section goes here. -->

   </LinearLayout>
</ScrollView>
상단에는 'Shrine'을 나타내는 <ImageView>가 있는 <LinearLayout>를 볼 수 있습니다. 로고
그 다음에 'SHRINE'를 나타내는 <TextView> 태그가 있습니다. 라벨을 지정합니다. 이 라벨의 텍스트는 @string/shr_app_name이라는 문자열 리소스입니다. 문자열 리소스 이름을 Command + Click (또는 Control + Click)으로 입력하거나 app -> res -> values -> strings.xml을 열면 문자열 리소스가 정의된 strings.xml 파일을 확인할 수 있습니다. 향후 더 많은 문자열 리소스가 추가되면 여기에 정의됩니다. 이 파일의 모든 리소스에는 Shrine 앱의 일부임을 나타내는 shr_ 접두사가 있어야 합니다.
시작 코드를 알아봤으므로 이제 첫 번째 구성요소를 구현해 보겠습니다.
3. 텍스트 입력란 추가
먼저 사용자가 사용자 이름과 비밀번호를 입력할 수 있도록 로그인 페이지에 두 개의 텍스트 입력란을 추가합니다. 플로팅 라벨과 오류 메시지를 표시하는 기본 제공 기능이 포함된 MDC 텍스트 필드 구성요소를 사용하겠습니다.

XML 추가
shr_login_fragment.xml에서 'SHRINE' 아래에 <LinearLayout> 내부의 하위 요소 TextInputEditText가 있는 두 개의 TextInputLayout 요소를 추가합니다. 라벨 <TextView>:
shr_login_fragment.xml
<com.google.android.material.textfield.TextInputLayout
   android:layout_width="match_parent"
   android:layout_height="wrap_content"
   android:layout_margin="4dp"
   android:hint="@string/shr_hint_username">

   <com.google.android.material.textfield.TextInputEditText
       android:layout_width="match_parent"
       android:layout_height="wrap_content"
       android:inputType="text"
       android:maxLines="1" />
</com.google.android.material.textfield.TextInputLayout>

<com.google.android.material.textfield.TextInputLayout
   android:id="@+id/password_text_input"
   android:layout_width="match_parent"
   android:layout_height="wrap_content"
   android:layout_margin="4dp"
   android:hint="@string/shr_hint_password">

   <com.google.android.material.textfield.TextInputEditText
       android:id="@+id/password_edit_text"
       android:layout_width="match_parent"
       android:layout_height="wrap_content" />
</com.google.android.material.textfield.TextInputLayout>
위의 스니펫은 두 개의 텍스트 필드를 나타내며 각각 <TextInputLayout> 요소와 <TextInputEditText> 하위 요소로 구성됩니다. 각 텍스트 필드의 힌트 텍스트는 android:hint 속성에 지정됩니다.
텍스트 필드에 새로운 문자열 리소스 두 개(@string/shr_hint_username 및 @string/shr_hint_password)가 포함되었습니다. strings.xml을 열어 이 문자열 리소스를 확인합니다.
strings.xml
...
<string name="shr_hint_username">Username</string>
<string name="shr_hint_password">Password</string>
...
입력 확인 추가
TextInputLayout 구성요소는 오류 피드백 기능을 기본으로 제공합니다.
오류 의견을 표시하려면 shr_login_fragment.xml를 다음과 같이 변경합니다.
- 비밀번호
TextInputLayout요소에서app:errorEnabled속성을 true로 설정합니다. 이렇게 하면 텍스트 필드 아래 오류 메시지에 추가 패딩이 추가됩니다. android:inputType속성을 'textPassword'(으)로 설정합니다. 를 비밀번호TextInputEditText요소에서 입력합니다. 이렇게 하면 비밀번호 입력란의 입력 텍스트가 숨겨집니다.
이렇게 변경하면 shr_login_fragment.xml의 텍스트 필드가 다음과 같이 표시됩니다.
shr_login_fragment.xml
<com.google.android.material.textfield.TextInputLayout
   android:layout_width="match_parent"
   android:layout_height="wrap_content"
   android:layout_margin="4dp"
   android:hint="@string/shr_hint_username">

   <com.google.android.material.textfield.TextInputEditText
       android:layout_width="match_parent"
       android:layout_height="wrap_content"
       android:inputType="text"
       android:maxLines="1" />
</com.google.android.material.textfield.TextInputLayout>

<com.google.android.material.textfield.TextInputLayout
   android:id="@+id/password_text_input"
   android:layout_width="match_parent"
   android:layout_height="wrap_content"
   android:layout_margin="4dp"
   android:hint="@string/shr_hint_password"
   app:errorEnabled="true">

   <com.google.android.material.textfield.TextInputEditText
       android:id="@+id/password_edit_text"
       android:layout_width="match_parent"
       android:layout_height="wrap_content"
       android:inputType="textPassword"/>
</com.google.android.material.textfield.TextInputLayout>
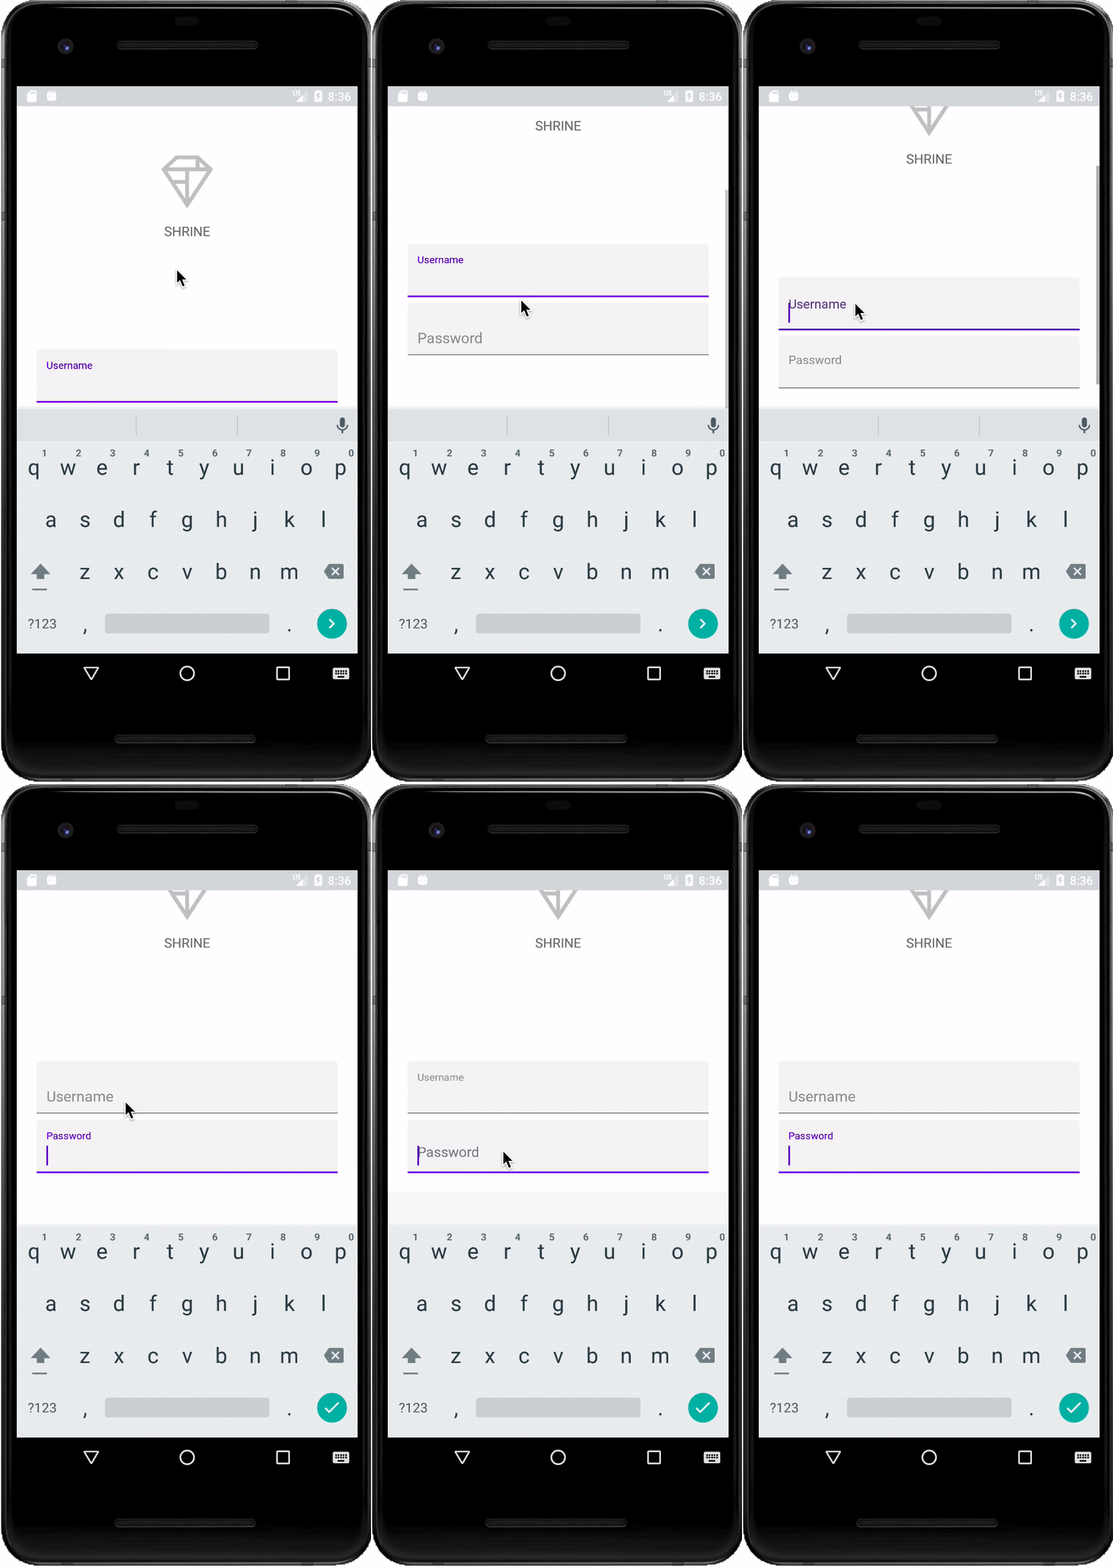
이제 앱을 실행해 봅니다. '사용자 이름'이라는 텍스트 입력란 2개가 있는 페이지가 표시됩니다. 그리고 '비밀번호'입니다.
플로팅 라벨 애니메이션을 확인해보세요.

4. 버튼 추가
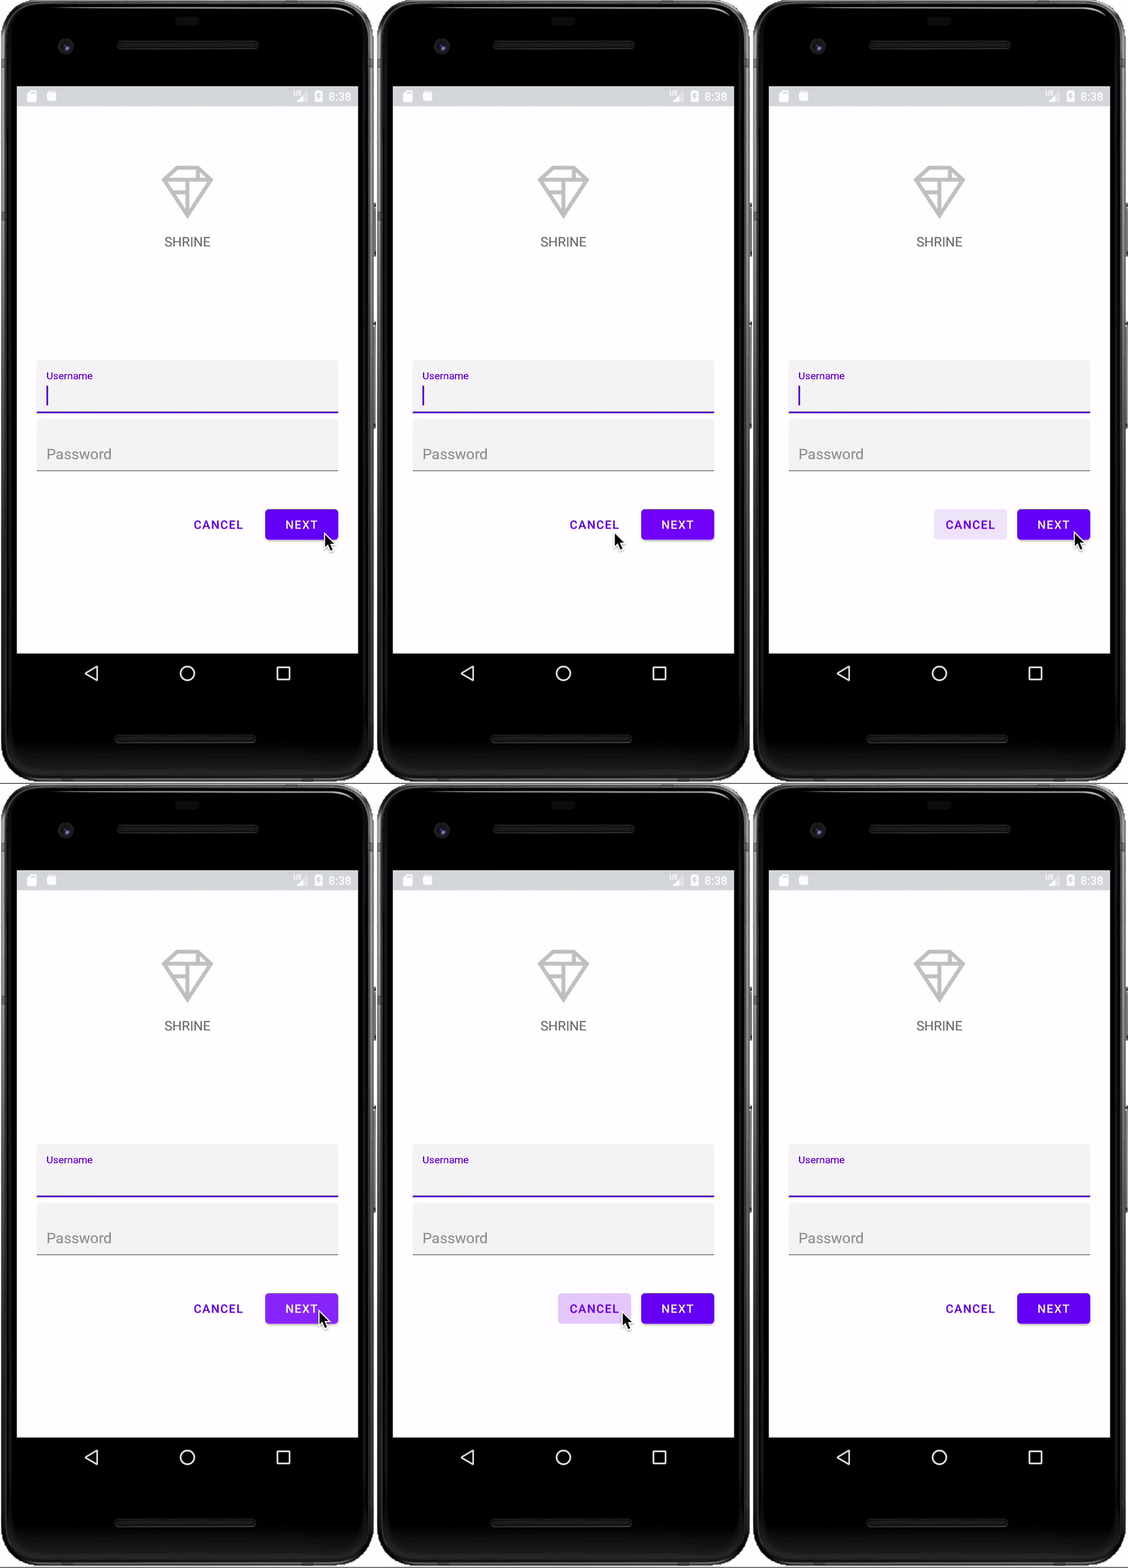
이제 '취소'와 '다음' 버튼 두 개를 로그인 페이지에 추가합니다. 상징적인 Material Design 잉크 물결 효과가 내장된 MDC 버튼 구성요소를 사용하겠습니다.

XML 추가
shr_login_fragment.xml에서 <RelativeLayout>를 <LinearLayout>의 TextInputLayout 요소 아래에 추가합니다. 그런 다음 <RelativeLayout>에 <MaterialButton> 요소 두 개를 추가합니다.
결과 XML 파일은 다음과 같습니다.
shr_login_fragment.xml
<RelativeLayout
   android:layout_width="match_parent"
   android:layout_height="wrap_content">

   <com.google.android.material.button.MaterialButton
       android:id="@+id/next_button"
       android:layout_width="wrap_content"
       android:layout_height="wrap_content"
       android:layout_alignParentEnd="true"
       android:layout_alignParentRight="true"
       android:text="@string/shr_button_next" />

   <com.google.android.material.button.MaterialButton
       android:id="@+id/cancel_button"
       style="@style/Widget.MaterialComponents.Button.TextButton"
       android:layout_width="wrap_content"
       android:layout_height="wrap_content"
       android:layout_marginEnd="12dp"
       android:layout_marginRight="12dp"
       android:layout_toStartOf="@id/next_button"
       android:layout_toLeftOf="@id/next_button"
       android:text="@string/shr_button_cancel" />

</RelativeLayout>
작업이 끝났습니다. 앱을 실행하면 각 버튼을 탭할 때 잉크 물결 효과가 표시됩니다.

5. 다음 프래그먼트로 이동
마지막으로 LoginFragment.java에 자바 코드를 추가하여 'NEXT'를 연결합니다. 다른 프래그먼트에 전달됩니다. 레이아웃에 추가한 각 구성요소에는 id가 할당되어 있습니다. 이러한 id를 사용하여 코드의 구성요소를 참조하고 오류 검사와 탐색을 추가합니다.
onCreateView() 아래에 비밀번호가 유효한지 확인하는 로직과 함께 비공개 불리언 isPasswordValid 메서드를 LoginFragment.java에 추가해 보겠습니다. 이 데모에서는 비밀번호가 8자 이상인지 확인합니다.
LoginFragment.java
/*
   In reality, this will have more complex logic including, but not limited to, actual
   authentication of the username and password.
*/
private boolean isPasswordValid(@Nullable Editable text) {
   return text != null && text.length() >= 8;
}
다음으로 'Next'에 클릭 리스너를 추가합니다. 방금 만든 isPasswordValid() 메서드를 기반으로 오류를 설정하고 삭제하는 버튼입니다. onCreateView()에서 이 클릭 리스너는 인플레이터 줄과 return view 줄 사이에 배치해야 합니다.
다음으로 비밀번호 TextInputEditText에 키 리스너를 추가하여 오류를 해결하는 키 이벤트를 수신 대기합니다. 이 리스너는 또한 isPasswordValid()를 사용하여 비밀번호가 유효한지 확인해야 합니다. onCreateView()의 클릭 리스너 바로 아래에 이를 추가할 수 있습니다.
이제 onCreateView() 메서드가 다음과 같이 표시됩니다.
LoginFragment.java
@Override
public View onCreateView(
       @NonNull LayoutInflater inflater, ViewGroup container, Bundle savedInstanceState) {
   // Inflate the layout for this fragment
   View view = inflater.inflate(R.layout.shr_login_fragment, container, false);
   final TextInputLayout passwordTextInput = view.findViewById(R.id.password_text_input);
   final TextInputEditText passwordEditText = view.findViewById(R.id.password_edit_text);
   MaterialButton nextButton = view.findViewById(R.id.next_button);

   // Set an error if the password is less than 8 characters.
   nextButton.setOnClickListener(new View.OnClickListener() {
       @Override
       public void onClick(View view) {
           if (!isPasswordValid(passwordEditText.getText())) {
               passwordTextInput.setError(getString(R.string.shr_error_password));
           } else {
               passwordTextInput.setError(null); // Clear the error
           }
       }
   });

   // Clear the error once more than 8 characters are typed.
   passwordEditText.setOnKeyListener(new View.OnKeyListener() {
       @Override
       public boolean onKey(View view, int i, KeyEvent keyEvent) {
           if (isPasswordValid(passwordEditText.getText())) {
               passwordTextInput.setError(null); //Clear the error
           }
           return false;
       }
   });
   return view;
}
이제 다른 프래그먼트로 이동할 수 있습니다. 오류 유효성 검사에 성공하면 다른 프래그먼트로 이동하도록 onCreateView()의 OnClickListener를 업데이트합니다. 이렇게 하려면 클릭 리스너의 else 사례에 ProductGridFragment로 이동하는 다음 줄을 추가하면 됩니다.
LoginFragment.java
...
((NavigationHost) getActivity()).navigateTo(new ProductGridFragment(), false); // Navigate to the next Fragment
...
이제 클릭 리스너가 다음과 같이 표시됩니다.
LoginFragment.java
...
MaterialButton nextButton = view.findViewById(R.id.next_button);

// Set an error if the password is less than 8 characters.
nextButton.setOnClickListener(new View.OnClickListener() {
   @Override
   public void onClick(View view) {
       if (!isPasswordValid(passwordEditText.getText())) {
           passwordTextInput.setError(getString(R.string.shr_error_password));
       } else {
           passwordTextInput.setError(null); // Clear the error
           ((NavigationHost) getActivity()).navigateTo(new ProductGridFragment(), false); // Navigate to the next Fragment
       }
   }
});
...
이 새로운 코드 줄은 MainActivity에서 navigateTo() 메서드를 호출하여 새 프래그먼트(ProductGridFragment)로 이동합니다. 현재 MDC-102에서 작업할 빈 페이지입니다.
이제 앱을 빌드합니다. 계속해서 다음 버튼을 누르세요.
축하합니다. 이 화면은 MDC-102에서 작업할 다음 Codelab의 시작점이 됩니다.
6. 완료
기본 XML 마크업과 최대 30줄의 Java를 사용하는 Android용 Material 구성요소는 Material Design 가이드라인을 준수하고 모든 기기에서 일관되게 보이고 동작하는 멋진 로그인 페이지를 만드는 데 도움이 되었습니다.
다음 단계
텍스트 필드와 버튼은 MDC Android 라이브러리의 두 가지 핵심 구성요소이지만 이 외에도 더 많은 요소가 있습니다. MDC Android의 나머지 구성요소를 살펴볼 수 있습니다. 또는 MDC 102: 머티리얼 디자인 구조 및 레이아웃으로 이동하여 상단 앱 바, 카드 뷰, 그리드 레이아웃에 관해 알아보세요. 머티리얼 구성요소를 사용해 주셔서 감사합니다. 이 Codelab에 만족하셨길 바랍니다.
