
1. 總覽
自然語言處理 (NLP) 是研究如何從文字資料中取得洞察資訊並進行分析。網際網路上產生的文字內容持續增加,因此機構比以往更想運用這些文字內容,取得與自家業務相關的資訊。
NLP 的用途十分廣泛,包括翻譯語言、分析情緒、從頭生成句子等等。這項技術目前正積極研發中,將徹底改變我們處理文字的方式。
我們將探討如何大規模對大量文字資料使用 NLP。這項工作確實可能令人望而生畏!幸好,我們會利用 Spark MLlib 和 spark-nlp 等程式庫,簡化這項作業。
2. 我們的應用實例
我們 (虛構) 機構「FoodCorp」的首席資料科學家想進一步瞭解食品業的趨勢。我們有權存取 Reddit 子論壇 r/food 的貼文,這些文字資料將用於探索使用者討論的內容。
其中一種方法是使用稱為「主題模型」的 NLP 方法。主題模型是一種統計方法,可識別一組文件語意含義的趨勢。換句話說,我們可以在 Reddit「貼文」的語料庫中建立主題模型,產生「主題」清單或描述趨勢的字詞群組。
我們會使用名為「潛在狄利克雷分配」(LDA) 的演算法建構模型,這項演算法通常用於將文字分組。如要瞭解 LDA 的絕佳入門介紹,請參閱這篇文章。
3. 建立專案
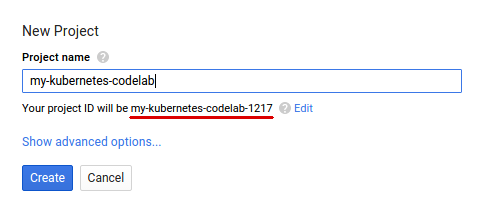
如果您沒有 Google 帳戶 (Gmail 或 Google 應用程式),請先建立帳戶。登入 Google Cloud Platform 主控台 ( console.cloud.google.com),然後建立新專案:


接著,您需要在 Cloud 控制台中啟用帳單,才能使用 Google Cloud 資源。
完成這項程式碼研究室的費用不應超過數美元,但如果您決定使用更多資源,或是將資源繼續執行,則可能會增加費用。PySpark-BigQuery 和 Spark-NLP Codelab 結尾都會說明「清除」步驟。
Google Cloud Platform 新使用者享有價值 $300 美元的免費試用期。
4. 設定環境
首先,我們需要啟用 Dataproc 和 Compute Engine API。
按一下畫面左上方的「選單」圖示。

從下拉式選單中選取「API 管理工具」。
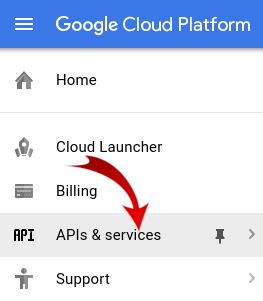
按一下「啟用 API 和服務」。

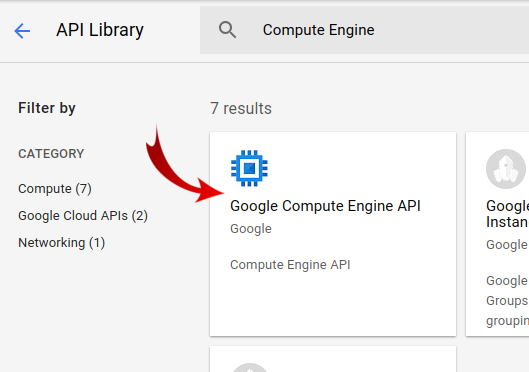
在搜尋框中搜尋「Compute Engine」。在顯示的結果清單中,按一下「Google Compute Engine API」。
在 Google Compute Engine 頁面中,按一下「啟用」
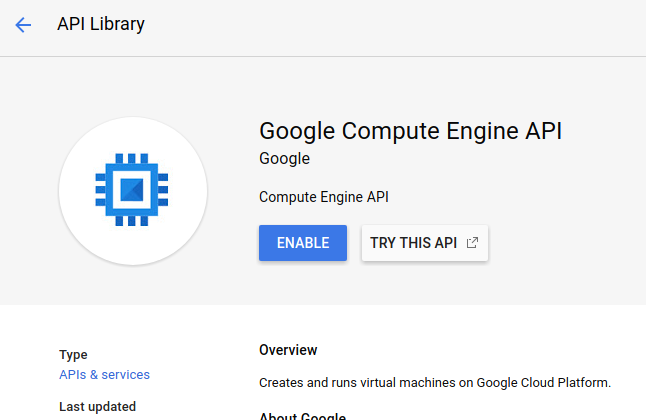
啟用後,請點選向左箭頭返回。
現在搜尋「Google Dataproc API」,並啟用該 API。
接著,按一下雲端控制台右上角的按鈕,開啟 Cloud Shell:

我們將設定一些環境變數,以便在進行程式碼實驗室時參照。首先,請為要建立的 Dataproc 叢集選擇名稱 (例如「my-cluster」),並在環境中設定該名稱。你可以使用任何名稱。
CLUSTER_NAME=my-cluster
接著,從這裡選擇一個可用區域。例如 us-east1-b.
REGION=us-east1
最後,我們需要設定工作要從中讀取資料的來源 bucket。我們在 bucket bm_reddit 中提供範例資料,但如果您已完成使用 PySpark 預先處理 BigQuery 資料,也可以使用該作業產生的資料。
BUCKET_NAME=bm_reddit
設定環境變數後,請執行下列指令來建立 Dataproc 叢集:
 gcloud beta dataproc clusters create ${CLUSTER_NAME} \
     --region ${REGION} \
     --metadata 'PIP_PACKAGES=google-cloud-storage spark-nlp==2.7.2' \
     --worker-machine-type n1-standard-8 \
     --num-workers 4 \
     --image-version 1.4-debian10 \
     --initialization-actions gs://dataproc-initialization-actions/python/pip-install.sh \
     --optional-components=JUPYTER,ANACONDA \
     --enable-component-gateway
現在逐一說明這些指令:
gcloud beta dataproc clusters create ${CLUSTER_NAME}:會啟動 Dataproc 叢集的建立作業,並使用您先前提供的名稱。我們在此加入 beta,啟用 Dataproc 的 Beta 版功能,例如元件閘道 (詳情請見下文)。
--zone=${ZONE}:設定叢集位置。
--worker-machine-type n1-standard-8:這是要用於工作人員的機器類型。
--num-workers 4:叢集上會有四個工作人員。
--image-version 1.4-debian9:這表示我們將使用的 Dataproc 映像檔版本。
--initialization-actions ...:初始化動作是建立叢集和 worker 時執行的自訂指令碼。這些檔案可以是使用者建立並儲存在 GCS 值區中,也可以從公開值區參照 dataproc-initialization-actions。這裡包含的初始化動作可使用 Pip 安裝 Python 套件,如 --metadata 標記所提供。
--metadata 'PIP_PACKAGES=google-cloud-storage spark-nlp':這是以空格分隔的清單,列出要安裝到 Dataproc 的套件。在本例中,我們將安裝 google-cloud-storage Python 用戶端程式庫和 spark-nlp。
--optional-components=ANACONDA:選用元件是與 Dataproc 搭配使用的常見套件,會在建立 Dataproc 叢集時自動安裝。相較於初始化動作,使用選用元件的優點包括啟動時間較短,以及經過特定 Dataproc 版本測試。整體來說,這類廣告的可靠性較高。
--enable-component-gateway:這個標記可讓我們利用 Dataproc 的元件閘道,查看常見的使用者介面,例如 Zeppelin、Jupyter 或 Spark 記錄。注意:部分項目需要相關聯的選用元件。
如需 Dataproc 的深入介紹,請參閱這個程式碼研究室。
接著,在 Cloud Shell 中執行下列指令,複製含有程式碼範例的存放區,並 cd 到正確的目錄:
cd
git clone https://github.com/GoogleCloudPlatform/cloud-dataproc
cd cloud-dataproc/codelabs/spark-nlp
5. Spark MLlib
Spark MLlib 是以 Apache Spark 編寫的可擴充機器學習程式庫。MLlib 運用 Spark 的效率和一系列微調的機器學習演算法,可分析大量資料。這項服務提供 Java、Scala、Python 和 R API。在本程式碼研究室中,我們將特別著重於 Python。
MLlib 包含大量轉換器和估算器。轉換器是可變動或變更資料的工具,通常使用 transform() 函式;估算器是預先建構的演算法,可用於訓練資料,通常使用 fit() 函式。
例如:
- 符記化 (從一連串的字詞建立數字向量)
- one-hot 編碼 (建立代表字串中出現字詞的稀疏向量)
- 停用字移除工具 (移除無法為字串增加語意價值的字詞)
估算器範例包括:
- 分類 (這是蘋果還是橘子?)
- 迴歸 (這個蘋果應該要多少錢?)
- 分群 (所有蘋果的相似程度)
- 決策樹 (如果顏色為橘色,則為橘子。否則就是蘋果)
- 降維 (我們可以從資料集中移除特徵,但仍能區分蘋果和橘子嗎?)。
MLlib 也包含其他常見機器學習方法的工具,例如超參數調整和選取,以及交叉驗證。
此外,MLlib 包含 Pipelines API,可讓您使用不同的轉換器建構資料轉換管道,並重新執行。
6. Spark-NLP
Spark-nlp 是 John Snow Labs 建立的程式庫,可使用 Spark 執行有效率的自然語言處理工作。其中包含內建的註解工具,可處理常見工作,例如:
- 符記化 (從一連串的字詞建立數字向量)
- 建立字詞嵌入 (透過向量定義字詞之間的關係)
- 詞性標記 (哪些字是名詞?哪些是動詞?)
雖然不在本程式碼研究室的範圍內,但 spark-nlp 也與 TensorFlow 整合良好。
最重要的是,Spark-NLP 提供可輕鬆插入 MLlib Pipelines 的元件,擴充了 Spark MLlib 的功能。
7. 自然語言處理最佳做法
在從資料中擷取實用資訊前,我們需要先處理一些事項。我們將採取下列前處理步驟:
代碼化
傳統上,我們首先要做的就是「權杖化」資料。這項程序會根據「符記」或字詞分割資料。一般來說,我們會在此步驟中移除標點符號,並將所有字詞設為小寫。舉例來說,假設我們有以下字串:What time is it? 經過斷詞後,這個句子會包含四個詞元:「what" , "time", "is", "it". 我們不希望模型將 what 這個字視為兩個不同的大寫字。此外,標點符號通常無法協助我們從字詞中推斷出更多資訊,因此我們也會移除標點符號。
正規化
我們通常會「正規化」資料。這項功能會將意義相近的字詞替換為相同字詞。舉例來說,如果系統在文字中識別出「fought」、「battled」和「dueled」這幾個字,則正規化可能會將「battled」和「dueled」替換為「fought」。
詞幹提取
詞幹提取會將字詞替換為詞根。舉例來說,「車」、「車輛」和「車子」都會替換為「車」,因為這些字詞的根本含意相同。
移除停用字
停用詞是指「和」和「的」等字詞,通常不會為句子的語意增加價值。我們通常會移除這些內容,以減少文字資料集中的雜訊。
8. 執行工作
我們即將執行的工作如下。程式碼位於 cloud-dataproc/codelabs/spark-nlp/topic_model.py。請花幾分鐘詳閱程式碼和相關註解,瞭解具體情況。我們也會在下方重點介紹幾個章節:
# Python imports
import sys

# spark-nlp components. Each one is incorporated into our pipeline.
from sparknlp.annotator import Lemmatizer, Stemmer, Tokenizer, Normalizer
from sparknlp.base import DocumentAssembler, Finisher

# A Spark Session is how we interact with Spark SQL to create Dataframes
from pyspark.sql import SparkSession

# These allow us to create a schema for our data
from pyspark.sql.types import StructField, StructType, StringType, LongType

# Spark Pipelines allow us to sequentially add components such as transformers
from pyspark.ml import Pipeline

# These are components we will incorporate into our pipeline.
from pyspark.ml.feature import StopWordsRemover, CountVectorizer, IDF

# LDA is our model of choice for topic modeling
from pyspark.ml.clustering import LDA

# Some transformers require the usage of other Spark ML functions. We import them here
from pyspark.sql.functions import col, lit, concat

# This will help catch some PySpark errors
from pyspark.sql.utils import AnalysisException

# Assign bucket where the data lives
try:
    bucket = sys.argv[1]
except IndexError:
    print("Please provide a bucket name")
    sys.exit(1)

# Create a SparkSession under the name "reddit". Viewable via the Spark UI
spark = SparkSession.builder.appName("reddit topic model").getOrCreate()

# Create a three column schema consisting of two strings and a long integer
fields = [StructField("title", StringType(), True),
          StructField("body", StringType(), True),
          StructField("created_at", LongType(), True)]
schema = StructType(fields)

# We'll attempt to process every year / month combination below.
years = ['2016', '2017', '2018', '2019']
months = ['01', '02', '03', '04', '05', '06',
          '07', '08', '09', '10', '11', '12']

# This is the subreddit we're working with.
subreddit = "food"

# Create a base dataframe.
reddit_data = spark.createDataFrame([], schema)

# Keep a running list of all files that will be processed
files_read = []

for year in years:
    for month in months:

        # In the form of <project-id>.<dataset>.<table>
        gs_uri = f"gs://{bucket}/reddit_posts/{year}/{month}/{subreddit}.csv.gz"

        # If the table doesn't exist we will simply continue and not
        # log it into our "tables_read" list
        try:
            reddit_data = (
                spark.read.format('csv')
                .options(codec="org.apache.hadoop.io.compress.GzipCodec")
                .load(gs_uri, schema=schema)
                .union(reddit_data)
            )

            files_read.append(gs_uri)

        except AnalysisException:
            continue

if len(files_read) == 0:
    print('No files read')
    sys.exit(1)

# Replacing null values with their respective typed-equivalent is usually
# easier to work with. In this case, we'll replace nulls with empty strings.
# Since some of our data doesn't have a body, we can combine all of the text
# for the titles and bodies so that every row has useful data.

df_train = (
    reddit_data
    # Replace null values with an empty string
    .fillna("")
    .select(
         # Combine columns
        concat(
            # First column to concatenate. col() is used to specify that we're referencing a column
            col("title"),
            # Literal character that will be between the concatenated columns.
            lit(" "),
            # Second column to concatenate.
            col("body")
        # Change the name of the new column
        ).alias("text")
    )
)

# Now, we begin assembling our pipeline. Each component here is used to some transformation to the data.
# The Document Assembler takes the raw text data and convert it into a format that can
# be tokenized. It becomes one of spark-nlp native object types, the "Document".
document_assembler = DocumentAssembler().setInputCol("text").setOutputCol("document")

# The Tokenizer takes data that is of the "Document" type and tokenizes it.
# While slightly more involved than this, this is effectively taking a string and splitting
# it along ths spaces, so each word is its own string. The data then becomes the
# spark-nlp native type "Token".
tokenizer = Tokenizer().setInputCols(["document"]).setOutputCol("token")

# The Normalizer will group words together based on similar semantic meaning.
normalizer = Normalizer().setInputCols(["token"]).setOutputCol("normalizer")

# The Stemmer takes objects of class "Token" and converts the words into their
# root meaning. For instance, the words "cars", "cars'" and "car's" would all be replaced
# with the word "car".
stemmer = Stemmer().setInputCols(["normalizer"]).setOutputCol("stem")

# The Finisher signals to spark-nlp allows us to access the data outside of spark-nlp
# components. For instance, we can now feed the data into components from Spark MLlib.
finisher = Finisher().setInputCols(["stem"]).setOutputCols(["to_spark"]).setValueSplitSymbol(" ")

# Stopwords are common words that generally don't add much detail to the meaning
# of a body of text. In English, these are mostly "articles" such as the words "the"
# and "of".
stopword_remover = StopWordsRemover(inputCol="to_spark", outputCol="filtered")

# Here we implement TF-IDF as an input to our LDA model. CountVectorizer (TF) keeps track
# of the vocabulary that's being created so we can map our topics back to their
# corresponding words.
# TF (term frequency) creates a matrix that counts how many times each word in the
# vocabulary appears in each body of text. This then gives each word a weight based
# on its frequency.
tf = CountVectorizer(inputCol="filtered", outputCol="raw_features")

# Here we implement the IDF portion. IDF (Inverse document frequency) reduces
# the weights of commonly-appearing words.
idf = IDF(inputCol="raw_features", outputCol="features")

# LDA creates a statistical representation of how frequently words appear
# together in order to create "topics" or groups of commonly appearing words.
lda = LDA(k=10, maxIter=10)

# We add all of the transformers into a Pipeline object. Each transformer
# will execute in the ordered provided to the "stages" parameter
pipeline = Pipeline(
    stages = [
        document_assembler,
        tokenizer,
        normalizer,
        stemmer,
        finisher,
        stopword_remover,
        tf,
        idf,
        lda
    ]
)

# We fit the data to the model.
model = pipeline.fit(df_train)

# Now that we have completed a pipeline, we want to output the topics as human-readable.
# To do this, we need to grab the vocabulary generated from our pipeline, grab the topic
# model and do the appropriate mapping.  The output from each individual component lives
# in the model object. We can access them by referring to them by their position in
# the pipeline via model.stages[<ind>]

# Let's create a reference our vocabulary.
vocab = model.stages[-3].vocabulary

# Next, let's grab the topics generated by our LDA model via describeTopics(). Using collect(),
# we load the output into a Python array.
raw_topics = model.stages[-1].describeTopics().collect()

# Lastly, let's get the indices of the vocabulary terms from our topics
topic_inds = [ind.termIndices for ind in raw_topics]

# The indices we just grab directly map to the term at position <ind> from our vocabulary.
# Using the below code, we can generate the mappings from our topic indices to our vocabulary.
topics = []
for topic in topic_inds:
    _topic = []
    for ind in topic:
        _topic.append(vocab[ind])
    topics.append(_topic)

# Let's see our topics!
for i, topic in enumerate(topics, start=1):
    print(f"topic {i}: {topic}")
執行工作
現在就來執行工作。請執行下列指令:
gcloud dataproc jobs submit pyspark --cluster ${CLUSTER_NAME}\
    --region ${REGION}\
    --properties=spark.jars.packages=com.johnsnowlabs.nlp:spark-nlp_2.11:2.7.2\
    --driver-log-levels root=FATAL \
    topic_model.py \
    -- ${BUCKET_NAME}
這個指令可讓我們運用 Dataproc Jobs API。加入 pyspark 指令,向叢集指出這是 PySpark 工作。我們提供叢集名稱、這裡提供的選用參數,以及包含工作的檔案名稱。在本例中,我們提供 --properties 參數,可變更 Spark、Yarn 或 Dataproc 的各種屬性。我們正在變更 Spark 屬性 packages,讓 Spark 知道我們想將 spark-nlp 封裝在工作中。我們也提供 --driver-log-levels root=FATAL 參數,可抑制 PySpark 的大部分記錄輸出內容 (錯誤除外)。一般來說,Spark 記錄檔通常會很吵雜。
最後,-- ${BUCKET} 是 Python 指令碼本身的指令列引數,可提供 bucket 名稱。請注意 -- 和 ${BUCKET} 之間的空格。
工作執行幾分鐘後,我們應該會看到包含模型的輸出內容:
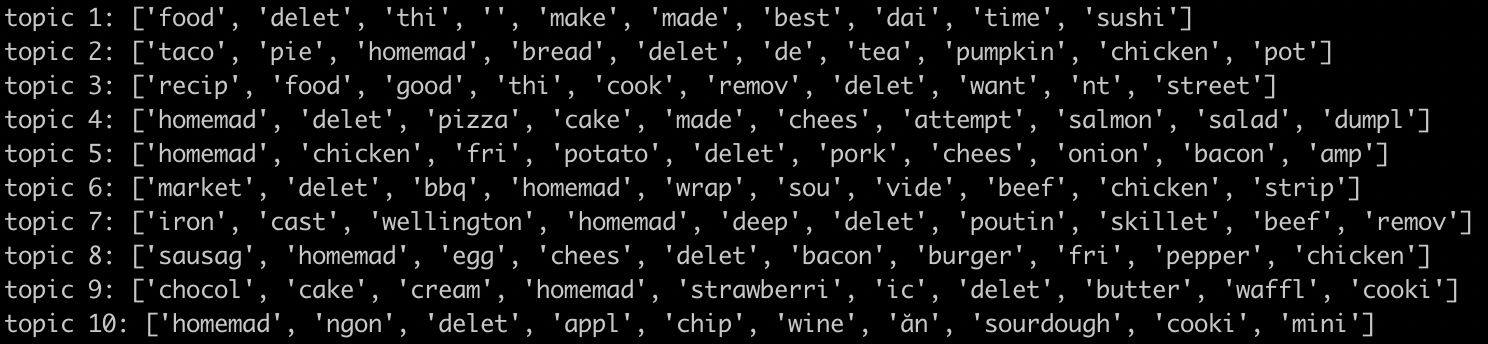
太棒了!您可以從模型輸出內容推斷趨勢嗎?我們的呢?
從上述輸出內容,您可能會從主題 8 推斷早餐食品的趨勢,以及從主題 9 推斷甜點的趨勢。
9. 清除
完成本快速入門導覽課程後,如要避免系統向您的 GCP 帳戶收取不必要的費用,請按照下列步驟操作:
如果您專為本程式碼研究室建立了專案,也可以選擇刪除該專案:
- 前往 GCP 主控台的「Projects」(專案) 頁面。
- 在專案清單中選取要刪除的專案,然後點按「Delete」(刪除)。
- 在方塊中輸入專案 ID,然後按一下「Shut down」(關閉) 刪除專案。
授權
這項內容採用的授權為創用 CC 姓名標示 3.0 通用授權和 Apache 2.0 授權。