
1. Overview
Let's take a moment to look at the massive architecture we have built over the last four parts:
Part 1: We used BigQuery Knowledge Catalog to transform raw Froyo recipe PDFs into structured, relational tables.
Part 2: We built a Zero-ETL transactional bridge, federating our BigQuery warehouse directly into AlloyDB.
Part 3: We orchestrated a Multi-Agent application (FroyoOS) using the Agent Development Kit and MCP Toolbox.
Part 4: We proved our agent was safe for production by building a dual-track Evaluation Pipeline.
Our operations are running flawlessly. But what about the developers and the business analysts who need to understand the massive amounts of data this system is generating?
Today, we are going to explore the future of analytics. We will start right inside our code editor Antigravity IDE with Google Cloud Data Agent Kit, and then move to the Google Cloud console to visualize our data using BigQuery Conversational Analytics.
Let's start building!
What you'll learn
In this final codelab of the Agentic Data Cloud series, you will bring all the pieces of your architecture together to deliver actionable business insights. You will learn:
- IDE-First Analytics: How to install and configure the ANTIGRAVITY IDE and the Google Cloud Data Agent Kit to query your architecture directly from your development environment.
- Conversational BigQuery: How to create, configure, and instruct BigQuery Data Agents to automate complex SQL tasks and forecasting using natural language.
- Data Democratization: How to publish your agents to the enterprise, making them accessible to analysts and business users across the organization.
- Visualizing Insights: How to seamlessly integrate your agent's conversational analytics into Data Studio to create dynamic, forecasting-ready dashboards.
- The Agentic Data Cloud Ecosystem: How to articulate the value of your end-to-end architecture — from raw unstructured data in Part 1 to executive-ready dashboards in Part 5.
Requirements
2. Before you begin
Create a project
- In the Google Cloud Console, on the project selector page, select or create a Google Cloud project.
- Make sure that billing is enabled for your Cloud project. Learn how to check if billing is enabled on a project.
- You'll use Cloud Shell, a command-line environment running in Google Cloud. Click Activate Cloud Shell at the top of the Google Cloud console.

- Once connected to Cloud Shell, you check that you're already authenticated and that the project is set to your project ID using the following command:
gcloud auth list
- Run the following command in Cloud Shell to confirm that the gcloud command knows about your project.
gcloud config list project
- If you want to authenticate
gcloud auth login
- If your project is not set, use the following command to set it:
export PROJECT_ID=<YOUR_PROJECT_ID>
gcloud config set project <YOUR_PROJECT_ID>
- Enable the required APIs: Run this command to enable all the required APIs:
gcloud services enable \
  alloydb.googleapis.com \
  bigquery.googleapis.com \
  run.googleapis.com \
  cloudbuild.googleapis.com \
  artifactregistry.googleapis.com \
  iam.googleapis.com \
  secretmanager.googleapis.com \
  compute.googleapis.com \
  servicenetworking.googleapis.com \
  aiplatform.googleapis.com
3. Expanding the Data Warehouse
Remember the BigQuery tables we created from our unstructured data?
To do some meaningful analytics, we need historical transaction data. In BigQuery, under our froyo_data dataset, let's create three new tables to simulate years of franchise operations:
- froyo_data.orders: Historical order headers (Dates, Store IDs, Totals)
- froyo_data.order_items: Line-item details (Quantities, Prices)
- froyo_data.customer_allergen_data: A CRM table tracking our loyal customers' known allergies
Lets add these sales and customer related tables to that dataset in preparation of our analytics use case.
- Go to Cloud Shell Terminal from your Google Cloud Console.
- Navigate to your workspace's root folder or to the froyo-data project root folder (that we have been working on for the past couple of parts of this series).
- Download the 3 historical data files (in csv files) into your working directory by running the following commands one by one:
wget https://raw.githubusercontent.com/AbiramiSukumaran/froyo-data/main/customer_allergen_data.csv
wget https://raw.githubusercontent.com/AbiramiSukumaran/froyo-data/main/order_items.csv
wget https://raw.githubusercontent.com/AbiramiSukumaran/froyo-data/main/orders.csv
- Once you see those files in the root of your working directory, navigate to your Cloud Shell Terminal by toggling to the terminal.
- Navigate into the directory where you have these 3 files on your Cloud Shell Terminal.
- Make sure your BigQuery has the dataset named "froyo_data" from our part 1 of this series (if not, go back and create the dataset and tables).
- Run the following commands from your Cloud Shell Terminal:
bq load \
  --autodetect \
  --source_format=CSV \
  --skip_leading_rows=1 \
  --allow_quoted_newlines \
  --quote="" \
  froyo_data.orders \
  ./orders.csv
bq load \
  --autodetect \
  --source_format=CSV \
  --skip_leading_rows=1 \
  --allow_quoted_newlines \
  --quote="" \
  froyo_data.order_items \
  ./order_items.csv
bq load \
  --autodetect \
  --source_format=CSV \
  --skip_leading_rows=1 \
  --allow_quoted_newlines \
  --quote="" \
  froyo_data.customer_allergen_data \
  ./customer_allergen_data.csv
This should create the 3 additional tables in your froyo_data dataset.
4. The Developer Experience — Enter the "Data Agent Kit"
Traditionally, if a developer wanted to analyze data or write complex machine learning queries, they had to constantly switch context between their IDE, database consoles, and documentation.
Not anymore. With the newly launched Google Cloud Data Agent Kit extension, your IDE becomes a data powerhouse.
ANTIGRAVITY IDE
ANTIGRAVITY IDE is Google's next-generation, agent-first development environment designed specifically for the AI era. It natively integrates massive multi-modal context windows and autonomous tool use directly into the editor, allowing developers to orchestrate cloud resources and orchestrate complex data pipelines without ever leaving their code.
Setting Up the ANTIGRAVITY IDE
- Download the IDE: Head over to antigravity.google and download the Antigravity IDE for your operating system (Windows, macOS, or Linux).
- Install and Launch: Run the installer and open the application.
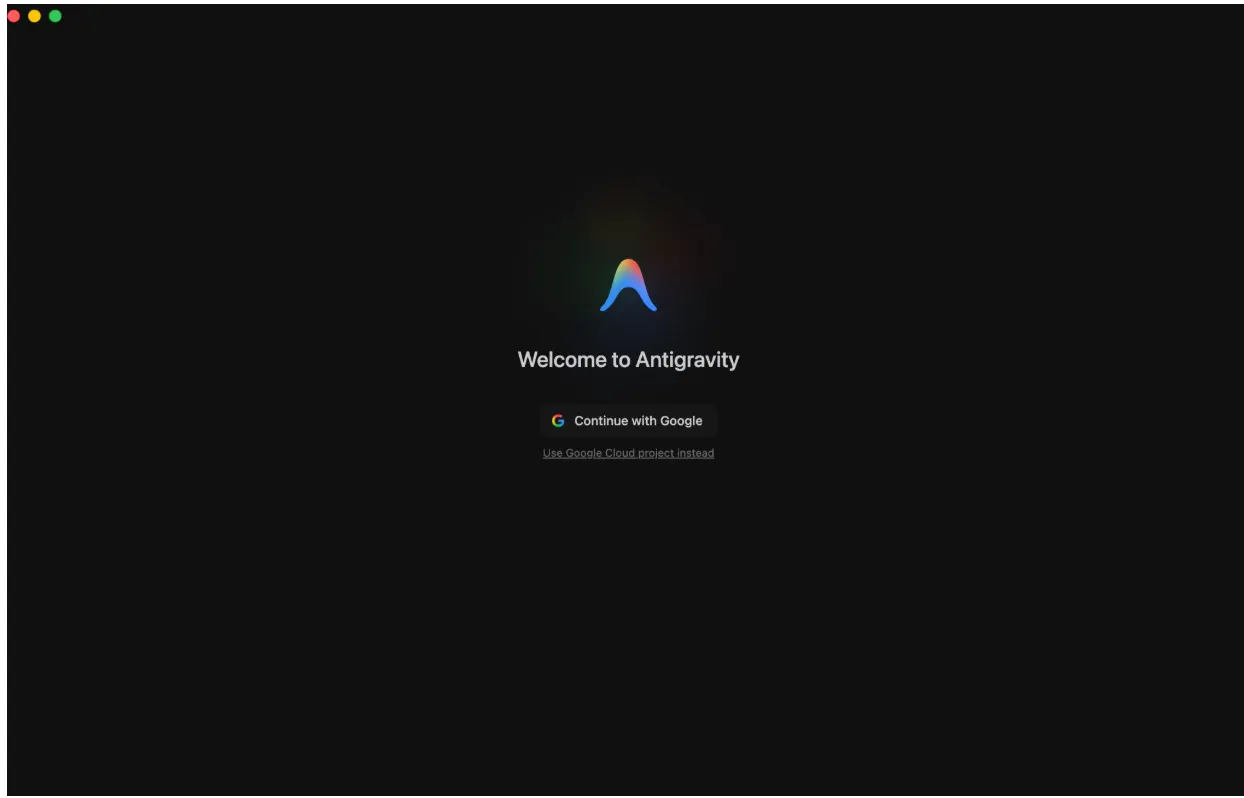
- Click continue with Google, select your Gmail account and authorize.
- Once you're logged in, create a working folder (workspace/ project). Let's call it "Agent Data Cloud".
It should appear in the "Projects" list on the left:
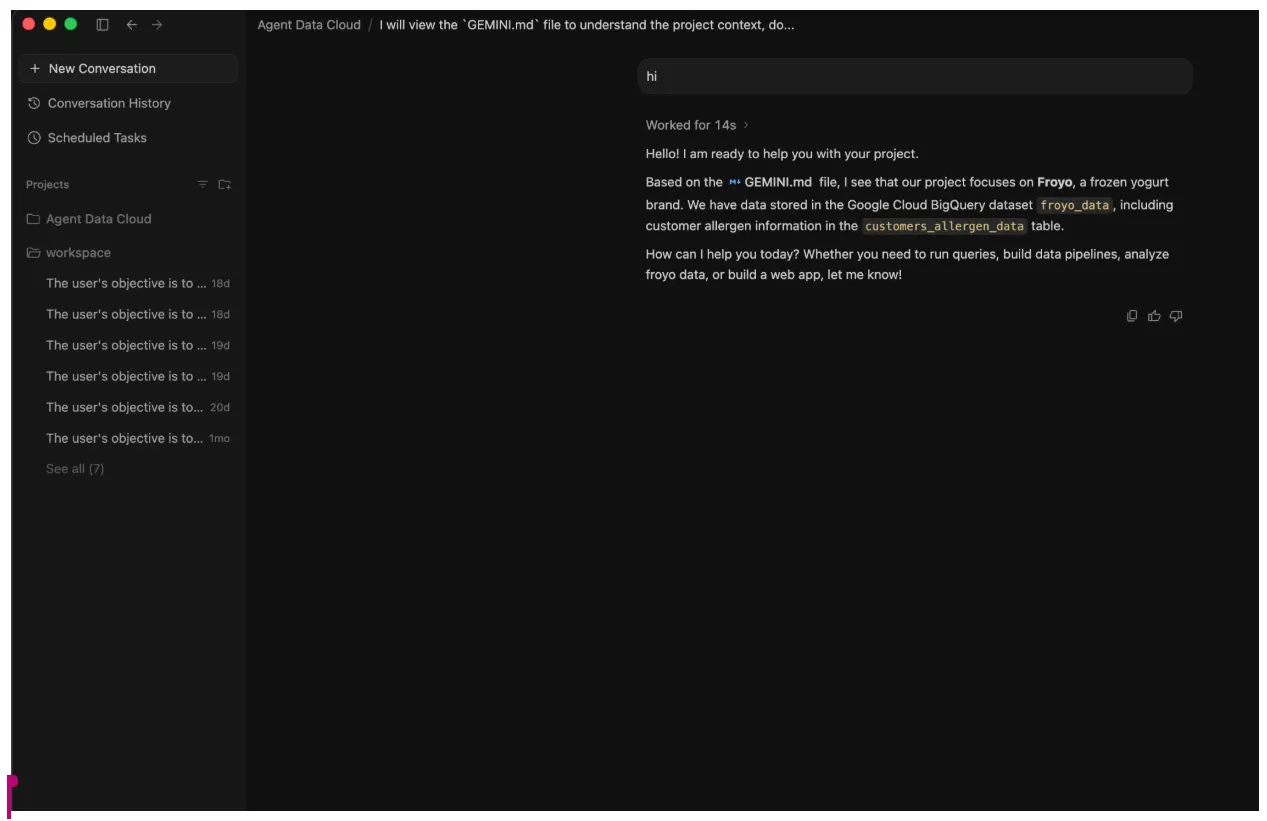
- Have a preliminary chat with the agent — "hi".
- On the top right corner note the Open IDE button!!!
But before you could click that, you need to install Antigravity IDE. Go to antigravity.google/download page and scroll down to the Antigravity IDE section, download the variant you need.
Once downloaded, go back to your open Antigravity instance and click Open IDE button on the top right corner.
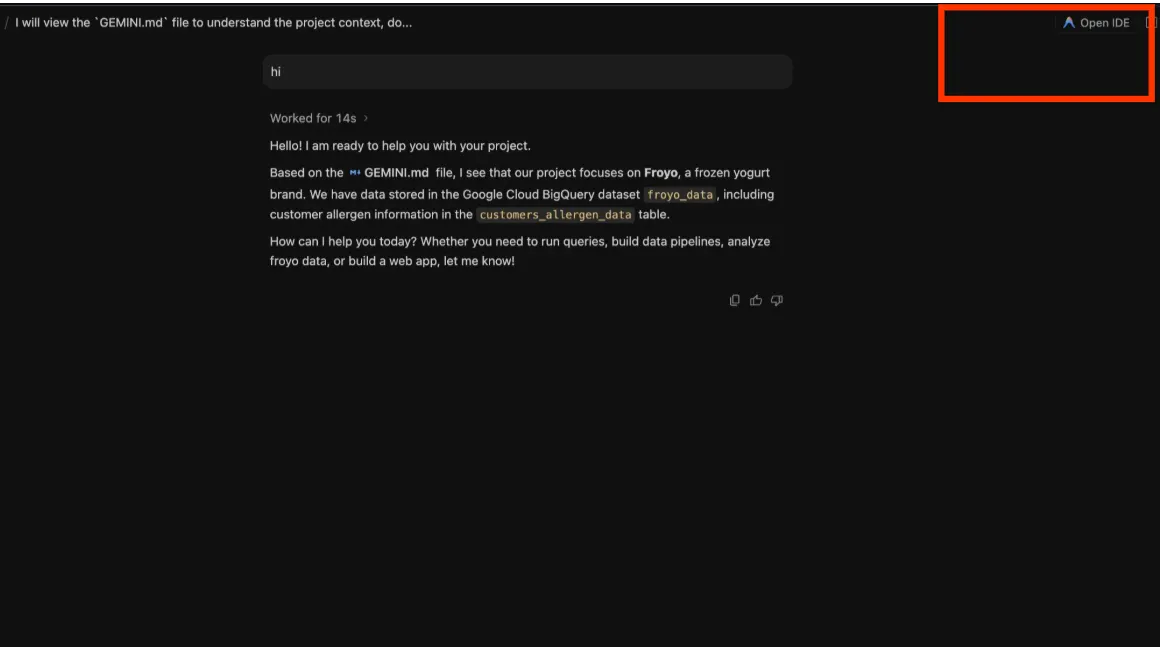
- You should see the pop ups about permissions, continue to open it!
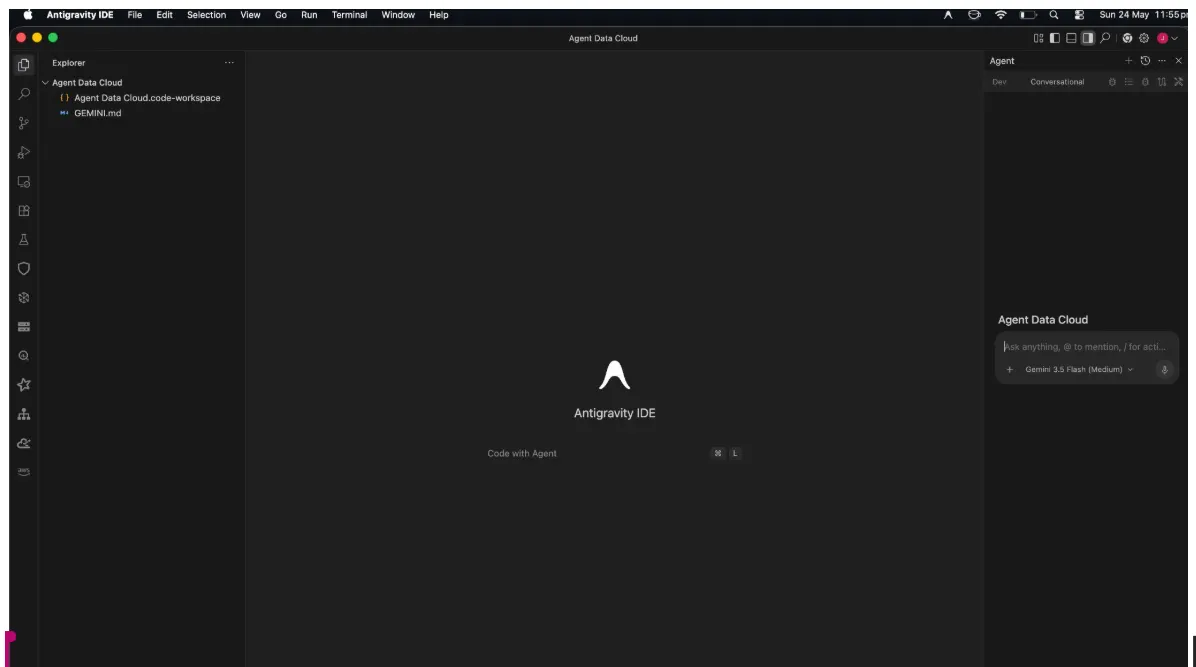
On the right side you see the agent pane on the left the project explorer and in the center the space for your development.
Set up the Data Agent Kit Extension
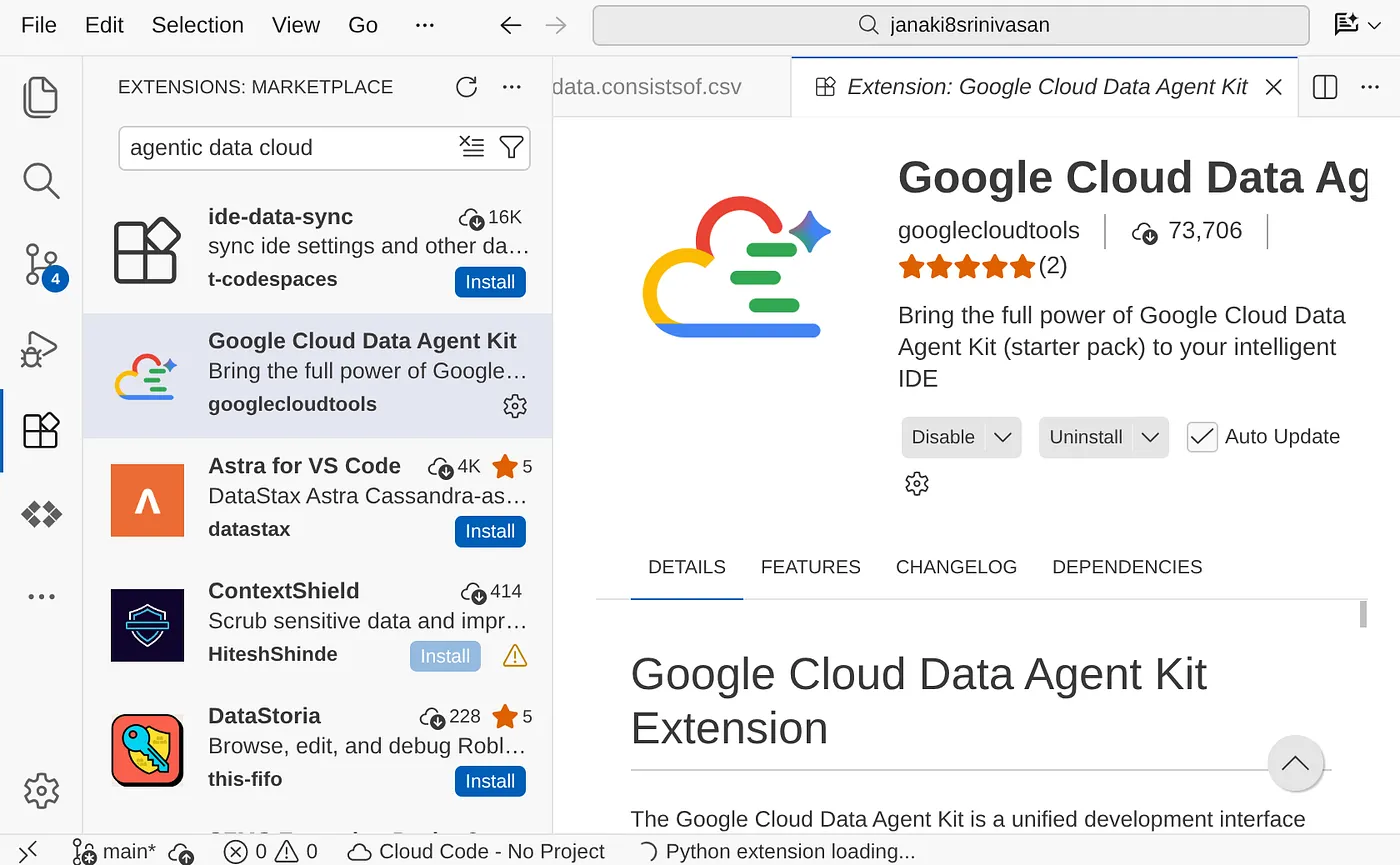
- Install the Extension: Open the Extensions marketplace inside the ANTIGRAVITY IDE. Search for and install the Google Cloud Data Agent Kit extension.
- Click the Install button and once done, you would be able to see that extension on the navigation pane.
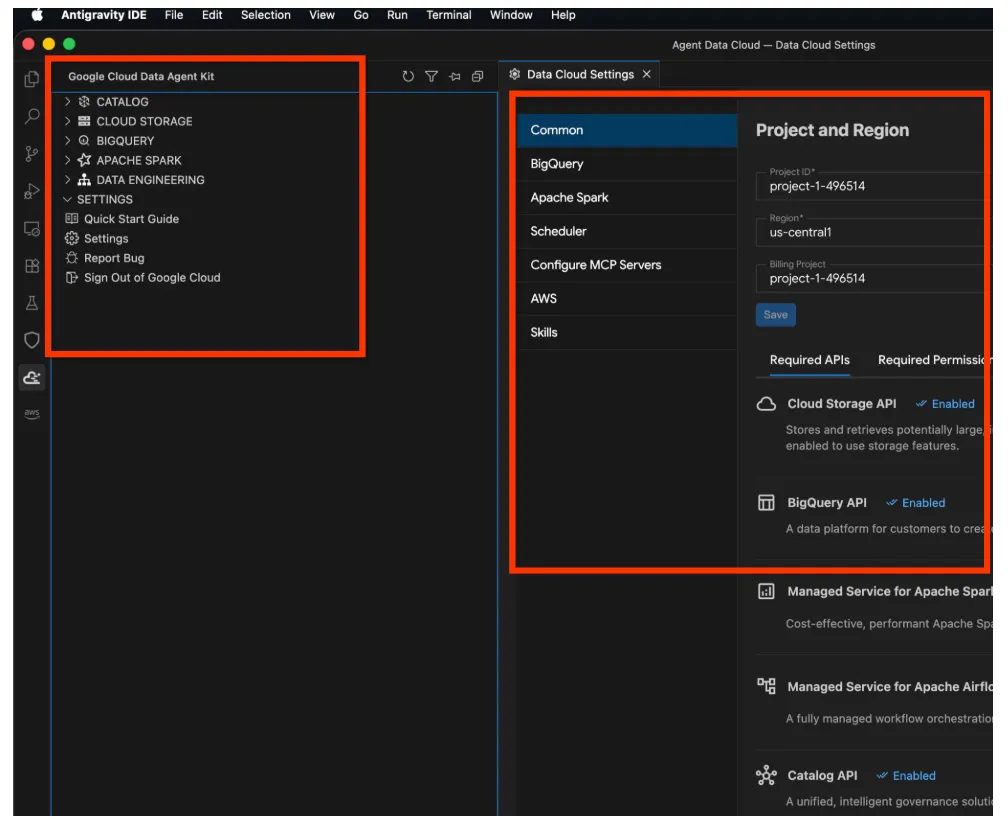
- Click that and it opens the Google Cloud Data Agent Kit explorer, go to the SETTINGS section and click Settings. Put your project details and region in there and save.
- Now click the Project Explorer on top of the Navigation pane. It should open your project explorer in the explorer pane.
- Right click the explorer space and create a new file called " GEMINI.md".
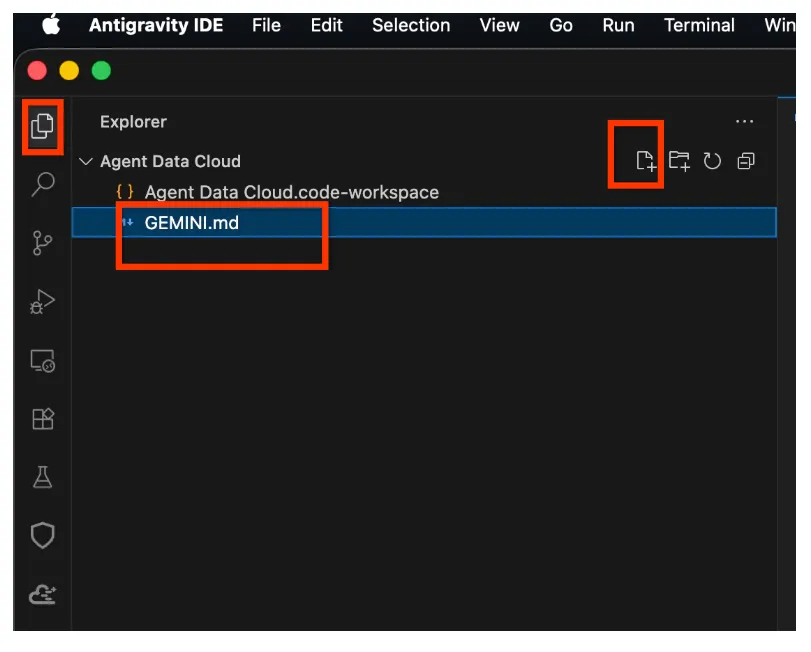
- Paste the following in GEMINI.md (Don't forget to replace <<YOUR_PROJECT_ID>> with your value):
## 1. Project Context
- **Project ID**: <<YOUR_PROJECT_ID>>
- **Domain**: This project is centralized around "Froyo", a brand of frozen yogurt offering multiple flavors.
- **Data**: All froyo, customer, order related information is processed and stored in BigQuery `froyo_data` dataset.

## 2. Execution & Data Processing Rules
- **CRITICAL RULE - Structured Specs**: The semantic and structured information extracted from the PDFs is available in a BigQuery dataset named `froyo_data`.
- **CRITICAL RULE - Customer Data**: Existing Froyo customer data resides in BigQuery in the tables `customers_allergen_data`.
- ** CRITICAL RULE - Sales Data**: Sales data is present in tables `orders` and `order_items`.
- ** CRITICAL RULE - General: When you are referencing a dataset, ensure you are using it with the dataset ID (`froyo_data`) . For example, to query orders table in this dataset you should use `froyo_data.orders`.
Now, you have a highly capable AI agent sitting directly in your IDE, ready to write code, generate SQL, and analyze your architecture.
We now have a fascinating analytical challenge: Can we correlate our historical sales with the complex, inferred allergen data we extracted from PDFs back in Part 1?
5. Inferring Intelligence via the IDE Agent
Let's ask our IDE Agent to do the heavy lifting. Open the Agent Data Kit chat window right inside your ANTIGRAVITY IDE and prompt it the following:
Does Midnight Swirl contain any allergen?
It will ask for a series of permissions, allow as applicable.
Finally it will retrieve response for you at the end of its analysis:
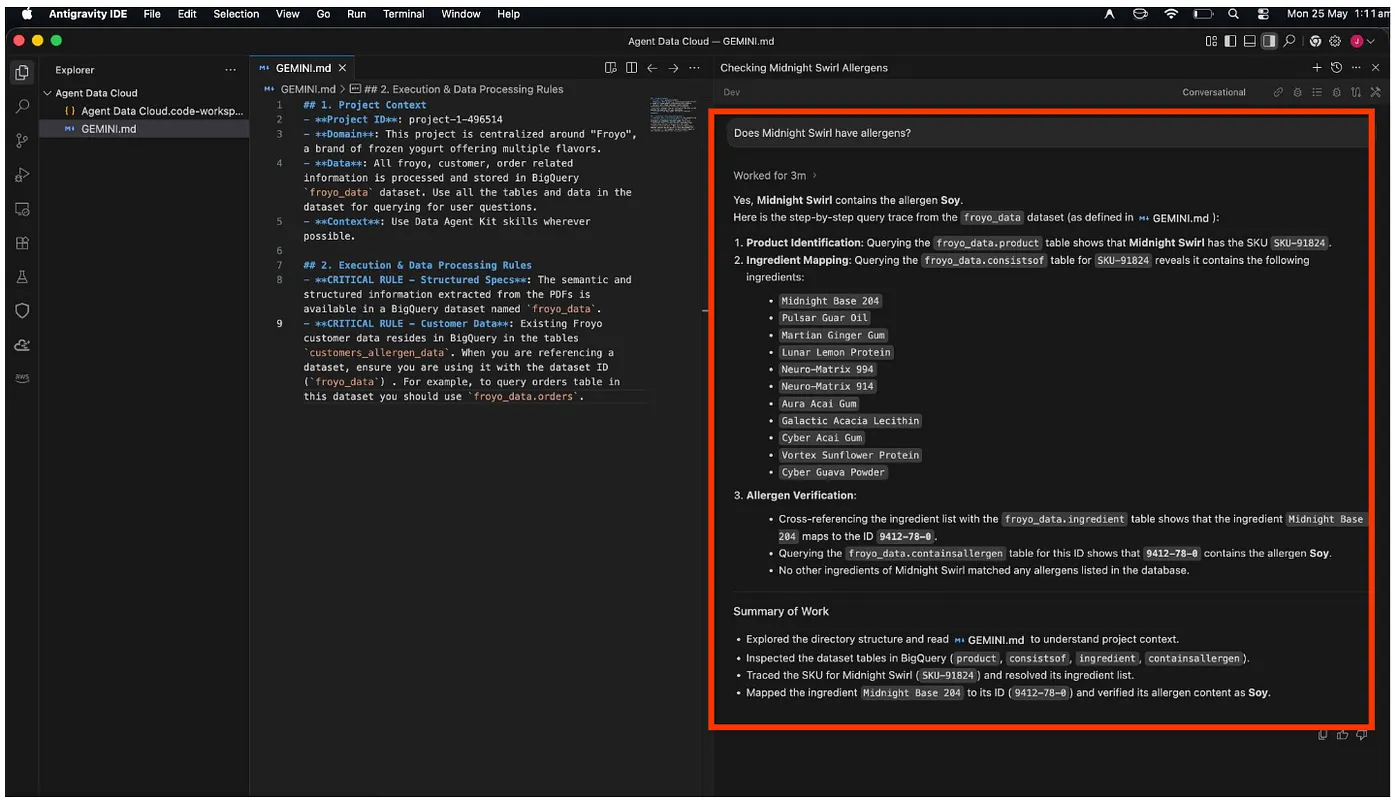
Yay!!! It has correctly identified that the Midnight Swirl item has Soy.
Now let's ask a slightly more complex one. Send the following prompt in the Antigravity IDE:
I want to see the top 5 most popular products purchased by
customers who have a registered 'Dairy' allergy.
Response:
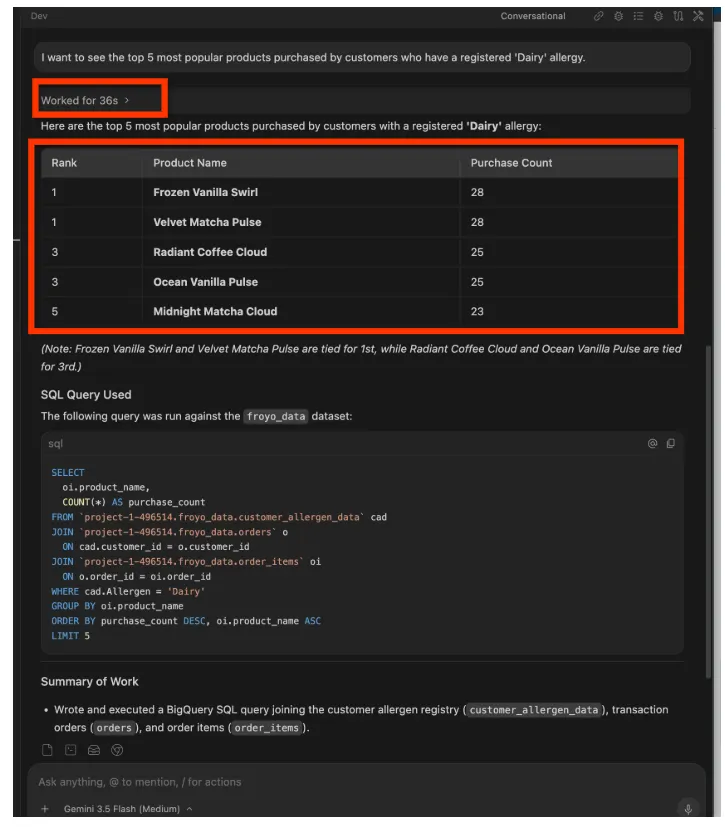
You can keep going. Try prompts like:
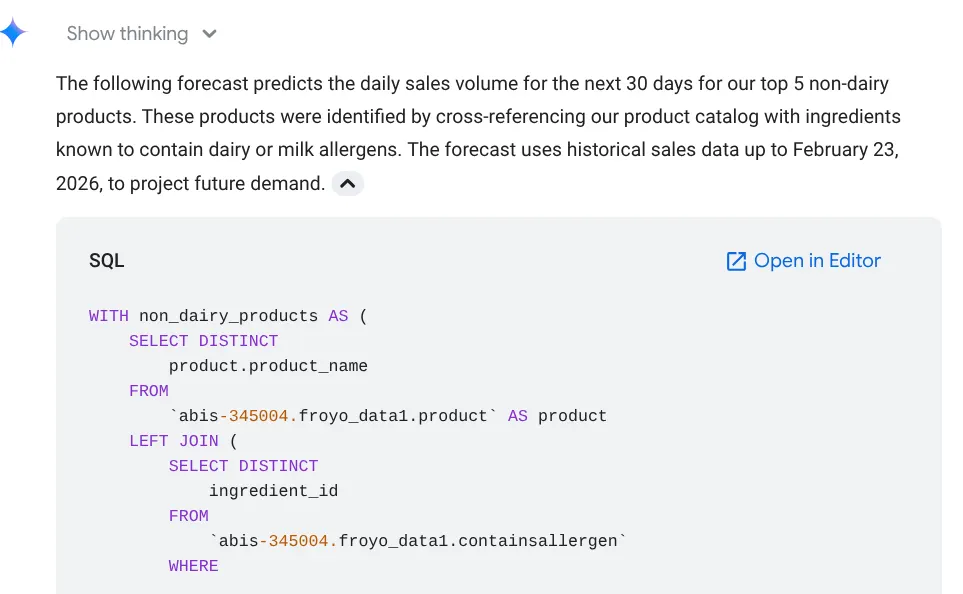
Forecast the sales volume of our top non-dairy products
for the next 30 days based on historical data.
Without needing to look up the BQML syntax, the Agent Data Kit drops the exact CREATE MODEL and ML.FORECAST code into your editor. Can execute this directly against your BigQuery environment without ever leaving the ANTIGRAVITY IDE!
How amazing is this!!!
6. Conversational Analytics in BigQuery
While developers love the IDE, business users and executives live in the cloud console. They don't want to see SQL, they just want answers.
Let's get started:
- Grant yourself required roles
Navigate to the project's IAM page and grant yourself the Gemini Data Analytics Data Agent Owner role:
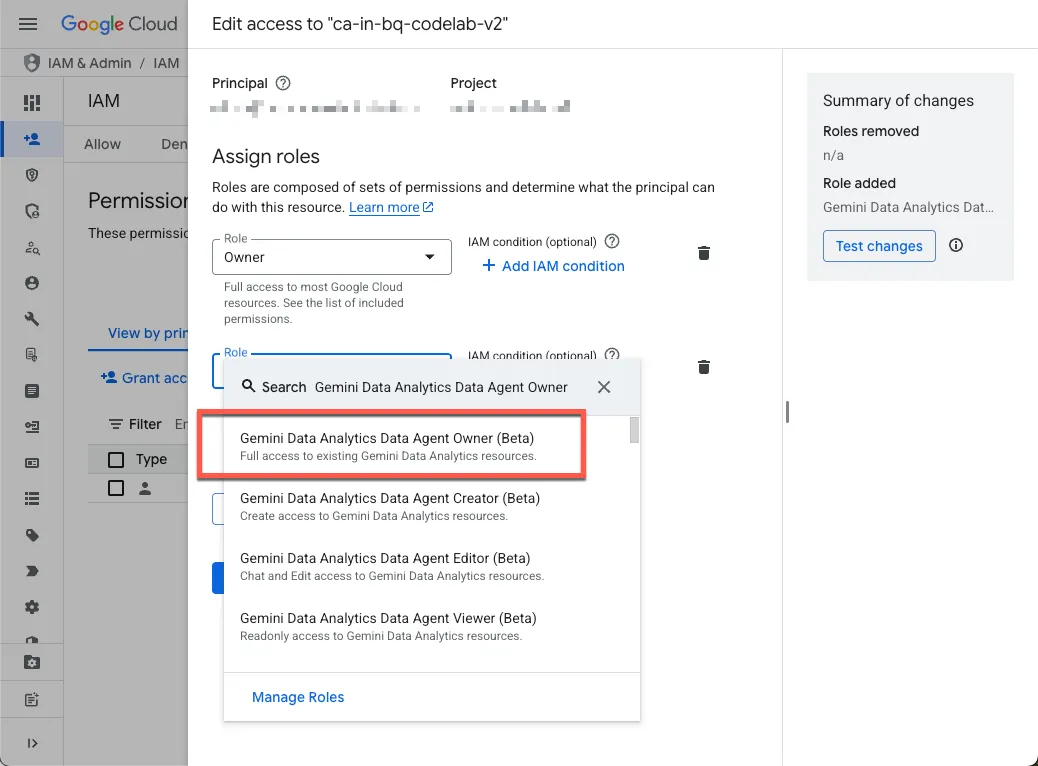
This role grants you permission to create, edit, share, and delete all data agents in the project.
- Enable the required APIs
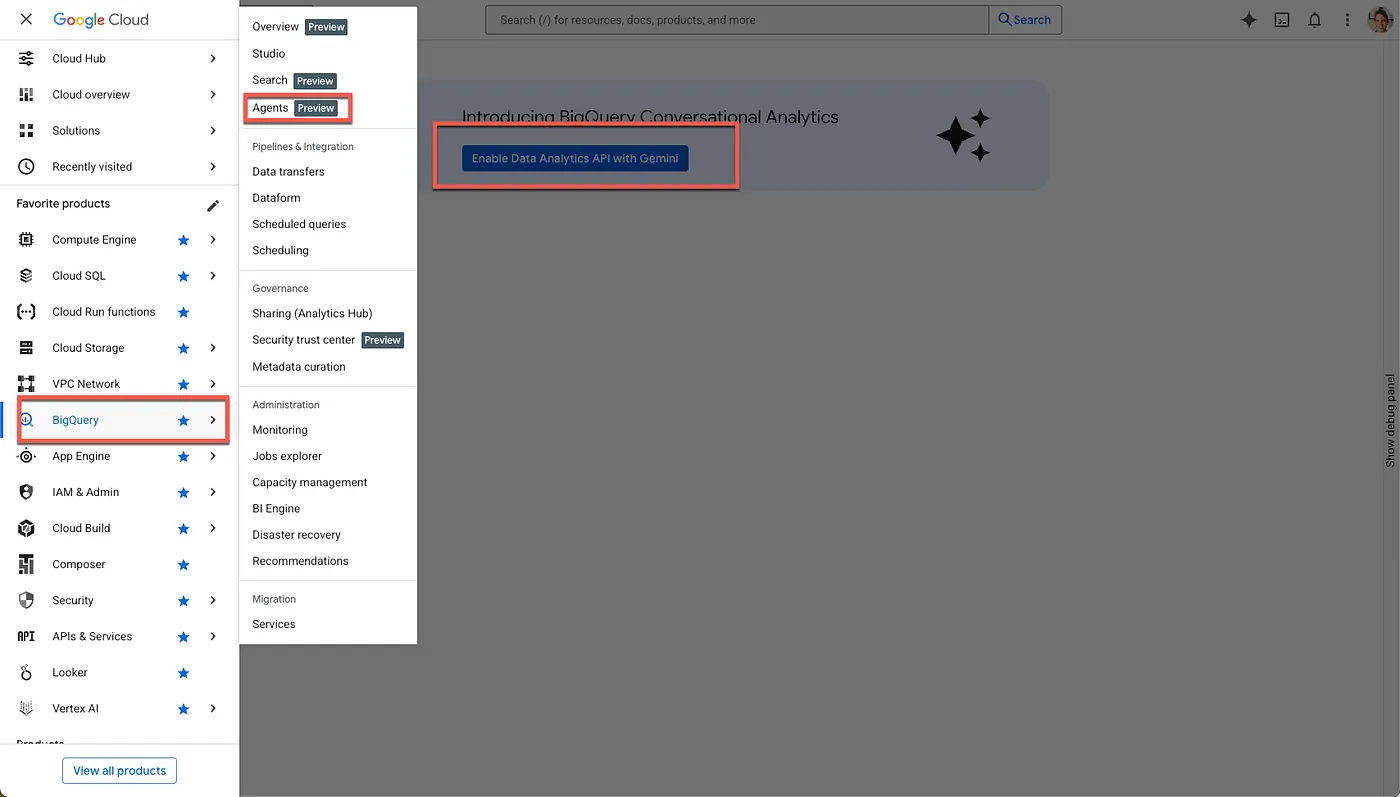
Go to BigQuery on Google Cloud Console. Use the sidebar navigation menu or search menu at the top of the page to navigate to BigQuery > Agents.
Click Enable the Data Analytics API with Gemini:
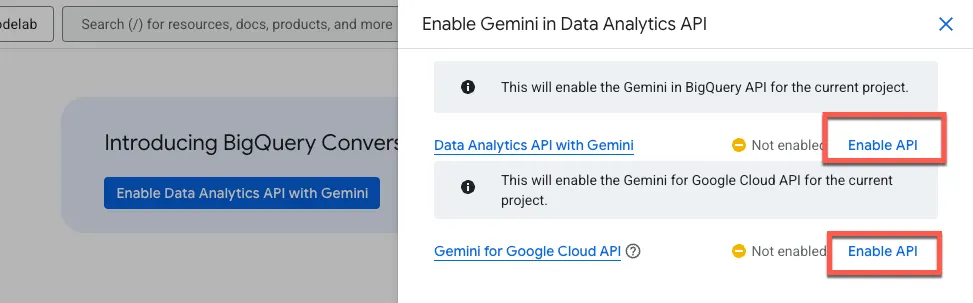
Enable both the Gemini in BigQuery API and the Gemini for Google Cloud API:
You should now see the new agent page:
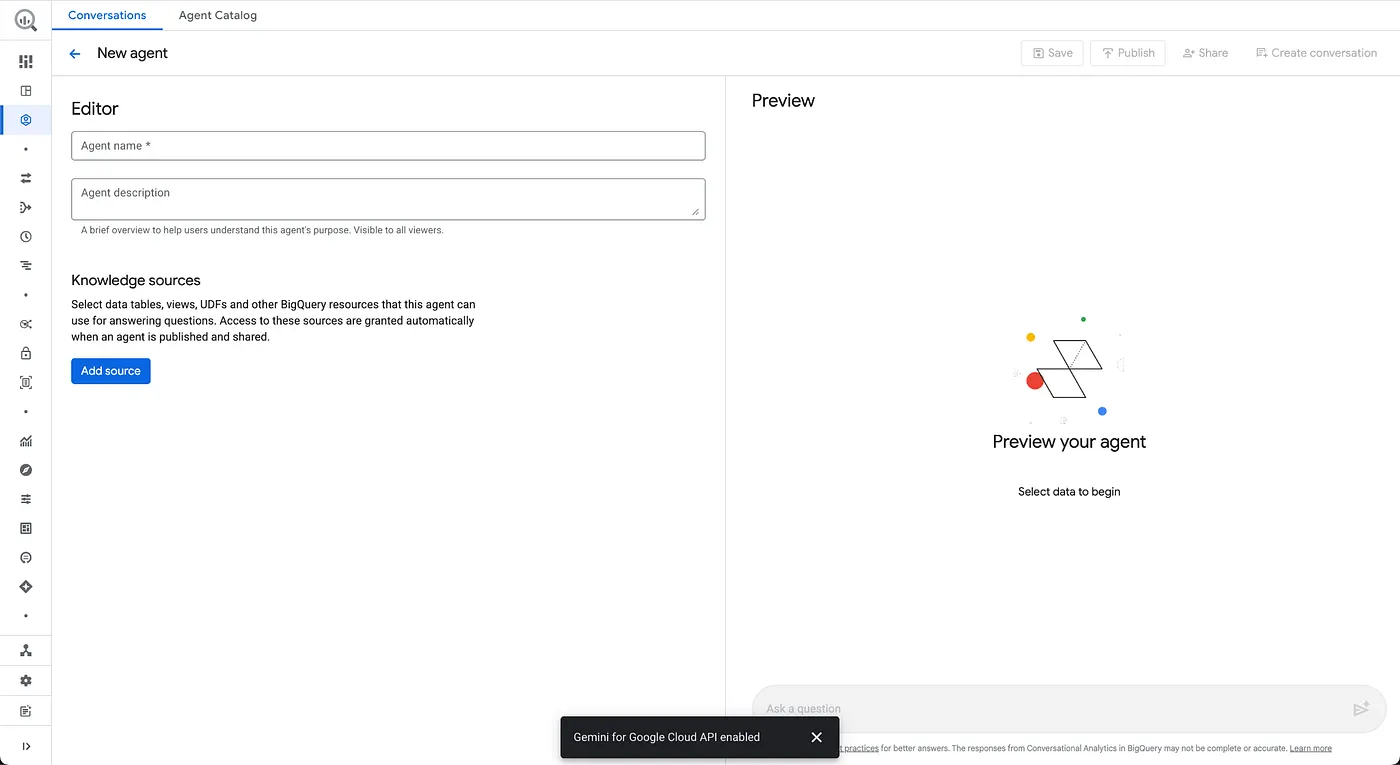
- Configure Agent Information
Agent Name: Froyo Agent
Agent Description: Helps with answering froyo products, allergen, ingredient, recipe, customer,order,sales related questions.
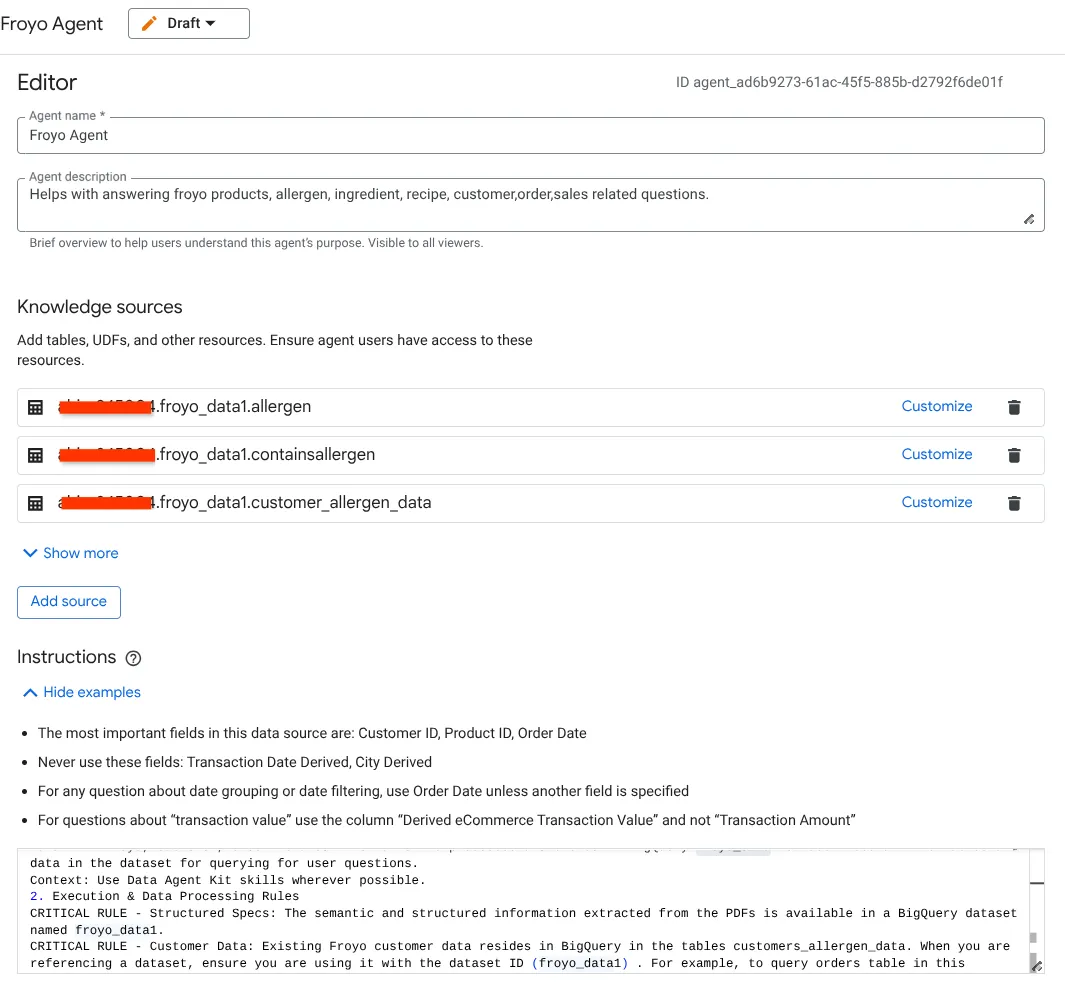
- Go to Knowledge Sources section and select all the tables below from your dataset:
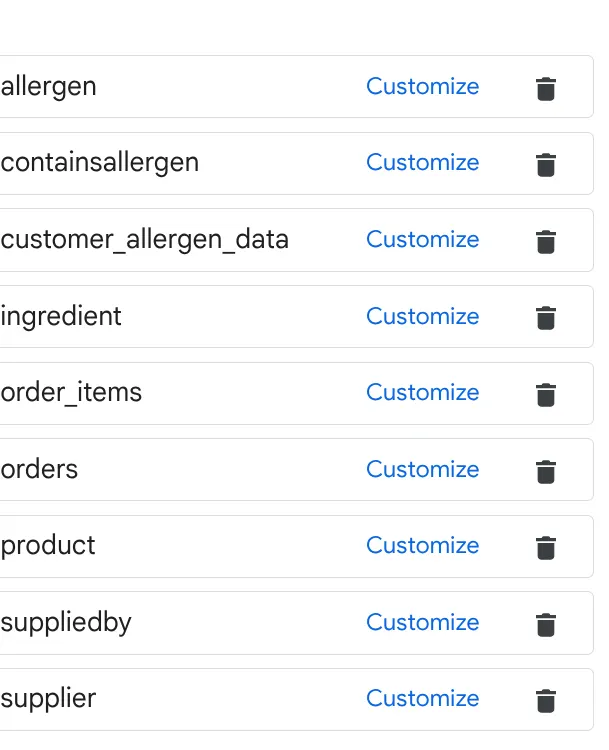
a. Add the tables in the image above and click Add Source.
b. For each source, click the customize button on the right. You will see the below form:
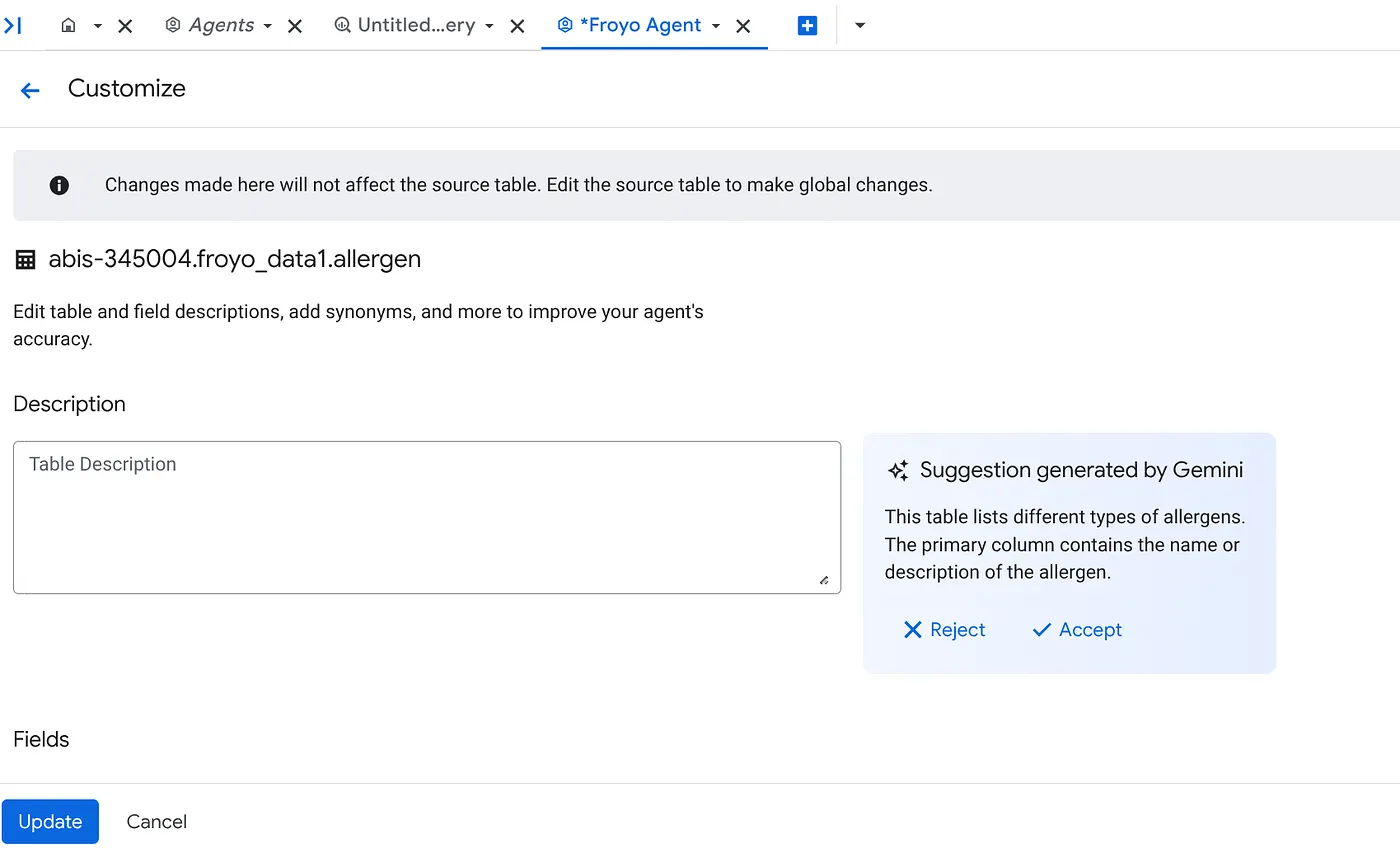
c. Click "Accept" for the table description.
d. Click "Accept" for each of the fields' descriptions as well.
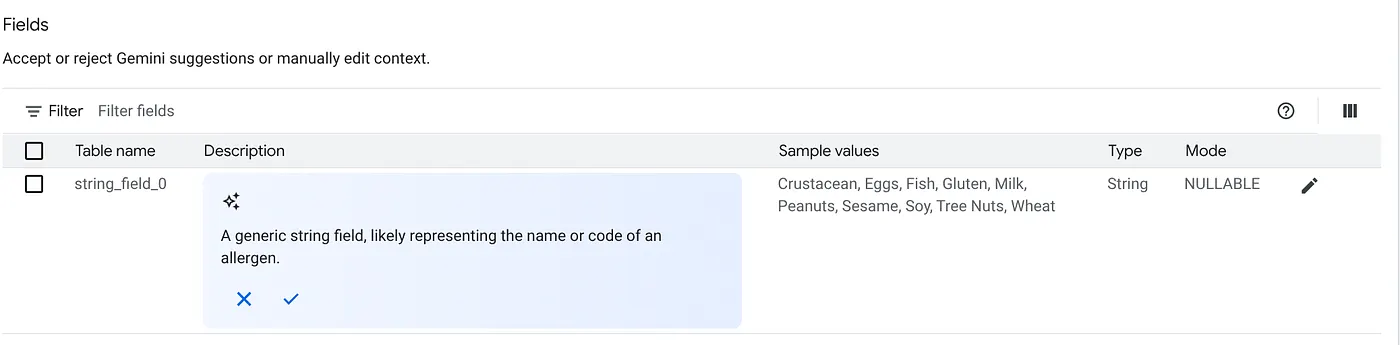
e. Click Update.
You have to repeat this for all the tables in the source.
- Configure Instructions
Put the same instructions we used in Antigravity IDE GEMINI.md here:
1. Project Context
Project ID: <<YOUR_PROJECT_ID>>
Domain: This project is centralized around "Froyo", a brand of frozen yogurt offering multiple flavors.
Data: All froyo, customer, order related information is processed and stored in BigQuery froyo_data dataset. Use all the tables and data in the dataset for querying for user questions.
Context: Use Data Agent Kit skills wherever possible.
2. Execution & Data Processing Rules
CRITICAL RULE - Structured Specs: The semantic and structured information extracted from the PDFs is available in a BigQuery dataset named froyo_data.
CRITICAL RULE - Customer Data: Existing Froyo customer data resides in BigQuery in the tables customers_allergen_data. When you are referencing a dataset, ensure you are using it with the dataset ID (froyo_data) . For example, to query orders table in this dataset you should use froyo_data.orders.
- Save your agent.
7. Chat with your Data!
- Test it on the right hand side preview section:
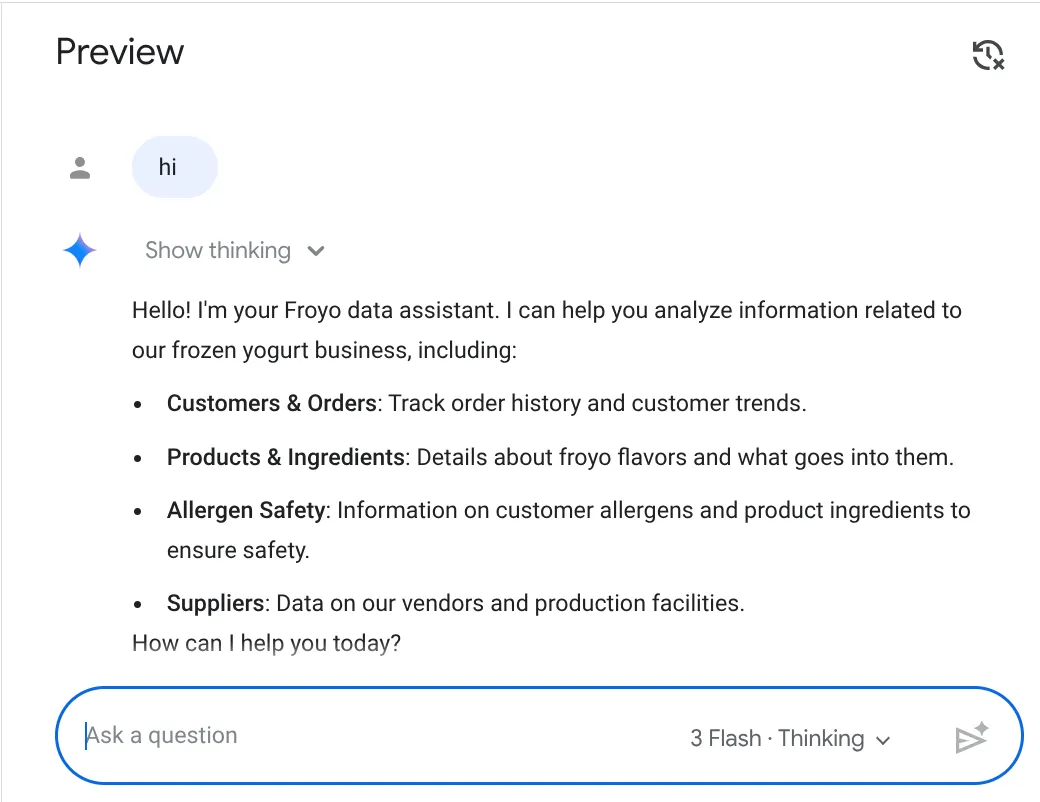
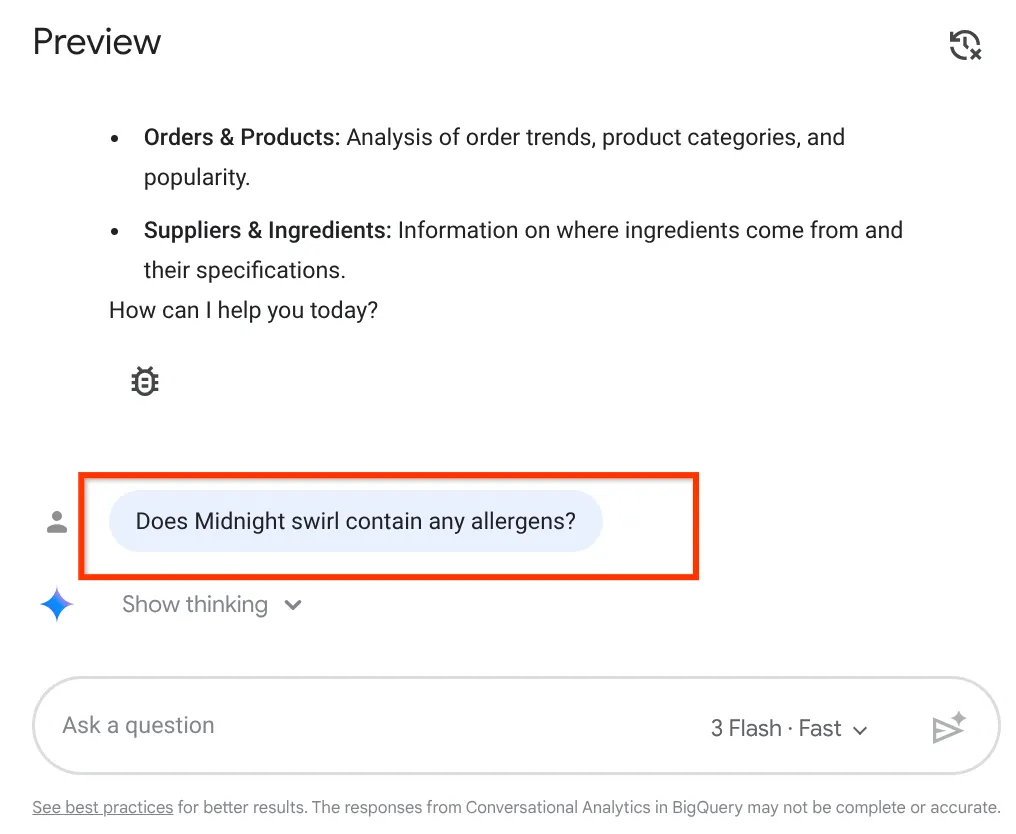
Ask your question:
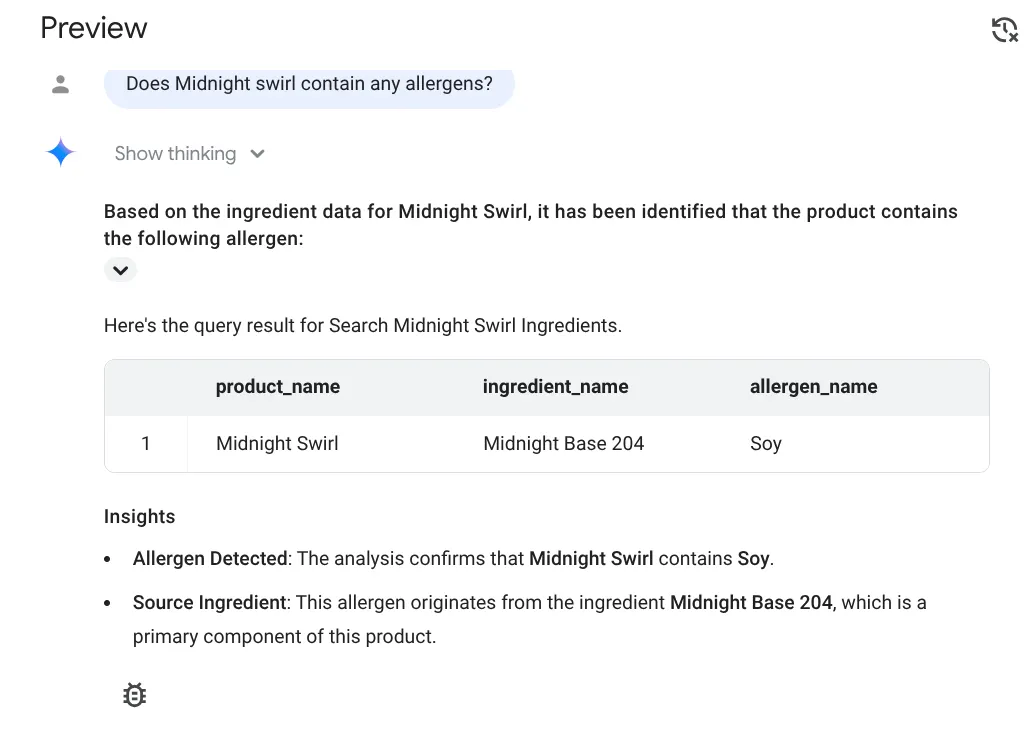
Does midnight swirl contain any allergen?
Here's the response:
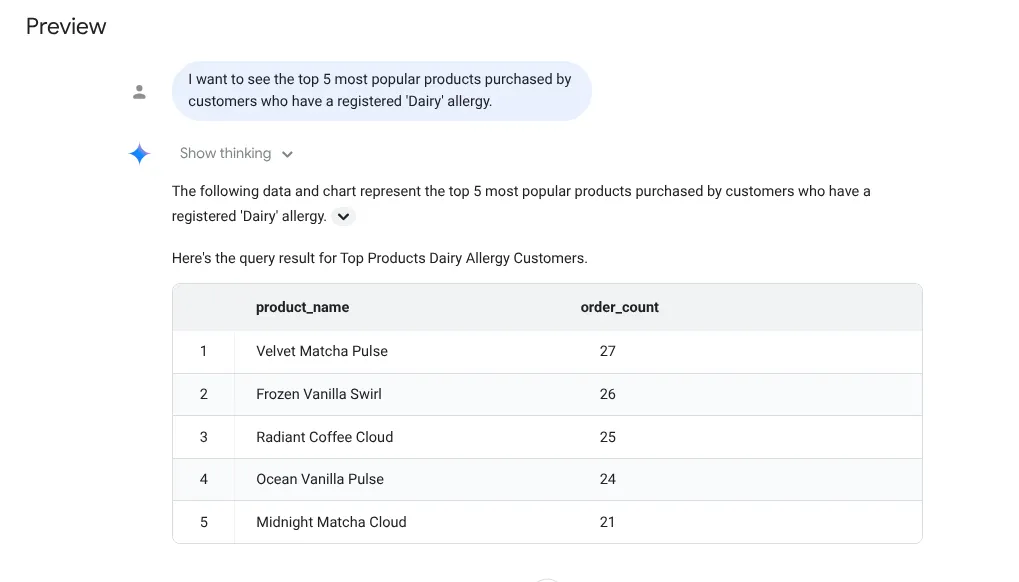
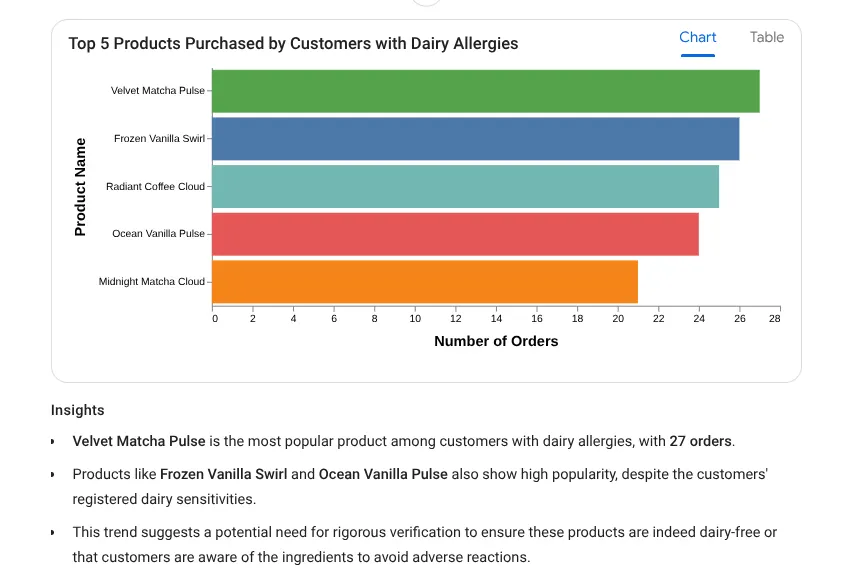
Now let's ask the complicated question:
I want to see the top 5 most popular products purchased by
customers who have a registered 'Dairy' allergy.
Response:
Let's try a deep insight prompt now:
Forecast the sales volume of our top non-dairy products
for the next 30 days based on historical data.
You can see it shows you the query it uses, with the table result along with chart:
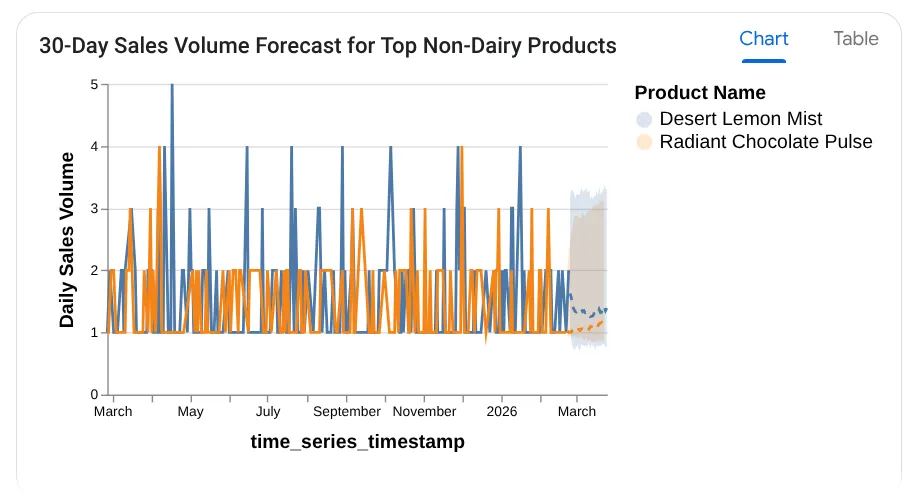
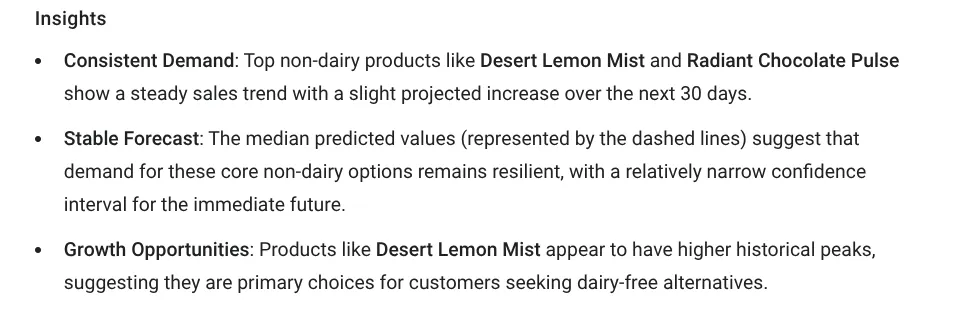
Wow! So that went well with the charts and insights. Time for the ultimate question for products.
8. The Ultimate Test
Ask the question:
What will be the top most selling product of 2026
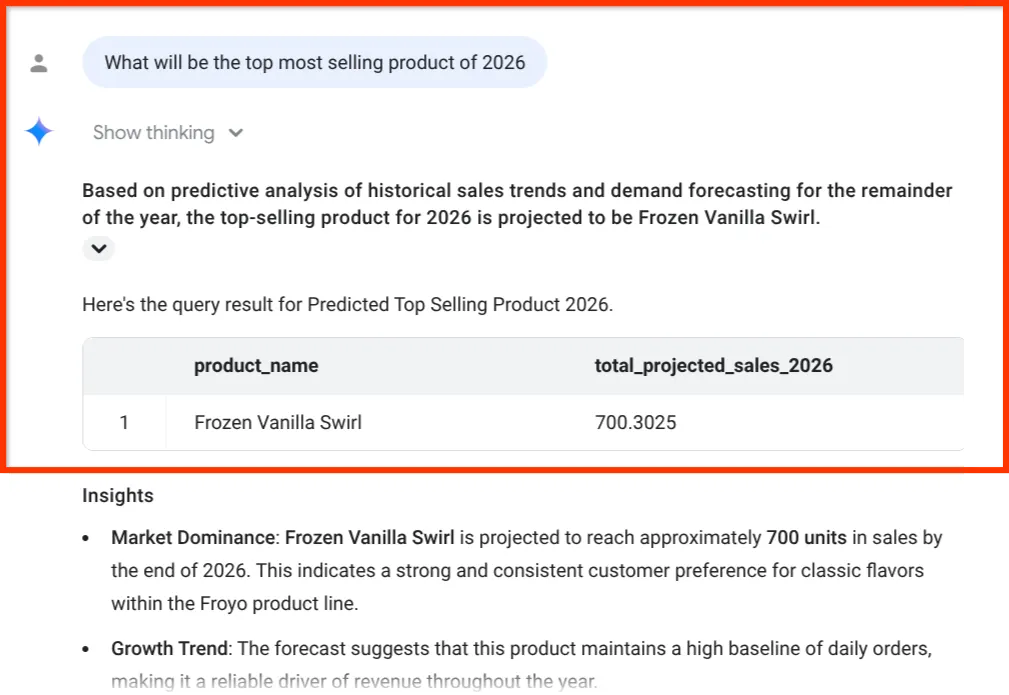
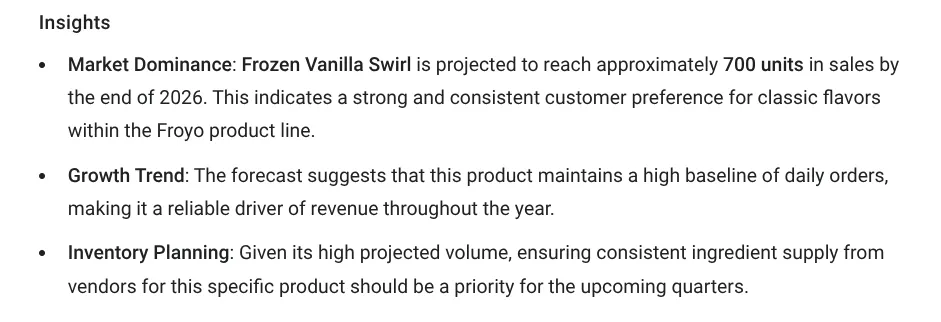
Look at that final insight. The BigQuery Data Agent didn't just give us a number; it explicitly tied the sales forecast back to our inventory and ingredient supply chain — the exact data we extracted from messy PDFs back in Part 1!
9. Publishing Your Agent to the Enterprise
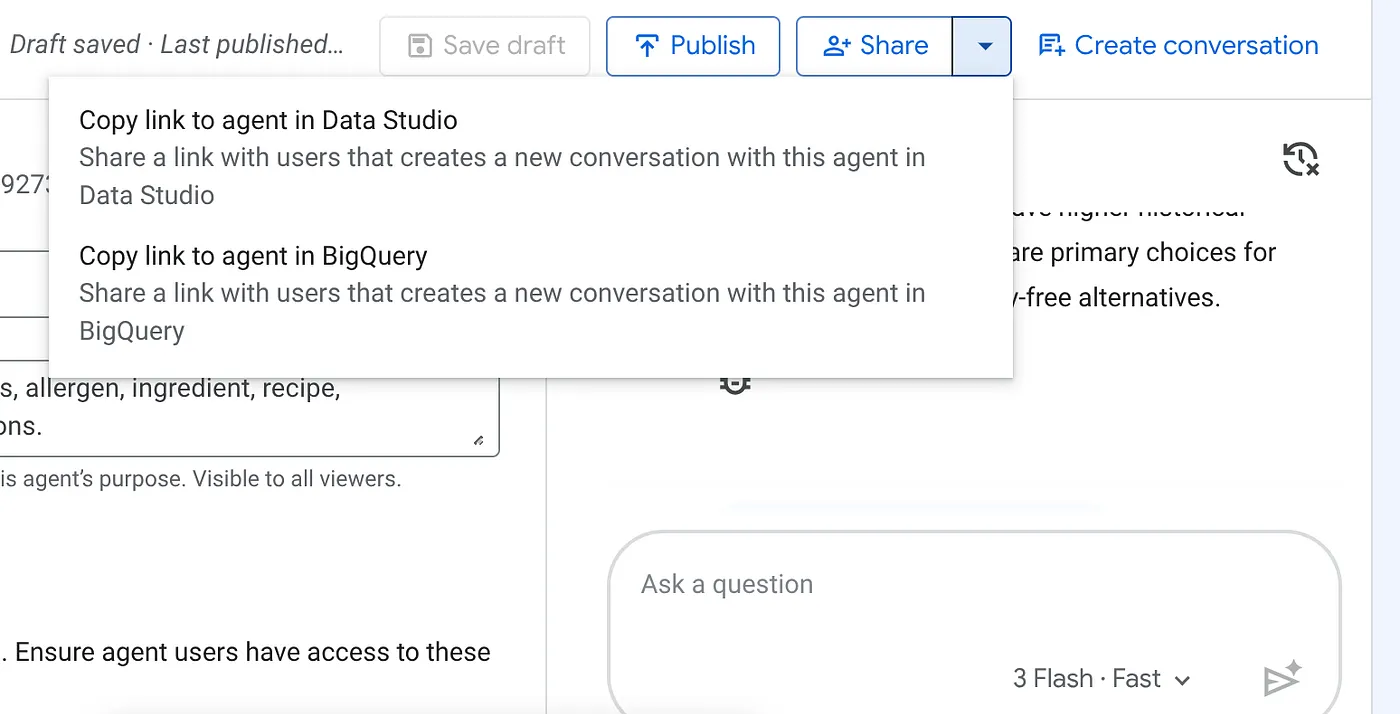
Click the Publish button on the top of the preview agent.
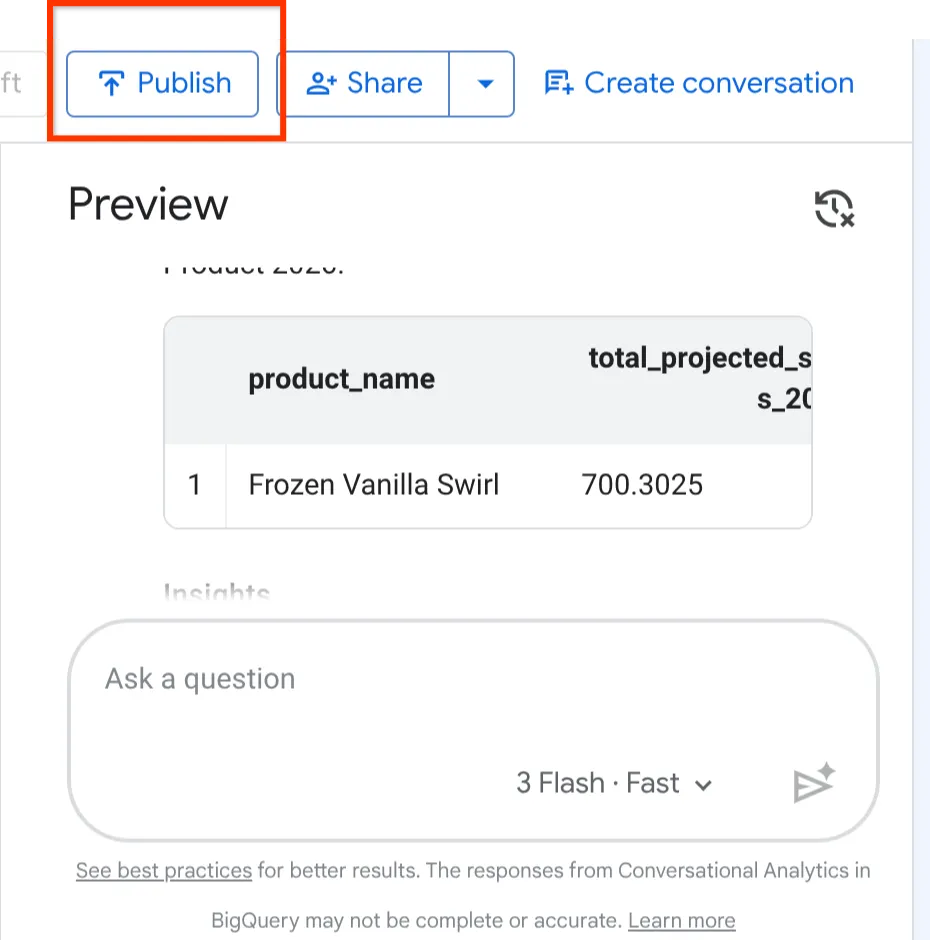
Now that we have built, configured, and tested our Froyo Agent, it is time to release it to the rest of the business.
In the top right corner of the Agent configuration page, click the Publish button.
By publishing, your agent instantly becomes available across three powerful enterprise channels for you and anyone you share it with:
- BigQuery: Your data analysts can now chat with this agent directly from the Agents hub or right inside their BigQuery Studio SQL workspace.
- Conversational Analytics API: Your developers can access this agent via a REST API, allowing them to integrate these exact conversational analytics into your own custom internal web applications.
- Data Studio: Your executives can interact with this agent and create dynamic conversational dashboards directly inside Data Studio.
We have successfully taken our data out of silos and put it directly into the hands of the people who need it, exactly where they already work!
Click the drop-down of the Share button on top of your published BigQuery Agent and select "Copy Link to agent in data studio" option from the list:
Paste that link in your browser and press enter. Provide confirmation for the agent interaction access alert:
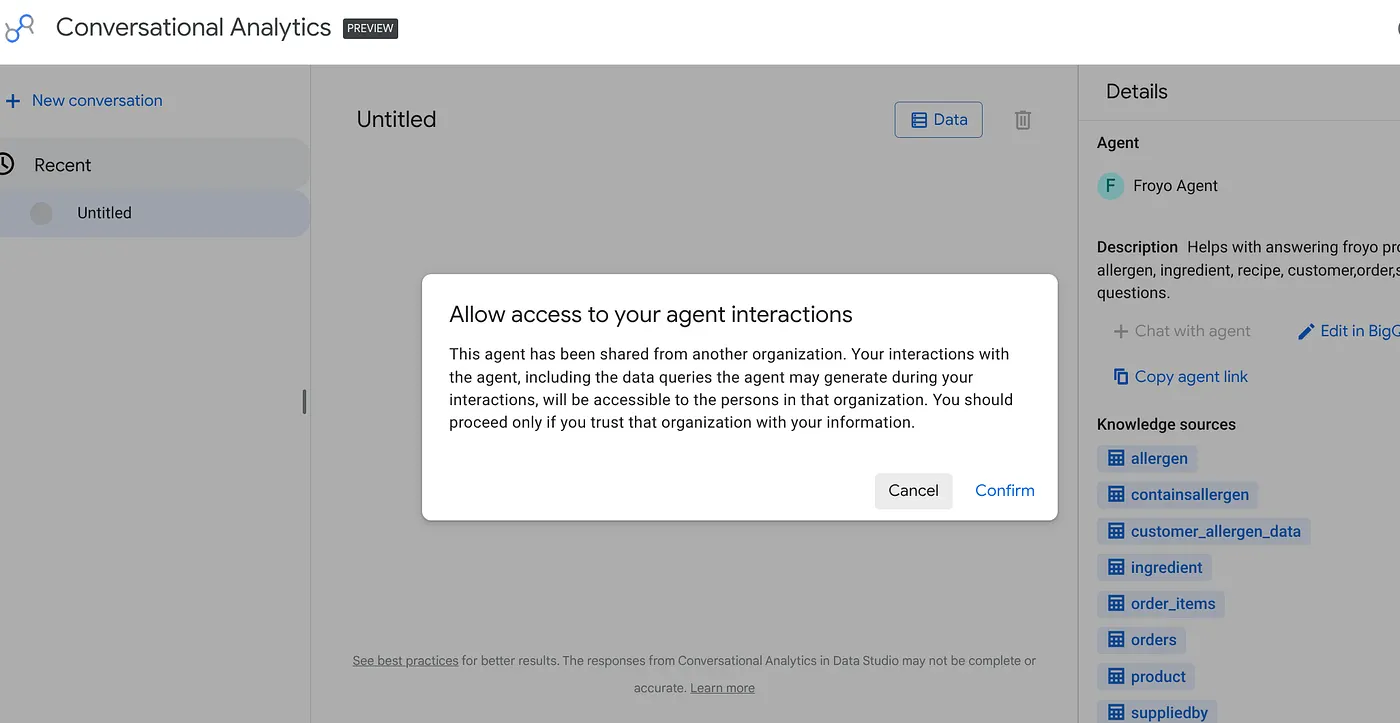
You can start interactive conversations and visualizations with the newly published agent from Data Studio and so can your leadership and other teams that need this information!
10. Clean up
Once this lab is done, do not forget to remove permissions to all users for the BigQuery Agent you just created.
11. Congratulations!
You have officially built an Agentic Data Cloud!
You didn't just build a simple chatbot. Over the course of these five sessions, you successfully architected a complete, modern, and evaluated enterprise AI system from the ground up. You've moved from "dark data" to real-time transactional intelligence, and finally to conversational business forecasting.
12. The Complete Picture
Take a step back and look at what we have achieved in this series. We didn't just build a simple chatbot. We architected a complete, modern Agentic Data Cloud:
Part 1: Unlocked dark data by turning PDFs into structured relational tables using Knowledge Catalog.
Part 2: Broke down data silos by federating our analytical warehouse directly into an AlloyDB transactional database.
Part 3: Empowered users by building a Multi-Agent OS that seamlessly executes secure database tools via the MCP protocol
Part 4: Ensured safety by implementing a rigorous Evaluation pipeline to catch hallucinations and jailbreaks.
Part 5: Democratized insights using ANTIGRAVITY IDE and Conversational Analytics in BigQuery.
This is the future of enterprise software. The AI Agent is no longer just a wrapper around an LLM. It is a fully integrated, evaluated, and secure orchestration engine sitting on top of a unified data platform.