
1. Introduction
Antigravity is an agentic development platform that is designed to help anyone build in the agent-first era. It consists of four main products: Antigravity, Antigravity IDE, Antigravity CLI, and Antigravity SDK.
In this codelab, we will focus solely on Antigravity IDE for developers.
What you'll learn
- Understand the Antigravity platform.
- Install Antigravity IDE.
- Explore the Antigravity editor and agent panel.
- Slash commands.
- Customizations, MCP servers, and Skills.
What you'll need
Antigravity IDE needs to be locally installed on your system (Mac, Windows and specific Linux distributions). Additionally, you will need the following:
- Chrome web browser.
- A Gmail account (Personal Gmail account).
Reporting issues
As you work through the codelab and with Antigravity, you might encounter problems.
For codelab related issues (typos, wrong instructions), please open a bug with the Report a mistake button in the bottom-left corner of this codelab:
For bugs or feature requests related to Antigravity, please report the issue within Antigravity. You can report product feedback by clicking on Settings, available in the bottom left corner of the Antigravity product. And then choosing the option Provide Feedback.
2. Antigravity Platform
Before we focus on Antigravity IDE, let's first understand the Antigravity platform.
Antigravity consists of 4 separate products:
- Antigravity: The flagship standalone application and your command center to manage multiple local agents in parallel.
- Antigravity IDE: The fully-featured, agentic IDE for developers.
- Antigravity CLI: A command-line interface for terminal-based agent interactions.
- Antigravity SDK: Tools for developers to programmatically integrate Antigravity into their own systems.
While all products provide access to the same underlying Antigravity agents, the level of interaction is different.
In Antigravity, you work at a higher level with agents. In conversations with the agent, you explain what you want it to build and you let it deal with the code. You get to see the code generated but you're not necessarily dipping into the code yourself.
In Antigravity IDE, you're at a lower coding level. You can still talk to the agent via the agent panel but you also get a full view of the code and get help from the agent as you generate and edit code.
In Antigravity CLI, you're utilizing agents from the command line interface. Again, you can still talk to the agent and get it to generate and edit code but everything happens in the terminal.
What level you choose is up to you. Typically, you'd start building in Antigravity at a higher level and as complexity increases, you'd switch to Antigravity IDE for coding or Antigravity CLI for more terminal friendly tasks.
3. Installation
If you already have the Antigravity application installed but Antigravity IDE is not installed yet, you should see an Install IDE button on the top right corner:
You can either click on that button or directly go to the Antigravity IDE download page to download and install Antigravity IDE for your operating system (macOS, Windows, Linux).
Once the installation is done, you should be greeted with a welcome screen:
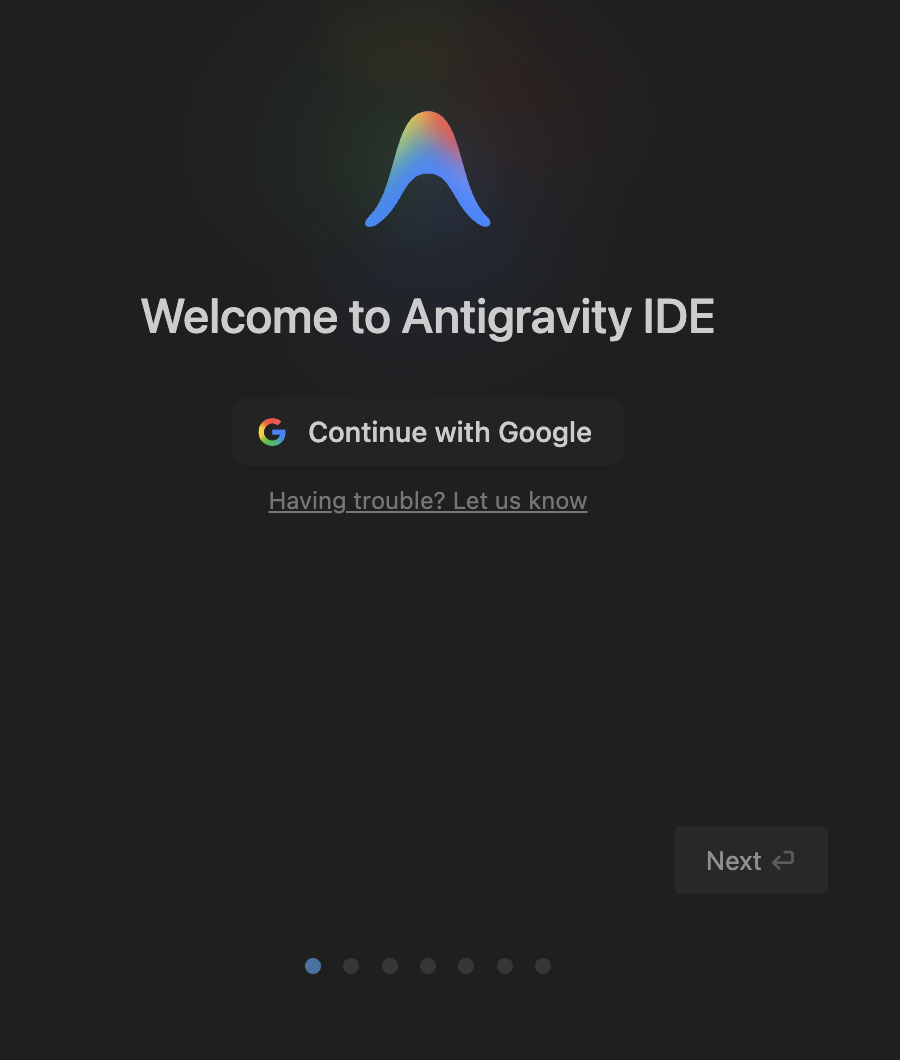
Login with your Google account and continue the installation by choosing your theme.
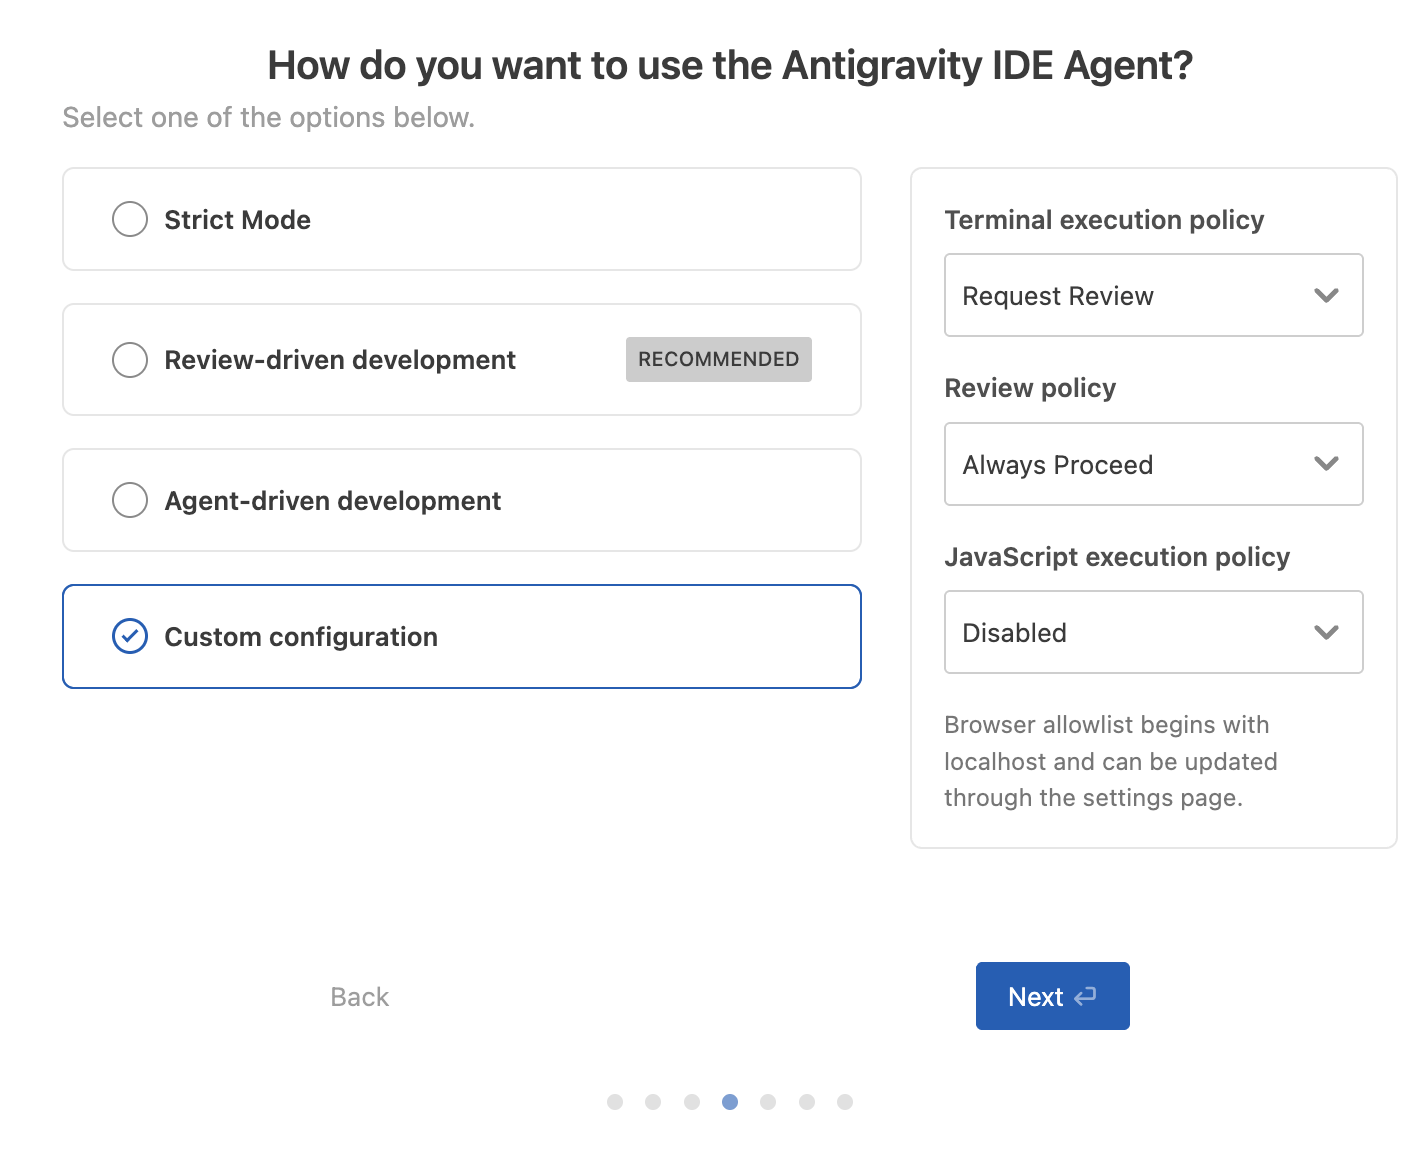
At some point, you'll be asked how you want to use the Antigravity IDE agent. On this screen, you can adjust the terminal execution policy, review policy, and JavaScript execution policy for the agent. Choose Review-driven development for now.
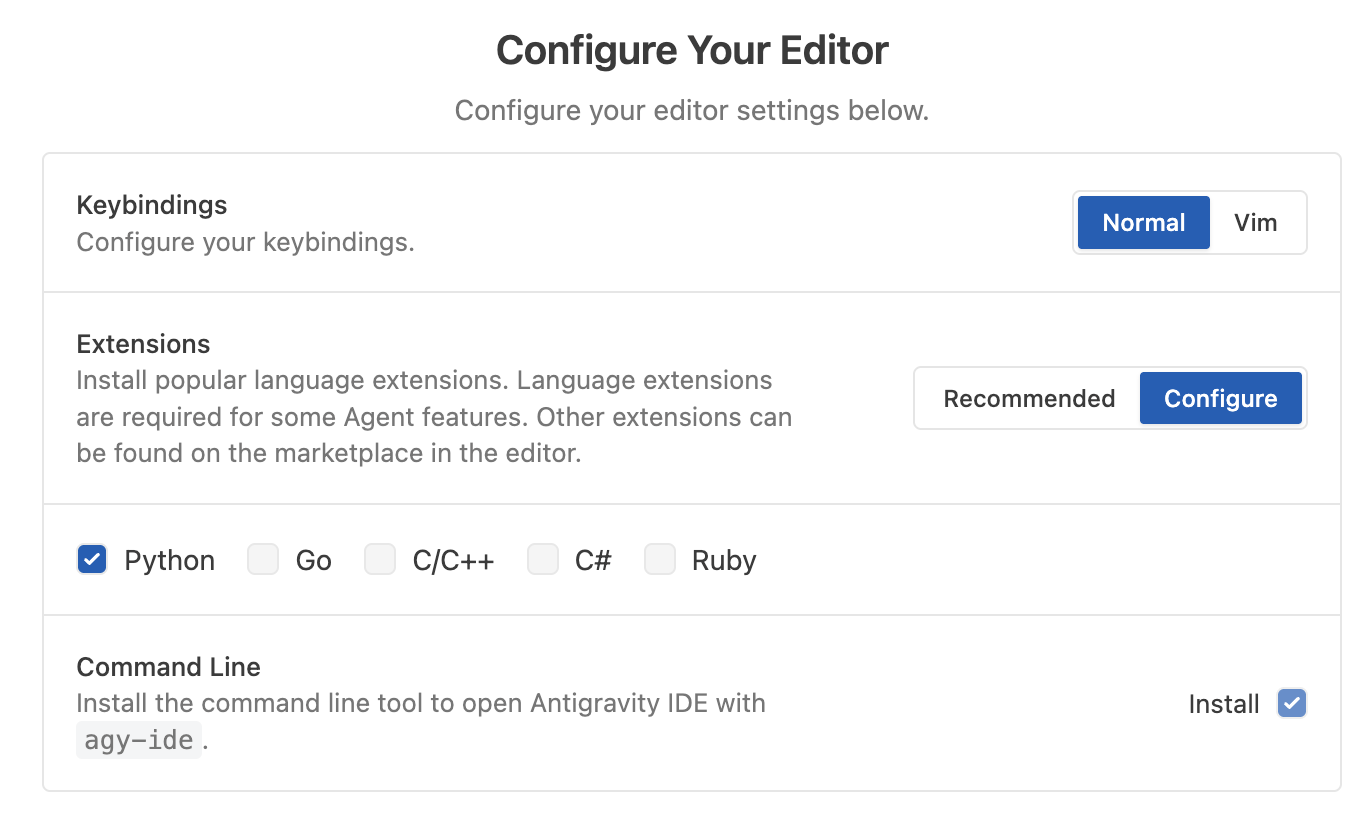
In a subsequent screen, you can configure extensions and agy-ide command line tool. We recommend installing only the extensions you need.
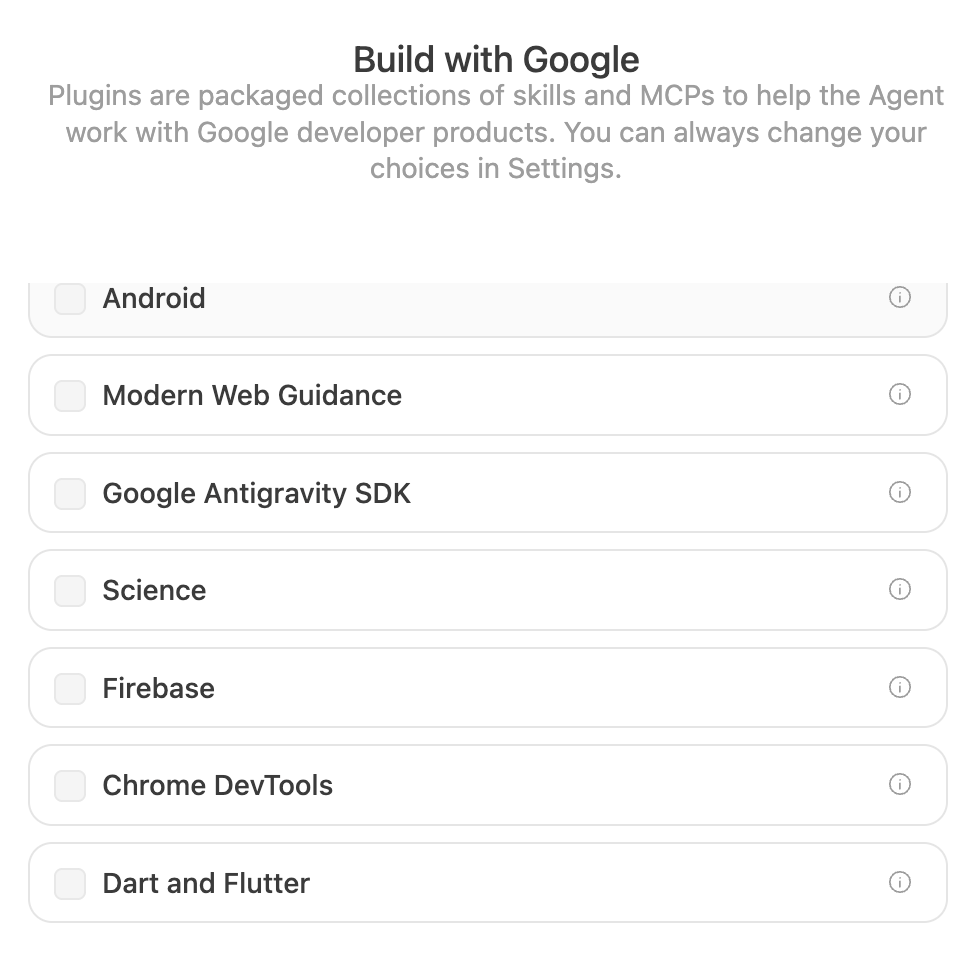
Antigravity IDE also comes with plugins, packaged collections of skills and MCPs to help agents work with Google developer products. Choose the ones you think might be useful for your work:
You're now ready to use Antigravity IDE.
4. Antigravity IDE Interface
When you first start Antigravity IDE, you should see the main Antigravity IDE interface.
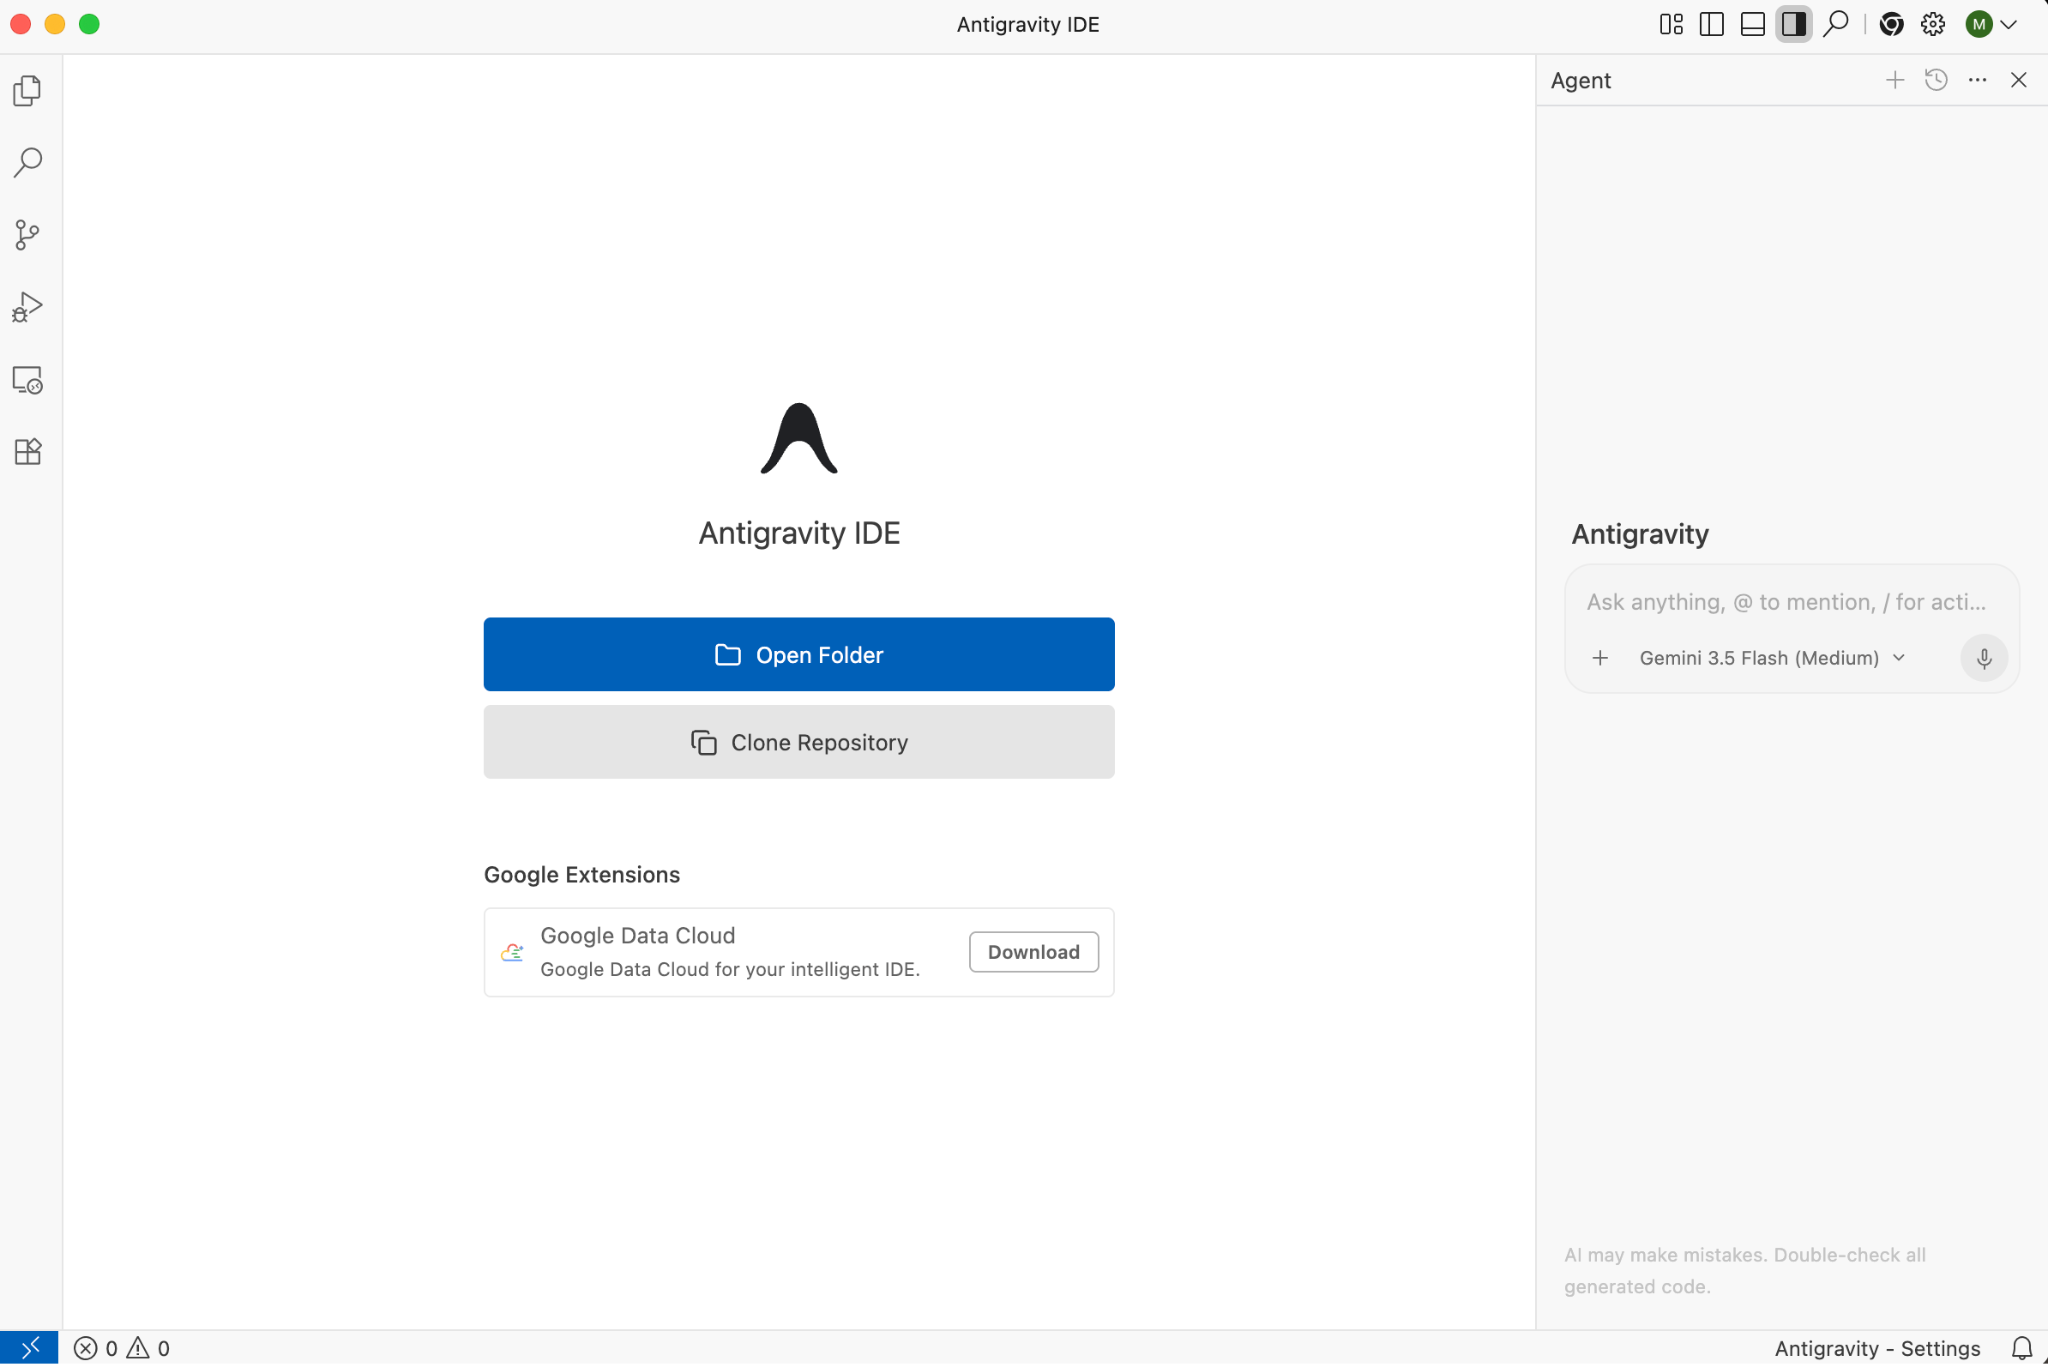
You can start by opening a local folder. It's also a good idea to open a new terminal via Terminal and then New Terminal menu item.
You now have the editor, terminal, and the agent ready:
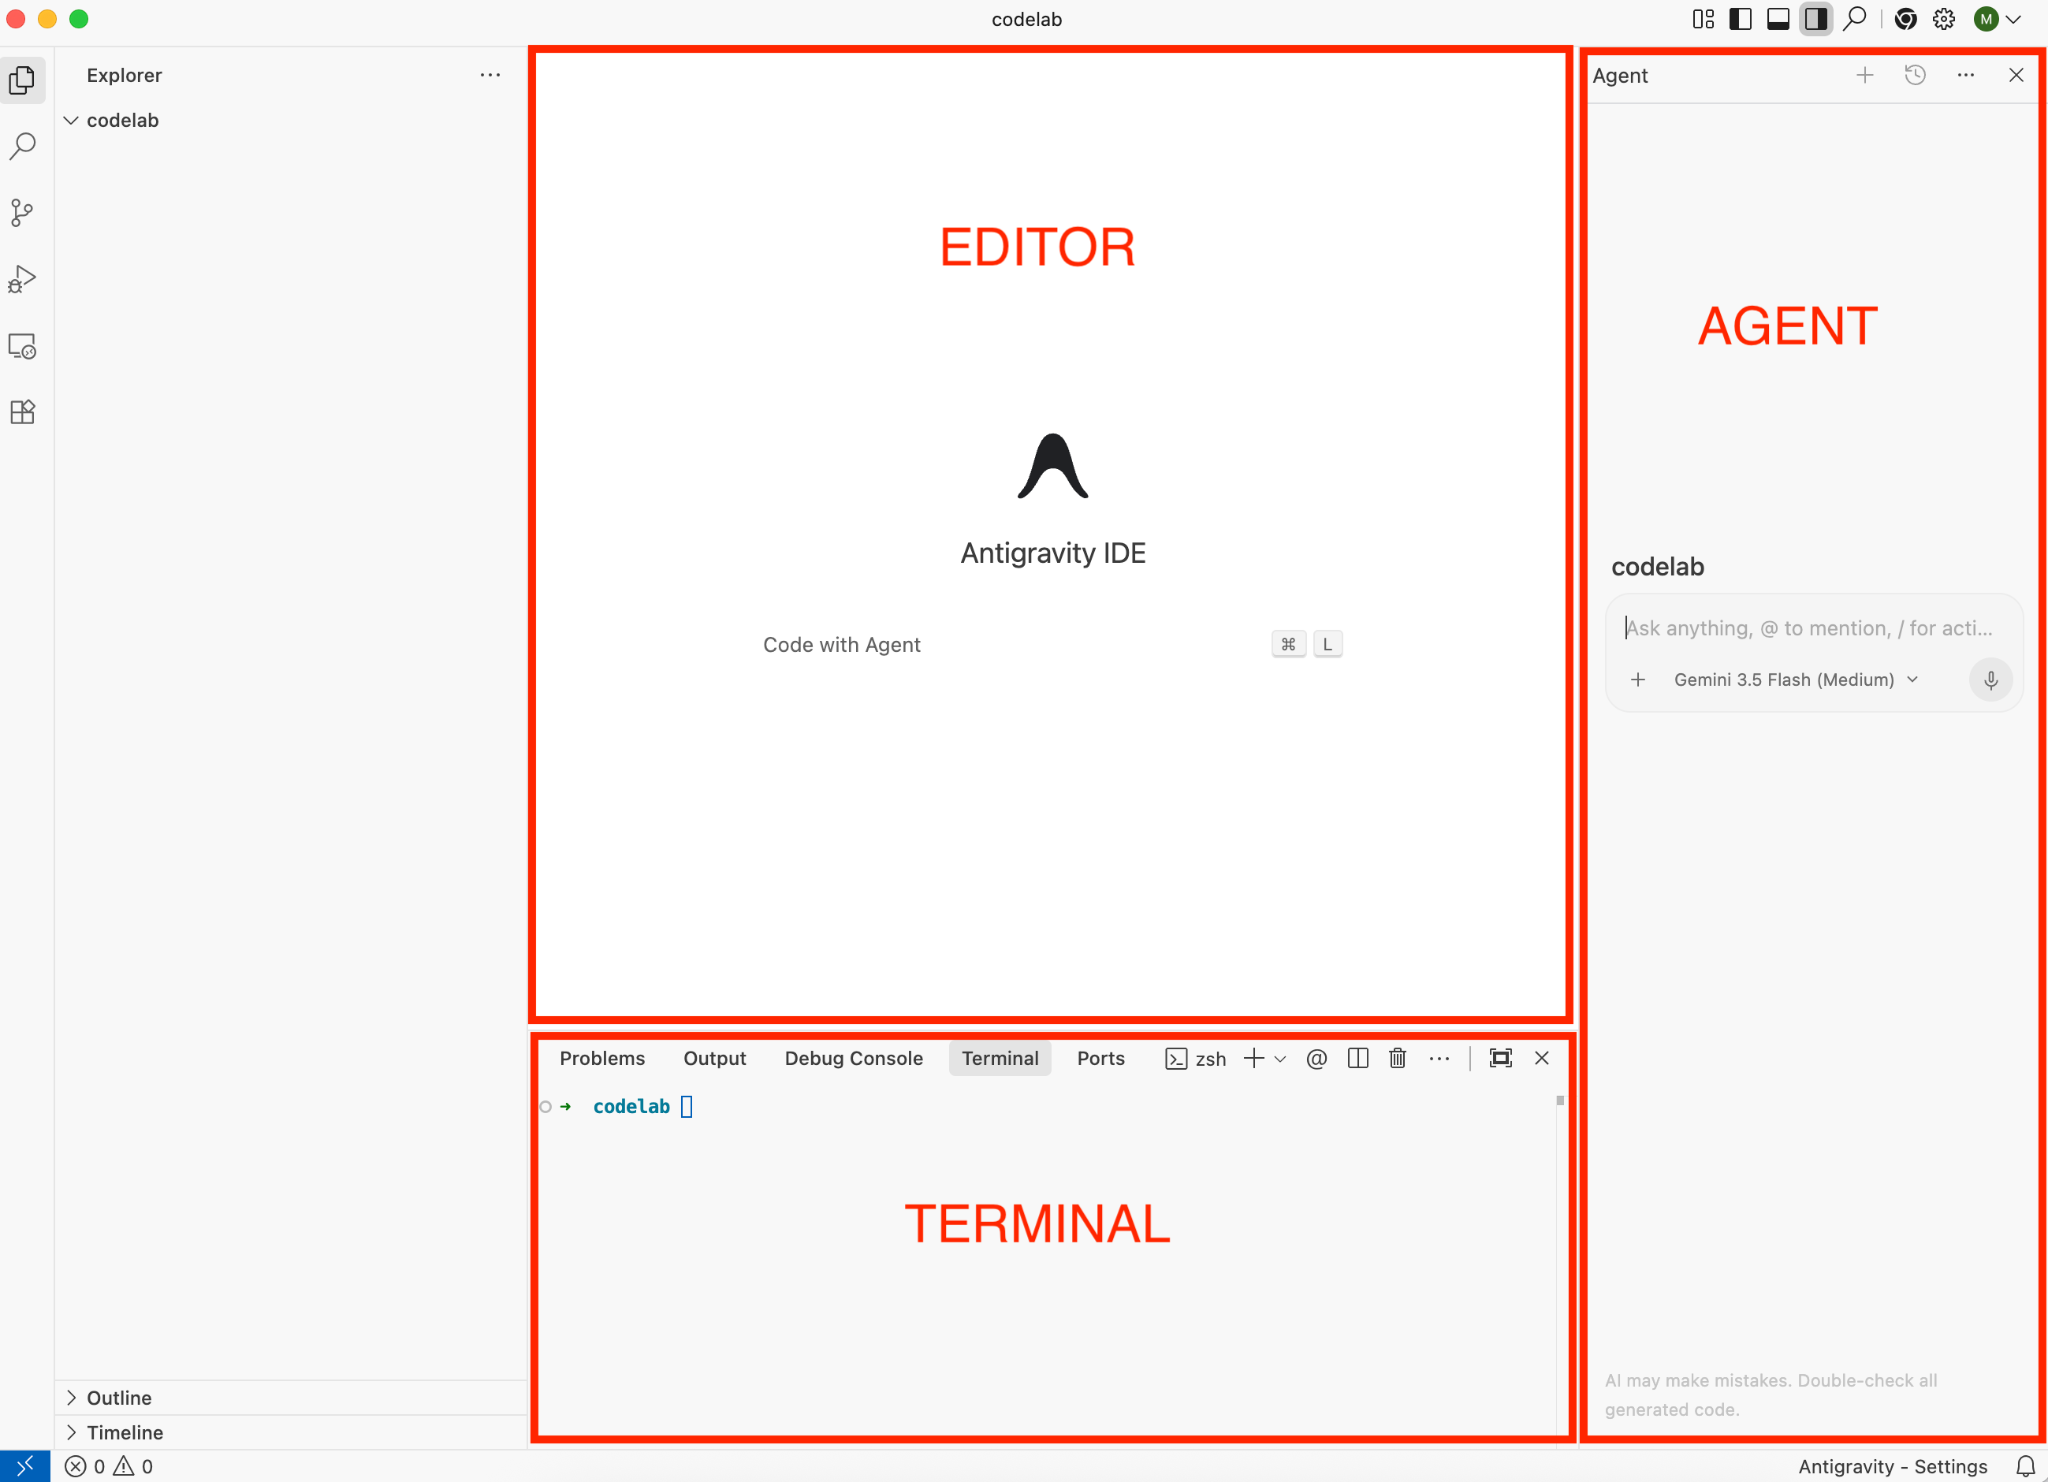
In the editor, you get AI assistance from Antigravity as you type code. The agent panel is where you chat with the agent, choose different models, and refer to files and commands. The terminal is not AI assisted by default, but if you install Antigravity CLI, you can start it with agy command and get AI assistance in the terminal as well.
Antigravity Settings
It's good to take a look at Antigravity Settings on the bottom right corner. It has the basic settings for the agent:
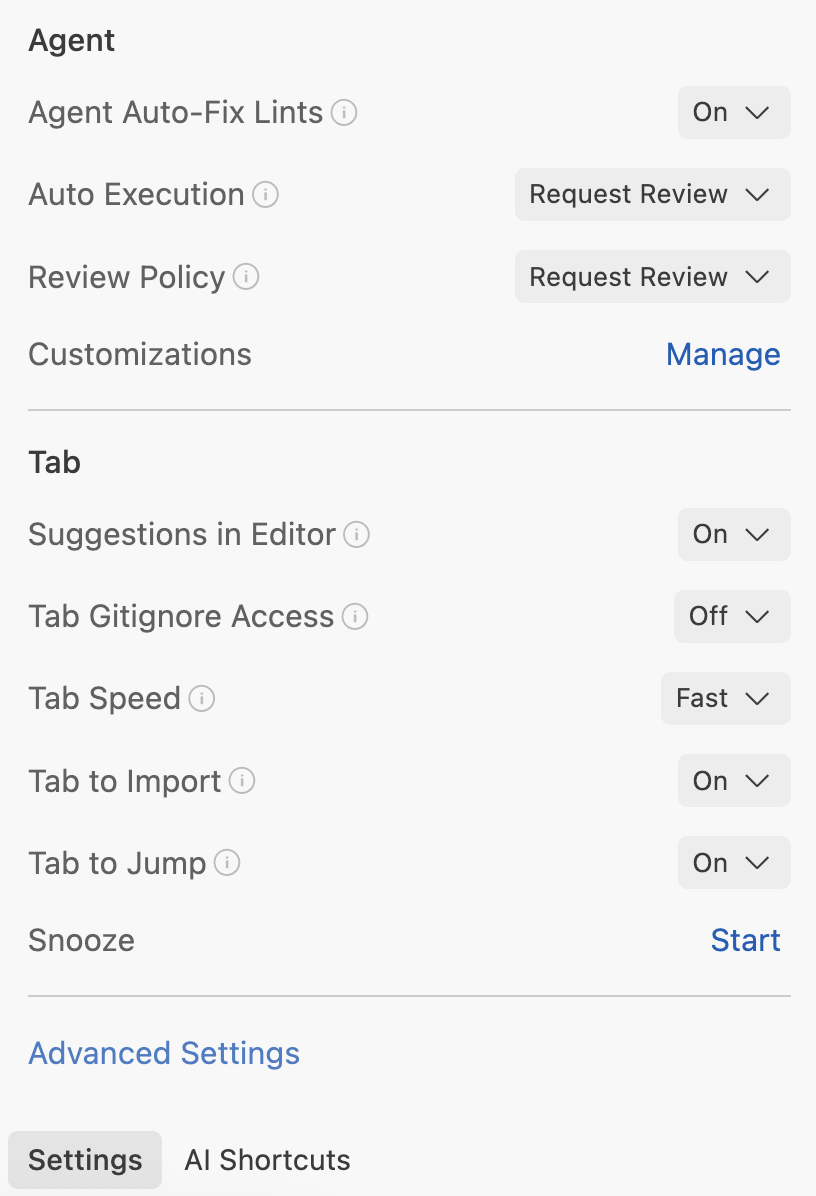
Advanced Settings provide more settings such as the agent security mode:
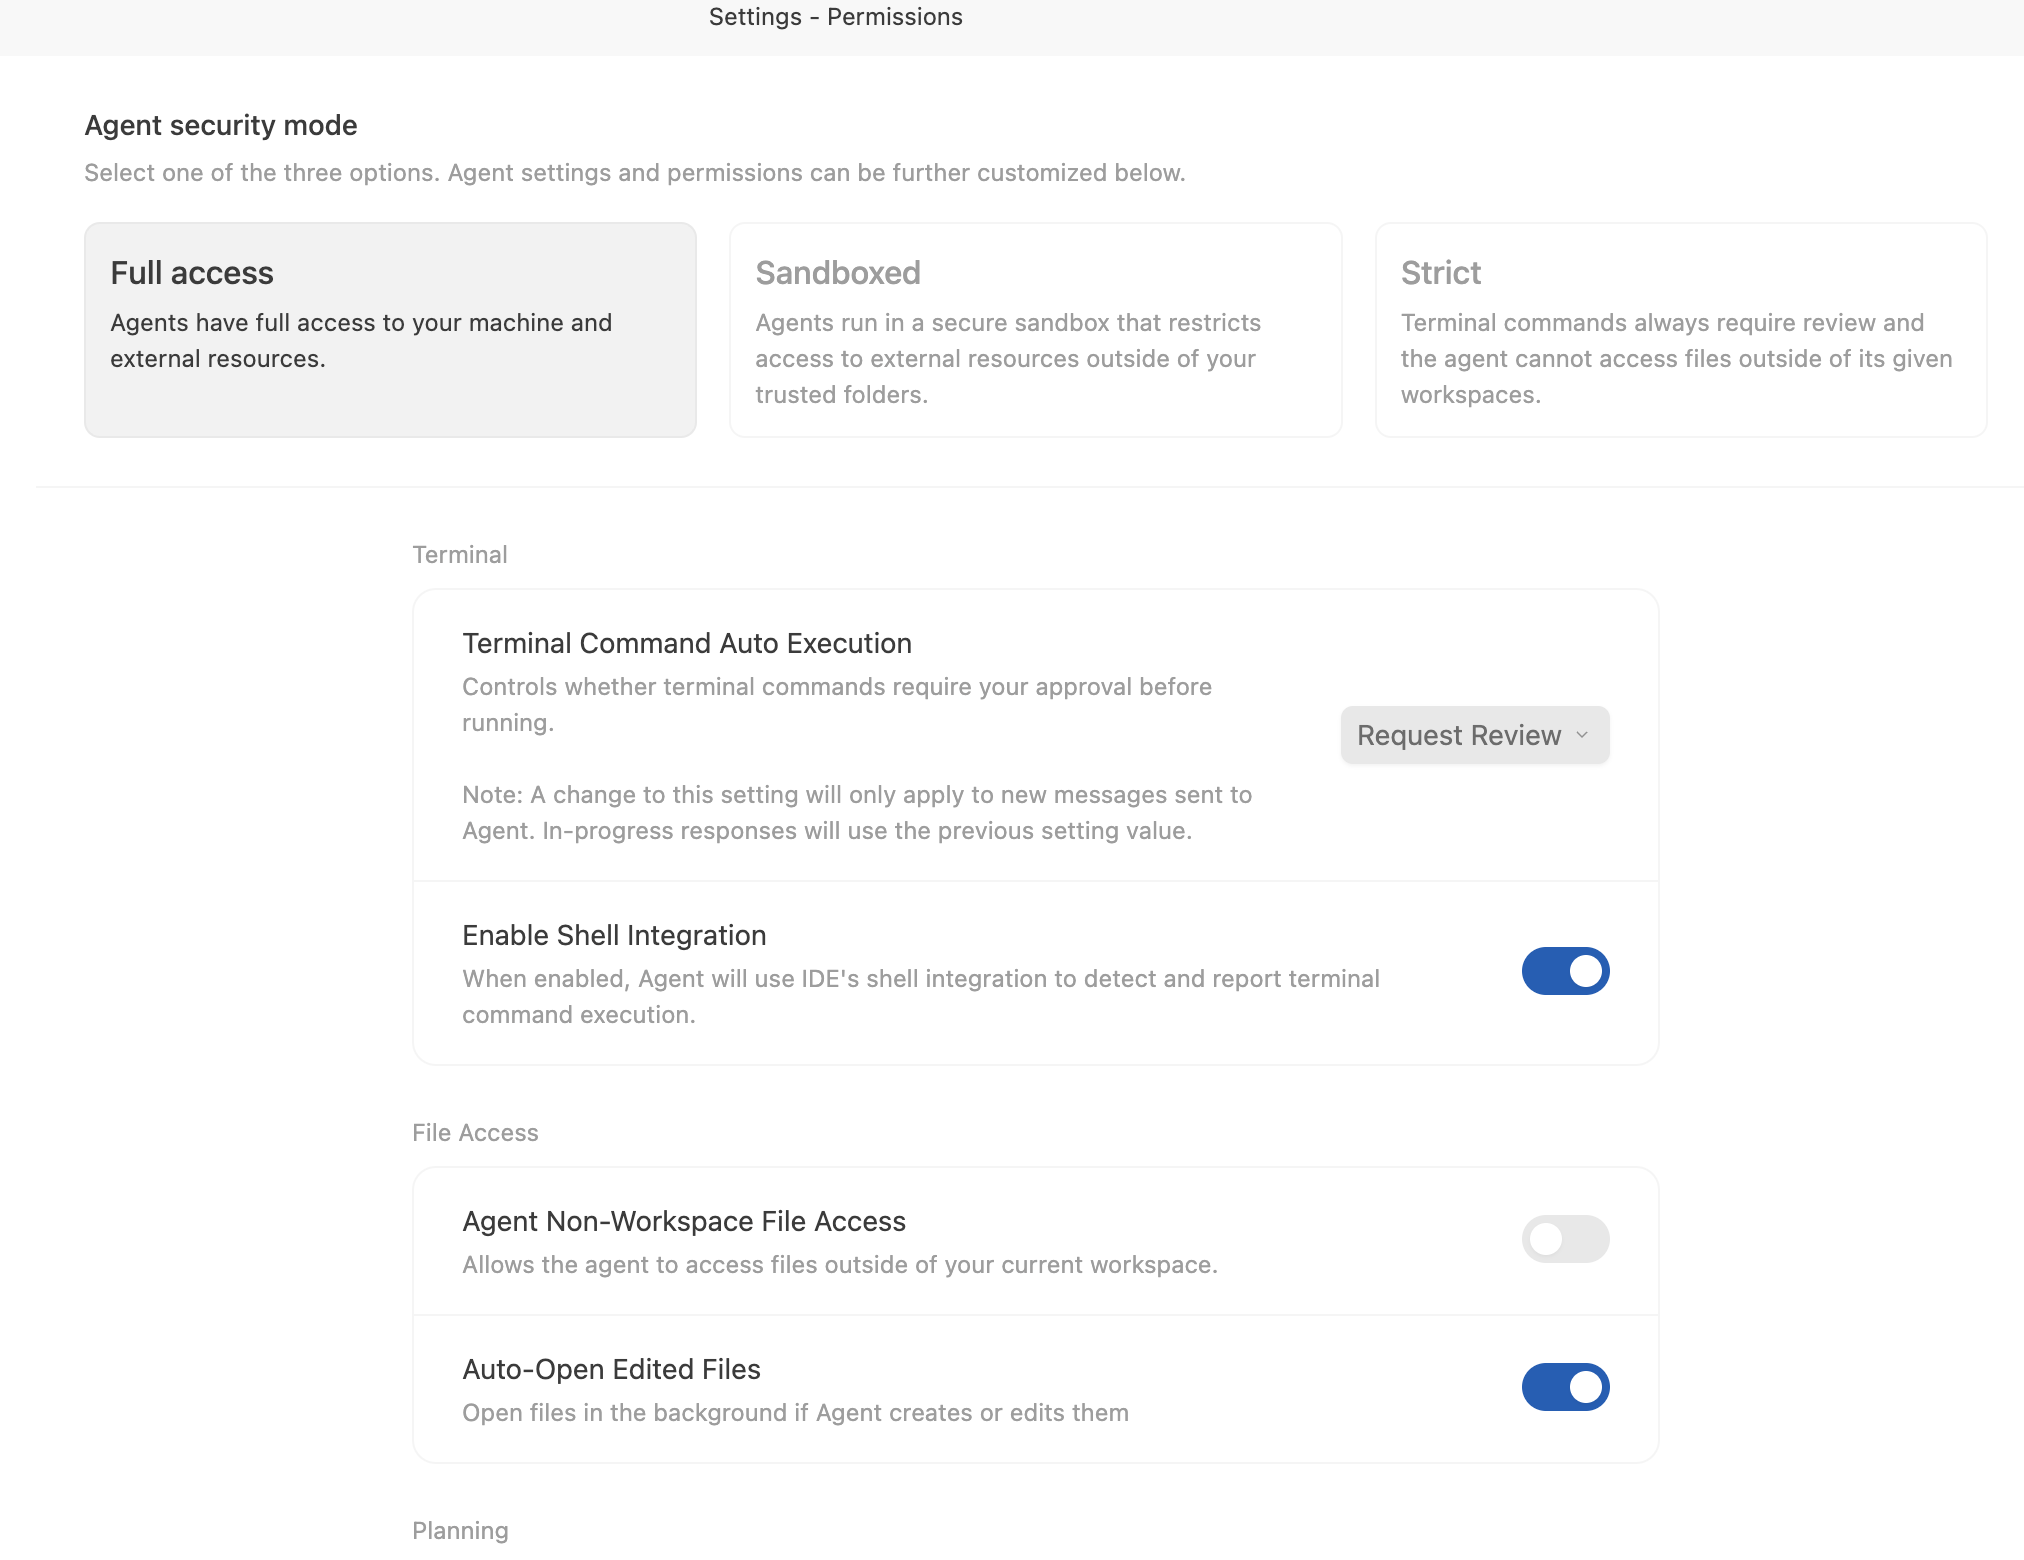
This allows you to specify how much freedom the agent has in regard to terminal commands, file system access, and so on. Make sure you review them and choose settings you're comfortable with your project.
5. Editor
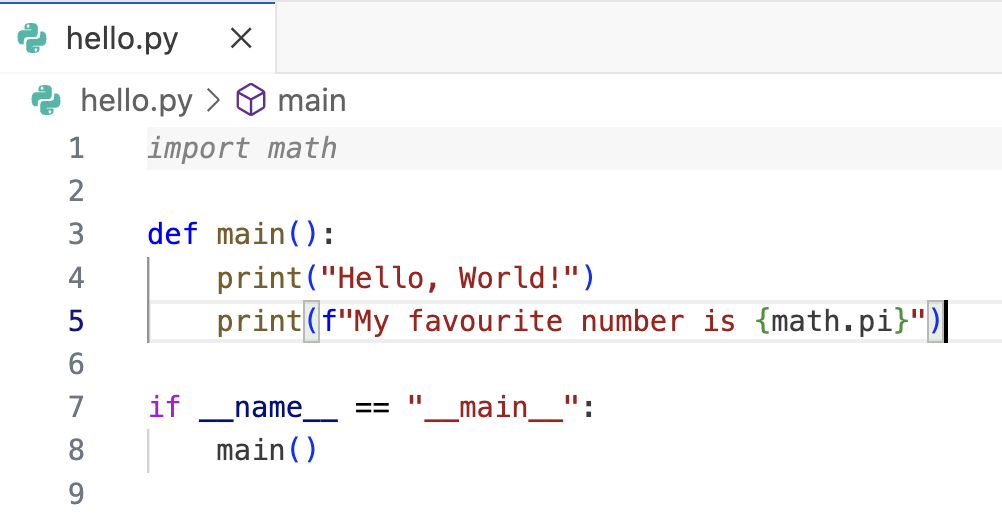
Let's explore the editor. Create a Python file, hello.py to explore the editor features.
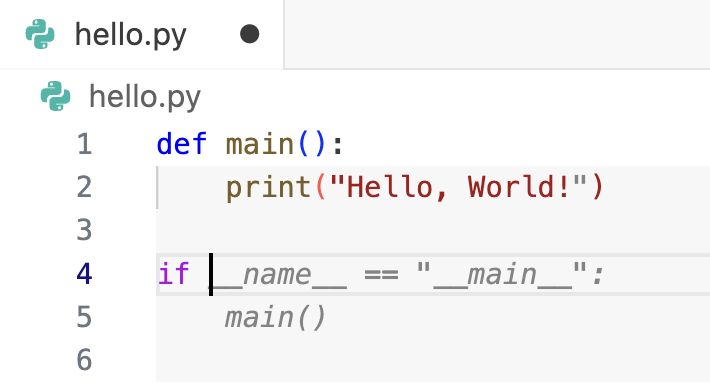
As you type code in hello.py in the editor, a smart auto-complete kicks in that you can accept by pressing Tab:
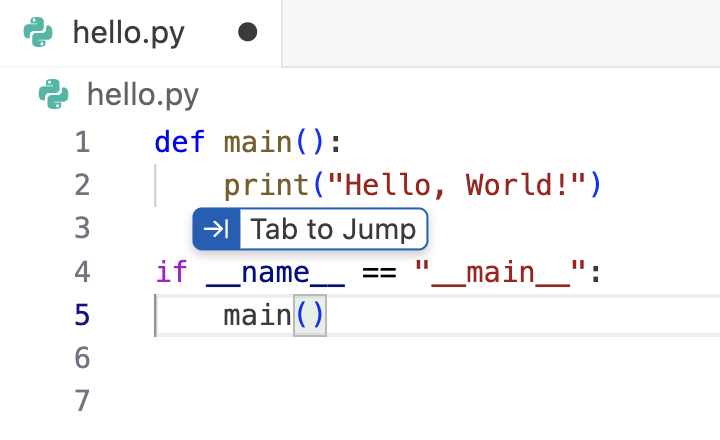
You get a tab to jump suggestions to get the cursor to the next logical place in the code. For example, as you finish typing main(), the editor asks you to jump to the main method:
You also get a tab to import suggestion to add missing dependencies:
6. Agent Panel
On the right, you find the agent side panel. If it's not visible, you can toggle it with the Cmd + L shortcut.
You can choose different model types, use @ to include more context such as files, directories, terminal, MCP servers or / for commands (covered in a later step).
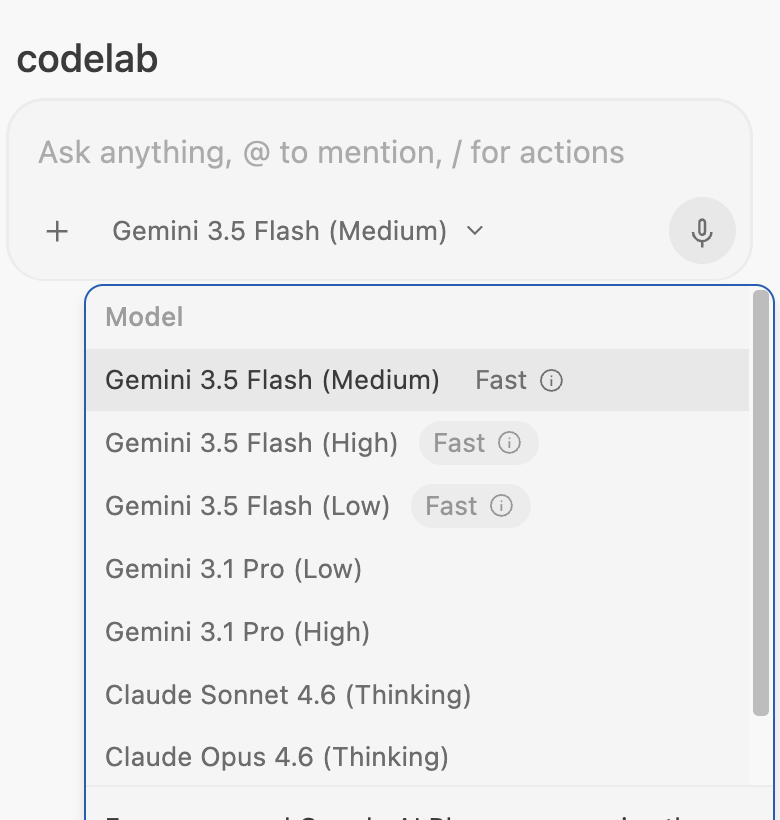
The easiest way to interact with the agent is to start asking questions in a conversation but there are multiple ways to interact with the agent.
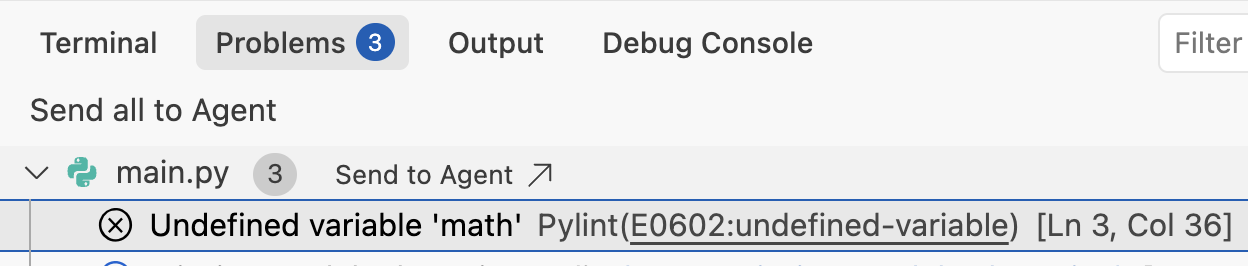
If you have a static linter installed (e.g. Pylint), you'll see syntax errors in the code when you make a mistake. If hover over a problem in the editor and select Explain and fix . This opens up the agent panel for an explanation and a possible fix from the agent:

You can also go to the Problems tab of the IDE and select Send to Agent to get the agent to try to fix those problems:
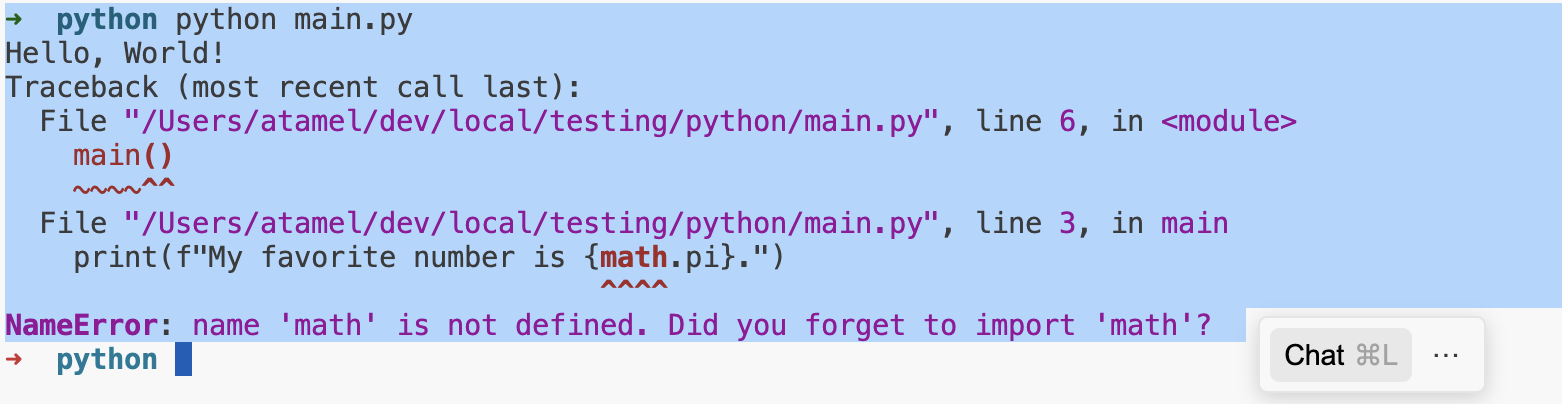
You can also select a part of the terminal output with and error and send it to the agent conversation with Cmd + L:
As you chat with the agent, you'll see some icons on the top of the input window:
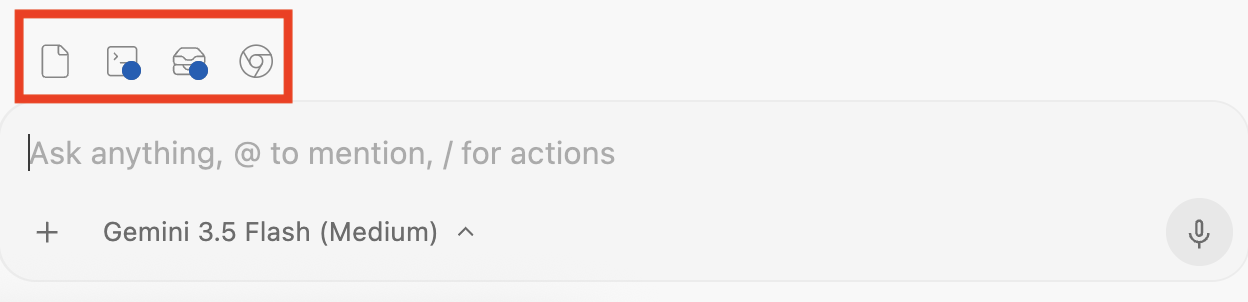
These are Changes Overview (to see code changes), Terminal (background processes), Artifacts, and Browser.
7. Artifacts
At the heart of Antigravity is its ability to effortlessly gather your feedback at every stage of the development. As the agent works on a task, it creates different artifacts along the way:
- Before coding: An implementation plan and a task list.
- As it generates code: Code diffs.
- After coding: A walkthrough to explain what it did and verify the results.
These artifacts are a way for Antigravity to communicate its plans and progress. More importantly, they're also a way for you to provide feedback to the agent in Google docs style comments. This is very useful to effectively steer the agent in the direction you want.
Let's try to build a simple application and see how we can provide feedback to Antigravity along the way.
In the agent side panel, try this prompt:
Build a TODO list application with Python Flask, SQlite DB, and a CRUD frontend. Keep the application simple
This will kickstart the agent to start planning and produce an implementation plan.
Implementation plan
An implementation plan is an overview of what Antigravity intends to do, which tech stack it will use, and a high-level description of the proposed changes.
In a few seconds, you should see an implementation plan in the conversation:
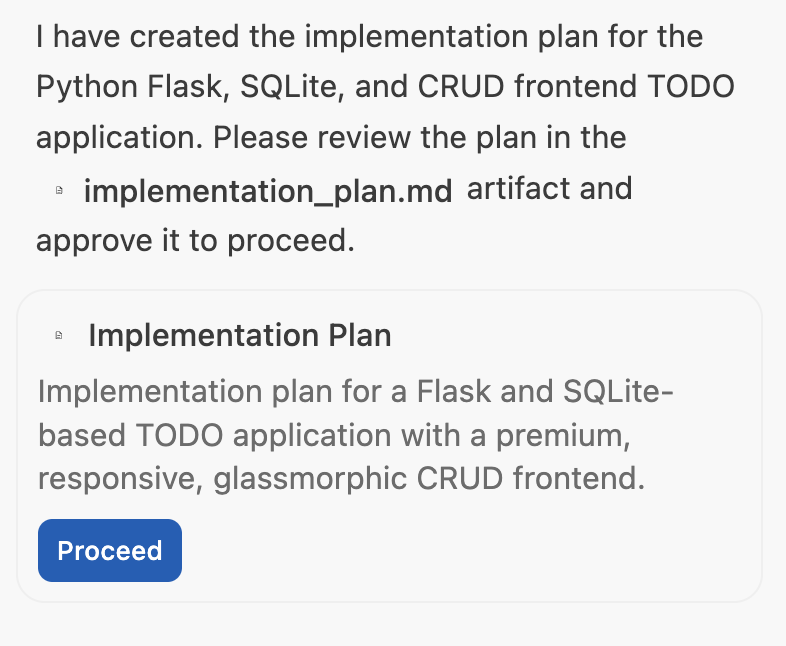
If you're happy with it, you can click on the Proceed button. If you want to provide feedback, you can open the implementation plan and add Google doc style comments before submitting it.
Task list
After the implementation plan is updated, Antigravity creates a task list. This is a concrete list of steps Antigravity will follow to create and verify the app. It's a way for it to communicate its progress:
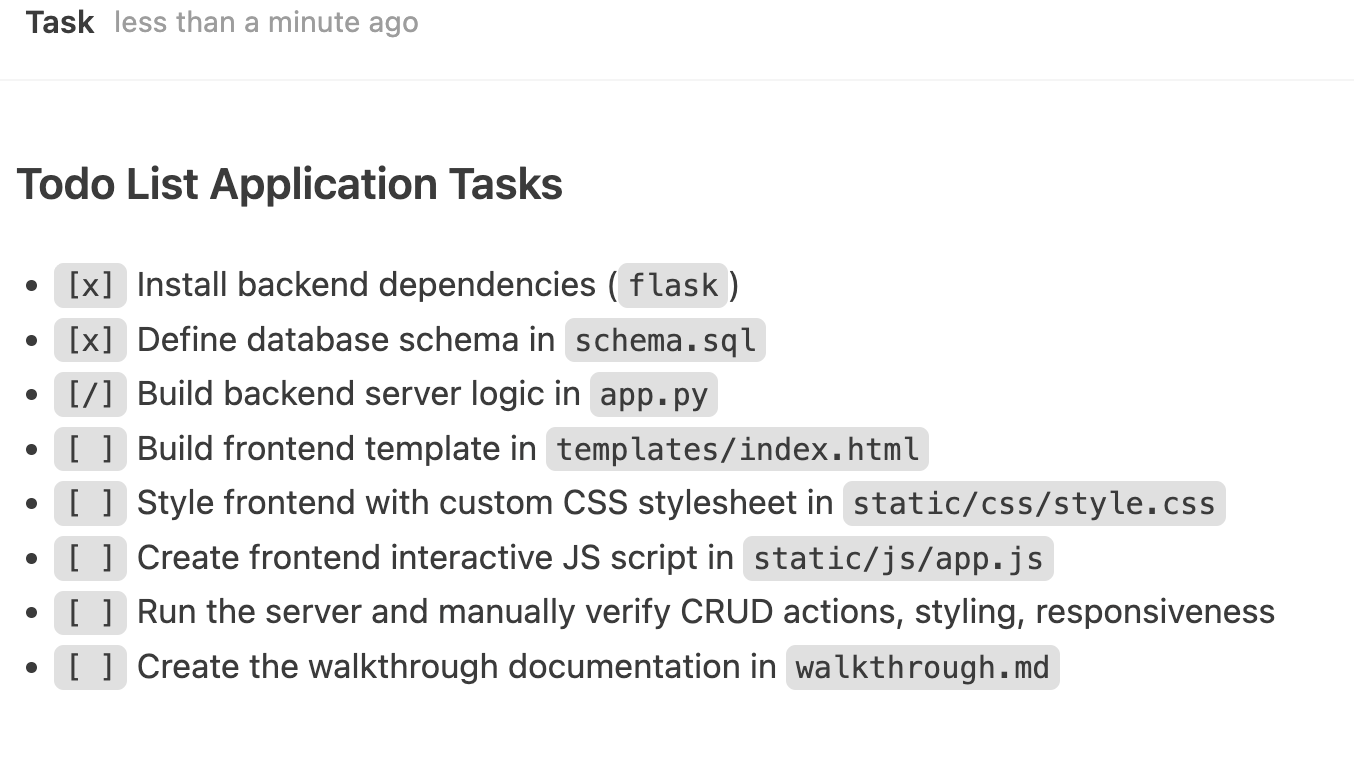
Code changes
At this point, Antigravity will generate some code in new files. You can Accept all or Reject all these changes in the agent chat side panel without looking into details. You can also click on Review changes to see the details of changes and add detailed comments in the code.
Walkthrough
Once Antigravity is done with coding, it starts the server, it might open up a browser to verify the app. It will do some manual testing like adding tasks, updating tasks, etc. In the end, it creates a walkthrough file to summarize what it did to verify the app. This could include a screenshot or a verification flow with a browser recording.
You can comment on the screenshot or the browser recording in the walkthrough too. For example, we can add a comment Change the blue theme to orange theme and submit. After the comment is submitted, Antigravity makes the changes, verifies the results, and updates the walkthrough
Undo changes
Last but not least, after each step, if you're not happy with the change, you have the option of undoing it from the chat. You just choose the ↩️ Undo changes up to this point in the chat.
8. Slash Commands
There are built-in slash / commands available in Antigravity IDE. In the agent side panel, if you type / , you should see the list of commands:
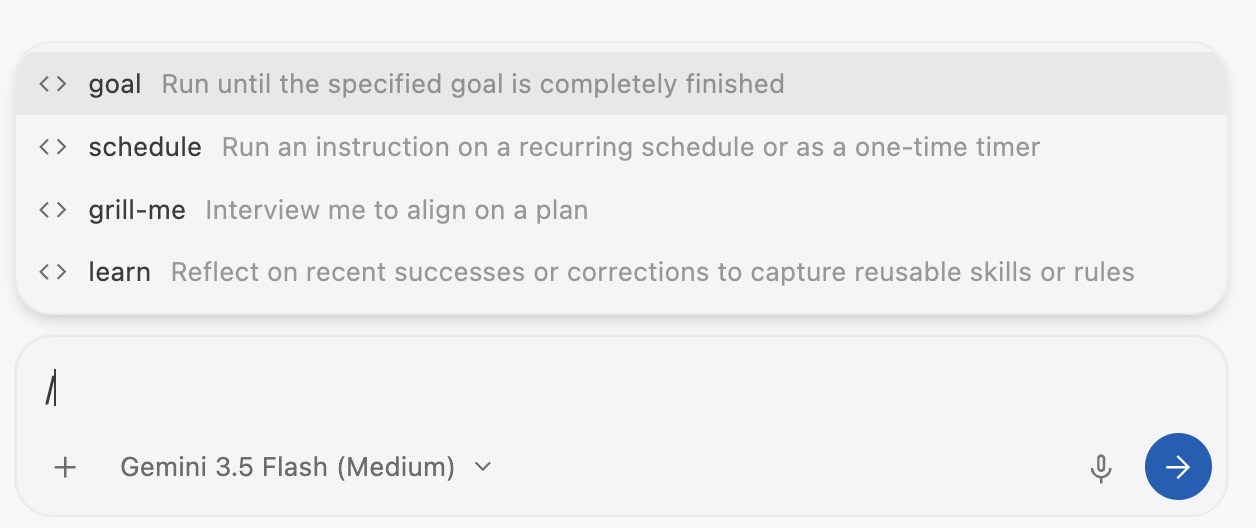
/goal instructs the agent to run a task until completion, /schedule allows tasks to be scheduled as recurring or one-time tasks. /grill-me is useful to align on a plan with the agent and /learn is useful to extract reusable skills or rules from conversations.
Play with these commands to see how they can be useful to you.
9. Customizations
Antigravity IDE comes with a couple of customization options: Rules and Workflows.
Click on the ... on the top right corner and choose Customizations, you will see Rules and Workflows:
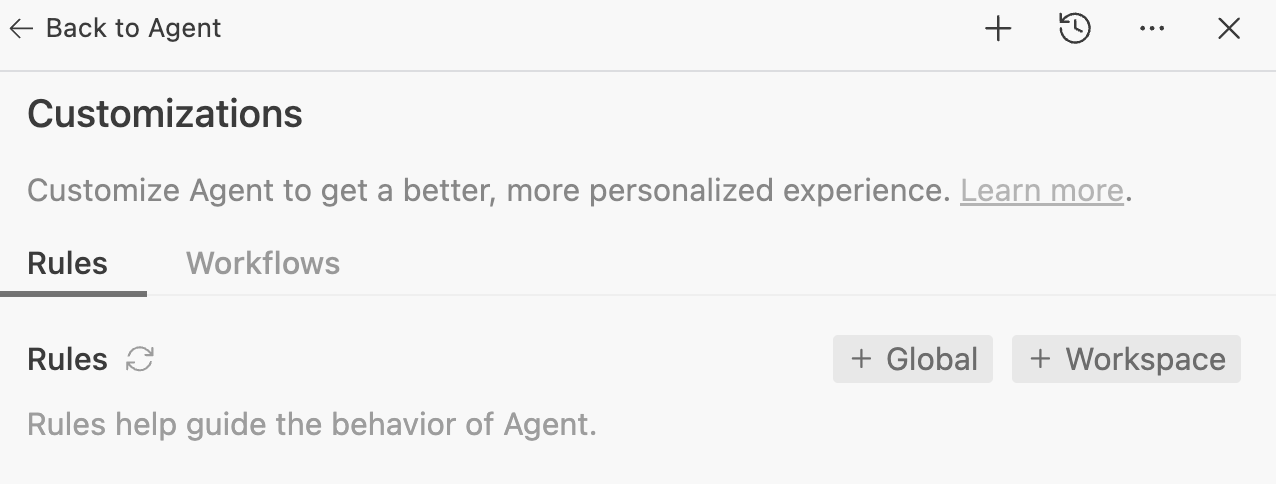
Rules help guide the behavior of the agent. These are guidelines you can provide to make sure the agent follows as it generates code and tests. For example, you might want the agent to follow a certain code style, or to always document methods. You can add these as rules and the agent will take them into account.
Workflows are saved prompts that you can trigger on demand with /, as you interact with the agent. They also guide the behavior of the agent but they're triggered by the user on demand.
A good analogy is that Rules are more like system instructions whereas Workflows are more like saved prompts that you can choose on demand.
Both Rules and Workflows can be applied globally or per workspace and saved to the following locations:
- Global rule:
~/.gemini/GEMINI.md - Global workflows:
~/.gemini/config/global_workflows/ - Workspace rules:
.agents/rules/ - Workspace workflows:
.agents/workflows/
Let's add some rules and workflows in the workspace.
Add a rule
First, let's add a code style rule. Go to Rules and select the +Workspace button. Give it a name such as code-style-guide with the following code style rules:
* Make sure all the code is styled with PEP 8 style guide
* Make sure all the code is properly commented
Second, let's add another rule to make sure the code is generated in a modular way with examples in a code-generation-guide rule:
* The main method in main.py is the entry point to showcase functionality.
* Do not generate code in the main method. Instead generate distinct functionality in a new file (eg. feature_x.py)
* Then, generate example code to show the new functionality in a new method in main.py (eg. example_feature_x) and simply call that method from the main method.
The two rules are saved and ready
Add a workflow
Let's also define a workflow to generate unit tests. This will allow us to trigger unit tests once we're happy with the code (rather than the agent generating unit tests all the time).
Go to Workflows and select the +Workspace button. Give it a name such as generate-unit-tests with the following:
* Generate unit tests for each file and each method
* Make sure the unit tests are named similar to files but with test_ prefix
The workflow is also ready to go now.
Try it out
Let's now see rules and workflows in action. Create a skeleton main.py file in your workspace:
def main():
    pass

if __name__ == "__main__":
    main()
Now, go to the agent side panel and ask the agent: Implement binary search and bubble sort.
After a minute or two, you should get three files in the workspace: main.py, bubble_sort.py, binary_search.py. You'll also notice that all the rules are implemented: the main file is not cluttered and has the example code, each feature is implemented in its own file, all the code is documented and in good style:
from binary_search import binary_search, binary_search_recursive
from bubble_sort import bubble_sort, bubble_sort_descending


def example_binary_search():
    """
    Demonstrate binary search algorithm with various test cases.
    """
    ...

def example_bubble_sort():
    """
    Demonstrate bubble sort algorithm with various test cases.
    """
    ...

def main():
    """
    Main entry point to showcase functionality.
    """
    example_binary_search()
    example_bubble_sort()
    print("\n" + "=" * 60)


if __name__ == "__main__":
    main()
Now that we're happy with the code, let's see if we can trigger the generate unit test workflow.
Go to the chat and start typing /generate and Antigravity already knows about our workflow:
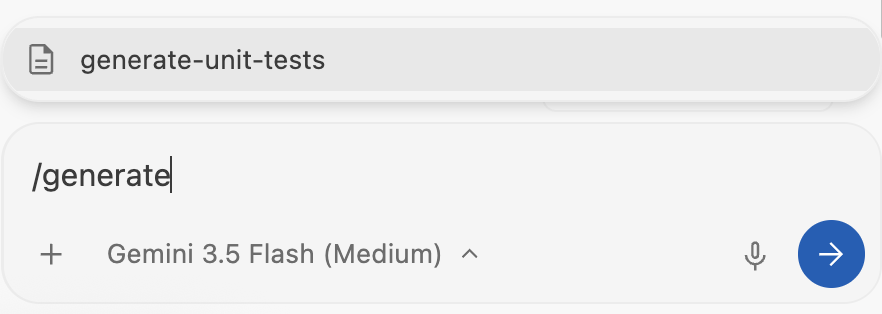
Select generate-unit-tests and enter. After a few seconds, you'll get new files in your workspace: test_binary_search.py, test_bubble_sort.py with a number of tests already implemented!
10. MCP Servers
The Model Context Protocol (MCP) has emerged as the standard to help connect agents to external systems. They play a key role in ensuring that the agent remains grounded in terms of your data and integration.
Antigravity IDE supports MCP servers, both local and remote. It also ships with integrations to several MCP servers that work with Google Cloud services and they are simply one-click installs with a few configuration data.
Click on the ... on the top right corner and choose MCP Servers. This brings up a dialog, where you can see a list of MCP servers:
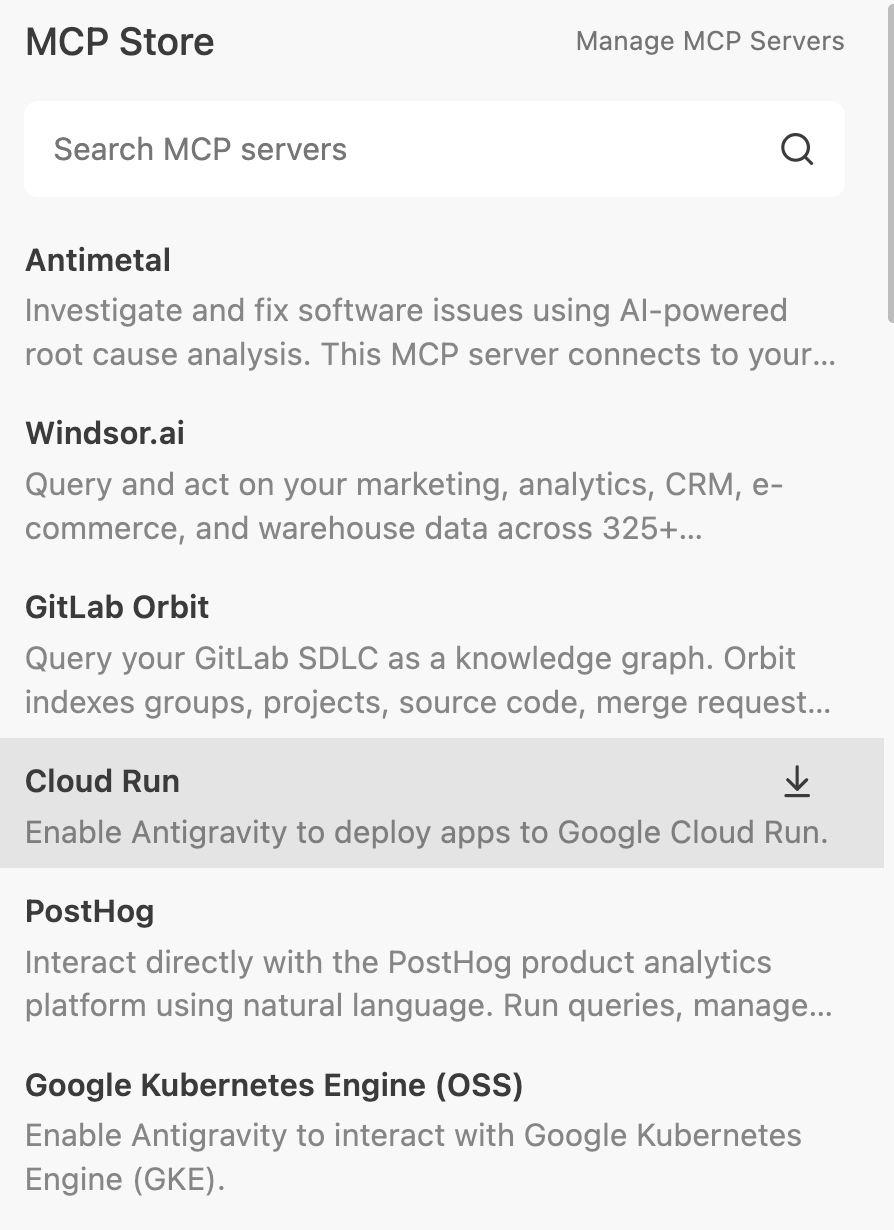
You can click on Cloud Run to install its MCP server, for example.
If you click on Manage MCP Servers on top right, you can also see the raw MCP server configuration in ~/.gemini/config/mcp_config.json. You can also add other custom MCP servers in this file and hit the refresh button to see them recognized in Antigravity IDE.
To use the configured MCP servers, you can ask Antigravity something that requires an MCP server. For example, you can have the cloudrun-mcp server enabled and ask Antigravity the following: Build and deploy a Cloud Run service. This should prompt Antigravity to look for and use the cloudrun-mcp server to configure and deploy a Cloud Run service.
11. Skills
While Antigravity's underlying models are powerful generalists, they don't know your specific project context or team standards. Loading every single rule or tool into the agent's context window leads to tool bloat, higher costs, latency, and confusion.
Skills solve this through progressive disclosure. A skill is a specialized package of knowledge that sits dormant until needed. It is only loaded into the agent's context when your specific request matches the skill's description .
Structure and Scope
Skills are directory-based packages. You can define them in two scopes depending on your needs:
- Global Scope (
~/.gemini/config/skills/): Available across all Antigravity products (Antigravity, Antigravity IDE, Antigravity CLI) and projects. - Project/Workspace Scope (
<project-root>/.agents/skills/): This would make the skill available only within a specific project.
A typical skill directory looks like this :
my-skill/
├── SKILL.md    #(Required) metadata & instructions.
├── scripts/    # (Optional) Python or Bash scripts for execution.
├── references/ # (Optional) text, documentation, or templates.
└── assets/     # (Optional) Images or logos.
Let's add a skill now.
Code Review Skill
This is an instruction-only skill i.e. we only need to create the SKILL.md file, that will contain the metadata and the skills instructions. Let's create a skill that provides details to the agent to review code changes for bugs, style issues and best practices.
Create a directory in the project folder that will contain the skill:
mkdir -p .agents/skills/code-review
Create a SKILL.md file in the project folder e.g. .agents/skills/code-review that we just created, with the content shown below:
---
name: code-review
description: Reviews code changes for bugs, style issues, and best practices. Use when reviewing PRs or checking code quality.
---

# Code Review Skill

When reviewing code, follow these steps:

## Review checklist

1. **Correctness**: Does the code do what it's supposed to?
2. **Edge cases**: Are error conditions handled?
3. **Style**: Does it follow project conventions?
4. **Performance**: Are there obvious inefficiencies?

## How to provide feedback

- Be specific about what needs to change
- Explain why, not just what
- Suggest alternatives when possible
Notice that the SKILL.md file above contains the metadata (name and description) at the top and then the instructions. When the agent loads, it will only read the metadata of the skills and it will only load the full skills instructions, only when needed.
Let us validate the skill. Start a new conversation with Antigravity and ask which skills are installed. You should see the code-review skill:
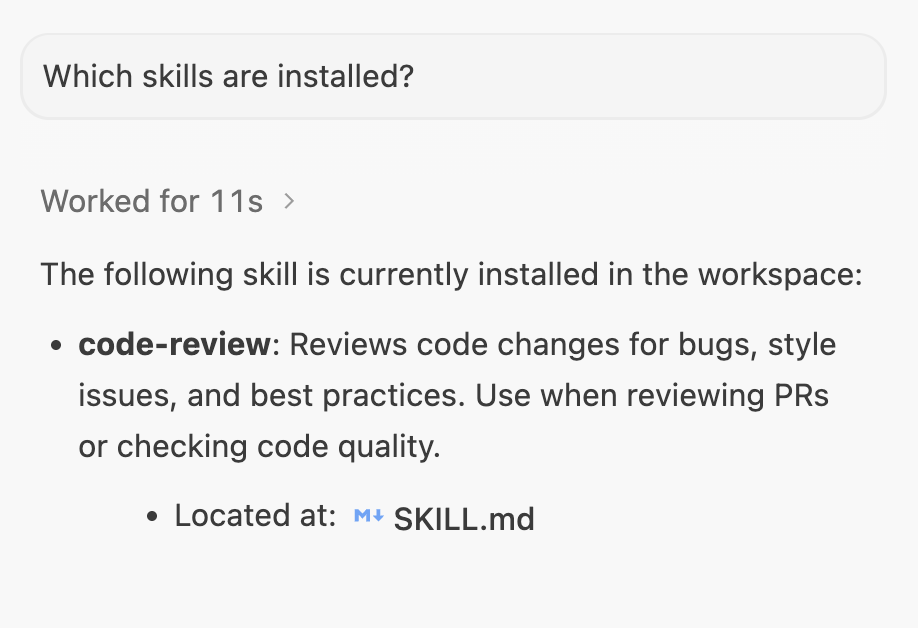
Try it out
Create a new file named demo_bad_code.py in the with the contents shown below:
import time

def get_user_data(users, id):
   # Find user by ID
   for u in users:
       if u['id'] == id:
            return u
   return None

def process_payments(items):
   total = 0
   for i in items:
       # Calculate tax
       tax = i['price'] * 0.1
       total = total + i['price'] + tax
       time.sleep(0.1) # Simulate slow network call

   return total

def run_batch():
   users = [{'id': 1, 'name': 'Alice'}, {'id': 2, 'name': 'Bob'}]
   items = [{'price': 10}, {'price': 20}, {'price': 100}]

   u = get_user_data(users, 3)
   print("User found: " + u['name']) # Will crash if None

   print("Total: " + str(process_payments(items)))

if __name__ == "__main__":
   run_batch()
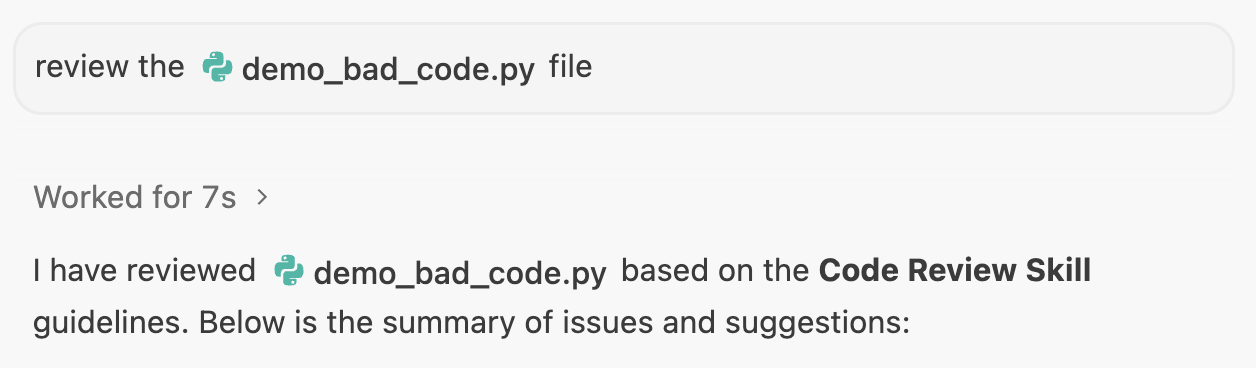
Open a new conversation in a specific project in Antigravity and give the following prompt: review the @demo_bad_code.py file.
The Agent should identify the code-review skill, load the details and then perform the action as per the instructions given in the code-review/SKILL.md file.
A sample output is shown below:
12. Conclusion
Congratulations! You have now successfully installed, configured and explored the main features of Antigravity IDE!
To learn more about the Antigravity platform, take a look at the following codelabs and reference documentation.
Other codelabs
- Getting Started with Google Antigravity
- Building with Google Antigravity
- Hands-on with Antigravity CLI
- Build and Deploy to Google Cloud with Antigravity
Reference docs
- Official Site : https://antigravity.google/
- Documentation: https://antigravity.google/docs/home
- Use cases : https://antigravity.google/use-cases
- Download : https://antigravity.google/download
- Youtube Channel for Google Antigravity : https://www.youtube.com/@googleantigravity