
1. 简介
概览
在本实验中,用户将探索如何通过支持 VPC spoke,使用 Network Connectivity Center(NCC) 大规模建立 VPC 间连接。将 VPC 定义为 VPC spoke 后,用户就可以通过 NCC hub 将其连接到多个 VPC 网络。采用 VPC Spoke 配置的 NCC 可降低通过 VPC 对等互连管理配对 VPC 间连接的运营复杂性,而是使用集中式连接管理模型。
请注意,Network Connectivity Center (NCC) 是 Google Cloud 中网络连接管理的中心辐射型控制平面模型。hub 资源提供集中式连接管理模型,可用于 spoke 之间的连接。
构建内容
在此 Codelab 中,您将使用 NCC hub 构建一个逻辑中心辐射型拓扑,以在三个不同的 VPC 之间实现全网状 VPC 连接结构。
学习内容
- 使用 NCC 实现全网状 VPC 连接
- 跨 VPC 的 Private NAT
所需条件
- 了解 GCP VPC 网络
- 了解 Cloud Router 和 BGP 路由
- 两个单独的 GCP 项目
- 此 Codelab 需要 5 个 VPC。其中一个 VPC 必须位于与 NCC hub 不同的项目中
- 检查您的配额:网络,并在需要时申请添加其他网络,如下面的屏幕截图所示:

目标
- 设置 GCP 环境
- 配置 Network Connectivity Center,并将 VPC 配置为 spoke
- 验证数据路径
- 探索 NCC 可维护性功能
- 清理已使用的资源
准备工作
Google Cloud 控制台和 Cloud Shell
在本实验中,我们将使用 Google Cloud 控制台和 Cloud Shell 与 GCP 进行交互。
NCC Hub 项目 Google Cloud 控制台
您可以通过 https://console.cloud.google.com 访问 Cloud 控制台。
在 Google Cloud 中设置以下各项,以便更轻松地配置 Network Connectivity Center:
在 Google Cloud Console 的“项目选择器”页面上,选择或创建一个 Google Cloud 项目。
启动 Cloud Shell。此 Codelab 使用了 $variables 来帮助在 Cloud Shell 中实现 gcloud 配置。
gcloud auth list
gcloud config list project
gcloud config set project [HUB-PROJECT-NAME]
projectname=[HUB-PROJECT-NAME]
echo $projectname
gcloud config set compute/zone us-central1-a
gcloud config set compute/region us-central1
IAM 角色
NCC 需要 IAM 角色才能访问特定 API。请务必根据需要为用户配置 NCC IAM 角色。
角色/说明 | 权限 |
networkconnectivity.networkAdmin - 允许网络管理员管理 hub 和 spoke。 | networkconnectivity.hubs.networkconnectivity.spokes. |
networkconnectivity.networkSpokeManager - 允许在 hub 中添加和管理 spoke。在共享 VPC 中使用,其中宿主项目拥有 Hub,但其他项目中的其他管理员可以添加 spoke 以连接到 Hub。 | networkconnectivity.spokes.** |
networkconnectivity.networkUsernetworkconnectivity.networkViewer - 允许网络用户查看 hub 和 spoke 的不同属性。 | networkconnectivity.hubs.getnetworkconnectivity.hubs.listnetworkconnectivity.spokes.getnetworkconnectivity.spokes.listnetworkconnectivity.spokes.aggregatedList |
2. 设置网络环境
概览
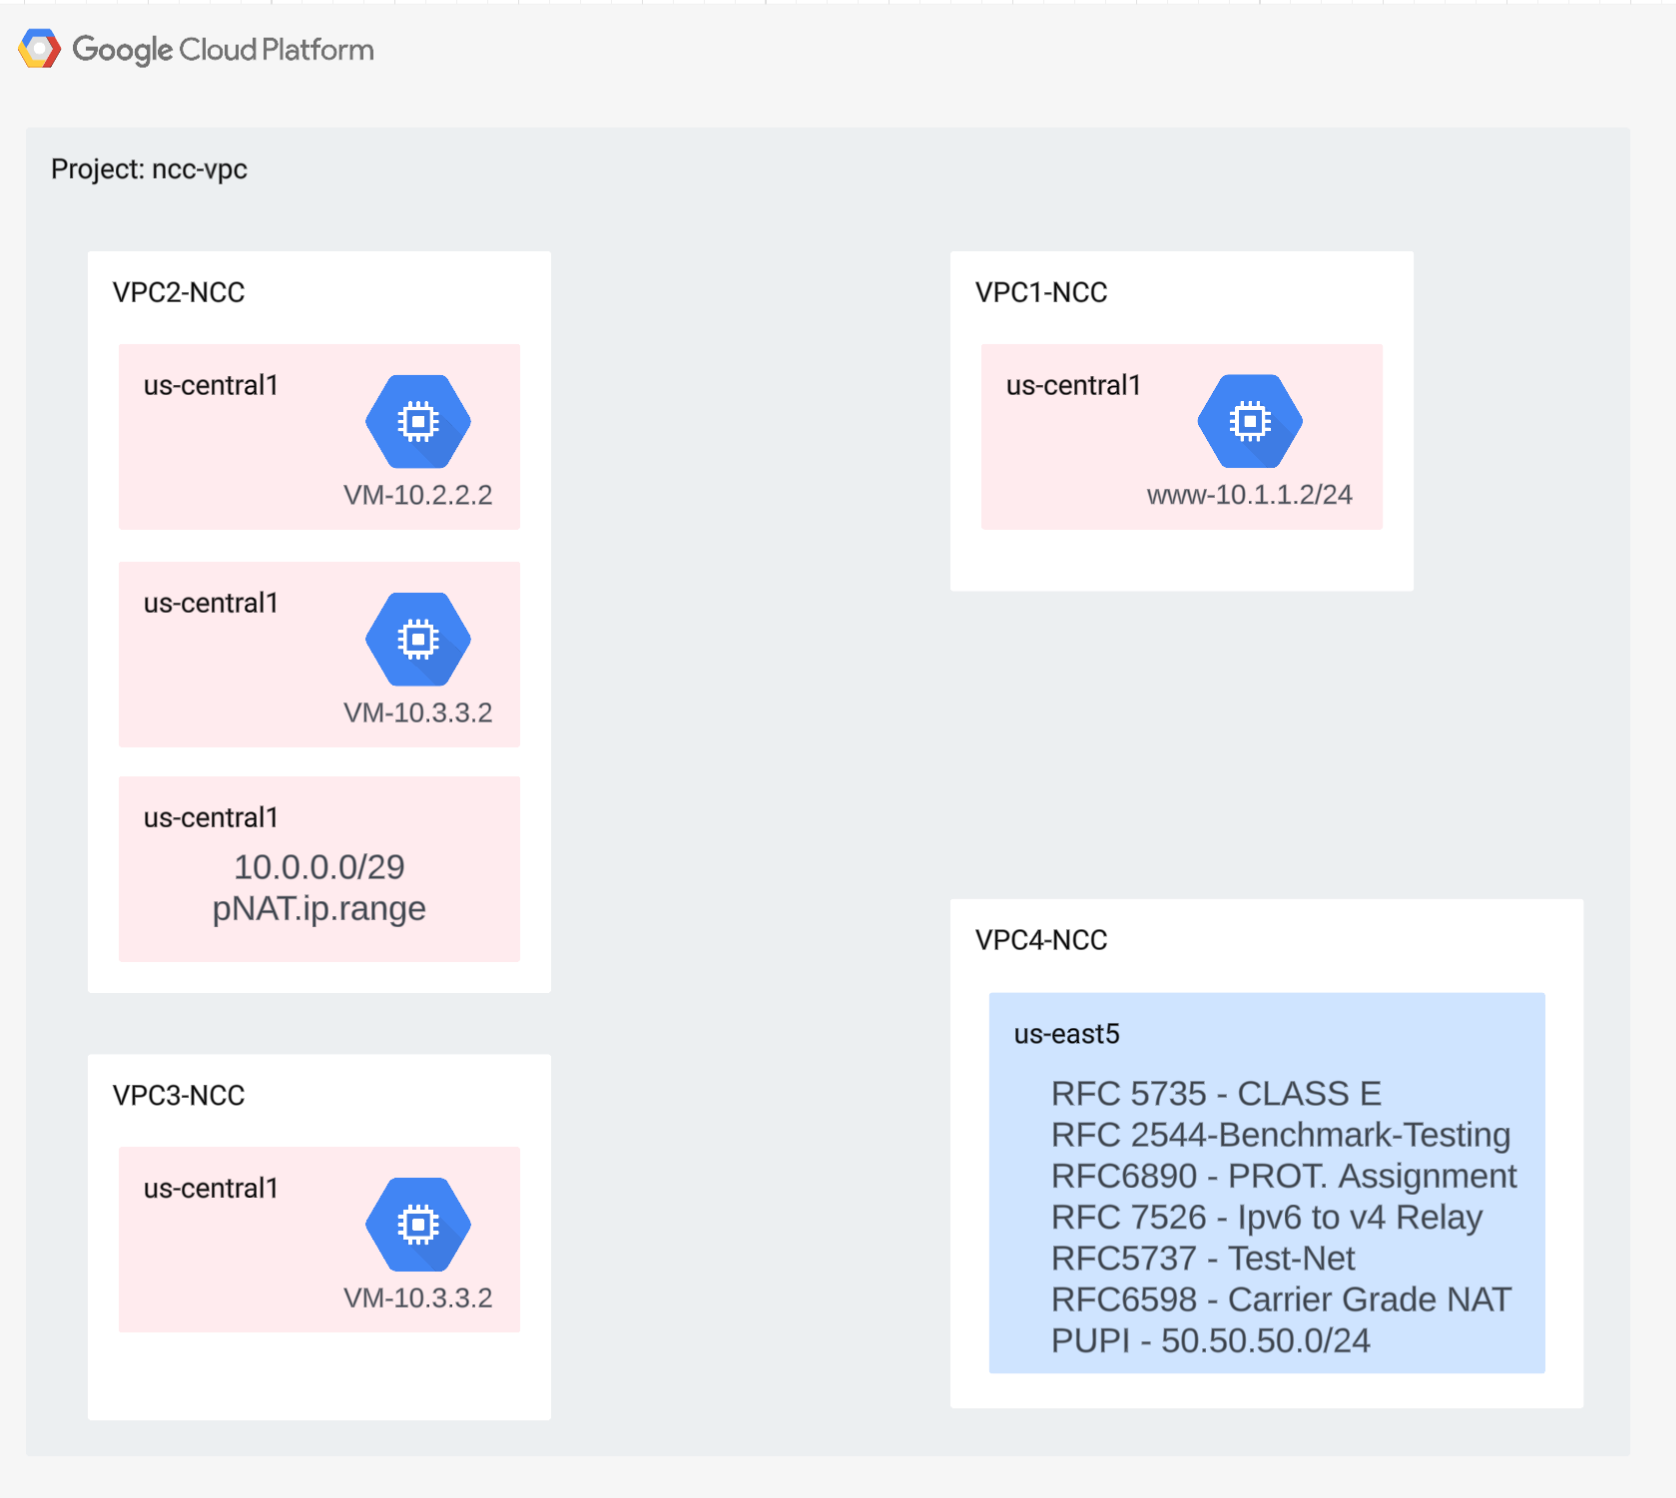
在本部分中,我们将在单个项目中部署 VPC 网络和防火墙规则。此逻辑图展示了在此步骤中设置的网络环境。
为了演示跨项目 Spoke 支持,我们将在后续步骤中在另一个项目中部署 VPC 和防火墙规则。
创建 VPC 和子网
VPC 网络包含您将安装 GCE 虚拟机的子网,用于数据路径验证
gcloud compute networks create vpc1-ncc --subnet-mode custom
gcloud compute networks create vpc2-ncc --subnet-mode custom
gcloud compute networks create vpc3-ncc --subnet-mode custom
gcloud compute networks create vpc4-ncc --subnet-mode custom

gcloud compute networks subnets create vpc1-ncc-subnet1 \
--network vpc1-ncc --range 10.1.1.0/24 --region us-central1

gcloud compute networks subnets create vpc1-ncc-subnet2 \
--network vpc1-ncc --range 10.1.2.0/25 --region us-central1

gcloud compute networks subnets create vpc1-ncc-subnet3 \
--network vpc1-ncc --range 10.1.2.128/25 --region us-central1

gcloud compute networks subnets create vpc2-ncc-subnet1 \
--network vpc2-ncc --range 10.2.2.0/24 --region us-central1
VPC 支持的子网范围
NCC 支持所有有效的 IPv4 子网范围,包括以非公开方式使用的公共 IP 地址。在此步骤中,在 VPC4 中创建将导入到 Hub 路由表中的有效 IP 范围。
gcloud compute networks subnets create benchmark-testing-rfc2544 \
--network vpc4-ncc --range 198.18.0.0/15 --region us-east1

gcloud compute networks subnets create class-e-rfc5735 \
--network vpc4-ncc --range 240.0.0.0/4 --region us-east1

gcloud compute networks subnets create ietf-protcol-assignment-rfc6890 \
--network vpc4-ncc --range 192.0.0.0/24 --region us-east1

gcloud compute networks subnets create ipv6-4-relay-rfc7526 \
--network vpc4-ncc --range 192.88.99.0/24 --region us-east1

gcloud compute networks subnets create pupi \
--network vpc4-ncc --range 50.50.50.0/24 --region us-east1

gcloud compute networks subnets create test-net-1-rfc5737 \
--network vpc4-ncc --range 192.0.2.0/24 --region us-east1

gcloud compute networks subnets create test-net-2-rfc5737 \
--network vpc4-ncc --range 198.51.100.0/24 --region us-east1

gcloud compute networks subnets create test-net-3-rfc5737 \
--network vpc4-ncc --range 203.0.113.0/24 --region us-east1
创建重叠的子网范围
NCC 不会将重叠的 IP 范围导入到 hub 路由表中。用户将在后面的步骤中解决此限制。目前,请为 VPC2 和 VPC3 创建两个重叠的 IP 范围。
gcloud compute networks subnets create overlapping-vpc2 \
--network vpc3-ncc --range 10.3.3.0/24 --region us-central1

gcloud compute networks subnets create overlapping-vpc3 \
--network vpc2-ncc --range 10.3.3.0/24 --region us-central1
配置 VPC 防火墙规则
在每个 VPC 上配置防火墙规则以允许
- SSH
- 内部 IAP
- 10.0.0.0/8 范围
gcloud compute firewall-rules create ncc1-vpc-internal \
--network vpc1-ncc \
--allow all \
--source-ranges 10.0.0.0/8

gcloud compute firewall-rules create ncc2-vpc-internal \
--network vpc2-ncc \
--allow all \
--source-ranges 10.0.0.0/8

gcloud compute firewall-rules create ncc3-vpc-internal \
--network vpc3-ncc \
--allow all \
--source-ranges 10.0.0.0/8

gcloud compute firewall-rules create ncc4-vpc-internal \
--network vpc4-ncc \
--allow all \
--source-ranges 10.0.0.0/8

gcloud compute firewall-rules create ncc1-vpc-iap \
--network vpc1-ncc \
--allow all \
--source-ranges 35.235.240.0/20

gcloud compute firewall-rules create ncc2-vpc-iap \
--network vpc2-ncc \
--allow=tcp:22 \
--source-ranges 35.235.240.0/20

gcloud compute firewall-rules create ncc3-vpc-iap \
--network vpc3-ncc \
--allow=tcp:22  \
--source-ranges 35.235.240.0/20

gcloud compute firewall-rules create ncc4-vpc-iap \
--network vpc4-ncc \
--allow=tcp:22  \
--source-ranges 35.235.240.0/20
在每个 VPC 中配置 GCE 虚拟机
您需要临时互联网访问权限才能在“vm1-vpc1-ncc”上安装软件包。
创建四个虚拟机,每个虚拟机都将分配给之前创建的某个 VPC
gcloud compute instances create vm1-vpc1-ncc \
--subnet vpc1-ncc-subnet1 \
--metadata=startup-script='#!/bin/bash
  apt-get update
  apt-get install apache2 -y
  apt-get install tcpdump -y
  service apache2 restart
  echo "
<h3>Web Server: www-vm1</h3>" | tee /var/www/html/index.html'


gcloud compute instances create vm2-vpc2-ncc \
--zone us-central1-a \
--subnet vpc2-ncc-subnet1 \
--no-address

gcloud compute instances create pnat-vm-vpc2 \
--zone us-central1-a \
--subnet overlapping-vpc3 \
--no-address


gcloud compute instances create vm1-vpc4-ncc \
--zone us-east1-b \
--subnet class-e-rfc5735 \
--no-address
3. Network Connectivity Center Hub
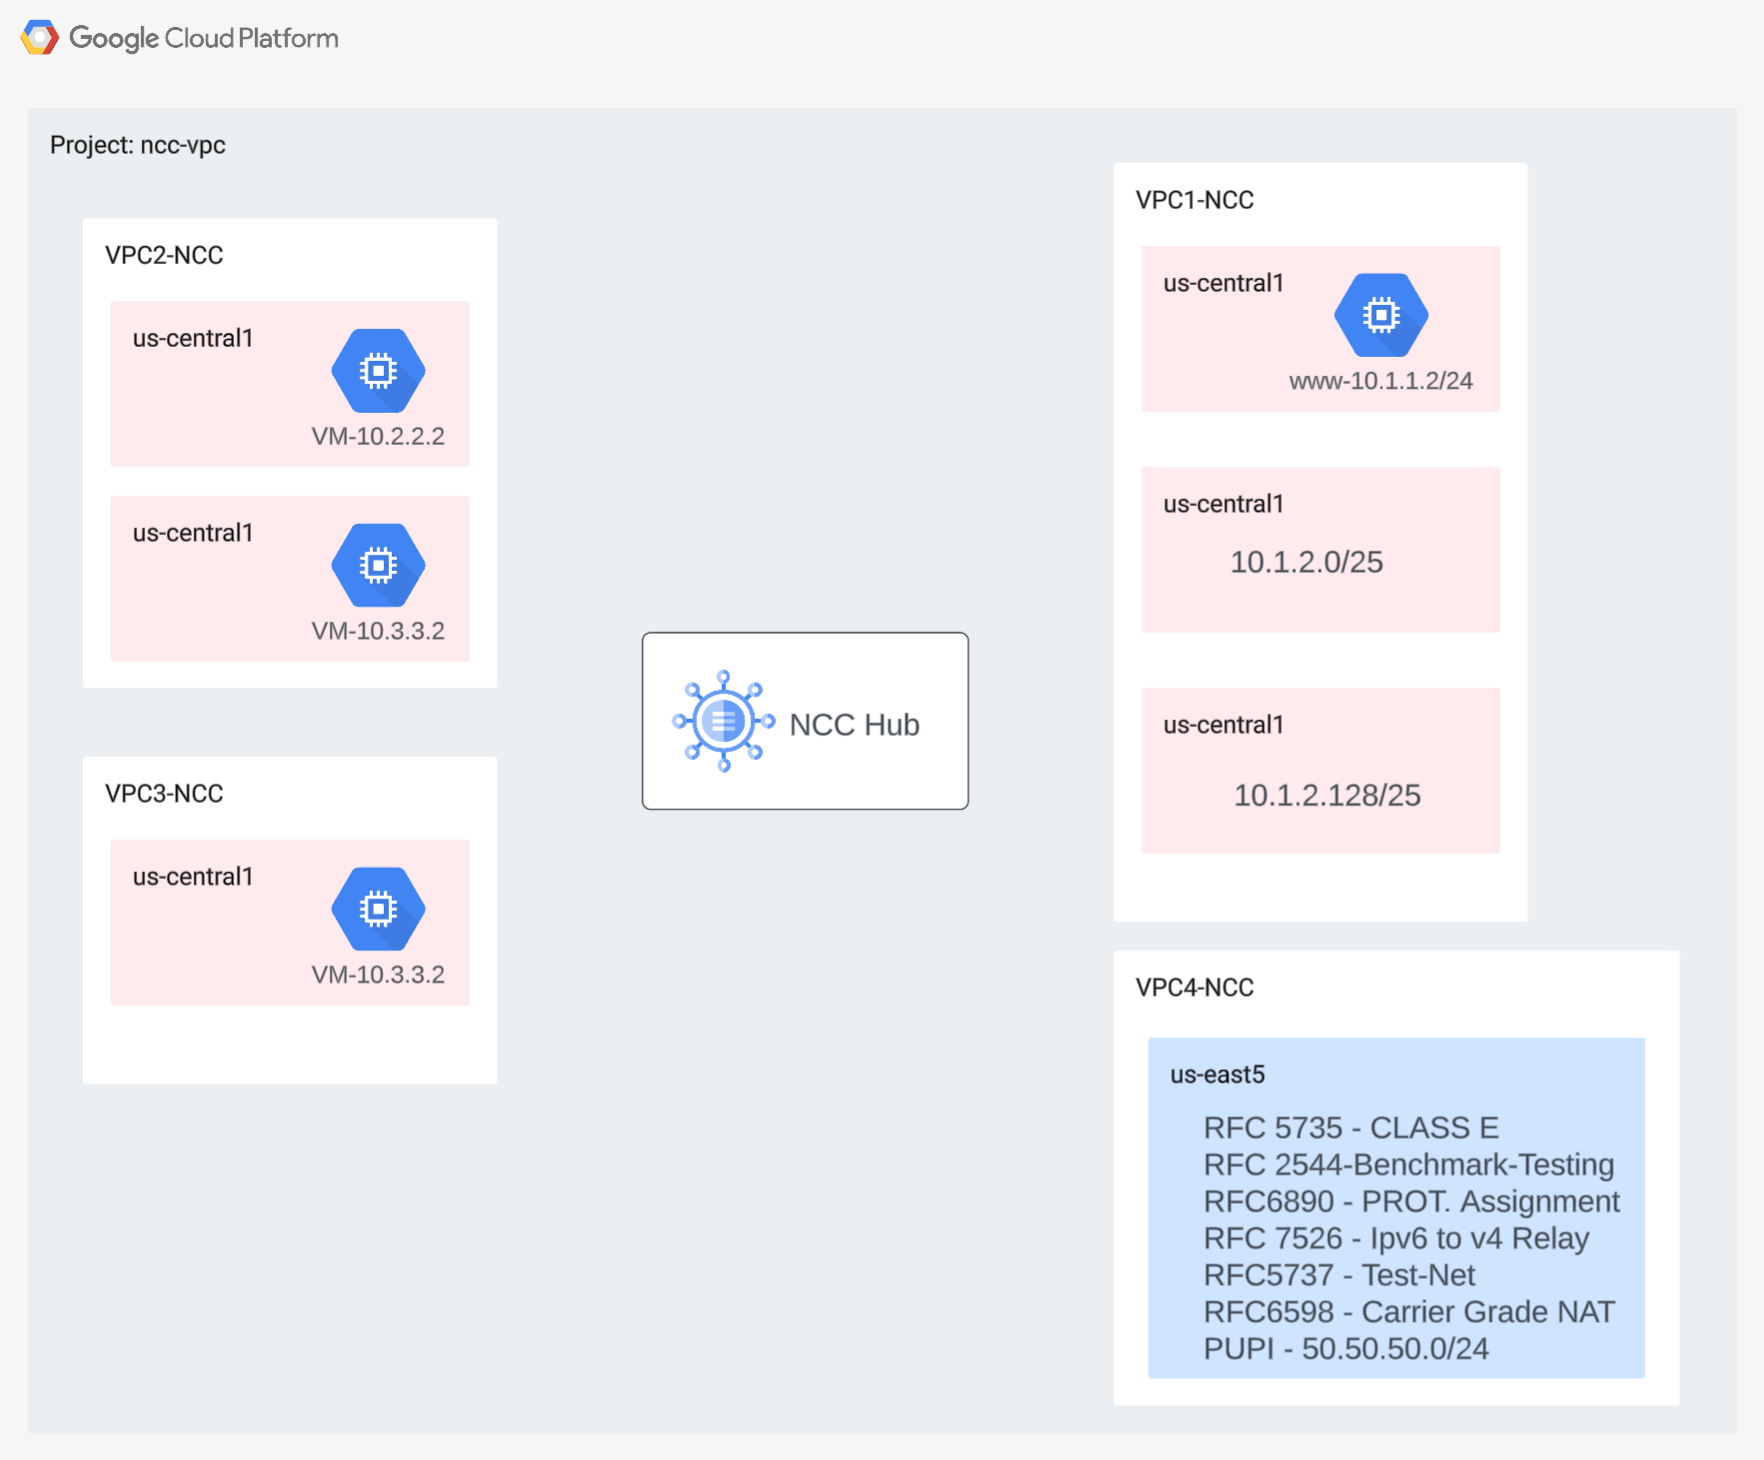
概览
在本部分中,我们将使用 gcloud 命令配置 NCC hub。NCC hub 将充当控制平面,负责在各个 VPC spoke 之间构建路由配置。
启用 API 服务
启用 Network Connectivity API(如果尚未启用):
gcloud services enable networkconnectivity.googleapis.com
创建 NCC Hub
使用 gCloud 命令创建 NCC hub
gcloud network-connectivity hubs create ncc-hub
输出示例
Create request issued for: [ncc-hub]
Waiting for operation [projects/user-3p-dev/locations/global/operations/operation-1668793629598-5edc24b7ee3ce-dd4c765b-5ca79556] to complete...done.
Created hub [ncc-hub]
描述新创建的 NCC hub,并记下名称和关联的路径。
gcloud network-connectivity hubs describe ncc-hub
gcloud network-connectivity hubs describe ncc-hub
createTime: '2023-11-02T02:28:34.890423230Z'
name: projects/user-3p-dev/locations/global/hubs/ncc-hub
routeTables:
- projects/user-3p-dev/locations/global/hubs/ncc-hub/routeTables/default
state: ACTIVE
uniqueId: de749c4c-0ef8-4888-8622-1ea2d67450f8
updateTime: '2023-11-02T02:28:48.613853463Z'
NCC hub 引入了一个路由表,可定义用于创建数据连接的控制平面。查找 NCC hub 的路由表名称
gcloud network-connectivity hubs route-tables list --hub=ncc-hub
NAME: default
HUB: ncc-hub
DESCRIPTION:
查找 NCC 默认路由表的 URI。
gcloud network-connectivity hubs route-tables describe default --hub=ncc-hub
createTime: '2023-02-24T17:32:58.786269098Z'
name: projects/user-3p-dev/locations/global/hubs/ncc-hub/routeTables/default
state: ACTIVE
uid: eb1fdc35-2209-46f3-a8d6-ad7245bfae0b
updateTime: '2023-02-24T17:33:01.852456186Z'
列出 NCC hub 默认路由表的内容。注意* 在定义 spoke 之前,NCC hub 的路由表将为空
gcloud network-connectivity hubs route-tables routes list --hub=ncc-hub --route_table=default
NCC hub 的路由表应为空。
4. 具有 VPC spoke 的 NCC
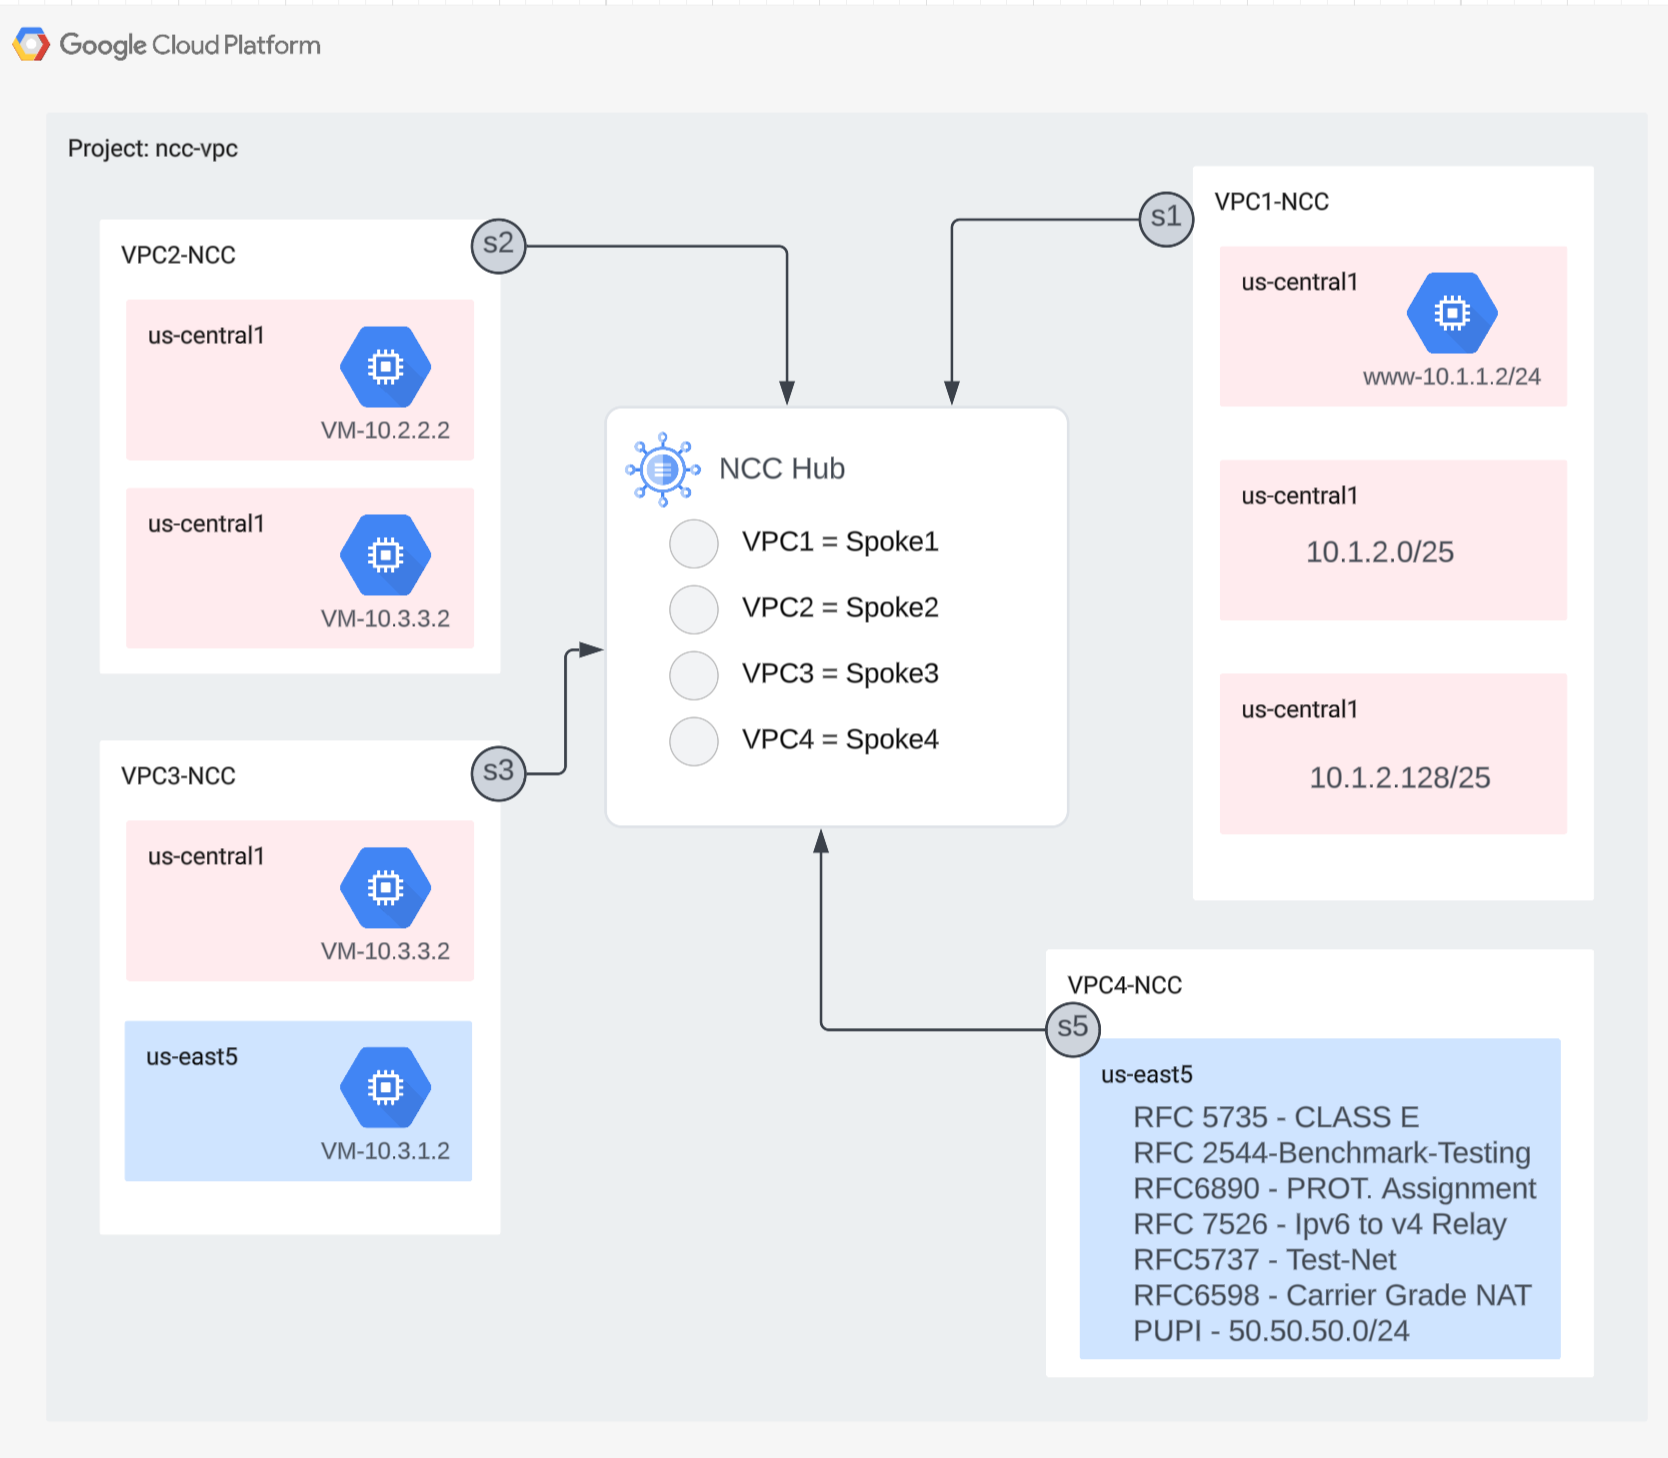
概览
在本部分中,您将使用 gCloud 命令将三个 VPC 配置为 NCC spoke。
将 VPC 配置为 NCC spoke
按以下顺序将以下 VPC 配置为 NCC spoke
- VPC4
- VPC1
- VPC2
- VPC3
将 VPC4 配置为 NCC spoke,并将其分配给之前创建的 NCC hub。NCC Spoke API 调用需要指定位置。使用“--global”标志后,用户在配置新的 NCC spoke 时无需指定完整的 URI 路径,从而简化了 gcloud 语法。
gcloud network-connectivity spokes linked-vpc-network create vpc4-spoke4 \
--hub=ncc-hub \
--vpc-network=vpc4-ncc \
--global
将 VPC1 配置为 NCC spoke。
管理员可以排除子网路由,防止其从 VPC spoke 导出到 NCC hub 的路由表。在此 Codelab 部分中,您将创建一个基于汇总前缀的排除导出规则,以防 VPC1 的子网导出到 NCC Hub 路由表中。
使用以下 gcloud 命令列出属于 VPC1 的所有子网。
gcloud config set accessibility/screen_reader false
gcloud compute networks subnets list --network=vpc1-ncc
请注意设置部分中之前创建的一对 /25 子网。
NAME              REGION       NETWORK   RANGE          STACK_TYPE
vpc1-ncc-subnet1  us-central1  vpc1-ncc  10.1.1.0/24    IPV4_ONLY
vpc1-ncc-subnet2  us-central1  vpc1-ncc  10.1.2.0/25    IPV4_ONLY
vpc1-ncc-subnet3  us-central1  vpc1-ncc  10.1.2.128/25  IPV4_ONLY
将 VPC1 配置为 NCC spoke,然后使用“export-exclude-ranges”关键字来过滤该特定范围内的 /24 汇总路由,从而防止将这对 /25 子网导入到 hub 路由表中。
gcloud network-connectivity spokes linked-vpc-network create vpc1-spoke1 \
--hub=ncc-hub \
--vpc-network=vpc1-ncc \
--exclude-export-ranges=10.1.2.0/24 \
--global
注意* 每个 NCC spoke 最多可过滤 16 个唯一的 IP 范围。
列出 NCC hub 默认路由表的内容。NCC hub 路由表上的一对 /25 子网发生了什么变化?
gcloud network-connectivity hubs route-tables routes list --hub=ncc-hub --route_table=default --filter="NEXT_HOP:vpc1-ncc"
IP_CIDR_RANGE  STATE   TYPE                  NEXT_HOP  HUB      ROUTE_TABLE
10.1.1.0/24    ACTIVE  VPC_PRIMARY_SUBNET    vpc1-ncc  ncc-hub  default
将 VPC2 配置为 NCC spoke
gcloud network-connectivity spokes linked-vpc-network create vpc2-spoke2 \
--hub=ncc-hub \
--vpc-network=vpc2-ncc \
--global
将 VPC3 配置为 NCC spoke,并将其分配给之前创建的 NCC hub。
gcloud  network-connectivity spokes linked-vpc-network create vpc3-spoke3 \
--hub=ncc-hub \
--vpc-network=vpc3-ncc \
--global
这是怎么回事?
ERROR: (gcloud.network-connectivity.spokes.linked-vpc-network.create) Invalid resource state for "https://www.googleapis.com/compute/v1/projects/xxxxxxxx/global/networks/vpc3-ncc": 10.3.3.0/24 (SUBNETWORK) overlaps with 10.3.3.0/24 (SUBNETWORK) from "projects/user-3p-dev/global/networks/vpc2-ncc" (peer)
NCC Hub 检测到与 VPC2 的 IP 范围重叠。请注意,VPC2 和 VPC3 都设置了相同的 10.3.3.0/24 IP 子网。
使用“排除导出”功能过滤重叠的 IP 范围
使用 gcloud 命令更新 VPC2 spoke 以排除重叠的 IP 范围。
gcloud  network-connectivity spokes linked-vpc-network update vpc2-spoke2 \
--hub=ncc-hub \
--vpc-network=vpc2-ncc \
--exclude-export-ranges=10.3.3.0/24 \
--global
使用 gcloud 命令更新 VPC3 的 NCC spoke,以排除重叠的子网范围。
gcloud network-connectivity spokes linked-vpc-network create vpc3-spoke3 \
--hub=ncc-hub \
--vpc-network=vpc3-ncc \
--exclude-export-ranges=10.3.3.0/24 \
--global
列出 NCC hub 默认路由表的内容并检查输出结果。
gcloud network-connectivity hubs route-tables routes list --hub=ncc-hub --route_table=default
系统会排除 VPC2 和 VPC3 中重叠的 IP 范围。NCC Hub 路由表支持所有有效的 IPv4 有效范围类型。
默认情况下,以非公开方式使用的公共 IP 地址 (PUPI) 子网范围不会从 VPC Spoke 导出到 NCC Hub 路由表。
使用 gcloud 命令确认网络 50.50.50.0/24 不在 NCC hub 的路由表中。
gcloud network-connectivity hubs route-tables routes list --hub=ncc-hub --route_table=default --filter="NEXT_HOP:vpc-ncc4"
使用以下 gcloud 命令更新 VPC4-Spoke,以在 NCC VPC 之间启用 PUPI 地址交换。
gcloud network-connectivity spokes linked-vpc-network update vpc4-spoke4 \
--include-export-ranges=ALL_IPV4_RANGES \
--global
使用 gcloud 命令在 NCC hub 的路由表中查找网络 50.50.50.0/24。
gcloud network-connectivity hubs route-tables routes list --hub=ncc-hub --route_table=default | grep 50.50.50.0/24
5. 具有跨项目 spoke 的 NCC
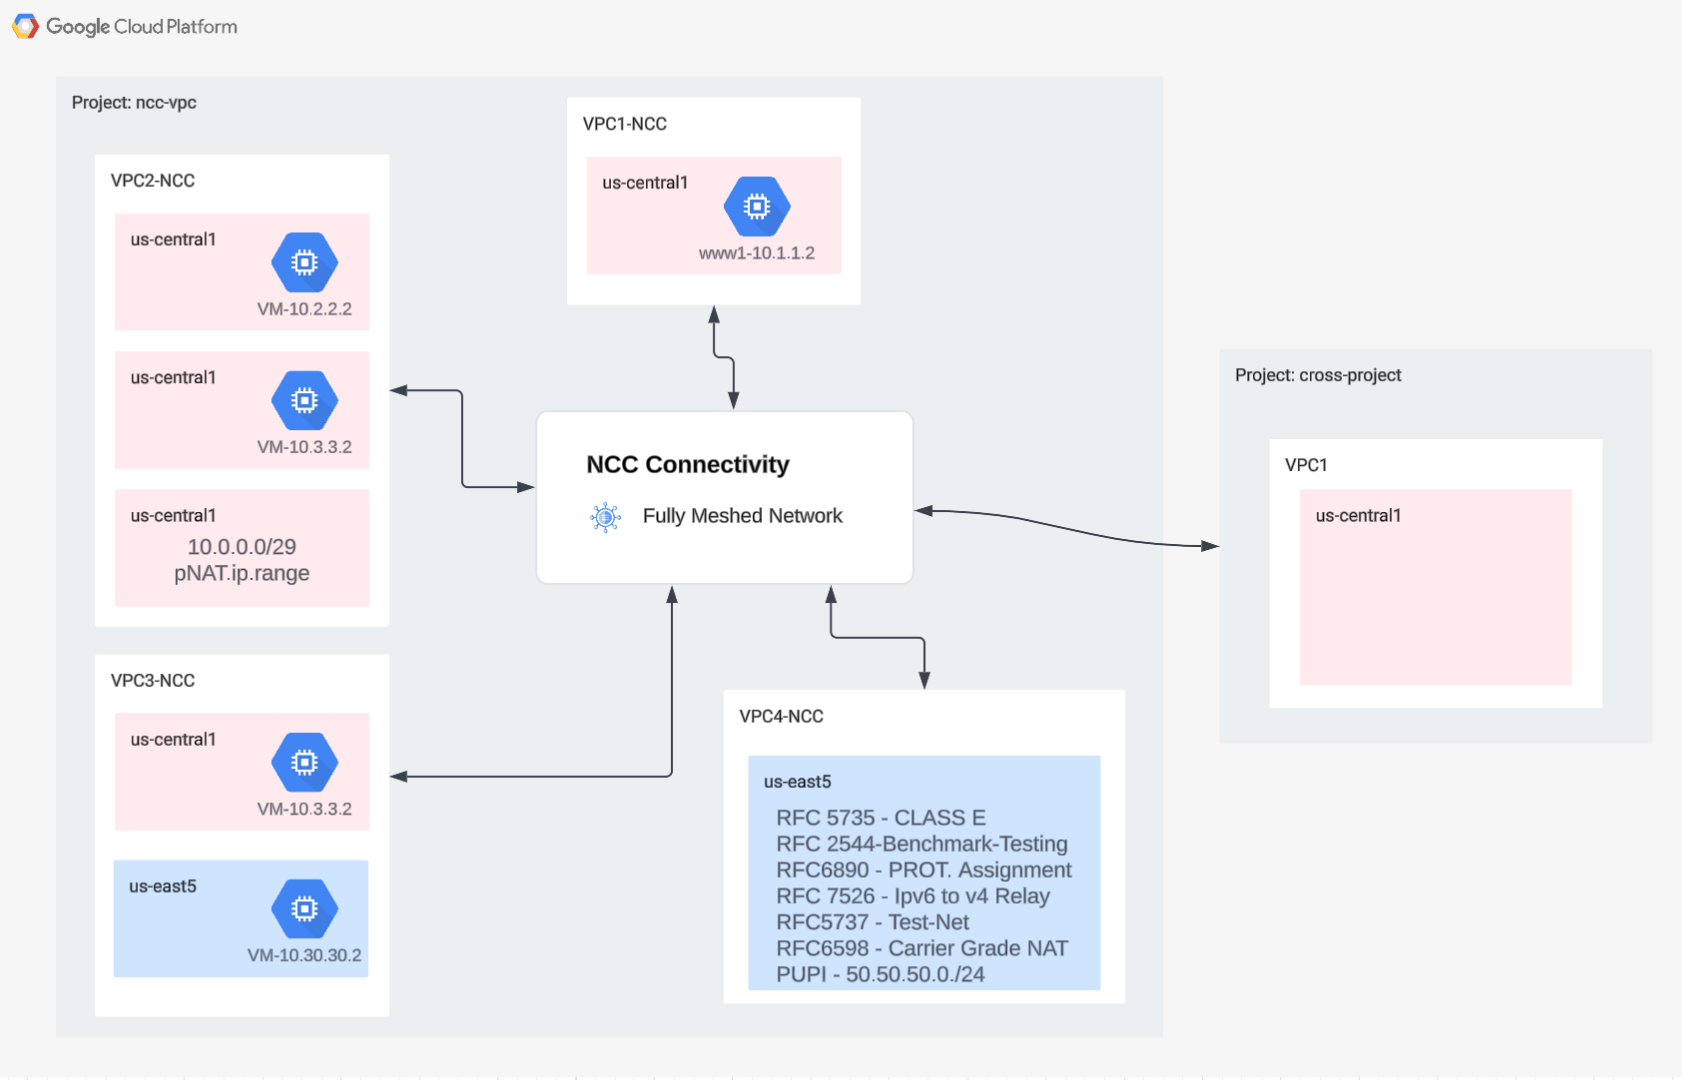
概览
到目前为止,您已配置与 Hub 位于同一项目中的 NCC spoke。在本部分中,您将使用 gCloud 命令将 VPC 配置为 NCC spoke(来自 NCC hub 以外的单独项目)。
这样一来,管理自有 VPC 的项目所有者便可参与与 NCC Hub 的网络连接。
跨项目:Google Cloud 控制台和 Cloud Shell
在本实验中,我们将使用 Google Cloud 控制台和 Cloud Shell 与 GCP 进行交互。
跨项目 Spoke Google Cloud 控制台
您可以通过 https://console.cloud.google.com 访问 Cloud 控制台。
在 Google Cloud 中设置以下各项,以便更轻松地配置 Network Connectivity Center:
在 Google Cloud Console 的“项目选择器”页面上,选择或创建一个 Google Cloud 项目。
启动 Cloud Shell。此 Codelab 使用了 $variables 来帮助在 Cloud Shell 中实现 gcloud 配置。
gcloud auth list
gcloud config list project
gcloud config set project [YOUR-CROSSPROJECT-NAME]
xprojname=[YOUR-CROSSPROJECT-NAME]
echo $xprojname
gcloud config set compute/zone us-central1-a
gcloud config set compute/region us-central1
IAM 角色
NCC 需要 IAM 角色才能访问特定 API。请务必根据需要为用户配置 NCC IAM 角色。
跨项目 spoke 管理员必须至少获得以下 IAM 角色:“networkconnectivity.networkSpokeManager”。”
下表列出了 NCC Hub 和 Spoke 管理员所需的 IAM 角色,以供参考。
角色/说明 | 权限 |
networkconnectivity.networkAdmin - 允许网络管理员管理 hub 和 spoke。 | networkconnectivity.hubs.networkconnectivity.spokes. |
networkconnectivity.networkSpokeManager - 允许在 hub 中添加和管理 spoke。在共享 VPC 中使用,其中宿主项目拥有 Hub,但其他项目中的其他管理员可以添加 spoke 以连接到 Hub。 | networkconnectivity.spokes.** |
networkconnectivity.networkUsernetworkconnectivity.networkViewer - 允许网络用户查看 hub 和 spoke 的不同属性。 | networkconnectivity.hubs.getnetworkconnectivity.hubs.listnetworkconnectivity.spokes.getnetworkconnectivity.spokes.listnetworkconnectivity.spokes.aggregatedList |
在跨项目环境中创建 VPC 和子网
VPC 网络包含您将安装 GCE 虚拟机的子网,用于数据路径验证
gcloud compute networks create xproject-vpc \
--subnet-mode custom

gcloud compute networks subnets create xprj-net-1 \
--network xproject-vpc \
--range 10.100.1.0/24 \
--region us-central1

gcloud compute networks subnets create xprj-net-2 \
--network xproject-vpc \
--range 10.100.2.0/24 \
--region us-central1
NCC Hub 项目 URI
使用以下 gcloud 命令查找 NCC Hub URI。您需要此 URI 路径才能在下一步中配置跨项目 NCC Spoke。
gcloud network-connectivity hubs describe ncc-hub
跨项目 Spoke VPC
登录到 VPC 不属于 NCC Hub 项目的其他项目。在 Cloud Shell 中,使用以下命令将 VPC 配置为 NCC spoke。
- HUB_URI 应该是其他项目中的 Hub 的 URI。
- VPC_URI 应与 spoke 位于同一项目中
- VPC-network 指定了此跨项目 VPC 将加入另一个项目中的 NCC Hub
gcloud network-connectivity spokes linked-vpc-network create xproj-spoke \
--hub=projects/[YOUR-PROJECT-NAME]/locations/global/hubs/ncc-hub \
--global \
--vpc-network=xproject-vpc
。
Create request issued for: [xproj-spoke]
Waiting for operation [projects/xproject/locations/global/operations/operation-1689790411247-600dafd351158-2b862329-19b747f1] to complete...done.
Created spoke [xproj-spoke].
createTime: '2023-07-19T18:13:31.388500663Z'
hub: projects/[YOUR-PROJECT-NAME]/locations/global/hubs/ncc-hub
linkedVpcNetwork:
  uri: https://www.googleapis.com/compute/v1/projects/xproject/global/networks/xproject-vpc
name: projects/xproject/locations/global/spokes/xproj-spoke
reasons:
- code: PENDING_REVIEW
  message: Spoke is Pending Review
spokeType: VPC_NETWORK
state: INACTIVE
uniqueId: 46b4d091-89e2-4760-a15d-c244dcb7ad69
updateTime: '2023-07-19T18:13:38.652800902Z'
跨项目 NCC spoke 的状态是什么?为什么?
6. 拒绝或接受跨项目 Spoke
概览
NCC Hub 管理员必须明确接受跨项目 spoke 加入 hub。这样可以防止项目所有者将恶意 NCC spoke 附加到 NCC 全局路由表。接受或拒绝 Spoke 后,您可以通过运行上述命令来根据需要拒绝或接受该 Spoke。
登录 Cloud Shell,返回 NCC Hub 所在的项目。
确定要查看的跨项目 Spoke
gcloud network-connectivity hubs list-spokes ncc-hub \
 --filter="reason:PENDING_REVIEW"
接受 spoke
gcloud network-connectivity hubs accept-spoke ncc-hub --spoke=xproj-spoke
可选:拒绝 spoke
gcloud network-connectivity spokes reject-spoke ncc-hub --spoke=xproj-spoke
--details="some reason to reject"
列出 hub 上的有效 spoke
gcloud network-connectivity hubs list-spokes ncc-hub \
 --filter="state:ACTIVE"
NAME            PROJECT          LOCATION  TYPE         STATE   STATE REASON
Xproj-spoke     xproj            global    VPC_NETWORK  ACTIVE
vpc4-spoke4     user-3p-dev      global    VPC_NETWORK  ACTIVE
vpc1-spoke1     user-3p-dev      global    VPC_NETWORK  ACTIVE
vpc2-spoke2     user-3p-dev      global    VPC_NETWORK  ACTIVE
vpc3-spoke3     user-3p-dev      global    VPC_NETWORK  ACTIVE
列出 Hub 上的子网路由
从输出中,您能否看到来自跨 VPC spoke 的子网路由?
gcloud network-connectivity hubs route-tables routes list \
--route_table=default \
--hub=ncc-hub \
--filter="NEXT_HOP:xprj-vpc"
IP_CIDR_RANGE  STATE   TYPE                NEXT_HOP  HUB      ROUTE_TABLE
10.100.1.0/24  ACTIVE  VPC_PRIMARY_SUBNET  xprj-vpc  ncc-hub  default
使用包含-导出过滤条件更新跨项目 spoke VPC
登录到 VPC 不属于 NCC Hub 项目的项目。在 Cloud Shell 中,使用以下命令将 VPC 配置为 NCC spoke。
- HUB_URI 应该是其他项目中的 Hub 的 URI。
- VPC_URI 应与 spoke 位于同一项目中
- VPC-network 指定了此跨项目 VPC 将加入另一个项目中的 NCC Hub
- 仅将子网范围 10.100.2.0/24 导入到 NCC Hub 路由表中
- 记下输出中的“ETAG”值。此值由 NCC 生成,您需要将此值提供给 NCC Hub 管理员。NCC hub 管理员在接受跨项目 spoke 加入 hub 的请求时,需要参考此值。
gcloud network-connectivity spokes linked-vpc-network update xproj-spoke \
--hub=projects/[YOUR-PROJECT-NAME]/locations/global/hubs/ncc-hub \
--global \
--include-export-ranges=10.100.2.0/24
Update request issued for: [xprj-vpc]
Waiting for operation [projects]/xproject/locations/global/operations/operation-1742936388803-6313100521cae-020ac5d2-58
52fbba] to complete...done.
Updated spoke [xprj-vpc].
createTime: '2025-02-14T14:25:41.996129250Z'
etag: '4'
fieldPathsPendingUpdate:
- linked_vpc_network.include_export_ranges
group: projects/xxxxxxxx/locations/global/hubs/ncc-hub/groups/default
hub: projects/xxxxxxxx/locations/global/hubs/ncc-hub
linkedVpcNetwork:
  includeExportRanges:
  - 10.100.2.0/24
  uri: https://www.googleapis.com/compute/v1/projects/xproject/global/networks/vpc1-spoke
name: projects/xproject/locations/global/spokes/xprj-vpc
reasons:
- code: UPDATE_PENDING_REVIEW
  message: Spoke update is Pending Review
spokeType: VPC_NETWORK
state: ACTIVE
uniqueId: 182e0f8f-91cf-481c-a081-ea6f7e40fb0a
updateTime: '2025-03-25T20:59:51.995734879Z'
确定要查看的更新后的跨项目 Spoke
登录托管 NCC Hub 的项目。在 Cloud Shell 中,使用此命令检查跨项目 VPC spoke 更新的状态。
- 什么是 ETAG 值?此值应与 VPC Spoke 更新的输出一致。
gcloud network-connectivity hubs list-spokes ncc-hub \
--filter="reasons:UPDATE_PENDING_REVIEW" \
--format=yaml
接受来自跨项目 Spoke 的更新后的更改
使用该命令接受跨项目 spoke 加入 NCC Hub 的请求
gcloud network-connectivity hubs accept-spoke-update ncc-hub \
 --spoke=https://www.googleapis.com/networkconnectivity/v1/projects/xproject/locations/global/spokes/xproj-spoke \
 --spoke-etag={etag value}
(可选)拒绝来自跨项目 Spoke 的更新后的更改
使用该命令拒绝跨项目 Spoke 加入 NCC Hub 的请求
gcloud network-connectivity hubs reject-spoke-update ncc-hub  \
--spoke=https://www.googleapis.com/networkconnectivity/v1/projects/xproject/locations/global/spokes/xproj-spoke  \
--details="not today" \
--spoke-etag={etag value}
验证跨项目 spoke 是否已加入 NCC hub
gcloud network-connectivity hubs list-spokes ncc-hub \ --filter="name:xproj-spoke"
7. VPC 之间的 Private NAT
概览
在本部分中,您将为两个 VPC 之间重叠的子网范围配置专用 NAT。请注意,VPC 之间的 Private NAT 需要 NCC。
在上一部分中,VPC2 和 VPC3 配置了重叠的子网范围“10.3.3.0/24”。这两个 VPC 都配置为 NCC spoke,以防止将重叠的子网插入到 NCC hub 路由表中,这意味着没有第 3 层数据路径来访问位于该子网上的主机。
在 NCC Hub 项目中使用以下命令查找重叠的子网范围。
gcloud compute networks subnets list --network vpc2-ncc

gcloud compute networks subnets list --network vpc3-ncc
在 vpc2-ncc 上,包含重叠 IP 范围的子网名称是什么?
*记下子网名称并将其保存到某个位置。您将为此范围配置源 NAT。
配置 Private NAT
专门分配一个可路由的子网范围,用于从 VPC2 的重叠子网中获取 NAT 流量。通过使用“–purpose=PRIVATE_NAT”标志配置不重叠的子网范围。
gcloud beta compute networks subnets create ncc2-spoke-nat \
--network=vpc2-ncc \
--region=us-central1 \
--range=10.10.10.0/29 \
--purpose=PRIVATE_NAT
创建专用 Cloud Router 以执行专用 NAT
gcloud compute routers create private-nat-cr \
--network vpc2-ncc \
--region us-central1
将 Cloud Router 配置为对来自 vpc2-ncc 的重叠范围 10.3.3.0/24 进行源 NAT。在下面的配置示例中,“overlapping-vpc3”是重叠子网的名称。“ALL”关键字表示子网中的所有 IP 范围都将进行源 NAT。
gcloud beta compute routers nats create ncc2-nat \
--router=private-nat-cr \
--type=PRIVATE \
--nat-custom-subnet-ip-ranges=overlapping-vpc3:ALL \
--router-region=us-central1
上述步骤创建了 NAT IP 范围池和将要转换的特定子网。在此步骤中,创建 NAT 规则“1”,用于转换来自重叠子网范围的匹配流量的网络数据包(如果目标网络采用 NCC hub 路由表中的路径)。
gcloud beta compute routers nats rules create 1 \
--router=private-nat-cr \
--region=us-central1 \
--match='nexthop.hub == "//networkconnectivity.googleapis.com/projects/$projectname/locations/global/hubs/ncc-hub"' \
--source-nat-active-ranges=ncc2-spoke-nat \
--nat=ncc2-nat
验证 Private NAT 的数据路径
gcloud beta compute routers nats describe ncc2-nat --router=private-nat-cr
输出示例
enableDynamicPortAllocation: true
enableEndpointIndependentMapping: false
endpointTypes:
- ENDPOINT_TYPE_VM
name: ncc2-nat
rules:
- action:
    sourceNatActiveRanges:
    - https://www.googleapis.com/compute/beta/projects/xxxxxxxx/regions/us-central1/subnetworks/ncc2-spoke-nat
  match: nexthop.hub == "//networkconnectivity.googleapis.com/projects/xxxxxxxx/locations/global/hubs/ncc-hub"
  ruleNumber: 1
sourceSubnetworkIpRangesToNat: LIST_OF_SUBNETWORKS
subnetworks:
- name: https://www.googleapis.com/compute/beta/projects/xxxxxxxx/regions/us-central1/subnetworks/overlapping-vpc3
  sourceIpRangesToNat:
  - ALL_IP_RANGES
type: PRIVATE
或者,
- 切换到 Web 控制台
- 依次前往“网络服务 > Cloud NAT > ncc2-nat”
验证动态端口分配是否默认处于启用状态。

接下来,您将验证使用为 VPC2 配置的专用 NAT 路径的数据路径。

打开与 “vm1-vpc1-ncc”的 SSH 会话,并使用以下 tcpdump 命令捕获源自 NAT 池范围 “10.10.10.0/29”的数据包。
vm1-vpc1-ncc
sudo tcpdump -i any net 10.10.10.0/29 -n
在撰写此 Codelab 时,专用 NAT 不支持 ICMP 数据包。建立与“pNat-vm-vpc2”的 SSH 会话,并使用如下所示的 curl 命令连接到“vm1-vpc1-ncc”上的 TCP 端口 80。
pnat-vm-vpc2
curl 10.1.1.2 -v
检查 “vm1-vpc1-ncc.”上的 tcpdump 输出。在 vm1-vpc1-ncc 上,发起与我们的 Web 服务器的 TCP 会话的来源 IP 地址是什么?
tcpdump: data link type LINUX_SLL2
tcpdump: verbose output suppressed, use -v[v]... for full protocol decode
listening on any, link-type LINUX_SLL2 (Linux cooked v2), snapshot length 262144 bytes
19:05:27.504761 ens4  In  IP 10.10.10.2.1024 > 10.1.1.2:80: Flags [S], seq 2386228656, win 65320, options [mss 1420,sackOK,TS val 3955849029 ecr 0,nop,wscale 7], length 0
19:05:27.504805 ens4  Out IP 10.1.1.2:80 > 10.10.10.2.1024: Flags [S.], seq 48316785, ack 2386228657, win 64768, options [mss 1420,sackOK,TS val 1815983704 ecr 3955849029,nop,wscale 7], length 0
<output snipped>
8. NCC 对 IPv6 子网的支持
Network Connectivity Center 支持在 NCC VPC spoke 和混合 spoke 之间交换 IPv6 子网和动态路由。在本部分中,配置 NCC 以支持仅限 IPv6 和双栈 IPv4-and-IPv6 子网路由交换模式。

创建新的 IPv6 VPC,该 VPC 将作为 VPC spoke 加入 NCC-Hub。GCP 会自动分配 fd20::/20 范围内的所有 ULA 地址。
gcloud compute networks create vpc5-ncc \
--subnet-mode custom \
--enable-ula-internal-ipv6

gcloud compute networks subnets create vpc5-ext-ipv6 \ --network=vpc5-ncc \
--stack-type=IPV6 \
--ipv6-access-type=EXTERNAL \
--region=us-central1

gcloud compute networks subnets create vpc5-ipv4-subnet1 \
--network vpc5-ncc \
--range 10.5.5.0/24 \
--region us-central1
使用此命令将 VPC5 配置为 NCC spoke,并排除 IPv4 子网路由,防止其导出到 hub 路由表中。将 IPv6 ULA 网络导出到 NCC hub 路由表中。
gcloud network-connectivity spokes linked-vpc-network create vpc5-spoke5 \
--hub=ncc-hub \
--vpc-network=vpc5-ncc \
--exclude-export-ranges=10.5.5.0/24
--global
为专用 IPv6 唯一本地地址 (ULA) 启用 VPC1 和 VPC4。GCP 会自动分配 fd20::/20 范围内的所有 ULA 地址。
gcloud compute networks update vpc-ncc4 \
    --enable-ula-internal-ipv6

gcloud compute networks update vpc-ncc1 \
    --enable-ula-internal-ipv6
在 VPC1 中创建原生 IPv6 子网和双栈 IPv4_IPv6 子网
gcloud compute networks subnets create vpc1-ipv6-sn1 \
    --network=vpc-ncc1 \
    --stack-type=IPV6_ONLY \
    --ipv6-access-type=INTERNAL \
    --region=us-central1

gcloud compute networks subnets create vpc1-ipv64-sn2 \
    --network=vpc-ncc1 \
    --range=10.10.10.0/24 \
    --stack-type=IPV4_IPV6 \
    --ipv6-access-type=INTERNAL \
    --region=us-east1
在 VPC4 中创建原生 IPv6 子网和双栈 IPv4_IPv6 子网
gcloud compute networks subnets create vpc4-ipv6-sn1 \
    --network=vpc-ncc4 \
    --stack-type=IPV6_ONLY \
    --ipv6-access-type=INTERNAL \
    --region=us-central1

gcloud compute networks subnets create vpc4-ipv64-sn2 \
    --network=vpc-ncc4 \
    --range=10.40.40.0/24 \
    --stack-type=IPV4_IPV6 \
    --ipv6-access-type=INTERNAL \
    --region=us-east1
在 VPC1 上,创建 IPv6 VPC 防火墙规则,以允许源自 IPv6 ULA 范围的流量。
gcloud compute firewall-rules create allow-icmpv6-ula-ncc1 \
    --network=vpc-ncc1 \
    --action=allow \
    --direction=ingress \
    --rules=all \
    --source-ranges=fd20::/20
在 VPC4 上,创建 IPv6 VPC 防火墙规则,以允许源自 IPv6 ULA 范围的流量。
gcloud compute firewall-rules create allow-icmpv6-ula-ncc4 \
    --network=vpc-ncc4 \
    --action=allow \
    --direction=ingress \
    --rules=all \
    --source-ranges=fd20::/20
创建三个 GCE IPv6 实例,以便在下一部分中验证数据路径连接。注意:vpc1-dualstack-vm 将用作堡垒主机,以获得对原生 IPv6 GCE 虚拟机的带外访问权限。
gcloud compute instances create vpc4-ipv6-vm \
    --zone us-central1-a \
    --subnet=vpc4-ipv6-sn1 \
    --stack-type=IPV6_ONLY

gcloud compute instances create vpc1-ipv6-vm \
    --zone us-central1-a \
    --subnet=vpc1-ipv6-sn1 \
    --stack-type=IPV6_ONLY

gcloud compute instances create vpc1-dual-stack-vm \
    --zone us-east1-b \
    --network=vpc-ncc1 \
    --subnet=vpc2-ipv64-sn2 \
    --stack-type=IPV4_IPV6
检查 NCC Hub 是否有 IPv6 子网
检查 NCC hub 路由表中是否存在 IPv6 ULA 子网。
gcloud network-connectivity hubs route-tables routes list --route_table=default \
--hub=ncc-hub \
--filter="IP_CIDR_RANGE:fd20"
请注意,上述命令的输出未列出 IPv6 子网。默认情况下,VPC spoke 中的 IPv6 子网不会导出到 NCC hub 路由表。
Listed 0 items.
使用以下 gcloud 命令更新 VPC1 和 VPC4 spoke,以将 IPv6 子网导出到 NCC hub 路由表中。
gcloud network-connectivity spokes linked-vpc-network update vpc1-spoke1 \
  --global \
  --include-export-ranges=ALL_IPV6_RANGES

gcloud network-connectivity spokes linked-vpc-network update vpc4-spoke4 \
  --global \
  --include-export-ranges=ALL_IPV6_RANGES

gcloud network-connectivity spokes linked-vpc-network update vpc5-spoke5 \
  --global \
  --include-export-ranges=ALL_IPV6_RANGES
再次检查 NCC Hub 路由表中是否有 IPv6 ULA 子网。
gcloud network-connectivity hubs route-tables routes list --route_table=default \
--hub=ncc-hub \
--filter="IP_CIDR_RANGE:fd20"
输出示例
IP_CIDR_RANGE                  PRIORITY  LOCATION     STATE   TYPE                SITE_TO_SITE  NEXT_HOP  HUB            ROUTE_TABLE
fd20:c95:95d2:1000:0:0:0:0/64            us-east1     ACTIVE  VPC_PRIMARY_SUBNET  N/A           vpc-ncc4  ncc-hub  default
fd20:c95:95d2:1:0:0:0:0/64               us-central1  ACTIVE  VPC_PRIMARY_SUBNET  N/A           vpc-ncc4  ncc-hub  default
fd20:670:3823:0:0:0:0:0/64               us-central1  ACTIVE  VPC_PRIMARY_SUBNET  N/A           vpc-ncc5  ncc-hub  default
fd20:90:6768:1000:0:0:0:0/64             us-east1     ACTIVE  VPC_PRIMARY_SUBNET  N/A           vpc-ncc2  ncc-hub  default
fd20:90:6768:0:0:0:0:0/64                us-central1  ACTIVE  VPC_PRIMARY_SUBNET  N/A           vpc-ncc2  ncc-hub  default
过滤具有 NCC VPC spoke 的 IPv6 子网
检查 NCC hub 路由表中的外部 IPv6 子网路由
gcloud network-connectivity hubs route-tables routes list --route_table=default \
--hub=ncc-hub \
--filter="NEXT_HOP:vpc-ncc5"
示例输出,ncc hub 路由表已学习到外部 IPv6 范围。
IP_CIDR_RANGE                  PRIORITY  LOCATION     STATE   TYPE                SITE_TO_SITE  NEXT_HOP  HUB            ROUTE_TABLE
10.5.5.0/24                              us-central1  ACTIVE  VPC_PRIMARY_SUBNET  N/A           vpc-ncc5  ncc-hub  default
2600:1900:4001:ce6:0:0:0:0/64            us-central1  ACTIVE  VPC_PRIMARY_SUBNET  N/A           vpc-ncc5  ncc-hub  default
fd20:670:3823:0:0:0:0:0/64               us-central1  ACTIVE  VPC_PRIMARY_SUBNET  N/A           vpc-ncc5  ncc-hub  default
10.50.10.0/24                            us-central1  ACTIVE  VPC_PRIMARY_SUBNET  N/A           vpc-ncc5  ncc-hub  default
使用以下 gcloud 命令更新 VPC5 spoke,以防止将两个特定的内部 IPv6 子网和一个外部 IPv6 子网注入到 NCC hub 路由表中。
gcloud network-connectivity spokes linked-vpc-network update vpc5-spoke5 \
 --global \
 --include-export-ranges=fd20:670:3823:0:0:0:0:0/48 \
 --exclude-export-ranges=fd20:670:3823:1::/64,fd20:670:3823:2::/64
使用 gcloud 命令验证 VPC5 Spoke 的导出过滤器
gcloud network-connectivity spokes linked-vpc-network update vpc5-spoke5 \
 --global \
 --include-export-ranges=fd20:670:3823:0:0:0:0:0/48 \
 --exclude-export-ranges=fd20:670:3823:1::/64,fd20:670:3823:2::/64
检查 NCC hub 路由表中的外部 IPv6 子网路由
gcloud network-connectivity hubs route-tables routes list --route_table=default \
--hub=ncc-hub \
--filter="NEXT_HOP:vpc-ncc5"
示例输出,ncc hub 路由表已学习到外部 IPv6 范围。
IP_CIDR_RANGE               PRIORITY  LOCATION     STATE   TYPE                SITE_TO_SITE  NEXT_HOP  HUB            ROUTE_TABLE
fd20:670:3823:0:0:0:0:0/64            us-central1  ACTIVE  VPC_PRIMARY_SUBNET  N/A           vpc-ncc5  demo-mesh-hub  default
9. 验证数据路径连接
IPv4 数据路径连接
参考该图,验证每台虚拟机之间的 IPv4 数据路径。

通过 SSH 连接到“vm1-vpc1-ncc”,并启动 TCP 转储以跟踪来自“vm2-vpc2-ncc”的 ICMP 数据包。请注意,此虚拟机位于 VPC2 上。
vm1-vpc1-ncc
sudo tcpdump -i any icmp -v -e -n
建立 SSH 会话以连接到“vm1-vpc2-ncc”,并与“vm1-vpc1-ncc”的 IP 地址建立“ping”连接。
vm1-vpc2-ncc
ping 10.1.1.2
建立 SSH 连接以连接到“vm1-vpc2-ncc”,并“ping”vm1-vpc4-ncc 的 IP 地址。
vm1-vpc2-ncc
ping 240.0.0.2
IPv6 数据路径连接
参考该图,验证每个虚拟机之间的 IP64 数据路径。
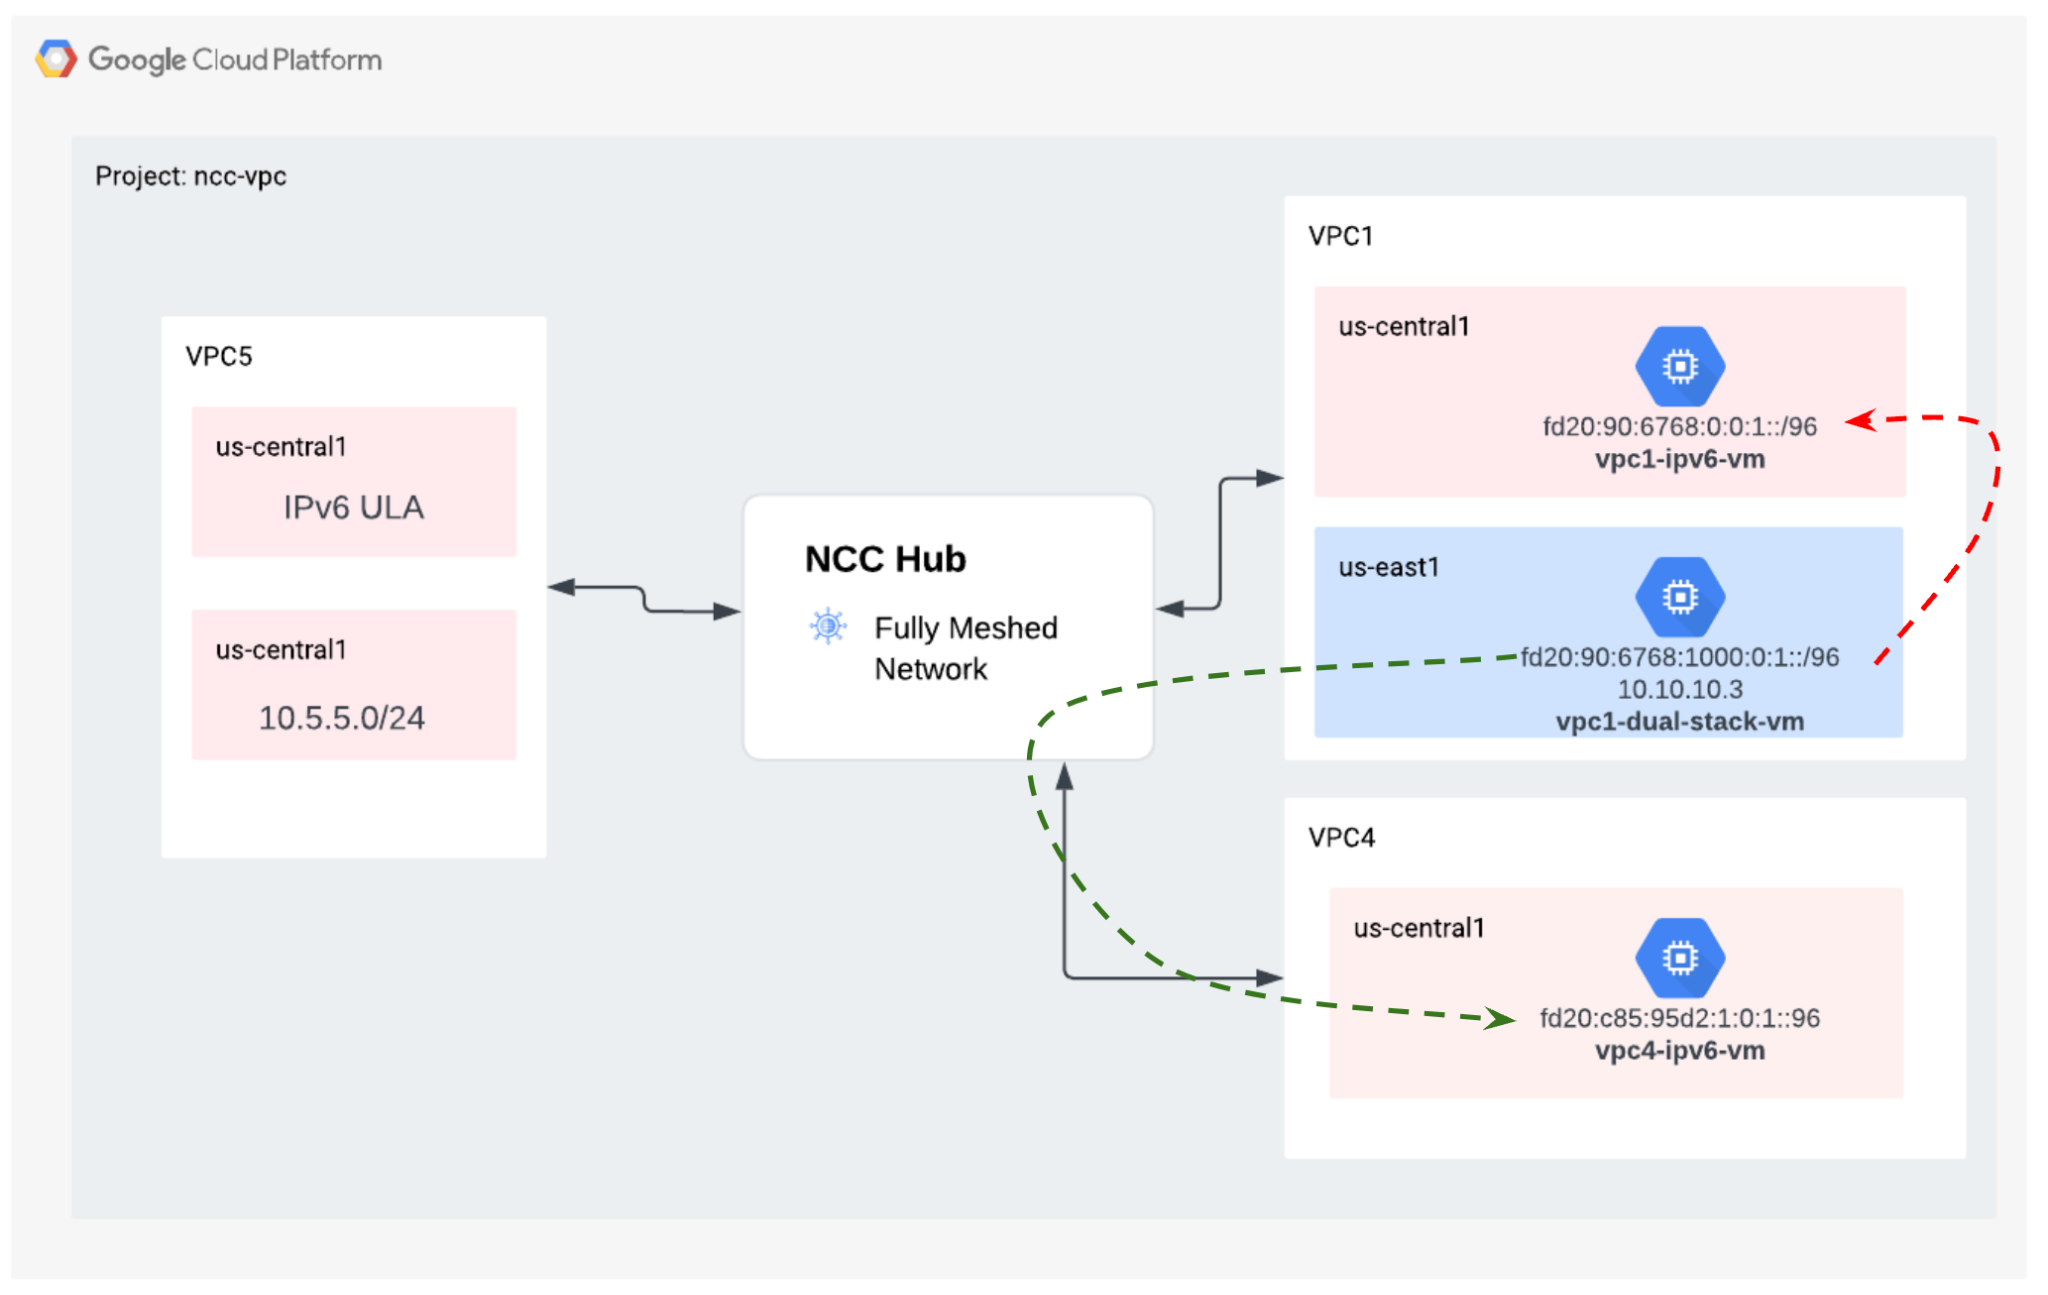
使用 gcloud 命令列出每个已启用 IPv6 的实例的 IP 地址。
gcloud compute instances list --filter="INTERNAL_IP:fd20"
示例输出
NAME                ZONE           MACHINE_TYPE   PREEMPTIBLE  INTERNAL_IP                   EXTERNAL_IP      STATUS
vpc1-ipv6-vm        us-central1-a  n1-standard-1               fd20:90:6768:0:0:1:0:0/96                      RUNNING
vpc4-ipv6-vm        us-central1-a  n1-standard-1               fd20:c95:95d2:1:0:1:0:0/96                     RUNNING
vpc1-dual-stack-vm  us-east1-b     n1-standard-1               10.10.10.3                    XXX.196.137.107  RUNNING
                                                               fd20:90:6768:1000:0:1:0:0/96
建立 SSH 会话以连接到“vpc1-dualstack-vm”,并“ping”vpc1-ipv6-vm 的 IPv6 地址,以验证全局 VPC 中的 IPv6 连接
ping fd20:90:6768:1000:0:1::
建立 SSH 会话以连接到“vpc1-dualstack-vm”,并“ping”vpc4-ipv6-vm 的 IPv6 地址,以验证 NCC 连接的 IPv6 连接性。
ping fd20:c95:95d2:1:0:1::
10. 清理
登录 Cloud Shell 并删除中心和分支站点网络中的虚拟机实例
删除专用 VPC NAT 配置
gcloud beta compute routers nats rules delete 1 \
--nat=ncc2-nat \
--router=private-nat-cr \
--region=us-central1 \
--quiet

gcloud beta compute routers nats delete ncc2-nat \
--router=private-nat-cr \
--router-region=us-central1 \
--quiet

gcloud compute routers delete private-nat-cr \
--region=us-central1 \
--quiet
删除 NCC spoke
gcloud network-connectivity spokes delete vpc1-spoke1 --global --quiet

gcloud network-connectivity spokes delete vpc2-spoke2 --global --quiet

gcloud network-connectivity spokes delete vpc3-spoke3 --global --quiet

gcloud network-connectivity spokes delete vpc4-spoke4 --global --quiet
拒绝跨项目 spoke
从 NCC Hub 拒绝跨项目 VPC Spoke。
gcloud network-connectivity spokes reject projects/$xprojname/locations/global/spokes/xproj-spoke \--details="cleanup" \
--global
删除 NCC Hub
gcloud network-connectivity hubs delete ncc-hub --quiet
删除防火墙规则
gcloud compute firewall-rules delete ncc1-vpc-internal --quiet
gcloud compute firewall-rules delete ncc2-vpc-internal --quiet
gcloud compute firewall-rules delete ncc3-vpc-internal --quiet
gcloud compute firewall-rules delete ncc4-vpc-internal --quiet
gcloud compute firewall-rules delete ncc1-vpc-iap --quiet
gcloud compute firewall-rules delete ncc2-vpc-iap --quiet
gcloud compute firewall-rules delete ncc3-vpc-iap --quiet
gcloud compute firewall-rules delete ncc4-vpc-iap --quiet
gcloud compute firewall-rules delete allow-icmpv6-ula-ncc1
gcloud compute firewall-rules delete allow-icmpv6-ula-ncc4
删除 GCE 实例
gcloud compute instances delete vm1-vpc1-ncc --zone=us-central1-a --quiet
gcloud compute instances delete vm2-vpc2-ncc --zone=us-central1-a --quiet
gcloud compute instances delete pnat-vm-vpc2 --zone=us-central1-a --quiet
gcloud compute instances delete vm1-vpc4-ncc --zone=us-east1-b --quiet
gcloud compute instances delete vpc4-ipv6-vm  --zone us-central1-a --quiet
gcloud compute instances delete vpc2-dual-stack-vm --zone us-east1-b --quiet
gcloud compute instances delete vpc2-ipv6-vm --zone us-central1-a --quiet
删除 VPC 子网
gcloud compute networks subnets delete ncc2-spoke-nat --region us-central1 --quiet
gcloud compute networks subnets delete vpc1-ncc-subnet1 --region us-central1 --quiet
gcloud compute networks subnets delete vpc1-ncc-subnet2 --region us-central1 --quiet
gcloud compute networks subnets delete vpc1-ncc-subnet3 --region us-central1 --quiet
gcloud compute networks subnets delete vpc2-ncc-subnet1 --region us-central1 --quiet
gcloud compute networks subnets delete overlapping-vpc2 --region us-central1 --quiet
gcloud compute networks subnets delete overlapping-vpc3 --region us-central1 --quiet

gcloud compute networks subnets delete benchmark-testing-rfc2544 --region us-east1 --quiet
gcloud compute networks subnets delete class-e-rfc5735 --region us-east1 --quiet
gcloud compute networks subnets delete ietf-protcol-assignment-rfc6890 --region us-east1 --quiet
gcloud compute networks subnets delete ipv6-4-relay-rfc7526 --region us-east1 --quiet
gcloud compute networks subnets delete pupi --region us-east1 --quiet
gcloud compute networks subnets delete test-net-1-rfc5737 --region us-east1 --quiet
gcloud compute networks subnets delete test-net-2-rfc5737 --region us-east1 --quiet
gcloud compute networks subnets delete test-net-3-rfc5737 --region us-east1 --quiet
gcloud compute networks subnets delete vpc1-ipv64-sn2 --region=us-east1 --quiet
gcloud compute networks subnets delete vpc1-ipv6-sn1 --region=us-central1 --quiet
gcloud compute networks subnets delete vpc4-ipv64-sn2 --region=us-east1 --quiet
gcloud compute networks subnets delete vpc4-ipv6-sn1 --region=us-central1 --quiet
gcloud compute networks subnets delete vpc5-ext-ipv6 --region=us-central1 --quiet
删除 VPC
gcloud compute networks delete vpc1-ncc vpc2-ncc vpc3-ncc vpc4-ncc, vpc5-ncc --quiet
11. 恭喜!
您已完成 Network Connectivity Center 实验!
所学内容
- 使用 NCC hub 配置了全网状 VPC 对等互连网络
- NCC Spoke 排除过滤条件
- 跨项目 Spoke 支持
- VPC 之间的 Private NAT
后续步骤
©Google LLC 或其关联公司。保留所有权利。请勿分发。