

1. はじめに
この Codelab では、gCurrenC 計算ツール ウェブ アプリケーションを Google Cloud でビルドしてデプロイし、不正アクセスから保護します。Google Antigravity、Google Cloud Developer プラグイン、Developer Knowledge(DK)MCP サーバーを使用して、アプリケーションにアクセスできるユーザーを制御し、不正使用から保護するセキュリティ アーキテクチャを設計して実装します。
このラボでは、Google Antigravity を DK MCP サーバーに接続します。これにより、Antigravity は公式のリアルタイムの Google Cloud ドキュメントをグラウンディングとして利用できます。Antigravity は、静的なトレーニング データや古いモデルの重みに依存するのではなく、現在のアーキテクチャ パターン、最新の gcloud CLI 構文、セキュリティ パラメータを動的に取得します。これにより、ハルシネーションが減少し、最新の知識に基づいて回答が生成されます。
作成するアプリの概要
- プライベート コンピューティング ワークロード: 2 つの Compute Engine 仮想マシン(VM)が、パブリック IP アドレスのないカスタム Virtual Private Cloud(VPC)ネットワーク内で gCurrenC 計算ツールのウェブアプリを実行します。
- 安全な上り(内向き)パイプライン: 専用のプロキシ専用サブネットを備えたグローバル外部アプリケーション ロードバランサ。インターネット トラフィックを Google Front End(GFE)経由でプライベート VM にルーティングし、パブリック インターネットに公開しません。
- 安全な下り(外向き)パイプライン: Cloud Router と Cloud NAT ゲートウェイを、プロジェクト レベルの Cloud Next Generation Firewall(Cloud NGFW) Enterprise および Certificate Authority Service(CAS)と組み合わせて、アウトバウンド HTTPS 通貨交換 API トラフィックに対してオンザフライの TLS 検査と侵入防止サービス(IPS)スキャンを実行します。
学習内容
- Antigravity CLI を使用して
google-cloud-developerプラグインをインストールし、Antigravity で DK MCP サーバーを構成します。 - Identity-Aware Proxy(IAP)の TCP 転送を使用して、Compute Engine に分離されたプライベート ウェブ アプリケーションをデプロイしてテストします。
- Antigravity でグラウンディングされたマルチターン プロンプトを使用して、プロジェクト レベルの上り(内向き)と下り(外向き)のセキュリティ アーキテクチャを設計します。
- グローバル外部アプリケーション ロード バランシング、Cloud NAT、CAS、Cloud NGFW Enterprise の
bashデプロイ スクリプトを生成、自己監査、実行します。
2. 始める前に
前提条件
この Codelab を開始する前に、次のものが揃っていることを確認してください。
- Google アカウントと Google Chrome ブラウザ。
- 課金が有効になっている新しい Google Cloud プロジェクト。プロジェクト ID(
PROJECT_ID)をメモしておきます。この Codelab では、API の有効化、API キーの作成、Google Cloud リソースのデプロイにこの ID を使用します。 - API キー、Compute Engine リソース、VPC ネットワーク、CAS プール、IAP トンネル、Cloud NGFW エンドポイントを作成するための、Google Cloud プロジェクトの Identity and Access Management(IAM)権限。
gcloudCLI で認証し、アクティブな Google Cloud プロジェクトを設定して、必要な API を有効にします。- ターミナルまたは Cloud Shell で、認証済みであることを確認します。
gcloud auth listgcloud auth login gcloudCLI がプロジェクトを使用するように構成されていることを確認します。gcloud config list projectPROJECT_IDは、実際の Google Cloud プロジェクト ID に置き換えます。export PROJECT_ID=PROJECT_ID gcloud config set project PROJECT_ID- Google Cloud プロジェクトで必要な API を有効にします。
gcloud services enable \
   compute.googleapis.com \
   iap.googleapis.com \
   networksecurity.googleapis.com \
   privateca.googleapis.com \
   developerknowledge.googleapis.com \
   apikeys.googleapis.com
- ターミナルまたは Cloud Shell で、認証済みであることを確認します。
- Google Antigravity のダウンロード ページから、ローカル システムに Antigravity 2.0 をインストールします。
Antigravity CLI を使用して Google Cloud Developer プラグインをインストールする
Antigravity CLI を使用して Google Cloud Developer プラグインをインストールする手順は次のとおりです。
- ローカル ワークステーションに Antigravity CLI をインストールするには、次の操作を行います。
- ローカル ターミナルを開きます。
- インストーラ スクリプトを実行します。
curl -fsSL https://antigravity.google/cli/install.sh | bash - ターミナル セッションを閉じて再度開き、Antigravity CLI バイナリ
agyがシステムPATHで使用できるようにします。
- ローカル ターミナルで次のコマンドを実行して、
google-cloud-developerプラグインをインストールします。agy plugin install https://github.com/google/skills/plugins/cloud/google-cloud-developerCloning plugin from https://github.com/google/skills.git... [ok] google-cloud-developer ✔ skills : 5 processed - agents : skipped (not found) - commands : skipped (not found) ✔ mcpServers : 1 processed - hooks : skipped (not found)
3. Antigravity と DK MCP サーバーを設定する
このセクションでは、制限付きの Google Cloud API キーを使用して、Antigravity で DK MCP サーバーを構成します。
- Antigravity を開き、
/goalと入力して Enter キーを押し、目標モードを有効にします。次に、以下のプロンプトを貼り付けて、制限付き API キーを作成し、DK MCP サーバーを構成します。PROJECT_IDは、始める前にセクションの Google Cloud プロジェクト ID に置き換えます。詳細については、google-cloud-developer プラグインをご覧ください。Set up Antigravity to use the Developer Knowledge MCP server on my local machine. Run the necessary terminal commands to complete the following: 1. Create a restricted API key named 'DKP-MCP-Key' that can only target the Developer Knowledge API. Use the PROJECT_ID to create the API key. 2. Retrieve the actual key string of the newly created API key. 3. Create or safely update my ~/.gemini/config/mcp_config.json file (preserve any existing MCP servers) with the correct JSON structure to connect the developer-knowledge server using that API key in the headers. You MUST use the following JSON structure for the new server: "developer-knowledge": { "serverUrl": "https://developerknowledge.googleapis.com/mcp", "headers": { "x-goog-api-key": "<INSERT_RETRIEVED_API_KEY_HERE>" } } When you are done, confirm that the setup is complete. - DK MCP サーバーがアクティブであることを確認するには、Antigravity チャット ウィンドウに次のプロンプトを入力します。
Which MCP servers are available?developer-knowledgeと、利用可能なツール(search_documents、answer_query、get_documents)が一覧表示されます。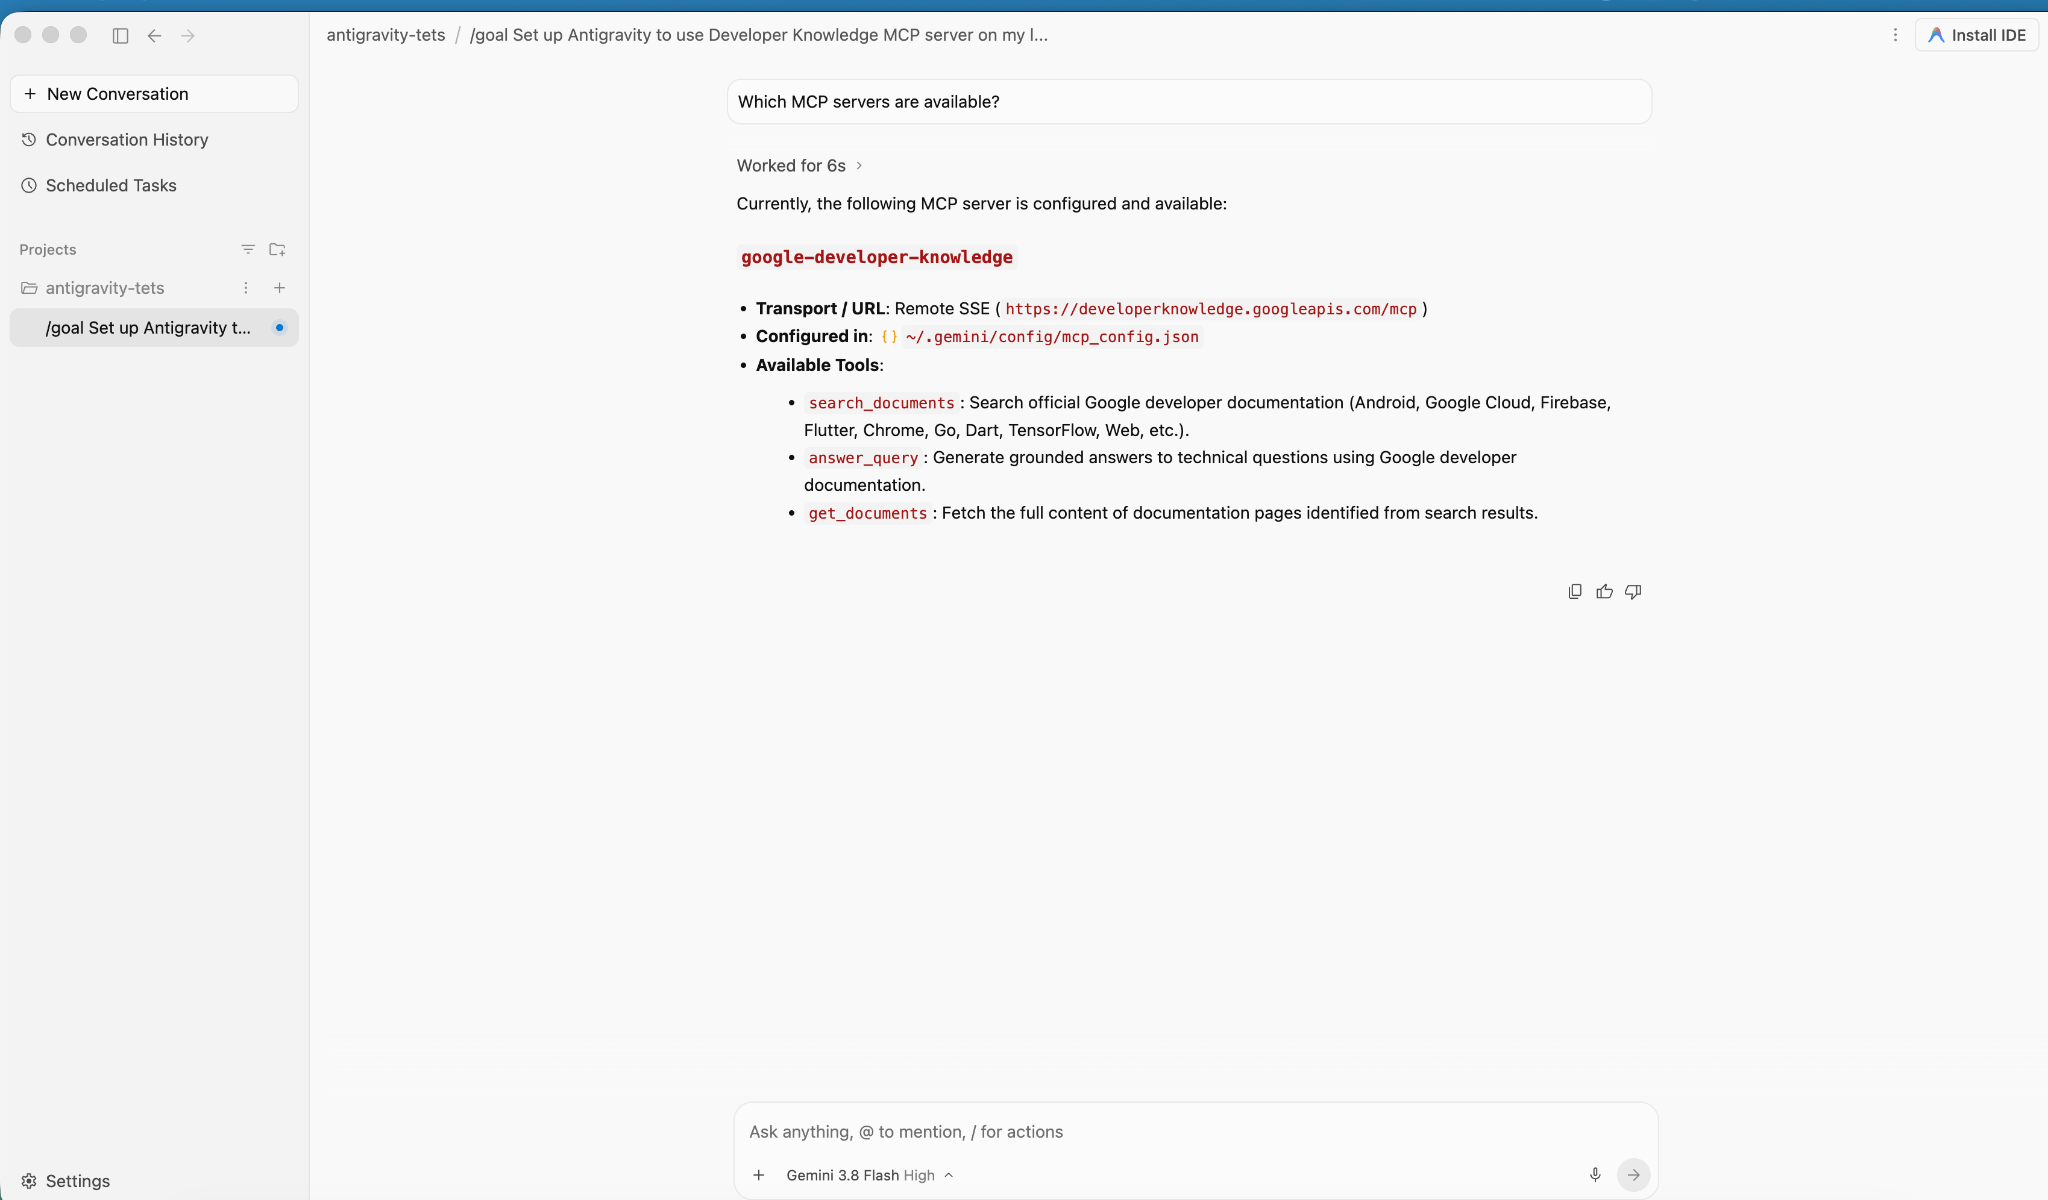
4. アプリケーションを作成してデプロイする
このセクションでは、カスタム VPC ネットワーク内の 2 つのプライベート Compute Engine VM に gCurrenC 計算ツール アプリケーションをデプロイします。
このアプリケーションには、以下が含まれます。
- Python の組み込み
http.server標準ライブラリをポート8080で使用し、/healthzヘルスチェック エンドポイントを備えた、USD、EUR、GBP、JPY、CAD、INR、AUDをサポートするライブ通貨コンバータ。 - セキュリティ検証コンソール。リアルタイムのアウトバウンド API 接続と暗号化された脅威防止プローブを実行します。
- Google の IAP 範囲が、パブリック IP アドレスを公開せずに管理テスト用のポート
22と8080にアクセスできるようにする上り(内向き)ファイアウォール ルール。
アプリケーションをデプロイする
- Antigravity のチャット ウィンドウに「
/goal」と入力し、次のプロンプトを実行します。You are a Cloud developer. Deploy the "gCurrenC calculator" app onto two (2) Compute Engine VMs with no external IP addresses (`--no-address`) inside a dedicated custom VPC network and private subnet. CRITICAL INSTRUCTIONS ON OUTPUT: - The VMs are strictly private with no external IP addresses and the local IAP tunnel has NOT been started yet. Any web URL is completely unreachable and will fail with a connection error. - In your final response, simply confirm that the private VMs and Managed Instance Group are deployed, and state that the user should establish the IAP tunnel. Do not output, format, or suggest any web preview link or URL (such as http://localhost:8080 or internal IP addresses) in your final response. Run this script in the terminal: ```bash #!/usr/bin/env bash set -euxo pipefail # Disable any interactive confirmation prompts so execution never hangs export CLOUDSDK_CORE_DISABLE_PROMPTS=1 # --- User Configuration --- PROJECT_ID="[PROJECT_ID]" REGION="us-central1" ZONE="us-central1-a" NETWORK="gcurrenc-vpc" SUBNET="gcurrenc-app-subnet" SUBNET_RANGE="10.10.1.0/24" # -------------------------- echo "==> [1/5] Configuring project, default region/zone, and enabling APIs..." gcloud config set project "${PROJECT_ID}" gcloud config set compute/region "${REGION}" gcloud config set compute/zone "${ZONE}" gcloud services enable compute.googleapis.com echo "==> [2/5] Creating custom VPC network and private workload subnet..." gcloud compute networks create "${NETWORK}" \ --subnet-mode=custom \ --description="Dedicated VPC for currency exchange app demo" 2>/dev/null || true gcloud compute networks subnets create "${SUBNET}" \ --network="${NETWORK}" \ --region="${REGION}" \ --range="${SUBNET_RANGE}" \ --enable-private-ip-google-access \ --description="Private subnet hosting backend compute instances" 2>/dev/null || true echo "==> [3/5] Generating standalone Python standard-library startup script..." cat << 'STARTUP_EOF' > /tmp/private_app_startup.sh #!/bin/bash set -euxo pipefail mkdir -p /opt/gcurrenc-app # Pure Python standard-library application (zero pip/apt dependencies needed at boot) cat << 'APPEOF' > /opt/gcurrenc-app/app.py import os import sys import json import socket import urllib.request import urllib.parse import ssl from http.server import BaseHTTPRequestHandler, ThreadingHTTPServer SUPPORTED_CURRENCIES = ["USD", "EUR", "GBP", "JPY", "CAD", "INR", "AUD"] class CurrencyAppHandler(BaseHTTPRequestHandler): def address_string(self): return str(self.client_address[0]) def do_GET(self): parsed = urllib.parse.urlparse(self.path) path = parsed.path params = urllib.parse.parse_qs(parsed.query) if path == "/favicon.ico": self.send_response(204) self.end_headers() return if path == "/healthz": self.send_response(200) self.send_header("Content-Type", "text/plain") self.end_headers() self.wfile.write(b"OK") return if path == "/api/security-test": mode = params.get("mode", ["safe"])[0] target = "https://secure.eicar.org/eicar.com.txt" if mode == "threat" else "https://api.frankfurter.dev/v1/latest?from=USD&to=EUR" try: req = urllib.request.Request(target, headers={"User-Agent": "SecureCurrencyApp/1.0"}) ctx = ssl.create_default_context() with urllib.request.urlopen(req, timeout=5, context=ctx) as resp: data = {"verdict": "PERMITTED", "target": target, "http_status": resp.status} code = 200 except Exception as e: data = {"verdict": "BLOCKED_OR_FAILED", "target": target, "error": str(e)} code = 502 self.send_response(code) self.send_header("Content-Type", "application/json") self.end_headers() self.wfile.write(json.dumps(data, indent=2).encode("utf-8")) return self.render_page() def do_POST(self): parsed = urllib.parse.urlparse(self.path) if parsed.path == "/generate": content_length = int(self.headers.get("Content-Length", 0)) post_body = self.rfile.read(content_length).decode("utf-8") form = urllib.parse.parse_qs(post_body) base_curr = form.get("base_curr", ["USD"])[0] target_curr = form.get("target_curr", ["EUR"])[0] try: amount = float(form.get("amount", ["2500.00"])[0]) except ValueError: amount = 2500.00 rate_str = "Unavailable" total_str = "Rate lookup pending outbound internet activation" try: if base_curr == target_curr: rate = 1.0 else: url = f"https://api.frankfurter.dev/v1/latest?from={base_curr}&to={target_curr}" req = urllib.request.Request(url, headers={"User-Agent": "SecureCurrencyApp/1.0"}) with urllib.request.urlopen(req, timeout=4) as resp: res_json = json.loads(resp.read().decode("utf-8")) rate = res_json["rates"][target_curr] rate_str = str(rate) total_str = f"{round(amount * rate, 2):,.2f} {target_curr}" except Exception as e: total_str = f"Outbound connection unavailable {str(e)}" self.render_page(base_curr, target_curr, amount, rate_str, total_str) return self.send_response(404) self.end_headers() def render_page(self, base_curr="USD", target_curr="EUR", amount=2500.00, fx_rate="1.00", total_str=""): hostname = socket.gethostname() curr_options_base = "".join([f'<option value="{c}" {"selected" if c == base_curr else ""}>{c}</option>' for c in SUPPORTED_CURRENCIES]) curr_options_target = "".join([f'<option value="{c}" {"selected" if c == target_curr else ""}>{c}</option>' for c in SUPPORTED_CURRENCIES]) result_block = "" if total_str: if fx_rate == "Unavailable": rate_line = "<p style='margin: 6px 0;'>Exchange Rate: <span style='color: #d93025; font-weight: bold;'>⚠️ Offline-Outbound internet blocked</span></p>" else: rate_line = f"<p style='margin: 6px 0; font-size: 14px; color: #137333;'>🟢 Exchange Rate: <strong>1 {base_curr} = {fx_rate} {target_curr}</strong> (Secured via Cloud NAT & Cloud NGFW)</p>" result_block = f""" <div style="margin-top: 22px; background: #e6f4ea; border: 1px solid #c6e1c6; border-left: 5px solid #34a853; padding: 18px 20px; border-radius: 8px;"> <h4 style="margin: 0 0 6px 0; text-transform: uppercase; font-size: 12px; color: #137333; letter-spacing: 0.5px;">Conversion Result</h4> <div style="font-size: 24px; font-weight: 700; color: #202124; margin-bottom: 6px;"> {amount:,.2f} {base_curr} = <span style="color: #1a73e8;">{total_str}</span> </div> {rate_line} </div> """ html = ("""<!DOCTYPE html> <html lang="en"> <head> <meta charset="UTF-8"> <meta name="viewport" content="width=device-width, initial-scale=1.0"> <title>gCurrenC calculator</title> <style> body { font-family: -apple-system, BlinkMacSystemFont, "Segoe UI", Roboto, "Helvetica Neue", Arial, sans-serif; background: #f8f9fa; margin: 30px 15px; color: #202124; display: flex; justify-content: center; } .container { width: 100%; max-width: 860px; } .card { background: white; padding: 24px 28px; border-radius: 12px; box-shadow: 0 1px 3px rgba(60,64,67,0.12), 0 4px 8px rgba(60,64,67,0.06); border: 1px solid #dadce0; margin-bottom: 20px; } .header { display: flex; justify-content: space-between; align-items: center; border-bottom: 1px solid #e8eaed; padding-bottom: 14px; margin-bottom: 20px; } .header h2 { margin: 0 0 4px 0; font-size: 20px; font-weight: 600; } .header p { margin: 0; font-size: 13px; color: #5f6368; } .badge { background: #e8f0fe; color: #1a73e8; padding: 6px 12px; border-radius: 16px; font-weight: 600; font-size: 12px; border: 1px solid #d2e3fc; display: flex; align-items: center; gap: 6px; } .badge::before { content: ""; width: 8px; height: 8px; border-radius: 50%; background-color: #34a853; } .form-row { display: flex; gap: 14px; align-items: flex-end; flex-wrap: wrap; } .form-group { display: flex; flex-direction: column; gap: 6px; } .form-group label { font-size: 12px; font-weight: 600; color: #5f6368; text-transform: uppercase; letter-spacing: 0.5px; } input, select { padding: 10px 14px; border: 1px solid #dadce0; border-radius: 6px; font-size: 14px; color: #202124; background-color: #fff; box-sizing: border-box; transition: border-color 0.15s, box-shadow 0.15s; } input:focus, select:focus { outline: none; border-color: #1a73e8; box-shadow: 0 0 0 3px rgba(26, 115, 232, 0.15); } button { padding: 11px 20px; background: #1a73e8; color: white; border: none; border-radius: 6px; font-size: 14px; font-weight: 500; cursor: pointer; transition: background 0.15s, box-shadow 0.15s; } button:hover { background: #1557b0; box-shadow: 0 1px 2px rgba(60,64,67,0.3); } .danger-btn { background: #d93025; } .danger-btn:hover { background: #b31412; } pre { background: #202124; color: #8ab4f8; padding: 14px; border-radius: 6px; overflow-x: auto; font-family: "SF Mono", "Fira Code", Consolas, monospace; font-size: 13px; line-height: 1.5; margin: 0; } /* Collapsible Security Console */ details.security-drawer { background: white; border-radius: 12px; box-shadow: 0 1px 3px rgba(60,64,67,0.12); border: 1px solid #dadce0; overflow: hidden; margin-bottom: 24px; } details.security-drawer summary { padding: 16px 20px; font-size: 14px; font-weight: 600; cursor: pointer; list-style: none; display: flex; justify-content: space-between; align-items: center; user-select: none; background: #fafafa; transition: background 0.15s; } details.security-drawer summary::-webkit-details-marker { display: none; } details.security-drawer summary:hover { background: #f1f3f4; } details.security-drawer[open] summary { border-bottom: 1px solid #dadce0; background: #ffffff; } .expand-toggle { font-size: 13px; font-weight: 500; } details.security-drawer summary .expand-toggle::before { content: "▶ Click to Expand"; color: #1a73e8; } details.security-drawer[open] summary .expand-toggle::before { content: "▼ Click to Collapse"; color: #5f6368; } .drawer-body { padding: 20px; background: #ffffff; } .drawer-body p { margin-top: 0; font-size: 13px; color: #5f6368; } .probe-buttons { display: flex; gap: 10px; margin-bottom: 14px; } </style> </head> <body> <div class="container"> <div class="card"> <div class="header"> <div> <h2>💱 gCurrenC calculator</h2> </div> <div class="badge">Serving host: {hostname}</div> </div> <form method="POST" action="/generate"> <div class="form-row"> <div class="form-group" style="flex: 1.5; min-width: 140px;"> <label>Amount</label> <input type="number" step="0.01" name="amount" value="{amount}" required> </div> <div class="form-group" style="flex: 1; min-width: 100px;"> <label>From</label> <select name="base_curr">{curr_options_base}</select> </div> <div class="form-group" style="flex: 1; min-width: 100px;"> <label>To (Target)</label> <select name="target_curr">{curr_options_target}</select> </div> <div class="form-group"> <button type="submit">Convert currency ➔</button> </div> </div> </form> {result_block} </div> <!-- Collapsible Security Verification Console --> <details class="security-drawer"> <summary> <span>🛡️ Security verification console</span> <span class="expand-toggle"></span> </summary> <div class="drawer-body"> <p>Test outbound HTTPS traffic and threat prevention capabilities in real time:</p> <div class="probe-buttons"> <button type="button" onclick="runProbe('safe')">Test Outbound API Connection</button> <button type="button" class="danger-btn" onclick="runProbe('threat')">Simulate Encrypted Threat (EICAR)</button> </div> <pre id="output">Waiting for command...</pre> </div> </details> </div> <script> function runProbe(mode) { const el = document.getElementById('output'); el.innerText = 'Executing outbound request...'; fetch('/api/security-test?mode=' + mode) .then(res => res.json()) .then(data => el.innerText = JSON.stringify(data, null, 2)) .catch(err => el.innerText = 'Connection dropped / reset by Firewall: ' + err); } </script> </body> </html>""" .replace("{hostname}", str(hostname)) .replace("{amount}", str(amount)) .replace("{curr_options_base}", curr_options_base) .replace("{curr_options_target}", curr_options_target) .replace("{result_block}", result_block) ) self.send_response(200) self.send_header("Content-Type", "text/html; charset=utf-8") self.end_headers() self.wfile.write(html.encode("utf-8")) def run(): server_address = ('0.0.0.0', 8080) httpd = ThreadingHTTPServer(server_address, CurrencyAppHandler) httpd.serve_forever() if __name__ == '__main__': run() APPEOF # Register and start systemd unit cat << 'SERVICEEOF' > /etc/systemd/system/gcurrenc-app.service [Unit] Description=Currency exchange calculator web application After=network.target [Service] Type=simple User=root WorkingDirectory=/opt/gcurrenc-app ExecStart=/usr/bin/python3 /opt/gcurrenc-app/app.py Restart=always [Install] WantedBy=multi-user.target SERVICEEOF systemctl daemon-reload systemctl enable gcurrenc-app systemctl start gcurrenc-app STARTUP_EOF echo "==> [4/5] Creating Firewall, Regional Instance Template, and 2-VM MIG..." gcloud compute firewall-rules create allow-iap-admin \ --network="${NETWORK}" \ --allow=tcp:22,tcp:8080 \ --source-ranges=35.235.240.0/20 \ --target-tags=gcurrenc-app-vm \ --description="Allow IAP SSH and port 8080 access to private VMs" \ --quiet 2>/dev/null || true # Explicitly pass both --region and --instance-template-region to avoid prompt gcloud compute instance-templates create gcurrenc-app-template \ --instance-template-region="${REGION}" \ --region="${REGION}" \ --network="${NETWORK}" \ --subnet="${SUBNET}" \ --machine-type=e2-medium \ --no-address \ --tags=gcurrenc-app-vm \ --metadata-from-file=startup-script=/tmp/private_app_startup.sh \ --quiet gcloud compute instance-groups managed create gcurrenc-app-mig \ --base-instance-name=gcurrenc-vm \ --template="projects/${PROJECT_ID}/regions/${REGION}/instanceTemplates/gcurrenc-app-template" \ --size=2 \ --zone="${ZONE}" \ --quiet gcloud compute instance-groups managed set-named-ports gcurrenc-app-mig \ --named-ports=http-port:8080 \ --zone="${ZONE}" \ --quiet echo "==> [5/5] Verifying private VM deployment and internal status..." sleep 30 gcloud compute instances list \ --filter="name ~ '^gcurrenc-vm-'" \ --zones="${ZONE}" \ --format="table(name,zone.basename():label=ZONE,networkInterfaces[0].networkIP:label=INTERNAL_IP,status)" FIRST_VM=$(gcloud compute instances list \ --filter="name ~ '^gcurrenc-vm-'" \ --zones="${ZONE}" \ --format="value(name)" \ --limit=1) echo "Testing healthz on ${FIRST_VM} via IAP tunnel..." gcloud compute ssh "${FIRST_VM}" \ --zone="${ZONE}" \ --tunnel-through-iap \ --quiet \ --command="curl -fsS http://localhost:8080/healthz" echo "" echo "==========================================================================" echo "PREREQUISITE COMPLETE: 2 private VMs deployed with no external IPs." echo "VPC: ${NETWORK} | Subnet: ${SUBNET} (${SUBNET_RANGE})" echo "Instance Group: gcurrenc-app-mig (Zone: ${ZONE}, Port: 8080)" echo "" echo "The VMs are private and the IAP tunnel is not active. Set up the background IAP tunnel first to access the deployed app." echo "" echo "==========================================================================" ```
VM インスタンスの作成を確認する
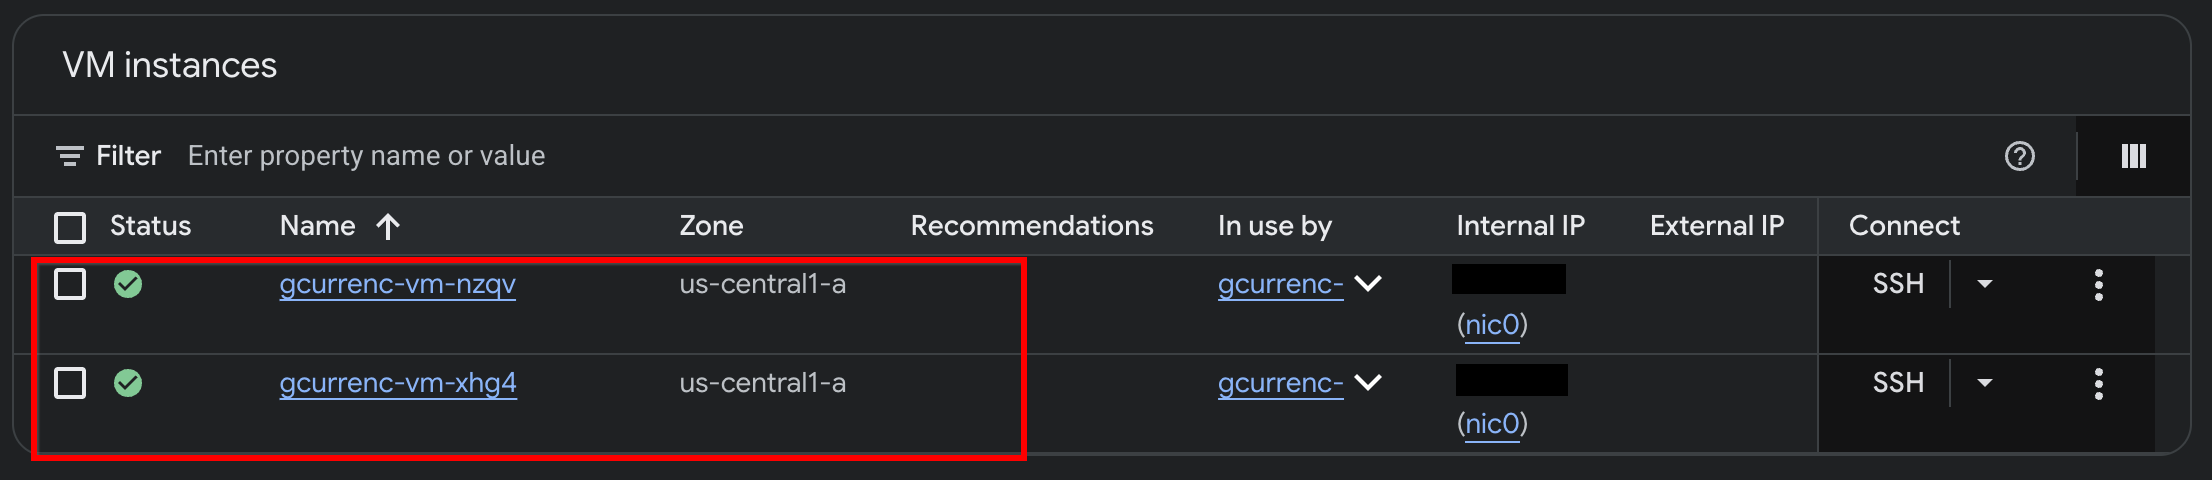
Antigravity が 2 つのプライベート Compute Engine VM へのアプリケーションのデプロイを完了したら、Google Cloud コンソールでインスタンスを確認します。
- Google Cloud コンソールで、[VM インスタンス] に移動します。
- 2 つの VM インスタンスが内部 IP アドレスで実行され、外部 IP アドレスがないことを確認します。
5. アプリケーションをテストする
プライベート VM には外部 IP アドレス(--no-address)と Cloud NAT ゲートウェイがないため、インターネットへのルートがなく、外部の為替レート API にアクセスできません。安全なアウトバウンド アクセスを構成する前に、ローカル IAP トンネルを介してアプリケーションをテストし、インターネット アクセスがないことを確認します。
/goalモードで、Antigravity チャット ウィンドウで次のプロンプトを実行します。Automate the IAP tunnel configuration and health verification for the web app, then output the live test URL. Run a terminal script that performs the following steps non-interactively: 1. Firewall Check: - Identify the active network ('gcurrenc-vpc' if it exists, otherwise 'default'). - Idempotently ensure an ingress firewall rule exists permitting 'tcp:22,tcp:8080' from the Google IAP range '35.235.240.0/20' targeting 'gcurrenc-app-vm'. 2. VM Health Verification: - Find the first running instance matching '^gcurrenc-vm-' in zone 'us-central1-a'. - Via 'gcloud compute ssh --tunnel-through-iap', verify that the 'gcurrenc-app' systemd service is active. If not active, restart it. 3. Background IAP Tunnel: - Free up local port 8080 if an old tunnel or process is lingering (e.g., using 'lsof -ti:8080 | xargs kill -9' or 'fuser -k 8080/tcp'). - Launch 'gcloud compute start-iap-tunnel <VM_NAME> 8080 --local-host-port=localhost:8080 --zone=us-central1-a' in the background using nohup, redirecting output to '/tmp/iap_tunnel.log'. - Wait up to 10 seconds for the tunnel to establish, checking with 'curl -fsS http://localhost:8080/healthz'. 4. Output Web Preview URL: - Detect whether the environment is Google Cloud Shell (check if $CLOUD_SHELL is true) or a local workstation. - If Cloud Shell, print instructions and the direct web preview link. - If local machine, provide the clickable 'http://localhost:8080' URL.- トンネルが起動したら、ウェブブラウザで
http://localhost:8080/を開きます。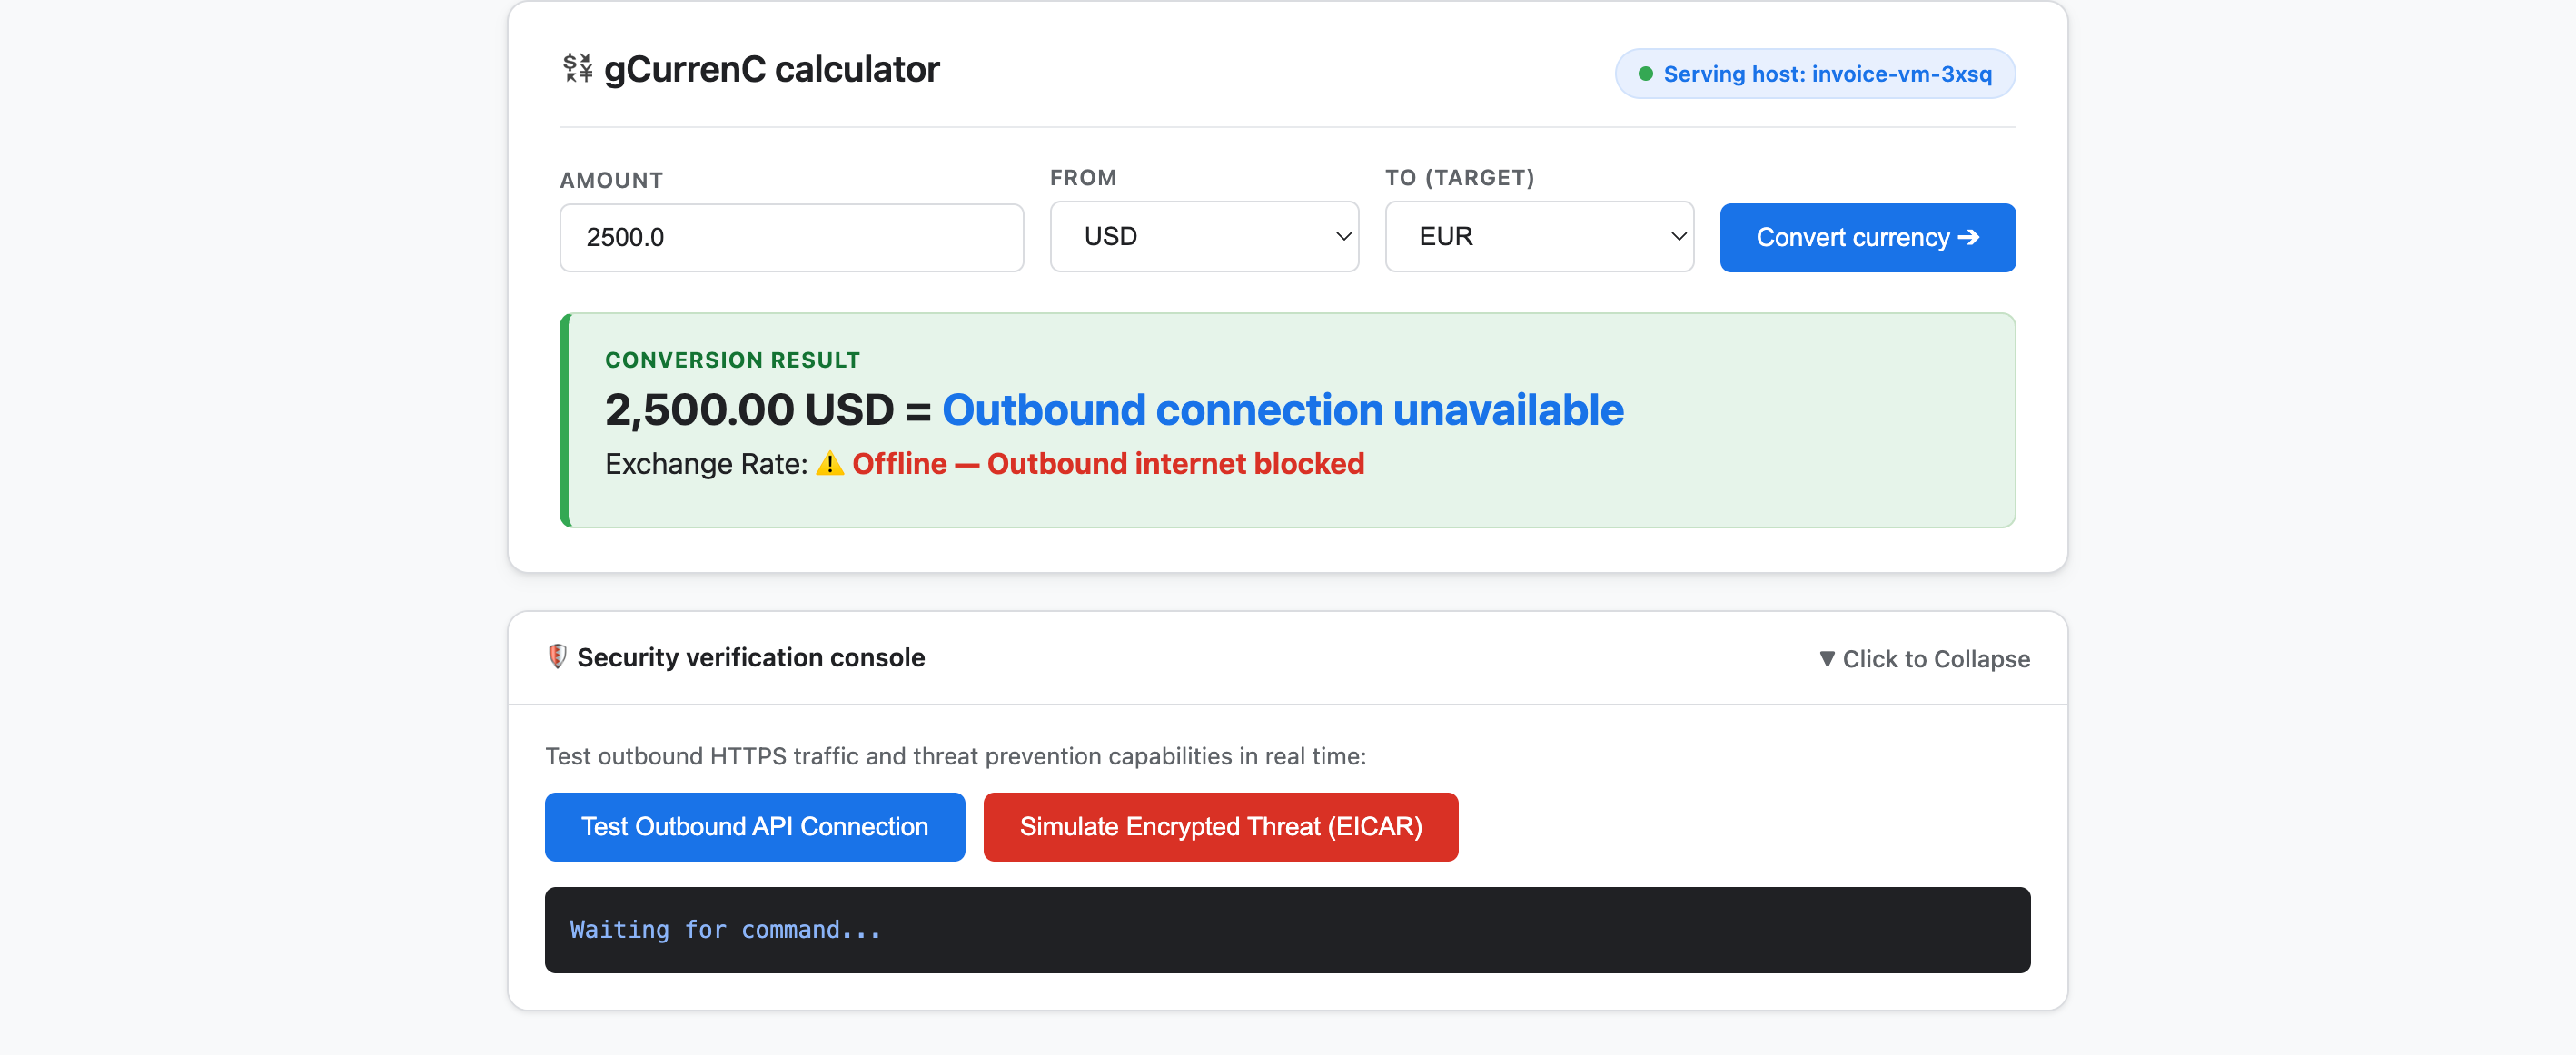
- アプリケーションをテストします。
- [通貨を換算] をクリックします。変換結果には
Offline - Outbound internet blockedとOutbound connection unavailableが表示されます。プライベート VM はインターネットに接続して最新の為替レートを取得できないため、この結果は想定どおりです。 - [セキュリティ検証コンソール] を開き、[アウトバウンド API 接続をテスト] をクリックします。出力には、
https://api.frankfurter.dev/v1/latestのverdict: BLOCKED_OR_FAILED(https://api.frankfurter.dev/v1/latestから為替レートを取得できないため、この結果は想定どおりです。 - [暗号化された脅威(EICAR)をシミュレートする] をクリックします。出力には、
https://secure.eicar.org/eicar.com.txtのverdict: BLOCKED_OR_FAILEDも表示されます。プライベート VM にはインターネット接続がないため、この結果も想定どおりです。
- [通貨を換算] をクリックします。変換結果には
ローカル IAP トンネルを停止する
セキュリティ アーキテクチャを設計してデプロイする前に、ローカル IAP トンネルを終了してポート 8080 を解放します。
/goalモードで、次のプロンプトを実行します。Free up local port 8080 and terminate any running Google Cloud IAP tunnels (e.g., kill processes matching 'start-iap-tunnel' or listening on port 8080).8080が解放されたことを確認します。
6. アプリケーションを保護する
前のセクションでは、パブリック IP アドレスのないプライベート Compute Engine VM を作成し、次の 2 つのネットワークとセキュリティの主要な課題を検証しました。
- インバウンド アクセス(上り(内向き)): インターネット ユーザーはプライベート VM インスタンスに直接アクセスできません。ウェブ アプリケーションを公開するには、VM を公共のインターネットに公開することなく、グローバル外部アプリケーション ロードバランサと専用のプロキシ専用サブネットを介してトラフィックをプロキシする必要があります。
- アウトバウンド アクセス(下り(外向き)): プライベート VM には、ライブ HTTPS 為替レート API をクエリするためのインターネットへのルートがありません。アウトバウンド アクセスを有効にするには、SSL/TLS の信頼を損なうことなく、暗号化されたトラフィックを検査してマルウェアとデータ漏洩を検出する必要があります。
このセクションでは、Google Cloud の公式ドキュメント(@retrieving-developer-knowledge)に基づいて、Antigravity に合理化されたワークフローを案内し、アプリケーションのプロジェクト レベルの Ingress および Egress セキュリティ アーキテクチャを設計、自己監査、デプロイします。
統合セキュリティ アーキテクチャを設計する
/goalモードで、次のプロンプトを実行して、インバウンド トラフィック フローとアウトバウンド トラフィック フローの両方をカバーするエンドツーエンドのアーキテクチャ図と説明を生成します。You are a Google Cloud Network and Security Architect. We need to design an end-to-end security architecture for our "gCurrenC calculator" app running on private Compute Engine VMs with no external IP addresses inside 'gcurrenc-vpc'. We are operating in a standalone Google Cloud project without an Organization resource, so all security resources must be scoped at the project level. Use the @retrieving-developer-knowledge skill to consult official Google Cloud documentation and suggest an architecture diagram and explanation covering both flows: 1. Ingress Flow: - How internet users securely reach the private VMs via a global external Application Load Balancer. - Why Envoy-based external Application Load Balancers require a dedicated proxy-only subnet, and how Google Front Ends (GFEs) proxy traffic to private backends without exposing VMs to the public internet. 2. Egress Flow: - How private VMs reach the internet via Cloud NAT to query live currency exchange APIs, such as frankfurter.dev. - How Cloud NGFW Enterprise provides Layer 7 deep packet inspection and intrusion prevention (IPS) for outbound encrypted HTTPS traffic. - How TLS inspection backed by Certificate Authority Service (CAS) decrypts outbound HTTPS sessions on the fly, and what Root CA trust configuration the private VMs require. Provide a clear diagram and explain how these components connect together.
アーキテクチャ リソースの概要を生成する
- 次のプロンプトを入力して、デプロイ スクリプトを生成する前に、設計をカテゴリ別のプロジェクト レベルのリソース概要に構造化します。
Act as a Lead Network Security Architect. Using the @retrieving-developer-knowledge skill, provide an architectural outline of all the Google Cloud resources required to secure the "gCurrenC calculator" app.

Our starting state:
- The custom VPC ('gcurrenc-vpc'), workload subnet ('gcurrenc-app-subnet'), and 2-instance MIG ('gcurrenc-app-mig', port 8080) are already deployed.
- All newly added security components must be project-level resources (no organization resources).

Structure your resource outline into three distinct categories, indicating which resources are new additions:
1. Core VPC Infrastructure: proxy-only subnet ('gcurrenc-proxy-subnet', 10.10.2.0/24), Cloud Router, and Cloud NAT gateway.
2. Inbound security (ingress): global external ALB components (forwarding rule on port 443, target HTTPS proxy, SSL certificate, URL map, backend service attached to 'gcurrenc-app-mig' on port 8080, and HTTP health check on '/healthz') and ingress firewall rules.
3. Outbound security (egress): CAS DevOps CA pool and root CA, project-level Cloud NGFW Enterprise components (Threat Prevention profile, Security Profile Group, Firewall Endpoint in zone us-central1-a, and Endpoint Association attaching the TLS policy), and global network firewall policy egress rules.

For each resource, briefly state its role in the security boundary and how it connects to adjacent components.
デプロイ スクリプトを生成して自己監査する
/goalモードで、次のプロンプトを実行して、完全な非インタラクティブなbashデプロイ スクリプトを生成し、同じターンでコンプライアンス要件に照らして自動的にセルフ監査します。Act as a Principal Infrastructure Engineer. Using the @retrieving-developer-knowledge skill, generate a complete, non-interactive Bash script to deploy this entire security architecture for our "gCurrenC calculator" app, and self-audit the script before outputting it. Requirements: - Discover the project ID, region, and zone dynamically from the existing 'gcurrenc-app-subnet' and 'gcurrenc-app-mig'. - Keep all resources scoped strictly to the project level (no Organization resource). - Deploy the proxy-only subnet, global external Application Load Balancer, Cloud Router, and Cloud NAT. Don't use Cloud Armor. - Deploy project-level Cloud NGFW Enterprise with CAS TLS inspection ('--tls-inspect' on the firewall policy egress rule and 'gcloud beta' for the project-level firewall endpoint association) and an explicit DENY override for malware and antivirus threats. - Distribute the root CA to the private VMs over IAP SSH with connection timeouts so the guest OS trust store is updated. - Print the final Load Balancer URL ('https://${LB_IP}') at the end. Wrap the script in 'set -euxo pipefail' and output only the single executable bash script block.bashスクリプトを生成し、コンプライアンス制約に照らしてすべてのコマンドを自己監査し、set -euxo pipefailでラップされた単一の実行可能スクリプト ブロックを出力します。
セキュリティ デプロイ スクリプトを実行する
/goalモードで、前のプロンプトで生成されたbashスクリプトを次の形式で Antigravity チャット ウィンドウに貼り付けて、デプロイを実行し、ライブ アプリケーション URL(https://<LB_IP>)を出力します。Run this script. <PASTED-SCRIPT>
7. 保護されたアプリケーションを確認する
デプロイ スクリプトが完了すると、Antigravity はグローバル外部アプリケーション ロードバランサ(https://<LB_IP>)の外部 HTTPS URL を出力します。
- ウェブブラウザで
https://<LB_IP>を開き、ブラウザの自己署名証明書の警告をバイパスして、gCurrenC 計算ツールのインターフェースを読み込みます。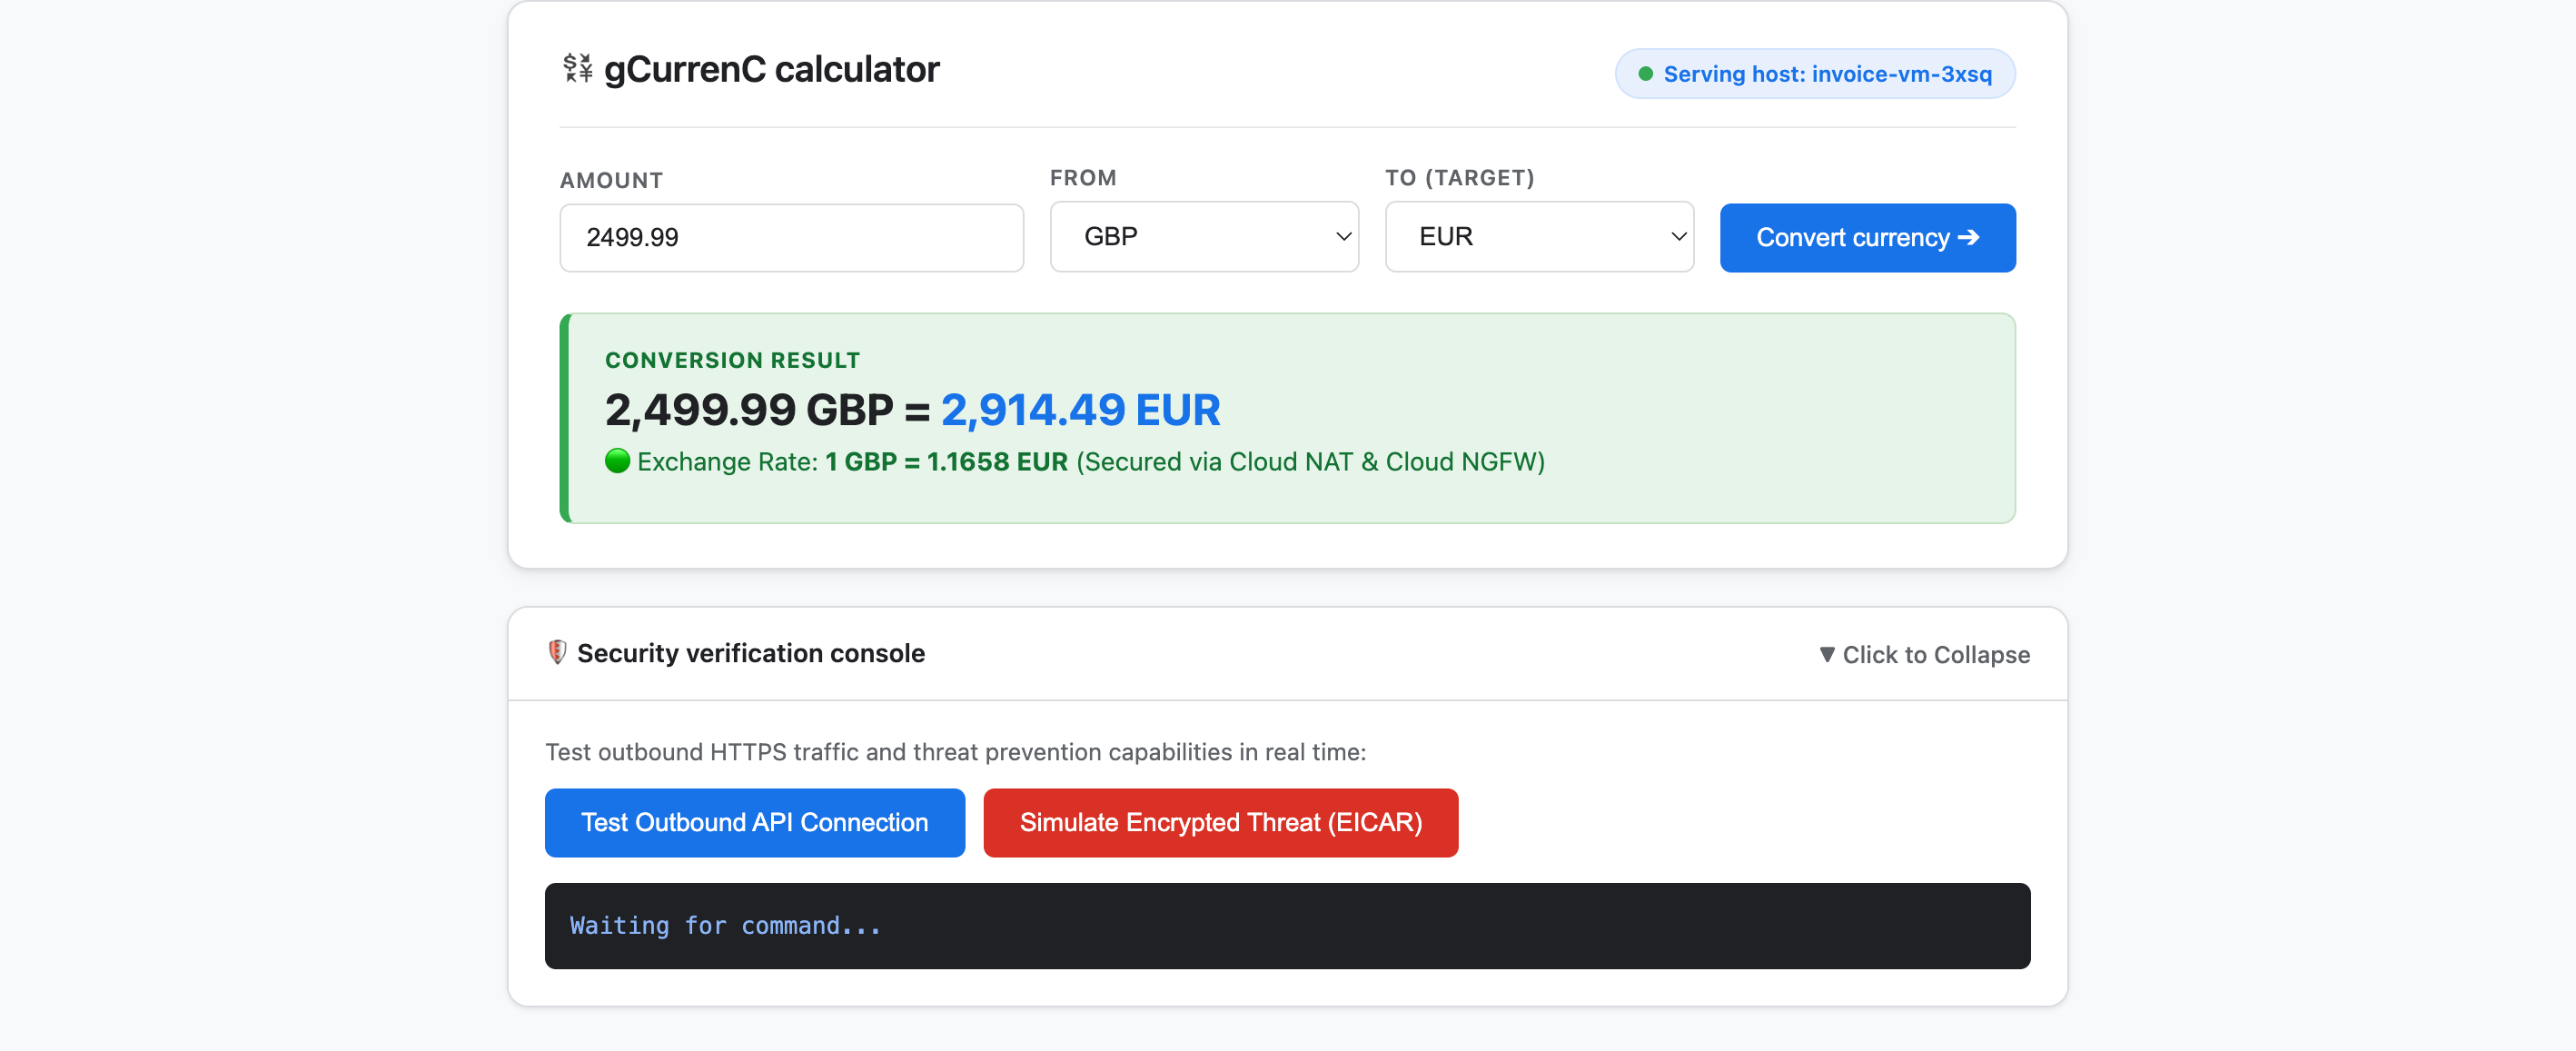
- アプリケーションをテストして、アウトバウンド接続と脅威対策の両方を確認します。
- [通貨を換算] をクリックします。アプリには、変換された最新の為替レートがすぐに表示されます。これにより、上り(内向き)ロード バランシングが Google Front End(GFE)とプロキシ専用サブネットを介してスムーズにルーティングされ、Cloud NAT が
api.frankfurter.devからライブ為替レートを取得することが確認されます。 - [セキュリティ検証コンソール] を開き、[アウトバウンド API 接続をテスト] をクリックします。アプリケーションに
verdict: PERMITTED(HTTP 200)が表示されます。これにより、Cloud NAT ルーティングが機能し、VM オペレーティング システムが復号された HTTPS セッションのプライベート CAS ルート CA を信頼していることが確認されます。 - [暗号化された脅威(EICAR)をシミュレートする] をクリックします。アプリケーションに
verdict: PERMITTEDが表示されます。これにより、Cloud NGFW Enterprise が CAS を利用した TLS インスペクションを使用してアウトバウンド HTTPS リクエストを復号し、侵入防止サービス(IPS)で EICAR テスト署名を検査することが確認されます。
- [通貨を換算] をクリックします。アプリには、変換された最新の為替レートがすぐに表示されます。これにより、上り(内向き)ロード バランシングが Google Front End(GFE)とプロキシ専用サブネットを介してスムーズにルーティングされ、Cloud NAT が
8. クリーンアップ
この Codelab で作成したリソースについて、Google Cloud アカウントに継続的に課金されないようにするには、Codelab のリソースのみを削除するか、Google Cloud プロジェクトを削除します。
- Google Cloud プロジェクトを保持し、この Codelab で作成したリソースのみを削除する場合は、Antigravity チャット ウィンドウで
/goalモードで次のプロンプトを実行します。Remove all resources created in this session, including the gcurrenc app and its resources. Don't delete the project. - この Codelab 専用の Google Cloud プロジェクトを作成し、プロジェクト全体を削除する場合は、Antigravity チャット ウィンドウで
/goalモードで次のプロンプトを実行します。Clean up the demo environment by deleting the Google Cloud project. Run the following command in the terminal: gcloud projects delete "$(gcloud config get-value project 2>/dev/null)" --quiet
9. 完了
おめでとうございます!Google Antigravity の Google Cloud Developer プラグイン(DK MCP サーバー)を使用して、Google Cloud に gCurrenC 計算ツール ウェブ アプリケーションをデプロイし、保護しました。
次のステップ
この Codelab で使用するサービスの詳細については、Google Cloud の公式ドキュメントをご覧ください。