
1. 事前準備
在先前的程式碼研究室中,您為 Android 和 iOS 建立的應用程式使用基本圖片標籤模型,可辨識數百個圖片類別。它非常籠統地辨識出花朵圖片,只看到花瓣、花朵、植物和天空。
如要更新應用程式,讓應用程式辨識特定花朵 (例如雛菊或玫瑰),您需要使用自訂模型,並以大量您想辨識的花朵類型範例訓練模型。
必要條件
- 本學習路徑中的前一個程式碼研究室。
建構項目和學習內容
- 如何使用 TensorFlow Lite Model Maker 訓練圖片分類器自訂模型。
軟硬體需求
- 不需要任何特定硬體,只要在瀏覽器中使用 Google Colab 即可完成所有作業。
2. 開始使用
我們已為您準備好所有程式碼,您可以使用 Google Colab 執行這些程式碼,詳情請參閱這篇文章。如果無法存取 Google Colab,可以複製存放區,並使用 ImageClassificationMobile->colab 目錄中的 CustomImageClassifierModel.ipynb 筆記本。
如果您有大量特定花卉的範例,使用 TensorFlow Lite Model Maker 訓練模型來辨識這些花卉相對容易。
最簡單的做法是建立包含圖片的 .zip 或 .tgz 檔案,並將圖片分類到不同目錄。舉例來說,如果您使用雛菊、蒲公英、玫瑰、向日葵和鬱金香的圖片,可以將這些圖片整理到下列目錄:

將其壓縮並放在伺服器上,即可使用該資料集訓練模型。本實驗室的後續部分會使用為您準備的其中一個。
本實驗室假設您使用 Google Colab 訓練模型。您可以在 colab.research.google.com 找到 Colab。如果您使用其他環境,可能必須安裝許多相依項目,包括 TensorFlow。
3. 安裝及匯入依附元件
- 安裝 TensorFlow Lite 模型製作工具。您可以使用 pip 安裝。結尾的 &> /dev/null 只是為了抑制輸出內容。Model Maker 輸出的內容很多,但並非都與主題直接相關。系統已隱藏通知,方便你專注於手邊的工作。
# Install Model maker
!pip install -q tflite-model-maker &> /dev/null
- 接著,您需要匯入要使用的程式庫,並確認您使用的是 TensorFlow 2.x:
# Imports and check that we are using TF2.x
import numpy as np
import os

from tflite_model_maker import configs
from tflite_model_maker import ExportFormat
from tflite_model_maker import model_spec
from tflite_model_maker import image_classifier
from tflite_model_maker.image_classifier import DataLoader

import tensorflow as tf
assert tf.__version__.startswith('2')
tf.get_logger().setLevel('ERROR')
環境準備就緒後,就可以開始建立模型了!
4. 下載及準備資料
如果圖片已整理到資料夾中,且這些資料夾已壓縮成 ZIP 檔,那麼下載並解壓縮 ZIP 檔後,系統會根據圖片所在的資料夾自動標示圖片。這個目錄會稱為 data_path。
data_path = tf.keras.utils.get_file(
      'flower_photos',
      'https://storage.googleapis.com/download.tensorflow.org/example_images/flower_photos.tgz',
      untar=True)
接著,這個資料路徑可以載入類神經網路模型,並透過 TensorFlow Lite Model Maker 的 ImageClassifierDataLoader 類別進行訓練。只要指向資料夾即可。
使用機器學習訓練模型時,有一項重要元素是不要將所有資料用於訓練。保留一些資料,用來測試模型是否能處理先前未曾看過的資料。使用 ImageClassifierDataLoader 傳回的資料集分割方法,即可輕鬆完成這項操作。將 0.9 傳遞至該函式,即可取得 90% 的訓練資料和 10% 的測試資料:
data = DataLoader.from_folder(data_path)
train_data, test_data = data.split(0.9)
資料準備就緒後,即可使用這些資料建立模型。
5. 建立圖片分類器模型
Model Maker 會抽象化許多類神經網路的設計細節,因此您不必處理網路設計,以及卷積、密集、relu、平坦化、損失函式和最佳化工具等項目。如要使用預設模型,只要一行程式碼就能建立模型,方法是使用提供的資料訓練類神經網路:
model = image_classifier.create(train_data)
執行這項指令後,您會看到類似下列範例的輸出內容:
Model: "sequential_2"
_________________________________________________________________
Layer (type)                 Output Shape              Param #
=================================================================
hub_keras_layer_v1v2_2 (HubK (None, 1280)              3413024
_________________________________________________________________
dropout_2 (Dropout)          (None, 1280)              0
_________________________________________________________________
dense_2 (Dense)              (None, 5)                 6405
=================================================================
Total params: 3,419,429
Trainable params: 6,405
Non-trainable params: 3,413,024
_________________________________________________________________
None
Epoch 1/5
103/103 [===] - 15s 129ms/step - loss: 1.1169 - accuracy: 0.6181

Epoch 2/5
103/103 [===] - 13s 126ms/step - loss: 0.6595 - accuracy: 0.8911

Epoch 3/5
103/103 [===] - 13s 127ms/step - loss: 0.6239 - accuracy: 0.9133

Epoch 4/5
103/103 [===] - 13s 128ms/step - loss: 0.5994 - accuracy: 0.9287

Epoch 5/5
103/103 [===] - 13s 126ms/step - loss: 0.5836 - accuracy: 0.9385
第一部分是顯示模型架構。Model Maker 在幕後執行的作業稱為「遷移學習」,這項技術會以現有的預先訓練模型做為起點,並運用該模型學到的圖片建構方式,瞭解這 5 種花卉。第一行會顯示:
hub_keras_layer_v1v2_2 (HubK (None, 1280) 3413024
關鍵在於「Hub」一字,表示這個模型來自 TensorFlow Hub。TensorFlow Lite Model Maker 預設會使用名為「MobileNet」的模型,該模型可辨識 1000 種圖片。這裡的邏輯是,用來學習「特徵」以區分 1000 個類別的方法可以重複使用。相同的「特徵」可以對應到我們的 5 種花朵類別,因此不必從頭學習。
模型經過 5 個訓練週期,每個訓練週期都是完整的訓練循環,類神經網路會嘗試將圖片與標籤配對。經過 5 個訓練週期後 (約 1 分鐘),模型分類訓練資料的準確率為 93.85%。由於有 5 個類別,隨機猜測的準確率為 20%,因此這是一大進展!(系統也會回報「損失」數字,但您可以暫時忽略。)
您先前已將資料分割為訓練和測試資料,因此可以評估網路在先前未見過的資料上的表現,這能更準確地指出網路在現實世界中的表現,方法是使用測試資料的 model.evaluate:
loss, accuracy = model.evaluate(test_data)
輸出內容如下所示:
12/12 [===] - 5s 115ms/step - loss: 0.6622 - accuracy: 0.8801
請注意此處的準確率。準確度為 88.01%,因此在實際使用預設模型時,應可達到這個準確度。以您在一分鐘內訓練的預設模型來說,這項結果還算不錯。當然,您可能可以進行許多調整來改善模型,這本身就是一門科學!
6. 匯出模型
模型訓練完成後,下一步就是以行動應用程式可用的 .tflite 格式匯出模型。模型製作工具提供簡單的匯出方法,您只需指定輸出目錄即可。
程式碼如下:
model.export(export_dir='/mm_flowers')
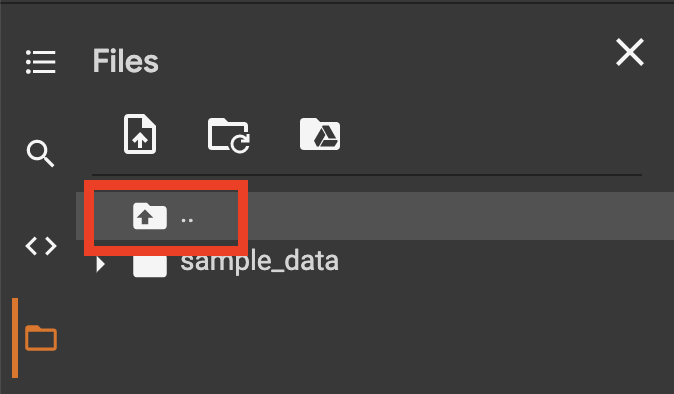
如果您在 Google Colab 中執行這項操作,可以點選畫面左側的資料夾圖示,查看模型:

這裡會列出目前的目錄。使用指定按鈕「向上」移動目錄:
您在程式碼中指定匯出至 mm_flowers 目錄。開啟該資料夾,您會看到名為「model.tflite」的檔案,這就是訓練好的模型。

選取檔案後,右側會顯示 3 個點。點選這些項目即可開啟內容選單,然後從選單下載模型。
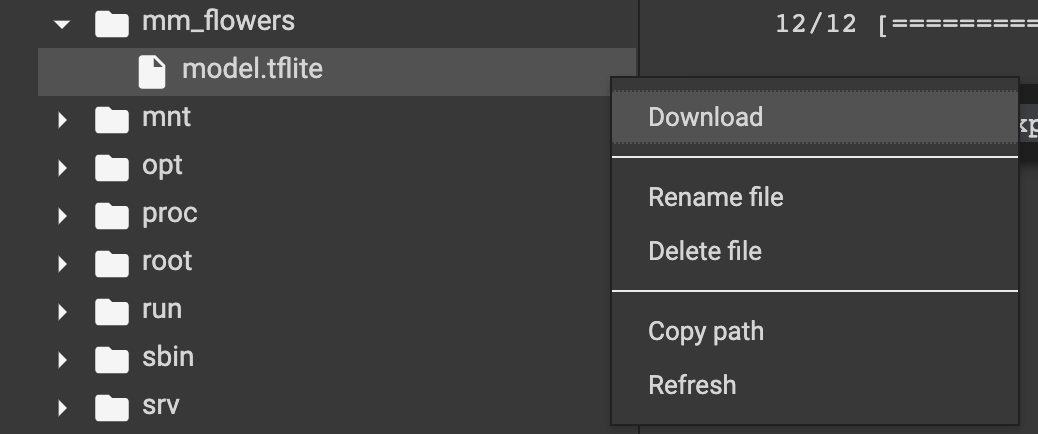
稍待片刻,模型就會下載到下載資料夾。
7. 恭喜
現在可以將其整合至行動應用程式了!您會在下一個實驗室中執行這項操作。