
1. はじめに
マテリアル 3 は、Google のオープンソース デザイン システムの最新版です。Flutter は、マテリアル 3 を使用した美しいアプリケーションを作成するためのサポートを拡充してきました。この Codelab では、空の Flutter アプリケーションから始めて、Flutter でマテリアル 3 を使用して、フルにスタイル設定され、アニメーション化されたアプリケーションを作成します。
作成するアプリの概要
この Codelab では、モックのメッセージ アプリケーションを作成します。作成するアプリの機能は次のとおりです。
- アダプティブ デザインを使用して、デスクトップまたはモバイルで動作するようにする。
- アニメーションを使用して、レイアウトを簡単かつ流れるように切り替える。
- マテリアル 3 を使用して表現豊かなスタイル設定を行う。
- Android、iOS、ウェブ、Windows、Linux、macOS で実行する。

この Codelab では Material 3 と Flutter を扱います。関連のない概念とコードブロックについては軽く触れるにとどめ、そのままコピーして貼り付けられるようにしています。
2. Flutter 環境をセットアップする
必要なもの
- Flutter SDK
- エディタ(VS Code、Android Studio など)
この Codelab は、Android、iOS、ウェブ、Windows、Linux、macOS でのデプロイがテストされています。一部のデプロイ ターゲットは、デプロイできるようにするために、追加のソフトウェアをインストールする必要があります。プラットフォームが正しくセットアップされているかを確認するには、flutter doctor を実行することをおすすめします。
$ flutter doctor
Doctor summary (to see all details, run flutter doctor -v):
[✓] Flutter (Channel stable, 3.32.1, on macOS 15.5 24F74 darwin-arm64, locale en-AU)
[✓] Android toolchain - develop for Android devices (Android SDK version 36.0.0)
[✓] Xcode - develop for iOS and macOS (Xcode 16.3)
[✓] Chrome - develop for the web
[✓] Android Studio (version 2024.2)
[✓] IntelliJ IDEA Community Edition (version 2024.3.1.1)
[✓] VS Code (version 1.100.3)
[✓] Connected device (3 available)
[✓] Network resources

• No issues found!
出力に、選択したデプロイ ターゲットに影響を与える問題が表示された場合、flutter doctor -v を実行して詳しい情報を取得してください。flutter doctor -v で表示された手順を行っても問題を解決できない場合は、Flutter コミュニティで質問することも検討してください。
3. 開始するには
空の Flutter アプリケーションを作成する
ほとんどの Flutter デベロッパーは、基礎的な「ボタンのタップを数える」アプリを flutter create で作り、数分かけて不要なものを削除しています。アプリの稼働に必要なものだけを含んだ空の Flutter プロジェクトを作成できます(--empty パラメータを使用)。
$ flutter create animated_responsive_layout --empty
Creating project animated_responsive_layout...
Resolving dependencies in `animated_responsive_layout`...
Downloading packages...
Got dependencies in `animated_responsive_layout`.
Wrote 129 files.

All done!
You can find general documentation for Flutter at: https://docs.flutter.dev/
Detailed API documentation is available at: https://api.flutter.dev/
If you prefer video documentation, consider: https://www.youtube.com/c/flutterdev

In order to run your empty application, type:

  $ cd animated_responsive_layout
  $ flutter run

Your empty application code is in animated_responsive_layout/lib/main.dart.
このコードは、コードエディタから実行することも、コマンドラインから直接実行することもできます。インストールしてあるツールチェーンと、シミュレータやエミュレータの有無に応じて、アプリケーションを実行するデプロイ ターゲットの決定を求められる場合があります。たとえば、次のように [Chome] オプションを選択することで、ウェブブラウザで空のアプリケーションを実行することを選べます。
$ cd animated_responsive_layout
$ flutter run
Connected devices:
macOS (desktop) • macos  • darwin-arm64   • macOS 15.5 24F74 darwin-arm64
Chrome (web)    • chrome • web-javascript • Google Chrome 137.0.7151.56

[1]: macOS (macos)
[2]: Chrome (chrome)
Please choose one (or "q" to quit): 2
Launching lib/main.dart on Chrome in debug mode...
Waiting for connection from debug service on Chrome...              6.4s
This app is linked to the debug service: ws://127.0.0.1:60848/AM68Aq_ZiB8=/ws
Debug service listening on ws://127.0.0.1:60848/AM68Aq_ZiB8=/ws

Flutter run key commands.
R Hot restart.
h List all available interactive commands.
d Detach (terminate "flutter run" but leave application running).
c Clear the screen
q Quit (terminate the application on the device).

A Dart VM Service on Chrome is available at: http://127.0.0.1:60848/AM68Aq_ZiB8=
The Flutter DevTools debugger and profiler on Chrome is available at: http://127.0.0.1:9100?uri=http://127.0.0.1:60848/AM68Aq_ZiB8=
Application finished.
この場合、Chrome ウェブブラウザで空のアプリが実行されます。Android、iOS、デスクトップ オペレーティング システムでの実行を選ぶこともできます。

4. メッセージ アプリを作成する
アバターを作成する
どんなメッセージ アプリケーションでも、ユーザーの画像が必要です。画像はユーザーを表し、アバターと呼ばれます。次に、プロジェクト ツリーの最上位にアセット ディレクトリを作成し、そこにこの Codelab の Git リポジトリから取得した一連の画像を保存します。その方法の 1 つは、次のように wget コマンドライン ツールを使うことです。
$ mkdir assets
$ cd assets
$ for name in avatar_1 avatar_2 avatar_3 avatar_4 \
              avatar_5 avatar_6 avatar_7 thumbnail_1; \
  do wget https://raw.githubusercontent.com/flutter/codelabs/main/animated-responsive-layout/step_04/assets/$name.png ; \
  done
これにより以下の画像がアプリの assets ディレクトリにダウンロードされます。
|
|
|
|
|
|
|
|
|
|
|
|
|
|
|
|


これでアバター画像アセットが用意できたので、それらを pubspec.yaml ファイルに追加する必要があります。
pubspec.yaml
name: animated_responsive_layout
description: "A new Flutter project."
publish_to: 'none'
version: 0.1.0

environment:
  sdk: ^3.8.0

dependencies:
  flutter:
    sdk: flutter

dev_dependencies:
  flutter_test:
    sdk: flutter
  flutter_lints: ^5.0.0

flutter:
  uses-material-design: true

                                        # Add from here...
  assets:
    - assets/avatar_1.png
    - assets/avatar_2.png
    - assets/avatar_3.png
    - assets/avatar_4.png
    - assets/avatar_5.png
    - assets/avatar_6.png
    - assets/avatar_7.png
    - assets/thumbnail_1.png
                                        # ... to here.
アプリケーションには、表示するメッセージのデータソースが必要です。プロジェクトの lib ディレクトリで、models サブディレクトリを作成します。これは、mkdir を使ってコマンドラインで行うことも、任意のテキスト エディタで行うこともできます。lib/models ディレクトリに、以下の内容の models.dart ファイルを作成します。
lib/models/models.dart
class Attachment {
  const Attachment({required this.url});

  final String url;
}

class Email {
  const Email({
    required this.sender,
    required this.recipients,
    required this.subject,
    required this.content,
    this.replies = 0,
    this.attachments = const [],
  });

  final User sender;
  final List<User> recipients;
  final String subject;
  final String content;
  final List<Attachment> attachments;
  final double replies;
}

class Name {
  const Name({required this.first, required this.last});

  final String first;
  final String last;
  String get fullName => '$first $last';
}

class User {
  const User({
    required this.name,
    required this.avatarUrl,
    required this.lastActive,
  });

  final Name name;
  final String avatarUrl;
  final DateTime lastActive;
}
これで、データの形状の定義を用意できたので、lib/models ディレクトリに次の内容の data.dart ファイルを作成します。
lib/models/data.dart
import 'models.dart';
final User user_0 = User(
name: const Name(first: 'Me', last: ''),
avatarUrl: 'assets/avatar_1.png',
lastActive: DateTime.now(),
);
final User user_1 = User(
name: const Name(first: '老', last: '强'),
avatarUrl: 'assets/avatar_2.png',
lastActive: DateTime.now().subtract(const Duration(minutes: 10)),
);
final User user_2 = User(
name: const Name(first: 'So', last: 'Duri'),
avatarUrl: 'assets/avatar_3.png',
lastActive: DateTime.now().subtract(const Duration(minutes: 20)),
);
final User user_3 = User(
name: const Name(first: 'Lily', last: 'MacDonald'),
avatarUrl: 'assets/avatar_4.png',
lastActive: DateTime.now().subtract(const Duration(hours: 2)),
);
final User user_4 = User(
name: const Name(first: 'Ziad', last: 'Aouad'),
avatarUrl: 'assets/avatar_5.png',
lastActive: DateTime.now().subtract(const Duration(hours: 6)),
);
final List<Email> emails = [
Email(
sender: user_1,
recipients: [],
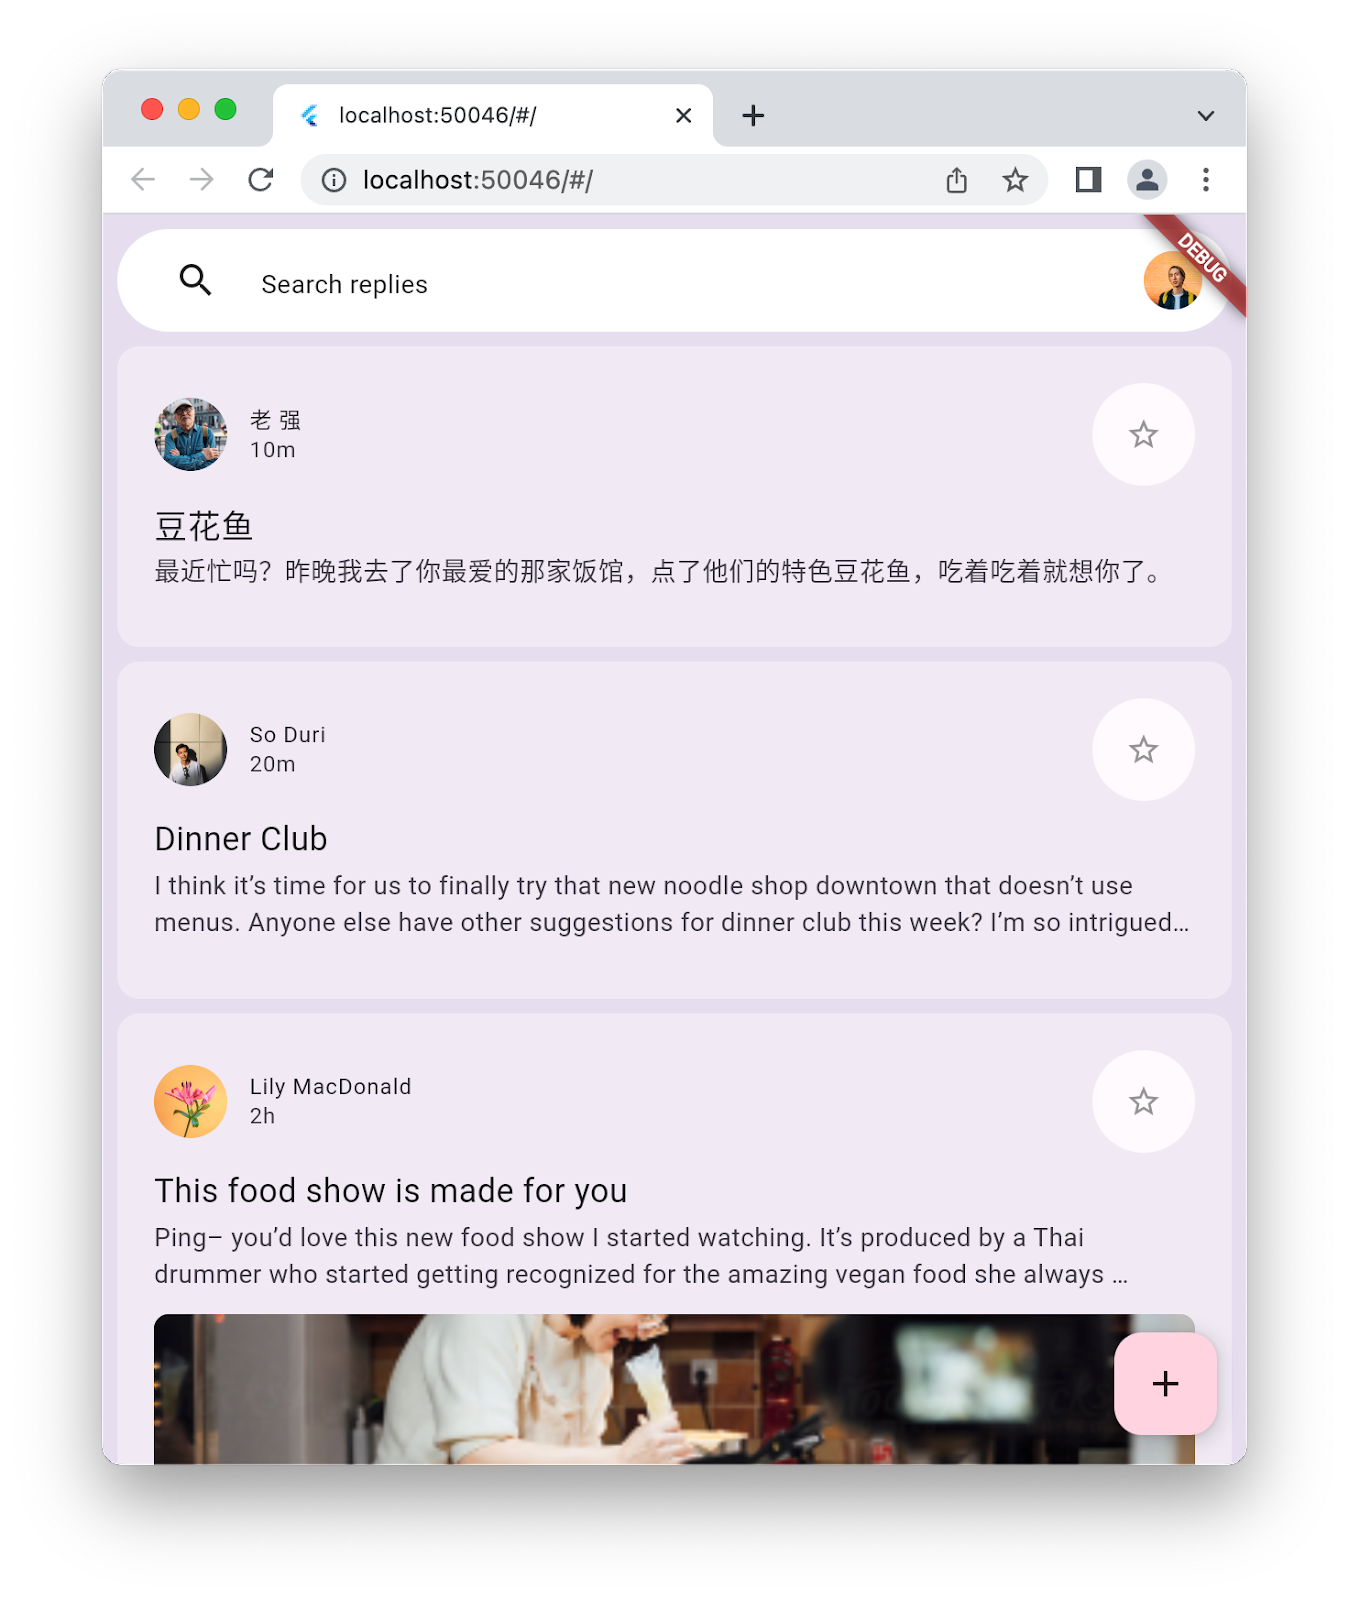
subject: '豆花鱼',
content: '最近忙吗?昨晚我去了你最爱的那家饭馆,点了他们的特色豆花鱼,吃着吃着就想你了。',
),
Email(
sender: user_2,
recipients: [],
subject: 'Dinner Club',
content:
'I think it's time for us to finally try that new noodle shop downtown that doesn't use menus. Anyone else have other suggestions for dinner club this week? I'm so intrigued by this idea of a noodle restaurant where no one gets to order for themselves - could be fun, or terrible, or both :)\n\nSo',
),
Email(
sender: user_3,
recipients: [],
subject: 'This food show is made for you',
content:
'Ping– you'd love this new food show I started watching. It's produced by a Thai drummer who started getting recognized for the amazing vegan food she always brought to shows.',
attachments: [const Attachment(url: 'assets/thumbnail_1.png')],
),
Email(
sender: user_4,
recipients: [],
subject: 'Volunteer EMT with me?',
content:
'What do you think about training to be volunteer EMTs? We could do it together for moral support. Think about it??',
),
];
final List<Email> replies = [
Email(
sender: user_2,
recipients: [user_3, user_2],
subject: 'Dinner Club',
content:
'I think it's time for us to finally try that new noodle shop downtown that doesn't use menus. Anyone else have other suggestions for dinner club this week? I'm so intrigued by this idea of a noodle restaurant where no one gets to order for themselves - could be fun, or terrible, or both :)\n\nSo',
),
Email(
sender: user_0,
recipients: [user_3, user_2],
subject: 'Dinner Club',
content:
'Yes! I forgot about that place! I'm definitely up for taking a risk this week and handing control over to this mysterious noodle chef. I wonder what happens if you have allergies though? Lucky none of us have any otherwise I'd be a bit concerned.\n\nThis is going to be great. See you all at the usual time?',
),
];
データが手に入ったところで、そのデータを表示するウィジェットをいくつか定義します。lib の下に widgets というサブディレクトリを作成します。widgets には 4 つのファイルを作成します。4 つのファイルがすべて作成されるまでの間、エディタに警告が表示される可能性があります。この Codelab のポイントは、マテリアル 3 を使用してアプリのスタイル設定を行うことでした。そこで、次に記載した内容の 4 つのファイルをそれぞれ追加します。
lib/widgets/email_list_view.dart
import 'package:flutter/material.dart';

import '../models/data.dart' as data;
import '../models/models.dart';
import 'email_widget.dart';
import 'search_bar.dart' as search_bar;

class EmailListView extends StatelessWidget {
  const EmailListView({
    super.key,
    this.selectedIndex,
    this.onSelected,
    required this.currentUser,
  });

  final int? selectedIndex;
  final ValueChanged<int>? onSelected;
  final User currentUser;

  @override
  Widget build(BuildContext context) {
    return Padding(
      padding: const EdgeInsets.symmetric(horizontal: 8.0),
      child: ListView(
        children: [
          const SizedBox(height: 8),
          search_bar.SearchBar(currentUser: currentUser),
          const SizedBox(height: 8),
          ...List.generate(data.emails.length, (index) {
            return Padding(
              padding: const EdgeInsets.only(bottom: 8.0),
              child: EmailWidget(
                email: data.emails[index],
                onSelected: onSelected != null
                    ? () {
                        onSelected!(index);
                      }
                    : null,
                isSelected: selectedIndex == index,
              ),
            );
          }),
        ],
      ),
    );
  }
}
メールのリストを表示できるのは、メッセージ アプリケーションの必須機能だと思われます。エディタにエラーがいくつか表示されますが、その一部は、次の email_widget.dart ファイルを追加すると消すことができます。
lib/widgets/email_widget.dart
import 'package:flutter/material.dart';
import '../models/models.dart';
import 'star_button.dart';

enum EmailType { preview, threaded, primaryThreaded }

class EmailWidget extends StatefulWidget {
  const EmailWidget({
    super.key,
    required this.email,
    this.isSelected = false,
    this.isPreview = true,
    this.isThreaded = false,
    this.showHeadline = false,
    this.onSelected,
  });

  final bool isSelected;
  final bool isPreview;
  final bool showHeadline;
  final bool isThreaded;
  final void Function()? onSelected;
  final Email email;

  @override
  State<EmailWidget> createState() => _EmailWidgetState();
}

class _EmailWidgetState extends State<EmailWidget> {
  late final ColorScheme _colorScheme = Theme.of(context).colorScheme;
  late Color unselectedColor = Color.alphaBlend(
    _colorScheme.primary.withAlpha(20),
    _colorScheme.surface,
  );

  Color get _surfaceColor => switch (widget) {
    EmailWidget(isPreview: false) => _colorScheme.surface,
    EmailWidget(isSelected: true) => _colorScheme.primaryContainer,
    _ => unselectedColor,
  };

  @override
  Widget build(BuildContext context) {
    return GestureDetector(
      onTap: widget.onSelected,
      child: Card(
        elevation: 0,
        color: _surfaceColor,
        clipBehavior: Clip.hardEdge,
        child: Column(
          crossAxisAlignment: CrossAxisAlignment.start,
          mainAxisSize: MainAxisSize.min,
          children: [
            if (widget.showHeadline) ...[
              EmailHeadline(email: widget.email, isSelected: widget.isSelected),
            ],
            EmailContent(
              email: widget.email,
              isPreview: widget.isPreview,
              isThreaded: widget.isThreaded,
              isSelected: widget.isSelected,
            ),
          ],
        ),
      ),
    );
  }
}

class EmailContent extends StatefulWidget {
  const EmailContent({
    super.key,
    required this.email,
    required this.isPreview,
    required this.isThreaded,
    required this.isSelected,
  });

  final Email email;
  final bool isPreview;
  final bool isThreaded;
  final bool isSelected;

  @override
  State<EmailContent> createState() => _EmailContentState();
}

class _EmailContentState extends State<EmailContent> {
  late final ColorScheme _colorScheme = Theme.of(context).colorScheme;
  late final TextTheme _textTheme = Theme.of(context).textTheme;

  Widget get contentSpacer => SizedBox(height: widget.isThreaded ? 20 : 2);

  String get lastActiveLabel {
    final DateTime now = DateTime.now();
    if (widget.email.sender.lastActive.isAfter(now)) throw ArgumentError();
    final Duration elapsedTime = widget.email.sender.lastActive
        .difference(now)
        .abs();
    return switch (elapsedTime) {
      Duration(inSeconds: < 60) => '${elapsedTime.inSeconds}s',
      Duration(inMinutes: < 60) => '${elapsedTime.inMinutes}m',
      Duration(inHours: < 24) => '${elapsedTime.inHours}h',
      Duration(inDays: < 365) => '${elapsedTime.inDays}d',
      _ => throw UnimplementedError(),
    };
  }

  TextStyle? get contentTextStyle => switch (widget) {
    EmailContent(isThreaded: true) => _textTheme.bodyLarge,
    EmailContent(isSelected: true) => _textTheme.bodyMedium?.copyWith(
      color: _colorScheme.onPrimaryContainer,
    ),
    _ => _textTheme.bodyMedium?.copyWith(color: _colorScheme.onSurfaceVariant),
  };

  @override
  Widget build(BuildContext context) {
    return Padding(
      padding: const EdgeInsets.all(20),
      child: Column(
        crossAxisAlignment: CrossAxisAlignment.start,
        children: [
          LayoutBuilder(
            builder: (context, constraints) {
              return Row(
                crossAxisAlignment: CrossAxisAlignment.center,
                children: [
                  if (constraints.maxWidth - 200 > 0) ...[
                    CircleAvatar(
                      backgroundImage: AssetImage(
                        widget.email.sender.avatarUrl,
                      ),
                    ),
                    const Padding(
                      padding: EdgeInsets.symmetric(horizontal: 6.0),
                    ),
                  ],
                  Expanded(
                    child: Column(
                      crossAxisAlignment: CrossAxisAlignment.start,
                      children: [
                        Text(
                          widget.email.sender.name.fullName,
                          overflow: TextOverflow.fade,
                          maxLines: 1,
                          style: widget.isSelected
                              ? _textTheme.labelMedium?.copyWith(
                                  color: _colorScheme.onSecondaryContainer,
                                )
                              : _textTheme.labelMedium?.copyWith(
                                  color: _colorScheme.onSurface,
                                ),
                        ),
                        Text(
                          lastActiveLabel,
                          overflow: TextOverflow.fade,
                          maxLines: 1,
                          style: widget.isSelected
                              ? _textTheme.labelMedium?.copyWith(
                                  color: _colorScheme.onSecondaryContainer,
                                )
                              : _textTheme.labelMedium?.copyWith(
                                  color: _colorScheme.onSurfaceVariant,
                                ),
                        ),
                      ],
                    ),
                  ),
                  if (constraints.maxWidth - 200 > 0) ...[const StarButton()],
                ],
              );
            },
          ),
          const SizedBox(width: 8),
          Column(
            crossAxisAlignment: CrossAxisAlignment.start,
            children: [
              if (widget.isPreview) ...[
                Text(
                  widget.email.subject,
                  style: const TextStyle(
                    fontSize: 18,
                  ).copyWith(color: _colorScheme.onSurface),
                ),
              ],
              if (widget.isThreaded) ...[
                contentSpacer,
                Text(
                  "To ${widget.email.recipients.map((recipient) => recipient.name.first).join(", ")}",
                  style: _textTheme.bodyMedium,
                ),
              ],
              contentSpacer,
              Text(
                widget.email.content,
                maxLines: widget.isPreview ? 2 : 100,
                overflow: TextOverflow.ellipsis,
                style: contentTextStyle,
              ),
            ],
          ),
          const SizedBox(width: 12),
          widget.email.attachments.isNotEmpty
              ? Container(
                  height: 96,
                  decoration: BoxDecoration(
                    borderRadius: BorderRadius.circular(8.0),
                    image: DecorationImage(
                      fit: BoxFit.cover,
                      image: AssetImage(widget.email.attachments.first.url),
                    ),
                  ),
                )
              : const SizedBox.shrink(),
          if (!widget.isPreview) ...[const EmailReplyOptions()],
        ],
      ),
    );
  }
}

class EmailHeadline extends StatefulWidget {
  const EmailHeadline({
    super.key,
    required this.email,
    required this.isSelected,
  });

  final Email email;
  final bool isSelected;

  @override
  State<EmailHeadline> createState() => _EmailHeadlineState();
}

class _EmailHeadlineState extends State<EmailHeadline> {
  late final TextTheme _textTheme = Theme.of(context).textTheme;
  late final ColorScheme _colorScheme = Theme.of(context).colorScheme;

  @override
  Widget build(BuildContext context) {
    return LayoutBuilder(
      builder: (context, constraints) {
        return Container(
          height: 84,
          color: Color.alphaBlend(
            _colorScheme.primary.withAlpha(12),
            _colorScheme.surface,
          ),
          child: Padding(
            padding: const EdgeInsets.fromLTRB(24, 12, 12, 12),
            child: Row(
              mainAxisSize: MainAxisSize.max,
              crossAxisAlignment: CrossAxisAlignment.center,
              children: [
                Expanded(
                  child: Column(
                    mainAxisSize: MainAxisSize.min,
                    crossAxisAlignment: CrossAxisAlignment.start,
                    children: [
                      Text(
                        widget.email.subject,
                        maxLines: 1,
                        overflow: TextOverflow.fade,
                        style: const TextStyle(
                          fontSize: 18,
                          fontWeight: FontWeight.w400,
                        ),
                      ),
                      Text(
                        '${widget.email.replies.toString()} Messages',
                        maxLines: 1,
                        overflow: TextOverflow.fade,
                        style: _textTheme.labelMedium?.copyWith(
                          fontWeight: FontWeight.w500,
                        ),
                      ),
                    ],
                  ),
                ),
                // Display a "condensed" version if the widget in the row are
                // expected to overflow.
                if (constraints.maxWidth - 200 > 0) ...[
                  SizedBox(
                    height: 40,
                    width: 40,
                    child: FloatingActionButton(
                      onPressed: () {},
                      elevation: 0,
                      backgroundColor: _colorScheme.surface,
                      child: const Icon(Icons.delete_outline),
                    ),
                  ),
                  const Padding(padding: EdgeInsets.only(right: 8.0)),
                  SizedBox(
                    height: 40,
                    width: 40,
                    child: FloatingActionButton(
                      onPressed: () {},
                      elevation: 0,
                      backgroundColor: _colorScheme.surface,
                      child: const Icon(Icons.more_vert),
                    ),
                  ),
                ],
              ],
            ),
          ),
        );
      },
    );
  }
}

class EmailReplyOptions extends StatefulWidget {
  const EmailReplyOptions({super.key});

  @override
  State<EmailReplyOptions> createState() => _EmailReplyOptionsState();
}

class _EmailReplyOptionsState extends State<EmailReplyOptions> {
  late final ColorScheme _colorScheme = Theme.of(context).colorScheme;

  @override
  Widget build(BuildContext context) {
    return LayoutBuilder(
      builder: (context, constraints) {
        if (constraints.maxWidth < 100) {
          return const SizedBox.shrink();
        }
        return Row(
          children: [
            Expanded(
              child: TextButton(
                style: ButtonStyle(
                  backgroundColor: WidgetStateProperty.all(
                    _colorScheme.onInverseSurface,
                  ),
                ),
                onPressed: () {},
                child: Text(
                  'Reply',
                  style: TextStyle(color: _colorScheme.onSurfaceVariant),
                ),
              ),
            ),
            const SizedBox(width: 8),
            Expanded(
              child: TextButton(
                style: ButtonStyle(
                  backgroundColor: WidgetStateProperty.all(
                    _colorScheme.onInverseSurface,
                  ),
                ),
                onPressed: () {},
                child: Text(
                  'Reply All',
                  style: TextStyle(color: _colorScheme.onSurfaceVariant),
                ),
              ),
            ),
          ],
        );
      },
    );
  }
}
このウィジェットでは、さまざまなことを行いました。一部の詳細は学ぶ価値があります。特に、どのようにしてウィジェット全体に色が適用されるかです。これは繰り返しのテーマになります。次は、search_bar.dart です。
lib/widgets/search_bar.dart
import 'package:flutter/material.dart';

import '../models/models.dart';

class SearchBar extends StatelessWidget {
  const SearchBar({super.key, required this.currentUser});

  final User currentUser;

  @override
  Widget build(BuildContext context) {
    return SizedBox(
      height: 56,
      child: Container(
        decoration: BoxDecoration(
          borderRadius: BorderRadius.circular(100),
          color: Colors.white,
        ),
        padding: const EdgeInsets.fromLTRB(31, 12, 12, 12),
        child: Row(
          crossAxisAlignment: CrossAxisAlignment.center,
          children: [
            const Icon(Icons.search),
            const SizedBox(width: 23.5),
            Expanded(
              child: TextField(
                maxLines: 1,
                decoration: InputDecoration(
                  isDense: true,
                  border: InputBorder.none,
                  hintText: 'Search replies',
                  hintStyle: Theme.of(context).textTheme.bodyMedium,
                ),
              ),
            ),
            CircleAvatar(backgroundImage: AssetImage(currentUser.avatarUrl)),
          ],
        ),
      ),
    );
  }
}
非常にシンプルなステートレス ウィジェットです。次に、別のウィジェット star_button.dart を追加します。
lib/widgets/star_button.dart
impoimport 'package:flutter/material.dart';

class StarButton extends StatefulWidget {
  const StarButton({super.key});

  @override
  State<StarButton> createState() => _StarButtonState();
}

class _StarButtonState extends State<StarButton> {
  bool state = false;
  late final ColorScheme _colorScheme = Theme.of(context).colorScheme;

  Icon get icon {
    final IconData iconData = state ? Icons.star : Icons.star_outline;

    return Icon(iconData, color: Colors.grey, size: 20);
  }

  void _toggle() {
    setState(() {
      state = !state;
    });
  }

  double get turns => state ? 1 : 0;

  @override
  Widget build(BuildContext context) {
    return AnimatedRotation(
      turns: turns,
      curve: Curves.decelerate,
      duration: const Duration(milliseconds: 300),
      child: FloatingActionButton(
        elevation: 0,
        shape: const CircleBorder(),
        backgroundColor: _colorScheme.surface,
        onPressed: () => _toggle(),
        child: Padding(padding: const EdgeInsets.all(10.0), child: icon),
      ),
    );
  }
}
次に、このアプリの主要部分である lib/main.dart を更新します。このファイルの現在の内容を次のように置き換えます。
lib/main.dart
import 'package:flutter/material.dart';

import 'models/data.dart' as data;
import 'models/models.dart';
import 'widgets/email_list_view.dart';

void main() {
  runApp(const MainApp());
}

class MainApp extends StatelessWidget {
  const MainApp({super.key});

  @override
  Widget build(BuildContext context) {
    return MaterialApp(
      theme: ThemeData.light(),
      home: Feed(currentUser: data.user_0),
    );
  }
}

class Feed extends StatefulWidget {
  const Feed({super.key, required this.currentUser});

  final User currentUser;

  @override
  State<Feed> createState() => _FeedState();
}

class _FeedState extends State<Feed> {
  late final _colorScheme = Theme.of(context).colorScheme;
  late final _backgroundColor = Color.alphaBlend(
    _colorScheme.primary.withAlpha(36),
    _colorScheme.surface,
  );

  @override
  Widget build(BuildContext context) {
    return Scaffold(
      body: Container(
        color: _backgroundColor,
        child: EmailListView(currentUser: widget.currentUser),
      ),
      floatingActionButton: FloatingActionButton(
        backgroundColor: _colorScheme.tertiaryContainer,
        foregroundColor: _colorScheme.onTertiaryContainer,
        onPressed: () {},
        child: const Icon(Icons.add),
      ),
    );
  }
}
アプリを実行して、何から始めるかを確認します。
5. NavigationBar を追加する
前のステップの最後では、スターター アプリにメッセージのリストがありましたが、それ以外のものは少しだけでした。このステップでは、NavigationBar を追加して、より視覚的な面白みを加えます。このアプリが UI の習作から本格的なアプリケーションに姿を変えるにあたって、ナビゲーション バーは、ユーザーが使用するアプリケーションのさまざまな領域を提供します。
NavigationBar があるということは、移動する先のデスティネーションがあるということです。lib ディレクトリに destinations.dart というファイルを作成し、次のコードを入力します。
lib/destinations.dart
import 'package:flutter/material.dart';

class Destination {
  const Destination(this.icon, this.label);
  final IconData icon;
  final String label;
}

const List<Destination> destinations = <Destination>[
  Destination(Icons.inbox_rounded, 'Inbox'),
  Destination(Icons.article_outlined, 'Articles'),
  Destination(Icons.messenger_outline_rounded, 'Messages'),
  Destination(Icons.group_outlined, 'Groups'),
];
これにより、アプリケーションに NavigationBar が表示する 4 つのデスティネーションが設定されます。次に、このデスティネーションのリストを以下のように lib/main.dart ファイルに配線します。
lib/main.dart
import 'package:flutter/material.dart';

import 'destinations.dart';                    // Add this import
import 'models/data.dart' as data;
import 'models/models.dart';
import 'widgets/email_list_view.dart';

void main() {
  runApp(const MainApp());
}

class MainApp extends StatelessWidget {
  const MainApp({super.key});

  @override
  Widget build(BuildContext context) {
    return MaterialApp(
      theme: ThemeData.light(),
      home: Feed(currentUser: data.user_0),
    );
  }
}

class Feed extends StatefulWidget {
  const Feed({super.key, required this.currentUser});

  final User currentUser;

  @override
  State<Feed> createState() => _FeedState();
}

class _FeedState extends State<Feed> {
  late final _colorScheme = Theme.of(context).colorScheme;
  late final _backgroundColor = Color.alphaBlend(
    _colorScheme.primary.withAlpha(36),
    _colorScheme.surface,
  );

  int selectedIndex = 0;                       // Add this variable

  @override
  Widget build(BuildContext context) {
    return Scaffold(
      body: Container(
        color: _backgroundColor,
        child: EmailListView(
                                              // Add from here...
          selectedIndex: selectedIndex,
          onSelected: (index) {
            setState(() {
              selectedIndex = index;
            });
          },
                                              // ... to here.
          currentUser: widget.currentUser,
        ),
      ),
      floatingActionButton: FloatingActionButton(
        backgroundColor: _colorScheme.tertiaryContainer,
        foregroundColor: _colorScheme.onTertiaryContainer,
        onPressed: () {},
        child: const Icon(Icons.add),
      ),
                                                  // Add from here...
      bottomNavigationBar: NavigationBar(
        elevation: 0,
        backgroundColor: Colors.white,
        destinations: destinations.map<NavigationDestination>((d) {
          return NavigationDestination(icon: Icon(d.icon), label: d.label);
        }).toList(),
        selectedIndex: selectedIndex,
        onDestinationSelected: (index) {
          setState(() {
            selectedIndex = index;
          });
        },
      ),
                                                // ...to here.
    );
  }
}
デスティネーションごとに別の内容を定義する代わりに、各メッセージの状態を変更して、NavigationBar で選択されているデスティネーションを反映させます。一貫性を保つために、逆方向も有効になっています。つまり、メッセージを選択すると、NavigationBar に対応するデスティネーションが表示されます。アプリケーションを実行して、以上の変更を確認します。

これは幅の狭い構成では合理的ですが、ウィンドウの幅を広げたり、スマートフォン シミュレータを水平に回転させたりすると、少々奇妙になります。これを解決するには、アプリケーションの幅が十分広いときに、画面の左側に NavigationRail を導入します。これは、次のステップで扱います。
6. NavigationRail を追加する
このステップでは、アプリケーションに NavigationRail を追加します。画面サイズに応じて 2 つのナビゲーション ウィジェットのうちの 1 つだけを表示するというアイデアです。つまり、必要なときに NavigationBar の表示と非表示を切り替える必要があるということです。lib/widgets ディレクトリで、disappearing_bottom_navigation_bar.dart ファイルを作成し、以下のコードを追加します。
lib/widgets/disappearing_bottom_navigation_bar.dart
import 'package:flutter/material.dart';

import '../destinations.dart';

class DisappearingBottomNavigationBar extends StatelessWidget {
  const DisappearingBottomNavigationBar({
    super.key,
    required this.selectedIndex,
    this.onDestinationSelected,
  });

  final int selectedIndex;
  final ValueChanged<int>? onDestinationSelected;

  @override
  Widget build(BuildContext context) {
    return NavigationBar(
      elevation: 0,
      backgroundColor: Colors.white,
      destinations: destinations.map<NavigationDestination>((d) {
        return NavigationDestination(icon: Icon(d.icon), label: d.label);
      }).toList(),
      selectedIndex: selectedIndex,
      onDestinationSelected: onDestinationSelected,
    );
  }
}
同じディレクトリで、disappearing_navigation_rail.dart という別のファイルを作成し、以下のコードを追加します。
lib/widgets/disappearing_navigation_rail.dart
import 'package:flutter/material.dart';

import '../destinations.dart';

class DisappearingNavigationRail extends StatelessWidget {
  const DisappearingNavigationRail({
    super.key,
    required this.backgroundColor,
    required this.selectedIndex,
    this.onDestinationSelected,
  });

  final Color backgroundColor;
  final int selectedIndex;
  final ValueChanged<int>? onDestinationSelected;

  @override
  Widget build(BuildContext context) {
    final colorScheme = Theme.of(context).colorScheme;
    return NavigationRail(
      selectedIndex: selectedIndex,
      backgroundColor: backgroundColor,
      onDestinationSelected: onDestinationSelected,
      leading: Column(
        children: [
          IconButton(onPressed: () {}, icon: const Icon(Icons.menu)),
          const SizedBox(height: 8),
          FloatingActionButton(
            shape: const RoundedRectangleBorder(
              borderRadius: BorderRadius.all(Radius.circular(15)),
            ),
            backgroundColor: colorScheme.tertiaryContainer,
            foregroundColor: colorScheme.onTertiaryContainer,
            onPressed: () {},
            child: const Icon(Icons.add),
          ),
        ],
      ),
      groupAlignment: -0.85,
      destinations: destinations.map((d) {
        return NavigationRailDestination(
          icon: Icon(d.icon),
          label: Text(d.label),
        );
      }).toList(),
    );
  }
}
リファクタリングによりナビゲーション イディオムをウィジェット自身の中に移動したので、lib/main.dart ファイルを変更する必要があります。
lib/main.dart
import 'package:flutter/material.dart';

// Remove the destination.dart import, it's not required
import 'models/data.dart' as data;
import 'models/models.dart';
import 'widgets/disappearing_bottom_navigation_bar.dart';  // Add import
import 'widgets/disappearing_navigation_rail.dart';        // Add import
import 'widgets/email_list_view.dart';

void main() {
  runApp(const MainApp());
}

class MainApp extends StatelessWidget {
  const MainApp({super.key});

  @override
  Widget build(BuildContext context) {
    return MaterialApp(
      theme: ThemeData.light(),
      home: Feed(currentUser: data.user_0),
    );
  }
}

class Feed extends StatefulWidget {
  const Feed({super.key, required this.currentUser});

  final User currentUser;

  @override
  State<Feed> createState() => _FeedState();
}

class _FeedState extends State<Feed> {
  late final _colorScheme = Theme.of(context).colorScheme;
  late final _backgroundColor = Color.alphaBlend(
    _colorScheme.primary.withAlpha(36),
    _colorScheme.surface,
  );

  int selectedIndex = 0;
                                                  // Add from here...
  bool wideScreen = false;

  @override
  void didChangeDependencies() {
    super.didChangeDependencies();

    final double width = MediaQuery.of(context).size.width;
    wideScreen = width > 600;
  }
                                                 // ... to here.

  @override
  Widget build(BuildContext context) {
                                                 // Modify from here...
    return Scaffold(
      body: Row(
        children: [
          if (wideScreen)
            DisappearingNavigationRail(
              selectedIndex: selectedIndex,
              backgroundColor: _backgroundColor,
              onDestinationSelected: (index) {
                setState(() {
                  selectedIndex = index;
                });
              },
            ),
          Expanded(
            child: Container(
              color: _backgroundColor,
              child: EmailListView(
                selectedIndex: selectedIndex,
                onSelected: (index) {
                  setState(() {
                    selectedIndex = index;
                  });
                },
                currentUser: widget.currentUser,
              ),
            ),
          ),
        ],
      ),
      floatingActionButton: wideScreen
          ? null
          : FloatingActionButton(
              backgroundColor: _colorScheme.tertiaryContainer,
              foregroundColor: _colorScheme.onTertiaryContainer,
              onPressed: () {},
              child: const Icon(Icons.add),
            ),
      bottomNavigationBar: wideScreen
          ? null
          : DisappearingBottomNavigationBar(
              selectedIndex: selectedIndex,
              onDestinationSelected: (index) {
                setState(() {
                  selectedIndex = index;
                });
              },
            ),
    );
                                                    // ... to here.
  }
}
main.dart ファイルに対する 1 つ目の重要な変更点は、ユーザーがディスプレイのサイズを変更したとき(ブラウザ ウィンドウのサイズ変更や、スマートフォンの回転など)に更新される wideScreen 状態の追加です。次の変更点は、NavigationBar と FloatingActionButton を、アプリが wideScreen モードにあるかどうかに依存させることです。最後の変更点は、画面の幅が十分広いときに左側に NavigationRail を導入することです。ウェブかデスクトップでアプリケーションを実行し、画面のサイズを変更して、2 つのレイアウトを確認してください。
|
|


2 つのレイアウトがあることは良いのですが、その間の遷移はまだまだです。バーとレールとの間の入れ替わりをもっとダイナミックにすれば、劇的に改善されます。次のステップでは、このアニメーションを追加します。
7. 遷移をアニメーション化する
アニメーション化された体験を生み出すには、各コンポーネントが適切に演出されている一連のアニメーションを作る必要があります。このアニメーションの場合、まず lib ディスプレイに animations.dart というファイルを作成し、そこで必要なアニメーション カーブを作ります。
lib/animations.dart
import 'package:flutter/animation.dart';

class BarAnimation extends ReverseAnimation {
  BarAnimation({required AnimationController parent})
    : super(
        CurvedAnimation(
          parent: parent,
          curve: const Interval(0, 1 / 5),
          reverseCurve: const Interval(1 / 5, 4 / 5),
        ),
      );
}

class OffsetAnimation extends CurvedAnimation {
  OffsetAnimation({required super.parent})
    : super(
        curve: const Interval(
          2 / 5,
          3 / 5,
          curve: Curves.easeInOutCubicEmphasized,
        ),
        reverseCurve: Interval(
          4 / 5,
          1,
          curve: Curves.easeInOutCubicEmphasized.flipped,
        ),
      );
}

class RailAnimation extends CurvedAnimation {
  RailAnimation({required super.parent})
    : super(
        curve: const Interval(0 / 5, 4 / 5),
        reverseCurve: const Interval(3 / 5, 1),
      );
}

class RailFabAnimation extends CurvedAnimation {
  RailFabAnimation({required super.parent})
    : super(curve: const Interval(3 / 5, 1));
}

class ScaleAnimation extends CurvedAnimation {
  ScaleAnimation({required super.parent})
    : super(
        curve: const Interval(
          3 / 5,
          4 / 5,
          curve: Curves.easeInOutCubicEmphasized,
        ),
        reverseCurve: Interval(
          3 / 5,
          1,
          curve: Curves.easeInOutCubicEmphasized.flipped,
        ),
      );
}

class ShapeAnimation extends CurvedAnimation {
  ShapeAnimation({required super.parent})
    : super(
        curve: const Interval(
          2 / 5,
          3 / 5,
          curve: Curves.easeInOutCubicEmphasized,
        ),
      );
}

class SizeAnimation extends CurvedAnimation {
  SizeAnimation({required super.parent})
    : super(
        curve: const Interval(
          0 / 5,
          3 / 5,
          curve: Curves.easeInOutCubicEmphasized,
        ),
        reverseCurve: Interval(
          2 / 5,
          1,
          curve: Curves.easeInOutCubicEmphasized.flipped,
        ),
      );
}
こういったカーブの作成には試行錯誤が必要ですが、Flutter のホットリロードを利用すれば簡単です。これらのアニメーションを使用するには、遷移が必要です。lib ディレクトリに transitions というサブディレクトリを作成し、以下のコードの bottom_bar_transition.dart というファイルを追加します。
lib/transitions/bottom_bar_transition.dart
import 'package:flutter/material.dart';
import '../animations.dart';

class BottomBarTransition extends StatefulWidget {
  const BottomBarTransition({
    super.key,
    required this.animation,
    required this.backgroundColor,
    required this.child,
  });

  final Animation<double> animation;
  final Color backgroundColor;
  final Widget child;

  @override
  State<BottomBarTransition> createState() => _BottomBarTransition();
}

class _BottomBarTransition extends State<BottomBarTransition> {
  late final Animation<Offset> offsetAnimation = Tween<Offset>(
    begin: const Offset(0, 1),
    end: Offset.zero,
  ).animate(OffsetAnimation(parent: widget.animation));

  late final Animation<double> heightAnimation = Tween<double>(
    begin: 0,
    end: 1,
  ).animate(SizeAnimation(parent: widget.animation));

  @override
  Widget build(BuildContext context) {
    return ClipRect(
      child: DecoratedBox(
        decoration: BoxDecoration(color: widget.backgroundColor),
        child: Align(
          alignment: Alignment.topLeft,
          heightFactor: heightAnimation.value,
          child: FractionalTranslation(
            translation: offsetAnimation.value,
            child: widget.child,
          ),
        ),
      ),
    );
  }
}
lib/transitions ディレクトリに nav_rail_transition.dart という別のファイルを加え、以下のコードを追加します。
lib/transitions/nav_rail_transition.dart
import 'package:flutter/material.dart';
import '../animations.dart';

class NavRailTransition extends StatefulWidget {
  const NavRailTransition({
    super.key,
    required this.animation,
    required this.backgroundColor,
    required this.child,
  });

  final Animation<double> animation;
  final Widget child;
  final Color backgroundColor;

  @override
  State<NavRailTransition> createState() => _NavRailTransitionState();
}

class _NavRailTransitionState extends State<NavRailTransition> {
  // The animations are only rebuilt by this method when the text
  // direction changes because this widget only depends on Directionality.
  late final bool ltr = Directionality.of(context) == TextDirection.ltr;
  late final Animation<Offset> offsetAnimation = Tween<Offset>(
    begin: ltr ? const Offset(-1, 0) : const Offset(1, 0),
    end: Offset.zero,
  ).animate(OffsetAnimation(parent: widget.animation));
  late final Animation<double> widthAnimation = Tween<double>(
    begin: 0,
    end: 1,
  ).animate(SizeAnimation(parent: widget.animation));

  @override
  Widget build(BuildContext context) {
    return ClipRect(
      child: DecoratedBox(
        decoration: BoxDecoration(color: widget.backgroundColor),
        child: AnimatedBuilder(
          animation: widthAnimation,
          builder: (context, child) {
            return Align(
              alignment: Alignment.topLeft,
              widthFactor: widthAnimation.value,
              child: FractionalTranslation(
                translation: offsetAnimation.value,
                child: widget.child,
              ),
            );
          },
        ),
      ),
    );
  }
}
この 2 つのウィジェットはナビゲーション レール ウィジェットとナビゲーション バー ウィジェットをラップし、出現と消失をアニメーションで表現します。この 2 つの遷移ウィジェットを使用するには、2 つのウィジェットを更新します。まずは disappearing_bottom_navigation_bar.dart からです。
lib/widgets/disappearing_bottom_navigation_bar.dart
import 'package:flutter/material.dart';

import '../animations.dart';                          // Add this import
import '../destinations.dart';
import '../transitions/bottom_bar_transition.dart';   // Add this import

class DisappearingBottomNavigationBar extends StatelessWidget {
  const DisappearingBottomNavigationBar({
    super.key,
    required this.barAnimation,                       // Add this parameter
    required this.selectedIndex,
    this.onDestinationSelected,
  });

  final BarAnimation barAnimation;                   // Add this variable
  final int selectedIndex;
  final ValueChanged<int>? onDestinationSelected;

  @override
  Widget build(BuildContext context) {
                                                     // Modify from here...
    return BottomBarTransition(
      animation: barAnimation,
      backgroundColor: Colors.white,
      child: NavigationBar(
        elevation: 0,
        backgroundColor: Colors.white,
        destinations: destinations.map<NavigationDestination>((d) {
          return NavigationDestination(icon: Icon(d.icon), label: d.label);
        }).toList(),
        selectedIndex: selectedIndex,
        onDestinationSelected: onDestinationSelected,
      ),
    );
                                                     // ... to here.
  }
}
前の変更ではアニメーションの 1 つを追加し、遷移を統合しています。これにより、ナビゲーション バーの出現と消失の仕方を制御できるようになります。
次に、disappearing_navigation_rail.dart を以下のように変更します。
lib/widgets/disappearing_navigation_rail.dart
import 'package:flutter/material.dart';

import '../animations.dart';                          // Add this import
import '../destinations.dart';
import '../transitions/nav_rail_transition.dart';     // Add this import
import 'animated_floating_action_button.dart';        // Add this import

class DisappearingNavigationRail extends StatelessWidget {
  const DisappearingNavigationRail({
    super.key,
    required this.railAnimation,                      // Add this parameter
    required this.railFabAnimation,                   // Add this parameter
    required this.backgroundColor,
    required this.selectedIndex,
    this.onDestinationSelected,
  });

  final RailAnimation railAnimation;                  // Add this variable
  final RailFabAnimation railFabAnimation;            // Add this variable
  final Color backgroundColor;
  final int selectedIndex;
  final ValueChanged<int>? onDestinationSelected;

  @override
  Widget build(BuildContext context) {
    // Delete colorScheme
                                                      // Modify from here ...
    return NavRailTransition(
      animation: railAnimation,
      backgroundColor: backgroundColor,
      child: NavigationRail(
        selectedIndex: selectedIndex,
        backgroundColor: backgroundColor,
        onDestinationSelected: onDestinationSelected,
        leading: Column(
          children: [
            IconButton(onPressed: () {}, icon: const Icon(Icons.menu)),
            const SizedBox(height: 8),
            AnimatedFloatingActionButton(
              animation: railFabAnimation,
              elevation: 0,
              onPressed: () {},
              child: const Icon(Icons.add),
            ),
          ],
        ),
        groupAlignment: -0.85,
        destinations: destinations.map((d) {
          return NavigationRailDestination(
            icon: Icon(d.icon),
            label: Text(d.label),
          );
        }).toList(),
      ),
    );
                                                      // ... to here.
  }
}
前のコードを入力する際に、未定義ウィジェット(FloatingActionButton)に関するエラーや警告が表示されたと思います。これを解決するために、以下のコードの animated_floating_action_button.dart というファイルを lib/widgets に追加します。
lib/widgets/animated_floating_action_button.dart
import 'dart:ui';

import 'package:flutter/material.dart';
import '../animations.dart';

class AnimatedFloatingActionButton extends StatefulWidget {
  const AnimatedFloatingActionButton({
    super.key,
    required this.animation,
    this.elevation,
    this.onPressed,
    this.child,
  });

  final Animation<double> animation;
  final VoidCallback? onPressed;
  final Widget? child;
  final double? elevation;

  @override
  State<AnimatedFloatingActionButton> createState() =>
      _AnimatedFloatingActionButton();
}

class _AnimatedFloatingActionButton
    extends State<AnimatedFloatingActionButton> {
  late final ColorScheme _colorScheme = Theme.of(context).colorScheme;
  late final Animation<double> _scaleAnimation = ScaleAnimation(
    parent: widget.animation,
  );
  late final Animation<double> _shapeAnimation = ShapeAnimation(
    parent: widget.animation,
  );

  @override
  Widget build(BuildContext context) {
    return ScaleTransition(
      scale: _scaleAnimation,
      child: FloatingActionButton(
        elevation: widget.elevation,
        shape: RoundedRectangleBorder(
          borderRadius: BorderRadius.all(
            Radius.circular(lerpDouble(30, 15, _shapeAnimation.value)!),
          ),
        ),
        backgroundColor: _colorScheme.tertiaryContainer,
        foregroundColor: _colorScheme.onTertiaryContainer,
        onPressed: widget.onPressed,
        child: widget.child,
      ),
    );
  }
}
以上の変更をアプリケーションに反映させるために、main.dart ファイルを以下のように更新します。
lib/main.dart
import 'package:flutter/material.dart';

import 'animations.dart';                               // Add this import
import 'models/data.dart' as data;
import 'models/models.dart';
import 'widgets/animated_floating_action_button.dart';  // Add this import
import 'widgets/disappearing_bottom_navigation_bar.dart';
import 'widgets/disappearing_navigation_rail.dart';
import 'widgets/email_list_view.dart';

void main() {
  runApp(const MainApp());
}

class MainApp extends StatelessWidget {
  const MainApp({super.key});

  @override
  Widget build(BuildContext context) {
    return MaterialApp(
      theme: ThemeData.light(),
      home: Feed(currentUser: data.user_0),
    );
  }
}

class Feed extends StatefulWidget {
  const Feed({super.key, required this.currentUser});

  final User currentUser;

  @override
  State<Feed> createState() => _FeedState();
}

class _FeedState extends State<Feed> with SingleTickerProviderStateMixin {
  late final _colorScheme = Theme.of(context).colorScheme;
  late final _backgroundColor = Color.alphaBlend(
    _colorScheme.primary.withAlpha(36),
    _colorScheme.surface,
  );
                                                        // Add from here...
  late final _controller = AnimationController(
    duration: const Duration(milliseconds: 1000),
    reverseDuration: const Duration(milliseconds: 1250),
    value: 0,
    vsync: this,
  );
  late final _railAnimation = RailAnimation(parent: _controller);
  late final _railFabAnimation = RailFabAnimation(parent: _controller);
  late final _barAnimation = BarAnimation(parent: _controller);
                                                        // ... to here.

  int selectedIndex = 0;
  // Remove wideScreen
  bool controllerInitialized = false;                   // Add this variable

  @override
  void didChangeDependencies() {
    super.didChangeDependencies();

    final double width = MediaQuery.of(context).size.width;
    // Remove wideScreen reference
                                                        // Add from here ...
    final AnimationStatus status = _controller.status;
    if (width > 600) {
      if (status != AnimationStatus.forward &&
          status != AnimationStatus.completed) {
        _controller.forward();
      }
    } else {
      if (status != AnimationStatus.reverse &&
          status != AnimationStatus.dismissed) {
        _controller.reverse();
      }
    }
    if (!controllerInitialized) {
      controllerInitialized = true;
      _controller.value = width > 600 ? 1 : 0;
    }
                                                        // ... to here.
  }

                                                        // Add from here ...
  @override
  void dispose() {
    _controller.dispose();
    super.dispose();
  }
                                                        // ... to here.

  @override
  Widget build(BuildContext context) {
                                                        // Modify from here ...
    return AnimatedBuilder(
      animation: _controller,
      builder: (context, _) {
        return Scaffold(
          body: Row(
            children: [
              DisappearingNavigationRail(
                railAnimation: _railAnimation,
                railFabAnimation: _railFabAnimation,
                selectedIndex: selectedIndex,
                backgroundColor: _backgroundColor,
                onDestinationSelected: (index) {
                  setState(() {
                    selectedIndex = index;
                  });
                },
              ),
              Expanded(
                child: Container(
                  color: _backgroundColor,
                  child: EmailListView(
                    selectedIndex: selectedIndex,
                    onSelected: (index) {
                      setState(() {
                        selectedIndex = index;
                      });
                    },
                    currentUser: widget.currentUser,
                  ),
                ),
              ),
            ],
          ),
          floatingActionButton: AnimatedFloatingActionButton(
            animation: _barAnimation,
            onPressed: () {},
            child: const Icon(Icons.add),
          ),
          bottomNavigationBar: DisappearingBottomNavigationBar(
            barAnimation: _barAnimation,
            selectedIndex: selectedIndex,
            onDestinationSelected: (index) {
              setState(() {
                selectedIndex = index;
              });
            },
          ),
        );
      },
    );
                                                        // ... to here.
  }
}
アプリを実行します。最初は、前と同じように見えます。画面のサイズを変更し、サイズや寸法に応じて、UI がナビゲーション レールとナビゲーション バーとの間で切り替わるのを確認します。遷移の動きは、遊び心のある流麗なものになっているはずです。使用されるアニメーション カーブをホットリロードで変更し、アプリケーションの雰囲気が変わるのを確認してください。
8. 詳細ビュー付きのリストを追加する
最後に、メッセージ アプリは、リストと詳細のレイアウトが効果を発揮するのに最適な場所です(ディスプレイの幅が十分あるときだけですが)。まず lib/widgets に reply_list_view.dart というファイルを作成し、以下のコードを入力します。
lib/widgets/reply_list_view.dart
import 'package:flutter/material.dart';

import '../models/data.dart' as data;
import 'email_widget.dart';

class ReplyListView extends StatelessWidget {
  const ReplyListView({super.key});

  @override
  Widget build(BuildContext context) {
    return Padding(
      padding: const EdgeInsets.only(right: 8.0),
      child: ListView(
        children: [
          const SizedBox(height: 8),
          ...List.generate(data.replies.length, (index) {
            return Padding(
              padding: const EdgeInsets.only(bottom: 8.0),
              child: EmailWidget(
                email: data.replies[index],
                isPreview: false,
                isThreaded: true,
                showHeadline: index == 0,
              ),
            );
          }),
        ],
      ),
    );
  }
}
次に、lib/transitions に list_detail_transition.dart を追加し、以下のコードを入力します。
lib/transitions/list_detail_transition.dart
import 'dart:ui';

import 'package:flutter/material.dart';
import '../animations.dart';

class ListDetailTransition extends StatefulWidget {
  const ListDetailTransition({
    super.key,
    required this.animation,
    required this.one,
    required this.two,
  });

  final Animation<double> animation;
  final Widget one;
  final Widget two;

  @override
  State<ListDetailTransition> createState() => _ListDetailTransitionState();
}

class _ListDetailTransitionState extends State<ListDetailTransition> {
  Animation<double> widthAnimation = const AlwaysStoppedAnimation(0);
  late final Animation<double> sizeAnimation = SizeAnimation(
    parent: widget.animation,
  );
  late final Animation<Offset> offsetAnimation = Tween<Offset>(
    begin: const Offset(1, 0),
    end: Offset.zero,
  ).animate(OffsetAnimation(parent: sizeAnimation));
  double currentFlexFactor = 0;

  @override
  void didChangeDependencies() {
    super.didChangeDependencies();

    final double width = MediaQuery.of(context).size.width;
    double nextFlexFactor = switch (width) {
      >= 800 && < 1200 => lerpDouble(1000, 2000, (width - 800) / 400)!,
      >= 1200 && < 1600 => lerpDouble(2000, 3000, (width - 1200) / 400)!,
      >= 1600 => 3000,
      _ => 1000,
    };

    if (nextFlexFactor == currentFlexFactor) {
      return;
    }

    if (currentFlexFactor == 0) {
      widthAnimation = Tween<double>(
        begin: 0,
        end: nextFlexFactor,
      ).animate(sizeAnimation);
    } else {
      final TweenSequence<double> sequence = TweenSequence([
        if (sizeAnimation.value > 0) ...[
          TweenSequenceItem(
            tween: Tween(begin: 0, end: widthAnimation.value),
            weight: sizeAnimation.value,
          ),
        ],
        if (sizeAnimation.value < 1) ...[
          TweenSequenceItem(
            tween: Tween(begin: widthAnimation.value, end: nextFlexFactor),
            weight: 1 - sizeAnimation.value,
          ),
        ],
      ]);

      widthAnimation = sequence.animate(sizeAnimation);
    }

    currentFlexFactor = nextFlexFactor;
  }

  @override
  Widget build(BuildContext context) {
    return widthAnimation.value.toInt() == 0
        ? widget.one
        : Row(
            children: [
              Flexible(flex: 1000, child: widget.one),
              Flexible(
                flex: widthAnimation.value.toInt(),
                child: FractionalTranslation(
                  translation: offsetAnimation.value,
                  child: widget.two,
                ),
              ),
            ],
          );
  }
}
この内容をアプリに統合するために、lib/main.dart を以下のように更新します。
lib/main.dart
import 'package:flutter/material.dart';

import 'animations.dart';
import 'models/data.dart' as data;
import 'models/models.dart';
import 'transitions/list_detail_transition.dart';          // Add import
import 'widgets/animated_floating_action_button.dart';
import 'widgets/disappearing_bottom_navigation_bar.dart';
import 'widgets/disappearing_navigation_rail.dart';
import 'widgets/email_list_view.dart';
import 'widgets/reply_list_view.dart';                     // Add import

void main() {
  runApp(const MainApp());
}

class MainApp extends StatelessWidget {
  const MainApp({super.key});

  @override
  Widget build(BuildContext context) {
    return MaterialApp(
      theme: ThemeData.light(),
      home: Feed(currentUser: data.user_0),
    );
  }
}

class Feed extends StatefulWidget {
  const Feed({super.key, required this.currentUser});

  final User currentUser;

  @override
  State<Feed> createState() => _FeedState();
}

class _FeedState extends State<Feed> with SingleTickerProviderStateMixin {
  late final _colorScheme = Theme.of(context).colorScheme;
  late final _backgroundColor = Color.alphaBlend(
    _colorScheme.primary.withAlpha(36),
    _colorScheme.surface,
  );
  late final _controller = AnimationController(
    duration: const Duration(milliseconds: 1000),
    reverseDuration: const Duration(milliseconds: 1250),
    value: 0,
    vsync: this,
  );
  late final _railAnimation = RailAnimation(parent: _controller);
  late final _railFabAnimation = RailFabAnimation(parent: _controller);
  late final _barAnimation = BarAnimation(parent: _controller);

  int selectedIndex = 0;
  bool controllerInitialized = false;

  @override
  void didChangeDependencies() {
    super.didChangeDependencies();

    final double width = MediaQuery.of(context).size.width;
    final AnimationStatus status = _controller.status;
    if (width > 600) {
      if (status != AnimationStatus.forward &&
          status != AnimationStatus.completed) {
        _controller.forward();
      }
    } else {
      if (status != AnimationStatus.reverse &&
          status != AnimationStatus.dismissed) {
        _controller.reverse();
      }
    }
    if (!controllerInitialized) {
      controllerInitialized = true;
      _controller.value = width > 600 ? 1 : 0;
    }
  }

  @override
  void dispose() {
    _controller.dispose();
    super.dispose();
  }

  @override
  Widget build(BuildContext context) {
    return AnimatedBuilder(
      animation: _controller,
      builder: (context, _) {
        return Scaffold(
          body: Row(
            children: [
              DisappearingNavigationRail(
                railAnimation: _railAnimation,
                railFabAnimation: _railFabAnimation,
                selectedIndex: selectedIndex,
                backgroundColor: _backgroundColor,
                onDestinationSelected: (index) {
                  setState(() {
                    selectedIndex = index;
                  });
                },
              ),
              Expanded(
                child: Container(
                  color: _backgroundColor,
                                                // Update from here ...
                  child: ListDetailTransition(
                    animation: _railAnimation,
                    one: EmailListView(
                      selectedIndex: selectedIndex,
                      onSelected: (index) {
                        setState(() {
                          selectedIndex = index;
                        });
                      },
                      currentUser: widget.currentUser,
                    ),
                    two: const ReplyListView(),
                  ),
                                                // ... to here.
                ),
              ),
            ],
          ),
          floatingActionButton: AnimatedFloatingActionButton(
            animation: _barAnimation,
            onPressed: () {},
            child: const Icon(Icons.add),
          ),
          bottomNavigationBar: DisappearingBottomNavigationBar(
            barAnimation: _barAnimation,
            selectedIndex: selectedIndex,
            onDestinationSelected: (index) {
              setState(() {
                selectedIndex = index;
              });
            },
          ),
        );
      },
    );
  }
}
アプリを実行して、すべてが統合されているのを確認します。本格的なアプリケーションの代わりとなるアプリで、マテリアル 3 のスタイル設定と、レイアウト間のアニメーションを実現しました。これは次のように表示されます。

9. 完了
おつかれさまです。これで、最初のマテリアル 3 Flutter アプリを作成できました。
この Codelab の全ステップをコードで確認するには、Flutter Codelab の GitHub リポジトリにアクセスしてください。
次のステップ
以下の Codelab をご覧ください。
参考資料
- Flutter のマテリアル 3 の最新情報をご覧ください。
- Flutter マテリアル 3 のドキュメントをご覧ください。
- マテリアル 3 の参考資料のすべてをご確認ください。