
1. 簡介
網路防火牆政策
防火牆是安全雲端環境的基本建構區塊。先前我們在機構和資料夾層級推出了防火牆政策,但虛擬私有雲防火牆維持不變。在這個版本中,我們將防火牆政策結構擴展至虛擬私有雲層級,並對目前的防火牆政策支援進行多項強化,以便在 Google Cloud 的資源階層中提供統一的防火牆支援,並提供一致的使用者體驗,讓使用者以安全、彈性且可擴充的方式管理防火牆政策控制項。
網路防火牆政策可做為防火牆規則的容器。將網路防火牆政策與虛擬私有雲網路建立關聯後,系統才會在任何位置強制執行政策中定義的規則。每個虛擬私有雲網路只能連結一項網路防火牆政策。網路防火牆政策支援防火牆規則中的 IAM 管理標記 (或簡稱標記),可取代目前的網路標記,並用於為工作負載提供身分。
在多個網路之間共用網路防火牆政策,並整合 IAM 控管的標記,可大幅簡化防火牆的設定和管理作業。
隨著網路防火牆政策的推出,Google Cloud 的防火牆政策現在包含下列元件:
- 階層式防火牆政策
- 虛擬私有雲防火牆規則
- 網路防火牆政策 ( 全域和區域)
資源階層中的機構和資料夾節點支援階層式防火牆政策,而虛擬私有雲防火牆規則和網路防火牆政策則是在虛擬私有雲層級套用。虛擬私有雲防火牆規則與網路防火牆政策的最大差異在於,虛擬私有雲防火牆規則只能套用至單一虛擬私有雲網路,而網路防火牆政策可附加至單一虛擬私有雲或虛擬私有雲群組,並享有批次更新等其他優點。
最後,每個虛擬私有雲網路都設有默示防火牆規則:
- 動作為「允許」且目的地為 0.0.0.0/0 的輸出規則
- 動作為拒絕、來源為 0.0.0.0/0 的輸入規則
根據預設,強制執行順序如下圖所示:
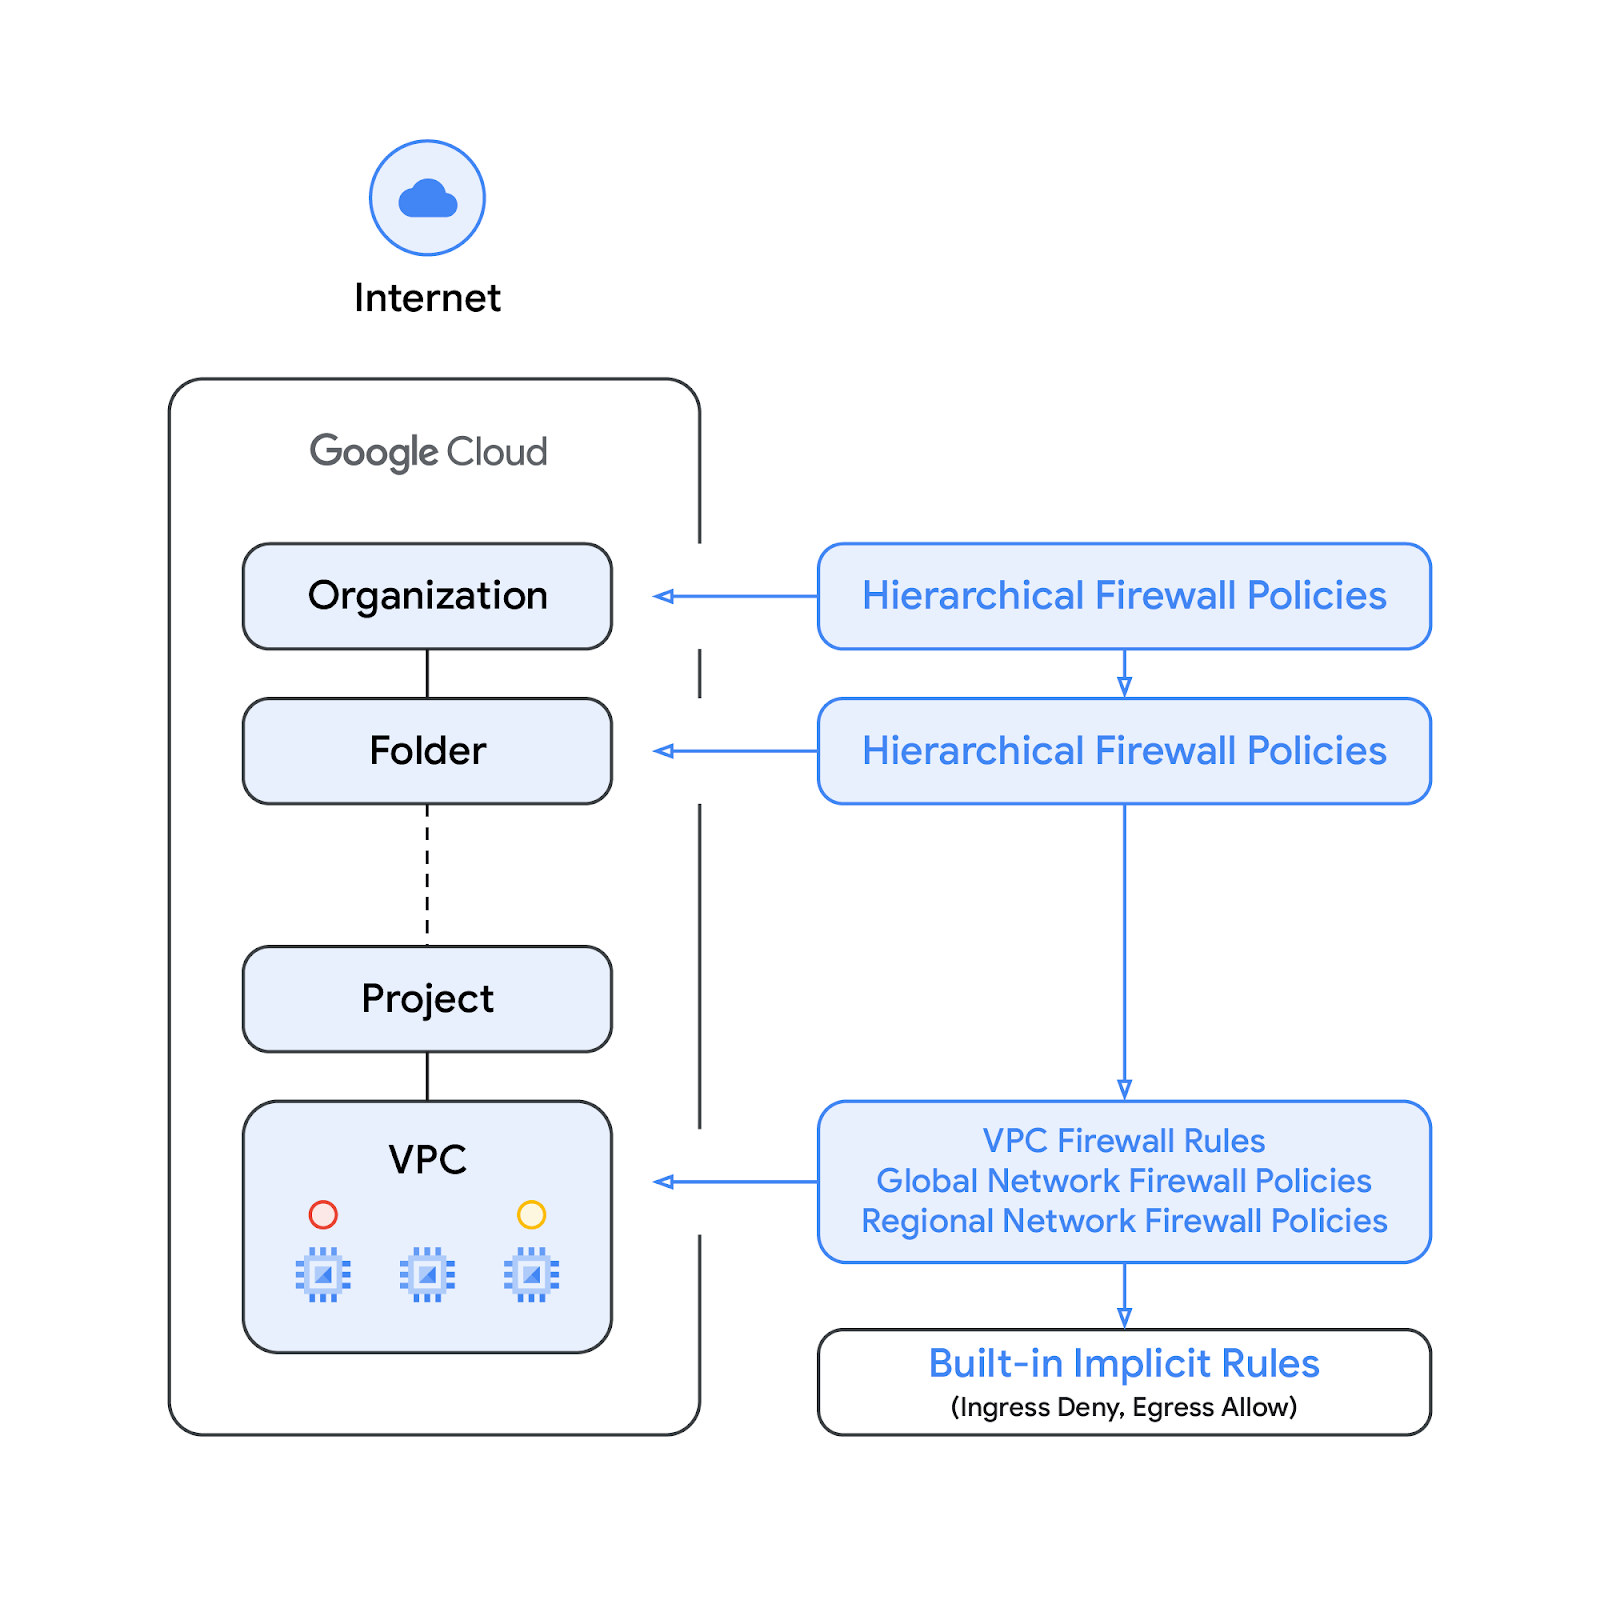
請注意,虛擬私有雲防火牆規則和全域網路防火牆政策的強制執行順序可以互換。客戶隨時可以使用 gcloud 指令指定強制執行順序。
標記
整合至網路防火牆政策規則的新標記,是在 Google Cloud 資源階層的機構層級定義的鍵/值組合資源。如名稱所示,這類標記包含 IAM 存取控管機制,可指定哪些使用者能對標記執行哪些操作。舉例來說,IAM 權限可讓您指定哪些主體可將值指派給標記,以及哪些主體可將標記附加至資源。將標記套用至資源後,網路防火牆規則即可使用該標記允許及拒絕流量。
標記遵循 Google Cloud 的資源繼承模型,也就是標記及其值會從父項向下傳遞至整個階層。因此,標記可能會在某個位置建立,然後由整個資源階層中的其他資料夾和專案使用。如要進一步瞭解標記和存取限制,請參閱這個頁面。
請勿將標記與網路標記混淆,後者是可新增至 Compute Engine 執行個體的字串,與執行個體相關聯,並在執行個體停用時消失。虛擬私有雲防火牆規則可能包含網路標記,但由於這些規則不屬於雲端資源,因此不受 IAM 存取控管。
請注意,本文會交互使用「標記」和「IAM 管理的標記」一詞。
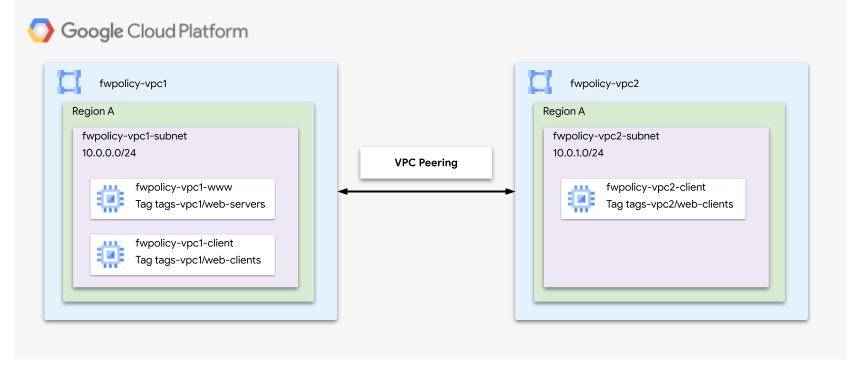
建構項目
本程式碼研究室分為兩部分:第一部分說明如何使用單一虛擬私有雲網路的網路防火牆政策和標記,第二部分則說明如何在對等互連的虛擬私有雲網路中使用標記,如下圖所示。因此,本程式碼研究室需要單一專案,並能夠建立多個虛擬私有雲網路。
課程內容
- 如何建立網路防火牆政策
- 如何建立及使用含網路防火牆政策的標記
- 如何透過虛擬私有雲網路對等互連使用標記
軟硬體需求
- Google Cloud 專案
- 瞭解如何部署執行個體及設定網路元件
- 虛擬私有雲防火牆設定知識
2. 事前準備
建立/更新變數
本程式碼研究室會使用 $variables,協助您在 Cloud Shell 中實作 gcloud 設定。
在 Cloud Shell 中執行下列操作:
gcloud config set project [project-id]
export project_id=`gcloud config list --format="value(core.project)"`
export org_id=[org]
export region=us-central1
export zone=us-central1-a
export prefix=fwpolicy
3. 建立虛擬私有雲網路和子網路
虛擬私人雲端網路
建立 fwpolicy-vpc1:
gcloud compute networks create $prefix-vpc1 --subnet-mode=custom
子網路
在所選區域中建立對應的子網路:
gcloud compute networks subnets create $prefix-vpc1-subnet \
   --range=10.0.0.0/24 --network=$prefix-vpc1 --region=$region
Cloud NAT
為 fwpolicy-pc1 建立 Cloud Router 和 Cloud NAT 閘道:
gcloud compute routers create $prefix-vpc1-cr \
  --region=$region --network=$prefix-vpc1

gcloud compute routers nats create $prefix-vpc1-cloudnat \
   --router=$prefix-vpc1-cr --router-region=$region \
   --auto-allocate-nat-external-ips \
   --nat-all-subnet-ip-ranges
4. 建立執行個體
建立防火牆規則,允許來自 IAP 範圍的輸入 SSH 流量 (如果尚未在 IAP 設定中定義):
gcloud compute firewall-rules create allow-ssh-ingress-from-iap-vpc1 \
  --direction=INGRESS \
  --action=allow \
  --network=$prefix-vpc1 \
  --rules=tcp:22 \
  --source-ranges=35.235.240.0/20
建立 fwpolicy-vpc1 用戶端和網路伺服器執行個體:
gcloud compute instances create $prefix-vpc1-www \
   --subnet=$prefix-vpc1-subnet --no-address --zone $zone \
   --metadata startup-script='#! /bin/bash
apt-get update
apt-get install apache2 -y
a2ensite default-ssl
a2enmod ssl
# Read VM network configuration:
md_vm="http://169.254.169.254/computeMetadata/v1/instance/"
vm_hostname="$(curl $md_vm/name -H "Metadata-Flavor:Google" )"
filter="{print \$NF}"
vm_network="$(curl $md_vm/network-interfaces/0/network \
-H "Metadata-Flavor:Google" | awk -F/ "${filter}")"
vm_zone="$(curl $md_vm/zone \
-H "Metadata-Flavor:Google" | awk -F/ "${filter}")"
# Apache configuration:
echo "Page on $vm_hostname in network $vm_network zone $vm_zone" | \
tee /var/www/html/index.html
systemctl restart apache2'

gcloud compute instances create $prefix-vpc1-client \
    --subnet=$prefix-vpc1-subnet --no-address --zone $zone
由於沒有定義任何虛擬私有雲防火牆規則 (除了本節開頭設定 IAP 時應建立的允許 SSH 規則),且預設會拒絕所有輸入流量,因此用戶端執行個體無法存取對應的網頁伺服器。如要確認要求會逾時,請開啟新視窗,對 fwpolicy-vpc1-client 執行個體啟動 SSH 工作階段,然後嘗試使用 curl 呼叫網路伺服器:
user@fwpolicy-vpc1-client$ curl fwpolicy-vpc1-www --connect-timeout 2
預期輸出內容:
curl: (28) Connection timed out after 2001 milliseconds
您也可以透過 Cloud Shell 驗證 fwpolicy-vpc1 是否未定義任何虛擬私有雲防火牆規則:
gcloud compute firewall-rules list --filter="network:$prefix-vpc1"
5. 全域網路防火牆政策
建立全域網路防火牆政策:
gcloud compute network-firewall-policies create \
   $prefix-example --description \
   "firewall-policy-description" --global
新增允許網路流量的規則:
gcloud compute network-firewall-policies rules create 500 \
    --action allow \
    --description "allow-web" \
    --layer4-configs tcp:80,tcp:443 \
    --firewall-policy $prefix-example \
    --src-ip-ranges 10.0.0.0/16 \
    --global-firewall-policy --enable-logging
說明網路防火牆政策,並確認規則已成功added:
gcloud compute network-firewall-policies describe \
    $prefix-example --global
預期輸出內容 (向上捲動至輸出內容開頭;請注意,系統也會顯示隱含規則):
creationTimestamp: '2022-09-23T12:46:53.677-07:00'
description: "firewall-policy-description"
fingerprint: Np1Rup09Amc=
id: '7021772628738421698'
kind: compute#firewallPolicy
name: fwpolicy-example
ruleTupleCount: 13
rules:
- action: allow
  description: allow-web
  direction: INGRESS
  disabled: false
  enableLogging: true
  kind: compute#firewallPolicyRule
  match:
    layer4Configs:
    - ipProtocol: tcp
      ports:
      - '80'
    - ipProtocol: tcp
      ports:
      - '443'
    srcIpRanges:
    - 10.0.0.0/16
  priority: 500
  ruleTupleCount: 5
...
將網路防火牆政策與 fwpolicy-vpc1 建立關聯:
gcloud compute network-firewall-policies associations create \
     --firewall-policy $prefix-example \
     --network $prefix-vpc1 \
     --name $prefix-vpc1-association \
     --global-firewall-policy
確認已成功套用至 fwpolicy-vpc1 網路:
gcloud compute networks get-effective-firewalls $prefix-vpc1
預期輸出內容 (請注意,如果優先採用階層式防火牆政策,相關規則會顯示在頂端):
TYPE                     FIREWALL_POLICY_NAME     PRIORITY    ACTION     DIRECTION  IP_RANGES
network-firewall-policy  fwpolicy-example      500         ALLOW      INGRESS    10.0.0.0/16
network-firewall-policy  fwpolicy-example      2147483645  GOTO_NEXT  INGRESS    ::/0
network-firewall-policy  fwpolicy-example      2147483647  GOTO_NEXT  INGRESS    0.0.0.0/0
network-firewall-policy  fwpolicy-example      2147483644  GOTO_NEXT  EGRESS     ::/0
network-firewall-policy  fwpolicy-example      2147483646  GOTO_NEXT  EGRESS     0.0.0.0/0
確認這項規則也已成功套用至 fwpolicy-vpc1 網路伺服器:
gcloud compute instances network-interfaces \
   get-effective-firewalls $prefix-vpc1-www --zone $zone
預期輸出內容與先前的指令 (fwpolicy-vpc1 生效防火牆) 類似:
TYPE                     FIREWALL_POLICY_NAME     PRIORITY    ACTION     DIRECTION  IP_RANGES
network-firewall-policy  fwpolicy-example      500         ALLOW      INGRESS    10.0.0.0/16
network-firewall-policy  fwpolicy-example      2147483645  GOTO_NEXT  INGRESS    ::/0
network-firewall-policy  fwpolicy-example      2147483647  GOTO_NEXT  INGRESS    0.0.0.0/0
network-firewall-policy  fwpolicy-example      2147483644  GOTO_NEXT  EGRESS     ::/0
network-firewall-policy  fwpolicy-example      2147483646  GOTO_NEXT  EGRESS     0.0.0.0/0
切換回 vpc1-client SSH 工作階段,然後再次嘗試執行 curl (請注意,下列指令假設使用 fwpolicy 做為前置字元;如果使用其他名稱,請相應調整 curl 指令):
user@vpc1-client$ curl fwpolicy-vpc1-www --connect-timeout 2
Page on vpc1-www in network vpc1 zone us-central1-a
在 Cloud Shell 中,確認網路防火牆政策已套用至 fwpolicy-vpc1:
gcloud compute network-firewall-policies describe \
   $prefix-example --global
預期的輸出內容 (向上捲動至輸出內容開頭):
---
associations:
- attachmentTarget: https://www.googleapis.com/compute/v1/projects/PROJECT_ID/global/networks/fwpolicy-vpc1
  name: fwpolicy-vpc1-association
...
6. IAM 控管的標記
標記是可附加至機構、資料夾或專案的鍵/值組合。詳情請參閱「建立及管理代碼」和「必要權限」。
tagAdmin 角色可讓您建立新代碼、更新及刪除現有代碼。組織管理員可以授予這個角色。在 Cloud Shell 中更新 IAM 政策,為使用者新增 tagAdmin 角色。如要查看每個預先定義的角色包含的權限,請參閱權限參考資料頁面。
gcloud organizations add-iam-policy-binding $org_id \
  --member user:[user@example.com] --role roles/resourcemanager.tagAdmin
執行下列指令,確認哪些使用者具有 resourcemanager.tagAdmin 角色:
gcloud organizations get-iam-policy $org_id --flatten=bindings \
  --filter=bindings.role:roles/resourcemanager.tagAdmin
建立新的標記鍵:
gcloud resource-manager tags keys create tags-vpc1 \
   --parent organizations/$org_id \
   --purpose GCE_FIREWALL \
   --purpose-data network=$project_id/$prefix-vpc1
預期輸出內容:
Waiting for TagKey [tags-vpc1] to be created...done.
createTime: '2022-09-23T20:49:01.162228Z'
etag: PwvmFuHO4wK1y6c5Ut2n5w==
name: tagKeys/622132302133
namespacedName: ORGANIZATION_ID/tags-vpc1
parent: organizations/ORGANIZATION_ID
purpose: GCE_FIREWALL
purposeData:
  network: https://www.googleapis.com/compute/v1/projects/PROJECT_ID/global/networks/6749205358365096383
shortName: tags-vpc1
updateTime: '2022-09-23T20:49:03.873776Z'
建立新的代碼值:
gcloud resource-manager tags values create web-servers \
   --parent=$org_id/tags-vpc1

gcloud resource-manager tags values create web-clients \
   --parent=$org_id/tags-vpc1
確認標記值已成功建立:
gcloud resource-manager tags values list \
   --parent=$org_id/tags-vpc1
預期輸出內容:
NAME                    SHORT_NAME   DESCRIPTION
tagValues/349564376683  web-servers
tagValues/780363571446  web-clients
在 Cloud Shell 中,說明現有的網路防火牆政策規則,確認未使用標記:
gcloud compute network-firewall-policies rules describe 500 \
    --firewall-policy $prefix-example \
    --global-firewall-policy
預期輸出內容:
---
action: allow
description: allow-web
direction: INGRESS
disabled: false
enableLogging: true
kind: compute#firewallPolicyRule
match:
  layer4Configs:
  - ipProtocol: tcp
    ports:
    - '80'
  - ipProtocol: tcp
    ports:
    - '443'
  srcIpRanges:
  - 10.0.0.0/16
priority: 500
ruleTupleCount: 5
在 Cloud Shell 中更新規則,只允許來自 vpc1-tags/web-clients 標記鍵的流量,並在具有 vpc1-tags/web-servers 標記鍵的執行個體上安裝規則。
gcloud compute network-firewall-policies rules update 500 \
    --firewall-policy $prefix-example \
    --src-secure-tags $org_id/tags-vpc1/web-clients \
    --target-secure-tags $org_id/tags-vpc1/web-servers \
    --global-firewall-policy
在 Cloud Shell 中,說明現有的網路防火牆政策規則,確認標記已成功套用並回報為「EFFECTIVE」(有效):
gcloud compute network-firewall-policies rules describe 500 \
    --firewall-policy $prefix-example \
    --global-firewall-policy
預期輸出內容:
---
action: allow
description: allow-web
direction: INGRESS
disabled: false
enableLogging: false
kind: compute#firewallPolicyRule
match:
  layer4Configs:
  - ipProtocol: tcp
    ports:
    - '80'
  - ipProtocol: tcp
    ports:
    - '443'
  srcIpRanges:
  - 10.0.0.0/16
  srcSecureTags:
  - name: tagValues/479619031616
    state: EFFECTIVE
priority: 500
ruleTupleCount: 7
targetSecureTags:
- name: tagValues/230424970229
  state: EFFECTIVE
在 Cloud Shell 中,確認規則已套用至 vpc1:
gcloud compute networks get-effective-firewalls $prefix-vpc1
預期輸出內容:
network-firewall-policy  fwpolicy-example      500         ALLOW      INGRESS    10.0.0.0/16
network-firewall-policy  fwpolicy-example      2147483645  GOTO_NEXT  INGRESS    ::/0
network-firewall-policy  fwpolicy-example      2147483647  GOTO_NEXT  INGRESS    0.0.0.0/0
network-firewall-policy  fwpolicy-example      2147483644  GOTO_NEXT  EGRESS     ::/0
network-firewall-policy  fwpolicy-example      2147483646  GOTO_NEXT  EGRESS     0.0.0.0/0
確認即使網路防火牆政策仍與虛擬私有雲網路建立關聯,允許網頁流量的規則也不會再套用至網路伺服器,因為標記未新增至執行個體:
gcloud compute instances network-interfaces \
   get-effective-firewalls $prefix-vpc1-www --zone $zone
預期輸出內容 (請注意,優先順序為 500 的防火牆規則不會顯示):
network-firewall-policy  fwpolicy-example      2147483645  GOTO_NEXT  INGRESS    ::/0
network-firewall-policy  fwpolicy-example      2147483647  GOTO_NEXT  INGRESS    0.0.0.0/0
network-firewall-policy  fwpolicy-example      2147483644  GOTO_NEXT  EGRESS     ::/0
network-firewall-policy  fwpolicy-example      2147483646  GOTO_NEXT  EGRESS     0.0.0.0/0
將標記使用者角色授予特定標記和使用者。如要查看每個預先定義的角色包含的權限,請參閱權限參考資料頁面。
gcloud resource-manager tags keys add-iam-policy-binding \
  $org_id/tags-vpc1 \
  --member user:[email] --role roles/resourcemanager.tagUser

gcloud projects add-iam-policy-binding $project_id \
  --member user:[email] --role roles/resourcemanager.tagUser
確認角色是否已成功新增:
gcloud resource-manager tags keys get-iam-policy $org_id/tags-vpc1

gcloud projects get-iam-policy $project_id --flatten=bindings \
   --filter=bindings.role:roles/resourcemanager.tagUser
預期輸出內容:
bindings:
- members:
  - user:[user]
  role: roles/resourcemanager.tagUser
...
將標記套用至 fwpolicy-vpc1-www 執行個體:
gcloud resource-manager tags bindings create \
  --location $zone \
  --tag-value $org_id/tags-vpc1/web-servers \
  --parent \
//compute.googleapis.com/projects/$project_id/zones/$zone/instances/$prefix-vpc1-www
預期輸出內容:
Waiting for TagBinding for parent [//compute.googleapis.com/projects/PROJECT_ID/zones/us-central1-a/instances/38369703403698502] and tag value [tagValues/34
9564376683] to be created with [operations/rctb.us-central1-a.6144808968019372877]...done.
done: true
metadata:
  '@type': type.googleapis.com/google.cloud.resourcemanager.v3.CreateTagBindingMetadata
name: operations/rctb.us-central1-a.6144808968019372877
response:
  '@type': type.googleapis.com/google.cloud.resourcemanager.v3.TagBinding
  name: tagBindings/%2F%2Fcompute.googleapis.com%2Fprojects%2FPROJECT_NUMBER%2Fzones%2Fus-central1-a%2Finstances%2F38369703403698502/tagValues/349564376683
  parent: //compute.googleapis.com/projects/PROJECT_NUMBER/zones/us-central1-a/instances/38369703403698502
  tagValue: tagValues/349564376683
驗證繫結:
gcloud resource-manager tags bindings list --location $zone --effective --parent //compute.googleapis.com/projects/$project_id/zones/$zone/instances/$prefix-vpc1-www
預期輸出內容:
namespacedTagKey: ORGANIZATION_ID/tags-vpc1
namespacedTagValue: ORGANIZATION_ID/tags-vpc1/web-servers
tagKey: tagKeys/622132302133
tagValue: tagValues/349564376683
再次確認有效的防火牆規則:
gcloud compute instances network-interfaces \
   get-effective-firewalls $prefix-vpc1-www --zone $zone
預期輸出內容:
network-firewall-policy  fwpolicy-example      490         ALLOW      INGRESS    10.0.0.0/16
network-firewall-policy  fwpolicy-example      2147483645  GOTO_NEXT  INGRESS    ::/0
network-firewall-policy  fwpolicy-example      2147483647  GOTO_NEXT  INGRESS    0.0.0.0/0
network-firewall-policy  fwpolicy-example      2147483644  GOTO_NEXT  EGRESS     ::/0
network-firewall-policy  fwpolicy-example      2147483646  GOTO_NEXT  EGRESS     0.0.0.0/0
切換回 fwpolicy-vpc1-client SSH 工作階段分頁,然後嘗試執行 curl:
user@fwpolicy-vpc1-client$ curl fwpolicy-vpc1-www --connect-timeout 2
你是否能連線?
如要驗證這一點,請透過 Cloud Shell 更新規則,移除來源 CIDR 條件。
gcloud compute network-firewall-policies rules update 500 \
    --firewall-policy $prefix-example \
    --src-ip-ranges "" \
    --global-firewall-policy

gcloud compute network-firewall-policies rules describe 500 \
    --firewall-policy $prefix-example \
    --global-firewall-policy

action: allow
description: allow-web
direction: INGRESS
disabled: false
enableLogging: false
kind: compute#firewallPolicyRule
match:
  layer4Configs:
  - ipProtocol: tcp
    ports:
    - '80'
  - ipProtocol: tcp
    ports:
    - '443'
  srcSecureTags:
  - name: tagValues/479619031616
    state: EFFECTIVE
priority: 490
ruleTupleCount: 7
targetSecureTags:
- name: tagValues/230424970229
  state: EFFECTIVE
切換回 fwpolicy-vpc1-client SSH 工作階段分頁,然後再試一次:
user@fwpolicy-vpc1-client$ curl fwpolicy-vpc1-www --connect-timeout 2
由於代碼未新增至 fwpolicy-vpc1-client,這次連線應該會逾時。請從 Cloud Shell 新增,然後再試一次。
gcloud resource-manager tags bindings create \
  --location $zone \
  --tag-value $org_id/tags-vpc1/web-clients \
  --parent \
//compute.googleapis.com/projects/$project_id/zones/$zone/instances/$prefix-vpc1-client
切換回 fwpolicy-vpc1-client SSH 工作階段分頁,然後再試一次,這次應該會成功。
user@fwpolicy-vpc1-client$ curl fwpolicy-vpc1-www --connect-timeout 2
7. 透過虛擬私有雲網路對等互連的 IAM 控管標記
在 Cloud Shell 中建立新的虛擬私有雲、子網路和用戶端,並設定網路之間的虛擬私有雲網路對等互連:
gcloud compute networks create $prefix-vpc2 --subnet-mode=custom

gcloud compute networks subnets create $prefix-vpc2-subnet \
   --range=10.0.1.0/24 --network=$prefix-vpc2 --region=$region

gcloud compute instances create $prefix-vpc2-client \
   --subnet=$prefix-vpc2-subnet --no-address --zone $zone

gcloud compute networks peerings create vpc1-to-vpc2 \
   --network=$prefix-vpc1 \
   --peer-project $project_id \
   --peer-network $prefix-vpc2

gcloud compute networks peerings create vpc2-to-vpc1 \
    --network=$prefix-vpc2 \
    --peer-project $project_id \
    --peer-network $prefix-vpc1
建立防火牆規則,允許來自 IAP 範圍的輸入 SSH 流量 (如果尚未在 IAP 設定中定義):
gcloud compute firewall-rules create allow-ssh-ingress-from-iap-vpc2 \
  --direction=INGRESS \
  --action=allow \
  --network=$prefix-vpc2 \
  --rules=tcp:22 \
  --source-ranges=35.235.240.0/20
雖然標記是機構層級的物件,但標記鍵會與特定虛擬私有雲建立關聯,因此無法套用至不同網路中的執行個體。因此,您必須建立適用於 vpc2 的新標記鍵和值:
gcloud resource-manager tags keys create tags-vpc2 \
   --parent organizations/$org_id \
   --purpose GCE_FIREWALL \
   --purpose-data network=$project_id/$prefix-vpc2

gcloud resource-manager tags values create web-clients \
   --parent=$org_id/tags-vpc2
將新標記套用至 fwpolicy-vpc2-client 執行個體:
gcloud resource-manager tags bindings create \
  --location $zone \
  --tag-value $org_id/tags-vpc2/web-clients \
  --parent \
//compute.googleapis.com/projects/$project_id/zones/$zone/instances/$prefix-vpc2-client
(選用) 列出 fwpolicy-vpc2-client 的繫結:
gcloud resource-manager tags bindings list --location $zone --effective --parent //compute.googleapis.com/projects/$project_id/zones/$zone/instances/$prefix-vpc2-client
預期輸出內容:
namespacedTagKey: ORGANIZATION_ID/tags-vpc2
namespacedTagValue: ORGANIZATION_ID/tags-vpc2/web-clients
tagKey: tagKeys/916316350251
tagValue: tagValues/633150043992
在 Cloud Shell 中說明現有的網路防火牆政策規則,確認未使用新標記:
gcloud compute network-firewall-policies rules describe 500 \
    --firewall-policy $prefix-example \
    --global-firewall-policy
預期輸出內容:
---
action: allow
description: allow-web
direction: INGRESS
disabled: false
enableLogging: true
kind: compute#firewallPolicyRule
match:
  layer4Configs:
  - ipProtocol: tcp
    ports:
    - '80'
  - ipProtocol: tcp
    ports:
    - '443'
  srcSecureTags:
  - name: tagValues/479619031616
    state: EFFECTIVE
priority: 500
ruleTupleCount: 6
targetSecureTags:
- name: tagValues/230424970229
  state: EFFECTIVE
更新現有防火牆規則,允許來自對等互連虛擬私有雲網路的標記:
gcloud compute network-firewall-policies rules update 500 \
    --firewall-policy $prefix-example \
    --src-secure-tags $org_id/tags-vpc1/web-clients,$org_id/tags-vpc2/web-clients \
    --global-firewall-policy
說明防火牆規則,確認規則已順利套用並回報為「有效」:
gcloud compute network-firewall-policies rules describe 500 \
    --firewall-policy $prefix-example \
    --global-firewall-policy
預期輸出內容:
---
action: allow
description: allow-web
direction: INGRESS
disabled: false
enableLogging: false
kind: compute#firewallPolicyRule
match:
  layer4Configs:
  - ipProtocol: tcp
    ports:
    - '80'
  - ipProtocol: tcp
    ports:
    - '443'
  srcSecureTags:
  - name: tagValues/479619031616
    state: EFFECTIVE
  - name: tagValues/633150043992
    state: EFFECTIVE
priority: 500
ruleTupleCount: 7
targetSecureTags:
- name: tagValues/230424970229
  state: EFFECTIVE
透過下列 gcloud 指令找出 fwpolicy-vpc1-www 的 IP:
gcloud compute instances list --filter=vpc1-www
透過 SSH 連線至 fwpolicy-vpc2-client,然後嘗試使用 curl fwpolicy-vpc1 的 IP:
user@fwpolicy-vpc2-client$ curl [fwpolicy-vpc1-www_IP] --connect-timeout 2
您應該可以連線至 fwpolicy-vpc1-www 伺服器。請參閱下一節的清除步驟。
8. 清除步驟
在 Cloud Shell 中,移除執行個體、Cloud NAT 和 Cloud Router:
gcloud -q compute instances delete $prefix-vpc2-client --zone=$zone

gcloud -q compute instances delete $prefix-vpc1-client --zone=$zone

gcloud -q compute instances delete $prefix-vpc1-www --zone=$zone

gcloud -q compute routers nats delete $prefix-vpc1-cloudnat \
--router=$prefix-vpc1-cr --router-region=$region

gcloud -q compute routers delete $prefix-vpc1-cr --region=$region
移除全域網路防火牆政策和標記:
gcloud -q resource-manager tags values delete \
   $org_id/tags-vpc2/web-clients

gcloud -q resource-manager tags keys delete $org_id/tags-vpc2

gcloud -q resource-manager tags values delete \
   $org_id/tags-vpc1/web-servers

gcloud -q resource-manager tags values delete \
   $org_id/tags-vpc1/web-clients

gcloud -q resource-manager tags keys delete $org_id/tags-vpc1

gcloud -q compute network-firewall-policies associations delete \
     --firewall-policy $prefix-example \
     --name $prefix-vpc1-association \
     --global-firewall-policy

gcloud -q compute network-firewall-policies delete \
   $prefix-example --global

gcloud -q compute firewall-rules delete allow-ssh-ingress-from-iap-vpc1

gcloud -q compute firewall-rules delete allow-ssh-ingress-from-iap-vpc2
如果 tagAdmin 和 tagUsers 角色已變更,請按照下列步驟操作:
gcloud organizations remove-iam-policy-binding $org_id \
  --member user:[email] --role roles/resourcemanager.tagAdmin

gcloud organizations remove-iam-policy-binding $org_id \
  --member user:[email] --role roles/resourcemanager.tagUser
最後,請移除虛擬私有雲網路對等互連、子網路和虛擬私有雲網路:
gcloud -q compute networks peerings delete vpc1-to-vpc2 \
    --network $prefix-vpc1

gcloud -q compute networks peerings delete vpc2-to-vpc1 \
    --network $prefix-vpc2

gcloud -q compute networks subnets delete $prefix-vpc1-subnet \
    --region $region

gcloud -q compute networks subnets delete $prefix-vpc2-subnet \
    --region $region

gcloud -q compute networks delete $prefix-vpc1

gcloud -q compute networks delete $prefix-vpc2
9. 恭喜!
恭喜,您已成功設定及驗證含標記設定的全域網路防火牆政策。