
1. 簡介
如要將應用程式內購功能新增至 Flutter 應用程式,必須正確設定 App 和 Play 商店、驗證購買交易,並授予必要權限,例如訂閱福利。
在本程式碼研究室中,您將在應用程式 (我們已提供) 中新增三種應用程式內購項目,並使用 Firebase 的 Dart 後端驗證這些購買交易。我們提供的應用程式 Dash Clicker 內含遊戲,使用 Dash 吉祥物做為貨幣。您將新增下列購買選項:
- 一次購買 2,000 個 Dash 的可重複購買選項。
- 一次性購買升級,將舊版 Dash 升級為新版 Dash。
- 訂閱方案:自動產生的點擊次數加倍。
第一個購買選項可讓使用者直接獲得 2,000 個 Dash。使用者可直接購買這些商品,且可重複購買。這類商品會直接消耗,且可多次消耗,因此稱為「消耗性商品」。
第二個選項是將 Dash 升級為更美觀的 Dash。這項商品只需購買一次,即可永久使用。這類商品稱為「不可消耗」,因為應用程式無法消耗,但可永久有效。
第三種也是最後一種購買方式是訂閱。訂閱期間,使用者可更快取得 Dashes,但停止支付訂閱費用後,福利也會隨之消失。
後端服務 (也提供給您) 會以 Dart 應用程式的形式執行,驗證購買交易並使用 Firestore 儲存交易。我們使用 Firestore 簡化程序,但在實際工作環境的應用程式中,您可以使用任何類型的後端服務。


建構項目
- 您將擴充應用程式,支援消耗性商品和訂閱項目。
- 您也會擴充 Dart 後端應用程式,以驗證及儲存所購項目。
課程內容
- 如何透過可購買的產品設定 App Store 和 Play 商店。
- 如何與商店通訊,驗證購買交易並將交易儲存在 Firestore 中。
- 如何管理應用程式內購交易。
軟硬體需求
- Android Studio
- Xcode (適用於 iOS 開發作業)
- Flutter SDK
2. 設定開發環境
如要開始本程式碼研究室,請下載程式碼,並變更 iOS 的軟體包 ID 和 Android 的套件名稱。
下載程式碼
如要從指令列複製 GitHub 存放區,請使用下列指令:
git clone https://github.com/flutter/codelabs.git flutter-codelabs
或者,如果您已安裝 GitHub 的 CLI 工具,請使用下列指令:
gh repo clone flutter/codelabs flutter-codelabs
程式碼範例會複製到 flutter-codelabs 目錄,其中包含一系列程式碼研究室的程式碼。本程式碼研究室的程式碼位於 flutter-codelabs/in_app_purchases 中。
flutter-codelabs/in_app_purchases 下的目錄結構包含一系列快照,顯示您在每個具名步驟結束時應處於的狀態。範例程式碼位於步驟 0,請按照下列方式前往:
cd flutter-codelabs/in_app_purchases/step_00
如要跳過步驟或查看某個步驟完成後的樣子,請在以該步驟命名的目錄中尋找。最後一個步驟的程式碼位於 complete 資料夾中。
設定範例專案
在常用的 IDE 中,開啟 step_00/app 中的入門專案。我們使用 Android Studio 擷取螢幕截圖,但 Visual Studio Code 也是不錯的選擇。無論使用哪種編輯器,請務必安裝最新版 Dart 和 Flutter 外掛程式。
您即將製作的應用程式必須與 App Store 和 Play 商店通訊,才能瞭解可用的產品和價格。每個應用程式都有專屬 ID。在 iOS App Store 中稱為軟體包 ID,在 Android Play 商店中則稱為應用程式 ID。這些 ID 通常是使用反向網域名稱標記建立。舉例來說,如果您要為 flutter.dev 建立應用程式內購應用程式,就會使用 dev.flutter.inapppurchase。請為應用程式想出 ID,現在要將該 ID 設為專案設定。
首先,請設定 iOS 的軟體包 ID。如要這麼做,請在 Xcode 應用程式中開啟 Runner.xcworkspace 檔案。
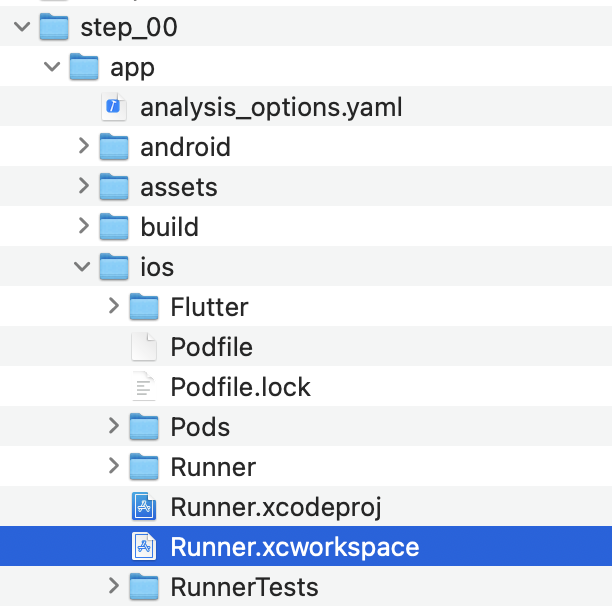
在 Xcode 的資料夾結構中,「Runner project」位於頂端,而「Flutter」、「Runner」和「Products」目標則位於 Runner 專案下方。按兩下「Runner」編輯專案設定,然後點選「Signing & Capabilities」。在「團隊」欄位下方輸入您剛才選擇的套件 ID,即可設定團隊。

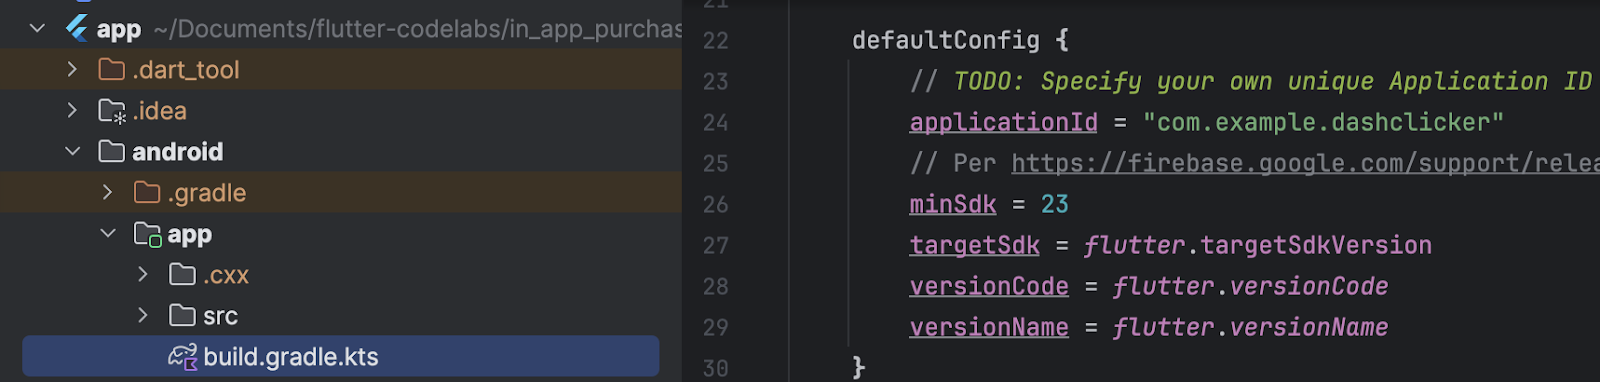
現在可以關閉 Xcode,返回 Android Studio 完成 Android 的設定。如要這麼做,請開啟 android/app, 下的 build.gradle.kts 檔案,然後將 applicationId (下圖第 24 行) 變更為應用程式 ID,與 iOS 軟體包 ID 相同。請注意,iOS 和 Android 商店的 ID 不一定要相同,但保持相同較不容易出錯,因此在本程式碼研究室中,我們也會使用相同的 ID。
3. 安裝外掛程式
在本程式碼研究室的這一部分,您將安裝 in_app_purchase 外掛程式。
在 pubspec 中新增依附元件
將 in_app_purchase 新增至專案的依附元件,即可將 in_app_purchase 新增至 pubspec:
$ cd app
$ flutter pub add in_app_purchase dev:in_app_purchase_platform_interface
Resolving dependencies...
Downloading packages...
  characters 1.4.0 (1.4.1 available)
  flutter_lints 5.0.0 (6.0.0 available)
+ in_app_purchase 3.2.3
+ in_app_purchase_android 0.4.0+3
+ in_app_purchase_platform_interface 1.4.0
+ in_app_purchase_storekit 0.4.4
+ json_annotation 4.9.0
  lints 5.1.1 (6.0.0 available)
  material_color_utilities 0.11.1 (0.13.0 available)
  meta 1.16.0 (1.17.0 available)
  provider 6.1.5 (6.1.5+1 available)
  test_api 0.7.6 (0.7.7 available)
Changed 5 dependencies!
7 packages have newer versions incompatible with dependency constraints.
Try `flutter pub outdated` for more information.
開啟 pubspec.yaml,並確認 in_app_purchase 現在列為 dependencies 下的項目,而 in_app_purchase_platform_interface 則列在 dev_dependencies 下。
pubspec.yaml
dependencies:
  flutter:
    sdk: flutter
  cloud_firestore: ^6.0.0
  cupertino_icons: ^1.0.8
  firebase_auth: ^6.0.1
  firebase_core: ^4.0.0
  google_sign_in: ^7.1.1
  http: ^1.5.0
  intl: ^0.20.2
  provider: ^6.1.5
  logging: ^1.3.0
  in_app_purchase: ^3.2.3

dev_dependencies:
  flutter_test:
    sdk: flutter
  flutter_lints: ^5.0.0
  in_app_purchase_platform_interface: ^1.4.0
4. 設定 App Store
如要在 iOS 裝置上設定及測試應用程式內購功能,請先在 App Store 中建立新應用程式,並在其中建立可供購買的產品。您不必發布任何內容,也不必將應用程式送交 Apple 審查。您必須擁有開發人員帳戶才能執行這項操作。如果沒有,請加入 Apple 開發人員計畫。
付費應用程式協議
如要使用應用程式內購功能,您也必須在 App Store Connect 中簽署付費應用程式的有效協議。前往 https://appstoreconnect.apple.com/,然後按一下「合約、稅務和銀行業務」。

您可以在這裡查看免費和付費應用程式的協議。免費應用程式的狀態應為有效,付費應用程式的狀態則為新。請務必查看並接受條款,然後輸入所有必要資訊。

如果一切設定正確,付費應用程式的狀態就會顯示為「有效」。這非常重要,因為沒有有效協議就無法測試應用程式內購。

註冊應用程式 ID
在 Apple 開發人員入口網站中建立新的 ID。前往 developer.apple.com/account/resources/identifiers/list,然後按一下「Identifiers」標題旁邊的「加號」圖示。

選擇應用程式 ID

選擇應用程式

提供一些說明,並將軟體包 ID 設為與先前在 Xcode 中設定的值相同。

如需建立新應用程式 ID 的更多指引,請參閱開發人員帳戶說明。
建立新應用程式
在 App Store Connect 中,使用專屬軟體包 ID 建立新應用程式。


如需建立新應用程式及管理合約的更多指引,請參閱 App Store Connect 說明。
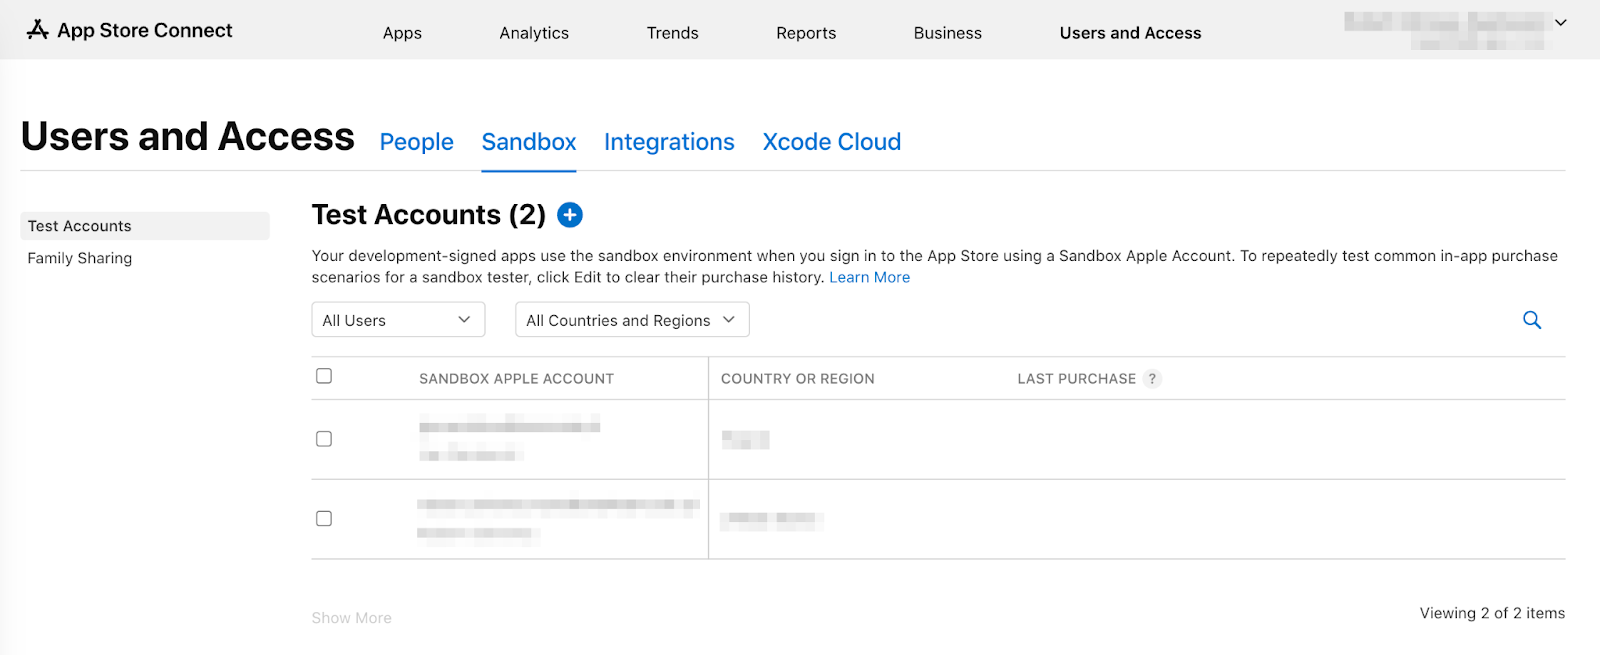
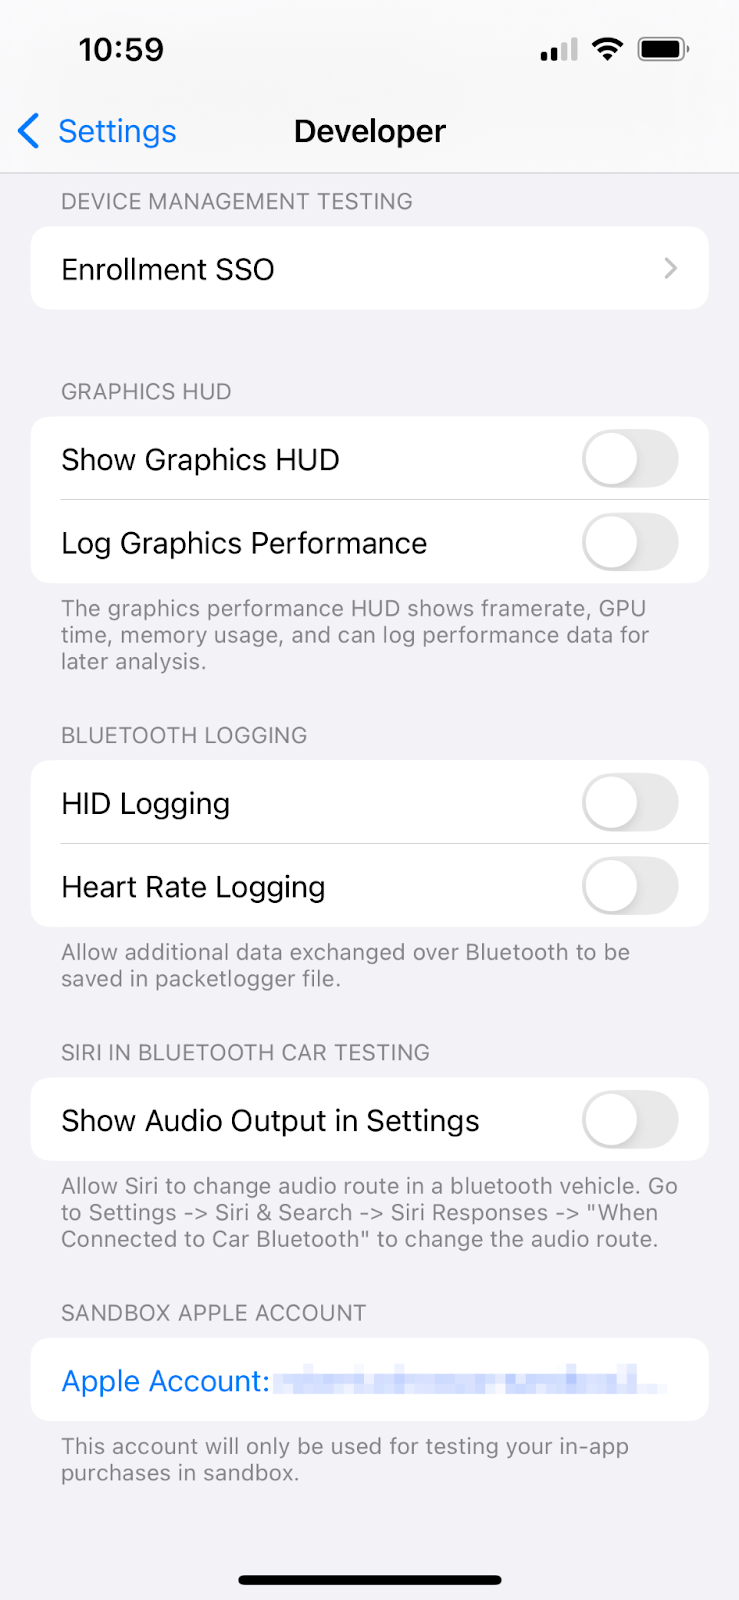
如要測試應用程式內購功能,您需要沙箱測試使用者。這個測試使用者不應連結至 iTunes,僅用於測試應用程式內購。你無法使用已用於 Apple 帳戶的電子郵件地址。在「使用者和存取權」中,前往「沙盒」建立新的沙盒帳戶,或管理現有的沙盒 Apple ID。
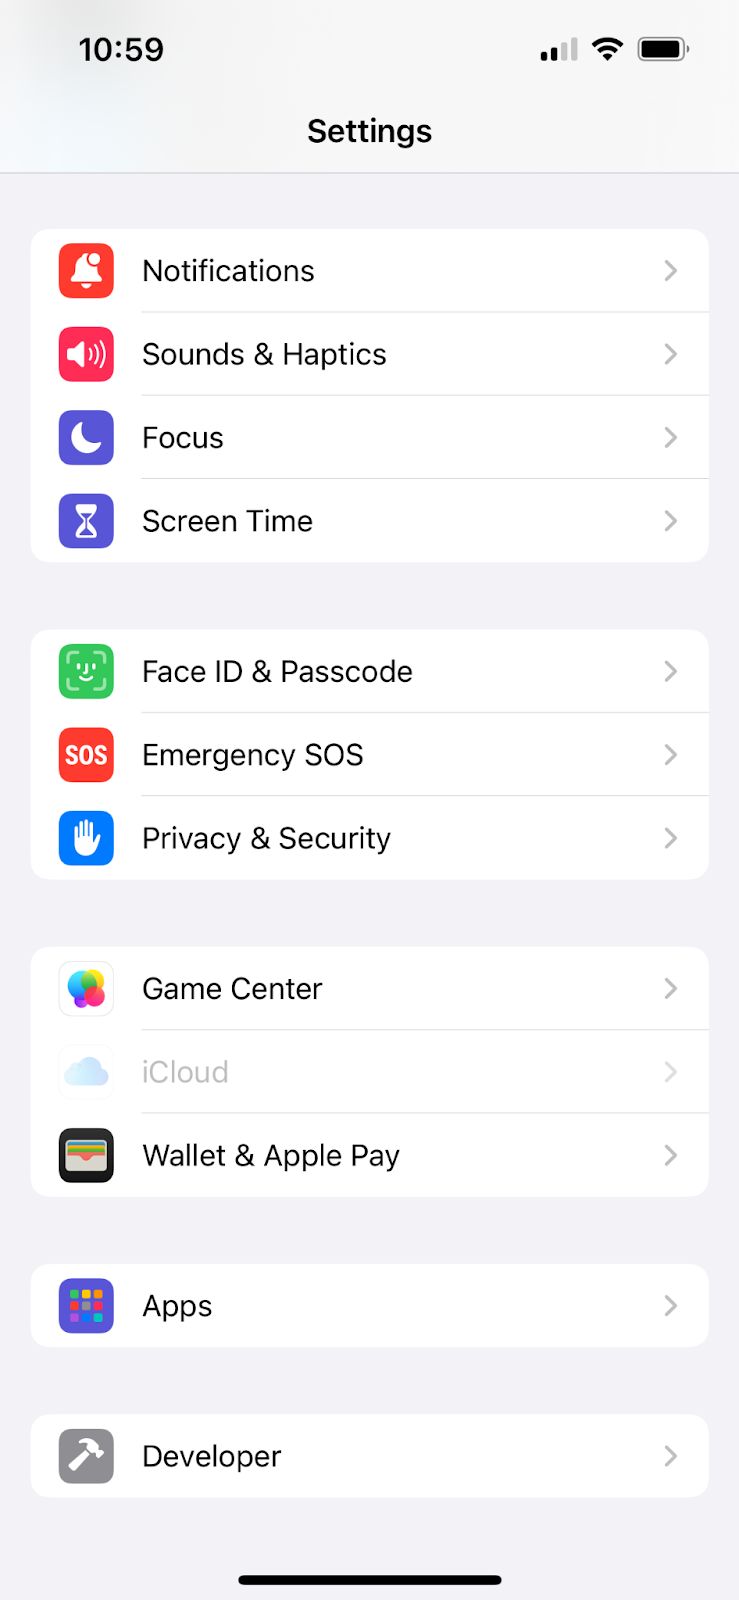
現在只要前往「設定」>「開發人員」>「Sandbox Apple 帳戶」,即可在 iPhone 上設定沙箱使用者。
設定應用程式內購商品
現在,請設定三項可購買商品:
dash_consumable_2k:可多次購買的消耗性商品,每次購買可讓使用者獲得 2, 000 個 Dash (應用程式內貨幣)。dash_upgrade_3d:只能購買一次的「升級」非消耗性商品,可讓使用者點選外觀不同的 Dash。dash_subscription_doubler:訂閱後,使用者在訂閱期間內每次點擊可獲得的 Dash 數量會加倍。
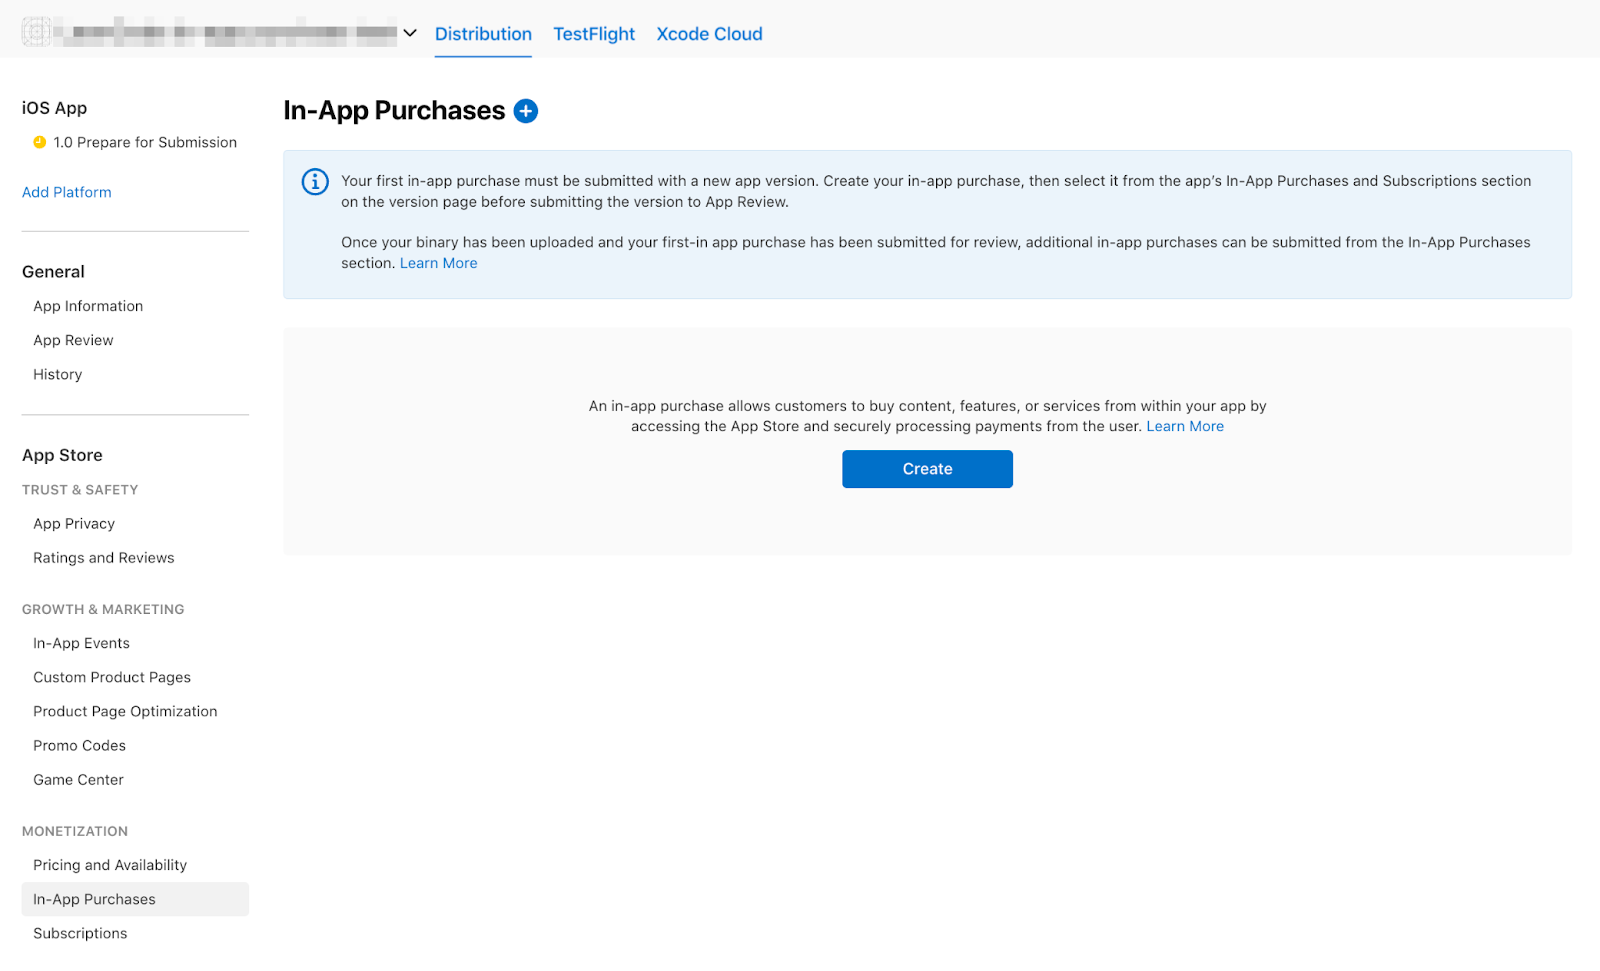
前往「應用程式內購」。
使用指定的 ID 建立應用程式內商品:
- 將
dash_consumable_2k設為「消耗品」。請使用dash_consumable_2k做為產品 ID。參考名稱只會用於 App Store Connect,請設為dash consumable 2k。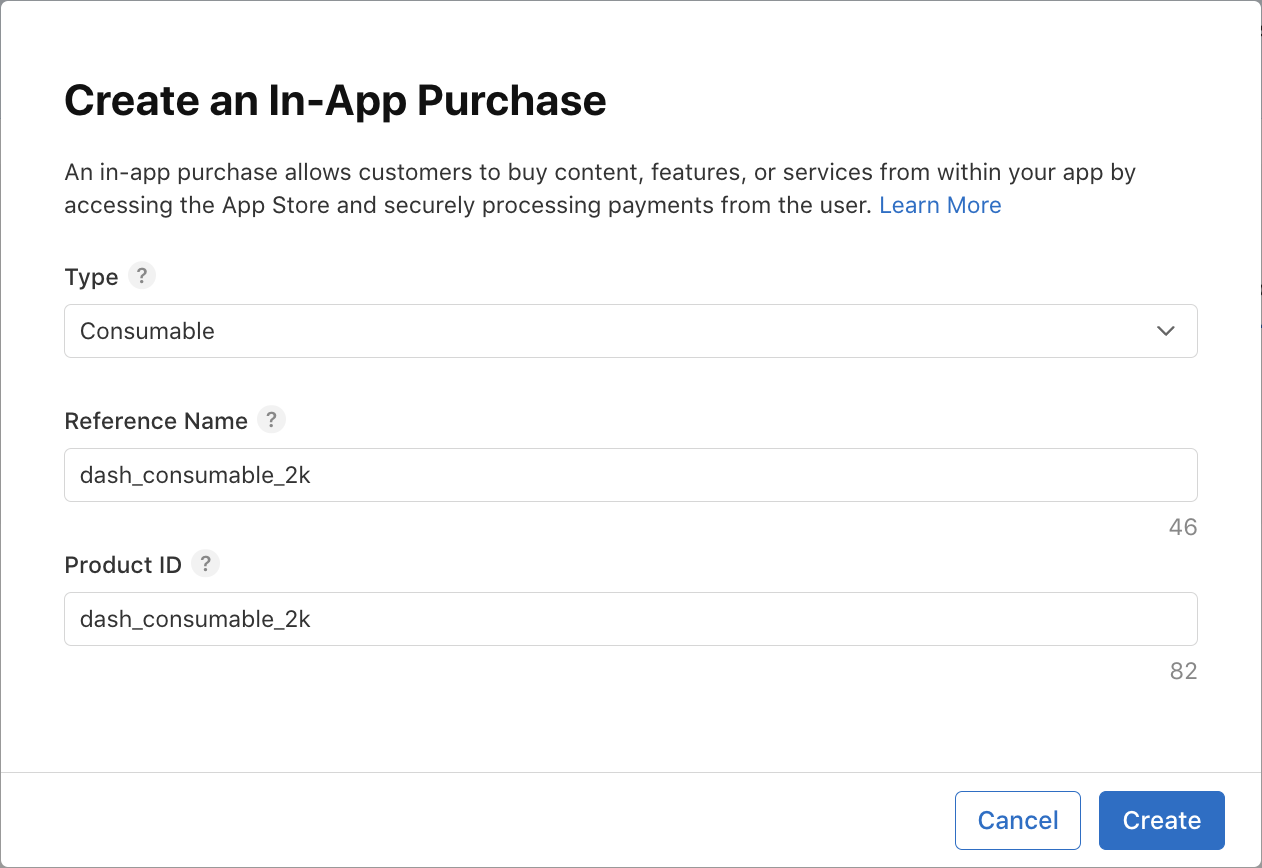 設定空檔。產品必須在沙箱使用者所在的國家/地區上架。
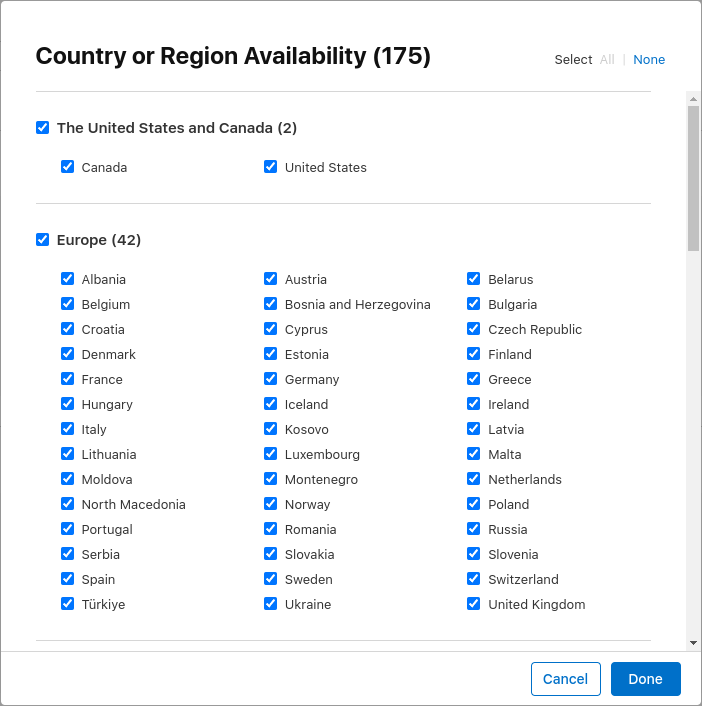 新增價格,並將價格設為
 $1.99或其他幣別的等值金額。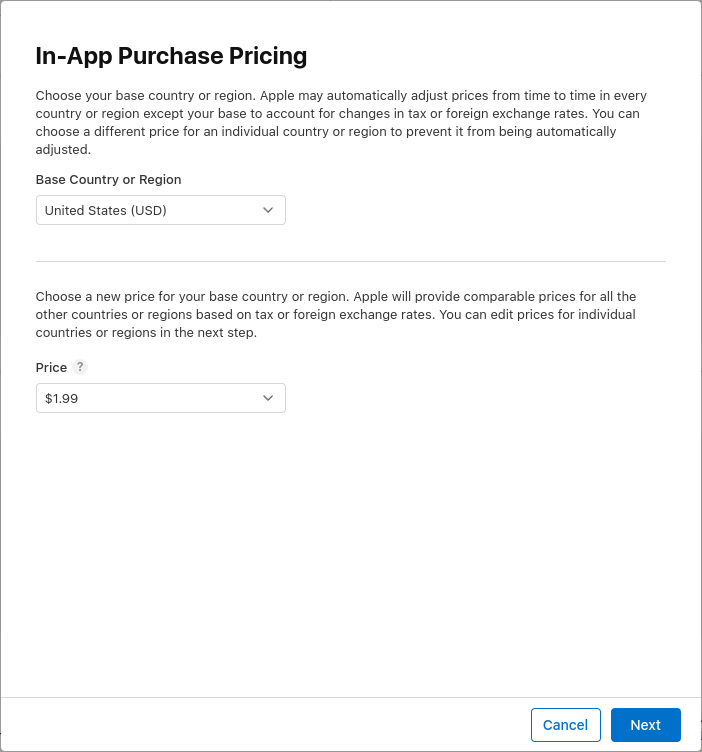 新增購買交易的本地化資訊。以
 2000 dashes fly out做為說明呼叫購買Spring is in the air。 新增評論螢幕截圖。除非產品送交審查,否則內容並不重要,但產品必須處於「準備提交」狀態,應用程式才能從 App Store 擷取產品。
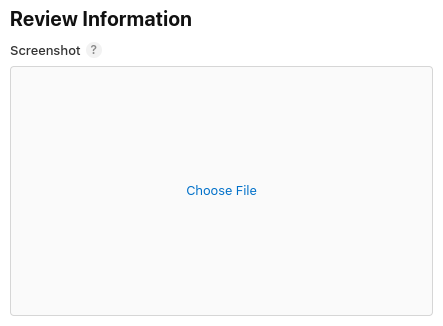
- 將
dash_upgrade_3d設為不可消耗。請使用dash_upgrade_3d做為產品 ID。將參照名稱設為dash upgrade 3d。以Brings your dash back to the future做為說明呼叫購買3D Dash。將價格設為$0.99。設定供應情形並上傳評論螢幕截圖,方式與dash_consumable_2k產品相同。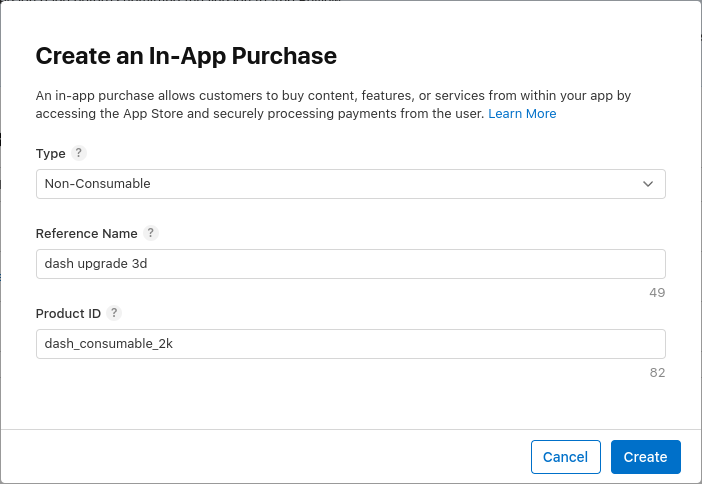
- 將「
dash_subscription_doubler」設為自動續訂型訂閱方案。訂閱的流程略有不同。首先,您必須建立訂閱群組。如果多個訂閱項目屬於同一個群組,使用者一次只能訂閱其中一個項目,但可以升級或降級。只要撥打電話給這個群組subscriptions,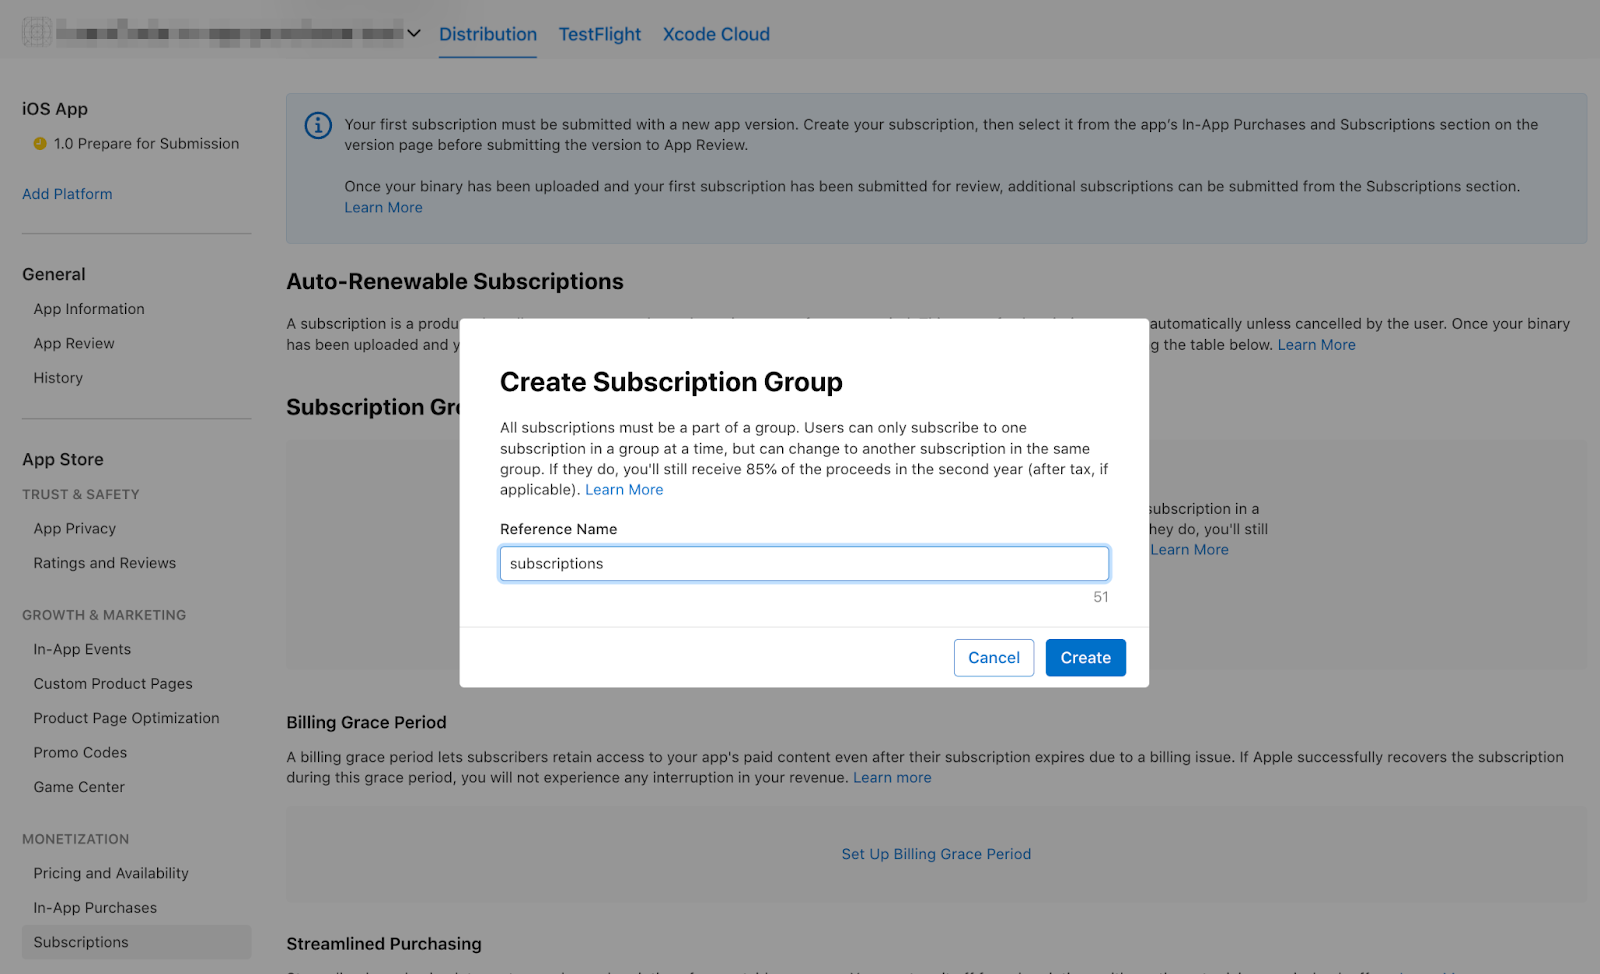 並為訂閱項目群組新增本地化內容。
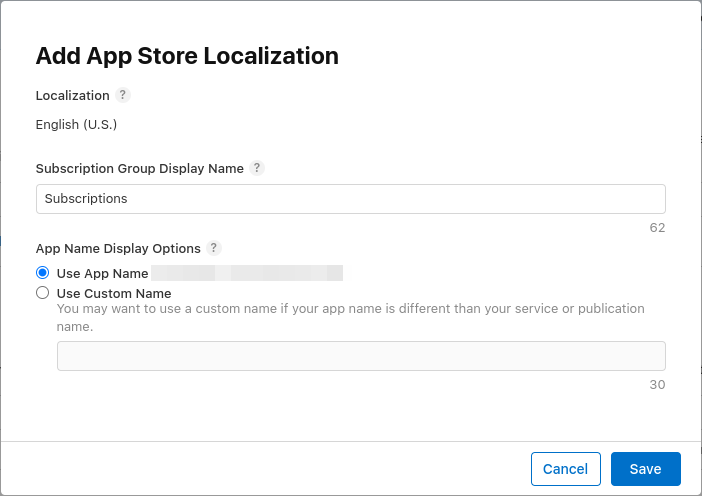 接下來,您將建立訂閱項目。將「參考名稱」設為
 dash subscription doubler,並將「產品 ID」設為dash_subscription_doubler。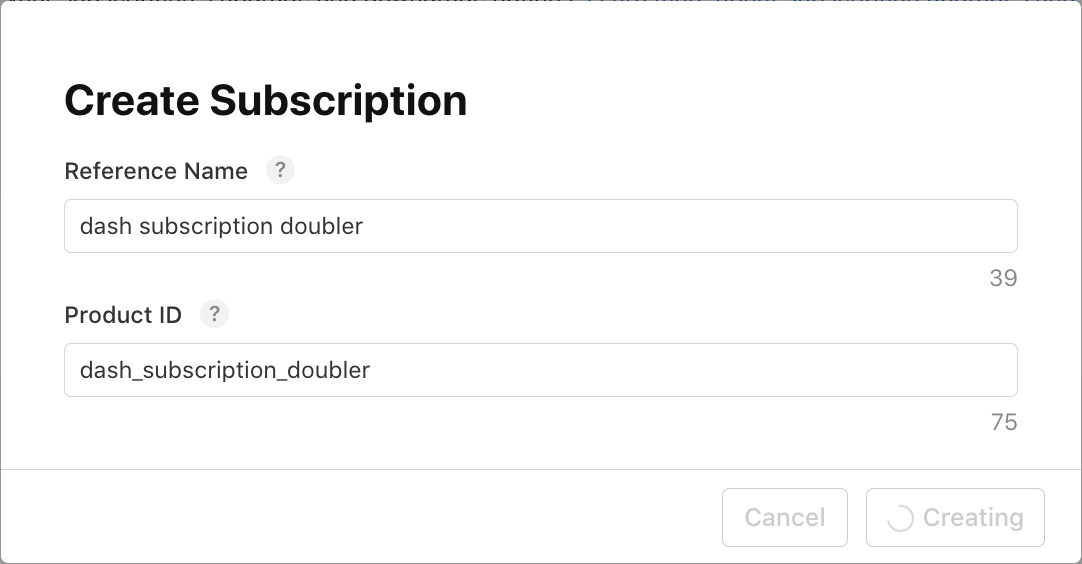 接著,選取 1 週的訂閱時間長度和本地化內容。將這個訂閱項目命名為
 Jet Engine,並加上Doubles your clicks說明。將價格設為$0.49。設定供應情形並上傳評論螢幕截圖,方式與dash_consumable_2k產品相同。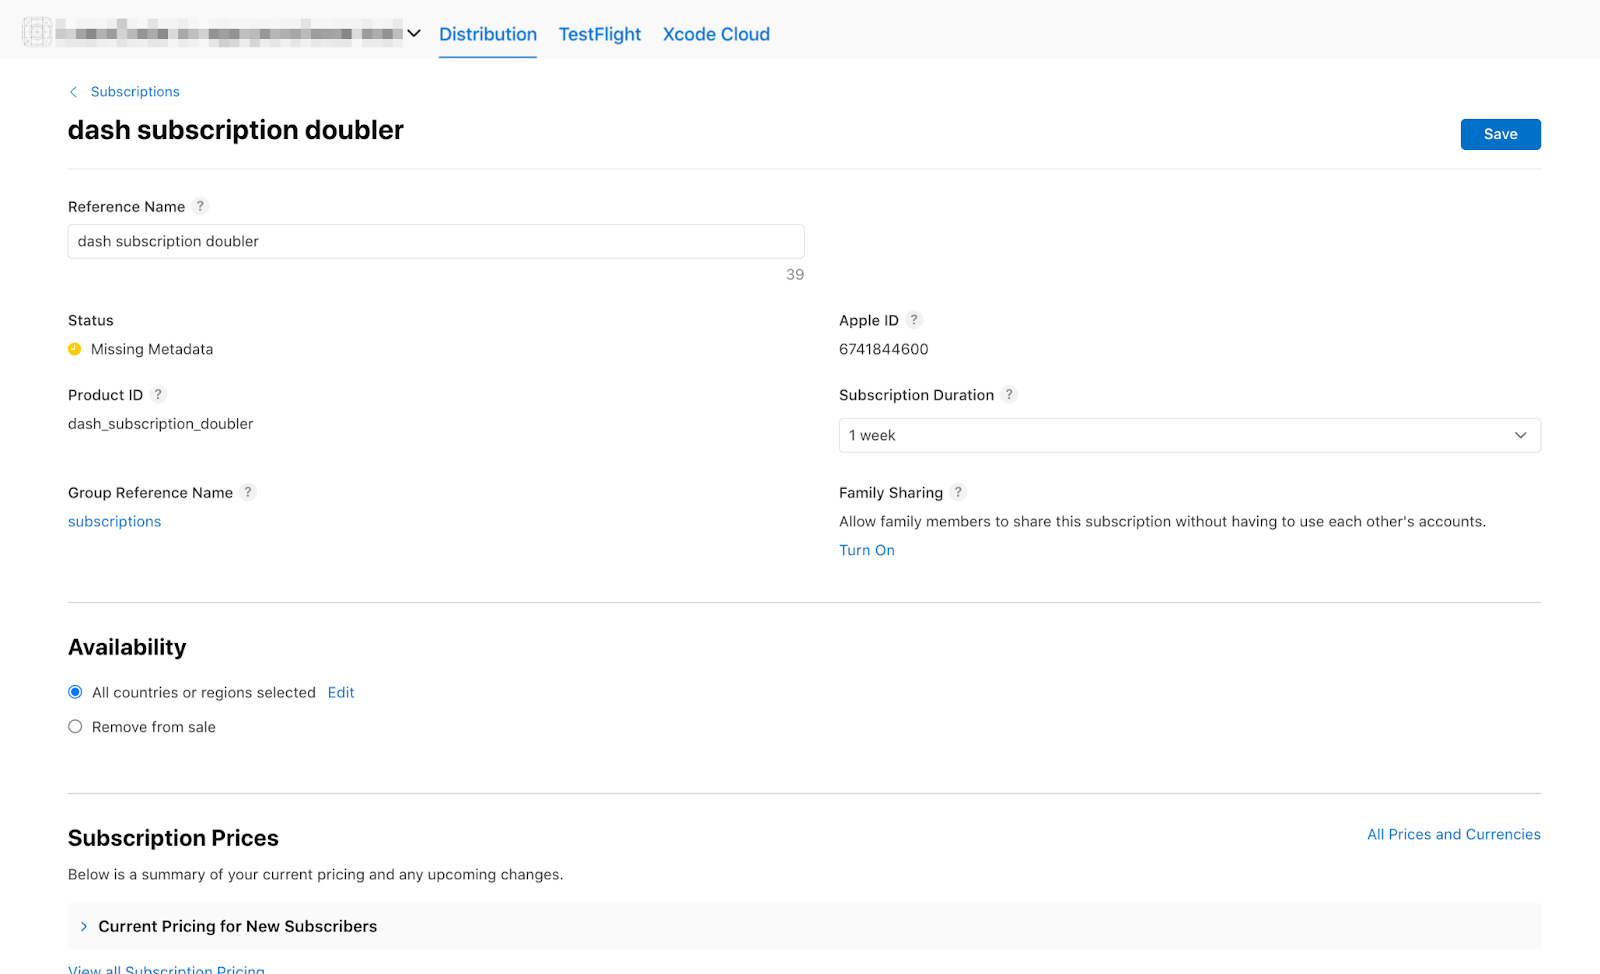
現在清單中應該會顯示產品:


5. 設定 Play 商店
與 App Store 相同,您也需要 Play 商店的開發人員帳戶。如果還沒有帳戶,請註冊帳戶。
建立新的應用程式
在 Google Play 管理中心建立新應用程式:
- 開啟 Play 管理中心。
- 依序選取「所有應用程式」>「建立應用程式」。
- 為應用程式選擇預設的語言並設定標題。請輸入應用程式在 Google Play 顯示的名稱。這個名稱日後可以變更。
- 指定應用程式為遊戲。日後可再變更這項設定。
- 指定您的應用程式是否收費。
- 填妥「內容指南」和「美國出口法律」聲明表單。
- 選取「建立應用程式」。
建立應用程式後,請前往資訊主頁,完成「設定應用程式」部分的所有工作。您可以在這裡提供應用程式的相關資訊,例如內容分級和螢幕截圖。
簽署申請
如要測試應用程式內購功能,您至少要將一個版本上傳至 Google Play。
為此,您需要使用偵錯金鑰以外的項目簽署發布版本建構作業。
建立金鑰儲存庫
如果已有金鑰存放區,請跳到下一個步驟。如果沒有,請在指令列執行下列指令來建立。
在 Mac/Linux 中,請使用下列指令:
keytool -genkey -v -keystore ~/key.jks -keyalg RSA -keysize 2048 -validity 10000 -alias key
在 Windows 中,請使用下列指令:
keytool -genkey -v -keystore c:\Users\USER_NAME\key.jks -storetype JKS -keyalg RSA -keysize 2048 -validity 10000 -alias key
這項指令會將 key.jks 檔案儲存在主目錄中。如要將檔案儲存在其他位置,請變更傳遞至 -keystore 參數的引數。保留
keystore
file private; don't check it into public source control!
從應用程式參照金鑰儲存區
建立名為 <your app dir>/android/key.properties 的檔案,其中包含金鑰存放區的參照:
storePassword=<password from previous step>
keyPassword=<password from previous step>
keyAlias=key
storeFile=<location of the key store file, such as /Users/<user name>/key.jks>
在 Gradle 中設定簽署
編輯 <your app dir>/android/app/build.gradle.kts 檔案,為應用程式設定簽署。
在 android 區塊之前,從屬性檔案新增金鑰存放區資訊:
import java.util.Properties
import java.io.FileInputStream

plugins {
    // omitted
}

val keystoreProperties = Properties()
val keystorePropertiesFile = rootProject.file("key.properties")
if (keystorePropertiesFile.exists()) {
    keystoreProperties.load(FileInputStream(keystorePropertiesFile))
}

android {
    // omitted
}
將 key.properties 檔案載入 keystoreProperties 物件。
將 buildTypes 區塊更新為:
   buildTypes {
        release {
            signingConfig = signingConfigs.getByName("release")
        }
    }
在模組的 build.gradle.kts 檔案中,使用簽署設定資訊設定 signingConfigs 區塊:
   signingConfigs {
        create("release") {
            keyAlias = keystoreProperties["keyAlias"] as String
            keyPassword = keystoreProperties["keyPassword"] as String
            storeFile = keystoreProperties["storeFile"]?.let { file(it) }
            storePassword = keystoreProperties["storePassword"] as String
        }
    }

    buildTypes {
        release {
            signingConfig = signingConfigs.getByName("release")
        }
    }
應用程式的發布版本現在會自動簽署。
如要進一步瞭解如何簽署應用程式,請參閱 developer.android.com 上的「簽署應用程式」。
上傳第一個建構版本
為應用程式設定簽署後,您應該可以執行下列指令來建構應用程式:
flutter build appbundle
這個指令預設會產生發布版本,輸出內容位於 <your app dir>/build/app/outputs/bundle/release/
在 Google Play 管理中心的資訊主頁中,依序前往「測試與發布」>「測試」>「封閉測試」,然後建立新的封閉測試版本。
接著,上傳建構指令產生的 app-release.aab 應用程式套件。
依序點選「儲存」和「檢查版本」。
最後,按一下「開始推出封閉測試」,啟用封閉測試版本。
設定測試使用者
如要測試應用程式內購功能,您必須在 Google Play 管理中心的兩個位置新增測試人員的 Google 帳戶:
- 特定測試群組 (內部測試)
- 授權測試人員
首先,請將測試人員新增至內部測試群組。返回「測試及發布」>「測試」>「內部測試」,然後點選「測試人員」分頁。

按一下「建立電子郵件名單」,建立新的電子郵件名單。為清單命名,並新增需要存取權才能測試應用程式內購功能的 Google 帳戶電子郵件地址。
接著,勾選清單的核取方塊,然後按一下「儲存變更」。
接著,新增授權測試人員:
- 返回 Google Play 管理中心的「所有應用程式」檢視畫面。
- 依序前往「設定」>「授權測試」。
- 新增需要測試應用程式內購項目的測試人員電子郵件地址。
- 將「授權回應」設為
RESPOND_NORMALLY。 - 按一下 [儲存變更]。

設定應用程式內購商品
現在要設定可在應用程式內購買的商品。
與 App Store 相同,您必須定義三種不同的購買項目:
dash_consumable_2k:可多次購買的消耗性商品,每次購買可讓使用者獲得 2, 000 個 Dash (應用程式內貨幣)。dash_upgrade_3d:只能購買一次的「升級」非消耗性商品,可讓使用者點選外觀不同的 Dash。dash_subscription_doubler:訂閱後,使用者在訂閱期間內每次點擊可獲得的 Dash 數量會加倍。
首先,請新增消耗性和非消耗性商品。
- 前往 Google Play 管理中心,然後選取應用程式。
- 依序點選「營利」>「產品」>「應用程式內商品」。
- 按一下「建立產品」

- 輸入產品的所有必要資訊。請確認產品 ID 與你打算使用的 ID 完全一致。
- 按一下 [儲存]。
- 按一下「啟用」。
- 針對非消耗性「升級」購買交易重複執行上述程序。
接著新增訂閱項目:
- 前往 Google Play 管理中心,然後選取應用程式。
- 依序前往「營利」>「產品」>「訂閱」。
- 按一下「建立訂閱項目」

- 輸入訂閱方案的所有必要資訊。請確認產品 ID 與您要使用的 ID 完全一致。
- 按一下「儲存」。
Play 管理中心現在應該已設定好購買交易。
6. 設定 Firebase
在本程式碼研究室中,您將使用後端服務驗證及追蹤使用者的購買交易。
使用後端服務有幾項優點:
- 安全地驗證交易。
- 您可以對應用程式商店的帳單事件做出反應。
- 您可以在資料庫中追蹤購買交易。
- 使用者無法透過倒轉系統時鐘,欺騙應用程式提供付費功能。
雖然有很多方法可以設定後端服務,但您將使用 Google 自己的 Firebase,透過 Cloud Functions 和 Firestore 進行設定。
本程式碼研究室不包含後端撰寫作業,因此範例程式碼已包含可處理基本購買交易的 Firebase 專案,方便您開始使用。
入門應用程式也包含 Firebase 外掛程式。
您只需要建立自己的 Firebase 專案、設定應用程式和 Firebase 後端,最後部署後端即可。
建立 Firebase 專案
前往 Firebase 控制台,然後建立新的 Firebase 專案。在本例中,請將專案命名為「Dash Clicker」。
在後端應用程式中,您會將購買交易與特定使用者建立關聯,因此需要驗證。如要這麼做,請搭配使用 Firebase 的驗證模組和 Google 登入功能。
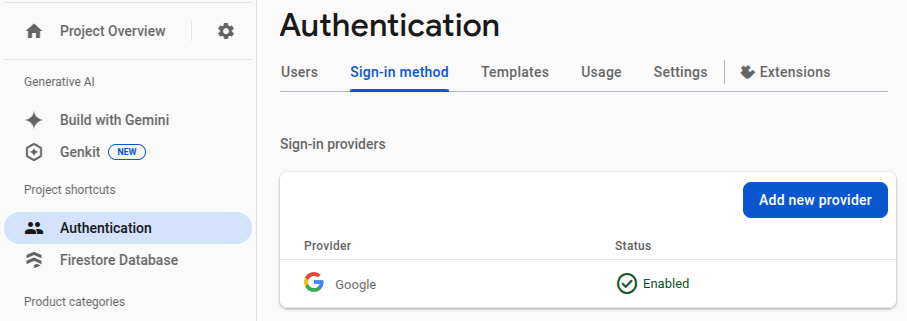
- 前往 Firebase 資訊主頁的「驗證」,然後視需要啟用。
- 前往「登入方式」分頁,然後啟用「Google」登入服務供應商。
您也會使用 Firebase 的 Firestore 資料庫,因此請一併啟用這項服務。
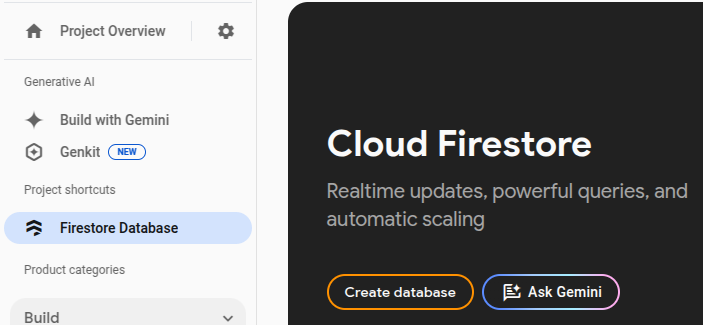
設定 Cloud Firestore 規則,如下所示:
rules_version = '2';
service cloud.firestore {
  match /databases/{database}/documents {
    match /purchases/{purchaseId} {
      allow read: if request.auth != null && request.auth.uid == resource.data.userId
    }
  }
}
為 Flutter 設定 Firebase
建議使用 FlutterFire CLI 在 Flutter 應用程式中安裝 Firebase。按照設定頁面的說明操作。
執行 flutterfire configure 時,請選取您在上一個步驟中建立的專案。
$ flutterfire configure

i Found 5 Firebase projects.
? Select a Firebase project to configure your Flutter application with ›
❯ in-app-purchases-1234 (in-app-purchases-1234)
  other-flutter-codelab-1 (other-flutter-codelab-1)
  other-flutter-codelab-2 (other-flutter-codelab-2)
  other-flutter-codelab-3 (other-flutter-codelab-3)
  other-flutter-codelab-4 (other-flutter-codelab-4)
  <create a new project>
接著選取「iOS」和「Android」這兩個平台,啟用這兩個平台。
? Which platforms should your configuration support (use arrow keys & space to select)? ›
✔ android
✔ ios
  macos
  web
系統提示是否要覆寫 firebase_options.dart 時,請選取「是」。
? Generated FirebaseOptions file lib/firebase_options.dart already exists, do you want to override it? (y/n) › yes
為 Android 設定 Firebase:後續步驟
在 Firebase 資訊主頁中,前往「專案總覽」,選擇「設定」,然後選取「一般」分頁。
向下捲動至「你的應用程式」,然後選取「dashclicker (android)」應用程式。

如要在偵錯模式中啟用 Google 登入,您必須提供偵錯憑證的 SHA-1 雜湊指紋。
取得偵錯簽署憑證雜湊
在 Flutter 應用程式專案的根目錄中,將目錄變更為 android/ 資料夾,然後產生簽署報告。
cd android
./gradlew :app:signingReport
系統會顯示大量簽署金鑰。由於您要尋找偵錯憑證的雜湊值,請找出 Variant 和 Config 屬性設為 debug 的憑證。金鑰存放區可能位於 .android/debug.keystore 底下的主資料夾中。
> Task :app:signingReport
Variant: debug
Config: debug
Store: /<USER_HOME_FOLDER>/.android/debug.keystore
Alias: AndroidDebugKey
MD5: XX:XX:XX:XX:XX:XX:XX:XX:XX:XX:XX:XX:XX:XX:XX:XX
SHA1: XX:XX:XX:XX:XX:XX:XX:XX:XX:XX:XX:XX:XX:XX:XX:XX:XX:XX:XX:XX
SHA-256: XX:XX:XX:XX:XX:XX:XX:XX:XX:XX:XX:XX:XX:XX:XX:XX:XX:XX:XX:XX:XX:XX:XX:XX:XX:XX:XX:XX:XX:XX:XX:XX
Valid until: Tuesday, January 19, 2038
複製 SHA-1 雜湊,並填寫應用程式提交模式對話方塊中的最後一個欄位。
最後,再次執行 flutterfire configure 指令,更新應用程式以納入簽署設定。
$ flutterfire configure
? You have an existing `firebase.json` file and possibly already configured your project for Firebase. Would you prefer to reuse the valus in your existing `firebase.json` file to configure your project? (y/n) › yes
✔ You have an existing `firebase.json` file and possibly already configured your project for Firebase. Would you prefer to reuse the values in your existing `firebase.json` file to configure your project? · yes
為 iOS 設定 Firebase:後續步驟
使用 Xcode 開啟 ios/Runner.xcworkspace。或使用您選擇的 IDE。
在 VSCode 中,對 ios/ 資料夾按一下滑鼠右鍵,然後按 open in xcode。
在 Android Studio 中,於 ios/ 資料夾上按一下滑鼠右鍵,然後依序點選 flutter 和 open iOS module in Xcode 選項。
如要在 iOS 上啟用 Google 登入功能,請在建構 plist 檔案中新增 CFBundleURLTypes 設定選項。(詳情請參閱 google_sign_in 套件說明文件)。在本例中,檔案為 ios/Runner/Info.plist。
鍵/值組合已新增,但必須替換值:
- 從
GoogleService-Info.plist檔案取得REVERSED_CLIENT_ID的值,但不要包含周圍的<string>..</string>元素。 - 在
CFBundleURLTypes鍵下,取代ios/Runner/Info.plist檔案中的值。
<key>CFBundleURLTypes</key>
<array>
    <dict>
        <key>CFBundleTypeRole</key>
        <string>Editor</string>
        <key>CFBundleURLSchemes</key>
        <array>
            <!-- TODO Replace this value: -->
            <!-- Copied from GoogleService-Info.plist key REVERSED_CLIENT_ID -->
            <string>com.googleusercontent.apps.REDACTED</string>
        </array>
    </dict>
</array>
Firebase 設定完成。
7. 收聽購買交易的最新消息
在本程式碼研究室的這一部分,您將準備好應用程式,以便購買產品。這個程序包括在應用程式啟動後,監聽購買更新和錯誤。
聆聽購物更新
在 main.dart, 中,找出具有 Scaffold 且包含兩個頁面的 BottomNavigationBar 的 MyHomePage 小工具。這個頁面也會為 DashCounter、DashUpgrades, 和 DashPurchases 建立三個 Provider。DashCounter 會追蹤目前的 Dash 數量,並自動遞增。DashUpgrades 會管理可使用 Dash 購買的升級項目。本程式碼研究室著重於 DashPurchases。
根據預設,系統會在首次要求供應商物件時定義該物件。應用程式啟動時,這個物件會直接監聽購買交易更新,因此請使用 lazy: false 在這個物件上停用延遲載入:
lib/main.dart
ChangeNotifierProvider<DashPurchases>(
  create: (context) => DashPurchases(
    context.read<DashCounter>(),
  ),
  lazy: false,                                             // Add this line
),
您也需要 InAppPurchaseConnection 的執行個體。不過,為了確保應用程式可測試,您需要某種方式來模擬連線。如要這麼做,請建立可在測試中覆寫的例項方法,並將其新增至 main.dart。
lib/main.dart
// Gives the option to override in tests.
class IAPConnection {
  static InAppPurchase? _instance;
  static set instance(InAppPurchase value) {
    _instance = value;
  }

  static InAppPurchase get instance {
    _instance ??= InAppPurchase.instance;
    return _instance!;
  }
}
按照以下指示更新測試:
test/widget_test.dart
import 'package:dashclicker/main.dart';
import 'package:flutter_test/flutter_test.dart';
import 'package:in_app_purchase/in_app_purchase.dart';     // Add this import
import 'package:in_app_purchase_platform_interface/src/in_app_purchase_platform_addition.dart'; // And this import

void main() {
  testWidgets('App starts', (tester) async {
    IAPConnection.instance = TestIAPConnection();          // Add this line
    await tester.pumpWidget(const MyApp());
    expect(find.text('Tim Sneath'), findsOneWidget);
  });
}

class TestIAPConnection implements InAppPurchase {         // Add from here
  @override
  Future<bool> buyConsumable({
    required PurchaseParam purchaseParam,
    bool autoConsume = true,
  }) {
    return Future.value(false);
  }

  @override
  Future<bool> buyNonConsumable({required PurchaseParam purchaseParam}) {
    return Future.value(false);
  }

  @override
  Future<void> completePurchase(PurchaseDetails purchase) {
    return Future.value();
  }

  @override
  Future<bool> isAvailable() {
    return Future.value(false);
  }

  @override
  Future<ProductDetailsResponse> queryProductDetails(Set<String> identifiers) {
    return Future.value(
      ProductDetailsResponse(productDetails: [], notFoundIDs: []),
    );
  }

  @override
  T getPlatformAddition<T extends InAppPurchasePlatformAddition?>() {
    // TODO: implement getPlatformAddition
    throw UnimplementedError();
  }

  @override
  Stream<List<PurchaseDetails>> get purchaseStream =>
      Stream.value(<PurchaseDetails>[]);

  @override
  Future<void> restorePurchases({String? applicationUserName}) {
    // TODO: implement restorePurchases
    throw UnimplementedError();
  }

  @override
  Future<String> countryCode() {
    // TODO: implement countryCode
    throw UnimplementedError();
  }
}                                                          // To here.
在 lib/logic/dash_purchases.dart 中,前往 DashPurchasesChangeNotifier 的程式碼。目前你只能在購買的 Dash 中新增 DashCounter。
新增串流訂閱屬性 _subscription (類型為 StreamSubscription<List<PurchaseDetails>> _subscription;)、IAPConnection.instance, 和匯入項目。完成的程式碼應如下所示:
lib/logic/dash_purchases.dart
import 'dart:async';

import 'package:flutter/foundation.dart';
import 'package:flutter/material.dart';
import 'package:in_app_purchase/in_app_purchase.dart';           // Add this import

import '../main.dart';                                           // And this import
import '../model/purchasable_product.dart';
import '../model/store_state.dart';
import 'dash_counter.dart';

class DashPurchases extends ChangeNotifier {
  DashCounter counter;
  StoreState storeState = StoreState.available;
  late StreamSubscription<List<PurchaseDetails>> _subscription;  // Add this line
  List<PurchasableProduct> products = [
    PurchasableProduct(
      'Spring is in the air',
      'Many dashes flying out from their nests',
      '\$0.99',
    ),
    PurchasableProduct(
      'Jet engine',
      'Doubles you clicks per second for a day',
      '\$1.99',
    ),
  ];

  bool get beautifiedDash => false;

  final iapConnection = IAPConnection.instance;                  // And this line

  DashPurchases(this.counter);

  Future<void> buy(PurchasableProduct product) async {
    product.status = ProductStatus.pending;
    notifyListeners();
    await Future<void>.delayed(const Duration(seconds: 5));
    product.status = ProductStatus.purchased;
    notifyListeners();
    await Future<void>.delayed(const Duration(seconds: 5));
    product.status = ProductStatus.purchasable;
    notifyListeners();
  }
}
late 關鍵字會新增至 _subscription,因為 _subscription 是在建構函式中初始化。這個專案預設設為不可為空 (NNBD),也就是說,未宣告為可為空的屬性必須有非空值。late 限定符可讓您延後定義這個值。
在建構函式中,取得 purchaseUpdated 串流並開始監聽串流。在 dispose() 方法中,取消串流訂閱。
lib/logic/dash_purchases.dart
import 'dart:async';

import 'package:flutter/foundation.dart';
import 'package:flutter/material.dart';
import 'package:in_app_purchase/in_app_purchase.dart';

import '../main.dart';
import '../model/purchasable_product.dart';
import '../model/store_state.dart';
import 'dash_counter.dart';

class DashPurchases extends ChangeNotifier {
  DashCounter counter;
  StoreState storeState = StoreState.notAvailable;         // Modify this line
  late StreamSubscription<List<PurchaseDetails>> _subscription;
  List<PurchasableProduct> products = [
    PurchasableProduct(
      'Spring is in the air',
      'Many dashes flying out from their nests',
      '\$0.99',
    ),
    PurchasableProduct(
      'Jet engine',
      'Doubles you clicks per second for a day',
      '\$1.99',
    ),
  ];

  bool get beautifiedDash => false;

  final iapConnection = IAPConnection.instance;

  DashPurchases(this.counter) {                            // Add from here
    final purchaseUpdated = iapConnection.purchaseStream;
    _subscription = purchaseUpdated.listen(
      _onPurchaseUpdate,
      onDone: _updateStreamOnDone,
      onError: _updateStreamOnError,
    );
  }

  @override
  void dispose() {
    _subscription.cancel();
    super.dispose();
  }                                                        // To here.

  Future<void> buy(PurchasableProduct product) async {
    product.status = ProductStatus.pending;
    notifyListeners();
    await Future<void>.delayed(const Duration(seconds: 5));
    product.status = ProductStatus.purchased;
    notifyListeners();
    await Future<void>.delayed(const Duration(seconds: 5));
    product.status = ProductStatus.purchasable;
    notifyListeners();
  }
                                                           // Add from here
  void _onPurchaseUpdate(List<PurchaseDetails> purchaseDetailsList) {
    // Handle purchases here
  }

  void _updateStreamOnDone() {
    _subscription.cancel();
  }

  void _updateStreamOnError(dynamic error) {
    //Handle error here
  }                                                        // To here.
}
現在應用程式會收到購買交易更新,因此在下一節中,您將進行購買交易!
繼續操作前,請先執行「flutter test"」測試,確認所有設定皆正確無誤。
$ flutter test

00:01 +1: All tests passed!
8. 購物
在本程式碼研究室的這部分,您將以實際可購買的產品取代現有的模擬產品。這些產品會從商店載入並顯示在清單中,輕觸產品即可購買。
調整 PurchasableProduct
PurchasableProduct 顯示模擬產品。將 purchasable_product.dart 中的 PurchasableProduct 類別替換為下列程式碼,即可更新為顯示實際內容:
lib/model/purchasable_product.dart
import 'package:in_app_purchase/in_app_purchase.dart';

enum ProductStatus { purchasable, purchased, pending }

class PurchasableProduct {
  String get id => productDetails.id;
  String get title => productDetails.title;
  String get description => productDetails.description;
  String get price => productDetails.price;
  ProductStatus status;
  ProductDetails productDetails;

  PurchasableProduct(this.productDetails) : status = ProductStatus.purchasable;
}
在 dash_purchases.dart, 中移除虛擬購買交易,並以空白清單 List<PurchasableProduct> products = []; 取代。
載入可用的購買交易
如要讓使用者能夠購買商品,請從商店載入購買交易。首先,請確認商店是否提供這項服務。如果商店無法使用,將 storeState 設為 notAvailable 會向使用者顯示錯誤訊息。
lib/logic/dash_purchases.dart
  Future<void> loadPurchases() async {
    final available = await iapConnection.isAvailable();
    if (!available) {
      storeState = StoreState.notAvailable;
      notifyListeners();
      return;
    }
  }
商店上架後,載入可購買的商品。根據先前的 Google Play 和 App Store 設定,您應該會看到 storeKeyConsumable、storeKeySubscription, 和 storeKeyUpgrade。如果預期購買項目無法使用,請將這項資訊列印到控制台;您可能也想將這項資訊傳送至後端服務。
await iapConnection.queryProductDetails(ids) 方法會傳回找不到的 ID 和找到的可購買產品。使用回應中的 productDetails 更新 UI,並將 StoreState 設為 available。
lib/logic/dash_purchases.dart
import '../constants.dart';

// ...

  Future<void> loadPurchases() async {
    final available = await iapConnection.isAvailable();
    if (!available) {
      storeState = StoreState.notAvailable;
      notifyListeners();
      return;
    }
    const ids = <String>{
      storeKeyConsumable,
      storeKeySubscription,
      storeKeyUpgrade,
    };
    final response = await iapConnection.queryProductDetails(ids);
    products = response.productDetails
        .map((e) => PurchasableProduct(e))
        .toList();
    storeState = StoreState.available;
    notifyListeners();
  }
在建構函式中呼叫 loadPurchases() 函式:
lib/logic/dash_purchases.dart
  DashPurchases(this.counter) {
    final purchaseUpdated = iapConnection.purchaseStream;
    _subscription = purchaseUpdated.listen(
      _onPurchaseUpdate,
      onDone: _updateStreamOnDone,
      onError: _updateStreamOnError,
    );
    loadPurchases();                                       // Add this line
  }
最後,將 storeState 欄位的值從 StoreState.available 變更為 StoreState.loading:
lib/logic/dash_purchases.dart
StoreState storeState = StoreState.loading;
顯示可購買的產品
請考慮 purchase_page.dart 檔案。PurchasePage 小工具會根據 StoreState 顯示 _PurchasesLoading、_PurchaseList, 或 _PurchasesNotAvailable,。小工具也會顯示使用者過去的購買記錄,這會在下一個步驟中使用。
_PurchaseList 小工具會顯示可購買的產品清單,並將購買要求傳送至 DashPurchases 物件。
lib/pages/purchase_page.dart
class _PurchaseList extends StatelessWidget {
  @override
  Widget build(BuildContext context) {
    var purchases = context.watch<DashPurchases>();
    var products = purchases.products;
    return Column(
      children: products
          .map(
            (product) => _PurchaseWidget(
              product: product,
              onPressed: () {
                purchases.buy(product);
              },
            ),
          )
          .toList(),
    );
  }
}
如果設定正確,Android 和 iOS 商店應該會顯示可用的產品。請注意,在各個管理中心輸入後,可能需要一段時間才能使用購買內容。

返回 dash_purchases.dart,然後實作購買產品的函式。你只需要將消耗品與非消耗品分開即可。升級和訂閱產品皆為不可消耗商品。
lib/logic/dash_purchases.dart
  Future<void> buy(PurchasableProduct product) async {
    final purchaseParam = PurchaseParam(productDetails: product.productDetails);
    switch (product.id) {
      case storeKeyConsumable:
        await iapConnection.buyConsumable(purchaseParam: purchaseParam);
      case storeKeySubscription:
      case storeKeyUpgrade:
        await iapConnection.buyNonConsumable(purchaseParam: purchaseParam);
      default:
        throw ArgumentError.value(
          product.productDetails,
          '${product.id} is not a known product',
        );
    }
  }
請先建立 _beautifiedDashUpgrade 變數,然後更新 beautifiedDash getter 以參照該變數,再繼續操作。
lib/logic/dash_purchases.dart
  bool get beautifiedDash => _beautifiedDashUpgrade;
  bool _beautifiedDashUpgrade = false;
_onPurchaseUpdate 方法會接收購買更新,更新購買頁面中顯示的產品狀態,並將購買交易套用至計數器邏輯。處理購買交易後,請務必呼叫 completePurchase,讓商店知道交易已正確處理。
lib/logic/dash_purchases.dart
  Future<void> _onPurchaseUpdate(
    List<PurchaseDetails> purchaseDetailsList,
  ) async {
    for (var purchaseDetails in purchaseDetailsList) {
      await _handlePurchase(purchaseDetails);
    }
    notifyListeners();
  }

  Future<void> _handlePurchase(PurchaseDetails purchaseDetails) async {
    if (purchaseDetails.status == PurchaseStatus.purchased) {
      switch (purchaseDetails.productID) {
        case storeKeySubscription:
          counter.applyPaidMultiplier();
        case storeKeyConsumable:
          counter.addBoughtDashes(2000);
        case storeKeyUpgrade:
          _beautifiedDashUpgrade = true;
      }
    }

    if (purchaseDetails.pendingCompletePurchase) {
      await iapConnection.completePurchase(purchaseDetails);
    }
  }
9. 設定後端
請先設定 Dart 後端,支援追蹤及驗證購買交易,再繼續進行後續步驟。
在本節中,請以 dart-backend/ 資料夾做為根目錄。
請確認您已安裝下列工具:
- Dart
- Firebase CLI
基本專案總覽
由於本程式碼研究室不涵蓋這個專案的某些部分,因此這些部分會納入範例程式碼。開始之前,建議先瀏覽範例程式碼,瞭解如何建構程式碼。
這段後端程式碼可在本機上執行,不需部署即可使用。不過,您必須能夠從開發裝置 (Android 或 iPhone) 連線至伺服器執行的機器。兩者必須連上相同網路,且你必須知道電腦的 IP 位址。
請嘗試使用下列指令執行伺服器:
$ dart ./bin/server.dart

Serving at http://0.0.0.0:8080
Dart 後端會使用 shelf 和 shelf_router 提供 API 端點。根據預設,伺服器不會提供任何路徑。稍後您將建立路徑,處理購買驗證程序。
範例程式碼中已包含 lib/iap_repository.dart 中的 IapRepository。由於學習如何與 Firestore 或一般資料庫互動,與本程式碼研究室無關,因此範例程式碼包含可在 Firestore 中建立或更新購買交易的函式,以及這些交易的所有類別。
設定 Firebase 存取權
如要存取 Firebase Firestore,您需要服務帳戶存取金鑰。如要產生私密金鑰,請開啟 Firebase 專案設定並前往「服務帳戶」部分,然後選取「產生新的私密金鑰」。

將下載的 JSON 檔案複製到 assets/ 資料夾,並重新命名為 service-account-firebase.json。
設定 Google Play 存取權
如要存取 Play 商店來驗證購買交易,您必須產生具備這些權限的服務帳戶,並下載該帳戶的 JSON 憑證。
- 前往 Google Cloud 控制台的 Google Play Android Developer API 頁面。
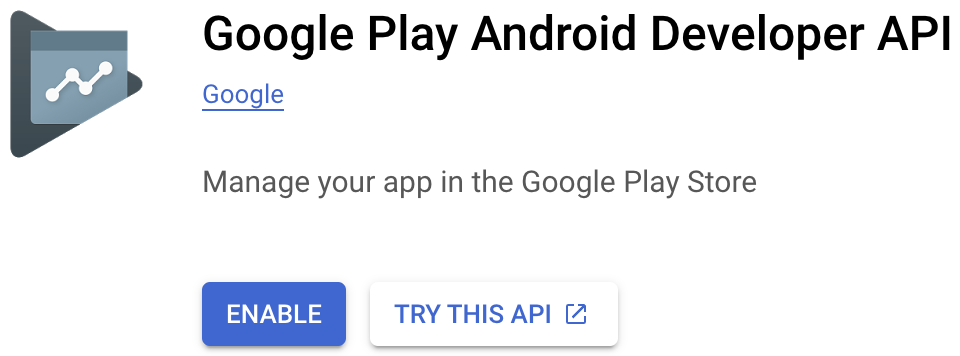 如果 Google Play 管理中心要求您建立專案或連結至現有專案,請先完成這項操作,然後返回這個頁面。
 - 接著前往服務帳戶頁面,然後按一下「+ 建立服務帳戶」。
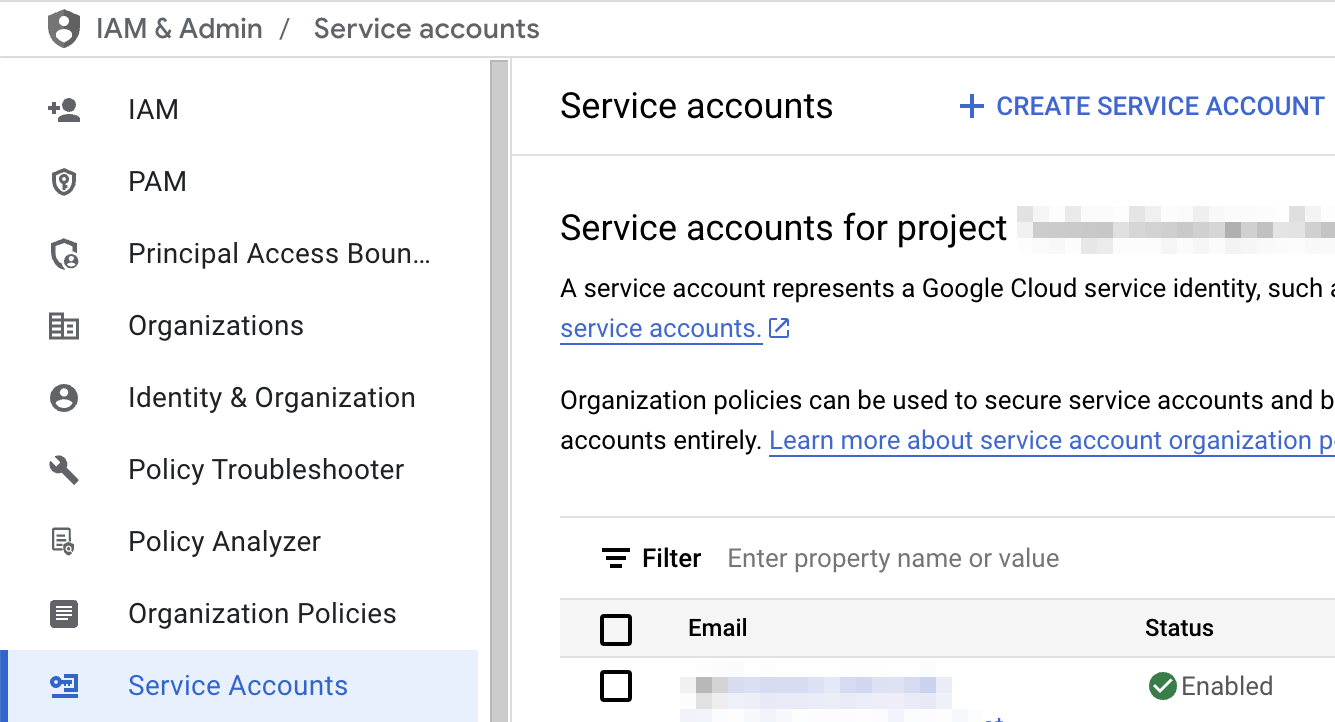
- 輸入「服務帳戶名稱」,然後點選「建立並繼續」。
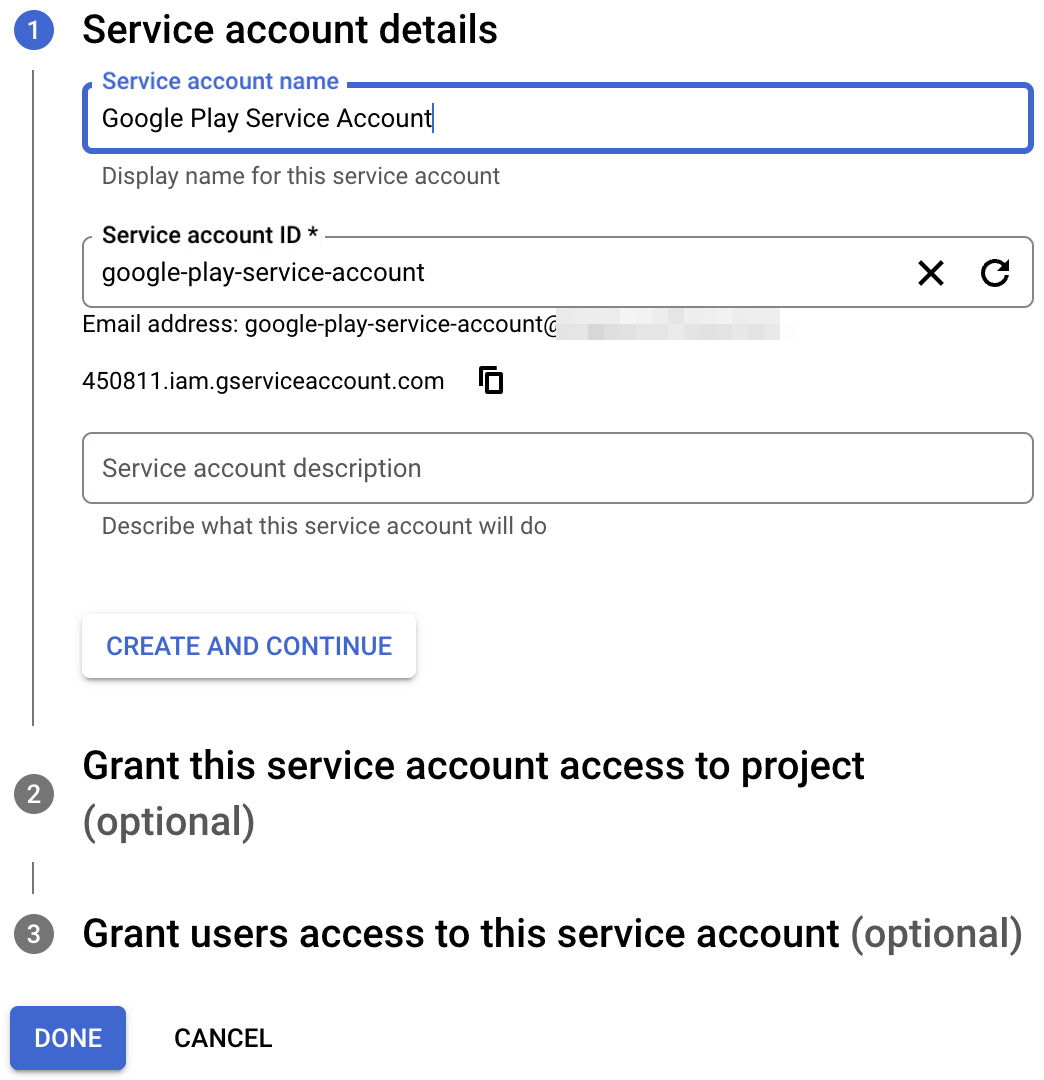
- 選取「Pub/Sub 訂閱者」角色,然後按一下「完成」。
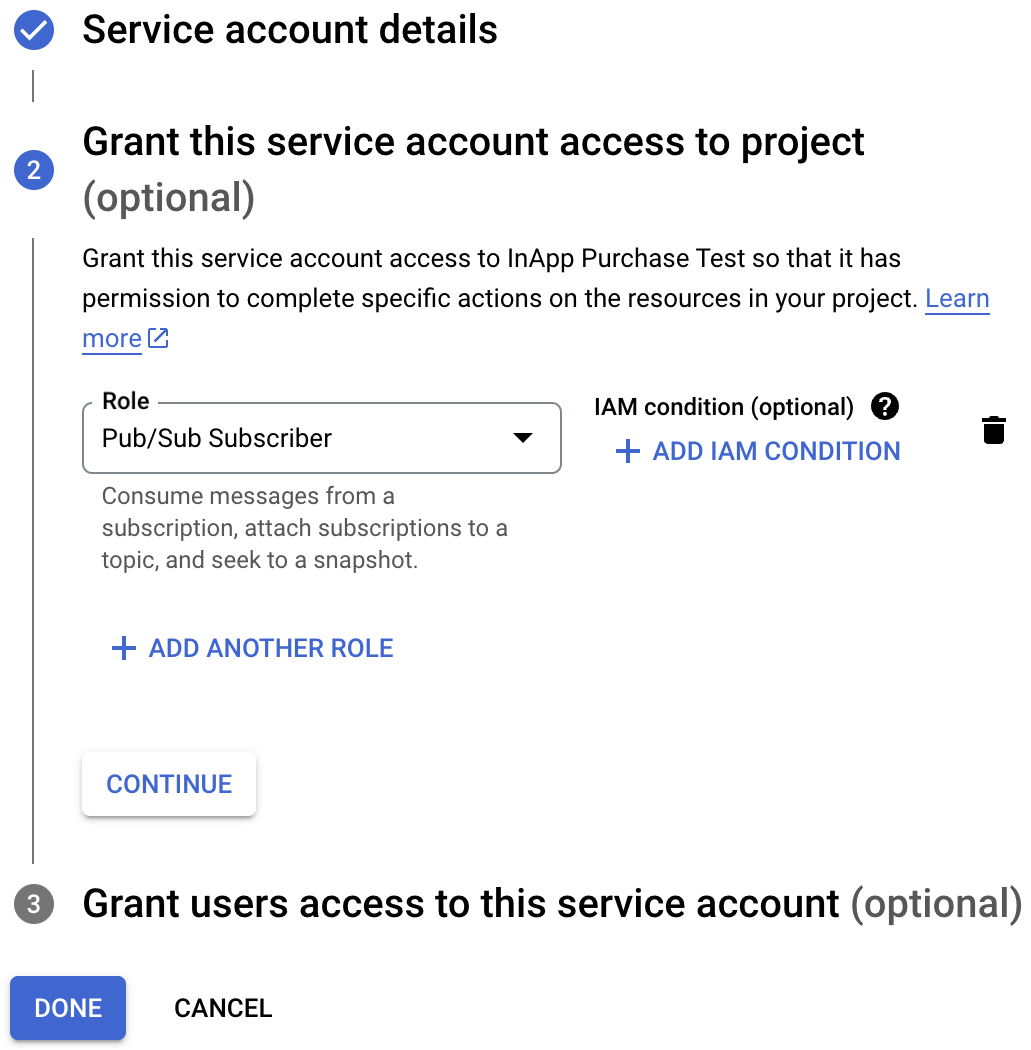
- 帳戶建立完成後,請前往「管理金鑰」。
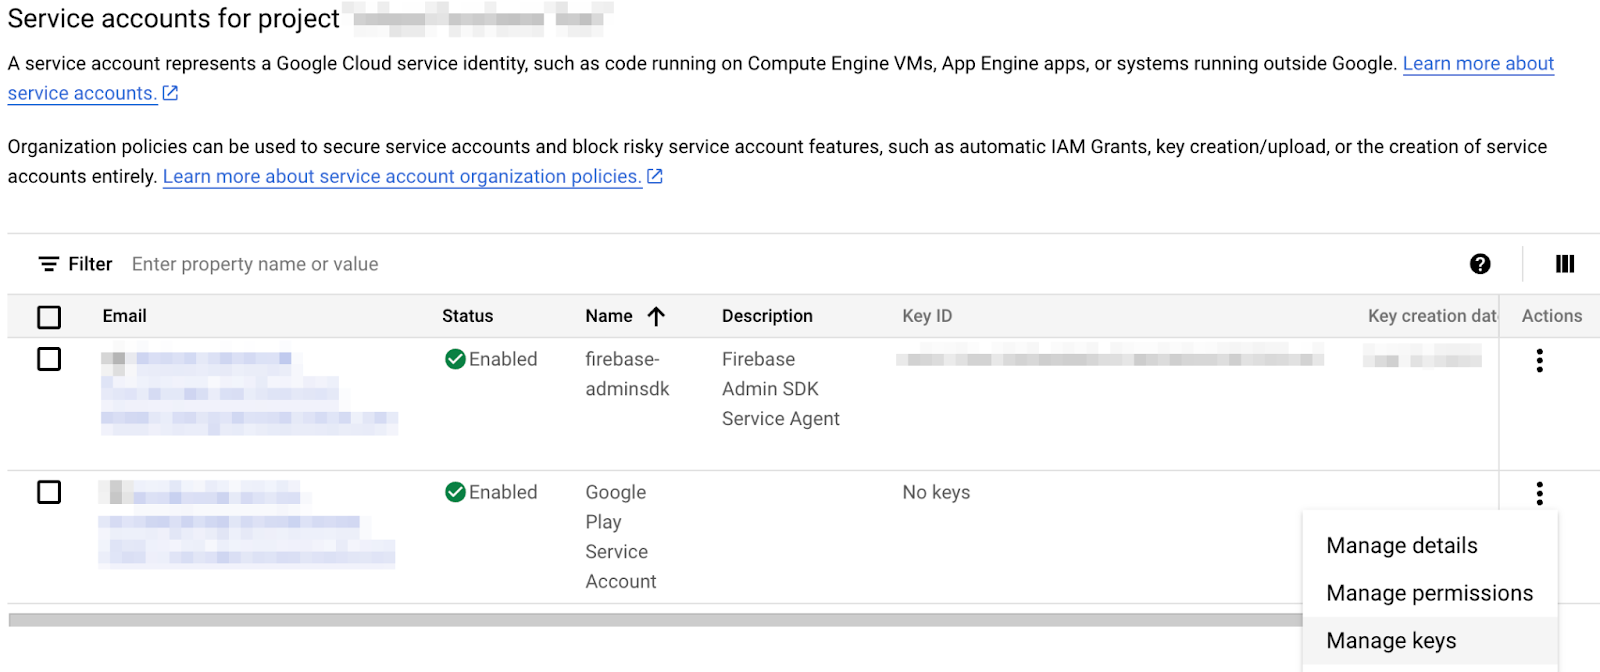
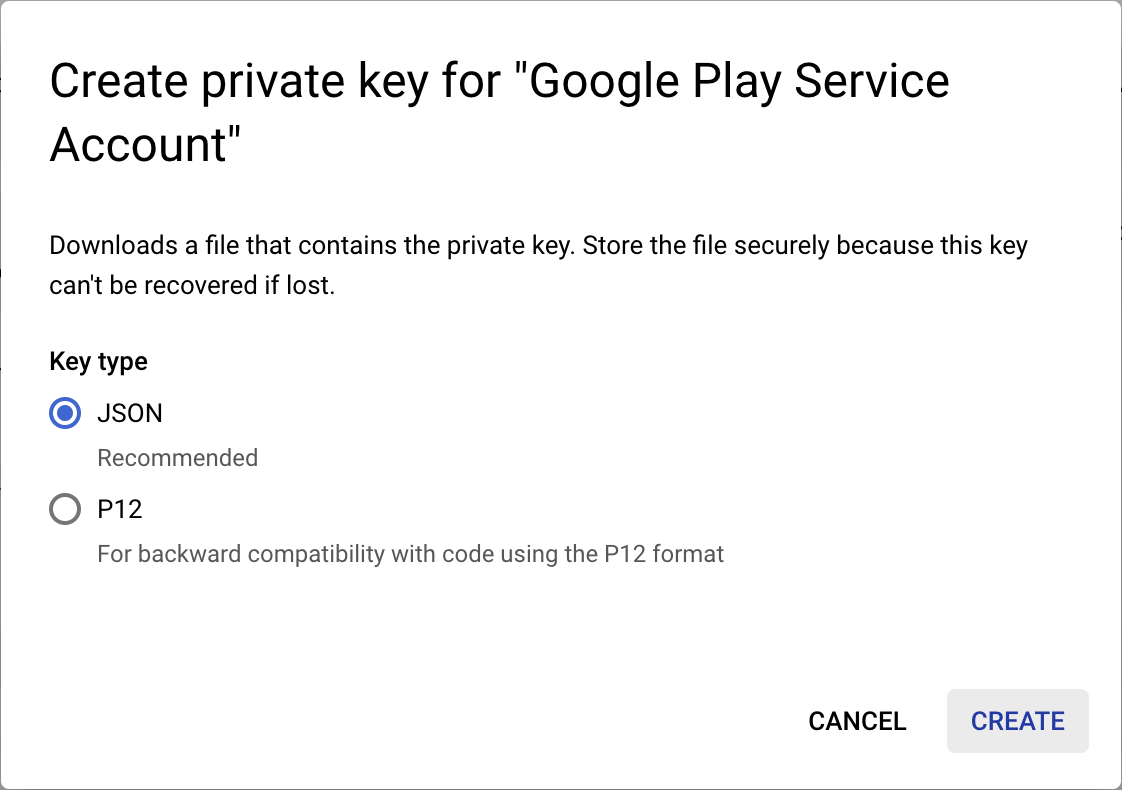
- 依序選取「新增金鑰」>「建立新的金鑰」。

- 建立並下載 JSON 金鑰。
- 將下載的檔案重新命名為
service-account-google-play.json,,然後移至assets/目錄。 - 接著前往 Play 管理中心的「使用者和權限」頁面

- 按一下「邀請新使用者」,然後輸入先前建立的服務帳戶電子郵件地址。您可以在「服務帳戶」頁面
 的表格中找到電子郵件地址
 - 授予應用程式「查看財務資料」和「管理訂單和訂閱項目」權限。
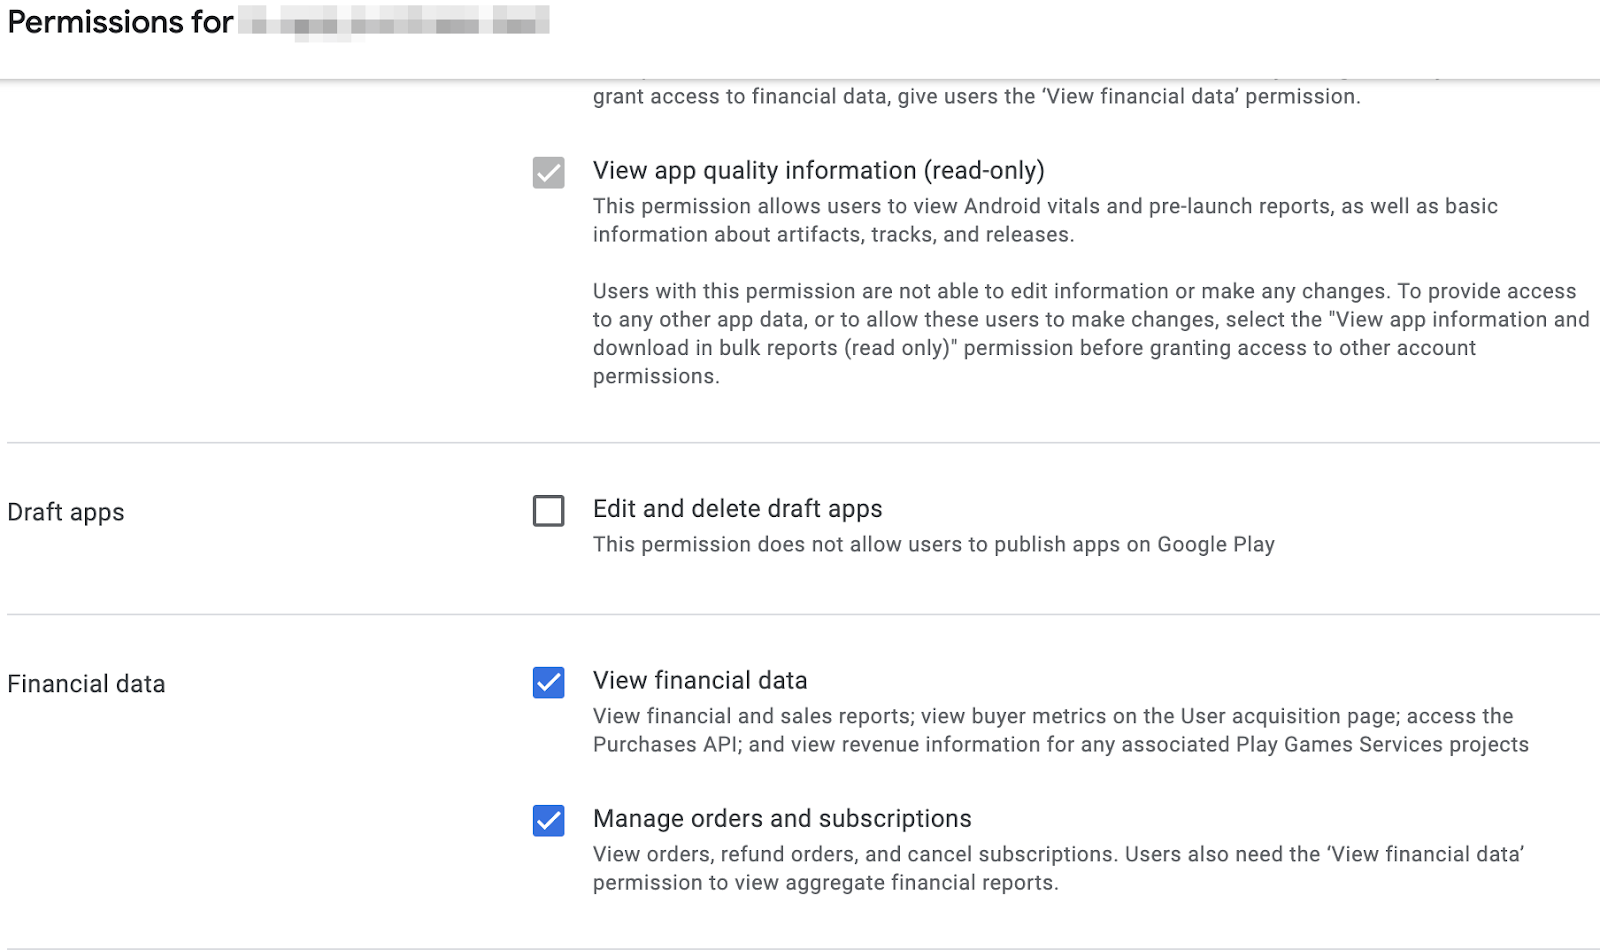
- 按一下「邀請使用者」。
最後,請開啟 lib/constants.dart,,並將 androidPackageId 的值替換為您為 Android 應用程式選擇的套件 ID。
設定 Apple App Store 存取權
如要存取 App Store 驗證購買交易,請設定共用密鑰:
- 開啟 App Store Connect。
- 前往「我的應用程式」,然後選取您的應用程式。
- 在側邊導覽列中,依序前往「一般」>「應用程式資訊」。
- 按一下「應用程式專用共用密碼」標題下方的「管理」。
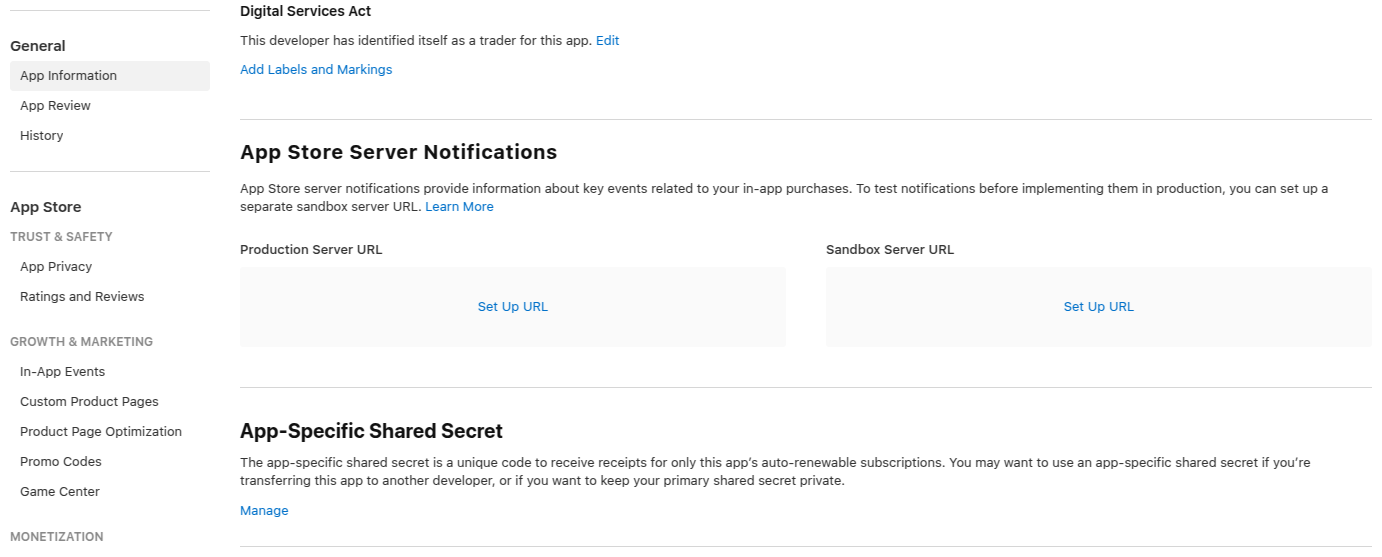
- 產生新的密鑰並複製。
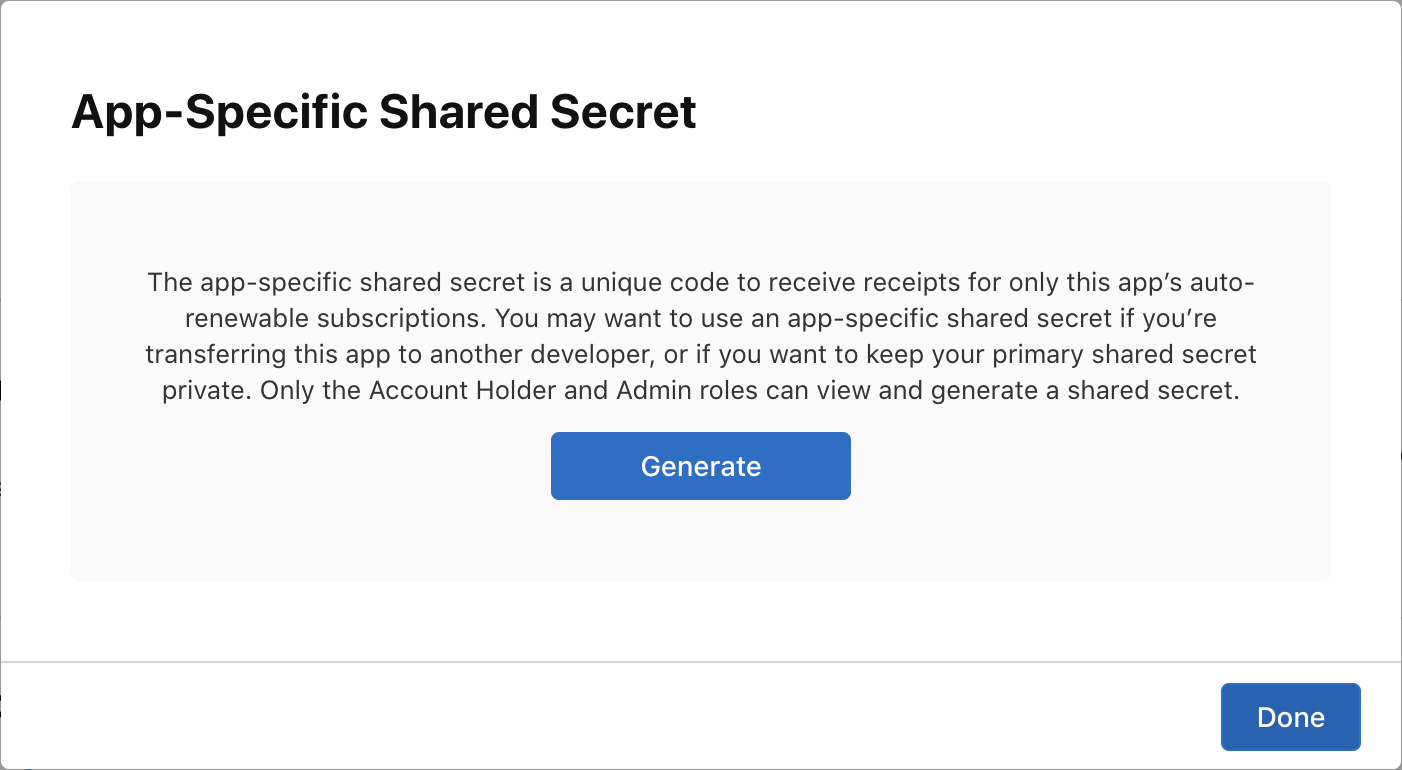
- 開啟
lib/constants.dart,,然後將appStoreSharedSecret的值替換為剛才產生的共用密鑰。
常數設定檔
請先確認 lib/constants.dart 檔案中已設定下列常數,再繼續操作:
androidPackageId:Android 裝置使用的套件 ID,例如com.example.dashclickerappStoreSharedSecret:用於存取 App Store Connect 的共用密鑰,可執行購買交易驗證。bundleId:iOS 裝置上使用的軟體包 ID,例如com.example.dashclicker
目前可以忽略其餘常數。
10. 驗證購買交易
驗證購買交易的一般流程在 iOS 和 Android 平台都差不多。
在這兩個商店中,應用程式都會在使用者購買商品時收到權杖。
應用程式會將這個權杖傳送至後端服務,後者隨後會使用提供的權杖,向相應商店的伺服器驗證購買交易。
後端服務接著可以選擇儲存購買交易,並回覆應用程式購買交易是否有效。
由後端服務與商店進行驗證,而非在使用者裝置上執行的應用程式,可防止使用者透過倒轉系統時鐘等方式,取得進階功能存取權。
設定 Flutter 端
設定驗證方法
由於您要將購買交易傳送至後端服務,因此請務必在使用者進行購買交易時驗證身分。啟動專案中已為您新增大部分的驗證邏輯,您只要確保 PurchasePage 在使用者尚未登入時顯示登入按鈕即可。在 PurchasePage 的建構方法開頭加入下列程式碼:
lib/pages/purchase_page.dart
import 'package:flutter/material.dart';
import 'package:provider/provider.dart';

import '../logic/dash_purchases.dart';
import '../logic/firebase_notifier.dart';                  // Add this import
import '../model/firebase_state.dart';                     // And this import
import '../model/purchasable_product.dart';
import '../model/store_state.dart';
import '../repo/iap_repo.dart';
import 'login_page.dart';                                  // And this one as well

class PurchasePage extends StatelessWidget {
  const PurchasePage({super.key});

  @override
  Widget build(BuildContext context) {                     // Update from here
    var firebaseNotifier = context.watch<FirebaseNotifier>();
    if (firebaseNotifier.state == FirebaseState.loading) {
      return _PurchasesLoading();
    } else if (firebaseNotifier.state == FirebaseState.notAvailable) {
      return _PurchasesNotAvailable();
    }

    if (!firebaseNotifier.loggedIn) {
      return const LoginPage();
    }                                                      // To here.

    // ...
從應用程式呼叫驗證端點
在應用程式中,建立 _verifyPurchase(PurchaseDetails purchaseDetails) 函式,使用 http POST 呼叫,在 Dart 後端呼叫 /verifypurchase 端點。
傳送所選商店 (Play 商店為 google_play,App Store 為 app_store)、serverVerificationData 和 productID。伺服器會傳回狀態碼,指出購買交易是否已驗證。
在應用程式常數中,將伺服器 IP 設定為本機電腦的 IP 位址。
lib/logic/dash_purchases.dart
import 'dart:async';
import 'dart:convert';                                     // Add this import

import 'package:flutter/foundation.dart';
import 'package:flutter/material.dart';
import 'package:http/http.dart' as http;                   // And this import
import 'package:in_app_purchase/in_app_purchase.dart';

import '../constants.dart';
import '../main.dart';
import '../model/purchasable_product.dart';
import '../model/store_state.dart';
import 'dash_counter.dart';
import 'firebase_notifier.dart';                           // And this one

class DashPurchases extends ChangeNotifier {
  DashCounter counter;
  FirebaseNotifier firebaseNotifier;                       // Add this line
  StoreState storeState = StoreState.loading;
  late StreamSubscription<List<PurchaseDetails>> _subscription;
  List<PurchasableProduct> products = [];

  bool get beautifiedDash => _beautifiedDashUpgrade;
  bool _beautifiedDashUpgrade = false;

  final iapConnection = IAPConnection.instance;

  DashPurchases(this.counter, this.firebaseNotifier) {     // Update this line
    final purchaseUpdated = iapConnection.purchaseStream;
    _subscription = purchaseUpdated.listen(
      _onPurchaseUpdate,
      onDone: _updateStreamOnDone,
      onError: _updateStreamOnError,
    );
    loadPurchases();
  }
在 main.dart: 中建立 DashPurchases 時新增 firebaseNotifier
lib/main.dart
        ChangeNotifierProvider<DashPurchases>(
          create: (context) => DashPurchases(
            context.read<DashCounter>(),
            context.read<FirebaseNotifier>(),
          ),
          lazy: false,
        ),
在 FirebaseNotifier 中新增 User 的 getter,以便將使用者 ID 傳遞至驗證購買交易的函式。
lib/logic/firebase_notifier.dart
  Future<FirebaseFirestore> get firestore async {
    var isInitialized = await _isInitialized.future;
    if (!isInitialized) {
      throw Exception('Firebase is not initialized');
    }
    return FirebaseFirestore.instance;
  }

  User? get user => FirebaseAuth.instance.currentUser;     // Add this line

  Future<void> load() async {
    // ...
將 _verifyPurchase 函式新增至 DashPurchases 類別。這個 async 函式會傳回布林值,指出購買交易是否已通過驗證。
lib/logic/dash_purchases.dart
  Future<bool> _verifyPurchase(PurchaseDetails purchaseDetails) async {
    final url = Uri.parse('http://$serverIp:8080/verifypurchase');
    const headers = {
      'Content-type': 'application/json',
      'Accept': 'application/json',
    };
    final response = await http.post(
      url,
      body: jsonEncode({
        'source': purchaseDetails.verificationData.source,
        'productId': purchaseDetails.productID,
        'verificationData':
            purchaseDetails.verificationData.serverVerificationData,
        'userId': firebaseNotifier.user?.uid,
      }),
      headers: headers,
    );
    if (response.statusCode == 200) {
      return true;
    } else {
      return false;
    }
  }
在套用購買交易之前,請先在 _handlePurchase 中呼叫 _verifyPurchase 函式。只有在購買交易通過驗證後,您才應套用。在正式版應用程式中,您可以進一步指定這項設定,例如在商店暫時無法使用時套用試用訂閱方案。不過,在這個範例中,請在購買交易通過驗證後套用。
lib/logic/dash_purchases.dart
  Future<void> _onPurchaseUpdate(
    List<PurchaseDetails> purchaseDetailsList,
  ) async {
    for (var purchaseDetails in purchaseDetailsList) {
      await _handlePurchase(purchaseDetails);
    }
    notifyListeners();
  }

  Future<void> _handlePurchase(PurchaseDetails purchaseDetails) async {
    if (purchaseDetails.status == PurchaseStatus.purchased) {
      // Send to server
      var validPurchase = await _verifyPurchase(purchaseDetails);

      if (validPurchase) {
        // Apply changes locally
        switch (purchaseDetails.productID) {
          case storeKeySubscription:
            counter.applyPaidMultiplier();
          case storeKeyConsumable:
            counter.addBoughtDashes(2000);
          case storeKeyUpgrade:
            _beautifiedDashUpgrade = true;
        }
      }
    }

    if (purchaseDetails.pendingCompletePurchase) {
      await iapConnection.completePurchase(purchaseDetails);
    }
  }
應用程式現在已準備好驗證購買交易。
設定後端服務
接著,設定後端,以便在後端驗證購買交易。
建構購買處理常式
由於兩間商店的驗證流程幾乎相同,請設定抽象 PurchaseHandler 類別,並為每間商店分別實作。

首先,請在 lib/ 資料夾中新增 purchase_handler.dart 檔案,並定義抽象 PurchaseHandler 類別,其中包含兩個抽象方法,分別用於驗證兩種不同的購買交易:訂閱項目和非訂閱項目。
lib/purchase_handler.dart
import 'products.dart';

/// Generic purchase handler,
/// must be implemented for Google Play and Apple Store
abstract class PurchaseHandler {
  /// Verify if non-subscription purchase (aka consumable) is valid
  /// and update the database
  Future<bool> handleNonSubscription({
    required String userId,
    required ProductData productData,
    required String token,
  });

  /// Verify if subscription purchase (aka non-consumable) is valid
  /// and update the database
  Future<bool> handleSubscription({
    required String userId,
    required ProductData productData,
    required String token,
  });
}
如您所見,每個方法都需要三個參數:
userId:已登入使用者的 ID,方便您將購買交易與使用者建立關聯。productData:產品相關資料。您將在一分鐘內定義這個項目。token:商店提供給使用者的權杖。
此外,為了方便使用這些購買交易處理常式,請新增可用於訂閱項目和非訂閱項目的 verifyPurchase() 方法:
lib/purchase_handler.dart
  /// Verify if purchase is valid and update the database
  Future<bool> verifyPurchase({
    required String userId,
    required ProductData productData,
    required String token,
  }) async {
    switch (productData.type) {
      case ProductType.subscription:
        return handleSubscription(
          userId: userId,
          productData: productData,
          token: token,
        );
      case ProductType.nonSubscription:
        return handleNonSubscription(
          userId: userId,
          productData: productData,
          token: token,
        );
    }
  }
現在,您只需針對這兩種情況呼叫 verifyPurchase,但仍可分別實作!
ProductData 類別包含不同可購買產品的基本資訊,包括產品 ID (有時也稱為 SKU) 和 ProductType。
lib/products.dart
class ProductData {
  final String productId;
  final ProductType type;

  const ProductData(this.productId, this.type);
}
ProductType 可以是訂閱項目或非訂閱項目。
lib/products.dart
enum ProductType { subscription, nonSubscription }
最後,產品清單會定義為同一個檔案中的對應。
lib/products.dart
const productDataMap = {
  'dash_consumable_2k': ProductData(
    'dash_consumable_2k',
    ProductType.nonSubscription,
  ),
  'dash_upgrade_3d': ProductData(
    'dash_upgrade_3d',
    ProductType.nonSubscription,
  ),
  'dash_subscription_doubler': ProductData(
    'dash_subscription_doubler',
    ProductType.subscription,
  ),
};
接著,請為 Google Play 商店和 Apple App Store 定義一些預留位置實作項目。從 Google Play 開始:
建立 lib/google_play_purchase_handler.dart,並新增擴充您剛編寫的 PurchaseHandler 的類別:
lib/google_play_purchase_handler.dart
import 'dart:async';

import 'package:googleapis/androidpublisher/v3.dart' as ap;

import 'constants.dart';
import 'iap_repository.dart';
import 'products.dart';
import 'purchase_handler.dart';

class GooglePlayPurchaseHandler extends PurchaseHandler {
  final ap.AndroidPublisherApi androidPublisher;
  final IapRepository iapRepository;

  GooglePlayPurchaseHandler(this.androidPublisher, this.iapRepository);

  @override
  Future<bool> handleNonSubscription({
    required String? userId,
    required ProductData productData,
    required String token,
  }) async {
    return true;
  }

  @override
  Future<bool> handleSubscription({
    required String? userId,
    required ProductData productData,
    required String token,
  }) async {
    return true;
  }
}
目前,處理常式方法會傳回 true,稍後您會用到這些方法。
如您所見,建構函式會採用 IapRepository 的例項。稍後,購買處理常式會使用這個執行個體,在 Firestore 中儲存購買資訊。如要與 Google Play 通訊,請使用提供的 AndroidPublisherApi。
接著,對應用程式商店處理常式執行相同操作。建立 lib/app_store_purchase_handler.dart,然後再次新增擴充 PurchaseHandler 的類別:
lib/app_store_purchase_handler.dart
import 'dart:async';

import 'package:app_store_server_sdk/app_store_server_sdk.dart';

import 'constants.dart';
import 'iap_repository.dart';
import 'products.dart';
import 'purchase_handler.dart';

class AppStorePurchaseHandler extends PurchaseHandler {
  final IapRepository iapRepository;

  AppStorePurchaseHandler(this.iapRepository);

  @override
  Future<bool> handleNonSubscription({
    required String userId,
    required ProductData productData,
    required String token,
  }) async {
    return true;
  }

  @override
  Future<bool> handleSubscription({
    required String userId,
    required ProductData productData,
    required String token,
  }) async {
    return true;
  }
}
太好了!現在您有兩個購買交易處理常式。接著,建立購買交易驗證 API 端點。
使用購買處理常式
開啟 bin/server.dart,並使用 shelf_route 建立 API 端點:
bin/server.dart
import 'dart:convert';

import 'package:firebase_backend_dart/helpers.dart';
import 'package:firebase_backend_dart/products.dart';
import 'package:shelf/shelf.dart';
import 'package:shelf_router/shelf_router.dart';

Future<void> main() async {
  final router = Router();

  final purchaseHandlers = await _createPurchaseHandlers();

  router.post('/verifypurchase', (Request request) async {
    final dynamic payload = json.decode(await request.readAsString());

    final (:userId, :source, :productData, :token) = getPurchaseData(payload);

    final result = await purchaseHandlers[source]!.verifyPurchase(
      userId: userId,
      productData: productData,
      token: token,
    );

    if (result) {
      return Response.ok('all good!');
    } else {
      return Response.internalServerError();
    }
  });

  await serveHandler(router.call);
}

({String userId, String source, ProductData productData, String token})
getPurchaseData(dynamic payload) {
  if (payload case {
    'userId': String userId,
    'source': String source,
    'productId': String productId,
    'verificationData': String token,
  }) {
    return (
      userId: userId,
      source: source,
      productData: productDataMap[productId]!,
      token: token,
    );
  } else {
    throw const FormatException('Unexpected JSON');
  }
}
程式碼會執行下列作業:
- 定義 POST 端點,以便從先前建立的應用程式呼叫。
- 解碼 JSON 酬載,並擷取下列資訊:
userId:登入的使用者 IDsource:使用的商店,可以是app_store或google_play。productData:先前建立的productDataMap。token:包含要傳送至商店的驗證資料。
- 視來源而定,呼叫
GooglePlayPurchaseHandler或AppStorePurchaseHandler的verifyPurchase方法。 - 如果驗證成功,這個方法會向用戶端傳回
Response.ok。 - 如果驗證失敗,這個方法會向用戶端傳回
Response.internalServerError。
建立 API 端點後,您需要設定兩個購買處理常式。您必須載入上一個步驟中取得的服務帳戶金鑰,並設定不同服務的存取權,包括 Android Publisher API 和 Firebase Firestore API。接著,使用不同的依附元件建立兩個購買處理常式:
bin/server.dart
import 'dart:convert';
import 'dart:io'; // new

import 'package:firebase_backend_dart/app_store_purchase_handler.dart'; // new
import 'package:firebase_backend_dart/google_play_purchase_handler.dart'; // new
import 'package:firebase_backend_dart/helpers.dart';
import 'package:firebase_backend_dart/iap_repository.dart'; // new
import 'package:firebase_backend_dart/products.dart';
import 'package:firebase_backend_dart/purchase_handler.dart'; // new
import 'package:googleapis/androidpublisher/v3.dart' as ap; // new
import 'package:googleapis/firestore/v1.dart' as fs; // new
import 'package:googleapis_auth/auth_io.dart' as auth; // new
import 'package:shelf/shelf.dart';
import 'package:shelf_router/shelf_router.dart';

Future<Map<String, PurchaseHandler>> _createPurchaseHandlers() async {
  // Configure Android Publisher API access
  final serviceAccountGooglePlay =
      File('assets/service-account-google-play.json').readAsStringSync();
  final clientCredentialsGooglePlay =
      auth.ServiceAccountCredentials.fromJson(serviceAccountGooglePlay);
  final clientGooglePlay =
      await auth.clientViaServiceAccount(clientCredentialsGooglePlay, [
    ap.AndroidPublisherApi.androidpublisherScope,
  ]);
  final androidPublisher = ap.AndroidPublisherApi(clientGooglePlay);

  // Configure Firestore API access
  final serviceAccountFirebase =
      File('assets/service-account-firebase.json').readAsStringSync();
  final clientCredentialsFirebase =
      auth.ServiceAccountCredentials.fromJson(serviceAccountFirebase);
  final clientFirebase =
      await auth.clientViaServiceAccount(clientCredentialsFirebase, [
    fs.FirestoreApi.cloudPlatformScope,
  ]);
  final firestoreApi = fs.FirestoreApi(clientFirebase);
  final dynamic json = jsonDecode(serviceAccountFirebase);
  final projectId = json['project_id'] as String;
  final iapRepository = IapRepository(firestoreApi, projectId);

  return {
    'google_play': GooglePlayPurchaseHandler(
      androidPublisher,
      iapRepository,
    ),
    'app_store': AppStorePurchaseHandler(
      iapRepository,
    ),
  };
}
驗證 Android 購買交易:導入購買交易處理常式
接著,繼續實作 Google Play 購買交易處理常式。
Google 已提供 Dart 套件,可與您驗證交易所需的 API 互動。您已在 server.dart 檔案中初始化這些項目,現在可在 GooglePlayPurchaseHandler 類別中使用。
實作非訂閱類型購買交易的處理常式:
lib/google_play_purchase_handler.dart
  /// Handle non-subscription purchases (one time purchases).
  ///
  /// Retrieves the purchase status from Google Play and updates
  /// the Firestore Database accordingly.
  @override
  Future<bool> handleNonSubscription({
    required String? userId,
    required ProductData productData,
    required String token,
  }) async {
    print(
      'GooglePlayPurchaseHandler.handleNonSubscription'
      '($userId, ${productData.productId}, ${token.substring(0, 5)}...)',
    );

    try {
      // Verify purchase with Google
      final response = await androidPublisher.purchases.products.get(
        androidPackageId,
        productData.productId,
        token,
      );

      print('Purchases response: ${response.toJson()}');

      // Make sure an order ID exists
      if (response.orderId == null) {
        print('Could not handle purchase without order id');
        return false;
      }
      final orderId = response.orderId!;

      final purchaseData = NonSubscriptionPurchase(
        purchaseDate: DateTime.fromMillisecondsSinceEpoch(
          int.parse(response.purchaseTimeMillis ?? '0'),
        ),
        orderId: orderId,
        productId: productData.productId,
        status: _nonSubscriptionStatusFrom(response.purchaseState),
        userId: userId,
        iapSource: IAPSource.googleplay,
      );

      // Update the database
      if (userId != null) {
        // If we know the userId,
        // update the existing purchase or create it if it does not exist.
        await iapRepository.createOrUpdatePurchase(purchaseData);
      } else {
        // If we don't know the user ID, a previous entry must already
        // exist, and thus we'll only update it.
        await iapRepository.updatePurchase(purchaseData);
      }
      return true;
    } on ap.DetailedApiRequestError catch (e) {
      print(
        'Error on handle NonSubscription: $e\n'
        'JSON: ${e.jsonResponse}',
      );
    } catch (e) {
      print('Error on handle NonSubscription: $e\n');
    }
    return false;
  }
您可以透過類似方式更新訂閱項目購買處理常式:
lib/google_play_purchase_handler.dart
  /// Handle subscription purchases.
  ///
  /// Retrieves the purchase status from Google Play and updates
  /// the Firestore Database accordingly.
  @override
  Future<bool> handleSubscription({
    required String? userId,
    required ProductData productData,
    required String token,
  }) async {
    print(
      'GooglePlayPurchaseHandler.handleSubscription'
      '($userId, ${productData.productId}, ${token.substring(0, 5)}...)',
    );

    try {
      // Verify purchase with Google
      final response = await androidPublisher.purchases.subscriptions.get(
        androidPackageId,
        productData.productId,
        token,
      );

      print('Subscription response: ${response.toJson()}');

      // Make sure an order ID exists
      if (response.orderId == null) {
        print('Could not handle purchase without order id');
        return false;
      }
      final orderId = extractOrderId(response.orderId!);

      final purchaseData = SubscriptionPurchase(
        purchaseDate: DateTime.fromMillisecondsSinceEpoch(
          int.parse(response.startTimeMillis ?? '0'),
        ),
        orderId: orderId,
        productId: productData.productId,
        status: _subscriptionStatusFrom(response.paymentState),
        userId: userId,
        iapSource: IAPSource.googleplay,
        expiryDate: DateTime.fromMillisecondsSinceEpoch(
          int.parse(response.expiryTimeMillis ?? '0'),
        ),
      );

      // Update the database
      if (userId != null) {
        // If we know the userId,
        // update the existing purchase or create it if it does not exist.
        await iapRepository.createOrUpdatePurchase(purchaseData);
      } else {
        // If we don't know the user ID, a previous entry must already
        // exist, and thus we'll only update it.
        await iapRepository.updatePurchase(purchaseData);
      }
      return true;
    } on ap.DetailedApiRequestError catch (e) {
      print(
        'Error on handle Subscription: $e\n'
        'JSON: ${e.jsonResponse}',
      );
    } catch (e) {
      print('Error on handle Subscription: $e\n');
    }
    return false;
  }
}
新增下列方法,方便剖析訂單 ID,以及兩種剖析購買狀態的方法。
lib/google_play_purchase_handler.dart
NonSubscriptionStatus _nonSubscriptionStatusFrom(int? state) {
  return switch (state) {
    0 => NonSubscriptionStatus.completed,
    2 => NonSubscriptionStatus.pending,
    _ => NonSubscriptionStatus.cancelled,
  };
}

SubscriptionStatus _subscriptionStatusFrom(int? state) {
  return switch (state) {
    // Payment pending
    0 => SubscriptionStatus.pending,
    // Payment received
    1 => SubscriptionStatus.active,
    // Free trial
    2 => SubscriptionStatus.active,
    // Pending deferred upgrade/downgrade
    3 => SubscriptionStatus.pending,
    // Expired or cancelled
    _ => SubscriptionStatus.expired,
  };
}

/// If a subscription suffix is present (..#) extract the orderId.
String extractOrderId(String orderId) {
  final orderIdSplit = orderId.split('..');
  if (orderIdSplit.isNotEmpty) {
    orderId = orderIdSplit[0];
  }
  return orderId;
}
Google Play 購買交易現在應該已通過驗證,並儲存在資料庫中。
接著,請前往瞭解 iOS 的 App Store 購買交易。
驗證 iOS 購買交易:導入購買交易處理常式
如要透過 App Store 驗證購買交易,可以使用名為 app_store_server_sdk 的第三方 Dart 套件,簡化驗證程序。
請先建立 ITunesApi 執行個體。使用沙箱設定,並啟用記錄功能,方便偵錯。
lib/app_store_purchase_handler.dart
  final _iTunesAPI = ITunesApi(
    ITunesHttpClient(ITunesEnvironment.sandbox(), loggingEnabled: true),
  );
現在,與 Google Play API 不同,App Store 對於訂閱項目和非訂閱項目使用相同的 API 端點。也就是說,您可以對這兩個處理常式使用相同的邏輯。將這些函式合併在一起,讓它們呼叫相同的實作項目:
lib/app_store_purchase_handler.dart
  @override
  Future<bool> handleNonSubscription({
    required String userId,
    required ProductData productData,
    required String token,
  }) {
    return handleValidation(userId: userId, token: token);
  }

  @override
  Future<bool> handleSubscription({
    required String userId,
    required ProductData productData,
    required String token,
  }) {
    return handleValidation(userId: userId, token: token);
  }

  /// Handle purchase validation.
  Future<bool> handleValidation({
    required String userId,
    required String token,
  }) async {

    // See next step
  }
現在,請實作 handleValidation:
lib/app_store_purchase_handler.dart
  /// Handle purchase validation.
  Future<bool> handleValidation({
    required String userId,
    required String token,
  }) async {
    print('AppStorePurchaseHandler.handleValidation');
    final response = await _iTunesAPI.verifyReceipt(
      password: appStoreSharedSecret,
      receiptData: token,
    );
    print('response: $response');
    if (response.status == 0) {
      print('Successfully verified purchase');
      final receipts = response.latestReceiptInfo ?? [];
      for (final receipt in receipts) {
        final product = productDataMap[receipt.productId];
        if (product == null) {
          print('Error: Unknown product: ${receipt.productId}');
          continue;
        }
        switch (product.type) {
          case ProductType.nonSubscription:
            await iapRepository.createOrUpdatePurchase(
              NonSubscriptionPurchase(
                userId: userId,
                productId: receipt.productId ?? '',
                iapSource: IAPSource.appstore,
                orderId: receipt.originalTransactionId ?? '',
                purchaseDate: DateTime.fromMillisecondsSinceEpoch(
                  int.parse(receipt.originalPurchaseDateMs ?? '0'),
                ),
                type: product.type,
                status: NonSubscriptionStatus.completed,
              ),
            );
            break;
          case ProductType.subscription:
            await iapRepository.createOrUpdatePurchase(
              SubscriptionPurchase(
                userId: userId,
                productId: receipt.productId ?? '',
                iapSource: IAPSource.appstore,
                orderId: receipt.originalTransactionId ?? '',
                purchaseDate: DateTime.fromMillisecondsSinceEpoch(
                  int.parse(receipt.originalPurchaseDateMs ?? '0'),
                ),
                type: product.type,
                expiryDate: DateTime.fromMillisecondsSinceEpoch(
                  int.parse(receipt.expiresDateMs ?? '0'),
                ),
                status: SubscriptionStatus.active,
              ),
            );
            break;
        }
      }
      return true;
    } else {
      print('Error: Status: ${response.status}');
      return false;
    }
  }
現在,您的 App Store 購買交易應該已通過驗證並儲存在資料庫中!
執行後端
此時,您可以執行 dart bin/server.dart 來提供 /verifypurchase 端點。
$ dart bin/server.dart
Serving at http://0.0.0.0:8080
11. 追蹤消費記錄
建議您在後端服務中追蹤使用者的購買交易。這是因為後端可以回應商店的事件,因此較不容易因快取而遇到過時的資訊,也不容易遭到竄改。
首先,請使用您建立的 Dart 後端,在後端設定商店事件的處理程序。
在後端處理商店活動
商店可以將任何帳單事件 (例如續訂) 通知後端。您可以在後端處理這些事件,確保資料庫中的購買交易記錄保持在最新狀態。在這個部分中,請為 Google Play 商店和 Apple App Store 進行設定。
處理 Google Play 帳款服務事件
Google Play 會透過所謂的「Cloud Pub/Sub 主題」提供帳單事件。這些基本上是訊息佇列,訊息可發布至佇列,也可從佇列取用。
由於這是 Google Play 專屬功能,因此您會在 GooglePlayPurchaseHandler 中加入這項功能。
首先,請開啟 lib/google_play_purchase_handler.dart,並新增 PubsubApi 匯入項目:
lib/google_play_purchase_handler.dart
import 'package:googleapis/pubsub/v1.dart' as pubsub;
接著,將 PubsubApi 傳遞至 GooglePlayPurchaseHandler,並修改類別建構函式來建立 Timer,如下所示:
lib/google_play_purchase_handler.dart
class GooglePlayPurchaseHandler extends PurchaseHandler {
  final ap.AndroidPublisherApi androidPublisher;
  final IapRepository iapRepository;
  final pubsub.PubsubApi pubsubApi; // new

  GooglePlayPurchaseHandler(
    this.androidPublisher,
    this.iapRepository,
    this.pubsubApi, // new
  ) {
    // Poll messages from Pub/Sub every 10 seconds
    Timer.periodic(Duration(seconds: 10), (_) {
      _pullMessageFromPubSub();
    });
  }
Timer 已設定為每隔十秒呼叫 _pullMessageFromPubSub 方法。你可以依個人喜好調整時間長度。
然後建立 _pullMessageFromPubSub
lib/google_play_purchase_handler.dart
  /// Process messages from Google Play
  /// Called every 10 seconds
  Future<void> _pullMessageFromPubSub() async {
    print('Polling Google Play messages');
    final request = pubsub.PullRequest(maxMessages: 1000);
    final topicName =
        'projects/$googleCloudProjectId/subscriptions/$googlePlayPubsubBillingTopic-sub';
    final pullResponse = await pubsubApi.projects.subscriptions.pull(
      request,
      topicName,
    );
    final messages = pullResponse.receivedMessages ?? [];
    for (final message in messages) {
      final data64 = message.message?.data;
      if (data64 != null) {
        await _processMessage(data64, message.ackId);
      }
    }
  }

  Future<void> _processMessage(String data64, String? ackId) async {
    final dataRaw = utf8.decode(base64Decode(data64));
    print('Received data: $dataRaw');
    final dynamic data = jsonDecode(dataRaw);
    if (data['testNotification'] != null) {
      print('Skip test messages');
      if (ackId != null) {
        await _ackMessage(ackId);
      }
      return;
    }
    final dynamic subscriptionNotification = data['subscriptionNotification'];
    final dynamic oneTimeProductNotification =
        data['oneTimeProductNotification'];
    if (subscriptionNotification != null) {
      print('Processing Subscription');
      final subscriptionId =
          subscriptionNotification['subscriptionId'] as String;
      final purchaseToken = subscriptionNotification['purchaseToken'] as String;
      final productData = productDataMap[subscriptionId]!;
      final result = await handleSubscription(
        userId: null,
        productData: productData,
        token: purchaseToken,
      );
      if (result && ackId != null) {
        await _ackMessage(ackId);
      }
    } else if (oneTimeProductNotification != null) {
      print('Processing NonSubscription');
      final sku = oneTimeProductNotification['sku'] as String;
      final purchaseToken =
          oneTimeProductNotification['purchaseToken'] as String;
      final productData = productDataMap[sku]!;
      final result = await handleNonSubscription(
        userId: null,
        productData: productData,
        token: purchaseToken,
      );
      if (result && ackId != null) {
        await _ackMessage(ackId);
      }
    } else {
      print('invalid data');
    }
  }

  /// ACK Messages from Pub/Sub
  Future<void> _ackMessage(String id) async {
    print('ACK Message');
    final request = pubsub.AcknowledgeRequest(ackIds: [id]);
    final subscriptionName =
        'projects/$googleCloudProjectId/subscriptions/$googlePlayPubsubBillingTopic-sub';
    await pubsubApi.projects.subscriptions.acknowledge(
      request,
      subscriptionName,
    );
  }
您剛才新增的程式碼會每隔十秒與 Google Cloud 的 Pub/Sub 主題通訊,並要求新訊息。然後在 _processMessage 方法中處理每則訊息。
這個方法會解碼傳入的訊息,並取得每筆購買交易 (包括訂閱和非訂閱) 的最新資訊,必要時會呼叫現有的 handleSubscription 或 handleNonSubscription。
每個訊息都必須使用 _askMessage 方法確認。
接著,在 server.dart 檔案中新增必要依附元件。將 PubsubApi.cloudPlatformScope 新增至憑證設定:
bin/server.dart
import 'package:googleapis/pubsub/v1.dart' as pubsub;      // Add this import

  final clientGooglePlay = await auth
      .clientViaServiceAccount(clientCredentialsGooglePlay, [
        ap.AndroidPublisherApi.androidpublisherScope,
        pubsub.PubsubApi.cloudPlatformScope,               // Add this line
      ]);
接著,建立 PubsubApi 執行個體:
bin/server.dart
final pubsubApi = pubsub.PubsubApi(clientGooglePlay);
最後,將其傳遞至 GooglePlayPurchaseHandler 建構函式:
bin/server.dart
  return {
    'google_play': GooglePlayPurchaseHandler(
      androidPublisher,
      iapRepository,
      pubsubApi,                                           // Add this line
    ),
    'app_store': AppStorePurchaseHandler(
      iapRepository,
    ),
  };
Google Play 設定
您已編寫程式碼,從 Pub/Sub 主題取用帳單事件,但尚未建立 Pub/Sub 主題,也沒有發布任何帳單事件。現在就來設定吧。
首先,請建立 Pub/Sub 主題:
- 將
constants.dart中的googleCloudProjectId值設為 Google Cloud 專案的 ID。 - 前往 Google Cloud Console 的 Cloud Pub/Sub 頁面。
- 確認您位於 Firebase 專案中,然後點選「+ 建立主題」。

- 為新主題命名,名稱與
constants.dart中googlePlayPubsubBillingTopic的值相同。在本例中,請將其命名為play_billing。如果選擇其他項目,請務必更新constants.dart。建立主題。
- 在 Pub/Sub 主題清單中,按一下剛建立主題的三個垂直圓點,然後點選「查看權限」。

- 在右側的側欄中,選擇「新增主體」。
- 在此新增
google-play-developer-notifications@system.gserviceaccount.com,並授予 Pub/Sub 發布者的角色。
- 儲存權限變更。
- 複製剛建立的主題的「主題名稱」。
- 再次開啟 Play 管理中心,然後從「所有應用程式」清單中選擇您的應用程式。
- 向下捲動,然後依序前往「營利」>「營利設定」。
- 填寫完整主題並儲存變更。

現在,所有 Google Play 帳單事件都會發布至該主題。
處理 App Store 帳單事件
接著,對 App Store 帳單事件執行相同操作。在 App Store 中,您可以透過兩種有效方式處理購買交易的更新。方法之一是實作您提供給 Apple 的 Webhook,Apple 會使用這個 Webhook 與您的伺服器通訊。第二種方式 (也是本程式碼研究室會介紹的方式) 是連線至 App Store Server API,然後手動取得訂閱資訊。
本程式碼研究室著重於第二種解決方案,是因為您必須將伺服器公開至網際網路,才能實作 Webhook。
在正式環境中,最好同時擁有這兩者。Webhook 可從 App Store 取得事件,而 Server API 則可在您錯過事件或需要再次確認訂閱狀態時使用。
首先,請開啟 lib/app_store_purchase_handler.dart,並新增 AppStoreServerAPI 依附元件:
lib/app_store_purchase_handler.dart
  final AppStoreServerAPI appStoreServerAPI;                 // Add this member

  AppStorePurchaseHandler(
    this.iapRepository,
    this.appStoreServerAPI,                                  // And this parameter
  );
修改建構函式,新增會呼叫 _pullStatus 方法的計時器。這個計時器會每隔 10 秒呼叫 _pullStatus 方法。你可以視需要調整計時器時間長度。
lib/app_store_purchase_handler.dart
  AppStorePurchaseHandler(this.iapRepository, this.appStoreServerAPI) {
    // Poll Subscription status every 10 seconds.
    Timer.periodic(Duration(seconds: 10), (_) {
      _pullStatus();
    });
  }
接著,請依下列方式建立 _pullStatus 方法:
lib/app_store_purchase_handler.dart
  /// Request the App Store for the latest subscription status.
  /// Updates all App Store subscriptions in the database.
  /// NOTE: This code only handles when a subscription expires as example.
  Future<void> _pullStatus() async {
    print('Polling App Store');
    final purchases = await iapRepository.getPurchases();
    // filter for App Store subscriptions
    final appStoreSubscriptions = purchases.where(
      (element) =>
          element.type == ProductType.subscription &&
          element.iapSource == IAPSource.appstore,
    );
    for (final purchase in appStoreSubscriptions) {
      final status = await appStoreServerAPI.getAllSubscriptionStatuses(
        purchase.orderId,
      );
      // Obtain all subscriptions for the order ID.
      for (final subscription in status.data) {
        // Last transaction contains the subscription status.
        for (final transaction in subscription.lastTransactions) {
          final expirationDate = DateTime.fromMillisecondsSinceEpoch(
            transaction.transactionInfo.expiresDate ?? 0,
          );
          // Check if subscription has expired.
          final isExpired = expirationDate.isBefore(DateTime.now());
          print('Expiration Date: $expirationDate - isExpired: $isExpired');
          // Update the subscription status with the new expiration date and status.
          await iapRepository.updatePurchase(
            SubscriptionPurchase(
              userId: null,
              productId: transaction.transactionInfo.productId,
              iapSource: IAPSource.appstore,
              orderId: transaction.originalTransactionId,
              purchaseDate: DateTime.fromMillisecondsSinceEpoch(
                transaction.transactionInfo.originalPurchaseDate,
              ),
              type: ProductType.subscription,
              expiryDate: expirationDate,
              status: isExpired
                  ? SubscriptionStatus.expired
                  : SubscriptionStatus.active,
            ),
          );
        }
      }
    }
  }
這個方法運作方式如下:
- 使用 IapRepository 從 Firestore 取得有效訂閱項目清單。
- 針對每筆訂單,向 App Store Server API 查詢訂閱狀態。
- 取得該訂閱交易的最後一筆交易。
- 檢查到期日。
- 更新 Firestore 中的訂閱狀態,如果訂閱方案已過期,系統會標示為過期。
最後,新增所有必要程式碼,設定 App Store Server API 存取權:
bin/server.dart
import 'package:app_store_server_sdk/app_store_server_sdk.dart';  // Add this import
import 'package:firebase_backend_dart/constants.dart';            // And this one.


  // add from here
  final subscriptionKeyAppStore = File(
    'assets/SubscriptionKey.p8',
  ).readAsStringSync();

  // Configure Apple Store API access
  var appStoreEnvironment = AppStoreEnvironment.sandbox(
    bundleId: bundleId,
    issuerId: appStoreIssuerId,
    keyId: appStoreKeyId,
    privateKey: subscriptionKeyAppStore,
  );

  // Stored token for Apple Store API access, if available
  final file = File('assets/appstore.token');
  String? appStoreToken;
  if (file.existsSync() && file.lengthSync() > 0) {
    appStoreToken = file.readAsStringSync();
  }

  final appStoreServerAPI = AppStoreServerAPI(
    AppStoreServerHttpClient(
      appStoreEnvironment,
      jwt: appStoreToken,
      jwtTokenUpdatedCallback: (token) {
        file.writeAsStringSync(token);
      },
    ),
  );
  // to here

  return {
    'google_play': GooglePlayPurchaseHandler(
      androidPublisher,
      iapRepository,
      pubsubApi,
    ),
    'app_store': AppStorePurchaseHandler(
      iapRepository,
      appStoreServerAPI,                                     // Add this argument
    ),
  };
設定 App Store
接著設定 App Store:
- 登入 App Store Connect,然後選取「使用者和存取權」。
- 依序前往「整合」>「金鑰」>「應用程式內購」。
- 輕觸「加號」圖示即可新增。
- 為金鑰命名,例如「Codelab key」。
- 下載內含金鑰的 p8 檔案。
- 然後複製到素材資源資料夾,並命名為
SubscriptionKey.p8。 - 從新建立的金鑰複製金鑰 ID,並在
lib/constants.dart檔案中將其設為appStoreKeyId常數。 - 複製金鑰清單頂端的「發行者 ID」,並在
lib/constants.dart檔案中將其設為appStoreIssuerId常數。

追蹤裝置上的購買交易
最安全的做法是在伺服器端追蹤購買交易,因為用戶端難以確保安全,但您需要某種方式將資訊傳回用戶端,讓應用程式可以根據訂閱狀態資訊採取行動。將購買交易儲存在 Firestore 中,即可將資料同步至用戶端,並自動更新資料。
您已在應用程式中加入 IAPRepo,這是 Firestore 存放區,包含 List<PastPurchase> purchases 中所有使用者的購買資料。如果購買交易的 productId storeKeySubscription 狀態未過期,存放區也會包含 hasActiveSubscription, (為 true)。如果使用者未登入,清單會是空白。
lib/repo/iap_repo.dart
  void updatePurchases() {
    _purchaseSubscription?.cancel();
    var user = _user;
    if (user == null) {
      purchases = [];
      hasActiveSubscription = false;
      hasUpgrade = false;
      return;
    }
    var purchaseStream = _firestore
        .collection('purchases')
        .where('userId', isEqualTo: user.uid)
        .snapshots();
    _purchaseSubscription = purchaseStream.listen((snapshot) {
      purchases = snapshot.docs.map((document) {
        var data = document.data();
        return PastPurchase.fromJson(data);
      }).toList();

      hasActiveSubscription = purchases.any(
        (element) =>
            element.productId == storeKeySubscription &&
            element.status != Status.expired,
      );

      hasUpgrade = purchases.any(
        (element) => element.productId == storeKeyUpgrade,
      );

      notifyListeners();
    });
  }
所有購買邏輯都在 DashPurchases 類別中,訂閱項目應在此套用或移除。因此,請將 iapRepo 新增為類別中的屬性,並在建構函式中指派 iapRepo。接著,直接在建構函式中新增事件監聽器,並在 dispose() 方法中移除事件監聽器。一開始,監聽器可以只是空白函式。由於 IAPRepo 是 ChangeNotifier,且您會在 Firestore 中的購買項目變更時呼叫 notifyListeners(),因此當購買的產品變更時,系統一律會呼叫 purchasesUpdate() 方法。
lib/logic/dash_purchases.dart
import '../repo/iap_repo.dart';                              // Add this import

class DashPurchases extends ChangeNotifier {
  DashCounter counter;
  FirebaseNotifier firebaseNotifier;
  StoreState storeState = StoreState.loading;
  late StreamSubscription<List<PurchaseDetails>> _subscription;
  List<PurchasableProduct> products = [];
  IAPRepo iapRepo;                                           // Add this line

  bool get beautifiedDash => _beautifiedDashUpgrade;
  bool _beautifiedDashUpgrade = false;
  final iapConnection = IAPConnection.instance;

  // Add this.iapRepo as a parameter
  DashPurchases(this.counter, this.firebaseNotifier, this.iapRepo) {
    final purchaseUpdated = iapConnection.purchaseStream;
    _subscription = purchaseUpdated.listen(
      _onPurchaseUpdate,
      onDone: _updateStreamOnDone,
      onError: _updateStreamOnError,
    );
    iapRepo.addListener(purchasesUpdate);
    loadPurchases();
  }

  Future<void> loadPurchases() async {
    // Elided.
  }

  @override
  void dispose() {
    _subscription.cancel();
    iapRepo.removeListener(purchasesUpdate);                 // Add this line
    super.dispose();
  }

  void purchasesUpdate() {
    //TODO manage updates
  }
接著,在 main.dart. 中將 IAPRepo 提供給建構函式。您可以使用 context.read 取得存放區,因為存放區已在 Provider 中建立。
lib/main.dart
        ChangeNotifierProvider<DashPurchases>(
          create: (context) => DashPurchases(
            context.read<DashCounter>(),
            context.read<FirebaseNotifier>(),
            context.read<IAPRepo>(),                         // Add this line
          ),
          lazy: false,
        ),
接著,請編寫 purchaseUpdate() 函式的程式碼。在 dash_counter.dart, 中,applyPaidMultiplier 和 removePaidMultiplier 方法會分別將乘數設為 10 或 1,因此您不必檢查是否已套用訂閱方案。訂閱狀態變更時,您也需要更新可購買產品的狀態,以便在購買頁面中顯示產品已啟用。根據是否已購買升級項目,設定 _beautifiedDashUpgrade 屬性。
lib/logic/dash_purchases.dart
  void purchasesUpdate() {
    var subscriptions = <PurchasableProduct>[];
    var upgrades = <PurchasableProduct>[];
    // Get a list of purchasable products for the subscription and upgrade.
    // This should be 1 per type.
    if (products.isNotEmpty) {
      subscriptions = products
          .where((element) => element.productDetails.id == storeKeySubscription)
          .toList();
      upgrades = products
          .where((element) => element.productDetails.id == storeKeyUpgrade)
          .toList();
    }

    // Set the subscription in the counter logic and show/hide purchased on the
    // purchases page.
    if (iapRepo.hasActiveSubscription) {
      counter.applyPaidMultiplier();
      for (var element in subscriptions) {
        _updateStatus(element, ProductStatus.purchased);
      }
    } else {
      counter.removePaidMultiplier();
      for (var element in subscriptions) {
        _updateStatus(element, ProductStatus.purchasable);
      }
    }

    // Set the Dash beautifier and show/hide purchased on
    // the purchases page.
    if (iapRepo.hasUpgrade != _beautifiedDashUpgrade) {
      _beautifiedDashUpgrade = iapRepo.hasUpgrade;
      for (var element in upgrades) {
        _updateStatus(
          element,
          _beautifiedDashUpgrade
              ? ProductStatus.purchased
              : ProductStatus.purchasable,
        );
      }
      notifyListeners();
    }
  }

  void _updateStatus(PurchasableProduct product, ProductStatus status) {
    if (product.status != ProductStatus.purchased) {
      product.status = ProductStatus.purchased;
      notifyListeners();
    }
  }
您現在已確保後端服務中的訂閱和升級狀態一律為最新狀態,並與應用程式同步。應用程式會據此運作,並將訂閱和升級功能套用至 Dash 點擊遊戲。
12. 大功告成!
恭喜!!!您已完成程式碼研究室。您可以在  complete 資料夾中找到本程式碼研究室的完整程式碼。
如要瞭解詳情,請嘗試其他 Flutter 程式碼研究室。