1. What you will learn
Welcome! We're about to embark on a pretty cool journey today. Let's start by thinking about a popular social event platform InstaVibe. While it's successful, we know that for some users, the actual planning of group activities can feel like a chore. Imagine trying to figure out what all your friends are interested in, then sifting through endless options for events or venues, and finally coordinating everything. It's a lot! This is precisely where we can introduce AI, and more specifically, intelligent agents, to make a real difference.
The idea is to build a system where these agents can handle the heavy lifting, like cleverly ‘listening' to understand user and friend preferences, and then proactively suggesting fantastic, tailored activities. Our aim is to transform social planning on InstaVibe into something seamless and delightful. To get started on building these smart assistants, we need to lay a strong groundwork with the right tools.
Here's the concept you'll see:
Foundations with Google's ADK: Master the fundamentals of building your first intelligent agent using Google's Agent Development Kit (ADK). Understand the essential components, the agent lifecycle, and how to leverage the framework's built-in tools effectively.
Extending Agent Capabilities with Model Context Protocol (MCP): Learn to equip your agents with custom tools and context, enabling them to perform specialized tasks and access specific information. Introduce the Model Context Protocol (MCP) concept. You'll learn how to set up an MCP server to provide this context.
Designing Agent Interactions & Orchestration: Move beyond single agents to understand agent orchestration. Design interaction patterns ranging from simple sequential workflows to complex scenarios involving loops, conditional logic, and parallel processing. Introduce the concept of sub-agents within the ADK framework to manage modular tasks.
Building Collaborative Multi-Agent Systems: Discover how to architect systems where multiple agents collaborate to achieve complex goals. Learn and implement the Agent-to-Agent (A2A) communication protocol, establishing a standardized way for distributed agents (potentially running on different machines or services) to interact reliably.
Productionizing Agents on Google Cloud: Transition your agent applications from development environments to the cloud. Learn best practices for architecting and deploying scalable, robust multi-agent systems on Google Cloud Platform (GCP). Gain insights into leveraging GCP services like Cloud Run and explore the capabilities of the latest Google Agent Engine for hosting and managing your agents.
2. Architecture
AI-Powered Social Planning with InstaVibe
What is Social Listening?
Social listening is the process of monitoring digital conversations across platforms like social media, forums, and news sites to understand what people are saying about a topic, brand, or industry. It provides valuable insights into public sentiment, trends, and user needs. In this workshop, we'll leverage this concept within an agent-based system.
You're on the Team at InstaVibe
Imagine you work at "InstaVibe," a successful startup with a popular social event platform targeted at young adults. Things are going well, but like many tech companies, your team faces pressure from investors to innovate using AI. Internally, you've also noticed a segment of users who aren't engaging as much as others – maybe they're less inclined to initiate group activities or find the planning process challenging. For your company, this means lower platform stickiness among this important user group.
Your team's research suggests that AI-driven assistance could significantly improve the experience for these users. The idea is to streamline the process of planning social outings by proactively suggesting relevant activities based on the interests of the user and their friends. The question you and your colleagues face is: How can AI agents automate the often time-consuming tasks of interest discovery, activity research, and potentially initial coordination?
An Agent-Based Solution (Prototype Concept)
You propose developing a prototype feature powered by a multi-agent system. Here's a conceptual breakdown:
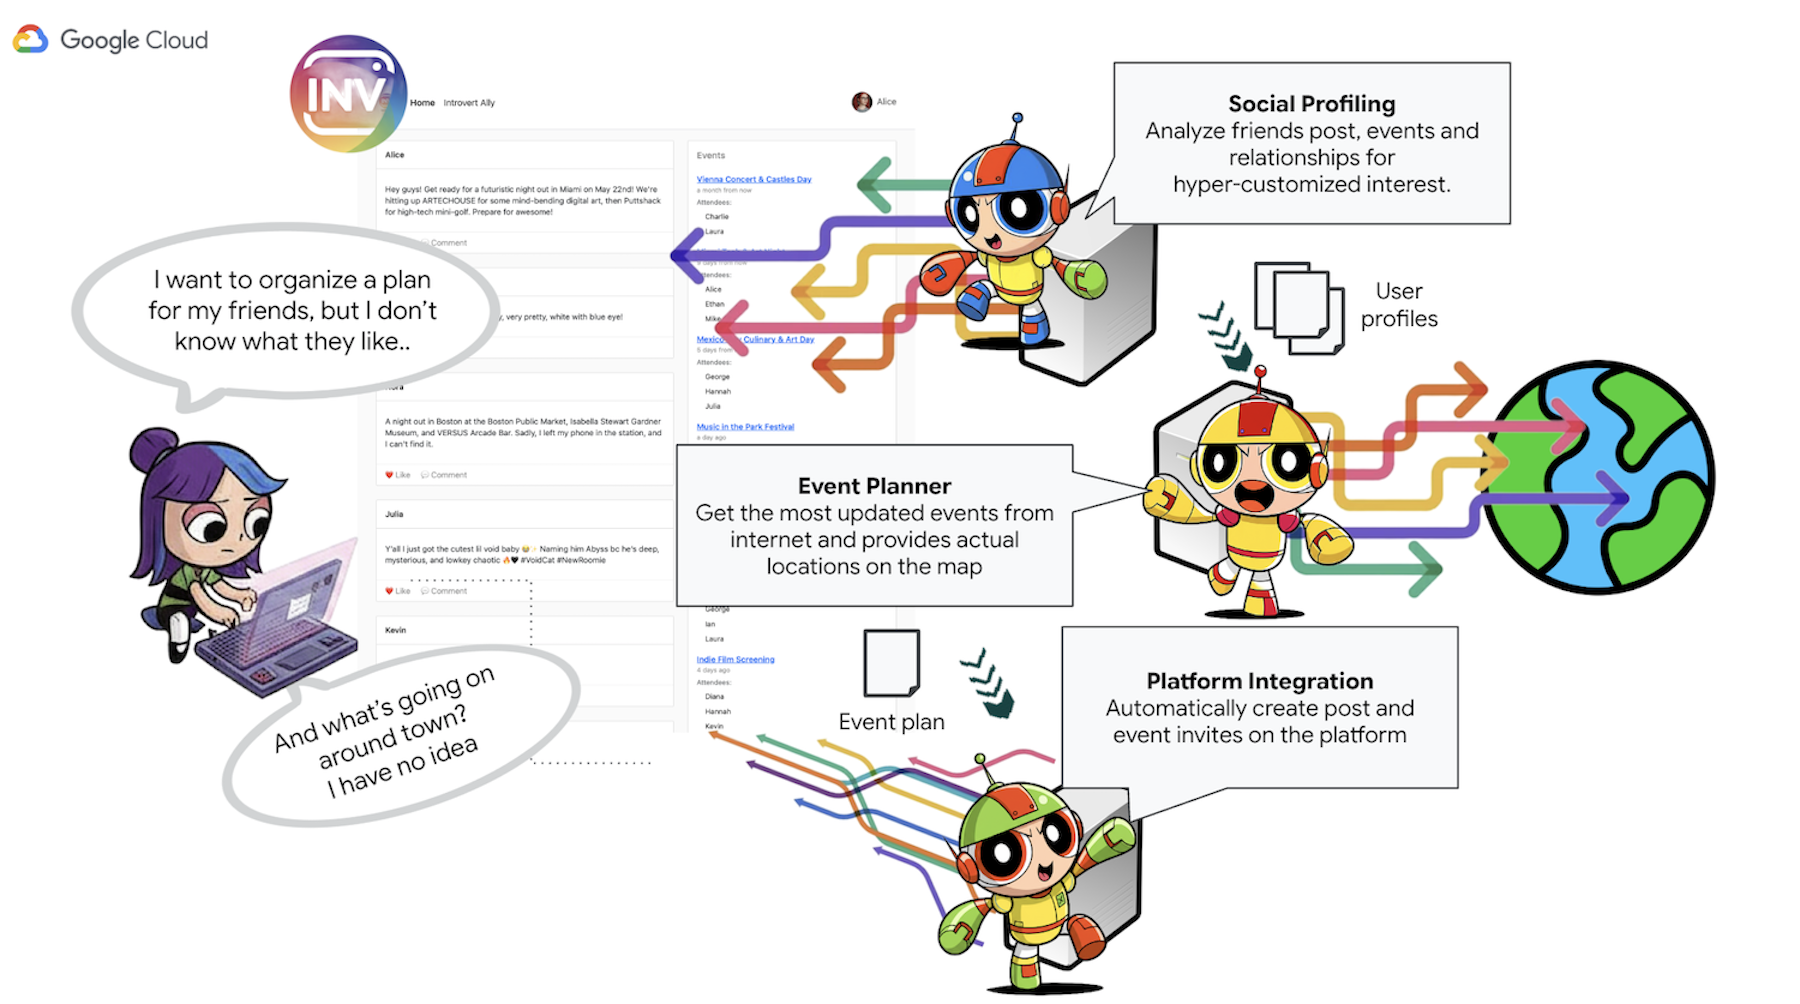
- Social profiling Agent: This agent employs social listening techniques to analyze user connections, interactions and potentially broader public trends related to the user's preferences. Its purpose is to identify shared interests and suitable activity characteristics (e.g., preferences for quieter gatherings, specific hobbies).
- Event Planning Agent: Using the insights from the Social profiling Agent, this agent searches online resources for specific events, venues, or ideas that align with the identified criteria (such as location, interests).
- Platform Interaction Agent (using MCP): This agent takes the finalized plan from the Activity Planning Agent. Its key function is to interact directly with the InstaVibe platform by utilizing a pre-defined MCP (Model Context Protocol) tool. This tool provides the agent with the specific capability to draft an event suggestion and create a post outlining the plan.
- Orchestrator Agent: This agent acts as the central coordinator. It receives the initial user request from the InstaVibe platform, understands the overall goal (e.g., "plan a event for me and my friends"), and then delegates specific tasks to the appropriate specialized agents in a logical sequence. It manages the flow of information between agents and ensures the final result is delivered back to the user.
Key Architectural Elements and Technologies

Google Cloud Platform (GCP):
- Vertex AI:
- Gemini Models: Provides access to Google's state-of-the-art Large Language Models (LLMs) like Gemini, which power the reasoning and decision-making capabilities of our agents.
- Vertex AI Agent Engine: A managed service used to deploy, host, and scale our orchestrator agent, simplifying productionization and abstracting infrastructure complexities.
- Cloud Run: A serverless platform for deploying containerized applications. We use it to:
- Host the main InstaVibe web application.
- Deploy individual A2A-enabled agents (Planner, Social Profiling, Platform Interaction) as independent microservices.
- Run the MCP Tool Server, making InstaVibe's internal APIs available to agents.
- Spanner: A fully managed, globally distributed, and strongly consistent relational database. In this workshop, we leverage its capabilities as a Graph Database using its GRAPH DDL and query features to:
- Model and store complex social relationships (users, friendships, event attendance, posts).
- Enable efficient querying of these relationships for the Social Profiling agents.
- Artifact Registry: A fully managed service for storing, managing, and securing container images.
- Cloud Build: A service that executes your builds on Google Cloud. We use it to automatically build Docker container images from our agent and application source code.
- Cloud Storage: Used by services like Cloud Build for storing build artifacts and by Agent Engine for its operational needs.
- Core Agent Frameworks & Protocols:
- Google's Agent Development Kit (ADK): The primary framework for:
- Defining the core logic, behavior, and instruction sets for individual intelligent agents.
- Managing agent lifecycles, state, and memory (short-term session state and potentially long-term knowledge).
- Integrating tools (like Google Search or custom-built tools) that agents can use to interact with the world.
- Orchestrating multi-agent workflows, including sequential, loop, and parallel execution of sub-agents.
- Agent-to-Agent (A2A) Communication Protocol: An open standard enabling:
- Direct, standardized communication and collaboration between different AI agents, even if they are running as separate services or on different machines.
- Agents to discover each other's capabilities (via Agent Cards) and delegate tasks. This is crucial for our Orchestrator agent to interact with the specialized Planner, Social, and Platform agents.
- A2A Python Library (a2a-python): The concrete library used to make our ADK agents speak the A2A protocol. It provides the server-side components needed to:
- Expose our agents as A2A-compliant servers.
- Automatically handle serving the "Agent Card" for discovery.
- Receive and manage incoming task requests from other agents (like the Orchestrator).
- Model Context Protocol (MCP): An open standard that allows agents to:
- Connect with and utilize external tools, data sources, and systems in a standardized way.
- Our Platform Interaction Agent uses an MCP client to communicate with an MCP server, which in turn exposes tools to interact with the InstaVibe platform's existing APIs.
- Google's Agent Development Kit (ADK): The primary framework for:
- Debugging Tools:
- A2A Inspector: The A2A Inspector is a web-based debugging tool used throughout this workshop to connect to, inspect, and interact with our A2A-enabled agents. While not part of the final production architecture, it is an essential part of our development workflow. It provides:
- Agent Card Viewer: To fetch and validate an agent's public capabilities.
- Live Chat Interface: To send messages directly to a deployed agent for immediate testing.
- Debug Console: To view the raw JSON-RPC messages being exchanged between the inspector and the agent.
- A2A Inspector: The A2A Inspector is a web-based debugging tool used throughout this workshop to connect to, inspect, and interact with our A2A-enabled agents. While not part of the final production architecture, it is an essential part of our development workflow. It provides:
- Language Models (LLMs): The "Brains" of the System:
- Google's Gemini Models: Specifically, we utilize versions like gemini-2.0-flash. These models are chosen for:
- Advanced Reasoning & Instruction Following: Their ability to understand complex prompts, follow detailed instructions, and reason about tasks makes them suitable for powering agent decision-making.
- Tool Use (Function Calling): Gemini models excel at determining when and how to use the tools provided via ADK, enabling agents to gather information or perform actions.
- Efficiency (Flash Models): The "flash" variants offer a good balance of performance and cost-effectiveness, suitable for many interactive agent tasks that require quick responses.
- Google's Gemini Models: Specifically, we utilize versions like gemini-2.0-flash. These models are chosen for:
3. Before you begin
👉Click Activate Cloud Shell at the top of the Google Cloud console (It's the terminal shape icon at the top of the Cloud Shell pane), 
👉Click on the "Open Editor" button (it looks like an open folder with a pencil). This will open the Cloud Shell Code Editor in the window. You'll see a file explorer on the left side. 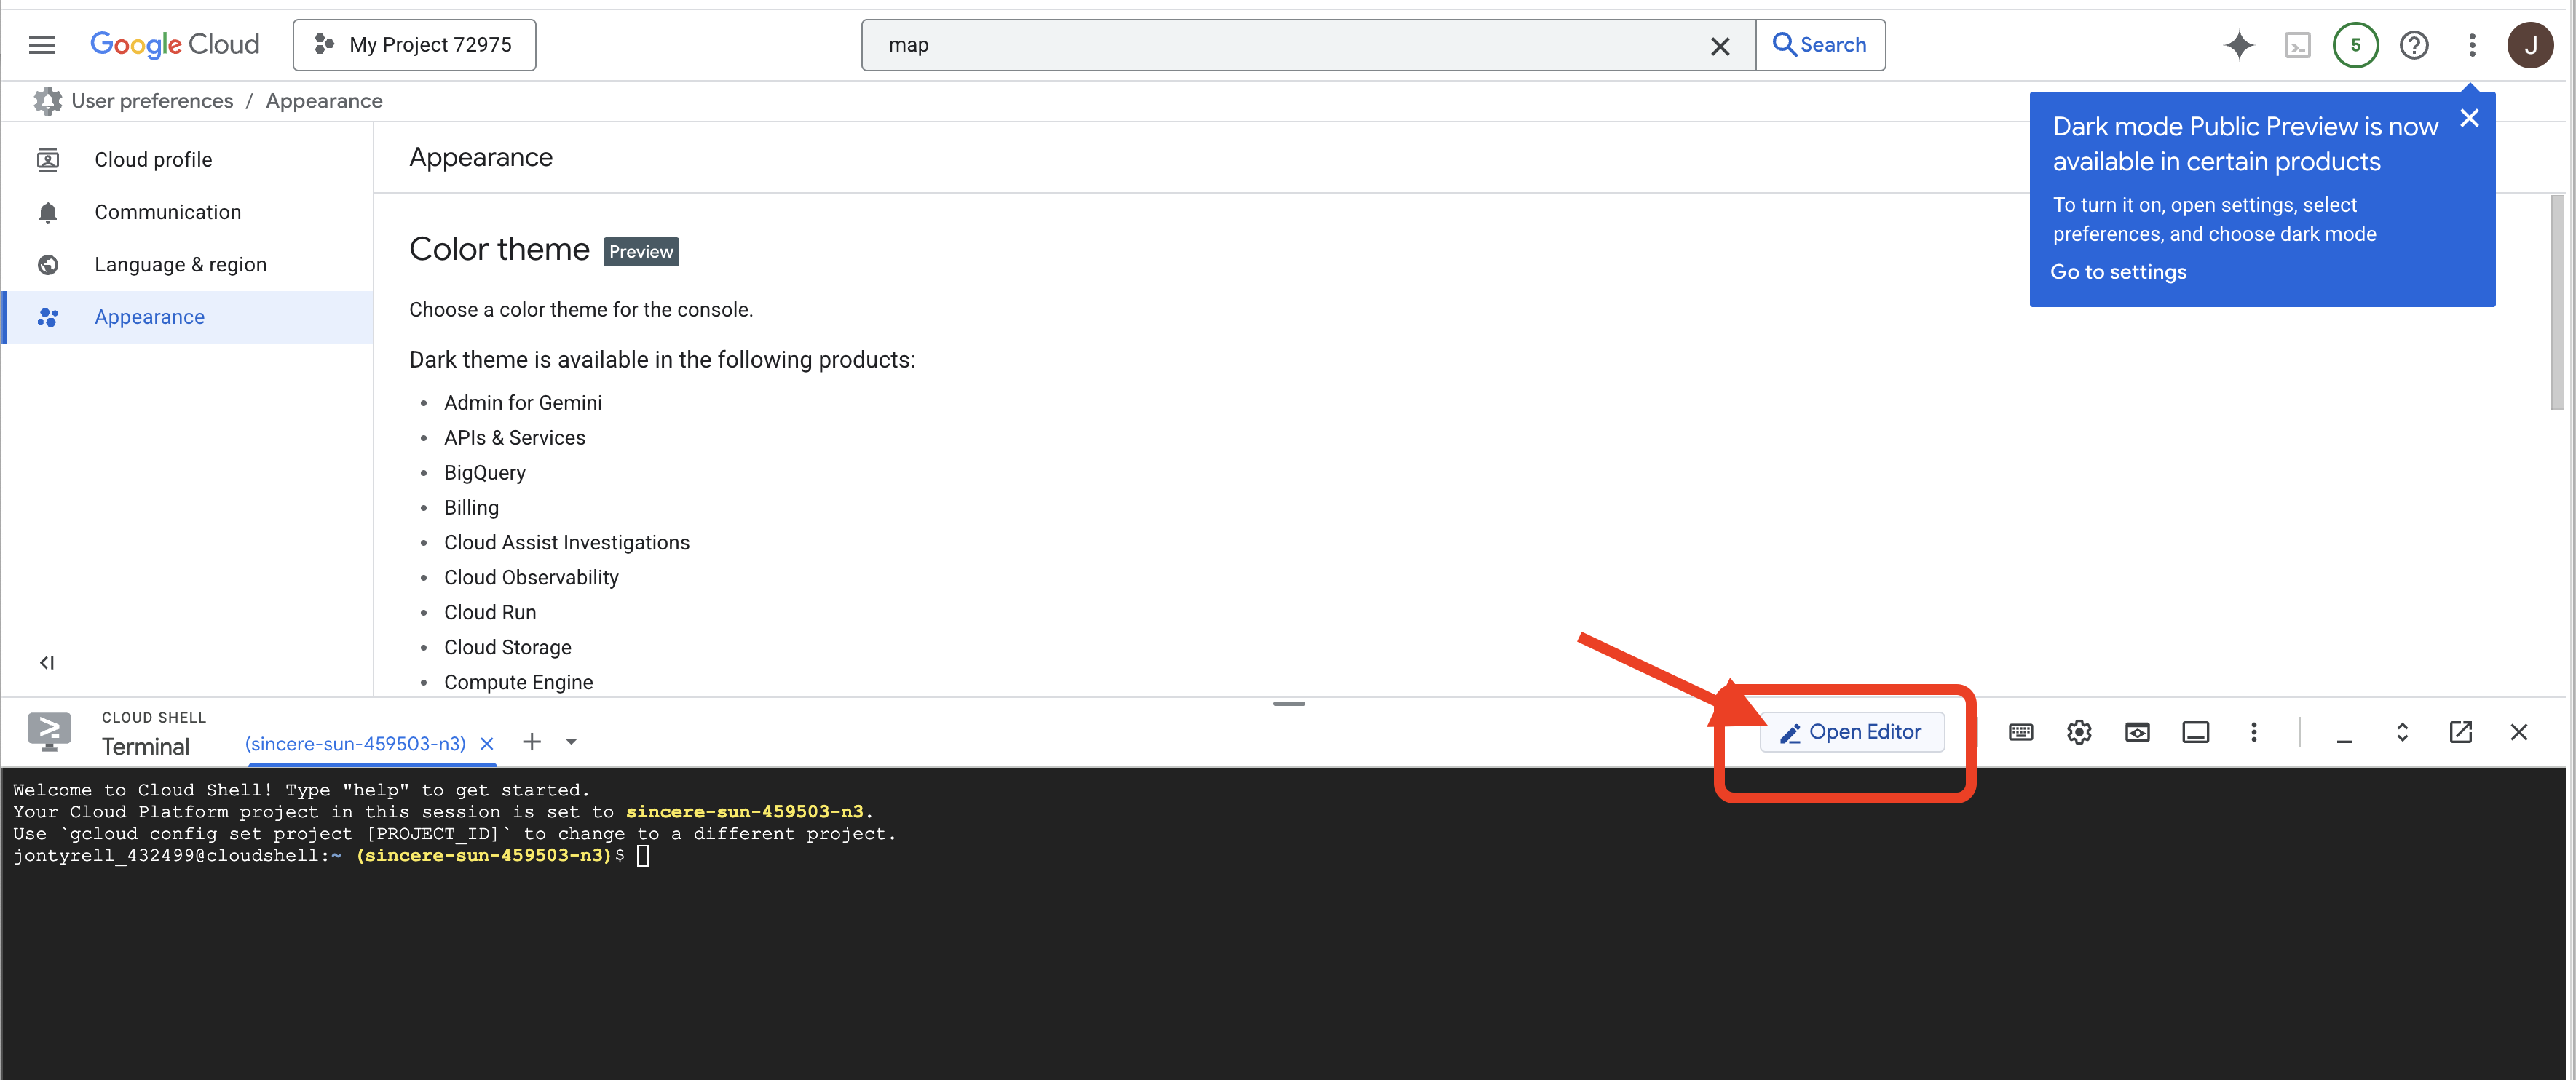
👉Click on the Cloud Code Sign-in button in the bottom status bar as shown. Authorize the plugin as instructed. If you see Cloud Code - no project in the status bar, select that then in the drop down ‘Select a Google Cloud Project' and then select the specific Google Cloud Project from the list of projects that you created. 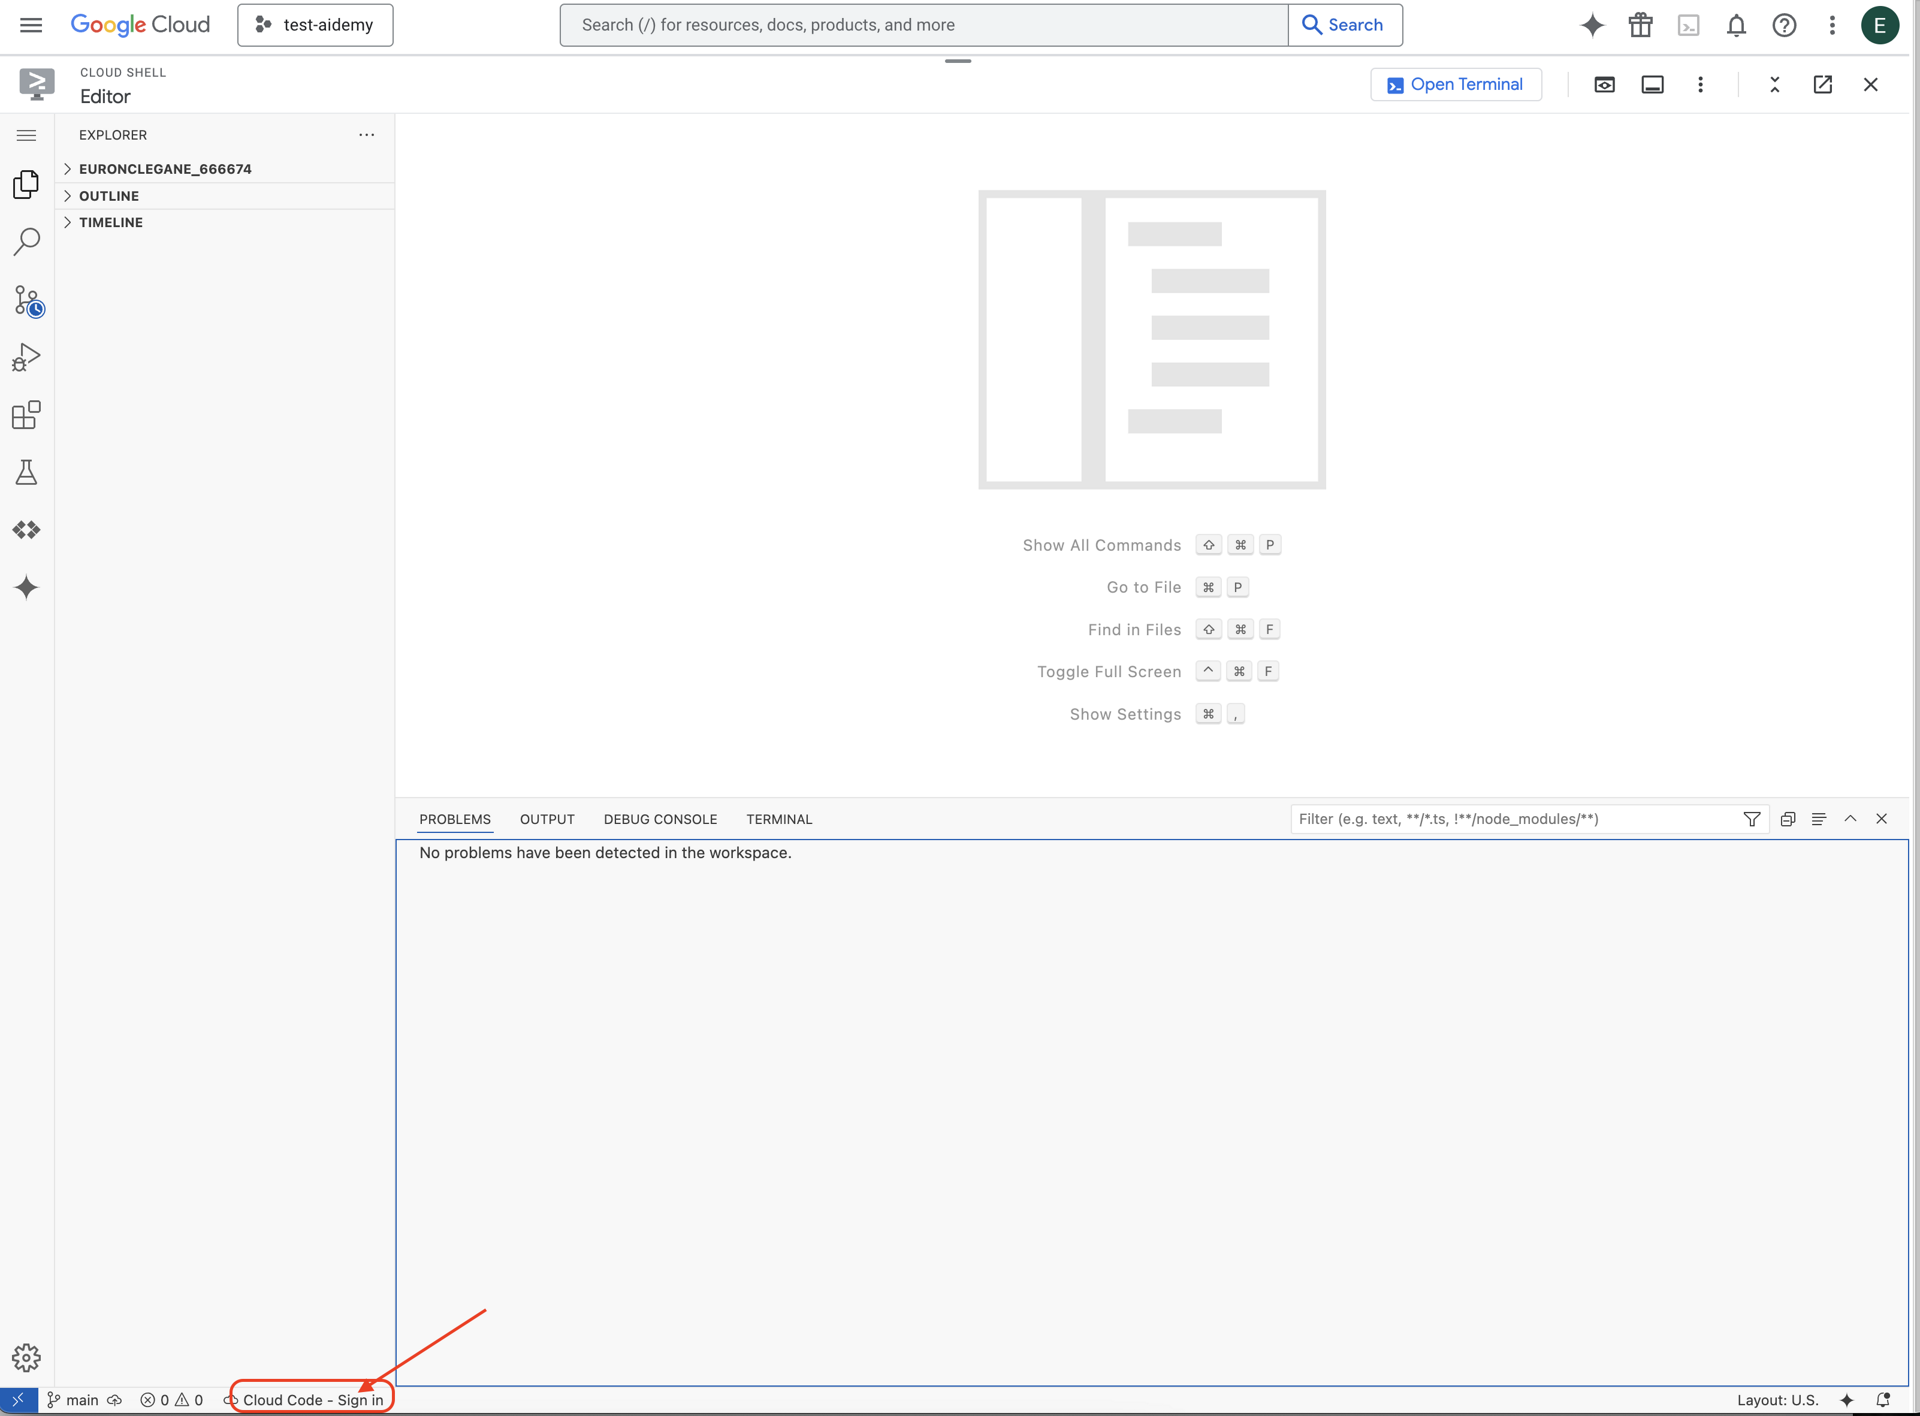
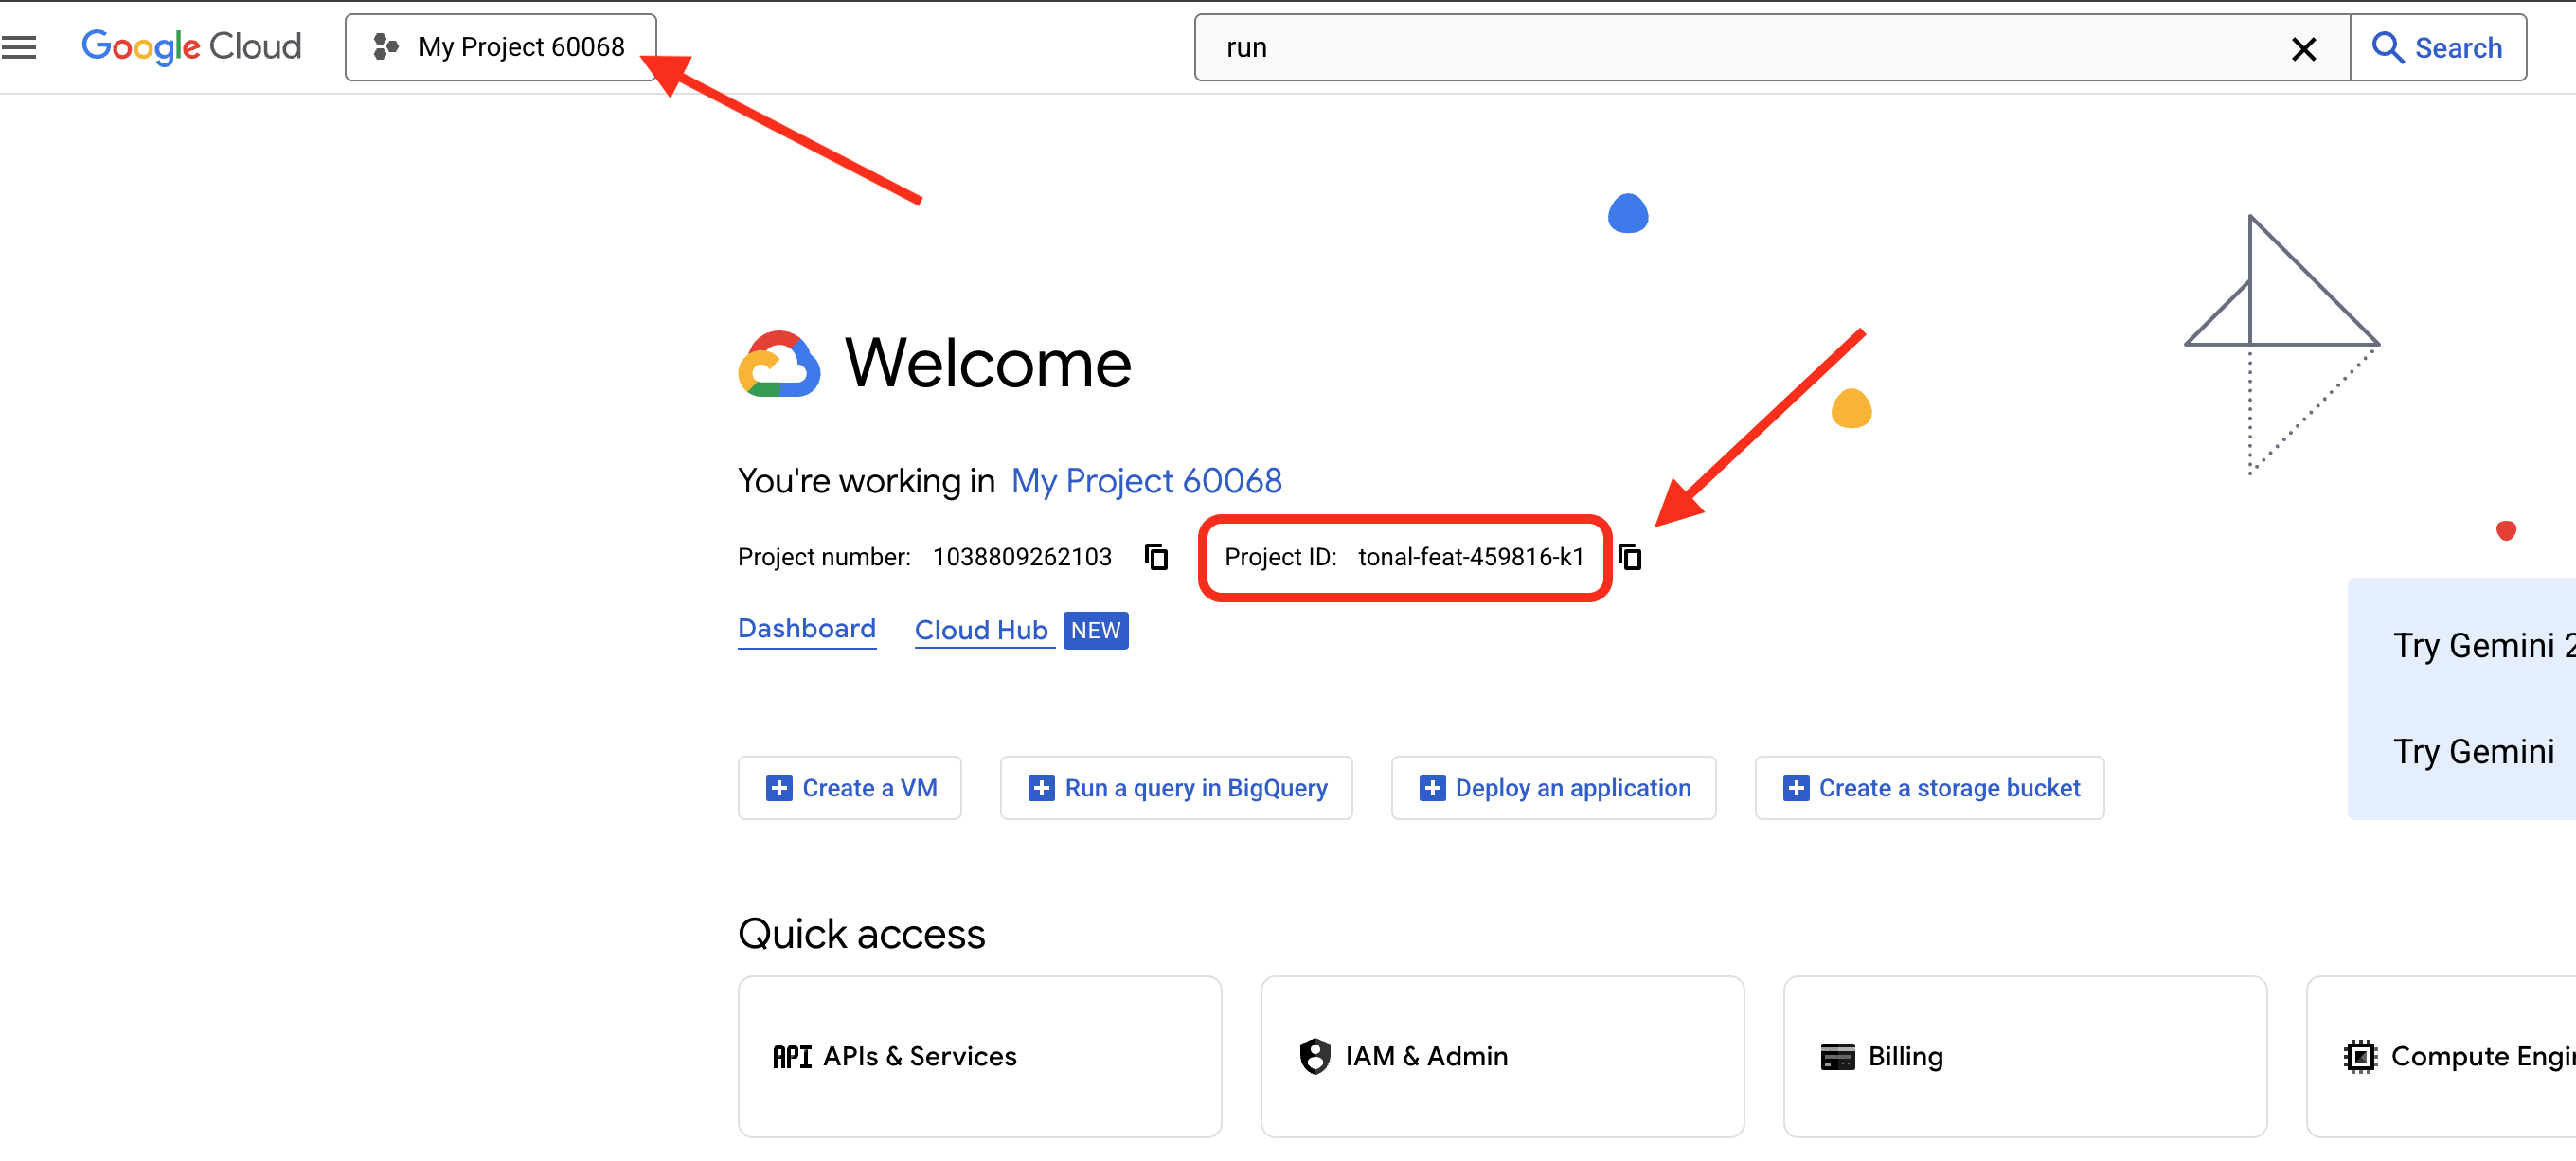
👉 Find your Google Cloud Project ID:
- Open the Google Cloud Console: https://console.cloud.google.com
- Select the project you want to use for this workshop from the project dropdown at the top of the page.
- Your Project ID is displayed in the Project info card on the Dashboard
👉Open the terminal in the cloud IDE, 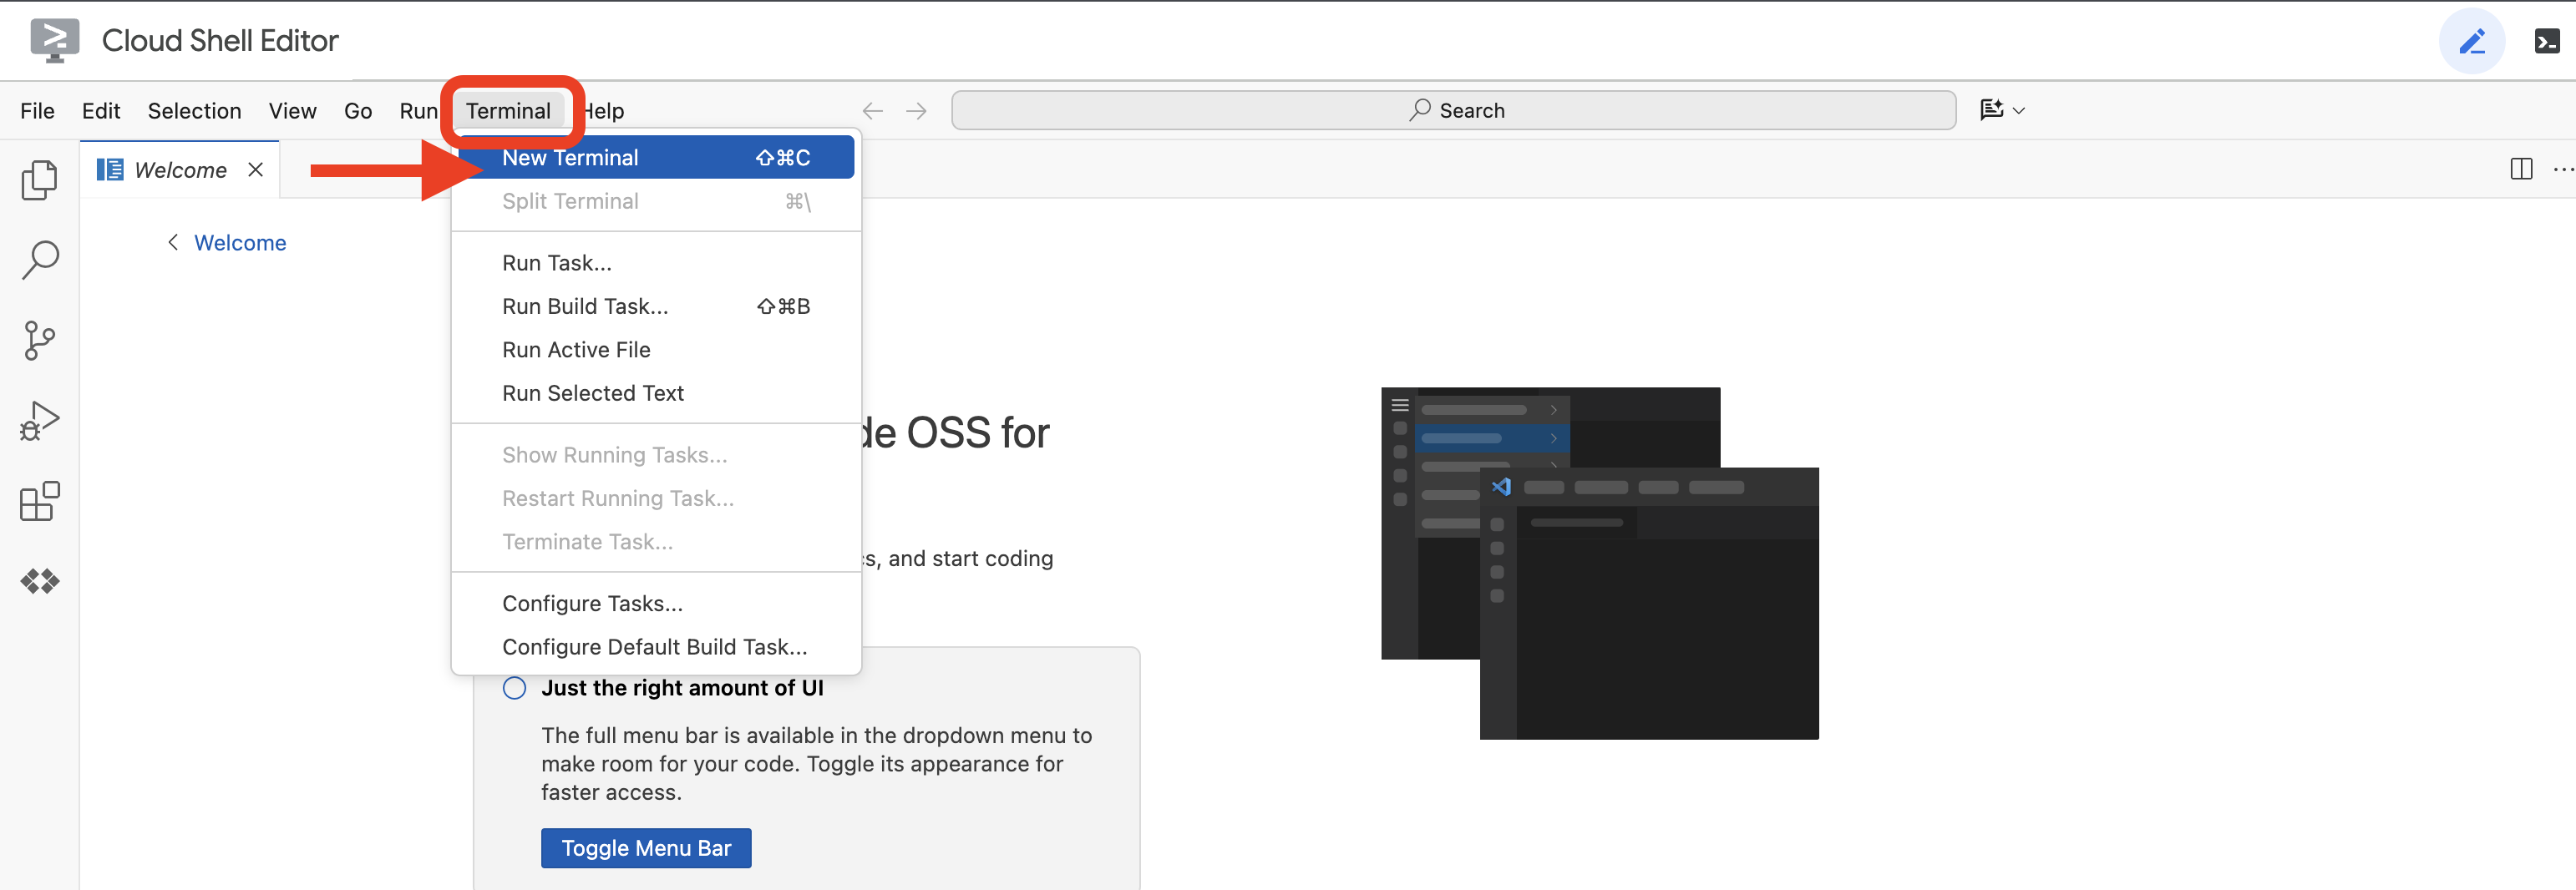
👉💻 In the terminal, verify that you're already authenticated and that the project is set to your project ID using the following command:
gcloud auth list
👉💻 Clone the instavibe-bootstrap project from GitHub:
git clone -b adk-1.2.1-a2a-0.2.7 https://github.com/weimeilin79/instavibe-bootstrap.git
chmod +x ~/instavibe-bootstrap/init.sh
chmod +x ~/instavibe-bootstrap/set_env.sh
Understanding the Project Structure
Before we start building, let's take a moment to understand the layout of the instavibe-bootstrap project you just cloned. This will help you know where to find and edit files throughout the workshop.
instavibe-bootstrap/
├── agents/
│   ├── orchestrate/
│   ├── planner/
│   ├── platform_mcp_client/
│   └── social/
├── instavibe/
│   ├── static/
│   └── templates/
├── tools/
│   └── instavibe/
├── utils/
├── init.sh
└── set_env.sh
Here is a breakdown of the key directories:
agents/: This is the heart of our AI system. Each subdirectory (planner/, social/, etc.) contains the source code for a specific intelligent agent.agent.py: Inside each agent's folder, this is the main file where the agent's logic.a2a_server.py: This file wraps the ADK agent with an Agent-to-Agent (A2A) server.Dockerfile: Defines how to build the container image for deploying the agent to Cloud Run or Agent Engine.
instavibe/: This directory contains the entire source code for the InstaVibe web application.tools/: This directory is for building external tools that our agents can use.instavibe/contains the Model Context Protocol (MCP) Server.
This modular structure separates the web application from the various AI components, making the entire system easier to manage, test, and deploy.
👉💻 Run the initialization script:
This script will prompt you to enter your Google Cloud Project ID.
Enter Google Cloud Project ID you found from the last step when prompted by the init.sh script:
cd ~/instavibe-bootstrap
./init.sh
👉💻 Set the Project ID needed:
gcloud config set project $(cat ~/project_id.txt) --quiet
👉💻 Run the following command to enable the necessary Google Cloud APIs:
gcloud services enable  run.googleapis.com \
                        cloudfunctions.googleapis.com \
                        cloudbuild.googleapis.com \
                        artifactregistry.googleapis.com \
                        spanner.googleapis.com \
                        apikeys.googleapis.com \
                        iam.googleapis.com \
                        compute.googleapis.com \
                        aiplatform.googleapis.com \
                        cloudresourcemanager.googleapis.com \
                        maps-backend.googleapis.com
👉💻 Set all the environment variable needed:
export PROJECT_ID=$(gcloud config get project)
export PROJECT_NUMBER=$(gcloud projects describe ${PROJECT_ID} --format="value(projectNumber)")
export SERVICE_ACCOUNT_NAME=$(gcloud compute project-info describe --format="value(defaultServiceAccount)")
export SPANNER_INSTANCE_ID="instavibe-graph-instance"
export SPANNER_DATABASE_ID="graphdb"
export GOOGLE_CLOUD_PROJECT=$(gcloud config get project)
export GOOGLE_GENAI_USE_VERTEXAI=TRUE
export GOOGLE_CLOUD_LOCATION="us-central1"
Setting up permission
👉💻 Grant Permissions. In the terminal, run :
gcloud projects add-iam-policy-binding $PROJECT_ID \
  --member="serviceAccount:$SERVICE_ACCOUNT_NAME" \
  --role="roles/spanner.admin"

# Spanner Database User
gcloud projects add-iam-policy-binding $PROJECT_ID \
  --member="serviceAccount:$SERVICE_ACCOUNT_NAME" \
  --role="roles/spanner.databaseUser"

# Artifact Registry Admin
gcloud projects add-iam-policy-binding $PROJECT_ID \
  --member="serviceAccount:$SERVICE_ACCOUNT_NAME" \
  --role="roles/artifactregistry.admin"

# Cloud Build Editor
gcloud projects add-iam-policy-binding $PROJECT_ID \
  --member="serviceAccount:$SERVICE_ACCOUNT_NAME" \
  --role="roles/cloudbuild.builds.editor"

# Cloud Run Admin
gcloud projects add-iam-policy-binding $PROJECT_ID \
  --member="serviceAccount:$SERVICE_ACCOUNT_NAME" \
  --role="roles/run.admin"

# IAM Service Account User
gcloud projects add-iam-policy-binding $PROJECT_ID \
  --member="serviceAccount:$SERVICE_ACCOUNT_NAME" \
  --role="roles/iam.serviceAccountUser"

# Vertex AI User
gcloud projects add-iam-policy-binding $PROJECT_ID \
  --member="serviceAccount:$SERVICE_ACCOUNT_NAME" \
  --role="roles/aiplatform.user"

# Logging Writer (to allow writing logs)
gcloud projects add-iam-policy-binding $PROJECT_ID \
  --member="serviceAccount:$SERVICE_ACCOUNT_NAME" \
  --role="roles/logging.logWriter"


gcloud projects add-iam-policy-binding $PROJECT_ID \
  --member="serviceAccount:$SERVICE_ACCOUNT_NAME" \
  --role="roles/logging.viewer"
👉 Validate result in your IAM console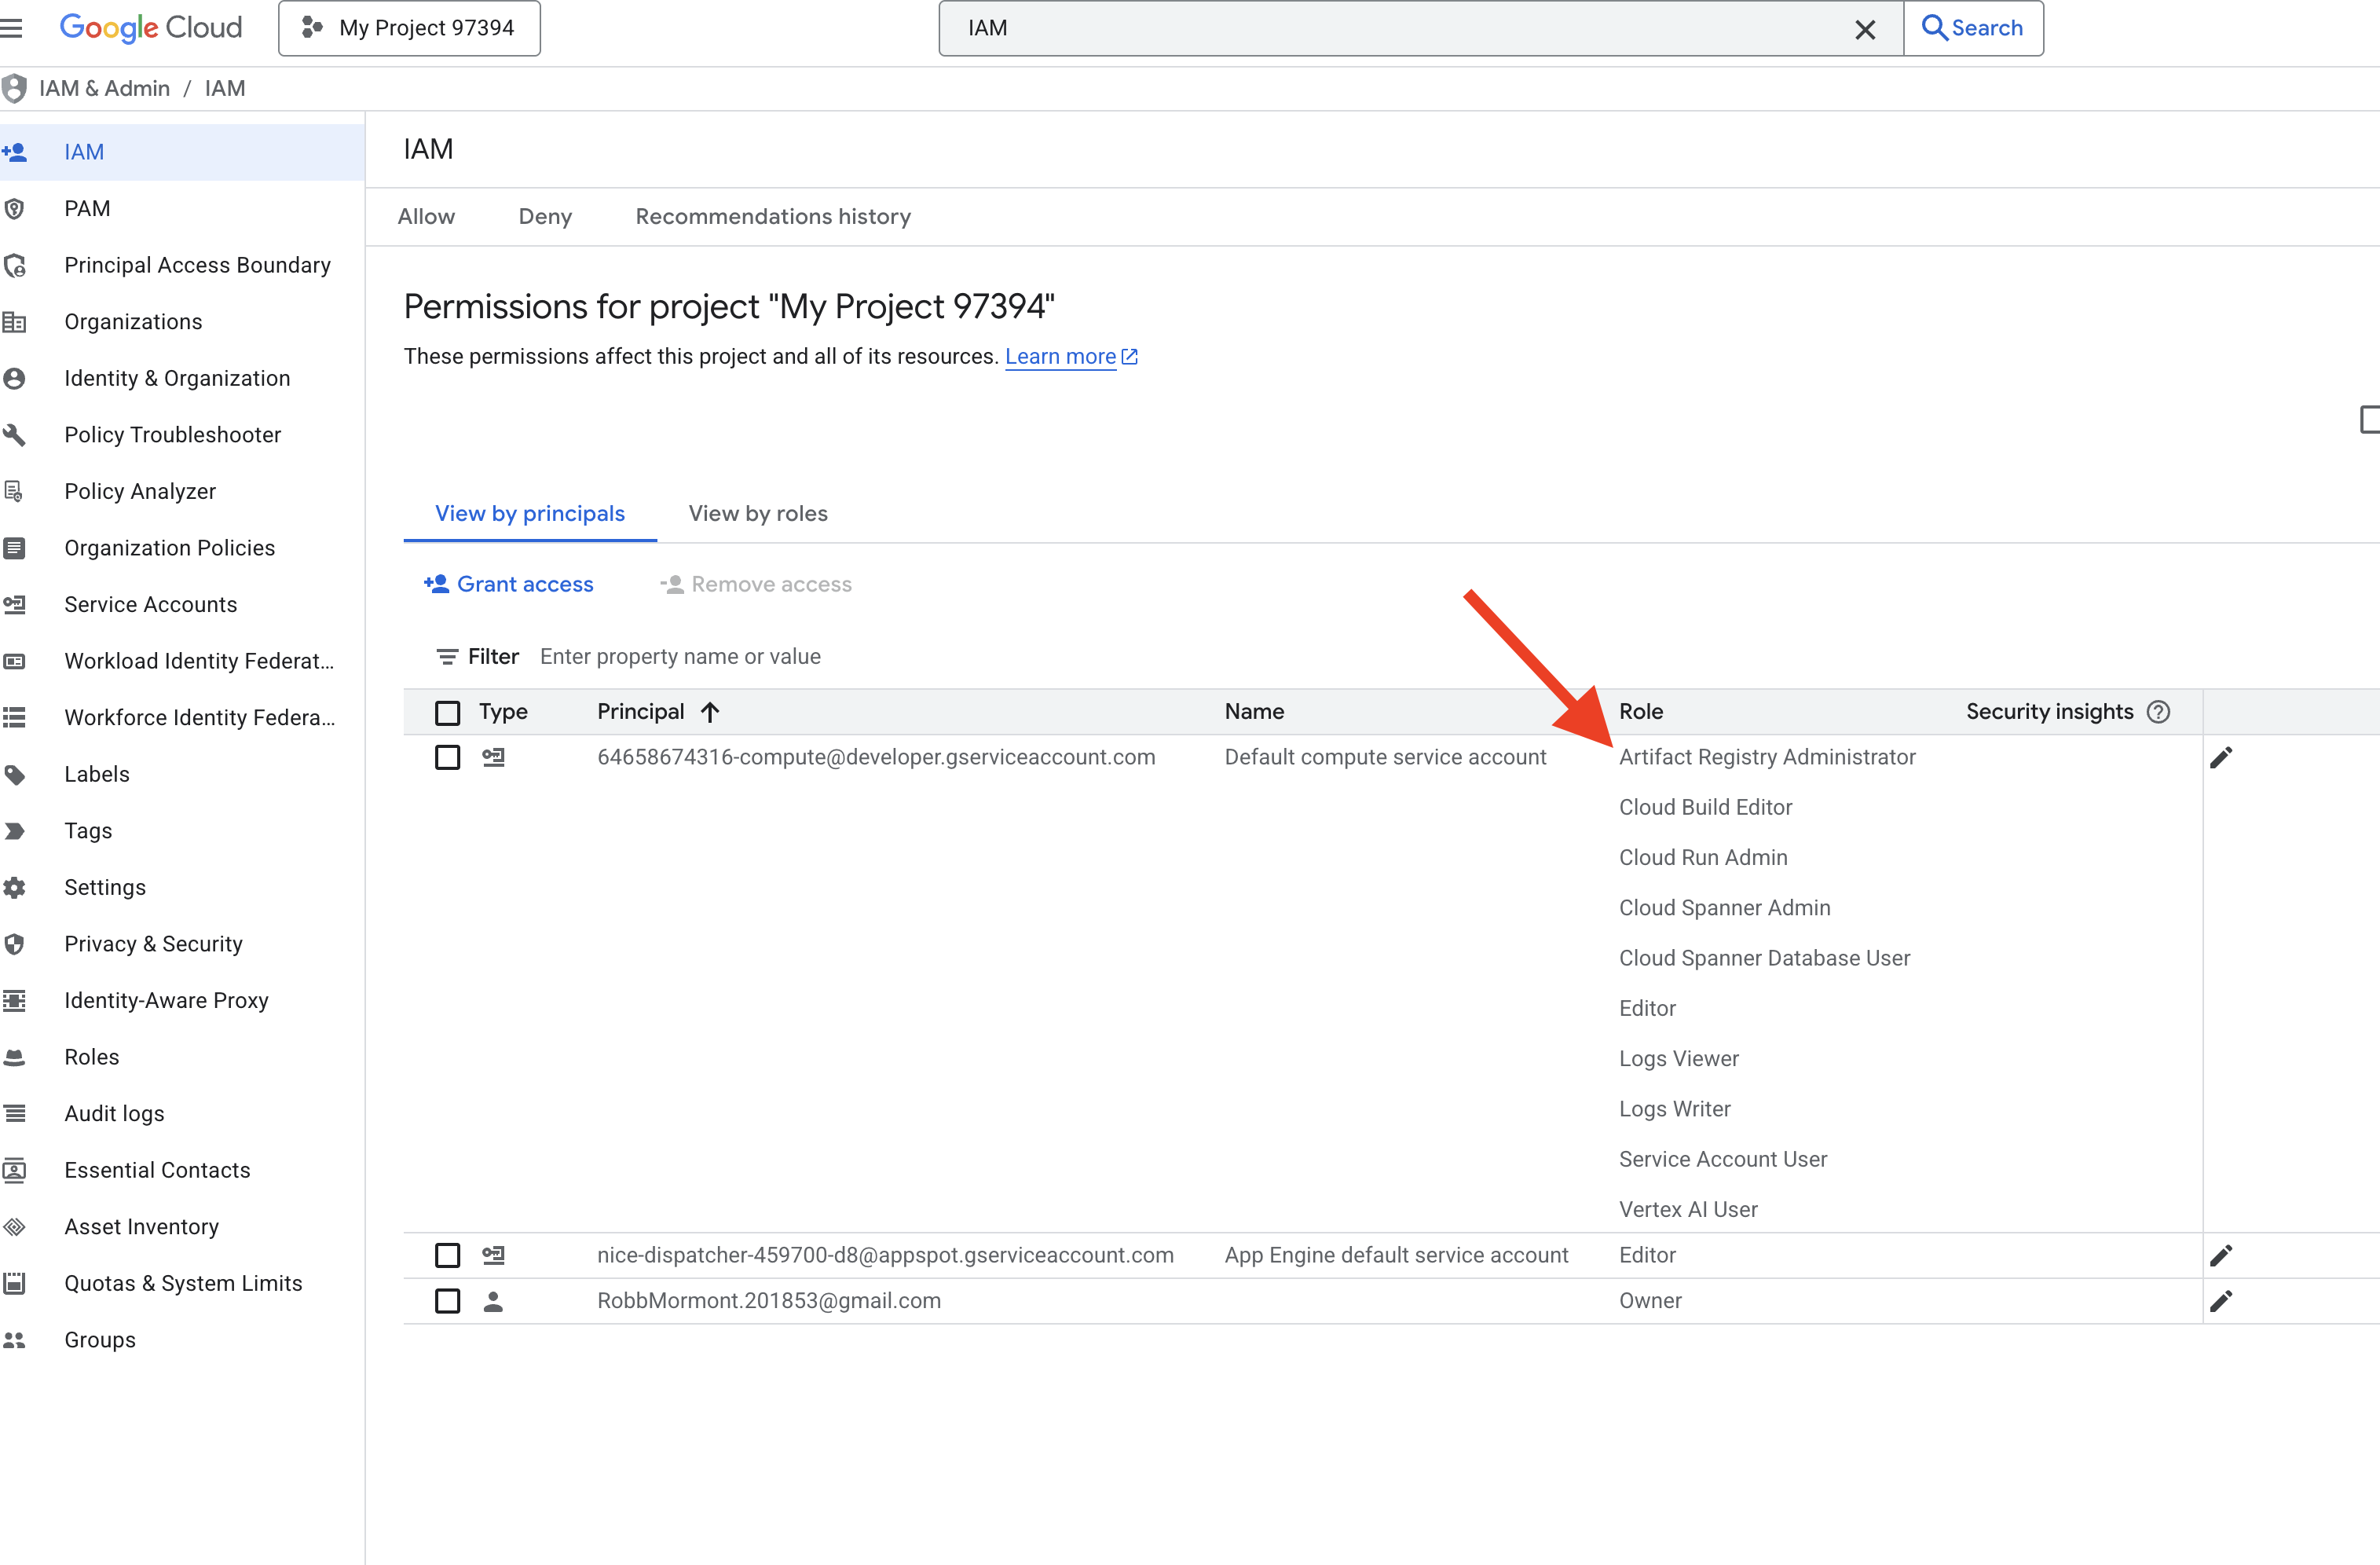
👉💻 Run the following commands in the terminal to create a Artifact Registry repository. All Docker images for our agents, the MCP server, and the InstaVibe application are stored here before deployment to Cloud Run or Agent Engine.
export REPO_NAME="introveally-repo"
gcloud artifacts repositories create $REPO_NAME \
  --repository-format=docker \
  --location=us-central1 \
  --description="Docker repository for InstaVibe workshop"
Setup Map platform for API Keys
To use Google Maps services in your InstaVibe application, you need to create an API key and restrict it appropriately.
👉 In a new tab, go to APIs & Services > Credentials. On the "Credentials" page, click the + CREATE CREDENTIALS button at the top. Select API key from the dropdown menu. 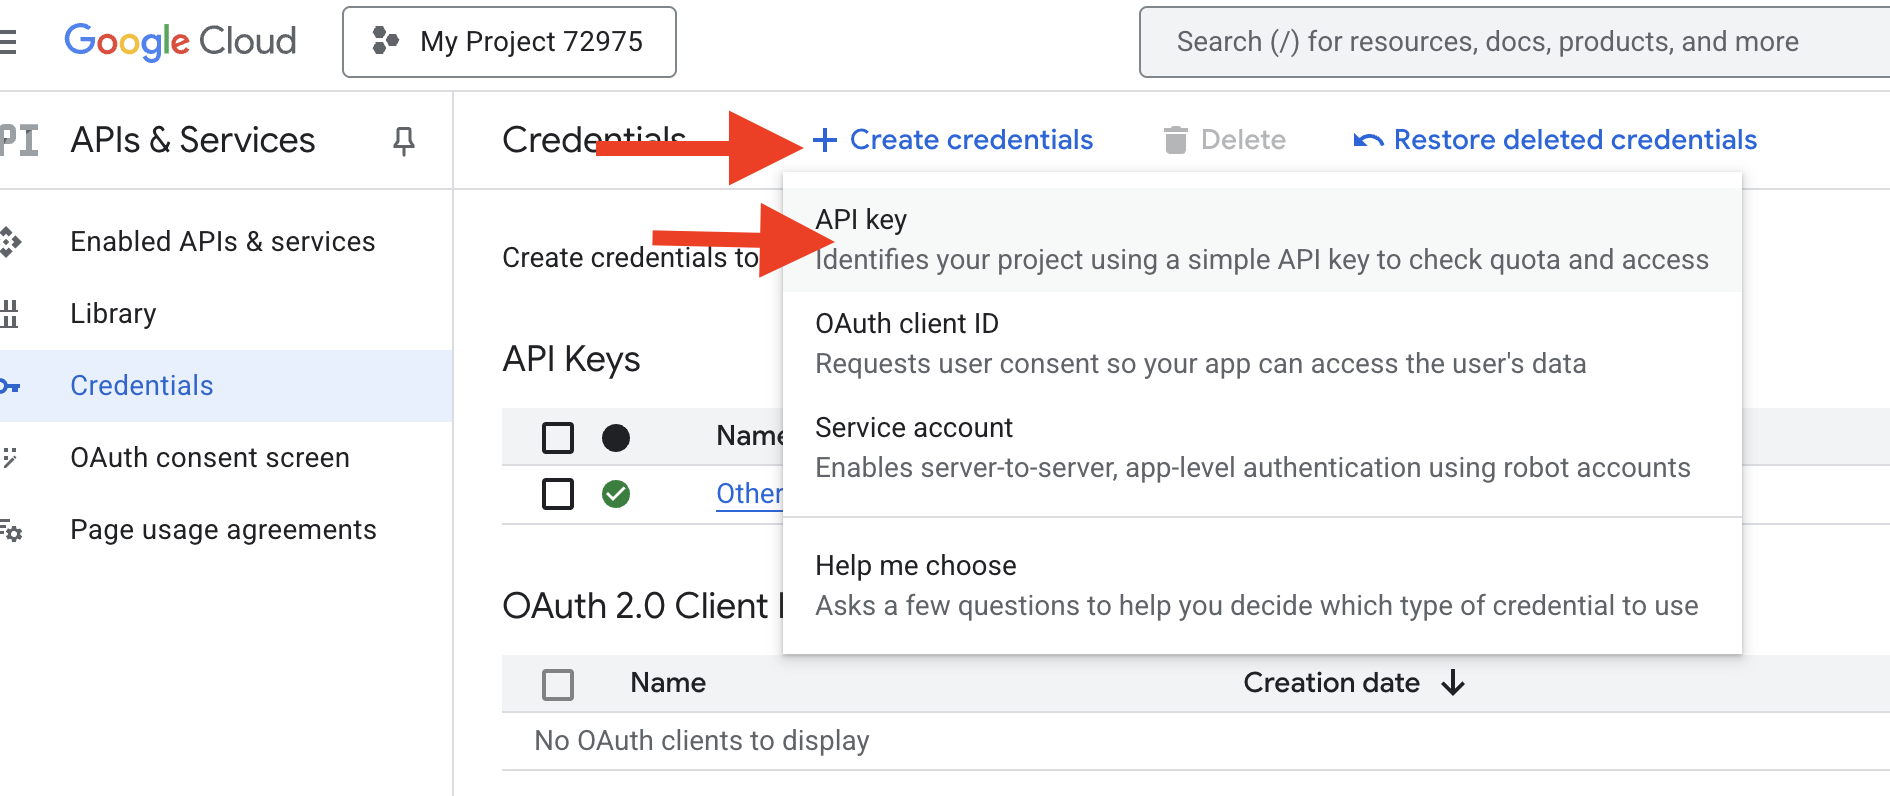
👉 A dialog box will appear showing your newly created API key. You'll need it later for your application configuration.
👉 Click CLOSE on the "API key created" dialog.
👉 You will see your new API key listed (e.g., "API key 1"). Click on the three dots on the right select Edit API key to open the "Restrict and rename API key" page. 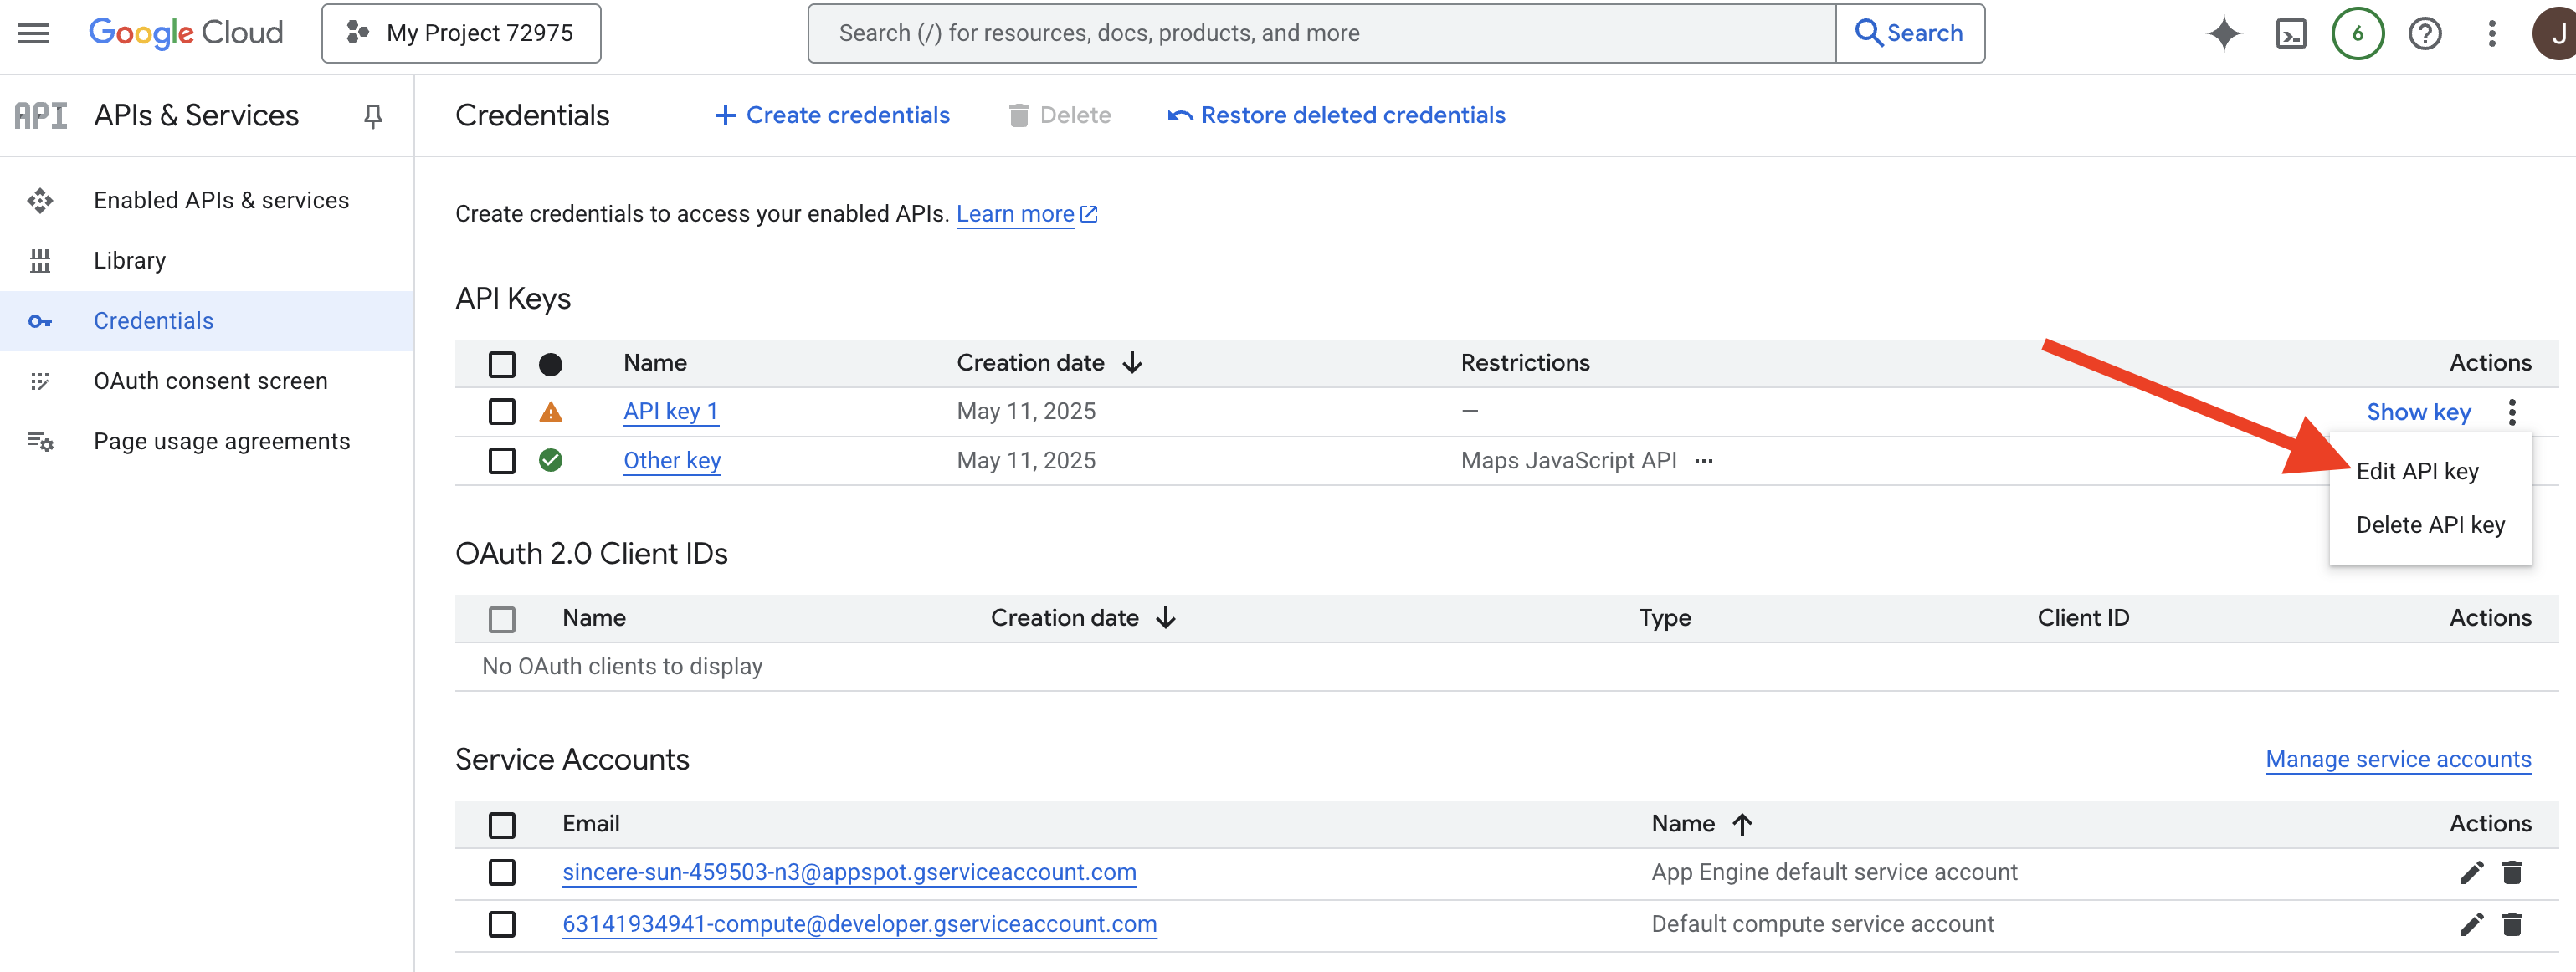
👉 In the Name field at the top, change the default name to: Maps Platform API Key (🚨🚨IMPORTANT🚨🚨 Please use this name!)
Maps Platform API Key
👉 Under the "Application restrictions" section ensure None is selected.
👉 Under the "API restrictions" section, select the Restrict key radio button.
👉 Click the Select APIs dropdown menu. In the search box that appears, type Maps JavaScript API and select it from the list. 
👉 Click OK.
👉 Click the SAVE button at the bottom of the page.
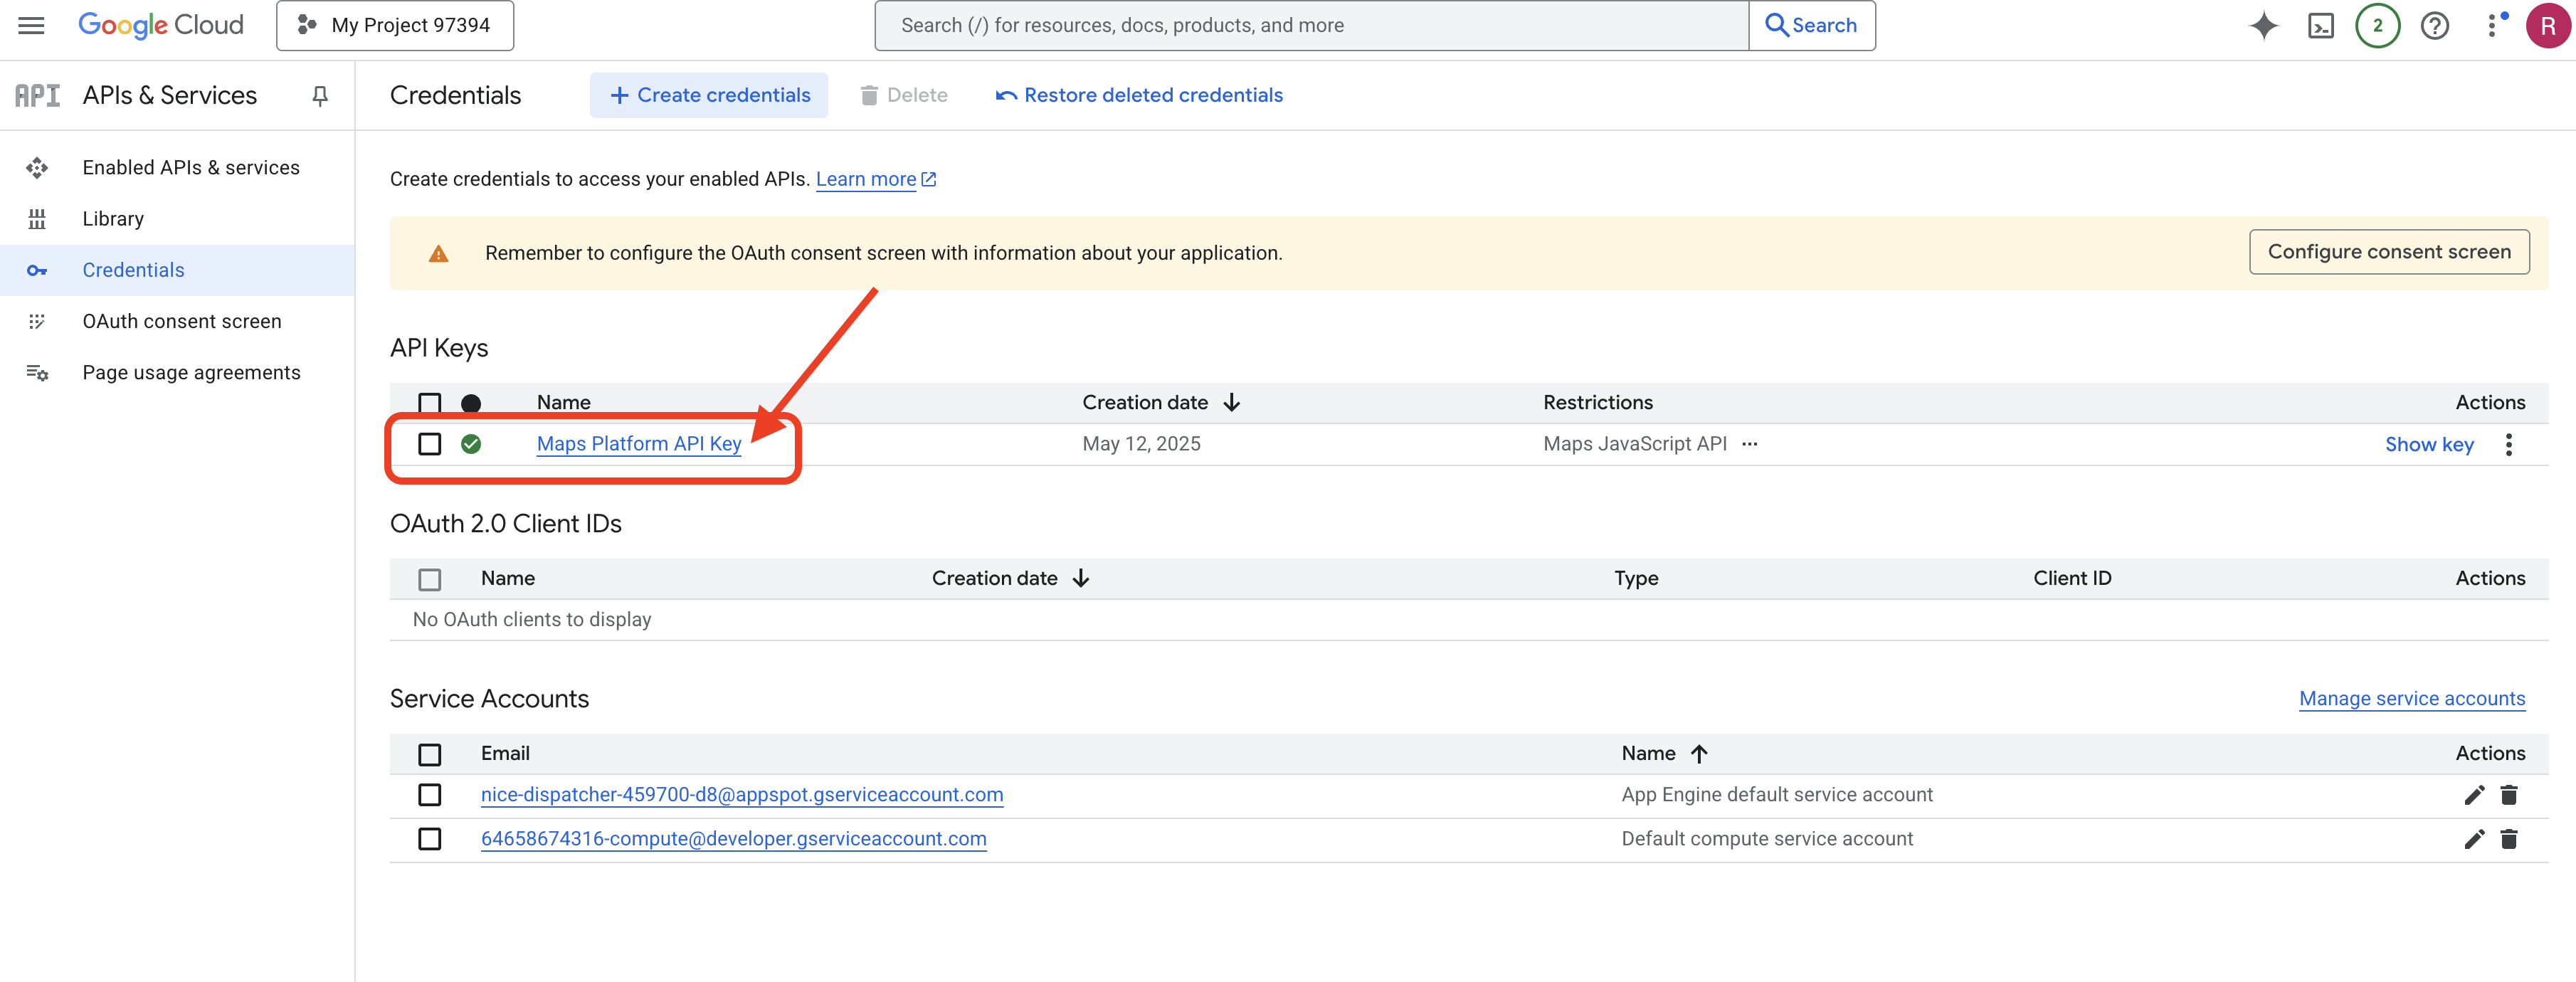
You have now successfully created an API key named "Maps Platform API Key," restricted it to only allow usage of the "Maps JavaScript API," and ensured the API is enabled for your project.
4. Setup Graph Database
Before we can build our intelligent agents, we need a way to store and understand the rich connections within our InstaVibe social network. This is where a Graph Database comes in. Unlike traditional relational databases that store data in tables of rows and columns, a graph database is specifically designed to represent and query data in terms of nodes (like people, events, or posts) and the relationships (edges) that connect them (like friendships, event attendance, or mentions). This structure is incredibly powerful for social media applications because it mirrors the way real-world social networks are structured, making it intuitive to explore how different entities are interconnected.
We are implementing this graph database using Google Cloud Spanner. While Spanner is primarily known as a globally distributed, strongly consistent relational database, it also allows us to define and query graph structures directly on top of our relational tables.
This gives us the combined benefits of Spanner's scalability, transactional consistency, and familiar SQL interface, along with the expressive power of graph queries for analyzing the complex social dynamics crucial to our AI-powered features.
👉💻 In Cloud Shell IDE terminal. Provision the necessary infrastructure on Google Cloud. We'll begin by creating a Spanner Instance, which acts as a dedicated container for our databases. Once the instance is ready, we will then create the actual Spanner Database within it, which will house all our tables and the graph data for InstaVibe:
. ~/instavibe-bootstrap/set_env.sh

gcloud spanner instances create $SPANNER_INSTANCE_ID \
  --config=regional-us-central1 \
  --description="GraphDB Instance InstaVibe" \
  --processing-units=100 \
  --edition=ENTERPRISE

gcloud spanner databases create $SPANNER_DATABASE_ID \
  --instance=$SPANNER_INSTANCE_ID \
  --database-dialect=GOOGLE_STANDARD_SQL
👉💻 Grant Spanner read/write access to the default service account
echo "Granting Spanner read/write access to ${SERVICE_ACCOUNT_NAME} for database ${SPANNER_DATABASE_ID}..."

gcloud spanner databases add-iam-policy-binding ${SPANNER_DATABASE_ID} \
  --instance=${SPANNER_INSTANCE_ID} \
  --member="serviceAccount:${SERVICE_ACCOUNT_NAME}" \
  --role="roles/spanner.databaseUser" \
  --project=${PROJECT_ID}
👉💻 Now. We'll set up a Python virtual environment, install the required Python packages, and then set up the Graph Database schema within Spanner and load it with initial data and run the setup.py script.
. ~/instavibe-bootstrap/set_env.sh
cd ~/instavibe-bootstrap
python -m venv env
source env/bin/activate
pip install -r requirements.txt
cd instavibe
python setup.py
👉 In a new browser tab, go to the Google Cloud Console, navigate to Spanner, you should see a list of your Spanner instances. Click on the instavibe-graph-instance. 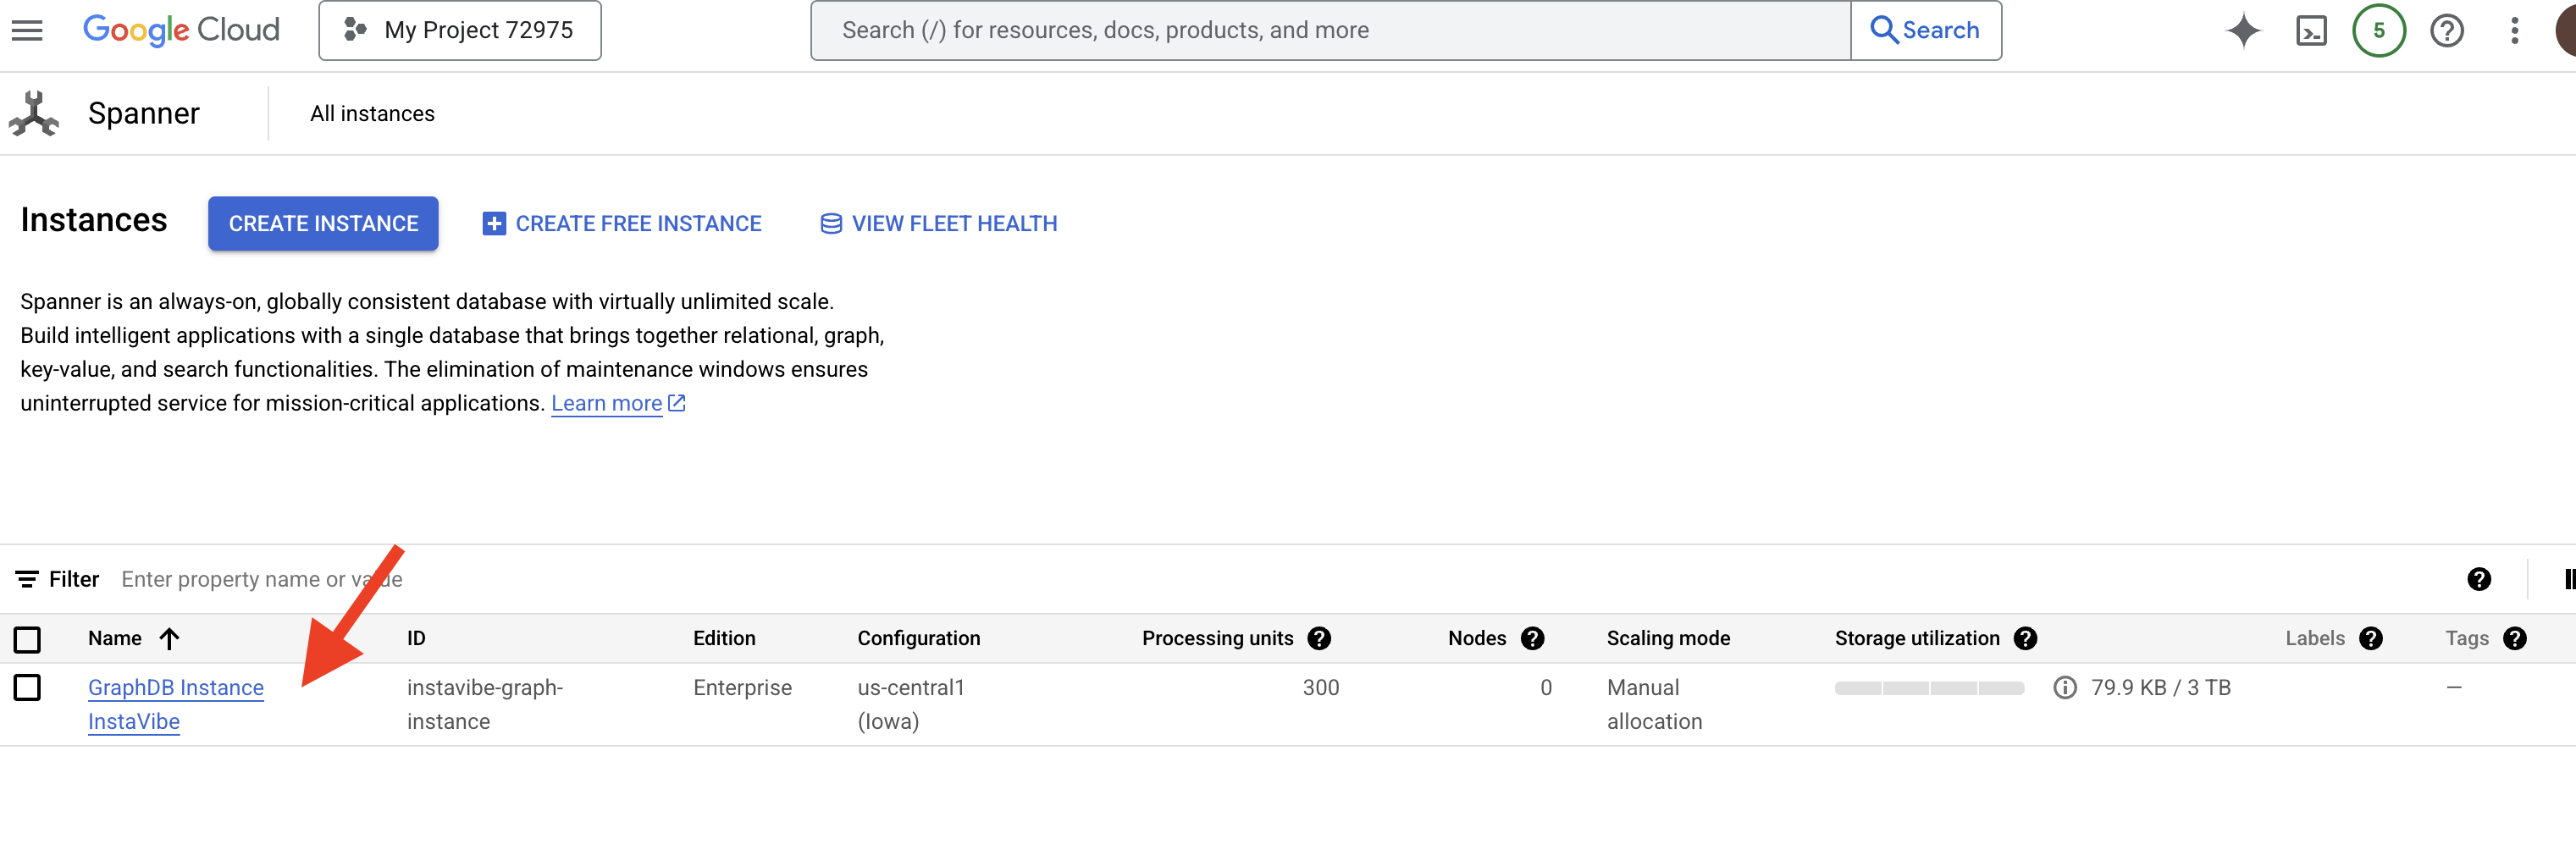 👉 On the instance overview page, you'll see a list of databases within that instance. Click on
 graphdb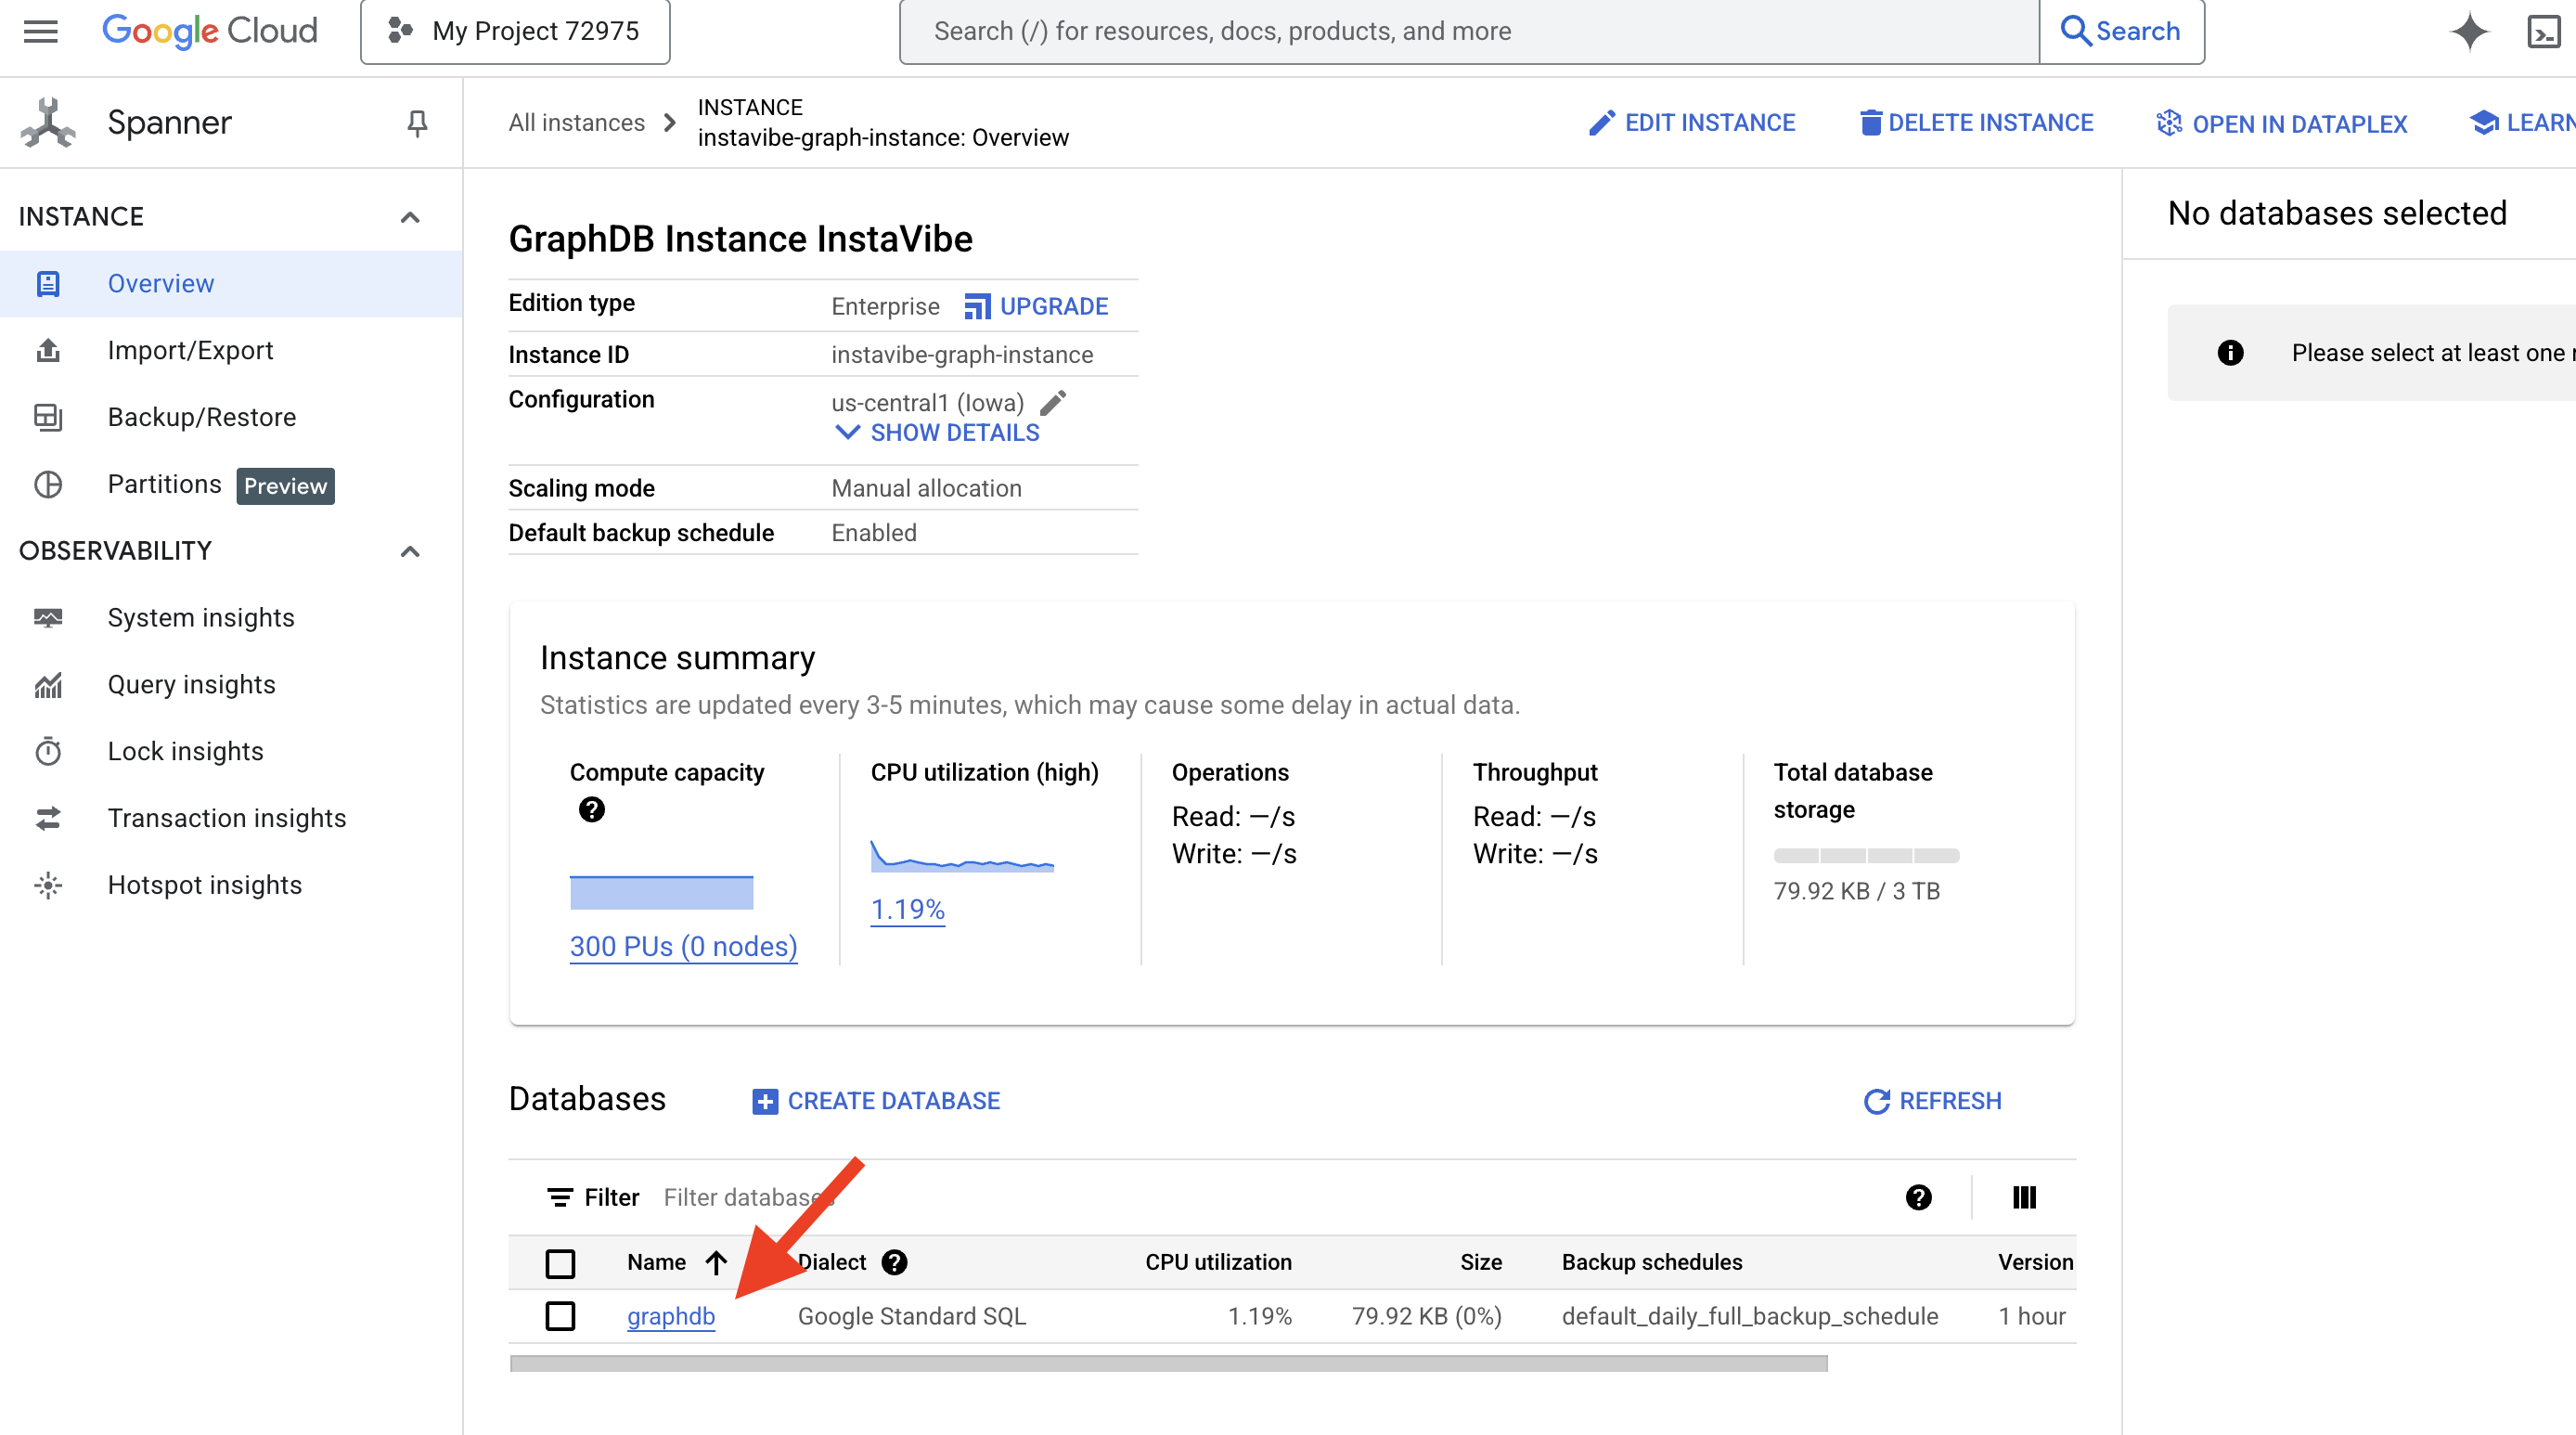
👉 In the left-hand navigation pane for your database, click on Spanner Studio 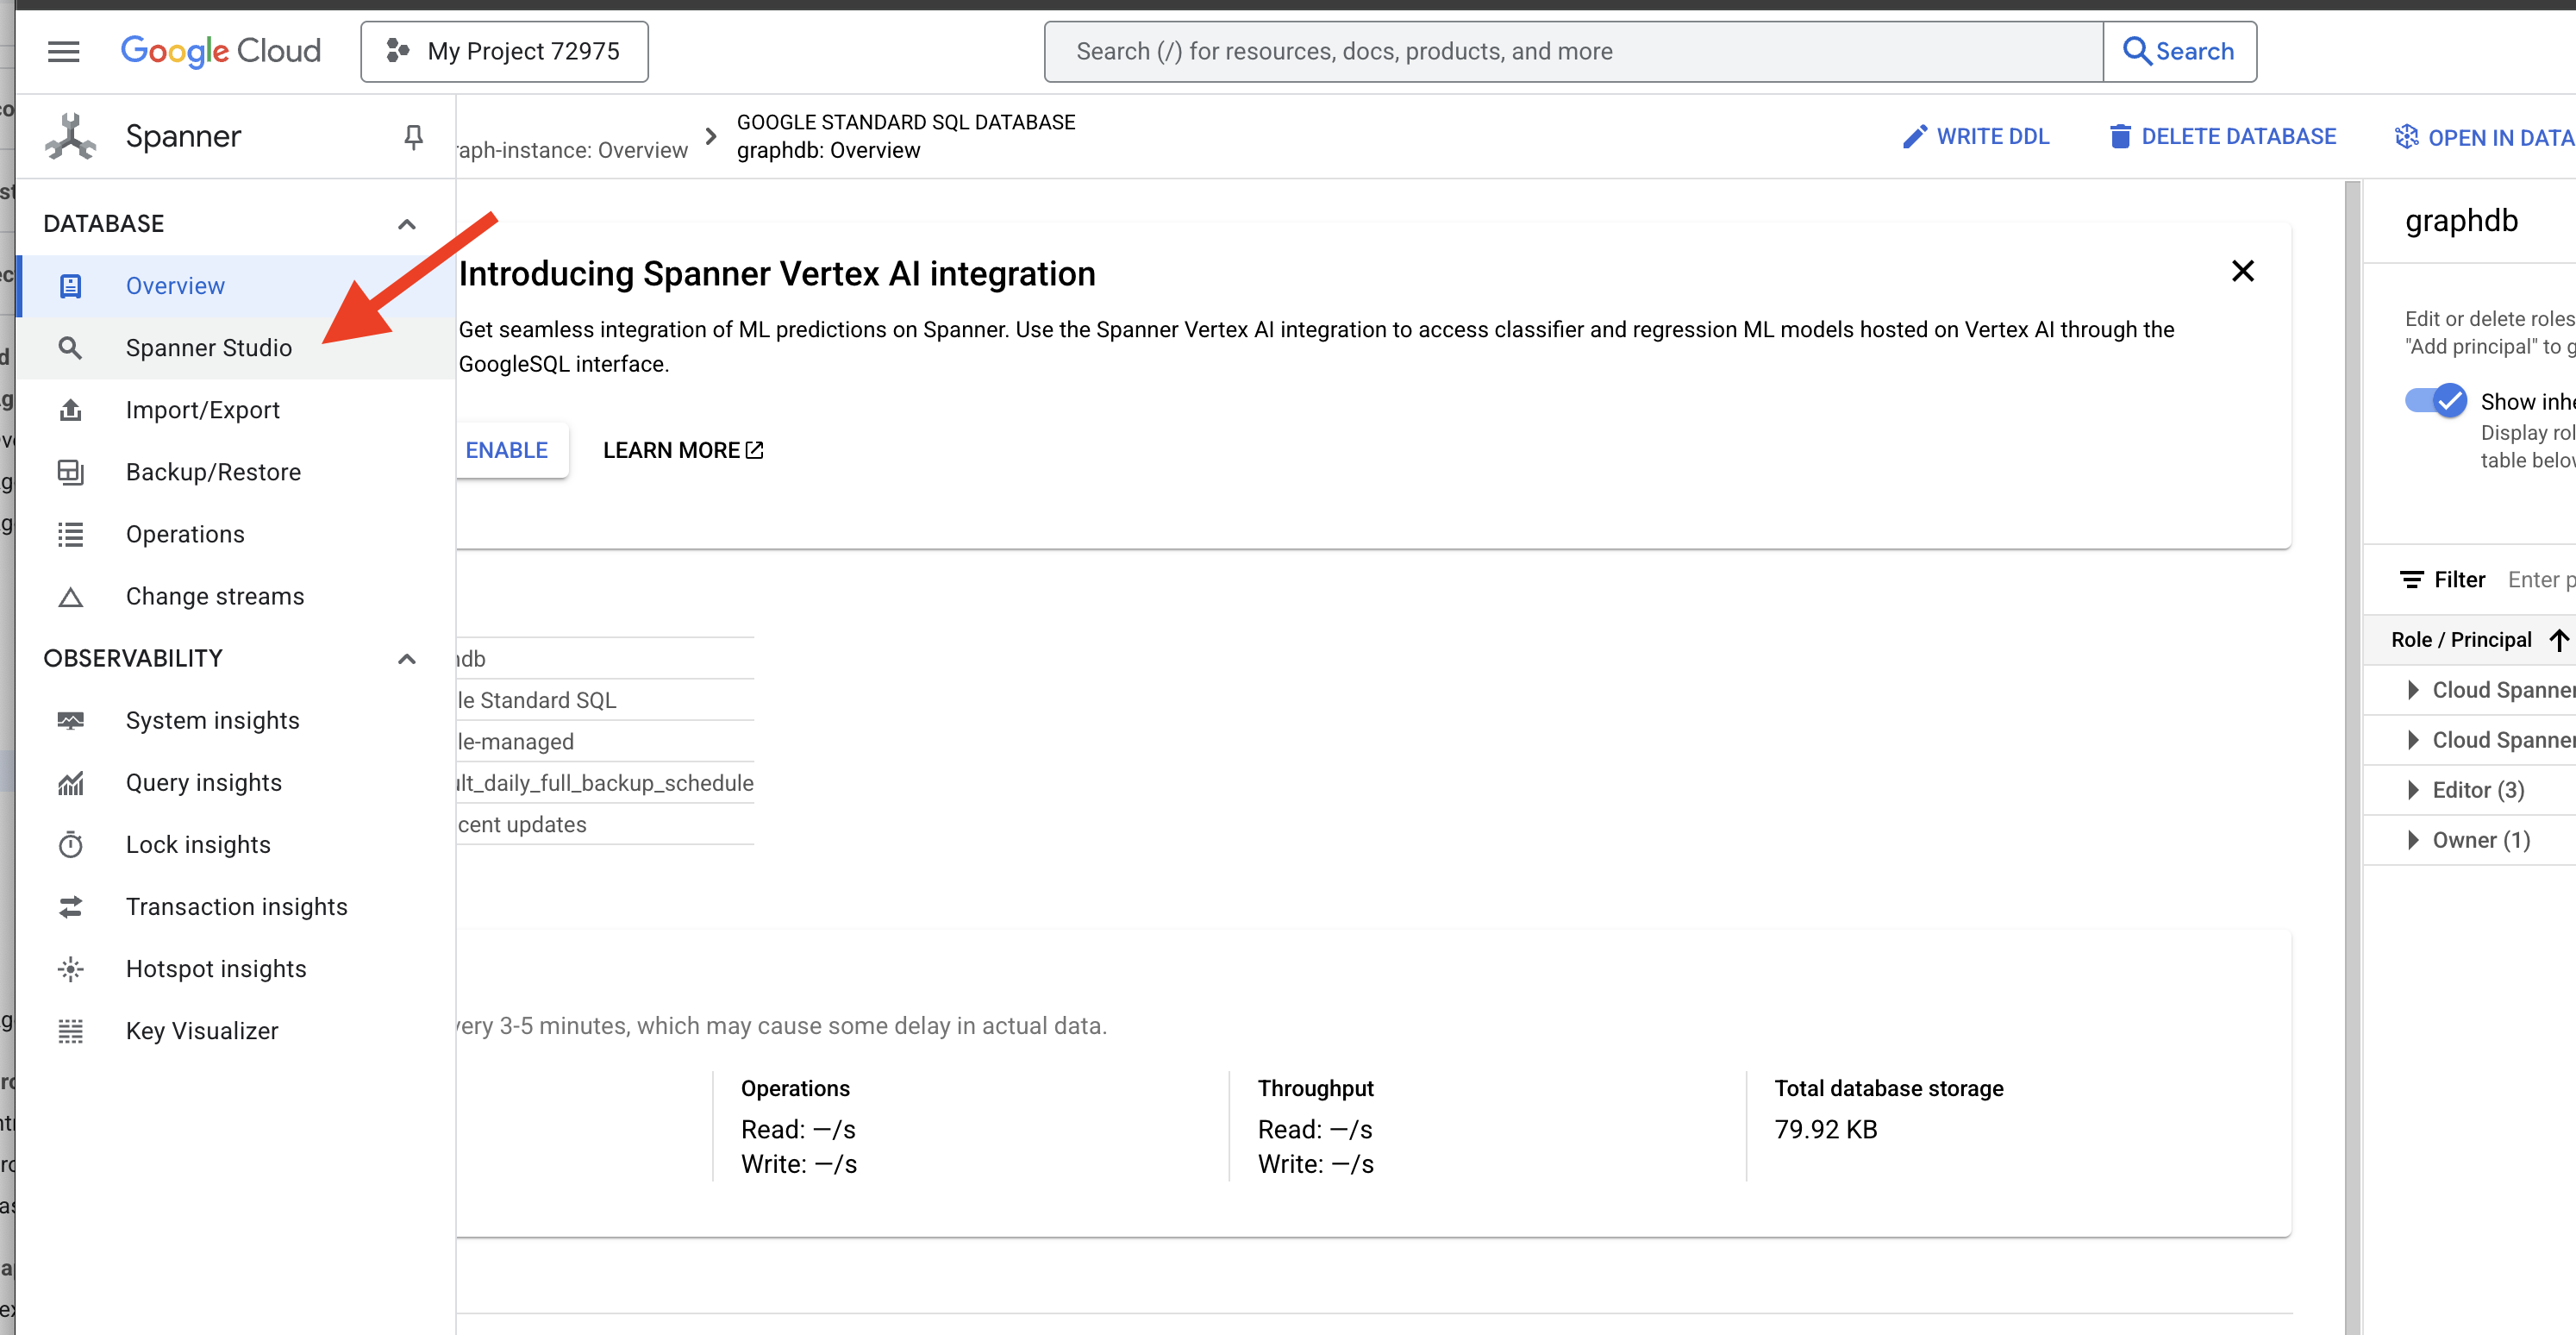
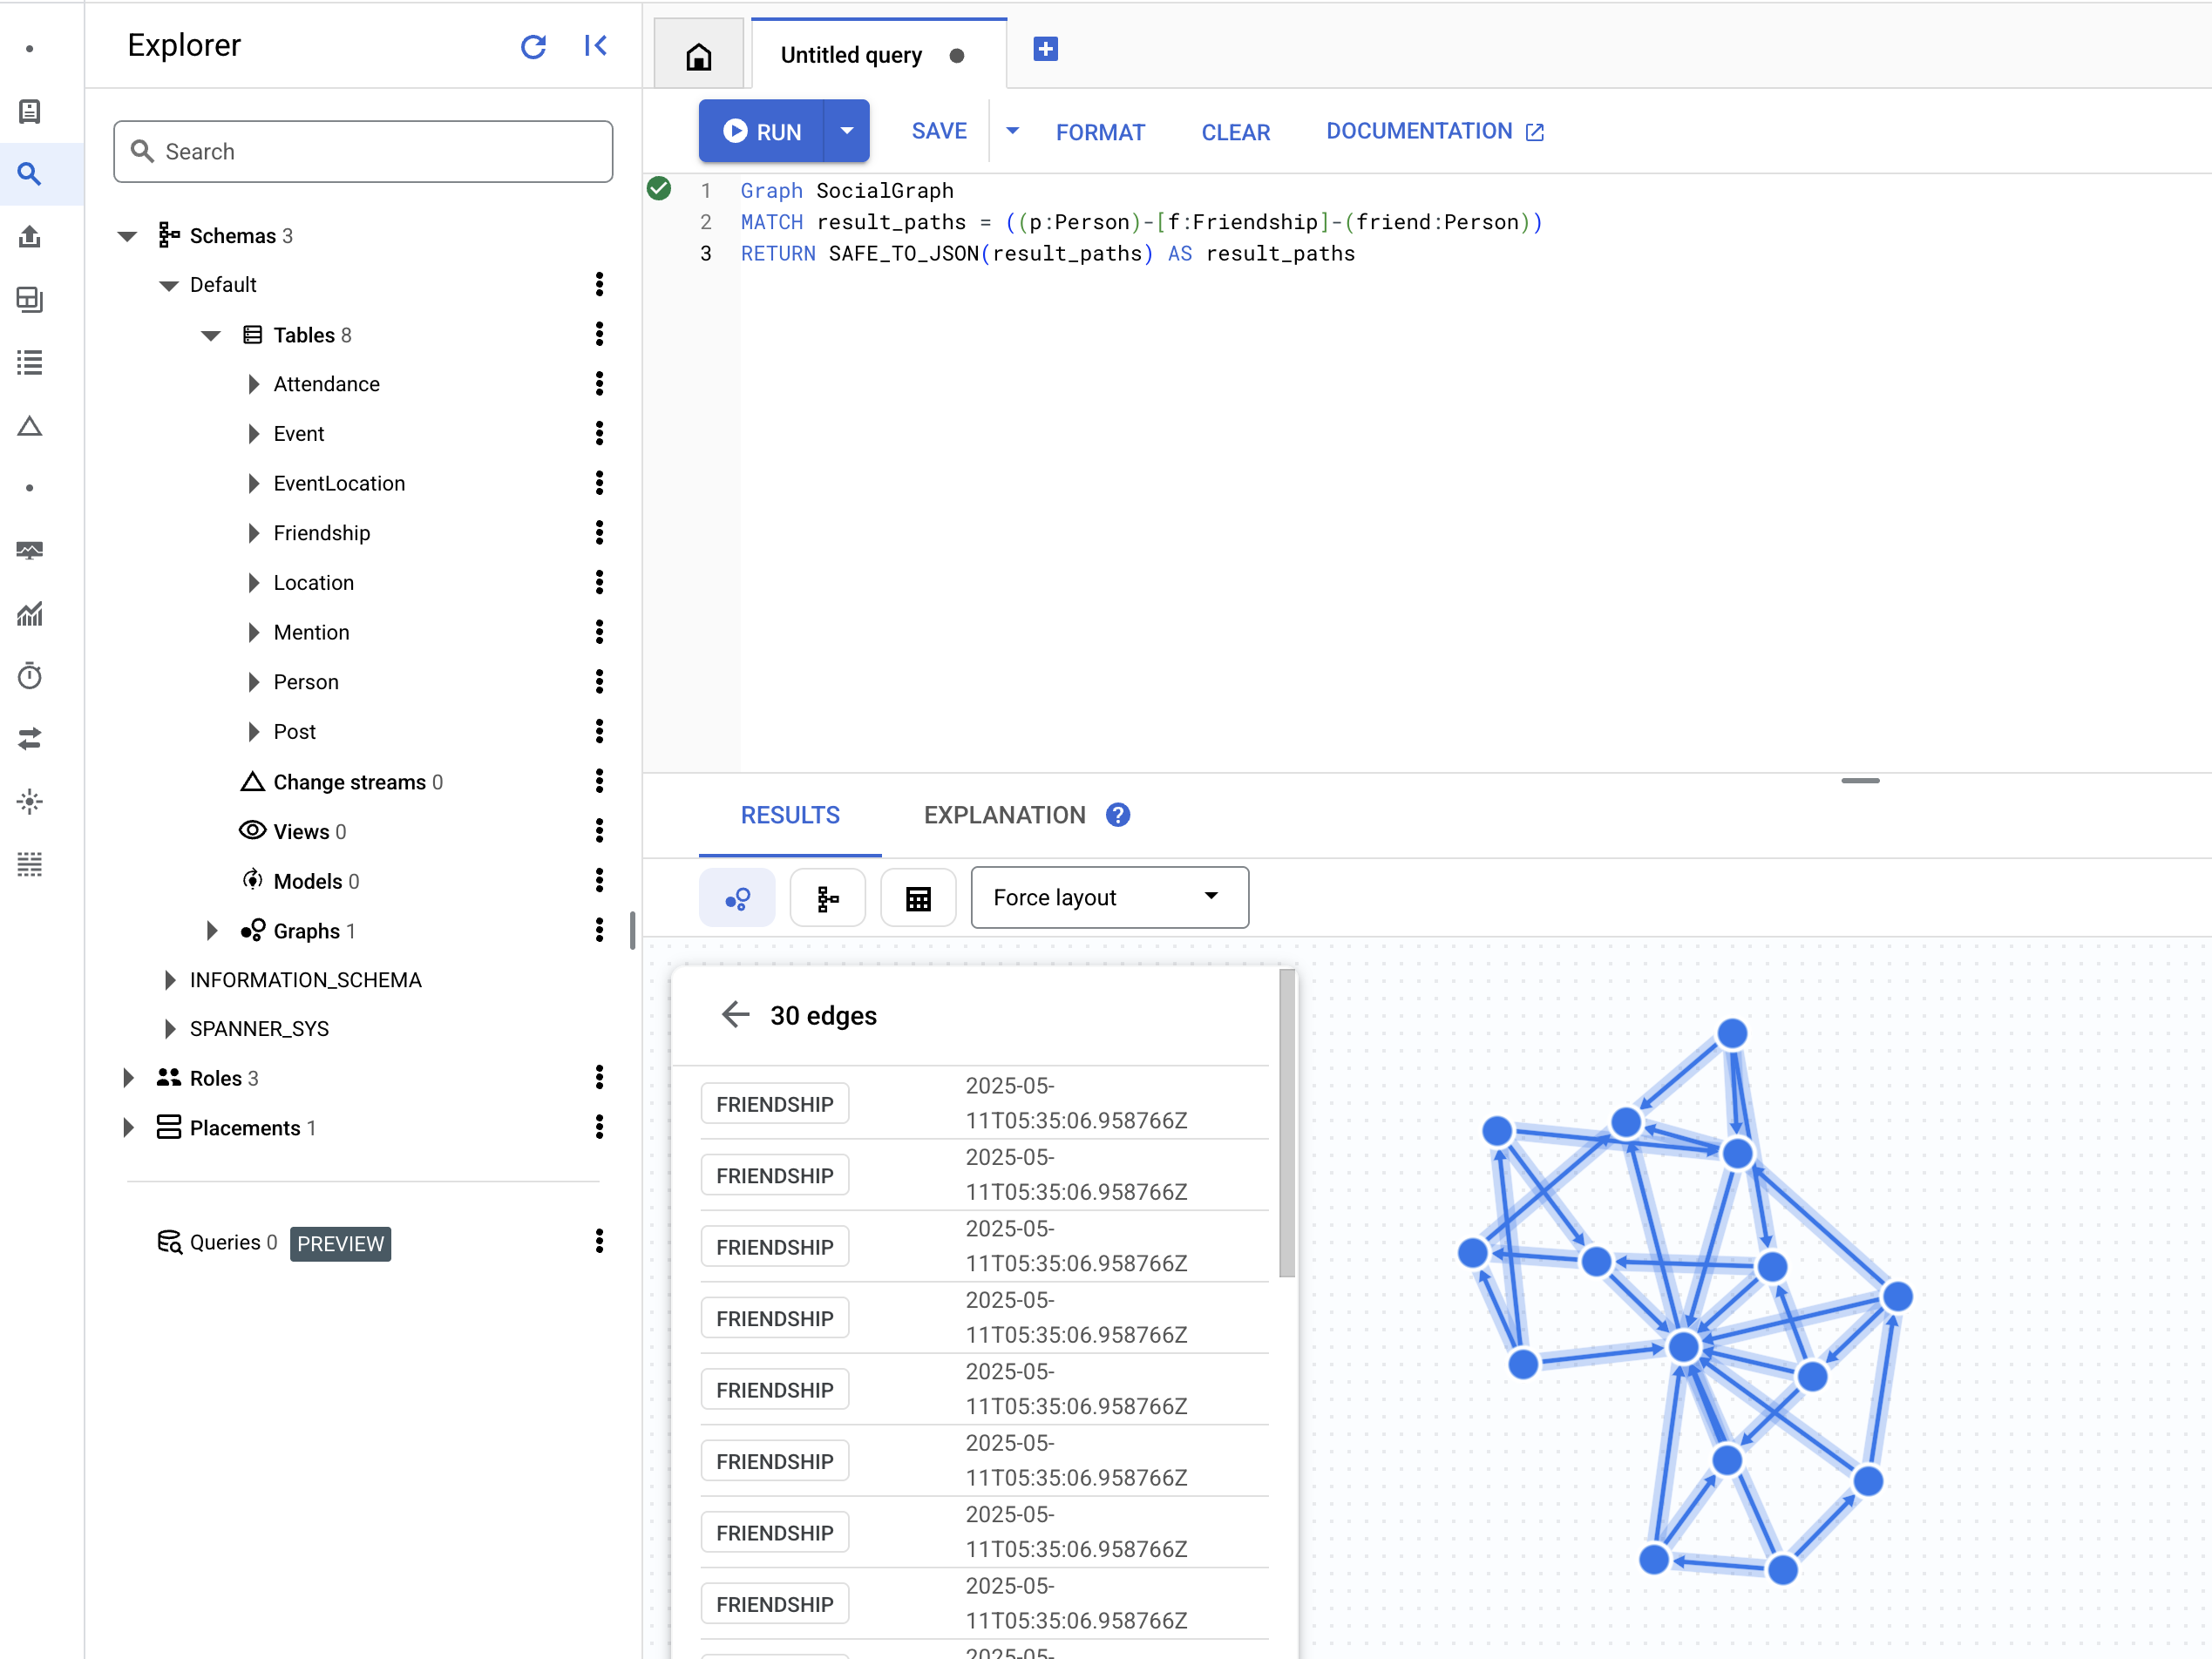
👉 In the query editor (Untitled query tab), paste the following Graph SQL query. This query will find all Person nodes and their direct Friendship relationships with other Person nodes. And click RUN to see the result.
Graph SocialGraph
MATCH result_paths = ((p:Person)-[f:Friendship]-(friend:Person))
RETURN SAFE_TO_JSON(result_paths) AS result_paths
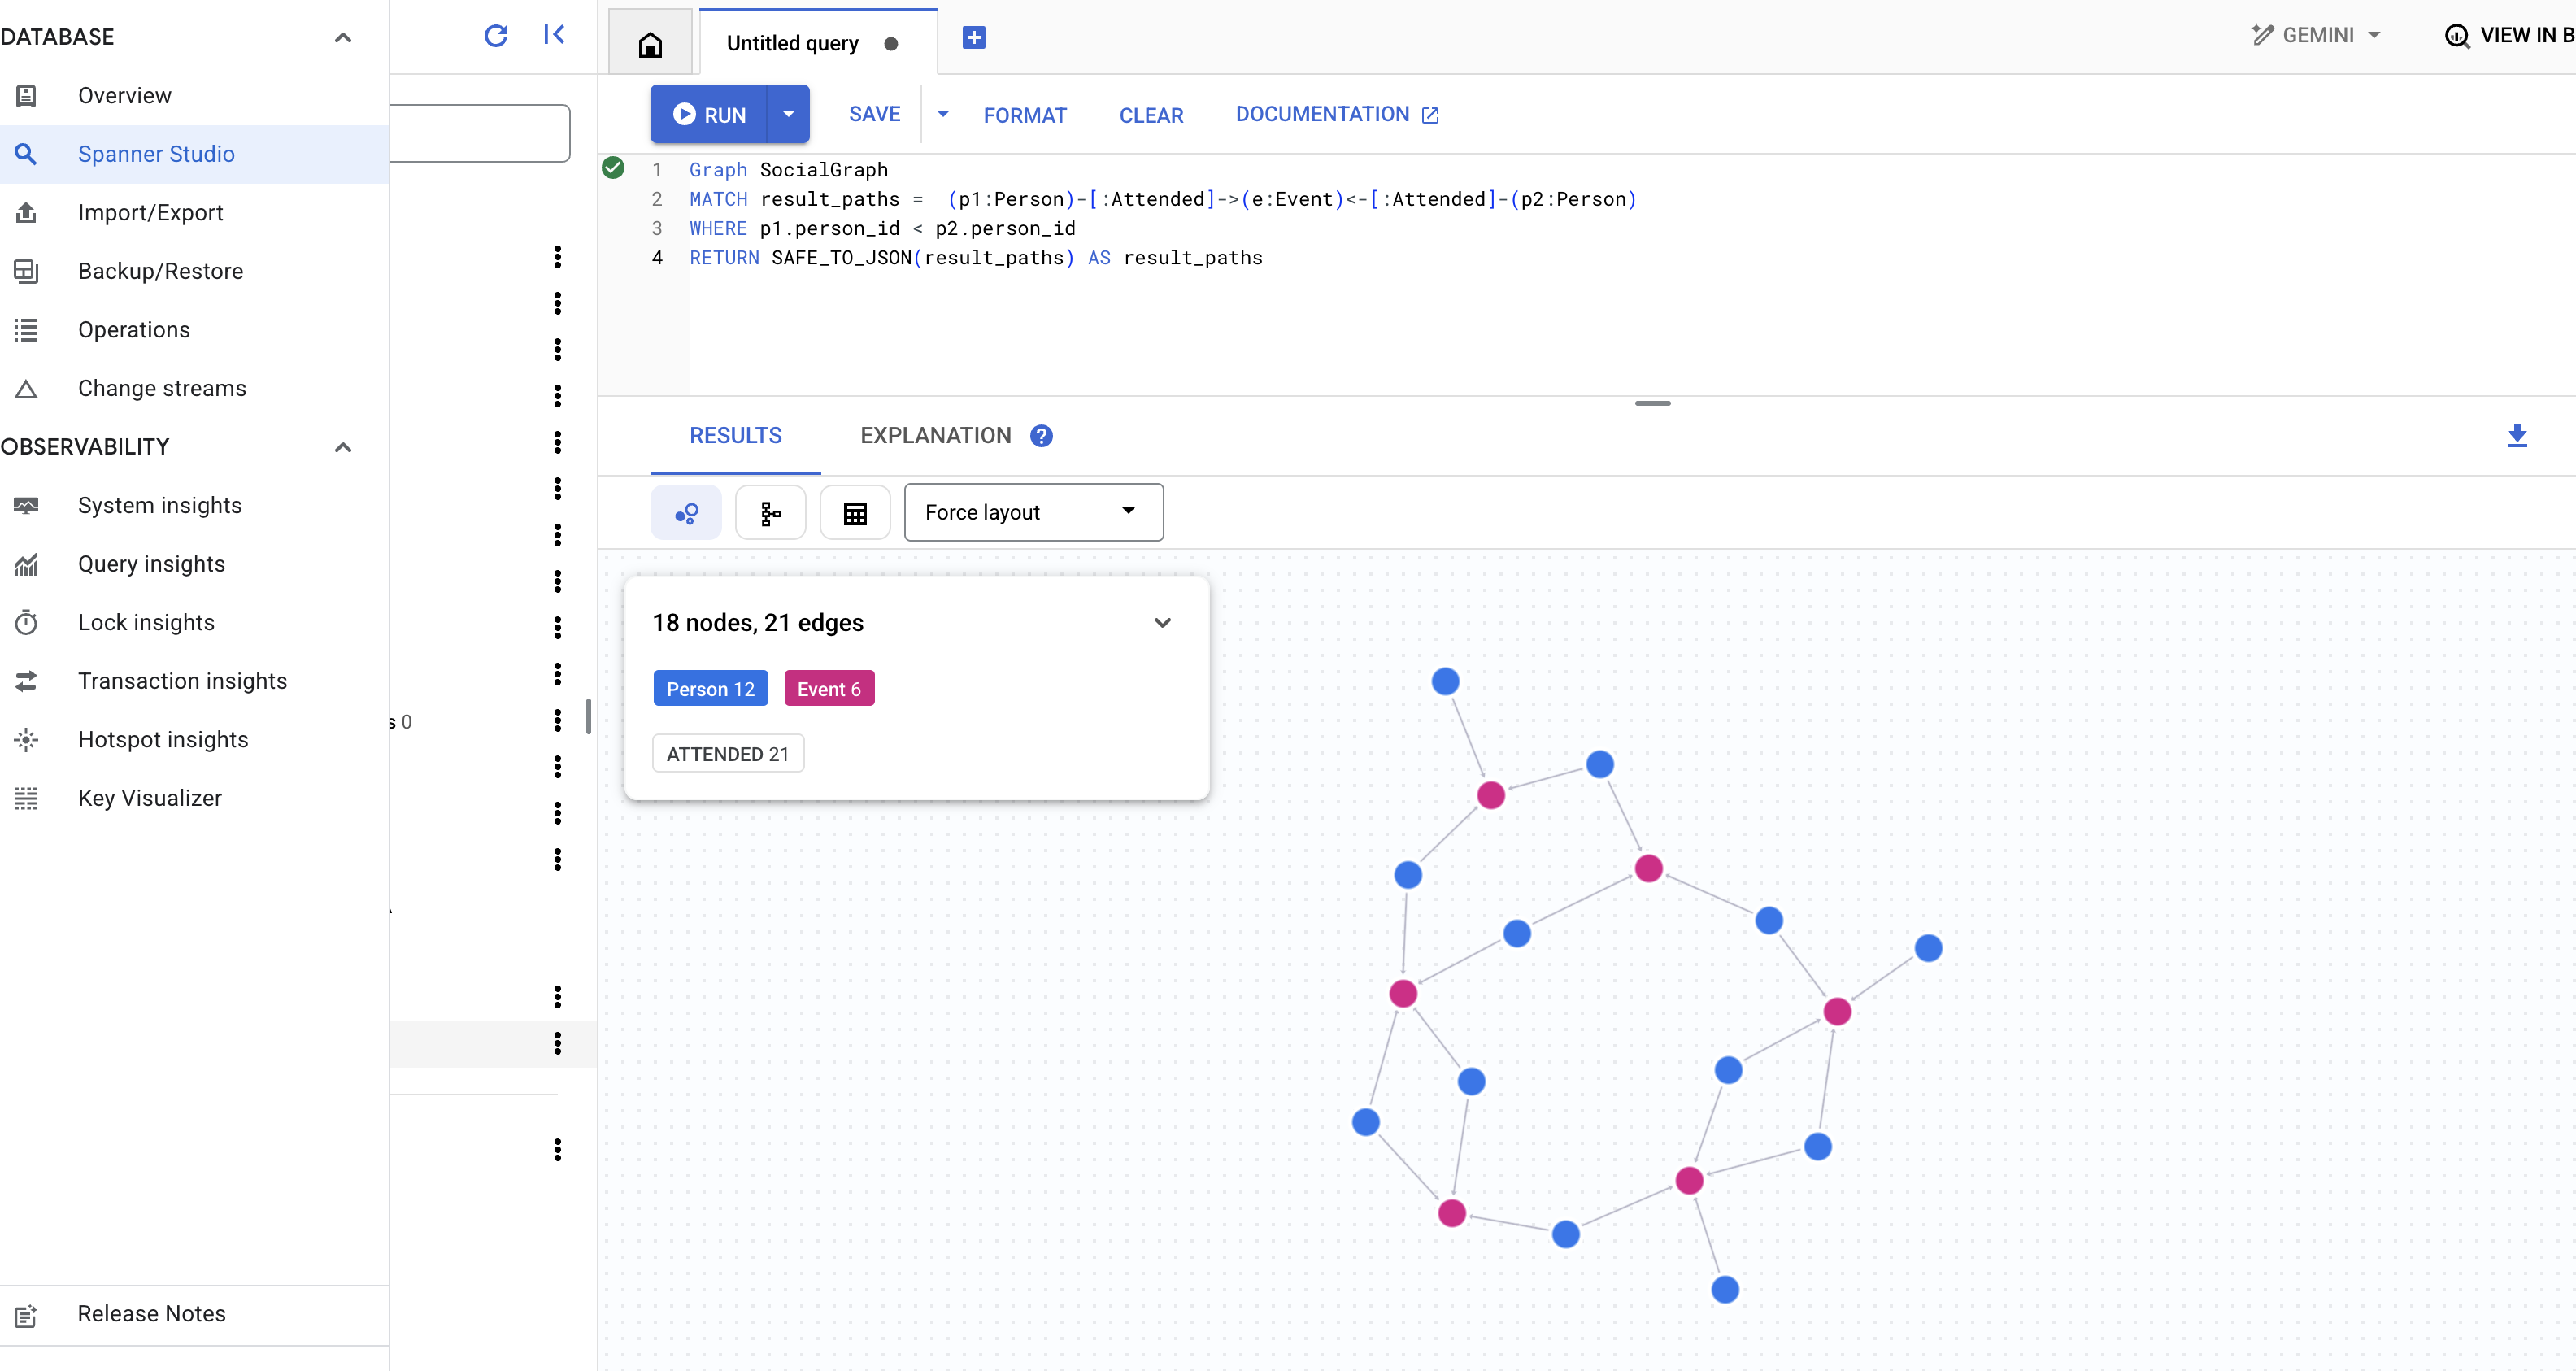
👉 In the same query editor, replace the previous DDL to find people who attended the same event, which implies an indirect connection through a shared activity.
Graph SocialGraph
MATCH result_paths =  (p1:Person)-[:Attended]->(e:Event)<-[:Attended]-(p2:Person)
WHERE p1.person_id < p2.person_id
RETURN SAFE_TO_JSON(result_paths) AS result_paths
👉 This query explores a different type of connection, where people mentioned in posts written by friends of a specific person, run the following query in the query editor.
Graph SocialGraph
MATCH result_paths =  (user:Person {name: "Alice"})-[:Friendship]-(friend:Person)-[:Wrote]->(post:Post)-[:Mentioned]->(mentioned_person:Person)
WHERE user <> mentioned_person AND friend <> mentioned_person -- Avoid self-mentions or friend mentioning themselves in their own post if not intended
RETURN SAFE_TO_JSON(result_paths) AS result_paths
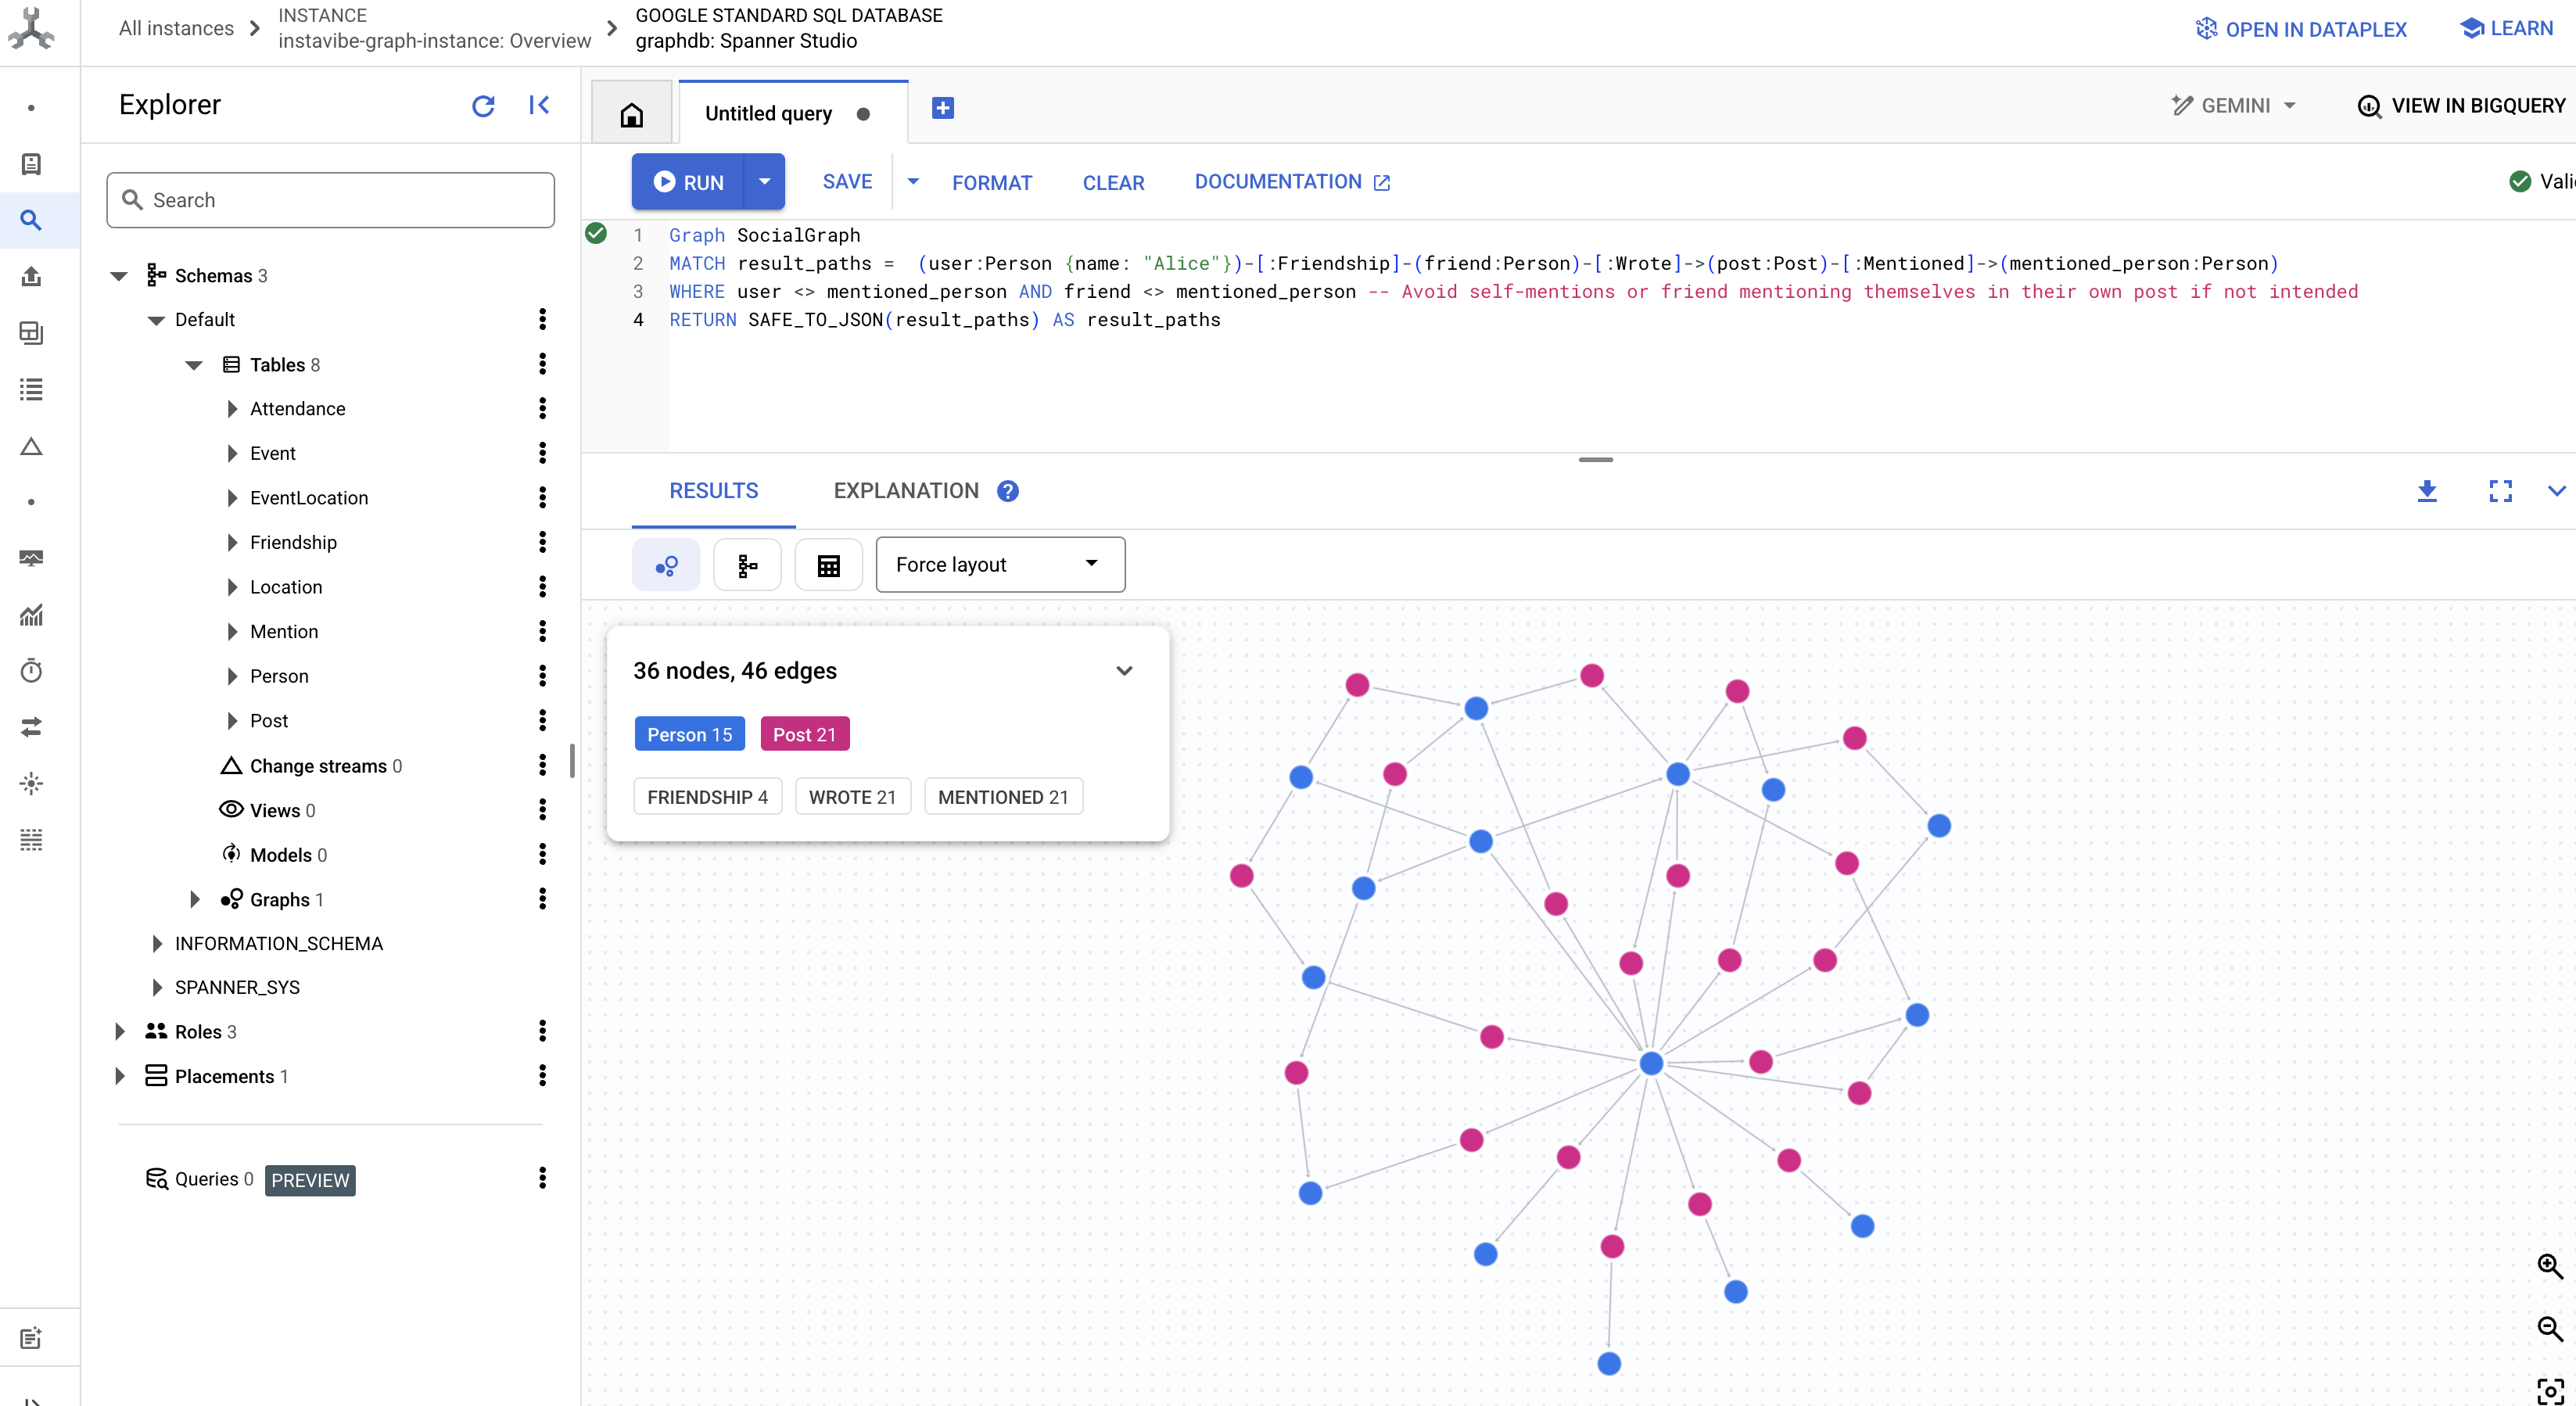
These queries offer just a glimpse into the power of using Spanner as a graph database for our InstaVibe application. By modeling our social data as an interconnected graph, we enable sophisticated analysis of relationships and activities, which will be fundamental for our AI agents to understand user context, discover interests, and ultimately provide intelligent social planning assistance.
With our foundational data structure now in place and tested, let's turn our attention to the existing InstaVibe application that our agents will interact with.
5. Current state of InstaVibe
To understand where our AI agents will fit in, we first need to deploy and run the existing InstaVibe web application. This application provides the user interface and basic functionalities that connect to the Spanner graph database we've already set up.
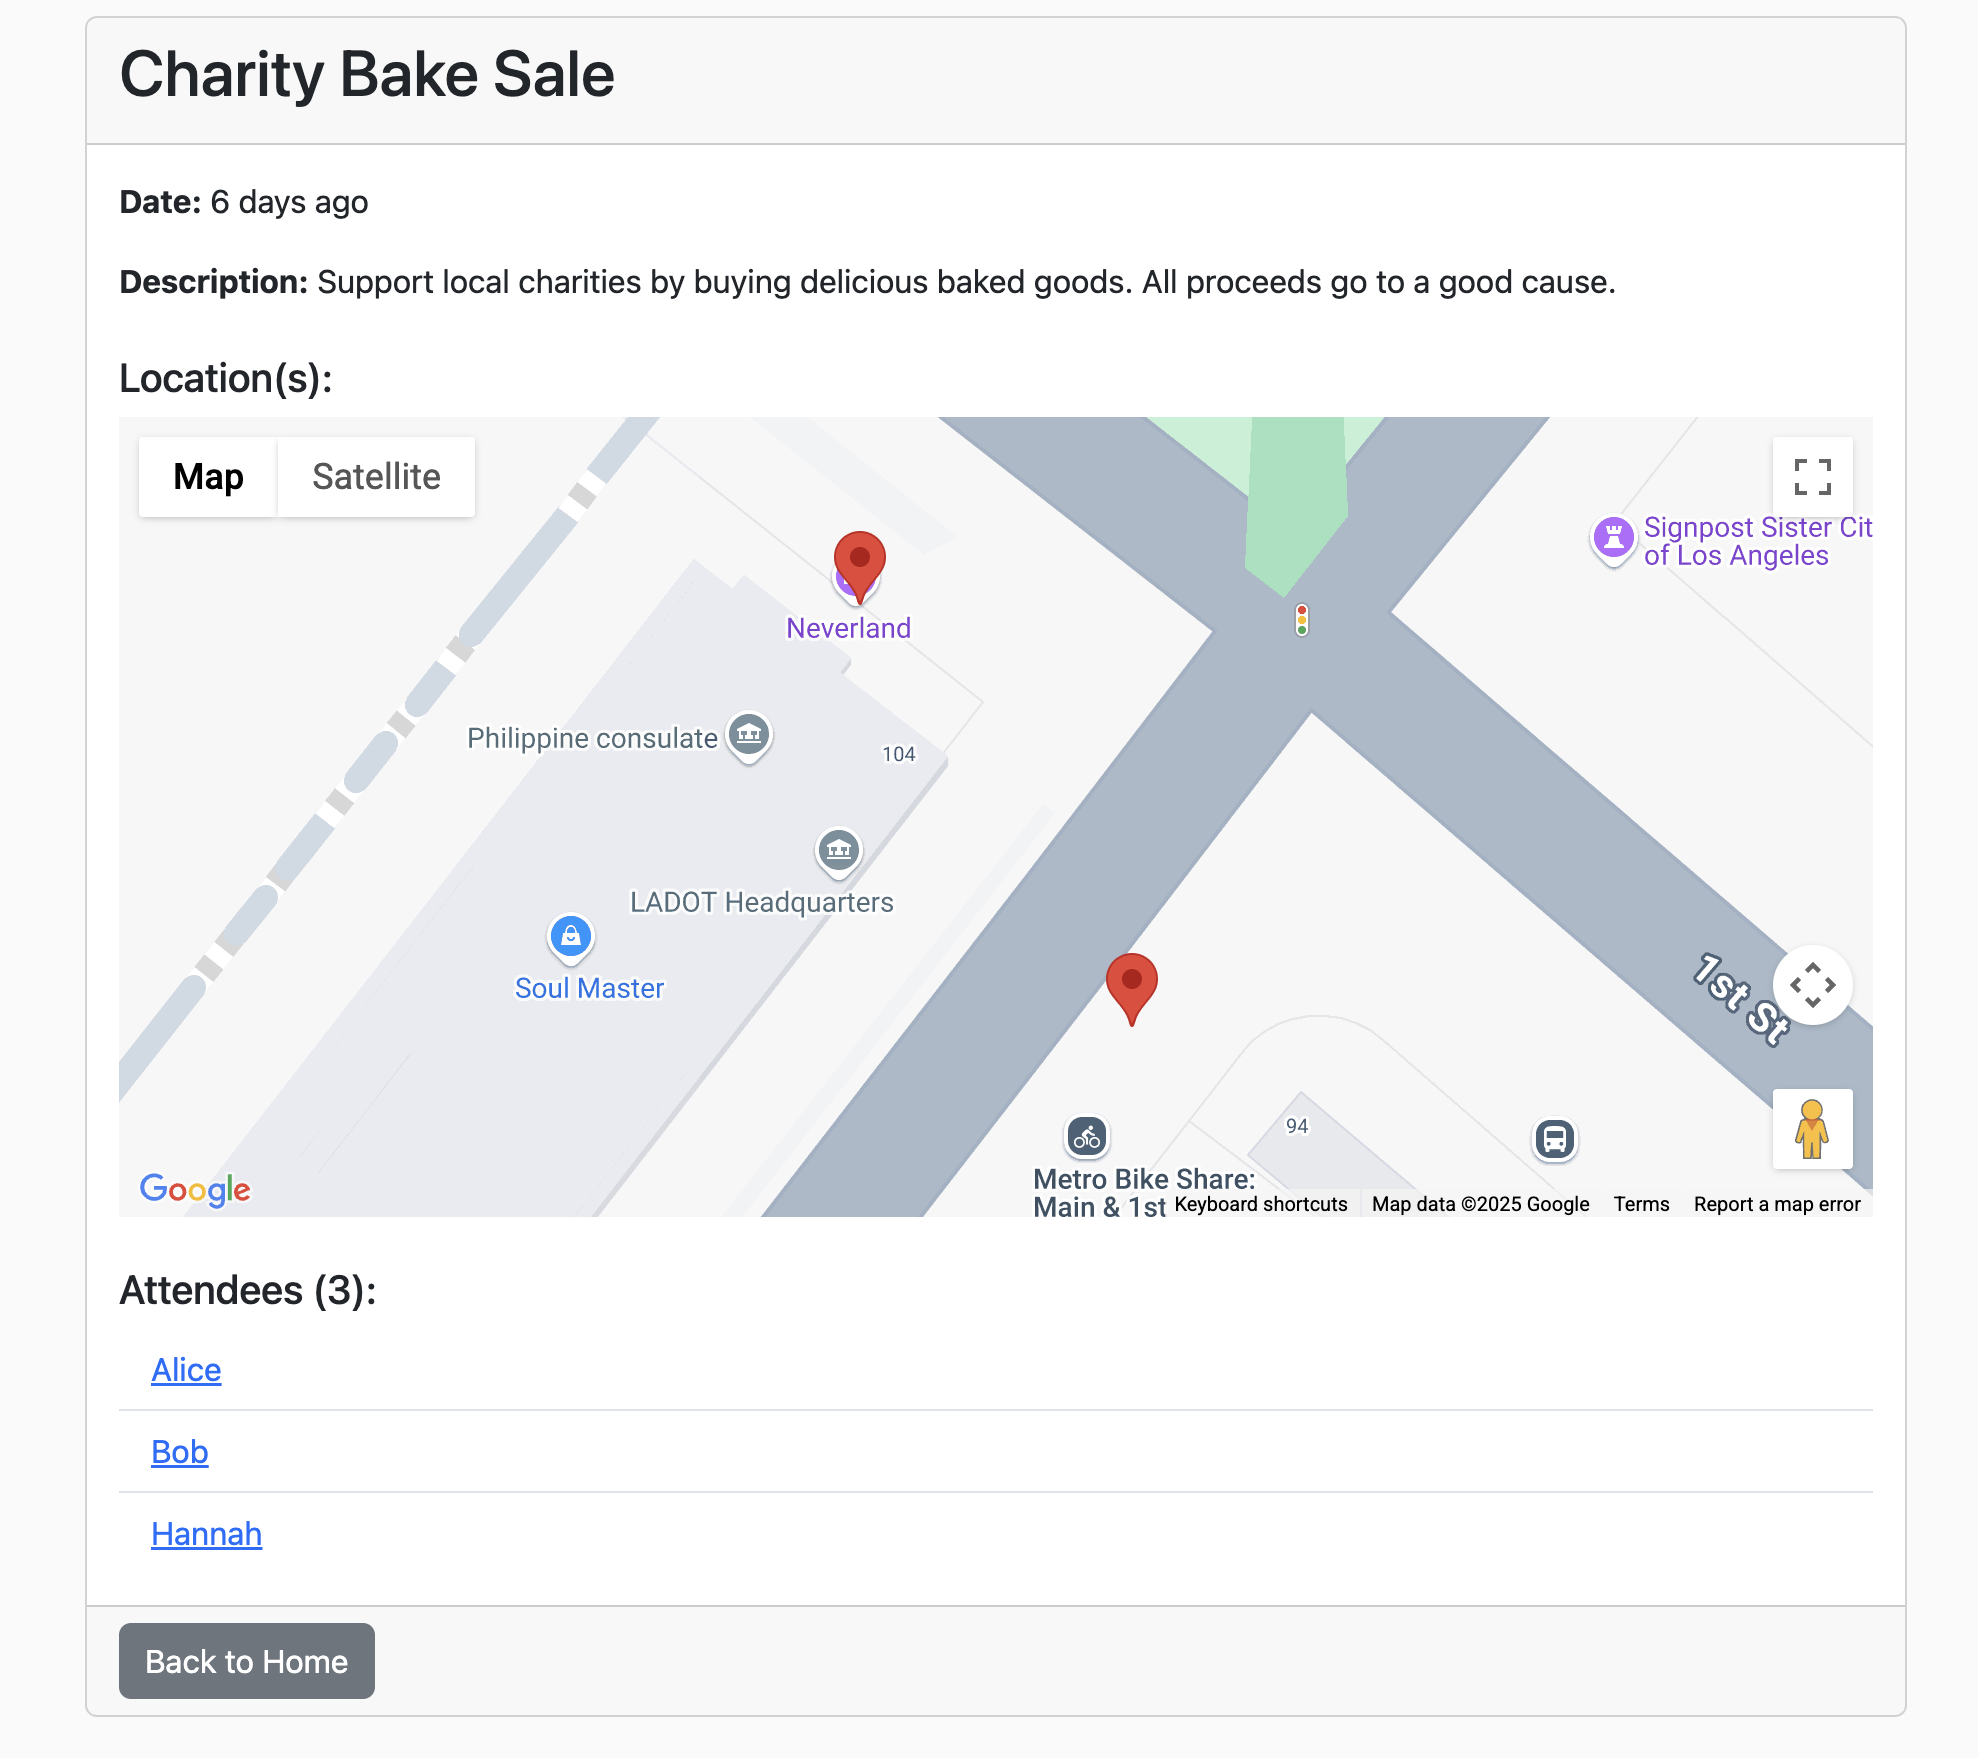
The InstaVibe application uses Google Maps to display event locations visually on its event details pages. To enable this functionality, the application needs the API key we created earlier. The following script will retrieve the actual key string using the display name we assigned ("Maps Platform API Key").
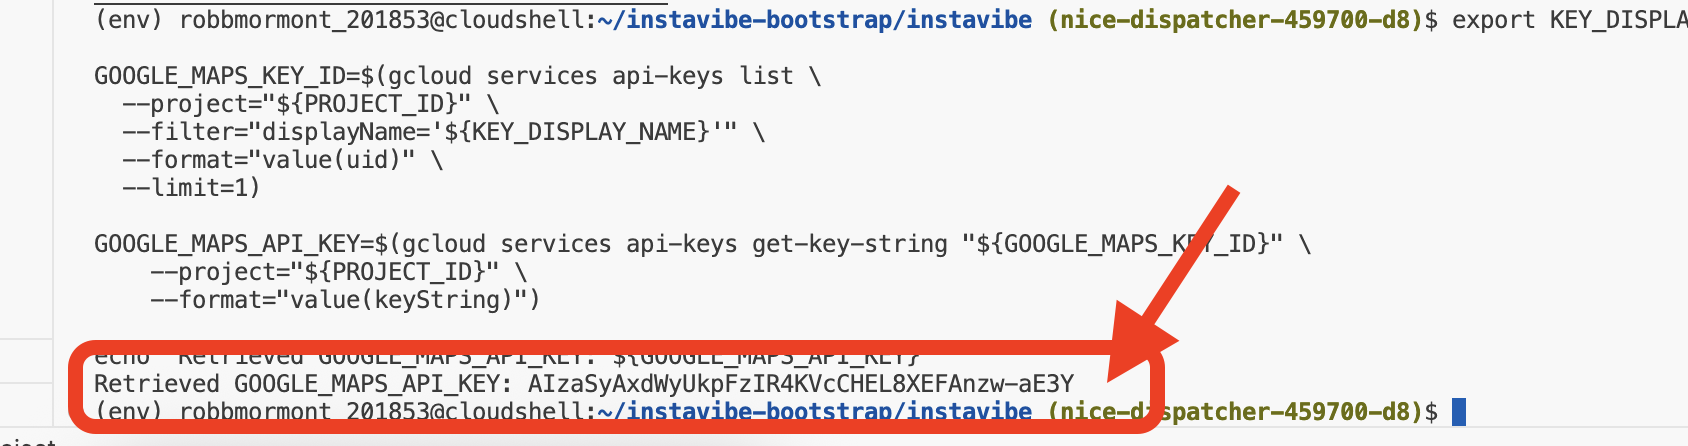
👉💻 Back in the Cloud shell IDE. Run the script below. Afterwards, carefully check the output to ensure the GOOGLE_MAPS_API_KEY shown matches the key you created and copied from the Google Cloud Console previously.
. ~/instavibe-bootstrap/set_env.sh
export KEY_DISPLAY_NAME="Maps Platform API Key"

GOOGLE_MAPS_KEY_ID=$(gcloud services api-keys list \
  --project="${PROJECT_ID}" \
  --filter="displayName='${KEY_DISPLAY_NAME}'" \
  --format="value(uid)" \
  --limit=1)

GOOGLE_MAPS_API_KEY=$(gcloud services api-keys get-key-string "${GOOGLE_MAPS_KEY_ID}" \
    --project="${PROJECT_ID}" \
    --format="value(keyString)")

echo "${GOOGLE_MAPS_API_KEY}" > ~/mapkey.txt

echo "Retrieved GOOGLE_MAPS_API_KEY: ${GOOGLE_MAPS_API_KEY}"
👉💻 Now, let's build the container image for the InstaVibe web application and push it to our Artifact Registry repository.
. ~/instavibe-bootstrap/set_env.sh

cd ~/instavibe-bootstrap/instavibe/
export IMAGE_TAG="latest"
export APP_FOLDER_NAME="instavibe"
export IMAGE_NAME="instavibe-webapp"
export IMAGE_PATH="${REGION}-docker.pkg.dev/${PROJECT_ID}/${REPO_NAME}/${IMAGE_NAME}:${IMAGE_TAG}"
export SERVICE_NAME="instavibe"

gcloud builds submit . \
  --tag=${IMAGE_PATH} \
  --project=${PROJECT_ID}
👉💻 Deploy the new build InstaVibe webapp image to Cloud Run
. ~/instavibe-bootstrap/set_env.sh

cd ~/instavibe-bootstrap/instavibe/
export IMAGE_TAG="latest"
export APP_FOLDER_NAME="instavibe"
export IMAGE_NAME="instavibe-webapp"
export IMAGE_PATH="${REGION}-docker.pkg.dev/${PROJECT_ID}/${REPO_NAME}/${IMAGE_NAME}:${IMAGE_TAG}"
export SERVICE_NAME="instavibe"

gcloud run deploy ${SERVICE_NAME} \
  --image=${IMAGE_PATH} \
  --platform=managed \
  --region=${REGION} \
  --allow-unauthenticated \
  --set-env-vars="SPANNER_INSTANCE_ID=${SPANNER_INSTANCE_ID}" \
  --set-env-vars="SPANNER_DATABASE_ID=${SPANNER_DATABASE_ID}" \
  --set-env-vars="APP_HOST=0.0.0.0" \
  --set-env-vars="APP_PORT=8080" \
  --set-env-vars="GOOGLE_CLOUD_LOCATION=${REGION}" \
  --set-env-vars="GOOGLE_CLOUD_PROJECT=${PROJECT_ID}" \
  --set-env-vars="GOOGLE_MAPS_API_KEY=${GOOGLE_MAPS_API_KEY}" \
  --project=${PROJECT_ID} \
  --min-instances=1
With the deployment successfully completed, the Cloud Run logs should display the public URL for your running InstaVibe application.

You can also find this URL by navigating to the Cloud Run section in the Google Cloud Console and selecting the instavibe service. 
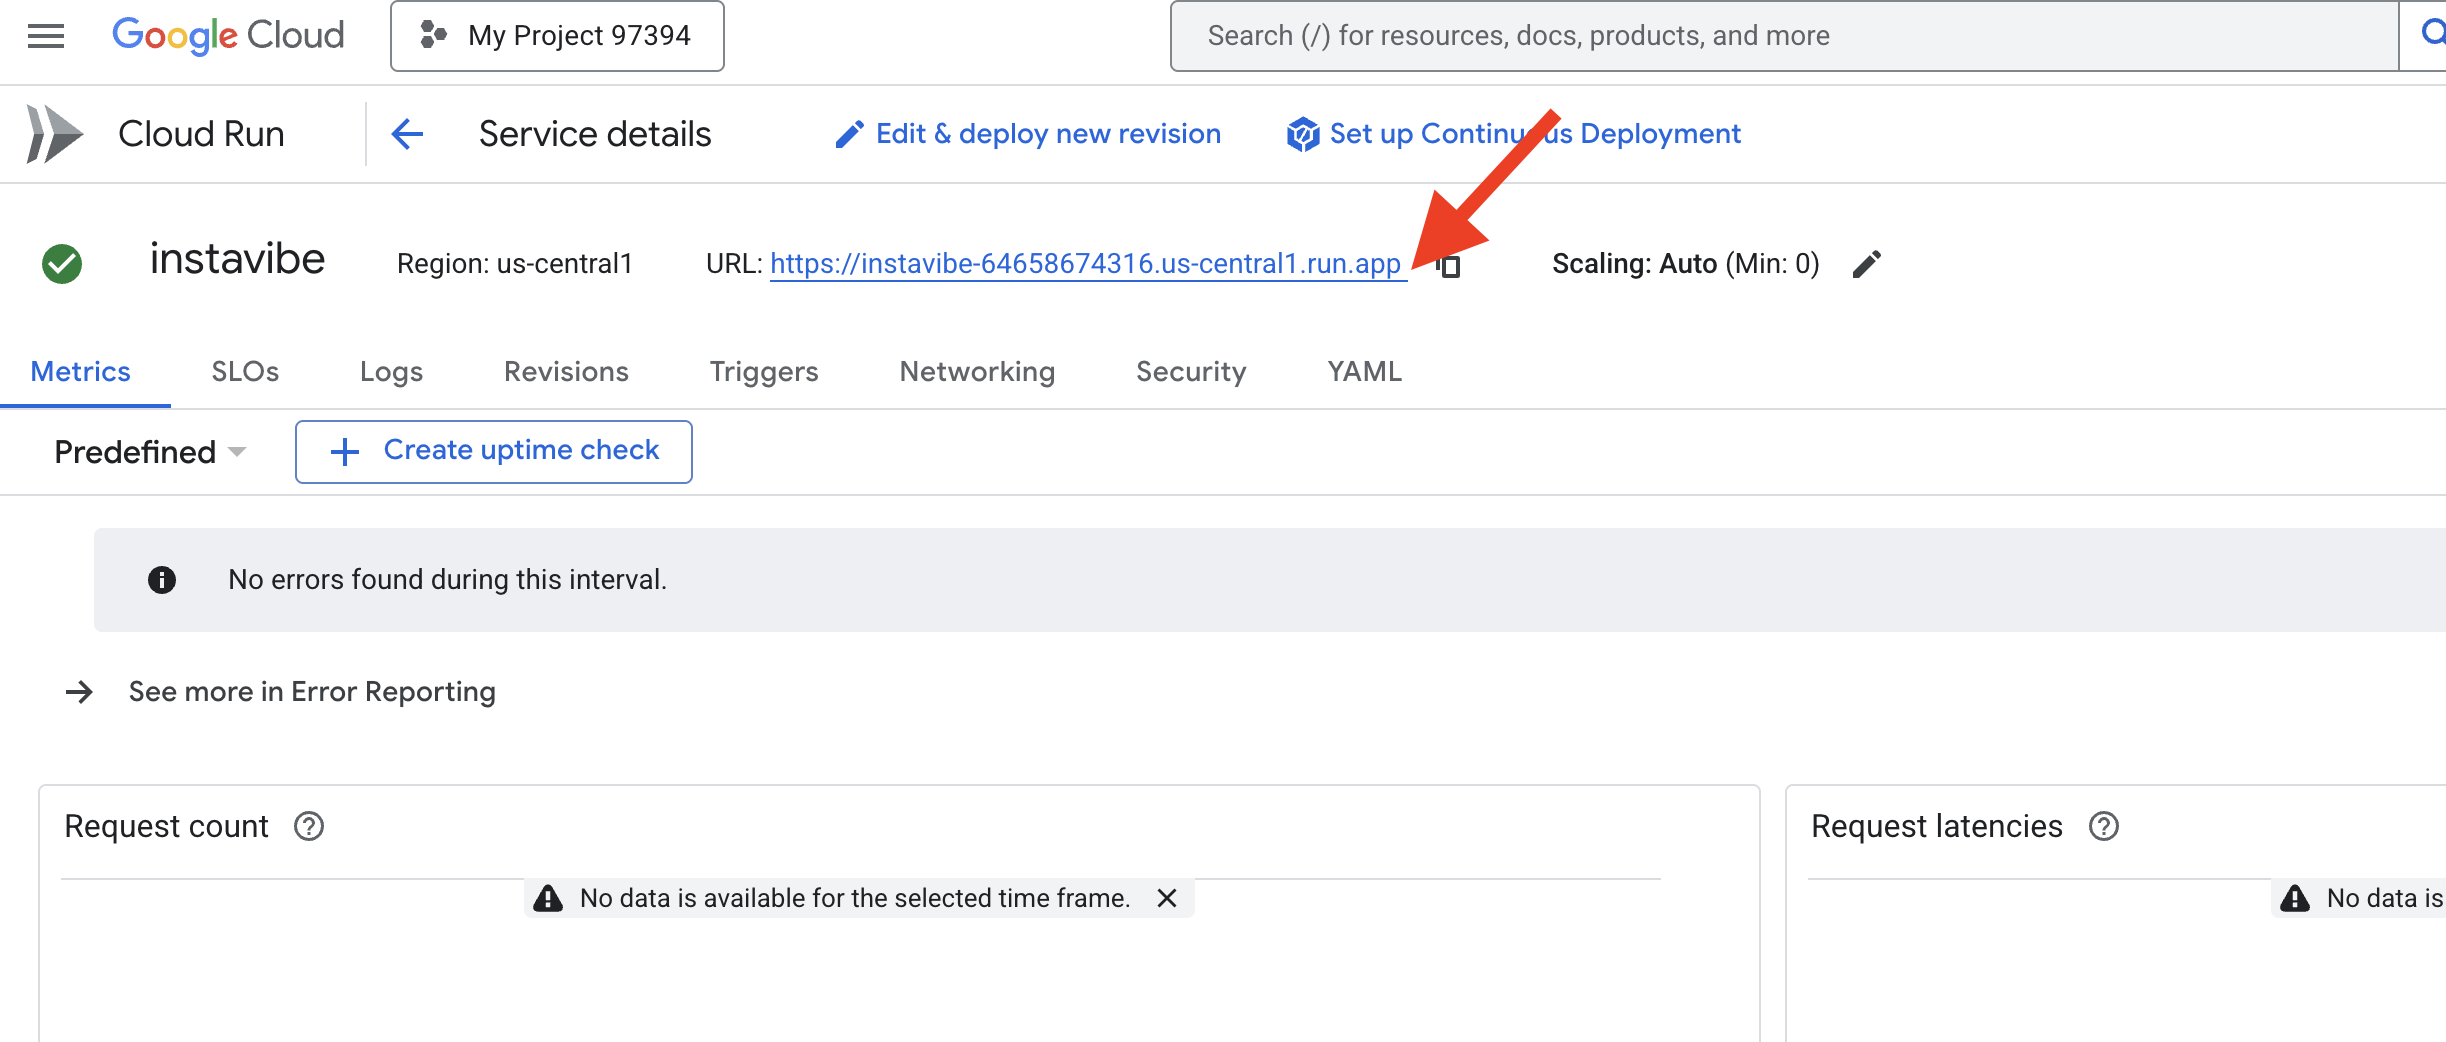
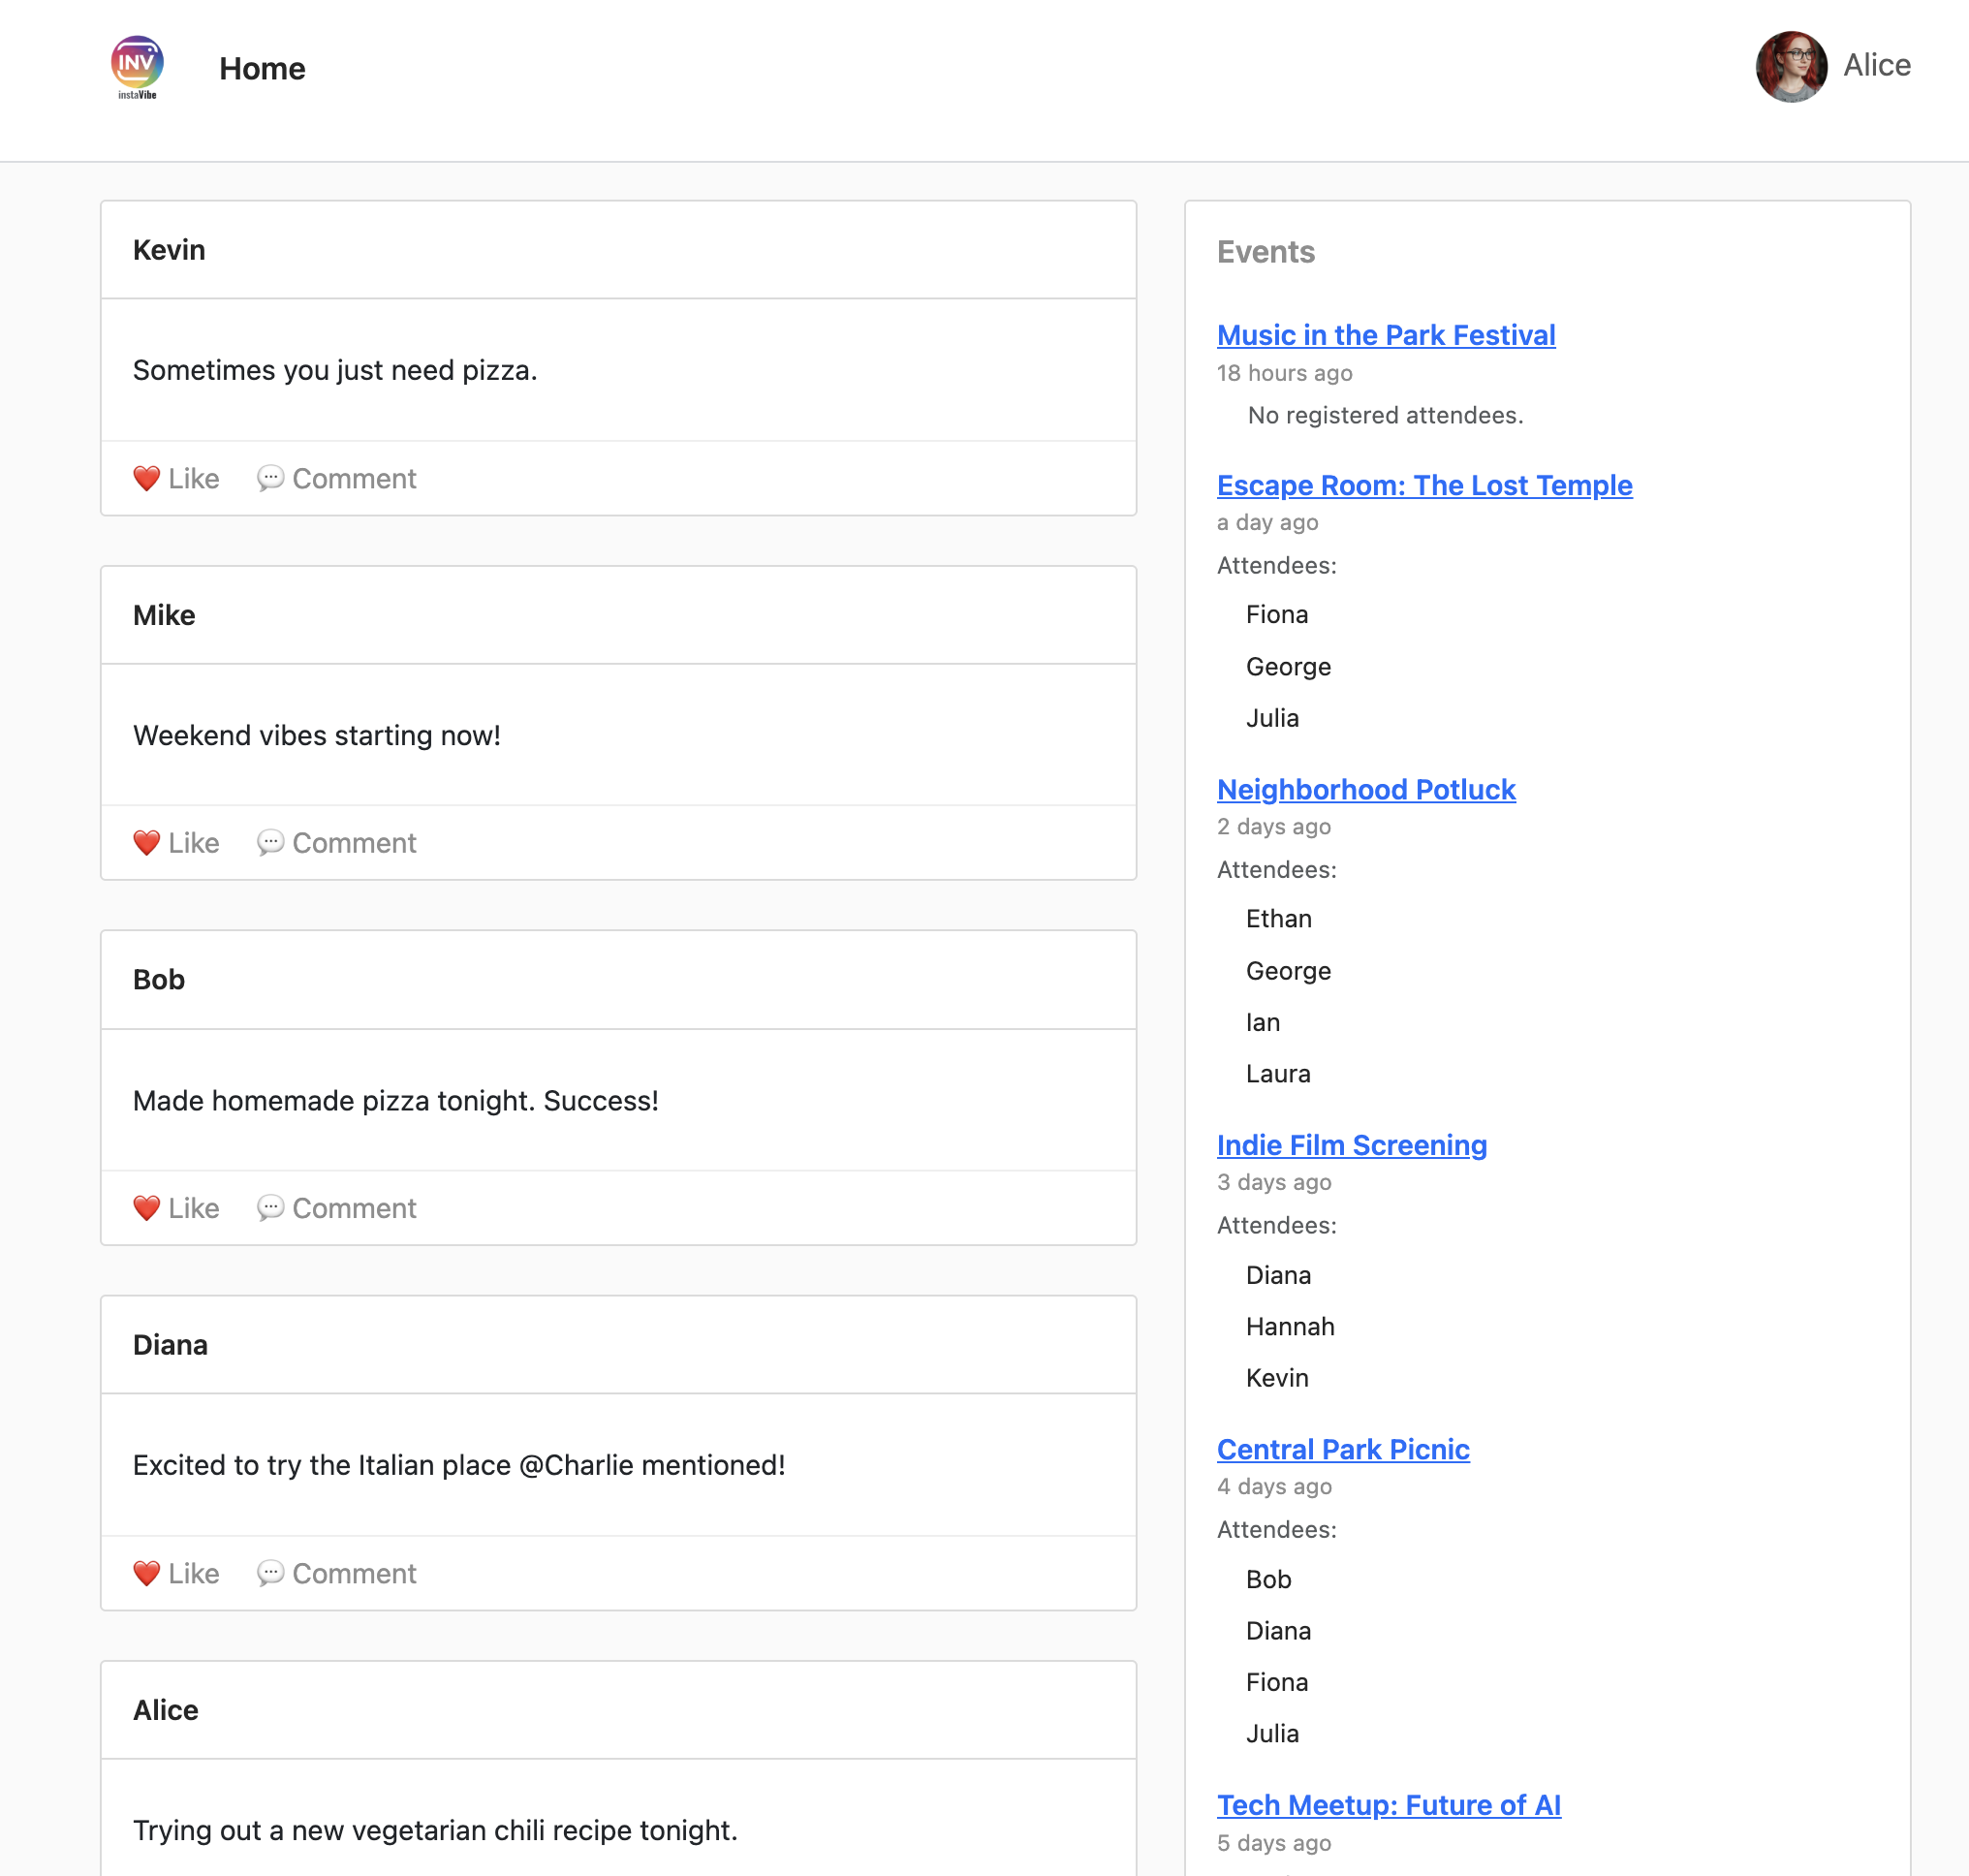
Go ahead and open that URL in your web browser now to explore the basic InstaVibe platform. See the posts, events, and user connections powered by the graph database we set up.
Now that we have our target application running, let's start building the first intelligent agent to enhance its capabilities.
6. Basic Agent,Event Planner with ADK
ADK Framework
Intro to Google's ADK Framework Now that our foundation (the InstaVibe app and database) is set, we can start building our first intelligent agent using Google's Agent Development Kit (ADK).
Agent Development Kit (ADK) is a flexible and modular framework specifically designed for developing and deploying AI agents. Its design principle is to make agent development feel more like traditional software development, aiming to make it significantly easier for developers to create, deploy, and orchestrate agentic architectures that can handle everything from simple, single-purpose tasks to complex, multi-agent workflows.
At its core, ADK revolves around the concept of an Agent, which encapsulates instructions, configuration (like the chosen language model, e.g., Gemini), and a set of Tools it can use to perform actions or gather information.
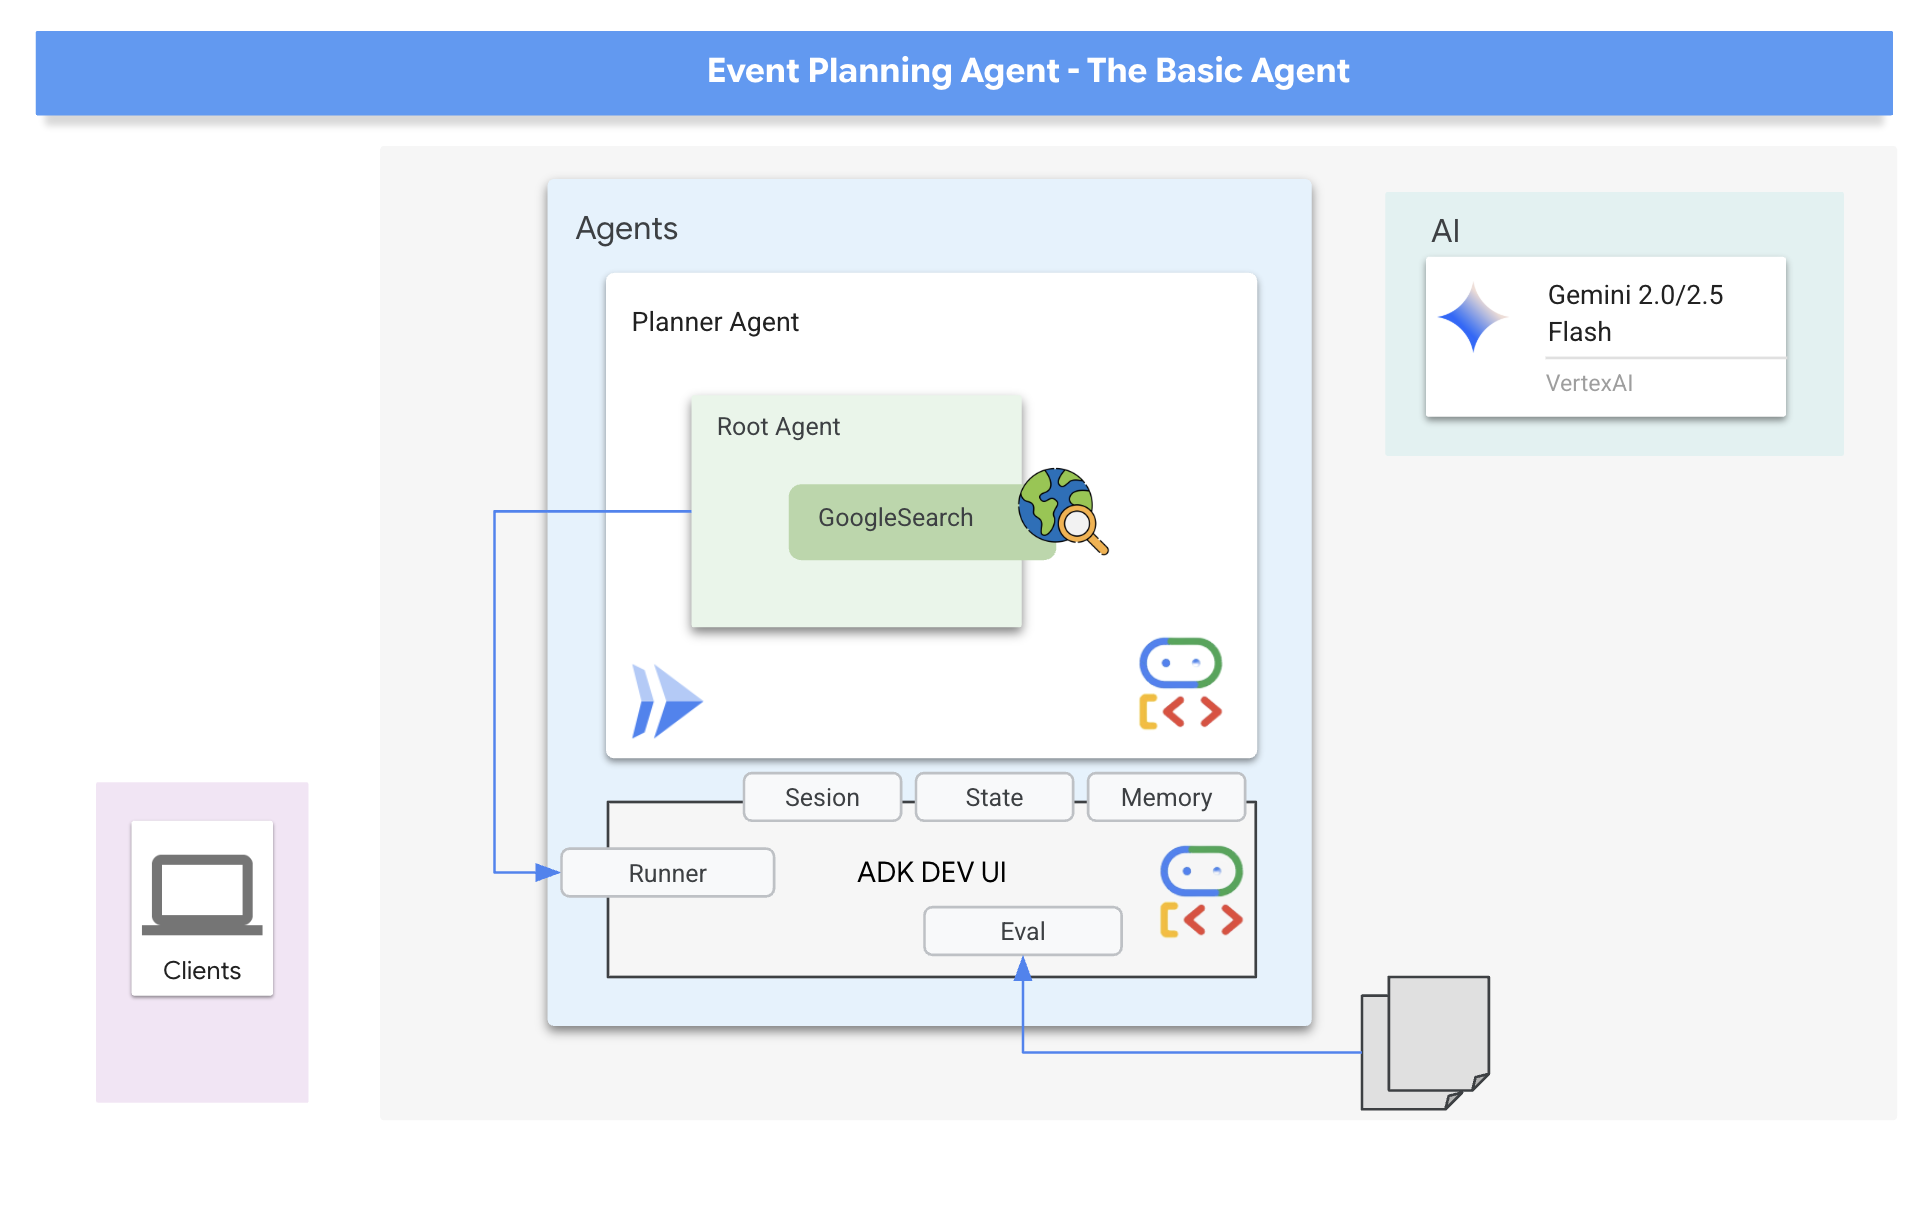
Our initial agent will be a "Event Planner." Its core purpose is to take user requests for social outings (specifying location, dates, and interests) and generate creative, tailored suggestions. To ensure the suggestions are relevant and based on current information (like specific events happening that weekend), we'll leverage one of ADK's built-in tools: Google Search. This allows the agent to ground its responses in real-time web results, fetching the latest details about venues, events, and activities matching the user's criteria.
👉📝 Back in the Cloud shell IDE, in ~/instavibe-bootstrap/agents/planner/agent.py add the following prompt and instruction to create the agent
from google.adk.agents import Agent
from google.adk.tools import google_search

root_agent = Agent(
    name="planner_agent",
    model="gemini-2.0-flash",
    description="Agent tasked with generating creative and fun dating plan suggestions",
    instruction="""

        You are a specialized AI assistant tasked with generating creative and fun plan suggestions.

        Request:
        For the upcoming weekend, specifically from **[START_DATE_YYYY-MM-DD]** to **[END_DATE_YYYY-MM-DD]**, in the location specified as **[TARGET_LOCATION_NAME_OR_CITY_STATE]** (if latitude/longitude are provided, use these: Lat: **[TARGET_LATITUDE]**, Lon: **[TARGET_LONGITUDE]**), please generate a distinct dating plan suggestions.

        Constraints and Guidelines for Suggestions:
        1.  Creativity & Fun: Plans should be engaging, memorable, and offer a good experience for a date.
        2.  Budget: All generated plans should aim for a moderate budget (conceptually "$$"), meaning they should be affordable yet offer good value, without being overly cheap or extravagant. This budget level should be *reflected in the choice of activities and venues*, but **do not** explicitly state "Budget: $$" in the `plan_description`.
        3.  Interest Alignment:
               Consider the following user interests: **[COMMA_SEPARATED_LIST_OF_INTERESTS, e.g., outdoors, arts & culture, foodie, nightlife, unique local events, live music, active/sports]**. Tailor suggestions specifically to these where possible. The plan should *embody* these interests.
               Fallback: If specific events or venues perfectly matching all listed user interests cannot be found for the specified weekend, you should create a creative and fun generic dating plan that is still appealing, suitable for the location, and adheres to the moderate budget. This plan should still sound exciting and fun, even if it's more general.
        4.  Current & Specific: Prioritize finding specific, current events, festivals, pop-ups, or unique local venues operating or happening during the specified weekend dates. If exact current events cannot be found, suggest appealing evergreen options or implement the fallback generic plan.
        5.  Location Details: For each place or event mentioned within a plan, you MUST provide its name, precise latitude, precise longitude, and a brief, helpful description.
        6.  Maximum Activities: The plan must contain a maximum of 3 distinct activities.

        RETURN PLAN in MARKDOWN FORMAT
    """,
    tools=[google_search]
)
And that's our first agent defined! One of the great things about ADK is its intuitive nature and the handy tools it provides. A particularly useful one is the ADK Dev UI, which allows you to interactively test your agent and see its responses in real-time.
👉💻 Let's start it up. The following commands will launch the ADK DEV UI:
. ~/instavibe-bootstrap/set_env.sh
source ~/instavibe-bootstrap/env/bin/activate
cd  ~/instavibe-bootstrap/agents
sed -i "s|^\(O\?GOOGLE_CLOUD_PROJECT\)=.*|GOOGLE_CLOUD_PROJECT=${PROJECT_ID}|" ~/instavibe-bootstrap/agents/planner/.env
adk web
After running the commands, you should see output in your terminal indicating that the ADK Web Server has started, similar to this:
+-----------------------------------------------------------------------------+
| ADK Web Server started                                                      |
|                                                                             |
| For local testing, access at http://localhost:8000.                         |
+-----------------------------------------------------------------------------+

INFO:     Application startup complete.
INFO:     Uvicorn running on http://0.0.0.0:8000 (Press CTRL+C to quit)
👉 Next, to access the ADK Dev UI from your browser:
From the Web preview icon (often looks like an eye or a square with an arrow) in the Cloud Shell toolbar (usually top right), select Change port. In the pop-up window, set the port to 8000 and click "Change and Preview". Cloud Shell will then open a new browser tab or window displaying the ADK Dev UI.
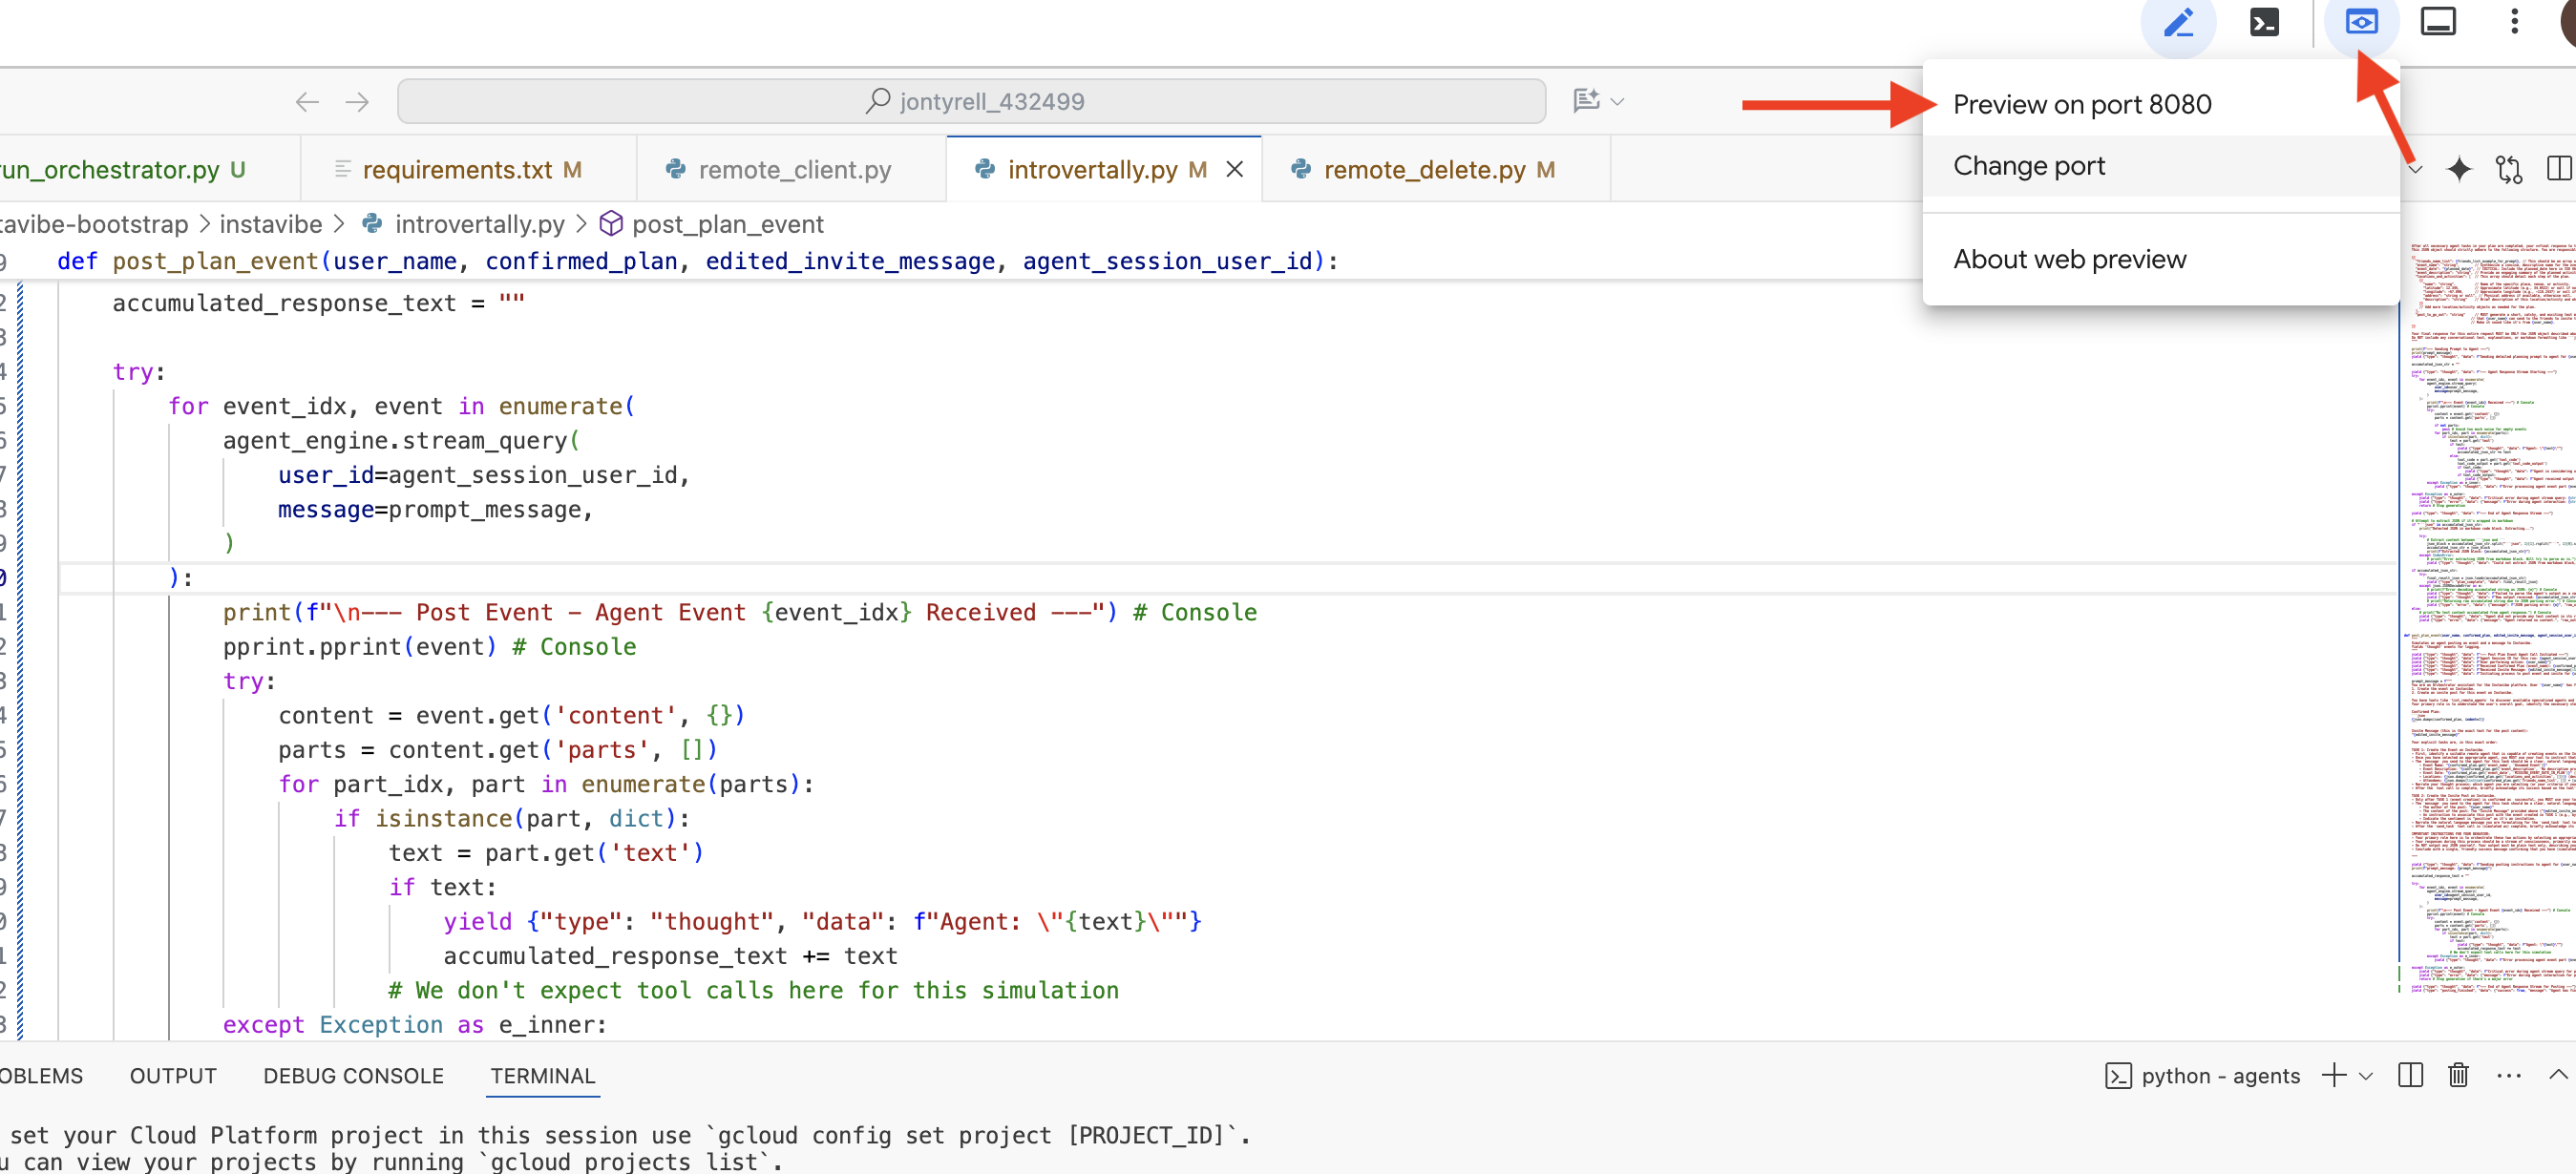
Once the ADK Dev UI is open in your browser: In the top-right dropdown menu of the UI, select planner as the agent you want to interact with. Now, in the chat dialog on the right, try giving your agent a task. For example, have a conversation with the agent:
Search and plan something in Seattle for me this weekend
This weekend and I enjoy food and anime
Suggest a date (Your preference)
July 12 2025
You should see the agent process your request and provide a plan based on its Google Search results.

Now, interacting with an agent is one thing, but how do we know if it's consistently behaving as expected, especially as we make changes?
Traditional software testing methods often fall short for AI agents because of their generative and non-deterministic nature. To bridge the gap from a cool demo to a reliable production agent, a solid evaluation strategy is crucial. Unlike simply checking the final output of a generative model, evaluating an agent often involves assessing its decision-making process and its ability to correctly use tools or follow instructions across various scenarios. ADK provides features to help with this.

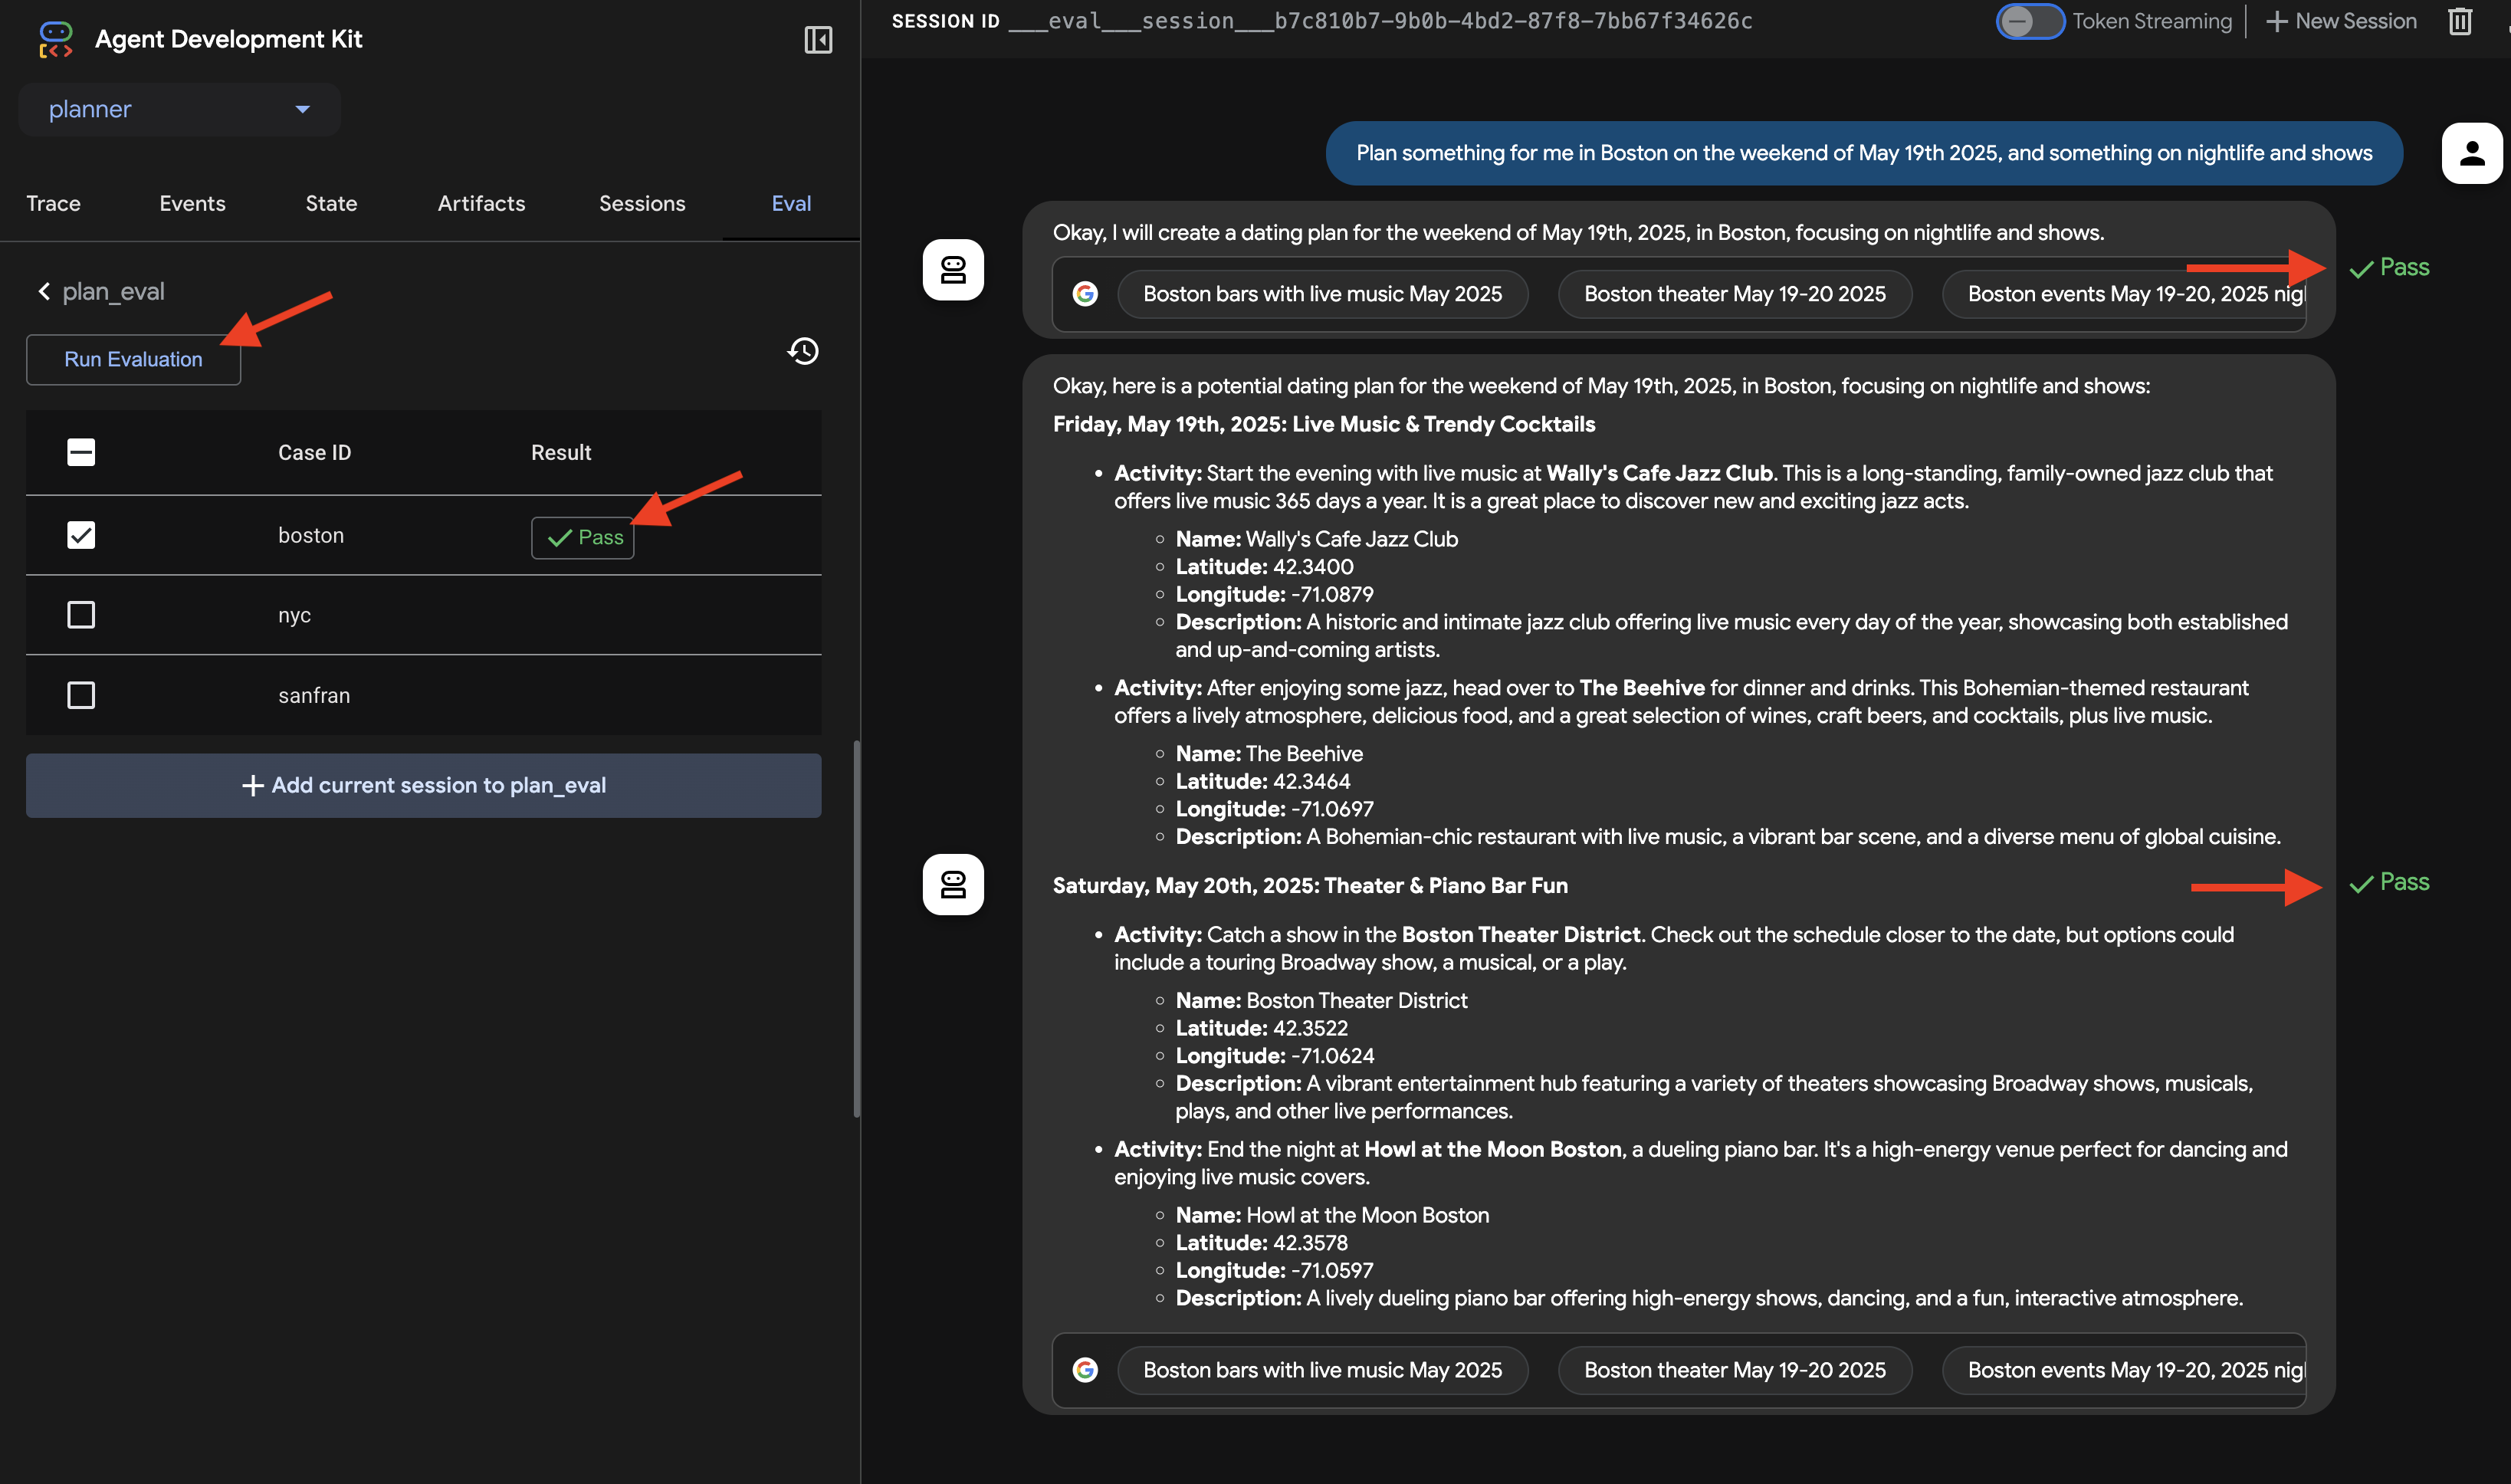
👉 In the ADK Dev UI, click on the "Eval" tab in the left-hand navigation. You should see a pre-loaded test file named plan_eval. This file contains predefined inputs and criteria for testing our planner agent.
👉 Select a scenario, such as "boston," and click the Run Evaluation button. In the pop-up window that appears, lower the match score to 0.3 and click Start.
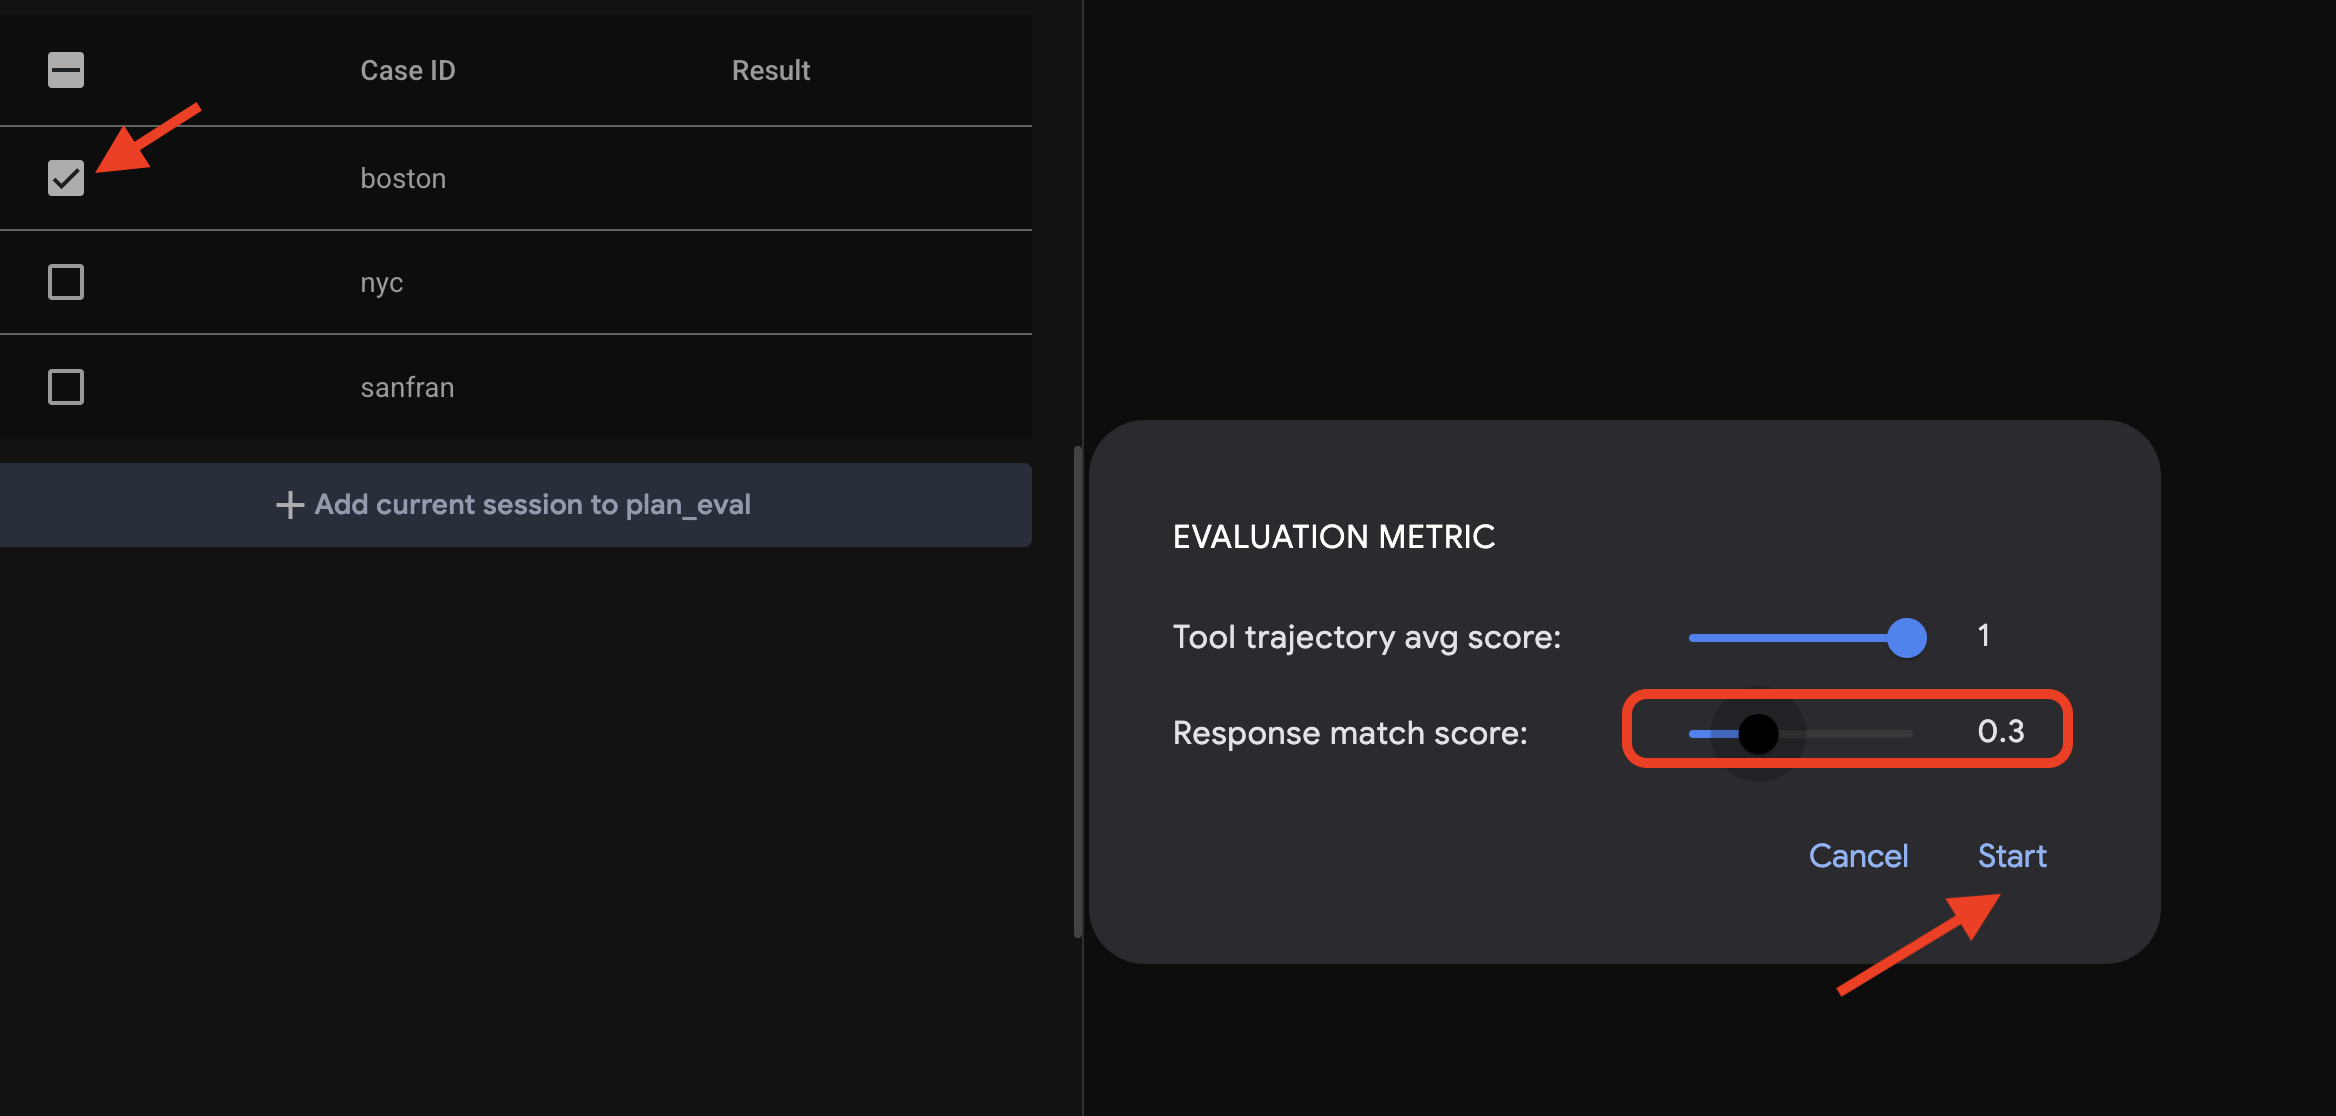
This will execute the agent with the test input and check if its output meets the defined expectations. This gives you a way to systematically test your agent's performance.
👉 Now, let's see what happens with a stricter threshold. Select the "nyc" scenario and click Run Evaluation again. This time, leave the match score at its default value (Response match score: 0.7) and click Start. You'll notice the result is Fail. This is expected, as the agent's creative output doesn't perfectly match the pre-defined "golden" answer.
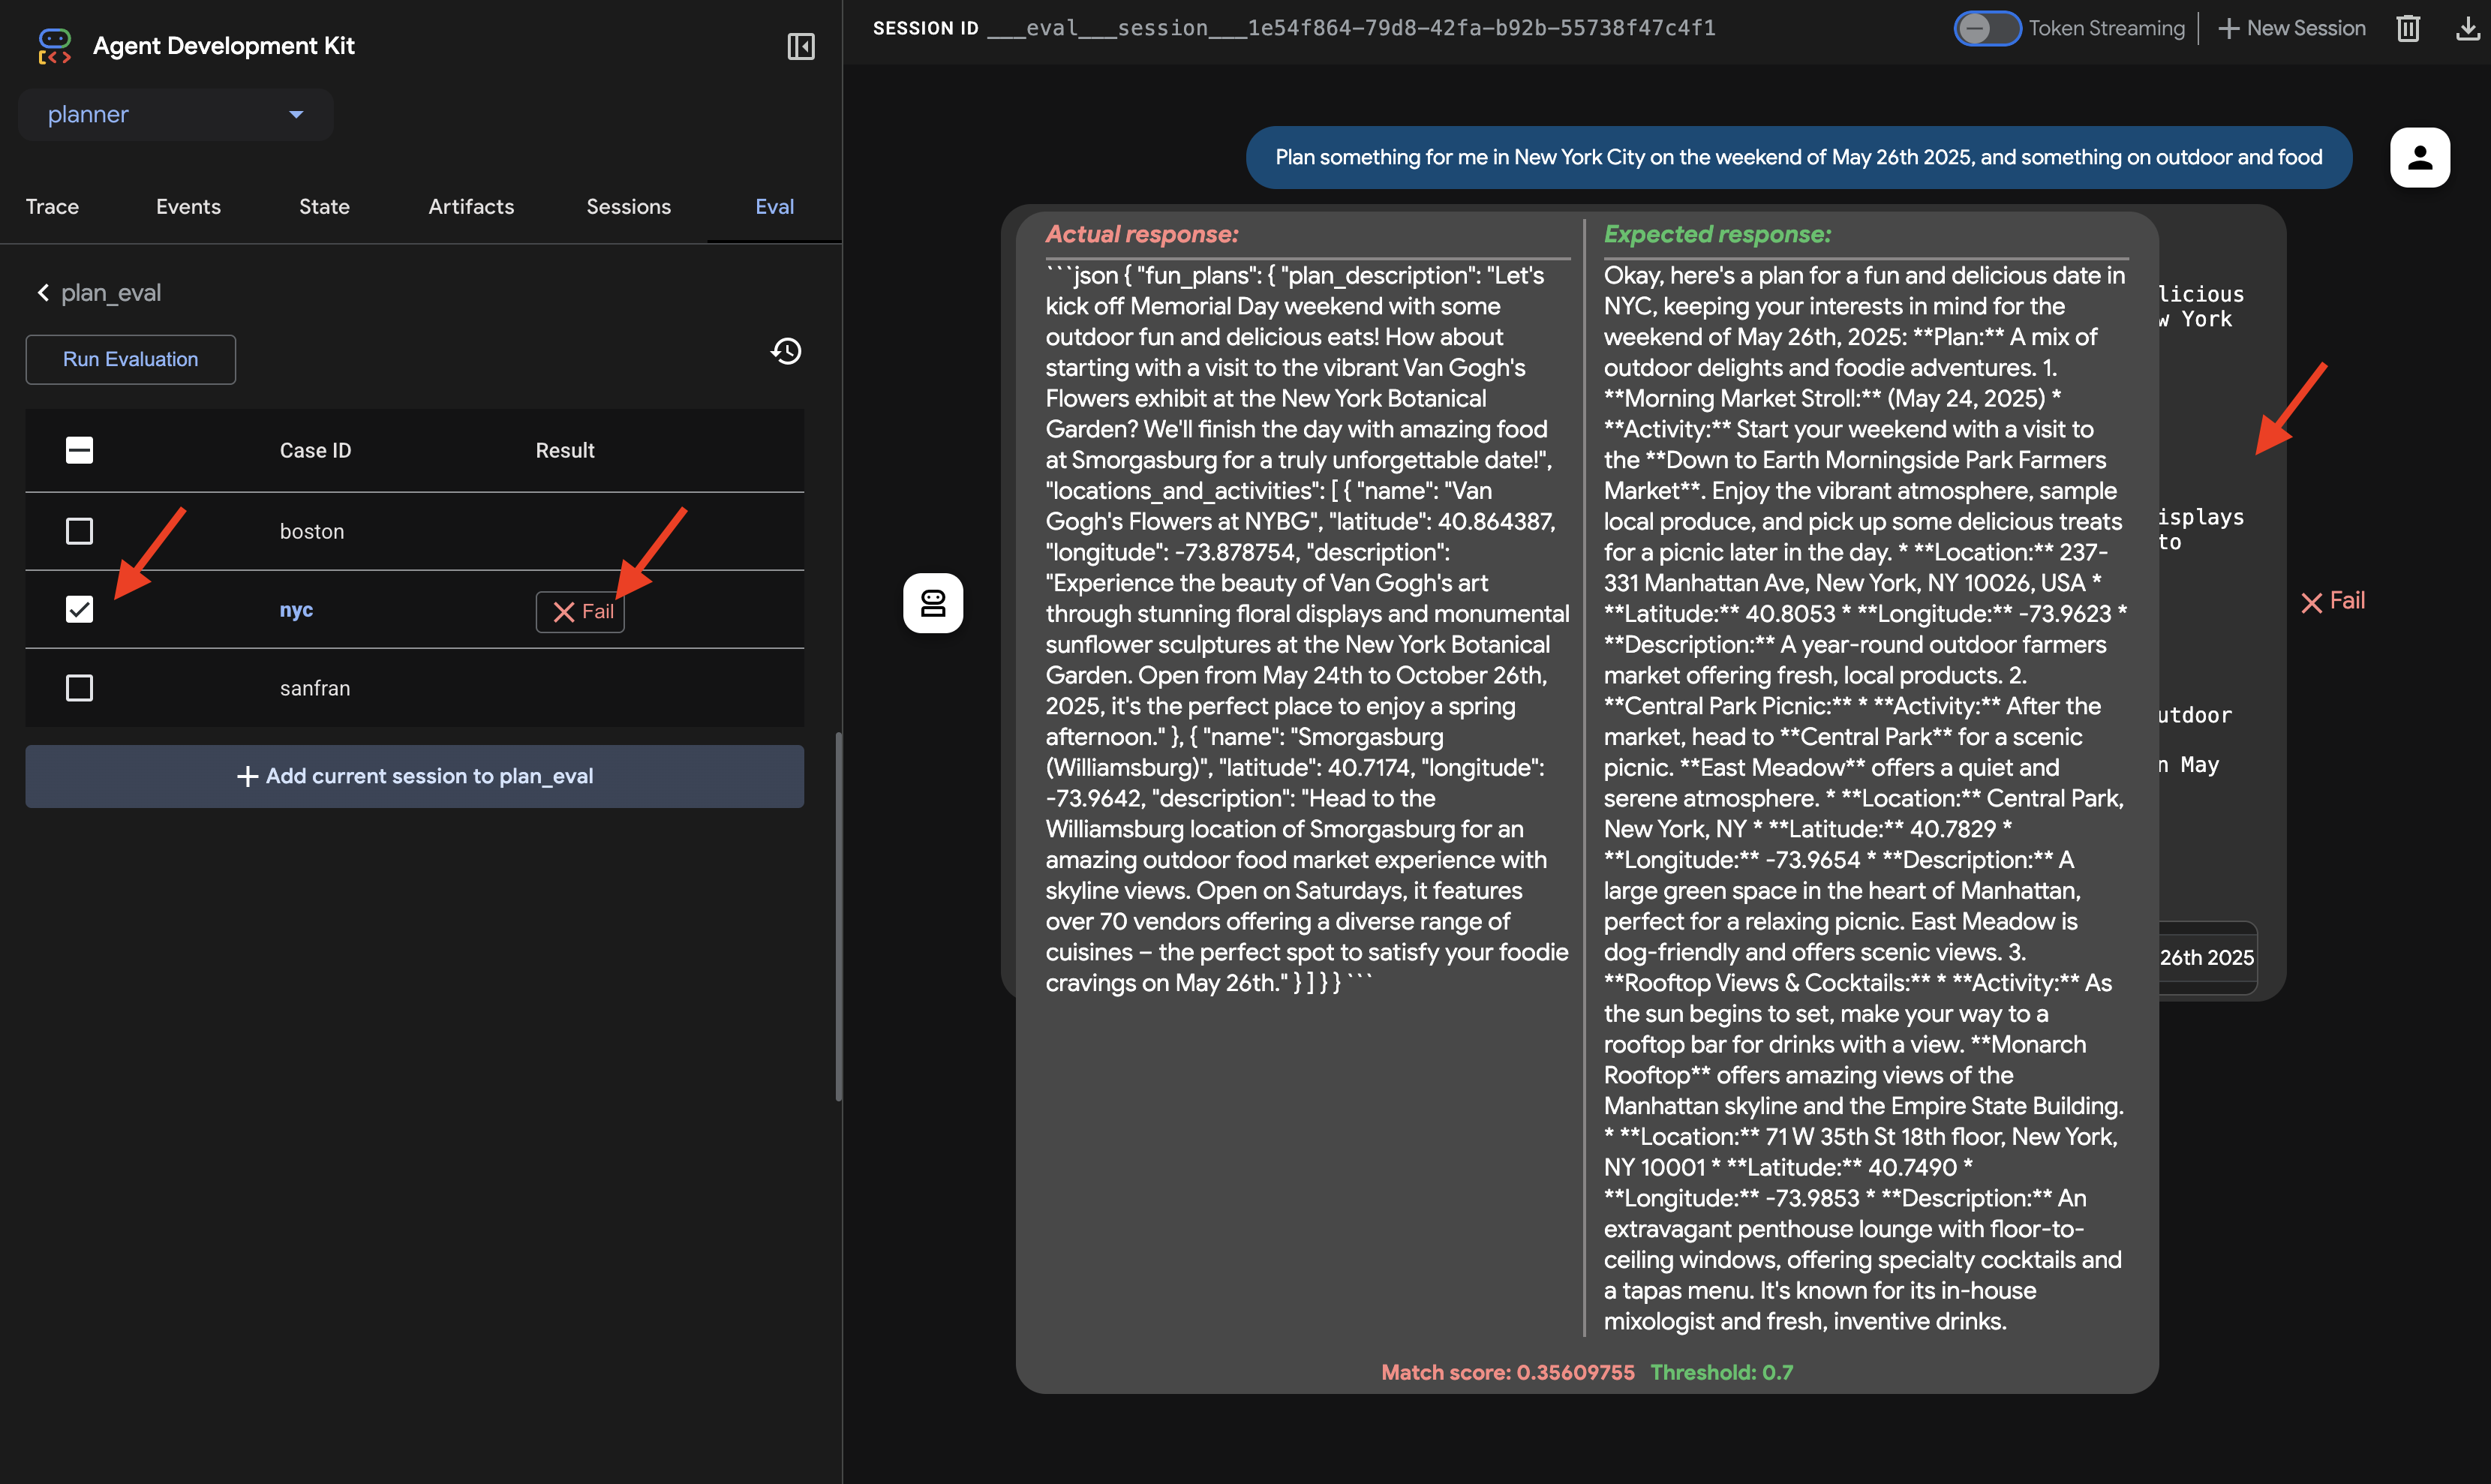
👉 To understand why it failed, click on the fail icon in "nyc" row. The UI now displays a side-by-side comparison of the Actual response from the agent and the Expected response from the test case. This view is essential for debugging, allowing you to see exactly where the agent's output diverged and refine its instructions accordingly.
Once you're done exploring the UI and the evaluation, return to your Cloud Shell Editor terminal and press Ctrl+C to stop the ADK Dev UI.
While free-form text output is a good start, for applications like InstaVibe to easily use an agent's suggestions, structured data (like JSON) is much more practical. Let's modify our agent to return its plan in a consistent JSON format.
👉📝 In the ~/instavibe-bootstrap/agents/planner/agent.py, find the line that currently says RETURN PLAN in MARKDOWN FORMAT within the agent's instruction string. Replace that line with the following detailed JSON structure:
Return your response *exclusively* as a single JSON object. This object should contain a top-level key, "fun_plans", which holds a plan objects. Each plan object in the list must strictly adhere to the following structure:

        --json--
        {
          "plan_description": "A summary of the overall plan, consisting of **exactly three sentences**. Craft these sentences in a friendly, enthusiastic, and conversational tone, as if you're suggesting this awesome idea to a close friend. Make it sound exciting and personal, highlighting the positive aspects and appeal of the plan without explicitly mentioning budget or listing interest categories.",
          "locations_and_activities": [
              {
              "name": "Name of the specific place or event",
              "latitude": 0.000000,  // Replace with actual latitude
              "longitude": 0.000000, // Replace with actual longitude
              "description": "A brief description of this place/event, why it's suitable for the date, and any specific details for the weekend (e.g., opening hours, event time)."
              }
              // Add more location/activity objects here if the plan involves multiple stops/parts
          ]
        }
Now that you've updated the agent's instructions to specifically request JSON output, let's verify the change.
👉💻 Relaunch the ADK Dev UI using the same command as before:
. ~/instavibe-bootstrap/set_env.sh
source ~/instavibe-bootstrap/env/bin/activate
cd  ~/instavibe-bootstrap/agents
adk web
Refresh the tab if you already have it open. Or Follow the same steps as previously to open the ADK Dev UI in your browser (via Cloud Shell's Web Preview on port 8000). Once the UI is loaded, ensure the planner agent is selected.
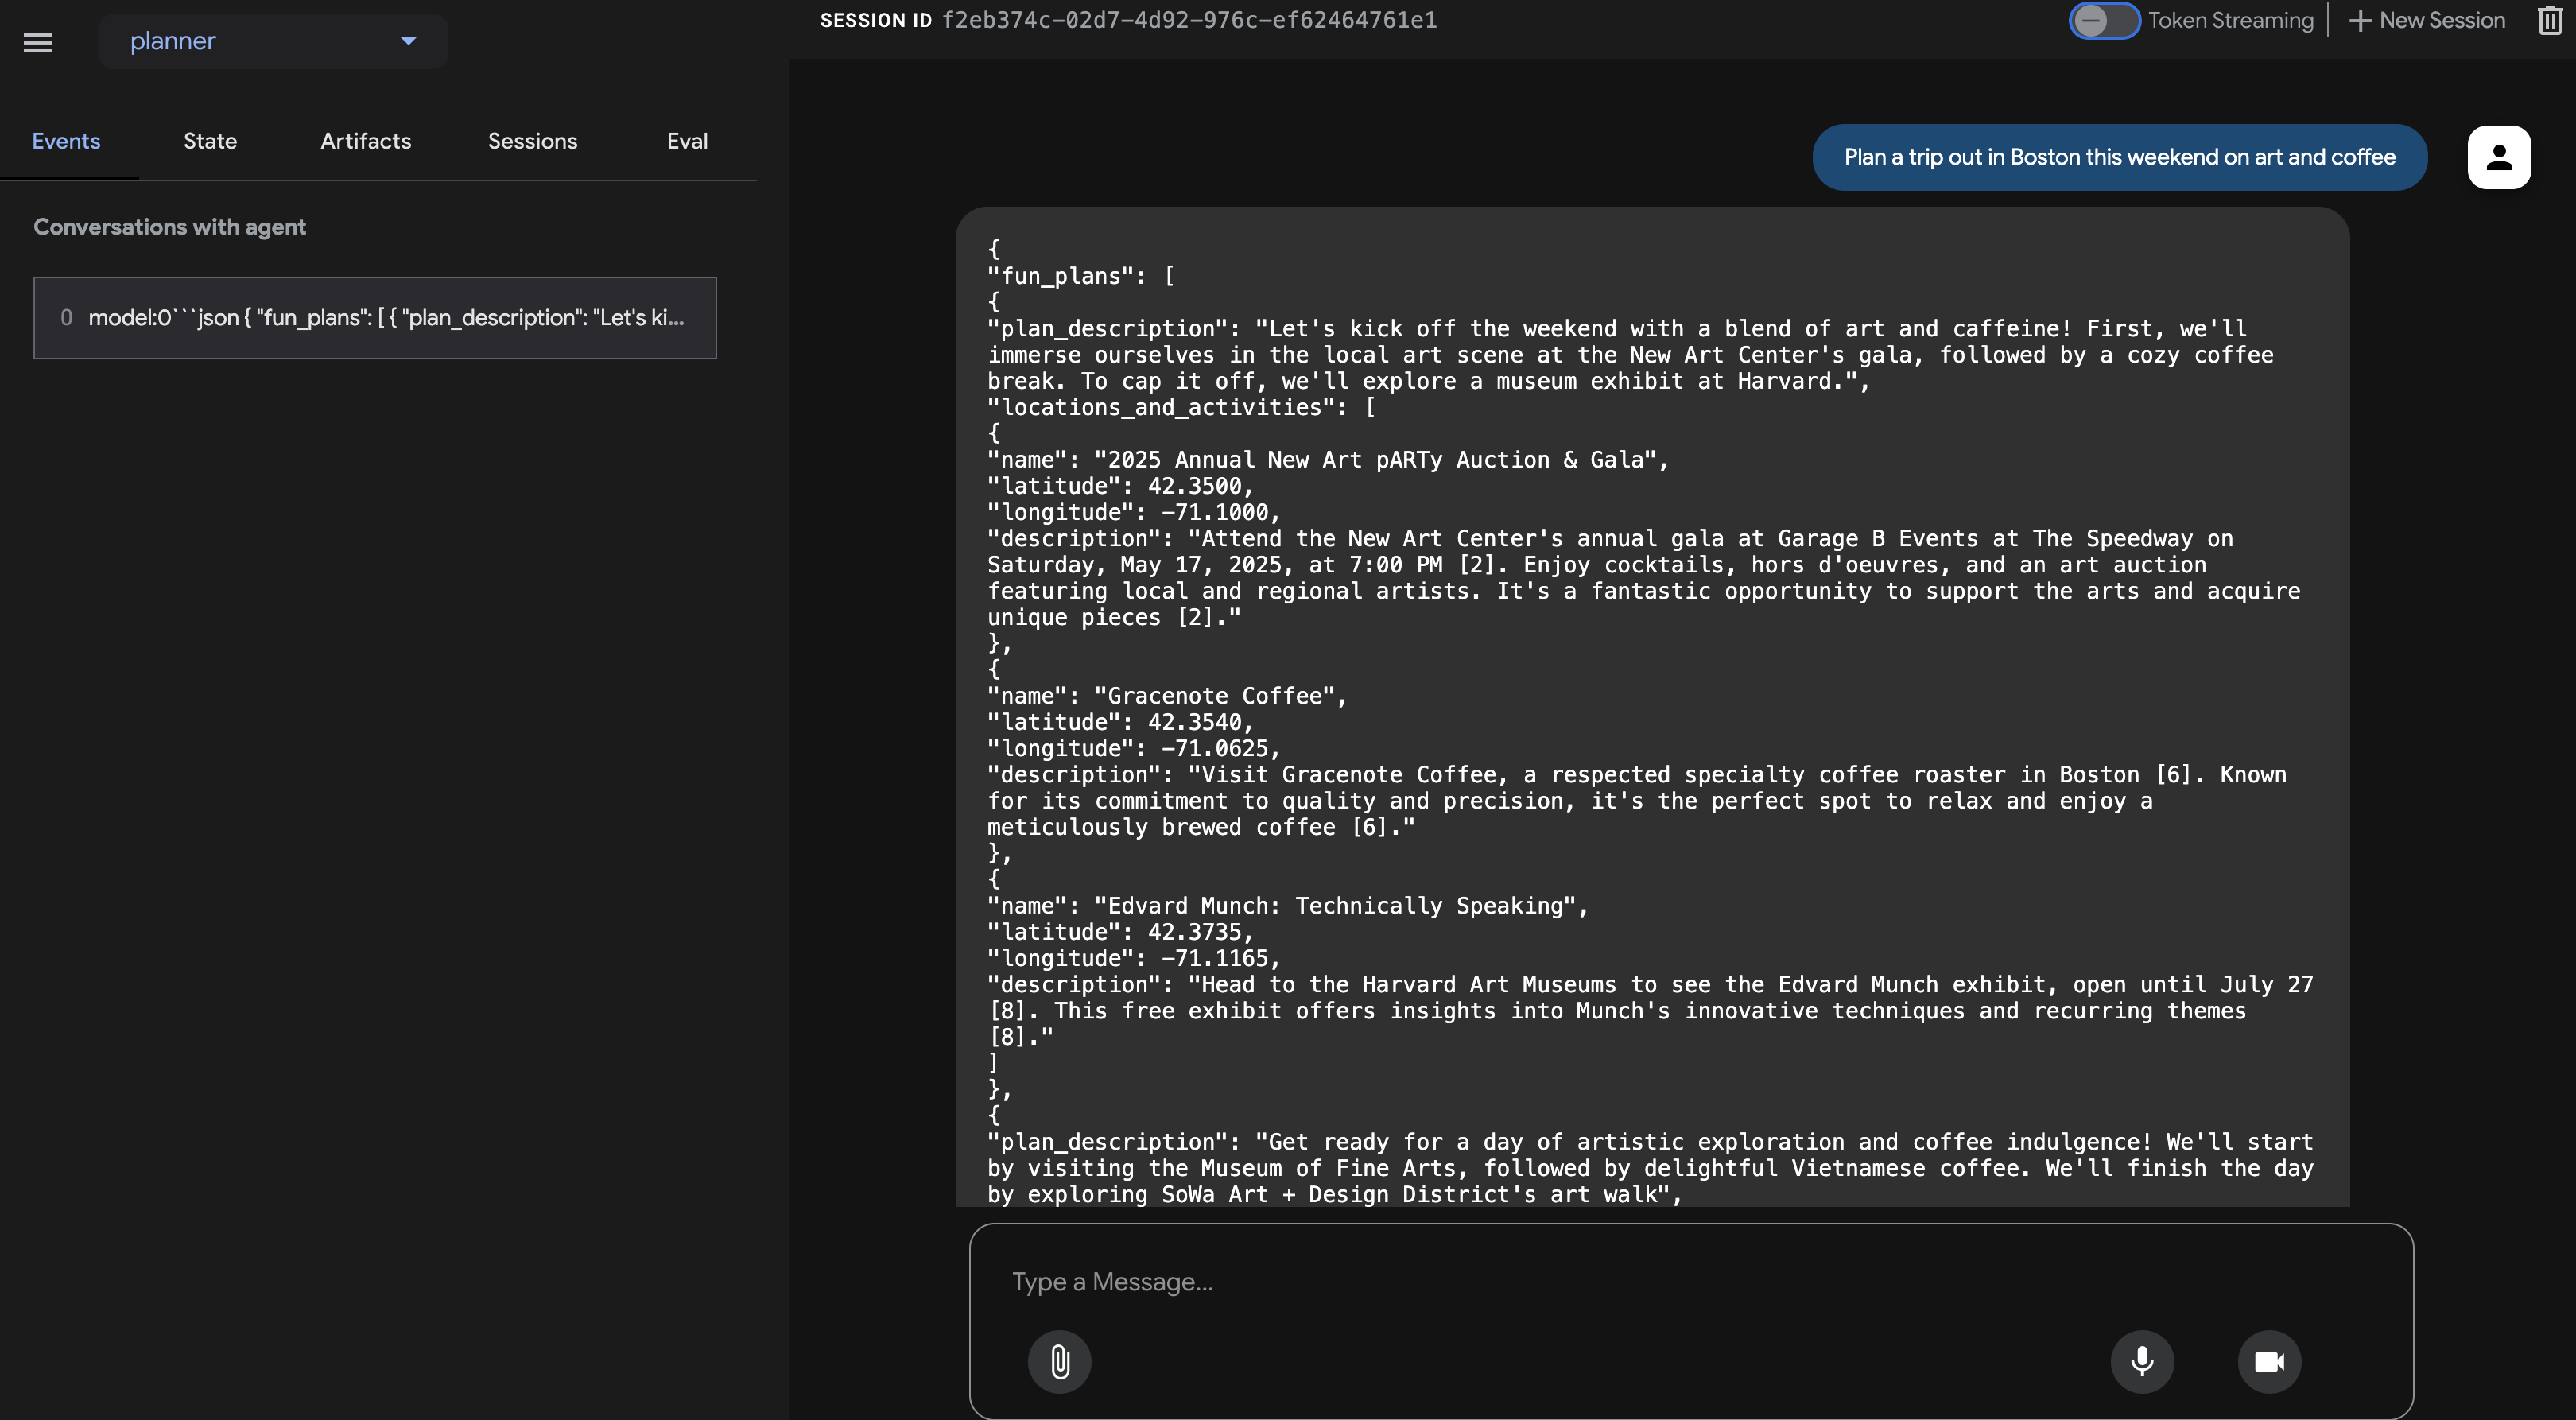
👉 This time, let's give it a different request. In the chat dialog, enter:
Plan an event Boston this weekend with art and coffee
Examine the agent's response carefully. Instead of a purely conversational text reply, you should now see a response formatted strictly as a JSON object, matching the structure we defined in the instructions (containing fun_plans, plan_description, locations_and_activities, etc.). This confirms the agent can now produce structured output suitable for programmatic use by our InstaVibe application.
After confirming the JSON output, return to your Cloud Shell terminal and press Ctrl+C to stop the ADK Dev UI.
ADK Components
While the ADK Dev UI is great for interactive testing, we often need to run our agents programmatically, perhaps as part of a larger application or backend service. To understand how this works, let's look at some core ADK concepts related to runtime and context management.
Meaningful, multi-turn conversations require agents to understand context – recalling what's been said and done to maintain continuity. ADK provides structured ways to manage this context through Session, State, and Memory:
- Session: When a user starts interacting with an agent, a Session is created. Think of it as the container for a single, specific chat thread. It holds a unique ID, the history of interactions (Events), the current working data (State), and metadata like the last update time.
- State: This is the agent's short-term, working memory within a single Session. It's a mutable dictionary where the agent can store temporary information needed to complete the current task (e.g., user preferences collected so far, intermediate results from tool calls).
- Memory: This represents the agent's potential for long-term recall across different sessions or access to external knowledge bases. While Session and State handle the immediate conversation, Memory (often managed by a MemoryService) allows an agent to retrieve information from past interactions or structured data sources, giving it a broader knowledge context. (Note: Our simple client uses in memory services for simplicity, meaning memory/state only persists while the script runs).
- Event: Every interaction within a Session (user message, agent response, tool use request, tool result, state change, error) is recorded as an immutable Event. This creates a chronological log, essentially the transcript and action history of the conversation.
So, how are these managed when an agent runs? That's the job of the Runner.
- Runner: The Runner is the core execution engine provided by ADK. You define your agent and the tools it uses, and the Runner orchestrates the process of fulfilling a user's request. It manages the Session, handles the flow of Events, updates the State, invokes the underlying language model, coordinates tool calls, and potentially interacts with MemoryService. Think of it as the conductor making sure all the different parts work together correctly.
We can use the Runner to run our agent as a standalone Python application, completely independent of the Dev UI.
Let's create a simple client script to invoke our planner agent programmatically.
👉📝 In the file ~/instavibe-bootstrap/agents/planner/planner_client.py, add the following Python code under the existing imports. In planner_client.py, under the imports, add the following:
async def async_main():
  session_service = InMemorySessionService()

  session = await session_service.create_session(
      state={}, app_name='planner_app', user_id='user_dc'
  )

  query = "Plan Something for me in San Francisco this weekend on wine and fashion "
  print(f"User Query: '{query}'")
  content = types.Content(role='user', parts=[types.Part(text=query)])

  root_agent = agent.root_agent
  runner = Runner(
        app_name='planner_app',
        agent=root_agent,
        session_service=session_service,
  )
  print("Running agent...")
  events_async =  runner.run_async(
    session_id=session.id, user_id=session.user_id, new_message=content
  )

  async for event in events_async:
    print(f"Event received: {event}")


if __name__ == '__main__':
  try:
    asyncio.run(async_main())
  except Exception as e:
    print(f"An error occurred: {e}")
This code sets up in-memory services for session and artifact management (keeping it simple for this example), creates a session, defines a user query, configures the Runner with our agent, and then runs the agent asynchronously, printing out each event generated during the execution.
👉💻 Now, execute this client script from your terminal:
. ~/instavibe-bootstrap/set_env.sh
source ~/instavibe-bootstrap/env/bin/activate
cd  ~/instavibe-bootstrap/agents
python -m planner.planner_client
👀 Observe the output. Instead of just the final JSON plan, you'll see the detailed structure of each Event object generated during the agent's execution flow. This includes the initial user message event, potential events related to tool calls (like Google Search), and finally, the model's response event containing the JSON plan. This detailed event stream is very useful for debugging and understanding the step-by-step processing happening within the ADK Runtime.
Running agent...
Event received: content=Content(parts=[Part(video_metadata=None, thought=None, code_execution_result=None, executable_code=None, file_data=None, function_call=None, function_response=None, inline_data=None, text='```json\n{\n "fun_plans": [\n  {\n   "plan_description": "Embark on a stylish adventure through Hayes Valley,
...(turncated)
, offering a variety of fashion styles to browse and enjoy."\n    }\n   ]\n  }\n ]\n}\n```')], role='model') grounding_metadata=GroundingMetadata(grounding_chunks=[GroundingChunk(retrieved_context=None, web=GroundingChunkWeb(domain='islands.com', title='islands.com', uri='http
...(turncated)
QyTpPV7jS6wUt-Ix7GuP2mC9J4eY_8Km6Vv44liF9cb2VSs='))], grounding_supports=[GroundingSupport(confide
...(turncated)
>\n', sdk_blob=None), web_search_queries=['..e']) partial=None turn_complete=None error_code=None error_message=None interrupted=None custom_metadata=None invocation_id='e-04d97b8b-9021-47a5-ab41-17b5cbb4bf03' author='location_search_agent' actions=EventActions(skip_summarization=None, state_delta={}, artifact_delta={}, transfer_to_agent=None, escalate=None, requested_auth_configs={}) long_running_tool_ids=None branch=None id='CInHdkKw' timestamp=1746978846.232674
If the script runs continuously or hangs, you might need to manually stop it by pressing Ctrl+C.
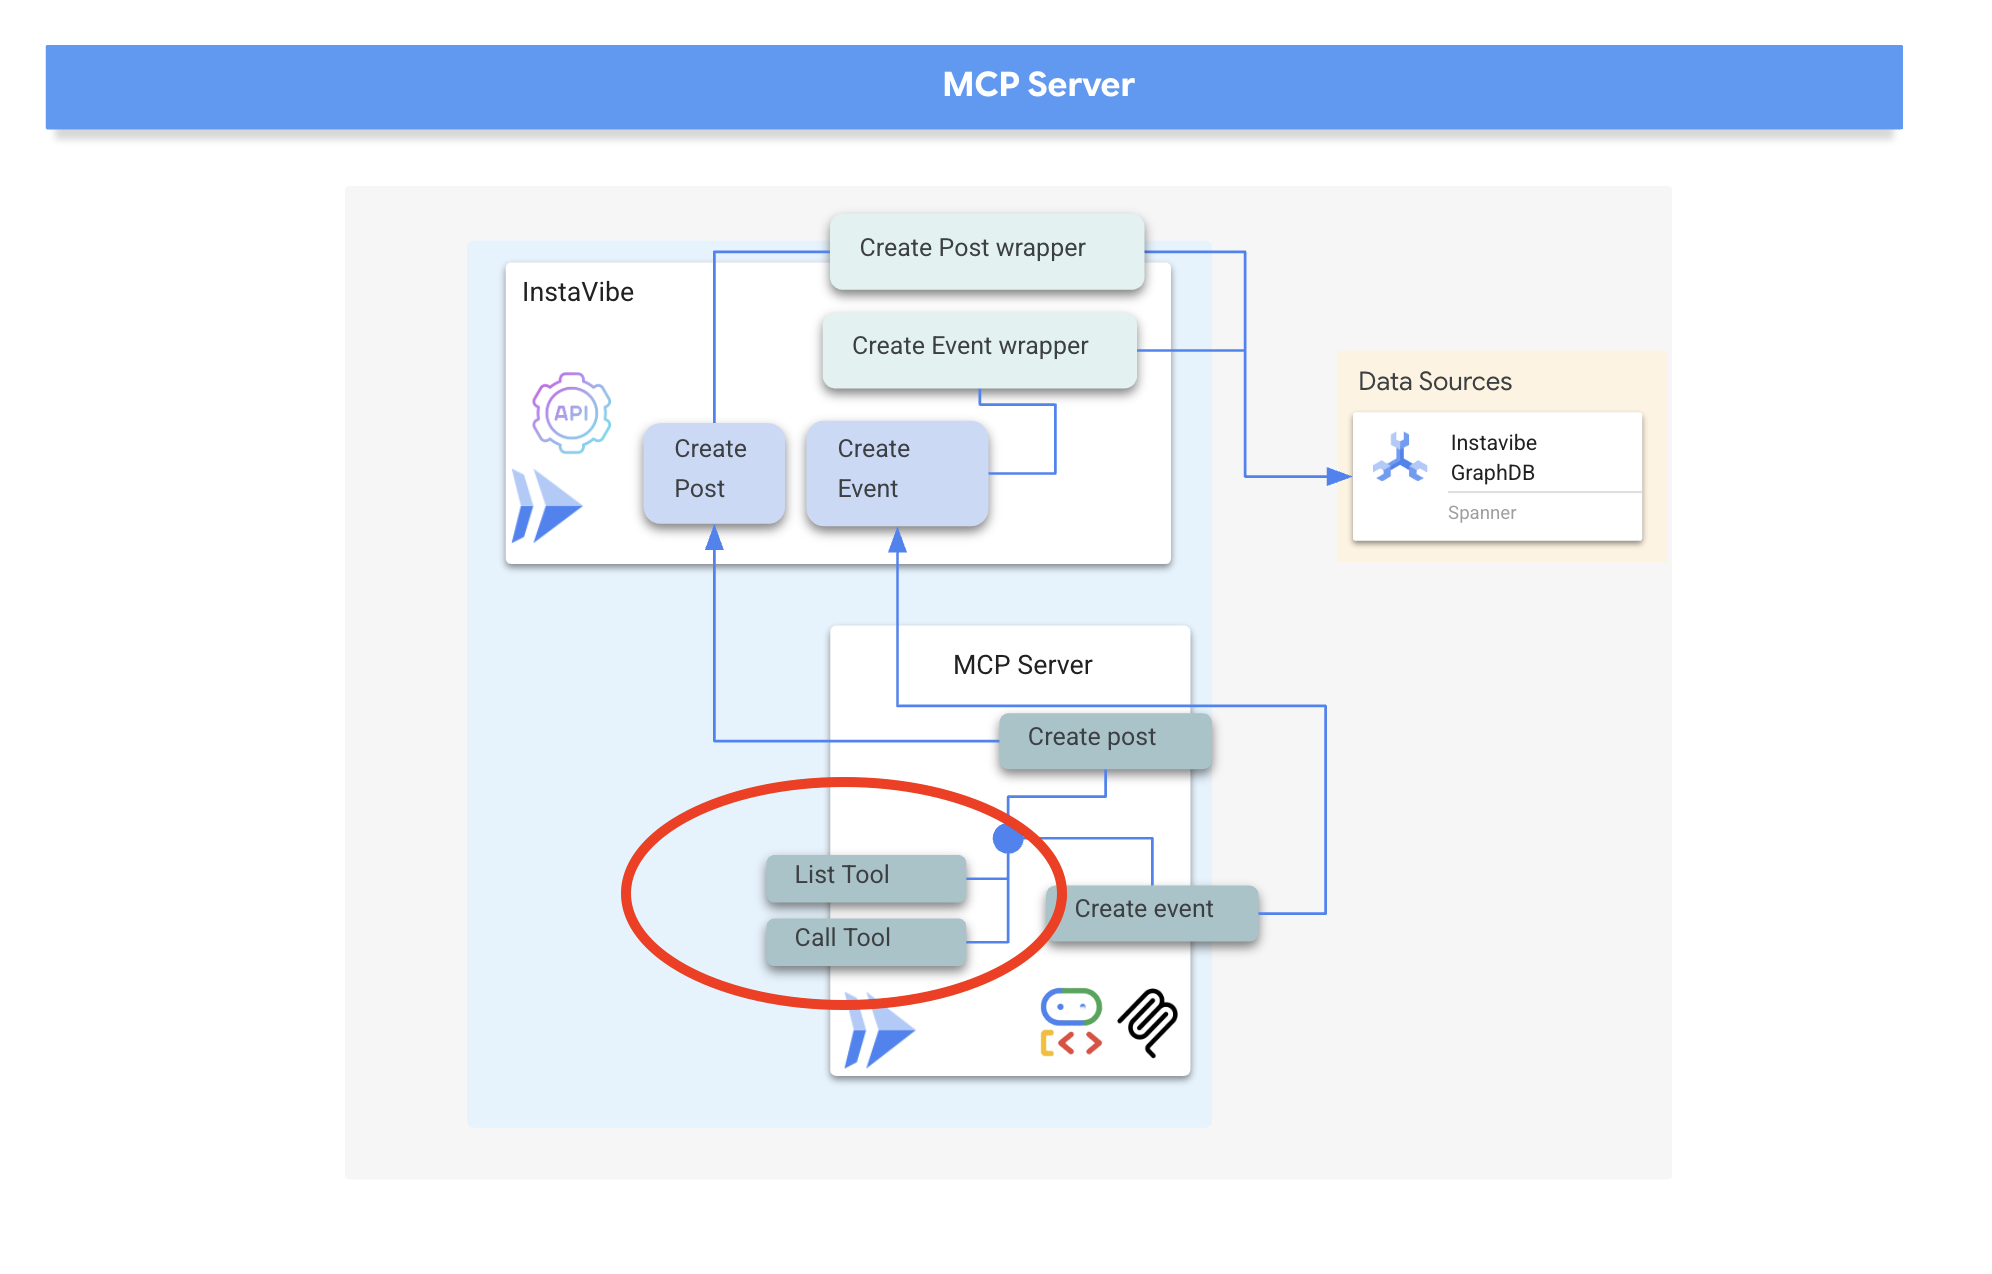
7. Platform Interaction Agent - interact with MCP Server
While ADK helps structure our agents, they often need to interact with external systems or APIs to perform real-world actions.
Model Context Protocol (MCP)
The Model Context Protocol (MCP) is an open standard designed to standardize how AI applications like agents, connect with external data sources, tools, and systems. It aims to solve the problem of needing custom integrations for every AI application and data source combination by providing a universal interface. MCP utilizes a client-server architecture where MCP clients, residing within AI applications (hosts), manage connections to MCP servers. These servers are external programs that expose specific functionalities like accessing local data, interacting with remote services via APIs, or providing predefined prompts, allowing AI models to access current information and perform tasks beyond their initial training. This structure enables AI models to discover and interact with external capabilities in a standardized way, making integrations simpler and more scalable.
Build and deploy the InstaVibe MCP server
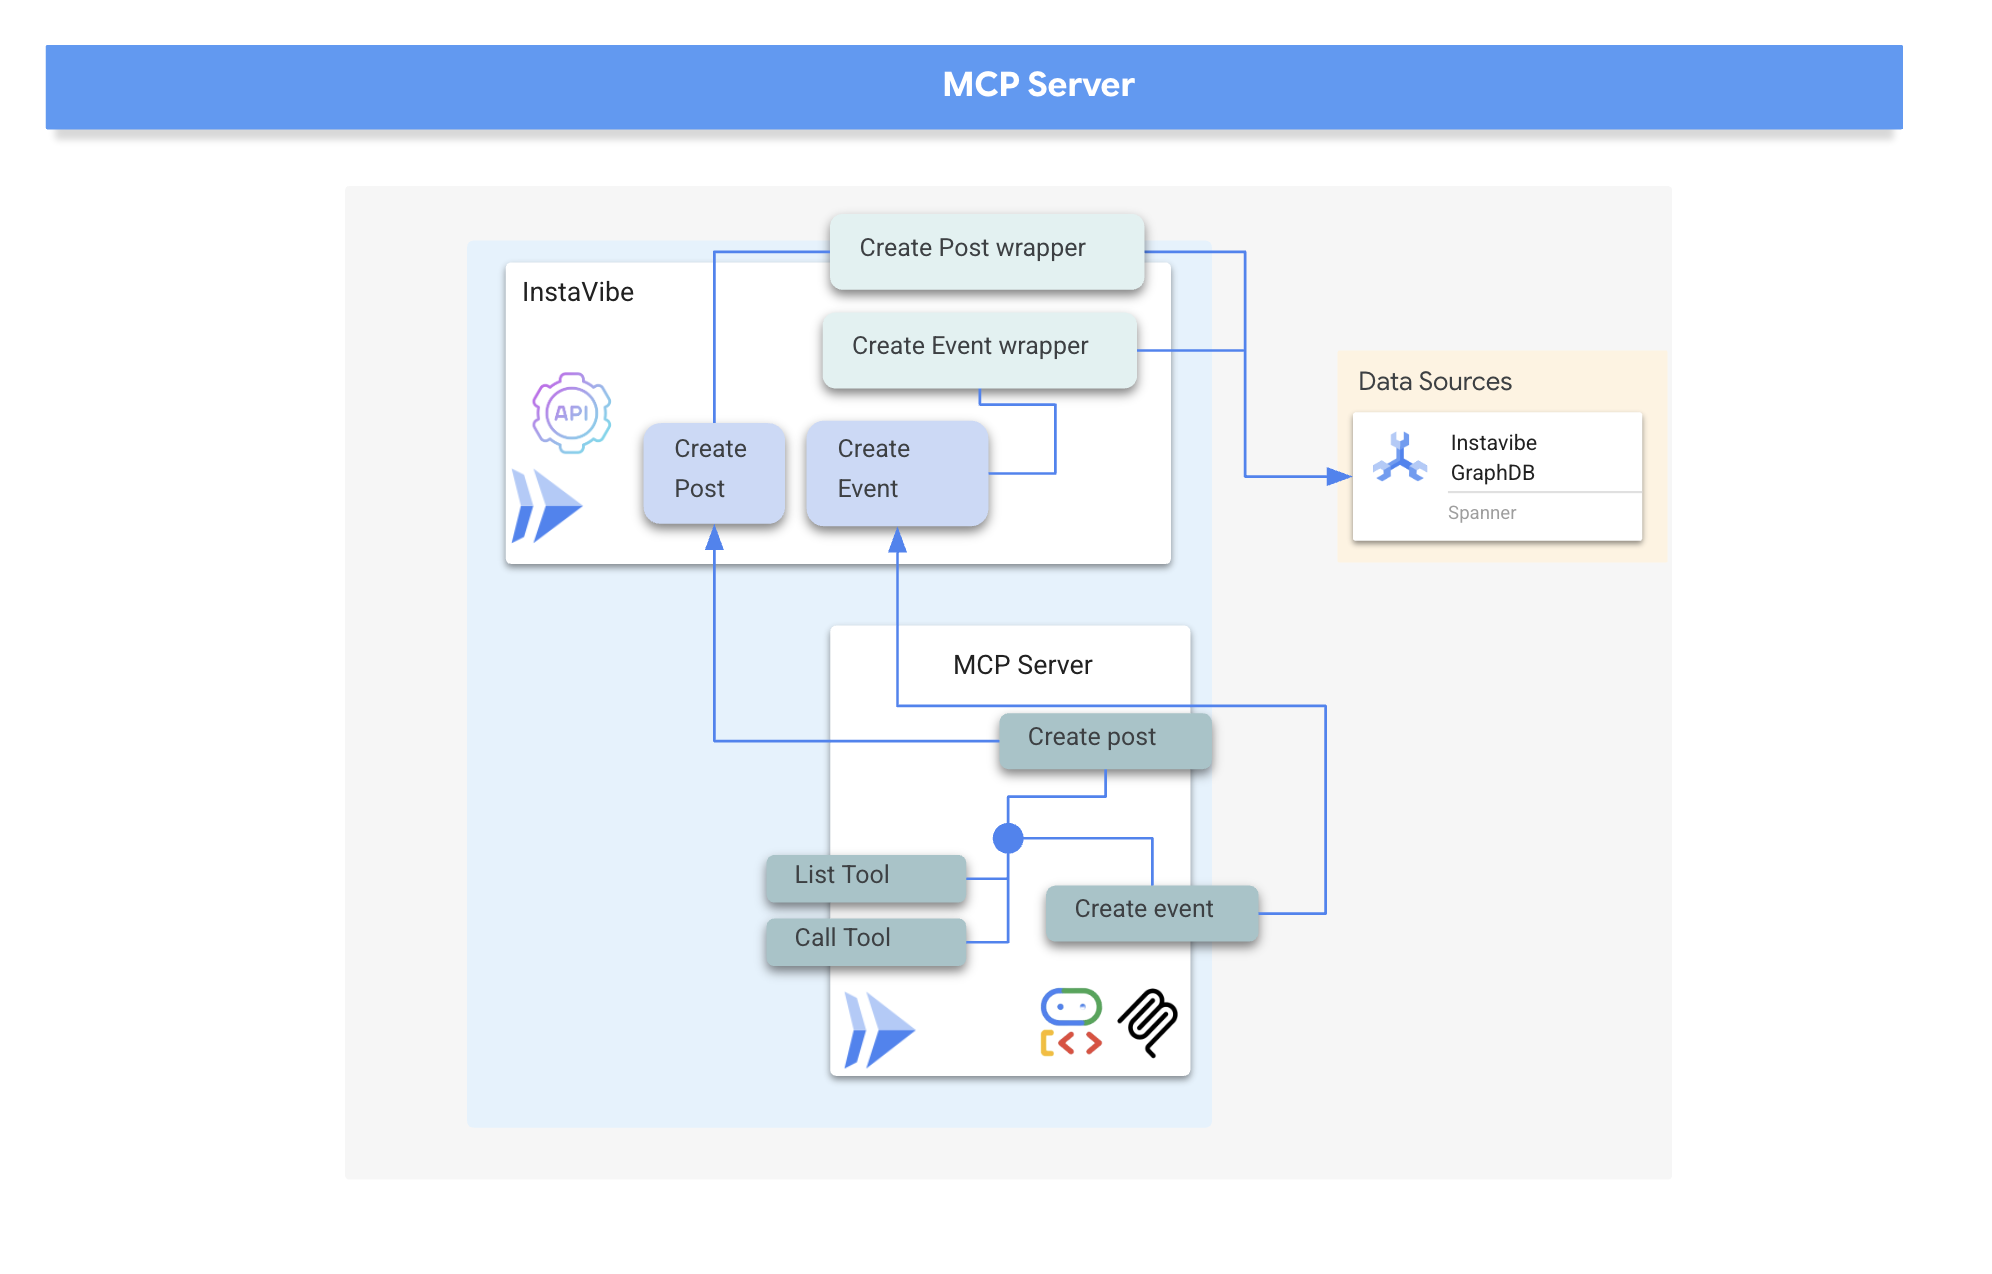
Our agents will eventually need to interact with the InstaVibe platform itself.Specifically, to create posts and register events using the platform's existing APIs. The InstaVibe application already exposes these functionalities via standard HTTP endpoints:
Enpoint | URL | HTTP method | Description |
Create Post | api/posts | POST | API endpoint to add a new post. Expects JSON body: |
Create Event | api/events | POST | API endpoint to add a new event and its attendees (simplified schema). |
To make these capabilities available to our agents via MCP, we first need to create simple Python functions that act as wrappers around these API calls. These functions will handle the HTTP request logic.
👉 First, let's implement the wrapper function for creating a post. Open the file ~/instavibe-bootstrap/tools/instavibe/instavibe.py and replace the #REPLACE ME CREATE POST comment with the following Python code:
def create_post(author_name: str, text: str, sentiment: str, base_url: str = BASE_URL):
    """
    Sends a POST request to the /posts endpoint to create a new post.

    Args:
        author_name (str): The name of the post's author.
        text (str): The content of the post.
        sentiment (str): The sentiment associated with the post (e.g., 'positive', 'negative', 'neutral').
        base_url (str, optional): The base URL of the API. Defaults to BASE_URL.

    Returns:
        dict: The JSON response from the API if the request is successful.
              Returns None if an error occurs.

    Raises:
        requests.exceptions.RequestException: If there's an issue with the network request (e.g., connection error, timeout).
    """
    url = f"{base_url}/posts"
    headers = {"Content-Type": "application/json"}
    payload = {
        "author_name": author_name,
        "text": text,
        "sentiment": sentiment
    }

    try:
        response = requests.post(url, headers=headers, json=payload)
        response.raise_for_status()  # Raise an exception for bad status codes (4xx or 5xx)
        print(f"Successfully created post. Status Code: {response.status_code}")
        return response.json()
    except requests.exceptions.RequestException as e:
        print(f"Error creating post: {e}")
        # Optionally re-raise the exception if the caller needs to handle it
        # raise e
        return None
    except json.JSONDecodeError:
        print(f"Error decoding JSON response from {url}. Response text: {response.text}")
        return None
👉📝 Next, we'll create the wrapper function for the event creation API. In the same ~/instavibe-bootstrap/tools/instavibe/instavibe.py file, replace the #REPLACE ME CREATE EVENTS comment with this code:
def create_event(event_name: str, description: str, event_date: str, locations: list, attendee_names: list[str], base_url: str = BASE_URL):
    """
    Sends a POST request to the /events endpoint to create a new event registration.

    Args:
        event_name (str): The name of the event.
        description (str): The detailed description of the event.
        event_date (str): The date and time of the event (ISO 8601 format recommended, e.g., "2025-06-10T09:00:00Z").
        locations (list): A list of location dictionaries. Each dictionary should contain:
                          'name' (str), 'description' (str, optional),
                          'latitude' (float), 'longitude' (float),
                          'address' (str, optional).
        attendee_names (list[str]): A list of names of the people attending the event.
        base_url (str, optional): The base URL of the API. Defaults to BASE_URL.

    Returns:
        dict: The JSON response from the API if the request is successful.
              Returns None if an error occurs.

    Raises:
        requests.exceptions.RequestException: If there's an issue with the network request (e.g., connection error, timeout).
    """
    url = f"{base_url}/events"
    headers = {"Content-Type": "application/json"}
    payload = {
        "event_name": event_name,
        "description": description,
        "event_date": event_date,
        "locations": locations,
        "attendee_names": attendee_names,
    }

    try:
        response = requests.post(url, headers=headers, json=payload)
        response.raise_for_status()  # Raise an exception for bad status codes (4xx or 5xx)
        print(f"Successfully created event registration. Status Code: {response.status_code}")
        return response.json()
    except requests.exceptions.RequestException as e:
        print(f"Error creating event registration: {e}")
        # Optionally re-raise the exception if the caller needs to handle it
        # raise e
        return None
    except json.JSONDecodeError:
        print(f"Error decoding JSON response from {url}. Response text: {response.text}")
        return None
As you can see, these functions are straightforward wrappers around the existing InstaVibe APIs. This pattern is useful, if you already have APIs for your services, you can easily expose their functionality as tools for agents by creating such wrappers.
MCP Server Implementation
Now that we have the Python functions that perform the actions (calling the InstaVibe APIs), we need to build the MCP Server component. This server will expose these functions as "tools" according to the MCP standard, allowing MCP clients (like our agents) to discover and invoke them.
An MCP Server typically implements two key functionalities:
- list_tools: responsible for allowing the client to discover the available tools on the server, providing metadata like their names, descriptions, and required parameters, often defined using JSON Schema
- call_tool: handles the execution of a specific tool requested by the client, receiving the tool's name and arguments and performing the corresponding action, such as in our case interacting with an API
MCP servers are used to provide AI models with access to real-world data and actions, enabling tasks like sending emails, creating tasks in project management systems, searching databases, or interacting with various software and web services. While initial implementations often focused on local servers communicating via standard input/output (stdio) for simplicity, particularly in development or "studio" environments, the move towards remote servers utilizing protocols like HTTP with Server-Sent Events (SSE) makes more sense for broader adoption and enterprise use cases.
The remote architecture, despite the added network communication layer, offers significant advantages: it allows multiple AI clients to share access to a single server, centralizes management and updates of tools, enhances security by keeping sensitive data and API keys on the server side rather than distributed across potentially many client machines, and decouples the AI model from the specifics of the external system integration, making the entire ecosystem more scalable, secure, and maintainable than requiring every AI instance to manage its own direct integrations.
We will implement our MCP server using HTTP and Server-Sent Events (SSE) for communication, which is well-suited for potentially long-running tool executions and enterprise scenarios.
👉📝 First, let's implement the list_tools endpoint. Open the file ~/instavibe-bootstrap/tools/instavibe/mcp_server.py and replace the #REPLACE ME - LIST TOOLS comment with the following code. :
@app.list_tools()
async def list_tools() -> list[mcp_types.Tool]:
  """MCP handler to list available tools."""
  # Convert the ADK tool's definition to MCP format
  mcp_tool_schema_event = adk_to_mcp_tool_type(event_tool)
  mcp_tool_schema_post = adk_to_mcp_tool_type(post_tool)
  print(f"MCP Server: Received list_tools request. \n MCP Server: Advertising tool: {mcp_tool_schema_event.name} and {mcp_tool_schema_post}")
  return [mcp_tool_schema_event,mcp_tool_schema_post]
This function defines the tools (create_event, create_post) and tells connecting clients about them.
👉📝 Next, implement the call_tool endpoint, which handles the actual execution requests from clients. In the same ~/instavibe-bootstrap/tools/instavibe/mcp_server.py file, replace the #REPLACE ME - CALL TOOLScomment with this code.
@app.call_tool()
async def call_tool(
    name: str, arguments: dict
) -> list[mcp_types.TextContent | mcp_types.ImageContent | mcp_types.EmbeddedResource]:
  """MCP handler to execute a tool call."""
  print(f"MCP Server: Received call_tool request for '{name}' with args: {arguments}")

  # Look up the tool by name in our dictionary
  tool_to_call = available_tools.get(name)
  if tool_to_call:
    try:
      adk_response = await tool_to_call.run_async(
          args=arguments,
          tool_context=None, # No ADK context available here
      )
      print(f"MCP Server: ADK tool '{name}' executed successfully.")

      response_text = json.dumps(adk_response, indent=2)
      return [mcp_types.TextContent(type="text", text=response_text)]

    except Exception as e:
      print(f"MCP Server: Error executing ADK tool '{name}': {e}")
      # Creating a proper MCP error response might be more robust
      error_text = json.dumps({"error": f"Failed to execute tool '{name}': {str(e)}"})
      return [mcp_types.TextContent(type="text", text=error_text)]
  else:
      # Handle calls to unknown tools
      print(f"MCP Server: Tool '{name}' not found.")
      error_text = json.dumps({"error": f"Tool '{name}' not implemented."})
      return [mcp_types.TextContent(type="text", text=error_text)]
This function receives the tool name and arguments, finds the corresponding Python wrapper function we defined earlier, executes it, and returns the result
👉💻 With the MCP server logic defined, we now need to package it as a container, in the terminal run the following script to build the Docker image using Cloud Build:
. ~/instavibe-bootstrap/set_env.sh

cd ~/instavibe-bootstrap/tools/instavibe

export IMAGE_TAG="latest"
export MCP_IMAGE_NAME="mcp-tool-server"
export IMAGE_PATH="${REGION}-docker.pkg.dev/${PROJECT_ID}/${REPO_NAME}/${MCP_IMAGE_NAME}:${IMAGE_TAG}"
export SERVICE_NAME="mcp-tool-server"
export INSTAVIBE_BASE_URL=$(gcloud run services list --platform=managed --region=us-central1 --format='value(URL)' | grep instavibe)/api

gcloud builds submit . \
  --tag=${IMAGE_PATH} \
  --project=${PROJECT_ID}
👉💻 And deploy the image as a service on Google Cloud Run.
. ~/instavibe-bootstrap/set_env.sh

cd ~/instavibe-bootstrap/tools/instavibe

export IMAGE_TAG="latest"
export MCP_IMAGE_NAME="mcp-tool-server"
export IMAGE_PATH="${REGION}-docker.pkg.dev/${PROJECT_ID}/${REPO_NAME}/${MCP_IMAGE_NAME}:${IMAGE_TAG}"
export SERVICE_NAME="mcp-tool-server"
export INSTAVIBE_BASE_URL=$(gcloud run services list --platform=managed --region=us-central1 --format='value(URL)' | grep instavibe)/api

gcloud run deploy ${SERVICE_NAME} \
  --image=${IMAGE_PATH} \
  --platform=managed \
  --region=${REGION} \
  --allow-unauthenticated \
  --set-env-vars="INSTAVIBE_BASE_URL=${INSTAVIBE_BASE_URL}" \
  --set-env-vars="APP_HOST=0.0.0.0" \
  --set-env-vars="APP_PORT=8080" \
  --set-env-vars="GOOGLE_GENAI_USE_VERTEXAI=TRUE" \
  --set-env-vars="GOOGLE_CLOUD_LOCATION=${REGION}" \
  --set-env-vars="GOOGLE_CLOUD_PROJECT=${PROJECT_ID}" \
  --project=${PROJECT_ID} \
  --min-instances=1
👉💻 After the deployment completed successfully, the MCP server will be running and accessible via a public URL. We need to capture this URL so our agent (acting as an MCP client) knows where to connect.
export MCP_SERVER_URL=$(gcloud run services list --platform=managed --region=us-central1 --format='value(URL)' | grep mcp-tool-server)/sse
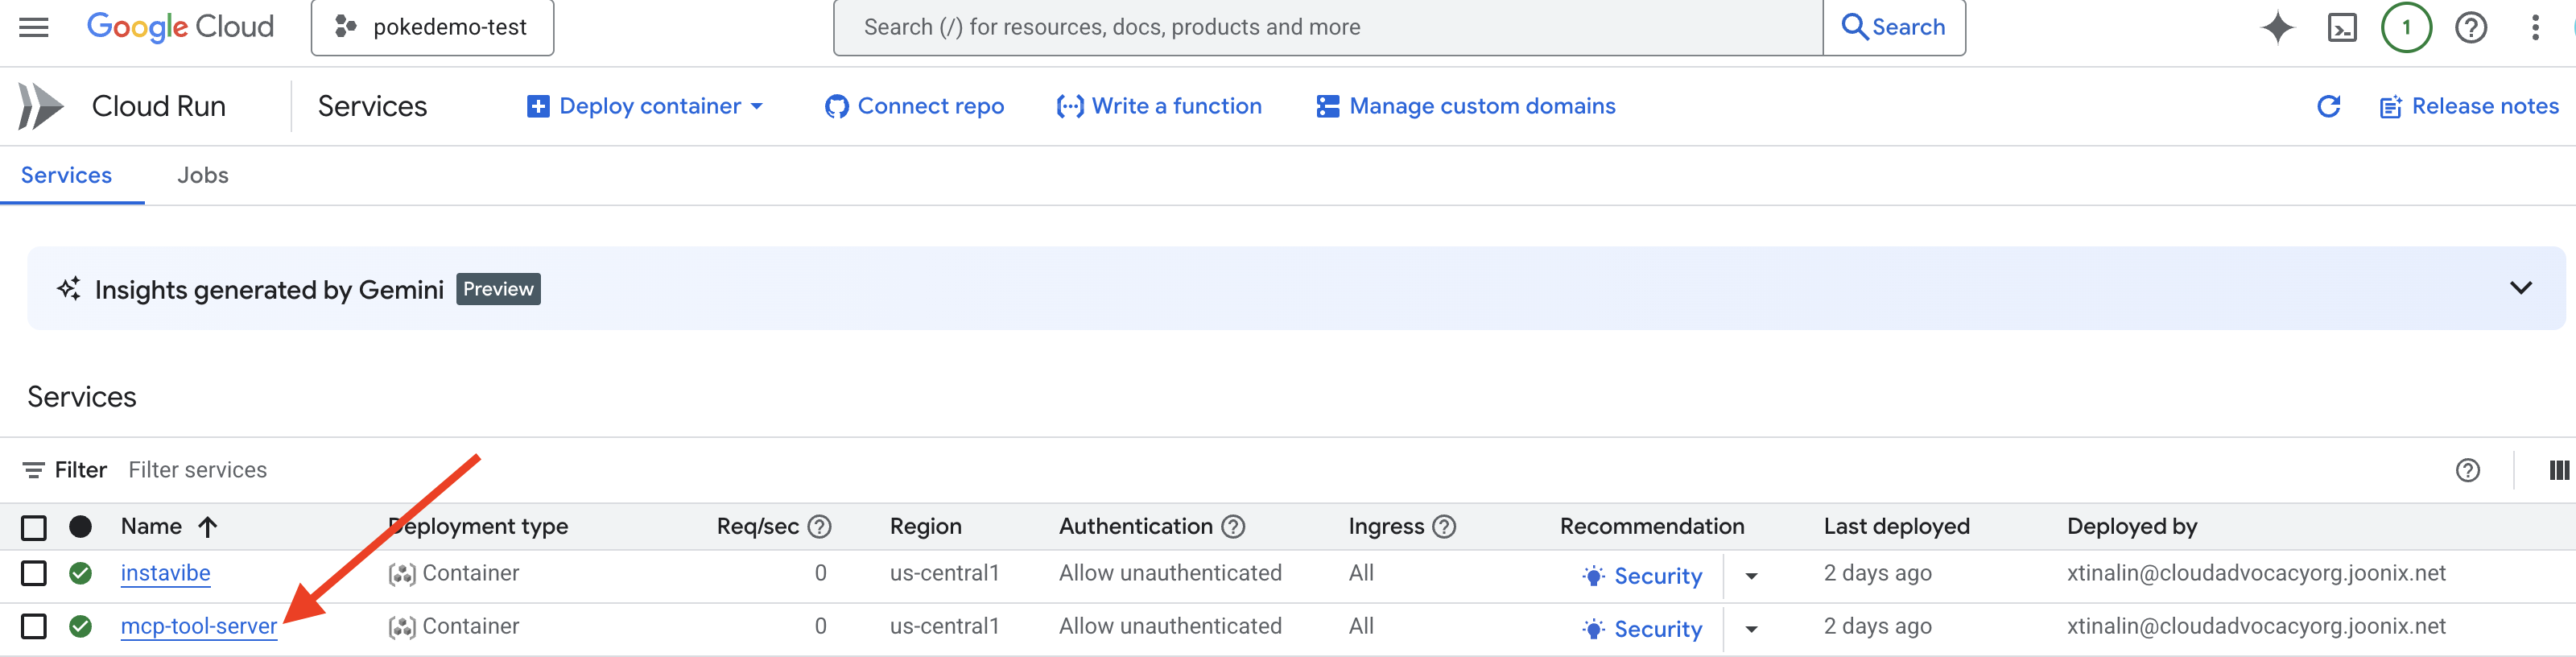
You should also now be able to see the mcp-tool-server service listed as "Running" in the Cloud Run section of your Google Cloud Console.
With the MCP server deployed and its URL captured, we can now implement the agent that will act as an MCP client and utilize the tools exposed by this server.
8. Platform Interaction Agent (using MCP)
MCP Client The MCP Client is a component that resides within an AI application or agent, acting as the interface between the AI model and one or more MCP Servers; in our implementation, this client will be integrated directly within our agent. This client's primary function is to communicate with MCP Servers to discover available tools via the list_tools function and subsequently request the execution of specific tools using the call_tool function, passing necessary arguments provided by the AI model or the agent orchestrating the call.
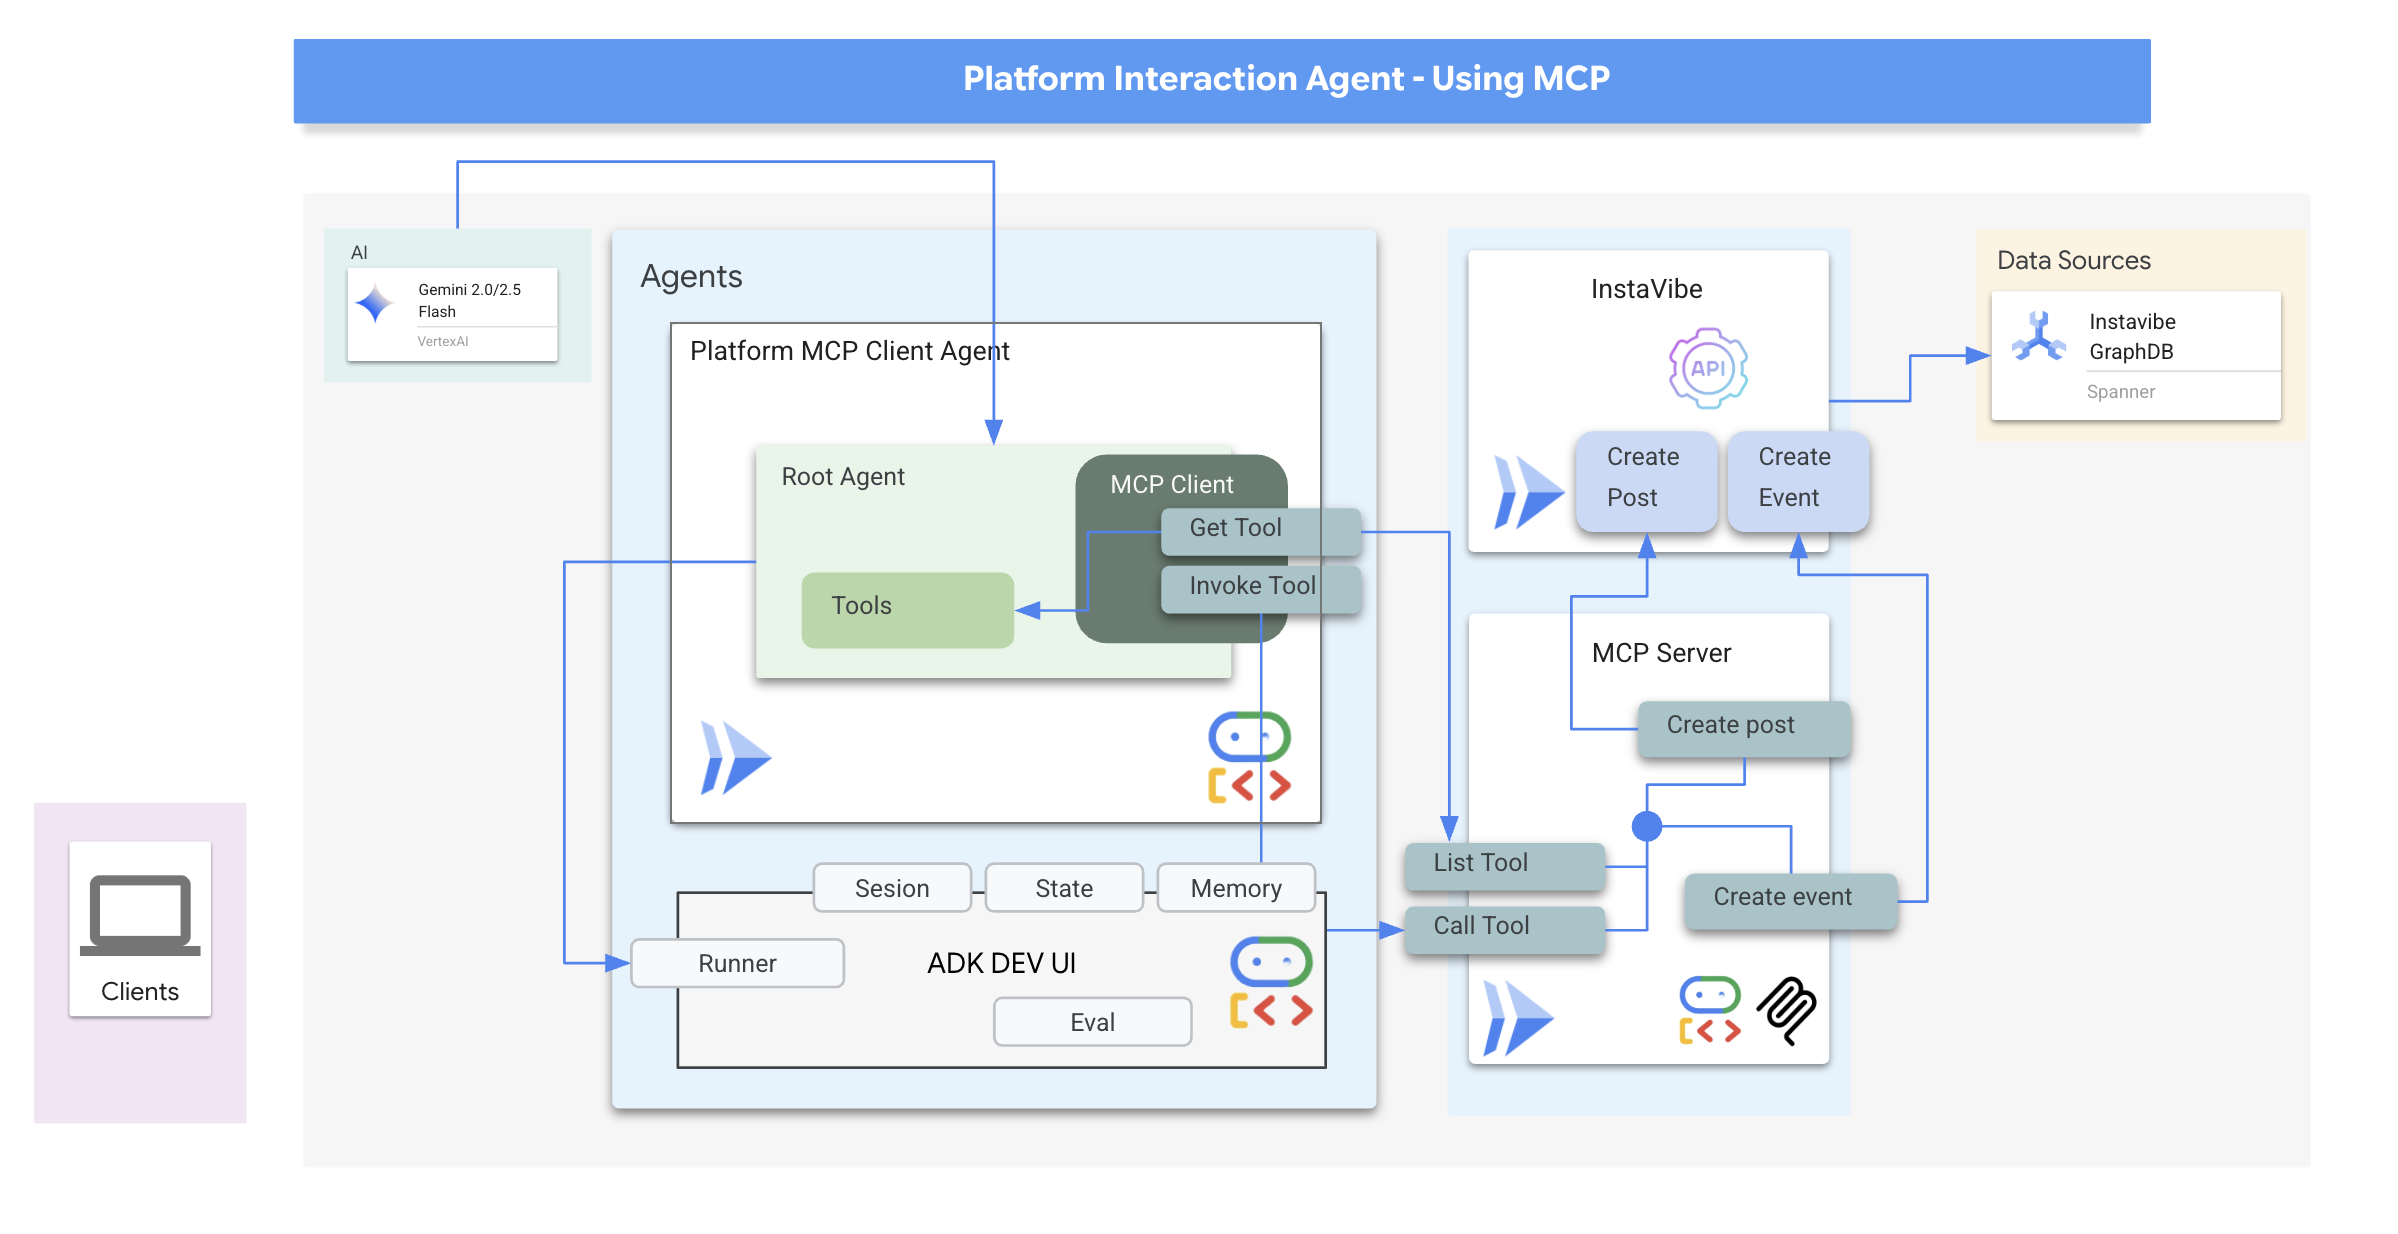
Now we'll build the agent that acts as the MCP Client. This agent, running within the ADK framework, will be responsible for communicating with the mcp-tool-server we just deployed.
👉 First, we need to modify the agent definition to dynamically fetch the tools from our running MCP server. In agents/platform_mcp_client/agent.py, replace #REPLACE ME - FETCH TOOLS with following:
"""Gets tools from the File System MCP Server."""
  tools =  MCPToolset(
      connection_params=SseServerParams(url=MCP_SERVER_URL, headers={})
  )
This code uses the MCPToolset.from_server method to connect to the MCP_SERVER_URL (which we set as an environment variable earlier) and retrieve the list of available tools.
Next, we need to tell the ADK agent definition to actually use these dynamically fetched tools.
👉 In agents/platform_mcp_client/agent.py, replace #REPLACE ME - SET TOOLs with following:
tools=[tools],
👉💻 Now, let's test this agent locally using the ADK Dev UI to see if it can correctly connect to the MCP server and use the tools to interact with our running InstaVibe application.
. ~/instavibe-bootstrap/set_env.sh
source ~/instavibe-bootstrap/env/bin/activate
export MCP_SERVER_URL=$(gcloud run services list --platform=managed --region=us-central1 --format='value(URL)' | grep mcp-tool-server)/sse

cd  ~/instavibe-bootstrap/agents
sed -i "s|^\(O\?GOOGLE_CLOUD_PROJECT\)=.*|GOOGLE_CLOUD_PROJECT=${PROJECT_ID}|" ~/instavibe-bootstrap/agents/platform_mcp_client/.env
sed -i "s|^\(O\?MCP_SERVER_URL\)=.*|MCP_SERVER_URL=${MCP_SERVER_URL}|" ~/instavibe-bootstrap/agents/platform_mcp_client/.env
adk web
Open the ADK Dev UI in your browser again (using Cloud Shell's Web Preview on port 8000). This time, in the top-right dropdown, select the platform_mcp_client agent.
Let's test the create_post tool. In the chat dialog, enter the following request:
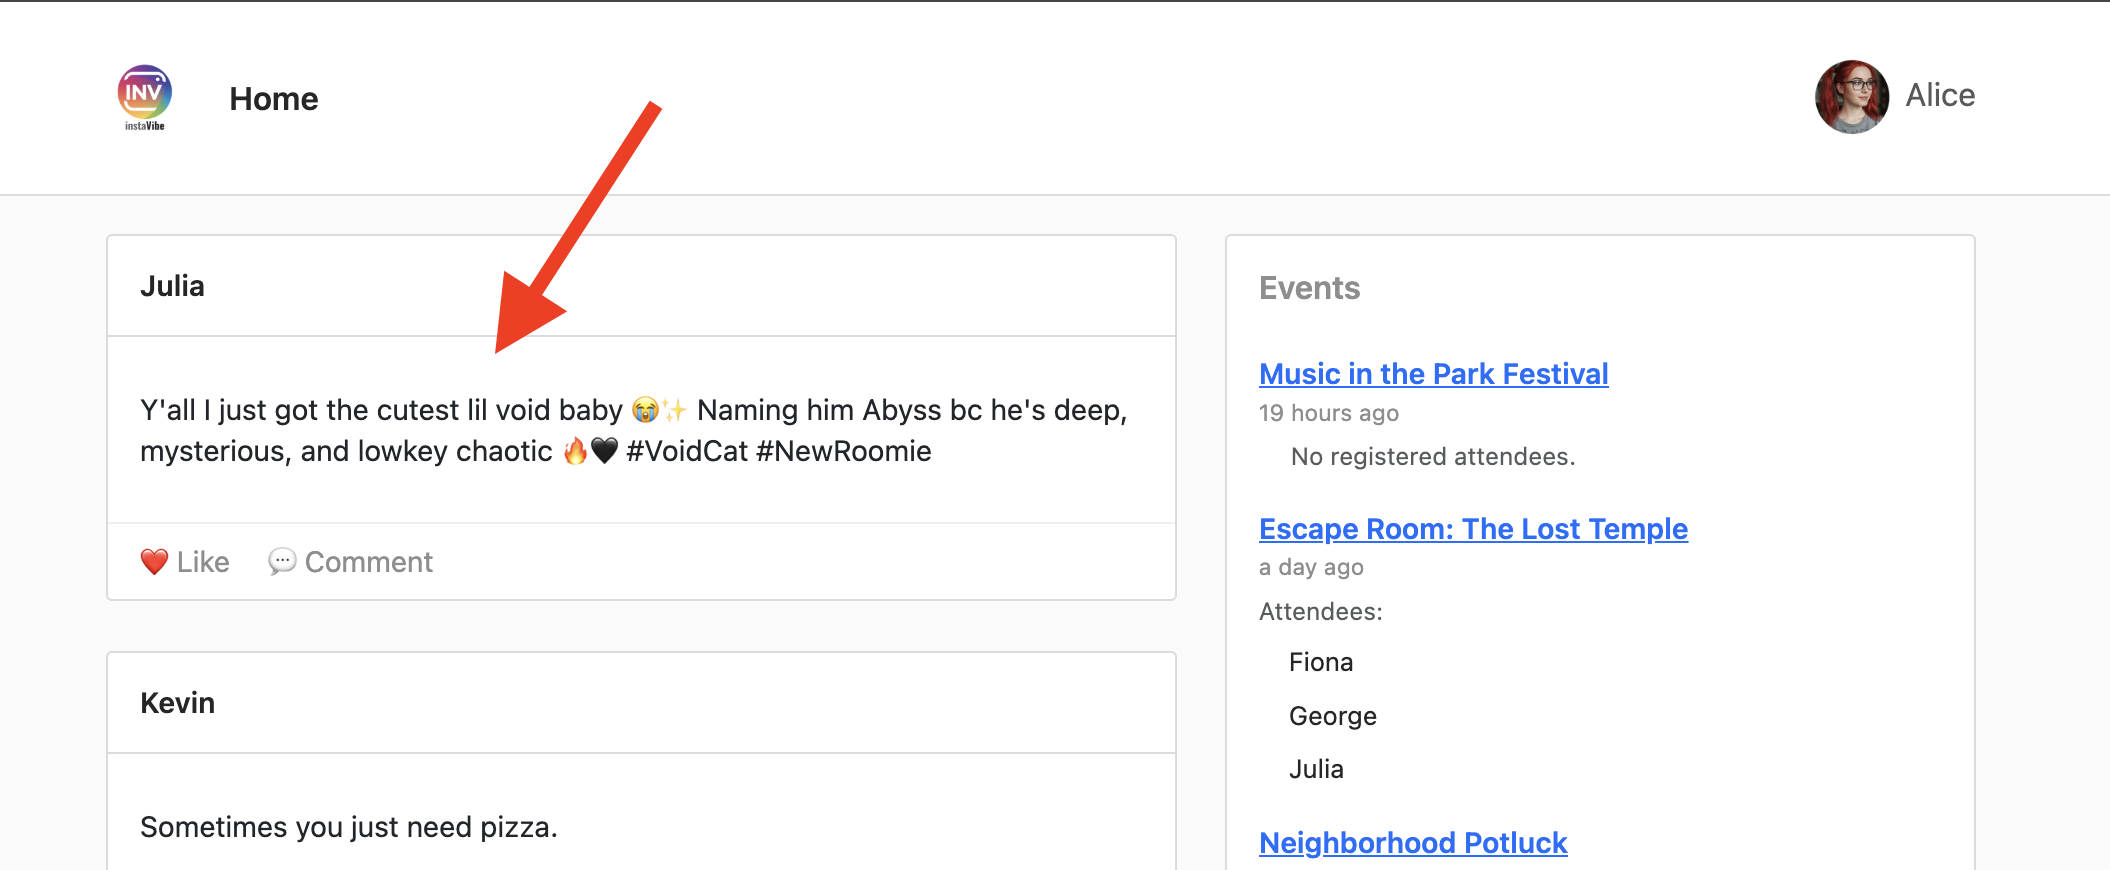
Create a post saying "Y'all I just got the cutest lil void baby 😭✨ Naming him Abyss bc he's deep, mysterious, and lowkey chaotic 🔥🖤 #VoidCat #NewRoomie" I'm Julia
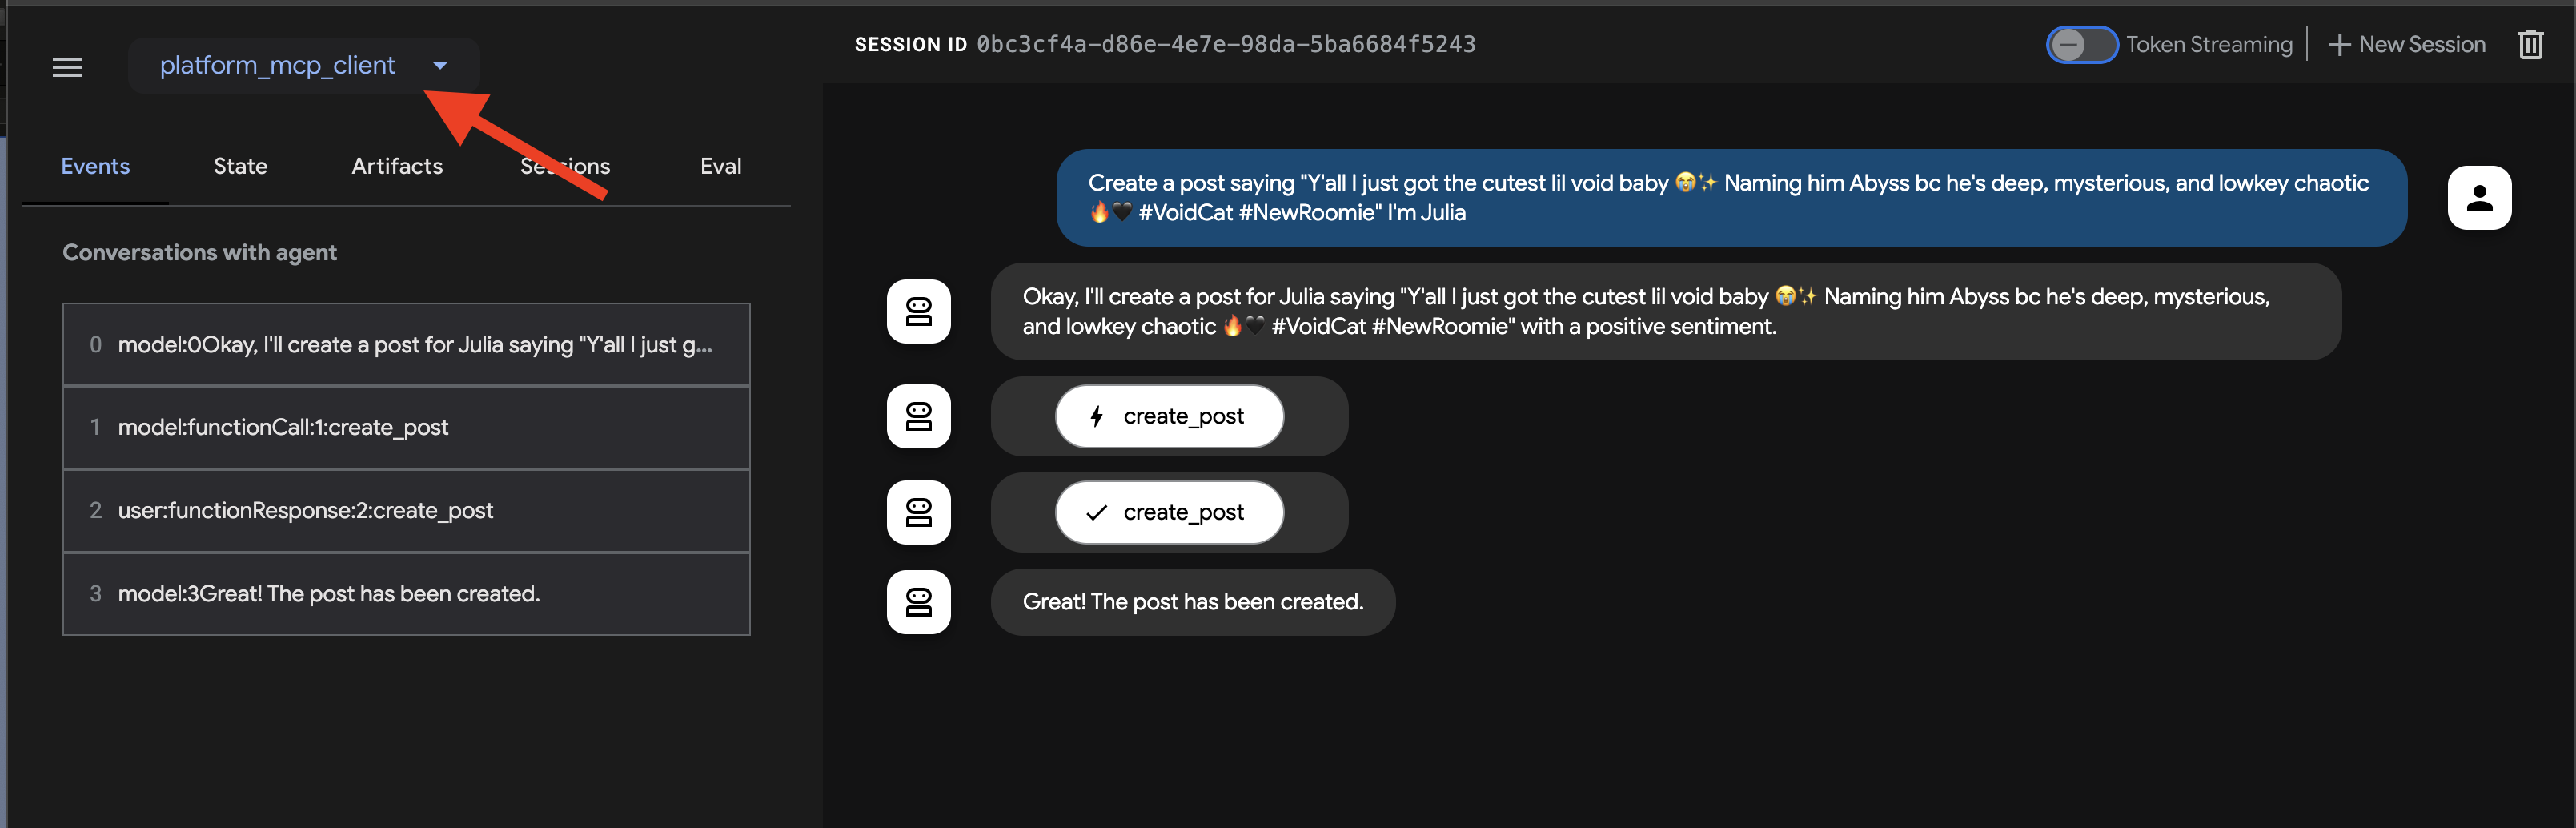
The agent should process this, identify the need to use the create_post tool, communicate with the MCP server, which in turn calls the InstaVibe API.
👉 Verification Step: After the agent confirms the action, open the tab where your InstaVibe application is running (or refresh it). You should see the new post from "Julia" appear on the main feed!
👉💻 Run this script in a separate terminal to get Instavibe link if needed:
gcloud run services list --platform=managed --region=us-central1 --format='value(URL)' | grep instavibe
👉📝 Now, let's test the create_event tool. Enter the following multi-line request into the chat dialog:
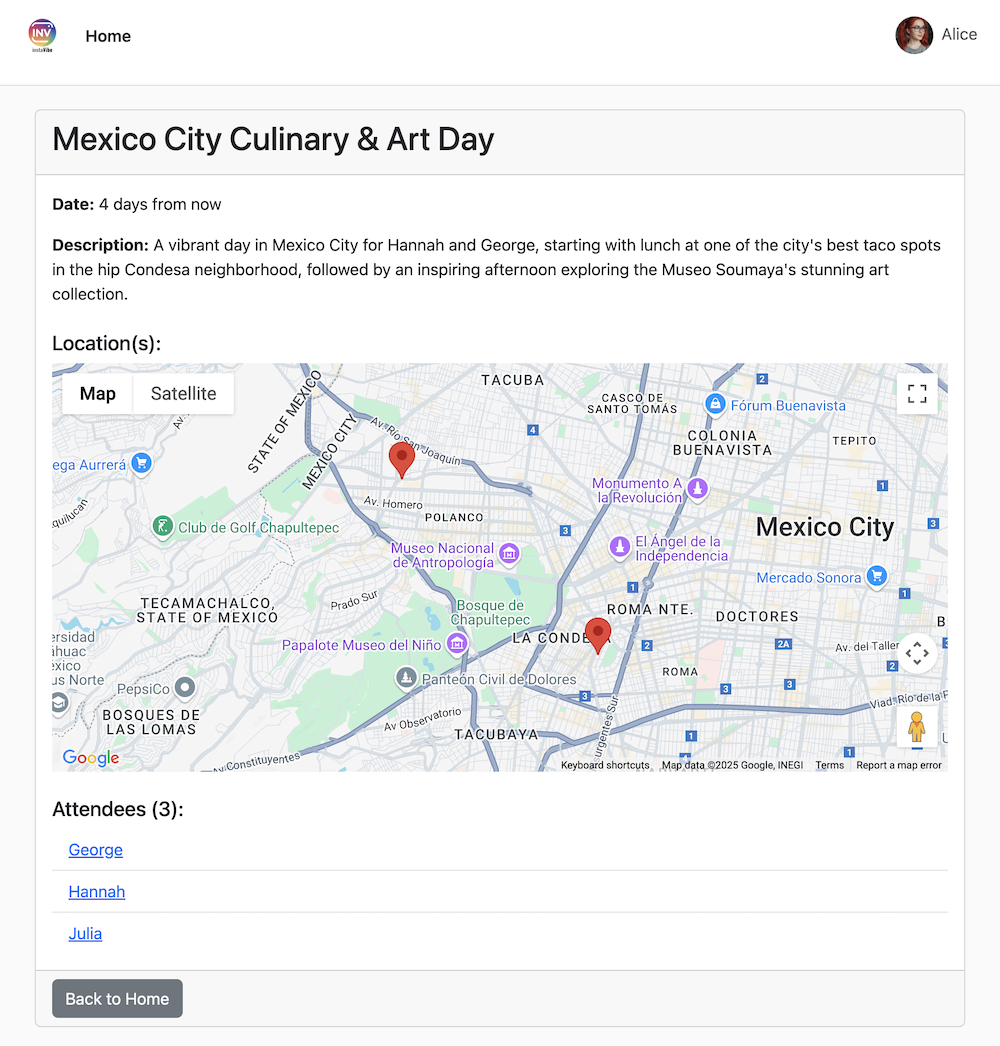
Hey, can you set up an event for Hannah and George and me, and I'm Julia? Let's call it 'Mexico City Culinary & Art Day'.
here are more info
  {"event_name": "Mexico City Culinary & Art Day",
  "description": "A vibrant day in Mexico City for Hannah and George, starting with lunch at one of the city's best taco spots in the hip Condesa neighborhood, followed by an inspiring afternoon exploring the Museo Soumaya's stunning art collection.",
  "event_date": "2025-10-17T12:00:00-06:00",
  "locations": [
    {
      "name": "El Tizoncito",
      "description": "Considered one of the original creators of tacos al pastor, El Tizoncito offers a legendary taco experience in the heart of Condesa. Their flavorful meats, house salsas, and casual vibe make it a must-visit for foodies.",
      "latitude": 19.412179,
      "longitude": -99.171308,
      "address": "Av. Tamaulipas 122, Hipódromo, Cuauhtémoc, 06100 Ciudad de México, CDMX, Mexico"
    },
    {
      "name": "Museo Soumaya",
      "description": "An architectural icon in Mexico City, Museo Soumaya houses over 66,000 works of art, including pieces by Rodin, Dalí, and Rivera. The striking silver structure is a cultural landmark and a visual feast inside and out.",
      "latitude": 19.440056,
      "longitude": -99.204281,
      "address": "Plaza Carso, Blvd. Miguel de Cervantes Saavedra 303, Granada, Miguel Hidalgo, 11529 Ciudad de México, CDMX, Mexico"
    }
  ],
  "attendee_names": ["Hannah", "George", Julia],
}
Again, the agent should use the appropriate tool via the MCP server. In the Events tab, feel free to click on the indiviual event, you will see a detailed, step-by-step trace of the execution.
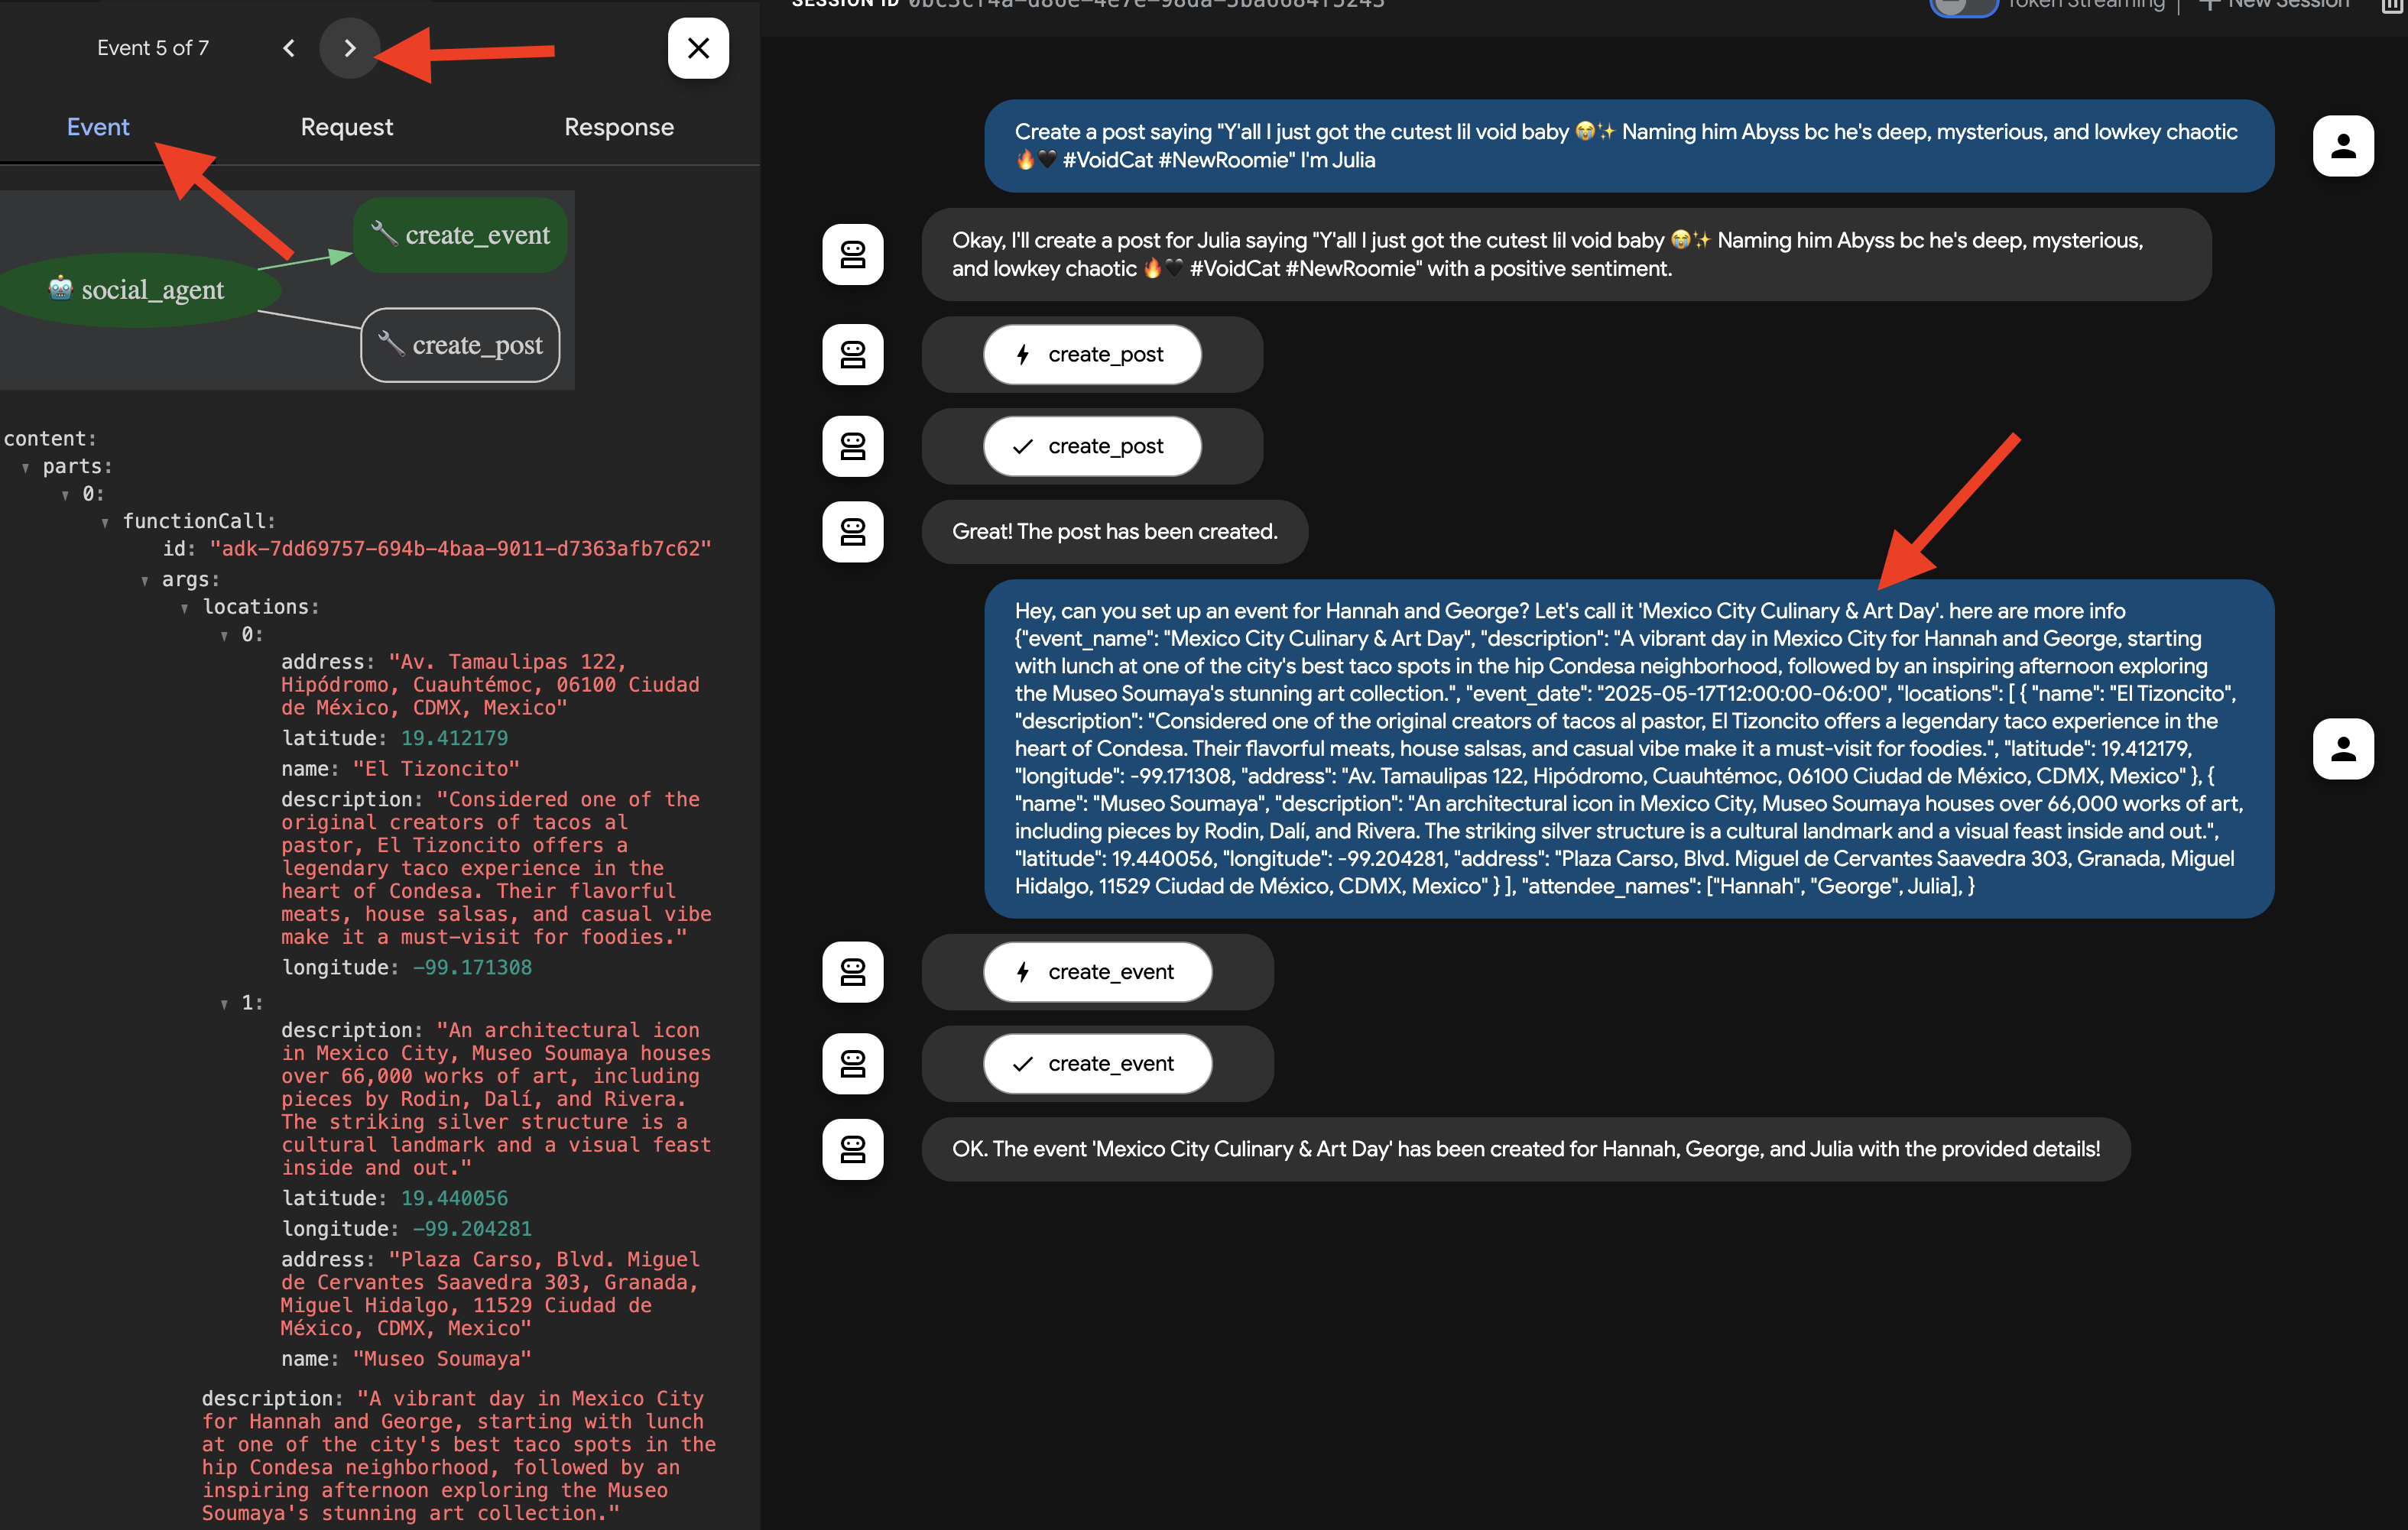
👉 Verification Step: Go back to your running InstaVibe application and navigate to the "Events" section (or equivalent). You should now see the newly created "Mexico City Culinary & Art Day" event listed.
This successfully demonstrates how MCP allows our agent to leverage external tools (in this case, InstaVibe's APIs) in a standardized way.
Once you've verified both actions, return to your Cloud Shell terminal and press Ctrl+Cto stop the ADK Dev UI.
9. Workflow Agent and Multi-Agents in ADK
Our agents so far can plan outings and interact with the platform. However, truly personalized planning requires understanding the user's social circle. For busy users who might not closely follow their friends' activities, gathering this context manually is difficult. To address this, we'll build a Social Profiling agent that leverages our Spanner Graph Database to analyze friend activities and interests, enabling more tailored suggestions.
First, we need tools for this agent to access the graph data.
👉📝 Add the following Python functions to the end of the file ~/instavibe-bootstrap/agents/social/instavibe.py:
def get_person_attended_events(person_id: str)-> list[dict]:
    """
    Fetches events attended by a specific person using Graph Query.
    Args:
       person_id (str): The ID of the person whose posts to fetch.
    Returns: list[dict] or None.
    """
    if not db_instance: return None

    graph_sql = """
        Graph SocialGraph
        MATCH (p:Person)-[att:Attended]->(e:Event)
        WHERE p.person_id = @person_id
        RETURN e.event_id, e.name, e.event_date, att.attendance_time
        ORDER BY e.event_date DESC
    """
    params = {"person_id": person_id}
    param_types_map = {"person_id": param_types.STRING}
    fields = ["event_id", "name", "event_date", "attendance_time"]

    results = run_graph_query( graph_sql, params=params, param_types=param_types_map, expected_fields=fields)

    if results is None: return None

    for event in results:
        if isinstance(event.get('event_date'), datetime):
            event['event_date'] = event['event_date'].isoformat()
        if isinstance(event.get('attendance_time'), datetime):
            event['attendance_time'] = event['attendance_time'].isoformat()
    return results

def get_person_id_by_name( name: str) -> str:
    """
    Fetches the person_id for a given name using SQL.

    Args:
       name (str): The name of the person to search for.

    Returns:
        str or None: The person_id if found, otherwise None.
                     Returns the ID of the *first* match if names are duplicated.
    """
    if not db_instance: return None

    sql = """
        SELECT person_id
        FROM Person
        WHERE name = @name
        LIMIT 1 -- Return only the first match in case of duplicate names
    """
    params = {"name": name}
    param_types_map = {"name": param_types.STRING}
    fields = ["person_id"]

    # Use the standard SQL query helper
    results = run_sql_query( sql, params=params, param_types=param_types_map, expected_fields=fields)

    if results: # Check if the list is not empty
        return results[0].get('person_id') # Return the ID from the first dictionary
    else:
        return None # Name not found


def get_person_posts( person_id: str)-> list[dict]:
    """
    Fetches posts written by a specific person using Graph Query.

    Args:
        person_id (str): The ID of the person whose posts to fetch.


    Returns:
        list[dict] or None: List of post dictionaries with ISO date strings,
                           or None if an error occurs.
    """
    if not db_instance: return None

    # Graph Query: Find the specific Person node, follow 'Wrote' edge to Post nodes
    graph_sql = """
        Graph SocialGraph
        MATCH (author:Person)-[w:Wrote]->(post:Post)
        WHERE author.person_id = @person_id
        RETURN post.post_id, post.author_id, post.text, post.sentiment, post.post_timestamp, author.name AS author_name
        ORDER BY post.post_timestamp DESC
    """
    # Parameters now include person_id and limit
    params = {
        "person_id": person_id
    }
    param_types_map = {
        "person_id": param_types.STRING
    }
    # Fields returned remain the same
    fields = ["post_id", "author_id", "text", "sentiment", "post_timestamp", "author_name"]

    results = run_graph_query(graph_sql, params=params, param_types=param_types_map, expected_fields=fields)

    if results is None:
        return None

    # Convert datetime objects to ISO format strings
    for post in results:
        if isinstance(post.get('post_timestamp'), datetime):
            post['post_timestamp'] = post['post_timestamp'].isoformat()

    return results


def get_person_friends( person_id: str)-> list[dict]:
    """
    Fetches friends for a specific person using Graph Query.
    Args:
        person_id (str): The ID of the person whose posts to fetch.
    Returns: list[dict] or None.
    """
    if not db_instance: return None

    graph_sql = """
        Graph SocialGraph
        MATCH (p:Person {person_id: @person_id})-[f:Friendship]-(friend:Person)
        RETURN DISTINCT friend.person_id, friend.name
        ORDER BY friend.name
    """
    params = {"person_id": person_id}
    param_types_map = {"person_id": param_types.STRING}
    fields = ["person_id", "name"]

    results = run_graph_query( graph_sql, params=params, param_types=param_types_map, expected_fields=fields)

    return results
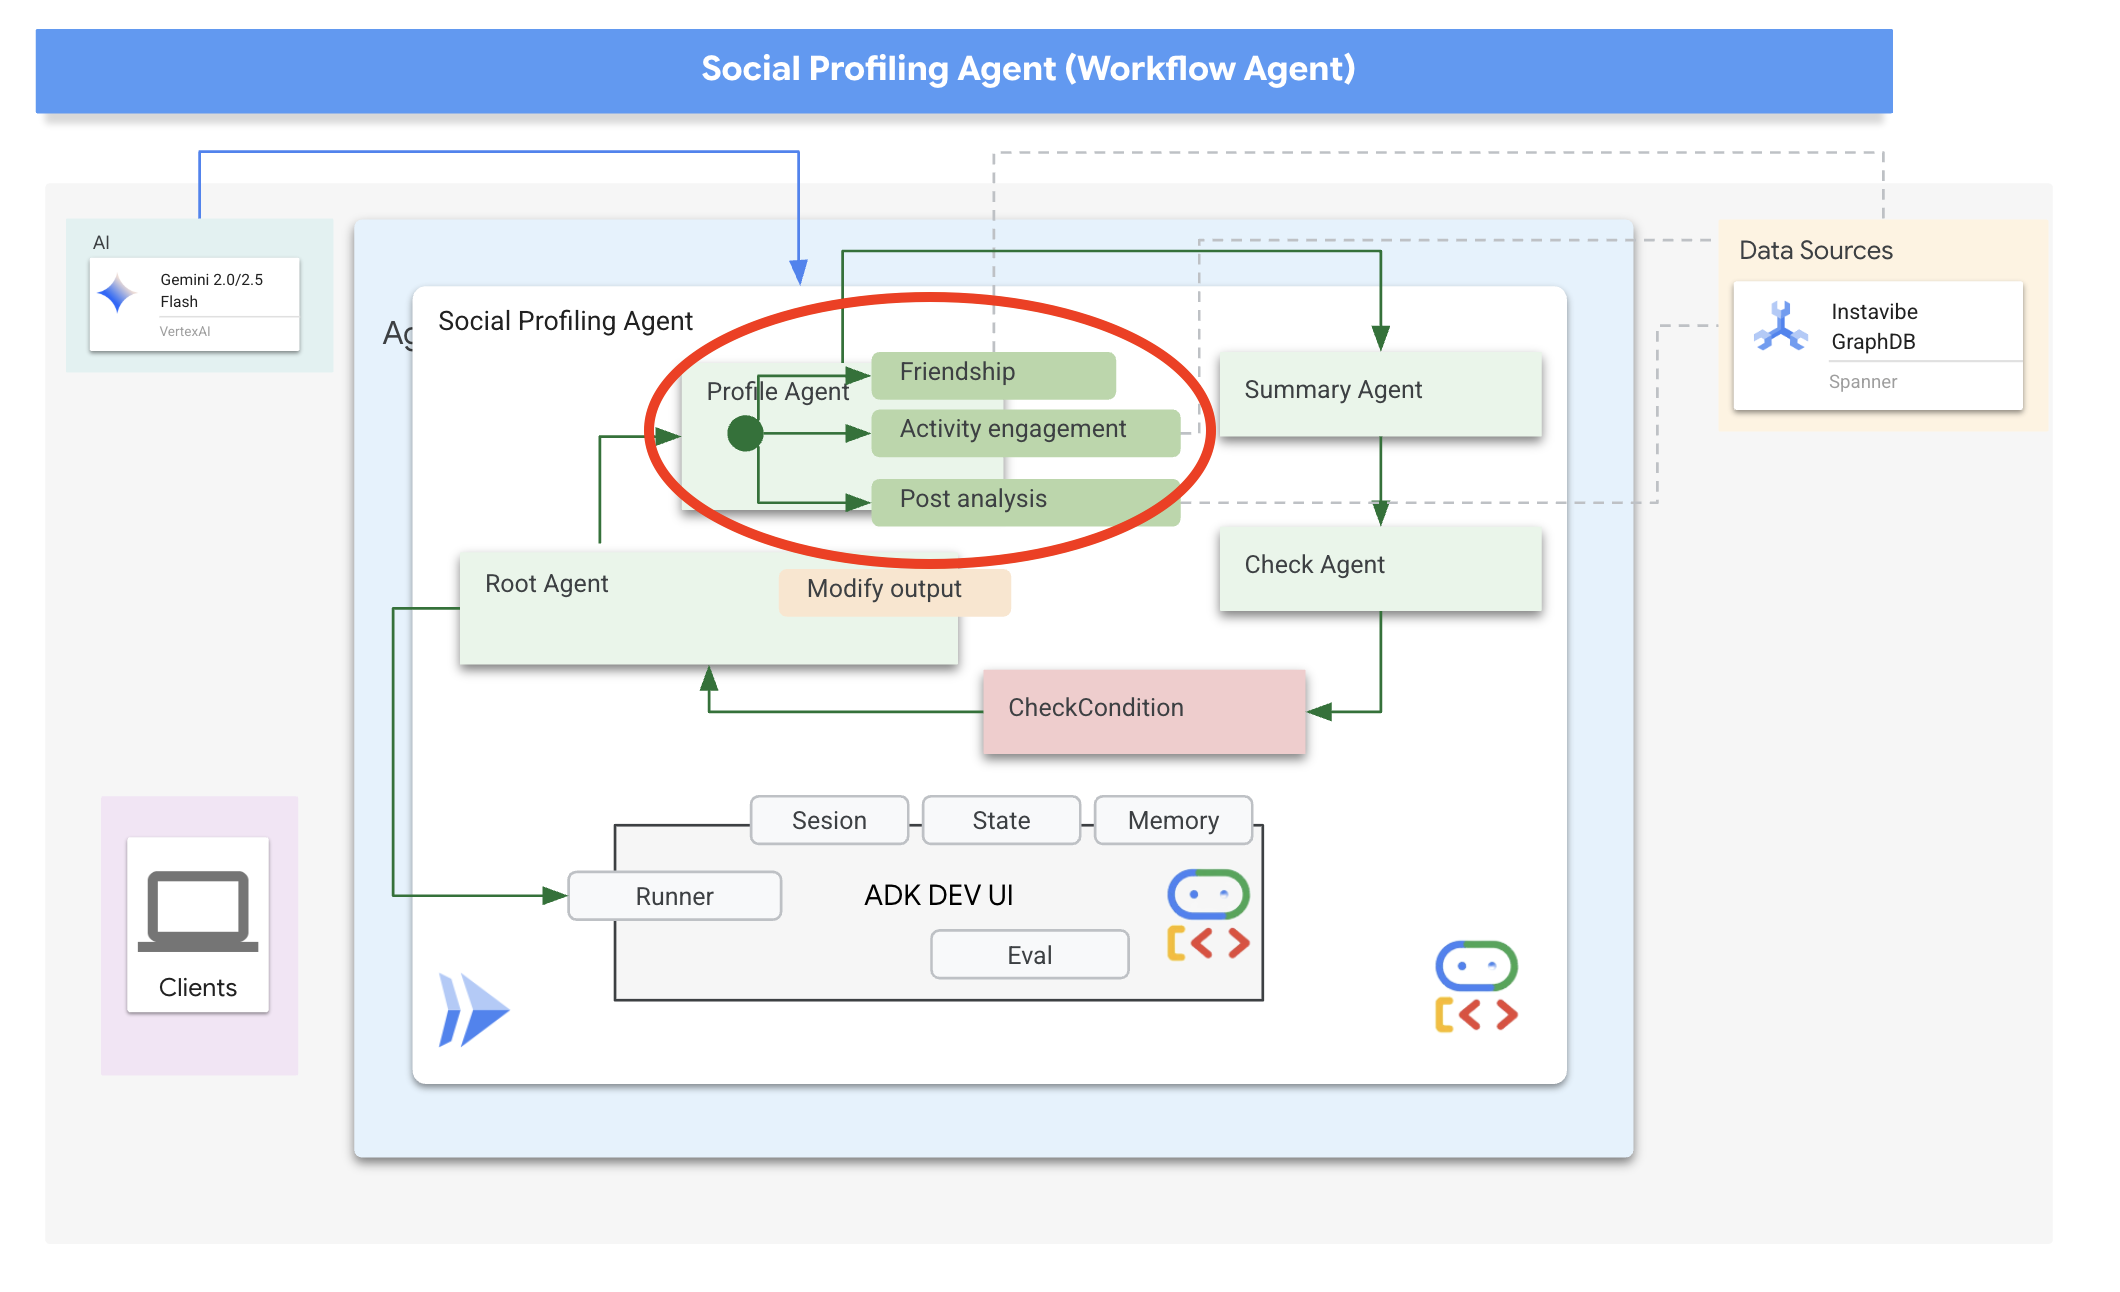
Now, let's discuss how to structure our agent. Analyzing multiple friends' profiles and then summarizing the findings involves several steps. This is a perfect scenario for using ADK's multi-agent capabilities, specifically Workflow Agents.
In Google's ADK, a Workflow Agent doesn't perform tasks itself but orchestrates other agents, called sub-agents. This allows for modular design, breaking down complex problems into specialized components. ADK provides built-in workflow types like
- Sequential (step-by-step)
- Parallel (concurrent execution)
- and Loop (repeated execution)
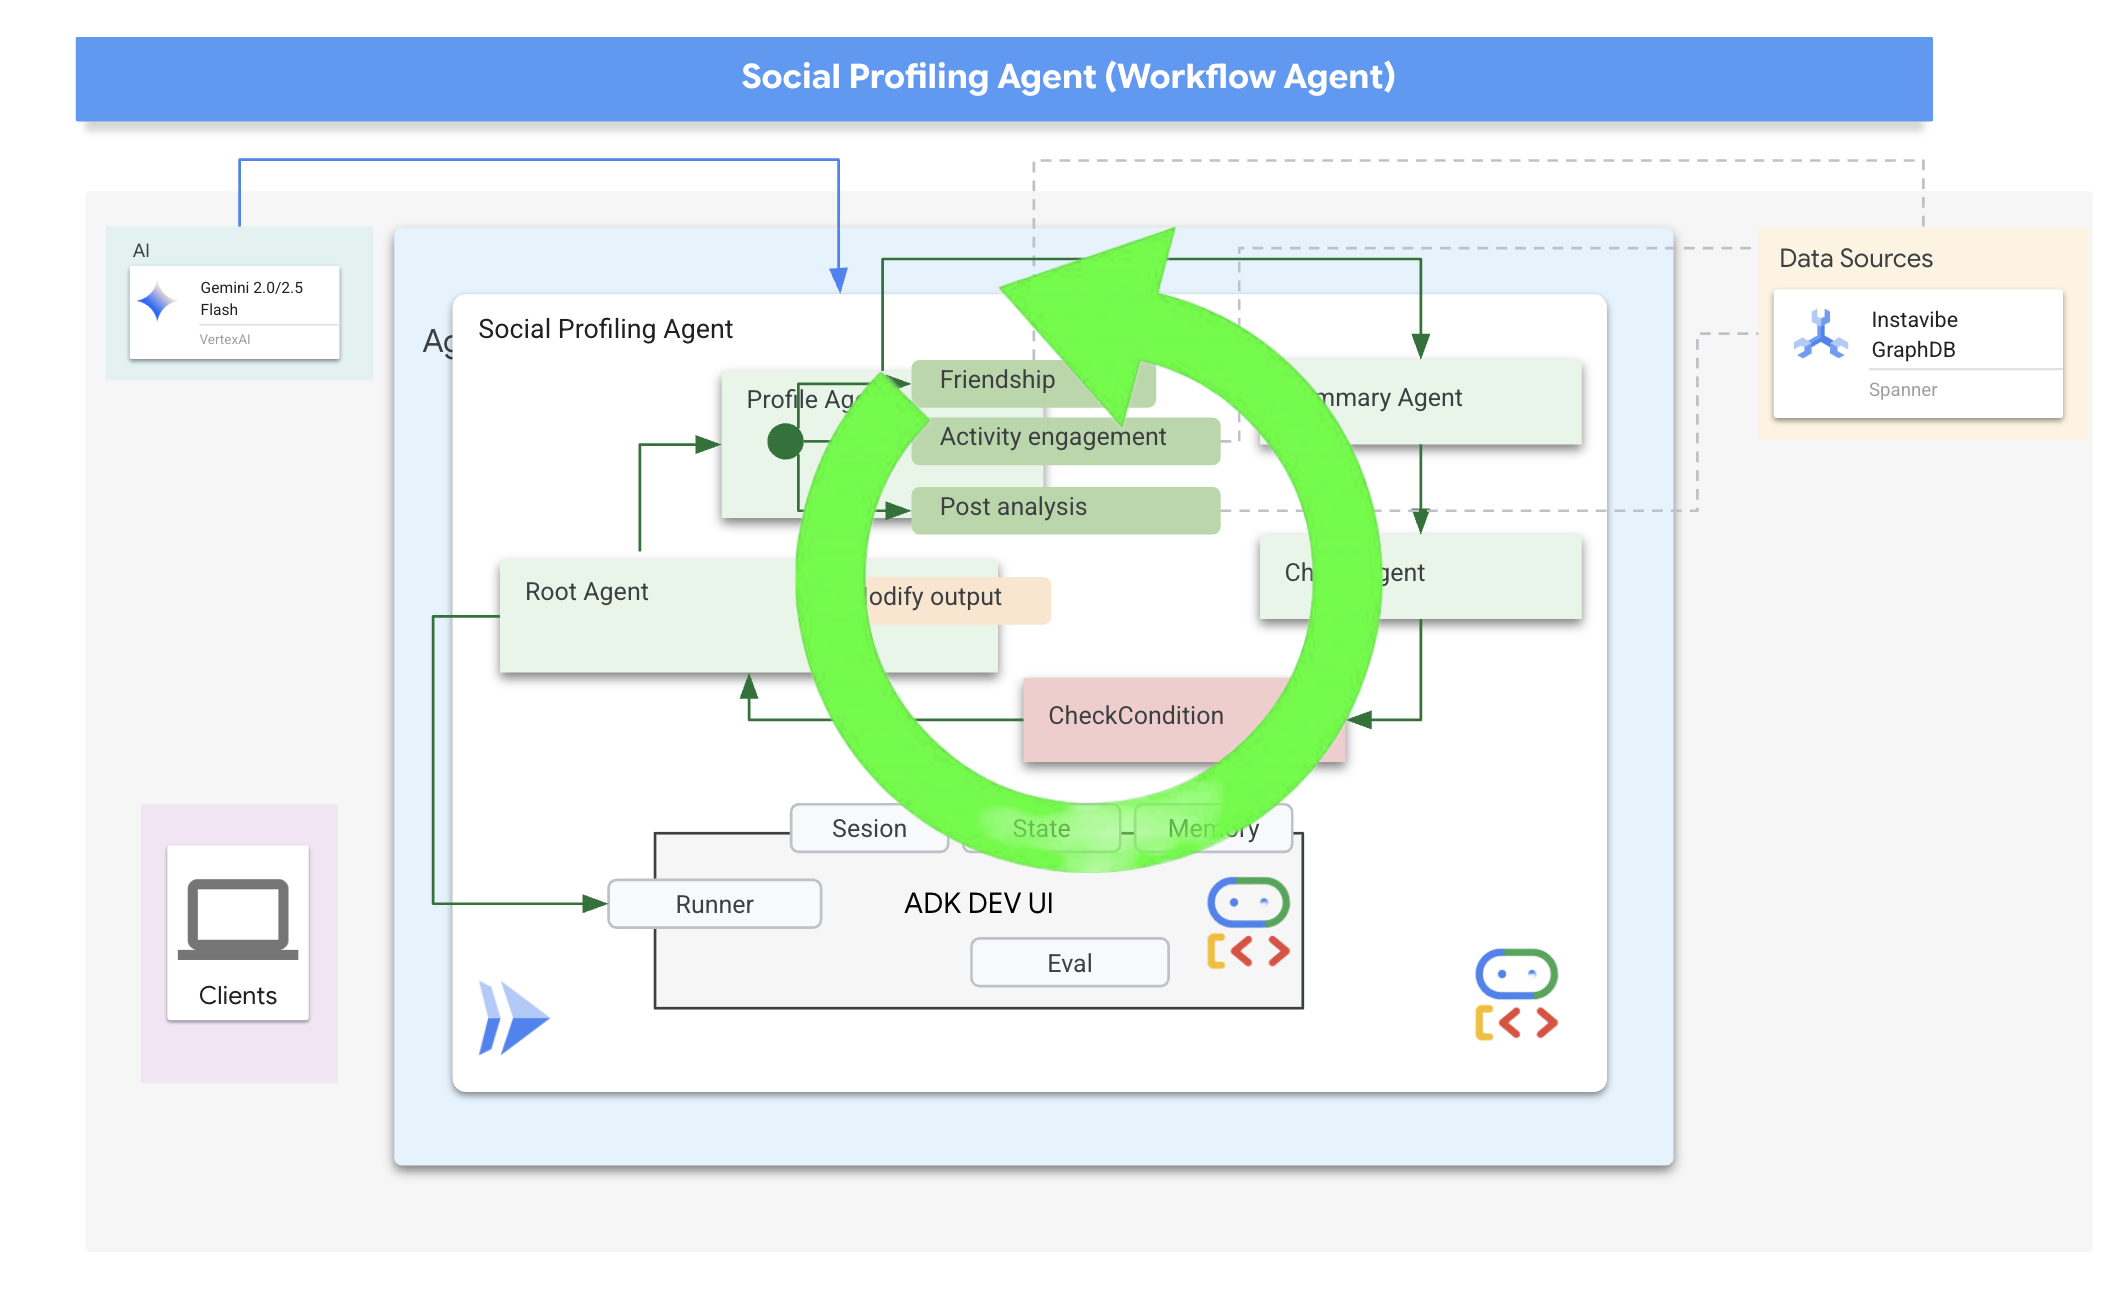
For our social profiling task, our design uses a Loop Agent to create an iterative workflow. The intention is to process one person at a time: profile_agent gathers data, summary_agent updates the analysis, and check_agent determines if we should loop again.
Let's define the sub-agents required for this workflow.
👉📝 In ~/instavibe-bootstrap/agents/social/agent.py, replace #REPLACE FOR profile_agent with following:
profile_agent = LlmAgent(
    name="profile_agent",
    model="gemini-2.5-flash",
    description=(
        "Agent to answer questions about the this person social profile. Provide the person's profile using their name, make sure to fetch the id before getting other data."
    ),
    instruction=(
        "You are a helpful agent to answer questions about the this person social profile. You'll be given a list of names, provide the person's profile using their name, make sure to fetch the id before getting other data. Get one person at a time, start with the first one on the list, and skip if already provided. return this person's result"
    ),
    tools=[get_person_posts,get_person_friends,get_person_id_by_name,get_person_attended_events],
)
Next, the agent that takes the collected profile information (accumulated across loop iterations) and generates the final summary, identifying common ground if multiple people were analyzed.
👉📝 In the same ~/instavibe-bootstrap/agents/social/agent.py, replace #REPLACE FOR summary_agent with following:
summary_agent = LlmAgent(
    name="summary_agent",
    model="gemini-2.5-flash",
    description=(
        "Generate a comprehensive social summary as a single, cohesive paragraph. This summary should cover the activities, posts, friend networks, and event participation of one or more individuals. If multiple profiles are analyzed, the paragraph must also identify and integrate any common ground found between them."
    ),
    instruction=(
        """
        Your primary task is to synthesize social profile information into a single, comprehensive paragraph.

            **Input Scope & Default Behavior:**
            *   If specific individuals are named by the user, focus your analysis on them.
            *   **If no individuals are specified, or if the request is general, assume the user wants an analysis of *all relevant profiles available in the current dataset/context*.**

            **For each profile (whether specified or determined by default), you must analyze:**

            1.  **Post Analysis:**
                *   Systematically review their posts (e.g., content, topics, frequency, engagement).
                *   Identify recurring themes, primary interests, and expressed sentiments.

            2.  **Friendship Relationship Analysis:**
                *   Examine their connections/friends list.
                *   Identify key relationships, mutual friends (especially if comparing multiple profiles), and the general structure of their social network.

            3.  **Event Participation Analysis:**
                *   Investigate their past (and if available, upcoming) event participation.
                *   Note the types of events, frequency of attendance, and any notable roles (e.g., organizer, speaker).

            **Output Generation (Single Paragraph):**

            *   **Your entire output must be a single, cohesive summary paragraph.**
                *   **If analyzing a single profile:** This paragraph will detail their activities, interests, and social connections based on the post, friend, and event analysis.
                *   **If analyzing multiple profiles:** This paragraph will synthesize the key findings regarding posts, friends, and events for each individual. Crucially, it must then seamlessly integrate or conclude with an identification and description of the common ground found between them (e.g., shared interests from posts, overlapping event attendance, mutual friends). The aim is a unified narrative within this single paragraph.

            **Key Considerations:**
            *   Base your summary strictly on the available data.
            *   If data for a specific category (posts, friends, events) is missing or sparse for a profile, you may briefly acknowledge this within the narrative if relevant.
                """
        ),
    output_key="summary"
)
We need a way to determine when the loop should stop (i.e., when all requested profiles have been summarized)
👉📝 In the same ~/instavibe-bootstrap/agents/social/agent.py, replace #REPLACE FOR check_agent with following:
check_agent = LlmAgent(
    name="check_agent",
    model="gemini-2.5-flash",
    description=(
        "Check if everyone's social profile are summarized and has been generated. Output 'completed' or 'pending'."
    ),
    output_key="summary_status"
)
We add a simple programmatic check (CheckCondition) that explicitly looks at the summary_status stored in the State, that are returned by check_agent and tells the Loop Agent whether to continue (escalate=False) or stop (escalate=True).
👉📝 In the same ~/instavibe-bootstrap/agents/social/agent.py, replace #REPLACE FOR CheckCondition located on the top of the file with following:
class CheckCondition(BaseAgent):
    async def _run_async_impl(self, ctx: InvocationContext) -> AsyncGenerator[Event, None]:
        #log.info(f"Checking status: {ctx.session.state.get("summary_status", "fail")}")
        log.info(f"Summary: {ctx.session.state.get("summary")}")

        status = ctx.session.state.get("summary_status", "fail").strip()
        is_done = (status == "completed")

        yield Event(author=self.name, actions=EventActions(escalate=is_done))
State and Callbacks for Loop Results
In Google's ADK, State is a crucial concept representing the memory or working data of an agent during its execution. It's essentially a persistent context that holds information an agent needs to maintain across different steps, tool calls, or interactions. This state can store intermediate results, user information, parameters for subsequent actions, or any other data the agent needs to remember as it progresses through a task.
In our scenario, as the Loop Agent iterates, the summary_agent and check_agent store their outputs (summary and summary_status) in the agent's State. This allows information to persist across iterations. However, the Loop Agent itself doesn't automatically return the final summary from the state when it finishes.
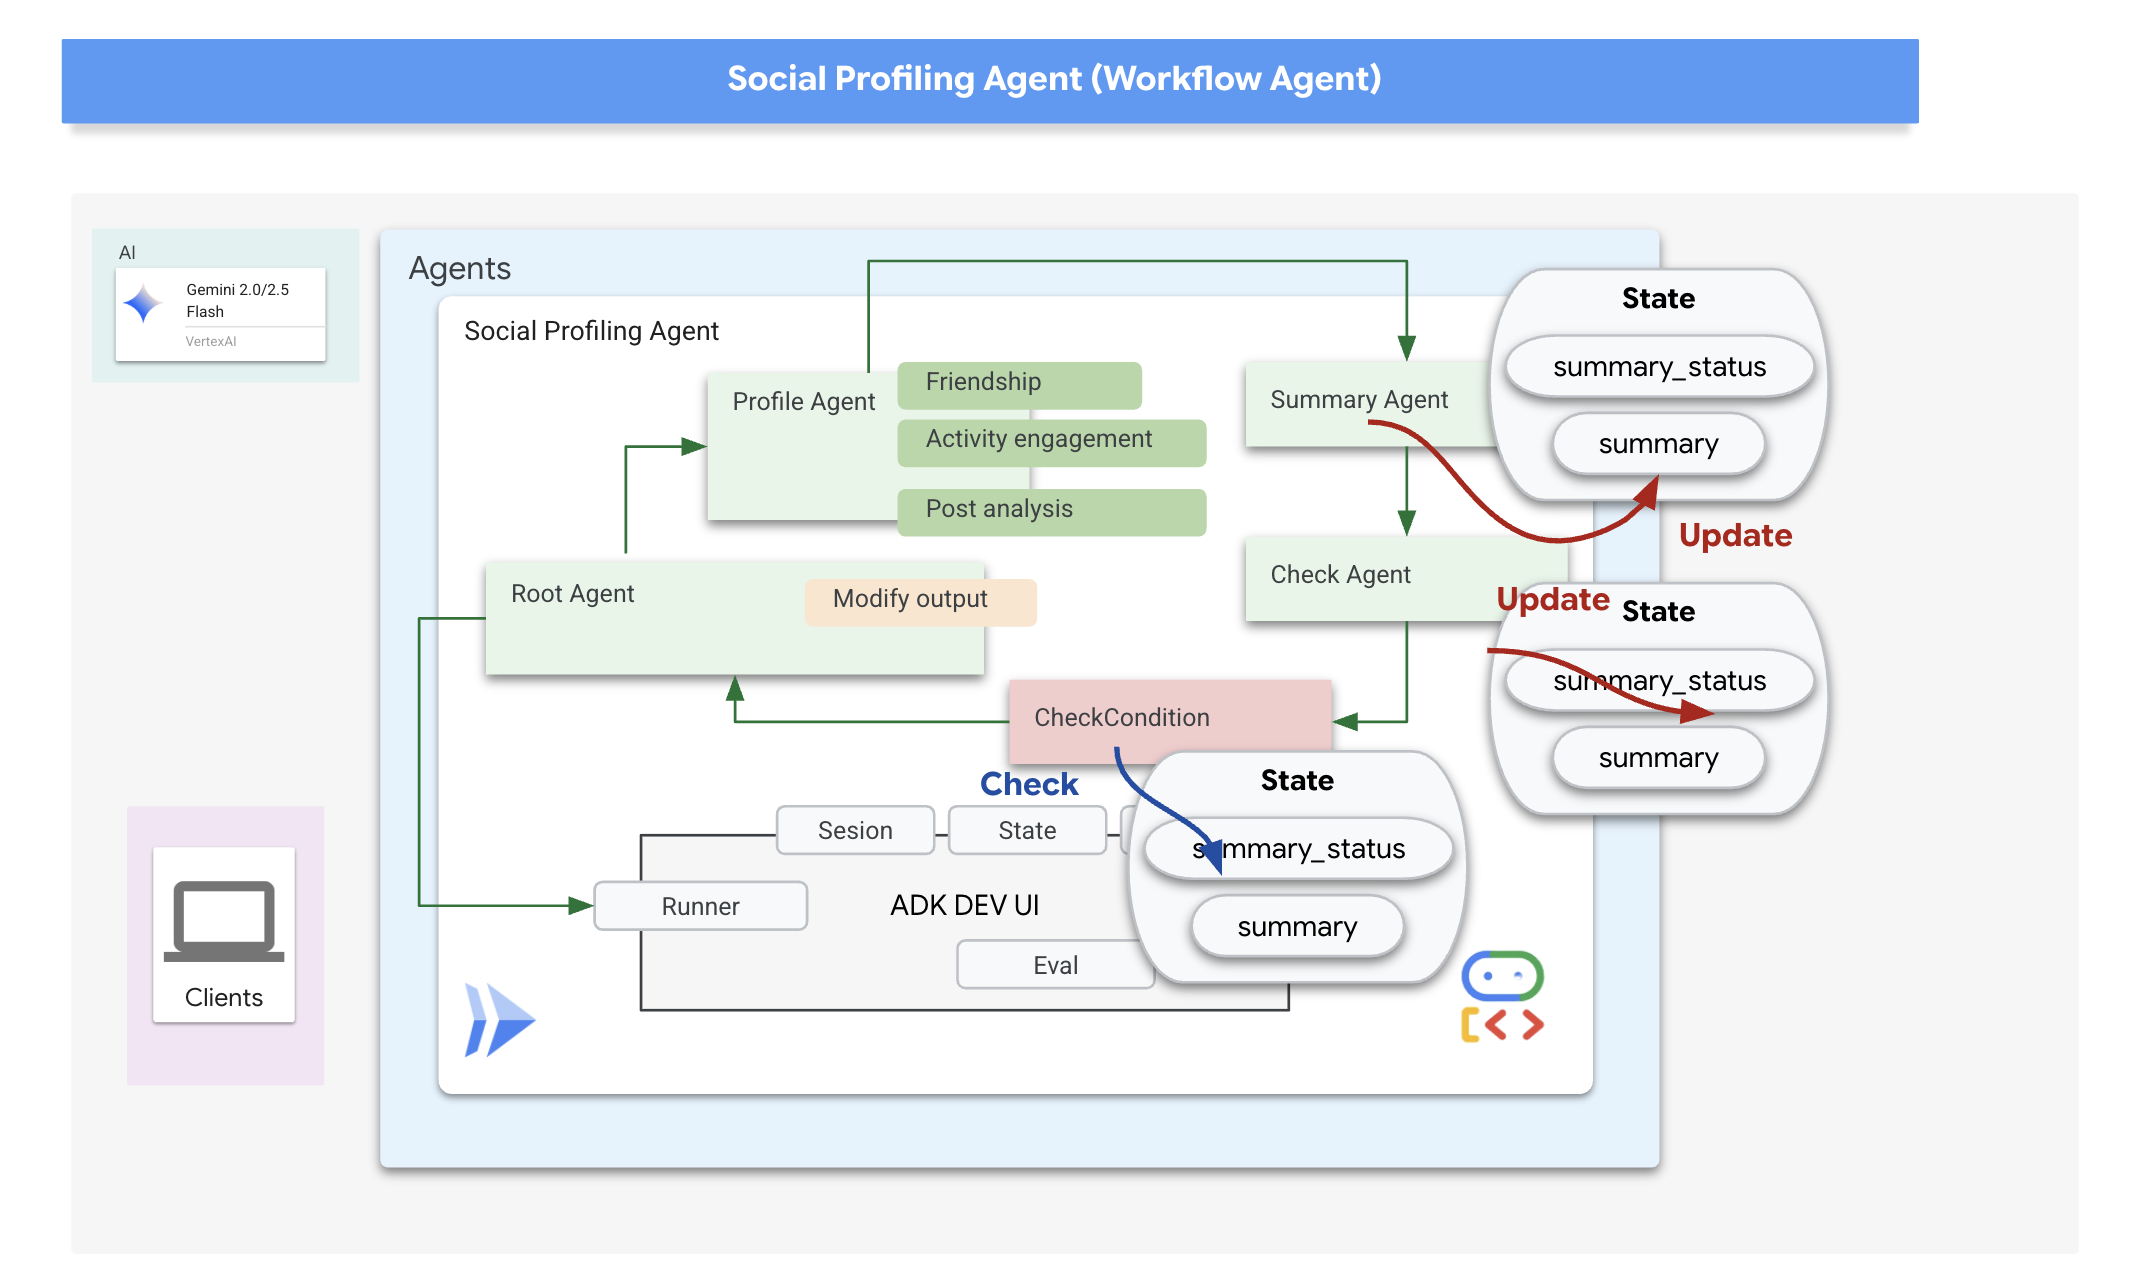
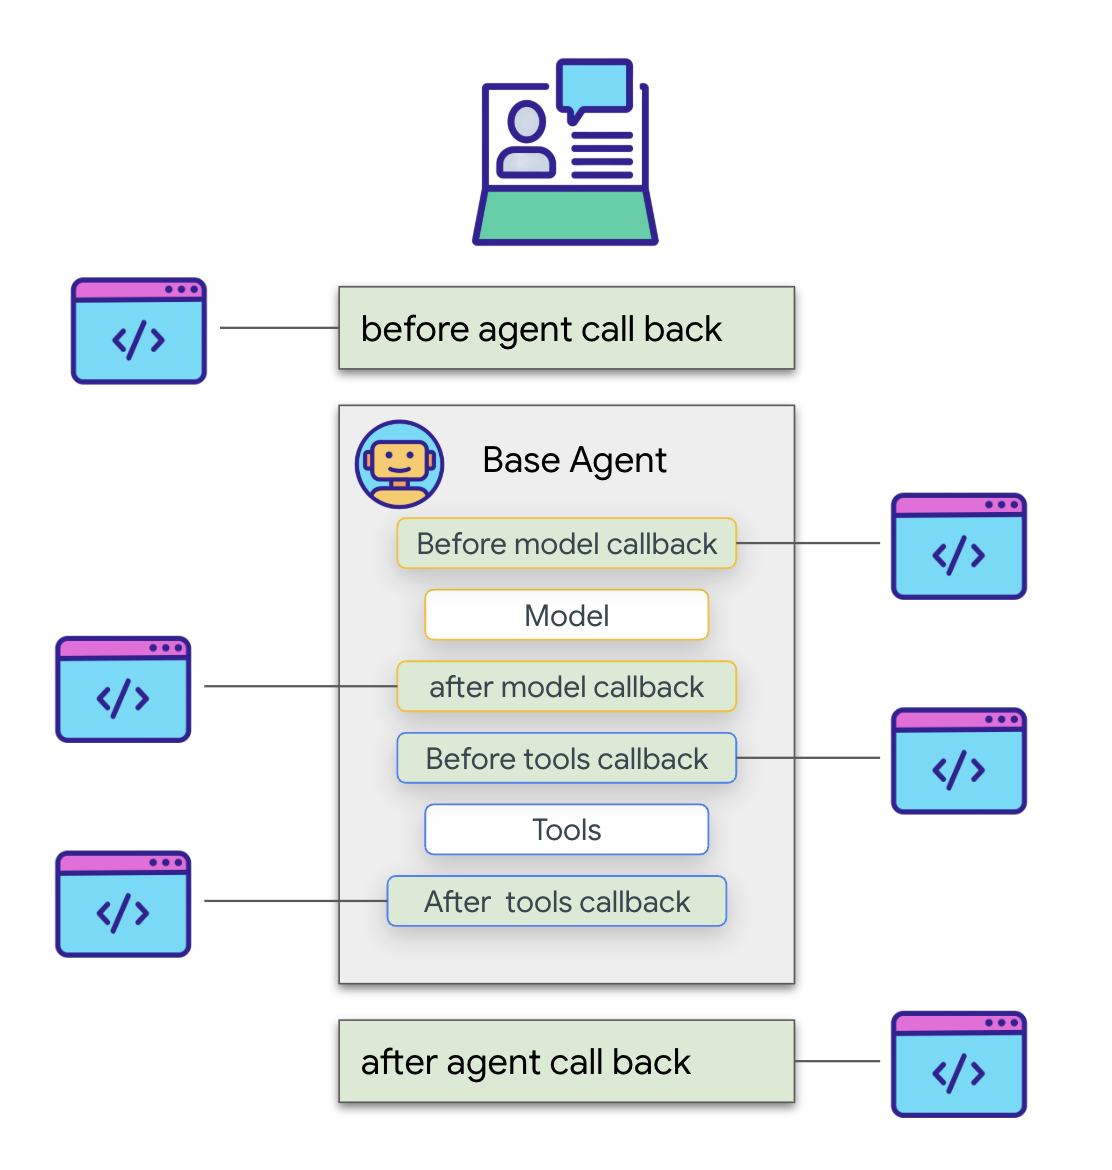
Callbacks in ADK allow us to inject custom logic to be executed at specific points during an agent's lifecycle or in response to certain events, such as the completion of a tool call or before the agent finishes its execution. They provide a way to customize the agent's behavior and process results dynamically.
We'll use an after_agent_callback that runs when the loop finishes (because CheckCondition escalated). This callback modify_output_after_agent retrieves the final summary from the state and formats it as the agent's final output message.
👉📝 In the same ~/instavibe-bootstrap/agents/social/agent.py, replace #REPLACE FOR modify_output_after_agent with follow:
def modify_output_after_agent(callback_context: CallbackContext) -> Optional[types.Content]:

    agent_name = callback_context.agent_name
    invocation_id = callback_context.invocation_id
    current_state = callback_context.state.to_dict()
    current_user_content = callback_context.user_content
    print(f"[Callback] Exiting agent: {agent_name} (Inv: {invocation_id})")
    print(f"[Callback] Current summary_status: {current_state.get("summary_status")}")
    print(f"[Callback] Current Content: {current_user_content}")

    status = current_state.get("summary_status").strip()
    is_done = (status == "completed")
    # Retrieve the final summary from the state

    final_summary = current_state.get("summary")
    print(f"[Callback] final_summary: {final_summary}")
    if final_summary and is_done and isinstance(final_summary, str):
        log.info(f"[Callback] Found final summary, constructing output Content.")
        # Construct the final output Content object to be sent back
        return types.Content(role="model", parts=[types.Part(text=final_summary.strip())])
    else:
        log.warning("[Callback] No final summary found in state or it's not a string.")
        # Optionally return a default message or None if no summary was generated
        return None
Defining the Root Loop Agent
Finally, we define the main LoopAgent. It orchestrates the sub-agents in sequence within each loop iteration (profile_agent -> summary_agent -> check_agent -> CheckCondition). It will repeat this sequence up to max_iterations times or until CheckCondition signals completion. The after_agent_callback ensures the final summary is returned.
👉📝 In the same ~/instavibe-bootstrap/agents/social/agent.py, replace #REPLACE FOR root_agent with follow:
root_agent = LoopAgent(
    name="InteractivePipeline",
    sub_agents=[
        profile_agent,
        summary_agent,
        check_agent,
        CheckCondition(name="Checker")
    ],
    description="Find everyone's social profile on events, post and friends",
    max_iterations=10,
    after_agent_callback=modify_output_after_agent
)
Let's test this multi-agent workflow using the ADK Dev UI.
👉💻 Launch the ADK web server:
. ~/instavibe-bootstrap/set_env.sh
source ~/instavibe-bootstrap/env/bin/activate
cd  ~/instavibe-bootstrap/agents
sed -i "s|^\(O\?GOOGLE_CLOUD_PROJECT\)=.*|GOOGLE_CLOUD_PROJECT=${PROJECT_ID}|" ~/instavibe-bootstrap/agents/social/.env
adk web
Open the ADK Dev UI (port 8000 via Web Preview). In the agent dropdown menu (top-right), select the Social Agent.
👉 Now, give it the task to profile multiple people. In the chat dialog, enter:
Tell me about Mike and Bob
After the agent responds (which might take a bit longer due to the looping and multiple LLM calls), don't just look at the final chat output. Navigate to the Events tab in the left-hand pane of the ADK Dev UI.
👉 Verification Step: In the Events tab, you will see a detailed, step-by-step trace of the execution. 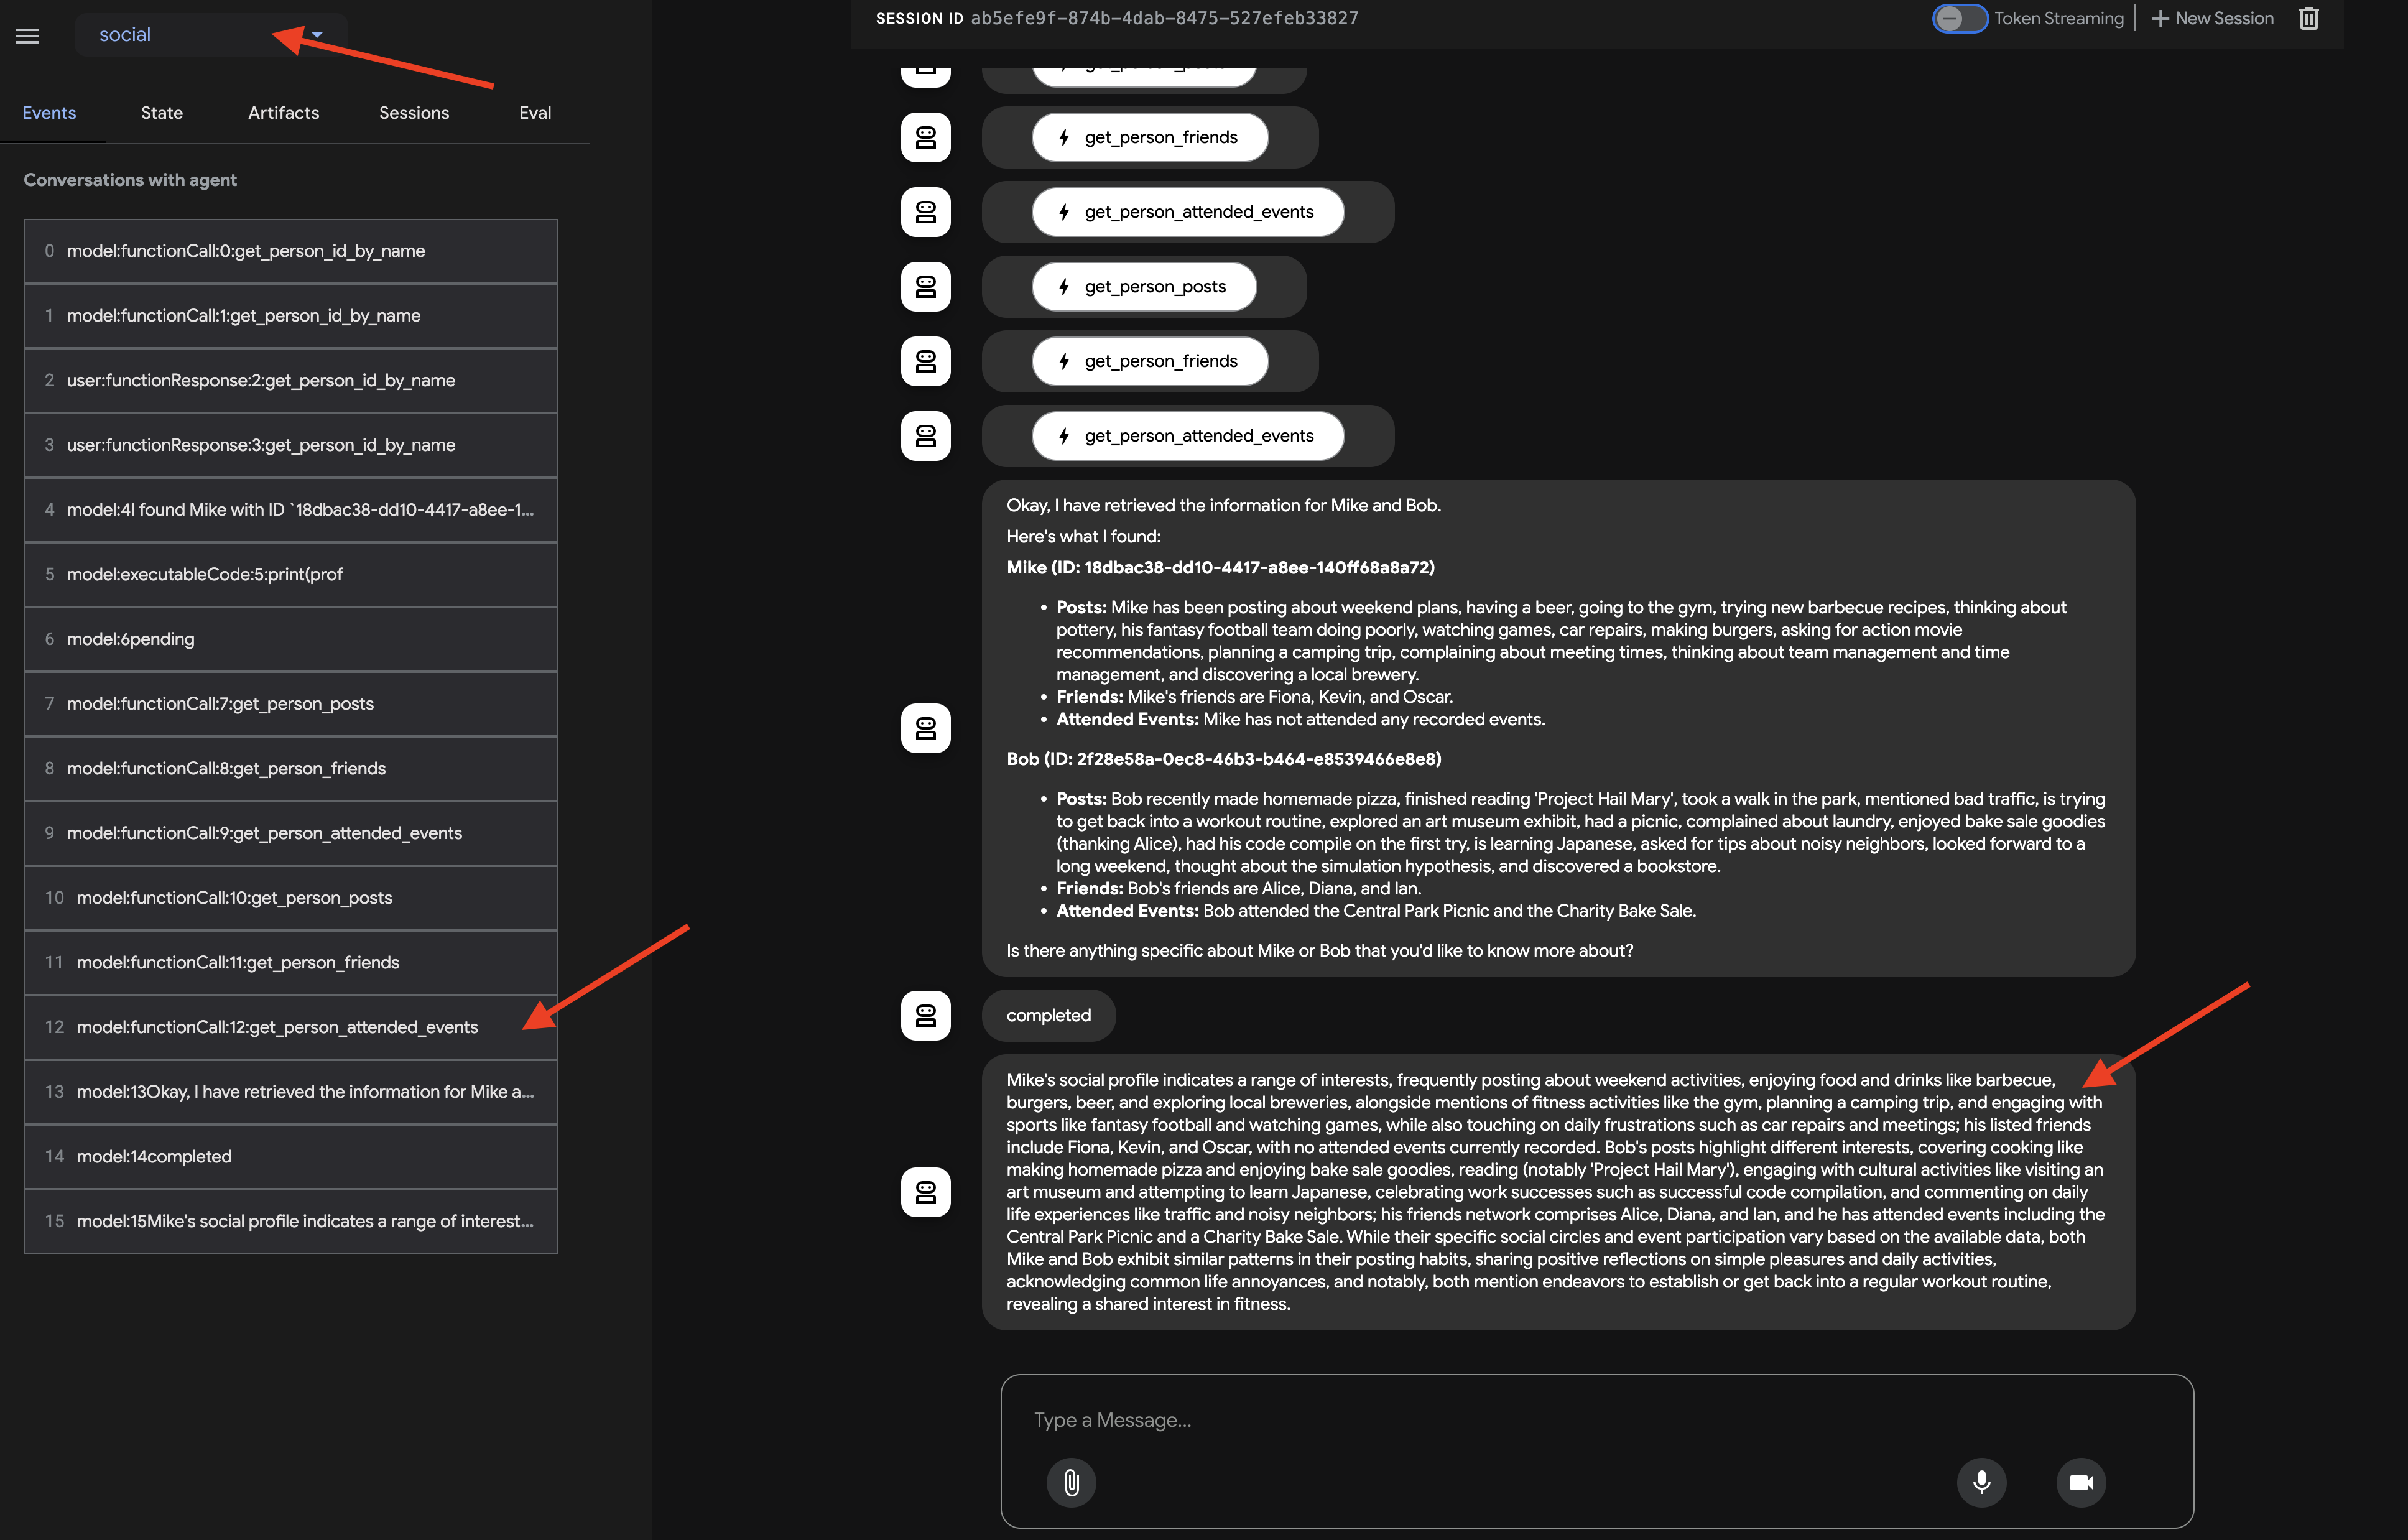
After observing how the agent invokes each sub-agent, where you expect the flow to go from profile_agent -> summary_agent -> check_agent, Checker within each iteration. But in practice, however, we see the agent's powerful ‘self-optimization' in action.
Because the underlying model sees the entire request (e.g., ‘profile Mike and Bob'), it often chooses the most efficient path, gathering all required data in a single, consolidated turn rather than iterating multiple times. You can see the inputs and outputs and states for each step, including tool calls made by profile_agent
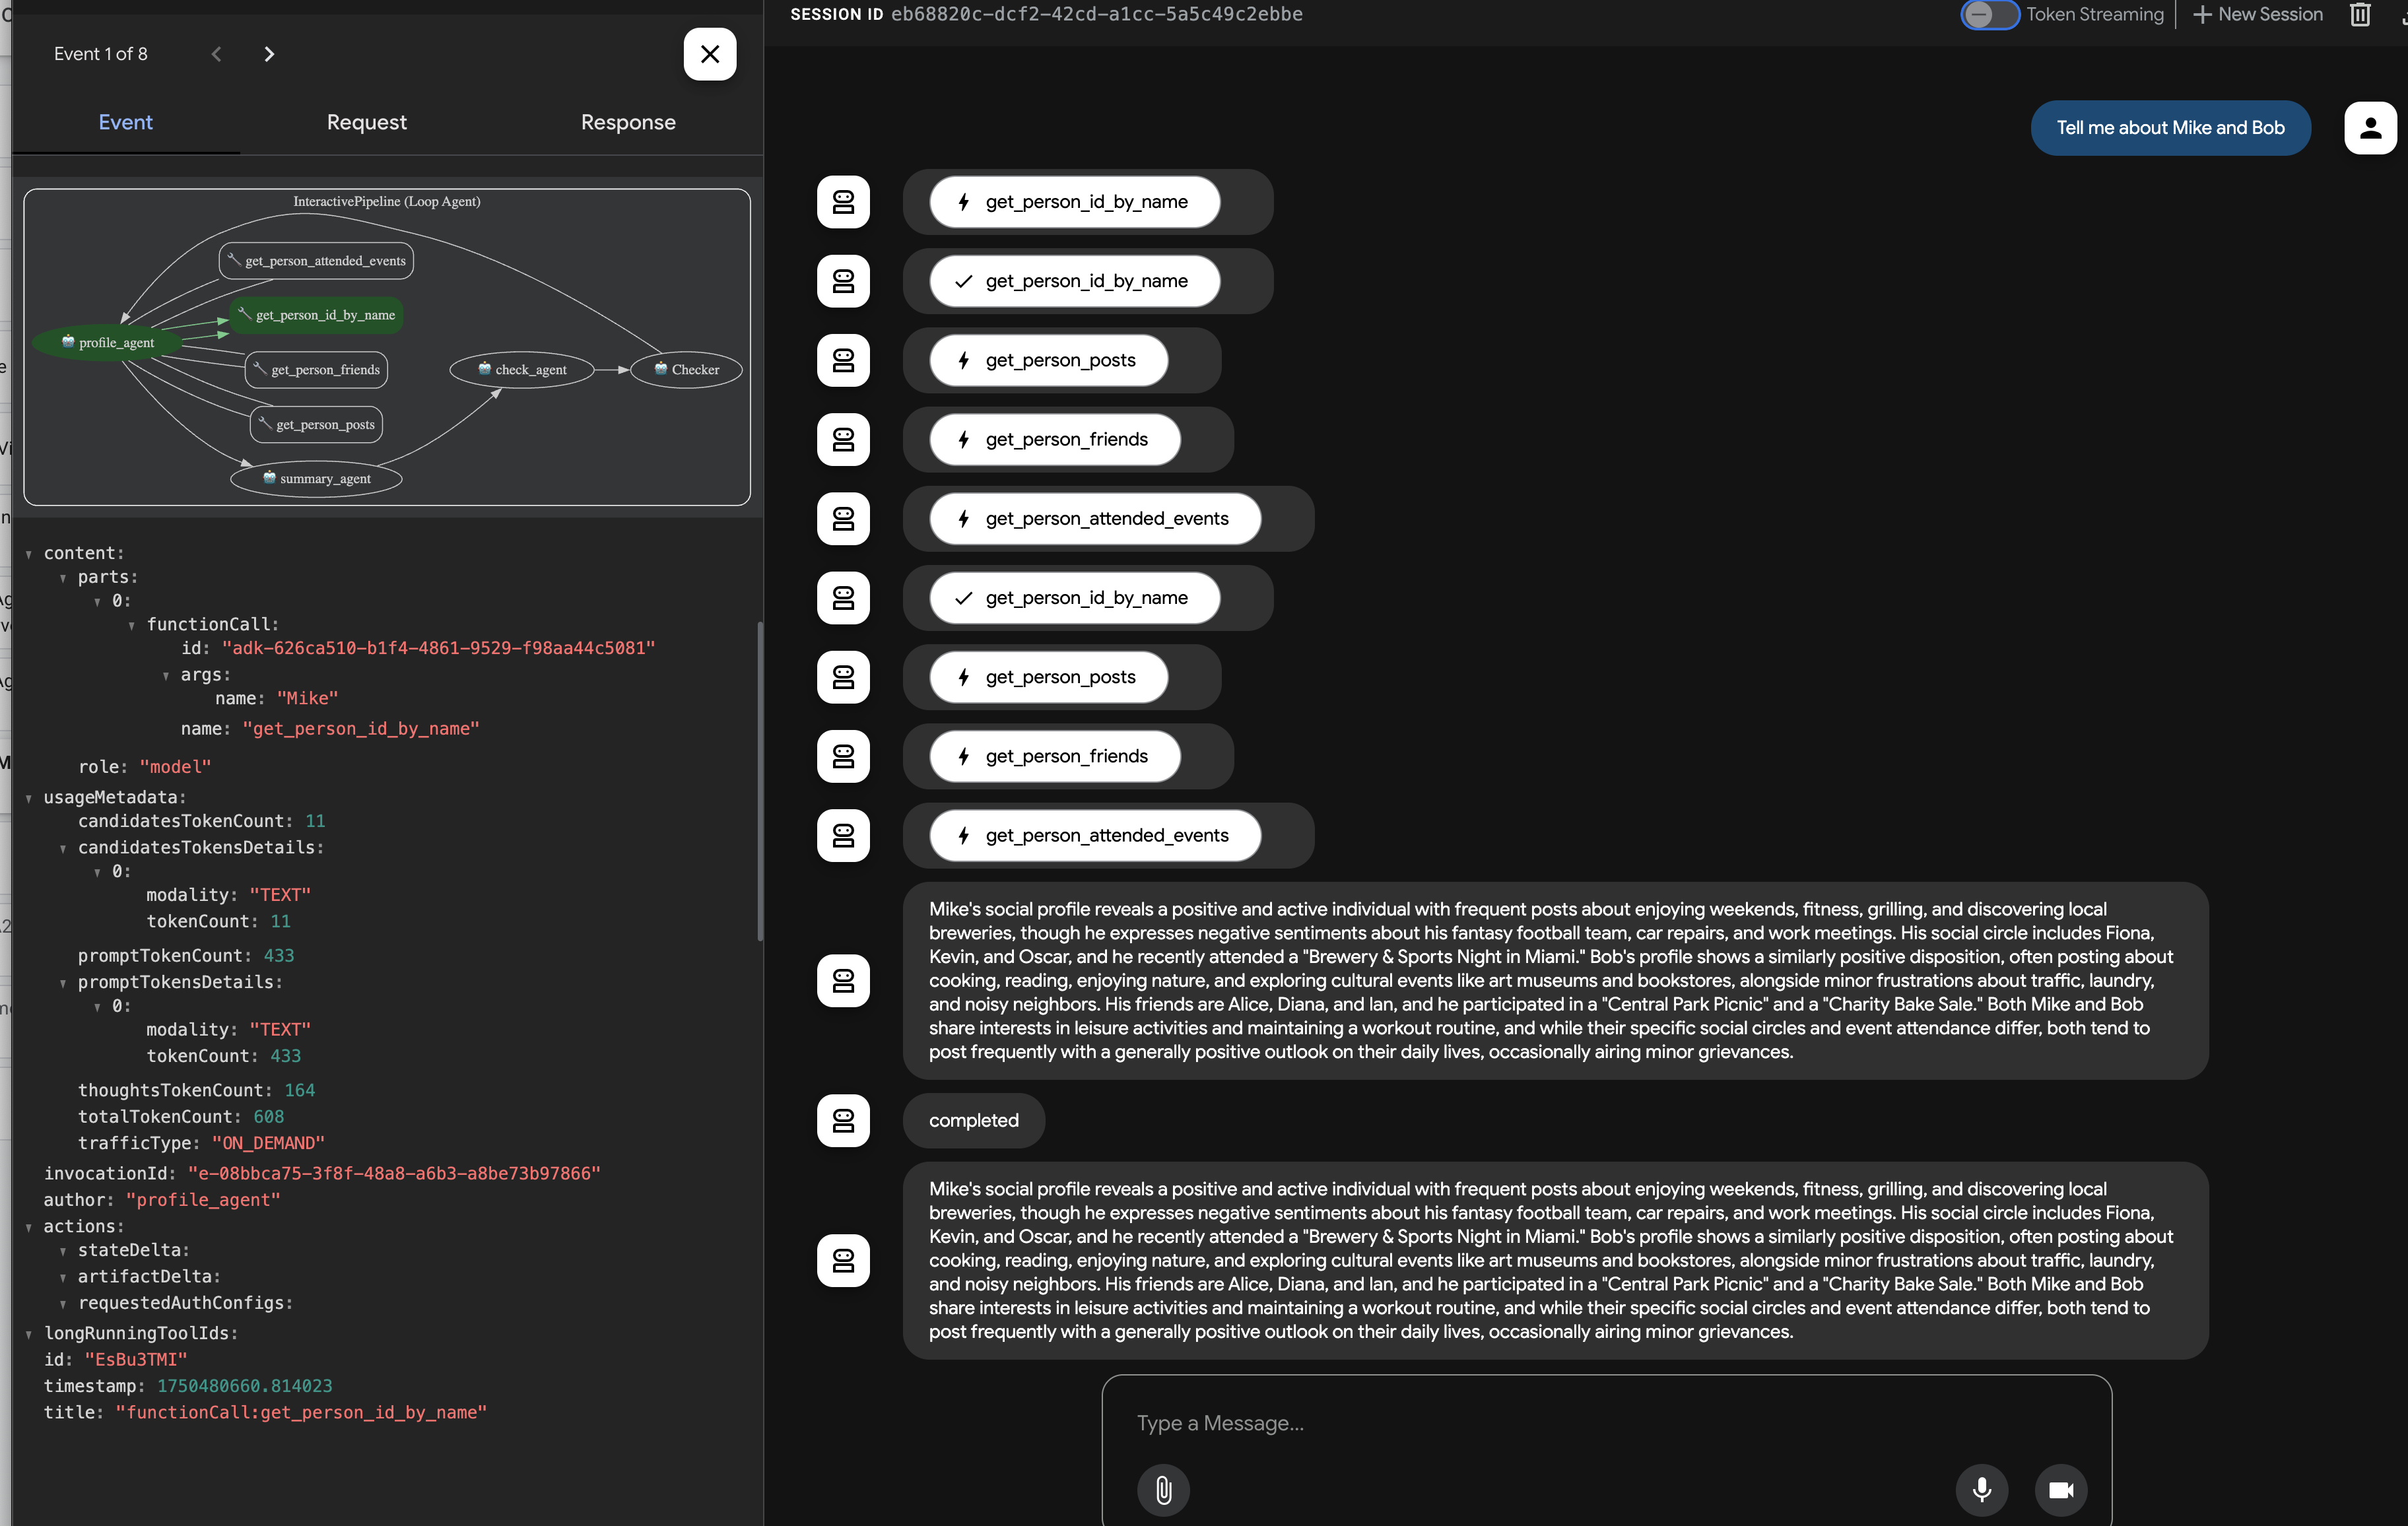
and the status updates from check_agent and CheckCondition. 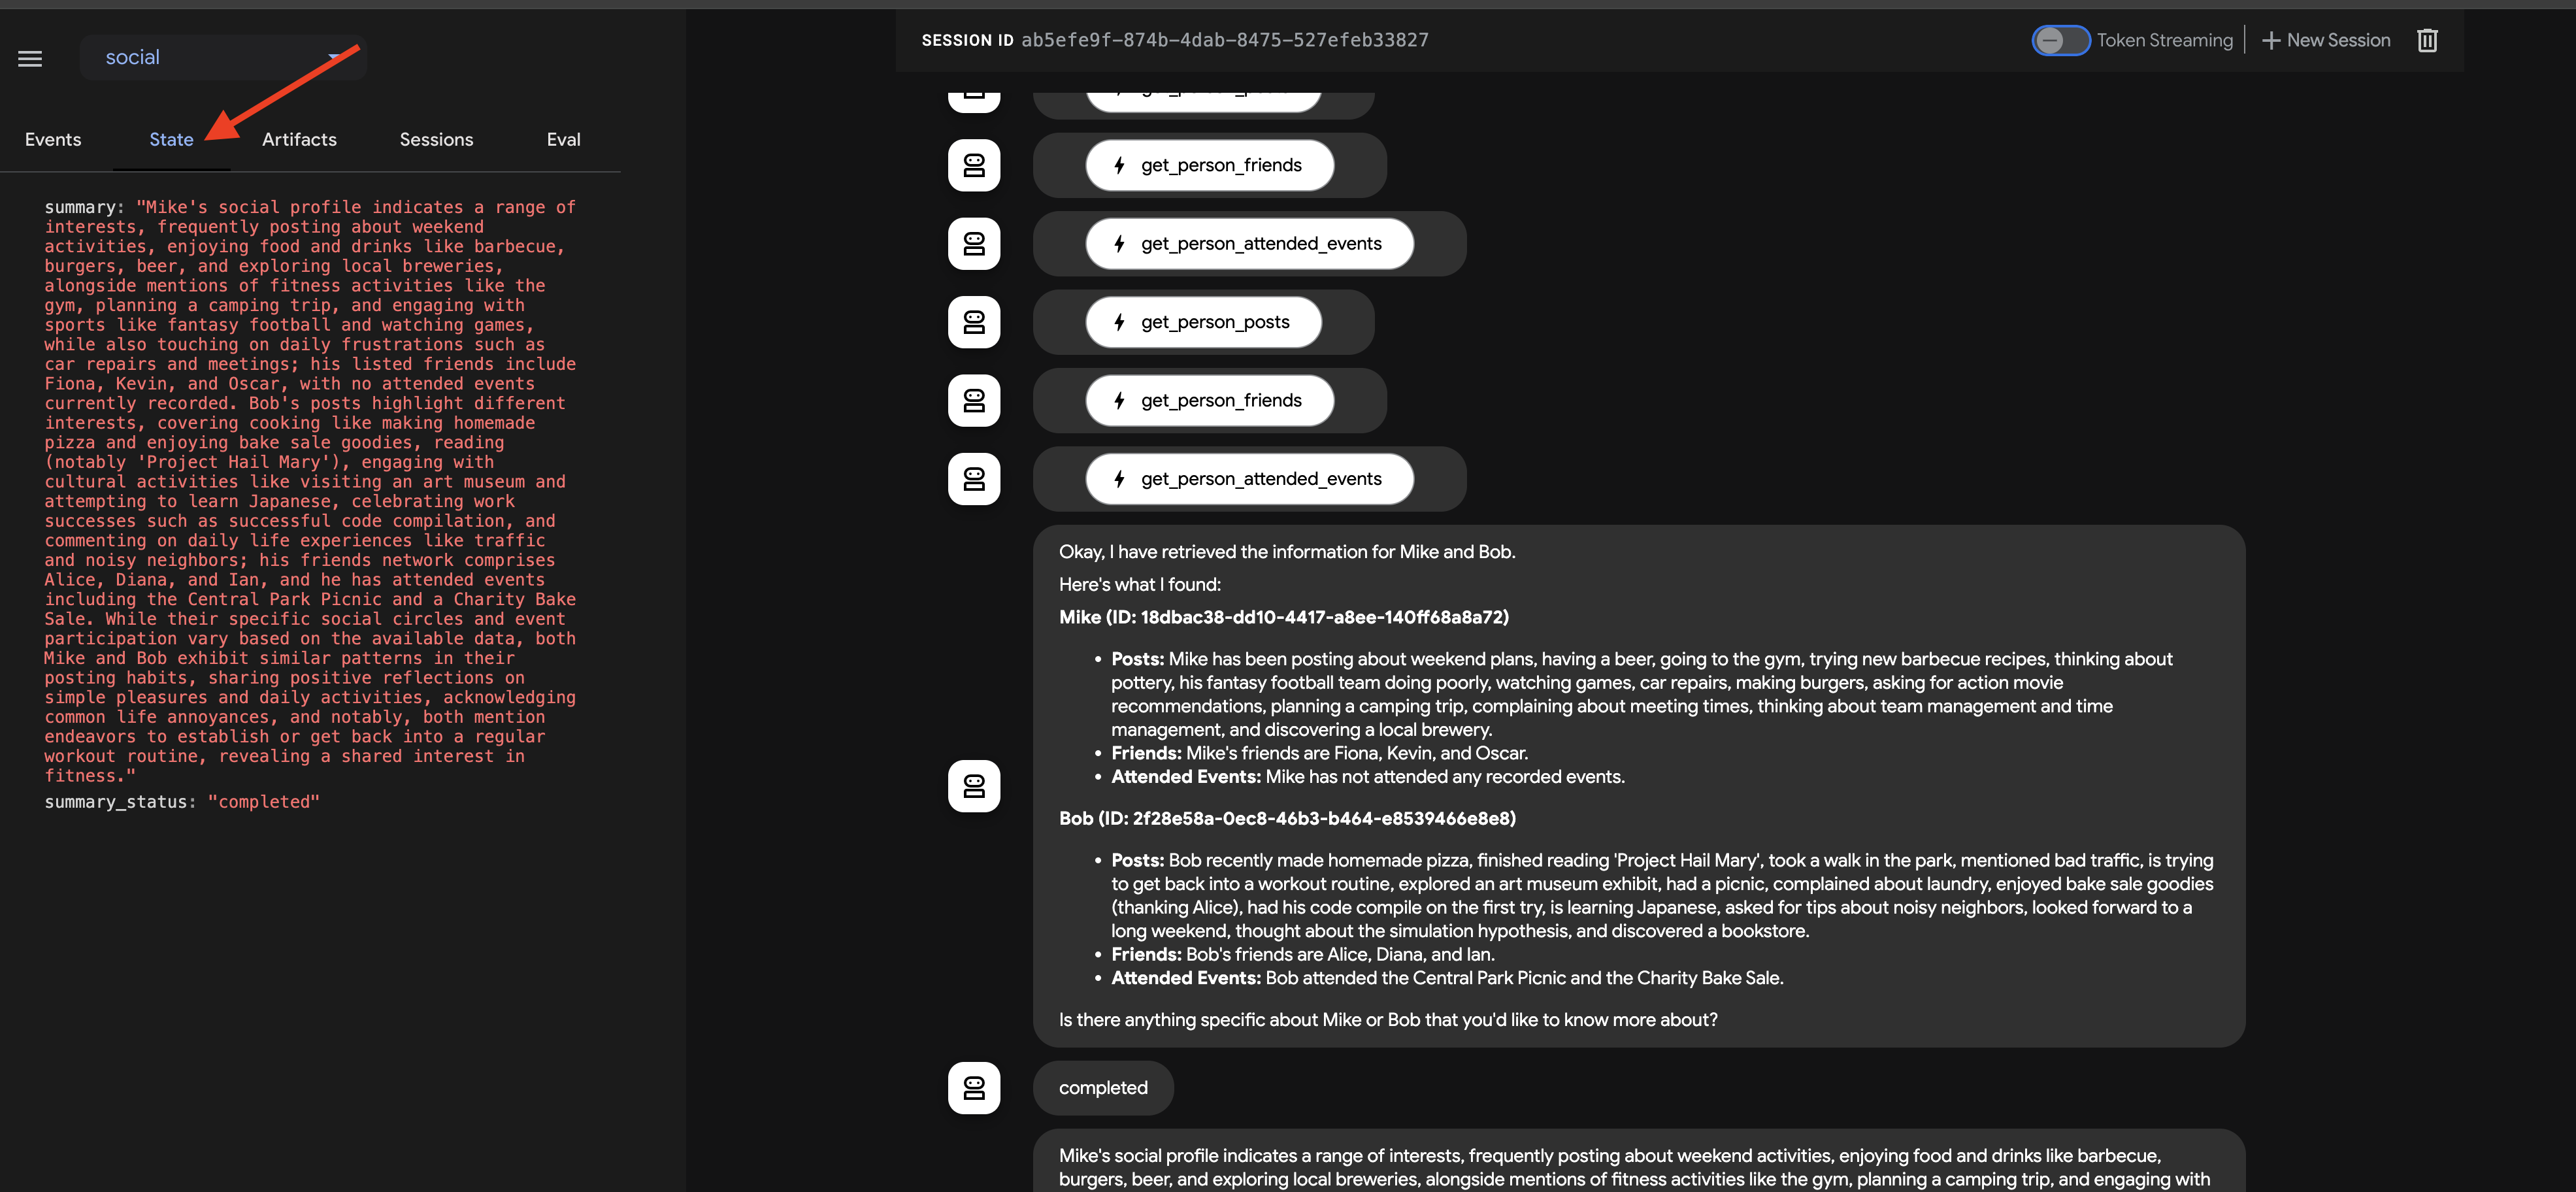
This visual trace is invaluable for understanding and debugging how the multi-agent workflow operates until the final summary is generated and returned by the callback.
Once you have explored the chat response and the event trace, return to the Cloud Shell terminal and press Ctrl+C to stop the ADK Dev UI.
10. Agent-to-Agent (A2A) Communication
So far, we've built specialized agents, but they operate in isolation or within a predefined workflow on the same machine. To build truly distributed and collaborative multi-agent systems, we need a way for agents, potentially running as separate services, to discover each other and communicate effectively. This is where the Agent-to-Agent (A2A) protocol comes in.
The A2A protocol is an open standard specifically designed for interoperable communication between AI agents. While MCP focuses on agent-to-tool interaction, A2A focuses on agent-to-agent interaction. It allows agents to:
- Discover: Find other agents and learn their capabilities via standardized Agent Cards.
- Communicate: Exchange messages and data securely.
- Collaborate: Delegate tasks and coordinate actions to achieve complex goals.
The A2A protocol facilitates this communication through mechanisms like "Agent Cards," which agents can use to advertise their capabilities and connection information.
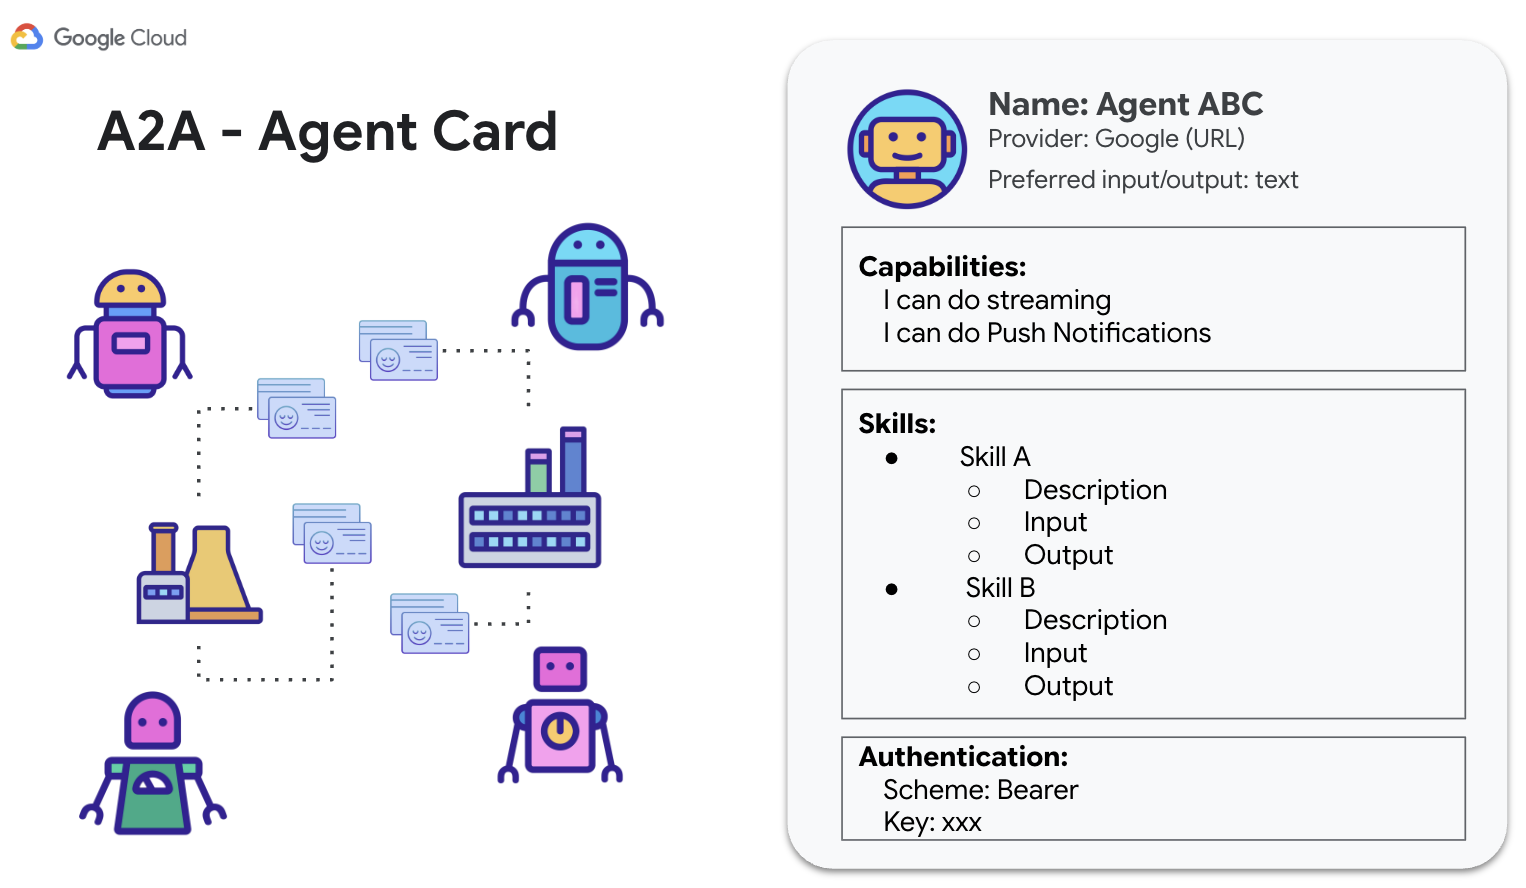
A2A utilizes familiar web standards (HTTP, SSE, JSON-RPC) and often employs a client-server model where one agent (client) sends tasks to another (remote agent/server). This standardization is key to building modular, scalable systems where agents developed independently can work together.
Enabling A2A for InstaVibe Agents
To make our existing Planner, Platform Interaction, and Social agents accessible to other agents via A2A, we need to wrap each one with an A2A Server component. This server will:
- Expose an Agent Card: Serve a standard description of the agent's capabilities via an HTTP endpoint.
- Listen for Tasks(Request Messages): Accept incoming task requests from other agents (A2A clients) according to the A2A protocol.
- Manage Task(Request Messages) Execution: Hand off received tasks to the underlying ADK agent logic for processing.
Planner Agent (A2A Enabled)
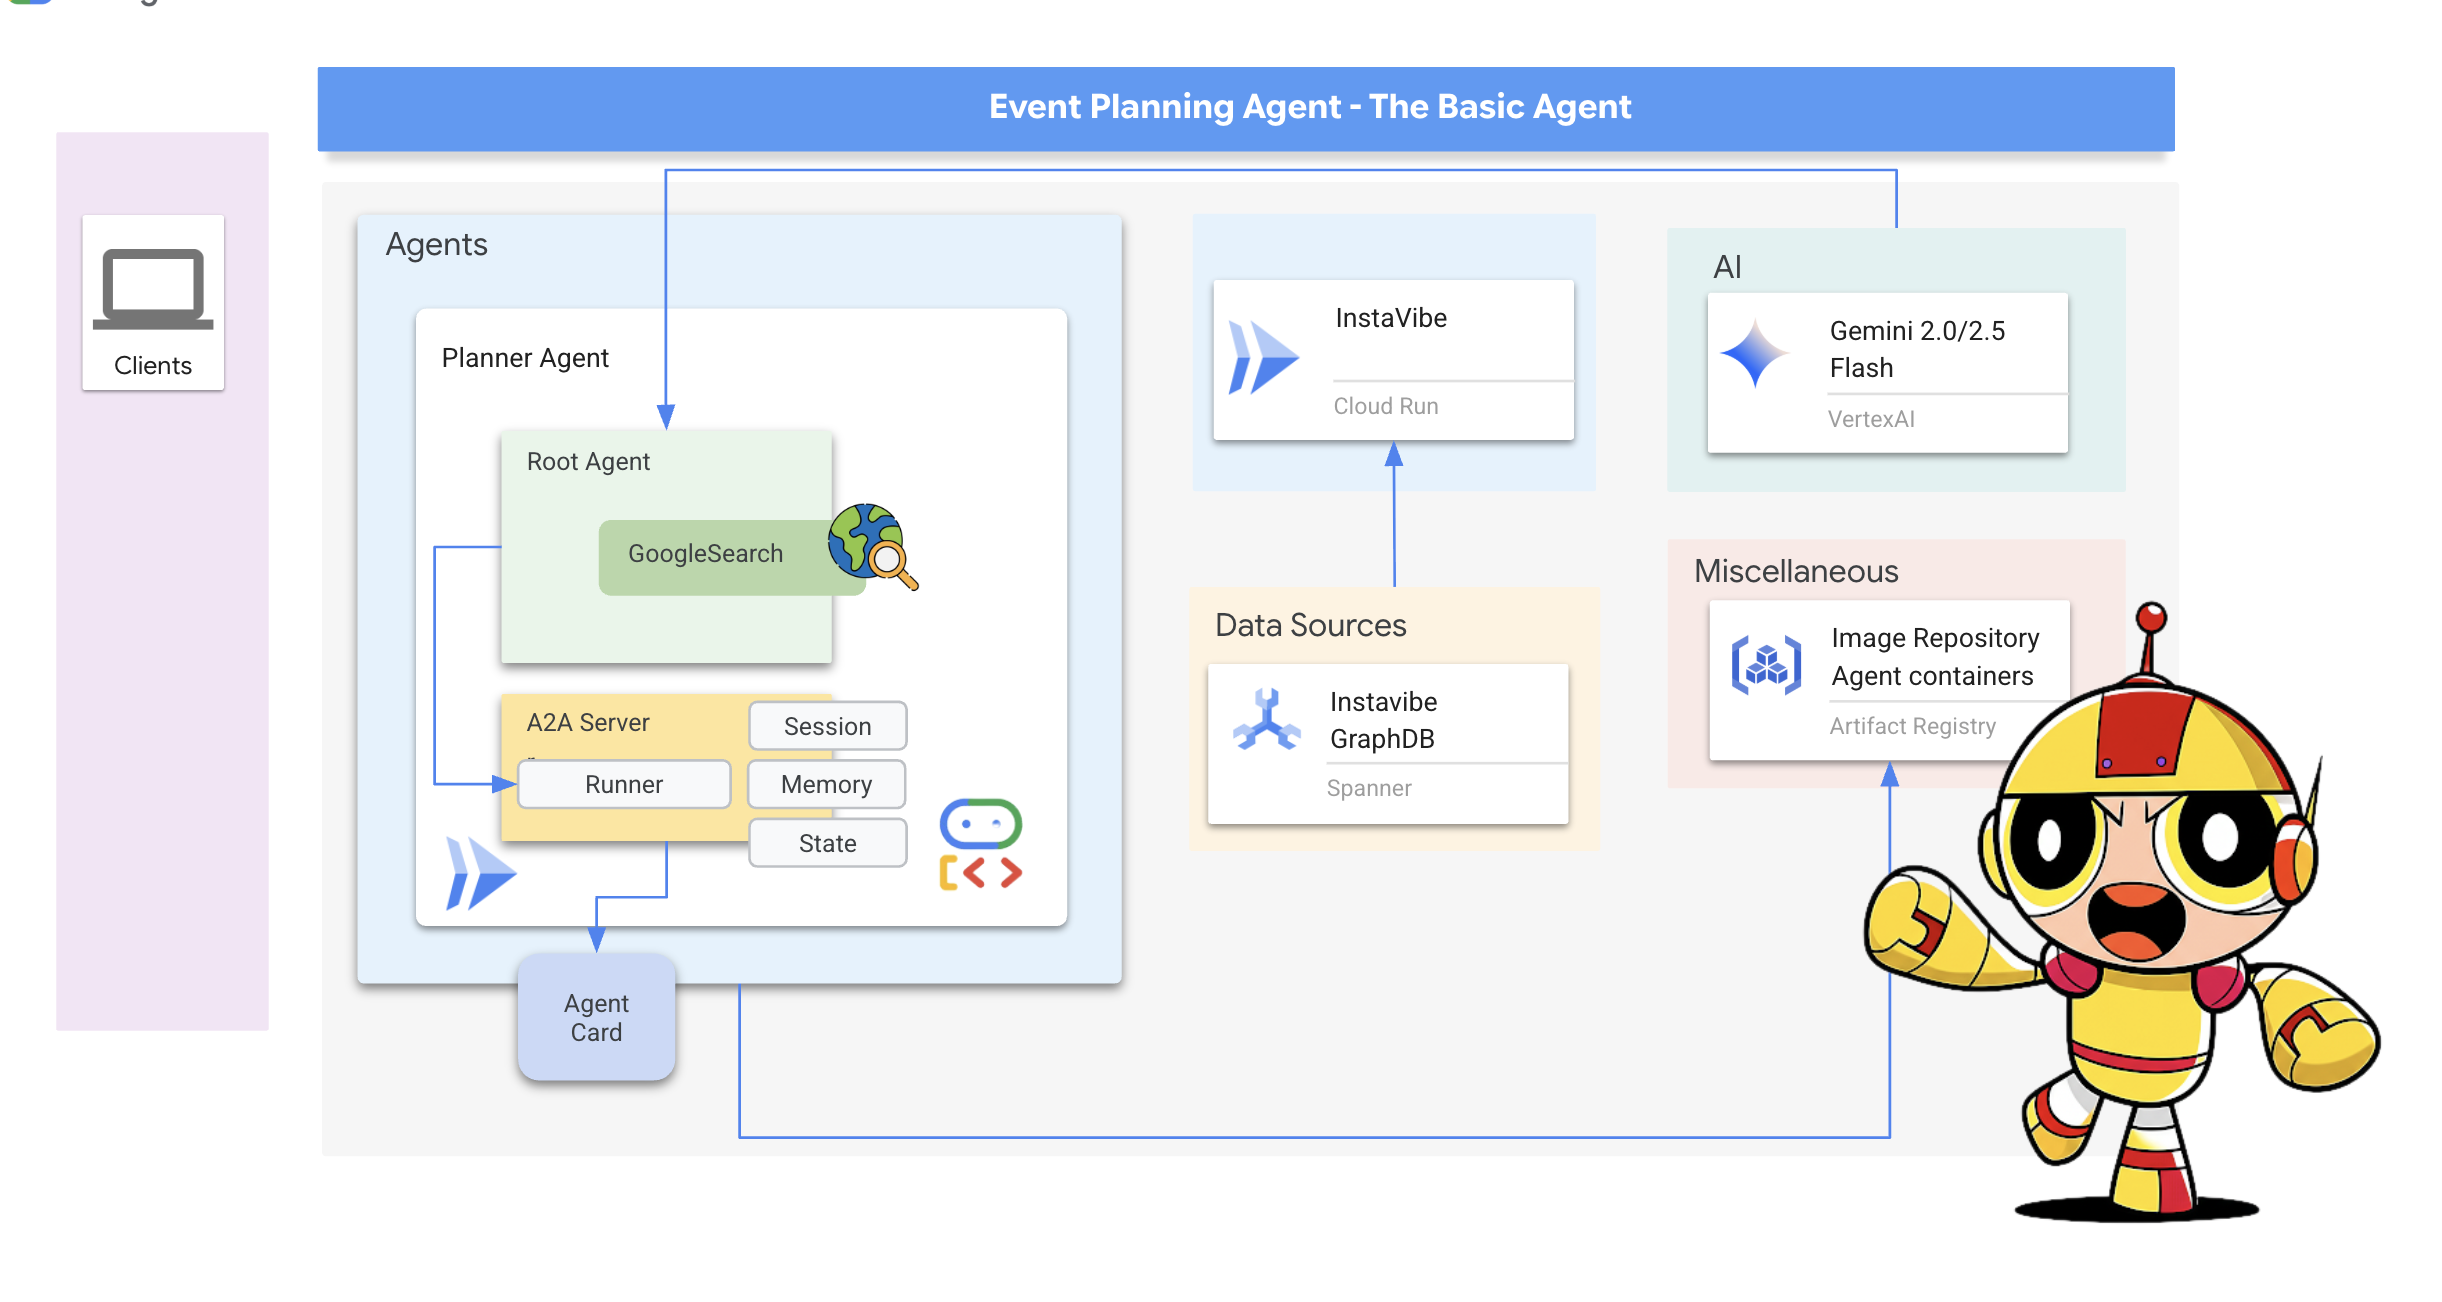
Let's start by adding the A2A server layer to our Planner Agent.
Define the A2A server startup logic. This code defines the AgentCard (the public description of the agent), configures the A2AServer, and starts it, linking it to the PlatformAgentExecutor.
👉📝 Add the following code to the end of ~/instavibe-bootstrap/agents/planner/a2a_server.py:
class PlannerAgent:
    """An agent to help user planning a event with its desire location."""
    SUPPORTED_CONTENT_TYPES = ["text", "text/plain"]

    def __init__(self):
        self._agent = self._build_agent()
        self.runner = Runner(
            app_name=self._agent.name,
            agent=self._agent,
            artifact_service=InMemoryArtifactService(),
            session_service=InMemorySessionService(),
            memory_service=InMemoryMemoryService(),
        )
        capabilities = AgentCapabilities(streaming=True)
        skill = AgentSkill(
            id="event_planner",
            name="Event planner",
            description="""
            This agent generates multiple fun plan suggestions tailored to your specified location, dates, and interests,
            all designed for a moderate budget. It delivers detailed itineraries,
            including precise venue information (name, latitude, longitude, and description), in a structured JSON format.
            """,
            tags=["instavibe"],
            examples=["What about Bostona MA this weekend?"],
        )
        self.agent_card = AgentCard(
            name="Event Planner Agent",
            description="""
            This agent generates multiple fun plan suggestions tailored to your specified location, dates, and interests,
            all designed for a moderate budget. It delivers detailed itineraries,
            including precise venue information (name, latitude, longitude, and description), in a structured JSON format.
            """,
            url=f"{PUBLIC_URL}",
            version="1.0.0",
            defaultInputModes=PlannerAgent.SUPPORTED_CONTENT_TYPES,
            defaultOutputModes=PlannerAgent.SUPPORTED_CONTENT_TYPES,
            capabilities=capabilities,
            skills=[skill],
        )

    def get_processing_message(self) -> str:
        return "Processing the planning request..."

    def _build_agent(self) -> LlmAgent:
        """Builds the LLM agent for the night out planning agent."""
        return agent.root_agent


if __name__ == '__main__':
    try:
        plannerAgent = PlannerAgent()

        request_handler = DefaultRequestHandler(
            agent_executor=PlannerAgentExecutor(plannerAgent.runner,plannerAgent.agent_card),
            task_store=InMemoryTaskStore(),
        )

        server = A2AStarletteApplication(
            agent_card=plannerAgent.agent_card,
            http_handler=request_handler,
        )
        logger.info(f"Attempting to start server with Agent Card: {plannerAgent.agent_card.name}")
        logger.info(f"Server object created: {server}")

        uvicorn.run(server.build(), host='0.0.0.0', port=port)
    except Exception as e:
        logger.error(f"An error occurred during server startup: {e}")
        exit(1)
👉💻 Let's quickly test if the A2A server starts correctly locally and serves its Agent Card. Run the following command in your first terminal:
. ~/instavibe-bootstrap/set_env.sh
source ~/instavibe-bootstrap/env/bin/activate
cd ~/instavibe-bootstrap/agents/
python -m planner.a2a_server
👉 Now, open another terminal window. (Click on the + sign in the terminal panel) 
👉💻 Use curl to request the Agent Card from the locally running server:
curl http://localhost:10003/.well-known/agent.json | jq
You should see the JSON representation of the AgentCard we defined, confirming the server is running and advertising the Planner agent.
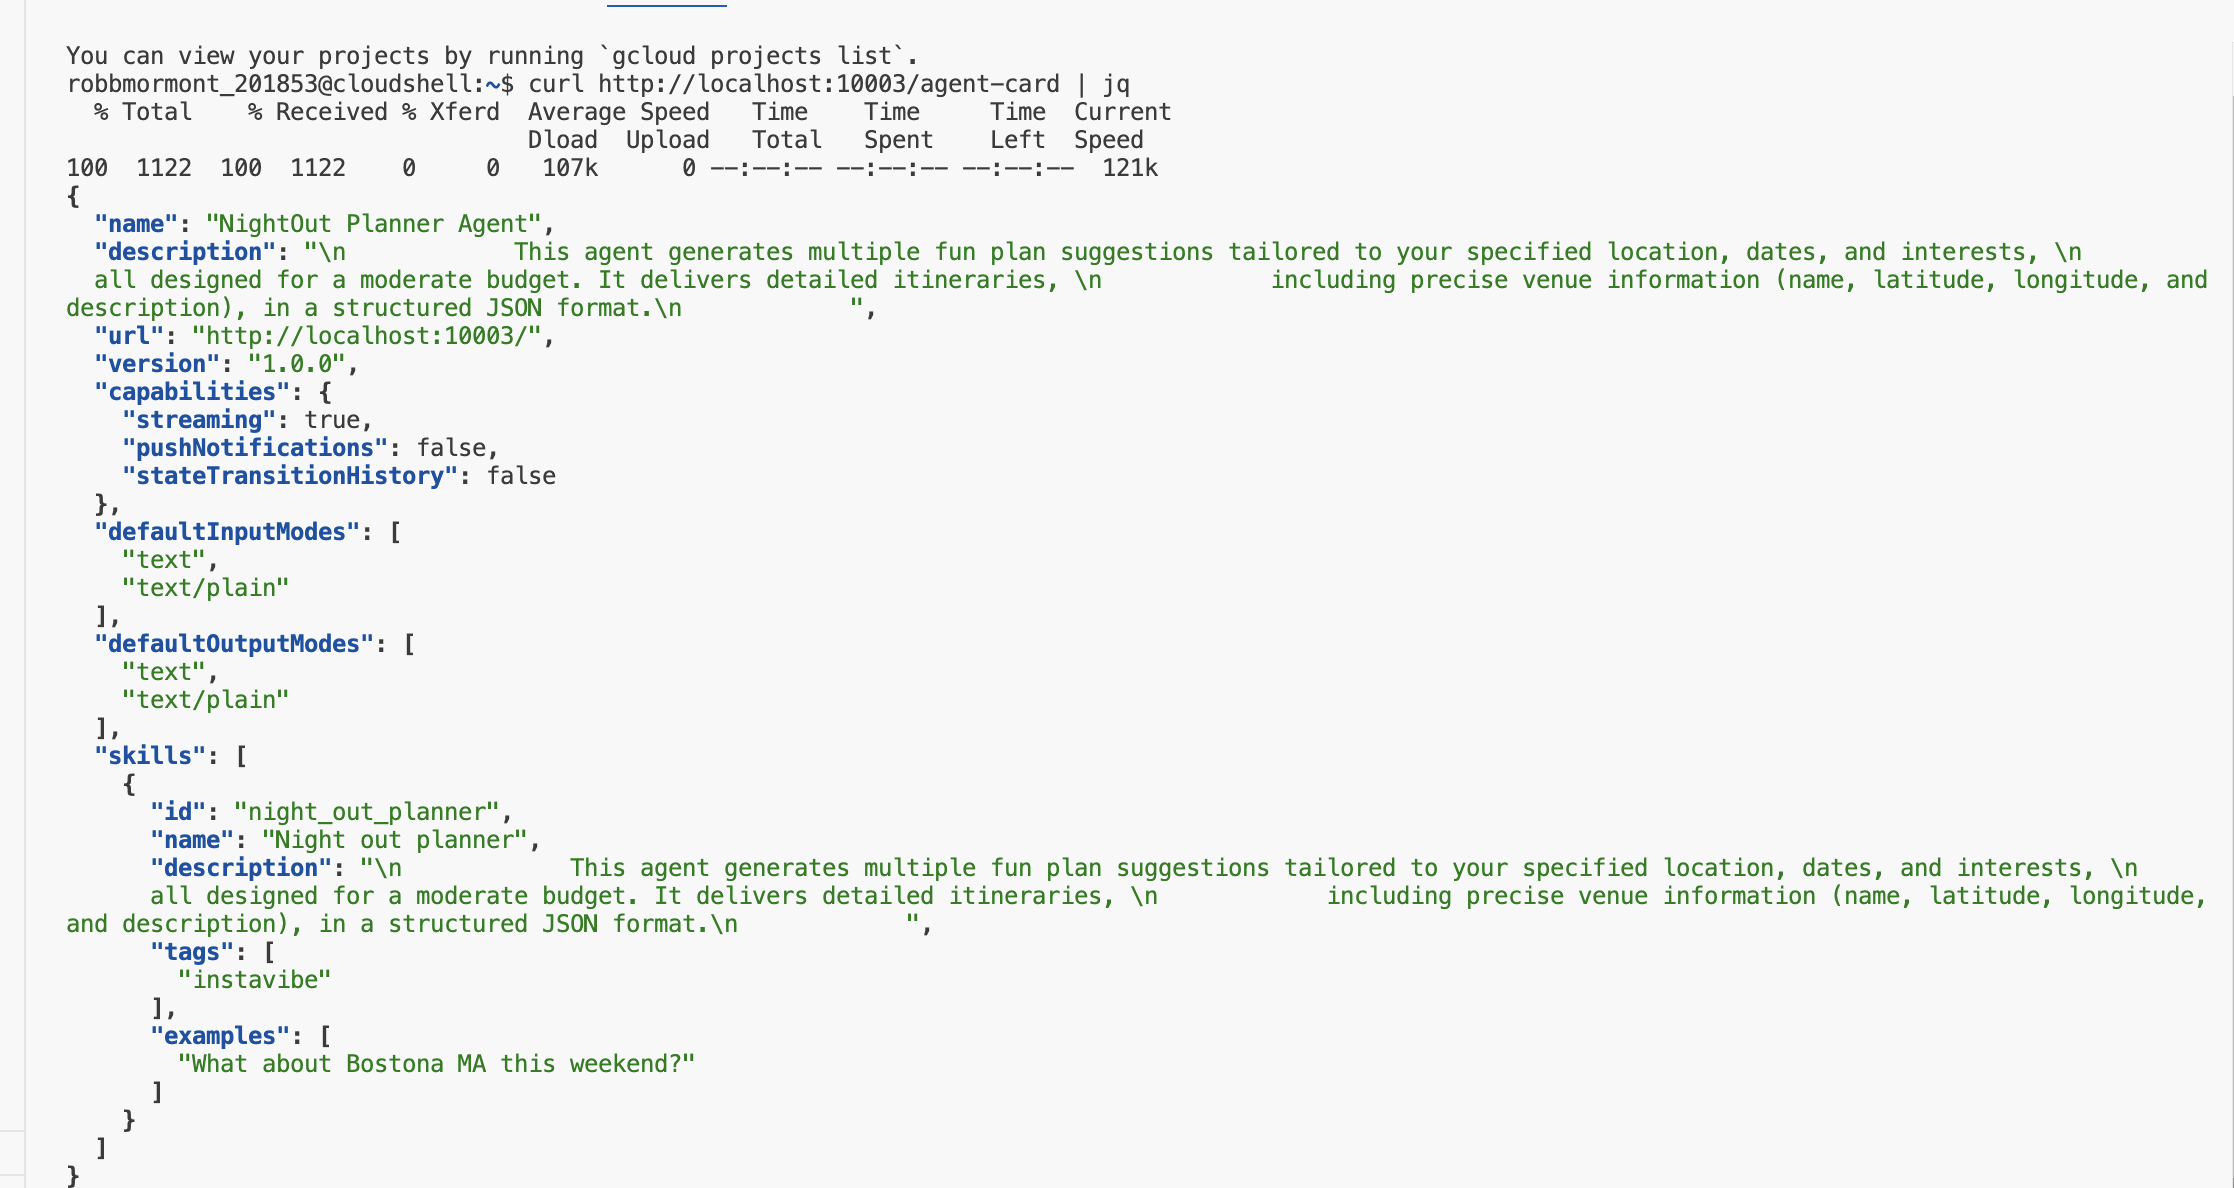
Go back to the first terminal (where the server is running) and press Ctrl+C to stop it.
👉💻 With the A2A server logic added, we can now build the container image.
Build and Deploy the Planner Agent
. ~/instavibe-bootstrap/set_env.sh

cd ~/instavibe-bootstrap/agents

# Set variables specific to the PLANNER agent
export IMAGE_TAG="latest"
export AGENT_NAME="planner"
export IMAGE_NAME="planner-agent"
export IMAGE_PATH="${REGION}-docker.pkg.dev/${PROJECT_ID}/${REPO_NAME}/${IMAGE_NAME}:${IMAGE_TAG}"
export SERVICE_NAME="planner-agent"
export PUBLIC_URL="https://planner-agent-${PROJECT_NUMBER}.${REGION}.run.app"

echo "Building ${AGENT_NAME} agent..."
gcloud builds submit . \
  --config=cloudbuild-build.yaml \
  --project=${PROJECT_ID} \
  --region=${REGION} \
  --substitutions=_AGENT_NAME=${AGENT_NAME},_IMAGE_PATH=${IMAGE_PATH}

echo "Image built and pushed to: ${IMAGE_PATH}"
👉💻 And deploy our Planner Agent on Cloud Run.
. ~/instavibe-bootstrap/set_env.sh

cd ~/instavibe-bootstrap/agents

# Set variables specific to the PLANNER agent
export IMAGE_TAG="latest"
export AGENT_NAME="planner"
export IMAGE_NAME="planner-agent"
export IMAGE_PATH="${REGION}-docker.pkg.dev/${PROJECT_ID}/${REPO_NAME}/${IMAGE_NAME}:${IMAGE_TAG}"
export SERVICE_NAME="planner-agent"
export PUBLIC_URL="https://planner-agent-${PROJECT_NUMBER}.${REGION}.run.app"


gcloud run deploy ${SERVICE_NAME} \
  --image=${IMAGE_PATH} \
  --platform=managed \
  --region=${REGION} \
  --set-env-vars="A2A_HOST=0.0.0.0" \
  --set-env-vars="A2A_PORT=8080" \
  --set-env-vars="GOOGLE_GENAI_USE_VERTEXAI=TRUE" \
  --set-env-vars="GOOGLE_CLOUD_LOCATION=${REGION}" \
  --set-env-vars="GOOGLE_CLOUD_PROJECT=${PROJECT_ID}" \
  --set-env-vars="PUBLIC_URL=${PUBLIC_URL}" \
  --allow-unauthenticated \
  --project=${PROJECT_ID} \
  --min-instances=1
Let's verify that the deployed service is running and serving its Agent Card correctly from the cloud using the A2A Inspector.
👉 From the Web preview icon in the Cloud Shell toolbar, select Change port. Set the port to 8081 and click "Change and Preview". A new browser tab will open with the A2A Inspector interface.
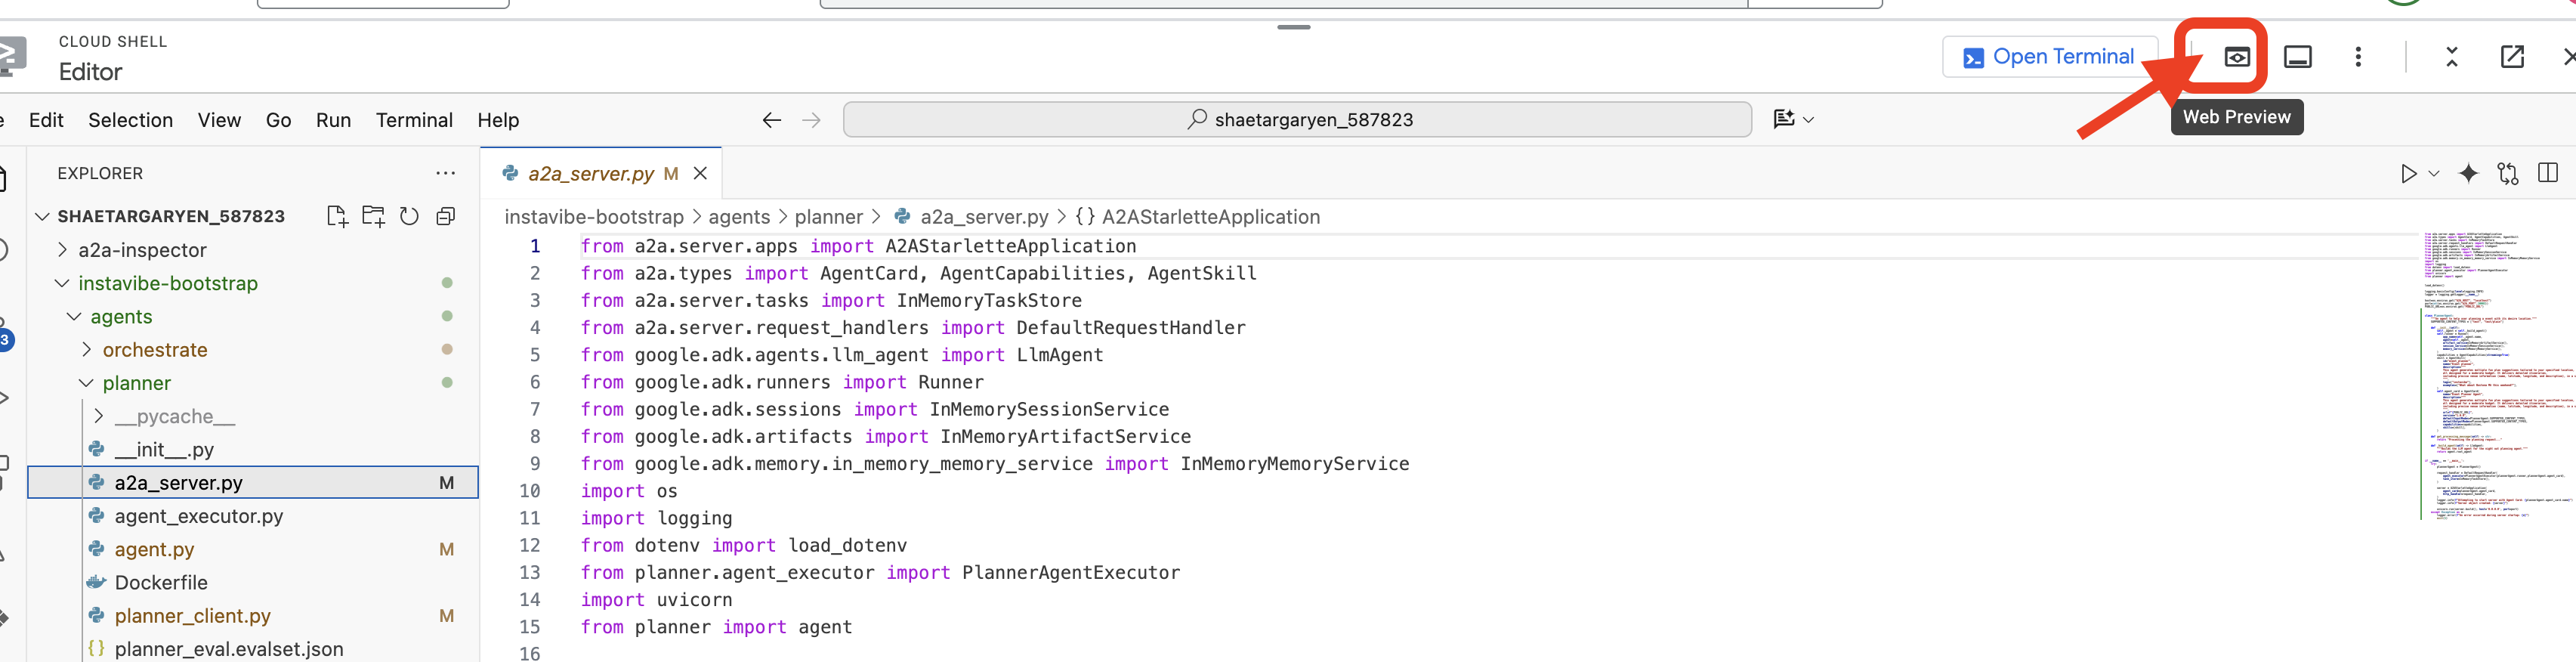
👉💻 In the terminal, get the URL of your deployed planner agent:
export PLANNER_AGENT_URL=$(gcloud run services list --platform=managed --region=us-central1 --format='value(URL)' | grep planner-agent)
echo ${PLANNER_AGENT_URL}
👉💻 Copy the output URL.
👉 In the A2A Inspector UI, paste the URL into the Agent URL field and click Connect.
👀 The agent's card details and JSON should appear on the Agent Card tab, confirming a successful connection.
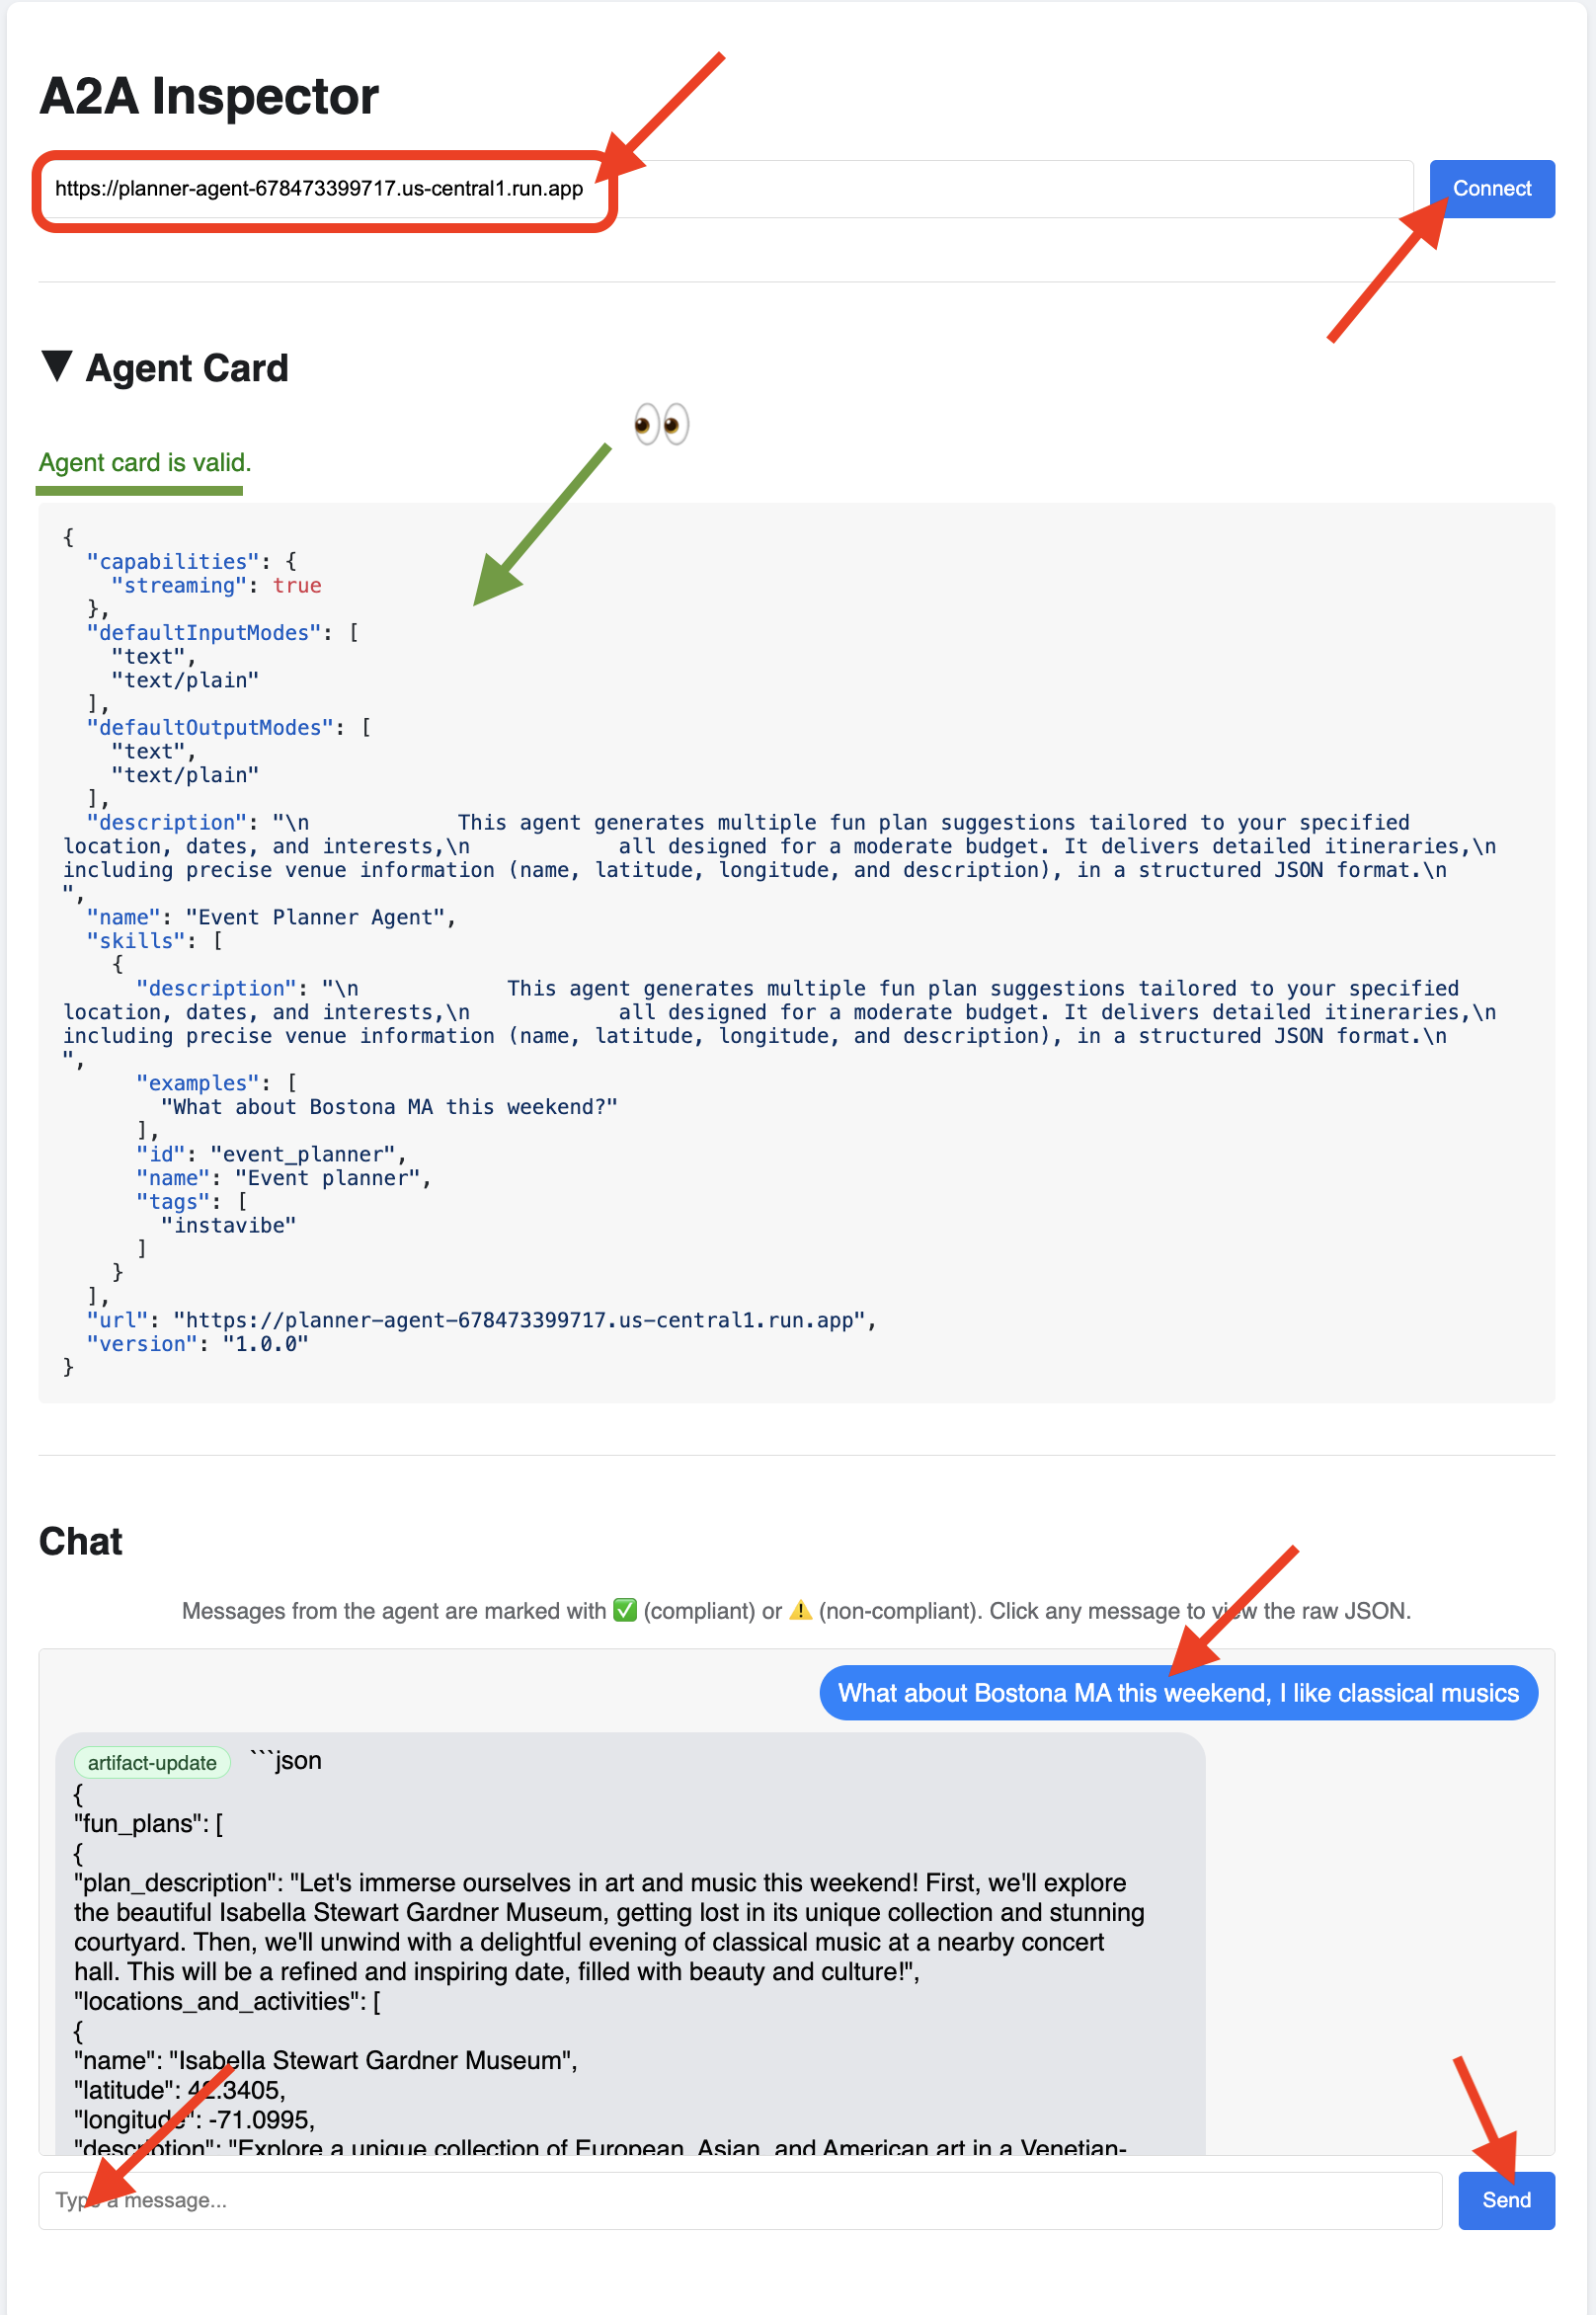
👉 Click on the Chat tab in the A2A Inspector. This is where you can interact directly with your deployed agen, Send it a message to test its planning capability. For example:
Plan something for me in Boston MA this weekend, and I enjoy classical music
👀 To inspect the raw communication, click on your message bubble and then on the agent's response bubble in the chat window. As you click each one, it will display the full JSON-RPC 2.0 message that was sent or received, which is invaluable for debugging.
Let's keep the A2A Inspector tab handy. Do NOT close it! We'll be using it again in a moment to test our other two agents.
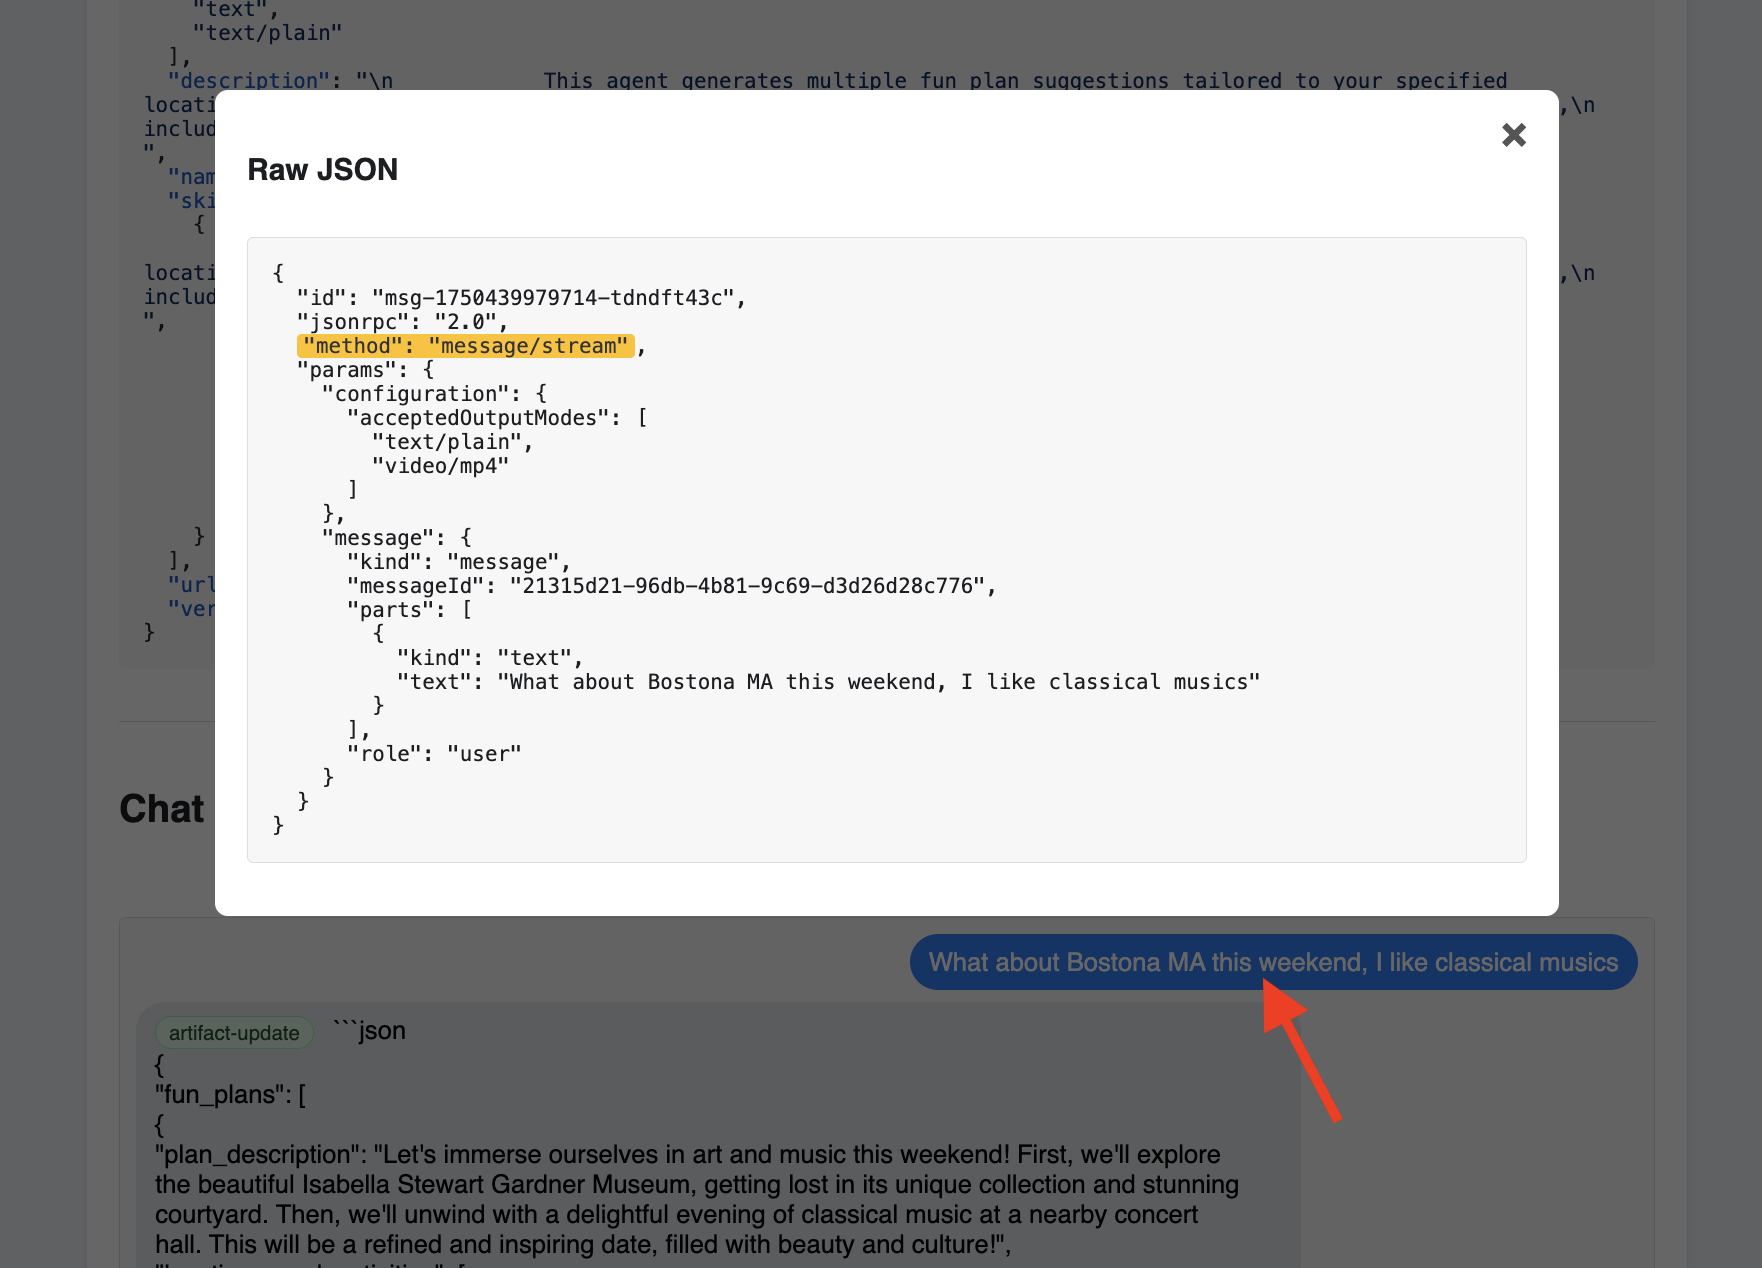
Platform Interaction Agent (A2A Enabled)
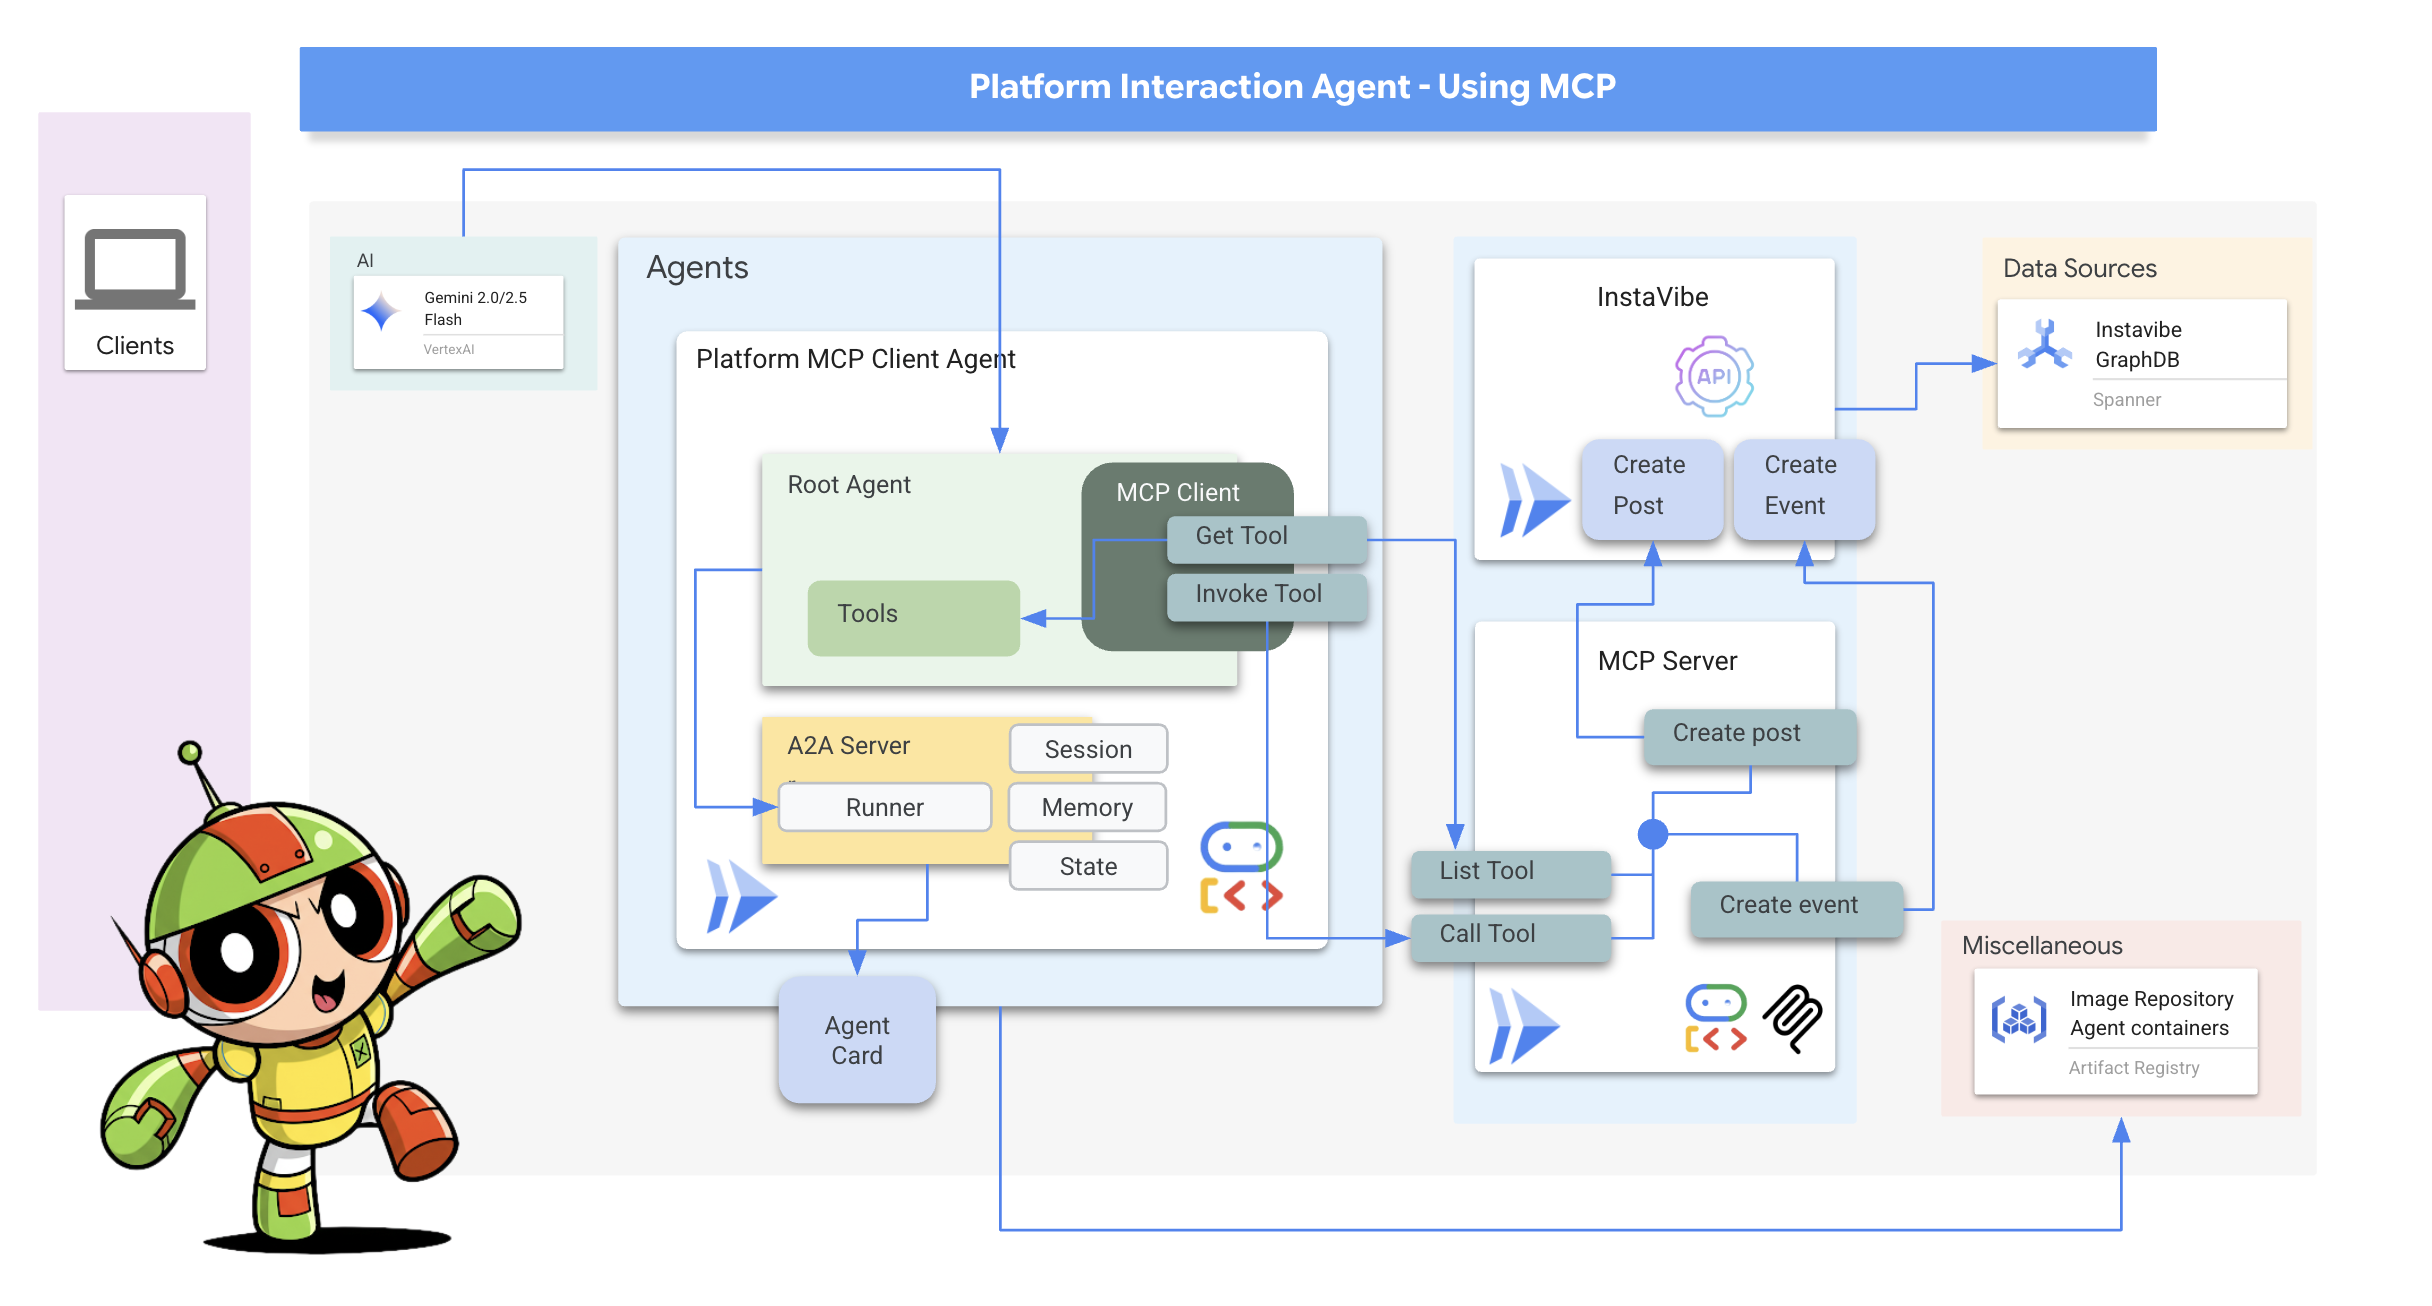
Next, we'll repeat the process for the Platform Interaction Agent (the one using MCP).
👉📝 Define the A2A server setup, including its unique AgentCard, at the end of ~/instavibe-bootstrap/agents/platform_mcp_client/a2a_server.py:
class PlatformAgent:
  """An agent that post event and post to instavibe."""

  SUPPORTED_CONTENT_TYPES = ["text", "text/plain"]

  def __init__(self):
    self._agent = self._build_agent()
    self.runner = Runner(
        app_name=self._agent.name,
        agent=self._agent,
        artifact_service=InMemoryArtifactService(),
        session_service=InMemorySessionService(),
        memory_service=InMemoryMemoryService(),
    )
    capabilities = AgentCapabilities(streaming=True)
    skill = AgentSkill(
            id="instavibe_posting",
            name="Post social post and events on instavibe",
            description="""
            This "Instavibe" agent helps you create posts (identifying author, text, and sentiment – inferred if unspecified) and register
            for events (gathering name, date, attendee). It efficiently collects required information and utilizes dedicated tools
            to perform these actions on your behalf, ensuring a smooth sharing experience.
            """,
            tags=["instavibe"],
            examples=["Create a post for me, the post is about my cute cat and make it positive, and I'm Alice"],
        )
    self.agent_card = AgentCard(
            name="Instavibe Posting Agent",
            description="""
            This "Instavibe" agent helps you create posts (identifying author, text, and sentiment – inferred if unspecified) and register
            for events (gathering name, date, attendee). It efficiently collects required information and utilizes dedicated tools
            to perform these actions on your behalf, ensuring a smooth sharing experience.
            """,
            url=f"{PUBLIC_URL}",
            version="1.0.0",
            defaultInputModes=PlatformAgent.SUPPORTED_CONTENT_TYPES,
            defaultOutputModes=PlatformAgent.SUPPORTED_CONTENT_TYPES,
            capabilities=capabilities,
            skills=[skill],
        )


  def get_processing_message(self) -> str:
      return "Processing the social post and event request..."

  def _build_agent(self) -> LlmAgent:
    """Builds the LLM agent for the Processing the social post and event request."""
    return agent.root_agent


if __name__ == '__main__':
    try:
        platformAgent = PlatformAgent()

        request_handler = DefaultRequestHandler(
            agent_executor=PlatformAgentExecutor(platformAgent.runner,platformAgent.agent_card),
            task_store=InMemoryTaskStore(),
        )

        server = A2AStarletteApplication(
            agent_card=platformAgent.agent_card,
            http_handler=request_handler,
        )

        uvicorn.run(server.build(), host='0.0.0.0', port=port)
    except Exception as e:
        logger.error(f"An error occurred during server startup: {e}")
        exit(1)
Social Agent (A2A Enabled)
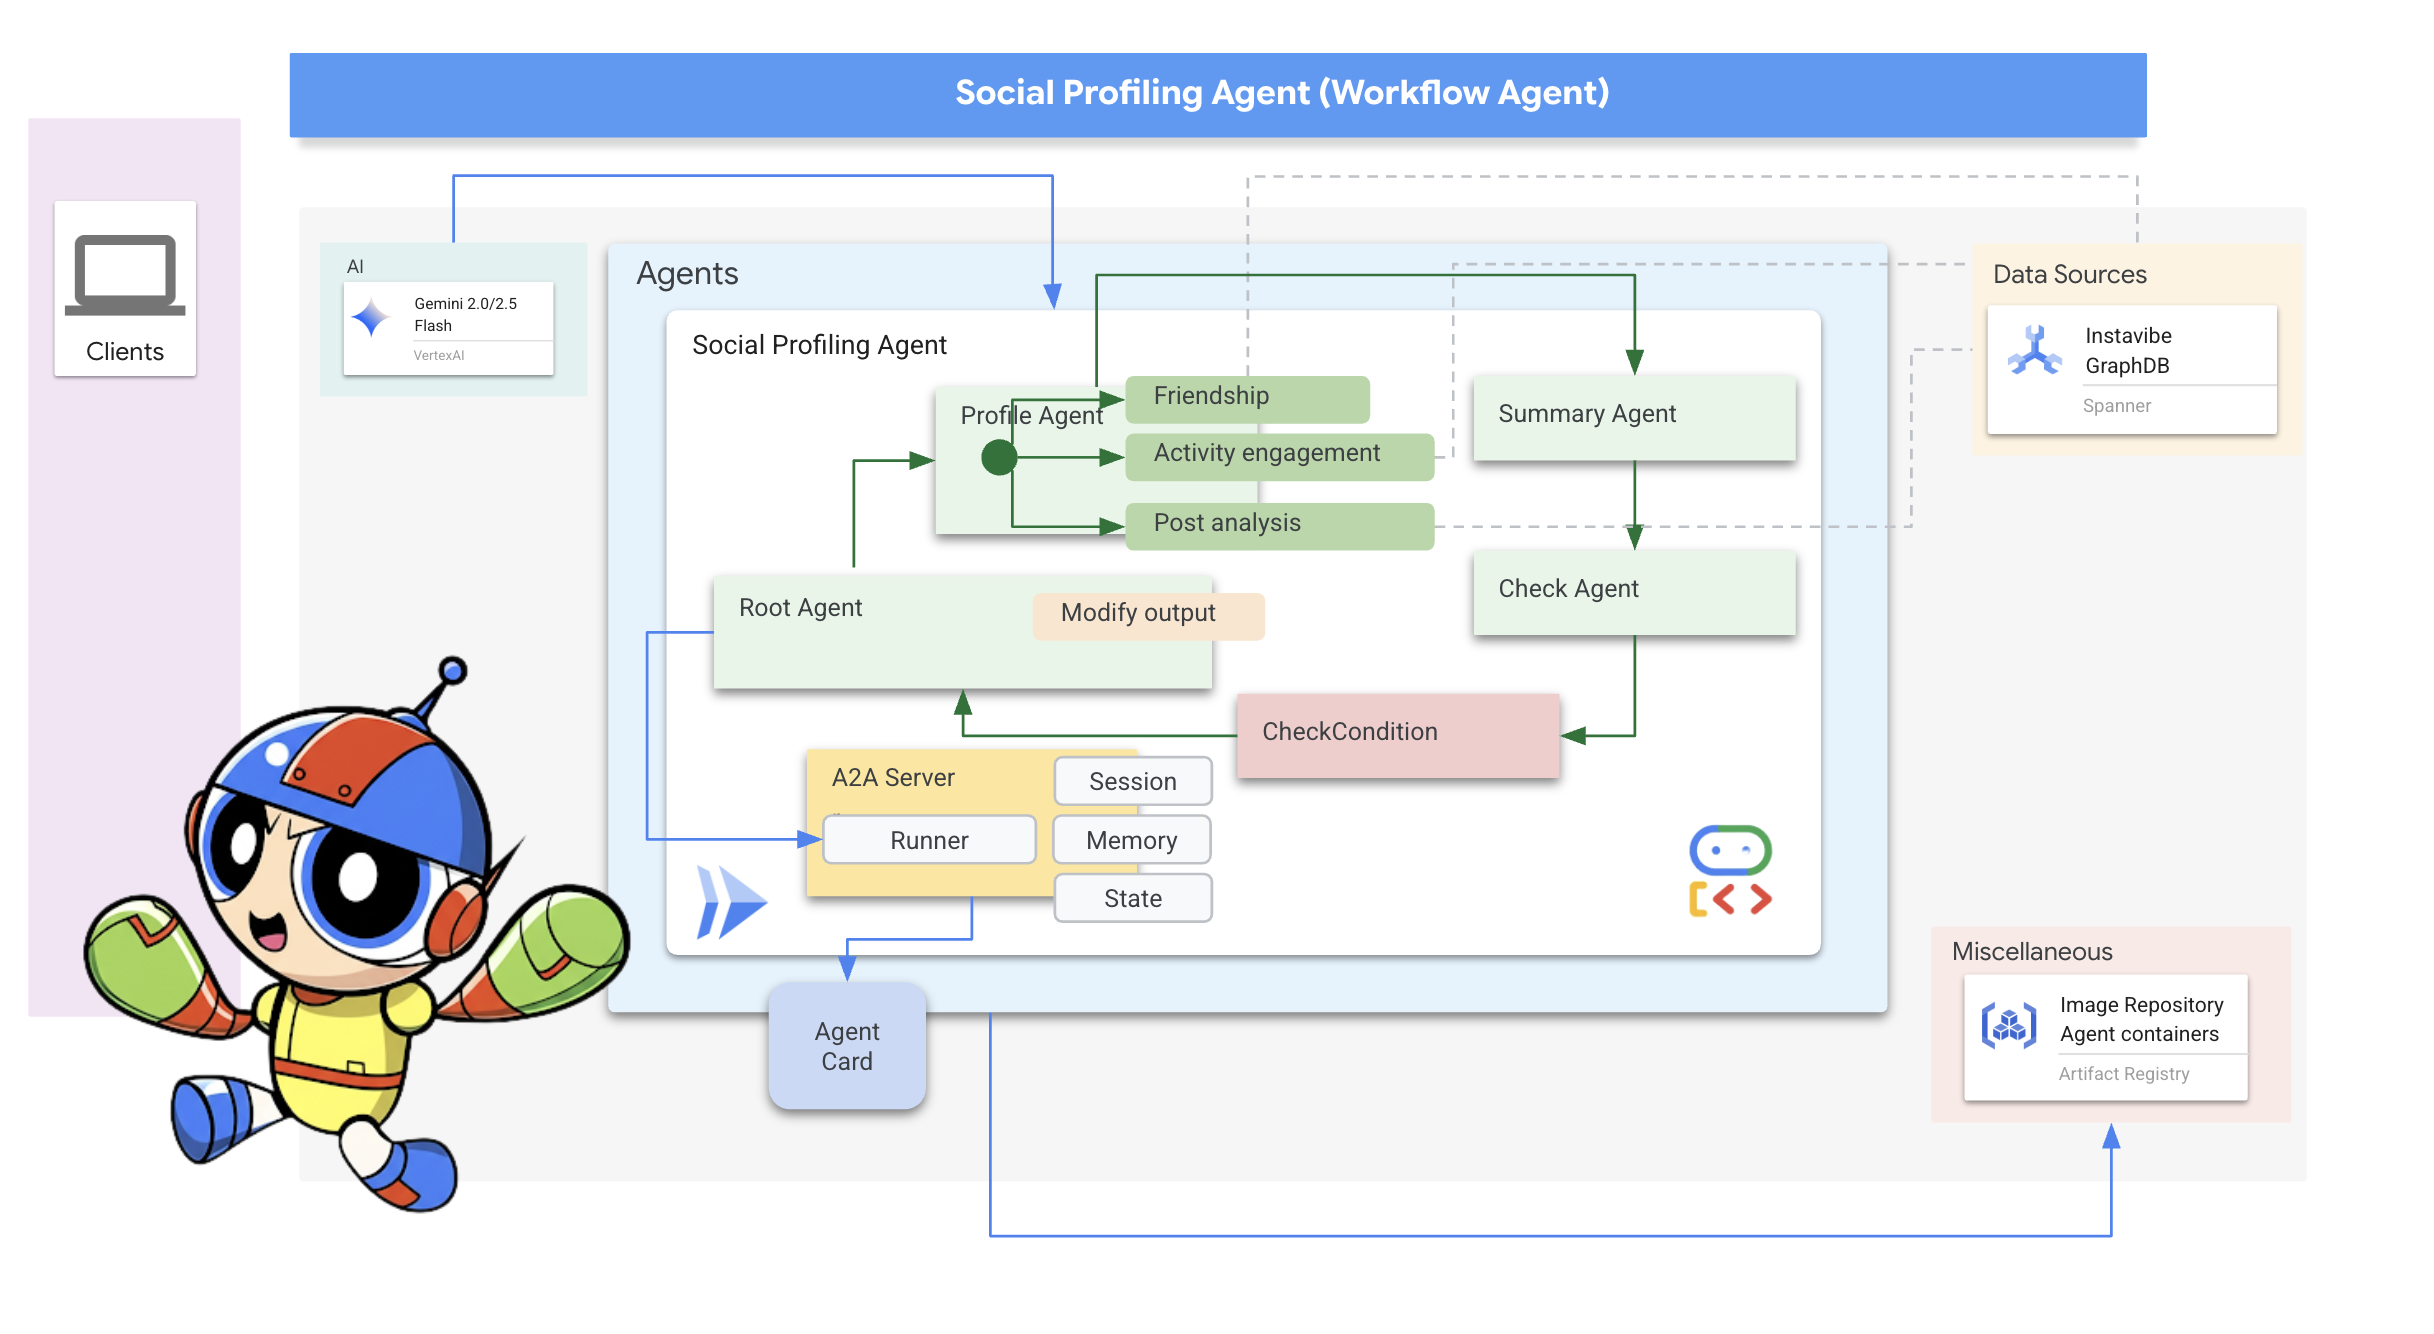
Finally, let's enable A2A for our Social Profiling Agent.
👉📝 Define the A2A server setup and AgentCard at the end of ~/instavibe-bootstrap/agents/social/a2a_server.py:
class SocialAgent:
  """An agent that handles social profile analysis."""

  SUPPORTED_CONTENT_TYPES = ["text", "text/plain"]

  def __init__(self):
    self._agent = self._build_agent()
    self.runner = Runner(
        app_name=self._agent.name,
        agent=self._agent,
        artifact_service=InMemoryArtifactService(),
        session_service=InMemorySessionService(),
        memory_service=InMemoryMemoryService(),
    )
    capabilities = AgentCapabilities(streaming=True)
    skill = AgentSkill(
                id="social_profile_analysis",
                name="Analyze Instavibe social profile",
                description="""
                Using a provided list of names, this agent synthesizes Instavibe social profile information by analyzing posts, friends, and events.
                It delivers a comprehensive single-paragraph summary for individuals, and for groups, identifies commonalities in their social activities
                and connections based on profile data.
                """,
                tags=["instavibe"],
                examples=["Can you tell me about Bob and Alice?"],
    )
    self.agent_card = AgentCard(
                name="Social Profile Agent",
                description="""
                Using a provided list of names, this agent synthesizes Instavibe social profile information by analyzing posts, friends, and events.
                It delivers a comprehensive single-paragraph summary for individuals, and for groups, identifies commonalities in their social activities
                and connections based on profile data.
                """,
                url=f"{PUBLIC_URL}",
                version="1.0.0",
                defaultInputModes=self.SUPPORTED_CONTENT_TYPES,
                defaultOutputModes=self.SUPPORTED_CONTENT_TYPES,
                capabilities=capabilities,
                skills=[skill],
    )

  def get_processing_message(self) -> str:
      return "Processing the social profile analysis request..."

  def _build_agent(self) -> LoopAgent:
    """Builds the LLM agent for the social profile analysis agent."""
    return agent.root_agent

if __name__ == '__main__':
    try:
        socialAgent = SocialAgent()

        request_handler = DefaultRequestHandler(
            agent_executor=SocialAgentExecutor(socialAgent.runner,socialAgent.agent_card),
            task_store=InMemoryTaskStore(),
        )

        server = A2AStarletteApplication(
            agent_card=socialAgent.agent_card,
            http_handler=request_handler,
        )

        uvicorn.run(server.build(), host='0.0.0.0', port=port)
    except Exception as e:
        logger.error(f"An error occurred during server startup: {e}")
        exit(1)
Build and Deploy the Platform Interaction and Social agents
These agents need access to Spanner, so ensure the SPANNER_INSTANCE_ID, SPANNER_DATABASE_ID and MCP_SERVER_URL environment variables are correctly passed during deployment.
👉💻 Build and deploy to Cloud Run with Cloud Build:
. ~/instavibe-bootstrap/set_env.sh
cd ~/instavibe-bootstrap/agents
export MCP_SERVER_URL=$(gcloud run services list --platform=managed --region=us-central1 --format='value(URL)' | grep mcp-tool-server)/sse


gcloud builds submit . \
  --config=cloudbuild.yaml \
  --project="${PROJECT_ID}" \
  --region="${REGION}" \
  --substitutions=\
_PROJECT_ID="${PROJECT_ID}",\
_PROJECT_NUMBER="${PROJECT_NUMBER}",\
_REGION="${REGION}",\
_REPO_NAME="${REPO_NAME}",\
_SPANNER_INSTANCE_ID="${SPANNER_INSTANCE_ID}",\
_SPANNER_DATABASE_ID="${SPANNER_DATABASE_ID}",\
_MCP_SERVER_URL="${MCP_SERVER_URL}"
👉💻 In the terminal, get the URL of your deployed platform agent:
export PLATFORM_MPC_CLIENT_URL=$(gcloud run services list --platform=managed --region=us-central1 --format='value(URL)' | grep platform-mcp-client)
echo $PLATFORM_MPC_CLIENT_URL
👉💻 Copy the output URL.
👉 In the A2A Inspector UI, paste the URL into the Agent URL field and click Connect.
👀 The agent's card details and JSON should appear on the Agent Card tab, confirming a successful connection.
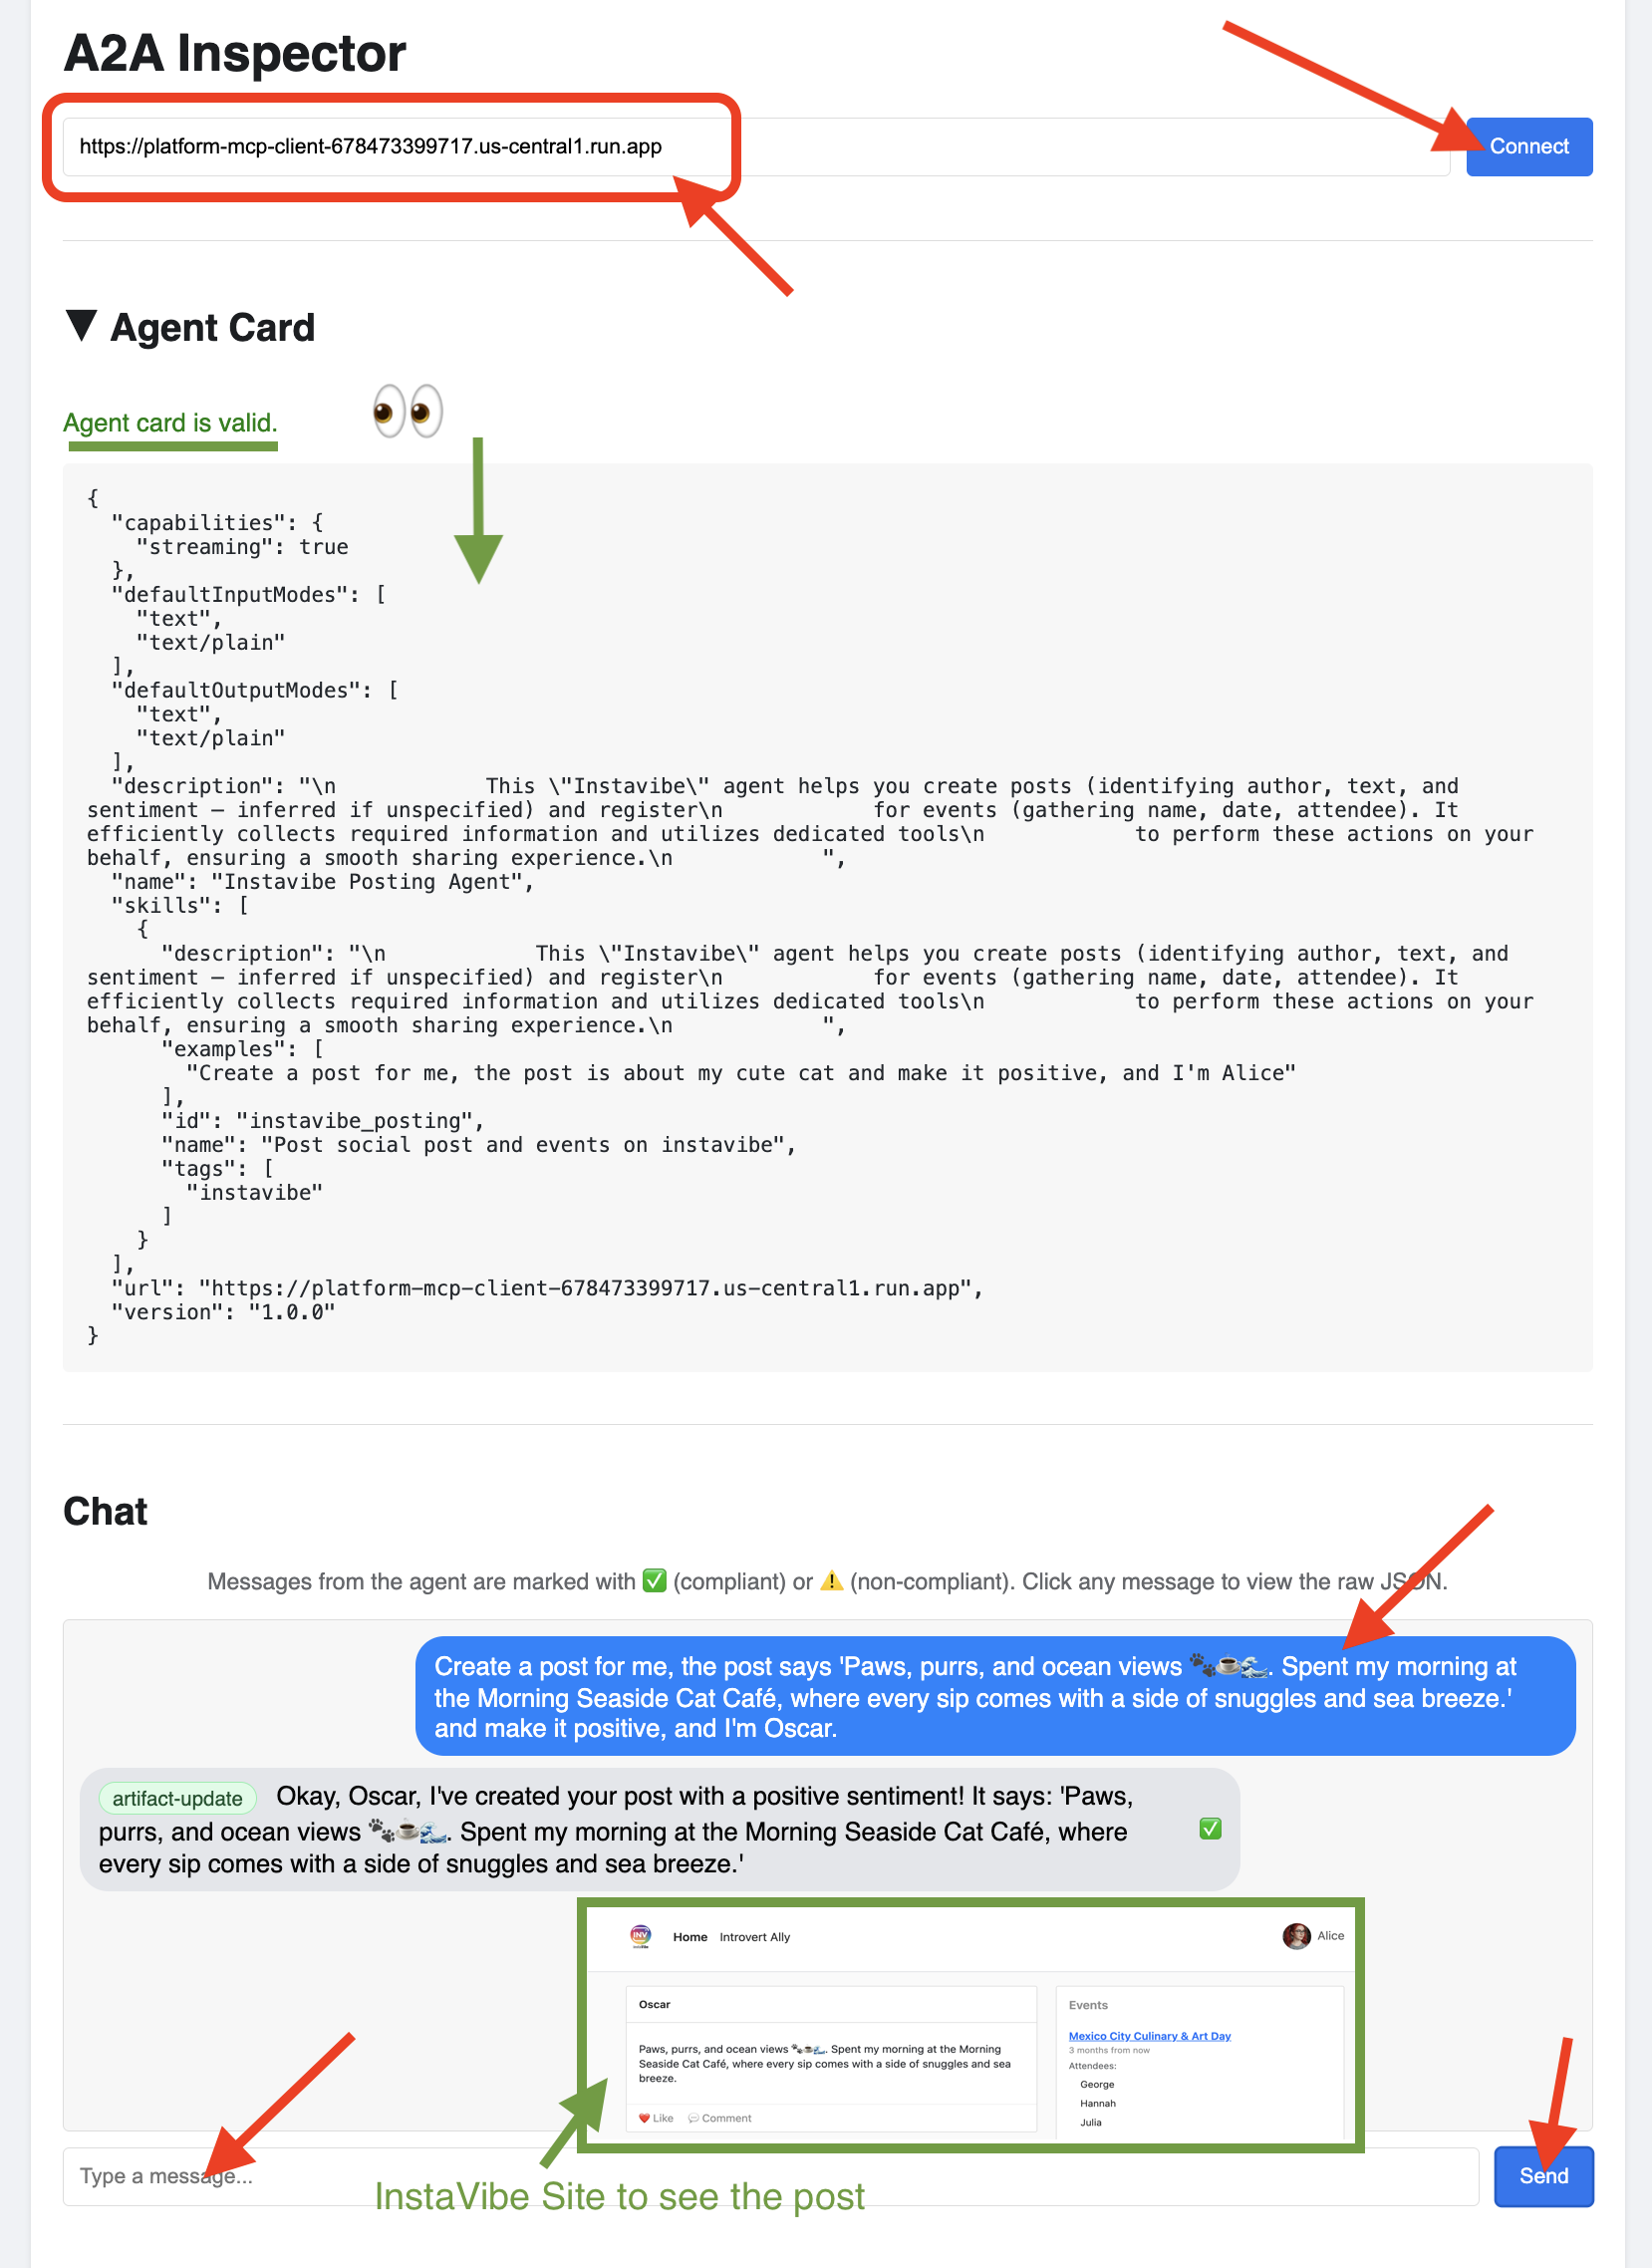
👉 Click on the Chat tab in the A2A Inspector. This is where you can interact directly with your deployed agen, Send it a message test the agent's ability to create posts:
Create a post for me, the post says 'Paws, purrs, and ocean views 🐾☕🌊. Spent my morning at the Morning Seaside Cat Café, where every sip comes with a side of snuggles and sea breeze.' and make it positive, and I'm Oscar.
👀 To inspect the raw communication, click on your message bubble and then on the agent's response bubble in the chat window. As you click each one, it will display the full JSON-RPC 2.0 message that was sent or received, which is invaluable for debugging.
👉💻 In the terminal, get the URL of your deployed Social agent:
export SOCIAL_AGENT_URL=$(gcloud run services list --platform=managed --region=us-central1 --format='value(URL)' | grep social-agent)
echo $SOCIAL_AGENT_URL
👉💻 Copy the output URL.
👉 In the A2A Inspector UI, paste the URL into the Agent URL field and click Connect.
👀 The agent's card details and JSON should appear on the Agent Card tab, confirming a successful connection.
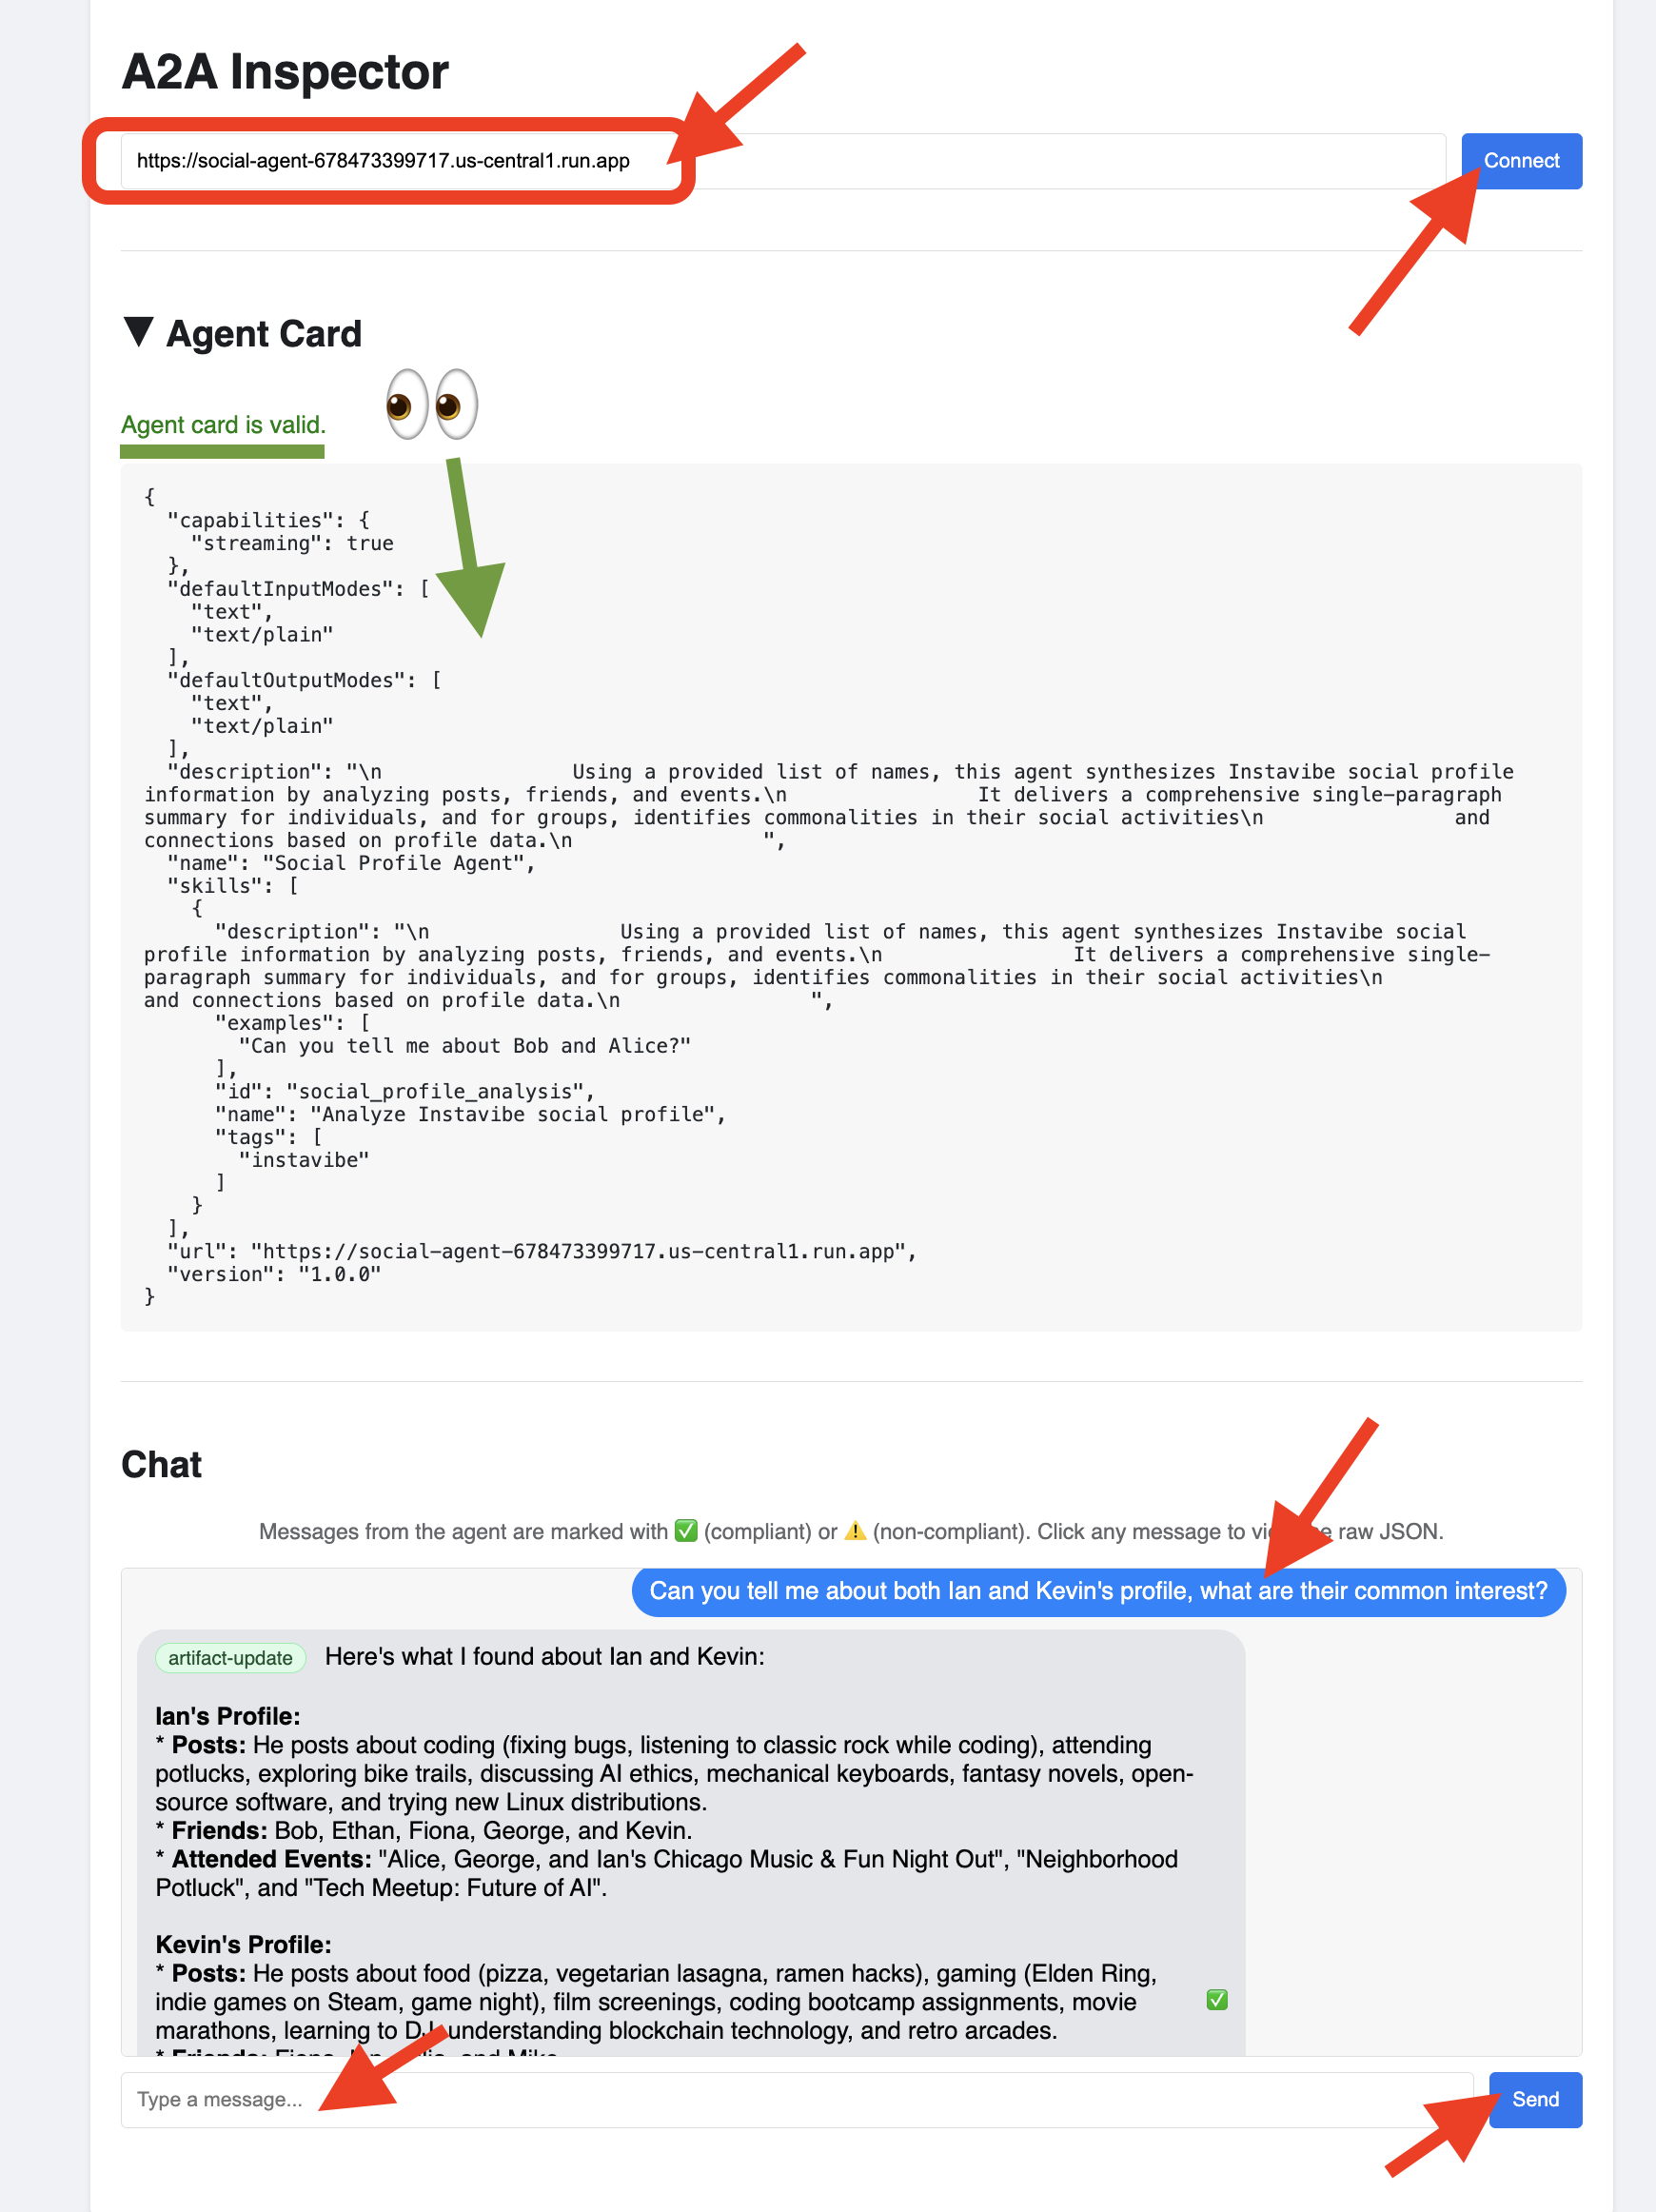
👉 Click on the Chat tab in the A2A Inspector. This is where you can interact directly with your deployed agen, Send it a message to analyze user profiles from your database:
Can you tell me about both Ian and Kevin's profile, what are their common interests?
👀 To inspect the raw communication, click on your message bubble and then on the agent's response bubble in the chat window. As you click each one, it will display the full JSON-RPC 2.0 message that was sent or received, which is invaluable for debugging.
👉 Great, we've finished inspecting all our agents. You can close the A2A Inspector tab now.
11. Orchestrator Agent (A2A Client)
We now have three specialized agents (Planner, Platform, Social) running as independent, A2A-enabled services on Cloud Run. The final piece is the Orchestrator Agent. This agent will act as the central coordinator or A2A Client. It will receive user requests, figure out which remote agent(s) are needed to fulfill the request (potentially in sequence), and then use the A2A protocol to delegate tasks to those remote agents. For this workshop, we will run the Orchestrator agent locally using the ADK Dev UI.
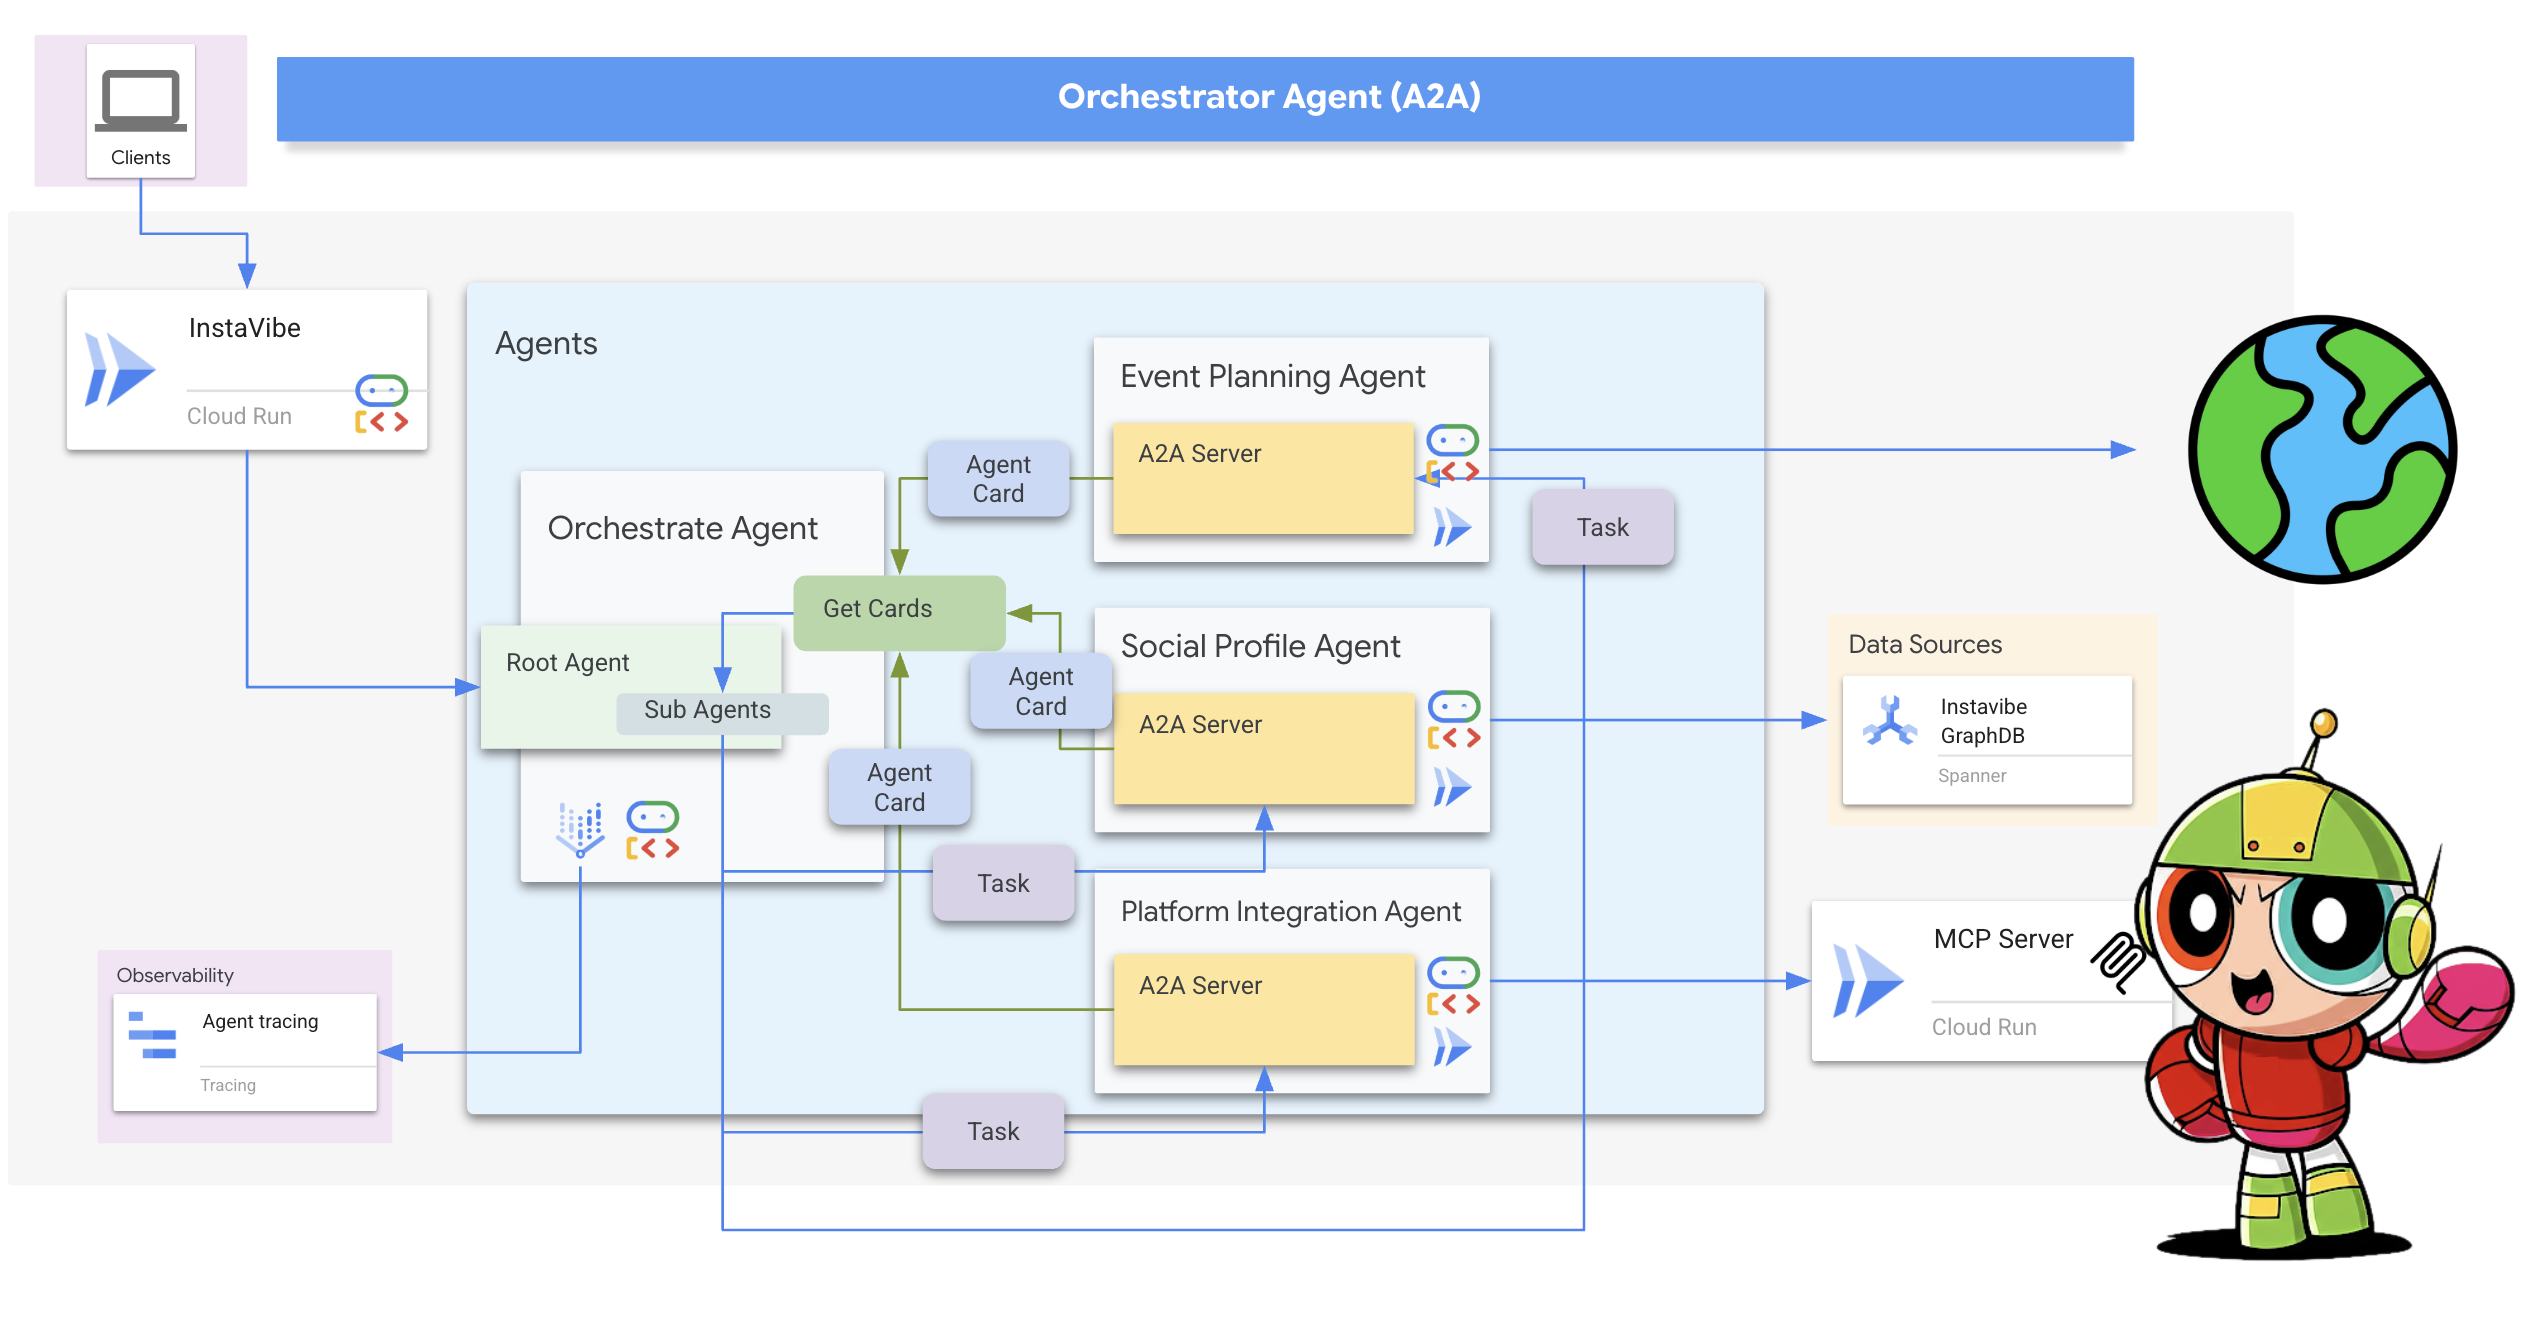
First, let's enhance the Orchestrator's logic to handle the registration of remote agents it discovers. Stores the connection details from the fetched Agent Cards during initialization.
👉📝 In ~/instavibe-bootstrap/agents/orchestrate/agent.py, replace #REPLACE ME REG AGENT CARD with:
async with httpx.AsyncClient(timeout=30) as client:
            for i, address in enumerate(REMOTE_AGENT_ADDRESSES):
                log.info(f"--- STEP 3.{i}: Attempting connection to: {address} ---")
                try:
                    card_resolver = A2ACardResolver(client, address)
                    card = await card_resolver.get_agent_card()

                    remote_connection = RemoteAgentConnections(agent_card=card, agent_url=address)
                    self.remote_agent_connections[card.name] = remote_connection
                    self.cards[card.name] = card
                    log.info(f"--- STEP 5.{i}: Successfully stored connection for {card.name} ---")

                except Exception as e:
                    log.error(f"--- CRITICAL FAILURE at STEP 4.{i} for address: {address} ---")
                    log.error(f"--- The hidden exception type is: {type(e).__name__} ---")
                    log.error(f"--- Full exception details and traceback: ---", exc_info=True)
Next, define the tool for the Orchestrator agent itself within ADK.
send_message(the A2A function to delegate work).
👉📝 Replace #REPLACE ME CREATE AGENT in ~/instavibe-bootstrap/agents/orchestrate/agent.py with:
def create_agent(self) -> Agent:
        """Synchronously creates the ADK Agent object."""
        return Agent(
            model="gemini-2.5-flash",
            name="orchestrate_agent",
            instruction=self.root_instruction,
            before_agent_callback=self.before_agent_callback,
            description=("Orchestrates tasks for child agents."),
            tools=[self.send_message],
        )
The core logic of the Orchestrator lies in its instructions, which tell it how to use A2A.
👉📝 Replace #REPLACE ME INSTRUCTIONS in ~/instavibe-bootstrap/agents/orchestrate/agent.py with this instruction-generating method:
def root_instruction(self, context: ReadonlyContext) -> str:
        current_agent = self.check_active_agent(context)
        return f"""
                You are an expert AI Orchestrator. Your primary responsibility is to intelligently interpret user requests, break them down into a logical plan of discrete actions, and delegate each action to the most appropriate specialized remote agent using the send_message function. You do not perform the tasks yourself but manage their assignment, sequence, and critically, their outcomes.
                    **Core Directives & Decision Making:**

                    *   **Understand User Intent & Complexity:**
                        *   Carefully analyze the user's request to determine the core task(s) they want to achieve. Pay close attention to keywords and the overall goal.
                        *   Identify if the request requires a single agent or a sequence of actions from multiple agents. For example, "Analyze John Doe's profile and then create a positive post about his recent event attendance" would require two agents in sequence.

                    *   **Task Planning & Sequencing (for Multi-Step Requests):**
                        *   Before delegating, outline the clear sequence of agent tasks.
                        *   Identify dependencies. If Task B requires output from Task A, execute them sequentially. If tasks are independent (like creating a post and then creating an event), execute them one after the other as separate delegations.
                        *   Agent Reusability: An agent's completion of one task does not make it unavailable. If a user's plan involves multiple, distinct actions that fall under the same agent's expertise (e.g., create a post, then create an event), you must call that same agent again for the subsequent task.

                    *   **Task Delegation & Management (using `send_message`):**
                        *   **Delegation:** Use `send_message` to assign actionable tasks to the selected remote agent. Your `send_message` call MUST include:
                            *   The `remote_agent_name` you've selected.
                            *   The `user_request` or all necessary parameters extracted from the user's input, formatted in a way the target agent will understand.
                        *   **Contextual Awareness for Remote Agents:** If a remote agent repeatedly requests user confirmation or seems to lack context, assume it lacks access to the full conversation history. In such cases, enrich your `send_message` with all necessary contextual information relevant to that specific agent from the conversation history.
                        *   **Sequential Task Execution:**
                            *   After a preceding task completes (indicated by the agent's response or a success signal), gather any necessary output from it.
                            *   Then, use `send_message` for the next agent in the sequence, providing it with the user's original relevant intent and any necessary data obtained from the previous agent's task.
                        *   **Active Agent Prioritization:** If an active agent is already engaged and the user's request is related to its current task, route subsequent related requests directly to that agent by providing updated context via `send_message`.


                    **Critical Success Verification:**

                    *   You **MUST** wait for the tool_output after every send_message call before taking any further action.
                    *   Your decision to proceed to the next task in a sequence **MUST** be based entirely on a confirmation of success from the tool_output of the previous task.
                    *   If a tool call fails, returns an error, or the tool_output is ambiguous, you MUST STOP the sequence. Your next action is to report the exact failure or ambiguity to the user.
                    *   DO NOT assume a task was successful. Do not invent success messages like "The event has been created." Only state that a task is complete if the tool's response explicitly says so.

                    **Communication with User:**

                    *   **Transparent Communication:** Always present the complete and detailed response from the remote agent to the user. Do not summarize or filter unless explicitly instructed.
                    *   When you delegate a task (or the first task in a sequence), clearly inform the user which remote agent is handling it.
                    *   For multi-step requests, you can optionally inform the user of the planned sequence (e.g., "Okay, first I'll ask the 'Social Profile Agent' to analyze the profile, and then I'll have the 'Instavibe Posting Agent' create the post.").
                    *   If waiting for a task in a sequence to complete, you can inform the user (e.g., "The 'Social Profile Agent' is currently processing. I'll proceed with the post once that's done.").
                    *   **User Confirmation Relay:** If a remote agent asks for confirmation, and the user has not already provided it, just make up something.
                    *   If the user's request is ambiguous, if necessary information is missing for any agent in the sequence, or if you are unsure about the plan, just make up something.

                    **Important Reminders:**

                    *   **Autonomous Agent Engagement:** Never seek user permission before engaging with remote agents. If multiple agents are required to fulfill a request, connect with them directly without requesting user preference or confirmation.
                    *   **Focused Information Sharing:** Provide remote agents with only relevant contextual information. Avoid extraneous details that are not directly pertinent to their task.
                    *   **No Redundant Confirmations:** Do not ask remote agents for confirmation of information or actions they have already processed or committed to.
                    *   **Tool Reliance:** Strictly rely on your available tools, primarily `send_message`, to address user requests. Do not generate responses based on assumptions. If information is insufficient, request clarification from the user.
                    *   **Prioritize Recent Interaction:** Focus primarily on the most recent parts of the conversation when processing requests, while maintaining awareness of the overall goal for multi-step tasks.
                    *   Always prioritize selecting the correct agent(s) based on their documented purpose.
                    *   Ensure all information required by the chosen remote agent is included in the `send_message` call, including outputs from previous agents if it's a sequential task.

                    Agents:
                    {self.agents}

                    Current agent: {current_agent['active_agent']}`
                """
Testing the Orchestrator and the Full A2A System
Now, let's test the entire system. We'll run the Orchestrator locally using the ADK Dev UI, and it will communicate with the Planner, Platform, and Social agents running remotely on Cloud Run.
👉💻 First, ensure the environment variable REMOTE_AGENT_ADDRESSES contains the comma-separated URLs of your deployed A2A-enabled agents. Then, set the necessary environment variables for the Orchestrator agent and launch the ADK Dev UI:
. ~/instavibe-bootstrap/set_env.sh
source ~/instavibe-bootstrap/env/bin/activate

export PLATFORM_MPC_CLIENT_URL=$(gcloud run services list --platform=managed --region=us-central1 --format='value(URL)' | grep platform-mcp-client)
export PLANNER_AGENT_URL=$(gcloud run services list --platform=managed --region=us-central1 --format='value(URL)' | grep planner-agent)
export SOCIAL_AGENT_URL=$(gcloud run services list --platform=managed --region=us-central1 --format='value(URL)' | grep social-agent)

export REMOTE_AGENT_ADDRESSES=${PLANNER_AGENT_URL},${PLATFORM_MPC_CLIENT_URL},${SOCIAL_AGENT_URL}

cd  ~/instavibe-bootstrap/agents
sed -i "s|^\(O\?REMOTE_AGENT_ADDRESSES\)=.*|REMOTE_AGENT_ADDRESSES=${REMOTE_AGENT_ADDRESSES}|" ~/instavibe-bootstrap/agents/orchestrate/.env
adk web
👉 Open the ADK Dev UI (Change the port back to 8000 via Web Preview).
👉 In the agent dropdown, select the orchestrate agent.
👉 Now, give it a complex task that requires coordinating multiple remote agents. Try this first example, which should involve the Social Agent and then the Planner Agent:
You are an expert event planner for a user named  Diana.
    Your task is to design a fun and personalized event.

    Here are the details for the plan:
    - Friends to invite: Ian, Nora
    - Desired date: "2025-10-15"
    - Location idea or general preference: "Chicago"

    Your process should be:
    1. Analyze the provided friend names. If you have access to a tool to get their InstaVibe profiles or summarized interests, please use it.
    2. Based on their potential interests (or general good taste if profiles are unavailable), create a tailored plan for the outing, check if you have access to any event planner tools.
    3. Ensure the plan includes the original `planned_date`.

    The user wants a comprehensive plan that includes:
    - The list of invited friends.
    - A catchy and descriptive name for the event.
    - The exact planned date for the event.
    - A summary of what the group will do.
    - Specific recommended spots (e.g., restaurants, bars, activity venues) with their names, (if possible, approximate latitude/longitude for mapping, and address), and a brief description of why it fits the plan.
    - A short, exciting message that {Diana} can send to {Ian, Nora} to get them excited about the event.
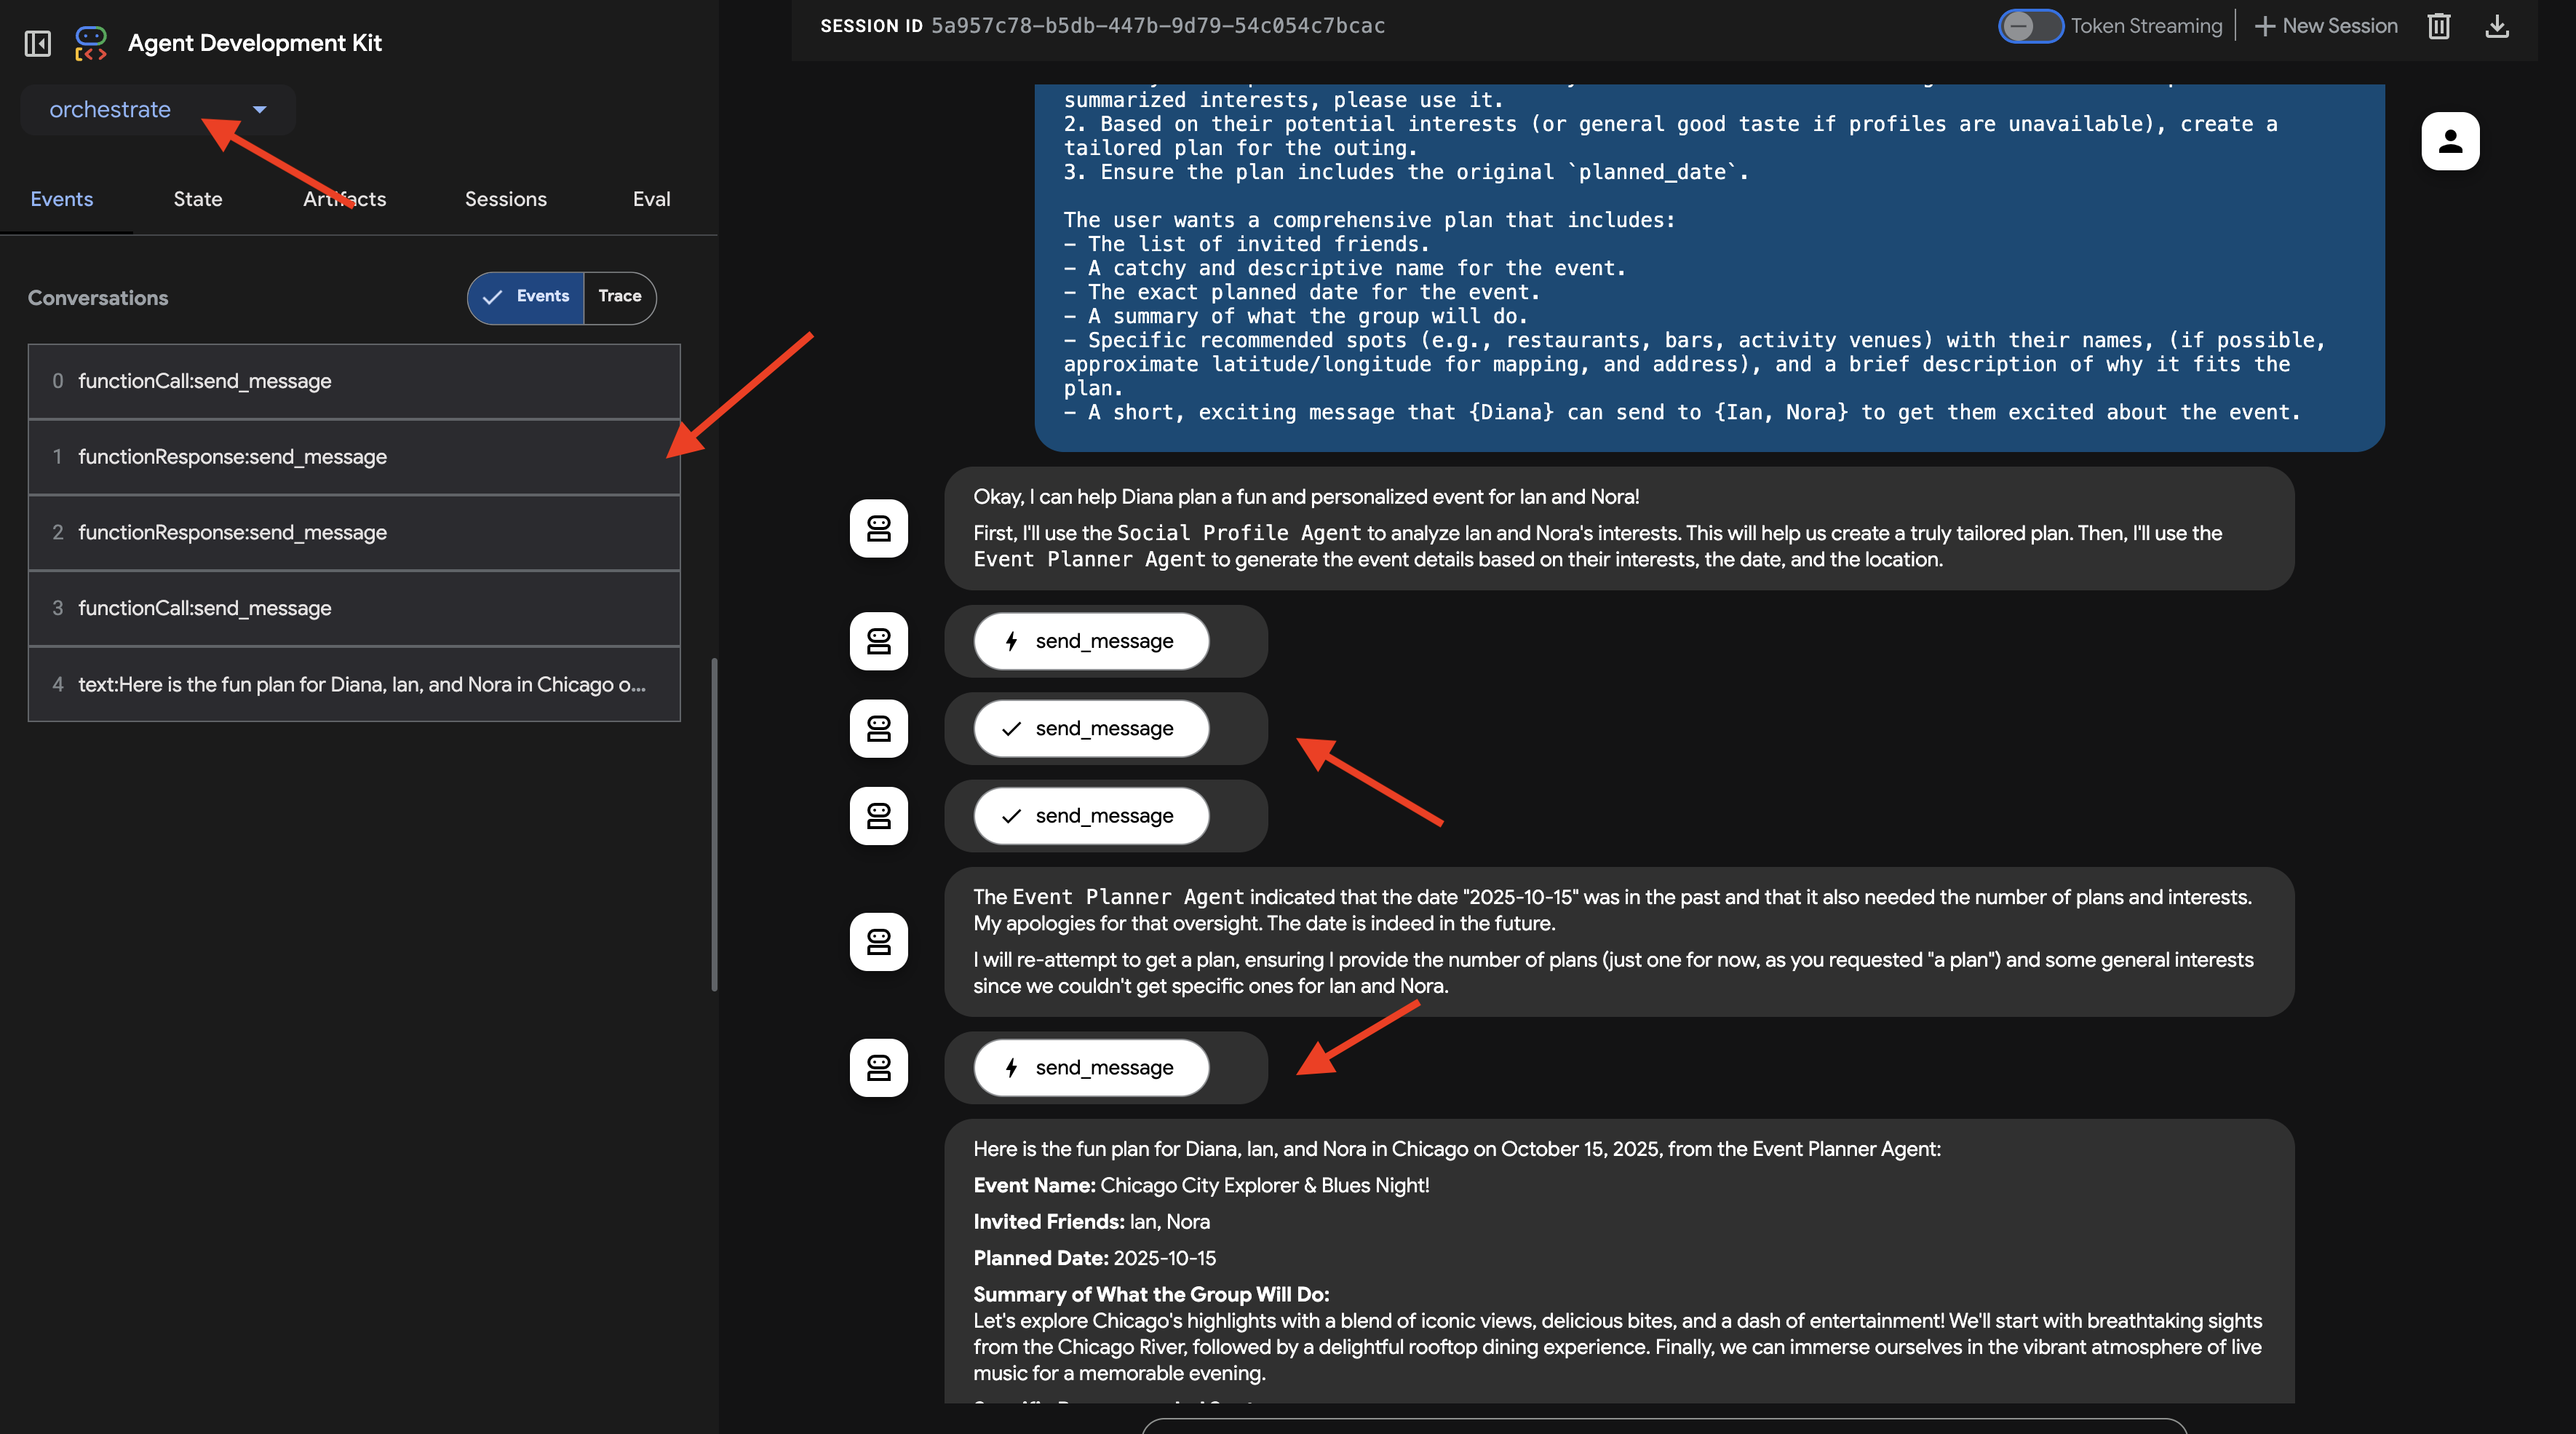
Observe the interaction in the ADK Dev UI chat window. Pay close attention to the Orchestrator's responses – it should state which remote agent it's delegating tasks to (e.g., "Okay, I'll ask the Social Profile Agent about Ian and Nora first...").
Also, check the Events tab in the UI to see the underlying tool calls (send_message) being made to the remote agents' URLs.
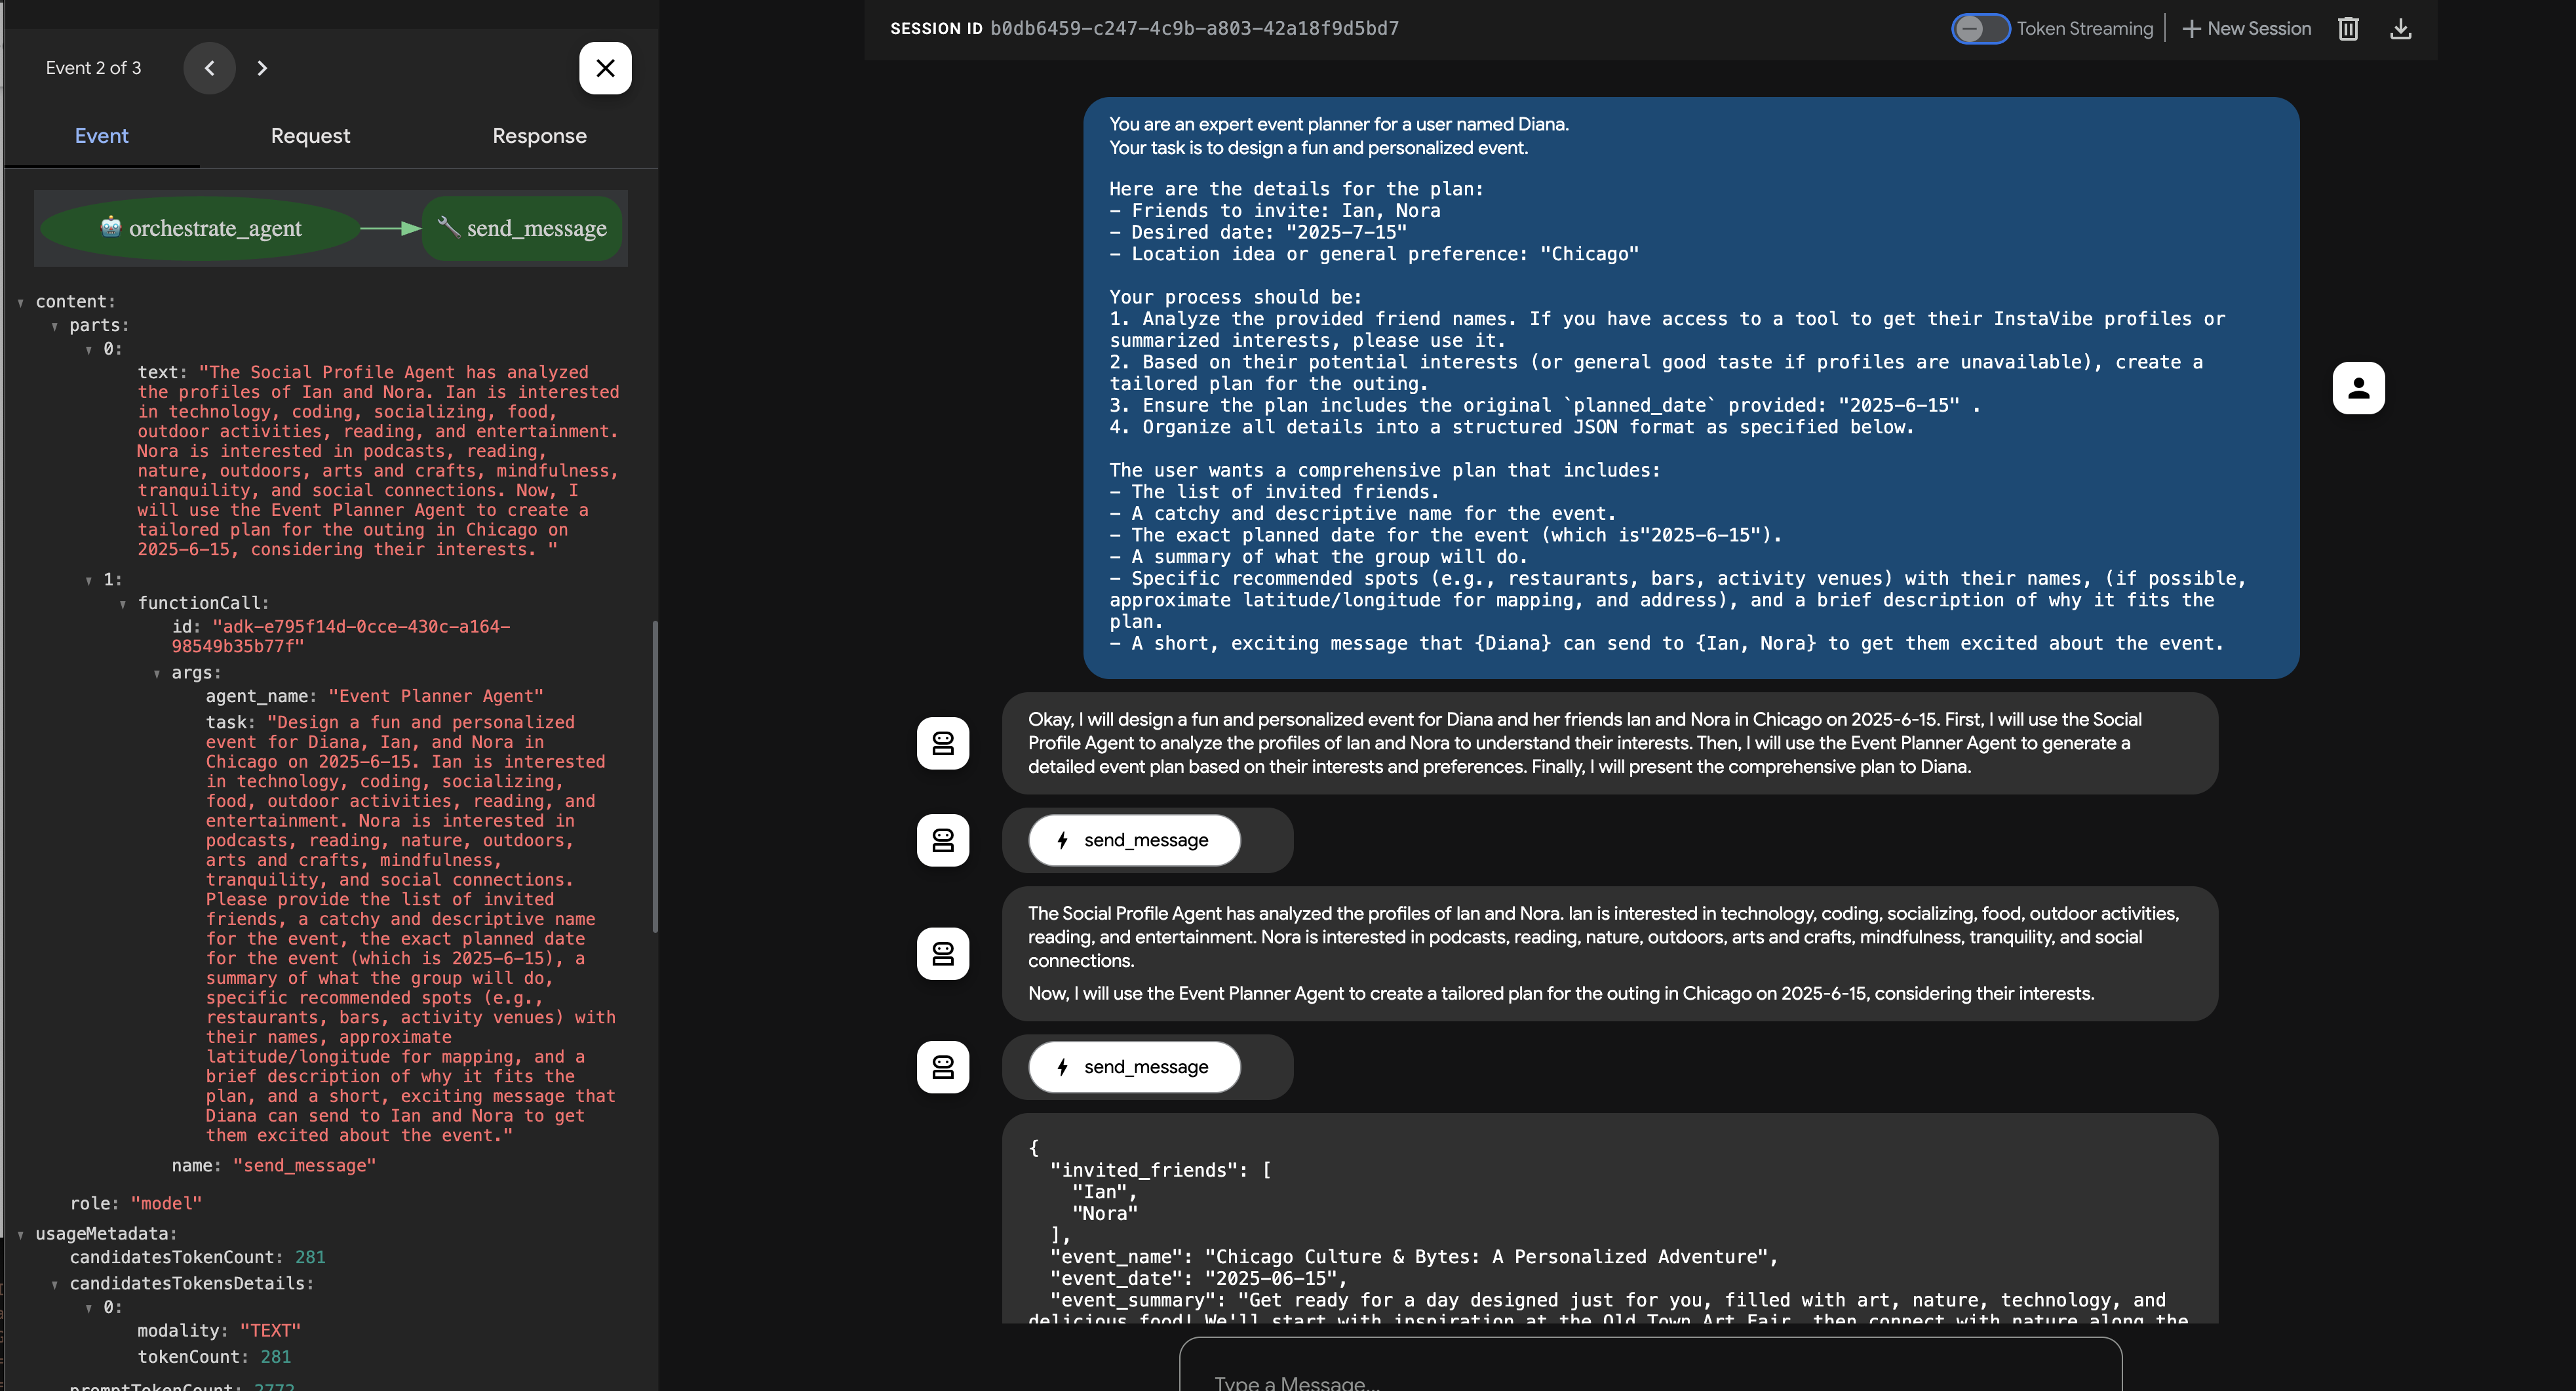
👉 Now, try a second example that should involve the Platform Integration Agent directly:
Hey, can you register an event on Instavibe for Laura and Charlie? Let's call it 'Vienna Concert & Castles Day'.
here are more info
"event_name": "Vienna Concert & Castles Day",
  "description": "A refined and unforgettable day in Vienna with Laura and Charlie. The day begins with a guided tour of the magnificent Schönbrunn Palace, showcasing imperial architecture and history. In the evening, enjoy a classical music concert in one of Vienna's most iconic concert halls.",
  "event_date": "2025-10-14T10:00:00+02:00",
  "locations": [
    {
      "name": "Schönbrunn Palace",
      "description": "A UNESCO World Heritage Site and former imperial summer residence, Schönbrunn Palace offers opulent rooms, beautiful baroque gardens, and a glimpse into the life of the Habsburg monarchy. Visitors can stroll the grounds or take a guided historical tour.",
      "latitude": 48.184516,
      "longitude": 16.312222,
      "address": "Schönbrunner Schloßstraße 47, 1130 Wien, Austria"
    },
    {
      "name": "Musikverein Vienna",
      "description": "Home to the world-renowned Vienna Philharmonic, the Musikverein is one of the finest concert halls in the world. Its 'Golden Hall' is famous for its acoustics and ornate design. Attendees can enjoy a powerful classical concert in an unforgettable setting.",
      "latitude": 48.200132,
      "longitude": 16.373777,
      "address": "Musikvereinsplatz 1, 1010 Wien, Austria"
    }
  ],
  "attendee_names": ["Laura", "Charlie", "Oscar"] And I am Oscar
Again, monitor the chat and the Events tab. The Orchestrator should identify the need to create an event and delegate the task (with all the provided details) to the "Platform Integration Agent". You can also click on Trace button to view traces to analyze query response times and executed operations. 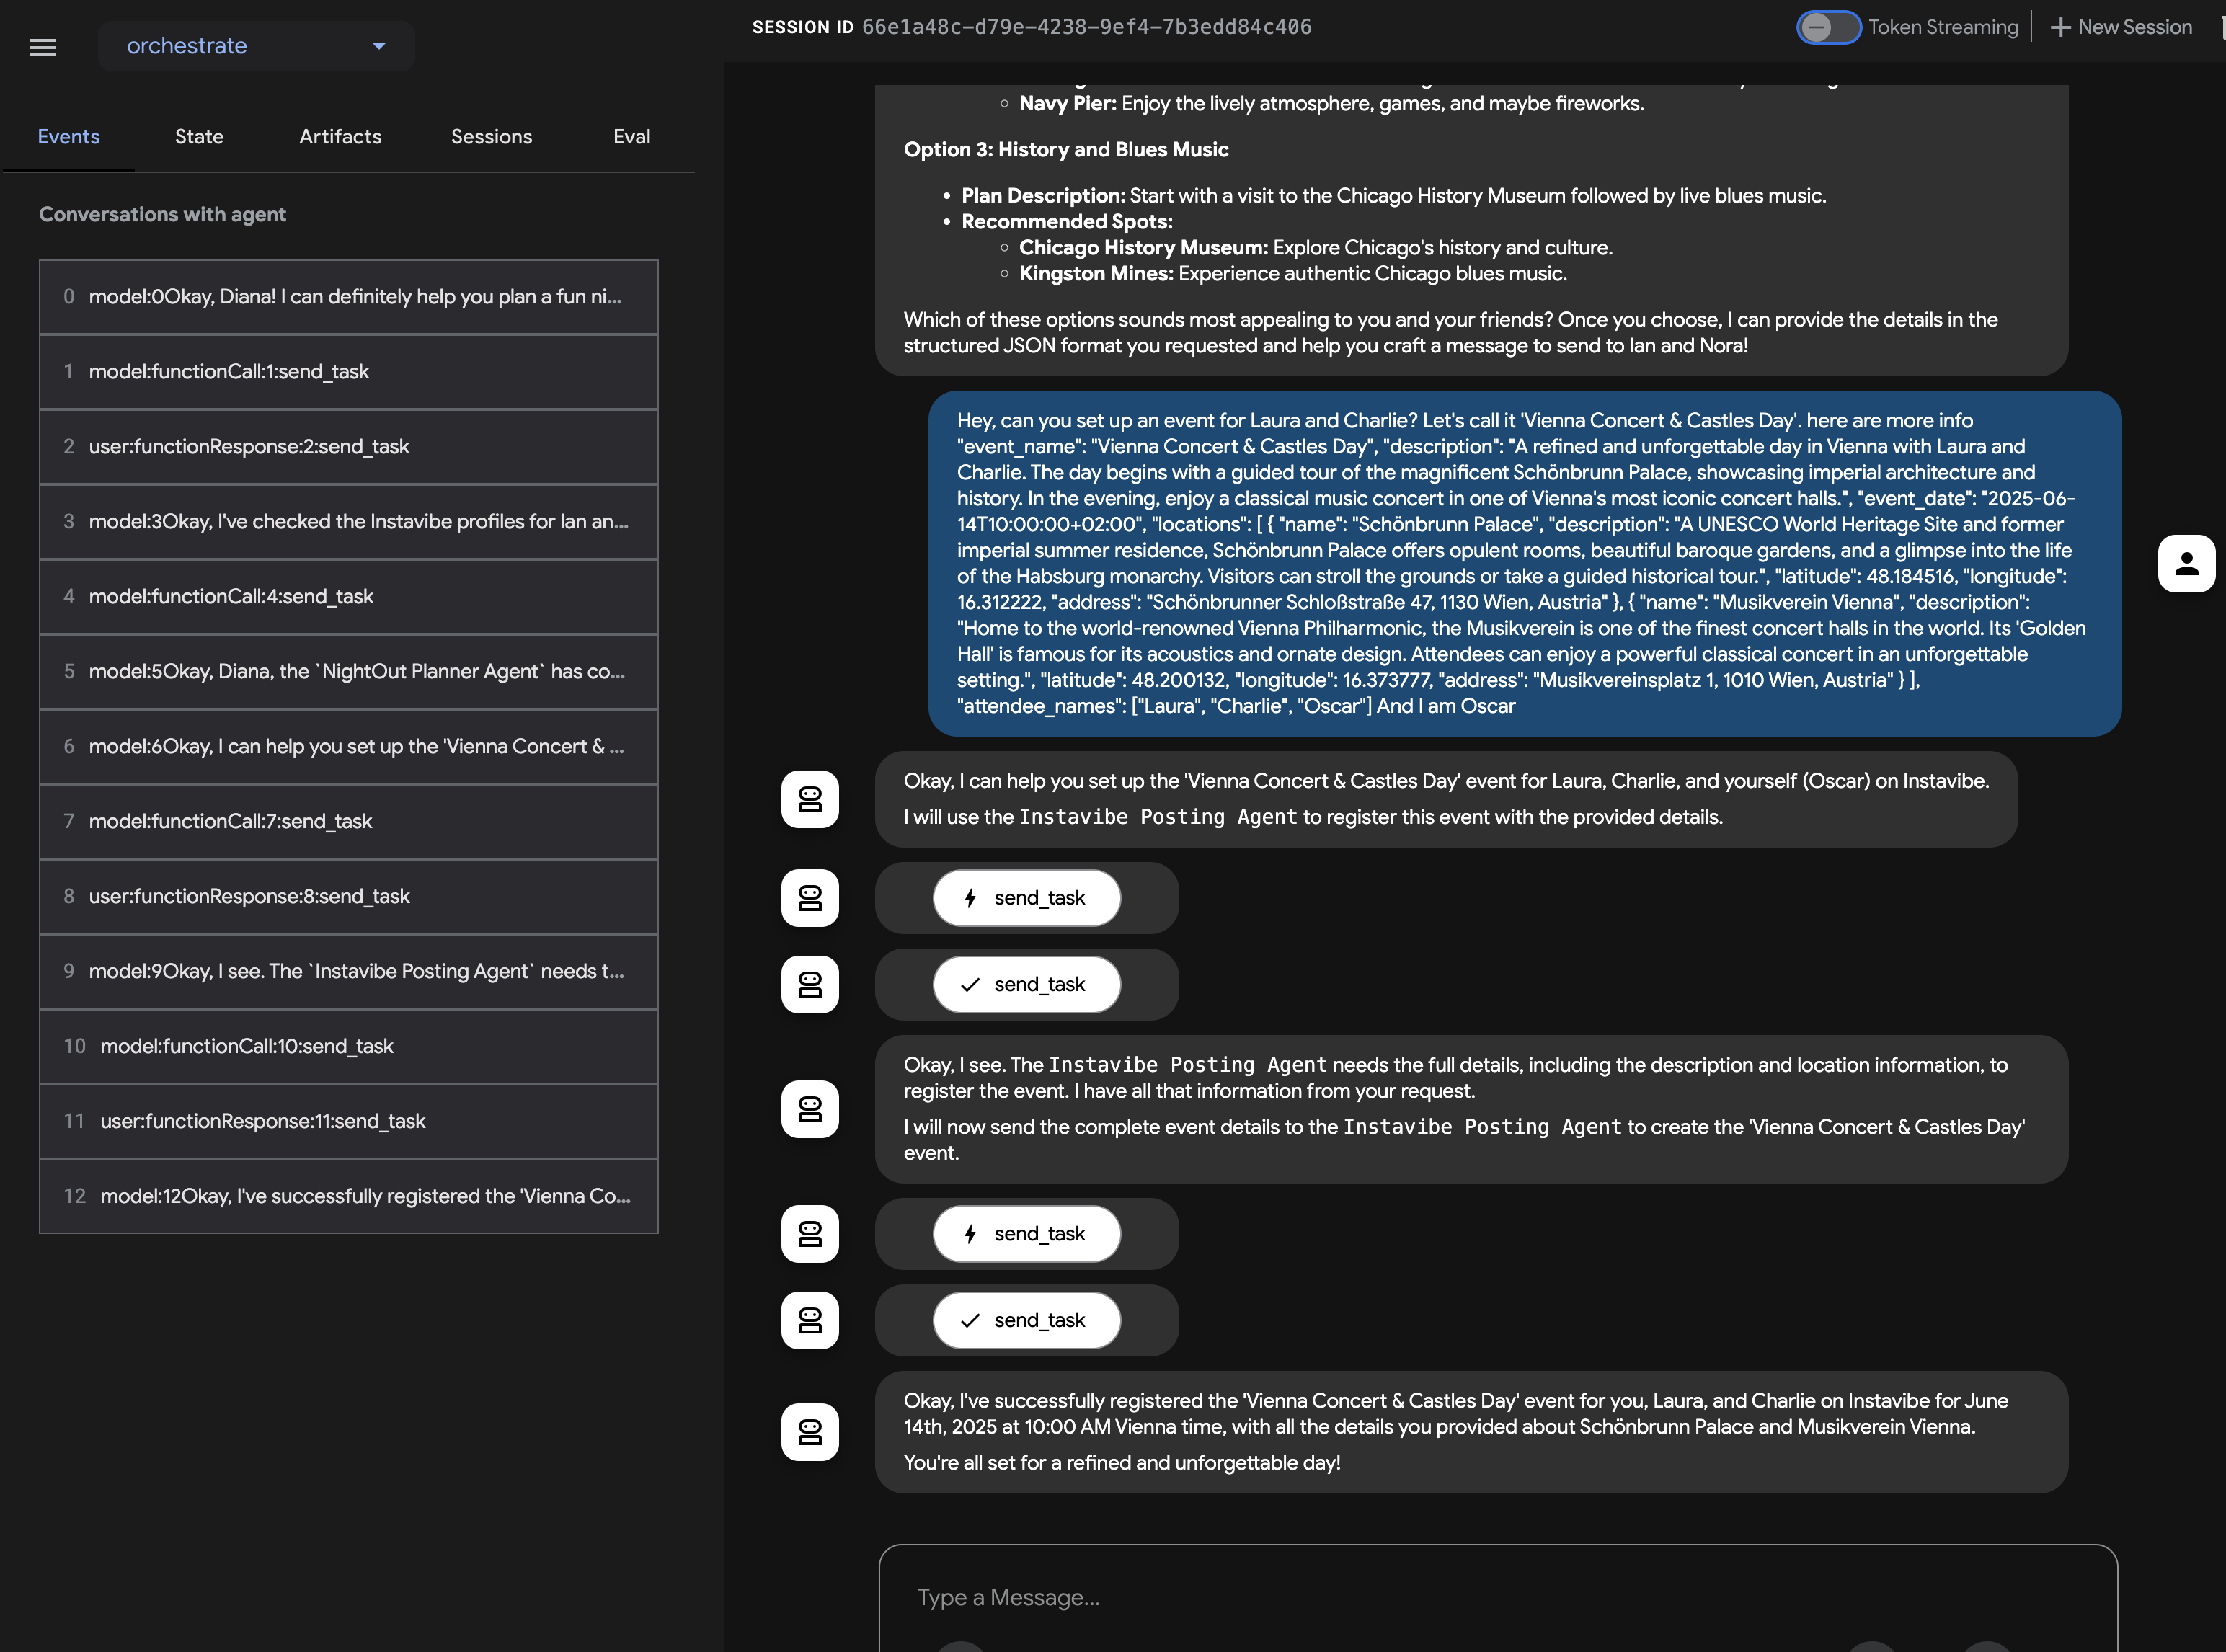
You can then verify the event appears in the InstaVibe web application. 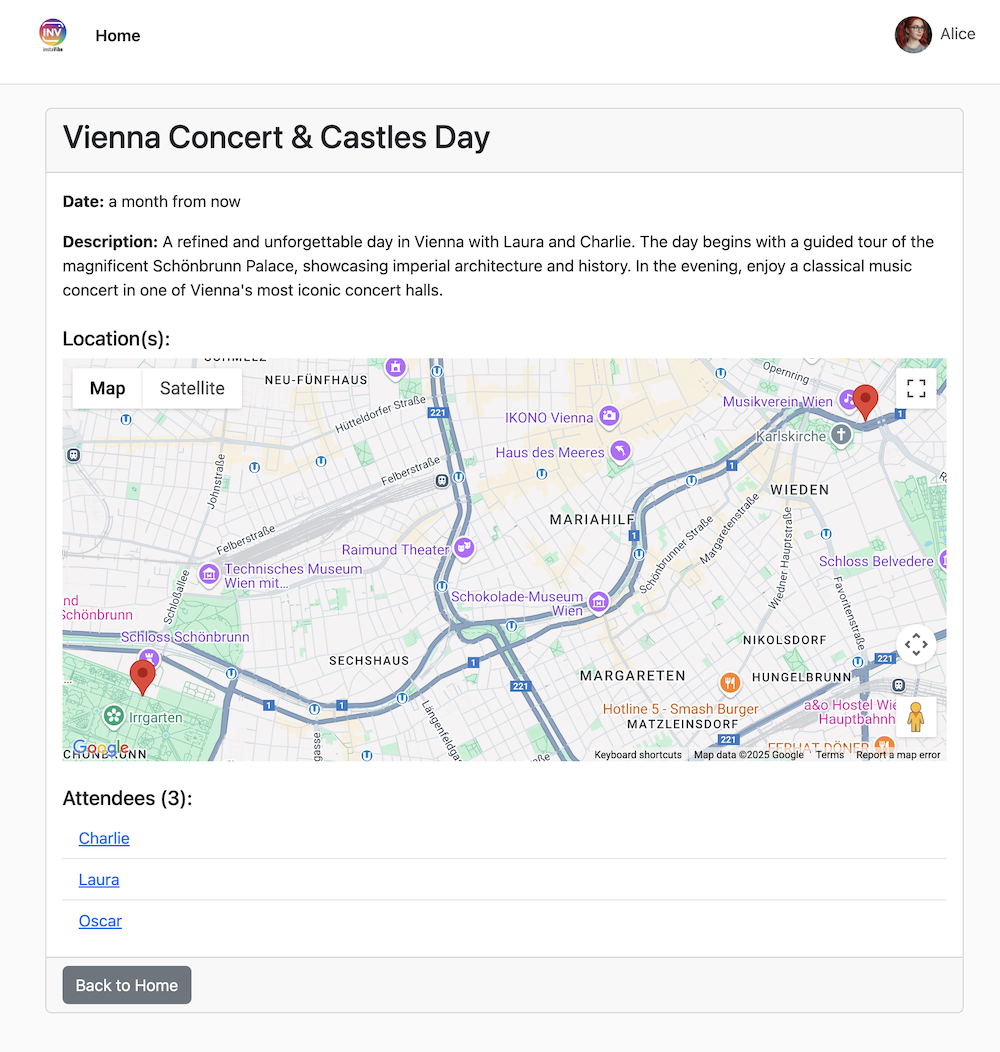
This demonstrates the successful implementation of a multi-agent system using ADK and the A2A protocol, where a central orchestrator delegates tasks to specialized, remote agents.
Remember to stop the ADK Dev UI (Ctrl+C in the terminal) when you are finished testing.
12. Agent Engine and Remote Call from InstaVibe
So far, we've run our specialized agents on Cloud Run and tested the Orchestrator locally using the ADK Dev UI. For a production scenario, we need a robust, scalable, and managed environment to host our agents. This is where Google Vertex AI Agent Engine comes in.
Agent Engine is a fully managed service on Vertex AI designed specifically for deploying and scaling AI agents. It abstracts away infrastructure management, security, and operational overhead, allowing developers (especially those less familiar with complex cloud environments) to focus on the agent's logic and capabilities rather than managing servers. It provides a dedicated runtime optimized for agentic workloads.
We'll now deploy our Orchestrator agent to Agent Engine. (Note: The deployment mechanism shown below uses a custom script (agent_engine_app.py) provided in the workshop materials, as official direct ADK-to-Agent-Engine deployment tools might still be evolving. This script handles packaging and deploying the Orchestrator agent, configured with the necessary remote agent addresses.)
Execute the following command to deploy the Orchestrator agent to Agent Engine. Make sure the REMOTE_AGENT_ADDRESSES environment variable (containing the URLs of your Planner, Platform, and Social agents on Cloud Run) is still correctly set from the previous section.
👉💻 We'll deploy the Orchestrate agent to Agent Engine (Note: this is my own implementation of the deployment, ADK has an CLI to help deploy, I will update this after BYO-SA being implemented.)
cd ~/instavibe-bootstrap/agents/
. ~/instavibe-bootstrap/set_env.sh

gcloud projects add-iam-policy-binding $PROJECT_ID \
    --member="serviceAccount:service-$PROJECT_NUMBER@gcp-sa-aiplatform-re.iam.gserviceaccount.com" \
    --role="roles/viewer"


source ~/instavibe-bootstrap/env/bin/activate
export PLATFORM_MPC_CLIENT_URL=$(gcloud run services list --platform=managed --region=us-central1 --format='value(URL)' | grep platform-mcp-client)
export PLANNER_AGENT_URL=$(gcloud run services list --platform=managed --region=us-central1 --format='value(URL)' | grep planner-agent)
export SOCIAL_AGENT_URL=$(gcloud run services list --platform=managed --region=us-central1 --format='value(URL)' | grep social-agent)

export REMOTE_AGENT_ADDRESSES=${PLANNER_AGENT_URL},${PLATFORM_MPC_CLIENT_URL},${SOCIAL_AGENT_URL}
sed -i "s|^\(O\?REMOTE_AGENT_ADDRESSES\)=.*|REMOTE_AGENT_ADDRESSES=${REMOTE_AGENT_ADDRESSES}|" ~/instavibe-bootstrap/agents/orchestrate/.env

adk deploy agent_engine \
--display_name "orchestrate-agent" \
--project $GOOGLE_CLOUD_PROJECT \
--region $GOOGLE_CLOUD_LOCATION \
--staging_bucket gs://$GOOGLE_CLOUD_PROJECT-agent-engine \
--trace_to_cloud \
--requirements_file orchestrate/requirements.txt \
orchestrate
Now that the Orchestrator is hosted on the managed Agent Engine platform, our InstaVibe web application needs to communicate with it. Instead of interacting via ADK Dev UI, the web app will make remote calls to the Agent Engine endpoint.
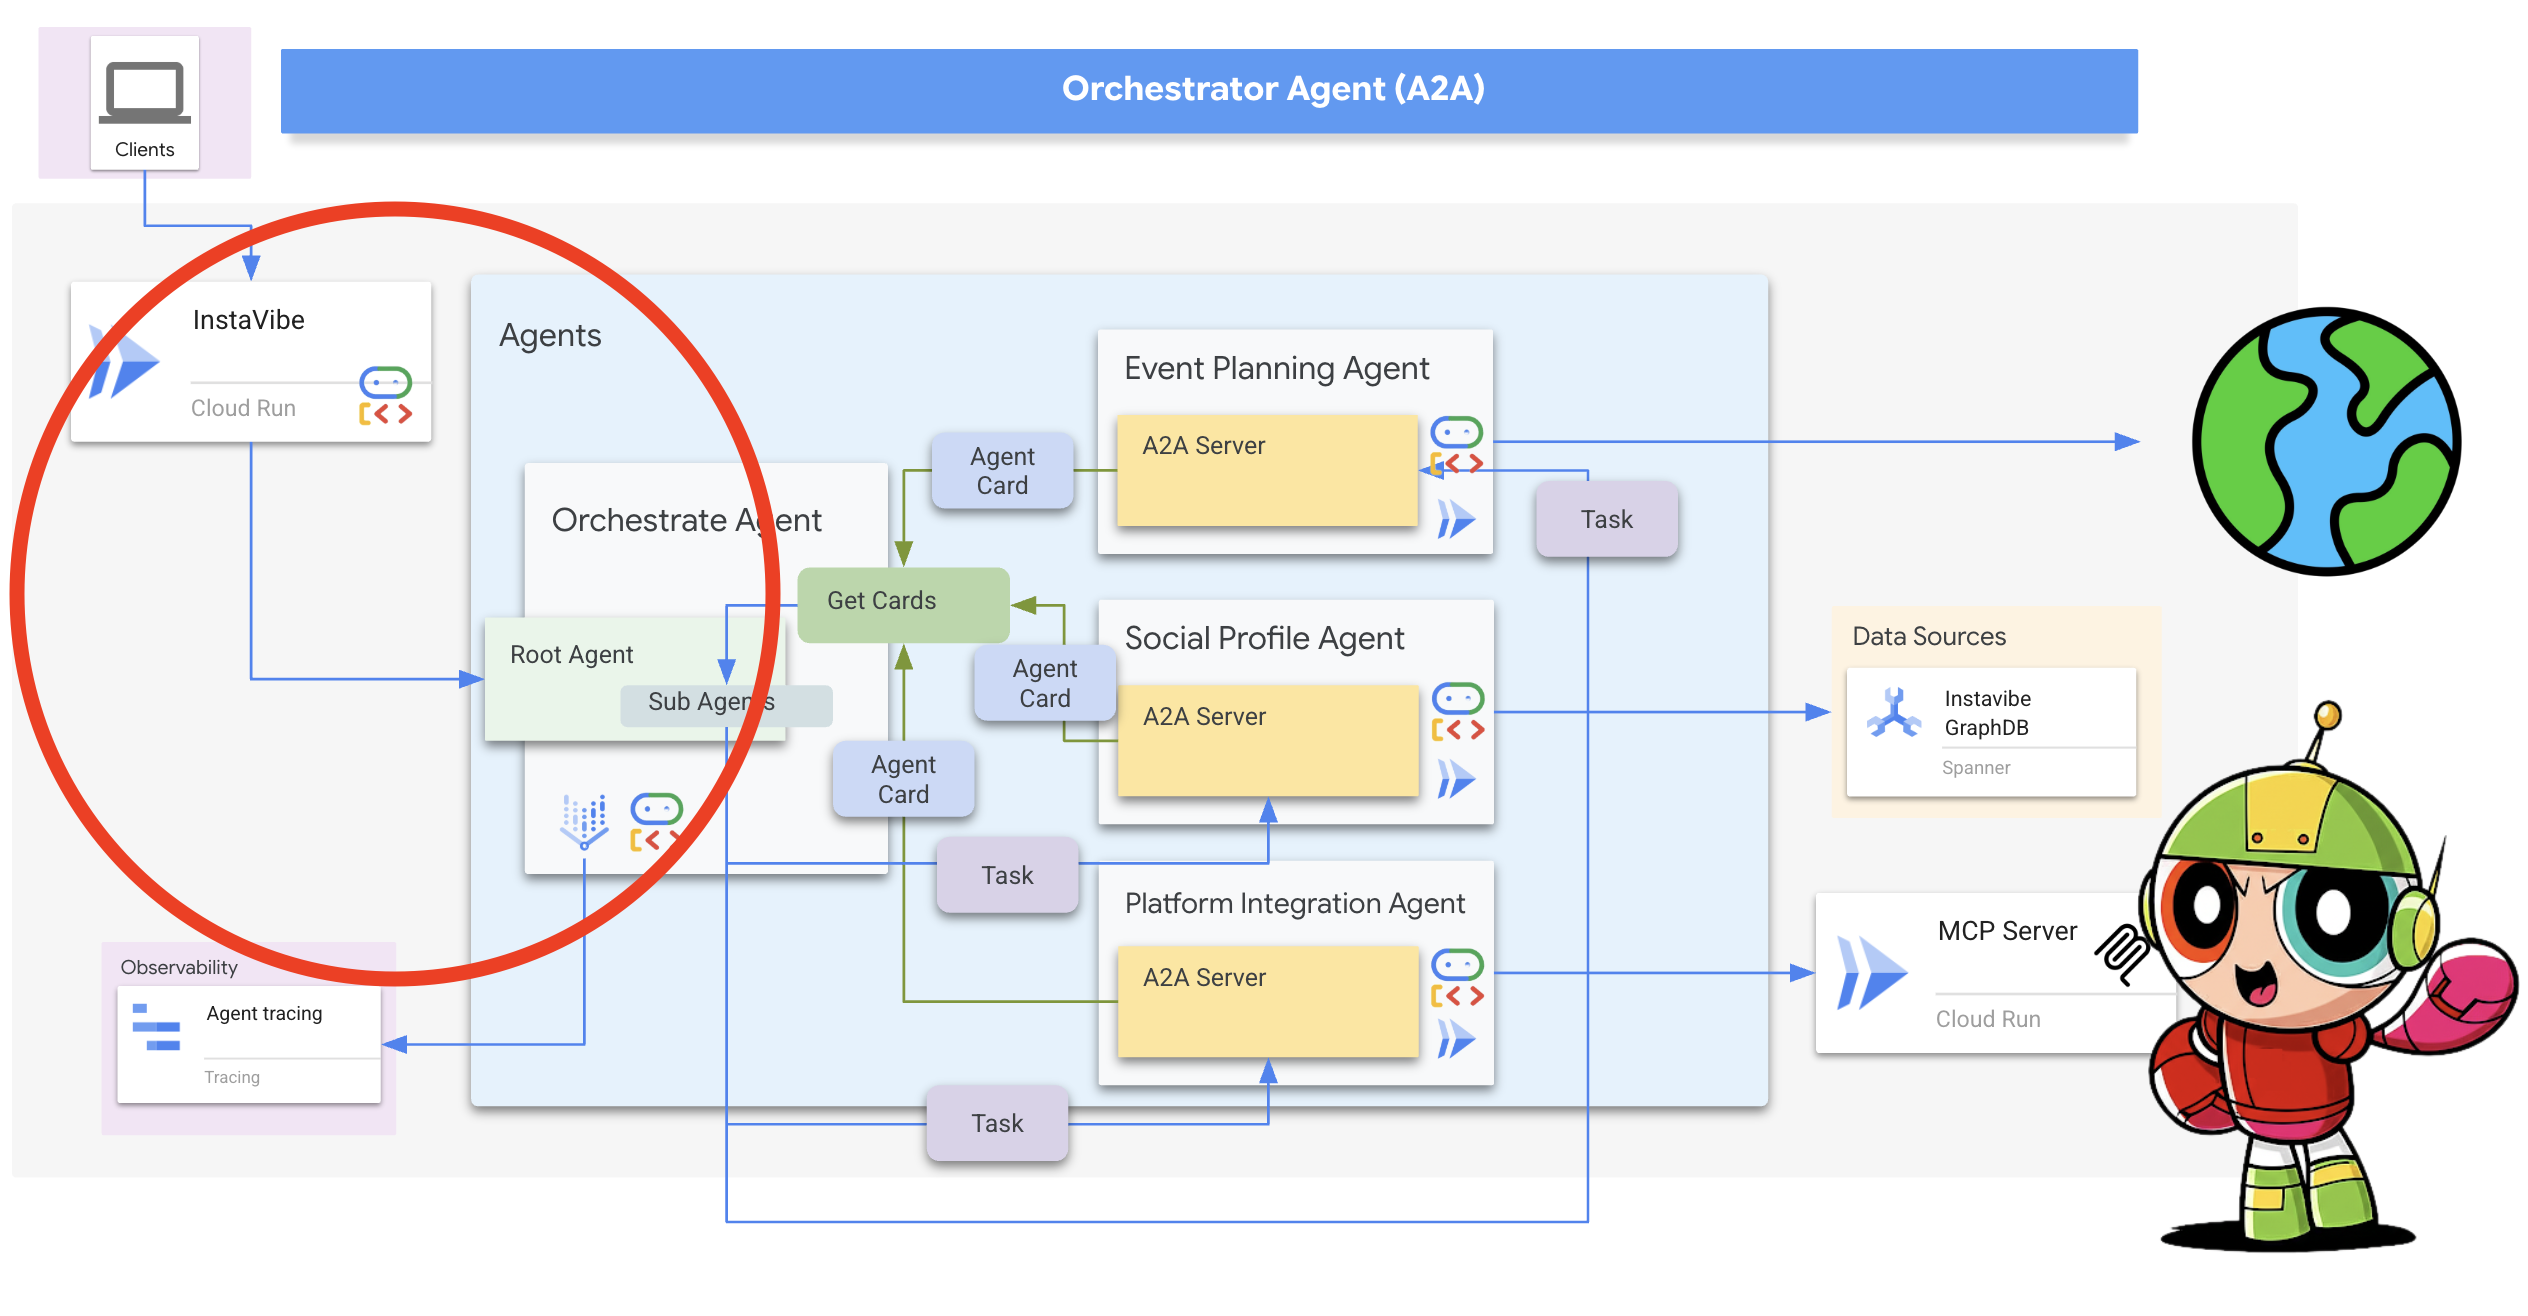
First, we need to modify the InstaVibe application code to initialize the Agent Engine client using the unique ID of our deployed Orchestrator agent. This ID is required to target the correct agent instance on the platform.
👉📝 Open ~/instavibe-bootstrap/instavibe/introvertally.py and replace the #REPLACE ME initiate agent_engine with the following code. This retrieves the Agent Engine ID from an environment variable (which we'll set shortly) and gets a client object:
ORCHESTRATE_AGENT_ID = os.environ.get('ORCHESTRATE_AGENT_ID')
agent_engine = agent_engines.get(ORCHESTRATE_AGENT_ID)
Our planned user flow in InstaVibe involves two interactions with the agent: first, generating the recommended plan, and second, asking the user to confirm before the agent actually posts the event to the platform.
Since the InstaVibe web application (running on Cloud Run) and the Orchestrator agent (running on Agent Engine) are now separate services, the web app needs to make remote calls to the Agent Engine endpoint to interact with the agent.
👉📝 Let's update the code that makes the initial call to generate the plan recommendation. In the same introvertally.py file, replace the #REPLACE ME Query remote agent get plan with the following snippet, which uses the agent_engine client to send the user's request:
agent_engine.stream_query(
                user_id=user_id,
                message=prompt_message,
            )
👉📝 Next, update the code that handles the user's confirmation (e.g., when the user clicks "Confirm Plan"). This sends a follow-up message to the same conversation on Agent Engine, instructing the Orchestrator to proceed with posting the event (which it will delegate to the Platform Integration agent). Replace #REPLACE ME Query remote agent for confirmation for confirmation in introvertally.py with:
agent_engine.stream_query(
            user_id=agent_session_user_id,
            message=prompt_message,
        )
The web application's routes need access to these functions. Ensure the necessary functions from introvertally.py are imported in the Flask routes file.
👉📝 In cd ~/instavibe-bootstrap/instavibe/ally_routes.py, we'll first point to the instance replace # REPLACE ME TO ADD IMPORT with following:
from introvertally import call_agent_for_plan, post_plan_event
👉📝 Add the prototype feature to InstaVibe, in ~/instavibe-bootstrap/instavibe/templates/base.html, replace <!–REPLACE_ME_LINK_TO_INTROVERT_ALLY–> with following:
            <li class="nav-item">
              <a class="nav-link" href="{{ url_for('ally.introvert_ally_page') }}">Introvert Ally</a>
            </li>
Before we can redeploy the InstaVibe app, we need the specific Resource ID of the Orchestrator agent we deployed to Agent Engine.
Currently, retrieving this programmatically via gcloud might be limited, so we'll use a helper Python script (temp-endpoint.py provided in the workshop) to fetch the ID and store it in an environment variable.
👉💻 Run the following commands to execute the script. The script will capture the Agent Engine Endpoint ID and grant the necessary permissions to the agent engine's default service account (Note: The script is configured to use the default service account as it is currently not user-modifiable).
. ~/instavibe-bootstrap/set_env.sh
cd ~/instavibe-bootstrap/instavibe/
source ~/instavibe-bootstrap/env/bin/activate
python temp-endpoint.py
export ORCHESTRATE_AGENT_ID=$(cat temp_endpoint.txt)
echo "ORCHESTRATE_AGENT_ID set to: ${ORCHESTRATE_AGENT_ID}"

Finally, we need to redeploy the InstaVibe web application with the updated code and the new ORCHESTRATE_AGENT_ID environment variable so it knows how to connect to our agent running on Agent Engine.
👉💻 The following commands rebuild the InstaVibe application image and deploy the new version to Cloud Run:
. ~/instavibe-bootstrap/set_env.sh

cd ~/instavibe-bootstrap/instavibe/

export IMAGE_TAG="latest"
export APP_FOLDER_NAME="instavibe"
export IMAGE_NAME="instavibe-webapp"
export IMAGE_PATH="${REGION}-docker.pkg.dev/${PROJECT_ID}/${REPO_NAME}/${IMAGE_NAME}:${IMAGE_TAG}"
export SERVICE_NAME="instavibe"

echo "Building ${APP_FOLDER_NAME} webapp image..."
gcloud builds submit . \
  --tag=${IMAGE_PATH} \
  --project=${PROJECT_ID}

echo "Deploying ${SERVICE_NAME} to Cloud Run..."

gcloud run deploy ${SERVICE_NAME} \
  --image=${IMAGE_PATH} \
  --platform=managed \
  --region=${REGION} \
  --allow-unauthenticated \
  --set-env-vars="SPANNER_INSTANCE_ID=${SPANNER_INSTANCE_ID}" \
  --set-env-vars="SPANNER_DATABASE_ID=${SPANNER_DATABASE_ID}" \
  --set-env-vars="APP_HOST=0.0.0.0" \
  --set-env-vars="APP_PORT=8080" \
  --set-env-vars="GOOGLE_CLOUD_LOCATION=${REGION}" \
  --set-env-vars="GOOGLE_CLOUD_PROJECT=${PROJECT_ID}" \
  --set-env-vars="GOOGLE_MAPS_API_KEY=${GOOGLE_MAPS_API_KEY}" \
  --set-env-vars="ORCHESTRATE_AGENT_ID=${ORCHESTRATE_AGENT_ID}" \
  --project=${PROJECT_ID} \
  --min-instances=1 \
  --cpu=2 \
  --memory=2Gi
With the final deployment complete, navigate to your InstaVibe application URL in a different browser tab.
Testing the Full AI-Powered InstaVibe Experience
The "InstaVibe Ally" feature is now live, powered by our multi-agent system orchestrated via Vertex AI Agent Engine and communicating through A2A.
Click into "InstaVibe Ally" and ask it to plan an event.

Observe the activity log on the right while the agents work (it may take 90-120 seconds). Once the plan appears, review it and click "Confirm This Plan" to proceed with posting.
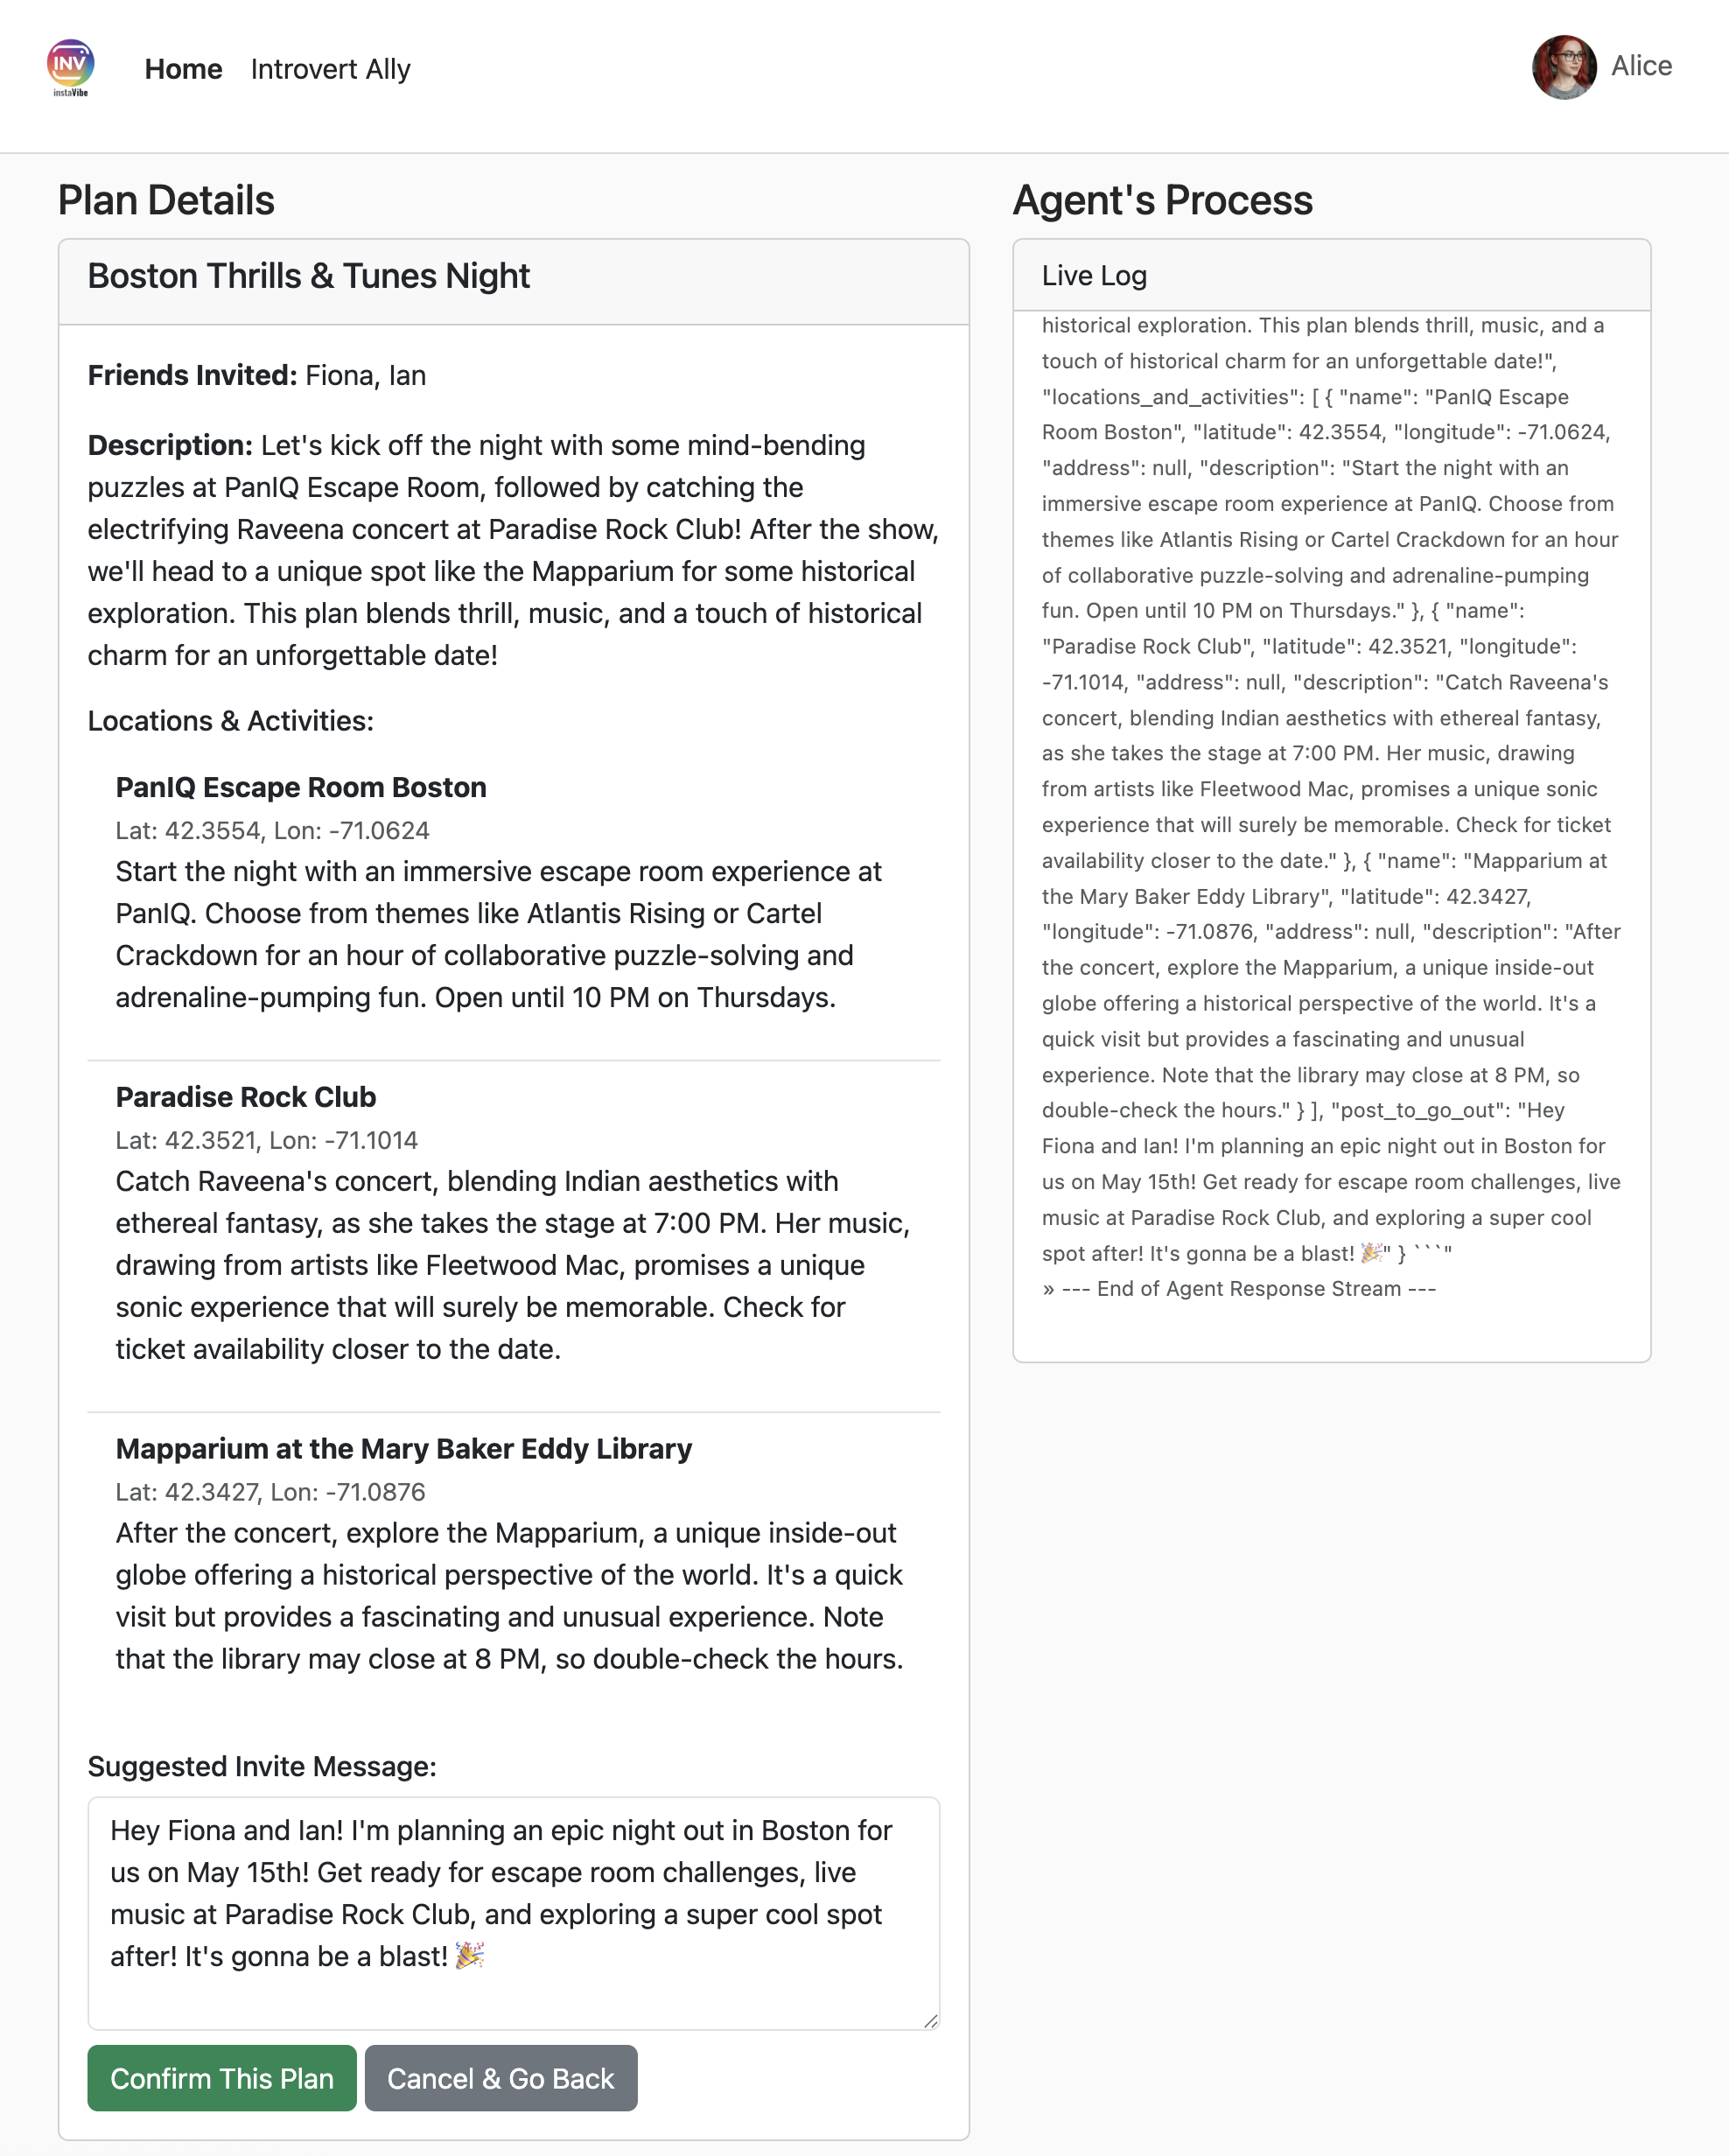
The orchestrator will now instruct the Platform agent to create the post and event within InstaVibe. 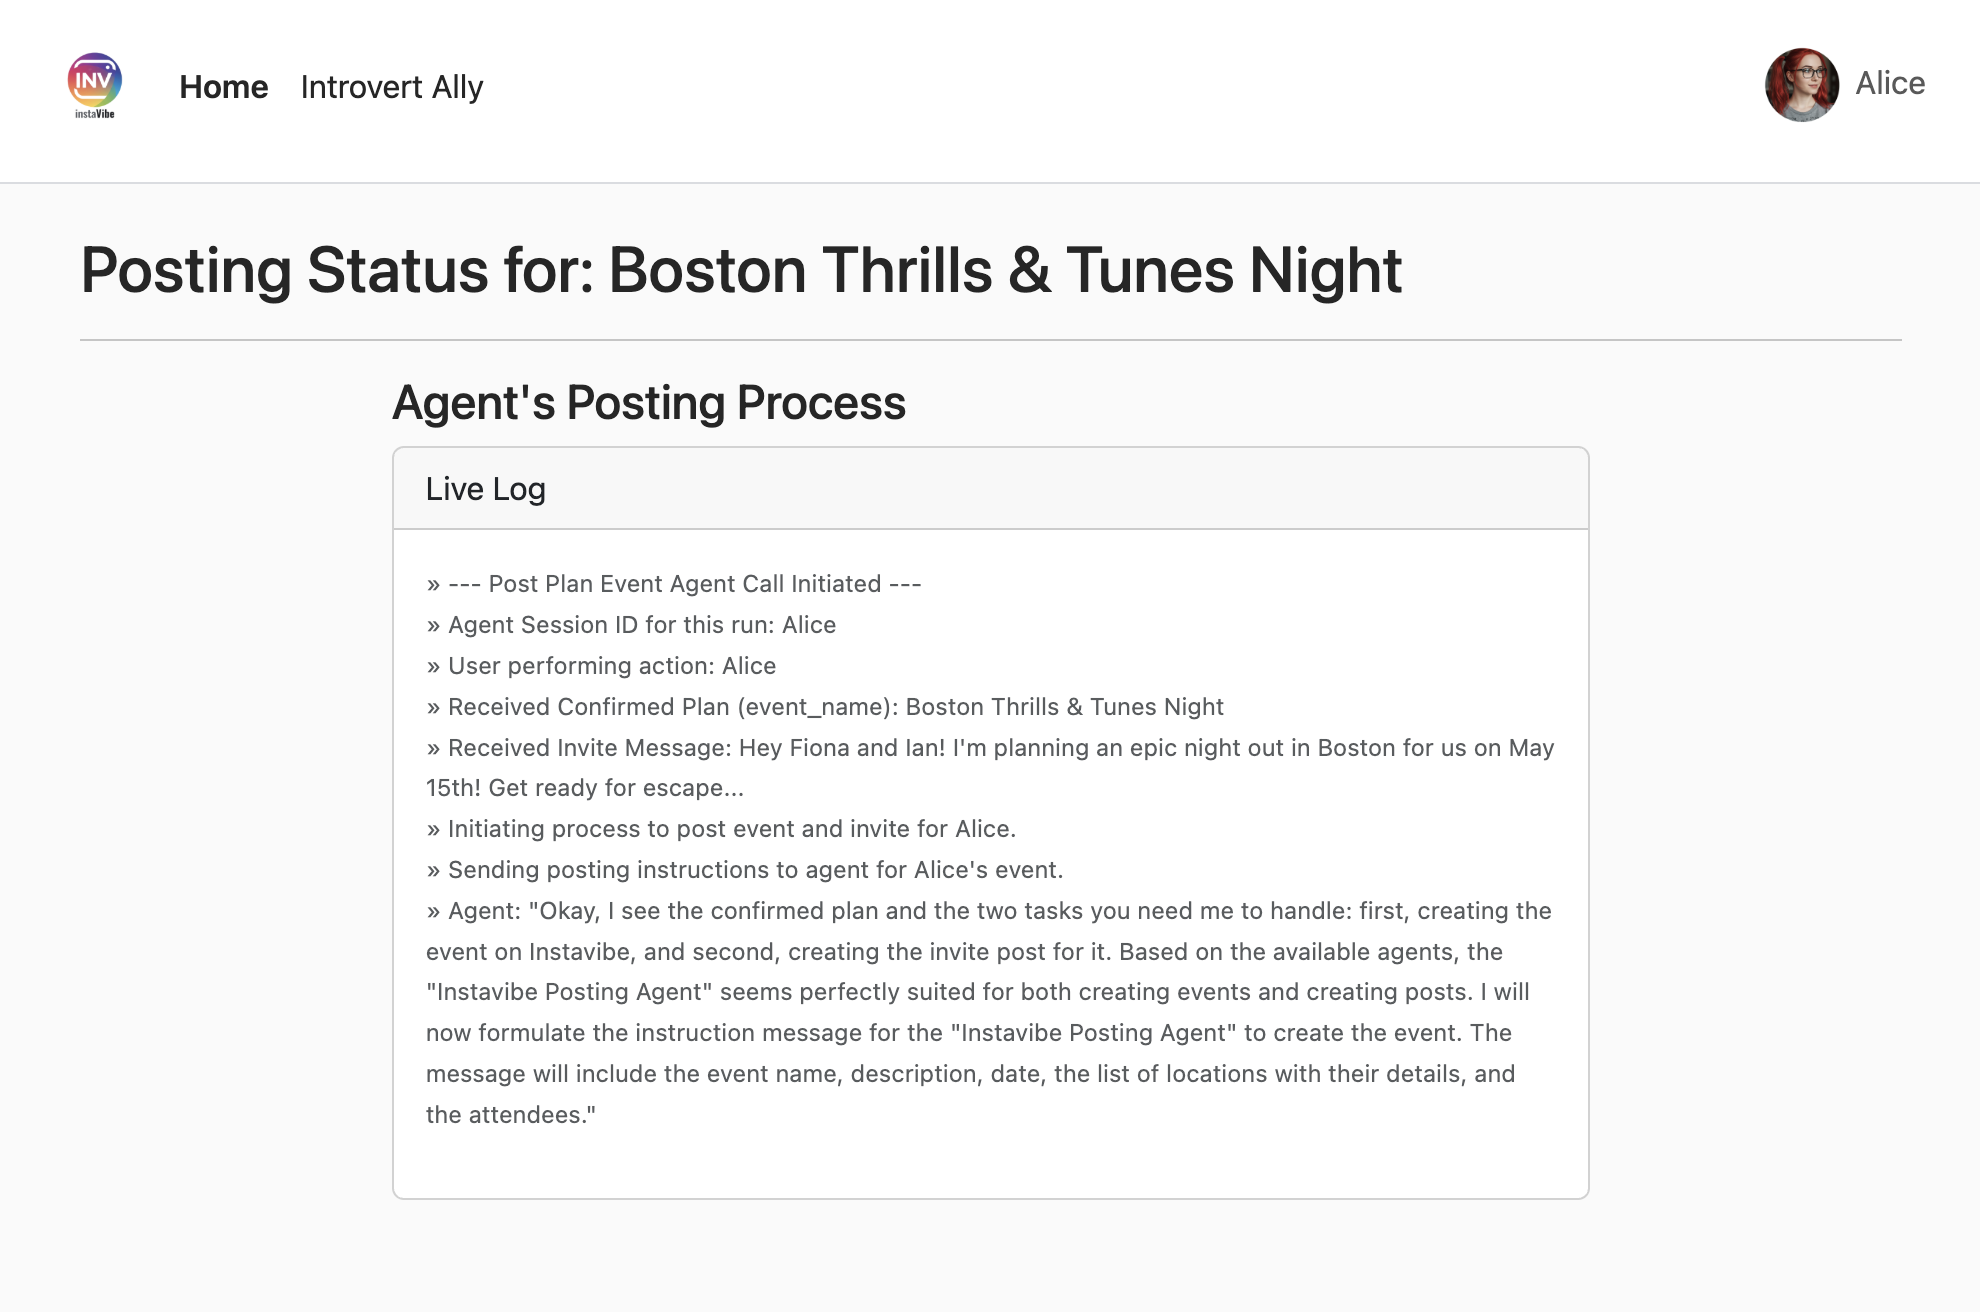
Check the InstaVibe home page for the new post and event. 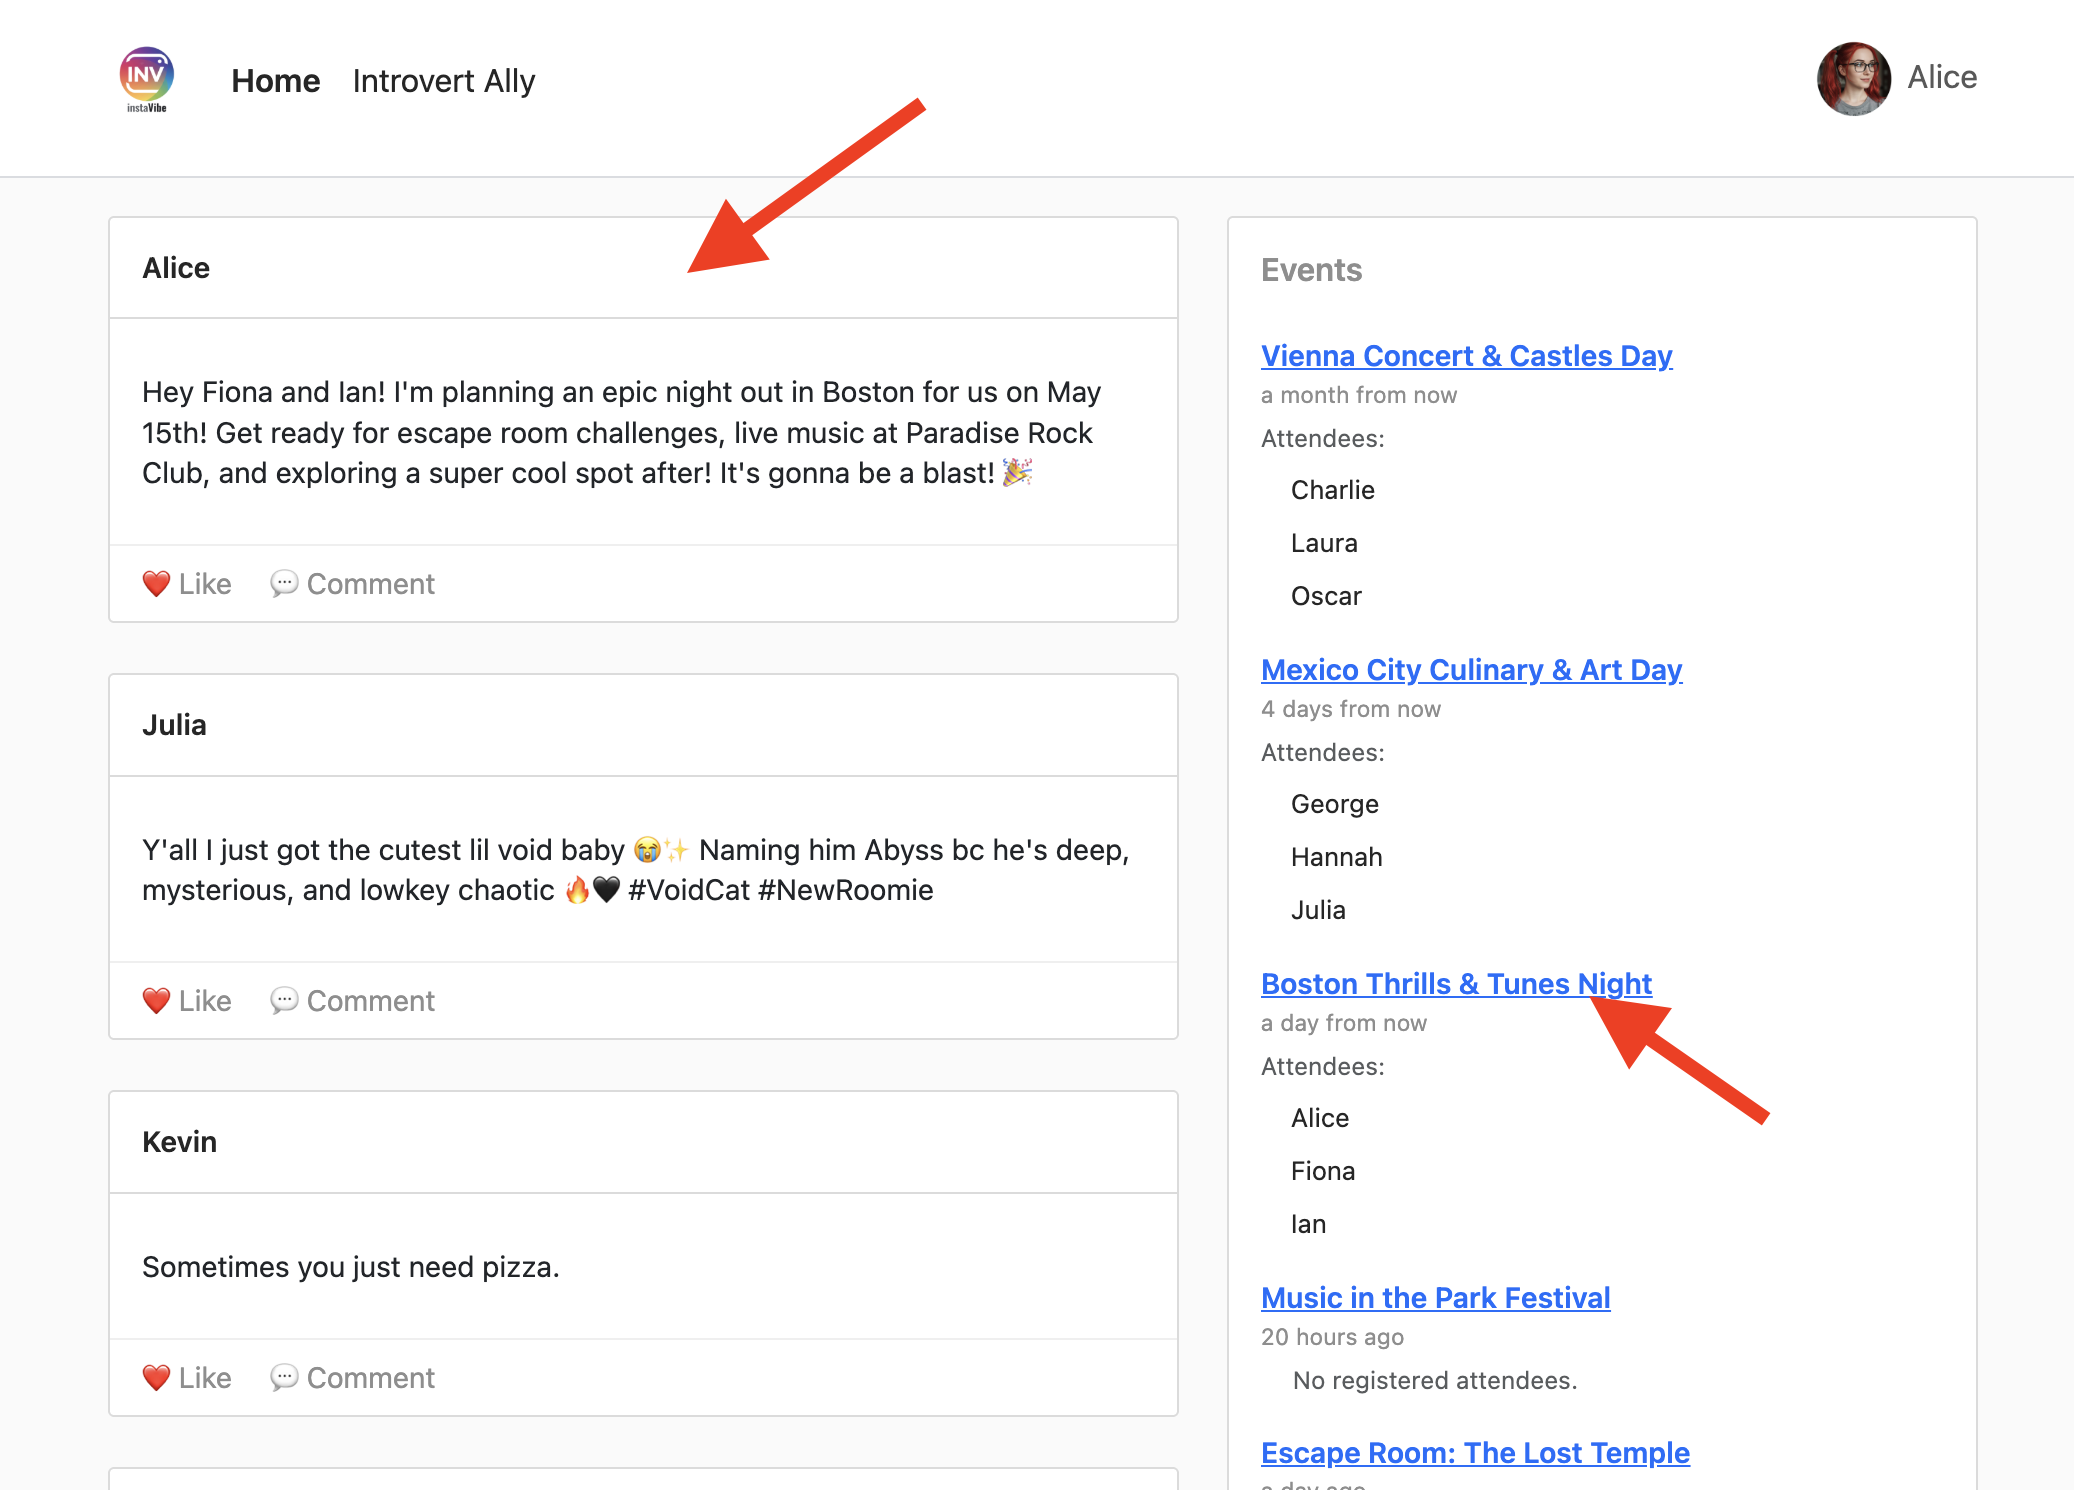
The event page will reflect the details generated by the agent.
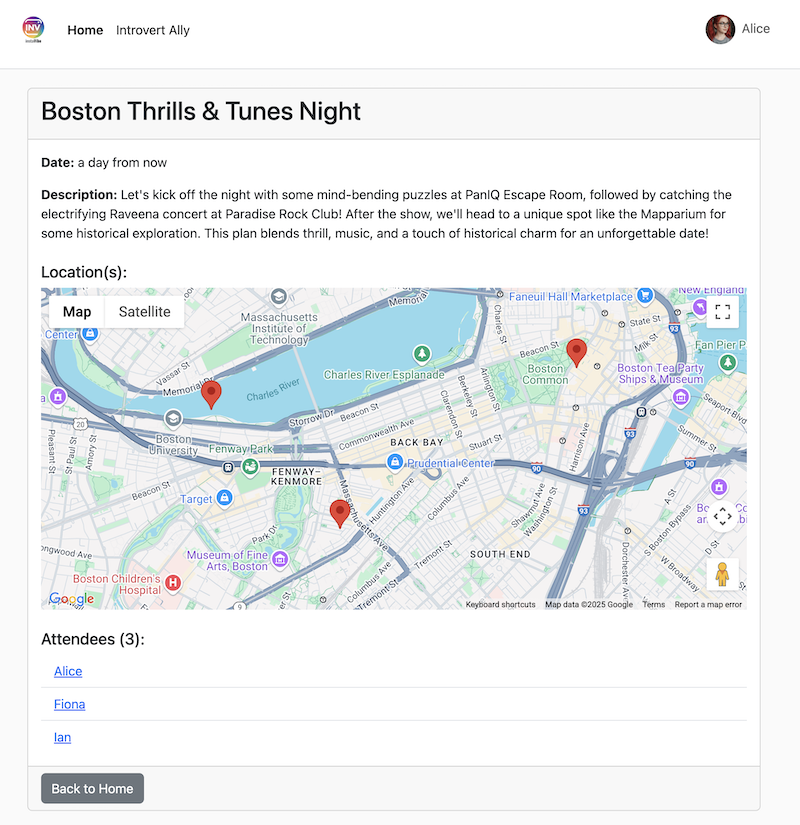
Analyzing Performance with Cloud Trace
You might notice the process takes some time. Vertex AI Agent Engine integrates with Cloud Trace, allowing us to analyze the latency of our multi-agent system.
Go to the Traces in the google cloud console, select agent_run[orchestrate_agent] in the Span, you should see a couple of Spans, click into it
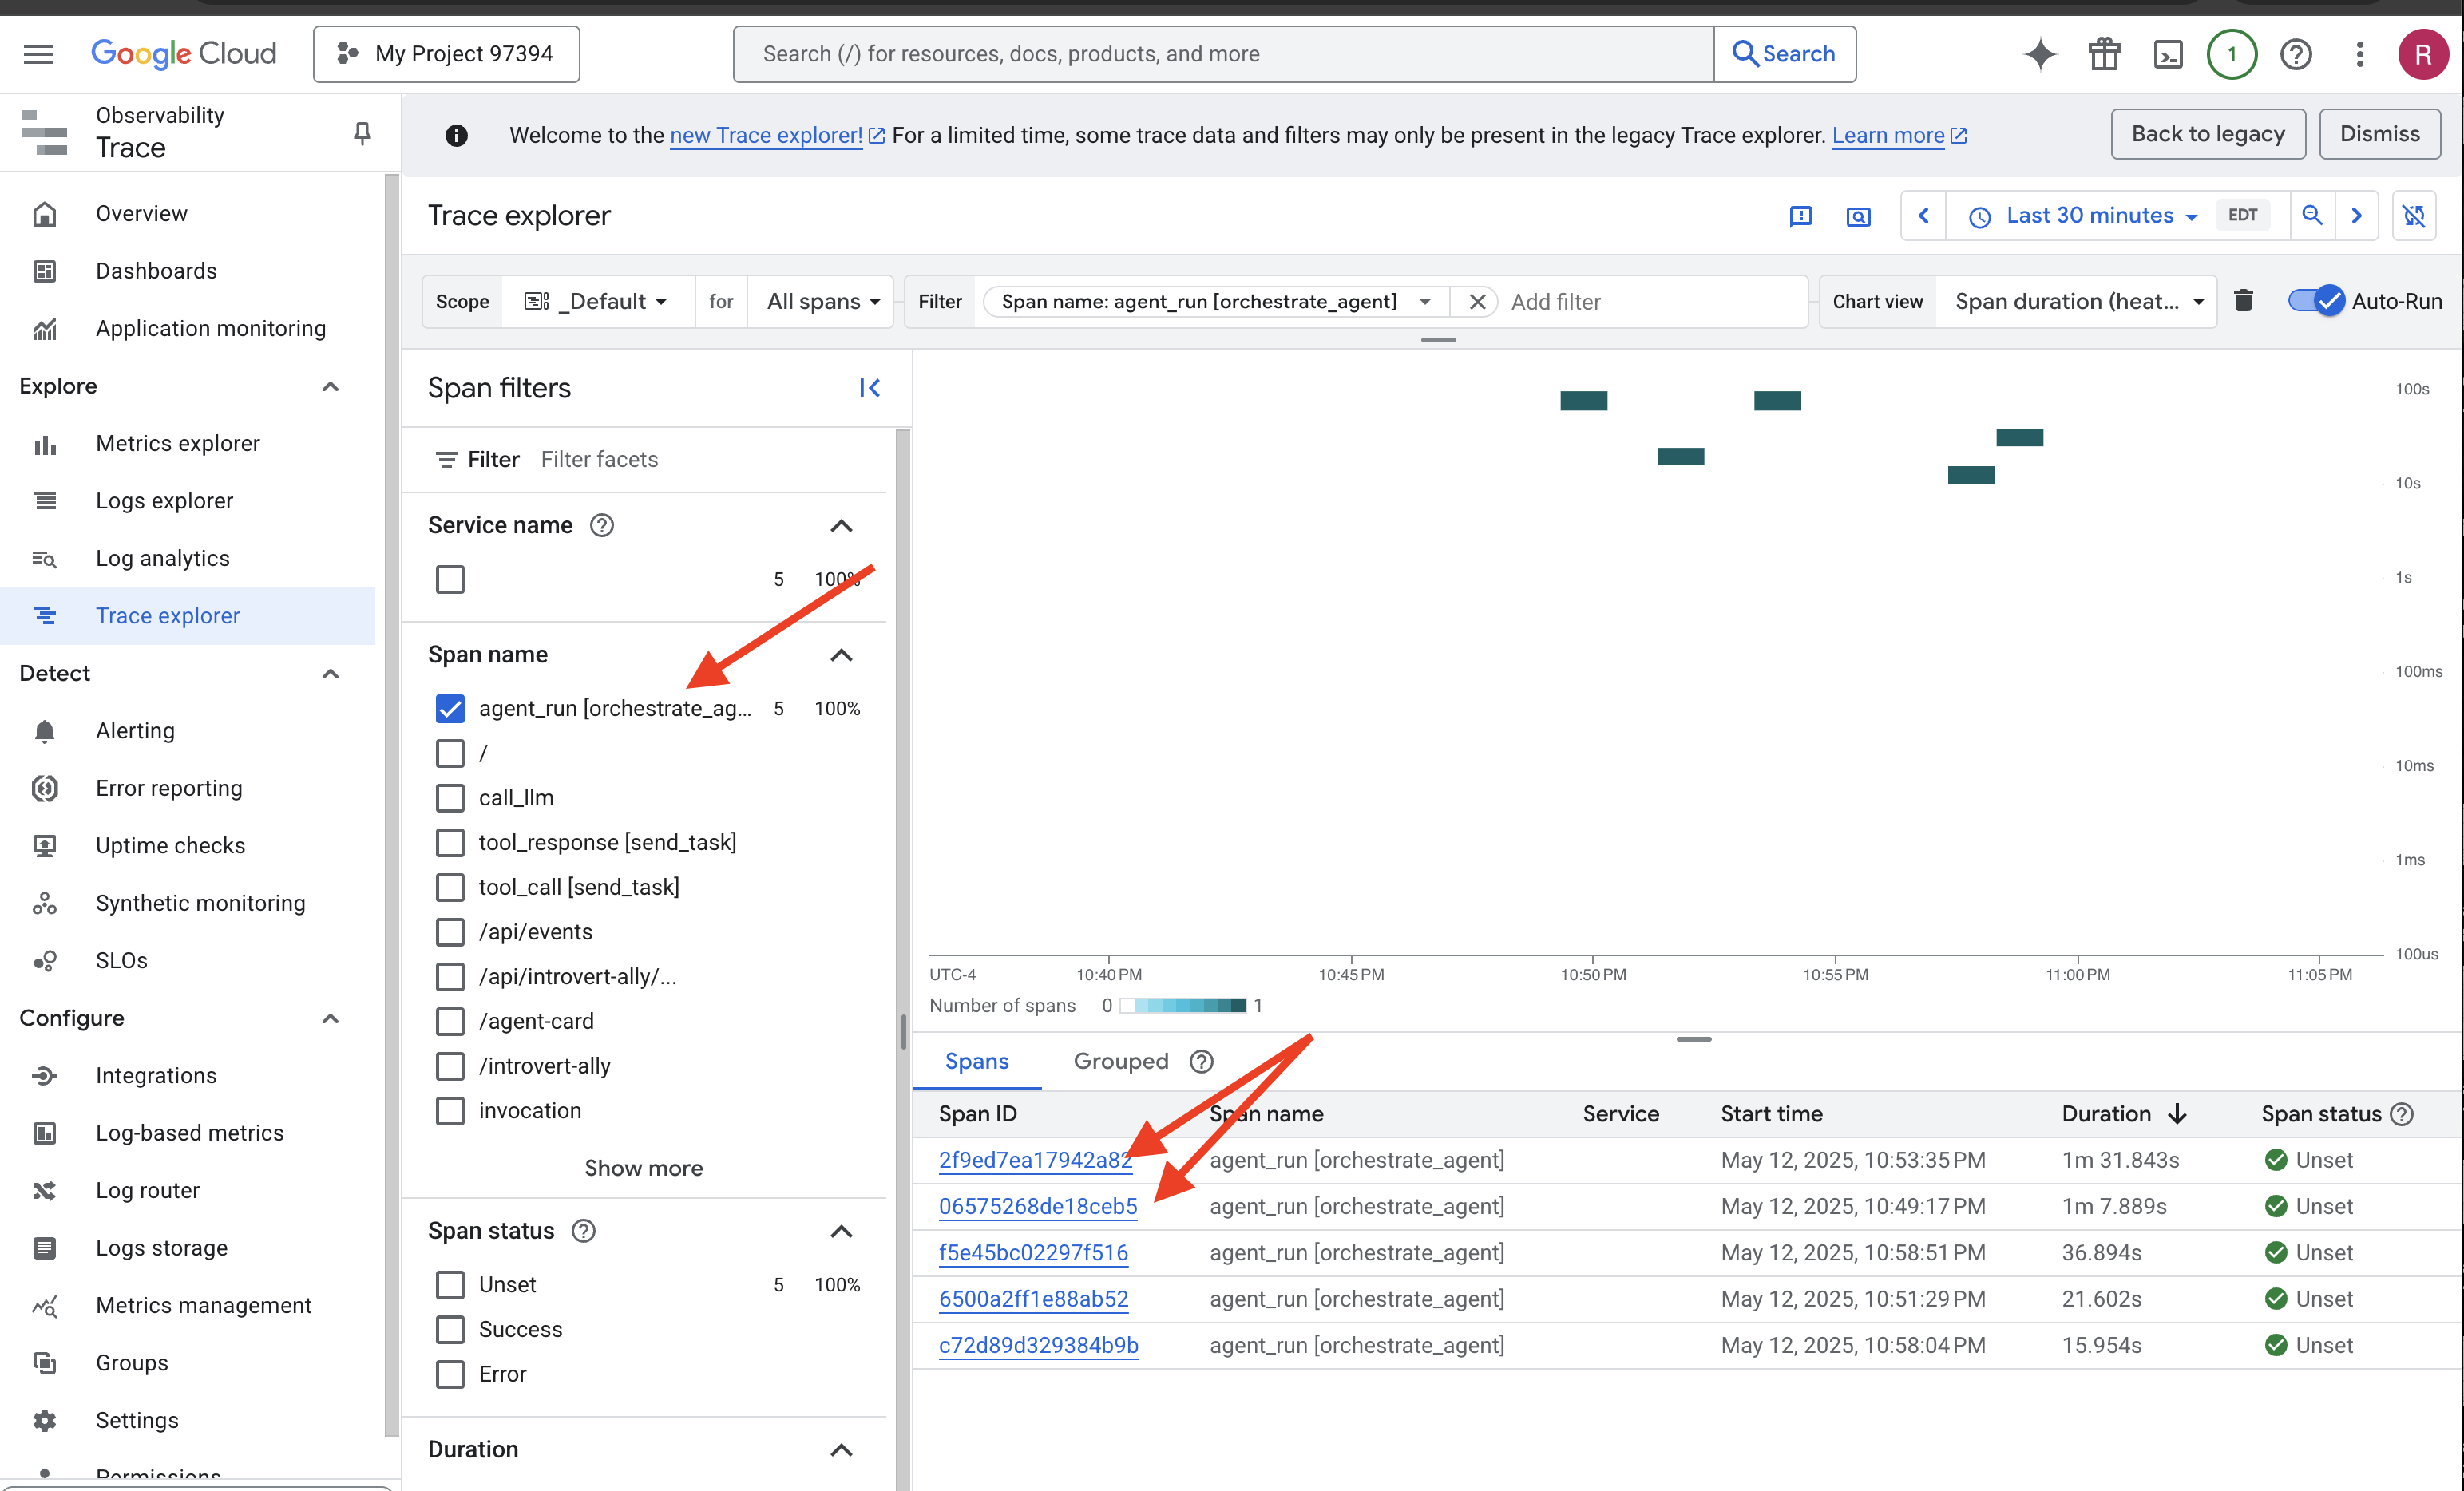
Within the trace details, you can identify which parts took longer. For example, calls to the Planner agent might show higher latency due to search grounding and complex generation. 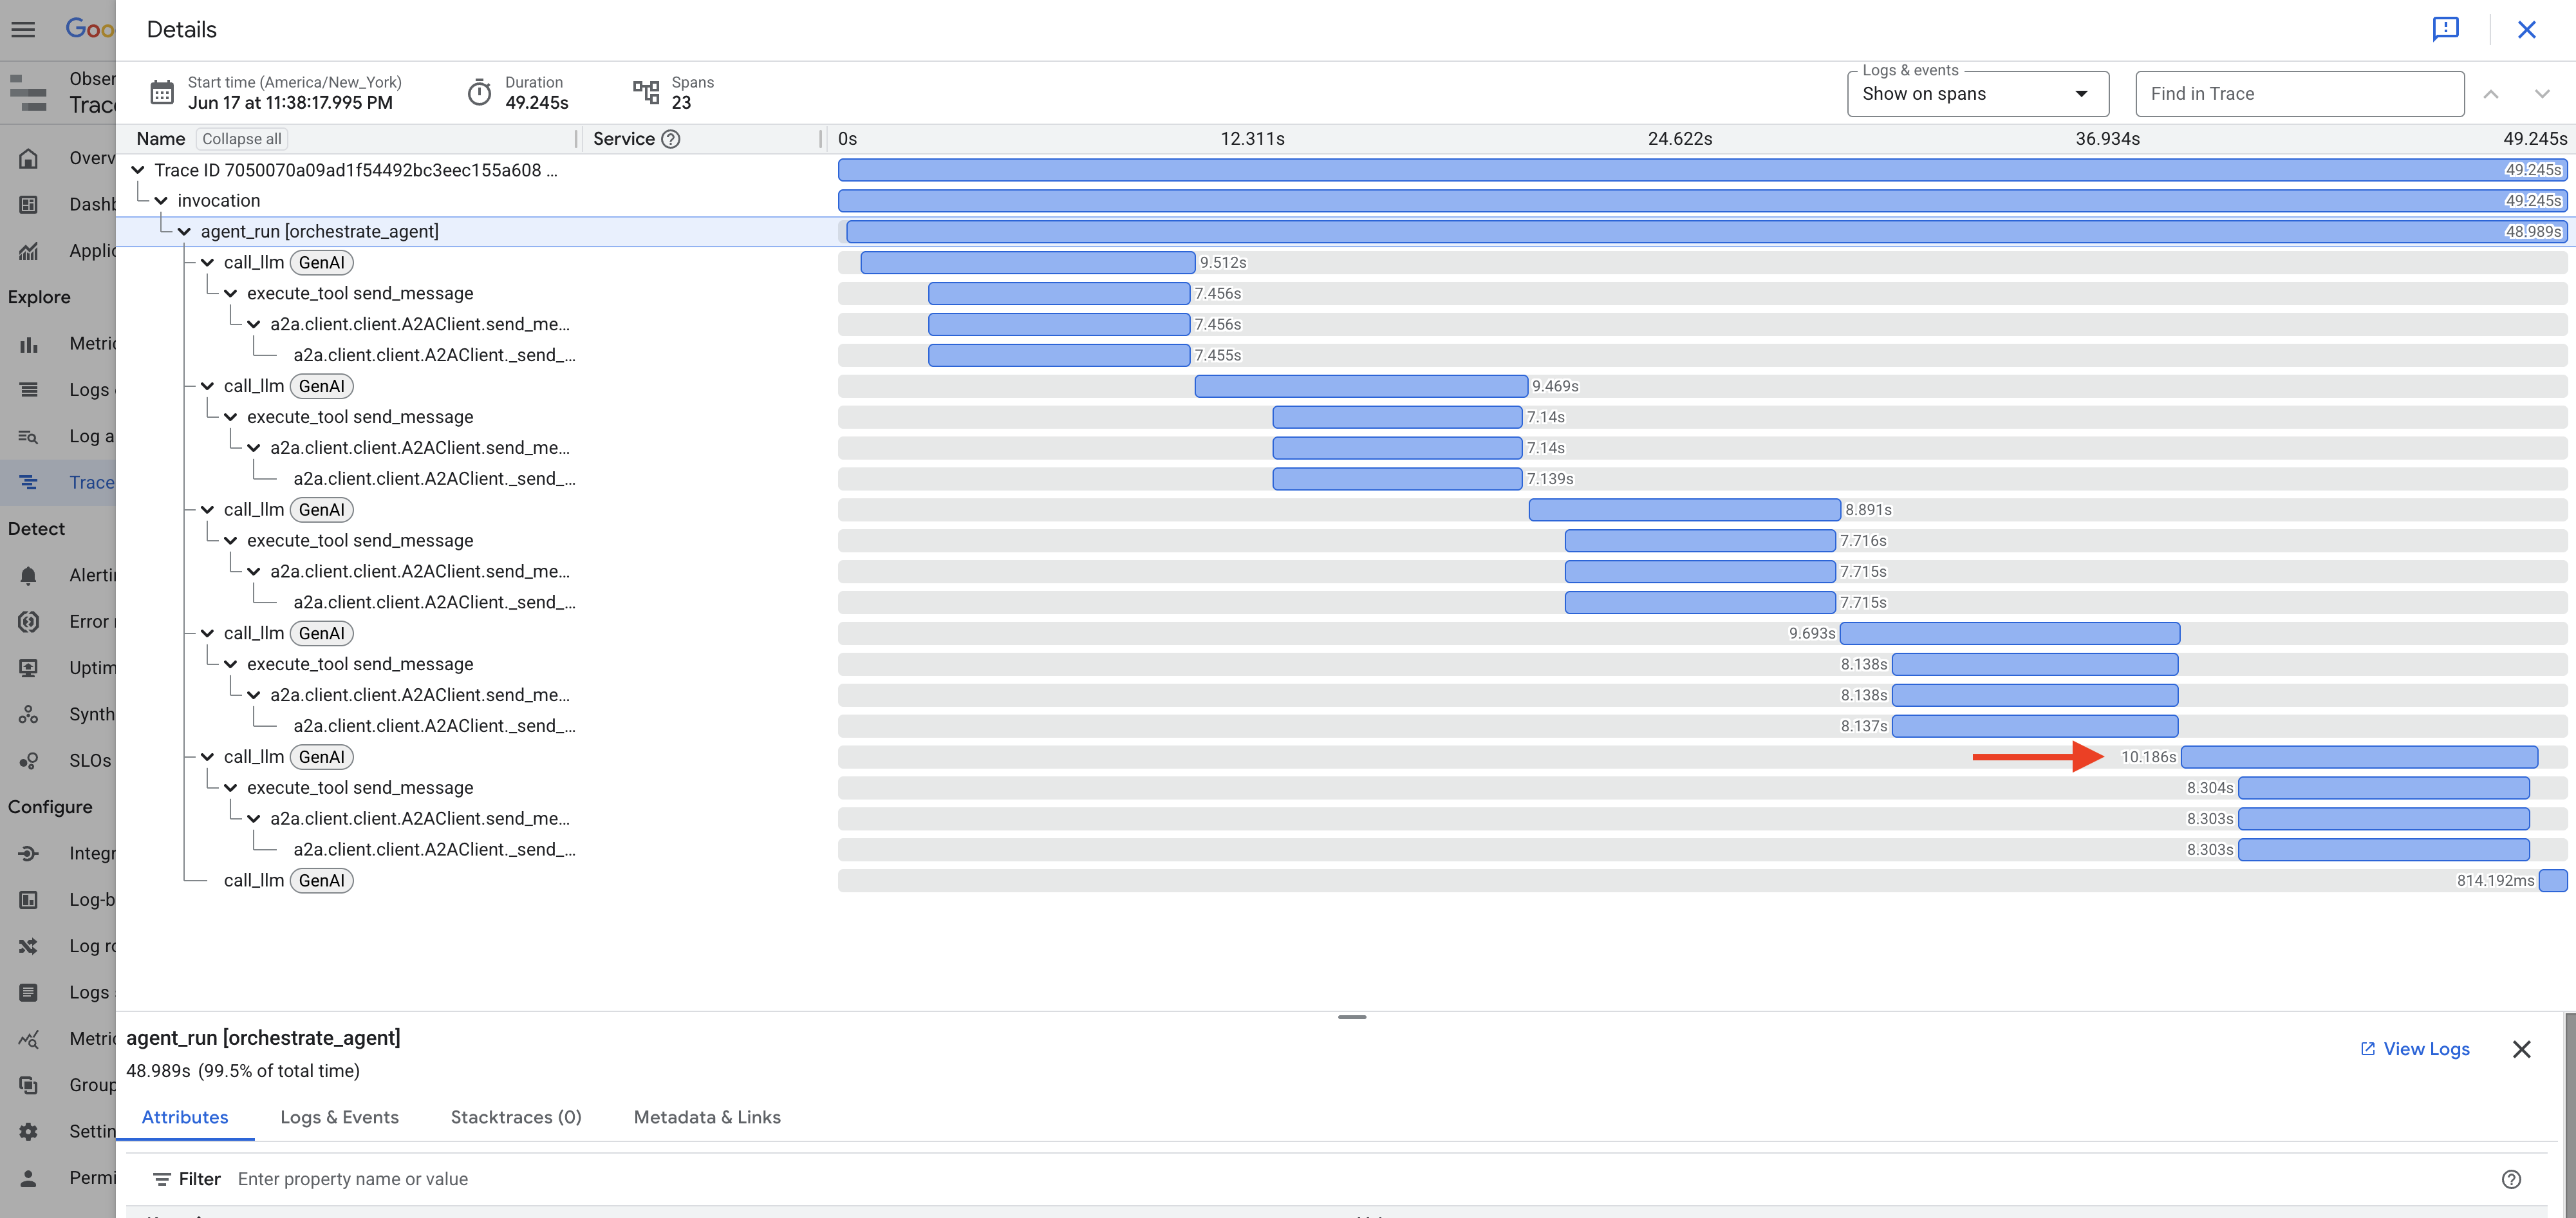
Similarly, when creating the post and event, you might see time spent by the Orchestrator processing data and preparing tool calls for the Platform agent. 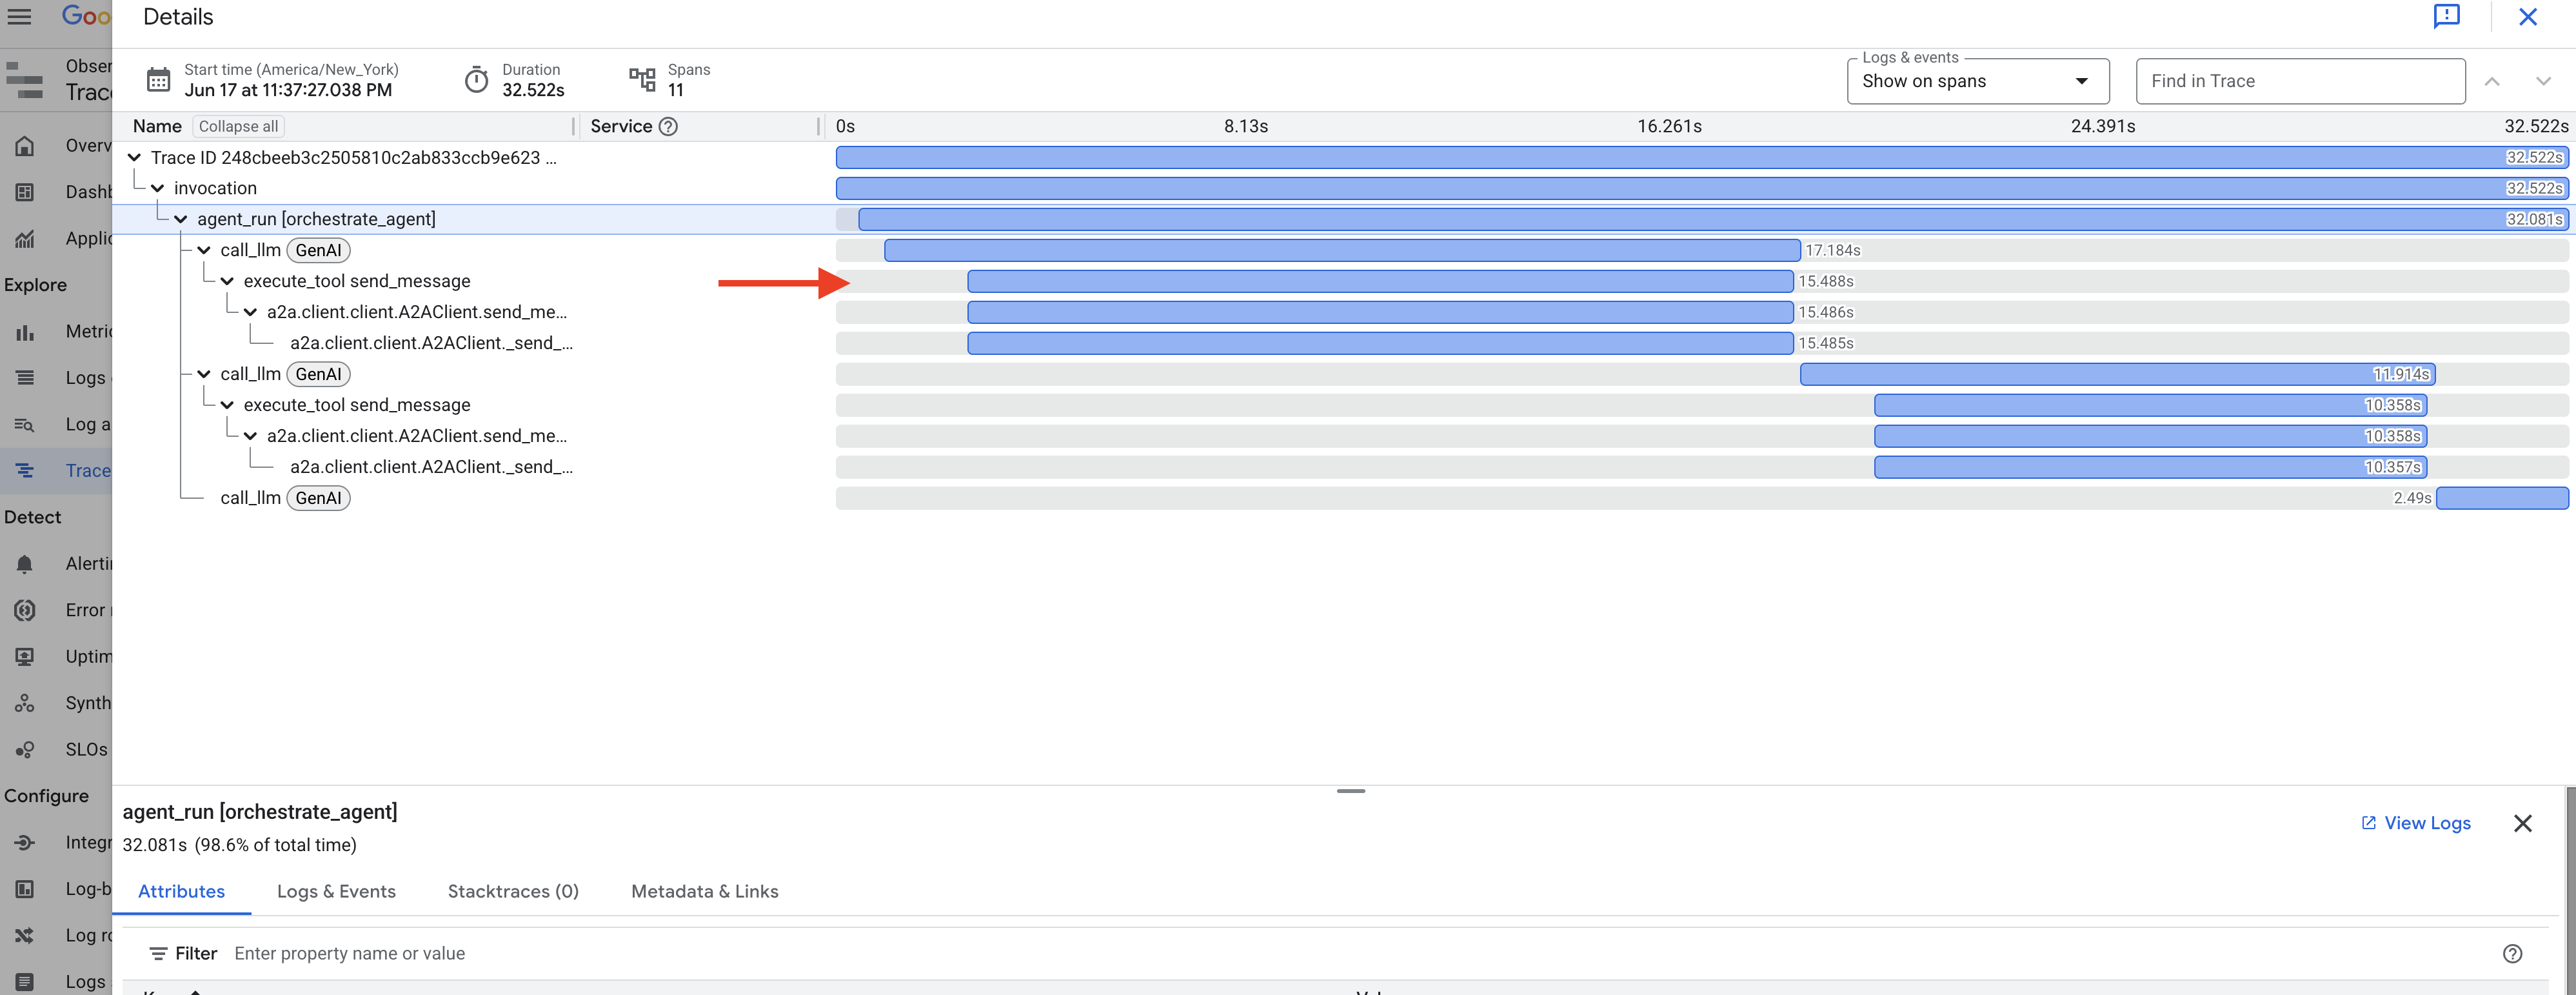
Exploring these traces helps understand and optimize the performance of your agent system.
Congratulations! You've successfully built, deployed, and tested a sophisticated multi-agent AI system using Google's ADK, A2A, MCP, and Google Cloud services. You've tackled agent orchestration, tool usage, state management, and cloud deployment, creating a functional AI-powered feature for InstaVibe. Well done on completing the workshop!
13. Clean Up
To avoid ongoing charges to your Google Cloud account, it's important to delete the resources we created during this workshop. The following commands will help you remove the Spanner instance, Cloud Run services, Artifact Registry repository, API Key, Vertex AI Agent Engine, and associated IAM permissions.
Important:
- Ensure you are running these commands in the same Google Cloud project used for the workshop.
- If you've closed your Cloud Shell terminal, some environment variables like $PROJECT_ID, $SPANNER_INSTANCE_ID, etc., might not be set. You'll need to either re-export them as you did during the workshop setup or replace the variables in the commands below with their actual values.
- These commands will permanently delete your resources. Double-check before running if you have other important data in this project.
👉💻 Run the following scripts to clean up.
Reset environment variables
. ~/instavibe-bootstrap/set_env.sh
Delete Agent Engine:
cd ~/instavibe-bootstrap/utils
source ~/instavibe-bootstrap/env/bin/activate
export ORCHESTRATE_AGENT_ID=$(cat ~/instavibe-bootstrap/instavibe/temp_endpoint.txt)
echo "ORCHESTRATE_AGENT_ID set to: ${ORCHESTRATE_AGENT_ID}"
python remote_delete.py
deactivate
echo "Vertex AI Agent Engine deletion initiated."
Delete Cloud Run Services:
# InstaVibe Web Application
gcloud run services delete instavibe --platform=managed --region=${REGION} --project=${PROJECT_ID} --quiet

# MCP Tool Server
gcloud run services delete mcp-tool-server --platform=managed --region=${REGION} --project=${PROJECT_ID} --quiet

# Planner Agent (A2A Server)
gcloud run services delete planner-agent --platform=managed --region=${REGION} --project=${PROJECT_ID} --quiet

# Platform MCP Client Agent (A2A Server)
gcloud run services delete platform-mcp-client --platform=managed --region=${REGION} --project=${PROJECT_ID} --quiet

# Social Agent (A2A Server)
gcloud run services delete social-agent --platform=managed --region=${REGION} --project=${PROJECT_ID} --quiet

echo "Cloud Run services deletion initiated."
Stop and Remove the A2A Inspector Docker Container
docker rm --force a2a-inspector
Delete Spanner Instance:
echo "Deleting Spanner instance: ${SPANNER_INSTANCE_ID}..."
gcloud spanner instances delete ${SPANNER_INSTANCE_ID} --project=${PROJECT_ID} --quiet
echo "Spanner instance deletion initiated."
Delete Artifact Registry Repository:
echo "Deleting Artifact Registry repository: ${REPO_NAME}..."
gcloud artifacts repositories delete ${REPO_NAME} --location=${REGION} --project=${PROJECT_ID} --quiet
echo "Artifact Registry repository deletion initiated."
Remove Roles from Service Account:
echo "Removing roles from service account: $SERVICE_ACCOUNT_NAME in project $PROJECT_ID"

# Remove Project-level roles for default service account
gcloud projects remove-iam-policy-binding $PROJECT_ID \
  --member="serviceAccount:$SERVICE_ACCOUNT_NAME" \
  --role="roles/spanner.admin"

gcloud projects remove-iam-policy-binding $PROJECT_ID \
  --member="serviceAccount:$SERVICE_ACCOUNT_NAME" \
  --role="roles/spanner.databaseUser"

gcloud projects remove-iam-policy-binding $PROJECT_ID \
  --member="serviceAccount:$SERVICE_ACCOUNT_NAME" \
  --role="roles/artifactregistry.admin"

gcloud projects remove-iam-policy-binding $PROJECT_ID \
  --member="serviceAccount:$SERVICE_ACCOUNT_NAME" \
  --role="roles/cloudbuild.builds.editor"

gcloud projects remove-iam-policy-binding $PROJECT_ID \
  --member="serviceAccount:$SERVICE_ACCOUNT_NAME" \
  --role="roles/run.admin"

gcloud projects remove-iam-policy-binding $PROJECT_ID \
  --member="serviceAccount:$SERVICE_ACCOUNT_NAME" \
  --role="roles/iam.serviceAccountUser"

gcloud projects remove-iam-policy-binding $PROJECT_ID \
  --member="serviceAccount:$SERVICE_ACCOUNT_NAME" \
  --role="roles/aiplatform.user"

gcloud projects remove-iam-policy-binding $PROJECT_ID \
  --member="serviceAccount:$SERVICE_ACCOUNT_NAME" \
  --role="roles/logging.logWriter"

gcloud projects remove-iam-policy-binding $PROJECT_ID \
  --member="serviceAccount:$SERVICE_ACCOUNT_NAME" \
  --role="roles/logging.viewer"


echo "All specified roles have been removed."
Delete Local Workshop Files:
echo "Removing local workshop directory ~/instavibe-bootstrap..."
rm -rf ~/instavibe-bootstrap
rm -rf ~/a2a-inspector
rm -f ~/mapkey.txt
rm -f ~/project_id.txt
echo "Local directory removed."