1. Overview
Last Updated: 2024-10-18
Written by Sanggyu Lee (sanggyulee@google.com)
What you'll build
In this codelab, you'll build a GenAI agent for retail customers
Your app will:
- It works on mobile or desktop.
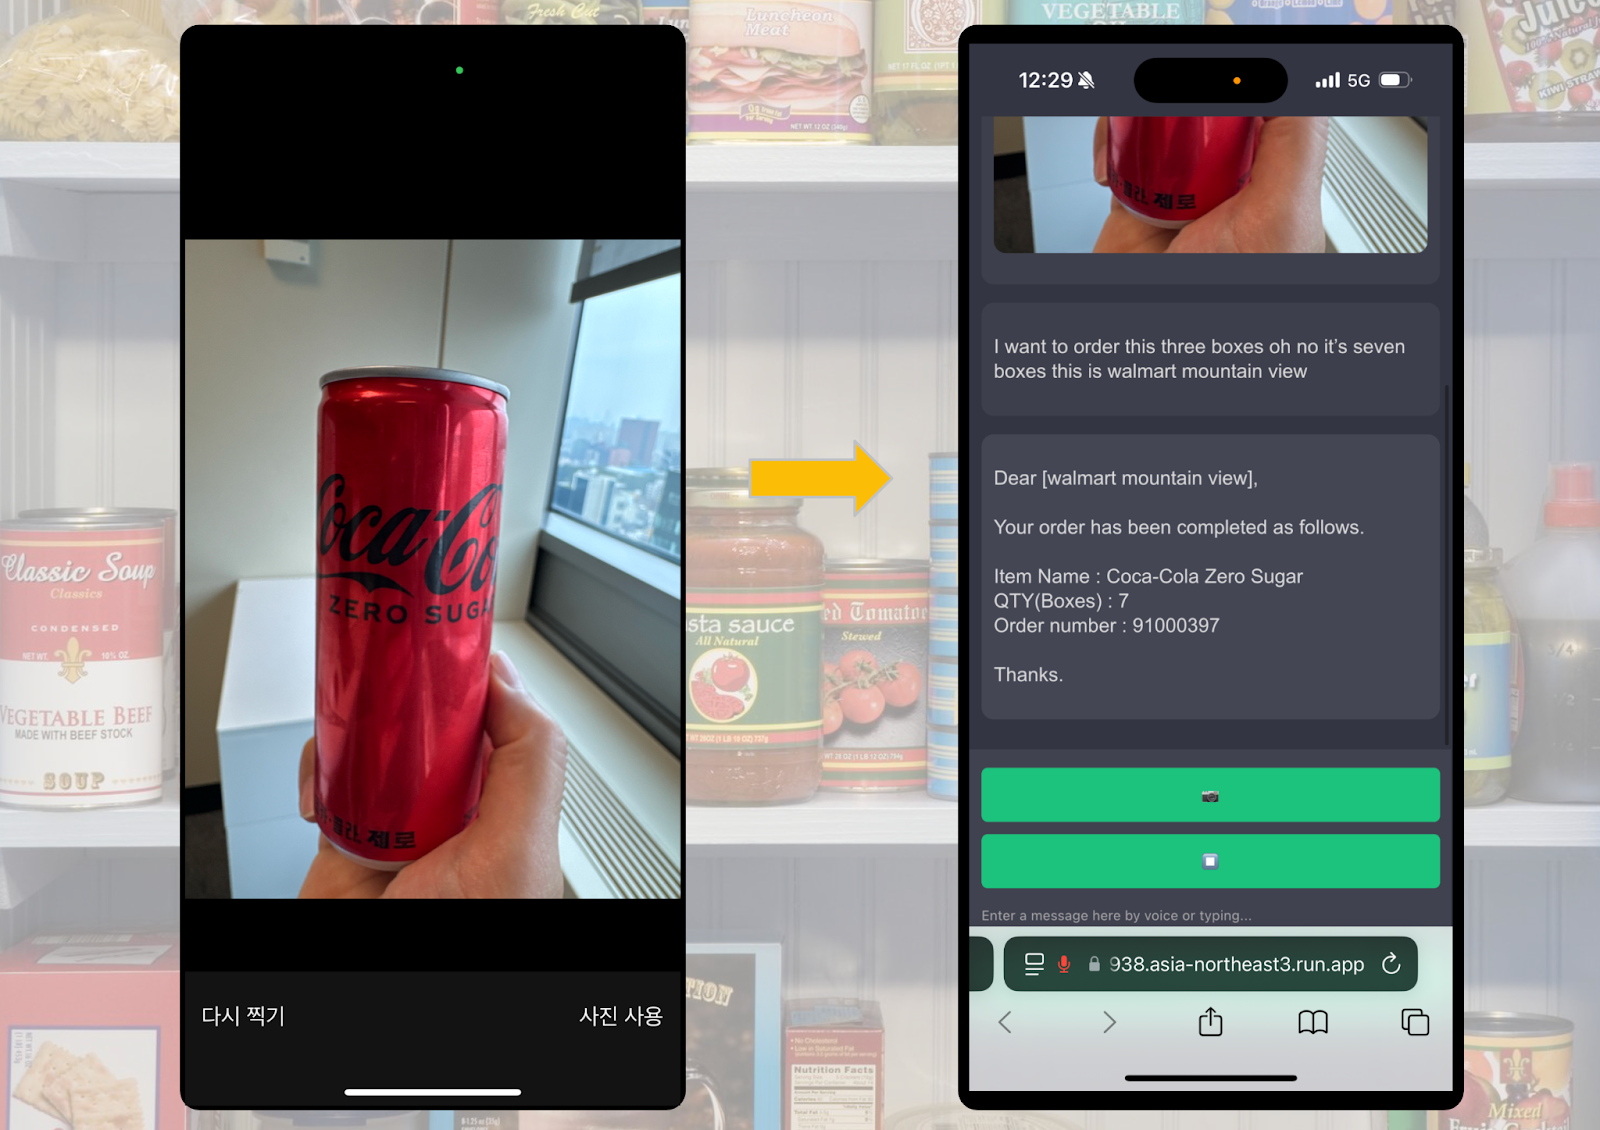
- You can take a photo for an item and order it with voice chat.
- Here's how the app works: You simply take a photo of the item and say, for example, "I want to order this, 3 boxes. I'm the manager at Walmart Honolulu." The app uploads the photo to Cloud Storage and transcribes your voice recording. This information is then sent to a Gemini model on Vertex AI, which identifies the item and your store (Walmart Honolulu). If the request meets the sales order criteria, the system generates a sales order with a unique ID.

2. What you'll learn
What you'll learn
- How to create an AI agent with Vertex AI
- How to send audio and receive a text transcription from the Speech-to-Text API service
- How to deploy your AI agent on Cloud Run
This codelab is focused on GenAI agent apps with Gemini. Non-relevant concepts and code blocks are glossed over and are provided for you to simply copy and paste.
What you'll need
- Google Cloud Account
- Knowledge of Python, Javascript and Google Cloud
Architecture

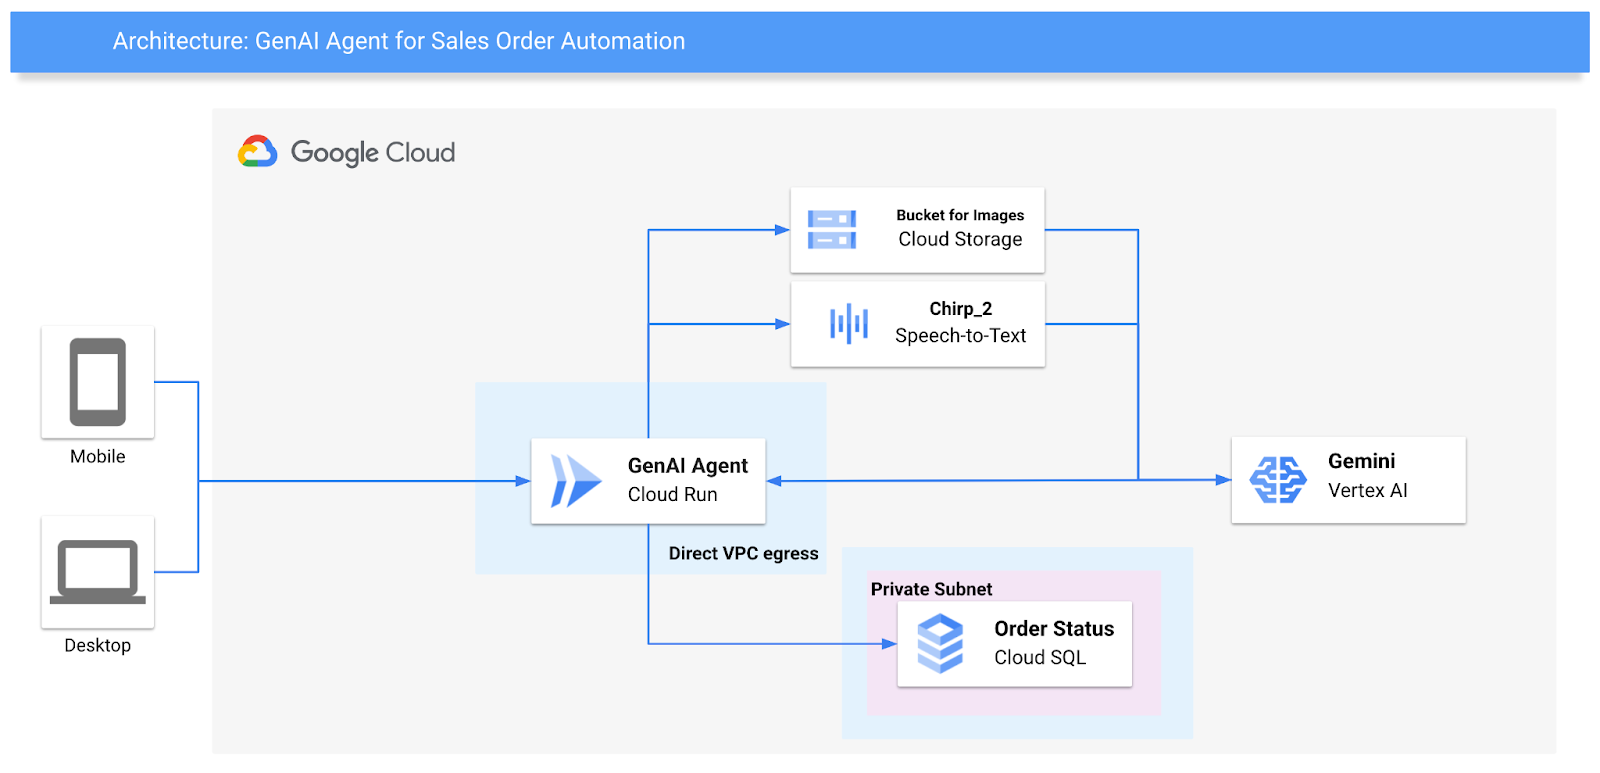
This Agent is for simplified ordering using Gemini's multi modality features with image and text prompts. If the order is spoken, Google Speech's Chirp 2 model transcribes it to text, which is then used, along with a provided image, to query Vertex AI's Gemini model.
We will build :
- Create a development environment
- Flask app to be called by users via mobile or PC. The App will run on Cloud Run.
3. Setup and Requirements
Self-paced environment setup
- Sign-in to the Google Cloud Console and create a new project or reuse an existing one. If you don't already have a Gmail or Google Workspace account, you must create one.


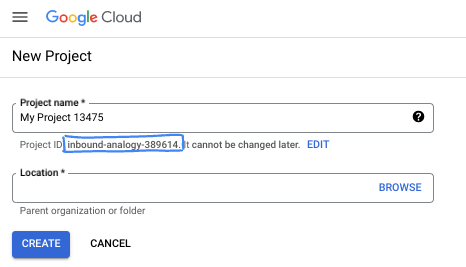
- The Project name is the display name for this project's participants. It is a character string not used by Google APIs. You can always update it.
- The Project ID is unique across all Google Cloud projects and is immutable (cannot be changed after it has been set). The Cloud Console auto-generates a unique string; usually you don't care what it is. In most codelabs, you'll need to reference your Project ID (typically identified as PROJECT_ID). If you don't like the generated ID, you might generate another random one. Alternatively, you can try your own, and see if it's available. It can't be changed after this step and remains for the duration of the project.
- For your information, there is a third value, a Project Number, which some APIs use. Learn more about all three of these values in the documentation.
- Next, you'll need to enable billing in the Cloud Console to use Cloud resources/APIs. Running through this codelab won't cost much, if anything at all. To shut down resources to avoid incurring billing beyond this tutorial, you can delete the resources you created or delete the project. New Google Cloud users are eligible for the $300 USD Free Trial program.
Start Cloud Shell
While Google Cloud can be operated remotely from your laptop, in this codelab you will be using Google Cloud Shell, a command line environment running in the Cloud.
From the Google Cloud Console, click the Cloud Shell icon on the top right toolbar:

It should only take a few moments to provision and connect to the environment. When it is finished, you should see something like this:

This virtual machine is loaded with all the development tools you'll need. It offers a persistent 5GB home directory, and runs on Google Cloud, greatly enhancing network performance and authentication. All of your work in this codelab can be done within a browser. You do not need to install anything.
4. Before you begin
Enable APIs
Enable the APIs required for the lab. This takes a few minutes.
gcloud services enable \
  run.googleapis.com \
  cloudbuild.googleapis.com \
  aiplatform.googleapis.com \
  speech.googleapis.com \
  sqladmin.googleapis.com \
  logging.googleapis.com \
  compute.googleapis.com \
  servicenetworking.googleapis.com \
  monitoring.googleapis.com
Expected console output :
Operation "operations/acf.p2-639929424533-ffa3a09b-7663-4b31-8f78-5872bf4ad778" finished successfully.
Set up the Environments
Before the CLI command set up the parameters for Google Cloud Environments.
export PROJECT_ID="<YOUR_PROJECT_ID>"
export VPC_NAME="<YOUR_VPC_NAME>" e.g : demonetwork
export SUBNET_NAME="<YOUR_SUBNET_NAME>" e.g : genai-subnet
export REGION="<YOUR_REGION>" e.g : us-central1
export GENAI_BUCKET="<YOUR BUCKET FOR AGENT>" # eg> genai-${PROJECT_ID}
For example :
export PROJECT_ID=$(gcloud config get-value project)
export VPC_NAME="demonetwork"
export SUBNET_NAME="genai-subnet"
export REGION="us-central1"
export GENAI_BUCKET="genai-${PROJECT_ID}"
5. Build your infrastructure
Create the Network for your app
Create a VPC for your app. To create the VPC with the name of "demonetwork", run :
gcloud compute networks create demonetwork \
    --subnet-mode custom
To create the subnetwork "genai-subnet" with address range 10.10.0.0/24 in the network "demonetwork", run:
gcloud compute networks subnets create genai-subnet \
    --network demonetwork \
    --region us-central1 \
    --range 10.10.0.0/24
Create a Cloud SQL for PostgreSQL
Allocated IP address ranges for private service access.
gcloud compute addresses create google-managed-services-my-network \
    --global \
    --purpose=VPC_PEERING \
    --prefix-length=16 \
    --description="peering range for Google" \
    --network=demonetwork
Create a private connection.
gcloud services vpc-peerings connect \
    --service=servicenetworking.googleapis.com \
    --ranges=google-managed-services-my-network \
    --network=demonetwork
Run the gcloud sql instances create command to create a Cloud SQL instance.
gcloud sql instances create sql-retail-genai \
  --database-version POSTGRES_14 \
  --tier db-f1-micro \
  --region=$REGION \
  --project=$PROJECT_ID \
  --network=projects/${PROJECT_ID}/global/networks/${VPC_NAME} \
  --no-assign-ip \
  --enable-google-private-path
This command may take a few minutes to complete.
Expected console output :
Created [https://sqladmin.googleapis.com/sql/v1beta4/projects/evident-trees-438609-q3/instances/sql-retail-genai].
NAME: sql-retail-genai
DATABASE_VERSION: POSTGRES_14
LOCATION: us-central1-c
TIER: db-f1-micro
PRIMARY_ADDRESS: -
PRIVATE_ADDRESS: 10.66.0.3
STATUS: RUNNABLE
Create a database for your app and the user
Run the gcloud sql databases create command to create a Cloud SQL database within the sql-retail-genai.
gcloud sql databases create retail-orders \
  --instance sql-retail-genai
Create a PostgreSQL database user, you would better change the password.
gcloud sql users create aiagent --instance sql-retail-genai --password "genaiaigent2@"
Create a bucket for storing images
Create a private bucket for your agent
gsutil mb -l $REGION gs://$GENAI_BUCKET
Update Bucket permissions
gsutil iam ch serviceAccount:<your service account>: roles/storage.objectUser gs://$GENAI_BUCKET
If assuming to use your default compute service account :
gsutil iam ch serviceAccount:$(gcloud projects describe $PROJECT_ID --format="value(projectNumber)")-compute@developer.gserviceaccount.com:roles/storage.objectUser gs://$GENAI_BUCKET
6. Prepare codes for your app
Prepare the codes
The web application for placing orders is built using Flask and can be run in a web browser on mobile or PC. It accesses the microphone and camera of the connected device and uses Google Speech's Chirp 2 model and Vertex AI's Gemini Pro 1.5 model. Order results are stored in a Cloud SQL database.
If you used the example environment variable names provided on the previous page, you can use the code below without modification. If you have customized environment variable names, you will need to change some variable values in the code accordingly.
Create two directories as follows.
mkdir -p genai-agent/templates
Create a requirements.txt
vi ~/genai-agent/requirements.txt
Enter a list of packages into the text file.
aiofiles==24.1.0
aiohappyeyeballs==2.4.3
aiohttp==3.10.9
aiosignal==1.3.1
annotated-types==0.7.0
asn1crypto==1.5.1
attrs==24.2.0
blinker==1.8.2
cachetools==5.5.0
certifi==2024.8.30
cffi==1.17.1
charset-normalizer==3.3.2
click==8.1.7
cloud-sql-python-connector==1.12.1
cryptography==43.0.1
docstring_parser==0.16
Flask==3.0.3
frozenlist==1.4.1
google-api-core==2.20.0
google-auth==2.35.0
google-cloud-aiplatform==1.69.0
google-cloud-bigquery==3.26.0
google-cloud-core==2.4.1
google-cloud-resource-manager==1.12.5
google-cloud-speech==2.27.0
google-cloud-storage==2.18.2
google-crc32c==1.6.0
google-resumable-media==2.7.2
googleapis-common-protos==1.65.0
greenlet==3.1.1
grpc-google-iam-v1==0.13.1
grpcio==1.66.2
grpcio-status==1.66.2
idna==3.10
itsdangerous==2.2.0
Jinja2==3.1.4
MarkupSafe==3.0.0
multidict==6.1.0
numpy==2.1.2
packaging==24.1
pg8000==1.31.2
pgvector==0.3.5
proto-plus==1.24.0
protobuf==5.28.2
pyasn1==0.6.1
pyasn1_modules==0.4.1
pycparser==2.22
pydantic==2.9.2
pydantic_core==2.23.4
python-dateutil==2.9.0.post0
requests==2.32.3
rsa==4.9
scramp==1.4.5
shapely==2.0.6
six==1.16.0
SQLAlchemy==2.0.35
typing_extensions==4.12.2
urllib3==2.2.3
Werkzeug==3.0.4
yarl==1.13.1
Create a main.py
vi ~/genai-agent/main.py
Enter python code into the main.py file.
from flask import Flask, render_template, request, jsonify, Response
import os
import base64
from google.api_core.client_options import ClientOptions
from google.cloud.speech_v2 import SpeechClient
from google.cloud.speech_v2.types import cloud_speech

import vertexai
from vertexai.generative_models import GenerativeModel, Part, SafetySetting
from google.cloud import storage
import uuid  # Import the uuid module
from typing import Dict  # Add this import
import datetime
import json
import re

import os
from google.cloud.sql.connector import Connector
import pg8000
import sqlalchemy
from sqlalchemy import create_engine, text

app = Flask(__name__)

# Replace with your actual project ID
project_id = os.environ.get("PROJECT_ID")

# Use a connection pool to reuse connections and improve performance
# This also handles connection lifecycle management automatically
engine = None

# Configure Google Cloud Storage
storage_client = storage.Client()
bucket_name = os.environ.get("GENAI_BUCKET")
client = SpeechClient(
    client_options=ClientOptions(
        api_endpoint="us-central1-speech.googleapis.com",
    ),
)

def get_engine():
    global engine  # Use global to access/modify the global engine variable
    if engine is None:  # Create the engine only once
        connector = Connector()

        def getconn() -> pg8000.dbapi.Connection:
            conn: pg8000.dbapi.Connection = connector.connect(
                os.environ["INSTANCE_CONNECTION_NAME"],  # Cloud SQL instance connection name
                "pg8000",
                user=os.environ["DB_USER"],
                password=os.environ["DB_PASS"],
                db=os.environ["DB_NAME"],
                ip_type="PRIVATE",
            )
            return conn

        engine = create_engine(
            "postgresql+pg8000://",
            creator=getconn,
            pool_pre_ping=True,  # Check connection validity before use
            pool_size=5,  # Adjust pool size as needed
            max_overflow=2, #  Allow some overflow for bursts
            pool_recycle=300, #  Recycle connections after 5 minutes
        )
    return engine

def migrate_db() -> None:
    engine = get_engine()  # Get the engine (creates it if necessary)
    with engine.begin() as conn:
        sql = """
            CREATE TABLE IF NOT EXISTS image_sales_orders (
                order_id SERIAL PRIMARY KEY,
                vendor_name VARCHAR(80) NOT NULL,
                order_item VARCHAR(100) NOT NULL,
                order_boxes INT NOT NULL,
                time_cast TIMESTAMP NOT NULL
            );
        """
        conn.execute(text(sql))


@app.before_request
def init_db():
    migrate_db()
    #print("Migration complete.")

@app.route('/')
def index():
    return render_template('index.html')

@app.route('/orderlist')
def orderlist():
    engine = get_engine()
    with engine.connect() as conn:
        sql = text("""
            SELECT order_id, vendor_name, order_item, order_boxes, time_cast
            FROM image_sales_orders
            ORDER BY time_cast DESC
        """)
        result = conn.execute(sql).mappings()  # Use .mappings() for dict-like access
        orders = []
        for row in result:
            order = {
                'OrderId': row['order_id'],
                'VendorName': row['vendor_name'],
                'OrderItem': row['order_item'],
                'OrderBoxes': row['order_boxes'],
                'OrderDate': row['time_cast'].strftime('%Y-%m-%d'),
                'OrderTime': row['time_cast'].strftime('%H:%M:%S'),
            }
            orders.append(order)
    return render_template('orderlist.html', orders=orders)

@app.route("/upload_photo", methods=["POST"])
def upload_photo():
    # Get the uploaded file
    file = request.files["photo"]

    # Generate a unique filename
    filename = f"{uuid.uuid4()}--{file.filename}"

    # Upload the file to Google Cloud Storage
    bucket = storage_client.get_bucket(bucket_name)
    blob = bucket.blob(filename)
    generation_match_precondition = 0
    blob.upload_from_file(file, if_generation_match=generation_match_precondition)

    # Return the destination filename
    image_url = f"gs://{bucket_name}/{filename}"

    # Return the destination filename
    return image_url

@app.route('/upload', methods=['POST'])
def upload():
    audio_data = request.form['audio_data']
    audio_data = base64.b64decode(audio_data.split(',')[1])

    audio_path = f"{uuid.uuid4()}--audio.wav"

    with open(audio_path, 'wb') as f:
        f.write(audio_data)

    transcript = transcribe_speech(audio_path)
    os.remove(audio_path)
    return jsonify({'transcript': transcript})

@app.route("/orders", methods=["POST"])
def cast_order() -> Response:
    prompt = request.form['transcript']
    image_url = request.form['image_url']
    print(f"Prompt: {prompt}")
    print(f"Image URL: {image_url}")

    model_response = generate(image_url=image_url, prompt=prompt)
    # Extract the text content from the model response
    response_text = model_response.text if hasattr(model_response, 'text') else str(model_response)

    #print(f"Response from Model !!!!!!: {response_text}")

    try:
        response_json = json.loads(response_text)
        function_name = response_json.get("function")
        parameters = response_json.get("parameters")

    except json.JSONDecodeError as e:
        logging.error(f"JSON decoding error: {e}")
        return Response(
            "I cannot fulfill your request because I cannot find the [Product Name], [Quantity (Box)], and [Retail Store Name] in the provided image and prompt.",
            status=500
        )

    if function_name == 'Z_SALES_ORDER_SRV/orderlistSet':
        engine = get_engine()
        with engine.connect() as conn:
            try:
                # Explicitly convert order_boxes to integer
                order_boxes = int(parameters["order_boxes"])
                vendor_name = parameters["vendor_name"]
                order_item = parameters["order_item"]

                # Prepare the SQL statement
                sql = text("""
                    INSERT INTO image_sales_orders (vendor_name, order_item, order_boxes, time_cast)
                    VALUES (:vendor_name, :order_item, :order_boxes, NOW())
                """)

                # Prepare parameters
                params = {
                    "vendor_name": vendor_name,
                    "order_item": order_item,
                    "order_boxes": order_boxes,
                }

                # Execute the SQL statement with parameters
                conn.execute(sql, params)
                conn.commit()

                response_message = f"Dear [{vendor_name}],\n\nYour order has been completed as follows. \n\nItem Name : {order_item}\nQTY(Boxes) : {order_boxes}\n\nThanks."
                return Response(response_message, status=200)

            except (KeyError, ValueError) as e:
                logging.error(f"Error inserting into database: {e}")
                response_message = "Error processing your order. Please check the input data."
                return Response(response_message, status=500)

    else:
        # Handle other function names if necessary
        return Response("Unknown function.", status=400)


def transcribe_speech(audio_file):
    with open(audio_file, "rb") as f:
        content = f.read()

    config = cloud_speech.RecognitionConfig(
        auto_decoding_config=cloud_speech.AutoDetectDecodingConfig(),
        language_codes=["auto"],
        #language_codes=["ko-KR"],    -- In case that needs to choose specific language
        model="chirp_2",
    )

    request = cloud_speech.RecognizeRequest(
        recognizer=f"projects/{project_id}/locations/us-central1/recognizers/_",
        config=config,
        content=content,
    )

    response = client.recognize(request=request)

    transcript = ""
    for result in response.results:
        transcript += result.alternatives[0].transcript

    return transcript

if __name__ == '__main__':
    app.run(debug=True, host="0.0.0.0", port=int(os.environ.get("PORT", 8080)))
    #app.run(debug=True)

def generate(image_url,prompt):
    vertexai.init(project=project_id, location="us-central1")
    model = GenerativeModel("gemini-1.5-pro-002")
    image1 = Part.from_uri(uri=image_url, mime_type="image/jpeg")

    prompt_default = """A retail store will give you an image with order details as an Input. You will identify the order details and provide an output as the following json format. You should not add any comment on it. The Box quantity should be arabic number. You can extract the item name from a given image or prompt. However, you should extract the retail store name or the quantity from only the text prompt but not the given image. All parameter values are strings. Don't assume any parameters. Do not wrap the json codes in JSON markers.

{\"function\":\"Z_SALES_ORDER_SRV/orderlistSet\",\"parameters\":{\"vendor_name\":Retail store name,\"order_item\":Item name,\"order_boxes\":Box quantity}}

If you are not clear on any parameter, provide the output as follows.
{\"function\":\"None\"}

You should not use the json markdown for the result.

Input :"""

    generation_config = {
        "max_output_tokens": 8192,
        "temperature": 0,
        "top_p": 0.95,
    }

    safety_settings = [
        SafetySetting(
            category=SafetySetting.HarmCategory.HARM_CATEGORY_HATE_SPEECH,
            threshold=SafetySetting.HarmBlockThreshold.OFF
        ),
        SafetySetting(
            category=SafetySetting.HarmCategory.HARM_CATEGORY_DANGEROUS_CONTENT,
            threshold=SafetySetting.HarmBlockThreshold.OFF
        ),
        SafetySetting(
            category=SafetySetting.HarmCategory.HARM_CATEGORY_SEXUALLY_EXPLICIT,
            threshold=SafetySetting.HarmBlockThreshold.OFF
        ),
        SafetySetting(
            category=SafetySetting.HarmCategory.HARM_CATEGORY_HARASSMENT,
            threshold=SafetySetting.HarmBlockThreshold.OFF
        ),
    ]

    responses = model.generate_content(
        [prompt_default, image1, prompt],
        generation_config=generation_config,
        safety_settings=safety_settings,
        stream=True,
    )

    response = ""
    for content in responses:
       response += content.text
       print(f"Content: {content}")
       print(f"Content type: {type(content)}")
       print(f"Content attributes: {dir(content)}")

    print(f"response_texts={response}")

    if response.startswith('json'):
       return clean_json_string(response)
    else:
       return response

def clean_json_string(json_string):
    pattern = r'^```json\s*(.*?)\s*```$'
    cleaned_string = re.sub(pattern, r'\1', json_string, flags=re.DOTALL)
    return cleaned_string.strip()
Create index.html
vi ~/genai-agent/templates/index.html
Enter HTML code into the index.html file.
<!DOCTYPE html>
<html>
<head>
    <title>GenAI Agent for Retail</title>
    <meta name="viewport" content="width=device-width, initial-scale=1.0">
    <style>
        /* Styles adjusted for chatbot interface */
        body {
            font-family: Arial, sans-serif;
            background-color: #343541;
            margin: 0;
            padding: 0;
            display: flex;
            flex-direction: column;
            height: 100vh;
        }

        .chat-container {
            flex: 1;
            overflow-y: auto;
            padding: 10px;
            background-color: #343541;
        }

        .message {
            max-width: 80%;
            margin-bottom: 15px;
            padding: 10px;
            border-radius: 10px;
            color: #dcdcdc;
            word-wrap: break-word;
        }

        .user-message {
            background-color: #3e3f4b;
            align-self: flex-end;
        }

        .assistant-message {
            background-color: #444654;
            align-self: flex-start;
        }

        .message-input {
            padding: 10px;
            background-color: #40414f;
            display: flex;
            align-items: center;
        }

        .message-input textarea {
            flex: 1;
            padding: 10px;
            border: none;
            border-radius: 5px;
            resize: none;
            background-color: #40414f;
            color: #dcdcdc;
            height: 40px;
            max-height: 100px;
            overflow-y: auto;
        }

        .message-input button {
            padding: 15px;
            margin-left: 5px;
            background-color: #19c37d;
            border: none;
            border-radius: 5px;
            color: white;
            font-weight: bold;
            cursor: pointer;
            flex-shrink: 0;
        }

        .image-preview {
            max-width: 100%;
            border-radius: 10px;
            margin-bottom: 10px;
        }

        .hidden {
            display: none;
        }

        /* Media queries for responsive design */
        @media screen and (max-width: 600px) {
            .message {
                max-width: 100%;
            }

            .message-input {
                flex-direction: column;
            }

            .message-input textarea {
                width: 100%;
                margin-bottom: 10px;
            }

            .message-input button {
                width: 100%;
                margin: 5px 0;
            }
        }
    </style>
</head>
<body>
    <div class="chat-container" id="chat-container">
        <!-- Messages will be appended here -->
    </div>

    <div class="message-input">
        <input type="file" name="photo" id="photo" accept="image/*" capture="camera" class="hidden">
        <button id="uploadImageButton">📷</button>
        <button id="recordButton">🎤</button>
        <textarea id="transcript" rows="1" placeholder="Enter a message here by voice or typing..."></textarea>
        <button id="sendButton">Send</button>
    </div>

    <script>
        const chatContainer = document.getElementById('chat-container');
        const transcriptInput = document.getElementById('transcript');
        const sendButton = document.getElementById('sendButton');
        const recordButton = document.getElementById('recordButton');
        const uploadImageButton = document.getElementById('uploadImageButton');
        const photoInput = document.getElementById('photo');

        let mediaRecorder;
        let audioChunks = [];
        let imageUrl = '';

        function appendMessage(content, sender) {
            const messageDiv = document.createElement('div');
            messageDiv.classList.add('message', sender === 'user' ? 'user-message' : 'assistant-message');

            if (typeof content === 'string') {
                const messageContent = document.createElement('p');
                messageContent.innerText = content;
                messageDiv.appendChild(messageContent);
            } else {
                messageDiv.appendChild(content);
            }

            chatContainer.appendChild(messageDiv);
            chatContainer.scrollTop = chatContainer.scrollHeight;
        }

        sendButton.addEventListener('click', () => {
            const message = transcriptInput.value.trim();
            if (message !== '') {
                appendMessage(message, 'user');

                // Prepare form data
                const formData = new FormData();
                formData.append('transcript', message);
                formData.append('image_url', imageUrl);

                // Send the message to the server
                fetch('/orders', {
                    method: 'POST',
                    body: formData
                })
                .then(response => response.text())
                .then(data => {
                    appendMessage(data, 'assistant');
                    // Reset imageUrl after sending
                    imageUrl = '';
                })
                .catch(error => {
                    console.error('Error:', error);
                });

                transcriptInput.value = '';
            }
        });

        transcriptInput.addEventListener('keypress', (e) => {
            if (e.key === 'Enter' && !e.shiftKey) {
                e.preventDefault();
                sendButton.click();
            }
        });

        recordButton.addEventListener('click', async () => {
            if (mediaRecorder && mediaRecorder.state === 'recording') {
                mediaRecorder.stop();
                recordButton.innerText = '🎤';
                return;
            }

            let stream = await navigator.mediaDevices.getUserMedia({ audio: true });
            mediaRecorder = new MediaRecorder(stream);
            mediaRecorder.start();
            recordButton.innerText = '⏹️';

            mediaRecorder.ondataavailable = event => {
                audioChunks.push(event.data);
            };

            mediaRecorder.onstop = async () => {
                let audioBlob = new Blob(audioChunks, { type: 'audio/wav' });
                audioChunks = [];

                let reader = new FileReader();
                reader.readAsDataURL(audioBlob);
                reader.onloadend = () => {
                    let base64String = reader.result;

                    // Send the audio data to the server
                    fetch('/upload', {
                        method: 'POST',
                        headers: {
                            'Content-Type': 'application/x-www-form-urlencoded'
                        },
                        body: 'audio_data=' + encodeURIComponent(base64String)
                    })
                    .then(response => response.json())
                    .then(data => {
                        transcriptInput.value = data.transcript;
                    })
                    .catch(error => {
                        console.error('Error:', error);
                    });
                };
            };
        });

        uploadImageButton.addEventListener('click', () => {
            photoInput.click();
        });

        photoInput.addEventListener('change', function() {
            if (photoInput.files && photoInput.files[0]) {
                const file = photoInput.files[0];
                const reader = new FileReader();
                reader.onload = function(e) {
                    const img = document.createElement('img');
                    img.src = e.target.result;
                    img.classList.add('image-preview');
                    appendMessage(img, 'user');
                };
                reader.readAsDataURL(file);

                const formData = new FormData();
                formData.append('photo', photoInput.files[0]);

                // Upload the image to the server
                fetch('/upload_photo', {
                    method: 'POST',
                    body: formData,
                })
                .then(response => response.text())
                .then(url => {
                    imageUrl = url;
                })
                .catch(error => {
                    console.error('Error uploading photo:', error);
                });
            }
        });
    </script>
</body>
</html>
Create a orderlist.html
vi ~/genai-agent/templates/orderlist.html
Enter HTML code into the orderlist.html file.
<!DOCTYPE html>
<html>
<head>
    <title>Order List</title>
    <style>
        body {
            font-family: sans-serif;
            line-height: 1.6;
            margin: 20px;
            background-color: #f4f4f4;
            color: #333;
        }

        h1 {
            text-align: center;
            color: #28a745; /* Green header */
        }

        table {
            width: 100%;
            border-collapse: collapse;
            margin-top: 20px;
            box-shadow: 0 0 10px rgba(0, 0, 0, 0.1); /* Add a subtle shadow */
        }

        th, td {
            padding: 12px 15px;
            text-align: left;
            border-bottom: 1px solid #ddd;
        }

        th {
            background-color: #28a745; /* Green header background */
            color: white;
        }

        tr:nth-child(even) {
            background-color: #f8f9fa; /* Alternating row color */
        }

        tr:hover {
            background-color: #e9ecef; /* Hover effect */
        }

    </style>
</head>
<body>
    <h1>Order List</h1>
    <table>
        <thead>
            <tr>
                <th>Order ID</th>
                <th>Retail Store Name</th>
                <th>Order Item</th>
                <th>Order Boxes</th>
                <th>Order Date</th>
                <th>Order Time</th>
            </tr>
        </thead>
        <tbody>
            {% for order in orders %}
            <tr>
                <td>{{ order.OrderId }}</td>
                <td>{{ order.VendorName }}</td>
                <td>{{ order.OrderItem }}</td>
                <td>{{ order.OrderBoxes }}</td>
                <td>{{ order.OrderDate }}</td>
                <td>{{ order.OrderTime }}</td>
            </tr>
            {% endfor %}
        </tbody>
    </table>
</body>
</html>
7. Deploy the flask app to Cloud Run
From the genai-agent directory, use the following command to deploy the app to Cloud Run:
cd ~/genai-agent
gcloud run deploy --source . genai-agent-sales-order \
--set-env-vars=PROJECT_ID=$PROJECT_ID \
--set-env-vars=REGION=$REGION \
--set-env-vars=INSTANCE_CONNECTION_NAME="${PROJECT_ID}:${REGION}:sql-retail-genai" \
--set-env-vars=DB_USER=aiagent \
--set-env-vars=DB_PASS=genaiaigent2@ \
--set-env-vars=DB_NAME=retail-orders \
--set-env-vars=GENAI_BUCKET=$GENAI_BUCKET \
--network=$PROJECT_ID \
--subnet=$SUBNET_NAME \
--vpc-egress=private-ranges-only \
--region=$REGION \
--allow-unauthenticated
Expected output :
Deploying from source requires an Artifact Registry Docker repository to store built containers. A repository named [cloud-run-source-deploy] in region [us-central1] will be created.

Do you want to continue (Y/n)?  Y
This will take a few minutes and you will see the Service URL if it completes successfully,
Expected output :
..........
Building using Buildpacks and deploying container to Cloud Run service [genai-agent-sales-order] in project [xxxx] region [us-central1]
✓ Building and deploying... Done.
  ✓ Uploading sources...
  ✓ Building Container... Logs are available at [https://console.cloud.google.com/cloud-build/builds/395d141c-2dcf-465d-acfb-f97831c448c3?project=xxxx].
  ✓ Creating Revision...
  ✓ Routing traffic...
  ✓ Setting IAM Policy...
Done.
Service [genai-agent-sales-order] revision [genai-agent-sales-order-00013-ckp] has been deployed and is serving 100 percent of traffic.
Service URL: https://genai-agent-sales-order-xxxx.us-central1.run.app
You can also check the service url in your Cloud Run console.
8. Test
- Type the Service URL that is generated in the previous step of Cloud Run Deployment in your mobile or laptop.
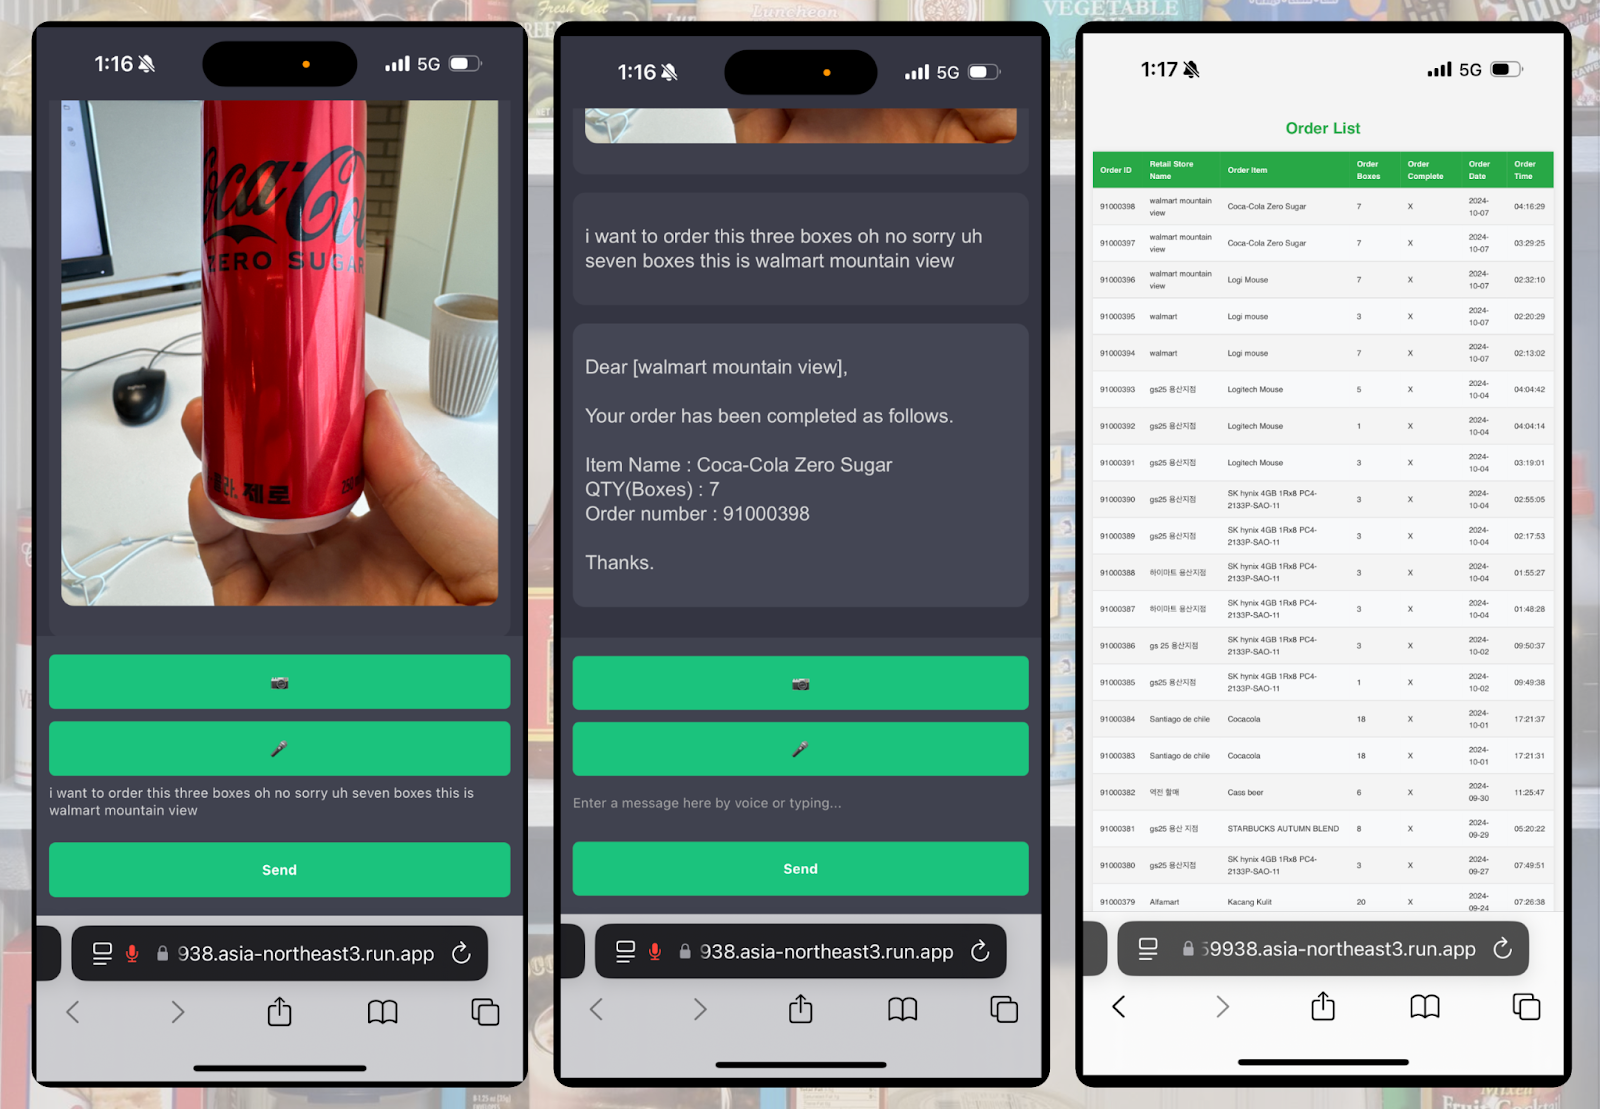
- Take a photo for an Item for your order and Enter the order quantity(boxes) and retail store name with typing or voice. <ex> "I want to order this three boxes. Oh no sorry uh seven boxes. This is Walmart Mountain Vew"
- Click "Send" and check if your order is completed.
- You can check the order history at {Service URL}/orderlist

9. Congratulations
Congratulations! You've built a GenAI Agent capable of automating business processes using Gemini on Vertex AI's multi-modality.
I'm excited for you to modify the prompts and tailor the agent to your specific needs.
