
1. 事前準備
在本程式碼研究室中,您將瞭解 Dialogflow 如何與後端系統連線,為使用者問題提供豐富且動態的回覆。
必要條件
繼續操作前,請先完成下列程式碼研究室:
您也需要瞭解 Dialogflow 的基本概念和建構方式,這些內容可從「使用 Dialogflow 建構聊天機器人」路徑中的下列影片取得。
課程內容
- 什麼是履行
- 如何為 Google 日曆設定服務帳戶
- 如何設定日曆
- 如何在 Dialogflow 中啟用執行要求
- 如何測試執行要求
建構項目
- 使用 Cloud Functions 執行動作
- Dialogflow 與 Google 日曆的整合
軟硬體需求
- 網頁瀏覽器和用於登入 Dialogflow 主控台的電子郵件地址
- 可存取 Google 日曆的 Google 帳戶
2. 什麼是履行?
「執行要求」是以 Webhook 形式部署的程式碼,可讓您的 Dialogflow 代理程式按意圖呼叫業務邏輯。在對話期間,執行要求可讓您使用 Dialogflow 自然語言處理程序擷取的資訊,並在您的後端產生動態回應或觸發動作。大多數 Dialogflow 代理程式都會使用完成動作。
以下提供幾個您可使用執行要求來擴充代理程式的範例:
- 根據從資料庫查詢的資訊來產生動態回應
- 根據顧客要求的產品提交訂單
- 導入遊戲規則和獲勝條件
3. 啟用 Calendar API
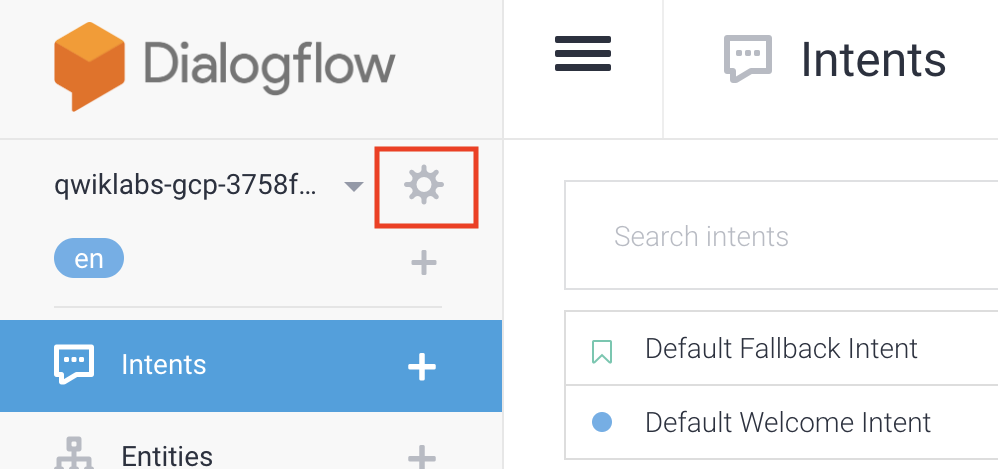
- 在 Dialogflow 主控台中,按一下
 。
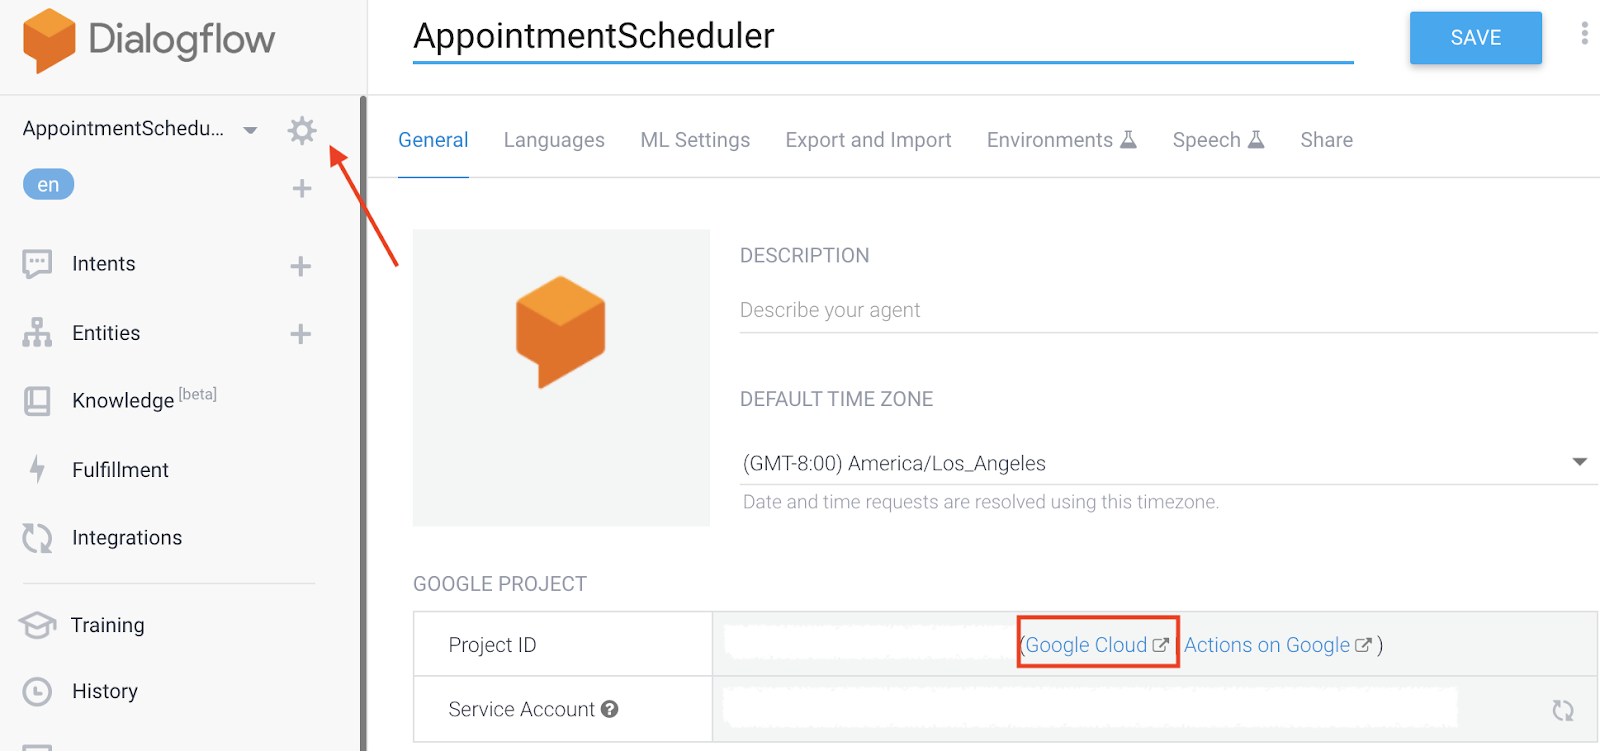
。 - 在「一般」分頁中,捲動至「專案 ID」,然後點按「Google Cloud」
 。
。
- 在 Google Cloud 控制台中,依序點選「導覽選單」圖示 ☰ >「API 和服務」>「程式庫」。
- 搜尋「Google Calendar API」,然後點按「啟用」,即可在 Google Cloud 專案中使用這個 API。
4. 設定服務帳戶
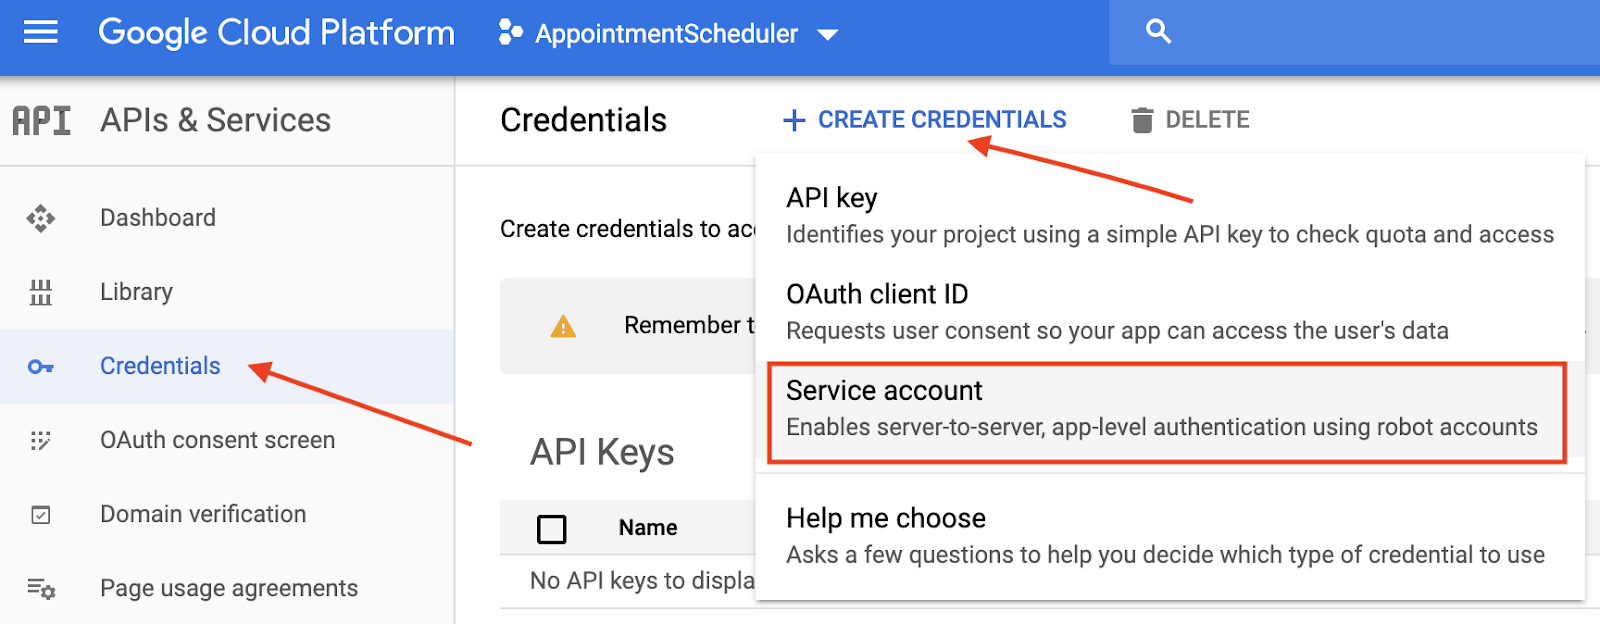
- 依序點選「導覽選單」圖示 ☰ >「API 和服務」>「憑證」。
- 依序按一下「建立憑證」 >「服務帳戶」。
- 在「服務帳戶詳細資料」中,輸入「appointment-scheduler」做為「服務帳戶名稱」,然後按一下「建立」。
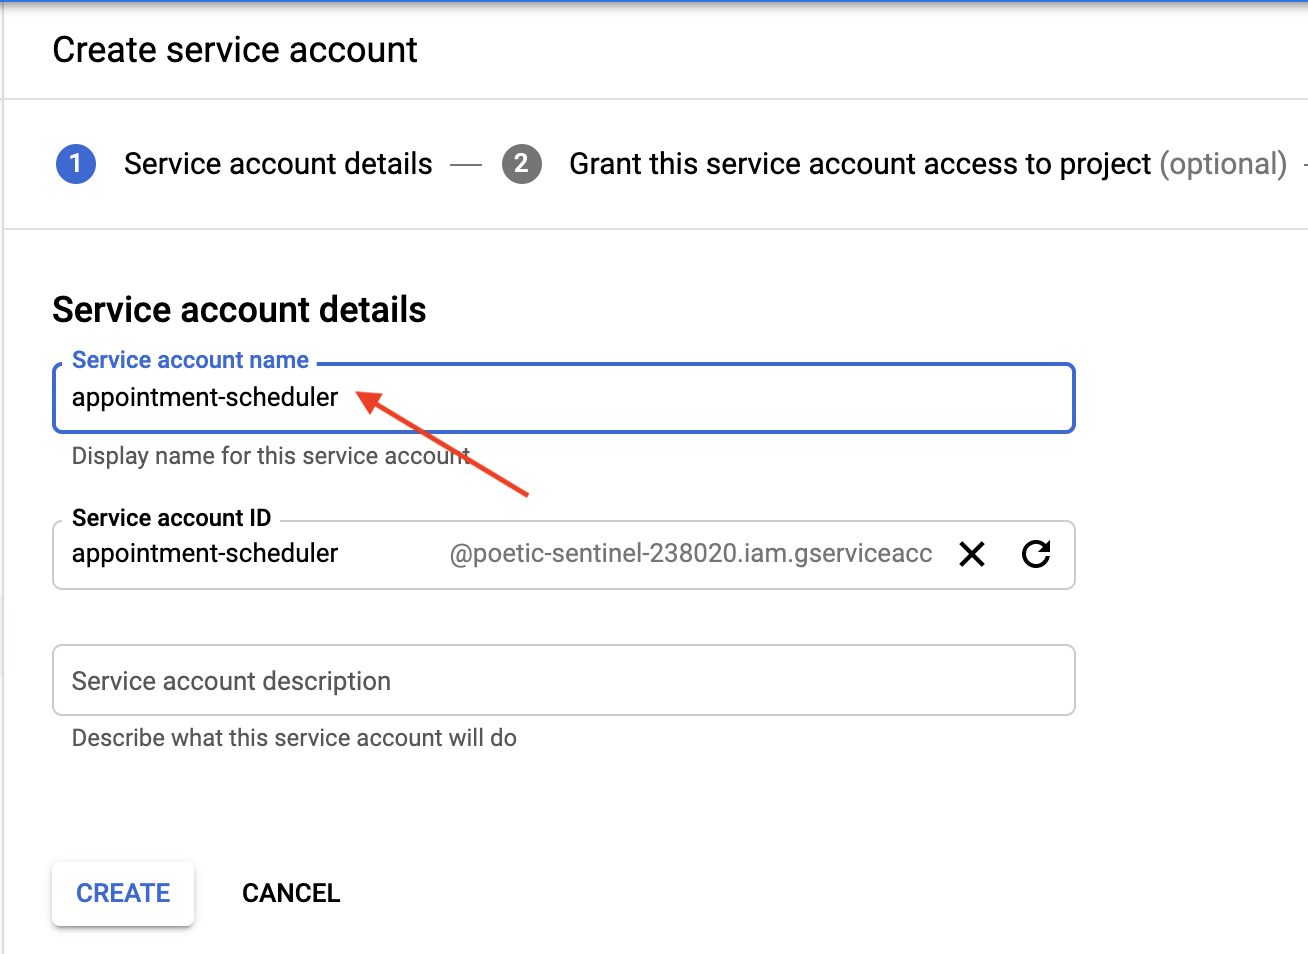
- 在「Grant this service account access to project」(將專案存取權授予這個服務帳戶) 頁面,點選「Continue」(繼續),略過這個步驟。
- 在「Grant users access to this service account (optional)」(將這個服務帳戶的存取權授予使用者 (選用)) 頁面,點選「Create Key」(建立金鑰),然後選取「JSON」並點選「Create」(建立)。
系統會將 JSON 檔案下載至您的電腦,您需要在後續設定章節中使用該檔案。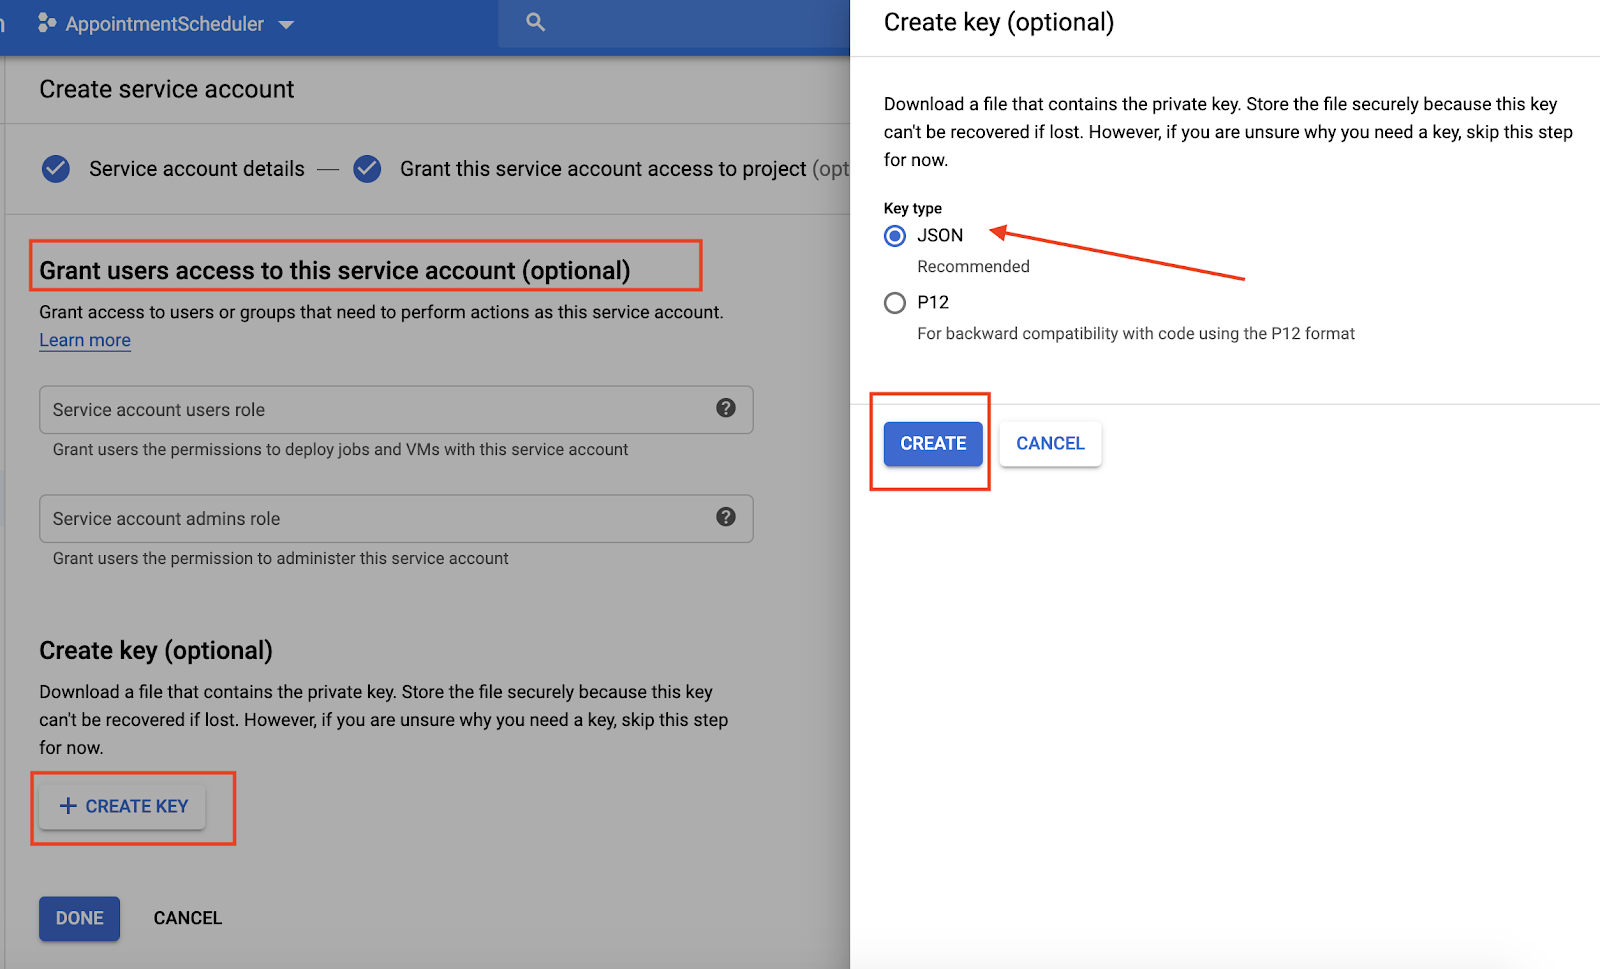
5. 設定日曆
 >「建立新日曆」。
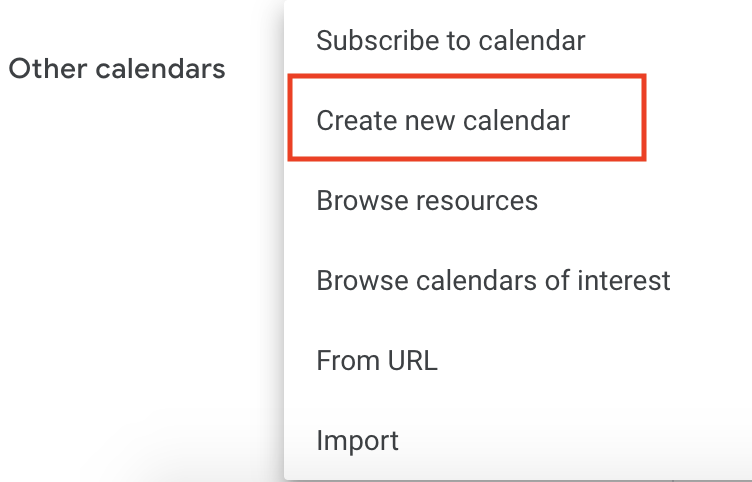
- 輸入「預約日曆」做為日曆名稱,然後按一下「建立日曆」。
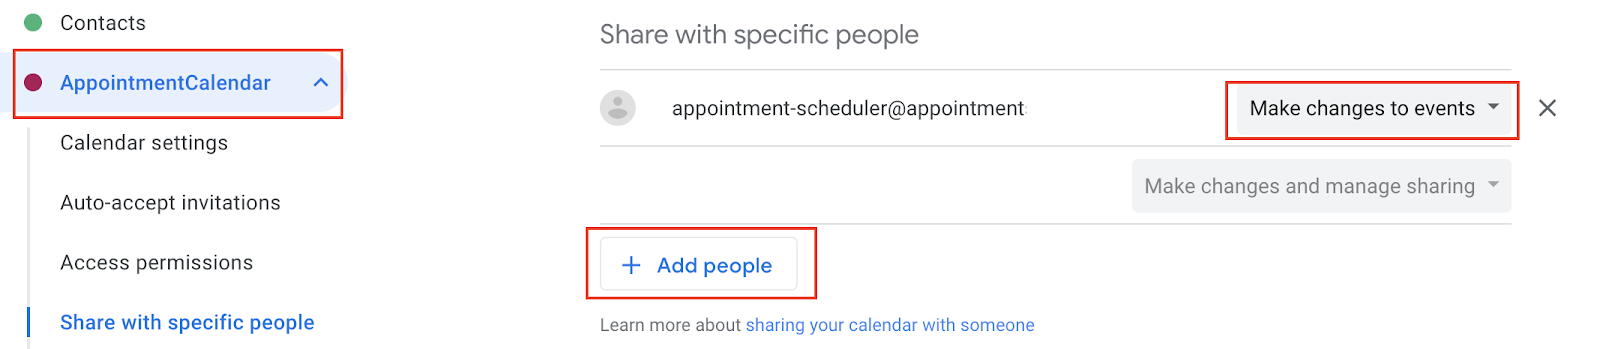
- 重新載入頁面,然後按一下「預約日曆」,捲動至「與特定使用者共用日曆」,然後按一下「新增邀請對象」。
- 複製您在設定服務帳戶時下載的 JSON 檔案中的
client_email,然後貼到對話方塊中。

- 按一下「權限」下拉式清單,然後依序點選「變更活動」 >「傳送」。
- 在「設定」頁面中,捲動至「整合日曆」,然後複製「日曆 ID」。

6. 在 Dialogflow 中設定執行要求
在履行作業中新增服務帳戶和日曆 ID
- 前往 AppointmentScheduler Dialogflow 代理程式,然後按一下「執行要求」。
- 啟用「Inline Editor」(內嵌編輯器)。

- 使用下列程式碼更新
index.js檔案:
'use strict';

// Import the Dialogflow module from Google client libraries.
const functions = require('firebase-functions');
const {google} = require('googleapis');
const {WebhookClient} = require('dialogflow-fulfillment');

// Enter your calendar ID below and service account JSON below
const calendarId = "<INSERT YOUR CALENDAR ID>";
const serviceAccount = {<INSERT CONTENTS OF YOUr JSON FILE HERE>}; // Starts with {"type": "service_account",...

// Set up Google Calendar Service account credentials
const serviceAccountAuth = new google.auth.JWT({
 email: serviceAccount.client_email,
 key: serviceAccount.private_key,
 scopes: 'https://www.googleapis.com/auth/calendar'
});

const calendar = google.calendar('v3');
process.env.DEBUG = 'dialogflow:*'; // enables lib debugging statements

const timeZone = 'America/Los_Angeles';
const timeZoneOffset = '-07:00';

// Set the DialogflowApp object to handle the HTTPS POST request.
exports.dialogflowFirebaseFulfillment = functions.https.onRequest((request, response) => {
 const agent = new WebhookClient({ request, response });
 console.log("Parameters", agent.parameters);
 const appointment_type = agent.parameters.appointment_type;
 function makeAppointment (agent) {
   // Calculate appointment start and end datetimes (end = +1hr from start)
   const dateTimeStart = new Date(Date.parse(agent.parameters.date.split('T')[0] + 'T' + agent.parameters.time.split('T')[1].split('-')[0] + timeZoneOffset));
   const dateTimeEnd = new Date(new Date(dateTimeStart).setHours(dateTimeStart.getHours() + 1));
   const appointmentTimeString = dateTimeStart.toLocaleString(
     'en-US',
     { month: 'long', day: 'numeric', hour: 'numeric', timeZone: timeZone }
   );
    // Check the availability of the time, and make an appointment if there is time on the calendar
   return createCalendarEvent(dateTimeStart, dateTimeEnd, appointment_type).then(() => {
     agent.add(`Ok, let me see if we can fit you in. ${appointmentTimeString} is fine!.`);
   }).catch(() => {
     agent.add(`I'm sorry, there are no slots available for ${appointmentTimeString}.`);
   });
 }

// Handle the Dialogflow intent named 'Schedule Appointment'.
 let intentMap = new Map();
 intentMap.set('Schedule Appointment', makeAppointment);
 agent.handleRequest(intentMap);
});

//Creates calendar event in Google Calendar
function createCalendarEvent (dateTimeStart, dateTimeEnd, appointment_type) {
 return new Promise((resolve, reject) => {
   calendar.events.list({
     auth: serviceAccountAuth, // List events for time period
     calendarId: calendarId,
     timeMin: dateTimeStart.toISOString(),
     timeMax: dateTimeEnd.toISOString()
   }, (err, calendarResponse) => {
     // Check if there is a event already on the Calendar
     if (err || calendarResponse.data.items.length > 0) {
       reject(err || new Error('Requested time conflicts with another appointment'));
     } else {
       // Create event for the requested time period
       calendar.events.insert({ auth: serviceAccountAuth,
         calendarId: calendarId,
         resource: {summary: appointment_type +' Appointment', description: appointment_type,
           start: {dateTime: dateTimeStart},
           end: {dateTime: dateTimeEnd}}
       }, (err, event) => {
         err ? reject(err) : resolve(event);
       }
       );
     }
   });
 });
}
- 將
<INSERT YOUR CALENDAR ID>替換成您在上一個部分複製的日曆 ID。 - 將
<INSERT CONTENTS OF YOUR JSON FILE HERE>替換為 JSON 檔案的內容。 - (選用) 根據「預約日曆」的時區,變更 const timeZone 和 const timeZoneOffset。
- 按一下 [Deploy] (部署)。
啟用執行要求的回應
- 前往 Dialogflow 主控台,然後按一下「Intents」。
- 按一下「Schedule Appointment Intent」。
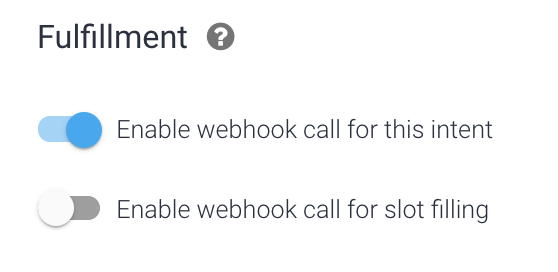
- 向下捲動至「Fulfillment」(執行要求),然後開啟「Enable webhook call for the intent」(為這個意圖啟用 Webhook 呼叫)。
- 按一下 [儲存]。
- 按一下 [Deploy] (部署)。
7. 測試聊天機器人
您可以在 Actions 模擬器中測試聊天機器人,也可以使用先前學過的網頁或 Google Home 整合服務。
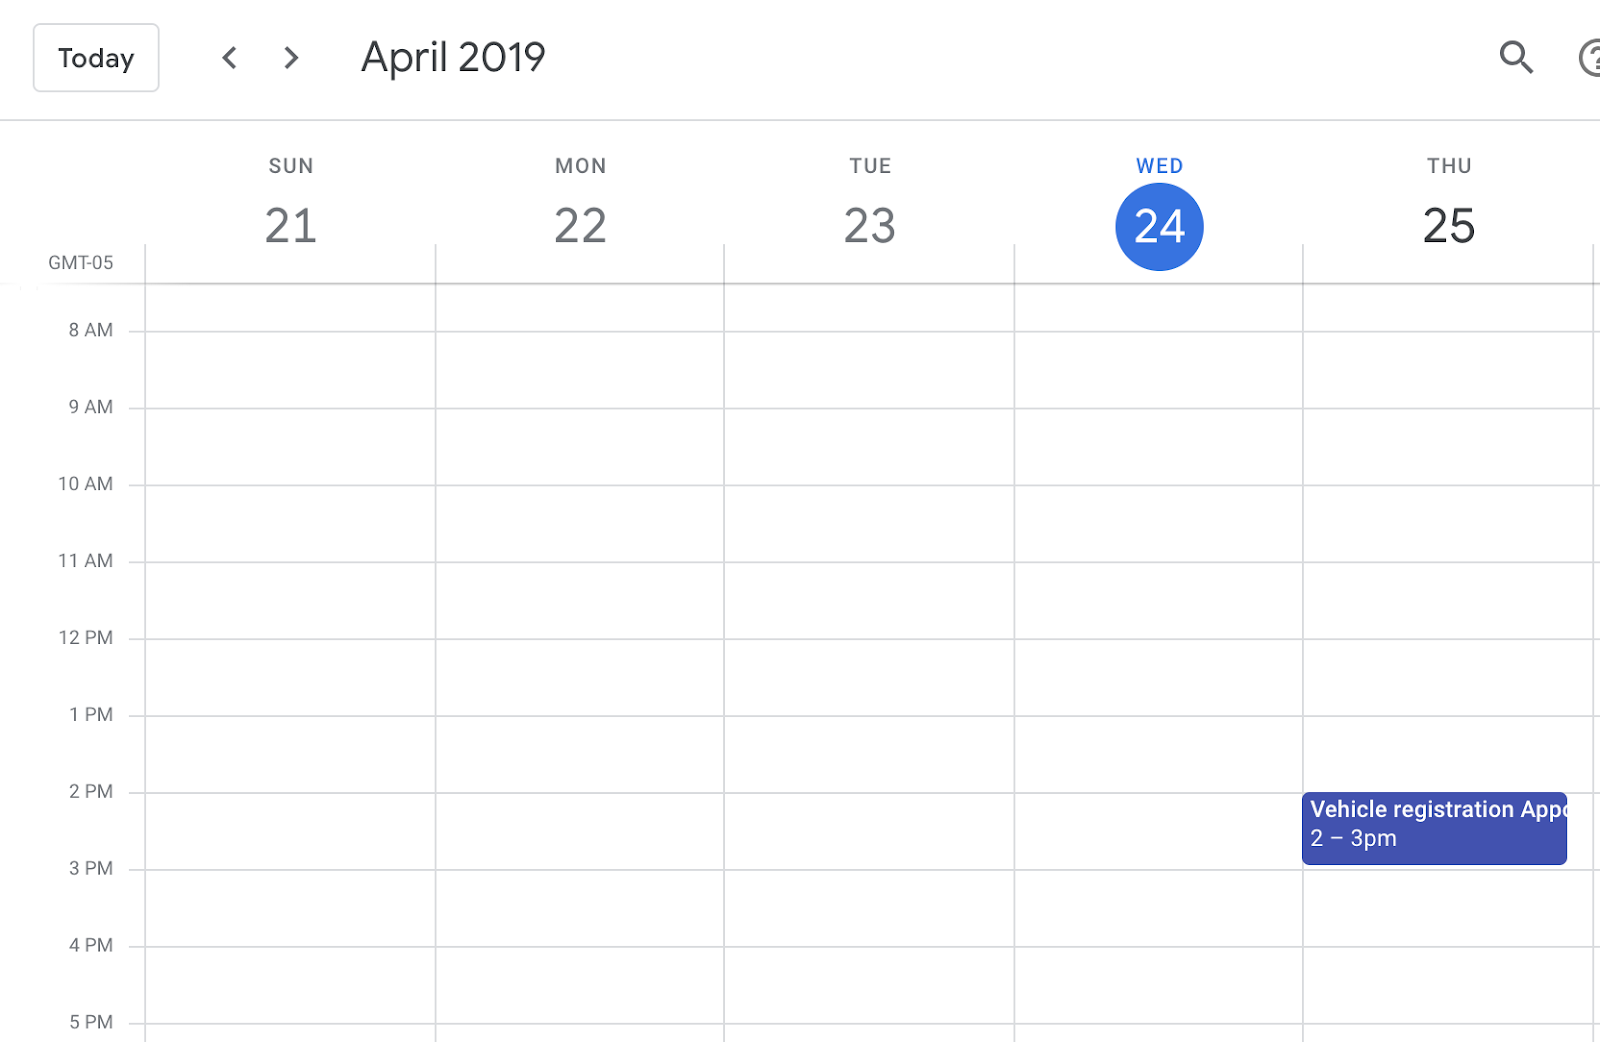
- 使用者:「設定明天下午 2 點的車輛登記預約。」
- 聊天機器人:「Ok, let me see if we can fit you in. 4 月 24 日下午 2 點可以!」
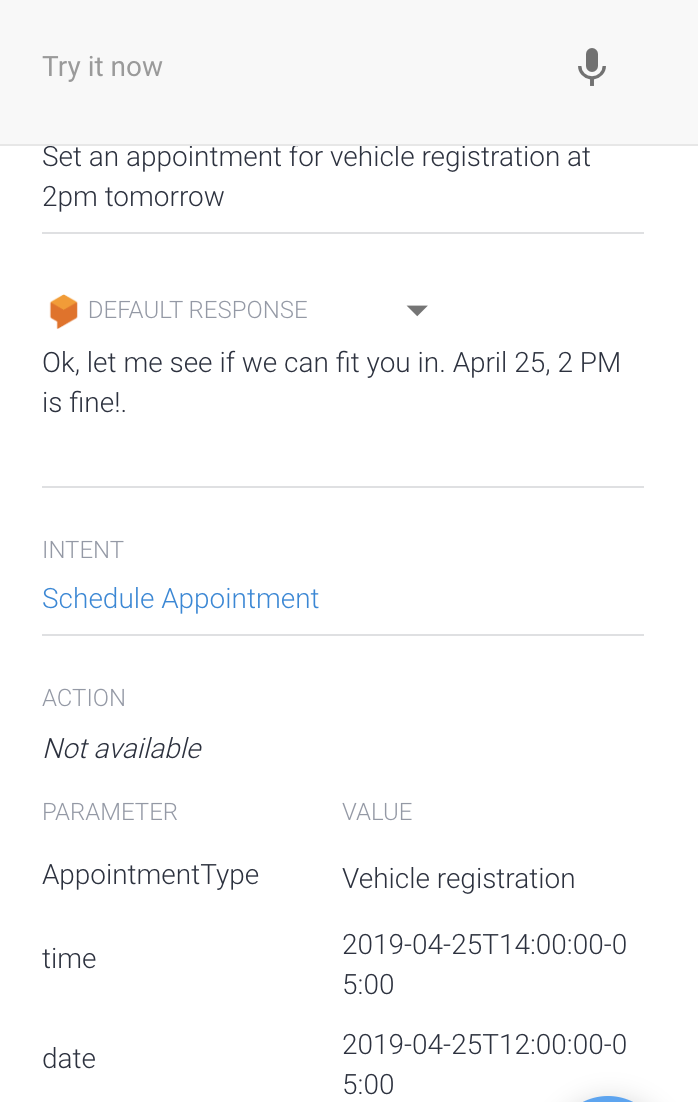
- 日曆會預訂回覆內容。
8. 清理
如果您打算完成其他 Dialogflow 程式碼研究室,請先略過本節,稍後再返回。
刪除 Dialogflow 代理程式
- 按一下現有代理程式旁邊的
 。
。
- 在「一般設定」分頁中,捲動至底部,然後點選「刪除這個代理程式」。
- 在對話方塊中輸入「Delete」,然後按一下「Delete」。
9. 恭喜
您已在 Dialogflow 中建立聊天機器人,並與 Google 日曆整合。你現在是聊天機器人開發人員!
瞭解詳情
如要瞭解詳情,請參閱 Dialogflow Github 頁面上的程式碼範例。